Embed Size (px)
Citation preview

1 L4 Manual Part 2 (Oct 2013) 29/10/2013
4. Hitting
Knowledge
i. Justify the use of bunts and the hit & run ii. Design a hitting circuit which incorporates several drills and progressions iii. Show an understanding of the conventional manner of setting a hitting line-up iv. Show how the team objective relates to adjusting the level of aggression in offence and defence.
Activities
i. Conduct on-field pre-game batting practice so as to develop situational awareness and execution ii. Provide opportunity for players to develop bunting skills iii. Organise and conduct a hitting circuit iv. Provide consistent flips for swing practice
Instruction
i. Explain “hitting counts” and a “2-strike” approach ii. Instruct offensive strategy: adjusting the level of aggression iii. Explain how a hitter may adjust his approach according to the count iv. Outline to hitters the process and importance of building on their database v. Correctly instruct players in the purpose and key points of the one-hand tee drill vi. Explain the difference between swing practice and game practice in hitting vii. Teach the fundamentals of bunting

2 L4 Manual Part 2 (Oct 2013) 29/10/2013
Correctly instruct players in the purpose and key points of the one-
hand tee drill
The one-handed tee drill is arguably the best drill available to assist players in developing a feel for a good swing, but
it is often poorly taught. The drill involves using each hand in isolation to produce an intended result. It is very
important that player tries to complete the drill with an absolute minimum of effort, so that the development of
coordination is accelerated. Instructions should be minimal, as the ball itself tells the player about the quality of
technique: if the ball consistently hits the target travelling on an angle somewhere between 45° and level, the swing
mechanics are, by definition, fine.
The tee must be at least 10m from the target so that the trajectory of the ball can be seen.
The target should be at about head-height so that the ball is lifted slightly when hit (“keep the ball out of the
infield”).
The ball should travel with backspin on a trajectory “slightly above level”. The speed of the ball is not
important for this drill.
Technical advice is initially limited: get your starting position, load and release. The most important points
are to work with as little muscular effort as possible and to find a way to get the ball to travel consistently as
intended. Very raw hitters may need slightly more help, but instruction should be limited to assisting the
hitter to get the ball to travel as intended consistently.
The hitter makes three attempts with the left, then three with the right, and repeats this for up to half an
hour. If this is too fatiguing, the hitter is using too much tension, trying to muscle the bat through, rather than
developing coordinated technique.

3 L4 Manual Part 2 (Oct 2013) 29/10/2013

4 L4 Manual Part 2 (Oct 2013) 29/10/2013
Provide consistent flips for swing practice
Flips (front toss) are the most commonly used swing drill in professional baseball. The player has to track the ball
coming in the same direction as would a pitch, but can still concentrate on the technical aspects of the swing.
The coach stands behind a strong screen set about 5m directly in front of the hitter, and uses an easy underhand toss
to enable the hitter to drive straight back in the direction of the coach. It is important that the coach is able to provide
good quality flips to the hitter.
1. Safety:
the screen must have no holes
the screen must be strong enough to withstand the considerable stresses it will encounter
the coach must remain entirely behind the screen, except that the throwing hand will briefly protrude for
the split second of ball release.
The hand must be back behind the screen before the ball reaches the hitter
The hitter must wear a helmet: the ball can bounce back off screen
2. Consistency:
The flipping action must be rhythmic and consistent to allow the hitter to load, get his timing etc. This
simulates the time available in a game as the pitcher goes into his delivery.
flips must be delivered with consistent accuracy and speed

5 L4 Manual Part 2 (Oct 2013) 29/10/2013
Design a hitting circuit which incorporates several drills and
progressions
In a club situation, where one coach is usually training many players, a hitting circuit can be an excellent way to keep
them profitably busy. A number of activities set up, with a given number of players at each one, moving on to the next
at the coach’s signal.
Think about available player groups, coaches, space, screens, fences, bats, balls (of different types), tees etc, and plan
a session which provides players with a lot of swings and time to work things out.
The drills below can be incorporated into a circuit quite easily, but there are others you may find a way to use.
Tee drill
Side toss
Rag ball
Wiffle ball
Flips
Overhand toss (thrown while in a kneeling or seated position from behind a L-screen)
Live batting practice

6 L4 Manual Part 2 (Oct 2013) 29/10/2013
Organise and conduct a hitting circuit
If resources are sufficient (balls and protective screens), hitting drills can be set up as a circuit to maximize the volume
of hitting activity even without an excess of coaching assistance. Eg
1. Dry swings 2. Tee work into screen or fence 3. Soft toss 4. Flips (or overhand toss)
Two people (or two pairs) per station; all stations for a fixed duration, or everyone move on at a given signal. Be
mindful of safety issues, and the need for ball retrieval.

7 L4 Manual Part 2 (Oct 2013) 29/10/2013
Teach the fundamentals of bunting
1. Bat: o Gripped for maximum control (eg, hands divide bat into three) o At top of strike zone and out toward pitcher o Held in line of sight so that ball can be more easily tracked to bat o Angled in the intended direction of the bunt
2. Posture: o Upper body squared off to pitcher o Lowered athletic stance
3. Making contact: o Bunt strikes only o If necessary, take head down to the ball (lowers body under control) o Keep bat at desired angle o Use bat to block the ball, not hit it o Ball must go to ground
4. Preferred direction of bunt: o With runner on 1B, bunt to 1B side o With runner on 2B, bunt to 3B side.

8 L4 Manual Part 2 (Oct 2013) 29/10/2013
Conducting on-field practice for bunting
Coach provides positive feedback on correct execution, or makes corrections as required, on these key points of
execution:
1. In groups of 3-6, hitter bunts ball thrown 10-15m by team-mate, attempting to master these tasks in order: o Anywhere on the ground; o Once this is mastered, attempts to bunt on the ground in fair territory o On ground to a specific target (cone, or between teammates feet etc)
2. Set up as for team batting practice
o Coach (or other) pitching,
o Hitter and runner in appropriate location (others awaiting their turn).
o Each player makes one attempt to execute (as a hitter or a runner), then moves off to join other line.
o Runner reads ball and runs to next base once it is clear it will hit the ground.
o Hitter bunts, attempting to master these tasks in order (depending on ability): 1. Anywhere on the ground (for beginners) 2. On the ground in fair territory 3. On ground to right side if runner is on 1B (more advanced players) 4. On ground to left side if runner is on 2B (more advanced players)

9 L4 Manual Part 2 (Oct 2013) 29/10/2013
Conduct on-field pre-game batting practice to develop situational
awareness and execution
Set up as for team batting practice, coach (or other) pitching, hitter and runner in appropriate location (others
awaiting their turn). Each player makes one attempt to execute (as a hitter or a runner), then moves off to join other
line.
1. Hit & run: 1B runner ensures pitch goes to plate, then steals, ensuring that he turns his head to see pitch reach plate. Hitter must hit the pitch (unless it bounces), aiming for a hard ground ball. Runner reads ball off bat and reacts accordingly:
o GB: keep going hard to prevent double play o Line drive: keep going hard with the intent of reaching 3B (don’t have time to stop and go back). o Pop-up or long fly: slow down, read and react o Safe hit: get to 3B. o Hitter misses pitch: try to steal base.
2. Moving 2B runner to 3B with 0 outs: Hitter is trying to do one of two things: hit a long fly ball, or hit a ground ball on right side. Runner gets a good secondary lead, reads ball off bat, and reacts accordingly:
o Safe hit: score o GB at or behind runner: get to 3B, score if possible (soft hit to outfield is easy to score on) o Line drive: start back to base, dive back to base if infielder catches ball, or run to 3B if ball gets through o Fly ball: from about 30’ off base, read ball and relevant fielder; react accordingly o Long fly ball: tag up and go to 3B on catch o Shallow fly ball (may not be caught): get the best lead you can while retaining chance to return to base if ball
is caught
3. Score runner from 3B: There are two main situational variations – the infield remains back (making it easy to score
on a soft GB); or the infield comes in (to make it difficult for 3B runner to score). With the infield back, a ground ball
will score the runner, so the runner attacks plate on a GB. If the infield is in, runner reads ball and reacts accordingly:
o Safe hit: score o GB: wait until ball gets past infield before scoring. o Soft GB, or “chopper”: attack plate and score o Line drive: start back to 3B, get back to base if infielder catches ball, or score if ball gets through o Medium or deep fly ball: return to base, read ball, score if possible after catch or balls hits ground. o Shallow fly ball: get the best lead you can while retaining chance to return to base if ball is caught

10 L4 Manual Part 2 (Oct 2013) 29/10/2013
Outline to hitters the process and importance of building on their
database
Experience is irreplaceable in the development of a hitter, but merely being in a situation is does not guarantee
maximum learning is occurring. The ability to focus on a task, and to maintain the intent and effort to improve, are
critical elements in allowing the hitter to add to his “database”: the amount of information available in a given
situation and the skill with which it can be used.
A lot of the information is stored sub-consciously: elite hitters may “not know what they know”. Whether they can tell you about it or not, they have a large database of relevant information:
Different pitch types: velocities, movement etc
What each of those pitches looks like in the first 15 feet, and what they do over the last 15 feet.
Individuals pitchers’ tendencies.
Situational probabilities: what’s likely to happen next?
Their own strengths and weaknesses, what works for them.
How to get themselves ready: off-season, in-season, week by week, day by day, pitch by pitch.
How can hitters build their database?
First of all, pay attention; don’t be half-hearted about getting better.
Watch good hitters and pitchers in action: TV games, National League, practice sessions (hitters and pitchers)
Be determined to learn from every opportunity: focus hard on the ball in your own games, especially if you get to face an outstanding pitcher, talk to experienced players and coaches, read, attend clinics.
Form the habit of replaying pitches, particularly good pitches (if you get the chance to watch a good pitcher throw a bullpen, memorise the flight of every pitch). Every time you re-run a pitch in your head, you are teaching your subconscious the trajectory of a ball in flight. This improves your ability to predict where a pitch will end up from the clues you pick up before, at and soon after release.
Play other hitting sports (tennis, squash, table tennis etc): research shows that practicing different hitting tasks improves your ability to adapt your swing.

11 L4 Manual Part 2 (Oct 2013) 29/10/2013
Explain the difference between swing practice and game practice in
hitting
The difference is important!
o Swing practice is practice designed solely to improve the way in which a hitter swings the bat. It may involve tee work, flips, soft toss, dry swings etc: all activities where the result achieved serves solely as feedback on the quality of the swing.
o Game practice is designed to rehearse the execution of specific tasks which frequently occur in a game. It is not productive, during game practice, to be concerned about the quality of the swing: the result is all that matters.

12 L4 Manual Part 2 (Oct 2013) 29/10/2013
Show an understanding of the conventional manner of setting a
hitting line-up
It is very rare for any team to have the ideal person for each position in the lineup. One approach is to compose your lineup according how likely each player is to the lead in a key statistic (each reflects particular characteristics).
The top of the order will usually be your best offensive players; the bottom four will usually be defensively oriented, and thus their hitting characteristics are less defined.
1. Leadoff: runs scored - (get on base, run the bases well).
2. 2nd leadoff type: runs scored is key; ideally will naturally hit to right side (left-hander?)
3. Best hitter (batting average).
4. RBIs
5. RBIs
6. RBIs or runs scored
7-9. As you see fit. If possible, avoid having a slow runner at number 9, as this could negate the strengths of your leadoff guys.

13 L4 Manual Part 2 (Oct 2013) 29/10/2013
Show how the team objective relates to adjusting the level of
aggression in offence and defence
Situational strategy is based on the relationship between the number of outs remaining and the number of runs
needed to win.
1. At the beginning of a game, a team has 27 outs to utilise in scoring as many runs as they can, so the relative cost/benefit is small and it is worth taking extra chances in order to score.
Aggressive at plate Take extra bases Steals Bunts for base hits
2. As the game goes on, and outs become more precious, a coach should minimise extra chances for outs or at least to ensure that each out is productive:
Hitters more patient Hit and runs Sac bunts Increased emphasis on moving the 2nd base runner over with no outs. Less stealing
3. With a critical run on base late in the game, any scoring chance may need to be taken (depending on outs, next hitter etc):
Score 3B runner on any outfield fly ball or pass ball. Score 2B runner on any hit to outfield Score 1B runner on any double

14 L4 Manual Part 2 (Oct 2013) 29/10/2013
Explain “hitting counts” and a “2-strike” approach
1. Hitting counts. A hitter should understand that on certain counts, when the pitcher is behind, he or she is under increased pressure to throw a strike. A hitter can never be guaranteed that a particular pitch is coming, but this pressure makes it a bit easier to predict what the pitch will be (usually a fastball). That assists the hitter in timing, and therefore hitting the pitch. These counts are therefore referred to as “hitter’s counts”:
3-0, 3-1, 2-0 (count strongly in hitter’s favour)
1-0, 2-1
3-2, 0-0 (in most situations, pitcher wants to throw a strike)
2. A two-strike approach. Many productive hitters will sacrifice aggression to ensure they put the ball in play when they have 2 strikes on them. These adjustments are designed to simplify the swing, improve plate coverage and give hitter more time to see the ball. They can include:
Focus on hitting ball deeper in the zone (as opposed to catching it way out in front).
Shortening up on the bat
Widening the stance – less body movement

15 L4 Manual Part 2 (Oct 2013) 29/10/2013
Justify the use of bunts and the hit & run
Bunts and hit & run plays diminish the chances of having a big inning, and are generally only used late in a game where
the scores are close.
Bunts are best used: o to get a runner into scoring position when a single run is critical
o to avoid a double-play at all costs
o when the hitter is unlikely to contribute anything if allowed to swing (eg, pitchers at a professional level)
The hit & run is used: o to minimize the chances of a double-play
o when the hitter has good bat control but little power
o when the pitcher is consistently throwing strikes

16 L4 Manual Part 2 (Oct 2013) 29/10/2013
5. Throwing
Activities
i. Conduct activities which encourage infielders to use a variety of throws ii. Run an arm development session
Instruction
i. Provide players with effective guidelines for developing arm strength
17 L4 Manual Part 2 (Oct 2013) 29/10/2013
Provide players with effective guidelines for developing arm strength
You must practice throwing in order to improve – you can’t avoid all throwing and expect to have a strong arm.
On the other hand, too much throwing can cause injury.
You must gradually build up the volume and intensity of throwing gradually: if you increase either one too
suddenly, you will cause an injury.
Long-toss is one good way to build up your arm strength:
o Start throwing about 20m
o Throw as easily as you can, but directly at a specific target (eg, partner’s face)
o After 5-10 throws, one partner moves back 3 or 4 steps
o This continues, always throwing as easily as you can for the distance, until you are throwing nearly as far as
you can. There is no need to keep the trajectory flat: let it have some air.

18 L4 Manual Part 2 (Oct 2013) 29/10/2013
o After 5-10 throws at that distance, shorten the distance and throw 5-10 throws hard and flat to re-establish
the mechanics required in a game
You cannot throw at maximum speed every day. If you are trying to improve velocity, throw hard twice a week,
and throw easy (“take your arm for a light jog”) on three or four other days.
Pay attention to any signs your body sends you that you are doing damage. Pain or discomfort, particularly in the
elbow or the shoulder, means you need to give it a rest. And you will then need to build back up gradually when
you do return to throwing; its much better if you don’t overdo it in the first place.
To be safe, you should have at least three months of the year where you don’t throw. This allows all the connective
tissue time to heal and adapt to the stresses of throwing.
Run an arm development session
Although one of the simplest of drills, long toss a very effective way to build throwing ability (mechanics, velocity and
arm endurance), and is thus a critical part of team’s training program. As with all activity, players must be eased into it,
so that the body can gradually adapt to the specific stresses.
1. After warming the body up, players commence throwing in pairs 5-10m apart, always aiming at a specific target:
eg, the face of their partner.
2. Each has 5-10 throws at that distance, and then one partner takes a couple of steps back.
3. This process is repeated (5-10 throws at each gradually increasing distance) until, after they have been doing the
drill for a couple of weeks, each player is throwing as far as they can.
19 L4 Manual Part 2 (Oct 2013) 29/10/2013
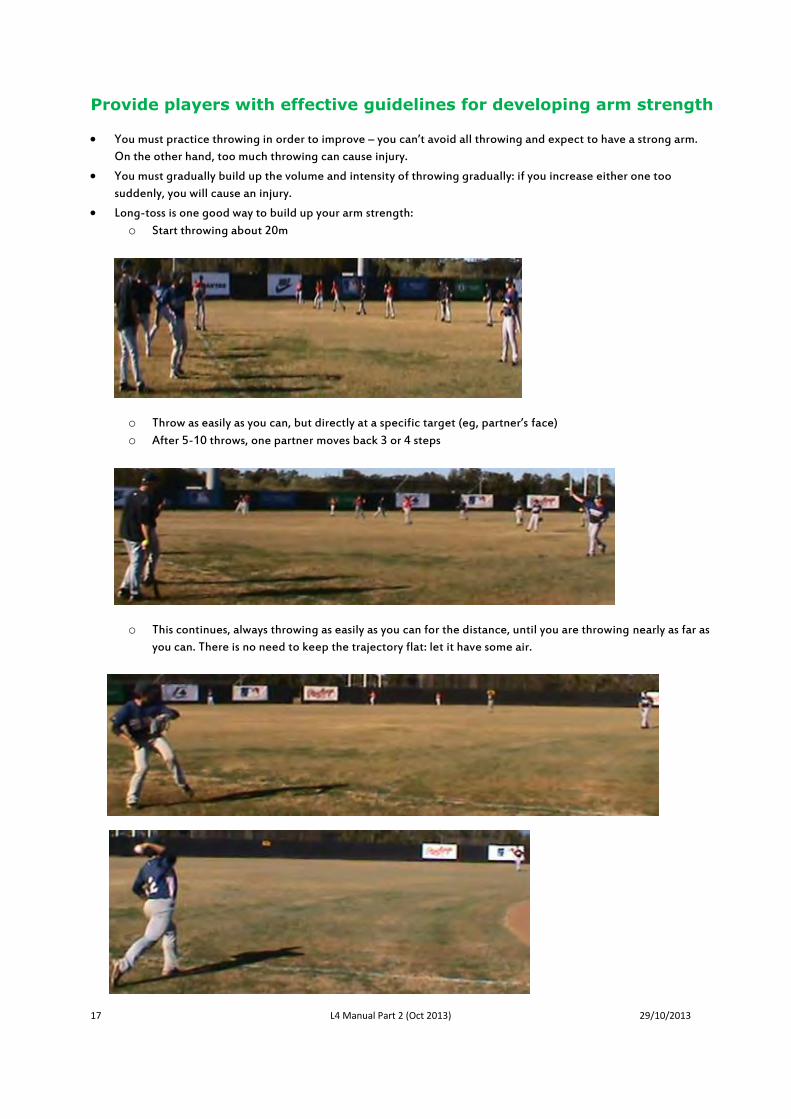
4. Players should be encouraged to throw as easily as possible for the given distance, and to “give the ball some air”:
there is no need to keep the throw flat.
5. Once well-conditioned, they can make 20-25 throws at their maximum distance, then shorten up the distance to
make some flat throws.
6. Start at about 8 minutes; as players become stronger, this drill can last up to 20 minutes.

20 L4 Manual Part 2 (Oct 2013) 29/10/2013
Conduct activities which encourage infielders to use a variety of
throws
Players start with the ball in their glove (graduating to having the coach hitting fungoes) and are encouraged to
experiment with the way they throw the ball. Players are asked to assess the best way to deliver the ball to different
bases in different situations:
Infielders should appreciate the differences involved in consistently delivering the ball to the various bases,
and the different throws required by different groundballs.
Outfielders should appreciate the different demands resulting from balls hit in different locations, and from
various games situations and runner locations.
21 L4 Manual Part 2 (Oct 2013) 29/10/2013
6. Pitching
Knowledge
i. Outline the key risk factors for young pitchers ii. Recall the various pitch limits and related rules for all National junior tournaments
Activities
i. Conduct an execution-centred bullpen session to develop control of various pitches ii. Conduct pitchers’ fielding practice
Instruction
i. Outline the characteristics and execution of common types of pitches. ii. Teach basic pickoffs iii. Explain the fundamentals of a sound pitching approach iv. Emphasise the importance of good tempo and body language by all players, especially pitchers. v. Instruct players in how to prepare themselves to pitch: annual periodisation, weekly routine, game
day

22 L4 Manual Part 2 (Oct 2013) 29/10/2013
Outline the key risk factors for young pitchers
The most important factors contributing to arm injuries in pitchers, particularly young pitchers, are:
1. Fatigue and overuse: the more they are pitch, the more connective tissue is overloaded, and the greater the
likelihood of injury. This is by far the most important factor, and must be carefully monitored.
2. Throwing velocity: the harder they throw, even if they have “good mechanics”, the more stress they put on key
structures. All the force has to be transmitted through the shoulder and elbow at some stage. One problem is that a
coach will often want to use the hard thrower more often, when in fact, he should be throwing less.
3. Throwing mechanics: a poor delivery can put even more stress on the arm.
4. Conditioning: if the arm or the body is not conditioned to do the work, chances of injury increase.
5. Pitch type: contrary to popular belief, the fastball places more stress on the arm than any other pitch type except for
the slider (assuming all are thrown with proper mechanics). The problem with the curve ball, for example, seems to
be two-fold:
o coaches overuse young pitchers who can throw one because they win a lot of games: fatigue and overuse are
the issue
o young pitchers, because they have small hands or a lack of coordination and strength, often throw it with
bad mechanics

23 L4 Manual Part 2 (Oct 2013) 29/10/2013
Outline the characteristics and execution of common types of
pitches:
Types of pitches
1. 4-seam and 2-seam FB. Pitchers should experiment with grips to understand the different properties of the 4-seam
and 2-seam fastballs:
o Arm action should not vary between the two; the grip accounts for the difference in flight properties.
o for a given arm action, the 4-seam will hold its altitude better than the 2-seam, and will usually have greater
velocity.
o The increased “sink” of the 2-seam is what makes it useful.
2. Curve ball (CB). Use same general mechanics as for FB; the break comes from topspin put on ball by rolling the
fingers over the top of the ball at release.
o A true CB breaks down more than across
o “High elbow” is particularly important (angle of break and injury prevention).
o Ball is still thrown, not guided; full arm action and follow-through.

24 L4 Manual Part 2 (Oct 2013) 29/10/2013
3. Change-up (CH). Use same general mechanics as for FB; the grip and hand tension takes care of speed variation.
o There are many variations: grip, pressure etc. All aim to make wrist action less efficient and thus reduce
velocity while retaining same arm speed as for FB.
o Initial goal is to master the reduction of velocity, then to throw pitch for a low strike.
o Ball is still thrown, not guided; full arm action and follow-through.
o Movement can be developed later.

25 L4 Manual Part 2 (Oct 2013) 29/10/2013
Explain the fundamentals of a sound pitching approach.
At every level of the game, a pitcher must avoid giving the hitters an advantage, so it is important that pitcher and
catcher to work together on pitching strategy and strive to adhere to the following guidelines:
o 1st pitch strike. If FB is his only consistent pitch, then it must be used.
o Stay ahead. All pitch selections based on the intent to stay ahead in the count.
o Change speeds. Keeps hitters off balance and reduces their effectiveness.
o Locate FB. Mastery of the FB gives pitcher a lot of options. From the hitter’s perspective, FB in a different
location is actually a different pitch.
Patience is required by coach: it takes time for a pitcher to be capable of doing these things.
26 L4 Manual Part 2 (Oct 2013) 29/10/2013
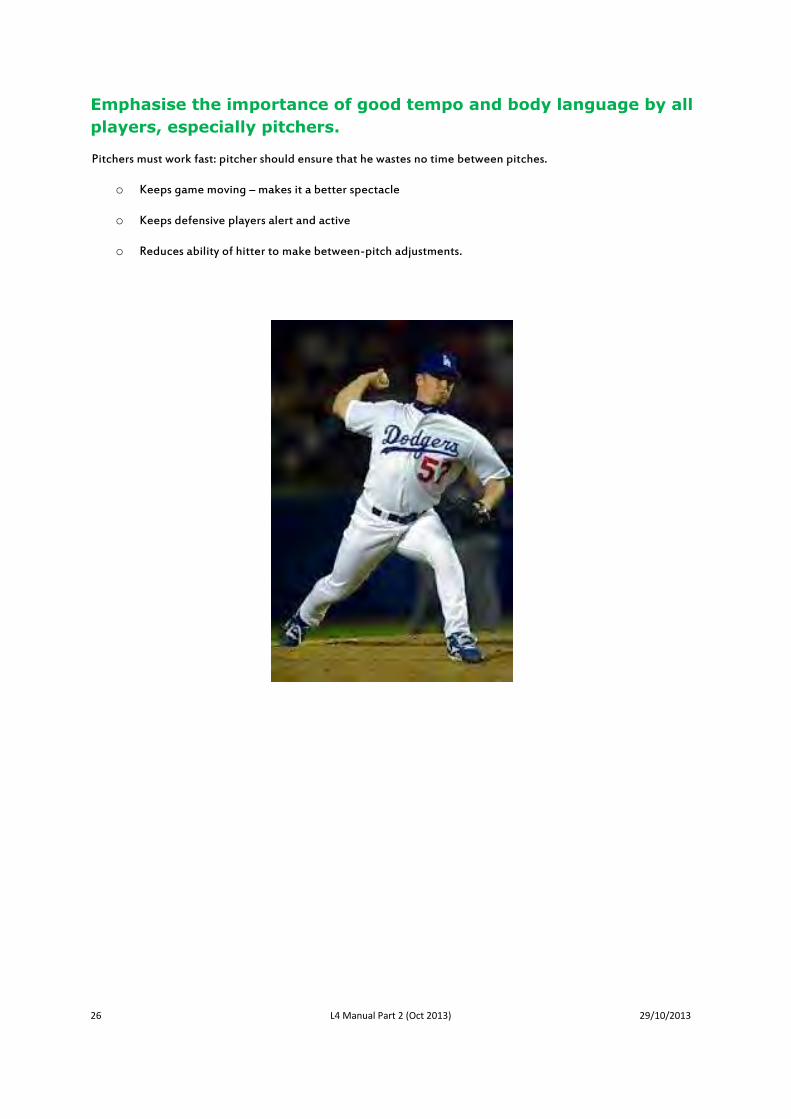
Emphasise the importance of good tempo and body language by all
players, especially pitchers.
Pitchers must work fast: pitcher should ensure that he wastes no time between pitches.
o Keeps game moving – makes it a better spectacle
o Keeps defensive players alert and active
o Reduces ability of hitter to make between-pitch adjustments.

27 L4 Manual Part 2 (Oct 2013) 29/10/2013
Instruct players in how to prepare themselves to pitch: annual
periodisation, weekly routine, game day
Pitchers should be trained to know how to prepare themselves.
1. Periodisation. Break the year into different periods (phases): post season, off-season, pre-season, competition. Plan the work done in each period to maximize development and progress. Eg:
a. Post-season (2-3 weeks): active rest and recuperation; may be longer if treatment of injuries is required b. Off-season (8-24 weeks): arm development, strength training, sprinting, modifications to technique etc.
Include some short breaks from training c. Pre-season (2-6 weeks): conditioning and skill work become more specific and more game oriented. d. Competition(10-20 weeks): built around weekly routine, but also with the aim of peaking at critical time.
2. Weekly routine. Each pitcher should establish an individualised regular weekly schedule to ensure they maximise recovery and progress. For example (assuming no injuries), during regular season competition:
Sunday: Pitch, then cool-down throwing, and a mix of light dynamic and static stretching Monday: Lift, light throw, stretch Tuesday: throw lightly, agilities, run, stretch. Wednesday: Lift, light throw, stretch Thursday: Bullpen, PFP, run, stretch Friday: Touch and feel pen, light lift, stretch Saturday: stretch.
Of course, many young players will not be lifting, and can thus ignore that activity. Alternatively, bodyweight-type strength activities can be incorporated into on-field work.
3. Game day: establish a routine by working backwards from game time. The following is an example of a game day schedule for a home team starting pitcher :
On rising, eat a good breakfast Hydrate all day At least 3 hrs prior to game: thorough stretch 45 minutes before game: active warmup routine, including jogging, mild agilities, ballistic stretches. 25 minutes before game: play catch, stretching arm to 75% max distance 15 minutes before game: bullpen warmup 5 minutes before game: finish warmup, head to dugout, catch breath, have a drink etc; head out to mound After outing: play light catch, run, stretch, review performance.
This schedule will need to be adjusted to suit the individual: how long do they like to throw before heading to pen? How long do they like to throw in pen? Etc

28 L4 Manual Part 2 (Oct 2013) 29/10/2013
Conduct an execution centred bullpen session to develop control of
various pitches
Bullpens can be conducted on flat ground, or on a mound. You will need a catcher in full gear. As part of his leadership duties, the catcher should be trained to run the bullpens: he should have the authority to do so, know the routines, the rules etc.
1. The pitcher must be warmed up and ready to start (long toss etc) before the bullpen starts. Do not allow them to warmup with the catcher.
2. The purpose of this type of pen is to rehearse making pitches: focus on hitting the target, not how hard they can throw etc. Emphasis is on pitcher focusing on a small target; eg, a spot in the catcher glove, not the whole glove.
3. Generally, the target should be in the bottom 1/3 of the strike zone: “the box”. 4. It is the pitchers job to know the purpose of the pen session and his routine, and be able to do it unsupervised.
(This may take a little time). 5. A pitcher should easily be able to throw 6 pitches per minute, so this session should take around 5-6 minutes. Any
longer, and they are throwing too many pitches or wasting time. 6. It is possible to have two pitchers throwing to one catcher, alternating pitches. This can be much more time-
efficient without requiring the pitchers to rush. 7. A good routine (39 pitches):
3 “1/2 box” fastballs away (outer half of the bottom 1/3 of the strike zone) from a windup 3 “1/2 box” fastballs in (inner half) from a windup 3 “1/2 box” fastballs away from set 3 “1/2 box” fastballs in from set 2 FB tilts to RHH (up & in, then down & away; 2 sets of two makes 4 pitches) 2 FB tilts to LHH (up & in, then down & away; 2 sets of two makes 4 pitches) 3 “box” change-ups from a windup 1 changeup tilt to RHH ( FB up & in, then box changeup - 2 pitches) from set 1 changeup tilt to LHH ( FB up & in, then box changeup - 2 pitches) from set 3 “box” curveballs from a windup 1 curveball tilt to RHH ( FB up & in, then box curveball - 2 pitches) from set 1 curveball tilt to LHH ( FB up & in, then box curveball - 2 pitches) from set 5 “tough pitches”: imagining full count on hitter, how many strikes can be thrown out of 5 pitches?
1 FB 1 changeup 1 FB 1 CB 1 FB
1 pitchout to a right-handed hitter 1 pitchout to a left-handed hitter
NB: If the pitcher achieves a poor result when attempting a pitch, he does not “get another try”. That is, the first round of 5 fastballs consists of 5 attempts, and no more. The catcher should keep count of how many times the pitcher “makes the pitch”: pitches the ball to the intended location. This number becomes as assessment of the pitcher’s success.

29 L4 Manual Part 2 (Oct 2013) 29/10/2013
Teach basic pickoffs
The purpose of a pickoff is to make it harder for the runner to get a good jump to the next base (to “keep him
honest”). Making an out on a pickoff is just a bonus.
1. Pickoff to 1B for a right hander
o Split hands and move both feet at the same time.
Right hand is lifted directly to head height on the 3B side: as the body turns away, the arm will be in perfect position for a short-arm throw.
Quick repositioning of feet: right foot is turned square to 1B; left foot takes short step to 1B.
o Without pause, make an accurate throw knee height over the base

30 L4 Manual Part 2 (Oct 2013) 29/10/2013
2. Pickoff to 1B for a lefthander
o Knee lift and early hand movements should look exactly like the commencement of a pitch.
o As knee reaches highest point, step directly to 1B and make knee-high throw over 1B.
o As skill improves, learn to minimize turning the shoulders to 1B

31 L4 Manual Part 2 (Oct 2013) 29/10/2013
3. Pickoff at 2B
o The mechanics are the same for both RHP and LHP.
o In one short jumping movement, swap feet: the stride foot should come down slightly on the 2B side of the mound.
o Ensure that the turn is to the glove side; ie: clockwise for LHP, anti-clockwise for a RHP.
o Using a short arm action, make a knee-high throw over the 2B.

32 L4 Manual Part 2 (Oct 2013) 29/10/2013
Conduct pitchers’ fielding practice
Use a fungo or roll the ball to have pitchers rehearse:
1. Routine comebacker: 1-3, 1-6 and 1-2.
3. Bunts to both sides, 1-3

33 L4 Manual Part 2 (Oct 2013) 29/10/2013
4. Bunt on 3B side, 1-5
4. Covering first base on a groundball to right side:
o Routine play: get ball from 1Bman early, then step on base, staying in fair territory, then turn to look for the next play (often at 3B).

34 L4 Manual Part 2 (Oct 2013) 29/10/2013
o 1Bman fumble (pitcher will have to stop on base)
o Self-executed: on a ball to the left side of the mound that takes the pitcher toward 1st, the pitcher
can pick up the ball, maintain his momentum and make the putout unassisted.

35 L4 Manual Part 2 (Oct 2013) 29/10/2013
7. Defence
Knowledge
i. Illustrate understanding of specified relay plays according to the National playbook ii. Name the five tools of a ballplayer and provide a basic outline of the positional relevance of each iii. Demonstrate solid knowledge of the 6Fs approach to fielding a routine groundball iv. Demonstrate solid knowledge of the 6Fs approach to making a backhand play v. Outline the 6Fs approach to executing a double play vi. Outline the 6Fs approach to a 1st baseman receiving an infield throw vii. Outline the reasons for and execution of varying infield depth
Activities
i. Conduct catcher’s blocking drills: ball directly in front, to either side, and catcher regaining feet to throw
ii. Conduct other catcher’s drills: throwing to all bases, pop-ups, bunt plays and tags iii. Drill backhand skills using the 6Fs sequence iv. Provide drills to help develop skills on forehand plays and slow rollers v. Arrange practice of key tasks for 1st Baseman vi. Drill key tasks for middle infielders vii. Use triangle drills for the rehearsal of DP feeds etc viii. Run drills for key tasks of 3B ix. Throw or fungo the ball to provide outfielders with practice on specific tasks. x. Conduct practice for double cuts, relays and flyball priorities. xi. Rehearse regular 1st & 3rd plays, and bunt defence
Instruction
i. Provide key points in the execution of slow roller plays using the glove and using the bare hand ii. Use the 6Fs sequence to instruct an infielder on the backhand play. iii. Guide the 1st Baseman in positioning and important routine tasks iv. Instruct middle infielders on the key points of double play feeds and turns, and steal coverage v. Provide simple instruction to a 3rd Baseman on key plays vi. Instruct an outfielder in the following important routine plays. vii. Instruct catchers on the basic postures: no runner on; runner on; pitch signs viii. Educate catchers on pitching strategy ix. Outline key communication expectations of Catchers x. Provide guidelines for the adjustment of infield depth

36 L4 Manual Part 2 (Oct 2013) 29/10/2013
Demonstrate solid knowledge of the 6Fs approach to fielding a
routine groundball
“The Six Fs” is an approach developed by Perry Hill, a very prominent infield coach in professional baseball. It provides
an excellent framework for teaching and assessing the fundamentals of fielding a groundball. The steps should be
rehearsed separately and then together, with lots of repetition through roll drills, so that the method becomes fluid
and automatic.
1. Feet:
o Develop a routine to ensure that your feet are ‘alive’ and your posture is athletic as the ball reaches the
contact zone – every pitch. You must be ready to move immediately in any direction
o Your feet carry you to the ball. As you approach the ball, lower your body gradually into fielding posture, like
a plane coming in to land
2. Field:
o Use a wide base: have you feet wide apart for stability and balance, so that your knees don’t get in the way,
and so that you can bend down more easily
o Move through the ball as you field it: do not be static. The left foot comes onto the ground just as the ball hits
the glove
o The hands should be out in front so that you can see the ball into the glove.
3. Funnel:
o Bring the ball to your centre of gravity (belly-button) with two hands, before splitting the hands to make the
throw
4. Footwork:
o While funnelling the ball then splitting the hands, rhythmically take the right foot to the left and the left to
the target, so as to land with the feet lined up to the target. (Your feet should never cross over).
5. Fire:
o Continuing in one smooth motion, fire the ball firmly and accurately to the target. The momentum of your
footwork provides a substantial amount of the force for the throw.
6. Follow:
o Follow the ball after you throw it: you should be taking two or three steps directly toward the target after you
release the ball. This ensures that you have momentum in the right direction
(The notes above describe technique for a right-handed thrower. Left-handers will use opposite leg and arm where
appropriate)

37 L4 Manual Part 2 (Oct 2013) 29/10/2013
Provide key points in the execution of forehand and slow roller plays
1. Forehand: when ball is too far to left side, player get as far as he can and reaches for ball with glove only, then
replaces feet (right to left, left to target) to come into a good throwing posture. Reverse pivot may be preferable,
but player can still replace feet.
2. Slow rollers: player runs hard toward ball, gaining control as he gets near, catches ball in glove or bare hand and
throws to 1B on the run

38 L4 Manual Part 2 (Oct 2013) 29/10/2013
Provide drills to help develop skills on forehand plays and slow
rollers
Coach uses roll drill to practice: 1. Forehand
1. Slow rollers

39 L4 Manual Part 2 (Oct 2013) 29/10/2013
Conduct activities which encourage infielders to use a variety of
throws
Players can start with the ball in the glove (graduating to balls fungoed by coach) and are encourages to experiment
with the way they throw the ball. Players are asked to assess the best way to deliver the ball to different bases in
different situations:
o Infielders should appreciate the differences involved in consistently delivering the ball to the various bases,
and the different throws required by different groundballs.
o Outfielders should appreciate the different demands resulting from balls hit in different locations, and from
various games situations and runner locations.

40 L4 Manual Part 2 (Oct 2013) 29/10/2013
Demonstrate solid knowledge of the 6Fs approach to making a
backhand play
An infielder needs to develop confidence in his ability to field a ball hit too far to the right side to be able to use the
routine approach. Many of the 6 Fs still apply, but the fielding posture is necessarily different:
o The head and right foot are directly in line with the path of the ball,
o The glove is in a backhand position well on front of the eyes.
o The body is side on to the path of the ball, but still low with a wide base
Once again, lots of roll drill is the key to developing this skill. A player should develop these skills in order:
1. No glove: player positions himself with right foot behind the line of the ball (wide base and head over path of ball).
Allows ball to roll so that it is blocked by that foot. This is to ensure that the right foot is behind the ball.
2. Receive with glove: same positioning as above, but this time use glove in backhand position to receive ball NB: make
contact with ball well in front of foot..
3. Replace feet to throw: once ball is caught, replace feet (right to left, left to target) to come into a good throwing
posture with momentum.
4. Power turn & drive (for when there is not much time): once ball I caught, transfer it quickly to throwing hand, drive
off right leg to make throw.
(The notes above describe technique for a right-handed thrower. Left-handers will use opposite leg and arm where
appropriate)
41 L4 Manual Part 2 (Oct 2013) 29/10/2013
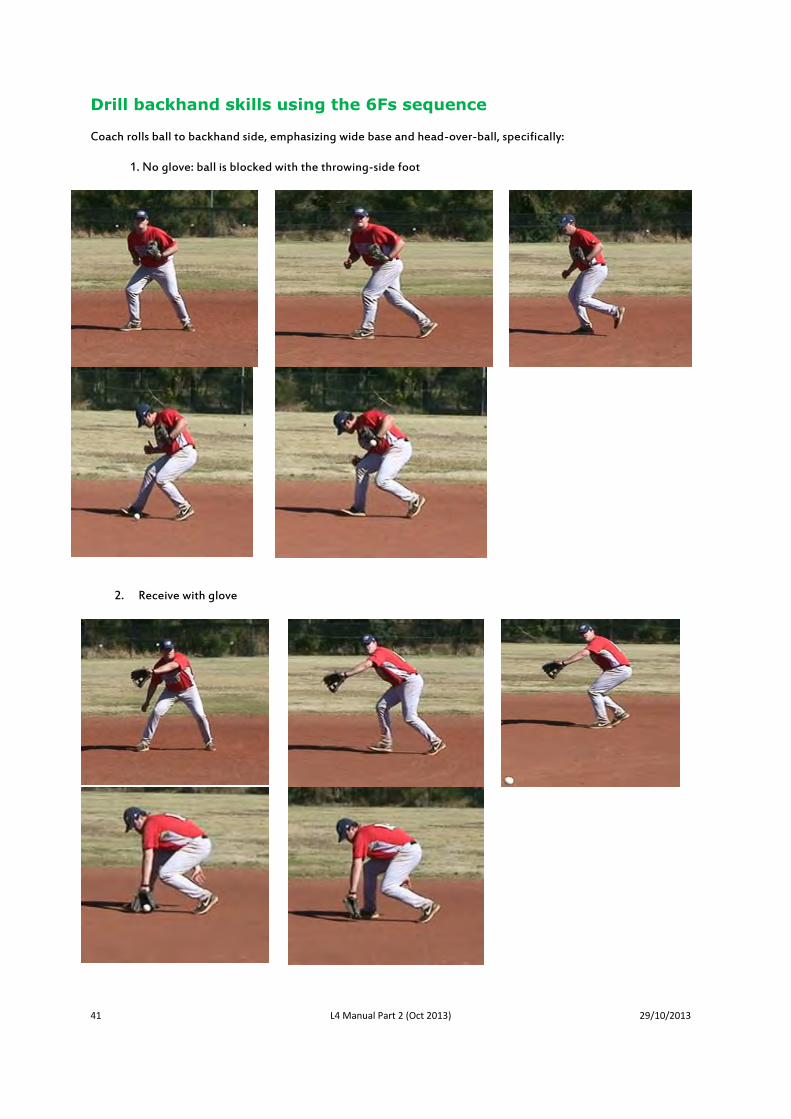
Drill backhand skills using the 6Fs sequence
Coach rolls ball to backhand side, emphasizing wide base and head-over-ball, specifically:
1. No glove: ball is blocked with the throwing-side foot
2. Receive with glove

42 L4 Manual Part 2 (Oct 2013) 29/10/2013
3. Replace feet to throw: “right to left; left to target”
4. No-step throw

43 L4 Manual Part 2 (Oct 2013) 29/10/2013
Outline and instruct the 6Fs approach to executing a double play
1. SS double play feeds:
2.
Glove side
Field the ball according to 6 Fs fundamentals
Clear the ball from the glove; give the 2nd Baseman a good view of ball
Little or no backswing (of throwing arm)
Maintain momentum under control
“Stiff-wristed” push-feed to face of 2nd Baseman
Follow the ball after release; hand reaches out as if shaking hands with 2B
Straight at SS
Field the ball according to 6 Fs fundamentals
Funnel
Retain low position
Keep body steady
Throw face-high to 2B
Backhand side
Field in front of right foot, as per 6 Fs backhand fundamentals
Open left leg to target
Stay low
Throw face-high to 2B
2. SS double play turns: “right foot on the bag, left foot to the ball”
Feed from 2B
Right toe on left-field corner of bag
Athletic, lively posture
Anticipate a bad throw
Read 2B throw, take large step with left foot toward the ball
Replace the feet to create distance & direction
Make a firm accurate throw to 1B
Lift cleats ready to lift cleats out of ground (in case of a collision with runner)
Feed from 1B (inside the line)
Left foot on base, give big target inside the base.
feet well spread, good balance, chest to 1st baseman, athletic, lively posture
Catch, step and throw

44 L4 Manual Part 2 (Oct 2013) 29/10/2013
3. 2nd Base double play feeds
Bare-hand side
Field ball cleanly
Maintain momentum toward base (under control)
Throw face-high over the base to SS
Walk after the feed
Straight at 2Bman Traditional method:
Field and funnel ball as per 6 Fs
Turn trunk toward SS, dropping left knee toward ground as throwing hand comes back over thigh, close to trunk.
Keeping elbow quite close to body, make a side-arm throw uphill to SS.
Power feed:
Approach ball on a curved path bending toward SS.
Field as per 6 Fs
With a strong lateral leg drive, throw the ball to the SS with a backhand motion. NB: push the ball with the hand side-on to the target, and finish with the palm facing the target.
Follow the ball for at least two steps.
Forehand side
Try to glove the ball as the left foot plants
Replace feet with a reverse pivot
Make a face-high throw to SS
4. 2nd Base double play turns: “Left foot on the bag right foot to the ball”
Feed from SS
Get to the base quickly
Wide base and athletic posture with left foot on the centre of the base, feet aligned to 1B.
Expect a bad throw and take the right foot to the ball once SS throws it, then step with left to 1B and throw
Lift cleats off the ground, so that the take-out slide can do no great harm.
Feed from 3B
As above, but it is nearly always best to have the left foot on the bag and take the right foot to the ball (rather than rock & fire)

45 L4 Manual Part 2 (Oct 2013) 29/10/2013
Instruct middle infielders on steal coverage
Ensure you know who is covering: if both infielders break to the bag, there will be a lot of gaps in the defence.
Before the pitch, position yourself so that you can get to the bag in time without having to break before the ball
reaches the hitter.
When the runner steals, break and get to the bag in time to receive the throw
If the throw is accurate, straddle the bag (which prevents the runners from sliding around you) and put the tag
straight down in front of the base. If the throw is down the line, try to catch it down the line so that you can still
tag the runner.
If the throw is not accurate, make sure the ball does not get by you and allow the runner to advance to 3B,
especially with less than two down

46 L4 Manual Part 2 (Oct 2013) 29/10/2013
Drill key tasks of middle infielders.
With other relevant players in position, Coach (or other) rolls, throws or fungoes ball as appropriate to have middle infielders practice the following skills:
1. SS double play feeds:
Glove side
Straight at SS
Backhand side
2. SS double play turns:
Feed from 2B
Feed from 1B
3. 2B double play feeds
Bare-hand side
Straight at 2Bman
Forehand side
4. 2B double play turns
Feed from SS
Feed from 3B 5. Steal coverage

47 L4 Manual Part 2 (Oct 2013) 29/10/2013
Use triangle drills to practice DP feeds
Triangle drills are an excellent way to practice basic skills: a large number of repetitions can be completed in a short
time, without the involvement of a coach.
o Three players stand 5-15m apart to form a triangle.
o The first player rolls the ball to the second who fields it and feeds it to the third using the correct throw for the
particular play being rehearsed.
o The third player now rolls to the first who fields it and feeds it to the second etc.
o In this way, all the double-play feeds can be rehearsed:
SS feeds
a. Ball on the base side
b. Ball straight at SS
c. Ball on the backhand side
2B feeds
a. Ball on the base side
b. Ball straight at 2Bman (backhand feed and regular)
c. Ball on the glove side

48 L4 Manual Part 2 (Oct 2013) 29/10/2013
Provide simple instruction to a 3rd Baseman on key plays
1. Double play feeds
Field ball according to 6 Fs guidelines
Replace feet and make a face high throw to 2B
2. PO5-3 double play
Used when ball is taking 3Bman toward base
Field ball cleanly, maintain momentum and continue to 3B
Placing right foot on base to force out lead runner, step directly to 1B with left to make the throw and
complete double play
3. Tagging a stealing runner
3B man must be prepared any time there is a runner on 2B
Every pitch, start the break toward 3B before checking whether runner is stealing or not: if 3Bman waits to check before breaking, he will often be too late to the base.
Straddle base, side-on to catcher, chest-on to runner.
On a good throw, catch ball and drop glove straight down in front of base.
Make sure a bad throw does not get past: the runner will score.
4. Fielding bunts
Attack ball
Gain control as you get close to ball
Field ball (glove or bare hand) and throw to 1B
49 L4 Manual Part 2 (Oct 2013) 29/10/2013
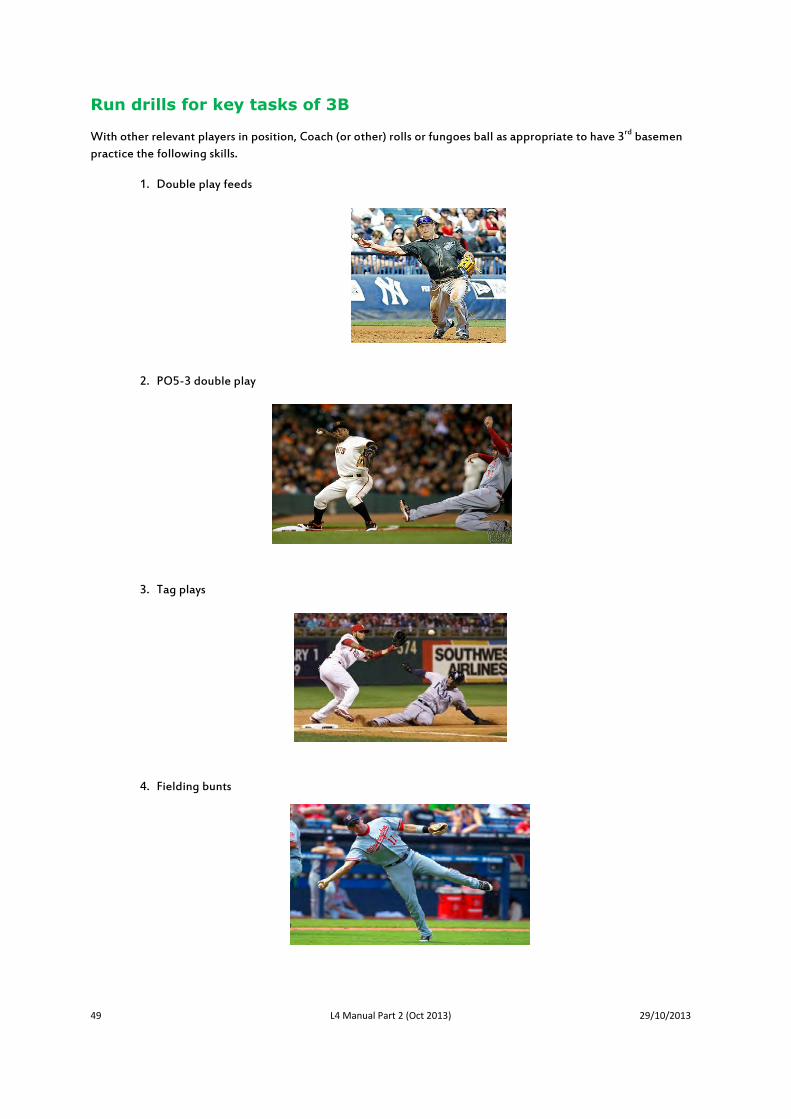
Run drills for key tasks of 3B
With other relevant players in position, Coach (or other) rolls or fungoes ball as appropriate to have 3rd basemen
practice the following skills.
1. Double play feeds
2. PO5-3 double play
3. Tag plays
4. Fielding bunts

50 L4 Manual Part 2 (Oct 2013) 29/10/2013
Outline the 6Fs approach to a 1st baseman receiving an infield throw
Read the ball off the bat
As soon as you know you cannot field it, hustle to the base and locate it with your throwing-side foot
Retaining the feel of the base with the heel of that foot, turn to face the direction of the throw
Be in an athletic position, ready to move in any direction
Read the throw
Turn back foot sideways
Step to the ball with glove-side foot: this foot should come onto the ground as the ball hits the glove. This ensures
that you do not “get out there” before you know where the throw is headed.
Back foot, being sideways, provides more stability and is less likely to drag off
Step off base once out is made

51 L4 Manual Part 2 (Oct 2013) 29/10/2013
Guide the 1st Baseman in positioning and important routine tasks.
1. Positioning with no runner on base: The 1st baseman must be comfortable that he can get to the base in time to receive a throw from an infielder.
Keeping that in mind, he should field as deep and as far off the foul line as possible. His first job is to be an infielder:
must be ready to field the ball that is hit in his vicinity. His ability to do that will be restricted if he is worried about
getting to the base in time. Adjustments can be made according to hitter.
2. Positioning with runner on 1B: Holding the runner on: right foot along-side home-plate side of base, left foot in fair territory, chest facing pitcher.
Athletic posture, glove at the ready: must be ready to receive a pickoff throw, or to move into better fielding
position if ball is pitched.
3. Tagging: If the pickoff throw is accurate (knee-high over bag), allow ball to travel as far as possible, turn the trunk and lower
the body (may go onto left knee) while catching ball and tag to centre-field corner of base. If the throw is
inaccurate, or the runner is clearly back, no tag is required: just make sure the ball does not get past.
4. Moving off the base Develop a set routine and master it. Eg, one big step with the right foot while squaring up to face home, then one
big side shuffle. This allows baseman to make reasonable distance and be in an athletic fielding stance when the
pitch reaches the plate.
5. Positioning with runner on 1B & 2B (less than two out). Stands at “double-play depth”: behind the runner, close enough to bag to make him think baseman could get back
for a pickoff, still well off the line but not as deep as he would be with no runner on base. (With two out, he can field
in normal fielding position)
6. Initiating the double play Field the ball cleanly and make an accurate throw to the inside of 2B. Use a reverse pivot on balls hit straight at him
or to the left. Can often glove the ball using the backhand catch on ball hit to his right.
As soon as the ball is thrown, get back to base to receive throw from middle infielder (pitcher makes a loud call if he
can cover the base for you).

52 L4 Manual Part 2 (Oct 2013) 29/10/2013
Arrange practice of key tasks for 1st Baseman.
1. Practising Tags: 1st baseman adopts posture to hold runner on. Coach (or other) throws ball to simulate pickoff. Baseman catches
ball and applies tag to opposite corner.
2. Moving off the base 1st baseman adopts posture to hold runner on. Coach (or other) simulates pitcher’s delivery; baseman uses correct
technique to get into fielding position. Coach may fungo groundball and have baseman execute putout or initiate
DP.

53 L4 Manual Part 2 (Oct 2013) 29/10/2013
Provide guidelines for the adjustment of infield depth
Managers often have non-verbal signs to inform the infielders of the depth at which to field in certain situations. This
can be as simple as pointing to 1B to indicate that they should just get the hitter (and thus field at normal depth) or
home to indicate they must make get the runner trying to score from 3B (and thus field move in to a shallower starting
position).
Adjustments are made infield depth according to game situation, for example, with less than two out and a runner on
3B. Keep in mind that bringing the infield in makes it easier for hitters to penetrate the infield, and should only be
done when the cost of allowing the 3B runner to score outweighs the cost of improving the hitter’s chance of reaching
base. Late in the game, bring the infield in:
If you are the visiting team: when the winning or tying run on is on 3B
If you are the home team: when the go ahead run on is on 3B
Many coaches will also bring the infield with a runner on 3B in any inning:
Any time there is one out and a close scoreline, as long as the hitter is not capable of stealing a base: even if a
slower runner gets on base, the inning can be ended with a double-play.
In any inning where each side has a very dominant pitcher on the mound, and thus one run can win the game.

54 L4 Manual Part 2 (Oct 2013) 29/10/2013
Instruct catchers on the three basic postures.
1. No runner on:
Priority is to be able to effectively receive any pitch around the strike zone
Comfortable and balanced posture (several variations are illustrated); rear can be “down”
Glove at bottom of strike zone, arm in relaxed position with elbow clear of knee
Provide open glove as target for pitcher
Throwing arm protected behind right leg (hung loosely to right heel)
2. Runner on
Additional priorities are to be able to: a) prevent any wild pitch getting past (high, low or wide); and b) throw to bases when required
More active posture (several variations are illustrated)
Wider feet
Butt up somewhat
Throwing hand in a position to make a quick exchange
Glove at bottom of strike zone, arm in relaxed position with elbow clear of knee
Provide open glove as target for pitcher
At an advanced level, posture may be varied according to situational probability. Eg. Slightly higher and
wider stance in blocking situations, lower and slightly narrower stance for throwing situations
3. Pitch signs
Right knee points just right of pitcher
Left knee to points to shortstop
Glove on end of left knee, thumb toward pitcher
Trunk held vertical

55 L4 Manual Part 2 (Oct 2013) 29/10/2013
Educate catchers on pitching strategy
Catchers must understand pitching strategy in order for the pitcher to get the most out of his ability.
No matter what level you are playing, the pitcher must avoid giving the hitters an advantage, so it is important that
pitcher and catcher to work together on pitching strategy and strive to adhere to the following guidelines:
1st pitch strike. If FB is his only consistent pitch, then it must be used.
Stay ahead. All pitch selections based on the intent to stay ahead in the count.
Change speeds. Keeps hitters off balance and reduces their effectiveness.
Locate FB. Mastery of the FB gives pitcher a lot of options. From the hitter’s perspective, FB in a different
location is actually a different pitch.
These are the basics of pitching strategy. As they progress, catchers must come to understand a pitcher’s strengths and
weaknesses, and be able to make adjustments accordingly.
Patience is required by coach: it takes time for a pitcher to be capable of doing these things.

56 L4 Manual Part 2 (Oct 2013) 29/10/2013
Outline key communication expectations of Catchers
When communicating with the defence, command attention first, and then move out in front of home plate
Use a loud, clear voice – sound authoritative, not panicky
Ensure your body language is that of someone who is in control of the situation
Make signals very clear (ensure everyone’s eye contact before beginning)
1. Let pitcher know which base to throw to as he fields a bunt
2. Remind pitcher to cover 1st base when a LHH comes to plate
3. Tell him to “Get over!” any time a groundball is hit to right side
4. When appropriate, remind infielders (and opposition) to “be alive for delayed steal!”
5. When a bunter comes to plate, tell 3rd baseman to be aware of the possible bunt.
6. On full count and two down with a force in place, remind infield that the play is at 1st base.
7. With a runner on 2nd base and 2 down, remind infield to keep the ball in the infield at all costs, even if
they can’t make the out at 1st base, it will save a run.
8. If a pitcher is throwing too many balls, and is not showing the ability or intent to make an adjustment on
their own, go visit him, remind him to settle down and make the necessary adjustment, forget
everything but hitting the glove etc.

57 L4 Manual Part 2 (Oct 2013) 29/10/2013
Conduct catcher’s blocking drills: ball directly in front, to either side,
and catcher regaining feet to throw
With catcher in full protective gear; from 3-5m, coach or teammate short-hops ball to catcher, which he correctly
blocks using his chest protector.
1. Ball directly in front
3. Ball to either side
3. All locations with catcher regaining feet quickly to gather ball and prepare to throw.

58 L4 Manual Part 2 (Oct 2013) 29/10/2013
Conduct other catcher’s drills: throwing to all bases, pop-ups, bunt
plays and tags
1. Throwing to all bases: from 8-10m, coach or teammate throws ball to catcher in receiving posture, who catches it
and throws it accurately to each base (5-6 to each base)
2. Pop-ups: with catcher in receiving posture, coach lobs or hits ball up to simulate a pop-up; catcher stands, locates
ball and makes catch
3. Bunt plays: with catcher in receiving posture, coach rolls ball to simulate a bunt. Catcher retrieves ball and comes up
ready to throw (throwing is optional). Catcher practices reverse pivot as well as rounding up on bunt to 3B side.
4. Tag plays: Coach or teammate throws or hit ball to simulate a throw to home; catcher receives ball and executes a
tag on a sliding runner, or on a standing runner.

59 L4 Manual Part 2 (Oct 2013) 29/10/2013
Outline the reasons for and execution of varying infield depth
With less than two out and a runner on 3B, adjustments can be made infield depth according to game situation. Because they are closer to the bat, bringing the infield in makes it easier for hitters to penetrate the infield, and should only be done when the cost of allowing the 3B runner to score outweighs the cost of improving the hitter’s chance of reaching base. Late in the game, bring the infield in:
If you are the visiting team: when the winning or tying run is on 3B
If you are the home team: when the go ahead run is on 3B
Many coaches will also bring the infield with a runner on 3B in any inning:
Any time there is one out and a close scoreline, as long as the hitter is not capable of stealing a base: even if a slower runner gets on base, the inning can be ended with a double-play.
In any inning where each side has a very dominant pitcher on the mound, and thus one run can win the game.
When the infield is in, all infielders will be on or inside the basepaths, or close enough to ensure that a 3rd base runner
cannot score on an infield ground ball. The middle infielders also move closer to the foul lines, so that when viewed
from home plate, the five defensive players (including the pitcher) are equally spaced.

60 L4 Manual Part 2 (Oct 2013) 29/10/2013
Instruct an outfielder in important routine plays.
1. Going back on ball
Run “sideways” - never back-pedal
Maintain good sprinting form for as long as necessary – holding the glove up will slow fielder down
Practice taking eyes off the ball for when there is a lot of distance to be covered.
2. Charging a ground ball (do or die)
Attack the ball hard early, easing slightly as you near ball to be under control
Field the ball with glove-hand only, take a quick crow-hop to re-gather for the throw
Make a long hop or flat throw to the correct base
3. Reverse turns
When fielding a ball on the glove side which is taking you away from the target base, a reverse pivot is
quicker and will produce a better throw
Glove the ball, replace the feet to pivot, and make a flat throw to the correct base.
4. Backing up
On every play, an outfielder who is not fielding a ball will have backing up responsibilities somewhere.
Whether it is an infield or outfield play, back up the player fielding the ball or the base to which a throw may
be made.
The outfielder will often be unable to stop the runner advancing one base, but can prevent him taking two
bases.

61 L4 Manual Part 2 (Oct 2013) 29/10/2013
Throw or fungo the ball to provide outfielders with practice of
specific tasks
With other relevant players in position, Coach (or other) throws or fungoes ball as appropriate to have outfielders
practice the following skills.
1. Going back on ball
2. Charging a ground ball (do or die)
3. Reverse turns
4. Backing up
62 L4 Manual Part 2 (Oct 2013) 29/10/2013
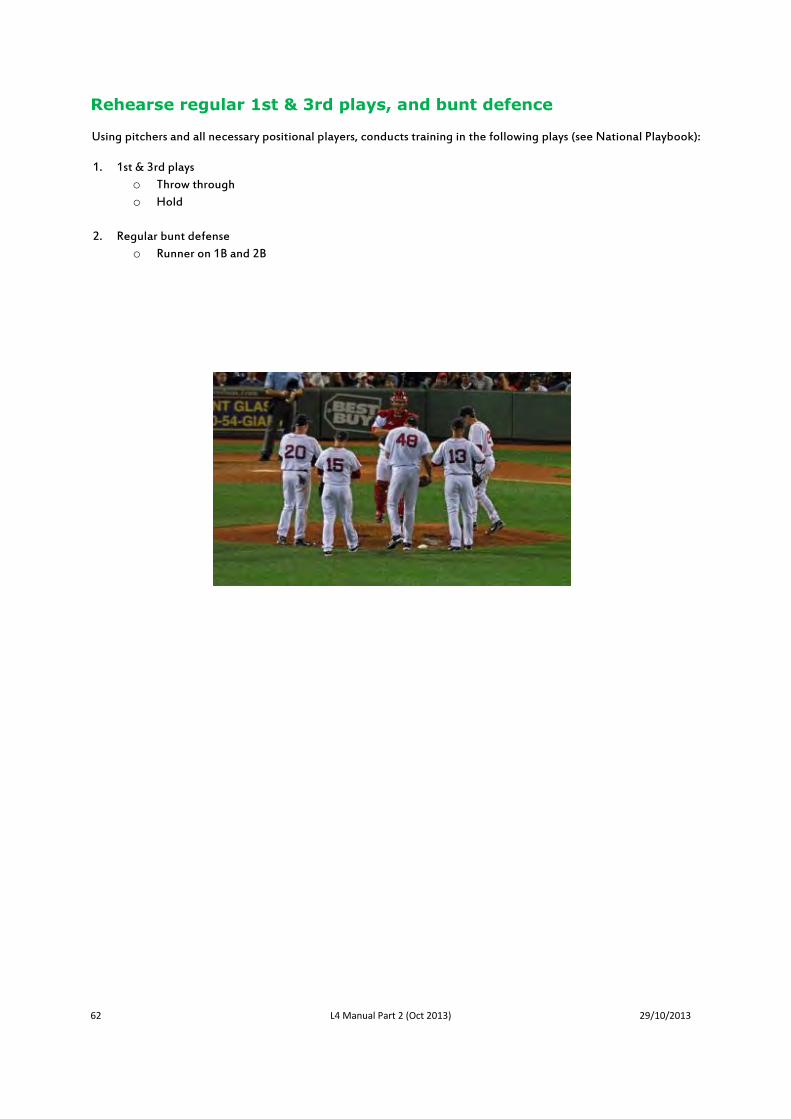
Rehearse regular 1st & 3rd plays, and bunt defence
Using pitchers and all necessary positional players, conducts training in the following plays (see National Playbook):
1. 1st & 3rd plays
o Throw through
o Hold
2. Regular bunt defense
o Runner on 1B and 2B

63 L4 Manual Part 2 (Oct 2013) 29/10/2013
8. Running
Activities
i. Train players in the prescribed acceleration drills ii. Engage players in rehearsing base-running: using his own judgment; iii. Rehearse the runner’s role on bunts and in the hit & run play iv. Conduct sessions for runners to practice situational baserunning
Instruction
i. Instruct key base-running skills ii. Explain the relative merits of sliding head first vs feet first iii. Instruct leads at 1B, 2B & 3B; iv. Instruct returns to 1B, 2B & 3B
64 L4 Manual Part 2 (Oct 2013) 29/10/2013
Train players in the prescribed acceleration drills
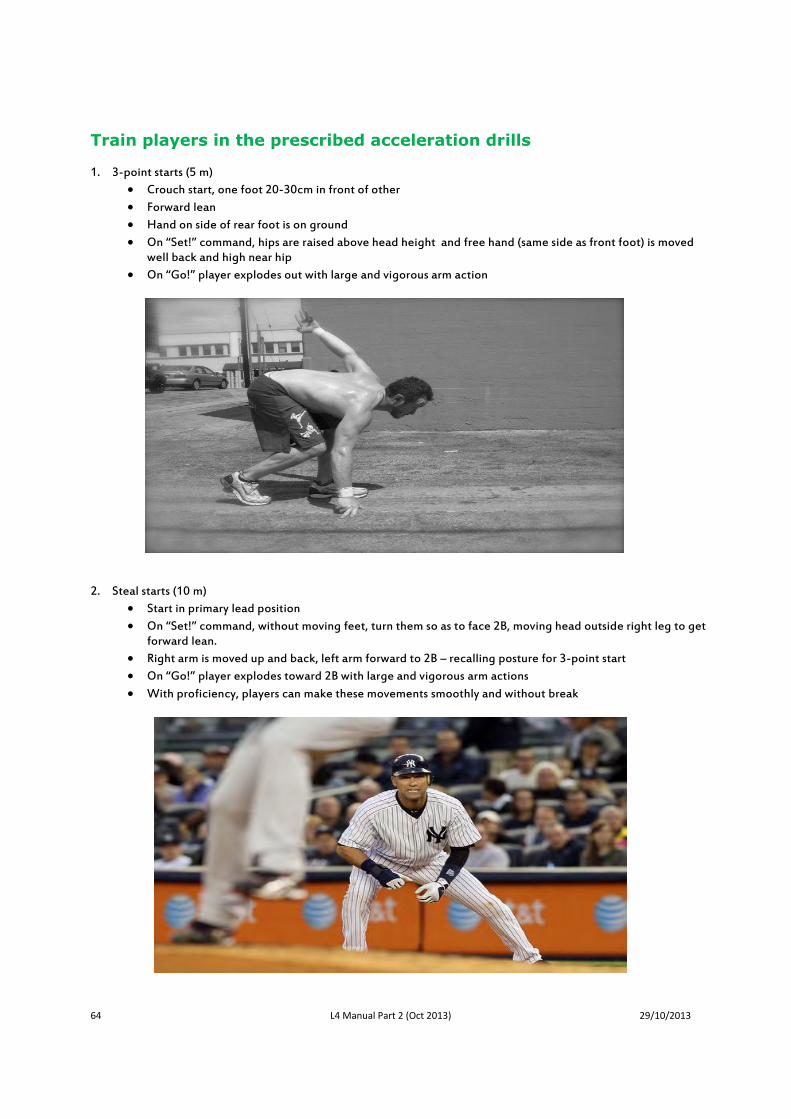
1. 3-point starts (5 m)
Crouch start, one foot 20-30cm in front of other
Forward lean
Hand on side of rear foot is on ground
On “Set!” command, hips are raised above head height and free hand (same side as front foot) is moved well back and high near hip
On “Go!” player explodes out with large and vigorous arm action
2. Steal starts (10 m)
Start in primary lead position
On “Set!” command, without moving feet, turn them so as to face 2B, moving head outside right leg to get forward lean.
Right arm is moved up and back, left arm forward to 2B – recalling posture for 3-point start
On “Go!” player explodes toward 2B with large and vigorous arm actions
With proficiency, players can make these movements smoothly and without break

65 L4 Manual Part 2 (Oct 2013) 29/10/2013
3. Beach flag starts (15 m) o Start lying on stomach, both hands under chin, facing direction of race o On “Go!” get up and sprint forward as quickly as possible o Avoid standing up straight: drive out on an angle.

66 L4 Manual Part 2 (Oct 2013) 29/10/2013
Instruct key baserunning skills
1. Stealing 2B
There is always an element of risk in stealing
Study the pitcher: what is his first movement when he starts to pitch?
Get a good lead, making sure not to give away your intent
Break hard as soon as he makes that first pitching movement – if you wait until you are sure, you will be out at 2B
Accelerate hard for two steps
Then, without slowing down, turn your head to see the ball reach the hitter.
If the ball gets to the catcher, continue to accelerate and slide hard into 2B
2. Hit & run
Similar to stealing
Biggest difference is that runner must make sure pitch is going to plate before breaking; never get picked off
Get a good break and keep your eyes on the ball while maintaining acceleration..
Read and react to ball
If the hitter hits a line drive, keep running hard : you are not going to get back to the base if the ball is caught
by an infielder anyway.
3. Angles
All runners must find the best compromise between maintaining speed and running the shortest path
Angle in and angle out should be about the same (relative to baseline)
Use base to assist turn by getting a good lean
4. Stealing 3B
“Never be the 1st or 3rd out at 3B”.
Momentum and timing are critical
Gain momentum with some short side-shuffles while pitcher is still in set position
If you have good momentum as he commences delivery, break hard and steal 3B.
If he holds set for longer than expected, quit on the steal
5. Balls in dirt
Read the flight of every pitch while taking secondary lead (see below).
Anticipate that every pitch is in the dirt; that way, you will be ready to go. If it doesn’t, and it isn’t hit, get back to the base!
As soon as you read that ball is going to bounce, steal
Rely on the fact that the time it takes the catcher to block, locate, and regather ball, then to stand up and throw it, will give you time to reach next base.
This is particularly true for a 1B runner.
Don’t not wait for the ball to bounce: precious time will be lost.
If situation demands that you run cautiously, you can read the ball’s position after the catcher’s block. Many
times it will be possible to advance to the next base.
6. Reading ball off bat on all bases
Before each pitch, check where the spaces are in the outfield.
You then know you can break immediately if the ball is heading to one of those spaces.
You must always see the ball reach the plate so that you can see the trajectory of a batted ball from the beginning.
Read path of ball and react accordingly.

67 L4 Manual Part 2 (Oct 2013) 29/10/2013
7. Own judgement
When you reach any base, use BOSO to assess the current situation: Ball (where is it?); Outs (and score and inning etc); Signs (get them from the coach); Outfield (where are they fielding? Where are the spaces? What are the arms like?). This information helps you plan what you will do in various situations once the ball is in play etc.
You decide for yourself whether to try for extra base or not: you have assessed situation before the pitch, now you read ball in play etc
Coach does not wave you on or stop you when you can see ball and the fielders for himself.
You must attack next base and stop only when someone forces you to (H-2B, 1B-3B, 2B-H etc)
Coach may assist when ball is behind you
8. Breaking up double play
It is your duty to the team to make it difficult for middle infielder to turn double
Run hard and slide hard (feet first)
Avoid contacting infielder with spikes
Slide must be within reach of base

68 L4 Manual Part 2 (Oct 2013) 29/10/2013
Instruct leads at 1B, 2B & 3B
1. Leads - general guidelines:
Always know where the ball is, and keep eyes on player with ball any time you leave a base
Primary lead is taken when pitcher is in set position or preparing to start windup. Runner must measure a consistent distance so that he knows how far he is off base without having to look back. Finish squared off to baseline, in athletic posture, ready to go in either direction
Secondary lead is a balanced side-shuffle taken when pitcher commits to pitch. It is used to gain momentum and decrease distance to next base, while remaining under control. Shuffle should be timed so that right foot comes down immediately after catcher receives ball.
Runner must watch flight of ball while he takes his secondary.
2. Leads at 1B
Primary lead: 1B receives most and quickest pickoffs, so the lead must be very exact. Eg: start with left foot, two steps then a side step.
Secondary lead: once again, be exact and finish on a strong, low posture, ready quickly move either way.
Getting a good jump is important but catcher’s frequently attempt pickoffs.
3. Leads at 2B
Primary lead: must still be measured, but can be longer than at 1B as pitcher will take longer to turn and throw. Eg: 5 steps and a lateral step. 3B coach communicates movements of middle infielders.
Secondary lead: as for 1B, but can be longer as the catcher has a longer throw.

69 L4 Manual Part 2 (Oct 2013) 29/10/2013
4. Leads at 3B
Lead off in foul territory (runner is out if hit by a batted ball in fair territory).
Primary lead: can vary according to how aggressively you are attacking the plate (situational). Pickoffs by pitcher are rare, but runner must still be aware.
Secondary: measured lead timed to have right foot coming down as catcher receives ball. Eg: half step with
right foot, then two walking steps. Delay start if the pitcher is working from windup: runner could end up too
far down the line, or flatfooted, if he starts too early.

70 L4 Manual Part 2 (Oct 2013) 29/10/2013
Instruct returns to 1B, 2B & 3B
1. Returns – general principles:
Immediately catcher has ball, quickly get back to within a safe distance.
If the catcher returns ball to the pitcher, move back to base under control, and prepare for the next pitch (BOSO)
If the catcher throws to your base, a dive back may be required.
2. Return to 1B:
On a catcher’s throw, it is best to dive back in with the right hand touching the right-field side of the bag. The
left hand can go out to right-field for support and balance.
3. Return to 2B:
When needed, diving back is done in the same way as at 1B.
4. Return to 3B:
Keeping eyes on ball, cross into fair territory to return to base. This provides visual and physical interference in
the event of a catcher’s throw.

71 L4 Manual Part 2 (Oct 2013) 29/10/2013
Conduct sessions for runners to practice situational baserunning
Assemble the group at the relevant location, with pitcher on the mound (and pitching) if appropriate, and have
player(s) rehearse correct technique, individually or in small groups. Provide feedback and correction as required.
1. Bunts
2. Hit & run
3. Stealing 3B
4. Balls in dirt
5. Reading ball off bat on all bases
6. Angles
7. Own judgement
8. Breaking up double play
9. Leads & returns - general guidelines
10. Leads at & returns at 1B
11. Leads & returns at 2B
12. Leads and returns at 3B

72 L4 Manual Part 2 (Oct 2013) 29/10/2013
Explain the relative merits of sliding head first vs feet first
Sliding feet first is statistically safer: hand injuries are baseball’s most common, and many of these occur when diving
into a base. Most studies indicate feet-first slides are also faster.

73 L4 Manual Part 2 (Oct 2013) 29/10/2013
Australian Baseball Federation Coaches Updating Policy
Updating is a requirement of the ABF and Australian Sports Commission’s National Coaching Accreditation Scheme (NCAS), and is necessary if the coach wishes to retain accreditation levels achieved and maintain coaching currency within the Australian Baseball Federation. Coaches are required to meet updating criteria or become reaccredited every four years. Otherwise, Accreditation acquired in 2010, for example, will expire in 2014, at the anniversary of their initial accreditation. Updating responsibilities: State Associations and the National Organisation are jointly responsible for updating: Level 1-4 State Associations Level 5-6 Australian Baseball Federation Accreditation responsibilities: Accreditation responsibilities in Baseball are apportioned as follows: Level 1-4 State Associations Level 5 State Associations & Australian Baseball Federation Level 6 Australian Baseball Federation Updating Criteria In order to update his or her accreditation, a coach must in a 4 year period: • Complete the next level of accreditation OR • Complete re-assessment at the current level of accreditation OR • Complete the following number of hours of updating activities: Level 1 – 24 hours Level 2 – 48 hours Level 3 – 60 hours Level 4 – 100 hours Level 5 – 120 hours Level 6 – 120 hours Level 7 – 120 hours Coach’s Responsibility It is the coach’s responsibility to provide evidence to the relevant body (see above) that she/he has met updating requirements. Participation in qualifying activities must be verified by an authorised person (e.g. convenor of the course / workshop / clinic, or regional or state coaching director). Timeframe for updating activities: Updating activities must be spread out over at least two years. They cannot be completed in the space of a single year (they would ideally be spread over 4 years). In special circumstances, the ABF or the relevant state body may negotiate on a case-by-case basis.

74 L4 Manual Part 2 (Oct 2013) 29/10/2013
Updating Activities There are three activities acceptable for the purposes of updating: practical coaching, self education, and assisting other coaches. 1. Practical coaching: At least 50% of the required updating hours for each level must be completed through practical coaching; in many cases, you will be able to maintain your accreditation through this means alone. This can be undertaken with any level of baseball player or team and may occur on a regular basis (weekly, fortnightly) or in specific situations such as camps and clinics.
- Coaching at club, regional, state, or national level; recorded as done in your own log book. Half your practical coaching requirement can be earned in this way.
- Coaching at club, regional, state or national level, supervised & signed off by authorised coach (state or regional coaching director or a coach with a higher level of accreditation)
- Coaching as a member of regional, state or national coaching or scouting committee - Coaching as a member of an international coaching exchange program - Coaching as a coaching director or development officer at club, regional, state or national level - Coaching in regional, state or national development programs - Coaching as a member of an international Baseball tour group
2. Self education: Up to 50% of the updating hours can be completed through completion of an approved course or seminar.
- Baseball specific coaching seminar - General coaching seminar or course - Strength & conditioning course - Sports Trainers course - Recognised First Aid, Advanced Resuscitation, Sports massage courses - Sports related tertiary education e.g. Sports Coaching, Human Movements, Physical Education - Sports Administration course (e.g. ASSA) - Leadership / communication training programs - Observe a coaching session of a coach of a higher accreditation level - Become a member of a coaches’ association (hours claimed must be equivalent to activities e.g.
hours spent at meetings) - Undertake a coaching scholarship - Other activities negotiated and approved with & by your state association or the ABF
3. Assisting other coaches: Again, up to 50% of the updating hours may be completed by assisting in the development of other coaches.
- Lecture or present at a coaching course - Become a mentor for another coach - Supervise coaching practice hours of another accredited coach - Assist in the development of coaching resources and reference materials e.g. journals, videos,
CD’s, course presentations - Other activities negotiated and approved with & by your state association or the ABF

75 L4 Manual Part 2 (Oct 2013) 29/10/2013
How to apply for updating
1. Make sure your log book (or other evidence) is signed off by the appropriate people across all areas of updating activities
2. Itemise your updating activities according to: a. which section they apply to (e.g. Practical Coaching) b. description of each activity and the number of hours claimed for it
3. Submit your evidence, together with your current contact details and the updating fee, to the appointed person in your state association (or to the ABF where required).
4. Be sure to include a signed Coaches Code of Conduct Agreement form with your updating submission. This form is available from your state association office.
It is always a good idea to provide any relevant extra background to your updating activities and attach it to your submission. Make sure your submission includes your accreditation number and level, as well as your current contact details (postal and phone).
Updating example: (Level 1)
Practical coaching 6 hours self monitored coaching in club Practical coaching 6 hours supervised coaching Self education 3 hours Baseball Seminar Self education 6 hours Red Cross First Aid course Assisting other coaches 3 hours presented at Level 0 coaching course
TOTAL 24 HOURS *Enclose signed log book etc to verify participation or activity Remember, all updating for Levels 1-4 is submitted to your STATE¬ association __________________________________________________________________________________ Contact details for ABF Postal: Australian Baseball Federation PO Box 1028 Mudgeeraba QLD 4213 Phone: (07) 5510 6822 Fax: (07) 5510 6855 Email: [email protected] Website: www.baseball.com.au

76 L4 Manual Part 2 (Oct 2013) 29/10/2013
Pre-Requisites for Practical Assessment
Practical assessment is the final assessment step at each level in the accreditation process.
Evidence of having met pre-requisites must be supplied prior to commencement of the practical assessment tasks.
Candidates must have previously: 1. successfully completed the ASC’s Beginning Coaching General Principles assessments 2. passed the written test appropriate to the accreditation level being sought 3. acquired the specified baseball experience, specifically the competencies needed to pass
the practical assessment tasks 4. paid the appropriate assessment fee
Practical Coaching/Playing Experience
Level 1: Minimum age of 14; no prior baseball experience required
Level 2: Minimum age of 16; and at least one of the following o Two (2) years of coaching with Level 1 Accreditation o Four (4) years of coaching without Accreditation o Six (6) years of playing with no coaching experience o One (1) year of coaching with Level 1 Accreditation plus three years as a player
Level 3: Minimum age of 18; and at least one of the following o Two (2) years of coaching with Level 2 Accreditation o Six (6) years of coaching without Accreditation o Eight (8) years of playing with no coaching experience o One (1) year of coaching with Level 2 Accreditation plus three years as a player
Level 4: Minimum age of 20; and at least one of the following o Two (2) years of coaching with Level 3 Accreditation o Eight (8) years of coaching without Accreditation o Ten (10) years of playing with no coaching experience o Four (4) years in Australian state team, national league team, or at US college level o Three (3) years of Australian national team or recognised professional experience o One (1) year of coaching with Level 3 Accreditation plus four years as a player
Level 5: at least one of the following o Two (2) years of coaching with Level 4 Accreditation o Fifteen (15) years of coaching without Accreditation o Ten (10) years total in Australian state team, national league team, pro ball and/or at US
college level o Five (5) years total in Australian national team or recognised professional experience o One (1) year of coaching with Level 4 Accreditation plus five years as a player
Level 6: at least one of the following o Two (2) years of coaching with Level 5 Accreditation o Fifteen (15) years total in Australian state team, national league team, pro ball and/or at
US college level o Ten (10) years total in Australian national team or recognised professional experience o Five (5) years of professional experience at AA or above o Experience at professional Major League level (US or Japan)

77 L4 Manual Part 2 (Oct 2013) 29/10/2013
Beginning Coaching General Principles Pre-Requisites
All coaches must have achieved the competencies covered in the Australian Sports Commission’s Beginning Coaching General Principles course. In most cases, this can be done in three ways:
Online: Complete the assessment tasks in the ASC’s online course (https://learning.ausport.gov.au/jPortal/default.aspx) and then obtain the Statement of Module Completion, in your own name. This can then be forwarded as a hard copy or email to the relevant Assessor (ensure that this is done prior to the deadline). Please note, that the course and the assessment are free of charges.
General Principles through an external provider: The Sports Commission has contracted various bodies (Sport & Rec etc) in each state to provide the General Principles course in a face-to-face setting. This course includes assessment tasks. Official evidence of completing these tasks satisfactorily must be provided to the practical Assessor. Please note, that with this option, course fees are payable and there is no provision for attempting the assessment tasks without attending the course.
Please note: Beginning Coaching is the only General Principles course with assessments which must be satisfied in order to be accredited. The ASC also has General Principles Courses for Intermediate and Advanced coaches, but at this stage neither is a requirement for any level of accreditation.
Physical Screening Check
Participants will need a personal fitness level that will enable them to physically complete the practical requirements of the course. Assessors reserve the right to request proof of fitness from a medical practitioner. Participants who are unable to meet this requirement will undertake alternate activities during the practical components of the course.
Coaches’ Code of Conduct
To attain or retain Coach Accreditation under the ABF NCAS, a coach must have read, understood and signed a current Coaches’ Code of Conduct. Failing to adhere to the requirements of the Code of Conduct may result in a coach being stripped of accreditation.

78 L4 Manual Part 2 (Oct 2013) 29/10/2013
Qualifications and Training of Presenters, Assessors and Mentors
Gaining a particular Level of Accreditation is a matter of passing the relevant assessment tasks to demonstrate the competencies required for that Level; it is not a matter of attending a course. There is no reason why the assessment task cannot be attempted at, or prior to, the commencement of any course or courses. Those who can already pass the assessment task need not complete any course. Those who can’t complete the tasks need to find a way to develop the necessary competencies, and one of the best ways to do this is to complete a course purpose-built to equip candidates with the skills required to pass the assessment. These courses can be designed and run by states, associations or even clubs. The crucial thing is that the assessment of an individual’s competencies will always be conducted according to NCAS guidelines and only by authorised personnel. It will be rigid and objective, as it is the key to quality control. In order to satisfactorily present a baseball-specific portion of an ABF National Coach Accreditation Scheme course, individuals must themselves have completed requirements for the specific competency in the NCAS.
Course Level
Minimum Accreditation Level
of Presenter
Minimum Accreditation Level
of Assessor 1-2 3 3
3 4 4
4 4 4
5 5 4
As all assessment will be done according to defined competency standards, it is not necessary that an assessor have a higher level of accreditation than the candidate.
Presenters and assessors for Level Five and above may have a variety of qualifications.
There are a number of ways by which a coach may achieve a Level 5 Accreditation, for example, and Level 6 will be largely individualized according to need.
Criteria for Levels 5-6 may include, or consist wholly of, demonstrated competencies
in a specialist area (Pitching Coach or Manager, for example), or completion of a combination of specified modules for Coaches of Hitting, Infield, Outfield, Catching, Baserunning, Offensive Strategy and Defensive Strategy.
The completion of coaching duties under the supervision of a mentor will also be a
significant education strategy at these higher levels.

79 L4 Manual Part 2 (Oct 2013) 29/10/2013
Complaints Handling Procedure
Any coach assessed as not yet competent in all required areas, and thus not granted the relevant level of Accreditation, may lodge an official complaint. Complainants should be aware that they must feel confident that they did in fact satisfy the specific criteria during the assessment process, or that the process was in some way flawed. If this cannot be substantiated, any complaint is unlikely to be upheld.
This complaint must be in writing (optional pro-forma attached), and lodged with the relevant state body along with a $50.00 lodgement fee within two (2) weeks of being informed of the assessment. The lodgement fee will be refunded if the complaint is upheld.
This complaint will be handled in the following manner:
1. For Levels 1-4, the state body will evaluate the complaint, the supporting evidence and any contradictory evidence (including feedback from the assessor). It will then make a decision to uphold or dismiss the complaint.
a. If the complaint is dismissed, the complainant will be informed in writing of the state body’s decision to uphold the original assessment. The complainant may then seek reassessment at a mutually suitable time.
b. If the complaint is upheld, the state body may, based on the strength of the evidence, either reverse the assessment decision or arrange for the candidate to be reassessed at a mutually suitable time within one month of the decision being reached.
c. If the state body decides to reverse the original decision, they must within two weeks provide the National Coaching Coordinator with a written account of the case, including all evidence and the reasons for the reversal.
2. For Level 5 assessments conducted by the state body, the state body will initially evaluate the complaint, the supporting evidence and any contradictory evidence (including feedback from the assessor). It will then formulate a recommendation to either uphold or dismiss the complaint; this recommendation, along with supporting evidence, will be forwarded to the appropriate ABF officer, who will review the case and come to the final decision.
a. If the complaint is dismissed, the ABF will inform the complainant of the decision in writing. The complainant may then seek reassessment at a mutually suitable time.
b. If the complaint is upheld, the ABF may, based on the strength of the evidence, either reverse the assessment decision or arrange for the candidate to be reassessed at a mutually suitable time within one month of the decision being reached.
c. If the ABF decides to reverse the original decision, they must within two weeks provide the state body with a written account of the case, including all evidence and the reasons for the reversal.
3. For Level 5-6 assessments conducted by the ABF, the state body will forward the complaint on to the ABF, with or without additional evidence (at their own discretion). The appropriate ABF officer and a panel of suitably qualified people will review the case and come to the final decision. The outcome of this review will be communicated according to the above guidelines (see paragraph 2a, 2b and 2c).

80 L4 Manual Part 2 (Oct 2013) 29/10/2013
Baseball Australia’s NCAS
Complaint about Competency Assessment:
Coach’s last name Other names Contact phone Email Date of Accreditation Course Accreditation Level attempted
Location of Accreditation Course Name of Course deliverer Date of Assessment
Name of Assessor (if known)
In what area(s) were you assessed as “not yet competent”?
Why do you believe this was an invalid assessment? In what way was the assessment process flawed? What evidence can you provide to support your case? Coach’s signature (Office use only)
Signature of state body representative Date received

81 L4 Manual Part 2 (Oct 2013) 29/10/2013
Baseball RCC/RPL Application Form
SECTION 1 – PERSONAL DETAILS
Name: ......................................................................................................................
Address: .............................................................................................................
.............................................................................................................
.............................................................................................................
Postcode: ..........................................................
Phone: .................................................... Fax:........................................................
Mobile: .....................................................Email: ...........................................................
SECTION 2 – ASSESSMENT (COMPULSORY)
Most coaches will need to complete the Australian Sports Commission’s Coaching General Principles
course and be assessed using the standard assessment tools.
Current Accreditation Level (if any):......................................................................................
Accreditation Level sought: ......................................................................................................
Evidence of completing the ASC’s General Principles Course
Please tick and attach relevant documentation to this application form.
Online BCGP certificate (to enrol in the free BCGP online course, go to:
https://learning.ausport.gov.au.
BCGP certificate from an approved Australian Sports Commission training
agency
Active After-school Community Coach Training Program Certificate
NCAS accreditation from another sport (specific evidence of GP completion
must be included)
Completion of a sports coaching, physical education or equivalent tertiary
qualification
Baseball Assessment Responsibilities for RCC and RPL Levels 1-3 State body Levels 4-5 Baseball Australia
Please contact the state or national baseball federation to complete the assessment tasks to the required standard and or supply evidence of meeting the required competencies below.
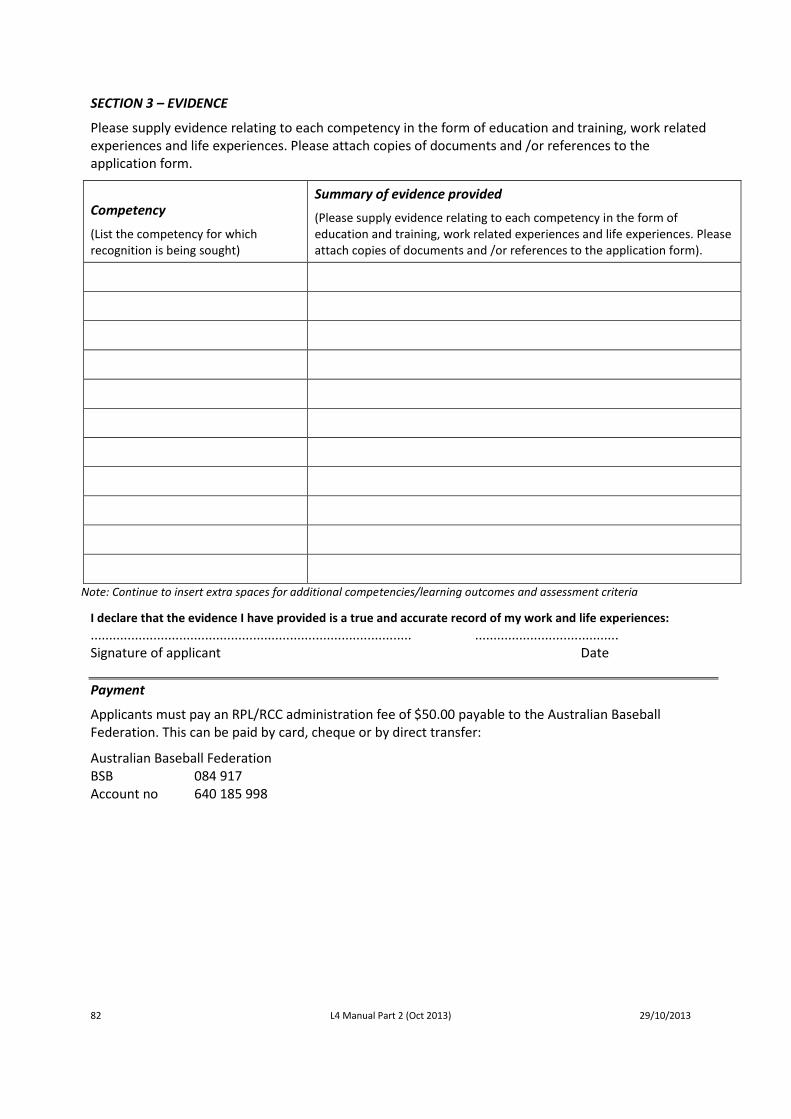
82 L4 Manual Part 2 (Oct 2013) 29/10/2013
SECTION 3 – EVIDENCE
Please supply evidence relating to each competency in the form of education and training, work related experiences and life experiences. Please attach copies of documents and /or references to the application form.
Competency
(List the competency for which recognition is being sought)
Summary of evidence provided
(Please supply evidence relating to each competency in the form of education and training, work related experiences and life experiences. Please attach copies of documents and /or references to the application form).
Note: Continue to insert extra spaces for additional competencies/learning outcomes and assessment criteria
I declare that the evidence I have provided is a true and accurate record of my work and life experiences:
....................................................................................... ....................................... Signature of applicant Date
Payment
Applicants must pay an RPL/RCC administration fee of $50.00 payable to the Australian Baseball Federation. This can be paid by card, cheque or by direct transfer:
Australian Baseball Federation BSB 084 917 Account no 640 185 998


![WELCOME [mlb.mlb.com]mlb.mlb.com/mlb/downloads/y2016/phr_handbook.pdf · An attempt hitting ANY portion of the target will be deemed a strike. Suggested Equipment: • Baseball Division](https://img.pdfslide.us/doc/110x75/5fd90f742b04b86b8b2ea4cf/welcome-mlbmlbcommlbmlbcommlbdownloadsy2016phr-an-attempt-hitting.jpg)