Embed Size (px)
Citation preview
University of Nebraska - LincolnDigitalCommons@University of Nebraska - LincolnHistorical Materials from University of Nebraska-Lincoln Extension Extension
1986
4-H 223 Clothing : Level IRose Marie Tondl
Follow this and additional works at: http://digitalcommons.unl.edu/extensionhist
This Article is brought to you for free and open access by the Extension at DigitalCommons@University of Nebraska - Lincoln. It has been accepted forinclusion in Historical Materials from University of Nebraska-Lincoln Extension by an authorized administrator of DigitalCommons@University ofNebraska - Lincoln.
Tondl, Rose Marie, "4-H 223 Clothing : Level I" (1986). Historical Materials from University of Nebraska-Lincoln Extension. 4877.http://digitalcommons.unl.edu/extensionhist/4877

RD2178 32460
r!. tr 5 533
. f/;~#1~ - fl(j, ;{ J. 3 ------
Nebraska Cooperative Extension 4-H 223
EVEL I
, national oriain , sex o r handicap .

Clothing Level I Project Planning and Evaluation Sheet
Name __________________ 4-H Age _____ Year ____ _
Years in 4-H _____ Name of Club ____________________ _
Signature of leader or parent ________________________ _
I plan to do these activities
1
2
3
4
5
6
From this activity, I learned:
Comments:
Presentations or community service activities _________________ _
CLOTHING - LEVEL I Extension Clothing Specialist
WHAT YOU'LL DO IN THIS PROJECT In Sewing For Fun, you did some simple sewing projects .
Now you are ready to use a commercial pattern and learn to sew clothes you can wear. In this project you will learn:
More about the sewing machine. How to select a pattern for yourself. How to select fabric and notions for your pattern. New construction skills :
facings casings kimono or raglan sleeves hand hemming
Modeling skills. How to take care of your clothes. How to keep a healthy, attractive appearance. To keep 4-H records using the Home Economics Project Planning Form.
Share what you learn w ith others by giving a presentation, exhibiting at the fair, and modeling in the fashion revue. Be sure to write down your plans in your 4-H record form. List the things you would like to learn and what you plan to make.
Use this manual when you select a pattern and fabric . As you sew, look at the guides for each feature under SEWING BASICS.
PROJECT REQUIREMENTS In the back of this manual there is a 4-H Clothing Con
struction Skills Checklist. Use this checklist when planning what you want to learn and do in this project. To complete Clothing - Level I you should: - Be able to check off 40 of the 50 skills listed . - Make at least 2 different garments for yourself.
Look through the pattern books in fabric stores for ideas. Try the suggested ideas listed here: pullover top/shirt wrap-around skirt pull on skirt (may be reversible) pull on pants/shorts vest (unlined) It is recommended that you take this project for one year
and then take Clothing - Level II. When planning your project:
Look for firm, medium-weight, woven fabric. Choose a pattern without a collar and set-in-sleeves. Choose a pattern that is sleeveless or one that featu res an easy sleeve such as raglan, cap or kimono. Start with easy patterns: Quick and Easy, Jiffy, Super Quick, Fast and Easy, etc.
3

Plain Fabric
Figure Fabric
ACTION IDEA. After you have made two of the easier kinds of garments, why not try something else? How about:
- Pants with drawstring waist One- or two-piece dress
- Robe or pajamas - Nightgown - Jumper
FABRIC FOR YOUR PROJECT A good fabric choice will help make your project a suc-
cess. When you buy, look for: Medium-weight woven fabric that will sew and press smoothly. Firm fabric that will not slip when you sew. Fabric that is colorfast and has been treated for shrinkage. Solid color or a small, overall print.
Plaids and stripes are more difficult fabrics to work with because the design must be matched. They are not to be used in Clothing - Level I.
Buy notions such as thread, and buttons when you buy the fabric. You will be able to match colors and have the notions when you need them. When selecting colors to match, select items one shade darker as they will appear a little lighter when used.
Before you begin to sew, pretreat the fabric according to the care label directions usually found on the end of the bolt. Be sure to write this information down on a 3x5 card, and attach a fabric sample, and file it for future reference.
ACTION IDEA. Start a Fabric File Box. Attach sample pieces of purchased fabric to 3x5 cards. Write down the fiber content, care method, any shrinkage and fabric finishes for each piece. Refer to the card when the garment needs washing.
PICKING A PATTERN The right pattern size is very important. Even if your mea
surements are not identical with the pattern size, fewer changes will be needed if you get the correct size. Instructions for finding your pattern size are given in pattern catalogs.
Patterns Come in Many Different Figure Types Pattern types for girls/women depend upon height, back
waist length, and body development. They are : Girl's Misses Young Junior/Teen Half Size Junior Women's
4
The types of boys/men are based on height and body build:
Boy's Men's Teen Boy's
Have someone take your measurements over whatever undergarments you will be wearing. Tie a string around your waist to find your natural waistline. While measuring, the tape measure should be comfortably snug, but not tight. Stand tall, but do not hold your breath while being measured.
Measure the following for girls: height, bust, waist, hips, and back waist length. For boys measure: height, chest, neck, sleeve length, waist, and hips (seat).
You are now ready to find out your pattern size. Compare your measurements to the standard measurements in the pattern catalog charts. For girls, use your height and back waist measurement to determine which figure type you match most closely. Select the size with measurements closest to your measurements.
GUYS GALS
NECK, around neck base
CHEST, around fullest part
WAIST, at natural waist
HIPS, around fullest part
SLEEVE, LENGTH, from center base of neck, over shoulder and best elbow to wrist
HEIGHT, from top of head, against wall, without shoes
Personal Measure
ment
Pattern Measure
ment
5
BUST, around fullest part
WAIST, at natural waist
HIPS, around fullest part
BACK WAIST, prominent bone at back of neck or waist
HEIGHT, from top of head, against wall, without shoes
Personal Measure
ment
Pattern Measure
ment

Comfort Ease
Design Ease
Body Measurements Are Not Pattern Measurements Because we need room to move in our clothing, the paper
pattern is larger than our body measurements. This additional room is called ease or "wiggle room." There are two types of ease: comfort and design. The amount of ease needed varies with the part of the body, the kind of fabric used, and how tight or loose you want the clothes to fit. Ease varies from pattern to pattern and closeness of fit changes from season to season.
Comfort ease is the amount of room needed in a garment for comfort. The amount of comfort ease varies with pattern companies.
Design ease is the extra amount of room needed to create a particular style or design. Pleats, gathers and flares are commonly used to add design ease.
Using these charts, find your body measurements, the pattern measurements, and see if your pattern needs to be adjusted for a better fit. Your leader will help you make adjustments before you cut out the pattern.
Using A Pattern Once you have chosen your pattern, study its three main
parts: The envelope front shows sketches or photographs of fin
ished garments. It also shows different views (ways the pattern can be made). Look at the pictures carefully to see how the garment is supposed to fit and what fabrics would work well for the design. The brand name, pattern number, figure type and size are also included on the front of the envelope.
The back of the envelope has more information: - Diagrams of the back view of the garment.
A description of the design. Yardage required for the various pattern views and fabric widths.
- A list of suggested fabrics and notions. - Sketches of individual pattern pieces. - Number of pattern pieces included. - Finished garment measurements.
Advice for special fabrics. - Standard body measurement charts.
ACTION IDEA. Do the "Envelope Please" exercise in the back of this manual.
The direction or guide sheet tells you how to lay out the pattern and how to sew the garment together. It gives:
- Instructions for preparing fabric. - The pattern pieces needed for cutting each view. - Cutting layout for different views, fabric width and
6
sizes. Directions for marking the pattern. Pictures and step by step directions to show you how to
sew. Read the direction sheet all the way through before you
begin to sew. The pattern pieces have a special language of their own.
Look over the pieces and learn all the symbols and t~rms before you begin to use the pattern. Be able to recogmze: - General markings:
adjustment lines center front and center back lines place on fold of fabric cutting lines grainline markings identification markings for the pattern piece
- Construction markings: arrows dots for matching seams buttonholes gathering and easing lines darts lines for pocket, and trim clip lines placement lines for pleats or tucks fold lines seam lines notches for matching pattern pieces
After studying the pattern you are ready to begin.
ACTION IDEA. Do the "Pattern Markings Crossword Puzzle" and the "Pattern 10" found in the back of this
manual.
Preparing The Fabric for Cutting . Wash the fabric in the same way the finished garment Will
be washed. Preshrink interfacings, tapes or trim. (See SEWING BASICS, on shrinking interfacing.)
Using the Pattern . 1 ) Look at the pattern guide and circle the style or v1ew
you plan to make. Then circle the layout plan for that style, your size and width of fabric. . .
2) Carefully read the guide sheet - especially the f1rst page which will have lots of information ~o help ~ou sew.
3) Be sure fabric is on straight of gram. Straighten the crosswise ends as well as the entire piece of fabric. Refer to Sewing For Fun - Grain Perfect Fabric or see NebGuide HEG 83-173 "Follow That Grainline."
4) Fold fabric with right sides inside for easier marking. Pin the tissue pieces to the fabric by following the layout
you circled on the direction sheet. Place pins abo~t ~very four inches at right angles to the edge. Check the gramhne of each piece. Measure with a tape measure or ruler from
7
4"
--I
I
~ jl II II '. I I I I
~ \ I I I I
4"
.,. ·~ 14'
' Pin at right angles 4 inches apart.

Fiber
Yarn
Fabric
"straight of grain arrow" marking on pattern to selvage to be sure all pieces are straight with the grain of the fabric. Have your leader or parents look at your layout before you cut.
Cutting needs to be done carefully so seams will match and be smooth. Be sure your shears are sharp and cut easily. A smooth cutting edge is made by cutting with long even strokes. Be sure to cut on the cutting line and cut out around notches. Pinking shears are not used for cutting out fabrics. They are a finishing shear. Walk around the cutting so you will be as close to the fabric being cut as possible.
Pattern markings can be transferred to the fabric in different ways. Test different methods on a small piece of fabric to see if they work and if you can remove them when you are done. Choose the method that is best for the fabric and easiest for you. Some ways to transfer markings are:
tracing wheel and carbon paper tailor's chalk tailor's tacks marking pens pins
FROM FIBER TO FABRICS Fabrics are made from fibers. Fibers are fine hair-like
strands that are twisted together to make yarns. Yarns are then woven or knitted into fabric.
There are many different types of fibers. They are natural or synthetic. Natural fibers come from nature - plants and animals. The plant fibers are cotton from the cotton plant and linen from the flax plant. The animal fibers are wool from sheep and silk from silk worm cocoons. These fibers absorb moisture and are usually more comfortable to wear than synthetic fibers.
The synthetic fibers are those which chemists have developed from chemicals in test tubes. Each group of synthetic fibers has a "generic" or family name. Generic name fibers you may be familiar with include nylon, polyester, acrylic, rayon and spandex. These fibers are generally wrinkle resistant and quick drying so are easier to care for than natural fibers.
Fabrics can be made from only one fiber or can be made by blending two or more fibers together. The label on the end of a bolt of fabric may read 100% cotton. If the fabric is made of two fibers, the bolt may read 65% cotton, 35% polyester.
All garments and bolts of fabric are required by law to contain a label that identifies the fiber content. When shopping for fabrics or buying a garment look for the fiber content
8
label. Look for care labels in ready-to-wear and on the ends of bolts of fabric.
A label may read Orion acrylic, Dacron polyester or Lycra spandex. The first name you read is called a tradename. Tradenames are names given by fiber manufacturers to specifically identify the synthetic fibers they produce.
ACTION IDEA. Collect samples of each natural fiber, mount them on the paper in back of manual titled "Fabric Facts". Try to find samples of the synthetic fibers and mount them, too.
Find a fabric blend; mount and label the percentage of blend.
THE SEWING MACHINE As you continue to sew, you will learn more about the
sewing machine. Sewing machines have various attachments. The presser
foot is one attachment that can be removed and replaced with a different attachment. A zipper foot is used when you put in a zipper. A buttonhole foot is used when making buttonholes. See the machine manual for other attachments.
The sewing machine may have special stitches besides the zigzag stitch. Use the sewing machine manual to learn how to adjust the machine for these special stitches. Practice on scraps of fabric.
Always sew with a sharp needle. A size 11 or 14 needle is the most often used. A burr on the end or a dull point can damage the fabric.
Clean the machine when you are finished sewing. Lint collects in the bobbin area and needs to be brushed out. Wipe the head of the machine with a damp cloth to keep it clean.
WHAT DOES A GOOD MACHINE STITCH LOOK LIKE? Before you sew on your garment, check the machine
stitch on a small doubled piece of fabric you will use. If the stitch is not balanced, the seams will not hold.
Look at the stitching you have done. If it is too tight the fabric will pucker. If it is too loose, there will be spaces between the two pieces of fabric when you spread them apart. The stitch should look the same on both sides. If not, the tension on the machine isn't right. Ask your leader or parent to make a tension adjustment on the machine.
THE SERGER MACHINE A serger machine stitches, trims and overcasts all in one
operation. The appearance of a serged seam is the same as that used by ready-to-wear manufacturers of clothing.
9
Upper Tension Too Loose.
Upper Tension Too Tight.
Balanced Tension
Serger Sewing Machine

Serger Cone of Thread.
Serger Tension 3-Thread Overlock.
3/4-Thread Overlock.
The purpose of this type of machine is primarily to stitch seams and finish raw edges. It has the advantage of speed and stitch quality on various fabrics.
A serger machine is a companion to the conventional sewing machine. A serger can not be used for "inside" areas such as putting in a zipper or a dart.
There are 2-, 3-, and 4-thread sergers. The more popular ones are the 3- and 3-4 thread models. A three-thread is used for seams that require maximum stretch and resiliency. The three-four thread is used for seams requiring hard wear or stress and frequent washings.
Use high-quality serger thread that comes on cones since the serger uses more thread in a serged seam. This type of thread provides fineness for more delicate finishing, strength, cross-winding for smooth top feeding, larger quantities, and economy.
Read the manual that comes with the serger to become familiar with the threading of the machine, types of sewing machine needles and the tension.
A balanced tension on the serger is needed on the needle and looper threads for stitch formation. The needle thread should be smooth on the right side and just show with no loops on the wrongside. The looper threads should be interlocked on the edge of the fabric, not have long loops, pull to one side or cause the fabric to curl inside the stitching.
SEWING BASICS
Set Up a Sewing Area Sewing is easier if you have everything in one place. Set
up a sewing area with: - Sewing machine and chair. - Your sewing tools. - A good light. - A wastebasket. - An ironing board and iron.
Organize Your Work The unit method is an organized way of assembling a gar
ment. Each garment piece cut is a unit. Complete some instructions within each unit before combining separate units to form larger ones. This is a faster way to work and each section of the garment is handled less.
As you sew, follow your pattern instructions. Check off each step as it is completed. Remember the things you learned in Sewing For Fun. Ask your leader for help with things that are new. Also, look in a commercial sewing book.
10
) }
STAY STITCHING The guide sheet will tell you to stay stitch. Stay stitching
is a row of regular length machine stitching placed 1 /8" inside the seam line. This is 1 /2" from the cut edge. This line of stitching keeps curved and slanted or bias · edges from stretching out of shape. Stitch through one thickness of fabric with matching thread.
In stay stitching, stitch with the grain. Many pattern pieces have arrows showing the direction to stitch. A simple way to recognize the direction is to compare stroking fabric to stroking a cat. When you stroke on grain, both a eat's fur and fabric lie smooth. When you stroke against the grain, a eat's fur bristles, and fabric yarns fray. Refer to NebGuide "Follow That Grainline".
INTERFACING Most patterns suggest an interfacing. Interfacing is a layer
of fabric placed between the garment fabric and the facing. Interfacing should add shape and support without changing the character of the fabric. Facings, waistbands, and buttonhole areas are some areas that may need to be supported with an interfacing.
There are two general types of interfacing. They are called sew-in and fusible. Sew-in interfacings are stitched into a garment. Fusibles are fused to a garment with heat, pressure and steam of an iron.
Always preshrink interfacings before inserting them in a garment. Preshrink sew-ins by laundering them with the fashion fabric. Fusibles should be placed in warm water for 1 0 minutes, rolled in a towel to remove excess moisture and laid flat to dry.
Your leader will help you decide if your garment needs an interfacing.
ACTION IDEA. Apply three different weights of fusible interfacing to the same fabric. Observe how the interfacing reacts to the fabric.
PRESSING Press as you sew to shape your garment. Pressing is not
ironing. Pressing is lifting and lowering the iron in the garment area to be pressed.
- Test a small piece of fabric to find the best pressing temperature. This temperature is determined by fiber content and fabric finish.
- Press with the grain of fabric. - Press each seam and construction detail before sewing
to another piece.
11
Stay Stitching
Against the Grain
With the Grain
Pressing is lifting and lowering the iron in the garment area to be pressed.

Inward Curve
Grade a seam allowance by holding your shears horizontally.
Crotch Seams
Understitching
- To avoid marking the fabric, do not press over pins or basting threads.
SEAMS In Sewing For Fun, you learned about making plain seams.
It is important to have good stitching with matching thread. The seam allowances should be even, flat and smooth. When pressing seams, first press the stitching line in the direction you sewed. Then press the seam open.
Enclosed seams need to be trimmed and graded to remove bulk. Grading means to trim all seam allowances within the one seam to different widths. Grade a seam allowance by holding your shears horizontally. Generally the shortest seam allowance is to the inside and the longest is to the outside of the article or garment. Curved seams need to be clipped or notched to lie flat. Inward curves are clipped; outward curves are notched or wedged.
UNDERARM AND CROTCH SEAMS Underarm and crotch seams need to be reinforced but
should not be clipped. Trim to 1 /4" below notches. Reinforce the curve with a second row of stitching 1 /4" away from the first.
SEAM FINISHES A seam finish can prevent raveling and give a neater ap
pearance to the inside of the garment. Your leader will discuss suitable seam finishes with you and help you decide which one to use. Refer to NebGuide HEG 81-14 7 "Seam Finishes".
ACTION IDEA. Make a notebook of seam finishes using the NebGuide "Seam Finishes".
UNDERSTITCHING This line of stitching keeps the edge of the facing or the
underside of a collar or cuff from rolling to the right side of the garment. Understitching goes through the facing or undercollar and all the fabric layers in the seam allowance. It's done from the right side after all the layers are trimmed, graded, clipped or notched. A Fact Sheet "Understitching" is available from your local Extension office.
FACINGS Facings should be flat, smooth and free from bulk. Under
stitch the seam to keep it from rolling. Tack the facing at seams and darts by hand or machine. The cut edge of the facing may be finished in different ways to prevent raveling.
12
See your pattern guide sheet for suggestions. (Example, pink and stitch, turn and stitch, etc.)
HEMS Hems may be put in by machine or by hand. When hem
ming by hand, use a single thread and make an evenly spaced stitch that does not show on the outside. Seams in the hem should be pressed open and trimmed. Extra fullness should be eased in. Hem width may vary with the fabric or style of the garment, but it should be even.
Machine stitched hems are quick and durable and often provide a decorative touch. The stitching may be either straight or a decorative stitch. Refer to NebGuide HEG 80-11 9 "Hems for Garments".
ACTION IDEA. Practice putting in a hem by hand on a sample. Try to keep your stitches from showing on the right side.
YOU AND YOUR APPEARANCE Good grooming means making yourself as neat and clean
as can be. It only takes a few minutes each day. Follow these steps to keep yourself neat and clean.
- Take a bath or shower every day. - Use a deodorant. - Wear clean undergarments daily. - Shampoo your hair often and have it trimmed as need-
ed. - Brush your teeth regularly. - Keep hands and fingernails clean. - Keep all your nails the same length. - Remember to trim toenails straight across.
Get plenty of rest and exercise. - Eat a variety of foods everyday:
fruits and vegetables milk and milk products meat and meat substitutes whole-grain or enriched breads and cereals.
Remember to wear a smile. A smile is a funny thing. You can give it away as often as you like and still have one left.
CLOTHING CARE When you spend time sewing clothes, you also want to
take good care of them. This will keep your clothes looking new and ready to wear.
- Always hang up your clothes after wearing. - Put soiled clothes in a laundry hamper, basket or bag. - Let parents/leader know if there are stains on your
clothes.
13

PIVOT FOR FULL TURN
8 8:)D G 0
I I I I I I I I I I I I I I I I I I I I I I I I
CJ
I
(j Step
~ I I I I I I I I \ a 8o
Start
- Empty your pockets before you put the clothes in the wash.
- Sew on buttons when they fall off so you don't lose them.
- Repair broken seams before wearing again. Wash clothes before they get too dirty.
- Fold and put away clean clothes. - Clean and put away your shoes when you take them off. Saying "I haven't a thing to wear" may mean you haven't
anything to wear that doesn't need washing, repairing, or pressing. Learn to give your clothes the tender, loving care they need to look nice and last a long time.
Get Organized - Collect enough hangers for all your clothes. Hang them
up after wearing or put soiled clothing in the laundry. - Keep your folded clothes neatly in drawers.
Clean and put away your shoes when you take them off. You may want to use a shoe bag, shoe rack, or shelf with boxes.
Repairs - Repair popped seams, and redo broken hems before
wearing the garment again.
MODELING TIPS When your garment is finished, you are ready to show
others what you have made. If you have good posture, poise and confidence, you'll do a better job of showing your friends and others your finished projects. Read the following suggestions, then learn to relax and enjoy every minute of "showing off."
- Practice good posture. Stand tall with your head erect, chest and rib cage high, stomach flat and knees relaxed . Keep your weight balanced on both feet . Relax arms at your sides.
- Walk smoothly. Keep the top of your body straight. Your legs, not your head, should lead as you walk. Pause with your feet in a "T" position as shown; right foot forward, weight on left foot.
- Learn how to turn slowly and smoothly so that garment details can be seen when you are in the fashion revue. To pivot, step forward with your right foot, make a half turn to the right by bringing your left foot around. Your back will be to the audience. Step forward again with right foot, bringing left foot around . You will now be facing the audience and will have completed a full turn.
14
- Practice walking with good posture. Smile. A warm, happy smile can make you feel better and can be a personal greeting to the people you meet.
ACTION IDEA. Practice modeling in your completed 4-H outfit and accessories before you model for the Fair judge.
HOW DO YOU RATE?
Now that you have completed your projects, take a good look at them. Answer the following questions:
1 . Do you like the style? 2. Do you like the color? 3. Do you like the way it fits? 4. Was it hard to sew? 5. Does it look well sewn? 6. Is it well pressed? 7. Can you wear it many places? 8. Does it go with your other clothes? 9. Is it easy to take care of?
FOR MORE HELP WITH YOUR PROJECT
• Ask your parents • Ask your leader • Look at your sewing machine use and care manual • Look at any commercial sewing book • Refer to the following NebGuides:
HEG 81-14 7 "Seam Finishes" HEG 80-119 "Hems for Garments" HEG 83-1 73 "Follow That Grainline"
• Refer to the following Fact Sheet: 3.9 "Understitching"
15
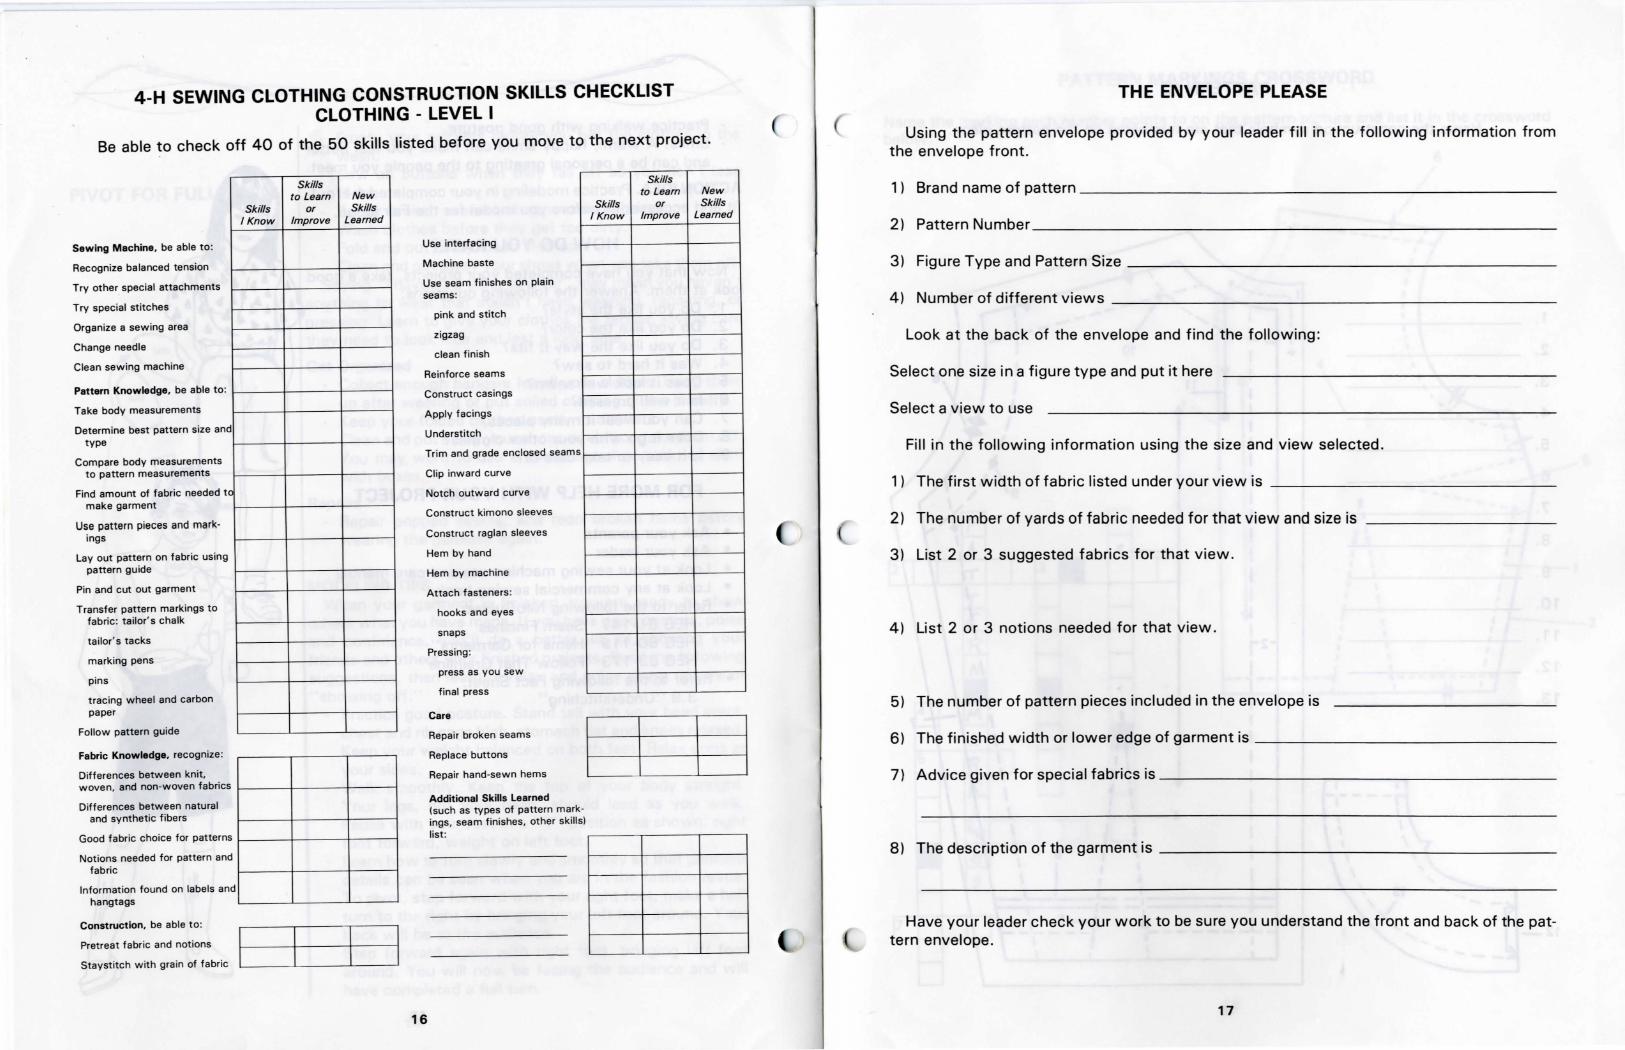
4-H SEWING CLOTHING CONSTRUCTION SKILLS CHECKLIST CLOTHING - LEVEL I
Be able to check off 40 of the 50 skills listed before you move to the next project.
Sewing Machine, be able to:
Recognize balanced tension
Try other special attachments
Try special st itches
Organize a sewing area
Change needle
Clean sewing machine
Pattern Knowledge, be able to:
Take body measurements
Determine best pattern size an d type
Compare body measurements t o pattern measurements
Find amount of fabric needed t make garment
Use pattern pieces and markings
Lay out pattern on fabric using pattern gu ide
Pin and cut out garment
Transfer pattern markings to fabric: tailor' s chalk
tailor ' s tacks
marking pens
pins
tracing wheel and carbon paper
Follow pattern guide
Fabric Knowledge, recognize :
Differences between knit,
0
Skills to Learn New
Skills or Skills /Know Improve Learned
woven, and non-woven fabrics ~---+----+-----1
Differences between natural and synthetic fibers
Good fabric choice for patterns f-----+---+----1
Notions needed for pattern and fabric
Information found on labels and hangtags
Construction, be able to :
Pret reat fabric and notions
Staystitch w ith grain of fabric
Use interfacing
Machine baste
Use seam finishes on plain seams:
pink and stitch
zigzag
clean finish
Reinforce seams
Construct casings
Apply fac ings
U nderstitch
Trim and grade enclosed seams
Clip inward curve
Notch outward curve
Construct kimono sleeves
Construct raglan sleeves
Hem by hand
Hem by machine
Attach fasteners :
hooks and eyes
snaps
Pressing :
press as you sew
final press
Care
16
Repair broken seams
Replace buttons
Repair hand-sewn hems
Additional Skills Learned (such as types of pattern markings , seam finishes, other skills) list :
Skills to Learn New
Skills or Skills /Know Improve Learned
I I I I
THE ENVELOPE PLEASE
Using the pattern envelope provided by your leader fill in the following information from the envelope front.
2) Pattern Number ___________________________ _
3) Figure Type and Pattern Size-----------------------
4) Number of different views -------------------------
Look at the back of the envelope and find the following:
Select one size in a figure type and put it here
Select a view to use
Fill in the following information using the size and view selected.
1) The first width of fabric listed under your view is
2) The number of yards of fabric needed for that view and size is
3) List 2 or 3 suggested fabrics for that view.
4) List 2 or 3 notions needed for that view.
5) The number of pattern pieces included in the envelope is
6) The finished width or lower edge of garment is-----------------
7) Advice given for special fabrics is----------------------
8) The description of the garment is ----------------------
Have your leader check your work to be sure you understand the front and back of the pattern envelope.
17

1.
2.
3.
4.
5.
6.
7.
8.
9.
10.
11 .
12.
13.
12-
PATTERN IQ
Name the construction symbols that are numbered on the pattern piece.
I I ,----' I I I
' I ' I I
13 I ~/
/
,""
-/ ~-
/ -/ \-- ---l 10 I -
_!1
--3
' ' \ \ \ ~
9/ ', ,I J.' I I I I I I I I I I
21 I I I I I I I
~ I I\ I
I I I I I
I l I
' ' I t ~ I ' ' 4-1 I I t \ I ' ' 6 I l ~ I :
t::::t=====:- -' I - ,--· J_ ------• t--:s __ ,_
f 6 1 I I I
18
PATTERN MARKINGS CROSSWORD
Name the marking each number points to on the pattern picture and list it in the crossword below:
7
, , "
, , ,
I I ,
4
\
, I'
I~ I \ I \ I \
' ' I \ 4 • I \
' ' ' ' ' ' ' ' ---- _____ ,
19
-· ------.. --- ...... -- ...
5
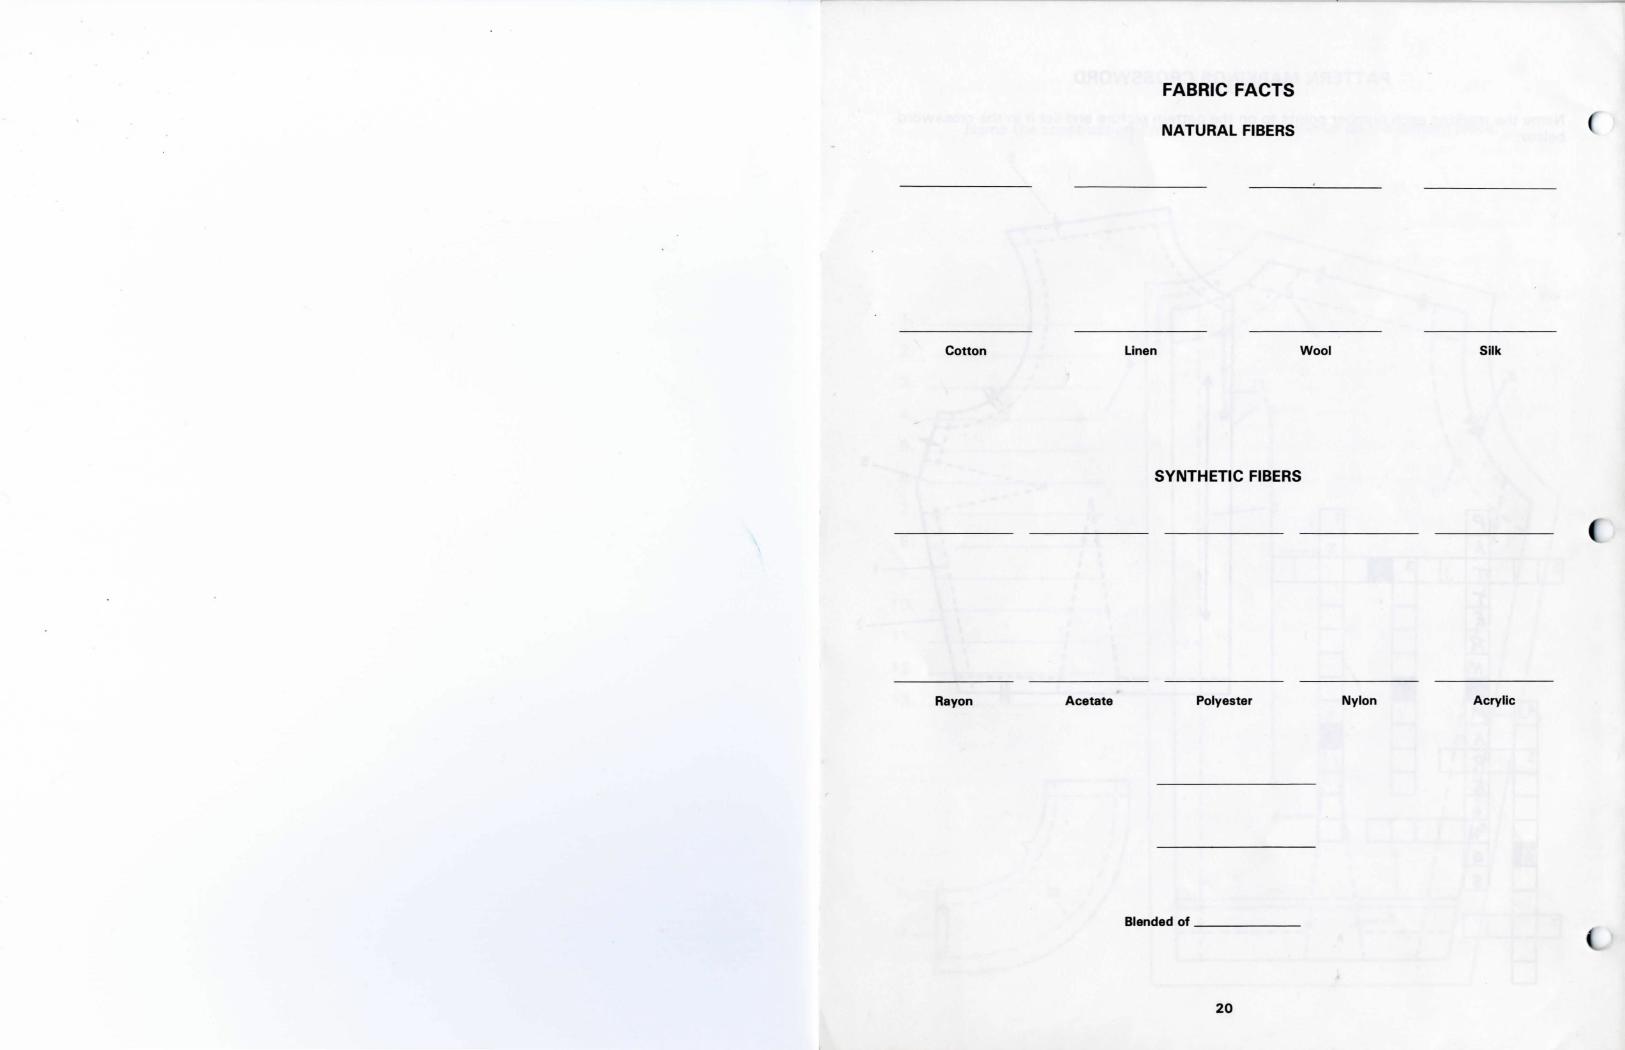
Cotton
Rayon Acetate
Linen
FABRIC FACTS
NATURAL FIBERS
Wool
SYNTHETIC FIBERS
Polyester
Blended of _____ _
20
Silk
Nylon Acrylic