Embed Size (px)
Citation preview

eircom advantage executive phone programming guide
1
eircom advantage executive phone D3 user guide

eircom advantage executive phone D3 user guide
2
Specifications subject to change without notice. Facilities described may or may not be supported by your network.eircom advantage is the registered trademark of eircom business systems. This documentation refers to software version 56.330 Revision 1. DM 910

eircom advantage executive phone D3 user guide
3
Table of Contents
4. eircom advantage executive phone D3 user guides ...... 5
4.1 eircom advantage executive phone D3 overview ........................................ 5
4.1.1 Display .................................................................................................................................... 5
4.1.2 Navigation Keys ...................................................................................................................... 6
4.1.3 Function Keys ......................................................................................................................... 6
4.1.4 Dual Colour Lamps (LEDs) ..................................................................................................... 7
4.2 eircom advantage executive phone D3 user guide ..................................... 7
4.2.1 Answering a Call ..................................................................................................................... 7
4.2.2 Making a Call .......................................................................................................................... 8
4.2.3 Making an internal call using Off-hook dialling ....................................................................... 8
4.2.4 Making an internal call using On-hook dialling ....................................................................... 9
4.2.5 Making an internal call using an Extension key .................................................................... 10
4.2.6 Making an internal call using the Phone book ...................................................................... 11
4.2.7 Making an external call using Off-hook dialling .................................................................... 12
4.2.8 Making an external call using On-hook dialling .................................................................... 12
4.2.9 Making an external call using a Line key .............................................................................. 12
4.2.10 Making an external call using a Speed dial key ................................................................... 13
4.2.11 Making an external call using the Phone Book .................................................................... 13
4.2.12 Making an external call using the Redial Mouse Key ........................................................... 14
4.2.13 Making an external call by using the Redial code ................................................................ 15
4.2.14 Putting a Call on Hold ........................................................................................................... 15
4.2.15 Retrieving a Call from Hold ................................................................................................... 15
4.2.16 To switch between held calls using the HOLD Key ............................................................. 16
4.2.17 Using the Held Call List ........................................................................................................ 16
4.2.18 Abandoning a call on Hold .................................................................................................... 16
4.2.19 Transferring a Call ................................................................................................................ 17
4.2.20 Parking a Call using the mouse keys ................................................................................... 17
4.2.21 Parking a Call using the PARK key ..................................................................................... 17
4.2.22 Parking a Call using the Park code ...................................................................................... 18
4.2.23 To retrieve a parked call using the mouse keys ................................................................... 18
4.2.24 To retrieve a parked call using the Unpark softkey .............................................................. 18
4.2.25 To retrieve a parked call using the retrieve parked call code ............................................... 19
4.2.26 Call Park timeout .................................................................................................................. 19
4.2.27 Paging ................................................................................................................................... 20
4.2.28 Answering Page calls ........................................................................................................... 20
4.2.29 To Pick Up a Call Ringing at another Extension .................................................................. 21
4.2.30 Conference Calls .................................................................................................................. 22
4.2.31 To end a conference call ...................................................................................................... 22
4.2.32 Using the CONFERENCE Key: ............................................................................................ 23
4.2.33 To Divert Incoming Calls ...................................................................................................... 23
4.2.34 To Divert all Calls to an Extension ....................................................................................... 24
4.2.35 To Divert all Calls to Voice Mail ............................................................................................ 24
4.2.36 To Divert all calls to a Common or Personal Address Book entry ....................................... 25
4.2.37 To Divert all calls to an External Number ............................................................................ 25
4.2.38 To Divert on No Answer ....................................................................................................... 26
4.2.39 To Divert On Busy ................................................................................................................ 27
4.2.40 Do Not Disturb (DND) ........................................................................................................... 27
4.2.41 List of Calls ........................................................................................................................... 28
4.2.42 To view an entry in the missed call list ................................................................................. 28
4.2.43 To call back an entry in the missed call list .......................................................................... 29
4.2.44 To view the time and date of the missed call ....................................................................... 29
4.2.45 To store a missed call in the Personal Address Book .......................................................... 30
4.2.46 To delete a missed call from the missed call list .................................................................. 30
4.2.47 To view the Missed Calls list when there are no new missed calls ...................................... 31

eircom advantage executive phone D3 user guide
4
4.2.48 Using the Dialled Number List .............................................................................................. 31
4.2.49 Using the Received Call List ................................................................................................. 31
4.2.50 Call Back ............................................................................................................................... 32
4.2.51 Intrusion ................................................................................................................................ 33
4.2.52 Day / Night Changeover ....................................................................................................... 33
4.2.53 To set the Day/Night Ringing Mode ..................................................................................... 34
4.2.54 Day/Night Ringing key .......................................................................................................... 34
4.2.55 Roaming PIN ........................................................................................................................ 34
4.2.56 To change the profile of an extension using the roaming PIN ............................................. 35
4.2.57 Unsuccessful log in to Roaming PIN .................................................................................... 35
4.2.58 Programming the Personal Address Book ........................................................................... 36
4.2.59 Creating a new entry in the Personal Address book ............................................................ 36
4.2.60 To program the advanced options for a Personal address book entry ................................ 37
4.2.61 To Modify an existing entry in the Personal Address book .................................................. 38
4.2.62 To delete an entry in the Personal Address Book ................................................................ 39
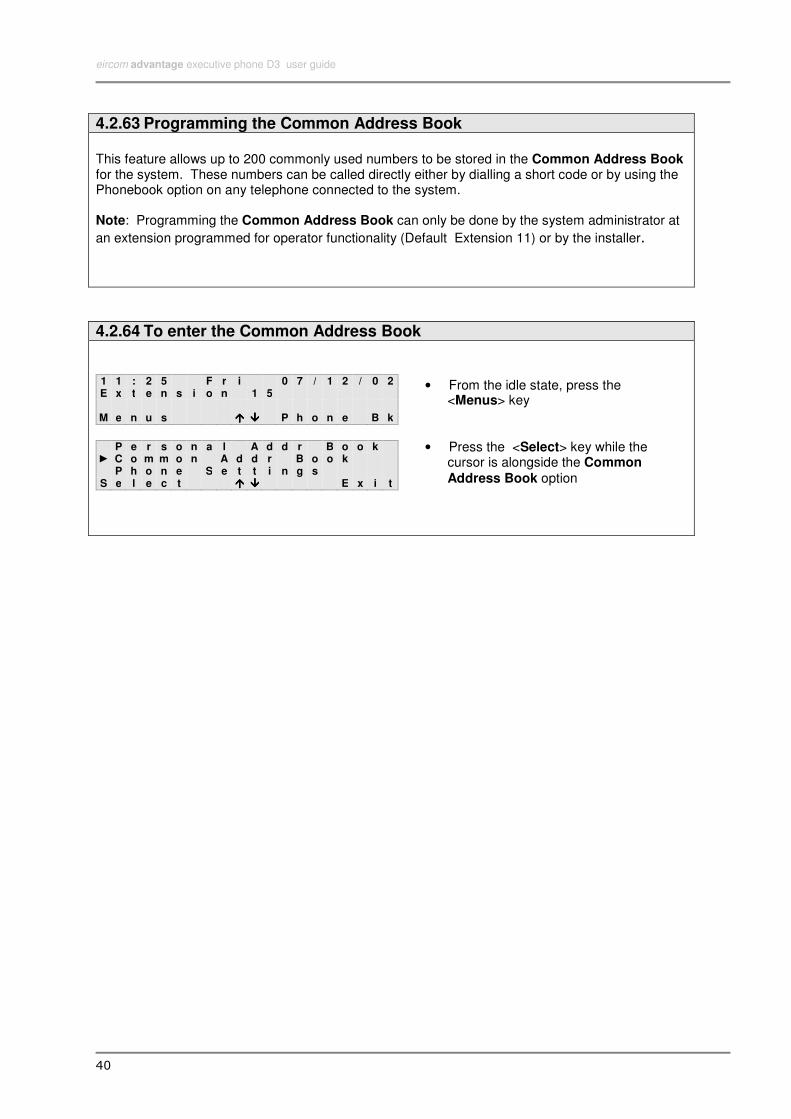
4.2.63 Programming the Common Address Book ........................................................................... 40
4.2.64 To enter the Common Address Book ................................................................................... 40
4.2.65 To Create a New Entry ......................................................................................................... 41
4.2.66 To Modify an entry in the Common Address Book ............................................................... 41
4.2.67 To delete an entry in the Common Address Book................................................................ 42
4.2.68 Door Phone........................................................................................................................... 43
4.2.69 Dialling Code Table .............................................................................................................. 44
4.3 eircom advantage executive phone programming guide ............................ 45
4.3.1 General ................................................................................................................................. 45
4.3.2 Phone Settings ..................................................................................................................... 46
4.3.4 Handset Volume ................................................................................................................... 47
4.3.5 Speaker Volume .................................................................................................................. 47
4.3.6 Headset Volume .................................................................................................................. 48
4.3.7 Display Contrast ................................................................................................................... 48
4.3.8 Change Language ................................................................................................................ 49
4.3.9 Define Function Key ............................................................................................................. 49
4.3.10 Redefine Keys ...................................................................................................................... 50
4.3.11 Keypad tones ........................................................................................................................ 51
4.3.12 Phone Software .................................................................................................................... 51
4.3.13 Receive Page Call ................................................................................................................ 51
4.3.14 Show Number ....................................................................................................................... 52
4.3.15 Change PIN Code ................................................................................................................ 53

eircom advantage executive phone D3 user guide
5
4. eircom advantage executive phone D3 user guides
4.1 eircom advantage executive phone D3 overview The eircom advantage Executive Key Set is a full hands free display telephone, designed specifically for use with the new generation eircom advantage voice and data switches. This phone, which can be either desk or wall mounted, supports headset operation allowing an increased degree of freedom for more intensive users of the system.
The executive D3 telephone has a 4 line 20-character, backlit display and associated navigation keys which guide the user through the use and programming of the system and of the phone.
4.1.1 Display Display prompts provide assistance to the user when operating or programming the telephone and the system. When the system phone is idle, the display shows the time, day and date on the top line, the extension number on the second line and the function of the context sensitive navigation keys on the fourth. The third line (normally blank) is used to display additional information.
Earpiece
Handset
Speaker
Mouthpiece
Programmable
Keys (x16)
Microphone
Dial Pad Keys
Fixed Function Keys (x6)
Navigation Keys
Display
Ringer lamp

eircom advantage executive phone D3 user guide
6
4.1.2 Navigation Keys The Executive System Phone D3 allows call control and programming operations to be performed quickly and intuitively using the phone display and the context sensitive navigation keys.
4.1.3 Function Keys The system phone has 16 programmable function keys, 6 fixed function keys, 4 context sensitive display-associated keys, a green speaker (off hook) key and a red on-hook or return to root key. The user can program the 16 programmable function keys with speed dials or other functions. The 6 fixed function keys cannot be altered.
Programmable Function Keys The factory settings of these keys are set as 6 LINE KEYS, 6 EXTENSION KEYS, 2 SPEED-DIAL KEYS, CONFERENCE and PICK-UP. Fixed Function Keys These keys provide single touch access to the most commonly used features of the system:
MESSAGE for voice mails and missed calls
MUTE disconnects microphone for secret consultation
REDIAL for any of the last 10 numbers
PARK a call for pick-up elsewhere
DIVERT to forward calls
HOLD to allow enquiry and transfer
Press the on-hook
key to return to root menu or to end current call.
Use ↑↑↑↑↓↓↓↓ keys
to scroll through
the options.
Press the speaker
key for handsfree operation.
Press the Upper left key to enter Menus
Press Upper Right key to enter Phone Book
Ringer Lamp

eircom advantage executive phone D3 user guide
7
4.1.4 Dual Colour Lamps (LEDs) Each function key has a red and a green lamp. Green is associated with this phone. Red is
associated with other users of the system. Fast flashing denotes ringing, slow flashing is for a
held or parked call and continuously ‘on’ means an active call.
4.2 eircom advantage executive phone D3 user guide By simply using the context sensitive navigation keys and following the prompts shown on the display, the user can access most of the features of the executive system phone D3.This section of the guide however provides more detailed instructions on how to operate the executive system phone. Throughout this and the following sections, the function of the left and right navigation keys will be shown in brackets, e.g. <Menus>. The fixed function keys will be shown in bold, e.g. SPEAKER .
Note: At installation, extension 11 is set as the default operator enabled phone.
4.2.1 Answering a Call
Incoming calls to the executive system phone are indicated in several ways -
− The Phone rings and the ringer lamp flashes
− The LED flashes on a Line or Extension key
− The LED alongside the SPEAKER key flashes
− The calling party is shown on the first line of the display E x t n 1 1 C a l l i n g
O p t i o n s ���� ���� A n s w e r
L i n e 1 C a l l i n g
O p t i o n s ���� ���� A n s w e r
Internal Call: The call can be answered by pressing the <Answer> or SPEAKER keys or by lifting the handset. External Call: The call can be answered by pressing the <Answer> or SPEAKER . keys or by lifting the handset.

eircom advantage executive phone D3 user guide
8
4.2.2 Making a Call The executive system phone allows the user to make an internal or external call in a number of different ways. Internal Calls
• Making an internal call using Off-hook dialling
• Making an internal call using On-hook dialling
• Making an internal call using an Extension key
• Making an internal call using the Phone Book External Calls
• Making an external call using Off-hook dialling
• Making an external call using On-hook dialling
• Making an external call using a Line key
• Making an external call using a Speed dial key
• Making an external call using the Phone Book
• Making an external call using the Redial Mouse Key
• Making an external call using the Redial key
• Making an external call using the Redial code
4.2.3 Making an internal call using Off-hook dialling 1 1 : 2 5 S a t 0 7 / 1 2 / 0 2 E x t e n s i o n 1 5
M e n u s ���� ���� P h o n e B k
I n t e r n a l D i a l l i n g
O p t i o n s ���� ���� C a n c e l
E x t n 1 8 R i n g i n g
O p t i o n s ���� ���� C a n c e l
E x t n 1 8 0 0 : 0 1 : 1 9
O p t i o n s ���� ���� E n d c a l l
With the telephone idle, to make an internal call, lift the handset or press the SPEAKER key. Internal dial tone will be heard and the display will show Internal Dialling. Dial the extension/group number required, e.g. 18.
The display shows the name/number of the extension/group being called and the status of the call, i.e. Ringing. This will change briefly to Connected when the called party answers, after which a call timer will be shown.
The call can be ended at any time by:
• Pressing the <Endcall> key
• Replacing the handset
• Pressing the ON HOOK key
Note: If the direct line seize feature is enabled for the extension, external dial tone will be heard when the extension goes off-hook, by pressing Hold you will hear internal dial tone.

eircom advantage executive phone D3 user guide
9
4.2.4 Making an internal call using On-hook dialling 1 1 : 2 5 S a t 0 7 / 1 2 / 0 2 E x t e n s i o n 1 5
M e n u s ���� ���� P h o n e B k
1 1 : 2 5 S a t 0 7 / 1 2 / 0 2 E x t e n s i o n 1 5 1 8
D e l e t e ���� ���� D i a l
E x t n 1 8 R i n g i n g
O p t i o n s ���� ���� C a n c e l
E x t n 1 8 0 0 : 0 1 : 1 9
O p t i o n s ���� ���� E n d c a l l
With the telephone idle, to make an internal call simply dial the extension/group number from the keypad. The number dialled will be shown on the third line of the display. The user can delete the last digit by pressing the left mouse key <Delete>. To initiate the call press Dial or pick up the handset or press the SPEAKER key.
The display shows the name/number of the extension/group being called and the status of the call, i.e. Ringing. This will change briefly to Connected when the called party answers, after which a call timer will be shown.
The call can be ended at any time by:
• Pressing the <Endcall> key
• Pressing the ON HOOK key
Note: If the direct line seize feature is enabled for the extension, then the system will attempt to make an external call as soon as the user initiates the call.
eircom advantage executive phone D3 user guide
10
4.2.5 Making an internal call using an Extension key E x t n 1 8 R i n g i n g
O p t i o n s ���� ���� C a n c e l
E x t n 1 8 0 0 : 0 1 : 1 9
O p t i o n s ���� ���� E n d c a l l
To make an internal call using an extension key, simply press the function key programmed for the extension you wish to ring. The display will show the ringing party on the first line and the extension key LED will flash. The phone is in handsfree mode. You can lift the handset at any time to exit handsfree mode.
The call can be ended at any time by:
• Pressing the <Endcall> key
• Replacing the handset or
• Pressing the ON HOOK key

eircom advantage executive phone D3 user guide
11
4.2.6 Making an internal call using the Phone book The executive system phone has access to three Address Books and by using the Phone Book feature you can make a call to any of the numbers stored in these lists.
Personal Address Book: Contains the numbers entered by the user at their extension using the System Phone. These numbers are only accessible from the extension at which they were entered. For details of how to create, modify and delete entries please refer to Section 4.1.16.
Common Address Book: Contains numbers common to all extensions on the system. The numbers are programmed by the operator ( Default extension 11). These entries are accessible from any of the extensions connected to the system. Alternatively, they can be programmed from
the eircom business systems remote maintenance centre. Extension List: Gives access to internal extensions and groups. 1 1 : 2 5 F r i 0 7 / 1 2 / 0 2 E x t e n s i o n 1 5
M e n u s ���� ���� P h o n e B k
P e r s o n a l A d d r B o o k C o m m o n A d d r e s s B o o k ► E x t e n s i o n L i s t S e l e c t ���� ���� E x i t
S e a r c h : ► E x t n 1 1 E x t n 1 2
S e l e c t ���� ���� B a c k
To make an internal call using the phone book, simply press the right mouse key labelled <Phone Bk > on the idle display. The user must specify the extension list,
by using the up & down arrow keys (↑↑↑↑↓↓↓↓) to point to Extension List and then pressing <Select>. The display will show a list of the extensions that can be dialled on the system. To dial the required extension
use the up & down arrow keys (↑↑↑↑↓↓↓↓) and then press <Select>, or you can dial the first letters of the extension name to jump to that entry
The call can be ended at any time by:
• Pressing the <Endcall> key
• Replacing the handset or
• Pressing the ON HOOK key
eircom advantage executive phone D3 user guide
12
4.2.7 Making an external call using Off-hook dialling
1 1 : 2 5 S a t 0 7 / 1 2 / 0 2 E x t e n s i o n 1 5
M e n u s ���� ���� P h o n e B k
I n t e r n a l d i a l l i n g
O p t i o n s ���� ���� C a n c e l
E x t e r n a l d i a l l i n g 8 1 6 6 9
O p t i o n s ���� ���� C a n c e l
Note: If the direct line seize feature is enabled, the user will hear external dial tone and the display will indicate external dialling as soon as the extension goes off-hook.
4.2.8 Making an external call using On-hook dialling 1 1 : 2 5 S a t 0 7 / 1 2 / 0 2 E x t e n s i o n 1 5
M e n u s ���� ���� P h o n e B k
1 1 : 2 5 S a t 0 7 / 1 2 / 0 2 E x t e n s i o n 1 5 0 7 2 4 0 3 0 5 1 1
D e l e t e ���� ���� D i a l
4.2.9 Making an external call using a Line key If one of the function keys has been programmed as a Line key, pressing this key will automatically seize the line and switch on the handsfree facility (you can switch off handsfree mode by lifting the handset). The required number can be dialled and the display will show the status of the call. The call can be ended at any time by either replacing the handset, pressing the ON HOOK key or <Endcall> key.
With the telephone idle, lift the handset or press the SPEAKER key. Internal dial tone will be heard and the display will show Internal Dialling.
• Dial the line access digit, the line access group or select a line using the pre-programmed keys. The top line of the display will then show External Dialling.
• Dial the number – the digits will appear on the display as they are
dialled. The user can cancel the external call and return to internal dialling by pressing <Cancel>.
With the telephone idle, to make an external call simply dial the line access digit or the line access group, followed by the external number from the keypad. The number dialled will be shown on the third line of the display. The user can delete the last digit by pressing the left mouse key <Delete>.
To initiate the call either press <Dial>, pick up the handset or press the SPEAKER key.
The call can be ended at any time by:
• Pressing the <Endcall> key
• Replacing the handset
• Pressing the OH HOOK key.
eircom advantage executive phone D3 user guide
13
4.2.10 Making an external call using a Speed dial key If one of the function keys has been programmed as a Speed Dial key, pressing this key will automatically seize the line, switch on the handsfree mode and dial the programmed number. The display will show the status of the call. The call can be ended at any time by replacing the handset or pressing the ON HOOK or <Endcall> key.
4.2.11 Making an external call using the Phone Book 1 1 : 2 5 F r i 0 7 / 1 2 / 0 2 E x t e n s i o n 1 5
M e n u s ���� ���� P h o n e B k
► P e r s o n a l A d d r B o o k C o m m o n A d d r e s s B o o k E x t e n s i o n L i s t
S e l e c t ���� ���� E x i t
S e a r c h : _ ► A N D R E W D A V E M
S e l e c t ���� ���� B a c k
Note : The Phone Book function may also be stored under a programmable key.
To make an external call using the phone book, simply press the right mouse key labelled <Phone Bk > on the idle display. The user must specify either the personal or common address book, by using the
up & down arrow keys (↑↑↑↑↓↓↓↓) and then pressing <Select>. The display will show a list of the address book entries that can be dialled on the system. To search for an entry, enter the first letter of the name. All entries starting with this character will then be displayed
To dial the required party use the up & down arrow keys (↑↑↑↑↓↓↓↓) and then press <Select>.

eircom advantage executive phone D3 user guide
14
4.2.12 Making an external call using the Redial Mouse Key The executive system phone can store details of up to the last ten external numbers dialled from the extension. Using the Redial Last Number feature allows the user to select a number from the list to redial.
1 1 : 2 5 F r i 0 7 / 1 2 / 0 2 E x t e n s i o n 1 5
M e n u s ���� ���� R e d i a l
D i a l l e d N u m b e r L i s t ► 0 1 . 6 0 9 3 3 3 2 4 3 0 2 . 6 9 6 6 7 7 7 1 3
S e l e c t ↑↑↑↑ ↓↓↓↓ E x I t
4.2.13 Making an external call using the REDIAL key
A call can be redialled as follows -
To redial the number the user can either, press the REDIAL key again, lift the handset, press the SPEAKER key or press <Select> twice, the system will then automatically select a line and redial the number.
Pressing the REDIAL key with the handset off-hook or with the handsfree mode activated automatically selects a line and redials the last number.
D i a l l e d N u m b e r L i s t ► 0 1 . 6 0 9 3 3 3 2 4 3 0 2 . 6 9 6 6 7 7 7 1 3
S e l e c t ↑↑↑↑ ↓↓↓↓ E x i t
A list of up to the last 10 external numbers dialled appears on the display, starting with the last number dialled.
To redial a number:
• At the idle display, press the
Up arrow key <↑↑↑↑> once, <Redial> will then appear on the display.
• Press the <Redial>key
• Move the cursor with the ↑↑↑↑↓↓↓↓ keys until it is alongside the number to be redialled
• Press the <Select> key twice or lift the handset to dial the entry or press the SPEAKER
key
Note: The <Redial> key will only appear if at least one external call has been made from the extension.
• Press the REDIAL key
while the System Phone is idle, the dialled number list will be shown on the display
• Use the ↑↑↑↑↓↓↓↓ keys to select the required number
eircom advantage executive phone D3 user guide
15
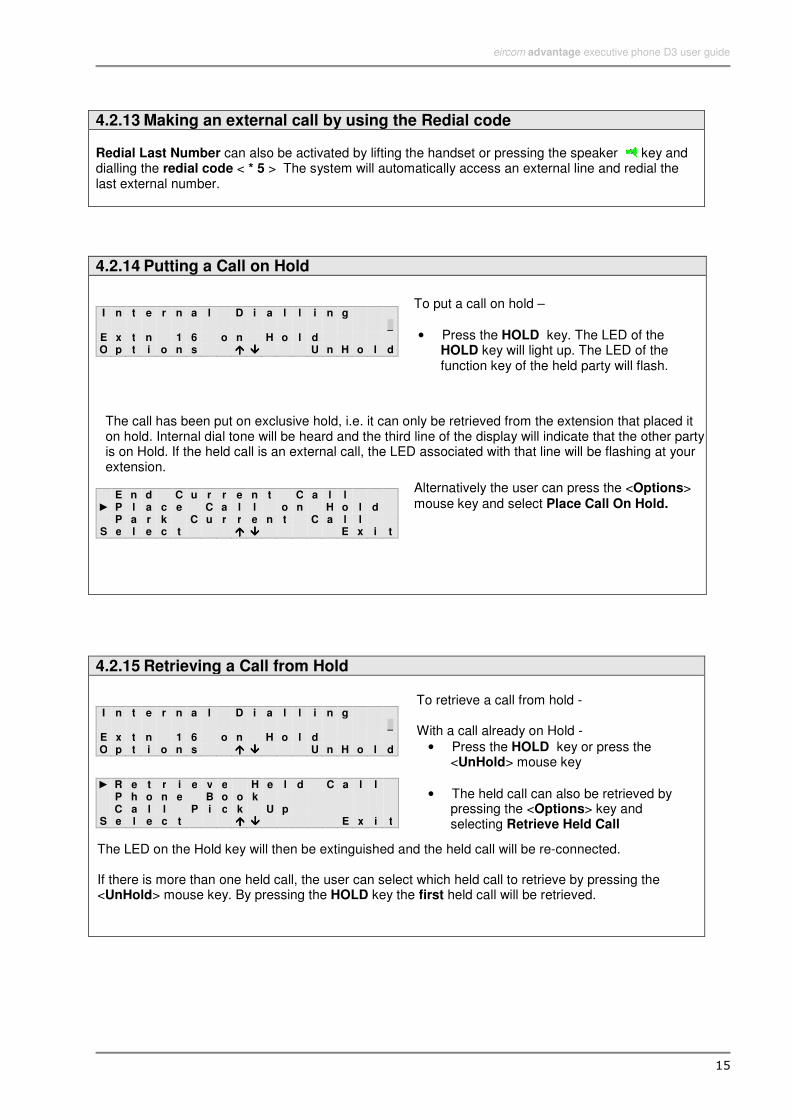
4.2.13 Making an external call by using the Redial code Redial Last Number can also be activated by lifting the handset or pressing the speaker key and dialling the redial code < * 5 > The system will automatically access an external line and redial the last external number.
4.2.14 Putting a Call on Hold
I n t e r n a l D i a l l i n g _
E x t n 1 6 o n H o l d O p t i o n s ���� ���� U n H o l d
E n d C u r r e n t C a l l ► P l a c e C a l l o n H o l d P a r k C u r r e n t C a l l
S e l e c t ���� ���� E x i t
4.2.15 Retrieving a Call from Hold
I n t e r n a l D i a l l i n g _
E x t n 1 6 o n H o l d O p t i o n s ���� ���� U n H o l d
► R e t r i e v e H e l d C a l l P h o n e B o o k C a l l P i c k U p
S e l e c t ���� ���� E x i t
To put a call on hold –
• Press the HOLD key. The LED of the HOLD key will light up. The LED of the function key of the held party will flash.
Alternatively the user can press the <Options> mouse key and select Place Call On Hold.
The call has been put on exclusive hold, i.e. it can only be retrieved from the extension that placed it on hold. Internal dial tone will be heard and the third line of the display will indicate that the other party is on Hold. If the held call is an external call, the LED associated with that line will be flashing at your extension.
To retrieve a call from hold - With a call already on Hold -
• Press the HOLD key or press the <UnHold> mouse key
• The held call can also be retrieved by pressing the <Options> key and selecting Retrieve Held Call
The LED on the Hold key will then be extinguished and the held call will be re-connected. If there is more than one held call, the user can select which held call to retrieve by pressing the <UnHold> mouse key. By pressing the HOLD key the first held call will be retrieved.

eircom advantage executive phone D3 user guide
16
4.2.16 To switch between held calls using the HOLD Key E x t n 1 8 0 0 : 0 0 : 5 2 E x t n 1 6 o n H o l d O p t i o n s ���� ���� E n d c a l l
I n t e r n a l D i a l l i n g _ 2 C a l l s o n H o l d O p t i o n s ���� ���� U n H o l d
4.2.17 Using the Held Call List H e l d C a l l L i s t ► E x t n 1 6 E x t n 1 8
S e l e c t ���� ���� E x i t
4.2.18 Abandoning a call on Hold If the system phone returns to idle when there is a call on hold, the held call will ring the extension as indicated below. E x t n 1 6 R e t u r n i n g F r o m H o l d
O p t i o n s ���� ���� A n s w e r
• Place the existing call on hold
• Make a second call e.g. an internal call to extension 18.
Once connected, this call can also be put on hold using any of the methods already described. Internal dial tone is heard and the display shows that there are now two calls on hold.
The display will show Returning From Hold. The call can be answered by pressing the <Answer> key, lifting the handset or pressing the SPEAKER key.
When more than one call is on hold, pressing the <UnHold> key displays a list of held calls.
• Use the ↑↑↑↑↓↓↓↓ keys to select the held call that you wish to retrieve.
• With the cursor alongside the call to be retrieved, press the <Select> key to speak to that caller.
• Press the HOLD key to return to the first call held.
To replace the first call on hold and return to the second call, press the HOLD key twice. This operation can be repeated to switch between the calls.
eircom advantage executive phone D3 user guide
17
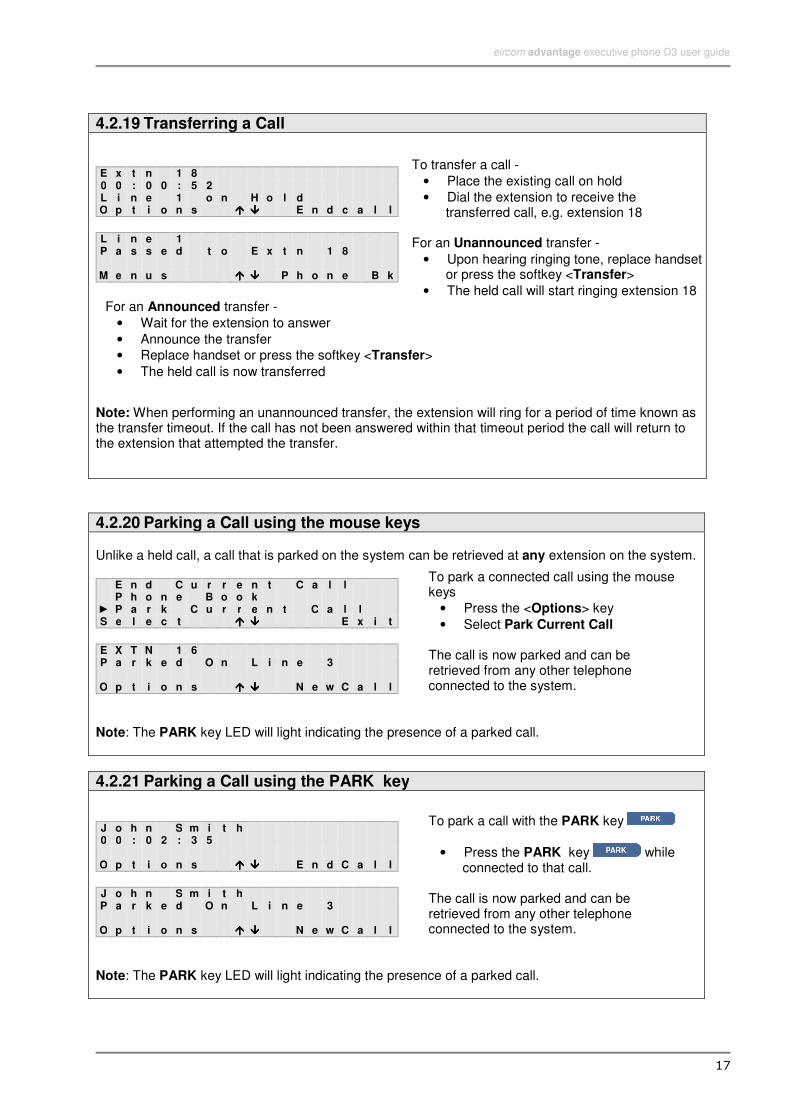
4.2.19 Transferring a Call E x t n 1 8 0 0 : 0 0 : 5 2 L i n e 1 o n H o l d O p t i o n s ���� ���� E n d c a l l
L i n e 1 P a s s e d t o E x t n 1 8
M e n u s ���� ���� P h o n e B k
Note: When performing an unannounced transfer, the extension will ring for a period of time known as the transfer timeout. If the call has not been answered within that timeout period the call will return to the extension that attempted the transfer.
4.2.20 Parking a Call using the mouse keys Unlike a held call, a call that is parked on the system can be retrieved at any extension on the system.
E n d C u r r e n t C a l l P h o n e B o o k ► P a r k C u r r e n t C a l l S e l e c t ���� ���� E x i t
E X T N 1 6 P a r k e d O n L i n e 3
O p t i o n s ���� ���� N e w C a l l
Note: The PARK key LED will light indicating the presence of a parked call.
4.2.21 Parking a Call using the PARK key J o h n S m i t h 0 0 : 0 2 : 3 5
O p t i o n s ���� ���� E n d C a l l
J o h n S m i t h P a r k e d O n L i n e 3
O p t i o n s ���� ���� N e w C a l l
Note: The PARK key LED will light indicating the presence of a parked call.
To park a connected call using the mouse keys
• Press the <Options> key
• Select Park Current Call The call is now parked and can be retrieved from any other telephone connected to the system.
To transfer a call -
• Place the existing call on hold
• Dial the extension to receive the transferred call, e.g. extension 18
For an Unannounced transfer -
• Upon hearing ringing tone, replace handset or press the softkey <Transfer>
• The held call will start ringing extension 18 For an Announced transfer -
• Wait for the extension to answer
• Announce the transfer
• Replace handset or press the softkey <Transfer>
• The held call is now transferred
To park a call with the PARK key
• Press the PARK key while connected to that call.
The call is now parked and can be retrieved from any other telephone connected to the system.

eircom advantage executive phone D3 user guide
18
4.2.22 Parking a Call using the Park code
I n t e r n a l D i a l l i n g _ 8 1 6 0 1 0 0 o n H o l d O p t i o n s ���� ���� U n H o l d
8 1 6 0 1 0 0 P a r k e d O n L i n e 3
O p t i o n s ���� ���� N e w C a l l
Note: The PARK key LED will light indicating the presence of a parked call.
4.2.23 To retrieve a parked call using the mouse keys 1 1 : 2 5 S a t 0 7 / 1 2 / 0 2 E x t e n s i o n 1 5
M e n u s ���� ���� U n P a r k
P a r k e d C a l l L i s t ► E x t n 1 6
S e l e c t ↑↑↑↑ ↓↓↓↓ C a n c e l
4.2.24 To retrieve a parked call using the Unpark softkey 1 1 : 2 5 S a t 0 7 / 1 2 / 0 2 E x t e n s i o n 1 5
M e n u s ���� ���� U n P a r k
P a r k e d C a l l L i s t ► E x t n 1 6
S e l e c t ↑↑↑↑ ↓↓↓↓ C a n c e l
• Press ���� key until the <Unpark> option appears at the bottom-right of the display
• Press the <UnPark> key, the display will indicate the list of calls currently parked
• Use the ↑↑↑↑↓↓↓↓ keys to scroll through the list and press the <Select> key to retrieve the call
To park a connected call using the Park code.
• Place the call on hold using one of the methods already described.
• Dial the Park code (*74). The call is now parked and can be retrieved from any other telephone connected to the system.
• Press ���� key once, the<Unpark> option will appear at the bottom-right of the display
• Press the <UnPark> key, the display will indicate the list of calls currently parked
• Use the ↑↑↑↑↓↓↓↓ keys to scroll through the list and press the <Select> key to retrieve the call

eircom advantage executive phone D3 user guide
19
4.2.25 To retrieve a parked call using the retrieve parked call code 1 1 : 2 5 S a t 0 7 / 1 2 / 0 2 E x t e n s i o n 1 5
M e n u s ���� ���� P h o n e B k
P a r k e d C a l l L i s t ► E x t n 1 6
S e l e c t ↑↑↑↑ ↓↓↓↓ C a n c e l
4.2.26 Call Park timeout Call Park Time-out: To prevent calls being abandoned or lost in the PARK state, there is a programmable timer that sets the maximum time a call can be parked on the system. By default this is set at 180 seconds. E x t n 1 6 R e t u r n i n g F r o m P a r k
O p t i o n s ↑↑↑↑ ↓↓↓↓ A n s w e r
If the Call Park Timer expires before the call is retrieved, the parked call will ring back the extension that parked it.
• Press the <Answer> key or lift the handset to answer the call
• Lift the handset or press the speaker key
• Dial the Unpark code followed by the extension Number *9#Extn No.
• Or dial *9* Line No.
eircom advantage executive phone D3 user guide
20
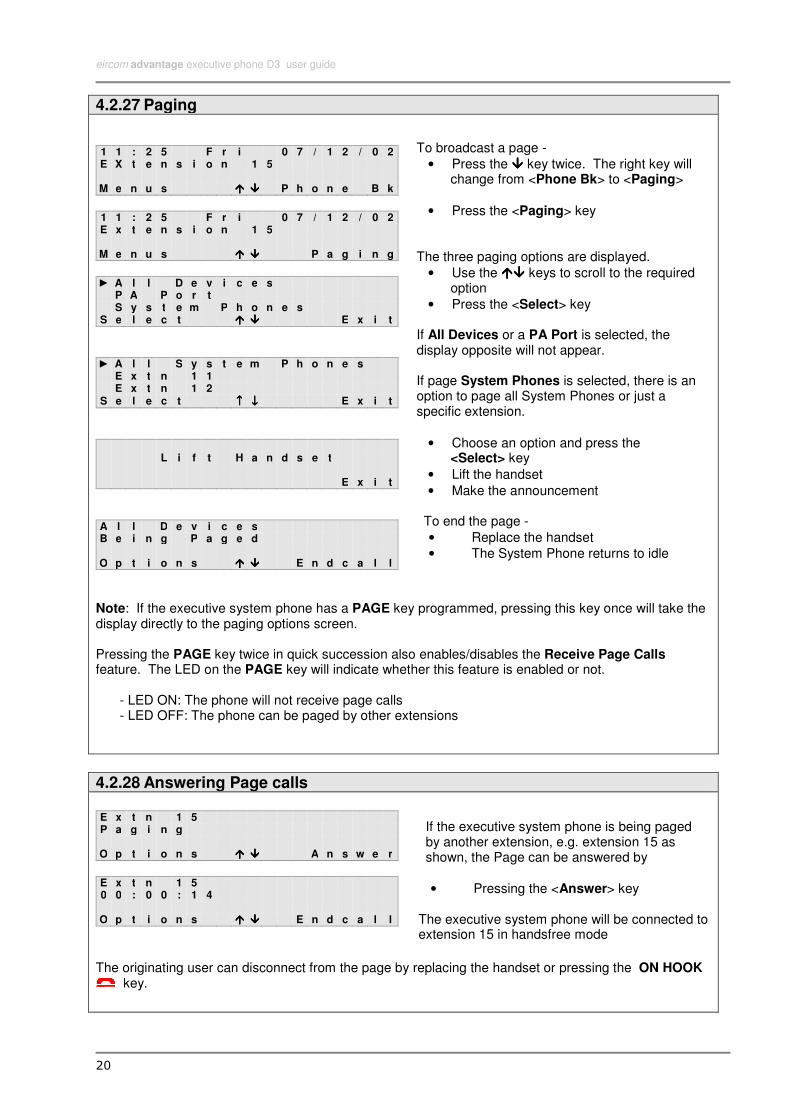
4.2.27 Paging 1 1 : 2 5 F r i 0 7 / 1 2 / 0 2 E X t e n s i o n 1 5
M e n u s ���� ���� P h o n e B k
1 1 : 2 5 F r i 0 7 / 1 2 / 0 2 E x t e n s i o n 1 5
M e n u s ���� ���� P a g i n g
► A l l D e v i c e s P A P o r t S y s t e m P h o n e s
S e l e c t ���� ���� E x i t
► A l l S y s t e m P h o n e s E x t n 1 1 E x t n 1 2
S e l e c t ↑↑↑↑ ↓↓↓↓ E x i t
L i f t H a n d s e t E x i t
A l l D e v i c e s B e i n g P a g e d
O p t i o n s ���� ���� E n d c a l l
Note: If the executive system phone has a PAGE key programmed, pressing this key once will take the display directly to the paging options screen. Pressing the PAGE key twice in quick succession also enables/disables the Receive Page Calls feature. The LED on the PAGE key will indicate whether this feature is enabled or not.
- LED ON: The phone will not receive page calls - LED OFF: The phone can be paged by other extensions
4.2.28 Answering Page calls
E x t n 1 5 P a g i n g
O p t i o n s ���� ���� A n s w e r
E x t n 1 5 0 0 : 0 0 : 1 4
O p t i o n s ���� ���� E n d c a l l
The originating user can disconnect from the page by replacing the handset or pressing the ON HOOK key.
To broadcast a page -
• Press the ���� key twice. The right key will change from <Phone Bk> to <Paging>
• Press the <Paging> key The three paging options are displayed.
• Use the �������� keys to scroll to the required option
• Press the <Select> key If All Devices or a PA Port is selected, the display opposite will not appear. If page System Phones is selected, there is an option to page all System Phones or just a specific extension.
• Choose an option and press the <Select> key
• Lift the handset
• Make the announcement To end the page -
• Replace the handset
• The System Phone returns to idle
If the executive system phone is being paged by another extension, e.g. extension 15 as shown, the Page can be answered by
• Pressing the <Answer> key The executive system phone will be connected to extension 15 in handsfree mode
eircom advantage executive phone D3 user guide
21
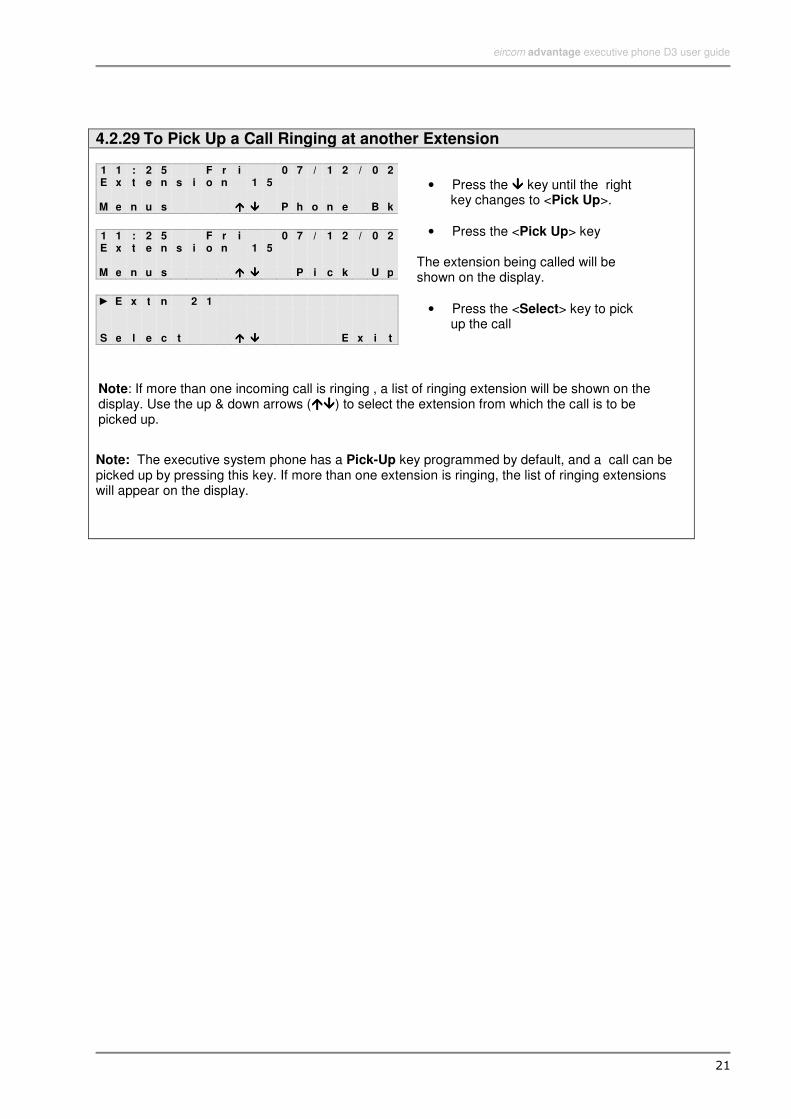
4.2.29 To Pick Up a Call Ringing at another Extension 1 1 : 2 5 F r i 0 7 / 1 2 / 0 2 E x t e n s i o n 1 5
M e n u s ���� ���� P h o n e B k
1 1 : 2 5 F r i 0 7 / 1 2 / 0 2 E x t e n s i o n 1 5
M e n u s ���� ���� P i c k U p
► E x t n 2 1
S e l e c t ���� ���� E x i t
Note: The executive system phone has a Pick-Up key programmed by default, and a call can be picked up by pressing this key. If more than one extension is ringing, the list of ringing extensions will appear on the display.
• Press the ���� key until the right key changes to <Pick Up>.
• Press the <Pick Up> key The extension being called will be shown on the display.
• Press the <Select> key to pick up the call
Note: If more than one incoming call is ringing , a list of ringing extension will be shown on the display. Use the up & down arrows (��������) to select the extension from which the call is to be picked up.
eircom advantage executive phone D3 user guide
22
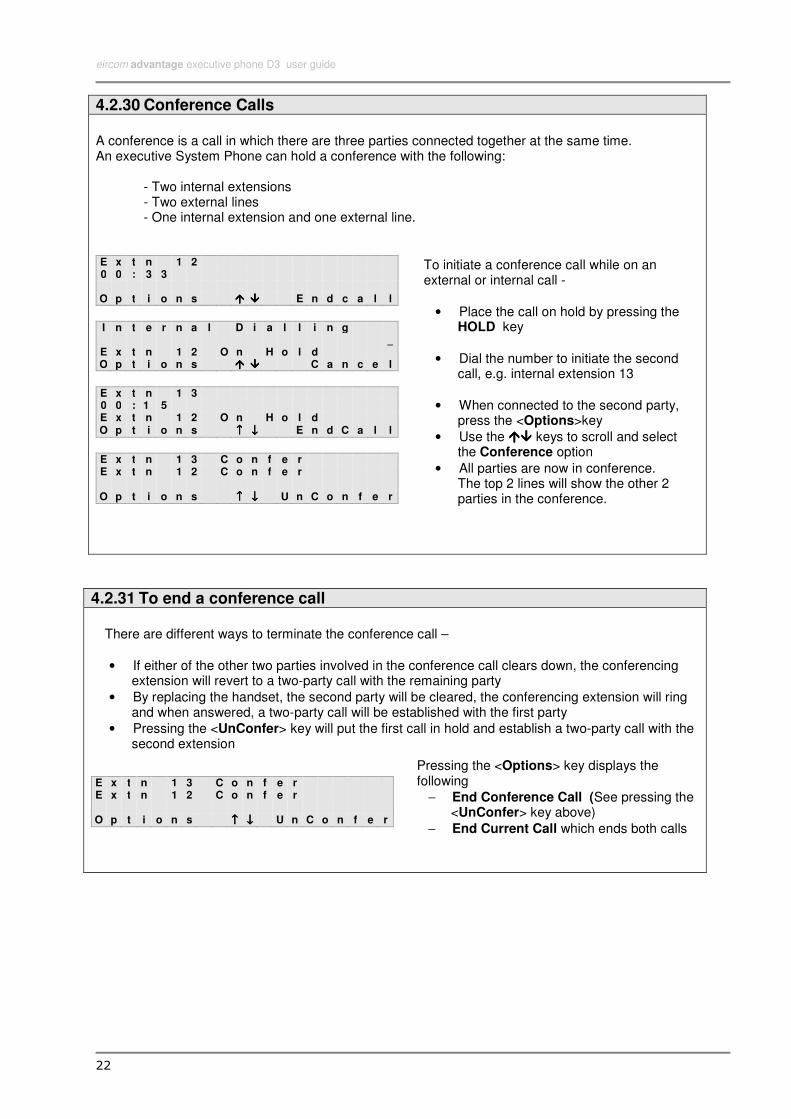
4.2.30 Conference Calls A conference is a call in which there are three parties connected together at the same time. An executive System Phone can hold a conference with the following: - Two internal extensions - Two external lines - One internal extension and one external line. E x t n 1 2 0 0 : 3 3
O p t i o n s ���� ���� E n d c a l l
I n t e r n a l D i a l l i n g _
E x t n 1 2 O n H o l d O p t i o n s ���� ���� C a n c e l
E x t n 1 3 0 0 : 1 5 E x t n 1 2 O n H o l d O p t i o n s ↑↑↑↑ ↓↓↓↓ E n d C a l l
E x t n 1 3 C o n f e r E x t n 1 2 C o n f e r
O p t i o n s ↑↑↑↑ ↓↓↓↓ U n C o n f e r
4.2.31 To end a conference call E x t n 1 3 C o n f e r E x t n 1 2 C o n f e r
O p t i o n s ↑↑↑↑ ↓↓↓↓ U n C o n f e r
To initiate a conference call while on an external or internal call -
• Place the call on hold by pressing the HOLD key
• Dial the number to initiate the second call, e.g. internal extension 13
• When connected to the second party, press the <Options>key
• Use the �������� keys to scroll and select the Conference option
• All parties are now in conference. The top 2 lines will show the other 2 parties in the conference.
There are different ways to terminate the conference call –
• If either of the other two parties involved in the conference call clears down, the conferencing extension will revert to a two-party call with the remaining party
• By replacing the handset, the second party will be cleared, the conferencing extension will ring and when answered, a two-party call will be established with the first party
• Pressing the <UnConfer> key will put the first call in hold and establish a two-party call with the second extension
Pressing the <Options> key displays the following
− End Conference Call (See pressing the <UnConfer> key above)
− End Current Call which ends both calls
eircom advantage executive phone D3 user guide
23
4.2.32 Using the CONFERENCE Key: The executive system phone by default will have a CONFERENCE key programmed.
• Pressing the CONFERENCE key will establish a conference between a held call and the call in progress
• While the conference is in progress, the LED of the CONFERENCE key will be lit
• Pressing the CONFERENCE key while the LED is lit will terminate the conference and establish a two-party call with the second party while putting the first call into Hold
4.2.33 To Divert Incoming Calls Incoming calls to an executive system phone can be diverted at various stages in the call and to various destinations as shown below -
Type Of Divert Destinations - Divert to an Extension Divert All Calls - Divert to Voice Mail Divert On Busy - Divert to External Number Divert On No Answer (Not available for Divert On Busy) Divert to an Entry in the Common/Personal Address Book . (Not available for Divert On Busy). Note: If there are no entries in the Address Books, these options will not be displayed.
eircom advantage executive phone D3 user guide
24
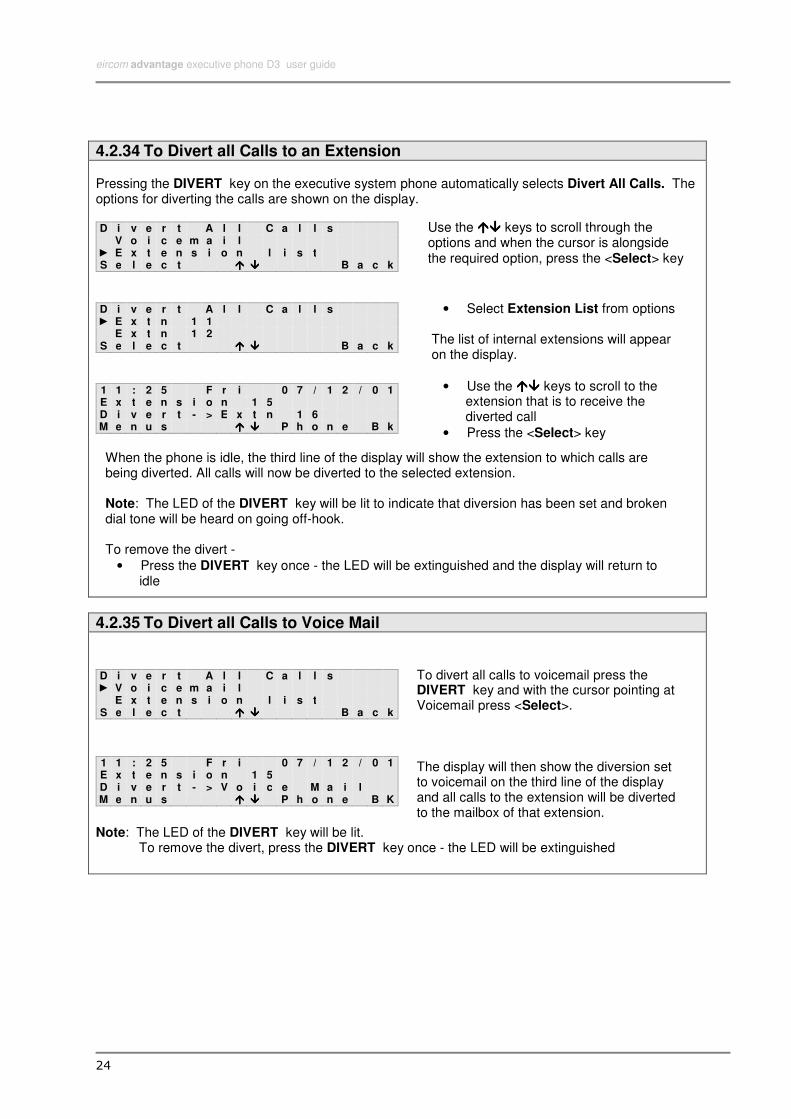
4.2.34 To Divert all Calls to an Extension Pressing the DIVERT key on the executive system phone automatically selects Divert All Calls. The options for diverting the calls are shown on the display. D i v e r t A l l C a l l s V o i c e m a i l ► E x t e n s i o n l i s t S e l e c t ���� ���� B a c k
D i v e r t A l l C a l l s ► E x t n 1 1 E x t n 1 2
S e l e c t ���� ���� B a c k
1 1 : 2 5 F r i 0 7 / 1 2 / 0 1 E x t e n s i o n 1 5 D i v e r t - > E x t n 1 6 M e n u s ���� ���� P h o n e B k
4.2.35 To Divert all Calls to Voice Mail D i v e r t A l l C a l l s ► V o i c e m a i l E x t e n s i o n l i s t
S e l e c t ���� ���� B a c k
1 1 : 2 5 F r i 0 7 / 1 2 / 0 1 E x t e n s i o n 1 5 D i v e r t - > V o i c e M a i l M e n u s ���� ���� P h o n e B K
Note: The LED of the DIVERT key will be lit. To remove the divert, press the DIVERT key once - the LED will be extinguished
• Select Extension List from options The list of internal extensions will appear on the display.
• Use the �������� keys to scroll to the extension that is to receive the diverted call
• Press the <Select> key
Use the �������� keys to scroll through the options and when the cursor is alongside the required option, press the <Select> key
When the phone is idle, the third line of the display will show the extension to which calls are being diverted. All calls will now be diverted to the selected extension.
Note: The LED of the DIVERT key will be lit to indicate that diversion has been set and broken dial tone will be heard on going off-hook.
To remove the divert -
• Press the DIVERT key once - the LED will be extinguished and the display will return to idle
To divert all calls to voicemail press the DIVERT key and with the cursor pointing at Voicemail press <Select>. The display will then show the diversion set to voicemail on the third line of the display and all calls to the extension will be diverted to the mailbox of that extension.

eircom advantage executive phone D3 user guide
25
4.2.36 To Divert all calls to a Common or Personal Address Book entry D i v e r t A l l C a l l s ► P e r s o n a l a d d r B o o k C o m m o n A d d r e s s B o o k
S e l e c t ���� ���� B a c k
S e a r c h : S ► S t e v e n
S e l e c t ���� ���� B a c k
1 1 : 2 5 F r i 0 7 / 1 2 / 0 1 E x t e n s i o n 1 5 D i v e r t - > S t e v e n M e n u s ���� ���� P h o n e B k
4.2.37 To Divert all calls to an External Number D i v e r t A l l C a l l s C o m m o n A d d r e s s B o o k ► E x t e r n a l N u m b e r S e l e c t ���� ���� E x i t
E n t e r E x t e r n a l N o . 8 1 6 _
A c c e p t ���� ���� B a c k
1 1 : 2 5 F r i 0 7 / 1 2 / 0 1 E x t e n s i o n 1 5 D i v e r t - > 8 1 6 0 0 0 0 M e n u s ���� ���� P h o n e B k
• Press the DIVERT key and select the Common or Personal Address Book option
• The Search command will appear on the display
• Enter the letters of the name to be found
• The display will show all entries beginning with those letters
• Scroll through the entries using the �������� keys
• Press <Select> when the curser is pointing to the required entry
When the phone is idle, the third line of the display will show the entry to which calls are diverted. Note: The LED of the DIVERT key will be lit. To remove the divert -
• Press the DIVERT key once - the LED will be extinguished
To set divert all calls to an External Number
• Press the DIVERT key and select External Number from the options
• Enter the number to which calls are to be diverted. The Line access digit is not required.
• Press the <Accept> key
When the phone is idle, the third line of the display will show the number to which calls are diverted.
Note: The LED of the DIVERT key will be lit. To remove the divert -
• Press the DIVERT key once - the LED will be extinguished
Note: If a diversion to an External Number has previously been set, this number will appear on the display.
eircom advantage executive phone D3 user guide
26
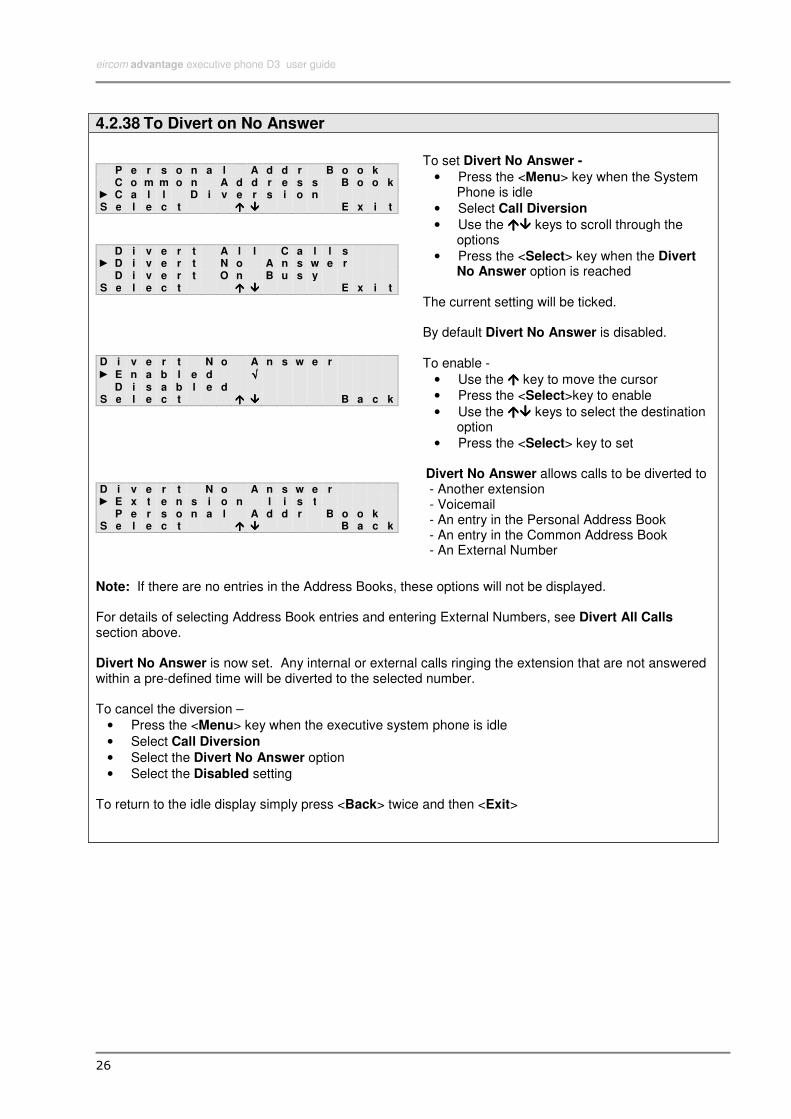
4.2.38 To Divert on No Answer
P e r s o n a l A d d r B o o k C o m m o n A d d r e s s B o o k ► C a l l D i v e r s i o n S e l e c t ���� ���� E x i t
D i v e r t A l l C a l l s ► D i v e r t N o A n s w e r D i v e r t O n B u s y
S e l e c t ���� ���� E x i t
D i v e r t N o A n s w e r ► E n a b l e d √√√√ D i s a b l e d
S e l e c t ���� ���� B a c k
D i v e r t N o A n s w e r ► E x t e n s i o n l i s t P e r s o n a l A d d r B o o k
S e l e c t ���� ���� B a c k
Note: If there are no entries in the Address Books, these options will not be displayed. For details of selecting Address Book entries and entering External Numbers, see Divert All Calls section above. Divert No Answer is now set. Any internal or external calls ringing the extension that are not answered within a pre-defined time will be diverted to the selected number. To cancel the diversion –
• Press the <Menu> key when the executive system phone is idle
• Select Call Diversion
• Select the Divert No Answer option
• Select the Disabled setting To return to the idle display simply press <Back> twice and then <Exit>
To set Divert No Answer -
• Press the <Menu> key when the System Phone is idle
• Select Call Diversion
• Use the �������� keys to scroll through the options
• Press the <Select> key when the Divert No Answer option is reached
The current setting will be ticked. By default Divert No Answer is disabled. To enable -
• Use the ���� key to move the cursor
• Press the <Select>key to enable
• Use the �������� keys to select the destination option
• Press the <Select> key to set Divert No Answer allows calls to be diverted to - Another extension - Voicemail - An entry in the Personal Address Book - An entry in the Common Address Book - An External Number

eircom advantage executive phone D3 user guide
27
4.2.39 To Divert On Busy
P e r s o n a l A d d r B o o k C o m m o n A d d r e s s B o o k ► C a l l D i v e r s i o n S e l e c t ���� ���� E x i t
D i v e r t A l l C a l l s D i v e r t N o A n s w e r ► D i v e r t O n B u s y S e l e c t ���� ���� E x i t
D i v e r t O n B u s y ► E n a b l e d √√√√ D i s a b l e d
S e l e c t ���� ���� B a c k
D i v e r t O n B u s y ► V o i c e m a i l E x t n 1 1 S e l e c t ���� ���� B a c k
4.2.40 Do Not Disturb (DND) Do Not Disturb is a function which when activated gives busy tone to all incoming calls. The exceptions to this are calls from extensions that have DND Override set in system programming.This function can be programmed into a programmable keys as described in section 4.3.9.
1 1 : 2 5 F r i 0 7 / 1 2 / 0 2 E x t e n s i o n 1 5 D o N o t D i s t u r b M e n u s ���� ���� P h o n e B k
To set Divert On Busy -
• Press the <Menu> key when the System Phone is idle
• Select Call Diversion
• Use the �������� keys to scroll through the options
• Press the <Select> key when the Divert On Busy option is reached
The current setting will be ticked. By default Divert On Busy is disabled. To enable -
• Use the ���� key to move the cursor
• Press the <Select> key to enable
• Use the �������� keys to select the destination option
• Press the <Select> key to set
Divert On Busy allows calls to be diverted to - - Another extension - Voicemail
Divert On Busy is now set. Any internal or external calls arriving at the extension while it is busy on another call will be diverted to the selected number. To cancel the diversion –
• Press the <Menu> key when the executive system phone is idle
• Select Call Diversion
• Select the Divert On Busy option
• Select the Disabled setting To return to the idle display simply press <Back> twice and then <Exit>.
To set DND -
• Press the DND key. The LED on the key will be lit and the display will show Do Not Disturb on the third line
To clear DND -
• Press the DND key. The LED on the key will be extinguished and DND will be cleared
eircom advantage executive phone D3 user guide
28
4.2.41 List of Calls The system maintains a list of the last 10 missed calls, 10 dialled calls and 10 received calls, for each extension equipped with an executive system phone. If more than 10 calls are missed, dialled or received, the list will be continually updated with the details of the last ten. 1 1 : 2 5 F r i 0 7 / 1 2 / 0 2 E x t e n s i o n 1 5 M i s s e d C a l l s = 0 1 M e n u s ���� ���� P h o n e B k
Once the system has recorded a missed, dialled or received call, the user has the option to
• Call the person who’s call was missed, dialled or received
• View the time and date of the call
• Save the details of the caller to his/her Personal Address Book.
• Delete the call entry from the list Once the user has checked his missed calls, the missed call message will be removed from third line of the display and the normal idle display will be shown again.
4.2.42 To view an entry in the missed call list 1 1 : 2 5 F r i 0 7 / 1 2 / 0 2 E x t e n s i o n 1 5 M i s s e d C a l l s = 0 1 M e n u s ���� ���� P h o n e B k
Note: If the voice module is fitted and there are any unread Voice Mail messages, pressing the MESSAGE
key will access the Mailbox option
M i s s e d C a l l L i s t ► 0 1 . 6 9 6 6 7 7 7 1 3 0 2 . J o h n W
S e l e c t ↑↑↑↑ ↓↓↓↓ E x i t
For the case of an unanswered incoming call, the number of calls missed will be shown on the third line of the display.
To view a missed call entry, when the third line of the display indicates a missed call simply;
• Press the MESSAGE key
The display will show the last 10 missed calls on the system. If the telephone number of a missed call matches an entry in the Personal or Common Address Book, then the name of the entry will be shown instead of the number.
If the unanswered incoming call does not present a number to the network, the entry in the list will show the text Unknown.

eircom advantage executive phone D3 user guide
29
4.2.43 To call back an entry in the missed call list 1 1 : 2 5 F r i 0 7 / 1 2 / 0 2 E x t e n s i o n 1 5 M i s s e d C a l l s = 0 3 M e n u s ���� ���� P h o n e B k
► C a l l T i m e o f C a l l S a v e
S e l e c t ↑↑↑↑ ↓↓↓↓ B a c k
E x t e r n a l D i a l l i n g 6 9 6 6 7 7 7 1 3
S e l e c t ↑↑↑↑ ↓↓↓↓ C a n c e l
M i s s e d C a l l L i s t ► 0 1 . 6 9 6 6 7 7 7 1 3 0 2 . J o h n W
S e l e c t ↑↑↑↑ ↓↓↓↓ E x i t
4.2.44 To view the time and date of the missed call 1 1 : 2 5 F r i 0 7 / 1 2 / 0 2 E x t e n s i o n 1 5 M i s s e d C a l l s = 0 3 M e n u s ���� ���� P h o n e B k
C a l l ► T i m e o f C a l l S a v e
S e l e c t ↑↑↑↑ ↓↓↓↓ B a c k
6 9 6 6 7 7 7 1 3 M i s s e d a t 1 8 : 4 2 O n W e d 1 8 / 1 2 / 0 2 B a c k
M i s s e d C a l l L i s t ► 0 1 . 6 9 6 6 7 7 7 1 3 0 2 . J o h n W
S e l e c t ↑↑↑↑ ↓↓↓↓ E x i t
To call back a missed call when the third line of the display indicates that a call was missed ;
• Press the MESSAGE Key .
• Use the �������� keys to select the required entry from the missed call list.
• Press the <Select> key
• Press the Call option.
The system will automatically access an external line and make a call to the selected number. Pressing the <Cancel> key will cancel the call and return the phone to the Idle state.
To view the time and date of a missed call when the third line of the display indicates that a call was missed ;
• Press the MESSAGE key .
• Use the �������� keys to select the required entry from the missed call list.
• Press the <Select> key
• Press the Time of Call option.
The system will display the missed party ID on the top line of the display with the time and date of that missed call on the second and third lines respectively. Pressing the <Back> key will return the user to the missed call list on the previous screen.

eircom advantage executive phone D3 user guide
30
4.2.45 To store a missed call in the Personal Address Book
1 1 : 2 5 F r i 0 7 / 1 2 / 0 2 E x t e n s i o n 1 5 M i s s e d C a l l s = 0 3 M e n u s ���� ���� P h o n e B k
C a l l T i m e o f C a l l ► S a v e S e l e c t ↑↑↑↑ ↓↓↓↓ B a c k
E n t e r N a m e _
A c c e p t B a c k
6 9 6 6 7 7 7 1 3 S t o r e d i n P e r s o n a l A d d r B o o k B a c k
M i s s e d C a l l L i s t ► 0 1 . 6 9 6 6 7 7 7 1 3 0 2 . J o h n W
S e l e c t ↑↑↑↑ ↓↓↓↓ E x i t
4.2.46 To delete a missed call from the missed call list
1 1 : 2 5 F r i 0 7 / 1 2 / 0 2 E x t e n s i o n 1 5 M i s s e d C a l l s = 0 3 M e n u s ���� ���� P h o n e B k
T i m e o f C a l l S a v e ► D e l e t e S e l e c t ↑↑↑↑ ↓↓↓↓ B a c k
Note: If there are no more entries left in the list, the display will show No Entries Found.
M i s s e d C a l l L i s t ► 0 1 . 6 9 6 6 7 7 7 1 3 0 2 . J o h n W
S e l e c t ↑↑↑↑ ↓↓↓↓ E x i t
To Store a missed call to the personal address book when the third line of the display indicates that a call was missed ;
• Press the MESSAGE key .
• Use the �������� keys to select the required entry from the missed call list.
• Press the <Select> key
• Press the Save option.
The display will prompt the user to enter the name for the Personal Address book entry. On entering the name and pressing the <Accept> key the system will confirm that the missed call entry has been stored in the personal address book of that user. Pressing the <Back> key will return the user to the missed call list on the previous screen.
To Delete a missed call from the missed call list when the third line of the display indicates that a call was missed ;
• Press the MESSAGE key .
• Use the �������� keys to select the required entry from the missed call list.
• Press the <Select> key
• Press the Delete option.
Selecting the Delete option will automatically delete the entry and return the user to the Missed Call List menu

eircom advantage executive phone D3 user guide
31
4.2.47 To view the Missed Calls list when there are no new missed calls
1 1 : 2 5 F r i 0 7 / 1 2 / 0 2 E x t e n s i o n 1 5
M e n u s ���� ���� P h o n e B k
M a i l b o x S e t t i n g s P h o n e S e t t i n g s ► L i s t o f C a l l s S e l e c t ���� ���� E x i t
► M i s s e d C a l l s D i a l l e d C a l l s R e c e i v e d C a l l s
S e l e c t ���� ���� E x i t
N o E n t r i e s F o u n d
B a c k
4.2.48 Using the Dialled Number List
M i s s e d C a l l L i s t ► D i a l l e d N u m b e r L i s t R e c e i v e d C a l l L i s t
S e l e c t ���� ���� B a c k
4.2.49 Using the Received Call List
M i s s e d C a l l L i s t D i a l l e d N u m b e r L i s t ► R e c e i v e d C a l l L i s t S e l e c t ���� ���� B a c k
To enter the Missed Calls list when there are no new missed calls -
• Press the <Menus> key
• Use the ↑↑↑↑↓↓↓↓ keys to move to the List of Calls option
• Press the <Select> key
• Use the ↑↑↑↑↓↓↓↓ keys to move to the Missed Calls option
• Press the <Select> key
Note: If there are no missed calls, the display will show No Entries Found.
The list of the last ten unanswered calls will be displayed. The calls can then be selected for calling, saving, deleting or to view the time and date details as previously described.
The Dialled Number List is accessed from the List of calls menu. Each entry can be Called, Saved, Deleted and the time & date information viewed in the same way as described for missed calls.
The Received Call List is accessed from the List of calls menu. Each entry can be Called, Saved, Deleted and the time & date information viewed in the same way as described for missed calls.
eircom advantage executive phone D3 user guide
32
4.2.50 Call Back When a called extension is busy, a call back can be set so that when the called extension becomes free, the system will first ring the extension that set the call back and when that extension answers, the system will ring the called extension.
E x t n 1 2 B u s y
O p t i o n s ↑↑↑↑ ↓↓↓↓ C a n c e l
C a n c e l I n t r u d e c a l l ► C a l l b a c k S e l e c t ���� ���� E x i t
E x t n 1 2 C a l l b a c k
O p t i o n s ���� ���� N e w C a l l
E x t n 1 2 C a l l b a c k
S e l e c t ���� ���� A n s w e r
E x t n 1 2 R i n g i n g
S e l e c t ���� ���� C a n c e l
Note: If the executive system phone has a CALLBACK key programmed, pressing this key once while hearing busy tone while calling another extension will set call back.
To set a call back (e.g. on extension 12) -
• On receiving busy tone, press the <Options> key
• Scroll down - when the cursor is alongside Call back
• Press the <Select> key Success tone will be heard confirming that the Call back feature has been set. The System Phone will return to idle. When Extension 12 becomes free, the extension that set the Call back will start to ring. When the handset is lifted or the SPEAKER
key is pressed, ringing tone will be heard and Extension 12 will start to ring.

eircom advantage executive phone D3 user guide
33
4.2.51 Intrusion If when calling another extension busy tone is heard, an executive system phone user can intrude on the busy extension. Alert tones will be given to indicate that another extension is about to intrude. The ability for an extension to intrude has to be enabled in system programming by the installer or system administrator. E x t n 1 2 B u s y
O p t i o n s ↑↑↑↑ ↓↓↓↓ C a n c e l
C a n c e l ► I n t r u d e c a l l C a l l b a c k
S e l e c t ���� ���� E x i t
C a n c e l ► I n t r u d e c a l l C a l l b a c k
S e l e c t ���� ���� I n t r u d e
Note: If the system phone has an INTRUDE key programmed, pressing this key once while hearing busy tone from another extension will let you intrude on the call.
4.2.52 Day / Night Changeover The system can be programmed so that incoming calls ring different extensions or groups of extensions at different times of the day, e.g. after hours, all calls ring a night service extension. These changeovers can take place automatically but can also be overridden by an extension provided that extension has Operator Functionality enabled in system programming. Normally only the system administrator or reception extension would have this facility programmed. Note: At installation, Extension 11 is automatically set as the default Operator phone and Operator Functionality will be enabled at that extension.
To intrude on a busy extension -
• When busy tone is heard, press the <Options> key
• Scroll down using the ↑↑↑↑↓↓↓↓ keys
• With the cursor alongside Intrude call press the <Select> key
• The busy extension will receive Alert tones
• Pressing the <Intrude> key will intrude on the call in progress
eircom advantage executive phone D3 user guide
34
4.2.53 To set the Day/Night Ringing Mode
M a i l b o x S e t t i n g s P h o n e S e t t i n g s ► D a y / n i g h t C h a n g e o v e S e l e c t ���� ���� E x i t
D a y / N i g h t C h a n g e o v e r ► D a y R i n g i n g √√√√ N i g h t R i n g i n g
S e l e c t ���� ���� B a c k
1 1 : 2 5 F r i 0 7 / 1 2 / 0 1 E x t e n s i o n 1 5 N i g h t R i n g i n g O p t i o n s ���� ���� P h o n e B k
4.2.54 Day/Night Ringing key If a feature key has been programmed as a Day/Night ringing key, pressing this key will toggle between the ringing modes. The LED on the key will be OFF when the current mode is the default mode (i.e. Day Ringing), and will be ON when any of the other ringing modes are set.
4.2.55 Roaming PIN Calls made from an extension are subject to the level of access that has been assigned to the user of that extension. The level of access defines the types of call the user is permitted to make, e.g. internal calls only, internal and external local calls only etc. The eircom advantage system offers up to 100 different user profiles with associated levels of access. By entering a User Name and a PIN code, a user can make calls at a roaming PIN enabled extension using his/her profile with its associated level of access. The eircom business systems technician will issue Roaming PIN and user numbers.
When the System Phone is idle -
• Press the <Menus> key
• Use the �������� keys to scroll through the options
• With the cursor alongside Day/Night Changeover, press the <Select> key
A list with the available ringing modes will be shown with the current option ticked.
• Use the �������� keys to scroll
• Press the <Select> key to set the ringing mode
• Press the <Back> key to return to menu
When the phone is idle, the current ringing mode will be displayed. Note: Day Ringing mode will not be displayed.
eircom advantage executive phone D3 user guide
35
4.2.56 To change the profile of an extension using the roaming PIN 1 1 : 2 5 F r i 0 7 / 1 2 / 0 1 E x t e n s i o n 1 5
M e n u s ���� ���� P h o n e B k
C a l l D i v e r s i o n P h o n e S e t t i n g s ► R o a m i n g P i n S e l e c t ↑↑↑↑ ↓↓↓↓ E x i t
R o a m i n g P i n ► E n a b l e d √√√√ D i s a b l e d
S e l e c t ↑↑↑↑ ↓↓↓↓ B a c k
R o a m i n g P i n U s e r : _ _ P i n : _ _ _ _ B a c k
R o a m i n g P i n U s e r : 1 0 P i n : 0 1 0 0 A c c e p t D e l e t e
1 1 : 2 5 F r i 0 7 / 1 2 / 0 1 E x t e n s i o n 1 5 ( 1 0 )
M e n u s ���� ���� P h o n e B k
4.2.57 Unsuccessful log in to Roaming PIN Each Roaming PIN user is allowed three attempts to enter the log-in information correctly after which the user number will be disabled for one hour. During this time the Roaming PIN will not be usable at any extension. U s e r T e m p o r a r i l y D i s a b l e d A s L o g i n A t t e m p t s E x c e e d e d B a c k
ROAMING Key: If one of the function keys has been programmed as a ROAMING key, pressing this key will initiate Roaming PIN log-in and the user will be prompted to input a user number and PIN. While Roaming PIN is activated, the LED on the key will be lit. Pressing the key while the LED is on will log the user out of the Roaming PIN feature.
• Press the <Menus> key
• Use the ↑↑↑↑↓↓↓↓ keys to scroll through the options
• When the cursor is alongside the Roaming PIN option
• Press the <Select> key To log-in to Roaming PIN as User 10 -
• Use the ↑↑↑↑↓↓↓↓ keys to move the cursor
• Press the <Select> key when the cursor is alongside Enabled
• Enter user number and Roaming PIN code
• Press the <Accept> key The System Phone will return to idle and the display will show the Roaming User number. Calls can now be made using the profile of User 10.
Note: The Roaming PIN user profile will automatically become inactive after a pre-determined time or the user can log-out by entering the Roaming PIN menu and selecting Disable.
If the user tries to log-on, the display shows that the user number is suspended.
• Press the <Back> key to exit

eircom advantage executive phone D3 user guide
36
4.2.58 Programming the Personal Address Book This feature allows up to 50 commonly used numbers to be stored in the Personal Address Book for the executive system phone. These numbers can be called directly either by dialling a short code, using the Phone book option on the system phone or by pressing a function key programmed for that number. The numbers stored in the Personal Address Book are only accessible from the extension at which they were programmed.
4.2.59 Creating a new entry in the Personal Address book 1 1 : 2 5 F r i 0 7 / 1 2 / 0 2 E x t e n s i o n 1 5
M e n u s ���� ���� P h o n e B k
► P e r s o n a l A d d r B o o k C a l l D i v e r s i o n P h o n e S e t t i n g s
S e l e c t ���� ���� E x i t
► N e w E n t r y M o d i f y E n t r y D e l e t e E n t r y
S e l e c t ���� ���� B a c k
E n t e r N u m b e r 6 9 6 6 7 7 7 1 3
N e x t ���� ���� D e l e t e
E n t e r N a m e M i k e M _
N e x t ���� ���� D e l e t e
To Enter the Personal Address Book –
• Press the <Menus> key
• Press the <Select> key while the cursor is pointing to the Personal Address Book option
• Press the <Select> key to create a new entry
Although not shown when programming, the entries will be stored sequentially using the codes *800 to *849 inclusive.
• Enter the telephone number
• To correct any errors the �������� keys can be used to move the cursor to the right or left
• The incorrect digit can then be deleted using the <Delete> key
• When the entry is correct, press the <Next> key
• Enter a name to identify the number, eg for 'M' press digit 6 once for 'I' press digit 4 three times etc. Lower case characters can be found with continued key presses of the same key.
• To correct any errors, the �������� keys can be used to move the cursor to the right or left. The incorrect digit can then be deleted using the <Delete> key
• When the entry is correct, press the <Next> key

eircom advantage executive phone D3 user guide
37
4.2.60 To program the advanced options for a Personal address book entry Usually, it is only necessary to program the number and name for the Phonebook entry but the system also allows the user to select the following parameters:
− The line group that the system will access when dialling the number (External Option)
− To enable or disable the system to send the CLI (Call line Identification) information to line when making the call (CLI Option)
− To store the number under a function key, allowing one touch dialling from that key (Function Option)
E n t e r N a m e M i k e M u r p h y
N e x t ���� ���� D e l e t e
D o Y o u W i s h T o C h a n g e t h e A d v a n c e d O p t i o n s ? N o Y e s
► E x t e r n a l : 9 C L I : P r e s e n t e d F u n c t i o n K e y : N o n e
S e l e c t ���� ���� B a c k
O f f ► 9 √√√√ * 9 1
S e l e c t ���� ���� B a c k
2. CLI Option: Selects whether or not the Calling Line Identification is sent to line. ► P r e s e n t e d √√√√ R e s t r i c t e d
S e l e c t ���� ���� B a c k
By default, the CLI option is set to Presented.
To program the advanced options for a personal address book entry;
• Enter the personal address book and enter the Number and Name for a new entry as previously described
• Press the <Next> Key
• The display will ask the user if they wish to change the advanced options
• Press the <Yes> key There are three settings available to the user to program - 1. External - 2. CLI - 3. Function Key
1. External Option: Selects the line group that the system will try to access when dialling the entry.
The following options are presented:
• “Off” (The system will not attempt to seize a line for the entry)
• Set Line Access Groups (*91-*98)
• “9” (Seize Any available line)
• Use the �������� keys to move to the required setting and press the <Select> key.
• To return to the previous screen press the <Back> key
By default, the external option is enabled ( 9 is ticked).
The following options are presented:
• Restricted: The CLI is not sent out to called parties.
• Presented: The CLI is sent out to called parties.
• Use the �������� keys to move to the required option and press the <Select> key
• To return to the previous screen press the <Back> key

eircom advantage executive phone D3 user guide
38
3. Function Key: This option allows the user to program a function key for that phone book entry. There are 16 programmable keys on the executive system phone with an extra 48 if the DSS is fitted.
N o n e
► F u n c t i o n K e y 1 √√√√ F u n c t i o n K e y 2
S e l e c t ���� ���� B a c k
By default, the Function Key option is set to None. ► E x t e r n a l : 9 C L I : P r e s e n t e d F u n c t i o n K e y : 0 1
S e l e c t ���� ���� B a c k
4.2.61 To Modify an existing entry in the Personal Address book
N e w E n t r y ► M o d i f y E n t r y D e l e t e E n t r y
S e l e c t ���� ���� B a c k
► * 8 0 0 : M i k e M u r p h y * 8 0 1 : J o h n S m i t h * 8 0 2 : J a n e R e i l l y
S e l e c t ���� ���� B a c k
► N a m e : M i k e M u r p h y N u m b e r : 1 2 3 4 5 6 7 8 9 0 E x t e r n a l : 9
S e l e c t ���� ���� B a c k
To modify an existing entry in the personal address book;
• Enter the personal address book as previously described
• Use the the �������� keys to select Modify Entry and press the <Select> key
• The programmed list of entries will be shown starting from the first entry ( *800 )
• Use the the �������� keys to select the entry to be modified and press the <Select> key
• The options that can be modified for that entry are:
- Name - Number - External - CLI - Function Key
• To modify an option use the �������� keys and press the <Select> key
• Each entry may then be modified as previously described
• Use the �������� keys to scroll to the required function key and press the <Select> Key
• The LED of the function key at which the cursor is pointing will be flashing
• Press the <Select> key to program that key as a personal address book entry. A tick will appear beside the selected entry
• On pressing the <Back> key the display will show the function key selected on the third line.

eircom advantage executive phone D3 user guide
39
4.2.62 To delete an entry in the Personal Address Book
N e w E n t r y M o d i f y E n t r y ► D e l e t e E n t r y S e l e c t ���� ���� B a c k
* 8 0 0 : M i k e M u r p h y * 8 0 1 : J o h n S m i t h ► * 8 0 2 : J a n e R e i l l y D e l e t e ���� ���� B a c k
D e l e t e E n t r y ? J a n e R e i l l y 1 2 3 4 5 6 7 N o Y e s
To delete a personal address book entry
• Enter the personal address book as previously described
• Use the the �������� keys to select Delete Entry and press the <Select> key
Only codes which have numbers assigned to them will be shown on the list.
• Use the �������� keys to scroll to the required entry, e.g. code 802
• Press the <Delete> key
The name and the number of the entry stored under code 802 will be displayed.
• Press the <Yes> key to delete the entry
• Press the <No> key to return to the previous window without deleting the entry
eircom advantage executive phone D3 user guide
40
4.2.63 Programming the Common Address Book This feature allows up to 200 commonly used numbers to be stored in the Common Address Book for the system. These numbers can be called directly either by dialling a short code or by using the Phonebook option on any telephone connected to the system. Note: Programming the Common Address Book can only be done by the system administrator at
an extension programmed for operator functionality (Default Extension 11) or by the installer.
4.2.64 To enter the Common Address Book 1 1 : 2 5 F r i 0 7 / 1 2 / 0 2 E x t e n s i o n 1 5
M e n u s ���� ���� P h o n e B k
P e r s o n a l A d d r B o o k ► C o m m o n A d d r B o o k P h o n e S e t t i n g s
S e l e c t ���� ���� E x i t
• From the idle state, press the <Menus> key
• Press the <Select> key while the cursor is alongside the Common
Address Book option

eircom advantage executive phone D3 user guide
41
4.2.65 To Create a New Entry ► N e w E n t r y M o d i f y E n t r y D e l e t e E n t r y
S e l e c t ���� ���� B a c k
E n t e r N u m b e r 6 9 6 6 7 7 7 1 3
S a v e ���� ���� D e l e t e
E n t e r N a m e M i k e S t e v e n s
S a v e ���� ���� D e l e t e
4.2.66 To Modify an entry in the Common Address Book
N e w E n t r y ► M o d i f y E n t r y D e l e t e E n t r y
S e l e c t ���� ���� B a c k
* 4 0 0 0 : O W E N K ► * 4 0 0 1 : D A V E M * 4 0 0 2 : A N D R E W
S e l e c t ���� ���� B a c k
► N a m e : D A V E M N u m b e r : 5 5 5 2 2 2 3 3 3 1 E x t e r n a l : 0
S e l e c t ���� ���� B a c K
With the cursor pointing to Modify Entry, press <Select> Only codes which have numbers assigned to them will be shown on the list.
• Use the �������� keys to scroll and press the <Select> key to access the entry
The attributes that can be edited are – Name Number External CLI Function Key.
To create a new entry -
• With the cursor pointing at New Entry press <Select>
Although not shown when programming, the entries will be stored sequentially using the codes *4000 to *4199 inclusive.
• Enter the telephone number
• To correct any errors, the �������� keys can be used to move the cursor to the right
• The incorrect digit can then be deleted using the <Delete> key
• When the entry is correct, press the <Save> key
• Enter a name to identify the number, eg for 'M' press digit 6 once for 'i' press digit 4 three times etc
• To correct any errors the up & down arrow keys (��������) keys can be used to move the cursor to the left or right. The incorrect digit can then be deleted using the <Delete> key
• When the entry is correct, press the <Save> key
To select the attribute required -
• Press the <Select> key Proceed as above in Common Address Book (Create a New Entry)
eircom advantage executive phone D3 user guide
42
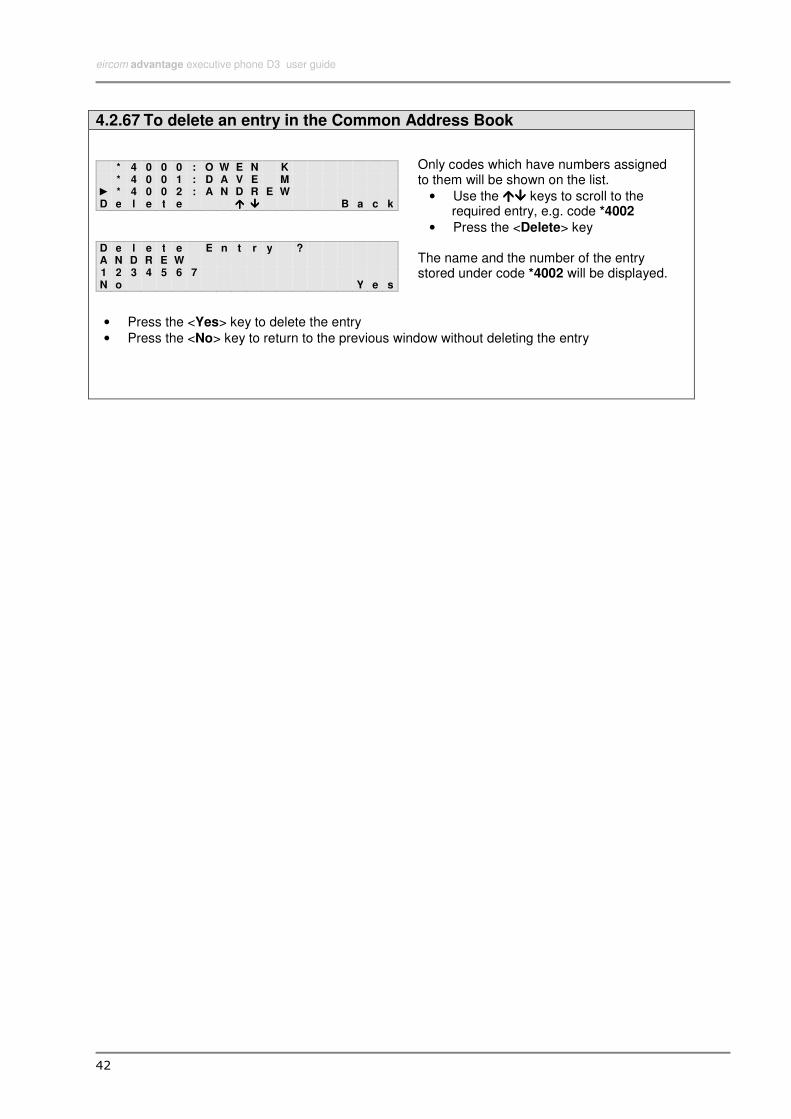
4.2.67 To delete an entry in the Common Address Book
* 4 0 0 0 : O W E N K * 4 0 0 1 : D A V E M ► * 4 0 0 2 : A N D R E W D e l e t e ���� ���� B a c k
D e l e t e E n t r y ? A N D R E W 1 2 3 4 5 6 7 N o Y e s
Only codes which have numbers assigned to them will be shown on the list.
• Use the �������� keys to scroll to the required entry, e.g. code *4002
• Press the <Delete> key The name and the number of the entry stored under code *4002 will be displayed.
• Press the <Yes> key to delete the entry
• Press the <No> key to return to the previous window without deleting the entry

eircom advantage executive phone D3 user guide
43
4.2.68 Door Phone
If the system has a door phone fitted, when the door button is pressed, the system will ring the extensions that have been assigned to ring for the door phone. D o o r p h o n e
C a l l i n g
O p t i o n s ↑↑↑↑ ↓↓↓↓ A n s w e r
D o o r p h o n e
0 0 : 0 0 : 0 1
O p t i o n s ���� ���� O p e n
D o o r p h o n e
O p e n i n g D o o r
O p t i o n s ↑↑↑↑ ↓↓↓↓ E n d c a l l
To answer a door phone call - A Doorphone call will be shown on the display of the System Phone programmed to ring.
• Press the <Answer> key to take the call
An internal call is established between the System Phone and the door phone extension.
• Press the <Open> key to unlock the door
To end the call either -
• Replace the handset or press the ON HOOK key
• Or Press the <Options> key to go into the menu and press <Endcall>
Note 1: It is not possible to put the call on hold. While the door is being opened, the call can be cleared and the System Phone will return to idle. Note 2: If the call is not answered within 30 seconds, the call is cleared and the extensions stop ringing. If all the extensions programmed to ring are busy, the door phone extension will receive 3 seconds of Busy tone after which the call is cleared. (DOOR PHONE) EXTENSION Key: If one of the programmable keys has been configured as the EXTENSION key for the door phone extension, the door can be opened by pressing this key when a call has been established with the door phone. The LED on the key will flash slowly to indicate that the door is opening. Door opening dialling code As well as being able to open the door while on a call to the door phone (see above), any extension user can also open the door by dialling the door opening code *78.

eircom advantage executive phone D3 user guide
44
4.2.69 Dialling Code Table
FEATURES CODES
To Call Extension (Extn No.)
To Access any Line 9
To Access a Line Group *91 to *98
Last Number Redial *5
Dial entries in Common Address Book *4000 to *4199
Dial entries in Personal Address Book *800 to *849
Park a Call (Recall) *74
Retrieve Parked Call from an extension *75 (Extn No.)
Retrieve Parked Line Call *9* (Line No.)
Retrieve Parked Extension *9# (Extn No.)
Universal Pick-up *719
Directed Pick-up *71 (Extn No.)
Directed Pick-off *71 (Extn No.)
Call Transfer Explicit (at dial tone with two calls on hold) *72
Conference (at dial tone with two calls on hold) *73
Directed Page *77 (Extn No.)
Page PA Port *77#
Universal Page (all Extensions and PA Port) *77*
Answering a Universal Page *76*
Answer a Page from an Extension *76 (Extn No.)
To call an Extension Group 80 – 89
Door Opening Code *78
To access Voice Mail *99
Break-out of Voice Mail (while listening to voice mail greeting)
* (Extn No.)
Remotely accessing your Voicemail (while listening to voice mail greeting.)
#PIN
Transfer call to Mailbox (While ringing the Extension) #99
Call-Back (at busy tone) 5
Intrude (at busy tone) 79 07/07/04
USER PROGRAMMING OPTIONS CODES
Divert All Calls to an Extension *21* (Extn No.) #
Divert All Calls to Voice Mail *21* *99 #
Divert All Calls to an External number *210* (Tel No.) #
Clear Divert All #21#
Divert on No Answer to an Extension *61* (Extn No.) #
Divert on No Answer to Voice Mail *61* *99 #
Divert on No Answer to an External number *610* (Tel No.) #
Divert on No Answer to an Extension after S seconds *61* (Extn No.) *S #
Divert on No Answer to Voice Mail after S seconds *61* *99 *S #
Divert on No Answer to an External number after S seconds *61* (Tel No.) *S #
Clear Divert on No Answer #61#
Divert on Busy to an extension *67* (Extn No.) #
Divert on Busy to Voice Mail *67* *99 #
Clear Divert on Busy #67#
Do Not Disturb *62#
Clear Do Not Disturb #62#
Program entries in Your Personal Address Book **8 (Index Code 00-49) * (Tel No.) #
Manual Day/Night Switch *07* (Ringing Mode 1-5) #
Change PIN code *70* PIN * NEWPIN * NEWPIN #
Clear PIN code *70* PIN #
Program PIN Code (if you have no PIN code) *70** NEWPIN * NEWPIN #
Activate Roaming PIN *68* (Roaming Account) * (Roaming PIN) #
Deactivate Roaming PIN #68#
Restrict CLI for all calls *30#
Select an external line and Restrict CLI for this call only *0 *30#
Present CLI for all calls *31#
Select an external line and Present CLI for this call only *0 *31#

eircom advantage executive phone D3 user guide
45
4.3 eircom advantage executive phone programming guide
4.3.1 General User programming allows executive system phone users to tailor the features and settings of the executive system phone to suit their own ways of working. The following options can be accessed and changed by pressing the <Menus> key when the executive system phone is idle
Personal Address Book Common Address Book Call Diversion Mailbox Settings * Phone Settings Day/Night Changeover** List of Calls Group Settings Roaming PIN*** Ringing Volume Handset Volume Speaker Volume Headset Volume LCD Contrast Change Language Define Function Keys Keypad Tones Phone Software Receive Page Calls Show Number Change PIN Code
Redefine Keys
01: Fn Key 01 02: Fn Key 02
03…. Redial Last Number
Day/Night Ringing ** Conference Call Intrude Call Call Pick Up Park Current Call Phone Book Internal Paging Transfer Call Call back Forward Recall CLI Restriction Roaming Pin *** Any line
Extension Key Line Key Speed Dial Key Central Speed Dial Notes: * Only available when the system is equipped with a voice module. (For information on using the
Voicemail see the voicemail guide) ** Only available if the extension has been enabled for Operator Functionality in system programming. *** Only available if the extension has been programmed as a Roaming PIN extension in system
programming.

eircom advantage executive phone D3 user guide
46
4.3.2 Phone Settings
1 1 : 2 5 F r i 0 7 / 1 2 / 0 1 E x t e n s i o n 1 5
M e n u s ���� ���� P h o n e B k
P e r s o n a l A d d r B o o k C a l l D i v e r s i o n
► P h o n e S e t t i n g s
S e l e c t ↑↑↑↑ ↓↓↓↓ E x i t
► R i n g i n g V o l u m e
H a n d s e t V o l u m e S p e a k e r V o l u m e
S e l e c t ↑↑↑↑ ↓↓↓↓ B a c k
4.3.3 Ringing Volume
R i n g i n g V o l u m e 2 0 %
S e l e c t ↑↑↑↑ ↓↓↓↓ B a c k
To enter the Phone Settings Menu, while the System Phone is idle -
• Press the <Menus> key
• Use the ↑↑↑↑↓↓↓↓ keys to scroll through the options
When the cursor is alongside Phone Settings -
• Press the <Select > key A list of settings will be displayed.
The volume is adjusted in steps of 5%. Each step is represented by a character position on the second line of the display and the % setting is shown in the top right-hand corner of the display. Use the up & down arrow keys (↑↑↑↑↓↓↓↓) to adjust the volume. As the volume is altered, a short burst
of ringing will be heard to demonstrate the new volume setting.
• Press the <Select> key to set the new volume level, the display will automatically return to the Phone Settings menu.
• Press the <Back> key to return to the Phone Settings menu without setting the new volume level.
To change a setting
• Press the <Select> key when the cursor is alongside the setting to be changed
• Press the <Back> key to return to the Phone programming menu

eircom advantage executive phone D3 user guide
47
4.3.4 Handset Volume
L i f t H a n d s e t
B a c k
H a n d s e t V o l u m e 2 0 %
S e l e c t ↑↑↑↑ ↓↓↓↓ B a c k
Use the up & down arrow keys (↑↑↑↑↓↓↓↓) to adjust the volume. As the volume is altered, a short burst of tone will be heard to demonstrate the new volume setting.
• Press the <Select> key to set the new volume level, the display will then prompt the user to replace the handset and on doing so, the display will return to the Phone Settings menu.
• Press the <Back> key and replace the handset to return to the Phone Settings menu without setting the new volume level.
4.3.5 Speaker Volume
S p e a k e r V o l u m e 2 0 %
S e l e c t ↑↑↑↑ ↓↓↓↓ B a c k
Use the up & down arrow keys (↑↑↑↑↓↓↓↓) to adjust the volume. As the volume is altered, a short burst of tone will be heard to demonstrate the new volume setting.
• Press the <Select> key to set the new volume level, the display will automatically return to the Phone Settings menu.
• Press the <Back> key to return to the Phone Settings menu without setting the new volume level.
When Handset Volume is selected, the display will prompt the user to –
• Lift Handset
• On lifting the handset the current handset volume will be displayed
The volume is adjusted in steps of 5%. Each step is represented by a character position on the second line of the display and the % setting is shown in the top right-hand corner of the display.
The volume is adjusted in steps of 5%. Each step is represented by a character position on the second line of the display and the % setting is shown in the top right-hand corner of the display.

eircom advantage executive phone D3 user guide
48
4.3.6 Headset Volume
H e a d s e t V o l u m e 2 0 %
S e l e c t ↑↑↑↑ ↓↓↓↓ B a c k
N o H e a d s e t C o n n e c t e d B a c k
Use the up & down arrow keys (↑↑↑↑↓↓↓↓) to adjust the volume. As the volume is altered, a short burst of tone will be heard to demonstrate the new volume setting.
• Press the <Select> key to set the new volume level, the display will automatically return to the Phone Settings menu.
• Press the <Back> key to return to the Phone Settings menu without setting the new volume level
4.3.7 Display Contrast L C D C o n t r a s t 2 0 %
S e l e c t ↑↑↑↑ ↓↓↓↓ B a c k
Use the up & down arrow keys (↑↑↑↑↓↓↓↓) to adjust the contrast setting. As the contrast is altered, the characters on the display will appear darker or lighter.
• Press the <Select> key to set the new volume level, the display will automatically return to the Phone Settings menu.
• Press the <Back> key to return to the Phone Settings menu without setting the new volume level
The volume is adjusted in steps of 5%. Each step is represented by a character position on the second line of the display and the % setting is shown in the top right-hand corner of the display.
If there is no headset connected to the system phone then the system will indicate this by displaying the message shown.
The contrast is adjusted in steps of 5%. Each step is represented by a character position on the second line of the display and the % setting is shown in the top right-hand corner of the display.

eircom advantage executive phone D3 user guide
49
4.3.8 Change Language
C h a n g e L a n g u a g e
► E N G L I S H √√√√
N E D E R L A N D S S e l e c t ↑↑↑↑ ↓↓↓↓ B a c k
Use the up & down arrow keys (↑↑↑↑↓↓↓↓) to view the language options that are available.
• Press the <Select> key to set the language, the display will automatically return to the Phone Settings menu and the selected language will used for all displays.
• Press the <Back> key to return to the Phone Settings menu without setting the new language
4.3.9 Define Function Key
A set of pre-defined languages is available on the phone display. On entering this menu option the current language setting
will be marked by a tick (√).
There are 16 function keys on the Executive System Phone situated to the right of the handset. These keys are factory programmed as line keys, extension keys, speed dial keys and functions such as Conference and Pickup. If a DSS module is fitted then an additional 48 keys will be available to the user. These can be programmed with any of the functions listed below
− Redial Last Number
− Day/Night Ringing (*)
− Conference Call
− Intrude Call
− Call Pick Up
− Park Current Call
− Phone Book
− Internal Paging
− Transfer Call
− Call back
− Forward recall (**)
− CLI Restriction
− Roaming PIN (***)
− Any Key
− Extension Key
− Line Key
− Speed Dial Key
− Central Speed Dial
. Notes: * Only accessible if the extension has been enabled with Operator Functionality.
** Only accessable if the system has analogue line capability *** Only accessible if Roaming PIN is enabled for the extension

eircom advantage executive phone D3 user guide
50
4.3.10 Redefine Keys
R e d e f i n e K e y s
► 0 1 : L i n e 0 1
0 2 : E x t n 1 1 S e l e c t ↑↑↑↑ ↓↓↓↓ B a c k
F u n c t i o n K e y 0 1 R e d i a l L a s t N u m b e r C o n f e r e n c e
S e l e c t ↑↑↑↑ ↓↓↓↓ B a c k
R e d e f i n e K e y s
► 0 1 : I n t r u d e C a l l
0 2 : E x t n 1 1 S e l e c t ↑↑↑↑ ↓↓↓↓ B a c k
To Define the Function keys -
• From the Phone Settings menu, select Redefine Keys
Note: Selecting the Reset All Keys option will return all keys to their default setting (factory set) as shown on the diagram above. The display will show the current settings for each of the 16 programmable keys.
• Use the ↑↑↑↑↓↓↓↓ keys to scroll through the list or press a function key to go directly to that key.
Note: The LED of each key will light as the cursor points to the key number.
• Press the <Select> key when the cursor is alongside the key to be redefined
The display will list the programmable functions available to the extension.
• Use the ↑↑↑↑↓↓↓↓ keys to scroll to the required function
• Press the <Select> key The display will show the key number with the new setting.
Press the <Back> key to return to the redefine keys menu
Notes: When assigning a function as a Speed Dial Key, the display will list all entries in the Personal Address Book. Select the one to be stored under the key. When that key is pressed, the telephone will automatically access a line and dial the stored number. When assigning a function key as a Central Speed Dial Key, the display will list all entries in the Common Address Book. Select the one to be stored under the key. When that key is pressed, the telephone will automatically access a line and dial the stored number. If the user programs a key with a function that has already been assigned to another key, then the first key will lose its original function and now appear on the display as undefined.
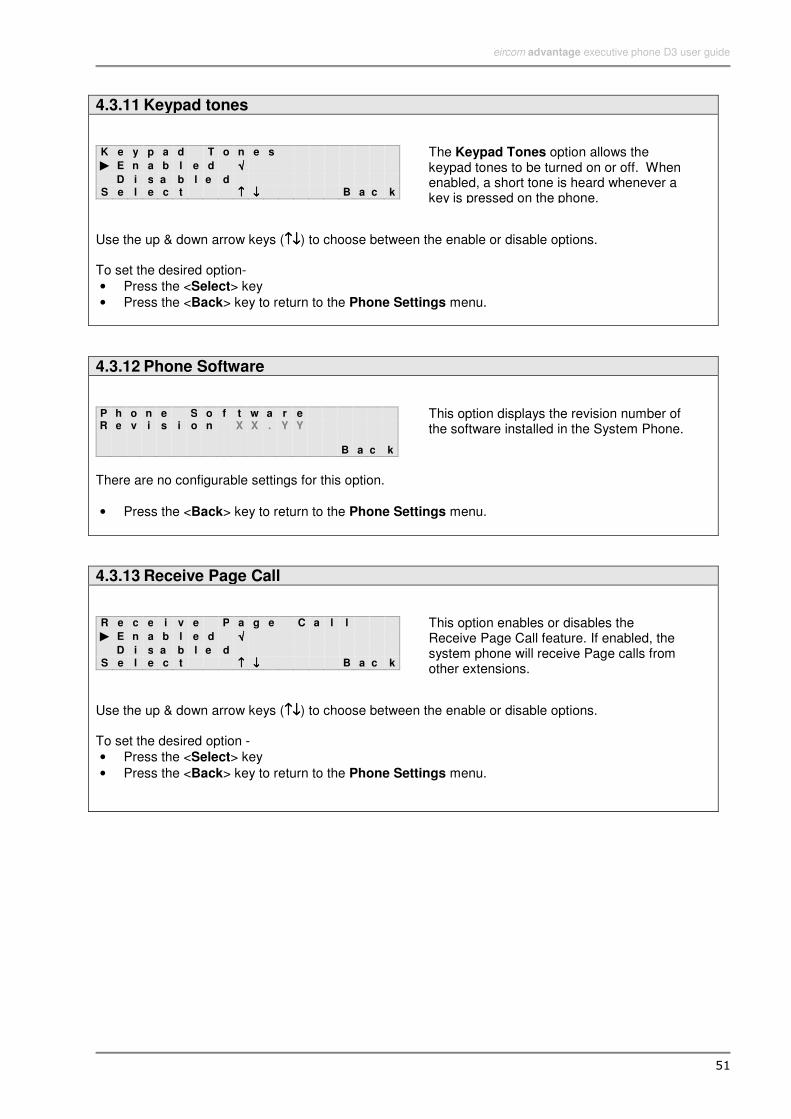
eircom advantage executive phone D3 user guide
51
4.3.11 Keypad tones
K e y p a d T o n e s
► E n a b l e d √√√√
D i s a b l e d S e l e c t ↑↑↑↑ ↓↓↓↓ B a c k
Use the up & down arrow keys (↑↑↑↑↓↓↓↓) to choose between the enable or disable options. To set the desired option-
• Press the <Select> key
• Press the <Back> key to return to the Phone Settings menu.
4.3.12 Phone Software
P h o n e S o f t w a r e R e v i s i o n X X . Y Y B a c k
There are no configurable settings for this option.
• Press the <Back> key to return to the Phone Settings menu.
4.3.13 Receive Page Call R e c e i v e P a g e C a l l
► E n a b l e d √√√√
D i s a b l e d S e l e c t ↑↑↑↑ ↓↓↓↓ B a c k
Use the up & down arrow keys (↑↑↑↑↓↓↓↓) to choose between the enable or disable options. To set the desired option -
• Press the <Select> key
• Press the <Back> key to return to the Phone Settings menu.
The Keypad Tones option allows the keypad tones to be turned on or off. When enabled, a short tone is heard whenever a key is pressed on the phone.
This option displays the revision number of the software installed in the System Phone.
This option enables or disables the Receive Page Call feature. If enabled, the system phone will receive Page calls from other extensions.

eircom advantage executive phone D3 user guide
52
4.3.14 Show Number S h o w N u m b e r
► E n a b l e d
D i s a b l e d S e l e c t ↑↑↑↑ ↓↓↓↓ B a c k
Use the up & down arrow keys (↑↑↑↑↓↓↓↓) to choose between the enable or disable options. To set the desired option -
• Press the <Select> key
• Press the <Back> key to return to the Phone Settings menu.
The system Phone user can select whether or not the Calling Line Identification (CLI) information (line number) is sent to line when an outgoing call is made.

eircom advantage executive phone D3 user guide
53
4.3.15 Change PIN Code
E n t e r O l d P i n C o d e : * * * *
A c c e p t D e l e t e
E n t e r N e w P i n C o d e : * * * *
A c c e p t D e l e t e
V e r i f y N e w P i n C o d e : * * * *
A c c e p t D e l e t e
P i n C o d e C h a n g e d
B a c k
I n v a l i d P i n C o d e B a c k
E r r o r C h a n g i n g P i n B a c k
Note: When remotely accessing voicemail (See Voicemail user guide), only certain 4 digit PIN codes are accepted by the system. The codes that will not be accepted by the system for remote access are the following:
• Any PIN code starting with the digits 19 or 20 (e.g. 1945, 2004, ..)
• Any PIN code that is a consecutive 4 digit number ( e.g. 1234, 9123,.. )
• Any PIN code that consists of the same 4 digits ( e.g. 1111, 4444 )
PIN codes are used when accessing voicemail
boxes. To change the PIN code
• Select Change Pin Code from the Phone Settings menu
• Enter the four digits of the old PIN code. Errors can be corrected using the <Delete> key
• Press the <Accept> key when finished
• Enter a new 4 digit PIN code
• Errors can be corrected using the <Delete> key
To save the new code -
• Press the <Accept> key To verify the New Pin Code -
• Enter the new 4 digit PIN To save the new PIN code -
• Press the <Accept> key If the PIN code was entered correctly, the display will show that the PIN code has been changed. If the old password was incorrect, the display will show that the PIN code is invalid. If the new PIN code and the verification PIN code were different the screen will show that an error has been made.