Embed Size (px)
Citation preview

Patrick Carey
COMPREHENSIVE
About the front cover imagePhotographs taken from nature provide the backdrop for Bill Brown’s artistic designs. Simple images of leaves and fl owers are manipulated through a series of design techniques to create the visually striking kaleidoscope image on the front cover. The philosophy of the artist’s work is simple: all art can be seen from a different perspective, leaving it up to viewers to interpret the art as they like. We invite you to look at nature from a New Perspective.
N E W P E R S P E C T I V E SNE
W P
ER
SP
EC
TI
VE
S
To learn more about Course Technology, visit www.cengage.com/coursetechnologyPurchase any of our products at your local college store or at our preferred online store www.ichapters.com
HTML, XHTML, and XML
3rd Edition
Building Skills for the Real World
N E W P E R S P E C T I V E S
ABOUT THIS BOOK
• Engages students with its hands-on approach and up-to-date coverage of HTML and XHTML, including an overview of Section 508 guidelines for Web accessibility
• Provides coverage of CSS and design styles to enhance Web page layout and appearance
• Teaches students how to embed multimedia content, create Web forms, and combine XHTML and other XML vocabularies
• Covers XML validation, including the creation and application of DTDs and schemas
NEW FOR THIS EDITION!
• Updated business case scenarios throughout the tutorials provide a rich and realistic context for students to apply the concepts and skills presented.
• InSight boxes offer expert advice and best practices to help students achieve a better understanding of concepts related to HTML, XHTML, and XML.
• Margin Tips provide helpful hints for more effi cient use of HTML, XHTML, and XML.
• Reality Check exercises are comprehensive, open-ended assignments that give students the opportunity to complete practical, real-world tasks, such as creating a personal Web site and creating and posting an online resume.
ABOUT THE NEW PERSPECTIVES SERIES
With its critical thinking and problem-solving approach, the New Perspectives Series is leading the way for today’s students to learn computer skills. Its case-based tutorials challenge students to apply what they are learning to real-life tasks, preparing them to easily transfer skills to new situations. Robust end-of-tutorial material offers students the resources they need to practice skills and enhance their knowledge. With the New Perspectives Series, students understand why they’re learning what they’re learning, and are better situated to retain skills beyond the classroom.
For additional information about the New Perspectives Series, please visit: www.cengage.com/ct/newperspectives
Provides complete coverage of HTML and XHTML, including:• Creating Web forms and using frames• Creating and validating well-formed
XHTML documents• Multimedia Web sites, including
audio, video, and Java applets
Provides a thorough introduction to HTML, XHTML and CSS, including:• Using HTML tags and styles to create
Web pages• Understanding CSS text properties• Creating and positioning graphics,
images, and boxes
Provides complete coverage of HTML, XHTML and DHTML, including:• Objects, expressions, functions,
program loops, and variables• Using JavaScript to validate Web
forms and create interactive Web page layouts
• Working with document nodes and the document node tree
HTML and XHTML5th Edition,Comprehensive1-4239-2546-7
Blended HTML, XHTML, and CSS 1st Edition, Introductory1-4239-0651-9
ALSO AVAILABLE
HTML, XHTML, and Dynamic HTML 4th Edition, Comprehensive1-4239-2543-2
HTML, XHTML, and XML 3rd Edition
COMPREHENSIVE
Carey
HT
ML
, XH
TM
L, a
nd
XM
L 3rd
Ed
itionC
OM
PR
EH
EN
SIV
E
0495806404_cvr_comp.indd 10495806404_cvr_comp.indd 1 4/16/09 10:18:50 AM4/16/09 10:18:50 AM
Licensed to:
New Perspectives on HTML, XHTML, and XML, 3rd Edition—Comprehensive
Vice President, Publisher: Nicole Jones Pinard
Executive Editor: Marie L. Lee
Associate Acquisitions Editor: Brandi Shailer
Senior Product Manager: Kathy Finnegan
Associate Product Manager: Leigh Robbins
Editorial Assistant: Julia Leroux-Lindsey
Director of Marketing: Cheryl Costantini
Marketing Manager: Ryan DeGrote
Marketing Coordinator: Kristen Panciocco
Developmental Editors: Mary Kemper, Robin M. Romer
Senior Content Project Manager: Jennifer Goguen McGrail
Composition: GEX Publishing Services
Text Designer: Steve Deschene
Art Director: Marissa Falco
Cover Designer: Elizabeth Paquin
Cover Art: Bill Brown
Copyeditor: Suzanne Huizenga
Proofreader: Kathy Orrino
Indexer: Alexandra Nickerson
© 2010 Course Technology, Cengage Learning
ALL RIGHTS RESERVED. No part of this work covered by the copyright herein maybe reproduced, transmitted, stored or used in any form or by any means graphic,electronic, or mechanical, including but not limited to photocopying, recording,scanning, digitizing, taping, Web distribution, information networks, or informa-tion storage and retrieval systems, except as permitted under Section 107 or 108
of the 1976 United States Copyright Act, without the prior written permission ofthe publisher.
Some of the product names and company names used in this book have been usedfor identification purposes only and may be trademarks or registered trademarksof their respective manufacturers and sellers.
Microsoft and the Office logo are either registered trademarks or trademarks ofMicrosoft Corporation in the United States and/or other countries. CourseTechnology, Cengage Learning is an independent entity from the MicrosoftCorporation, and not affiliated with Microsoft in any manner.
Disclaimer: Any fictional data related to persons or companies or URLs usedthroughout this book is intended for instructional purposes only. At the time thisbook was printed, any such data was fictional and not belonging to any real personsor companies.
ISBN-13: 978-0-495-80640-0
ISBN-10: 0-495-80640-4
Course Technology20 Channel Center Street
Boston, Massachusetts 02210
USA
Cengage Learning is a leading provider of customized learning solutions withoffice locations around the globe, including Singapore, the United Kingdom,Australia, Mexico, Brazil, and Japan. Locate your local office at: international.cengage.com/region
Cengage Learning products are represented in Canada by Nelson Education, Ltd.
To learn more about Course Technology, visit www.cengage.com/coursetechnologyTo learn more about Cengage Learning, visit www.cengage.com
Purchase any of our products at your local college store or at our preferred onlinestore www.ichapters.com
Printed in the United States of America1 2 3 4 5 6 7 8 9 13 12 11 10 09
For product information and technology assistance, contact us at Cengage Learning Customer & Sales Support, 1-800-354-9706
For permission to use material from this text or product, submit all requests online at cengage.com/permissions
Further permissions questions can be emailed [email protected]
A_C7002_FM.4c 4/24/09 9:38 AM Page ii
Copyright 2009 Cengage Learning, Inc. All Rights Reserved. May not be copied, scanned, or duplicated, in whole or in part.
Licensed to:
Session 1.1• Learn the history of the
Web and HTML• Describe HTML stan-
dards and specifications• Understand HTML ele-
ments and markup tags• Create the basic struc-
ture of an HTML file• Insert an HTML
comment
Session 1.2• Work with block-level
elements• Create ordered,
unordered, anddefinition lists
• Work with inlineelements
• Understand the divand span elements
Session 1.3• Add attributes to
HTML elements• Format page content
using the style attribute• Mark empty elements
with one-sided tags• Add an inline image to
a Web page• Work with character
sets and codes
Starting Data Files
Demo Case1
logo.jpg cengage.jpg logo.jpg euler.jpgdemo.gif eulertxt.htmdemo2.gifdemo_characters.htmdemo_html.htm
Case2 Case3 Case4
macbeth.jpg dessertweb.jpg logo.jpgmacbethtxt.htm torte.jpg smith.jpg
tortetxt.htm smith.txt
Developing a Web PageCreating a Product Page for a Startup Company
Case | Dave’s Devil Sticks
Dave Vinet is a machinist in Auburn, Maine. In his spare time, Dave builds andjuggles devil sticks—juggling props used in circuses and by street performers. Inrecent years, he has made customized sticks for his friends and colleagues.Encouraged by their enthusiasm for his work, Dave has decided to start a busi-ness called Dave’s Devil Sticks. So far his customers have come through word ofmouth; now Dave wants to advertise his business on the Web. To do that, Daveneeds to create a Web page that describes his company and its products. Hehas the text describing his company in a flyer that he hands out at jugglingconventions. He has also contacted a graphic artist to design a logo. He wantsto use this material in his Web page.
He has come to you for help in designing a Web page and writing the code. Hewants the Web page to contain the same information and graphics contained in hisflyer. To create Dave’s Web page, you’ll have to learn how to work with HTML, themarkup language used to create documents on the World Wide Web.
C6736_01 1/23/2008 16:15:52 Page 1
HTML and XHTML HTML 1
Tutorial 1Objectives
Copyright 2009 Cengage Learning, Inc. All Rights Reserved. May not be copied, scanned, or duplicated, in whole or in part.
Copyright 2009 Cengage Learning, Inc. All Rights Reserved. May not be copied, scanned, or duplicated, in whole or in part.
Licensed to:
Session 1.1
Exploring the History of the World Wide WebBefore you start creating a Web page for Dave, it’s helpful to first look at the history ofthe Web and how HTML was developed. You’ll start by reviewing networks.
NetworksA network is a structure that links several points called nodes allowing for the sharing ofinformation and services. For computer networks, each node is a device such as a computeror a printer or a scanner, capable of sending and receiving data electronically over thenetwork. A computer node is also called a host to distinguish it from other node devices.
As the network operates, nodes are either providing data to other nodes on the net-work or requesting data. A node that provides information or a service is called a server.For example, a print server is a network node that provides printing services to thenetwork; a file server is a node that provides storage space for saving and retrieving files.A computer or other device that requests services from a server is called a client. Net-works can follow several different designs. One of the most commonly used designs isthe client-server network in which several clients access information provided by one ormore servers. You might be using such a network to access your data files for this tutorial.
Networks can also be classified based on the range they cover. A network confined toa small geographic area, such as within a building or department, is referred to as a localarea network or LAN. A network that covers a wider area, such as several buildings orcities, is called a wide area network or WAN. Wide area networks typically consist oftwo or more local area networks connected together.
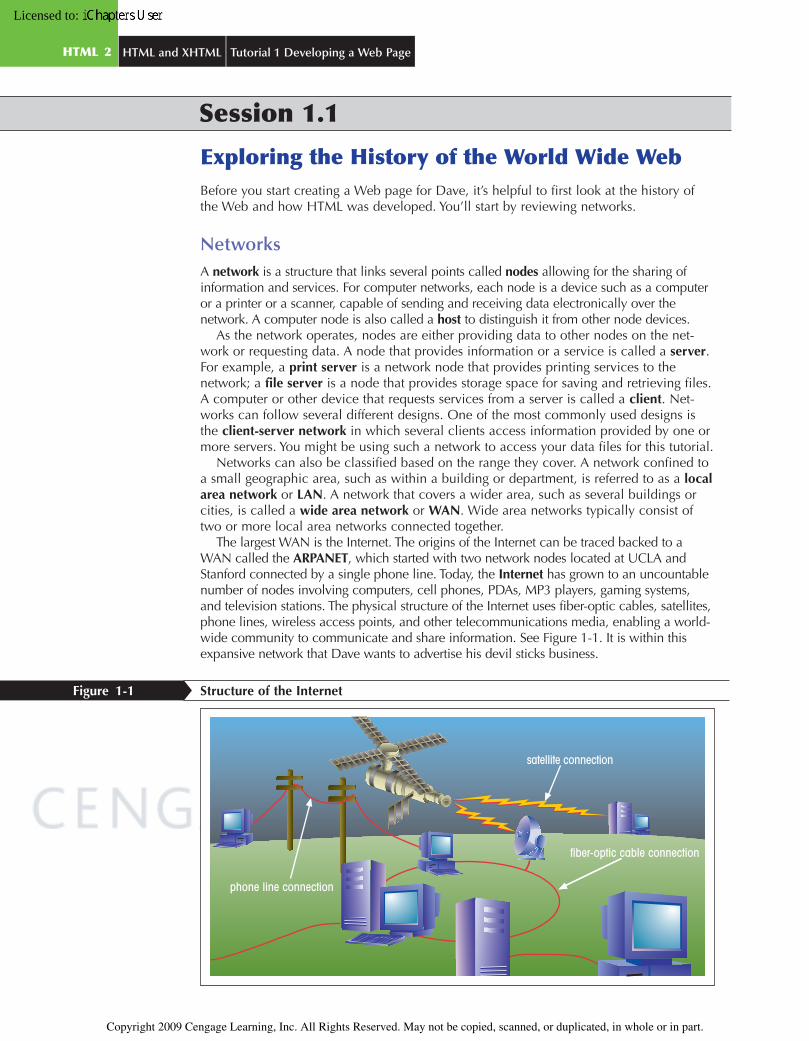
The largest WAN is the Internet. The origins of the Internet can be traced backed to aWAN called the ARPANET, which started with two network nodes located at UCLA andStanford connected by a single phone line. Today, the Internet has grown to an uncountablenumber of nodes involving computers, cell phones, PDAs, MP3 players, gaming systems,and television stations. The physical structure of the Internet uses fiber-optic cables, satellites,phone lines, wireless access points, and other telecommunications media, enabling a world-wide community to communicate and share information. See Figure 1-1. It is within thisexpansive network that Dave wants to advertise his devil sticks business.
Structure of the InternetFigure 1-1
phone line connection
fiber-optic cable connection
satellite connection
phone line connection
fiber-optic cable connection
satellite connection
C6736_01 1/8/2008 15:54:29 Page 2
HTML 2 HTML and XHTML Tutorial 1 Developing a Web Page
Copyright 2009 Cengage Learning, Inc. All Rights Reserved. May not be copied, scanned, or duplicated, in whole or in part.
Copyright 2009 Cengage Learning, Inc. All Rights Reserved. May not be copied, scanned, or duplicated, in whole or in part.
Licensed to:
Locating Information on a NetworkOne of the biggest obstacles to effectively using a network is not mechanical—it’s thehuman element. Users must be able to easily navigate the network and locate the infor-mation and services they need. Most of the early Internet tools required users to master abewildering array of terms, acronyms, and commands. Because network users had to bewell versed in computers and network technology, Internet use was limited to universitiesand departments of the government. To make the Internet accessible to the general pub-lic, it needed a simpler interface. This interface proved to be the World Wide Web.
The foundations for the World Wide Web, or the Web for short, were laid in 1989 byTimothy Berners-Lee and other researchers at the CERN nuclear research facility nearGeneva, Switzerland. They needed an information system that would make it easy fortheir researchers to locate and share data with minimal training and support. To meet thisneed, they developed a system of hypertext documents that enabled users to easily navi-gate from one topic to another. Hypertext is a method of organization in which informa-tion is not presented linearly, but in whatever order is requested by the user. For example,if you read the operating manual for your car starting with page 1 and proceeding to theend, you are processing the information linearly and in the order determined by themanual’s author. A hypertext approach would place the same information in a series ofsmaller documents, with each document dedicated to a single topic, allowing you—andnot the author—to choose the order and selection of topics you’ll view.
The key to hypertext is the use of links, which are the elements in a hypertext docu-ment that allow you to jump from one topic or document to another, usually by clickinga mouse button. Hypertext is ideally suited to use with networks because the end userdoes not need to know where a particular document, information source, or service islocated—he or she only needs to know how to activate the link. In the case of an expan-sive network like the Internet, documents can be located anywhere in the world; but thatis largely unseen by the user because of the hypertext structure. The fact that the Internetand the World Wide Web are synonymous in many users’ minds is a testament to thesuccess of the hypertext approach.
The original Web supported only textual documents, but the use of hypertext links hasexpanded through the years to encompass information in any form, including video,sound, interactive programs, conferencing, and online gaming. While the Web hasgreatly expanded to include these services, the basic foundation is still the same: a col-lection of interconnected documents linked through the use of hypertext.
Web Pages and Web ServersEach document on the World Wide Web is referred to as a Web page. Web pages arestored on Web servers, which are computers that make Web pages available to anydevice connected to the Internet. To view a Web page, the end user’s device needs a soft-ware program called a Web browser, which retrieves the page from the Web server andrenders it on the user’s computer or other device. See Figure 1-2.
C6736_01 1/8/2008 15:22:9 Page 3
HTML 3Tutorial 1 Developing a Web Page HTML and XHTML
Copyright 2009 Cengage Learning, Inc. All Rights Reserved. May not be copied, scanned, or duplicated, in whole or in part.
Copyright 2009 Cengage Learning, Inc. All Rights Reserved. May not be copied, scanned, or duplicated, in whole or in part.
Licensed to:
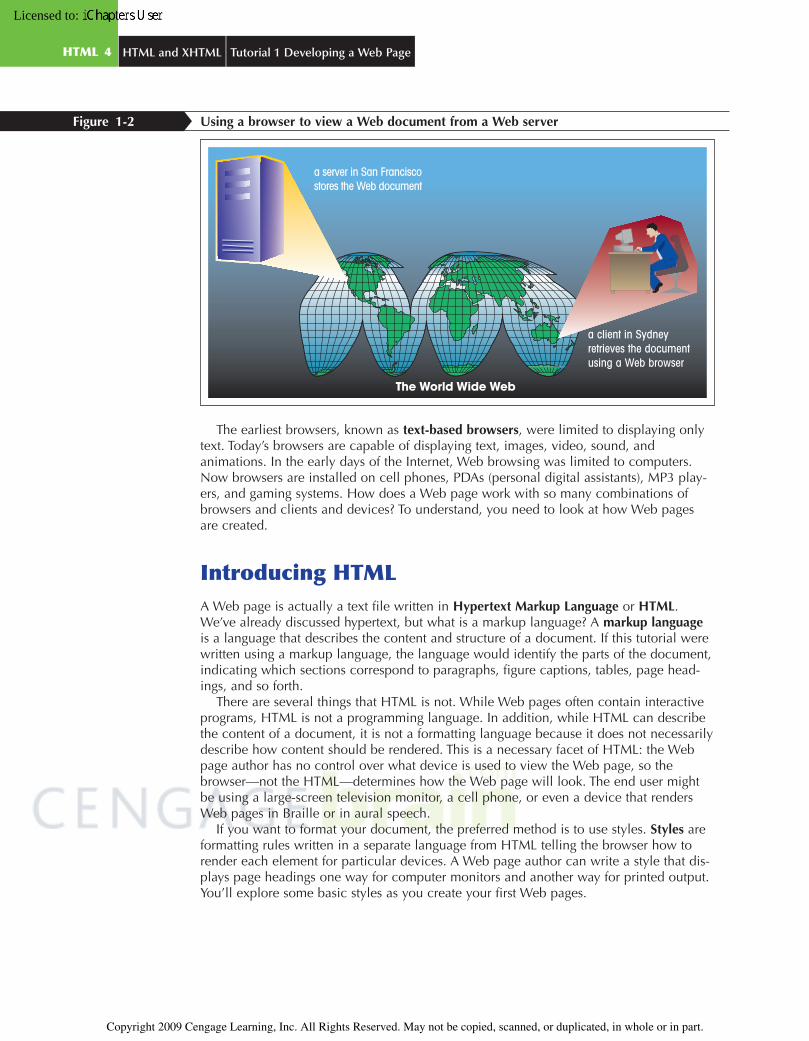
Using a browser to view a Web document from a Web serverFigure 1-2
The World Wide Web
a client in Sydneyretrieves the documentusing a Web browser
a server in San Franciscostores the Web document
The earliest browsers, known as text-based browsers, were limited to displaying onlytext. Today’s browsers are capable of displaying text, images, video, sound, andanimations. In the early days of the Internet, Web browsing was limited to computers.Now browsers are installed on cell phones, PDAs (personal digital assistants), MP3 play-ers, and gaming systems. How does a Web page work with so many combinations ofbrowsers and clients and devices? To understand, you need to look at how Web pagesare created.
Introducing HTMLA Web page is actually a text file written in Hypertext Markup Language or HTML.We’ve already discussed hypertext, but what is a markup language? A markup languageis a language that describes the content and structure of a document. If this tutorial werewritten using a markup language, the language would identify the parts of the document,indicating which sections correspond to paragraphs, figure captions, tables, page head-ings, and so forth.
There are several things that HTML is not. While Web pages often contain interactiveprograms, HTML is not a programming language. In addition, while HTML can describethe content of a document, it is not a formatting language because it does not necessarilydescribe how content should be rendered. This is a necessary facet of HTML: the Webpage author has no control over what device is used to view the Web page, so thebrowser—not the HTML—determines how the Web page will look. The end user mightbe using a large-screen television monitor, a cell phone, or even a device that rendersWeb pages in Braille or in aural speech.
If you want to format your document, the preferred method is to use styles. Styles areformatting rules written in a separate language from HTML telling the browser how torender each element for particular devices. A Web page author can write a style that dis-plays page headings one way for computer monitors and another way for printed output.You’ll explore some basic styles as you create your first Web pages.
C6736_01 1/8/2008 15:56:36 Page 4
HTML 4 HTML and XHTML Tutorial 1 Developing a Web Page
Copyright 2009 Cengage Learning, Inc. All Rights Reserved. May not be copied, scanned, or duplicated, in whole or in part.
Copyright 2009 Cengage Learning, Inc. All Rights Reserved. May not be copied, scanned, or duplicated, in whole or in part.
Licensed to:
The History of HTMLHTML evolved as the Web itself evolved. Thus in order to fully appreciate the nuances ofHTML, it’s a good idea to review the language’s history. The first popular markup lan-guage was the Standard Generalized Markup Language (SGML). Introduced in the 1980s,SGML is device- and system-independent, meaning that it can be applied to almost anytype of document stored in almost any format. While powerful, SGML is also quitecomplex; and for this reason SGML is limited to those organizations that can afford thecost and overhead of maintaining complex SGML environments. However, SGML canalso be used to create other markup languages that are tailored to specific tasks and aresimpler to use and maintain. HTML is one of the languages created with SGML.
In the early years after HTML was created, no single organization was responsible forthe language. Web developers were free to define and modify HTML in whatever waysthey thought best. Eventually, competing browsers, seeking to dominate the market,added new features called extensions to the language. The two major browsers duringthe 1990s, Netscape Navigator and Microsoft Internet Explorer, added the most exten-sions to HTML. Netscape provided an extension to add background sounds to docu-ments, while Internet Explorer added an extension to provide marquee-style text thatwould scroll automatically across the page. These extensions and others provided Webpage authors with more options, but at the expense of complicating Web pagedevelopment. A Web page that took advantage of extensions might work in one browserbut not in another.
Thus Web page authors faced the challenge of determining which browser or browserversion supported a particular extension, and they had to create a workaround for brows-ers that did not. By adding this layer of complexity to Web design, extensions, whileoften useful, diminished the promise of simplicity that made HTML so attractive in thefirst place.
Ultimately, a group of Web developers, programmers, and authors called the WorldWide Web Consortium, or the W3C, created a set of standards or specifications that allbrowser manufacturers were to follow. The W3C has no enforcement power; but becausea uniform language is in everyone’s best interest, the W3C’s recommendations are usuallyfollowed, though not always right away. The W3C also provides online tutorials, docu-mentation, and quizzes that you can use to test your knowledge of HTML and otherlanguages. For more information on the W3C and the services it offers, see its Web site atwww.w3c.org.
Figure 1-3 summarizes the various versions of HTML that the W3C has released overthe past decade. While you may not grasp all of the details of these versions yet, it’simportant to understand that HTML doesn’t come in only one version.
C6736_01 1/8/2008 15:22:9 Page 5
HTML 5Tutorial 1 Developing a Web Page HTML and XHTML
Copyright 2009 Cengage Learning, Inc. All Rights Reserved. May not be copied, scanned, or duplicated, in whole or in part.
Copyright 2009 Cengage Learning, Inc. All Rights Reserved. May not be copied, scanned, or duplicated, in whole or in part.
Licensed to:
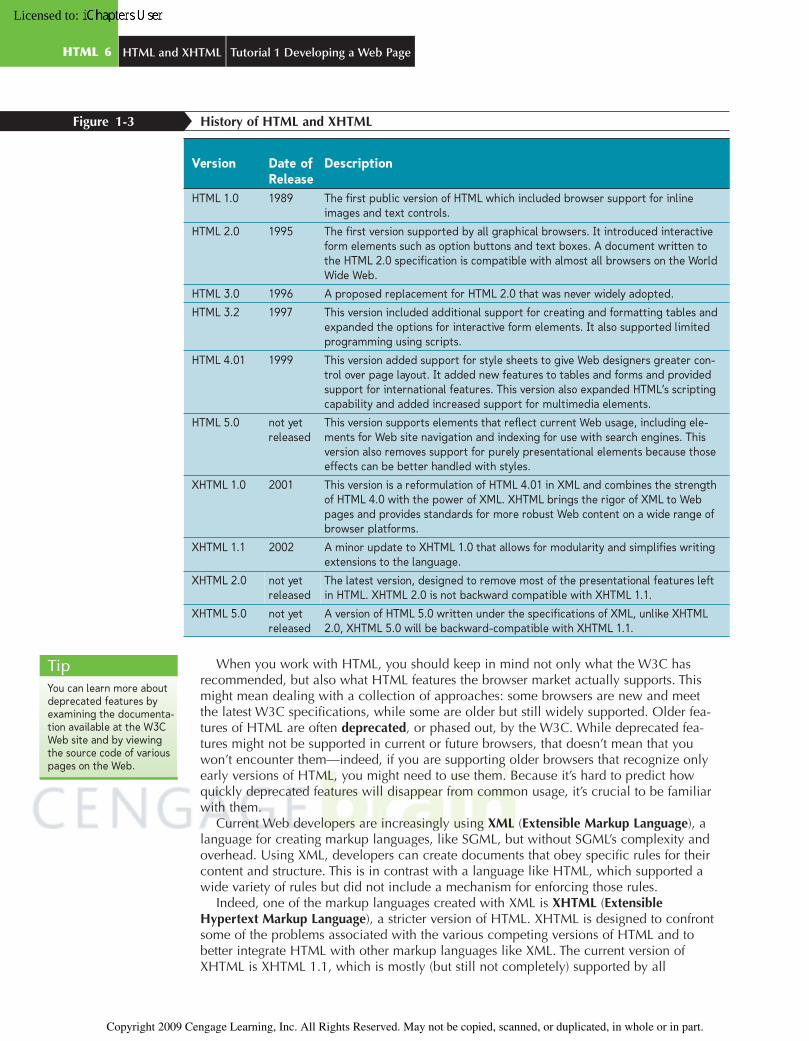
History of HTML and XHTMLFigure 1-3
Version Date ofRelease
Description
HTML 1.0 1989 The first public version of HTML which included browser support for inlineimages and text controls.
HTML 2.0 1995 The first version supported by all graphical browsers. It introduced interactiveform elements such as option buttons and text boxes. A document written tothe HTML 2.0 specification is compatible with almost all browsers on the WorldWide Web.
HTML 3.0 1996 A proposed replacement for HTML 2.0 that was never widely adopted.
HTML 3.2 1997 This version included additional support for creating and formatting tables andexpanded the options for interactive form elements. It also supported limitedprogramming using scripts.
HTML 4.01 1999 This version added support for style sheets to give Web designers greater con-trol over page layout. It added new features to tables and forms and providedsupport for international features. This version also expanded HTML’s scriptingcapability and added increased support for multimedia elements.
HTML 5.0 not yetreleased
This version supports elements that reflect current Web usage, including ele-ments for Web site navigation and indexing for use with search engines. Thisversion also removes support for purely presentational elements because thoseeffects can be better handled with styles.
XHTML 1.0 2001 This version is a reformulation of HTML 4.01 in XML and combines the strengthof HTML 4.0 with the power of XML. XHTML brings the rigor of XML to Webpages and provides standards for more robust Web content on a wide range ofbrowser platforms.
XHTML 1.1 2002 A minor update to XHTML 1.0 that allows for modularity and simplifies writingextensions to the language.
XHTML 2.0 not yetreleased
The latest version, designed to remove most of the presentational features leftin HTML. XHTML 2.0 is not backward compatible with XHTML 1.1.
XHTML 5.0 not yetreleased
A version of HTML 5.0 written under the specifications of XML, unlike XHTML2.0, XHTML 5.0 will be backward-compatible with XHTML 1.1.
When you work with HTML, you should keep in mind not only what the W3C hasrecommended, but also what HTML features the browser market actually supports. Thismight mean dealing with a collection of approaches: some browsers are new and meetthe latest W3C specifications, while some are older but still widely supported. Older fea-tures of HTML are often deprecated, or phased out, by the W3C. While deprecated fea-tures might not be supported in current or future browsers, that doesn’t mean that youwon’t encounter them—indeed, if you are supporting older browsers that recognize onlyearly versions of HTML, you might need to use them. Because it’s hard to predict howquickly deprecated features will disappear from common usage, it’s crucial to be familiarwith them.
Current Web developers are increasingly using XML (Extensible Markup Language), alanguage for creating markup languages, like SGML, but without SGML’s complexity andoverhead. Using XML, developers can create documents that obey specific rules for theircontent and structure. This is in contrast with a language like HTML, which supported awide variety of rules but did not include a mechanism for enforcing those rules.
Indeed, one of the markup languages created with XML is XHTML (ExtensibleHypertext Markup Language), a stricter version of HTML. XHTML is designed to confrontsome of the problems associated with the various competing versions of HTML and tobetter integrate HTML with other markup languages like XML. The current version ofXHTML is XHTML 1.1, which is mostly (but still not completely) supported by all
TipYou can learn more aboutdeprecated features byexamining the documenta-tion available at the W3CWeb site and by viewingthe source code of variouspages on the Web.
C6736_01 12/14/2007 15:27:48 Page 6
HTML 6 HTML and XHTML Tutorial 1 Developing a Web Page
Copyright 2009 Cengage Learning, Inc. All Rights Reserved. May not be copied, scanned, or duplicated, in whole or in part.
Copyright 2009 Cengage Learning, Inc. All Rights Reserved. May not be copied, scanned, or duplicated, in whole or in part.
Licensed to:
browsers. Because XHTML is an XML version of HTML, most of what you learn aboutHTML can be applied to XHTML.
Another version of XHTML, XHTML 2.0, is still in the draft stage and has proved to becontroversial because it is not backward-compatible with earlier versions of HTML andXHTML. In response to this controversy, another working draft of HTML called HTML 5.0is being developed. It provides greater support for emerging online technology while stillproviding support for older browsers. HTML 5 is also being developed under the XMLspecifications as XHTML 5.0. At the time of this writing, none of these versions hasmoved beyond the development stage nor has been adopted by the major browsers. Thisbook discusses the syntax of HTML 4.01 and XHTML 1.1, but also brings in deprecatedfeatures and browser-supported extensions where appropriate.
Writing HTML Code | InSight
Part of writing good HTML code is being aware of the requirements of various browsers anddevices as well as understanding the different versions of the language. Here are a fewguidelines for writing good HTML code:
• Become well versed in the history of HTML and the various versions of HTML and XHTML.Unlike other languages, HTML’s history does impact how you write your code.
• Know your market. Do you have to support older browsers, or have your clients standard-ized on one particular browser or browser version? Will your Web pages be viewed on asingle device like a computer, or do you have to support a variety of devices?
• Test your code on several different browsers and browser versions. Don’t assume that ifyour page works in one browser it will work on other browsers or even on earlier versionsof the same browser. Also check on the speed of the connection. A large file that per-forms well under a high-speed connection might be unusable under a dial-up connection.
• Read the documentation on the different versions of HTML and XHTML at the W3C Website and review the latest developments in new versions of the languages.
In general, any HTML code that you write should be compatible with the current versions ofthe following browsers: Internet Explorer (Windows), Firefox (Windows and Macintosh),Netscape Navigator (Windows), Opera (Windows), and Safari (Macintosh).
Tools for Creating HTML DocumentsBecause HTML documents are simple text files, you can create them with nothing morethan a basic text editor such as Windows Notepad. Specialized HTML authoring pro-grams, known as HTML converters and HTML editors, are also available to perform someof the rote work of document creation. An HTML converter is a program that translatestext written in another language into HTML code. You can create the source documentwith a word processor such as Microsoft Word, and then use the converter to save thedocument as an HTML file. Converters free you from the laborious task of typing HTMLcode; and because the conversion is automated, you usually do not have to worry aboutintroducing coding errors into your document. However, converters tend to create largeand complicated HTML files resulting in “bloated” code, which is more difficult to edit ifyou need to make changes. So while a converter can speed up Web page development,you will probably still have to invest time in cleaning up the code.
An HTML editor is a program that helps you create an HTML file by inserting HTMLcodes for you as you work. HTML editors can save you a lot of time and can help you workmore efficiently. Their advantages and limitations are similar to those of HTML converters.Like converters, HTML editors allow you to set up a Web page quickly, but you will still haveto work directly with the underlying HTML code to create a finished product.
C6736_01 12/14/2007 15:27:48 Page 7
HTML 7Tutorial 1 Developing a Web Page HTML and XHTML
Copyright 2009 Cengage Learning, Inc. All Rights Reserved. May not be copied, scanned, or duplicated, in whole or in part.
Copyright 2009 Cengage Learning, Inc. All Rights Reserved. May not be copied, scanned, or duplicated, in whole or in part.
Licensed to:
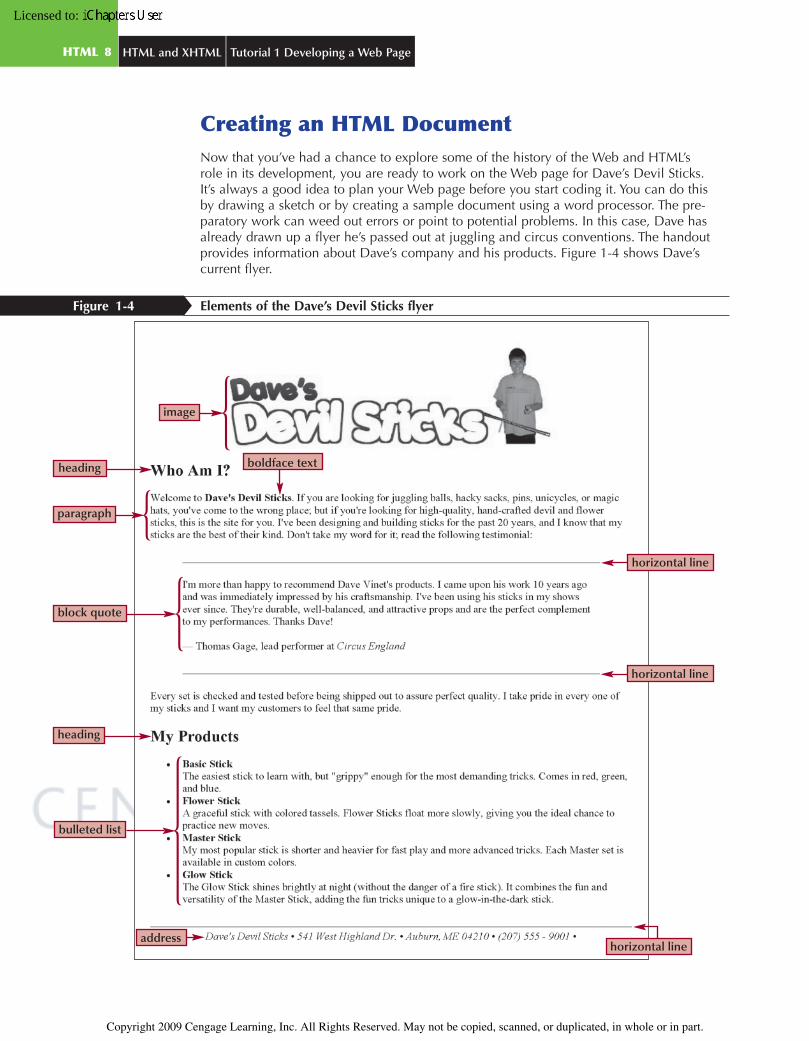
Creating an HTML DocumentNow that you’ve had a chance to explore some of the history of the Web and HTML’srole in its development, you are ready to work on the Web page for Dave’s Devil Sticks.It’s always a good idea to plan your Web page before you start coding it. You can do thisby drawing a sketch or by creating a sample document using a word processor. The pre-paratory work can weed out errors or point to potential problems. In this case, Dave hasalready drawn up a flyer he’s passed out at juggling and circus conventions. The handoutprovides information about Dave’s company and his products. Figure 1-4 shows Dave’scurrent flyer.
Elements of the Dave’s Devil Sticks flyerFigure 1-4
image
heading
paragraph
block quote
heading
bulleted list
addresshorizontal line
horizontal line
horizontal line
boldface text
C6736_01 1/8/2008 15:22:10 Page 8
HTML 8 HTML and XHTML Tutorial 1 Developing a Web Page
Copyright 2009 Cengage Learning, Inc. All Rights Reserved. May not be copied, scanned, or duplicated, in whole or in part.
Copyright 2009 Cengage Learning, Inc. All Rights Reserved. May not be copied, scanned, or duplicated, in whole or in part.
Licensed to:
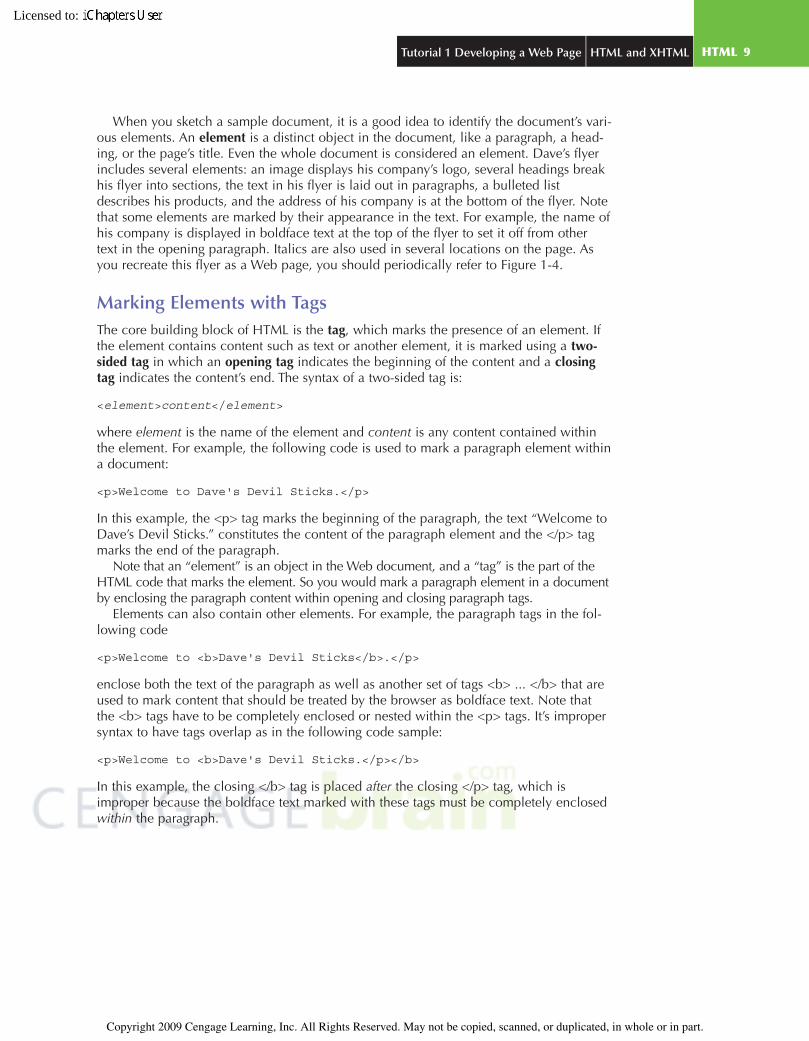
When you sketch a sample document, it is a good idea to identify the document’s vari-ous elements. An element is a distinct object in the document, like a paragraph, a head-ing, or the page’s title. Even the whole document is considered an element. Dave’s flyerincludes several elements: an image displays his company’s logo, several headings breakhis flyer into sections, the text in his flyer is laid out in paragraphs, a bulleted listdescribes his products, and the address of his company is at the bottom of the flyer. Notethat some elements are marked by their appearance in the text. For example, the name ofhis company is displayed in boldface text at the top of the flyer to set it off from othertext in the opening paragraph. Italics are also used in several locations on the page. Asyou recreate this flyer as a Web page, you should periodically refer to Figure 1-4.
Marking Elements with TagsThe core building block of HTML is the tag, which marks the presence of an element. Ifthe element contains content such as text or another element, it is marked using a two-sided tag in which an opening tag indicates the beginning of the content and a closingtag indicates the content’s end. The syntax of a two-sided tag is:
<element>content</element>
where element is the name of the element and content is any content contained withinthe element. For example, the following code is used to mark a paragraph element withina document:
<p>Welcome to Dave's Devil Sticks.</p>
In this example, the <p> tag marks the beginning of the paragraph, the text “Welcome toDave’s Devil Sticks.” constitutes the content of the paragraph element and the </p> tagmarks the end of the paragraph.
Note that an “element” is an object in the Web document, and a “tag” is the part of theHTML code that marks the element. So you would mark a paragraph element in a documentby enclosing the paragraph content within opening and closing paragraph tags.
Elements can also contain other elements. For example, the paragraph tags in the fol-lowing code
<p>Welcome to <b>Dave's Devil Sticks</b>.</p>
enclose both the text of the paragraph as well as another set of tags <b> ... </b> that areused to mark content that should be treated by the browser as boldface text. Note thatthe <b> tags have to be completely enclosed or nested within the <p> tags. It’s impropersyntax to have tags overlap as in the following code sample:
<p>Welcome to <b>Dave's Devil Sticks.</p></b>
In this example, the closing </b> tag is placed after the closing </p> tag, which isimproper because the boldface text marked with these tags must be completely enclosedwithin the paragraph.
C6736_01 1/8/2008 16:2:10 Page 9
HTML 9Tutorial 1 Developing a Web Page HTML and XHTML
Copyright 2009 Cengage Learning, Inc. All Rights Reserved. May not be copied, scanned, or duplicated, in whole or in part.
Copyright 2009 Cengage Learning, Inc. All Rights Reserved. May not be copied, scanned, or duplicated, in whole or in part.
Licensed to:
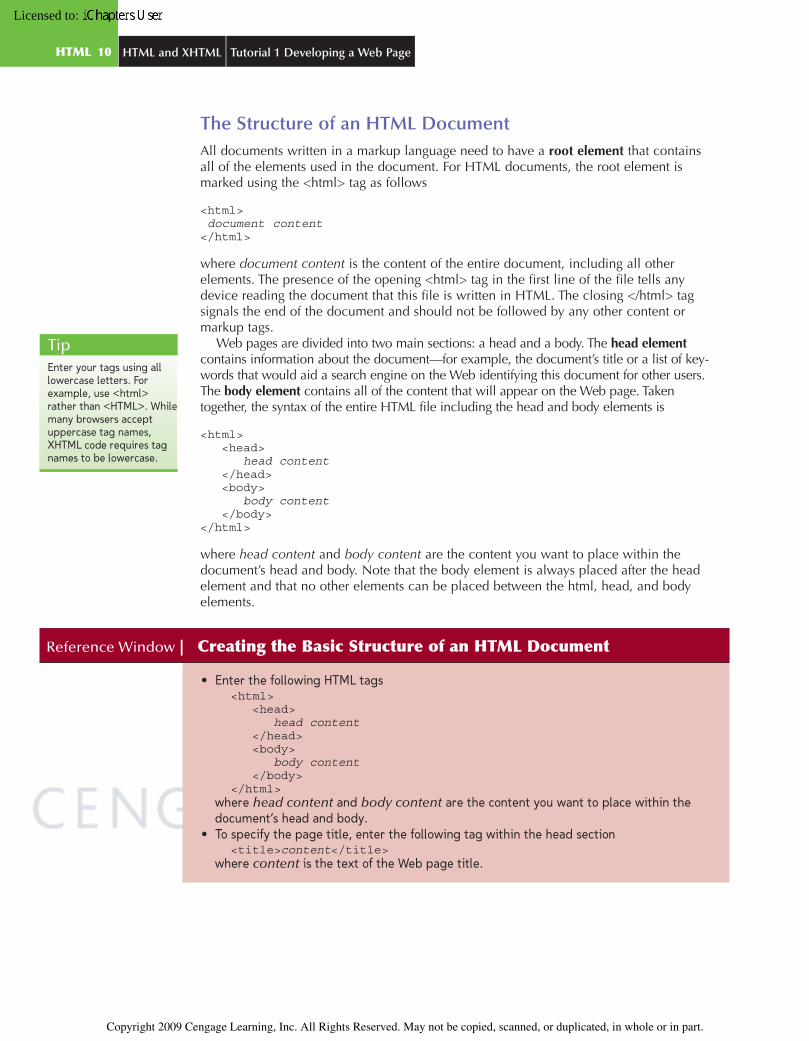
The Structure of an HTML DocumentAll documents written in a markup language need to have a root element that containsall of the elements used in the document. For HTML documents, the root element ismarked using the <html> tag as follows
<html>document content
</html>
where document content is the content of the entire document, including all otherelements. The presence of the opening <html> tag in the first line of the file tells anydevice reading the document that this file is written in HTML. The closing </html> tagsignals the end of the document and should not be followed by any other content ormarkup tags.
Web pages are divided into two main sections: a head and a body. The head elementcontains information about the document—for example, the document’s title or a list of key-words that would aid a search engine on the Web identifying this document for other users.The body element contains all of the content that will appear on the Web page. Takentogether, the syntax of the entire HTML file including the head and body elements is
<html><head>
head content</head><body>
body content</body>
</html>
where head content and body content are the content you want to place within thedocument’s head and body. Note that the body element is always placed after the headelement and that no other elements can be placed between the html, head, and bodyelements.
Reference Window | Creating the Basic Structure of an HTML Document
• Enter the following HTML tags<html>
<head>head content
</head><body>
body content</body>
</html>where head content and body content are the content you want to place within thedocument’s head and body.
• To specify the page title, enter the following tag within the head section<title>content</title>
where content is the text of the Web page title.
TipEnter your tags using alllowercase letters. Forexample, use <html>rather than <HTML>. Whilemany browsers acceptuppercase tag names,XHTML code requires tagnames to be lowercase.
C6736_01 1/8/2008 16:3:42 Page 10
HTML 10 HTML and XHTML Tutorial 1 Developing a Web Page
Copyright 2009 Cengage Learning, Inc. All Rights Reserved. May not be copied, scanned, or duplicated, in whole or in part.
Copyright 2009 Cengage Learning, Inc. All Rights Reserved. May not be copied, scanned, or duplicated, in whole or in part.
Licensed to:
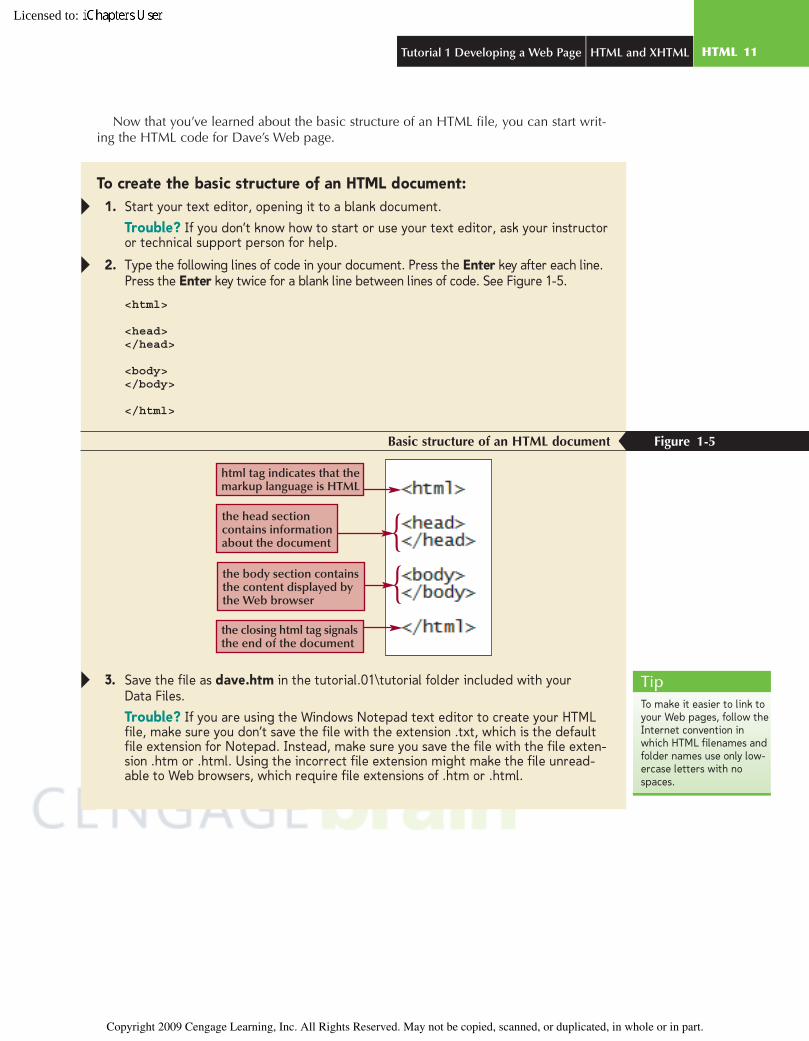
Now that you’ve learned about the basic structure of an HTML file, you can start writ-ing the HTML code for Dave’s Web page.
To create the basic structure of an HTML document:1. Start your text editor, opening it to a blank document.
Trouble? If you don’t know how to start or use your text editor, ask your instructoror technical support person for help.
2. Type the following lines of code in your document. Press the Enter key after each line.Press the Enter key twice for a blank line between lines of code. See Figure 1-5.
<html>
<head></head>
<body></body>
</html>
Basic structure of an HTML document Figure 1-5
html tag indicates that themarkup language is HTML
the head sectioncontains informationabout the document
the closing html tag signalsthe end of the document
the body section containsthe content displayed bythe Web browser
3. Save the file as dave.htm in the tutorial.01\tutorial folder included with yourData Files.
Trouble? If you are using the Windows Notepad text editor to create your HTMLfile, make sure you don’t save the file with the extension .txt, which is the defaultfile extension for Notepad. Instead, make sure you save the file with the file exten-sion .htm or .html. Using the incorrect file extension might make the file unread-able to Web browsers, which require file extensions of .htm or .html.
TipTo make it easier to link toyour Web pages, follow theInternet convention inwhich HTML filenames andfolder names use only low-ercase letters with nospaces.
C6736_01 1/8/2008 16:9:10 Page 11
HTML 11Tutorial 1 Developing a Web Page HTML and XHTML
Copyright 2009 Cengage Learning, Inc. All Rights Reserved. May not be copied, scanned, or duplicated, in whole or in part.
Copyright 2009 Cengage Learning, Inc. All Rights Reserved. May not be copied, scanned, or duplicated, in whole or in part.
Licensed to:
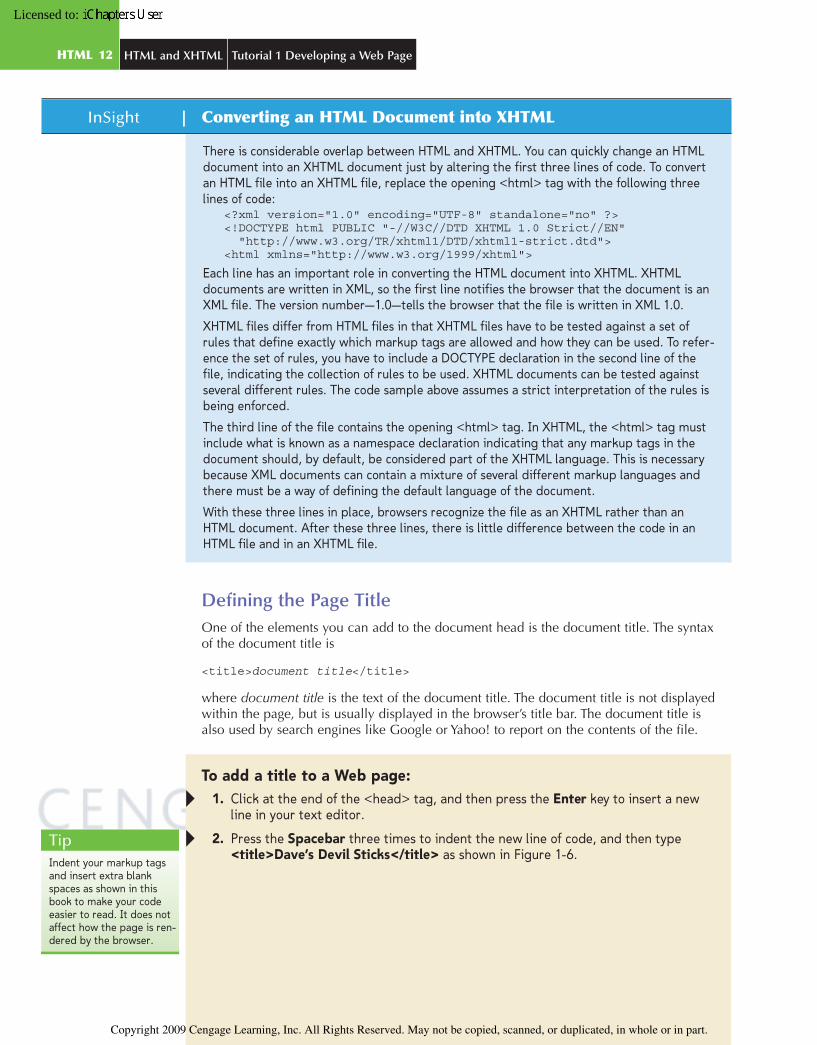
InSight | Converting an HTML Document into XHTML
There is considerable overlap between HTML and XHTML. You can quickly change an HTMLdocument into an XHTML document just by altering the first three lines of code. To convertan HTML file into an XHTML file, replace the opening <html> tag with the following threelines of code:
<?xml version="1.0" encoding="UTF-8" standalone="no" ?><!DOCTYPE html PUBLIC "-//W3C//DTD XHTML 1.0 Strict//EN"
"http://www.w3.org/TR/xhtml1/DTD/xhtml1-strict.dtd"><html xmlns="http://www.w3.org/1999/xhtml">
Each line has an important role in converting the HTML document into XHTML. XHTMLdocuments are written in XML, so the first line notifies the browser that the document is anXML file. The version number—1.0—tells the browser that the file is written in XML 1.0.
XHTML files differ from HTML files in that XHTML files have to be tested against a set ofrules that define exactly which markup tags are allowed and how they can be used. To refer-ence the set of rules, you have to include a DOCTYPE declaration in the second line of thefile, indicating the collection of rules to be used. XHTML documents can be tested againstseveral different rules. The code sample above assumes a strict interpretation of the rules isbeing enforced.
The third line of the file contains the opening <html> tag. In XHTML, the <html> tag mustinclude what is known as a namespace declaration indicating that any markup tags in thedocument should, by default, be considered part of the XHTML language. This is necessarybecause XML documents can contain a mixture of several different markup languages andthere must be a way of defining the default language of the document.
With these three lines in place, browsers recognize the file as an XHTML rather than anHTML document. After these three lines, there is little difference between the code in anHTML file and in an XHTML file.
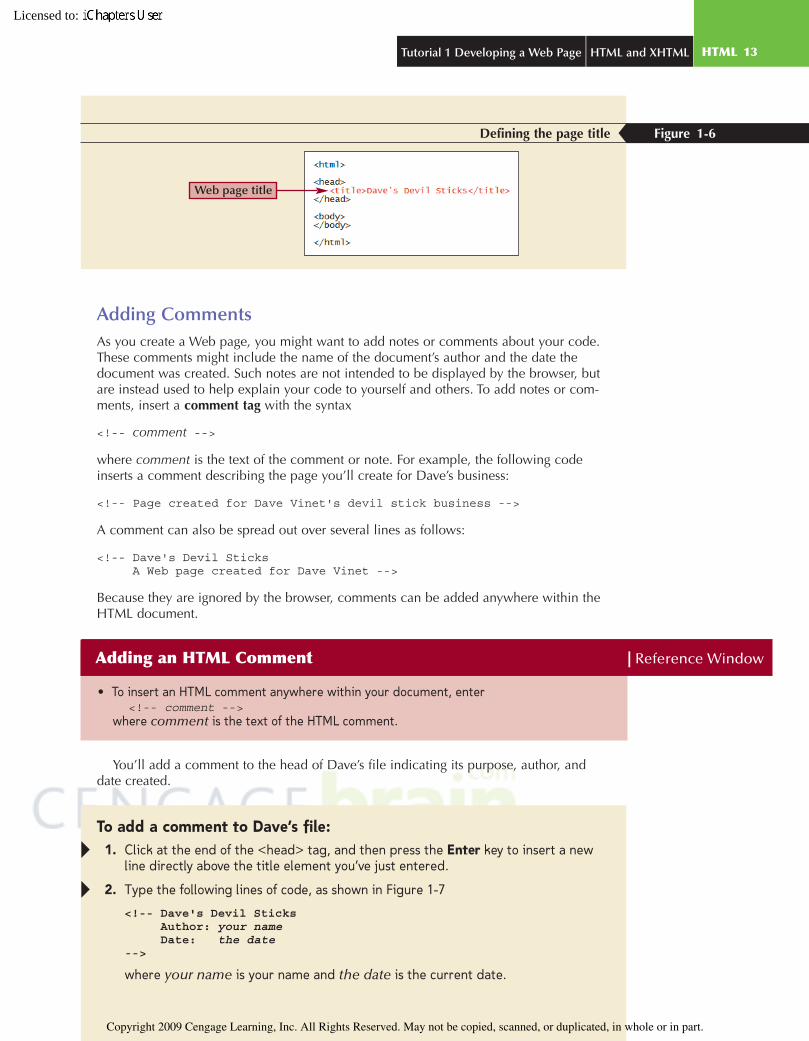
Defining the Page TitleOne of the elements you can add to the document head is the document title. The syntaxof the document title is
<title>document title</title>
where document title is the text of the document title. The document title is not displayedwithin the page, but is usually displayed in the browser’s title bar. The document title isalso used by search engines like Google or Yahoo! to report on the contents of the file.
To add a title to a Web page:1. Click at the end of the <head> tag, and then press the Enter key to insert a new
line in your text editor.
2. Press the Spacebar three times to indent the new line of code, and then type<title>Dave’s Devil Sticks</title> as shown in Figure 1-6.
TipIndent your markup tagsand insert extra blankspaces as shown in thisbook to make your codeeasier to read. It does notaffect how the page is ren-dered by the browser.
C6736_01 4/16/2009 9:20:51 Page 12
HTML 12 HTML and XHTML Tutorial 1 Developing a Web Page
Copyright 2009 Cengage Learning, Inc. All Rights Reserved. May not be copied, scanned, or duplicated, in whole or in part.
Copyright 2009 Cengage Learning, Inc. All Rights Reserved. May not be copied, scanned, or duplicated, in whole or in part.
Licensed to:
Defining the page title Figure 1-6
Web page title
Adding CommentsAs you create a Web page, you might want to add notes or comments about your code.These comments might include the name of the document’s author and the date thedocument was created. Such notes are not intended to be displayed by the browser, butare instead used to help explain your code to yourself and others. To add notes or com-ments, insert a comment tag with the syntax
<!-- comment -->
where comment is the text of the comment or note. For example, the following codeinserts a comment describing the page you’ll create for Dave’s business:
<!-- Page created for Dave Vinet's devil stick business -->
A comment can also be spread out over several lines as follows:
<!-- Dave's Devil SticksA Web page created for Dave Vinet -->
Because they are ignored by the browser, comments can be added anywhere within theHTML document.
Adding an HTML Comment | Reference Window
• To insert an HTML comment anywhere within your document, enter<!-- comment -->
where comment is the text of the HTML comment.
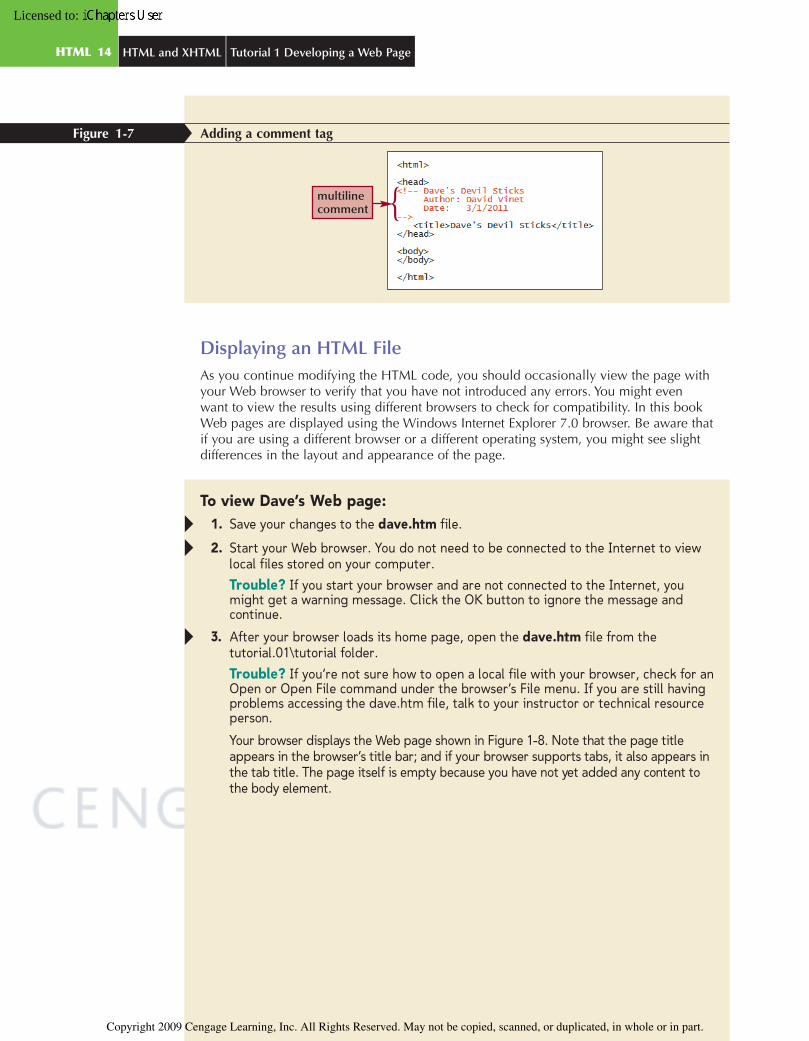
You’ll add a comment to the head of Dave’s file indicating its purpose, author, anddate created.
To add a comment to Dave’s file:1. Click at the end of the <head> tag, and then press the Enter key to insert a new
line directly above the title element you’ve just entered.
2. Type the following lines of code, as shown in Figure 1-7
<!-- Dave's Devil SticksAuthor: your nameDate: the date
-->
where your name is your name and the date is the current date.
C6736_01 1/8/2008 16:9:57 Page 13
HTML 13Tutorial 1 Developing a Web Page HTML and XHTML
Copyright 2009 Cengage Learning, Inc. All Rights Reserved. May not be copied, scanned, or duplicated, in whole or in part.
Copyright 2009 Cengage Learning, Inc. All Rights Reserved. May not be copied, scanned, or duplicated, in whole or in part.
Licensed to:
Adding a comment tagFigure 1-7
multilinecomment
Displaying an HTML FileAs you continue modifying the HTML code, you should occasionally view the page withyour Web browser to verify that you have not introduced any errors. You might evenwant to view the results using different browsers to check for compatibility. In this bookWeb pages are displayed using the Windows Internet Explorer 7.0 browser. Be aware thatif you are using a different browser or a different operating system, you might see slightdifferences in the layout and appearance of the page.
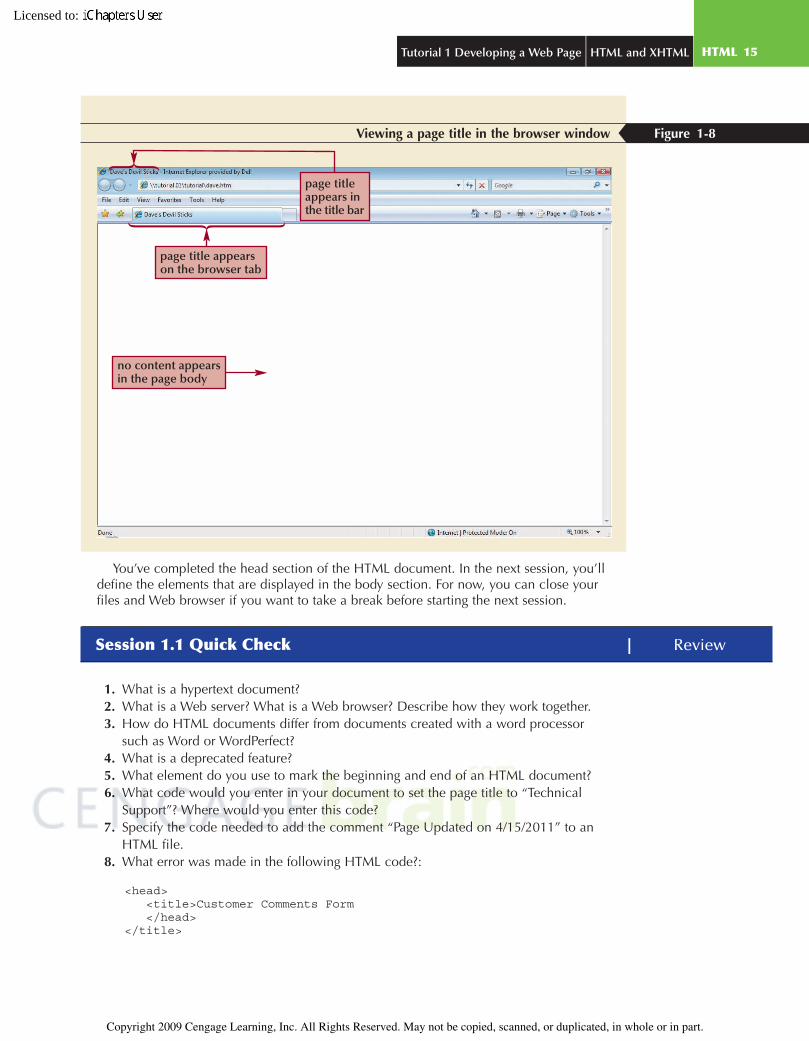
To view Dave’s Web page:1. Save your changes to the dave.htm file.
2. Start your Web browser. You do not need to be connected to the Internet to viewlocal files stored on your computer.
Trouble? If you start your browser and are not connected to the Internet, youmight get a warning message. Click the OK button to ignore the message andcontinue.
3. After your browser loads its home page, open the dave.htm file from thetutorial.01\tutorial folder.
Trouble? If you’re not sure how to open a local file with your browser, check for anOpen or Open File command under the browser’s File menu. If you are still havingproblems accessing the dave.htm file, talk to your instructor or technical resourceperson.
Your browser displays the Web page shown in Figure 1-8. Note that the page titleappears in the browser’s title bar; and if your browser supports tabs, it also appears inthe tab title. The page itself is empty because you have not yet added any content tothe body element.
C6736_01 1/8/2008 16:10:49 Page 14
HTML 14 HTML and XHTML Tutorial 1 Developing a Web Page
Copyright 2009 Cengage Learning, Inc. All Rights Reserved. May not be copied, scanned, or duplicated, in whole or in part.
Copyright 2009 Cengage Learning, Inc. All Rights Reserved. May not be copied, scanned, or duplicated, in whole or in part.
Licensed to:
Viewing a page title in the browser window Figure 1-8
page titleappears inthe title bar
page title appearson the browser tab
no content appearsin the page body
You’ve completed the head section of the HTML document. In the next session, you’lldefine the elements that are displayed in the body section. For now, you can close yourfiles and Web browser if you want to take a break before starting the next session.
Session 1.1 Quick Check | Review
1. What is a hypertext document?2. What is a Web server? What is a Web browser? Describe how they work together.3. How do HTML documents differ from documents created with a word processor
such as Word or WordPerfect?4. What is a deprecated feature?5. What element do you use to mark the beginning and end of an HTML document?6. What code would you enter in your document to set the page title to “Technical
Support”? Where would you enter this code?7. Specify the code needed to add the comment “Page Updated on 4/15/2011” to an
HTML file.8. What error was made in the following HTML code?:
<head><title>Customer Comments Form</head>
</title>
C6736_01 1/8/2008 16:4:4 Page 15
HTML 15Tutorial 1 Developing a Web Page HTML and XHTML
Copyright 2009 Cengage Learning, Inc. All Rights Reserved. May not be copied, scanned, or duplicated, in whole or in part.
Copyright 2009 Cengage Learning, Inc. All Rights Reserved. May not be copied, scanned, or duplicated, in whole or in part.
Licensed to:
Session 1.2
Working with Block-Level ElementsYou’re now ready to begin entering content into the body of Dave’s Web page. The firstelements you’ll add are block-level elements, which are elements that contain contentthat is viewed as a distinct block within the Web page. When rendered visually, block-level elements start on a new line in the document. Paragraphs are one example of ablock-level element. To explore block-level and other HTML elements, a demo page hasbeen prepared for you.
To open the HTML Tags demo page:1. Use your browser to open the demo_html.htm file from the tutorial.01\demo
folder.
2. If your browser prompts you to allow code on the Web page to be run, click theOK button.
Working with HeadingsThe first block-level elements you’ll explore are heading elements. Heading elements areelements that contain the text of main headings on the Web page. They are often used forintroducing new topics or dividing the page into topical sections. The syntax to mark aheading element is
<hn>content</hn>
where n is an integer from 1 to 6. Content marked with the <h1> tag is considered a majorheading and is usually displayed in large bold text. Content marked with <h2> down to<h6> tags is used for subheadings and is usually displayed in progressively smaller bold text.To see how these headings appear on your computer, use the demo page.
Reference Window | Marking Block-Level Elements
• To mark a heading, enter<hn>content</hn>
where n is an integer from 1 to 6 and content is the text of heading.• To mark a paragraph, enter
<p>content</p>
• To mark a block quote, enter<blockquote>content</blockquote>
• To mark a generic block-level element, enter<div>content</div>
To view heading elements:1. Click in the blue box on the bottom left of the demo page, type <h1>Dave’s Devil
Sticks</h1> and then press the Enter key to go to a new line.
2. Type <h2>Auburn, ME 04210</h2>.
C6736_01 1/8/2008 16:11:9 Page 16
HTML 16 HTML and XHTML Tutorial 1 Developing a Web Page
Copyright 2009 Cengage Learning, Inc. All Rights Reserved. May not be copied, scanned, or duplicated, in whole or in part.
Copyright 2009 Cengage Learning, Inc. All Rights Reserved. May not be copied, scanned, or duplicated, in whole or in part.
Licensed to:
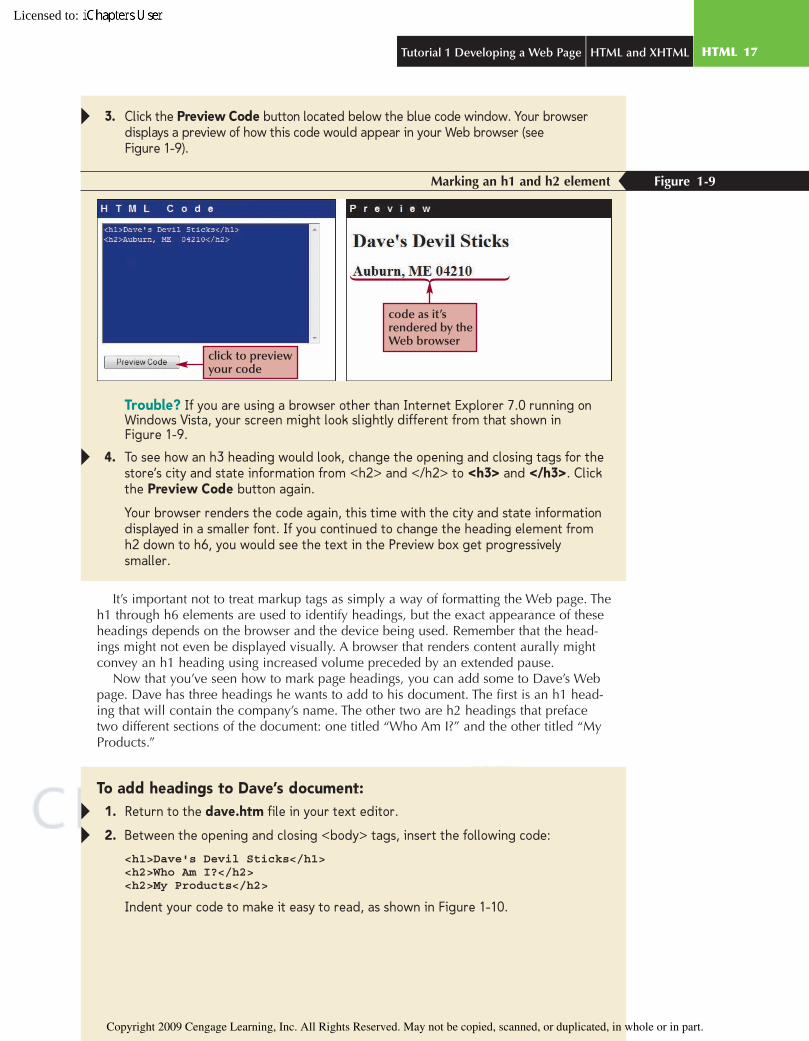
3. Click the Preview Code button located below the blue code window. Your browserdisplays a preview of how this code would appear in your Web browser (seeFigure 1-9).
Marking an h1 and h2 element Figure 1-9
click to previewyour code
code as it’srendered by theWeb browser
Trouble? If you are using a browser other than Internet Explorer 7.0 running onWindows Vista, your screen might look slightly different from that shown inFigure 1-9.
4. To see how an h3 heading would look, change the opening and closing tags for thestore’s city and state information from <h2> and </h2> to <h3> and </h3>. Clickthe Preview Code button again.
Your browser renders the code again, this time with the city and state informationdisplayed in a smaller font. If you continued to change the heading element fromh2 down to h6, you would see the text in the Preview box get progressivelysmaller.
It’s important not to treat markup tags as simply a way of formatting the Web page. Theh1 through h6 elements are used to identify headings, but the exact appearance of theseheadings depends on the browser and the device being used. Remember that the head-ings might not even be displayed visually. A browser that renders content aurally mightconvey an h1 heading using increased volume preceded by an extended pause.
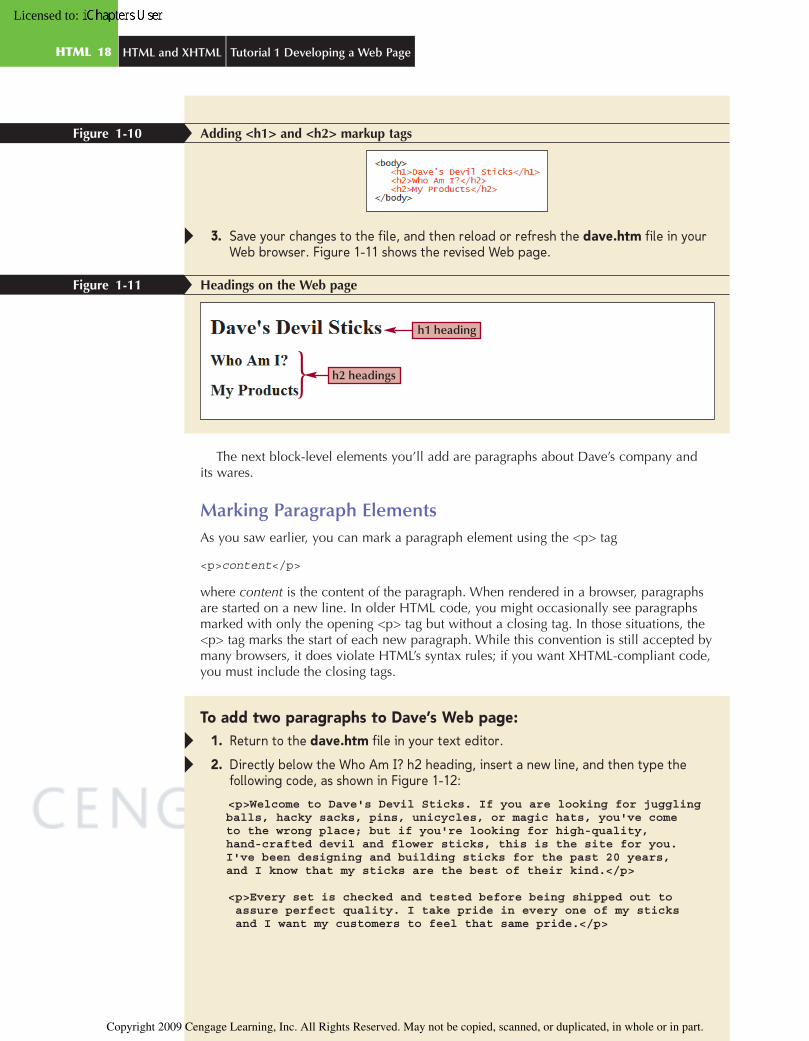
Now that you’ve seen how to mark page headings, you can add some to Dave’s Webpage. Dave has three headings he wants to add to his document. The first is an h1 head-ing that will contain the company’s name. The other two are h2 headings that prefacetwo different sections of the document: one titled “Who Am I?” and the other titled “MyProducts.”
To add headings to Dave’s document:1. Return to the dave.htm file in your text editor.
2. Between the opening and closing <body> tags, insert the following code:
<h1>Dave's Devil Sticks</h1><h2>Who Am I?</h2><h2>My Products</h2>
Indent your code to make it easy to read, as shown in Figure 1-10.
C6736_01 1/8/2008 16:4:5 Page 17
HTML 17Tutorial 1 Developing a Web Page HTML and XHTML
Copyright 2009 Cengage Learning, Inc. All Rights Reserved. May not be copied, scanned, or duplicated, in whole or in part.
Copyright 2009 Cengage Learning, Inc. All Rights Reserved. May not be copied, scanned, or duplicated, in whole or in part.
Licensed to:
Adding <h1> and <h2> markup tagsFigure 1-10
3. Save your changes to the file, and then reload or refresh the dave.htm file in yourWeb browser. Figure 1-11 shows the revised Web page.
Headings on the Web pageFigure 1-11
h1 heading
h2 headings
The next block-level elements you’ll add are paragraphs about Dave’s company andits wares.
Marking Paragraph ElementsAs you saw earlier, you can mark a paragraph element using the <p> tag
<p>content</p>
where content is the content of the paragraph. When rendered in a browser, paragraphsare started on a new line. In older HTML code, you might occasionally see paragraphsmarked with only the opening <p> tag but without a closing tag. In those situations, the<p> tag marks the start of each new paragraph. While this convention is still accepted bymany browsers, it does violate HTML’s syntax rules; if you want XHTML-compliant code,you must include the closing tags.
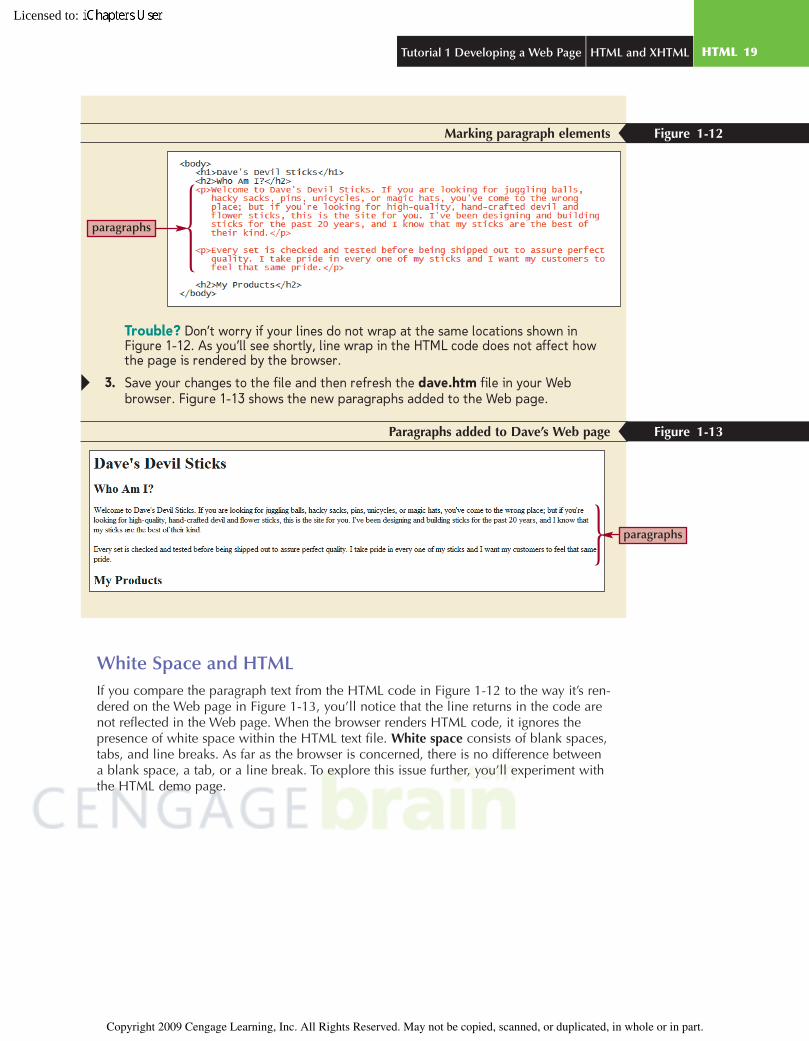
To add two paragraphs to Dave’s Web page:1. Return to the dave.htm file in your text editor.
2. Directly below the Who Am I? h2 heading, insert a new line, and then type thefollowing code, as shown in Figure 1-12:
<p>Welcome to Dave's Devil Sticks. If you are looking for jugglingballs, hacky sacks, pins, unicycles, or magic hats, you've cometo the wrong place; but if you're looking for high-quality,hand-crafted devil and flower sticks, this is the site for you.I've been designing and building sticks for the past 20 years,and I know that my sticks are the best of their kind.</p>
<p>Every set is checked and tested before being shipped out toassure perfect quality. I take pride in every one of my sticksand I want my customers to feel that same pride.</p>
C6736_01 12/14/2007 15:28:30 Page 18
HTML 18 HTML and XHTML Tutorial 1 Developing a Web Page
Copyright 2009 Cengage Learning, Inc. All Rights Reserved. May not be copied, scanned, or duplicated, in whole or in part.
Copyright 2009 Cengage Learning, Inc. All Rights Reserved. May not be copied, scanned, or duplicated, in whole or in part.
Licensed to:
Marking paragraph elements Figure 1-12
paragraphs
Trouble? Don’t worry if your lines do not wrap at the same locations shown inFigure 1-12. As you’ll see shortly, line wrap in the HTML code does not affect howthe page is rendered by the browser.
3. Save your changes to the file and then refresh the dave.htm file in your Webbrowser. Figure 1-13 shows the new paragraphs added to the Web page.
Paragraphs added to Dave’s Web page Figure 1-13
paragraphs
White Space and HTMLIf you compare the paragraph text from the HTML code in Figure 1-12 to the way it’s ren-dered on the Web page in Figure 1-13, you’ll notice that the line returns in the code arenot reflected in the Web page. When the browser renders HTML code, it ignores thepresence of white space within the HTML text file. White space consists of blank spaces,tabs, and line breaks. As far as the browser is concerned, there is no difference betweena blank space, a tab, or a line break. To explore this issue further, you’ll experiment withthe HTML demo page.
C6736_01 1/8/2008 16:16:9 Page 19
HTML 19Tutorial 1 Developing a Web Page HTML and XHTML
Copyright 2009 Cengage Learning, Inc. All Rights Reserved. May not be copied, scanned, or duplicated, in whole or in part.
Copyright 2009 Cengage Learning, Inc. All Rights Reserved. May not be copied, scanned, or duplicated, in whole or in part.
Licensed to:
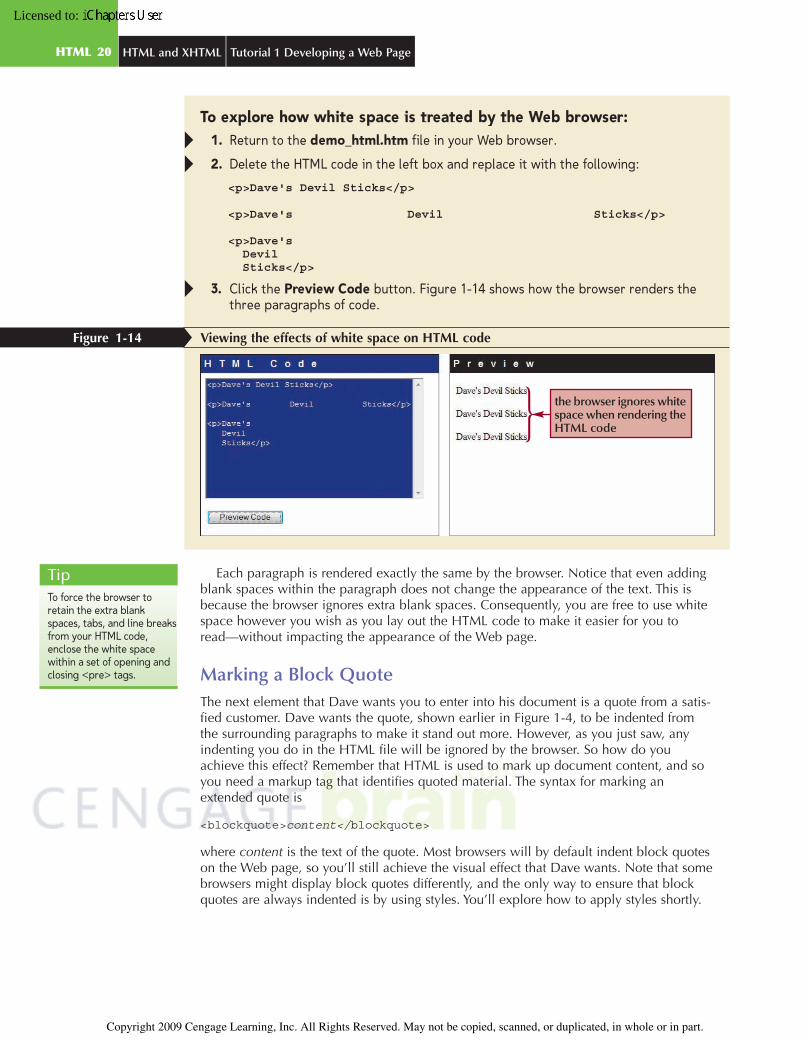
To explore how white space is treated by the Web browser:1. Return to the demo_html.htm file in your Web browser.
2. Delete the HTML code in the left box and replace it with the following:
<p>Dave's Devil Sticks</p>
<p>Dave's Devil Sticks</p>
<p>Dave'sDevilSticks</p>
3. Click the Preview Code button. Figure 1-14 shows how the browser renders thethree paragraphs of code.
Viewing the effects of white space on HTML codeFigure 1-14
the browser ignores whitespace when rendering theHTML code
Each paragraph is rendered exactly the same by the browser. Notice that even addingblank spaces within the paragraph does not change the appearance of the text. This isbecause the browser ignores extra blank spaces. Consequently, you are free to use whitespace however you wish as you lay out the HTML code to make it easier for you toread—without impacting the appearance of the Web page.
Marking a Block QuoteThe next element that Dave wants you to enter into his document is a quote from a satis-fied customer. Dave wants the quote, shown earlier in Figure 1-4, to be indented fromthe surrounding paragraphs to make it stand out more. However, as you just saw, anyindenting you do in the HTML file will be ignored by the browser. So how do youachieve this effect? Remember that HTML is used to mark up document content, and soyou need a markup tag that identifies quoted material. The syntax for marking anextended quote is
<blockquote>content</blockquote>
where content is the text of the quote. Most browsers will by default indent block quoteson the Web page, so you’ll still achieve the visual effect that Dave wants. Note that somebrowsers might display block quotes differently, and the only way to ensure that blockquotes are always indented is by using styles. You’ll explore how to apply styles shortly.
TipTo force the browser toretain the extra blankspaces, tabs, and line breaksfrom your HTML code,enclose the white spacewithin a set of opening andclosing <pre> tags.
C6736_01 1/8/2008 16:17:4 Page 20
HTML 20 HTML and XHTML Tutorial 1 Developing a Web Page
Copyright 2009 Cengage Learning, Inc. All Rights Reserved. May not be copied, scanned, or duplicated, in whole or in part.
Copyright 2009 Cengage Learning, Inc. All Rights Reserved. May not be copied, scanned, or duplicated, in whole or in part.
Licensed to:
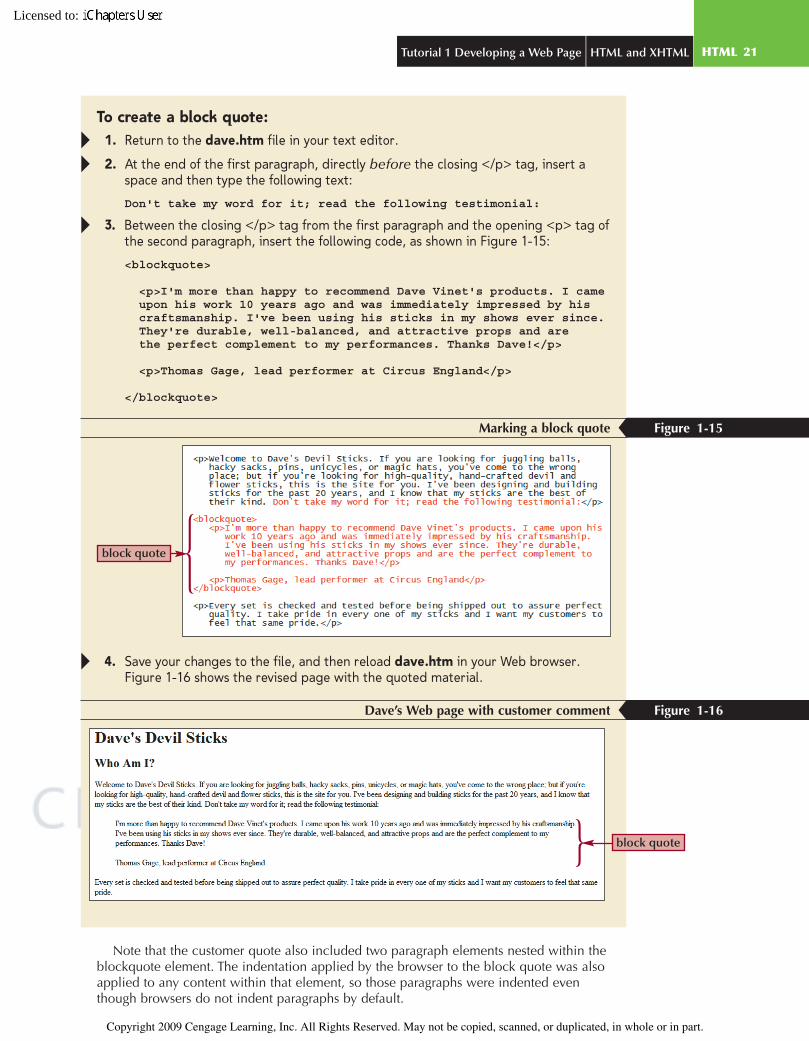
To create a block quote:1. Return to the dave.htm file in your text editor.
2. At the end of the first paragraph, directly before the closing </p> tag, insert aspace and then type the following text:
Don't take my word for it; read the following testimonial:
3. Between the closing </p> tag from the first paragraph and the opening <p> tag ofthe second paragraph, insert the following code, as shown in Figure 1-15:
<blockquote>
<p>I'm more than happy to recommend Dave Vinet's products. I cameupon his work 10 years ago and was immediately impressed by hiscraftsmanship. I've been using his sticks in my shows ever since.They're durable, well-balanced, and attractive props and arethe perfect complement to my performances. Thanks Dave!</p>
<p>Thomas Gage, lead performer at Circus England</p>
</blockquote>
Marking a block quote Figure 1-15
block quote
4. Save your changes to the file, and then reload dave.htm in your Web browser.Figure 1-16 shows the revised page with the quoted material.
Dave’s Web page with customer comment Figure 1-16
block quote
Note that the customer quote also included two paragraph elements nested within theblockquote element. The indentation applied by the browser to the block quote was alsoapplied to any content within that element, so those paragraphs were indented eventhough browsers do not indent paragraphs by default.
C6736_01 1/8/2008 16:18:15 Page 21
HTML 21Tutorial 1 Developing a Web Page HTML and XHTML
Copyright 2009 Cengage Learning, Inc. All Rights Reserved. May not be copied, scanned, or duplicated, in whole or in part.
Copyright 2009 Cengage Learning, Inc. All Rights Reserved. May not be copied, scanned, or duplicated, in whole or in part.
Licensed to:
Marking a ListDave has a list of products that he wants to display on his Web page. This information ispresented on his flyer as a bulleted list. He wants something similar on the Web site.HTML supports three kinds of lists: ordered, unordered, and definition.
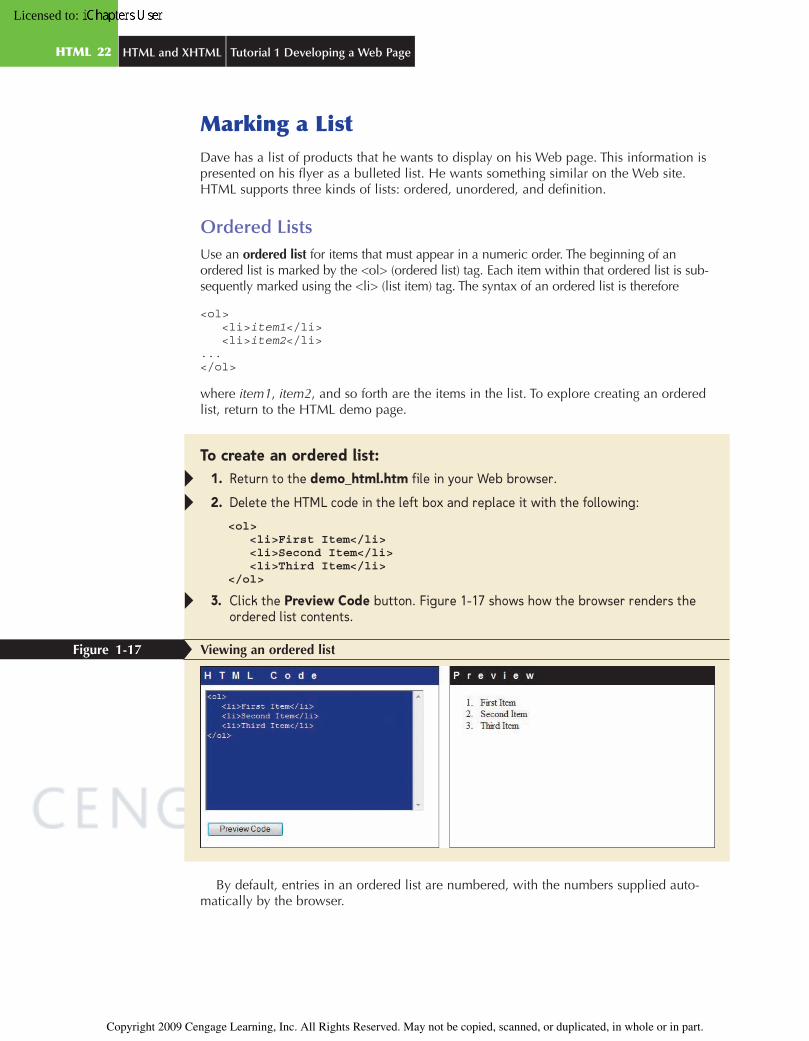
Ordered ListsUse an ordered list for items that must appear in a numeric order. The beginning of anordered list is marked by the <ol> (ordered list) tag. Each item within that ordered list is sub-sequently marked using the <li> (list item) tag. The syntax of an ordered list is therefore
<ol><li>item1</li><li>item2</li>
...</ol>
where item1, item2, and so forth are the items in the list. To explore creating an orderedlist, return to the HTML demo page.
To create an ordered list:1. Return to the demo_html.htm file in your Web browser.
2. Delete the HTML code in the left box and replace it with the following:
<ol><li>First Item</li><li>Second Item</li><li>Third Item</li>
</ol>
3. Click the Preview Code button. Figure 1-17 shows how the browser renders theordered list contents.
Viewing an ordered listFigure 1-17
By default, entries in an ordered list are numbered, with the numbers supplied auto-matically by the browser.
C6736_01 1/8/2008 16:17:57 Page 22
HTML 22 HTML and XHTML Tutorial 1 Developing a Web Page
Copyright 2009 Cengage Learning, Inc. All Rights Reserved. May not be copied, scanned, or duplicated, in whole or in part.
Copyright 2009 Cengage Learning, Inc. All Rights Reserved. May not be copied, scanned, or duplicated, in whole or in part.
Licensed to:
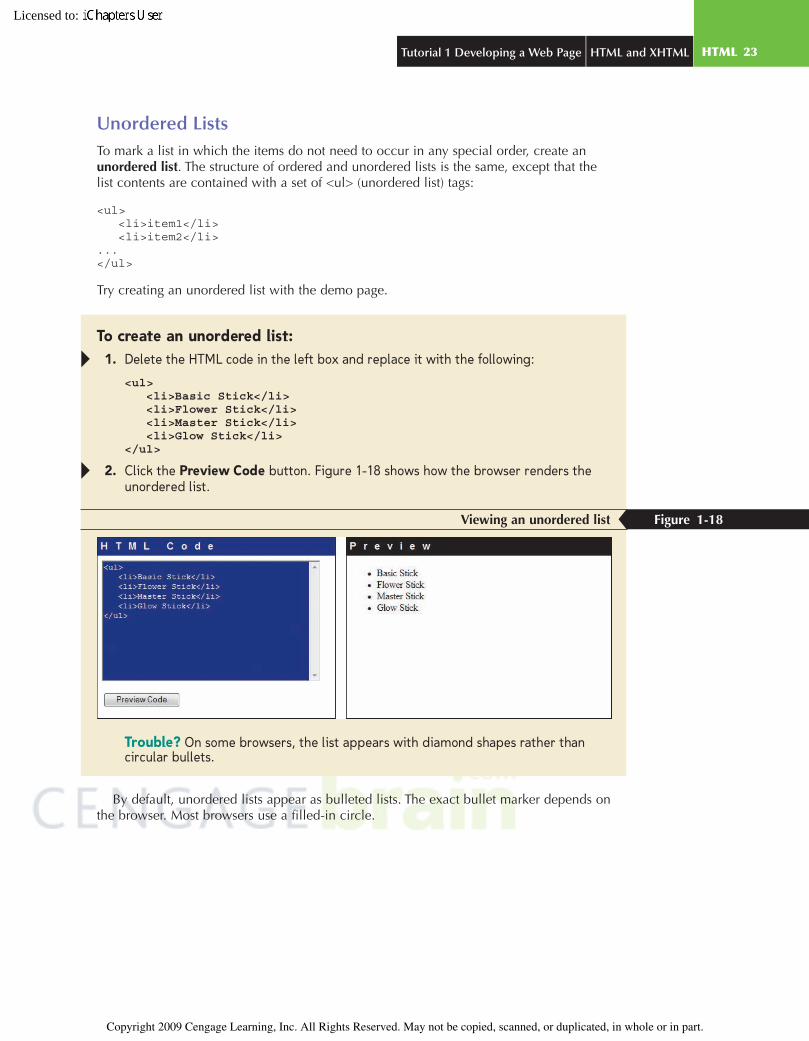
Unordered ListsTo mark a list in which the items do not need to occur in any special order, create anunordered list. The structure of ordered and unordered lists is the same, except that thelist contents are contained with a set of <ul> (unordered list) tags:
<ul><li>item1</li><li>item2</li>
...</ul>
Try creating an unordered list with the demo page.
To create an unordered list:1. Delete the HTML code in the left box and replace it with the following:
<ul><li>Basic Stick</li><li>Flower Stick</li><li>Master Stick</li><li>Glow Stick</li>
</ul>
2. Click the Preview Code button. Figure 1-18 shows how the browser renders theunordered list.
Viewing an unordered list Figure 1-18
Trouble? On some browsers, the list appears with diamond shapes rather thancircular bullets.
By default, unordered lists appear as bulleted lists. The exact bullet marker depends onthe browser. Most browsers use a filled-in circle.
C6736_01 1/8/2008 16:4:8 Page 23
HTML 23Tutorial 1 Developing a Web Page HTML and XHTML
Copyright 2009 Cengage Learning, Inc. All Rights Reserved. May not be copied, scanned, or duplicated, in whole or in part.
Copyright 2009 Cengage Learning, Inc. All Rights Reserved. May not be copied, scanned, or duplicated, in whole or in part.
Licensed to:
Reference Window | Marking Lists
• To mark an ordered list, enter<ol>
<li>item1</li><li>item2</li>
...</ol>
where item1, item2, and so forth are the items in the list.• To mark an unordered list, use
<ul><li>item1</li><li>item2</li>
...</ul>
• To mark a definition list, use<dl>
<dt>term1</dt><dd>description1</dd><dt>term2</dt><dd>description2a</dd><dd>description2b</dd>
...</dl>
where term1, term2, etc. are the terms in the list and description1, description2a,description2b, etc. are the descriptions associated with each term.
Nesting ListsYou can place one list inside of another to create several levels of list items. The top levelof the nested list contains the major items, with each sublevel containing items of lesserimportance. Most browsers differentiate the various levels by using a different listsymbol. Use the demo page to see how this works with unordered lists.
To create an unordered list:1. Click at the end of the <li>Basic Stick</li> line, and then press the Enter key to
insert a new blank line.
2. Insert the following code between the <li>Basic Stick</li> and <li>Flower Stick</li> lines:
<ul><li>Red</li><li>Blue</li><li>Green</li>
</ul>
3. Click the Preview Code button. Figure 1-19 shows the result of creating a nested list.
C6736_01 1/8/2008 16:18:50 Page 24
HTML 24 HTML and XHTML Tutorial 1 Developing a Web Page
Copyright 2009 Cengage Learning, Inc. All Rights Reserved. May not be copied, scanned, or duplicated, in whole or in part.
Copyright 2009 Cengage Learning, Inc. All Rights Reserved. May not be copied, scanned, or duplicated, in whole or in part.
Licensed to:
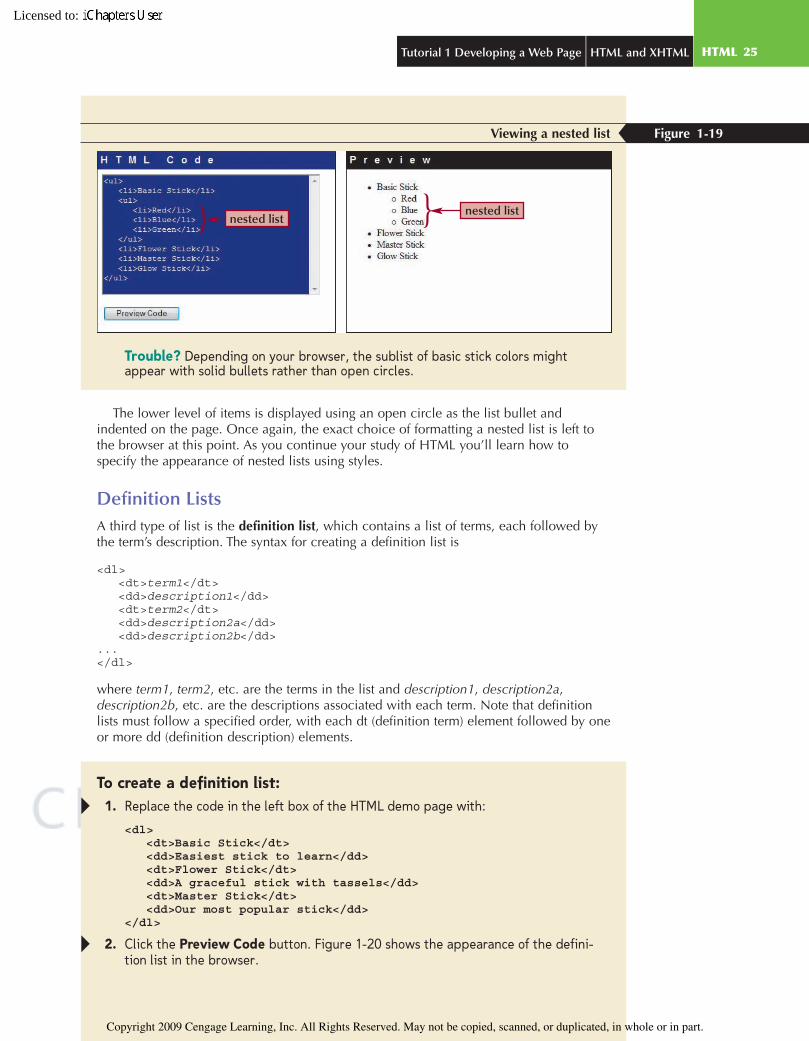
Viewing a nested list Figure 1-19
nested listnested list
Trouble? Depending on your browser, the sublist of basic stick colors mightappear with solid bullets rather than open circles.
The lower level of items is displayed using an open circle as the list bullet andindented on the page. Once again, the exact choice of formatting a nested list is left tothe browser at this point. As you continue your study of HTML you’ll learn how tospecify the appearance of nested lists using styles.
Definition ListsA third type of list is the definition list, which contains a list of terms, each followed bythe term’s description. The syntax for creating a definition list is
<dl><dt>term1</dt><dd>description1</dd><dt>term2</dt><dd>description2a</dd><dd>description2b</dd>
...</dl>
where term1, term2, etc. are the terms in the list and description1, description2a,description2b, etc. are the descriptions associated with each term. Note that definitionlists must follow a specified order, with each dt (definition term) element followed by oneor more dd (definition description) elements.
To create a definition list:1. Replace the code in the left box of the HTML demo page with:
<dl><dt>Basic Stick</dt><dd>Easiest stick to learn</dd><dt>Flower Stick</dt><dd>A graceful stick with tassels</dd><dt>Master Stick</dt><dd>Our most popular stick</dd>
</dl>
2. Click the Preview Code button. Figure 1-20 shows the appearance of the defini-tion list in the browser.
C6736_01 1/8/2008 16:4:9 Page 25
HTML 25Tutorial 1 Developing a Web Page HTML and XHTML
Copyright 2009 Cengage Learning, Inc. All Rights Reserved. May not be copied, scanned, or duplicated, in whole or in part.
Copyright 2009 Cengage Learning, Inc. All Rights Reserved. May not be copied, scanned, or duplicated, in whole or in part.
Licensed to:
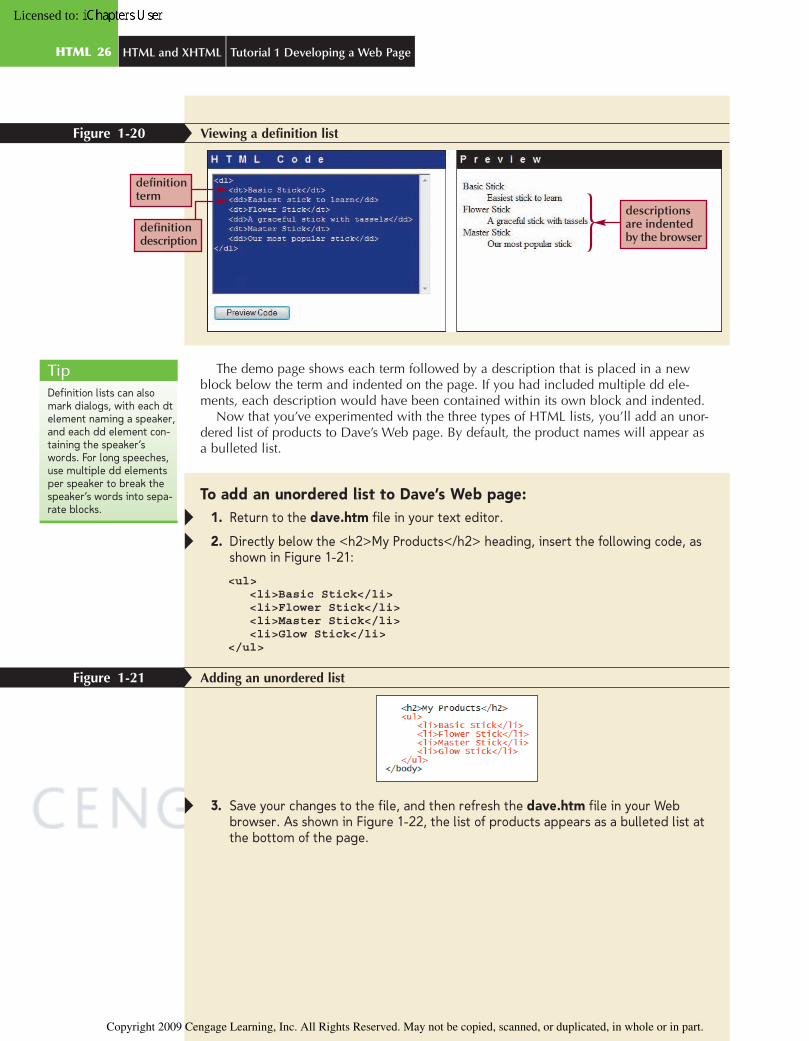
Viewing a definition listFigure 1-20
definitionterm
definitiondescription
descriptionsare indentedby the browser
The demo page shows each term followed by a description that is placed in a newblock below the term and indented on the page. If you had included multiple dd ele-ments, each description would have been contained within its own block and indented.
Now that you’ve experimented with the three types of HTML lists, you’ll add an unor-dered list of products to Dave’s Web page. By default, the product names will appear asa bulleted list.
To add an unordered list to Dave’s Web page:1. Return to the dave.htm file in your text editor.
2. Directly below the <h2>My Products</h2> heading, insert the following code, asshown in Figure 1-21:
<ul><li>Basic Stick</li><li>Flower Stick</li><li>Master Stick</li><li>Glow Stick</li>
</ul>
Adding an unordered listFigure 1-21
3. Save your changes to the file, and then refresh the dave.htm file in your Webbrowser. As shown in Figure 1-22, the list of products appears as a bulleted list atthe bottom of the page.
TipDefinition lists can alsomark dialogs, with each dtelement naming a speaker,and each dd element con-taining the speaker’swords. For long speeches,use multiple dd elementsper speaker to break thespeaker’s words into sepa-rate blocks.
C6736_01 12/14/2007 15:29:31 Page 26
HTML 26 HTML and XHTML Tutorial 1 Developing a Web Page
Copyright 2009 Cengage Learning, Inc. All Rights Reserved. May not be copied, scanned, or duplicated, in whole or in part.
Copyright 2009 Cengage Learning, Inc. All Rights Reserved. May not be copied, scanned, or duplicated, in whole or in part.
Licensed to:
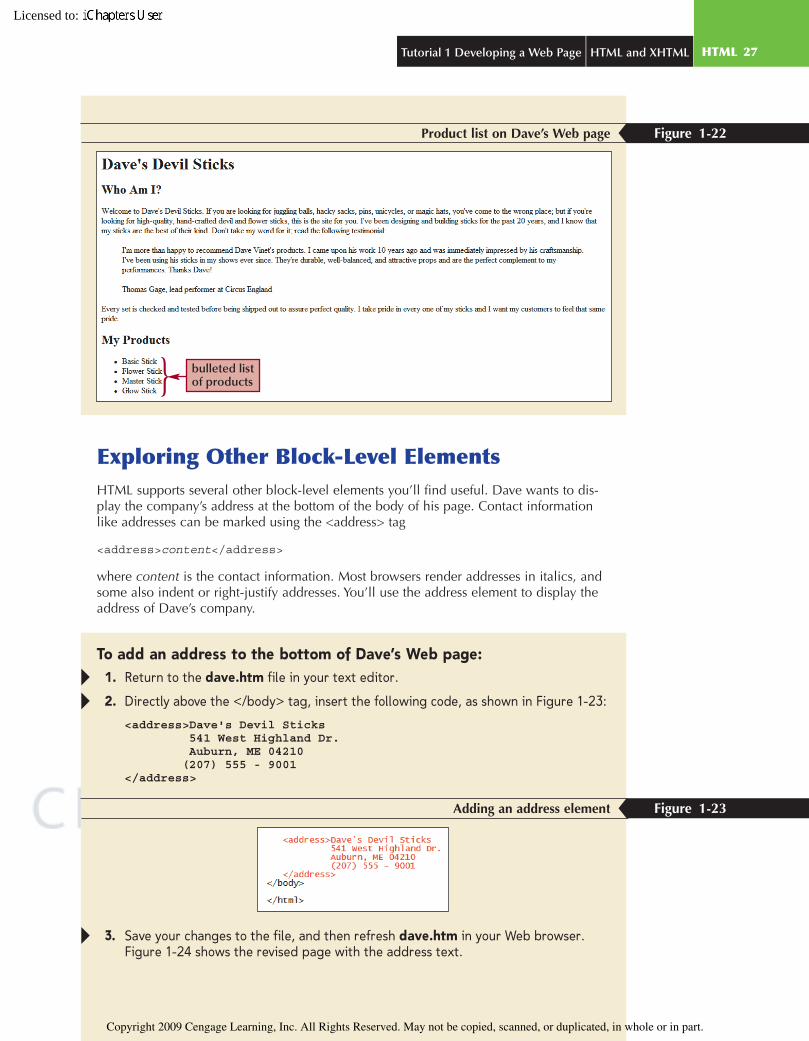
Product list on Dave’s Web page Figure 1-22
bulleted listof products
Exploring Other Block-Level ElementsHTML supports several other block-level elements you’ll find useful. Dave wants to dis-play the company’s address at the bottom of the body of his page. Contact informationlike addresses can be marked using the <address> tag
<address>content</address>
where content is the contact information. Most browsers render addresses in italics, andsome also indent or right-justify addresses. You’ll use the address element to display theaddress of Dave’s company.
To add an address to the bottom of Dave’s Web page:1. Return to the dave.htm file in your text editor.
2. Directly above the </body> tag, insert the following code, as shown in Figure 1-23:
<address>Dave's Devil Sticks541 West Highland Dr.Auburn, ME 04210
(207) 555 - 9001</address>
Adding an address element Figure 1-23
3. Save your changes to the file, and then refresh dave.htm in your Web browser.Figure 1-24 shows the revised page with the address text.
C6736_01 1/8/2008 16:4:10 Page 27
HTML 27Tutorial 1 Developing a Web Page HTML and XHTML
Copyright 2009 Cengage Learning, Inc. All Rights Reserved. May not be copied, scanned, or duplicated, in whole or in part.
Copyright 2009 Cengage Learning, Inc. All Rights Reserved. May not be copied, scanned, or duplicated, in whole or in part.
Licensed to:
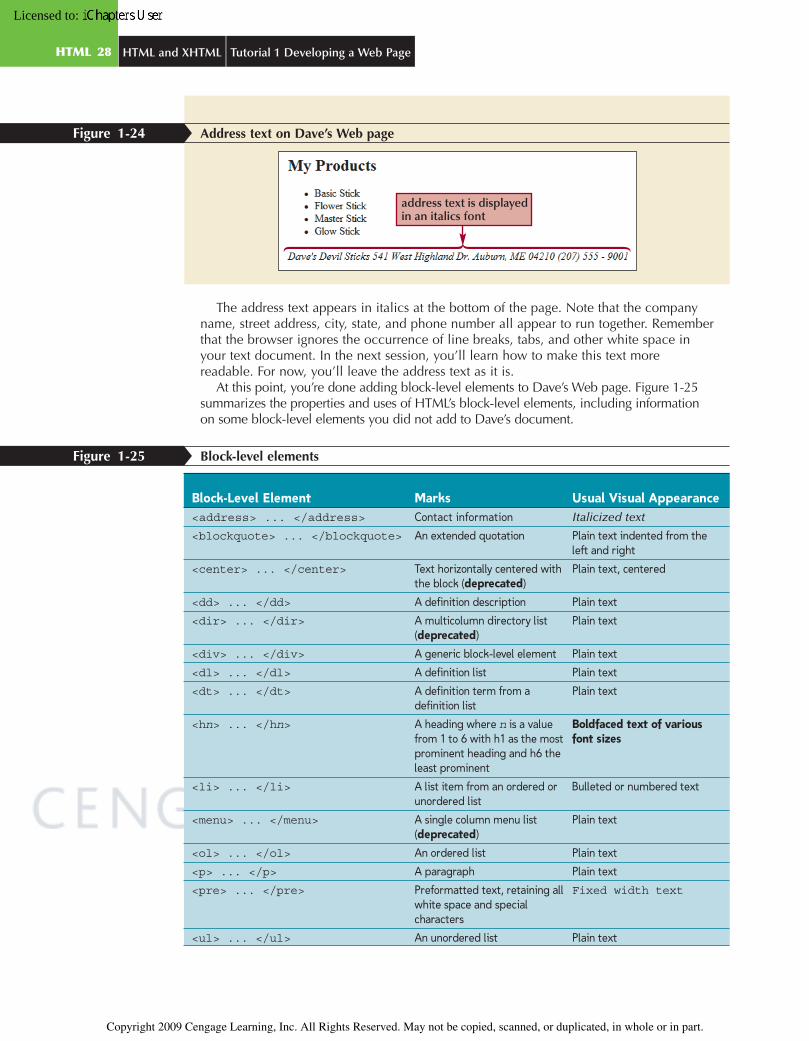
Address text on Dave’s Web pageFigure 1-24
address text is displayedin an italics font
The address text appears in italics at the bottom of the page. Note that the companyname, street address, city, state, and phone number all appear to run together. Rememberthat the browser ignores the occurrence of line breaks, tabs, and other white space inyour text document. In the next session, you’ll learn how to make this text morereadable. For now, you’ll leave the address text as it is.
At this point, you’re done adding block-level elements to Dave’s Web page. Figure 1-25summarizes the properties and uses of HTML’s block-level elements, including informationon some block-level elements you did not add to Dave’s document.
Block-level elementsFigure 1-25
Block-Level Element Marks Usual Visual Appearance<address> ... </address> Contact information Italicized text
<blockquote> ... </blockquote> An extended quotation Plain text indented from theleft and right
<center> ... </center> Text horizontally centered withthe block (deprecated)
Plain text, centered
<dd> ... </dd> A definition description Plain text
<dir> ... </dir> A multicolumn directory list(deprecated)
Plain text
<div> ... </div> A generic block-level element Plain text
<dl> ... </dl> A definition list Plain text
<dt> ... </dt> A definition term from adefinition list
Plain text
<hn> ... </hn> A heading where n is a valuefrom 1 to 6 with h1 as the mostprominent heading and h6 theleast prominent
Boldfaced text of variousfont sizes
<li> ... </li> A list item from an ordered orunordered list
Bulleted or numbered text
<menu> ... </menu> A single column menu list(deprecated)
Plain text
<ol> ... </ol> An ordered list Plain text
<p> ... </p> A paragraph Plain text
<pre> ... </pre> Preformatted text, retaining allwhite space and specialcharacters
Fixed width text
<ul> ... </ul> An unordered list Plain text
C6736_01 1/23/2008 16:17:14 Page 28
HTML 28 HTML and XHTML Tutorial 1 Developing a Web Page
Copyright 2009 Cengage Learning, Inc. All Rights Reserved. May not be copied, scanned, or duplicated, in whole or in part.
Copyright 2009 Cengage Learning, Inc. All Rights Reserved. May not be copied, scanned, or duplicated, in whole or in part.
Licensed to:
Working with Inline ElementsBlock-level elements place their content starting on a new line within the page. Anothertype of element is an inline element, which marks a section of text within a block-levelelement. If you think of a block-level element as a paragraph, an inline element is like aphrase or a collection of characters within that paragraph. Inline elements do not startout on a new line or block, but instead flow “in-line” with the rest of the characters inthe block.
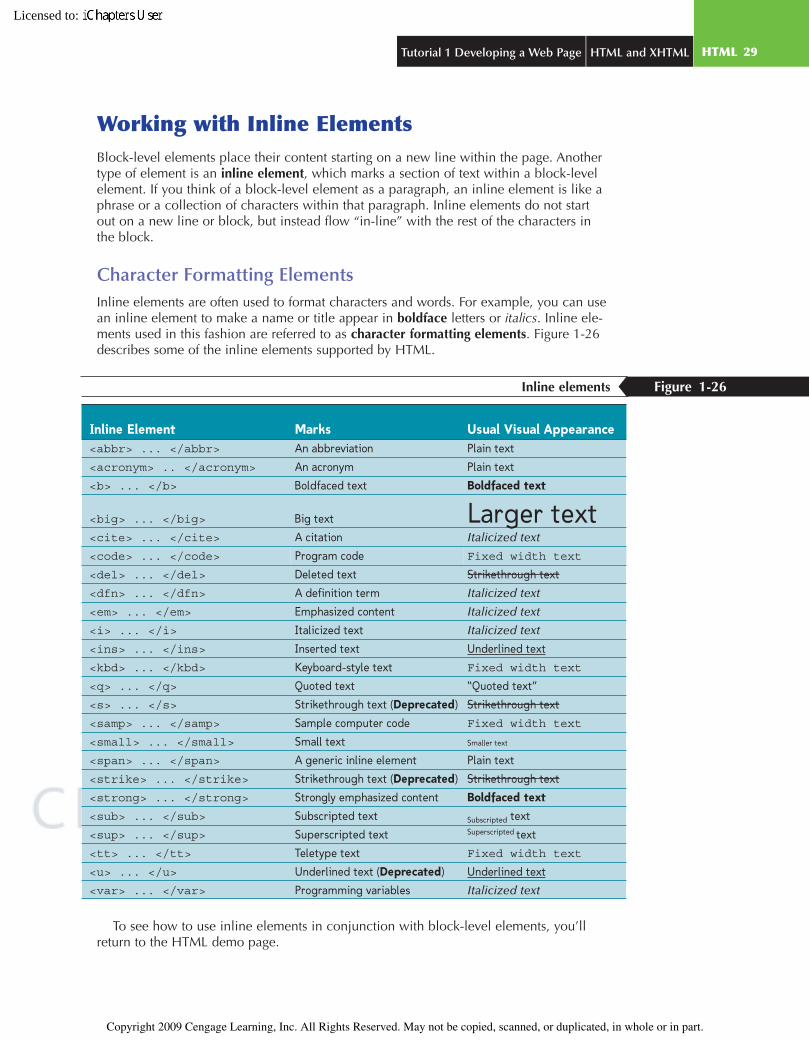
Character Formatting ElementsInline elements are often used to format characters and words. For example, you can usean inline element to make a name or title appear in boldface letters or italics. Inline ele-ments used in this fashion are referred to as character formatting elements. Figure 1-26describes some of the inline elements supported by HTML.
Inline elements Figure 1-26
Inline Element Marks Usual Visual Appearance<abbr> ... </abbr> An abbreviation Plain text
<acronym> .. </acronym> An acronym Plain text
<b> ... </b> Boldfaced text Boldfaced text
<big> ... </big> Big text Larger text<cite> ... </cite> A citation Italicized text
<code> ... </code> Program code Fixed width text
<del> ... </del> Deleted text Strikethrough text
<dfn> ... </dfn> A definition term Italicized text
<em> ... </em> Emphasized content Italicized text
<i> ... </i> Italicized text Italicized text
<ins> ... </ins> Inserted text Underlined text
<kbd> ... </kbd> Keyboard-style text Fixed width text
<q> ... </q> Quoted text “Quoted text”
<s> ... </s> Strikethrough text (Deprecated) Strikethrough text
<samp> ... </samp> Sample computer code Fixed width text
<small> ... </small> Small text Smaller text
<span> ... </span> A generic inline element Plain text
<strike> ... </strike> Strikethrough text (Deprecated) Strikethrough text
<strong> ... </strong> Strongly emphasized content Boldfaced text
<sub> ... </sub> Subscripted text Subscripted text
<sup> ... </sup> Superscripted text Superscripted text
<tt> ... </tt> Teletype text Fixed width text
<u> ... </u> Underlined text (Deprecated) Underlined text
<var> ... </var> Programming variables Italicized text
To see how to use inline elements in conjunction with block-level elements, you’llreturn to the HTML demo page.
C6736_01 1/9/2008 8:5:16 Page 29
HTML 29Tutorial 1 Developing a Web Page HTML and XHTML
Copyright 2009 Cengage Learning, Inc. All Rights Reserved. May not be copied, scanned, or duplicated, in whole or in part.
Copyright 2009 Cengage Learning, Inc. All Rights Reserved. May not be copied, scanned, or duplicated, in whole or in part.
Licensed to:
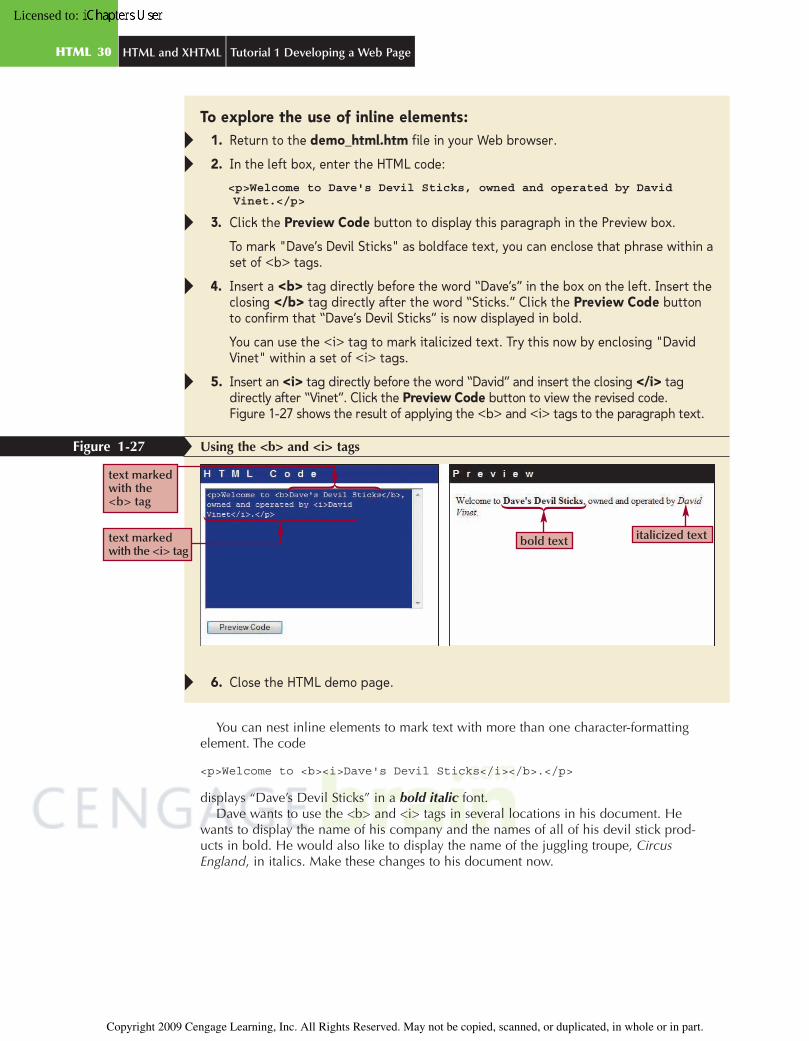
To explore the use of inline elements:1. Return to the demo_html.htm file in your Web browser.
2. In the left box, enter the HTML code:
<p>Welcome to Dave's Devil Sticks, owned and operated by DavidVinet.</p>
3. Click the Preview Code button to display this paragraph in the Preview box.
To mark "Dave’s Devil Sticks" as boldface text, you can enclose that phrase within aset of <b> tags.
4. Insert a <b> tag directly before the word “Dave’s” in the box on the left. Insert theclosing </b> tag directly after the word “Sticks.” Click the Preview Code buttonto confirm that “Dave’s Devil Sticks” is now displayed in bold.
You can use the <i> tag to mark italicized text. Try this now by enclosing "DavidVinet" within a set of <i> tags.
5. Insert an <i> tag directly before the word “David” and insert the closing </i> tagdirectly after “Vinet”. Click the Preview Code button to view the revised code.Figure 1-27 shows the result of applying the <b> and <i> tags to the paragraph text.
Using the <b> and <i> tagsFigure 1-27
text markedwith the<b> tag
text markedwith the <i> tag
bold text italicized text
6. Close the HTML demo page.
You can nest inline elements to mark text with more than one character-formattingelement. The code
<p>Welcome to <b><i>Dave's Devil Sticks</i></b>.</p>
displays “Dave’s Devil Sticks” in a bold italic font.Dave wants to use the <b> and <i> tags in several locations in his document. He
wants to display the name of his company and the names of all of his devil stick prod-ucts in bold. He would also like to display the name of the juggling troupe, CircusEngland, in italics. Make these changes to his document now.
C6736_01 1/9/2008 8:5:40 Page 30
HTML 30 HTML and XHTML Tutorial 1 Developing a Web Page
Copyright 2009 Cengage Learning, Inc. All Rights Reserved. May not be copied, scanned, or duplicated, in whole or in part.
Copyright 2009 Cengage Learning, Inc. All Rights Reserved. May not be copied, scanned, or duplicated, in whole or in part.
Licensed to:
Marking Inline Elements | Reference Window
• To mark boldface text, enter<b>content</b>
where content is the text to be displayed in boldface.• To mark italicized text, use
<i>content</i>• To mark text with a generic inline element, use
<span>content</span>
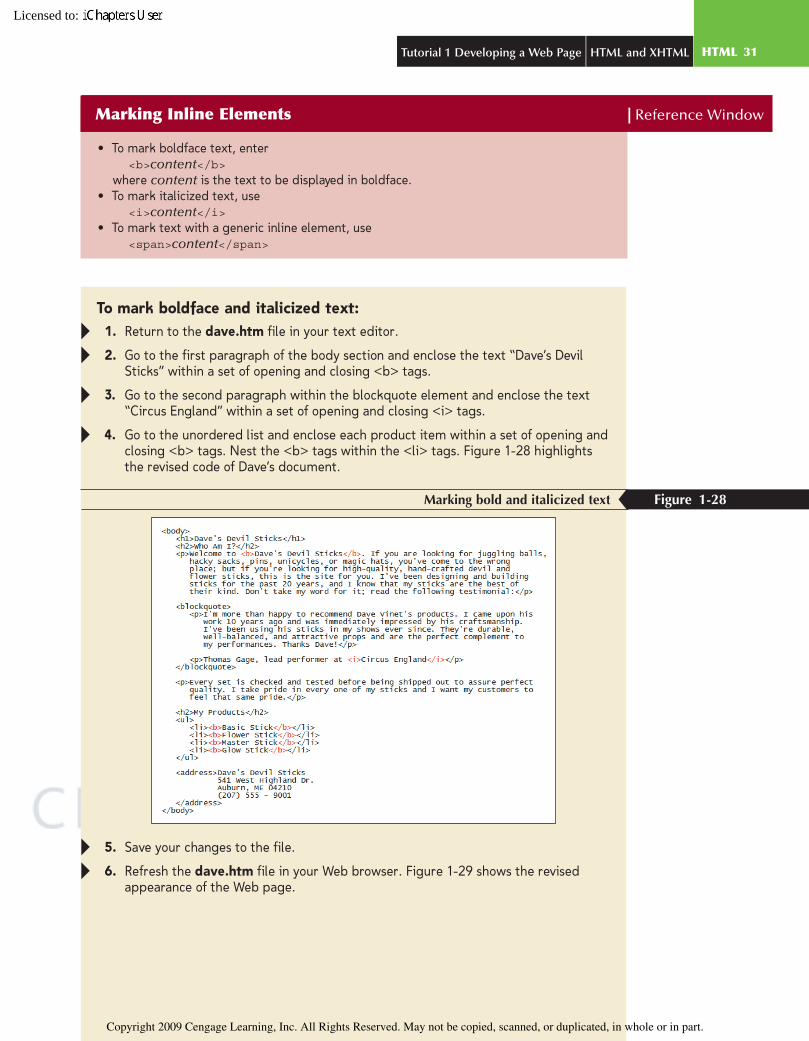
To mark boldface and italicized text:1. Return to the dave.htm file in your text editor.
2. Go to the first paragraph of the body section and enclose the text “Dave’s DevilSticks” within a set of opening and closing <b> tags.
3. Go to the second paragraph within the blockquote element and enclose the text“Circus England” within a set of opening and closing <i> tags.
4. Go to the unordered list and enclose each product item within a set of opening andclosing <b> tags. Nest the <b> tags within the <li> tags. Figure 1-28 highlightsthe revised code of Dave’s document.
Marking bold and italicized text Figure 1-28
5. Save your changes to the file.
6. Refresh the dave.htm file in your Web browser. Figure 1-29 shows the revisedappearance of the Web page.
C6736_01 1/8/2008 16:4:13 Page 31
HTML 31Tutorial 1 Developing a Web Page HTML and XHTML
Copyright 2009 Cengage Learning, Inc. All Rights Reserved. May not be copied, scanned, or duplicated, in whole or in part.
Copyright 2009 Cengage Learning, Inc. All Rights Reserved. May not be copied, scanned, or duplicated, in whole or in part.
Licensed to:
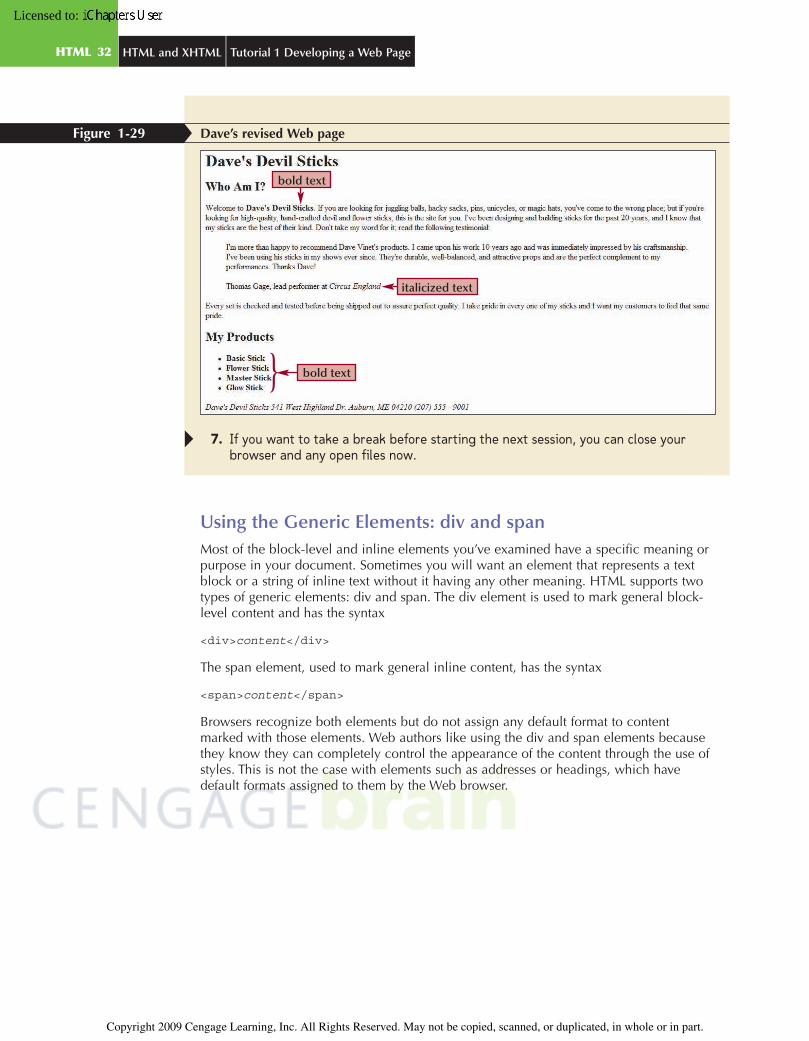
Dave’s revised Web pageFigure 1-29
bold text
italicized text
bold text
7. If you want to take a break before starting the next session, you can close yourbrowser and any open files now.
Using the Generic Elements: div and spanMost of the block-level and inline elements you’ve examined have a specific meaning orpurpose in your document. Sometimes you will want an element that represents a textblock or a string of inline text without it having any other meaning. HTML supports twotypes of generic elements: div and span. The div element is used to mark general block-level content and has the syntax
<div>content</div>
The span element, used to mark general inline content, has the syntax
<span>content</span>
Browsers recognize both elements but do not assign any default format to contentmarked with those elements. Web authors like using the div and span elements becausethey know they can completely control the appearance of the content through the use ofstyles. This is not the case with elements such as addresses or headings, which havedefault formats assigned to them by the Web browser.
C6736_01 1/8/2008 16:4:13 Page 32
HTML 32 HTML and XHTML Tutorial 1 Developing a Web Page
Copyright 2009 Cengage Learning, Inc. All Rights Reserved. May not be copied, scanned, or duplicated, in whole or in part.
Copyright 2009 Cengage Learning, Inc. All Rights Reserved. May not be copied, scanned, or duplicated, in whole or in part.
Licensed to:
Logical Elements vs. Physical Elements | InSight
As you learn more HTML, you’ll notice some overlap in how certain elements are displayedby the browser. To display italicized text, you could use the <dfn>, <em>, <i>, or <var>tags, or if you want to italicize an entire block of text, you could use the <address> tag. It’simportant to distinguish between how a browser displays an element and the element’s pur-pose in the document. Page elements can be organized into two types: logical elements andphysical elements. A logical element, marked with tags like <cite> or <code>, describes thenature of the enclosed content but not necessarily how that content should appear. A physi-cal element, on the other hand, marked with tags like <b> or <i>, describes how contentshould appear but doesn’t indicate the content’s nature.
While it can be tempting to use logical and physical elements interchangeably, your HTMLcode benefits in several ways when you respect the distinction. For one, different browserscan and do display logical elements differently. For example, both Netscape’s browser andInternet Explorer display text marked with the <cite> tag in italics, but the text-basedbrowser Lynx displays the citation text using a fixed width font. An aural browser thatdoesn’t render pages visually might increase the volume when it encounters cited text. Inaddition, Web programmers can also use logical elements to extract information from apage. For example, a program could automatically generate a bibliography from all of thecitations listed within a Web site.
In general, you should use a logical element that accurately describes the enclosed contentwhenever possible, letting the browser determine the appearance based on its function, anduse physical elements only for general content.
You’re finished working with block-level elements and inline elements. In the next ses-sion you’ll learn how to add images to the document as well as how to use styles to con-trol the appearance of your Web pages.
Session 1.2 Quick Check | Review
1. What is the difference between a block-level element and an inline element?2. If you want to add an extra blank line between paragraphs on your Web page, why
can’t you simply add an extra blank line to the HTML file?3. Specify the code to mark the main heading on your Web page.4. Specify the tag to mark an extended quotation. How would that quotation be ren-
dered in most visual browsers?5. Specify the code you would use to display the seasons of the year (Winter, Spring,
Summer, and Fall) as an unordered list.6. The following is a dialog from Shakespeare’s Hamlet. Indicate how you would use a
definition list to mark up this text, distinguishing between the speaker and the linesspoken.
HAMLETThere’s ne’er a villain dwelling in all Denmark; but he’s an arrant knave.HORATIOThere needs no ghost, my lord, come from the grave to tell us this.
7. What code would you enter to display the following text as a paragraph in your Webpage? Include both the block-level and inline element tags.
Hamlet, a play by William Shakespeare.8. What are the two generic page elements?
C6736_01 1/9/2008 8:9:13 Page 33
HTML 33Tutorial 1 Developing a Web Page HTML and XHTML
Copyright 2009 Cengage Learning, Inc. All Rights Reserved. May not be copied, scanned, or duplicated, in whole or in part.
Copyright 2009 Cengage Learning, Inc. All Rights Reserved. May not be copied, scanned, or duplicated, in whole or in part.
Licensed to:
Session 1.3
Using Element AttributesSo far you’ve used markup tags only to create Dave’s Web page. However, many markuptags contain attributes that control the use, behavior, and in some cases the appearanceof elements in the document. You apply an attribute to an element by adding it to theelement’s markup tag using the syntax
<element attribute1="value1" attribute2="value2" ...>content</element>
where attribute1, attribute2, etc. are the names of attributes associated with the elementand value1, value2, etc. are the values of those attributes. You can list attributes in anyorder, but you must separate them from one another with white space.
One attribute that is associated with most elements is the id attribute, which uniquelyidentifies the element in the Web page. The following code assigns the id value of “main-head” to the h1 heading “Dave’s Devil Sticks,” distinguishing it from other h1 headingsthat might exist in the document:
<h1 id="mainhead">Dave's Devil Sticks</h1>
You’ll learn more about the id attribute in the next tutorial. For a list of attributes associ-ated with each element, you can also refer to the appendices.
Reference Window | Adding an Attribute to an Element
• To add an element attribute, enter<element attribute1="value1" attribute2="value2" ...>content</element>
where attribute1, attribute2, etc. are the names of attributes associated with the elementand value1, value2, etc. are the values of those attributes.
The Style AttributeAnother important attribute is the style attribute. As you’ve seen, an element’s appear-ance on the Web page is determined by the browser. If you want to change how thebrowser displays an element, you can use the style attribute. The syntax of the styleattribute is
<element style="rules" ...>content</element>
where rules is a set of style rules. Style rules are entered by specifying a style name fol-lowed by a colon and then a style value. You can have multiple style rules with eachstyle name/value pair, separated from each other by a semicolon. The general form of thestyle attribute is therefore
style="name1:value1; name2:value2; ..."
where name1, name2, etc. are style names and value1, value2 and so forth are the val-ues of those styles.
TipAttribute names should beentered in lowercase lettersto be completely compliantwith the syntax rules ofXHTML. Attribute valuesmust be enclosed withinsingle or doublequotation marks.
C6736_01 12/14/2007 15:30:0 Page 34
HTML 34 HTML and XHTML Tutorial 1 Developing a Web Page
Copyright 2009 Cengage Learning, Inc. All Rights Reserved. May not be copied, scanned, or duplicated, in whole or in part.
Copyright 2009 Cengage Learning, Inc. All Rights Reserved. May not be copied, scanned, or duplicated, in whole or in part.
Licensed to:
As you proceed in your study of HTML you’ll learn more about styles and how toapply them. For now you’ll focus only on a few basic ones. The first is a style to aligntext. As you may have noticed, Web page text is usually aligned with the page’s leftmargin. To choose a different alignment, you can apply the following text-align style tothe element
style="text-align: alignment"
where alignment is left, right, center, or justify. For example, to center an h1 heading, youwould enter the following markup tag:
<h1 style="text-align: center"> ... </h1>
A second style you’ll explore defines the text color used in an element. Most browsersdisplay text in a black font. To apply a different text color, use
style="color: color"
where color is a color name such as red, blue, green, and so forth. Applying the follow-ing attribute to an h1 heading causes the browser to render the heading text in a red font:
<h1 style="color: red"> ... </h1>
You can both center the text and change its font color to red by combining the two stylesin one style attribute:
<h1 style="text-align: center; color: red"> ... </h1>
Applying the Style Attribute | Reference Window
• To add the style attribute, in the opening tag enterstyle="name1:value1; name2:value2; ..."
where name1, name2, etc. are style names and value1, value2 and so forth are the val-ues of those styles.
• To center text horizontally, usestyle="text-align: alignment"
where alignment is left, right, center, or justify.• To set the font color, use
style="color: color"where color is a color name.
To explore how to apply these two styles to a page element, you’ll return to the HTMLdemo page.
To explore the style attribute:1. Return to the demo_html.htm file in your Web browser.
2. Enter the following code in the left box, and then click the Preview Code button:
<h1>Dave's Devil Sticks</h1>
The demo page displays Dave’s Devil Sticks as an h1 heading in the Preview box.Now you’ll change the font color to red and center this heading in the box.
C6736_01 12/14/2007 15:30:1 Page 35
HTML 35Tutorial 1 Developing a Web Page HTML and XHTML
Copyright 2009 Cengage Learning, Inc. All Rights Reserved. May not be copied, scanned, or duplicated, in whole or in part.
Copyright 2009 Cengage Learning, Inc. All Rights Reserved. May not be copied, scanned, or duplicated, in whole or in part.
Licensed to:
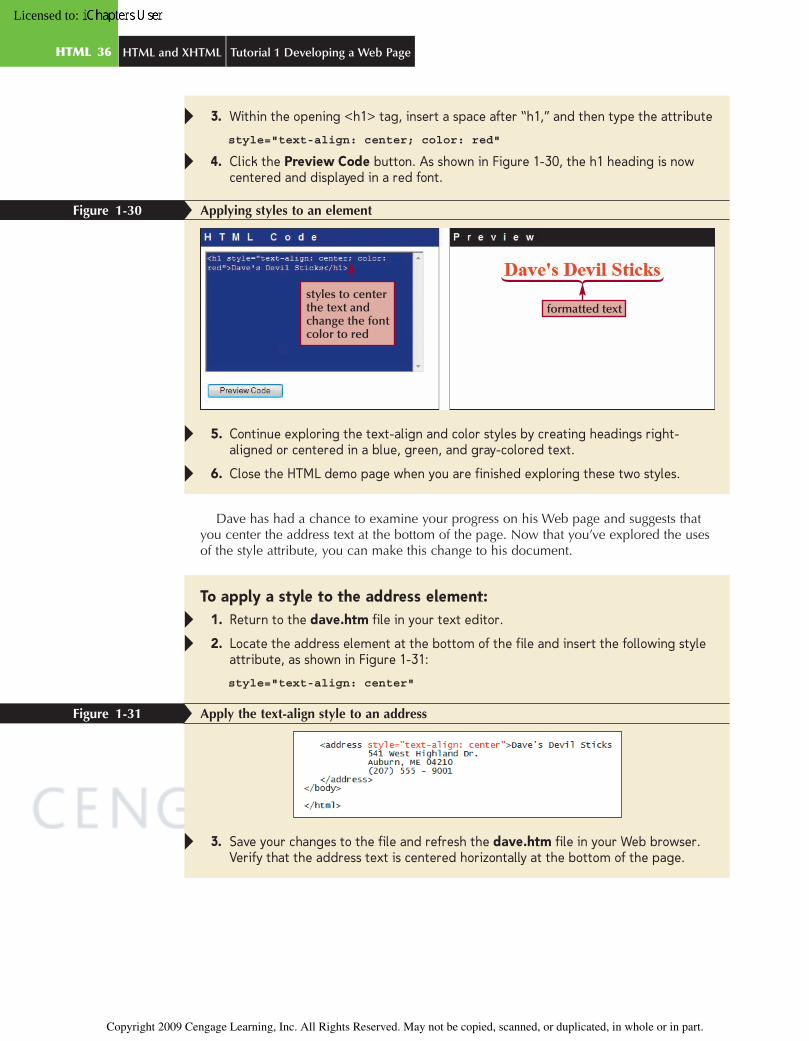
3. Within the opening <h1> tag, insert a space after “h1,” and then type the attribute
style="text-align: center; color: red"
4. Click the Preview Code button. As shown in Figure 1-30, the h1 heading is nowcentered and displayed in a red font.
Applying styles to an elementFigure 1-30
formatted textstyles to centerthe text andchange the fontcolor to red
5. Continue exploring the text-align and color styles by creating headings right-aligned or centered in a blue, green, and gray-colored text.
6. Close the HTML demo page when you are finished exploring these two styles.
Dave has had a chance to examine your progress on his Web page and suggests thatyou center the address text at the bottom of the page. Now that you’ve explored the usesof the style attribute, you can make this change to his document.
To apply a style to the address element:1. Return to the dave.htm file in your text editor.
2. Locate the address element at the bottom of the file and insert the following styleattribute, as shown in Figure 1-31:
style="text-align: center"
Apply the text-align style to an addressFigure 1-31
3. Save your changes to the file and refresh the dave.htm file in your Web browser.Verify that the address text is centered horizontally at the bottom of the page.
C6736_01 1/9/2008 8:15:56 Page 36
HTML 36 HTML and XHTML Tutorial 1 Developing a Web Page
Copyright 2009 Cengage Learning, Inc. All Rights Reserved. May not be copied, scanned, or duplicated, in whole or in part.
Copyright 2009 Cengage Learning, Inc. All Rights Reserved. May not be copied, scanned, or duplicated, in whole or in part.
Licensed to:
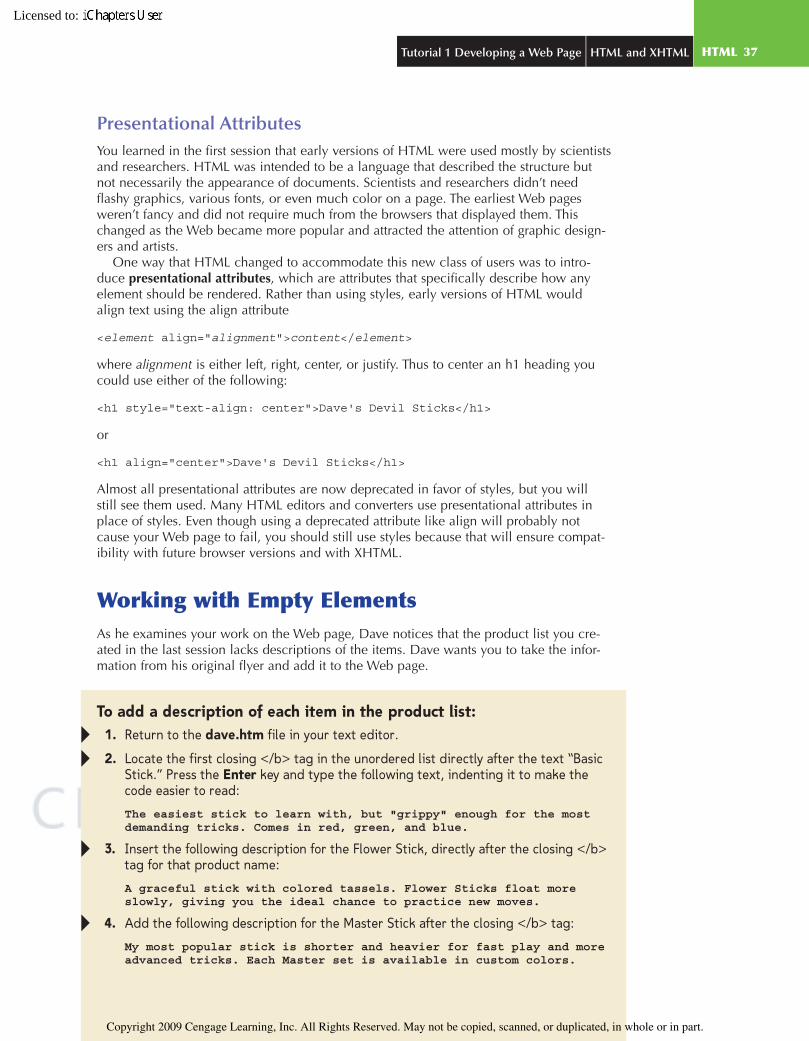
Presentational AttributesYou learned in the first session that early versions of HTML were used mostly by scientistsand researchers. HTML was intended to be a language that described the structure butnot necessarily the appearance of documents. Scientists and researchers didn’t needflashy graphics, various fonts, or even much color on a page. The earliest Web pagesweren’t fancy and did not require much from the browsers that displayed them. Thischanged as the Web became more popular and attracted the attention of graphic design-ers and artists.
One way that HTML changed to accommodate this new class of users was to intro-duce presentational attributes, which are attributes that specifically describe how anyelement should be rendered. Rather than using styles, early versions of HTML wouldalign text using the align attribute
<element align="alignment">content</element>
where alignment is either left, right, center, or justify. Thus to center an h1 heading youcould use either of the following:
<h1 style="text-align: center">Dave's Devil Sticks</h1>
or
<h1 align="center">Dave's Devil Sticks</h1>
Almost all presentational attributes are now deprecated in favor of styles, but you willstill see them used. Many HTML editors and converters use presentational attributes inplace of styles. Even though using a deprecated attribute like align will probably notcause your Web page to fail, you should still use styles because that will ensure compat-ibility with future browser versions and with XHTML.
Working with Empty ElementsAs he examines your work on the Web page, Dave notices that the product list you cre-ated in the last session lacks descriptions of the items. Dave wants you to take the infor-mation from his original flyer and add it to the Web page.
To add a description of each item in the product list:1. Return to the dave.htm file in your text editor.
2. Locate the first closing </b> tag in the unordered list directly after the text “BasicStick.” Press the Enter key and type the following text, indenting it to make thecode easier to read:
The easiest stick to learn with, but "grippy" enough for the mostdemanding tricks. Comes in red, green, and blue.
3. Insert the following description for the Flower Stick, directly after the closing </b>tag for that product name:
A graceful stick with colored tassels. Flower Sticks float moreslowly, giving you the ideal chance to practice new moves.
4. Add the following description for the Master Stick after the closing </b> tag:
My most popular stick is shorter and heavier for fast play and moreadvanced tricks. Each Master set is available in custom colors.
C6736_01 1/9/2008 8:10:3 Page 37
HTML 37Tutorial 1 Developing a Web Page HTML and XHTML
Copyright 2009 Cengage Learning, Inc. All Rights Reserved. May not be copied, scanned, or duplicated, in whole or in part.
Copyright 2009 Cengage Learning, Inc. All Rights Reserved. May not be copied, scanned, or duplicated, in whole or in part.
Licensed to:
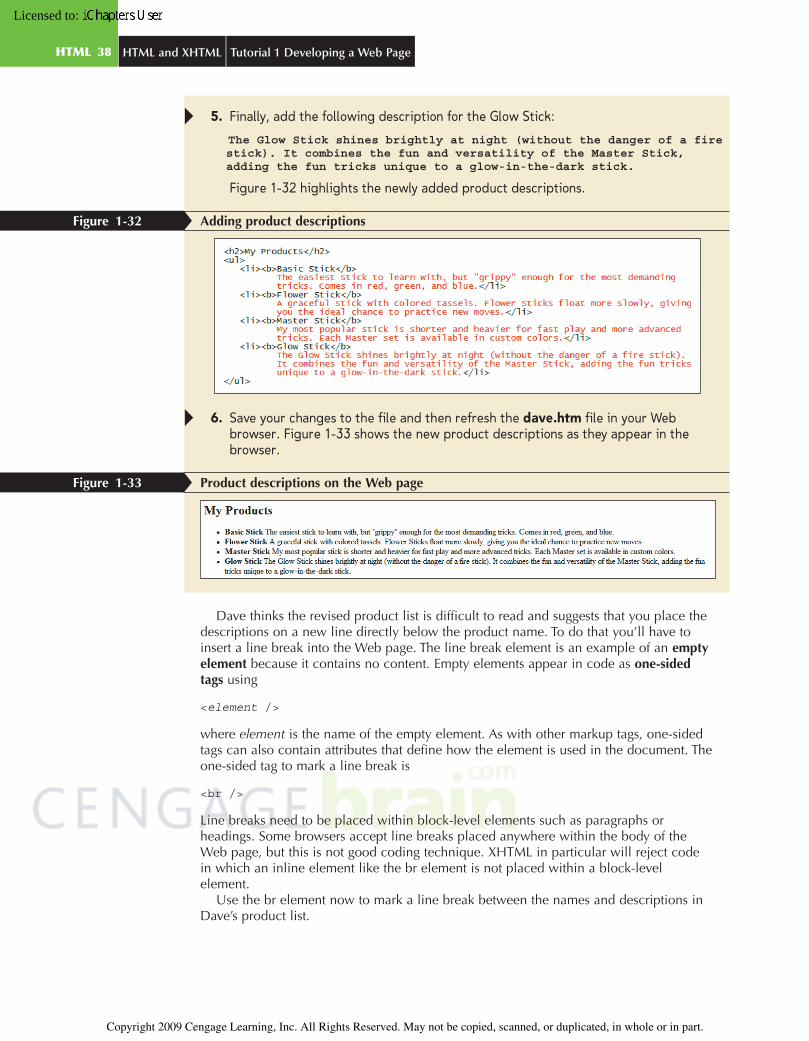
5. Finally, add the following description for the Glow Stick:
The Glow Stick shines brightly at night (without the danger of a firestick). It combines the fun and versatility of the Master Stick,adding the fun tricks unique to a glow-in-the-dark stick.
Figure 1-32 highlights the newly added product descriptions.
Adding product descriptionsFigure 1-32
6. Save your changes to the file and then refresh the dave.htm file in your Webbrowser. Figure 1-33 shows the new product descriptions as they appear in thebrowser.
Product descriptions on the Web pageFigure 1-33
Dave thinks the revised product list is difficult to read and suggests that you place thedescriptions on a new line directly below the product name. To do that you’ll have toinsert a line break into the Web page. The line break element is an example of an emptyelement because it contains no content. Empty elements appear in code as one-sidedtags using
<element />
where element is the name of the empty element. As with other markup tags, one-sidedtags can also contain attributes that define how the element is used in the document. Theone-sided tag to mark a line break is
<br />
Line breaks need to be placed within block-level elements such as paragraphs orheadings. Some browsers accept line breaks placed anywhere within the body of theWeb page, but this is not good coding technique. XHTML in particular will reject codein which an inline element like the br element is not placed within a block-levelelement.
Use the br element now to mark a line break between the names and descriptions inDave’s product list.
C6736_01 1/9/2008 8:24:9 Page 38
HTML 38 HTML and XHTML Tutorial 1 Developing a Web Page
Copyright 2009 Cengage Learning, Inc. All Rights Reserved. May not be copied, scanned, or duplicated, in whole or in part.
Copyright 2009 Cengage Learning, Inc. All Rights Reserved. May not be copied, scanned, or duplicated, in whole or in part.
Licensed to:

To create line breaks between the product names and descriptions:1. Return to the dave.htm file in your text editor.
2. Insert a <br /> tag directly after the closing </b> tag for the Basic Stick productdescription.
3. Add a <br /> tag after the closing </b> tag for each of the remaining three prod-uct names. Figure 1-34 shows the revised HTML code.
Adding line breaks to the Web page Figure 1-34
forces the browserto insert a line breakbefore renderingthe next line of text
4. Save your changes to the file and then refresh the Web page in your browser.Verify that each of the four product descriptions is displayed on a new line directlybelow the product name.
Marking a Horizontal RuleAnother useful empty element is the hr or horizontal rule element, which places a hori-zontal line across the Web page. The syntax of the hr element is
<hr />
The exact appearance of the horizontal rule is left to the browser. Most browsers displaya gray-shaded line a few pixels in height. Horizontal rules are considered block-level ele-ments because they are displayed starting on a new line in the Web page. The hr elementcan be nested either within the <body> tag, in which case the horizontal rule will extendacross the width of the Web page, or within a blockquote element, in which case thehorizontal rule will be indented like other contents of the block quote.
Horizontal rules are useful in breaking up a long Web page into topical sections. Davesuggests that you place a horizontal rule above and one below the customer quotationand a third at the bottom of the page directly above the company address.
To create three horizontal rules:1. Return to the dave.htm file in your text editor.
2. Directly below the opening <blockquote> tag, press the Enter key to insert a blankline, and then insert an <hr /> tag.
3. Insert one <hr /> tag directly above the closing </blockquote> tag and anotherabove the opening <address> tag. Figure 1-35 highlights the revised code.
C6736_01 1/23/2008 16:17:45 Page 39
HTML 39Tutorial 1 Developing a Web Page HTML and XHTML
Copyright 2009 Cengage Learning, Inc. All Rights Reserved. May not be copied, scanned, or duplicated, in whole or in part.
Copyright 2009 Cengage Learning, Inc. All Rights Reserved. May not be copied, scanned, or duplicated, in whole or in part.
Licensed to:

Marking horizontal rules with the <hr /> tagFigure 1-35
4. Save your changes to the file and then refresh the Web page in your browser. Asshown in Figure 1-36, three horizontal rules have been added to the document,visually breaking the Web page into sections.
Adding horizontal rules to the Web pageFigure 1-36
C6736_01 1/9/2008 8:26:46 Page 40
HTML 40 HTML and XHTML Tutorial 1 Developing a Web Page
Copyright 2009 Cengage Learning, Inc. All Rights Reserved. May not be copied, scanned, or duplicated, in whole or in part.
Copyright 2009 Cengage Learning, Inc. All Rights Reserved. May not be copied, scanned, or duplicated, in whole or in part.
Licensed to:
You show the revised page to Dave and he’s pleased with the addition of the horizon-tal rules. They have made the text easier to read and have nicely highlighted ThomasGage’s tribute.
Inserting an Inline ImageDave wants you to replace the name of the company with the company logo centered atthe top of the page. Because HTML files are simple text files, nontextual content likegraphics must be stored in separate files, which are then loaded by the browser as it ren-ders the page. The location of the graphic is marked as an inline image using the one-sided tag
<img src="file" alt="text" />
where file is the name of the graphic image file and text is text displayed by the browserin place of the graphic image. In this tutorial, you’ll assume that the graphic image file islocated in the same folder as the Web page, so you don’t have to specify the location ofthe file. In the next tutorial, you’ll learn how to reference files placed in other folders orlocations on the Web.
As the name implies, inline images are another example of an inline element and thusmust be placed within a block-level element such as a heading or a paragraph. Inlineimages are most widely stored in one of two formats: GIF (Graphics Interchange Format)or JPEG (Joint Photographic Experts Group). You can use an image editing applicationsuch as Adobe Photoshop to convert images to either of these two formats. Dave hasalready created such a graphic and stored it with the filename logo.jpg, located in thetutorial.01\tutorial folder included with your Data Files.
Marking Empty Elements | Reference Window
• To mark a line break, use<br />
• To mark a horizontal rule, use<hr />
• To mark an inline image, use<img src="file" alt="text" />
where file is the name of the graphic image file and text is text displayed by the browserin place of the graphic image.
To insert Dave’s logo centered at the top of the page:1. Return to the dave.htm file in your text editor.
2. Go to the h1 heading element at the top of the body section and insert the follow-ing attribute into the opening <h1> tag:
style="text-align: center"
3. Delete the text Dave’s Devil Sticks from between the opening and closing <h1>tags and replace it with
<img src="logo.jpg" alt="Dave's Devil Sticks" />
Figure 1-37 shows the revised code in the dave.htm file.
TipAlways include alternatetext for inline images. Thealt attribute is required inXHTML code and is highlyrecommended as a way ofaccommodating usersrunning nonvisual Webbrowsers.
C6736_01 1/9/2008 8:27:41 Page 41
HTML 41Tutorial 1 Developing a Web Page HTML and XHTML
Copyright 2009 Cengage Learning, Inc. All Rights Reserved. May not be copied, scanned, or duplicated, in whole or in part.
Copyright 2009 Cengage Learning, Inc. All Rights Reserved. May not be copied, scanned, or duplicated, in whole or in part.
Licensed to:
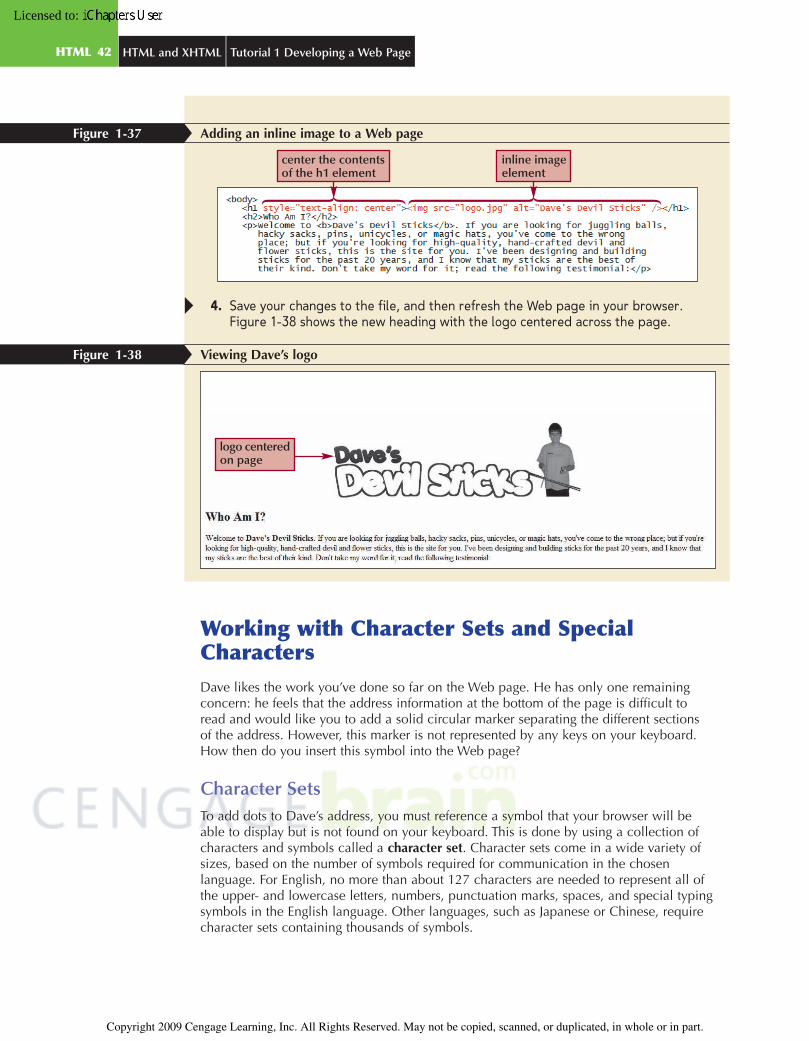
Adding an inline image to a Web pageFigure 1-37
center the contentsof the h1 element
inline imageelement
4. Save your changes to the file, and then refresh the Web page in your browser.Figure 1-38 shows the new heading with the logo centered across the page.
Viewing Dave’s logoFigure 1-38
logo centeredon page
Working with Character Sets and SpecialCharactersDave likes the work you’ve done so far on the Web page. He has only one remainingconcern: he feels that the address information at the bottom of the page is difficult toread and would like you to add a solid circular marker separating the different sectionsof the address. However, this marker is not represented by any keys on your keyboard.How then do you insert this symbol into the Web page?
Character SetsTo add dots to Dave’s address, you must reference a symbol that your browser will beable to display but is not found on your keyboard. This is done by using a collection ofcharacters and symbols called a character set. Character sets come in a wide variety ofsizes, based on the number of symbols required for communication in the chosenlanguage. For English, no more than about 127 characters are needed to represent all ofthe upper- and lowercase letters, numbers, punctuation marks, spaces, and special typingsymbols in the English language. Other languages, such as Japanese or Chinese, requirecharacter sets containing thousands of symbols.
C6736_01 1/9/2008 8:29:31 Page 42
HTML 42 HTML and XHTML Tutorial 1 Developing a Web Page
Copyright 2009 Cengage Learning, Inc. All Rights Reserved. May not be copied, scanned, or duplicated, in whole or in part.
Copyright 2009 Cengage Learning, Inc. All Rights Reserved. May not be copied, scanned, or duplicated, in whole or in part.
Licensed to:
Each character set has a name. The character set representing the alphabet of Englishcharacters is called ASCII (American Standard Code for Information Interchange). Amore extended character set called Latin-1 or the ISO 8859-1 character set supports 255characters and can be used by most languages that employ the Latin alphabet, includingEnglish, French, Spanish, and Italian. The most extended character set is Unicode, whichcan be used for any of the world’s languages, supporting up to 65,536 symbols. The mostcommonly used character set on the Web is UTF-8, which is a compressed version ofUnicode and is probably the default character set assumed by your browser. You canlearn more about character sets by visiting the W3C Web site and the Web site for theInternet Assigned Numbers Authority at www.iana.org.
Numeric Character ReferencesTo store a character set, browsers need to associate each symbol with a number in a pro-cess called character encoding. The number is called the numeric character reference.For example, the copyright symbol © from the UTF-8 character set has the number 169.If you know the numeric reference, you can insert the number directly into your code todisplay the symbol. The syntax to insert a numeric character reference is
&#code;
where code is the reference number. Thus to display the © symbol in your Web page,you would enter
©
into your HTML file. To render a numeric character reference correctly, the browserneeds to know the character set and encoding being used in the Web page. This informa-tion is typically sent by the Web server as it transfers the HTML page to the browser; andunless you are working with specialized international documents, you usually do nothave to worry about specifying the character set for the browser.
Character Entity ReferencesAnother way to insert a special symbol is to use a character entity reference, in which ashort memorable name is used in place of the numeric character reference. The syntax toinsert a character entity reference is
&char;
where char is the character’s name. The character entity reference for the copyright sym-bol is “copy,” so to display the © symbol in your Web page you could also insert
©
into your HTML code. One of the advantages of character entity references is that brows-ers can use them without knowing the character set or encoding. A disadvantage is thatolder browsers might not recognize the character entity reference and will thus displaythe reference name but not the symbol it represents.
C6736_01 1/9/2008 8:26:13 Page 43
HTML 43Tutorial 1 Developing a Web Page HTML and XHTML
Copyright 2009 Cengage Learning, Inc. All Rights Reserved. May not be copied, scanned, or duplicated, in whole or in part.
Copyright 2009 Cengage Learning, Inc. All Rights Reserved. May not be copied, scanned, or duplicated, in whole or in part.
Licensed to:
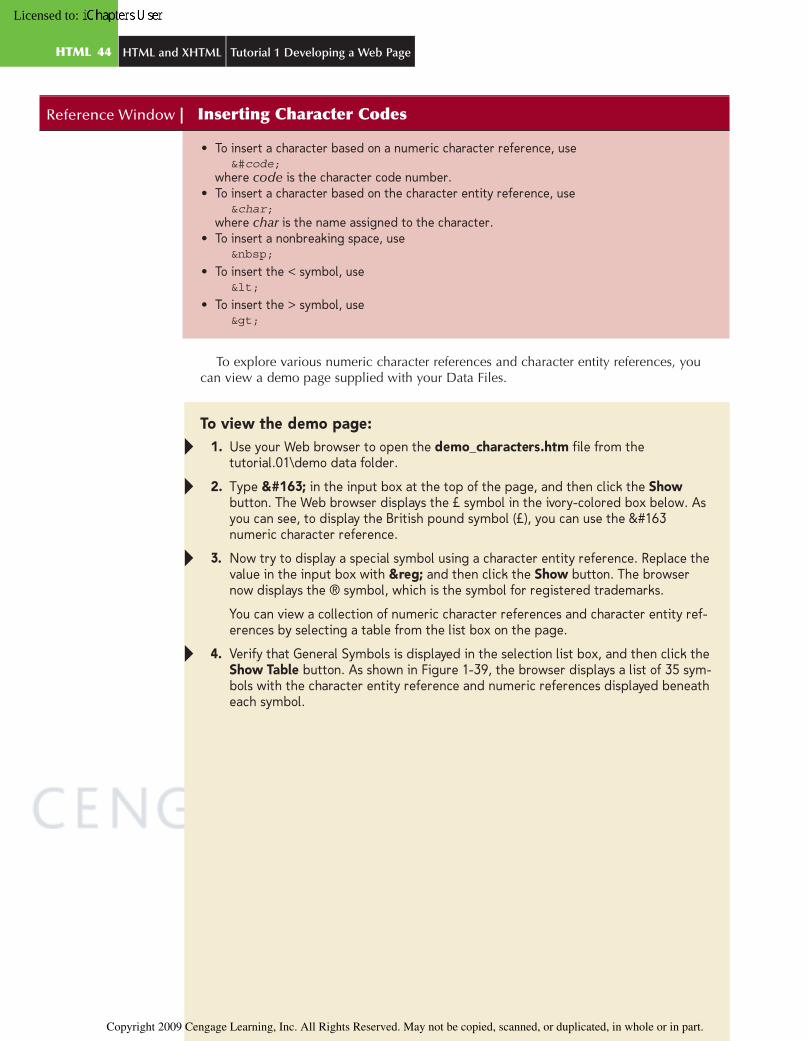
Reference Window | Inserting Character Codes
• To insert a character based on a numeric character reference, use&#code;
where code is the character code number.• To insert a character based on the character entity reference, use
&char;where char is the name assigned to the character.
• To insert a nonbreaking space, use
• To insert the < symbol, use<
• To insert the > symbol, use>
To explore various numeric character references and character entity references, youcan view a demo page supplied with your Data Files.
To view the demo page:1. Use your Web browser to open the demo_characters.htm file from the
tutorial.01\demo data folder.
2. Type £ in the input box at the top of the page, and then click the Showbutton. The Web browser displays the £ symbol in the ivory-colored box below. Asyou can see, to display the British pound symbol (£), you can use the £numeric character reference.
3. Now try to display a special symbol using a character entity reference. Replace thevalue in the input box with ® and then click the Show button. The browsernow displays the ® symbol, which is the symbol for registered trademarks.
You can view a collection of numeric character references and character entity ref-erences by selecting a table from the list box on the page.
4. Verify that General Symbols is displayed in the selection list box, and then click theShow Table button. As shown in Figure 1-39, the browser displays a list of 35 sym-bols with the character entity reference and numeric references displayed beneatheach symbol.
C6736_01 1/23/2008 16:17:58 Page 44
HTML 44 HTML and XHTML Tutorial 1 Developing a Web Page
Copyright 2009 Cengage Learning, Inc. All Rights Reserved. May not be copied, scanned, or duplicated, in whole or in part.
Copyright 2009 Cengage Learning, Inc. All Rights Reserved. May not be copied, scanned, or duplicated, in whole or in part.
Licensed to:
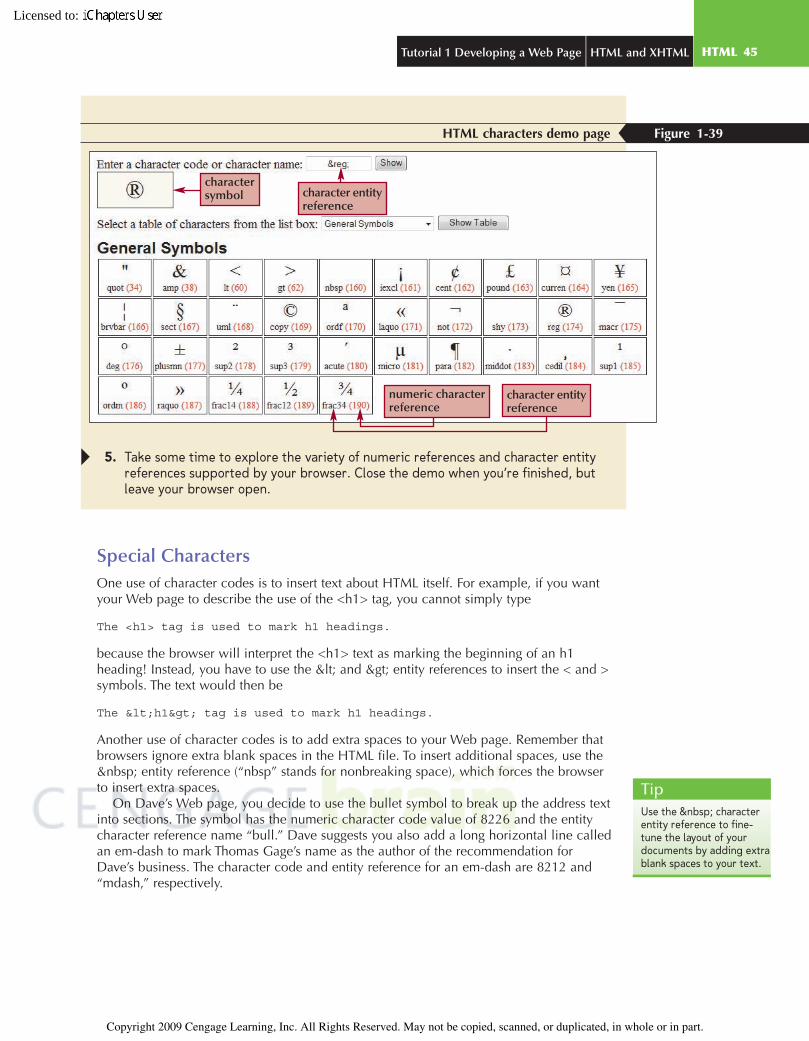
HTML characters demo page Figure 1-39
charactersymbol
character entityreference
numeric characterreference
character entityreference
5. Take some time to explore the variety of numeric references and character entityreferences supported by your browser. Close the demo when you’re finished, butleave your browser open.
Special CharactersOne use of character codes is to insert text about HTML itself. For example, if you wantyour Web page to describe the use of the <h1> tag, you cannot simply type
The <h1> tag is used to mark h1 headings.
because the browser will interpret the <h1> text as marking the beginning of an h1heading! Instead, you have to use the < and > entity references to insert the < and >symbols. The text would then be
The <h1> tag is used to mark h1 headings.
Another use of character codes is to add extra spaces to your Web page. Remember thatbrowsers ignore extra blank spaces in the HTML file. To insert additional spaces, use the entity reference (“nbsp” stands for nonbreaking space), which forces the browserto insert extra spaces.
On Dave’s Web page, you decide to use the bullet symbol to break up the address textinto sections. The symbol has the numeric character code value of 8226 and the entitycharacter reference name “bull.” Dave suggests you also add a long horizontal line calledan em-dash to mark Thomas Gage’s name as the author of the recommendation forDave’s business. The character code and entity reference for an em-dash are 8212 and“mdash,” respectively.
TipUse the characterentity reference to fine-tune the layout of yourdocuments by adding extrablank spaces to your text.
C6736_01 1/9/2008 8:26:14 Page 45
HTML 45Tutorial 1 Developing a Web Page HTML and XHTML
Copyright 2009 Cengage Learning, Inc. All Rights Reserved. May not be copied, scanned, or duplicated, in whole or in part.
Copyright 2009 Cengage Learning, Inc. All Rights Reserved. May not be copied, scanned, or duplicated, in whole or in part.
Licensed to:
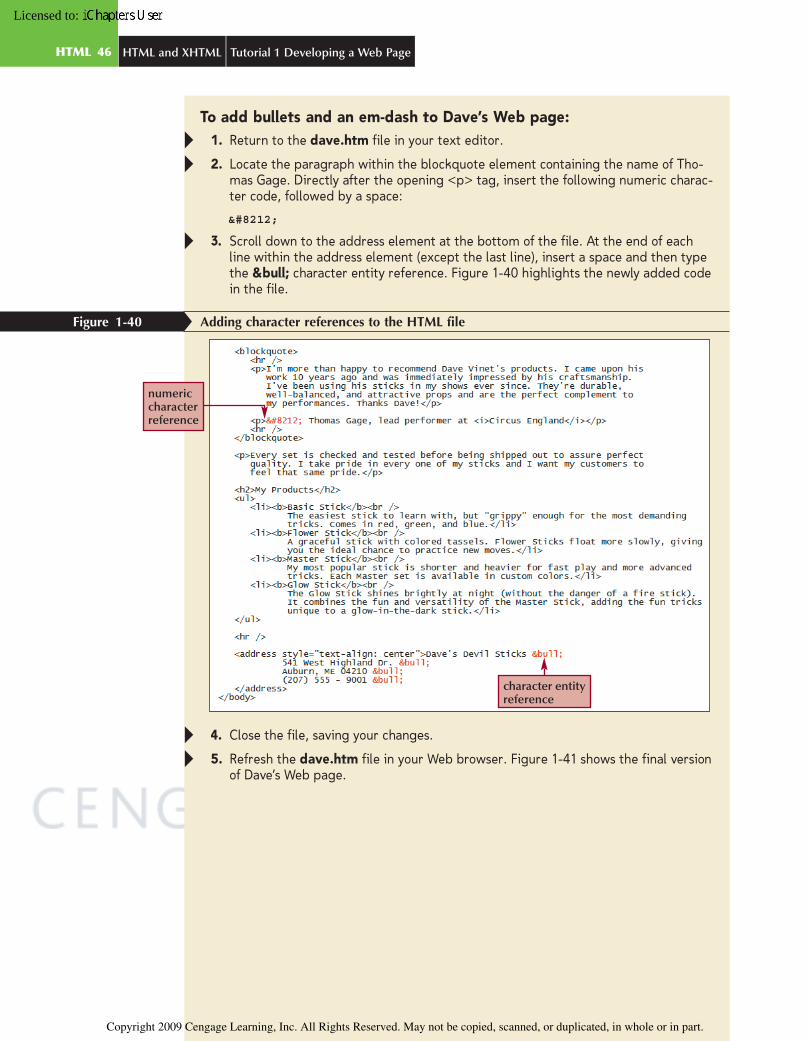
To add bullets and an em-dash to Dave’s Web page:1. Return to the dave.htm file in your text editor.
2. Locate the paragraph within the blockquote element containing the name of Tho-mas Gage. Directly after the opening <p> tag, insert the following numeric charac-ter code, followed by a space:
—
3. Scroll down to the address element at the bottom of the file. At the end of eachline within the address element (except the last line), insert a space and then typethe • character entity reference. Figure 1-40 highlights the newly added codein the file.
Adding character references to the HTML fileFigure 1-40
numericcharacterreference
character entityreference
4. Close the file, saving your changes.
5. Refresh the dave.htm file in your Web browser. Figure 1-41 shows the final versionof Dave’s Web page.
C6736_01 1/9/2008 8:26:14 Page 46
HTML 46 HTML and XHTML Tutorial 1 Developing a Web Page
Copyright 2009 Cengage Learning, Inc. All Rights Reserved. May not be copied, scanned, or duplicated, in whole or in part.
Copyright 2009 Cengage Learning, Inc. All Rights Reserved. May not be copied, scanned, or duplicated, in whole or in part.
Licensed to:
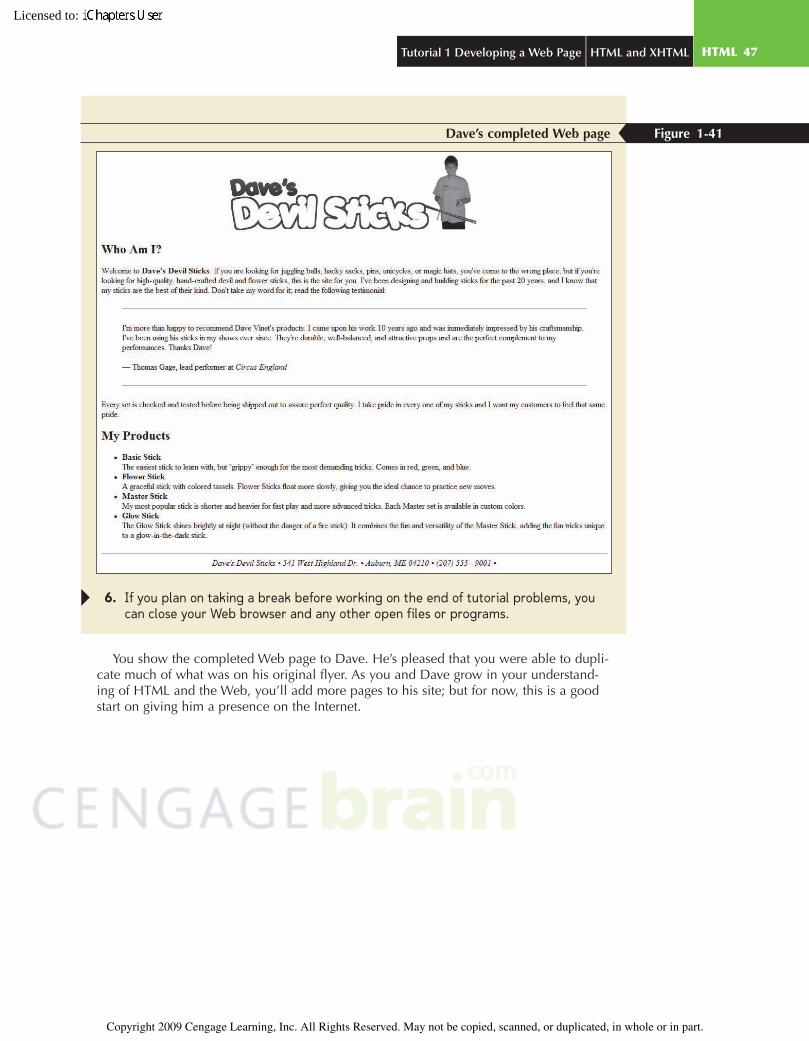
Dave’s completed Web page Figure 1-41
6. If you plan on taking a break before working on the end of tutorial problems, youcan close your Web browser and any other open files or programs.
You show the completed Web page to Dave. He’s pleased that you were able to dupli-cate much of what was on his original flyer. As you and Dave grow in your understand-ing of HTML and the Web, you’ll add more pages to his site; but for now, this is a goodstart on giving him a presence on the Internet.
C6736_01 12/14/2007 15:32:12 Page 47
HTML 47Tutorial 1 Developing a Web Page HTML and XHTML
Copyright 2009 Cengage Learning, Inc. All Rights Reserved. May not be copied, scanned, or duplicated, in whole or in part.
Copyright 2009 Cengage Learning, Inc. All Rights Reserved. May not be copied, scanned, or duplicated, in whole or in part.
Licensed to:
InSight | Publishing Your Page on the Web
Once you’ve completed your Web page, your next step is to research ways of getting it onthe Web. You first need to find a Web server to host the page. Some of the issues you’ll needto consider are how much you want to pay, how much space you need, and how important itis for you to have a highly trafficked Web site. You might first look toward the company thatprovides your Internet access. Most ISPs (Internet Service Providers) offer space on theirWeb server as part of their regular service or for a small fee. However, they usually limit theamount of space available to you, unless you pay an extra fee to host a larger site. There arealso free Web hosts, which provide space on servers for personal or noncommercial use.Once again, the amount of space you get is limited. Free Web hosting services make theirmoney from selling advertising space on your site, so you should be prepared to act as abillboard in return for space on their server.
Web sites are identified by their domain names. If you’re planning to create a commercialsite to advertise a product or service, you want the domain name to reflect your business.Free Web hosts usually include their names in your Web address. Thus instead of having aWeb address like
davesdevilsticks.com
you might have something like
freewebhosting.net/members/~davesdevilsticks.html
If you’re running a site for personal use, this might not be a problem—but it would lookunprofessional on a commercial site. If you are planning a commercial site and simply wantto advertise your product by publishing an online brochure, you can usually find an inexpen-sive host and pay a nominal yearly fee to reserve a Web address that reflects your company’sname. On the other hand, if you intend to run an e-commerce site where users can purchaseproducts online, you will need to invest in software and storage space to manage customerorders and inventory. You will also need to invest in getting your Web site noticed in theincreasingly crowded Internet market. Commercial pages require careful planning and gooddesign so that the investment in publishing the site is not wasted.
Review | Session 1.3 Quick Check
1. Specify the code you would enter to display the text “Product List” as an h2 head-ing, centered horizontally on the page.
2. What is a presentational attribute? What is a reason for using presentationalattributes? What is a reason for avoiding them?
3. Specify the code you would enter to mark the text “Hamlet by William Shakes-peare” as a centered h1 heading with a line break after the word “Hamlet.”
4. You want to add the graphic file portrait.gif to your Web page as an inline image.For nonvisual browsers, your page should display the text “David Vinet” in place ofthe image. Specify the code to do this.
5. What is ISO-8859-1?6. The trademark symbol ™ has the Unicode number 8482. How would you enter this
symbol into your Web page?7. The Greek letter b has the character entity name of “beta.” How would you enter
this symbol into your Web page?8. Specify the code you would enter to add three consecutive blank spaces to your
Web page.9. Specify the code you would enter to display the text “<h2>Hamlet</h2>“ on your
Web page.
C6736_01 12/14/2007 15:34:23 Page 48
HTML 48 HTML and XHTML Tutorial 1 Developing a Web Page
Copyright 2009 Cengage Learning, Inc. All Rights Reserved. May not be copied, scanned, or duplicated, in whole or in part.
Copyright 2009 Cengage Learning, Inc. All Rights Reserved. May not be copied, scanned, or duplicated, in whole or in part.
Licensed to:
Tutorial Summary | Review
In this tutorial you learned how to create a basic Web page using HTML. The tutorial beganby examining concepts and history surrounding networks and the development of the WorldWide Web. It then explored the history of HTML, explaining how the development of HTMLwas a key component in the development of the Web. The first session concluded with thecreation of a simple Web page consisting only of the page head. Work on designing thepage body began in the second session by first exploring how to mark block-level elements.The discussion of block-level elements included work with headings, paragraphs, blockquotes, and lists. The second session concluded with coverage of inline elements and dis-cussed the issue of physical elements versus logical elements. The third session began byexploring element attributes, showing how to use the style attribute to center the contents ofa block-level element. Because Web pages often need to display nontextual content, thethird session then examined how to use empty elements such as line breaks, horizontalrules, and inline images. The session and the tutorial concluded by discussing character setsand explored how to insert special character symbols into a Web page.
Key TermsARPANETASCIIattributeblock-level elementbody elementcharacter encodingcharacter entity referencecharacter formatting
elementcharacter setclientclient-server networkclosing tagcomment tagdefinition listdeprecatedelementempty elementExtensible Hypertext
Markup LanguageExtensible Markup
Languageextensionsfile serverhead elementheading elementhostHTML
HTML 5.0HTML converterHTML editorhypertextHypertext Markup
Languageinline elementinline imageInternet Service ProviderISO-8859-1ISPLANLatin-1linklocal area networklogical elementmarkup languagenetworknodenumeric character
referenceone-sided tagopening tagordered listphysical elementpresentational attributeprint server
root elementserverSGMLStandard Generalized
Markup Languagestyletagtext-based browsertwo-sided tagUnicodeunordered listUTF-8W3CWANWebWeb browserWeb pageWeb serverwhite spacewide area networkWorld Wide WebWorld Wide Web
ConsortiumXHTMLXHTML 2.0XHTML 5.0XML
C6736_01 12/14/2007 15:34:23 Page 49
HTML 49Tutorial 1 Developing a Web Page HTML and XHTML
Copyright 2009 Cengage Learning, Inc. All Rights Reserved. May not be copied, scanned, or duplicated, in whole or in part.
Copyright 2009 Cengage Learning, Inc. All Rights Reserved. May not be copied, scanned, or duplicated, in whole or in part.
Licensed to:
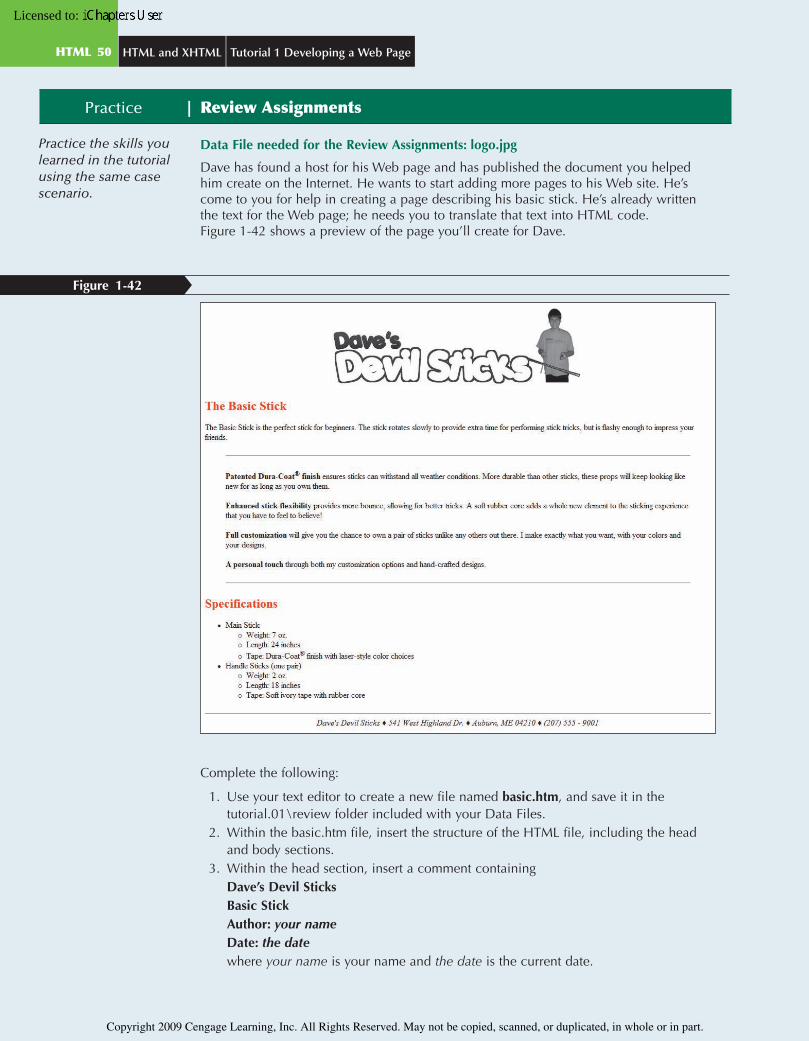
Practice | Review Assignments
Practice the skills youlearned in the tutorialusing the same casescenario.
Data File needed for the Review Assignments: logo.jpg
Dave has found a host for his Web page and has published the document you helpedhim create on the Internet. He wants to start adding more pages to his Web site. He’scome to you for help in creating a page describing his basic stick. He’s already writtenthe text for the Web page; he needs you to translate that text into HTML code.Figure 1-42 shows a preview of the page you’ll create for Dave.
Figure 1-42
Complete the following:
1. Use your text editor to create a new file named basic.htm, and save it in thetutorial.01\review folder included with your Data Files.
2. Within the basic.htm file, insert the structure of the HTML file, including the headand body sections.
3. Within the head section, insert a comment containingDave’s Devil SticksBasic StickAuthor: your nameDate: the datewhere your name is your name and the date is the current date.
C6736_01 12/14/2007 15:34:38 Page 50
HTML 50 HTML and XHTML Tutorial 1 Developing a Web Page
Copyright 2009 Cengage Learning, Inc. All Rights Reserved. May not be copied, scanned, or duplicated, in whole or in part.
Copyright 2009 Cengage Learning, Inc. All Rights Reserved. May not be copied, scanned, or duplicated, in whole or in part.
Licensed to:

4. Add the page title Basic Sticks to the head section.5. Within the body section, insert an h1 heading centered horizontally on the page and
containing the inline image file logo.jpg, located in the tutorial.01\review folderincluded with your Data Files. Specify the following alternate text for the image:Dave’s Devil Sticks: The Basic Stick.
6. Add two h2 headings containing the text The Basic Stick and Specifications. Set thefont color of the heading 2 text to red.
7. Directly below the first h2 heading, insert a paragraph containing the text: The BasicStick is the perfect stick for beginners. The stick rotates slowly to provide extratime for performing stick tricks, but is flashy enough to impress your friends.
8. Directly below the paragraph but above the second h2 heading, insert a block quotethat contains the following:a. Place a horizontal rule at the top and the bottom of the block quote.b. Between the two horizontal rules, insert the following four paragraphs:
Patented Dura-Coat finish ensures sticks can withstand all weather conditions.More durable than other sticks, these props will keep looking like new for as longas you own them.Enhanced stick flexibility provides more bounce, allowing for better tricks. A softrubber core adds a whole new element to the sticking experience that you haveto feel to believe!Full customization will give you the chance to own a pair of sticks unlike anyothers out there. I make exactly what you want, with your colors and yourdesigns.A personal touch through both my customization options and hand-crafteddesigns.
c. Change the first few words of each of the four paragraphs to a bold font, asindicated in Figure 1-42.
9. Directly below the second h2 heading, insert an unordered list. The list should con-tain two items: Main Stick and Handle Sticks (one pair).
10. Directly below the Main Stick list item, insert an unordered list containing the fol-lowing items:Weight: 7 oz.Length: 24 inchesTape: Dura-Coat finish with laser-style color choices
11. Directly below the Handle Sticks (one pair) list item, insert an unordered listcontaining:Weight: 2 oz.Length: 18 inchesTape: Soft ivory tape with rubber core
12. Locate the two occurrences of “Dura-Coat” in the document. Directly after the word“Dura-Coat,” insert the registered trademark symbol ®. The character entity name ofthe ® symbol is “reg.” Display the ® symbol as a superscript by placing the charac-ter within the sup inline element.
13. At the bottom of the body section, insert the company’s address:Dave’s Devil Sticks541 West Highland Dr.Auburn, ME 04210(207) 555 - 9001
C6736_01 12/14/2007 15:33:16 Page 51
HTML 51Tutorial 1 Developing a Web Page HTML and XHTML
Copyright 2009 Cengage Learning, Inc. All Rights Reserved. May not be copied, scanned, or duplicated, in whole or in part.
Copyright 2009 Cengage Learning, Inc. All Rights Reserved. May not be copied, scanned, or duplicated, in whole or in part.
Licensed to:
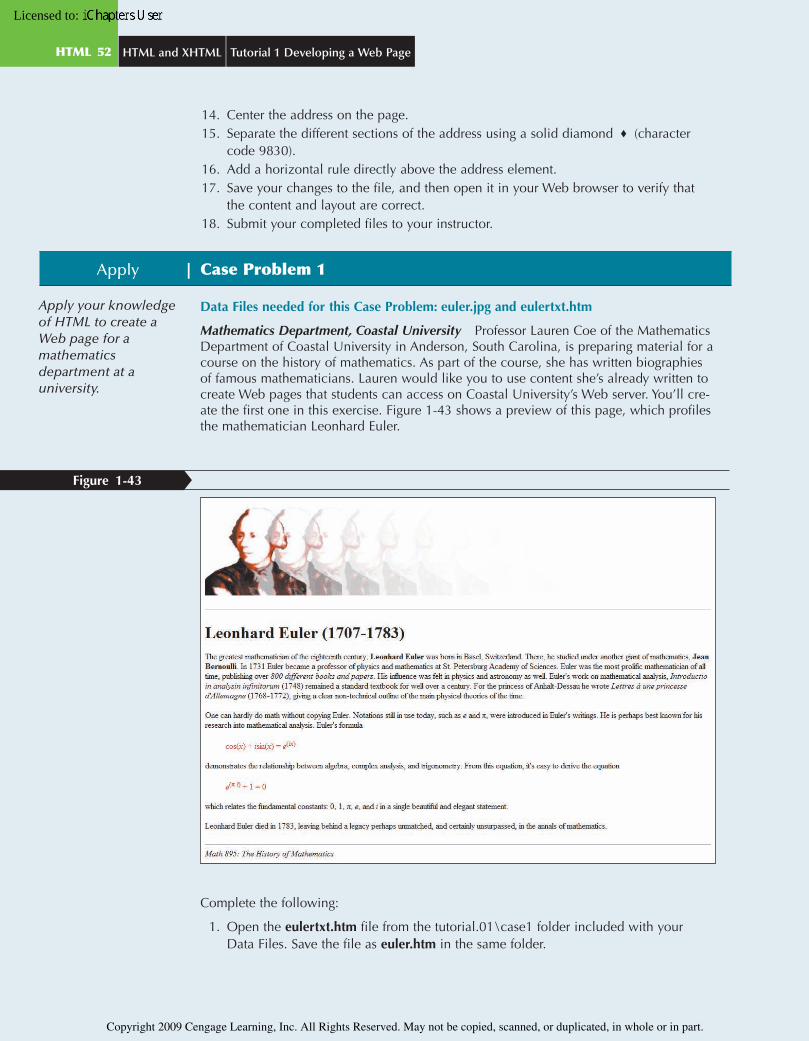
14. Center the address on the page.15. Separate the different sections of the address using a solid diamond (character
code 9830).16. Add a horizontal rule directly above the address element.17. Save your changes to the file, and then open it in your Web browser to verify that
the content and layout are correct.18. Submit your completed files to your instructor.
Apply | Case Problem 1
Apply your knowledgeof HTML to create aWeb page for amathematicsdepartment at auniversity.
Data Files needed for this Case Problem: euler.jpg and eulertxt.htm
Mathematics Department, Coastal University Professor Lauren Coe of the MathematicsDepartment of Coastal University in Anderson, South Carolina, is preparing material for acourse on the history of mathematics. As part of the course, she has written biographiesof famous mathematicians. Lauren would like you to use content she’s already written tocreate Web pages that students can access on Coastal University’s Web server. You’ll cre-ate the first one in this exercise. Figure 1-43 shows a preview of this page, which profilesthe mathematician Leonhard Euler.
Figure 1-43
Complete the following:
1. Open the eulertxt.htm file from the tutorial.01\case1 folder included with yourData Files. Save the file as euler.htm in the same folder.
C6736_01 1/23/2008 16:18:34 Page 52
HTML 52 HTML and XHTML Tutorial 1 Developing a Web Page
Copyright 2009 Cengage Learning, Inc. All Rights Reserved. May not be copied, scanned, or duplicated, in whole or in part.
Copyright 2009 Cengage Learning, Inc. All Rights Reserved. May not be copied, scanned, or duplicated, in whole or in part.
Licensed to:
2. Add opening and closing <html> tags to the file. Insert a head section and encloseLauren’s text on Euler within a body element.
3. Within the head section, insert a comment containingHistory of Math 895: Leonhard EulerAuthor: your nameDate: the datewhere your name is your name and the date is the current date.
4. Add the page title History of Math 895: Leonhard Euler to the head section.5. Directly below the opening <body> tag, insert a paragraph containing the inline
image file euler.jpg, located in the tutorial.01\case1 folder included with your DataFiles. Specify “Portrait of Leonhard Euler” as the alternative text.
6. Mark the next line containing “Leonhard Euler (1707 - 1783)” as an h1 heading.7. Mark the five blocks of text describing Euler’s life as paragraphs.8. Mark the two equations as block quotes. Change the font color of the two block
quotes to red.9. Mark the name of the course title at the bottom of the file as an address.
10. Insert horizontal rules directly above the h1 heading and the address element.11. Within the first paragraph, display the names “Leonhard Euler” and “Jean Bernoulli”
in boldface. Mark the phrase “800 different books and papers” as emphasized textusing the em element. Mark the phrase “Introduction in analysin infinitorum” as acitation.
12. In the phrase, “Lettres a une princesse d’Allemagne” replace the one-letter word awith à (the character entity name is “agrave”). Mark the entire publication as acitation.
13. In the second paragraph, italicize the notation for e and replace “pi” with the char-acter (the character name is “pi”).
14. In the first equation, italicize the letters e, x, and i (but do not italicize the “i” in“sin”). Display the term (ix) as a superscript.
15. In the second equation, replace “pi” with the character . Italicize the letter e and i.Display ( i ) as a superscript.
16. In the last paragraph, italicize the notations for e and i and replace “pi” with .17. Save your changes to the file, and then verify that the page appears correctly in your
Web browser.18. Submit your completed files to your instructor.
Apply | Case Problem 2
Apply your knowledgeof HTML to create apage showing textfrom a scene of aShakespeare play.
Data Files needed for this Case Problem: macbeth.jpg and macbethtxt.htm
Mansfield Classical Theatre Steve Karls is the director of Mansfield Classical Theatre, atheatre company for young people located in Mansfield, Ohio. This summer the com-pany is planning to perform the Shakespeare play Macbeth. Steve wants to put the text ofthe play on the company’s Web site and has asked for your help in designing and com-pleting the Web page. Steve wants to have a separate page for each scene from the play.A preview of the page you’ll create for Act I, Scene 1 is shown in Figure 1-44. Steve hasalready typed the text of the scene. He needs you to supply the HTML code.
C6736_01 1/23/2008 16:19:3 Page 53
HTML 53Tutorial 1 Developing a Web Page HTML and XHTML
Copyright 2009 Cengage Learning, Inc. All Rights Reserved. May not be copied, scanned, or duplicated, in whole or in part.
Copyright 2009 Cengage Learning, Inc. All Rights Reserved. May not be copied, scanned, or duplicated, in whole or in part.
Licensed to:
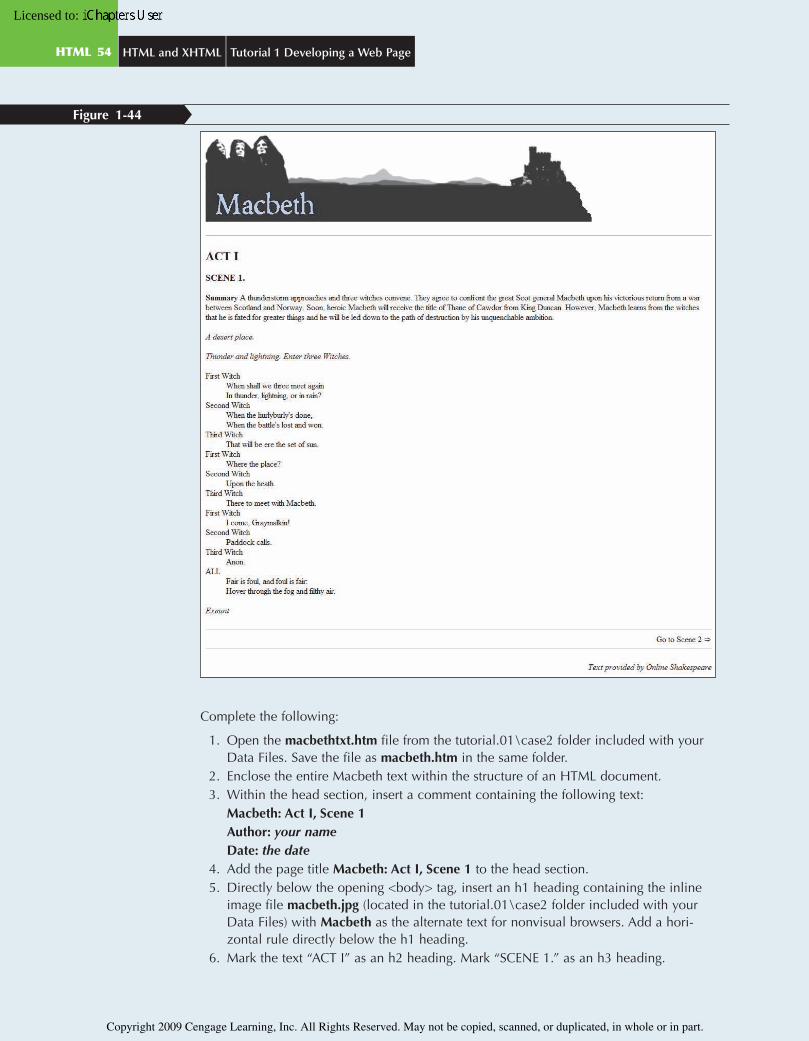
Figure 1-44
Complete the following:
1. Open the macbethtxt.htm file from the tutorial.01\case2 folder included with yourData Files. Save the file as macbeth.htm in the same folder.
2. Enclose the entire Macbeth text within the structure of an HTML document.3. Within the head section, insert a comment containing the following text:
Macbeth: Act I, Scene 1Author: your nameDate: the date
4. Add the page title Macbeth: Act I, Scene 1 to the head section.5. Directly below the opening <body> tag, insert an h1 heading containing the inline
image file macbeth.jpg (located in the tutorial.01\case2 folder included with yourData Files) with Macbeth as the alternate text for nonvisual browsers. Add a hori-zontal rule directly below the h1 heading.
6. Mark the text “ACT I” as an h2 heading. Mark “SCENE 1.” as an h3 heading.
C6736_01 12/14/2007 15:33:20 Page 54
HTML 54 HTML and XHTML Tutorial 1 Developing a Web Page
Copyright 2009 Cengage Learning, Inc. All Rights Reserved. May not be copied, scanned, or duplicated, in whole or in part.
Copyright 2009 Cengage Learning, Inc. All Rights Reserved. May not be copied, scanned, or duplicated, in whole or in part.
Licensed to:
7. Mark the summary of the scene as a paragraph. Display the word “Summary”in bold.
8. In the text of the play, mark the descriptions of setting, scene, and exits as separateparagraphs, and italicize the text, as shown in Figure 1-44.
9. Mark the dialog as a definition list, with each character’s name marked as a defini-tion term and each speech marked as a definition description. Where the speechgoes over one line, use a line break to keep the speech on separate lines, as shownin the figure.
10. Directly below the Exeunt paragraph, insert the line Go to Scene 2. Mark this line asa div element and align it with the right page margin. (Steve will mark this as a linklater.) At the end of the line, insert a right arrow character using the 8658 characternumber. Add horizontal rules directly above and below this statement.
11. Mark the line “Text provided by Online Shakespeare” as a paragraph, with the textitself marked with the cite element. Align the text with the right page margin.
12. Save your changes to the file, and then confirm the layout and content of the pagein your Web browser.
13. Submit the completed files to your instructor.
Challenge | Case Problem 3
Explore how to useHTML to create arecipe page.
Data Files needed for this Case Problem: dessertweb.jpg, torte.jpg, and tortetxt.htm
dessertWEB Amy Wu wants to take her love of cooking and sharing recipes to theWorld Wide Web. She’s interested in creating a new Web site called dessertWEB whereother cooks can submit and review dessert recipes. Each page within her site will have aphoto and description of the dessert, the ingredients, the cooking directions, and a list ofreviews. Each recipe will be rated on a 5-star scale. She already has information on onerecipe: Apple Bavarian Torte. She’s asked for your help in creating a Web page from thedata she’s collected. A preview of the completed page is shown in Figure 1-45.
C6736_01 4/16/2009 9:25:34 Page 55
HTML 55Tutorial 1 Developing a Web Page HTML and XHTML
Copyright 2009 Cengage Learning, Inc. All Rights Reserved. May not be copied, scanned, or duplicated, in whole or in part.
Copyright 2009 Cengage Learning, Inc. All Rights Reserved. May not be copied, scanned, or duplicated, in whole or in part.
Licensed to:
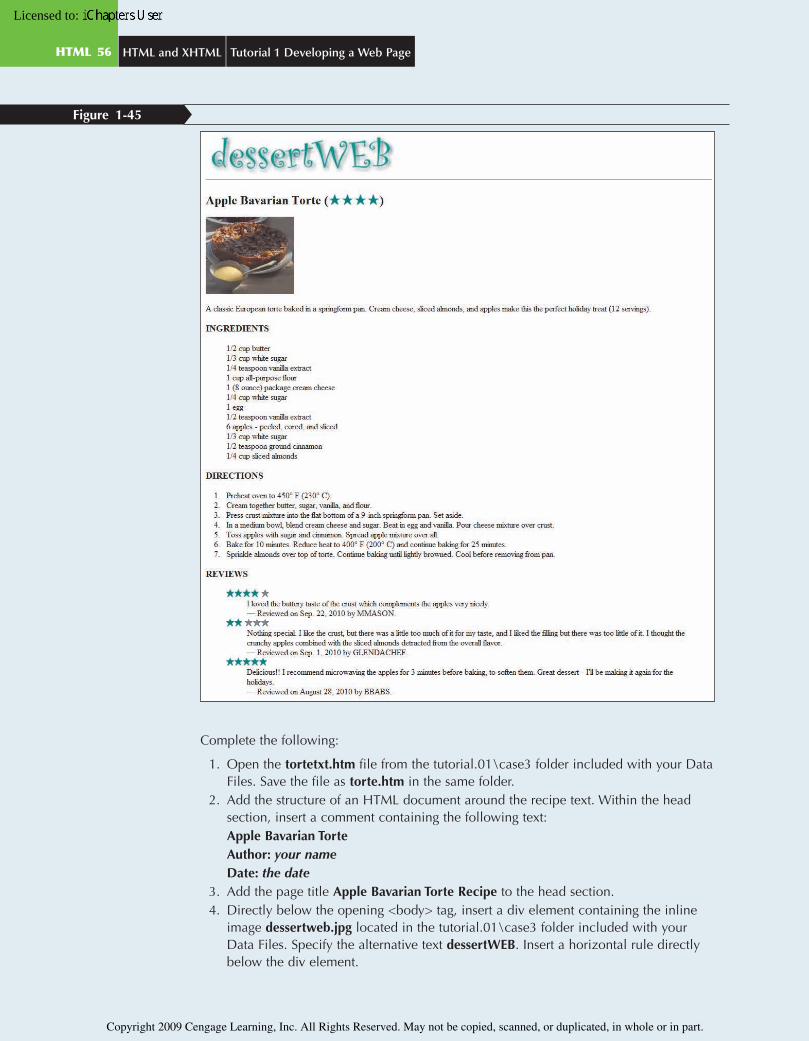
Figure 1-45
Complete the following:
1. Open the tortetxt.htm file from the tutorial.01\case3 folder included with your DataFiles. Save the file as torte.htm in the same folder.
2. Add the structure of an HTML document around the recipe text. Within the headsection, insert a comment containing the following text:Apple Bavarian TorteAuthor: your nameDate: the date
3. Add the page title Apple Bavarian Torte Recipe to the head section.4. Directly below the opening <body> tag, insert a div element containing the inline
image dessertweb.jpg located in the tutorial.01\case3 folder included with yourData Files. Specify the alternative text dessertWEB. Insert a horizontal rule directlybelow the div element.
C6736_01 12/14/2007 15:33:22 Page 56
HTML 56 HTML and XHTML Tutorial 1 Developing a Web Page
Copyright 2009 Cengage Learning, Inc. All Rights Reserved. May not be copied, scanned, or duplicated, in whole or in part.
Copyright 2009 Cengage Learning, Inc. All Rights Reserved. May not be copied, scanned, or duplicated, in whole or in part.
Licensed to:
5. Mark the text “Apple Bavarian Torte” as an h2 heading.6. Change the text “(4 stars)” to a set of 4 star symbols (character number 9733).
Enclose the star symbols in a span element, setting the font color to teal.7. Directly below the h2 heading, insert another div element containing the inline
image torte.jpg, located in the tutorial.01\case3 folder included with your DataFiles. Specify the alternative text Torte image.
8. Mark the description of the dessert as a paragraph.9. Mark “INGREDIENTS,” “DIRECTIONS,” and “REVIEWS” as h3 headings.
10. Enclose the list of ingredients in a block quote. Add line breaks after each item inthe list.
11. Mark the list of directions as an ordered list, with each direction a separate item inthe list. Replace the word “degrees” with the degree symbol (character name deg).
12. Enclose the list of reviews in a block quote. Turn the list into a definition list. Markup the definition list as follows:a. The definition term is the number of stars assigned by each reviewer. Change the
number of stars in the text file to star symbols (character number 9733). Amywants you to display 5 stars for each review with the number of stars displayed ina teal font matching the stars given by the reviewer and the remaining starsdisplayed in a gray font. Use the span element to enclose the two different groupsof stars.
b. There are two definition descriptions for each review. The first encloses the text ofthe review. The second encloses the date of the review and the name of thereviewer.
c. Insert an em-dash (character name “mdash”) before the word “Reviewed” in eachof the reviews.
13. Save your changes to the file, and then verify the layout and content of the page inyour Web browser.
14. Submit the completed files to your instructor.
Create | Case Problem 4
Test your knowledgeof HTML and use yourcreativity to design aWeb page for anexercise equipmentcompany.
Data Files needed for this Case Problem: logo.jpg, smith.jpg, and smith.txt
Body Systems Body Systems is a leading manufacturer of home gyms. The companyrecently hired you to assist in developing its Web site. Your first task is to create a Webpage for the LSM400, a popular weight machine sold by the company. You’ve been givena text file describing the features of the LSM400. You’ve also received two image files:one of the company’s logo and one of the LSM400. You are free to supplement these fileswith any other resources available to you. You are responsible for the page’s content andappearance.
Complete the following:
1. Create a new HTML file named smith.htm and save it in the tutorial.01\case4 folderincluded with your Data Files.
2. Add a comment to the head section of the document describing the document’scontent and containing your name and the date.
3. Add an appropriate page title to the document.
C6736_01 1/23/2008 16:19:54 Page 57
HTML 57Tutorial 1 Developing a Web Page HTML and XHTML
Copyright 2009 Cengage Learning, Inc. All Rights Reserved. May not be copied, scanned, or duplicated, in whole or in part.
Copyright 2009 Cengage Learning, Inc. All Rights Reserved. May not be copied, scanned, or duplicated, in whole or in part.
Licensed to:
4. Use the contents of the smith.txt document (located in the tutorial.01\case4 folder)as the basis of the text in the Web page. Include at least one example of each of thefollowing:• a heading• a paragraph• an ordered or unordered list• an inline element• an inline image• a horizontal rule• a special character• an element attribute
5. Structure your HTML code so that it will be easy for others to read and understand.6. Save your changes to the file, and then open it in your Web browser to verify that it
is readable and attractive.7. Submit your completed files to your instructor.
Review | Quick Check Answers
Session 1.1
1. A hypertext document is an electronic file containing elements that users can select,usually by clicking a mouse, to open other documents.
2. A Web server is a computer on a network that stores a Web site and makes it avail-able to clients. Users access the Web site by running a program called a Webbrowser on their computers.
3. HTML documents do not exactly specify the appearance of a document; rather theydescribe the purpose of various elements in the document and leave it to the Webbrowser to determine the final appearance. A word processor like Microsoft Wordexactly specifies the appearance of each document element.
4. Deprecated features are those features that are being phased out by the W3C andmight not be supported by future browsers.
5. The html element.6. In the head section of the document you would enter the code
<title>Technical Support</title>
7. <!-- Page Updated on 4/15/2011 -->
8. The title element was not properly nested within the head element.
Session 1.2
1. Block-level elements contain content that is displayed in a separate section withinthe page, such as a paragraph or a heading. An inline element is part of the sameblock as its surrounding content—for example, individual words or phrases within aparagraph.
2. Web browsers will strip out extra occurrences of white space and thus will ignorethe extra blank line.
3. <h1>content</h1>
4. Use the blockquote element. Most browsers indent blockquote text.
C6736_01 12/14/2007 15:33:23 Page 58
HTML 58 HTML and XHTML Tutorial 1 Developing a Web Page
Copyright 2009 Cengage Learning, Inc. All Rights Reserved. May not be copied, scanned, or duplicated, in whole or in part.
Copyright 2009 Cengage Learning, Inc. All Rights Reserved. May not be copied, scanned, or duplicated, in whole or in part.
Licensed to:
5. <ul>
<li>Winter</li>
<li>Spring</li>
<li>Summer</li>
<li>Fall</li>
</ul>
6. <dl>
<dt>HAMLET</dt>
<dd> There's ne'er a villain dwelling in all Denmark; but he's
an arrant knave.</dd>
<dt>HORATIO</dt>
<dd> There needs no ghost, my lord, come from the grave to tell
us this.</dd>
</dl>
7. <p><i>Hamlet</i>, a play by William Shakespeare</p>
8. div and span
Session 1.3
1. <h2 style="text-align: center">Product List</h2>
2. Presentational attributes are HTML attributes that exactly specify how the browsershould render an HTML element. Most presentational attributes have been depre-cated, replaced by styles. You should use presentational attributes when you need tosupport older browsers.
3. <h1 style="text-align: center">Hamlet<br /> by William
Shakespeare</h1>
4. <img src="portrait.gif" alt="David Vinet" />
5. ISO-8859-1 is a character set that supports 255 characters and can be used by mostlanguages that use the Latin alphabet.
6. ™
7. β
8.
9. <h2>Hamlet</h2>
C6736_01 1/23/2008 16:15:0 Page 59
HTML 59Tutorial 1 Developing a Web Page HTML and XHTML
Copyright 2009 Cengage Learning, Inc. All Rights Reserved. May not be copied, scanned, or duplicated, in whole or in part.
Copyright 2009 Cengage Learning, Inc. All Rights Reserved. May not be copied, scanned, or duplicated, in whole or in part.
Licensed to:
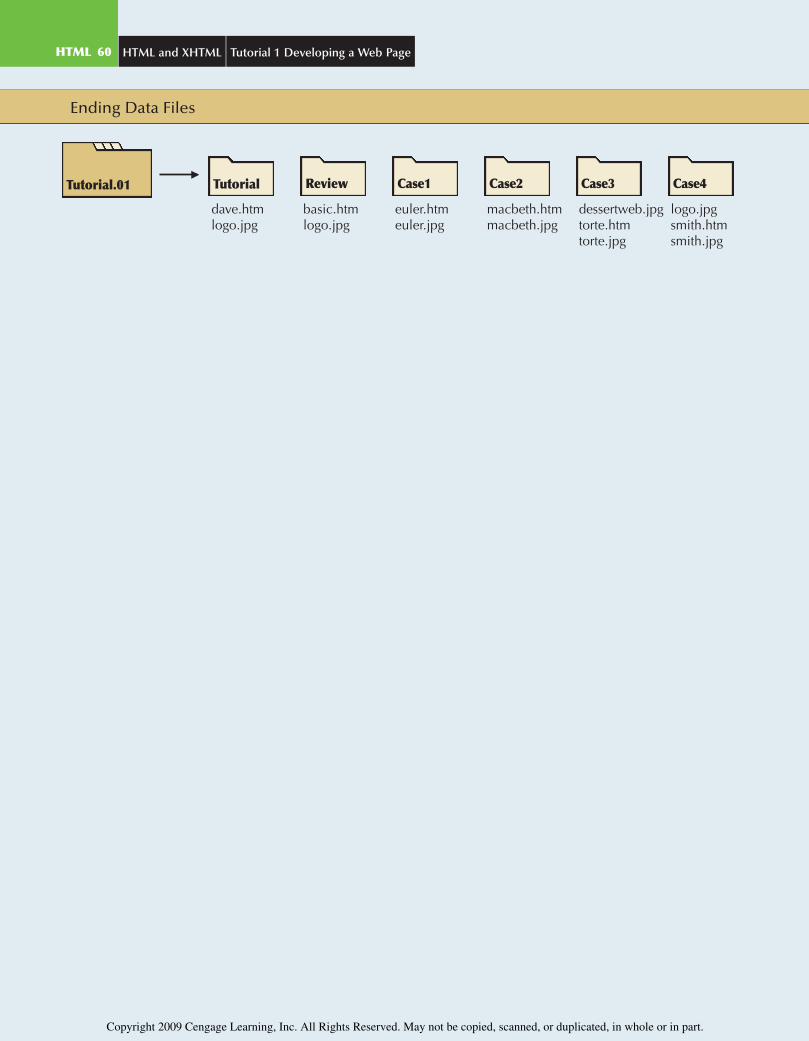
Ending Data Files
Case1 Case2 Case3 Case4
dave.htm basic.htm euler.htm macbeth.htm dessertweb.jpg logo.jpglogo.jpg logo.jpg euler.jpg macbeth.jpg torte.htm smith.htm
torte.jpg smith.jpg
C6736_01 1/23/2008 16:15:16 Page 60
HTML 60 HTML and XHTML Tutorial 1 Developing a Web Page
Copyright 2009 Cengage Learning, Inc. All Rights Reserved. May not be copied, scanned, or duplicated, in whole or in part.
Copyright 2009 Cengage Learning, Inc. All Rights Reserved. May not be copied, scanned, or duplicated, in whole or in part.