Embed Size (px)
Citation preview
23
3—Lifting Analysis
The Lifting Analysis component incorporates the Revised (1991) Lifting Equation from the NationalInstitute for Occupational Safety and Health (NIOSH), and provides a graphical representation of oneor more lifting tasks with feedback about possible musculoskeletal strains. The tool enables users to
• specify a lifting task by selecting appropriate values for task variables • analyze specific lifting tasks, based on task variables • obtain the composite lifting index for tasks performed by the same individual • view the ergonomic effects imposed by the task • determine which lifting task variables will reduce ergonomic hazards.
Working with the Lifting Analysis Component
Screen Layout andNavigation
Single-Task Lifting Analysis Window
The next section, Overview ofAnalysis Procedure, contains aQuick Reference box that providesa brief, step-by-step procedure forthe analysis. Quick Referenceboxes are also provided at theback of the User’s Guide.
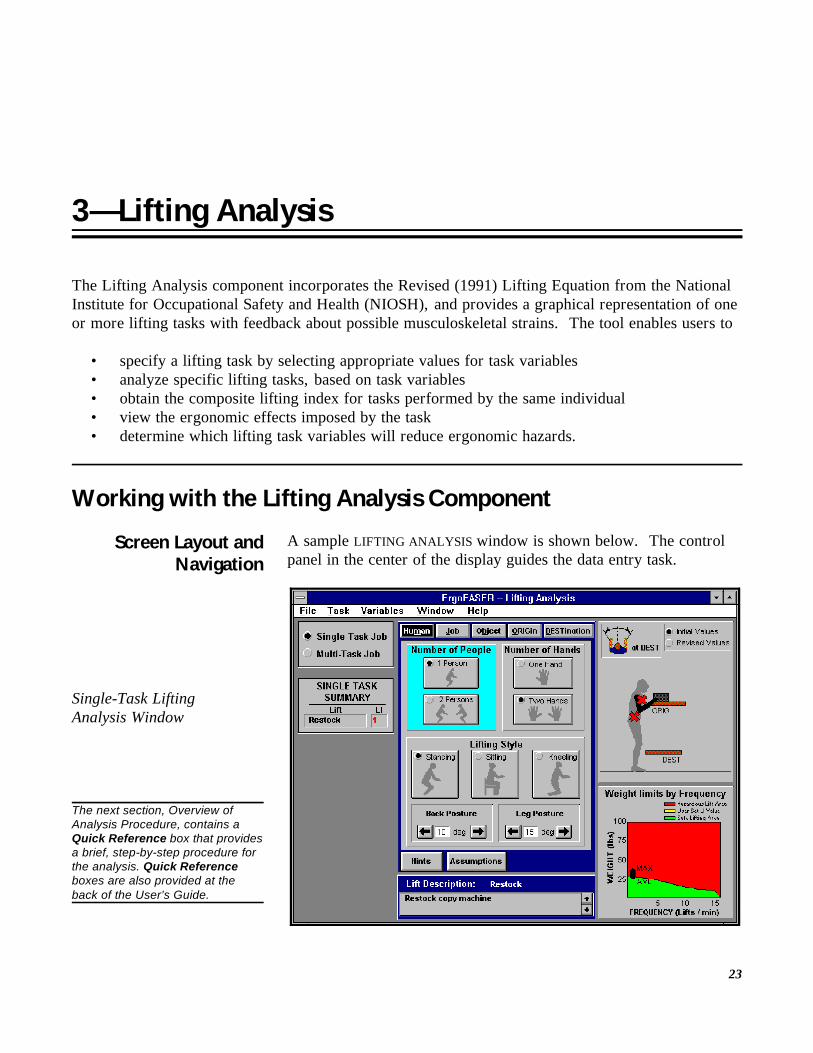
A sample LIFTING ANALYSIS window is shown below. The controlpanel in the center of the display guides the data entry task.
ErgoEASER User's Guide
24
Click on a red X in the TaskRepresentation panel to viewinformation about the potentialstrain.
The Task Representation panel (to the right of the control panel)contains a representation of a human figure that simulates thepostures specified in the data process. When a data entry producesan improper posture, the simulation places a red X over the part ofthe body at the potential injury point.
Directly below the control panel, a text box identifies the task beingreviewed. To the right is a graph showing the current status of thelifting analysis: The Lifting Index (LI), as computed by the liftingequation, is plotted on a curve showing the amount of weight thatmay be lifted as a function of frequency (lifts per minute). Thecurrent value of the LI is plotted as a black dot. If the dot is locatedon or below the curve (i.e., in the green area) the lift is considered asafe lift. If the dot is above the curve (in the red area), the lift isconsidered a hazardous lift (LI > 1). The MAX and the AVElabels beside the black dot indicate the maximum weight lifted andthe average weight lifted for that task. The dot becomes elongatedand the labels diverge as the MAX weight specified increases abovethe AVE weight specified.
Five buttons at the top of the control panel show the five parts of thelift that must be addressed:
Click on any of the buttons to go directly to that component of thesystem, or you may step sequentially through the process bypressing the Tab/SHIFT+Tab keys to sequence forward or back-ward. As you work through the analysis, note that the backgroundof the item you are currently working on will change color to cyan(light blue).
Overview ofAnalysis Procedure
Begin an analysis by entering the initial conditions characterizing thelifting task without attempting to "solve" any problems. To reflectthis "initial" condition, the Initial Values button is highlighted (thisis the default setting for a New Analysis). To conduct the analysis,click on the Revised Values button and manipulate the taskconditions to eliminate problems. The "initial" and "revised" dataare recorded and available for you to review at any time (see theAdditional Features section later in this chapter).
3–Lifting Analysis Component
25
To produce a valid analysis, you must provide a completedescription of the task by entering or confirming all of the data entryitems in each of these five components. At a minimum, enter eachof the variables that are fixed (i.e., that you are unable to change dueto physical constraints).
If a data entry leads to a violation of assumptions underlying theNIOSH lifting equation, the Assumptions button at the bottom ofthe control panel is illuminated with a bright red background. Youmay click on the Assumptions button at any time to view the statusof the assumptions.
There are five basic steps in the lifting analysis:
1. Start by opening an existing analysis or defining a new one. 2. Enter information on the task to be analyzed. 3. Modify variables to eliminate strains. 4. Save the analysis. 5. Generate a report.
These steps are described in detail in the remainder of this chapter. To expedite an analysis using a minimum of data entry andinteraction, refer to the Quick Reference box below.
Lifting Analysis Quick Reference
An online version of the LiftingAnalysis Quick Reference isavailable through the Help menu. The window is also reproduced inChapter 5 for your reference.
Lifting Analysis Quick Reference
Use this quick reference to guide your lifting task analysis withErgoEASER.
1. Enter information on each of the five Data Entry control panels: • Human Data Entry control panel• Job Data Entry control panel
• Object Data Entry control panel• Origin Data Entry control panel• Destination Data Entry control panel
2. Modify variables to eliminate potential strains (Xs):• Click the Revised Values radio button at the top of the task
representation panel.• Click on any X displayed in the task representation panel to find
out the cause of the strain. Make appropriate changes toeliminate the underlying stressors. (Click the Hints button forsuggestions about changes to implement).
3. Select Results from the File pull-down menu to generate a reportthat documents results.
ErgoEASER User's Guide
26
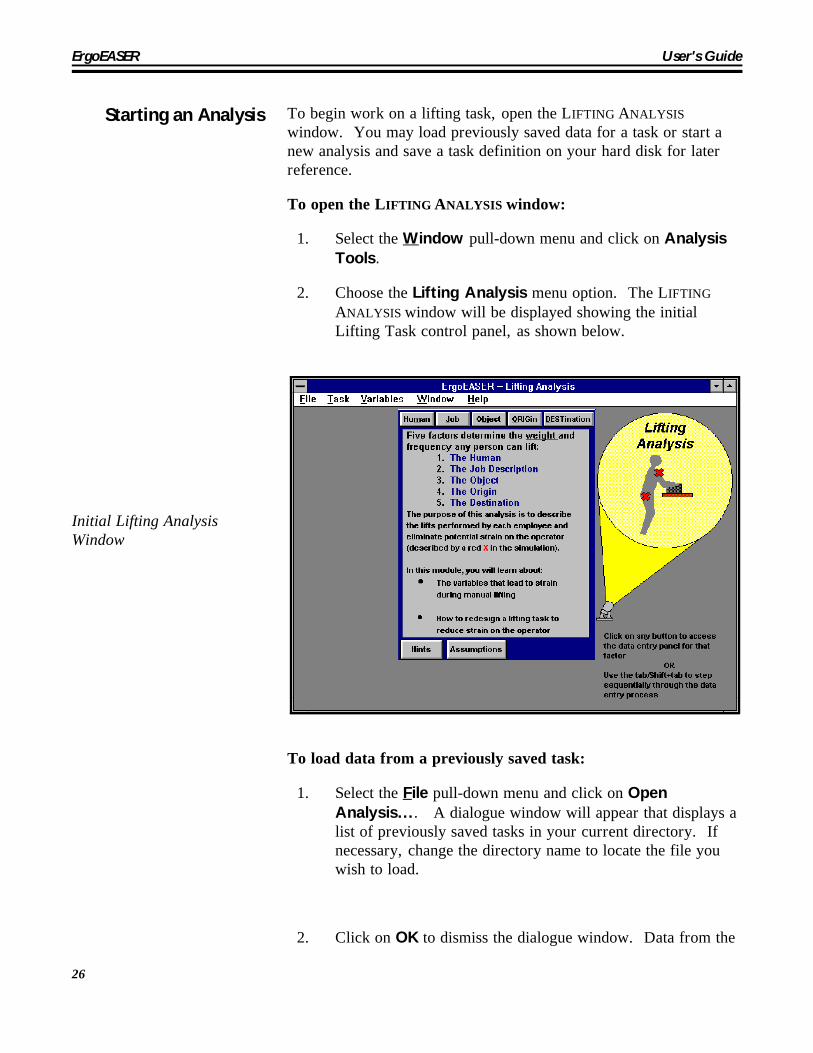
Starting an Analysis To begin work on a lifting task, open the LIFTING ANALYSISwindow. You may load previously saved data for a task or start anew analysis and save a task definition on your hard disk for laterreference.
To open the LIFTING ANALYSIS window:
1. Select the Window pull-down menu and click on AnalysisTools.
2. Choose the Lifting Analysis menu option. The LIFTINGANALYSIS window will be displayed showing the initialLifting Task control panel, as shown below.
Initial Lifting AnalysisWindow
To load data from a previously saved task:
1. Select the File pull-down menu and click on OpenAnalysis.... A dialogue window will appear that displays alist of previously saved tasks in your current directory. Ifnecessary, change the directory name to locate the file youwish to load.
2. Click on OK to dismiss the dialogue window. Data from the
3–Lifting Analysis Component
27
requested file is loaded into the LIFTING ANALYSIS window. To modify or complete specification of the data, refer to theinstructions for Entering Task Data.
To begin a new analysis:
Select the File pull-down menu and click on New Analysis.
Entering Task Data
You are not required to use theRevised Values option. It is onlynecessary if you wish to documentchanges.
The values of the task variables,for both the “initial” and “revised”conditions, may be viewed byselecting the Lifting Variablesmenu option from the Variablespull-down menu.
To analyze a lifting task, you must specify appropriate values fortask variables. The Lifting Analysis control panel leads you throughthe task definition process.
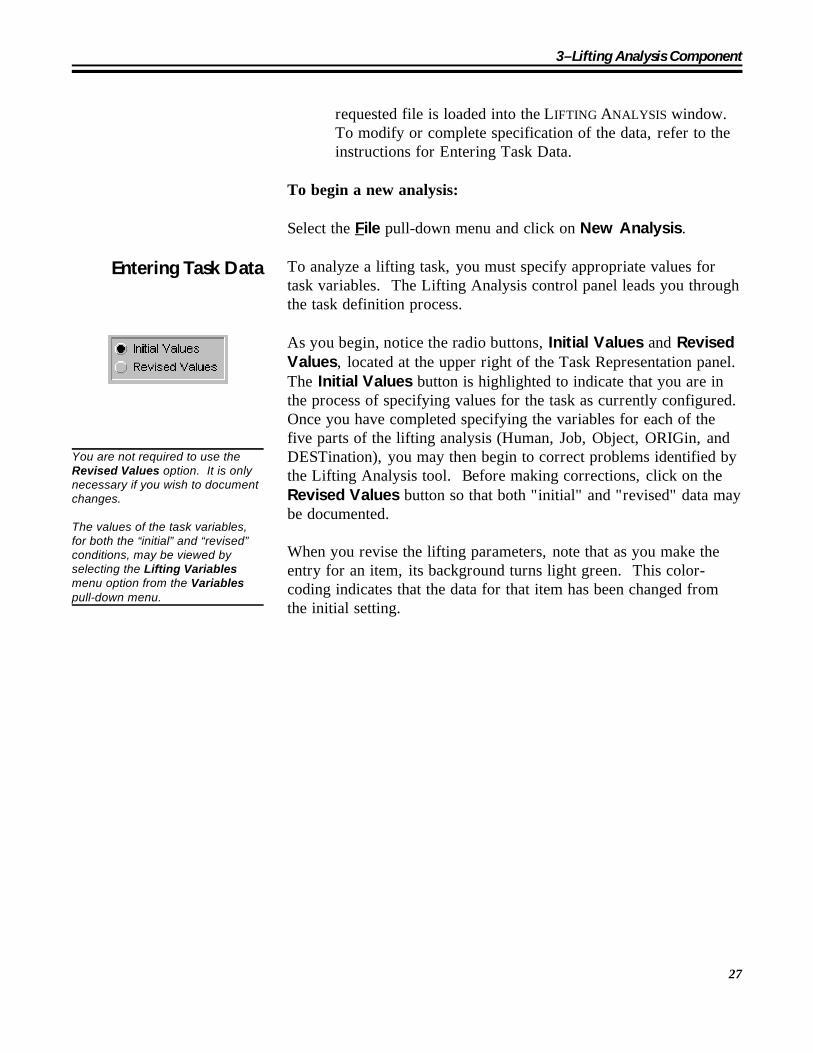
As you begin, notice the radio buttons, Initial Values and RevisedValues, located at the upper right of the Task Representation panel. The Initial Values button is highlighted to indicate that you are inthe process of specifying values for the task as currently configured. Once you have completed specifying the variables for each of thefive parts of the lifting analysis (Human, Job, Object, ORIGin, andDESTination), you may then begin to correct problems identified bythe Lifting Analysis tool. Before making corrections, click on theRevised Values button so that both "initial" and "revised" data maybe documented.
When you revise the lifting parameters, note that as you make theentry for an item, its background turns light green. This color-coding indicates that the data for that item has been changed fromthe initial setting.
ErgoEASER User's Guide
28
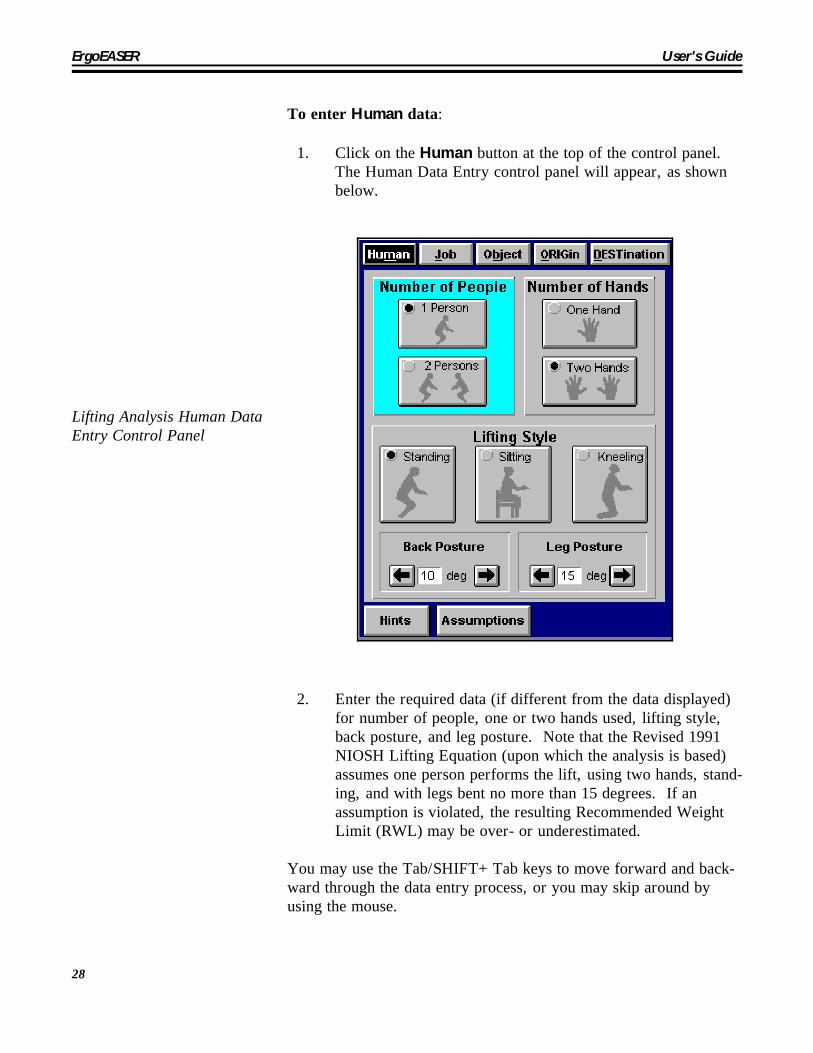
To enter Human data:
1. Click on the Human button at the top of the control panel. The Human Data Entry control panel will appear, as shownbelow.
Lifting Analysis Human DataEntry Control Panel
2. Enter the required data (if different from the data displayed)for number of people, one or two hands used, lifting style,back posture, and leg posture. Note that the Revised 1991NIOSH Lifting Equation (upon which the analysis is based)assumes one person performs the lift, using two hands, stand-ing, and with legs bent no more than 15 degrees. If an assumption is violated, the resulting Recommended WeightLimit (RWL) may be over- or underestimated.
You may use the Tab/SHIFT+Tab keys to move forward and back-ward through the data entry process, or you may skip around byusing the mouse.
3–Lifting Analysis Component
29
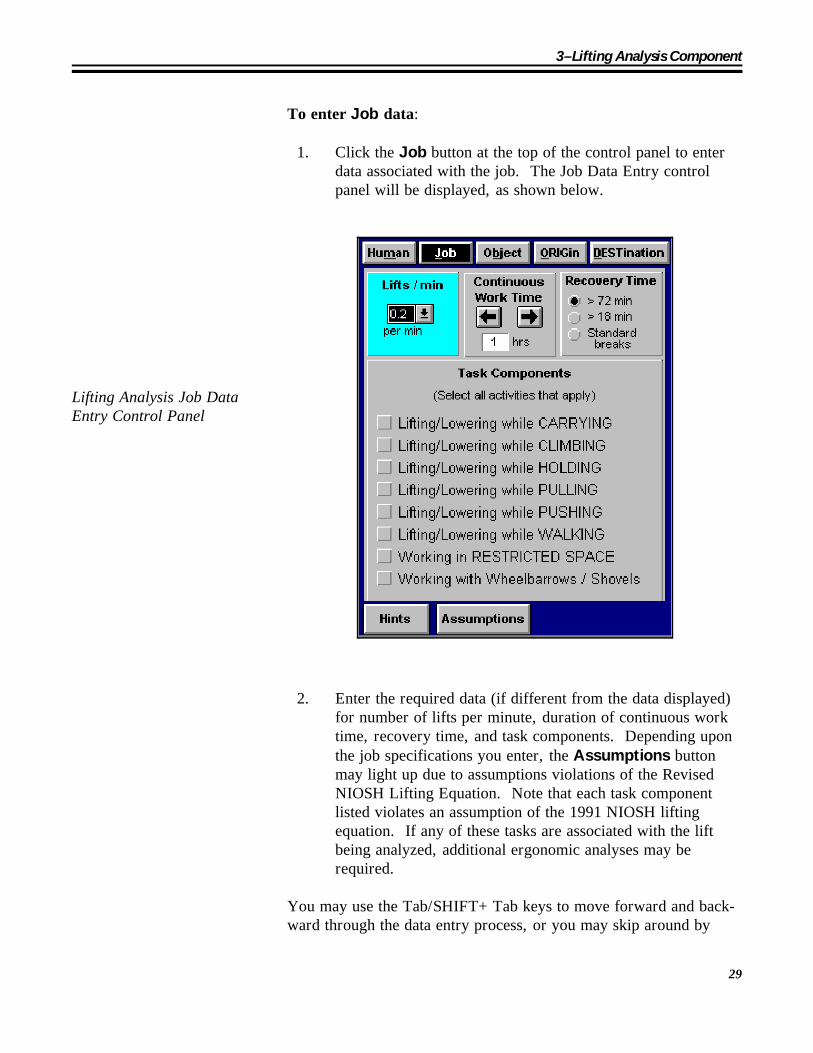
To enter Job data:
1. Click the Job button at the top of the control panel to enterdata associated with the job. The Job Data Entry controlpanel will be displayed, as shown below.
Lifting Analysis Job DataEntry Control Panel
2. Enter the required data (if different from the data displayed)for number of lifts per minute, duration of continuous worktime, recovery time, and task components. Depending uponthe job specifications you enter, the Assumptions buttonmay light up due to assumptions violations of the RevisedNIOSH Lifting Equation. Note that each task componentlisted violates an assumption of the 1991 NIOSH liftingequation. If any of these tasks are associated with the liftbeing analyzed, additional ergonomic analyses may berequired.
You may use the Tab/SHIFT+Tab keys to move forward and back-ward through the data entry process, or you may skip around by
ErgoEASER User's Guide
30
using the mouse.
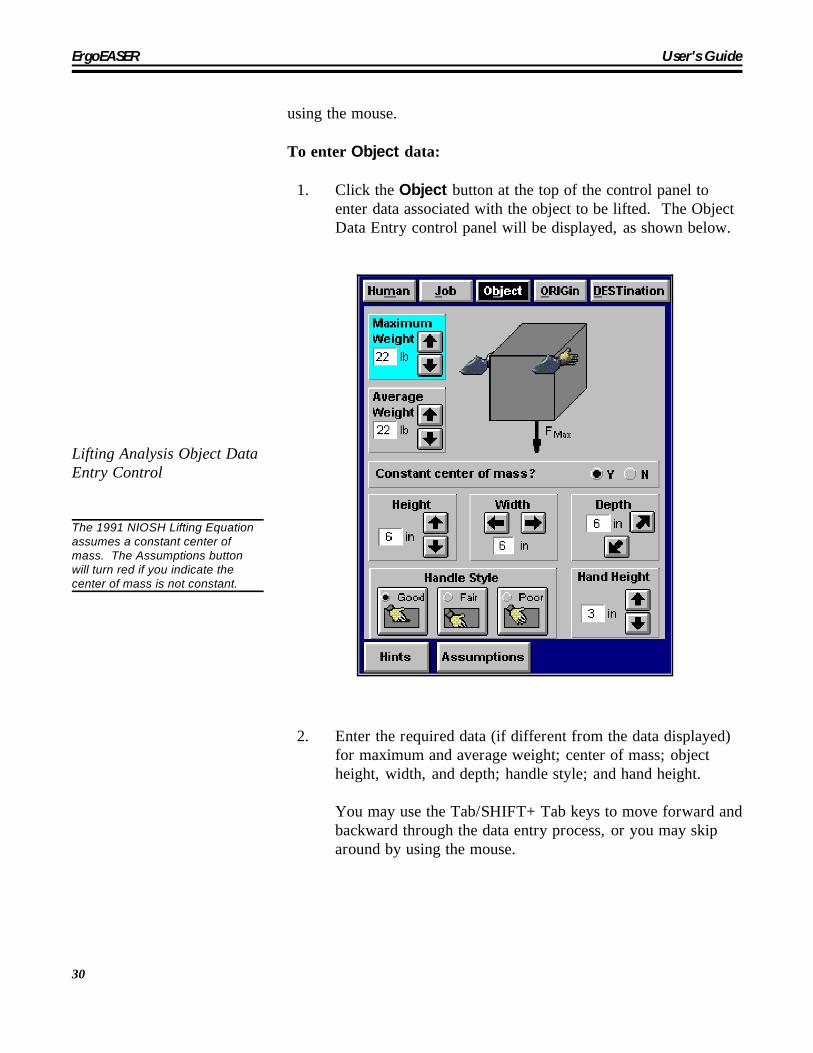
To enter Object data:
1. Click the Object button at the top of the control panel toenter data associated with the object to be lifted. The ObjectData Entry control panel will be displayed, as shown below.
Lifting Analysis Object DataEntry Control
The 1991 NIOSH Lifting Equationassumes a constant center ofmass. The Assumptions buttonwill turn red if you indicate thecenter of mass is not constant.
2. Enter the required data (if different from the data displayed)for maximum and average weight; center of mass; objectheight, width, and depth; handle style; and hand height.
You may use the Tab/SHIFT+Tab keys to move forward andbackward through the data entry process, or you may skiparound by using the mouse.
3–Lifting Analysis Component
31
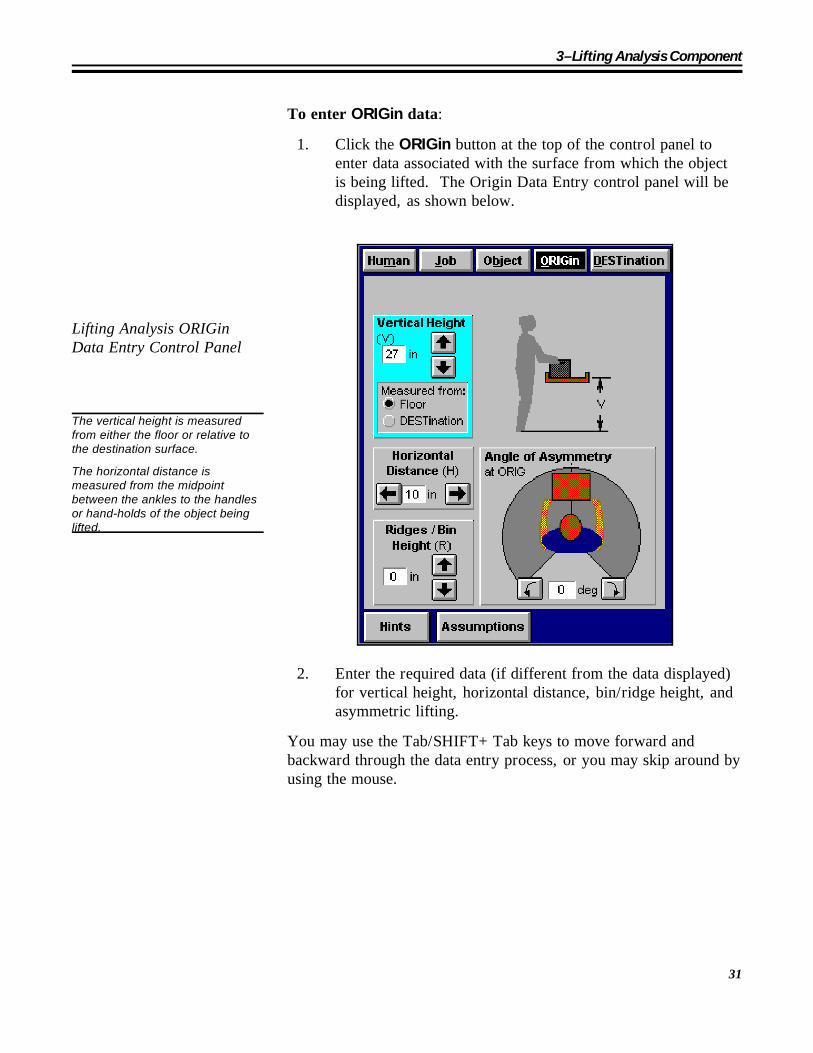
To enter ORIGin data:
1. Click the ORIGin button at the top of the control panel toenter data associated with the surface from which the objectis being lifted. The Origin Data Entry control panel will bedisplayed, as shown below.
Lifting Analysis ORIGinData Entry Control Panel
The vertical height is measuredfrom either the floor or relative tothe destination surface.
The horizontal distance ismeasured from the midpointbetween the ankles to the handlesor hand-holds of the object beinglifted.
2. Enter the required data (if different from the data displayed)for vertical height, horizontal distance, bin/ridge height, andasymmetric lifting.
You may use the Tab/SHIFT+Tab keys to move forward andbackward through the data entry process, or you may skip around byusing the mouse.
ErgoEASER User's Guide
32
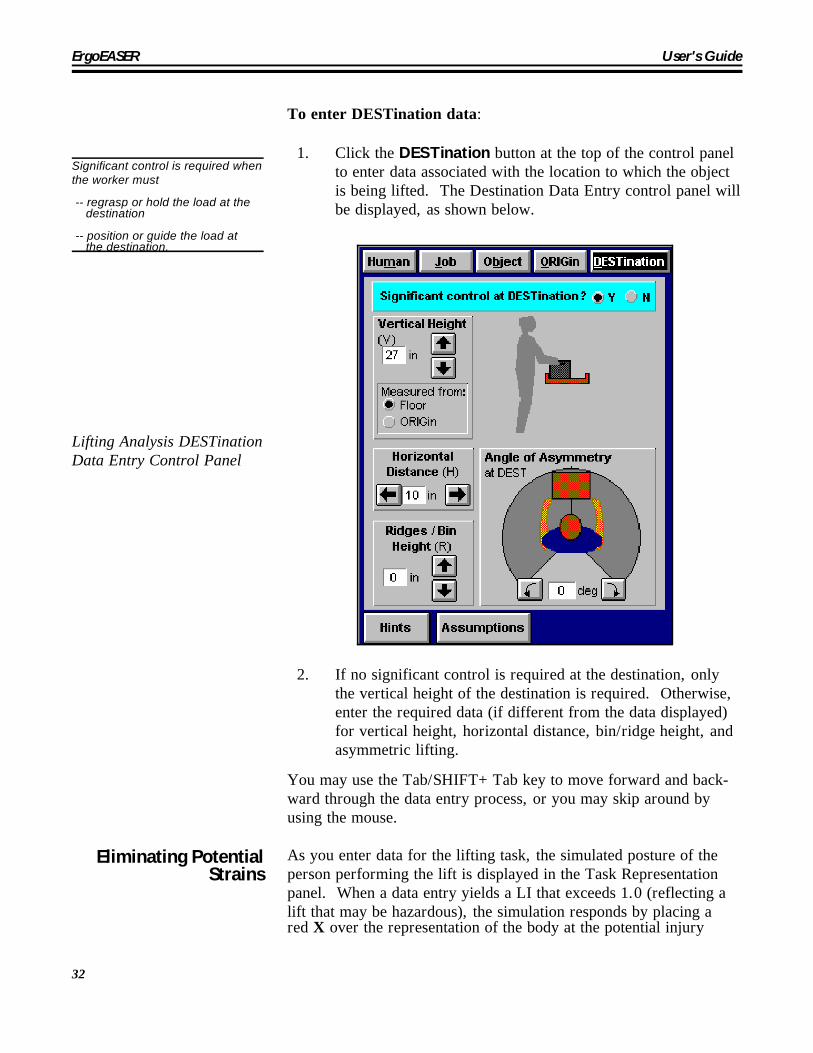
To enter DESTination data:
Significant control is required whenthe worker must
-- regrasp or hold the load at the destination
-- position or guide the load at the destination.
Lifting Analysis DESTinationData Entry Control Panel
1. Click the DESTination button at the top of the control panelto enter data associated with the location to which the objectis being lifted. The Destination Data Entry control panel willbe displayed, as shown below.
2. If no significant control is required at the destination, onlythe vertical height of the destination is required. Otherwise,enter the required data (if different from the data displayed)for vertical height, horizontal distance, bin/ridge height, andasymmetric lifting.
You may use the Tab/SHIFT+Tab key to move forward and back-ward through the data entry process, or you may skip around byusing the mouse.
Eliminating PotentialStrains
As you enter data for the lifting task, the simulated posture of theperson performing the lift is displayed in the Task Representationpanel. When a data entry yields a LI that exceeds 1.0 (reflecting alift that may be hazardous), the simulation responds by placing a red X over the representation of the body at the potential injury
3–Lifting Analysis Component
33
point. If a LI of 1.0 is not exceeded, red Xs (potential strains) willnot be displayed.
After you have completed the data entry process for all of the sys-tems (Human, Job, Object, ORIGin, and DESTination), you maywish to try to find appropriate solutions that eliminate each of thered Xs. Click on the Revised Values radio button at the top of theTask Representation panel to start recording the recommended liftingtask parameters.
The Lifting Analysis component provides three ways to determinethe elements contributing to strains:
1. Examine the red Xs in the Task Representation panel
2. Examine the ASSUMPTIONS window for possible violations ofthe Lifting Equation
3. Consult the HINTS window.
You may position the PotentialStrains dialogue window whereveryou wish and leave it open whileclicking on the Xs. Each time youclick on a red X, the explanation forthe associated potential strain isdisplayed in the dialogue window.
To learn about potential strains via the Xs:
1. Click on a red X in Task Representation panel. This willdisplay specific information about the potential strainrepresented by the X as well as suggestions to eliminate theunderlying stressor.
2. Click on the Close button to dismiss the dialogue window. To learn about assumption violations:
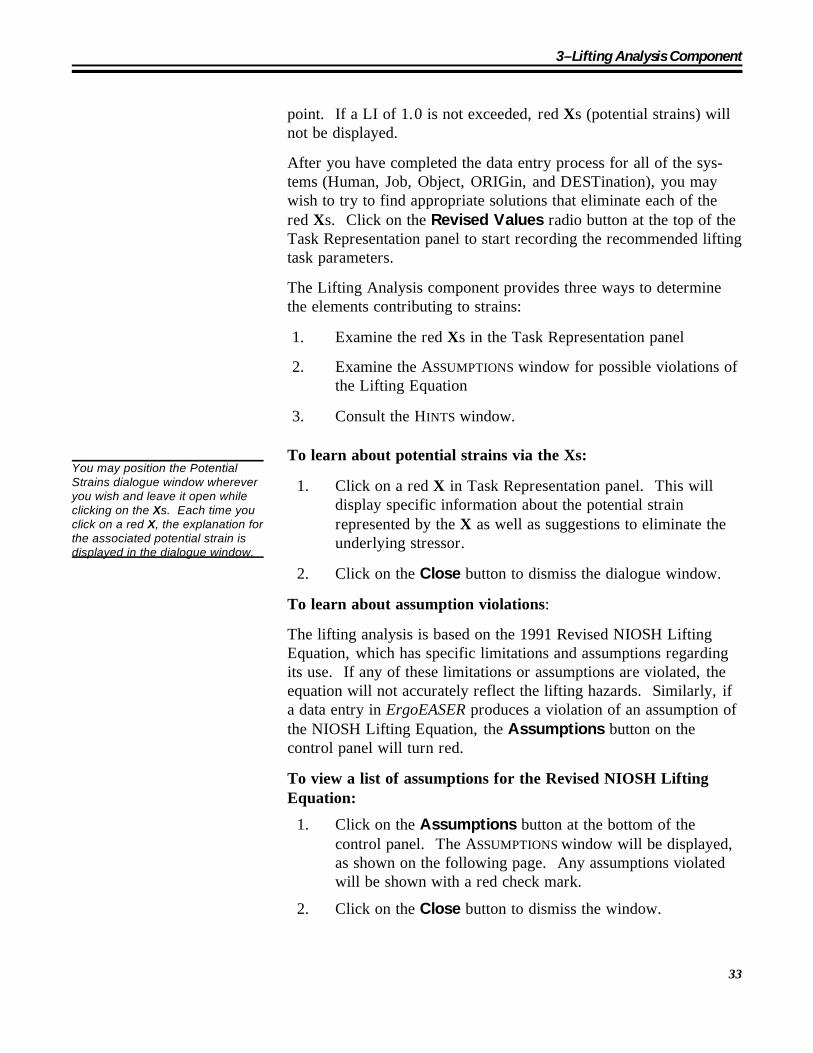
The lifting analysis is based on the 1991 Revised NIOSH LiftingEquation, which has specific limitations and assumptions regardingits use. If any of these limitations or assumptions are violated, theequation will not accurately reflect the lifting hazards. Similarly, ifa data entry in ErgoEASER produces a violation of an assumption ofthe NIOSH Lifting Equation, the Assumptions button on thecontrol panel will turn red.
To view a list of assumptions for the Revised NIOSH LiftingEquation:
1. Click on the Assumptions button at the bottom of thecontrol panel. The ASSUMPTIONS window will be displayed,as shown on the following page. Any assumptions violatedwill be shown with a red check mark.
2. Click on the Close button to dismiss the window.
ErgoEASER User's Guide
34
Lifting Assumptions Window
To obtain hints on how to eliminate potential strains:
The Hints button may be consulted for simple solutions andguidelines to eliminate the potential strains during lifting tasks. Toview the hints:
1. Click on the Hints button at the lower left corner of thecontrol panel.
The HINTS window is displayed, as shown on the followingpage, providing both specific and general suggestions avail-able within the tabs at the top of the window. The first tab,labeled How To Fix This Lift, contains recommendationsfor correcting the problems of the user’s newly defined liftingtask. The second tab, labeled Setting Up A Lift, displaysgeneral guidelines for setting up any lifting task. How ToFix This Lift allows for some flexibility in the type of liftbeing performed and the lifting environment.
2. In How To Fix This Lift, select the option at the top of thewindow that best matches your situation:
No Constraints for lifting tasks in which the weight,duration/frequency, origin, and destination of the lift may bemodified.

3–Lifting Analysis Component
35
Lifting Analysis HintsWindow
Constraints for lifting tasks in which these variables cannotbe changed easily (click on all Fixed conditions that apply).
3. Read the suggestions and try them out with the simulation. Recommendations are based on optimizing the variables. Thetask may be solved by changing all of the variables by a smallamount, or by optimizing only a few of the variables. Sometrial and error will be needed to achieve a solution that is bestor most practical for the situation.
4. At your discretion (and risk to the worker), you may adjustthe Lifting Index threshold upward. A Lifting Indexthreshold greater than 1.0 may require supporting medicaldata to justify the threshold. To change the threshold, clickthe Change LI button; a dialogue window will appear (seethe Lifting Index Threshold information in the AdditionalFeatures section of this chapter).
5. Click on the Close button to dismiss the HINTS window.
ErgoEASER User's Guide
36
Saving an Analysis You may save your analysis as a file in case you need to refer to orupdate it in the future. This can be done at any time during yourwork on the analysis within the Lifting Analysis component.
To save an analysis:
1. Select the File pull-down menu, and click on Save AnalysisAs. A dialogue window will appear that displays yourcurrent directory. You may change the directory pathname tosave the file to another location on your hard disk or to a diskdrive.
2. Click on OK to dismiss the dialogue window. The analysisdata will be saved with the extension .lft.
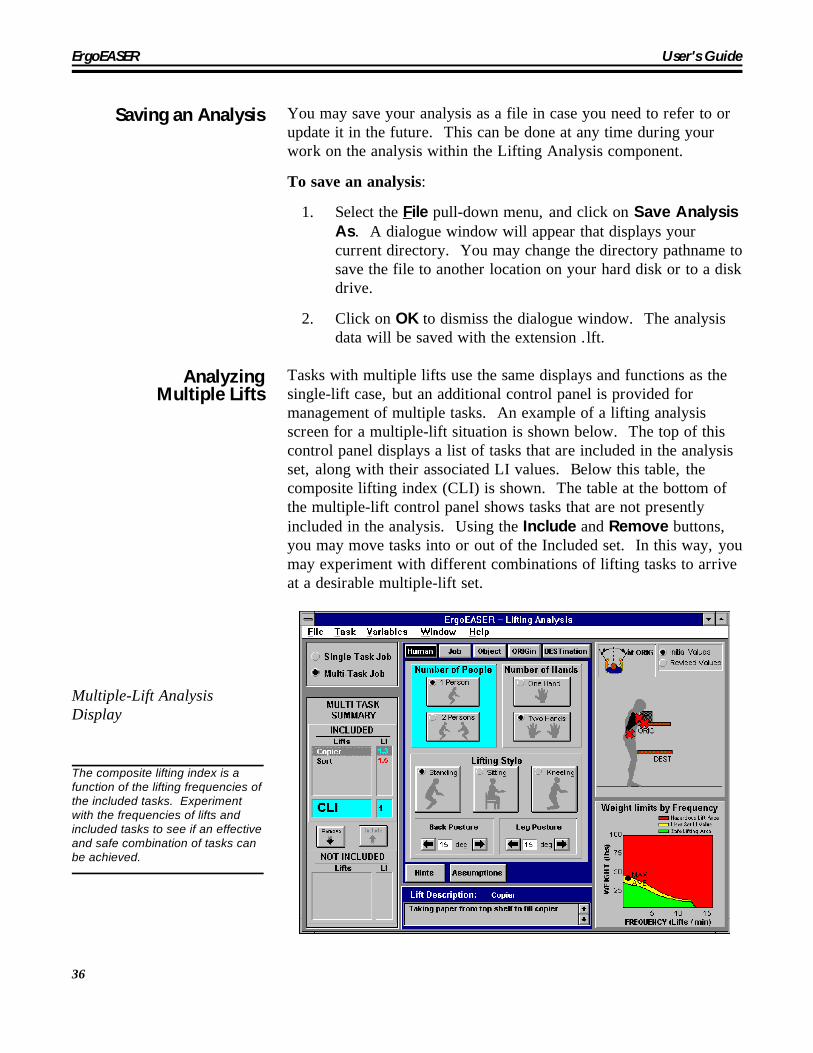
AnalyzingMultiple Lifts
Tasks with multiple lifts use the same displays and functions as thesingle-lift case, but an additional control panel is provided formanagement of multiple tasks. An example of a lifting analysisscreen for a multiple-lift situation is shown below. The top of thiscontrol panel displays a list of tasks that are included in the analysisset, along with their associated LI values. Below this table, thecomposite lifting index (CLI) is shown. The table at the bottom ofthe multiple-lift control panel shows tasks that are not presentlyincluded in the analysis. Using the Include and Remove buttons,you may move tasks into or out of the Included set. In this way, youmay experiment with different combinations of lifting tasks to arriveat a desirable multiple-lift set.
Multiple-Lift AnalysisDisplay
The composite lifting index is afunction of the lifting frequencies ofthe included tasks. Experimentwith the frequencies of lifts andincluded tasks to see if an effectiveand safe combination of tasks canbe achieved.
3–Lifting Analysis Component
37
Tasks may be added or deleted from the analysis.
To begin a new task definition:
1. Select the Task pull-down menu, and click on New. Adialogue window will appear, requesting that you enter aname and description for the task.
2. Type a short task name (eight characters) and a description. Click on OK to dismiss the dialogue window.
Refer to the instructions for Entering Task Data (page 27) tocomplete the data entry for the new task.
To delete a task:
1. Click on the name of the task you wish to delete from themulti-task summary list.
2. With the task highlighted, select the Task pull-down menuand click on Delete. A dialogue window will appear toverify the deletion. Click on OK to delete the task.
Generating ReportsYou may save reports for laterreference or comparison betweentasks.
Only the Overview section appliesto all lifting tasks considered in amultiple-lift analysis. To obtainoutput for task summaries and taskvariables for each task, you mustengage the print functionseparately for each task.
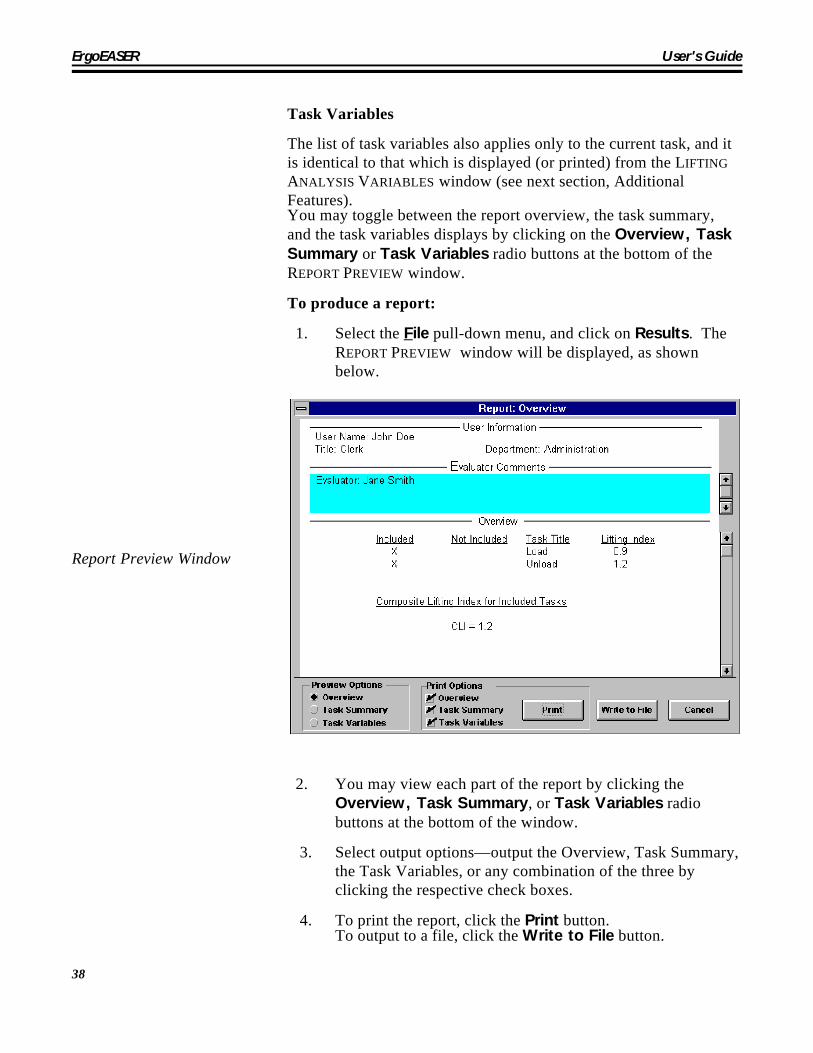
When you have completed an analysis, you may generate a reportsummarizing the data and conclusions. The report may be output toa printer or saved to your hard disk for later use. The reportcomprises three parts: an overview of all of the tasks considered(e.g., if multiple lifts are involved), a task summary for the currenttask being examined, and the list of variables for the current taskbeing examined. Overview
The overview, which is shown when the report preview is initiallydisplayed, includes the following:
operator information
space for evaluator’s comments
summary of all lifting tasks, indicating which have beenincluded and which excluded from the analysis.
The evaluator may type into the evaluator comment field below theevaluator’s name to record any comments or observations.
Task Summary
The task summary (for the task being examined) includes userinformation, space for evaluator’s comments, and the results of theanalysis for the current task.
ErgoEASER User's Guide
38
Task Variables
The list of task variables also applies only to the current task, and itis identical to that which is displayed (or printed) from the LIFTINGANALYSIS VARIABLES window (see next section, AdditionalFeatures). You may toggle between the report overview, the task summary,and the task variables displays by clicking on the Overview, TaskSummary or Task Variables radio buttons at the bottom of theREPORT PREVIEW window.
To produce a report:
1. Select the File pull-down menu, and click on Results. TheREPORT PREVIEW window will be displayed, as shownbelow.
Report Preview Window
2. You may view each part of the report by clicking theOverview, Task Summary, or Task Variables radiobuttons at the bottom of the window.
3. Select output options—output the Overview, Task Summary,the Task Variables, or any combination of the three byclicking the respective check boxes.
4. To print the report, click the Print button. To output to a file, click the Write to File button.
3–Lifting Analysis Component
39
To dismiss the window without output, click Cancel.
If multiple tasks are involved and you wish to print a report for eachtask analysis, you must select the desired task from the multiple-liftlist on the lifting analysis window, and then repeat steps 1-4 above togenerate the report. In this case, it is not necessary to print theoverview section, as it will be identical for all tasks included in thecurrent analysis.
Additional FeaturesAdditional features, available from the menu bar, enable the user to:
view operator information change the lifting index threshold view the list of task variables and their values specify either English or metric units of measure view the 1991 Revised NIOSH Lifting Equation use an on-screen calculator.
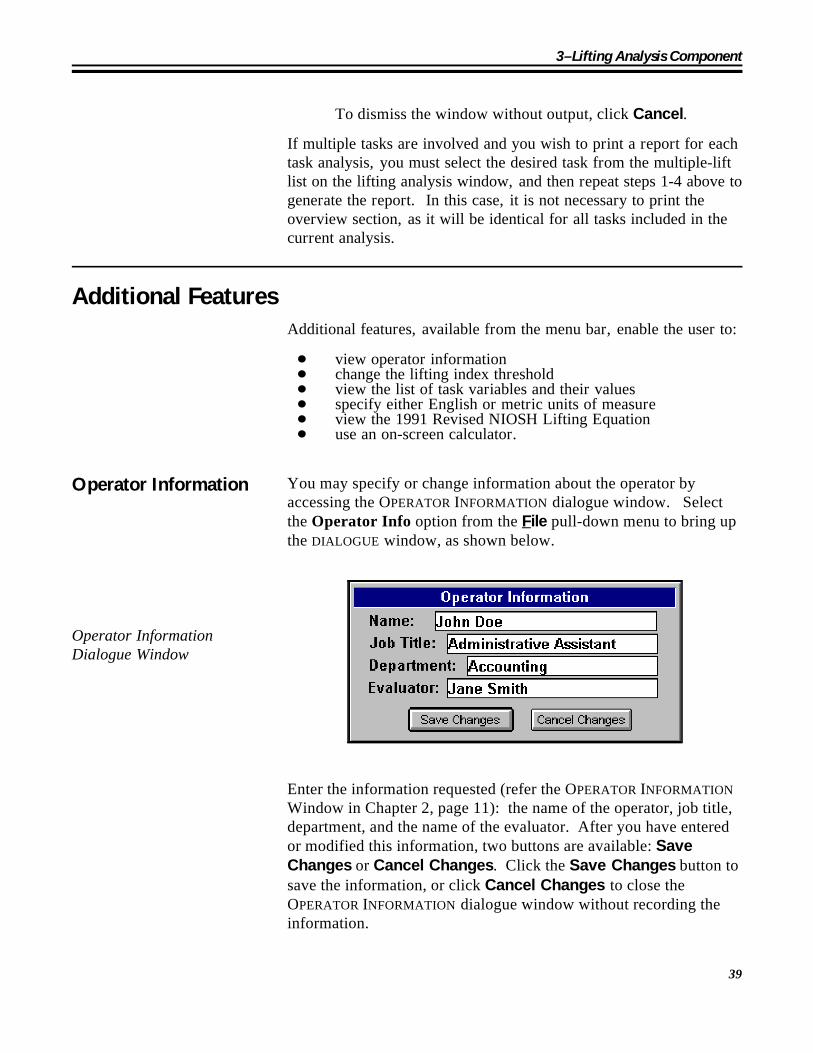
Operator Information You may specify or change information about the operator byaccessing the OPERATOR INFORMATION dialogue window. Selectthe Operator Info option from the File pull-down menu to bring upthe DIALOGUE window, as shown below.
Operator InformationDialogue Window
Enter the information requested (refer the OPERATOR INFORMATIONWindow in Chapter 2, page 11): the name of the operator, job title,department, and the name of the evaluator. After you have enteredor modified this information, two buttons are available: SaveChanges or Cancel Changes. Click the Save Changes button tosave the information, or click Cancel Changes to close theOPERATOR INFORMATION dialogue window without recording theinformation.
ErgoEASER User's Guide
40
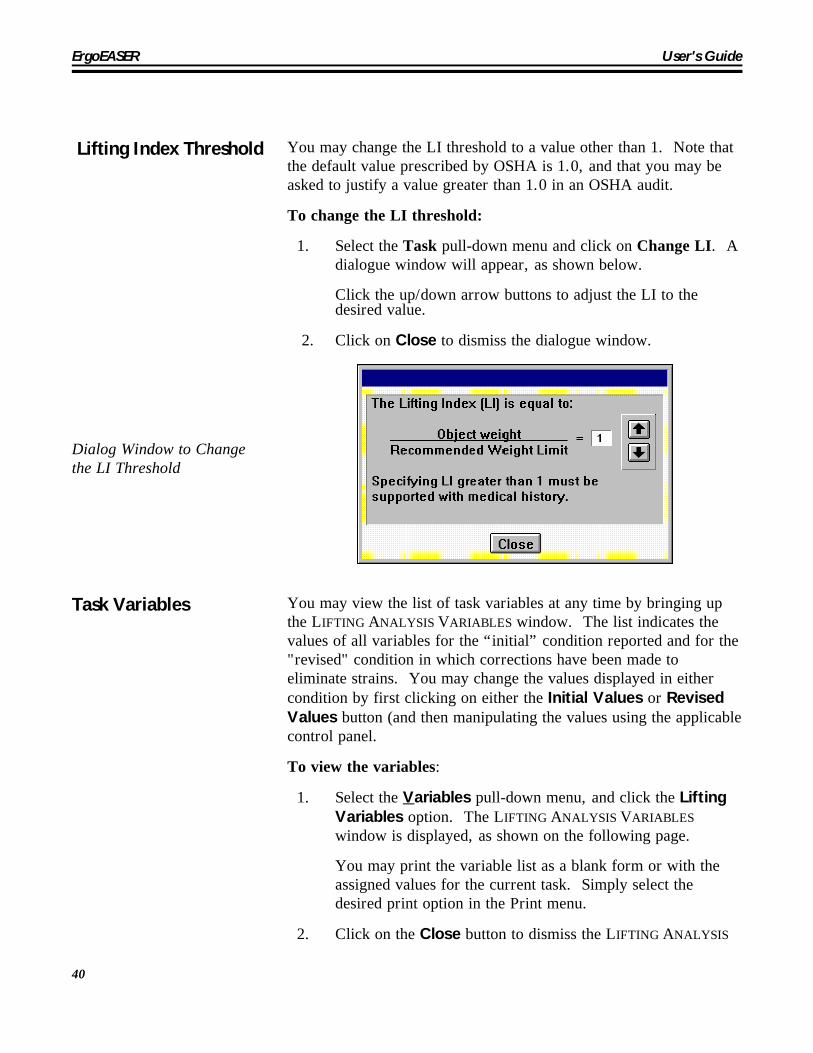
Lifting Index Threshold You may change the LI threshold to a value other than 1. Note thatthe default value prescribed by OSHA is 1.0, and that you may beasked to justify a value greater than 1.0 in an OSHA audit.
To change the LI threshold:
1. Select the Task pull-down menu and click on Change LI. Adialogue window will appear, as shown below.
Click the up/down arrow buttons to adjust the LI to the desired value.
2. Click on Close to dismiss the dialogue window.
Dialog Window to Changethe LI Threshold
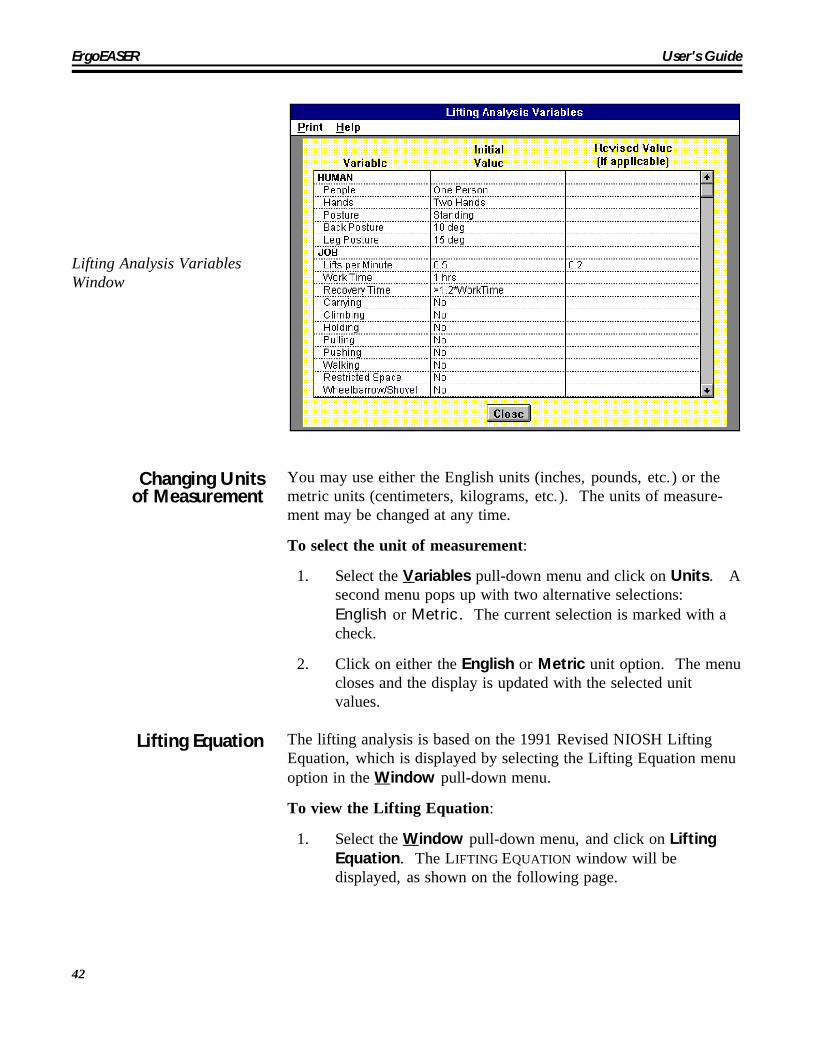
Task Variables You may view the list of task variables at any time by bringing upthe LIFTING ANALYSIS VARIABLES window. The list indicates thevalues of all variables for the “initial” condition reported and for the"revised" condition in which corrections have been made toeliminate strains. You may change the values displayed in eithercondition by first clicking on either the Initial Values or RevisedValues button (and then manipulating the values using the applicablecontrol panel.
To view the variables:
1. Select the Variables pull-down menu, and click the LiftingVariables option. The LIFTING ANALYSIS VARIABLESwindow is displayed, as shown on the following page.
You may print the variable list as a blank form or with theassigned values for the current task. Simply select thedesired print option in the Print menu.
2. Click on the Close button to dismiss the LIFTING ANALYSIS

3–Lifting Analysis Component
41
VARIABLES window.
ErgoEASER User's Guide
42
Lifting Analysis VariablesWindow
Changing Unitsof Measurement
You may use either the English units (inches, pounds, etc.) or themetric units (centimeters, kilograms, etc.). The units of measure-ment may be changed at any time.
To select the unit of measurement:
1. Select the Variables pull-down menu and click on Units. Asecond menu pops up with two alternative selections: English or Metric. The current selection is marked with acheck.
2. Click on either the English or Metric unit option. The menucloses and the display is updated with the selected unitvalues.
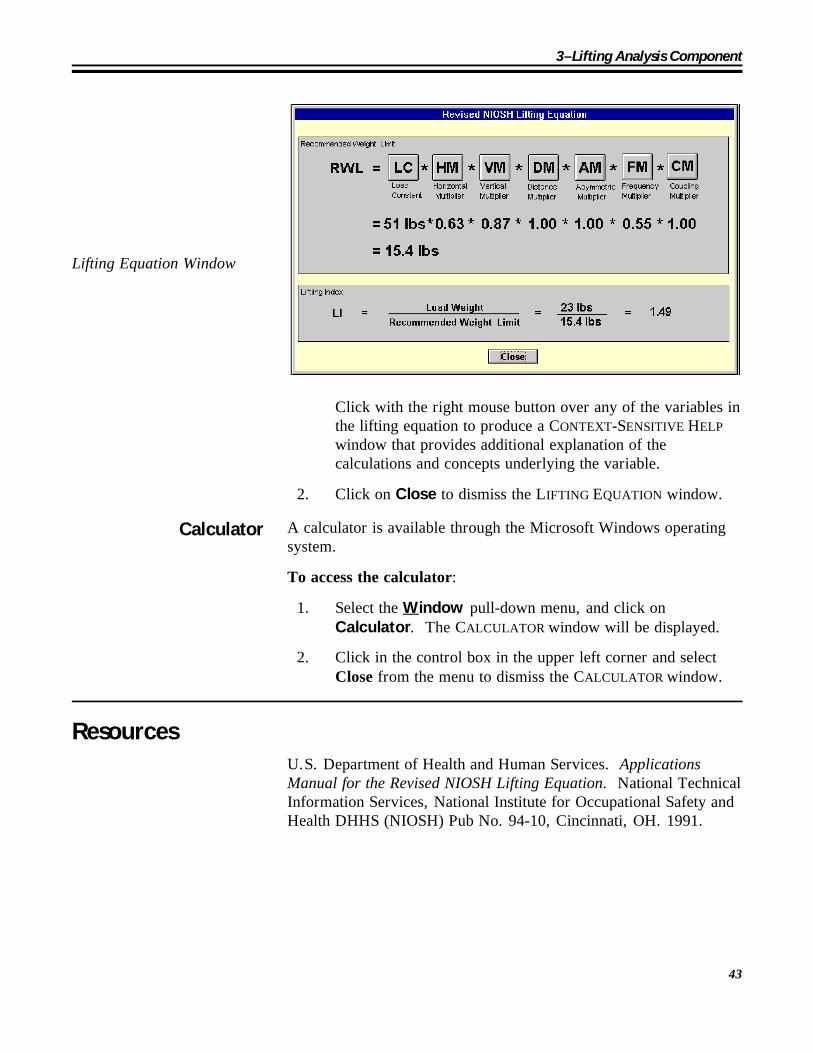
Lifting Equation The lifting analysis is based on the 1991 Revised NIOSH LiftingEquation, which is displayed by selecting the Lifting Equation menuoption in the Window pull-down menu.
To view the Lifting Equation:
1. Select the Window pull-down menu, and click on LiftingEquation. The LIFTING EQUATION window will bedisplayed, as shown on the following page.
3–Lifting Analysis Component
43
Lifting Equation Window
Click with the right mouse button over any of the variables inthe lifting equation to produce a CONTEXT-SENSITIVE HELPwindow that provides additional explanation of thecalculations and concepts underlying the variable.
2. Click on Close to dismiss the LIFTING EQUATION window.
Calculator A calculator is available through the Microsoft Windows operatingsystem.
To access the calculator:
1. Select the Window pull-down menu, and click onCalculator. The CALCULATOR window will be displayed.
2. Click in the control box in the upper left corner and selectClose from the menu to dismiss the CALCULATOR window.
ResourcesU.S. Department of Health and Human Services. ApplicationsManual for the Revised NIOSH Lifting Equation. National TechnicalInformation Services, National Institute for Occupational Safety andHealth DHHS (NIOSH) Pub No. 94-10, Cincinnati, OH. 1991.
![[XLS]Lifting LIne Analysis - Tom Speer - Home - · Web viewUsing the Analysis Sheet This spreadsheet uses lifting line theory to calculate the optimum planform shape and twist to](https://img.pdfslide.us/doc/110x75/5b05078f7f8b9a0a548e798d/xlslifting-line-analysis-tom-speer-home-viewusing-the-analysis-sheet-this.jpg)