Embed Size (px)
Citation preview

®
http://www.3com.com/
3Com OfficeConnect 56K Business Modem Getting Started Guide
Published January 1999Part Number 1.024.1942-00

3Com Corporation3800 Golf Rd.Rolling Meadows, Illinois60008
Copyright © 1998, 3Com Corporation. All rights reserved. No part of this documentation may be reproduced in any form or by any means or used to make any derivative work (such as translation, transformation, or adaptation) without written permission from 3Com Corporation.
3Com Corporation reserves the right to revise this documentation and to make changes in content from time to time without obligation on the part of 3Com Corporation to provide notification of such revision or change.
3Com Corporation provides this documentation without warranty of any kind, either implied or expressed, including, but not limited to, the implied warranties of merchantability and fitness for a particular purpose. 3Com may make improvements or changes in the product(s) and/or the program(s) described in this documentation at any time.
UNITED STATES GOVERNMENT LEGENDS:
If you are a United States government agency, then this documentation and the software described herein are provided to you subject to the following:
United States Government Legend: All technical data and computer software is commercial in nature and developed solely at private expense. Software is delivered as Commercial Computer Software as defined in DFARS 252.227-7014 (June 1995) or as a commercial item as defined in FAR 2.101(a) and as such is provided with only such rights as are provided in 3Com’s standard commercial license for the Software. Technical data is provided with limited rights only as provided in DFAR 252.227-7015 (Nov 1995) or FAR 52.227-14 (June 1987), whichever is applicable. You agree not to remove or deface any portion of any legend provided on any licensed program or documentation contained in, or delivered to you in conjunction with, this User Guide.
[Portions of this documentation are reproduced in whole or in part with permission from (as appropriate).]
Unless otherwise indicated, 3Com registered trademarks are registered in the United States and may or may not be registered in other countries.
3Com, the 3Com logo, OfficeConnect, and U.S. Robotics are registered trademarks of 3Com Corporation.
Microsoft, MS-DOS, Windows, and Windows NT are registered trademarks of Microsoft Corporation.
Other brand and product names may be registered trademarks or trademarks of their respective holders.

1 INTRODUCTION
This chapter includes
■ Using this Guide
■ Related Documentation
■ Conventions
■ Contacting 3Com
If the information in the release notes shipped with your product differs from the information in this guide, follow the instructions in the release notes.
Using this Guide Use this Getting Started Guide to obtain the information you need to get your 3Com OfficeConnect 56K Business Modem installed, configured, and running correctly.
Related Documentation
The Com OfficeConnect 56K Business Modem Command Reference found on the CD-ROM has detailed information about configuring your Business Modem.
In order to Go to chapter
Install the Business Modem Chapter 2
Troubleshoot the Business Modem Chapter 3
Make a connection to your Internet Service Provider (ISP)
See the 3Com OfficeConnect 56K Business Modem Command Reference found on the CD-ROM.
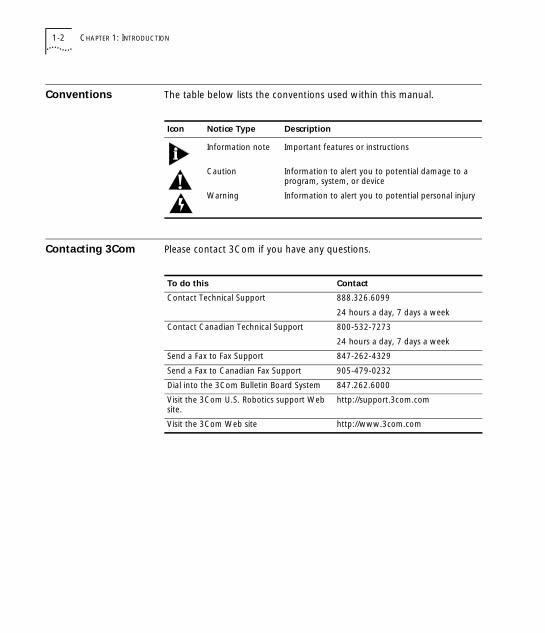
1-2 CHAPTER 1: INTRODUCTION
Conventions The table below lists the conventions used within this manual.
Contacting 3Com Please contact 3Com if you have any questions.
Icon Notice Type Description
Information note Important features or instructions
Caution Information to alert you to potential damage to a program, system, or device
Warning Information to alert you to potential personal injury
To do this Contact
Contact Technical Support 888.326.6099
24 hours a day, 7 days a week
Contact Canadian Technical Support 800-532-7273
24 hours a day, 7 days a week
Send a Fax to Fax Support 847-262-4329
Send a Fax to Canadian Fax Support 905-479-0232
Dial into the 3Com Bulletin Board System 847.262.6000
Visit the 3Com U.S. Robotics support Web site.
http://support.3com.com
Visit the 3Com Web site http://www.3com.com
2 INSTALLING THE BUSINESS MODEM
Use this chapter to install the Business Modem.
■ What You Need
■ Package Contents
■ Installing Your Business Modem
■ Desktop Installation
■ OfficeConnect Stacking Installation
■ Hardware Installation
■ Modem Driver Installation
■ Testing the Installation
■ For More Information
What You Need You need the following items (not included) in addition to the contents of your box to install the Business Modem:
■ Computer or terminal with a serial port (16650 UART recommended)
■ One of the following operating systems: Windows 95, Windows 98, Windows NT 4.0 or later, or Macintosh OS 8.
■ An analog telephone line
■ RS-232 serial cable
WARNING: The Business Modem requires a standard, analog telephone line. Do not connect your Business Modem to a digital telephone line. Digital lines are commonly used in office buildings and hotels. If you are unsure whether your line is analog or digital, ask your network administrator or your local telephone company.
Package Contents Your Business Modem package contains the following items:
2-2 CHAPTER 2: INSTALLING THE BUSINESS MODEM
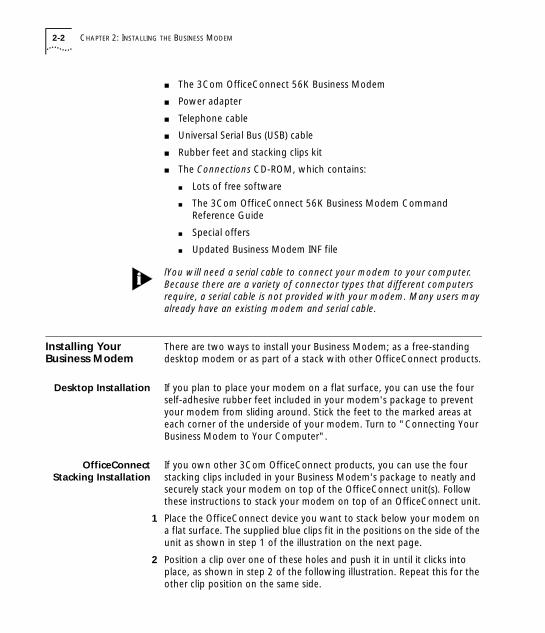
■ The 3Com OfficeConnect 56K Business Modem
■ Power adapter
■ Telephone cable
■ Universal Serial Bus (USB) cable
■ Rubber feet and stacking clips kit
■ The Connections CD-ROM, which contains:
■ Lots of free software
■ The 3Com OfficeConnect 56K Business Modem Command Reference Guide
■ Special offers
■ Updated Business Modem INF file
lYou will need a serial cable to connect your modem to your computer. Because there are a variety of connector types that different computers require, a serial cable is not provided with your modem. Many users may already have an existing modem and serial cable.
Installing Your Business Modem
There are two ways to install your Business Modem; as a free-standing desktop modem or as part of a stack with other OfficeConnect products.
Desktop Installation If you plan to place your modem on a flat surface, you can use the four self-adhesive rubber feet included in your modem's package to prevent your modem from sliding around. Stick the feet to the marked areas at each corner of the underside of your modem. Turn to "Connecting Your Business Modem to Your Computer".
OfficeConnectStacking Installation
If you own other 3Com OfficeConnect products, you can use the four stacking clips included in your Business Modem's package to neatly and securely stack your modem on top of the OfficeConnect unit(s). Follow these instructions to stack your modem on top of an OfficeConnect unit.
1 Place the OfficeConnect device you want to stack below your modem on a flat surface. The supplied blue clips fit in the positions on the side of the unit as shown in step 1 of the illustration on the next page.
2 Position a clip over one of these holes and push it in until it clicks into place, as shown in step 2 of the following illustration. Repeat this for the other clip position on the same side.

Installing Your Business Modem 2-3
3 Keeping the front of the units aligned, position the modem on top of the OfficeConnect device and rest the bottom of the modem on the clips' spikes, as shown in step 3 of the following illustration. Push the clips firmly into the modem until they click into place.
NOTE: To remove a clip, hold the units firmly with one hand and hook the first finger of your other hand around the back of the clip. Be careful not to pull so hard that you break the clip.
4 Repeat these steps to secure the other side.
Hardware Installation Look at the back of your computer for a port
Refer to your computer’s documentation to locate the serial port.After you have selected the correct cable, connect the male DB-25 end of your
If you have Ports may be labeled this way:
An IBM
compatible PC
COM, RS-232 or with symbols such as:
IOIOI
A Macintosh
Modem port
Printer port

2-4 CHAPTER 2: INSTALLING THE BUSINESS MODEM
serial cable to your Business Modem and the other end to a serial port on your computer.
Write down the number of the serial port to which you connect your Business Modem. If your serial ports are lettered instead of numbered, A is COM1 and B is COM2. If you cannot find a serial port, consult the documentation that came with your computer.
5 Connect one end of the phone cable to the wall jack and the other end to your Business Modem port labeled TELCO.
6 If you have a telephone that you’d like to connect to your modem, plug the phone cable into the your modem port labeled PHONE.
7 Plug one end of the power adapter to your Business Modem and the other end to a standard AC power outlet.
8 Turn on your computer.
If you have Connect the male DB-25 to your modem and the other end to
An IBM-compatible PC COM, RS-232 or with symbols such as:
IOIOI
A Macintosh the Modem port
or
the Printer port

Installing Your Business Modem 2-5
Modem DriverInstallation
Once your Business Modem is attached to your computer, you will need to install it’s drivers. The process will vary depending on your operating system.
Macintosh users: You will not need to install drivers to use your Business Modem.
WINDOWS 950 AND 950a
1 When Windows detects the modem, click Driver from disk provided by hardware manufacturer. Then click OK.
2 When you see the “Install From Disk” dialog box, hold down the SHIFT key while inserting the Connections CD into your CD-ROM drive. Release the SHIFT key when the light on your CD-ROM drive stops blinking. Then type D:\ (where “D” is the letter name of your CD-ROM drive), and click OK.
3 Follow the on-screen instrcutions to complete installation of the drivers.
WINDOWS 950b
1 When Windows detects the modem, hold down the SHIFT key while inserting the Connections CD into your CD-ROM drive. Release the SHIFT key when the light on your CD-ROM drive stops blinking. Then click Next.
2 Click Finish.
3 If you are prompted for the installation disk, type the location of the CD (typically D:\, where “D” is the letter name of your CD-ROM drive).
WINDOWS NT 4.0
NOTE: If you have installed the Windows NT Plug and Play utility (Service Pack 3), you should follow the instructions under “WINDOWS 950 AND 950a” above. Otherwise, continue below.
1 Double-click the My Computer on your desktop.
2 Double-click Control Panel.
3 Double-click the Ports icon.
4 Click Add.

2-6 CHAPTER 2: INSTALLING THE BUSINESS MODEM
5 Fill in the COM port # and IRQ fields with the COM port and IRQ you wish to use with your new modem. The “Base I/O Port Address” field will be filled in with the correct default value. Click OK.
6 The "Ports" screen will appear showing the COM port you just added. Click OK.
7 Return to the Control Panel and double-click the Modems icon.
8 Click Add.
9 Click Next. Your computer will look for the modem.
10 Once your computer finds the modem, you will see a screen showing that it has detected a "Standard Modem". Click Change.
11 Click Have Disk.
12 When you see the "Install From Disk" screen, hold down the SHIFT key while inserting the Connections CD into your CD-ROM drive. Release the SHIFT key when the light on your CD-ROM drive stops blinking. Then type D:\ in the text box, and click OK. (If your CD-ROM drive uses a letter other than D, use that letter instead.)
13 When you see the "Install New Modem" screen, click the manufacturer of your modem in the first column and then click type of modem you have in the second column. Then click OK.
14 Write the COM port setting here: ____. Click Next.
15 Click Finish.
WINDOWS 98 AND WINDOWS NT 5.0
1 When Windows detects the modem, hold down the SHIFT key while inserting the Connections CD into your CD-ROM drive. Release the SHIFT key when the light on your CD-ROM drive stops blinking. Then click Next.
2 Make sure the “Search for the best driver for your device” option is checked. Then click Next.
3 Make sure “CD-ROM drive” is checked and click Next.
4 Windows will alert you that it has found the driver for your modem. Click Next.
5 If you are prompted for the installation disk, type the location of the CD (typically D:\, where “D” is the letter name of your CD-ROM drive).
6 Click Finish.
7 If you are asked whether you wish to restart Windows, click Yes.
For More Information 2-7
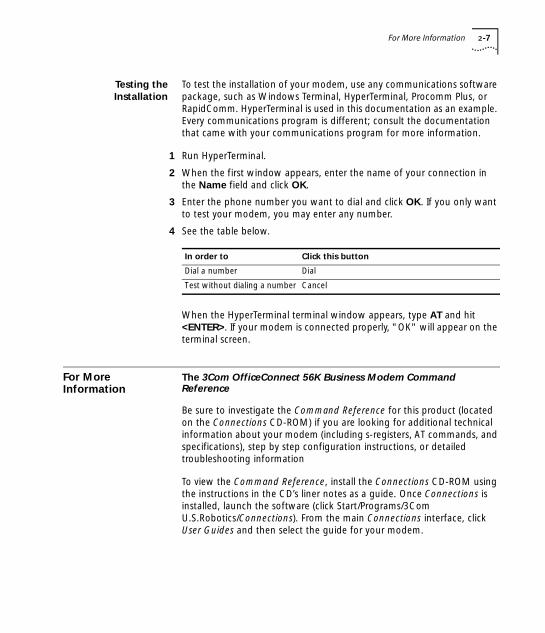
Testing theInstallation
To test the installation of your modem, use any communications software package, such as Windows Terminal, HyperTerminal, Procomm Plus, or RapidComm. HyperTerminal is used in this documentation as an example. Every communications program is different; consult the documentation that came with your communications program for more information.
1 Run HyperTerminal.
2 When the first window appears, enter the name of your connection in the Name field and click OK.
3 Enter the phone number you want to dial and click OK. If you only want to test your modem, you may enter any number.
4 See the table below.
When the HyperTerminal terminal window appears, type AT and hit <ENTER>. If your modem is connected properly, "OK" will appear on the terminal screen.
For More Information
The 3Com OfficeConnect 56K Business Modem Command Reference
Be sure to investigate the Command Reference for this product (located on the Connections CD-ROM) if you are looking for additional technical information about your modem (including s-registers, AT commands, and specifications), step by step configuration instructions, or detailed troubleshooting information
To view the Command Reference, install the Connections CD-ROM using the instructions in the CD’s liner notes as a guide. Once Connections is installed, launch the software (click Start/Programs/3Com U.S.Robotics/Connections). From the main Connections interface, click User Guides and then select the guide for your modem.
In order to Click this button
Dial a number Dial
Test without dialing a number Cancel

3 TROUBLESHOOTING
This chapter explains how to troubleshoot the Business Modem. This chapter is divided into these sections:
■ Problems that occur before connecting.
■ Problems that occur after connecting.
■ What to do if you still have problems.
Problems That Occur Before Connecting
No response to AT For Windows users, make sure that you set the correct COM port and IRQ in your communications software and, if applicable, in Windows' Control Panel - Ports.
For Macintosh users, make sure that you set the correct serial port (modem port or printer port) and that AppleTalk is disabled.
■ Make sure that your communications software is in Terminal mode.
■ Be sure that your communications software is set to the correct bit rate and word length (7 bits with or without a parity bit, or 8 bits and no parity).
Word Length Parity (1 Bit) Stop Bits
7 Even, Odd Mark, Space 1
7 None 2
8 None 1
3-2 CHAPTER 3: TROUBLESHOOTING
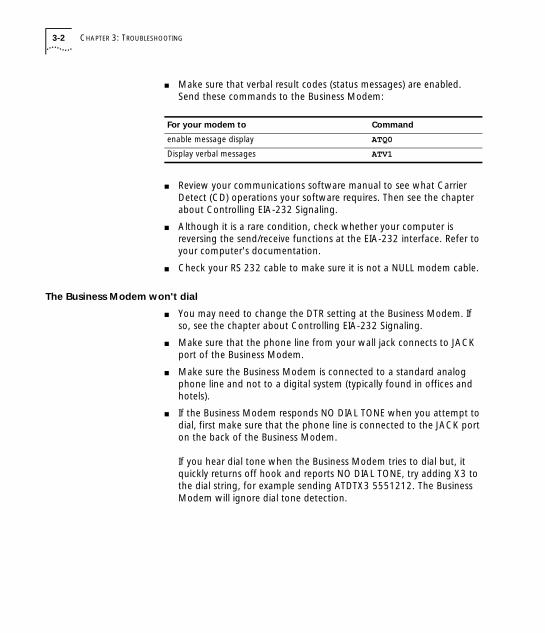
■ Make sure that verbal result codes (status messages) are enabled. Send these commands to the Business Modem:
■ Review your communications software manual to see what Carrier Detect (CD) operations your software requires. Then see the chapter about Controlling EIA-232 Signaling.
■ Although it is a rare condition, check whether your computer is reversing the send/receive functions at the EIA-232 interface. Refer to your computer's documentation.
■ Check your RS 232 cable to make sure it is not a NULL modem cable.
The Business Modem won't dial
■ You may need to change the DTR setting at the Business Modem. If so, see the chapter about Controlling EIA-232 Signaling.
■ Make sure that the phone line from your wall jack connects to JACK port of the Business Modem.
■ Make sure the Business Modem is connected to a standard analog phone line and not to a digital system (typically found in offices and hotels).
■ If the Business Modem responds NO DIAL TONE when you attempt to dial, first make sure that the phone line is connected to the JACK port on the back of the Business Modem.
If you hear dial tone when the Business Modem tries to dial but, it quickly returns off hook and reports NO DIAL TONE, try adding X3 to the dial string, for example sending ATDTX3 5551212. The Business Modem will ignore dial tone detection.
For your modem to Command
enable message display ATQ0
Display verbal messages ATV1

Problems That Occur Before Connecting 3-3
Double characters are appearing on your monitor
This is a signal that both the Business Modem's local echo and your software's local echo are on.
Type the command to turn off your online echo (ATF1) or turn your communications software's local echo off (refer to your software's documentation).
After you dial, the Business Modem reports NO CARRIER and then hangs up
■ Try increasing S7 and decreasing S9 to allow more time for the connection.
■ Try calling a different device. If you are trying to connect to an older modem at 2400 bps or less, it may not support error control. Try sending AT&M0, and then try the call again. Reset the Business Modem (send ATZ) after you finish the call.
Hear ringing but the Business Modem won't answer
■ Look at the TR LED to make sure that your terminal or computer is sending a DTR signal via the EIA-232 interface.
■ Send ATI4 to the Business Modem and check that S0 is set to a value higher than 0.
■ Set &F1 and S0=1, then try again.
The Business Modem acts as though a data link has been established, but no call was received,
Carrier Detect (CD) may be overridden (with &C0), but your system may require that the override be turned OFF (with &C1). Review your communications software manual to see what CD operations are required.
The Business Modem behaves as if <Enter> were pressed when you don't press any keys
Your software may be misreading signals from the Business Modem when the Business Modem sends a Carriage Return and a Line Feed before and after the RING and CONNECT messages. Sending the Quiet mode command, ATQ1, should solve the problem.

3-4 CHAPTER 3: TROUBLESHOOTING
Problems that Occur After Connecting
Your screen displays random or "garbage" characters
Make sure that the Business Modem is set to the same bit rate, word length, parity, and number of Stop bits as the device to which you are connecting.
If the settings are correct, the problem may be with the phone line. Try the following measures:
■ Place the call again. The phone company routes even local calls differently each time you call.
■ Call a different device to see if the problem persists. The problem may be with the device you first tried to call.
If the modem is set to a fixed serial port rate (&B1) and your software is fixed at 19.2K, 38.4K, 57.6K, or 115.2K bps, the reason may be one of the following:
■ Your computer may not support the higher serial port rate. If this is the case, fix your software rate at 9600 bps.
■ If you use memory-resident programs (TSRs-Terminate and Stay Resident programs) or disk-caching programs, they may be interfering. Try disabling them before you run your communications software.
■ Check that your software and the Business Modem are set for the same kind of flow control, either hardware or software. Some communications programs also require that you disable the type you are not using.
Many CRC errors ■ Send AT&F1 to enable hardware flow control and other optimized settings.
■ Try a different file transfer protocol (use ZMODEM if it's available to you)
■ If you use memory-resident programs (TSRs-Terminate and Stay Resident programs) or disk-caching programs, they may be interfering. Try disabling them before you run your communications software.

Problems that Occur After Connecting 3-5
Mainframe computer keeps dropping your connection
You must turn off the Business Modem's result codes and character echo (ATQ1E0). The modem at the mainframe also needs to be set to ATQ1E0.
Bad faxes or can't fax ■ Make sure the fax software is set to use Class 1 fax. Refer to your fax software's manual.
■ If you use memory-resident programs (TSRs-Terminate and Stay Resident programs) or disk-caching programs, they may be interfering. Try disabling them before you run your communications software.
Both devices exchange carrier signals, but fail to establish a communications link
■ Make sure the Business Modem is in the correct mode, fax or data, depending on whether the connection is to be made with a facsimile device or a data device.
See Chapter 2, Modes of Operation, in the electronic 3Com OfficeConnect 56K Business Modem Command Reference on the Connections CD for information on switching between Fax and Data modes.
■ Make sure the proper bit rate, word length, parity and number of Stop bits have been selected.
■ Send ATI4 and check to see that your modem is at the correct Bn setting to connect with either an HST modem (B1 setting) or “V.” modem (B0 setting).
■ Make sure that your Business Modem's connection rate setting, &Nn, is correct for the call. If the connection rate is locked at a speed (&N1-&N14) different from the calling modem's, the Business Modem hangs up. The default setting of &N0, variable link operations, allows the two modems to negotiate the highest possible connection rate.
■ If your modem is attempting to answer a V.32 call, you may need to lengthen the extra V.32 answer tones. See under S28 in Appendix B (Alphabetic Command Summary) in the electronic 3Com OfficeConnect 56K Business Modem Command Reference on the Connections CD.
3-6 CHAPTER 3: TROUBLESHOOTING
■ If you are attempting to make a connection using HST modulation, make sure that the modem at the other end of the line is HST compatible, V.32 terbo compatible at 14.4 Kbps, V.32 compatible at 9600 bps, V.22 bis-compatible at 2400 bps, Bell 212A-compatible at 1200 bps, or Bell 103-compatible at 300 bps.
■ If none of the above corrects the problem, it's likely that the quality of the phone connection is poor. The variable quality of phone line connections may be due to any number of conditions in the phone service's equipment or the current environment. Try several calls, and if you still can't get through, try calling another device. If the second device accepts your call, the problem may lie with the device you first tried to call.
If You Still Have Problems
The problems described above are by far the most common ones that users encounter. If the suggestions we've given don't clear up your difficulties, try the following:
1 Review the manual carefully to see if you've missed something.
2 Call or visit your dealer. Chances are that your dealer will be able to give you the assistance you need. This is much more efficient (and time-saving) than returning the product to 3Com Corporation.
3 If your dealer can't help you, refer to the Customer Service Access Card provided in this package. This card lists several important 3Com numbers.
4 If you must return your Business Modem to us, the Service Representative you talk with will give you a Service Repair Order (SRO) number. Products without an SRO number will not be accepted.
5 If you do return the Business Modem to us, please follow these procedures:
a Ship the unit, postage pre-paid, in its original container. If the original container is not available, pack the unit carefully in a strong box of corrugated cardboard with plenty of packing material.
b Be sure to include your SRO number inside the package, along with your name and address. Put your return address and your SRO number on the shipping label as well.
c Ship the package to the following address:

Problems that Occur After Connecting 3-7
3Com CorporationSRO# _______________
Attn: Dock 15 PCD1800 West Central
Mount Prospect, IL 60056
3Com will not accept packages sent COD, so be sure to send the modem postage paid.
3Com will repair your Business Modem and return it to you via United Parcel Service.
4 WARRANTY
3COM CORPORATION LIMITED WARRANTY
3Com OfficeConnect56K Business Modem
3Com warrants this hardware product to be free from defects in workmanship and materials, under normal use and service, for the lifetime of the product from the date of purchase from 3Com or its authorized reseller. 3Com's sole obligation under this express warranty shall be, at 3Com's option and expense, to repair the defective product or part, deliver to Customer an equivalent product or part to replace the defective item, or if neither of the two foregoing options is reasonably available, 3Com may, in its sole discretion, refund to Customer the purchase price paid for the defective product. All products that are replaced will become the property of 3Com. Replacement products may be new or reconditioned. 3Com warrants any replaced or repaired product or part for ninety (90) days from shipment, or the remainder of the initial warranty period, whichever is longer.
YEAR 2000 WARRANTY: In addition to the Hardware Warranty stated above, 3Com warrants that each product sold or licensed to Customer on and after January 1, 1998 that is date sensitive will continue performing properly with regard to such date data on and after January 1, 2000, provided that all other products used by Customer in connection or combination with the 3Com product, including hardware, software, and firmware, accurately exchange date data with the 3Com product, with the exception of those products identified at 3Com's Web site,
http://www.3com.com/products/yr2000.html

4-2 CHAPTER 4: WARRANTY
as not meeting this standard. If it appears that any product that is stated to meet this standard does not perform properly with regard to such date data on and after January 1, 2000, and Customer notifies 3Com before the later of April 1, 2000, or ninety (90) days after purchase of the product from 3Com or its authorized reseller, 3Com shall, at its option and expense, provide a software update which would effect the proper performance of such product, repair such product, deliver to Customer an equivalent product to replace such product, or if none of the foregoing is feasible, refund to Customer the purchase price paid for such product.
Any software update or replaced or repaired product will carry a Year 2000 Warranty for ninety (90) days after purchase or until April 1, 2000, whichever is later.
OBTAINING WARRANTY SERVICE: Customer must contact a 3Com Corporate Service Center or an Authorized 3Com Service Center within the applicable warranty period to obtain warranty service authorization. Dated proof of purchase from 3Com or its authorized reseller may be required. Products returned to 3Com's Corporate Service Center must be pre-authorized by 3Com with a Service Repair Order (SRO) number marked on the outside of the package, and sent prepaid and packaged appropriately for safe shipment, and it is recommended that they be insured or sent by a method that provides for tracking of the package. The repaired or replaced item will be shipped to Customer, at 3Com's expense, not later than thirty (30) days after 3Com receives the defective product. Return the product to:
3ComSRO#___________attn: Dock 15 PCD
1800 W. Central Ave.Mt. Prospect, IL 60056
3Com shall not be responsible for any software, firmware, information, or memory data of Customer contained in, stored on, or integrated with any products returned to 3Com for repair, whether under warranty or not.
WARRANTIES EXCLUSIVE: IF A 3COM PRODUCT DOES NOT OPERATE AS WARRANTED ABOVE, CUSTOMER'S SOLE REMEDY FOR BREACH OF THAT WARRANTY SHALL BE REPAIR, REPLACEMENT, OR REFUND OF THE PURCHASE PRICE PAID, AT 3COM'S OPTION. TO THE FULL EXTENT

3COM CORPORATION LIMITED WARRANTY 4-3
ALLOWED BY LAW, THE FOREGOING WARRANTIES AND REMEDIES ARE EXCLUSIVE AND ARE IN LIEU OF ALL OTHER WARRANTIES, TERMS, OR CONDITIONS, EXPRESS OR IMPLIED, EITHER IN FACT OR BY OPERATION OF LAW, STATUTORY OR OTHERWISE, INCLUDING WARRANTIES, TERMS, OR CONDITIONS OF MERCHANTABILITY, FITNESS FOR A PARTICULAR PURPOSE, SATISFACTORY QUALITY, CORRESPONDENCE WITH DESCRIPTION, AND NON-INFRINGEMENT, ALL OF WHICH ARE EXPRESSLY DISCLAIMED. 3COM NEITHER ASSUMES NOR AUTHORIZES ANY OTHER PERSON TO ASSUME FOR IT ANY OTHER LIABILITY IN CONNECTION WITH THE SALE, INSTALLATION, MAINTENANCE OR USE OF ITS PRODUCTS.
3COM SHALL NOT BE LIABLE UNDER THIS WARRANTY IF ITS TESTING AND EXAMINATION DISCLOSE THAT THE ALLEGED DEFECT OR MALFUNCTION IN THE PRODUCT DOES NOT EXIST OR WAS CAUSED BY CUSTOMER'S OR ANY THIRD PERSON'S MISUSE, NEGLECT, IMPROPER INSTALLATION OR TESTING, UNAUTHORIZED ATTEMPTS TO OPEN, REPAIR OR MODIFY THE PRODUCT, OR ANY OTHER CAUSE BEYOND THE RANGE OF THE INTENDED USE, OR BY ACCIDENT, FIRE, LIGHTNING, OTHER HAZARDS, OR ACTS OF GOD.
LIMITATION OF LIABILITY. TO THE FULL EXTENT ALLOWED BY LAW, 3COM ALSO EXCLUDES FOR ITSELF AND ITS SUPPLIERS ANY LIABILITY, WHETHER BASED IN CONTRACT OR TORT (INCLUDING NEGLIGENCE), FOR INCIDENTAL, CONSEQUENTIAL, INDIRECT, SPECIAL, OR PUNITIVE DAMAGES OF ANY KIND, OR FOR LOSS OF REVENUE OR PROFITS, LOSS OF BUSINESS, LOSS OF INFORMATION OR DATA, OR OTHER FINANCIAL LOSS ARISING OUT OF OR IN CONNECTION WITH THE SALE, INSTALLATION, MAINTENANCE, USE, PERFORMANCE, FAILURE, OR INTERRUPTION OF ITS PRODUCTS, EVEN IF 3COM OR ITS AUTHORIZED RESELLER HAS BEEN ADVISED OF THE POSSIBILITY OF SUCH DAMAGES, AND LIMITS ITS LIABILITY TO REPAIR, REPLACEMENT, OR REFUND OF THE PURCHASE PRICE PAID, AT 3COM'S OPTION. THIS DISCLAIMER OF LIABILITY FOR DAMAGES WILL NOT BE AFFECTED IF ANY REMEDY PROVIDED HEREIN SHALL FAIL OF ITS ESSENTIAL PURPOSE.
DISCLAIMER: Some countries, states, or provinces do not allow the exclusion or limitation of implied warranties or the limitation of incidental or consequential damages for certain products supplied to consumers, or the limitation of liability for personal injury, so the above limitations and exclusions may be limited in their application to you. When the implied warranties are not allowed to be excluded in their entirety, they will be
4-4 CHAPTER 4: WARRANTY
limited to the duration of the applicable written warranty. This warranty gives you specific legal rights which may vary depending on local law.
GOVERNING LAW: This Limited Warranty shall be governed by the laws of the State of California, U.S.A. excluding its conflicts of laws principles and excluding the United Nations Convention on Contracts for the International Sale of Goods.
Important: If you send your unit, pack it securely and be sure your SRO number is visible on the outside of the package.
Notices
FCC CertificationStatement
3Com3800 Golf Rd.Rolling Meadows, IL 60008
FCC Registration
FCC Notice The user may find the following information prepared by the Federal Communications Commission helpful:
The CIB Interference Handbook and The CIB Telephone Interference Bulletin.
These documents are available on the Internet through the FCC Compliance and Interference Bureau Home Page at http://www.fcc.gov/cib listed under documents. Select CIB Interference Handbook or CIB Telephone Interference Bulletin.
Any changes or modifications not expressly approved by the party responsible for compliance could void the user’s authority to operate this equipment.
Users should not attempt to make electrical ground connections by themselves, but should contact the appropriate inspection authority or electrician, as appropriate.
FCC15 CJE-0263 CJE-0396
FCC68 CJEUSA-73130-FA-E CJEUSA-30043-MM-E
CJEUSA-24161-M5-E
Ringer Equivalence
0.4B 0.4B
FCC Notice: Radio and Television Interference 4-5
FCC Notice: Radio and Television Interference
This equipment has been tested and found to comply with the limits for a Class B digital device, pursuant to Part 15 of the FCC Rules.
These limits are designed to provide reasonable protection against harmful interference in a residential installation. This equipment generates, uses and can radiate radio frequency energy and, if not installed and used in accordance with the instructions, may cause harmful interference to radio communications. However, there is no guarantee that interference will not occur in a particular installation. If this equipment does cause harmful interference to radio or television reception, which can be determined by turning the equipment off and on, the user is encouraged to try to correct the interference by one or more of the following measures:
■ Reorient or relocate the receiving antenna.
■ Increase the separation between the equipment and receiver.
■ Connect the equipment into an outlet on a circuit different from that to which the receiver is connected.
■ Consult the dealer or an experienced radio/TV technician for help.
The user may find the following information prepared by the Federal Communications Commission helpful:
The CIB Interference Handbook and The CIB Telephone Interference Bulletin.
These documents are available on the Internet through the FCC Compliance and Interference Bureau Home Page at http://www.fcc.gov/cib listed under documents. Select CIB Interference Handbook or CIB Telephone Interference Bulletin.
Any changes or modifications not expressly approved by the party responsible for compliance could void the user’s authority to operate this equipment.

4-6 CHAPTER 4: WARRANTY
Industry Canada (IC) This digital apparatus does not exceed the Class B limits for radio noise
emissions from digital apparatus set out in the interference-causing equipment standard entitled Digital Apparatus, ICES-003 of Industry Canada.
��� ������� �� ����� �������� �� ������ �� ������ ������ ������������������ ��� �������� �� ������ �� � ����� � �� ������� ��� ����� ��� � ��� ��� ��������� �������� ��� ������� ������� ���� � ��� ��������� �����
The Industry Canada label identifies certified equipment. This certification means that the equipment meets certain telecommunications network protective, operational, and safety requirements. The department does not guarantee the equipment will operate to a user's satisfaction.
Before installing this equipment, users should ensure that it is permissible to be connected to the facilities of the local telecommunications company. The equipment must also be installed using an acceptable method of connection. In some cases, the inside wiring associated with a single-line individual service may be extended by means of a certified connector assembly (telephone extension cord). The customer should be aware that compliance with the above conditions may not prevent degradation of service in some situations.
Repairs to certified equipment should be made by an authorized Canadian maintenance facility designated by the supplier. Any repairs or alterations made by a user to this equipment, or equipment malfunctions, may give the telecommunications company cause to request the user to disconnect the equipment.
Users should ensure for their own protection that the electrical ground connections of the power utility, telephone lines, and internal metallic water pipe system, if present, are connected together. This precaution may be particularly important in rural areas.
CAUTION: Users should not attempt to make electrical ground connections by themselves, but should contact the appropriate inspection authority or electrician, as appropriate.
UL Listed Accessory Your modem is a UL listed accessory. It must be used with a UL listed computer.