Embed Size (px)
Citation preview

3.8L Food Processor
FP16DCU


3
Congratulations on your purchase of the 3.8L Food Processor.
For over 30 years Cuisinart’s aim has been to produce the very finest kitchen equipment so that cooks at home as well as professional chefs have the tools to express their creativity.
All Cuisinart products are engineered for exceptionally long life, and designed to be easy to use as well as to give excellent performance day after day. That is why they have come to be regarded as the defining machines in their field by chefs across the world.
To learn more about new products we are launching, register for our free Cuisinart newsletter, simply visit our website www.cuisinart.co.uk and refer to the club sec-tion.
Whatever you cook, cook it better with Cuisinart.

4
Contents
Product Description . . . . . . . . . . . . . . . . . . . . . . . . . . . . . . . . . 5Safety Cautions . . . . . . . . . . . . . . . . . . . . . . . . . . . . . . . . . . . 6Instructions for Use . . . . . . . . . . . . . . . . . . . . . . . . . . . . . . . . . 10A Fitting and Removing the Bowls and Lid . . . . . . . . . . . . . . . . . . . . . . . . . . . . . . . . . 10B Fitting and Removing the Large and Small Pushers . . . . . . . . . . . . . . . . . . . . . . . . . . . . 13C Fitting and Removing the Discs . . . . . . . . . . . . . . . . . . . . . . . . . . . . . . . . . . . . . 15D Fitting and Removing the Blades . . . . . . . . . . . . . . . . . . . . . . . . . . . . . . . . . . . . . 17E Touch Pad Controls . . . . . . . . . . . . . . . . . . . . . . . . . . . . . . . . . . . . . . . . . . . 19Processing Techniques . . . . . . . . . . . . . . . . . . . . . . . . . . . . . . . 21A Chopping & Puréeing. . . . . . . . . . . . . . . . . . . . . . . . . . . . . . . . . . . . . . . . . . . 22B Slicing and Shredding . . . . . . . . . . . . . . . . . . . . . . . . . . . . . . . . . . . . . . . . . . . 25C Kneading Dough . . . . . . . . . . . . . . . . . . . . . . . . . . . . . . . . . . . . . . . . . . . . . 28D Trouble Shooting . . . . . . . . . . . . . . . . . . . . . . . . . . . . . . . . . . . . . . . . . . . . . 30Cleaning & Maintenance . . . . . . . . . . . . . . . . . . . . . . . . . . . . . . 34UK Guarantee . . . . . . . . . . . . . . . . . . . . . . . . . . . . . . . . . . . . 35UK After Sales Service . . . . . . . . . . . . . . . . . . . . . . . . . . . . . . . 36Recipes . . . . . . . . . . . . . . . . . . . . . . . . . . . . . . . . . . . . . . . . 37

5
Product Description
Pusher Assembly(Large and Small Pushers)
Lid with Wide Mouth Feed Tube
Metal Dough Blade
Large Chopping/ Mixing Blade
Small Chopping/ Mixing Blade
Reversible Shedding Disc
Adjustable Slicing Disc (Imm to 6mm)
Mini Bowl (1L)
Midi Bowl (2L)
Large Bowl (3.8L)
Control Buttons
Die Cast Housing Base

6
Safety CautionsCarefully read all the instructions before using the appliance and keep in a safe place for future reference
Always follow these safety cautions when using this appliance to avoid personal injury or damage to the appliance. This appliance should be used only as described within this instruction book.
n Ensure all packaging materials and any promotional labels or stickers are removed from the food processor before first use.
n Always inspect the appliance before use for noticeable signs of damage. Do not use if damaged, or if the appliance has been dropped. In the event of damage, or if the appliance develops a fault, contact the Cuisinart Customer Care Line (refer to ‘UK After Sales Service’ section).
n Do not use this appliance if the lead is damaged. In the event of lead damage discontinue use immediately. If the lead is damaged it must be replaced with a special lead available from the manufacturer or its service agent (see ‘UK After Sales Service’ section).
n Unplug from the mains when not in use, before putting on or taking off parts, before removing food and before cleaning.
n Always store blades and discs out of reach of children where they cannot accidently be touched.n Keep hands as well as spatulas and other utensils away from moving blades or discs while processing food to
prevent the possibility of severe personal injury or damage to the food processor. n Avoid contact with moving parts. Never push food down by hand when slicing or shredding. Always use
pusher.n Make sure motor has completely stopped before removing lid.n Never store any blade or disc on motor shaft. Store blades and discs as you would sharp knives, out of the
reach of children.n This appliance should not be used by adults or children whose lack of experience, product knowledge or
disability might cause a hazard, unless they have been correctly instructed and are adequately supervised.

7
n Children should always be supervised to ensure that they do not play with this product.n Do not use any accessories or attachments with this appliance other than those recommended by Cuisinart.n Never store processor with pusher assembly in locked position.n To protect against fire, electric shock or personal injury, do not immerse cord, plug or unit in water or other
liquids.n Do not leave the lead hanging over the edge of a kitchen table or worktop. n Avoid contact between the lead and hot surfaces.n For indoor use only.n For domestic use only. n This appliance should be used only for preparation of drinks / food as described within the instructions for use
that accompany it. Please retain these instructions for future reference.n Always ensure that your hands are dry before removing the plug from the mains outlet. Never pull the plug
out of the mains outlet by its lead.n To avoid injury or possible fire, do not cover the appliance when in use.n Do not connect this appliance to an external timer or remote control system.n This appliance complies with the basic requirements of Directives 04/108/EEC (Electromagnetic Compatibility)
and 06/95/EEC (Safety of domestic electrical appliances).
WARNING: A cut off plug inserted into a 13 amp outlet is a serious safety (shock) hazard. Ensure the cut off plug is disposed of safely.WARNING: Polythene bags over the product or packaging may be dangerous. To avoid danger of suffocation, keep away from babies and children. These bags are not toys.

8
The symbol on the product or on its packaging indicates that this product may not be treated as household waste. Instead it should be handed over to the applicable collection point for the recycling of electrical and electronic equipment.By ensuring this product is disposed of correctly, you will help prevent potential negative consequences for the environment and human health, which could otherwise be caused by inappropriate waste handling of this product. For more detailed information about the recycling of this product, please contact your local council office or your household waste disposal service.

9
For Your Safety
n Handle the blades and discs with extreme care, they are very sharp. Avoid touching the sharp edges.n Never place a blade or disc onto the motor spindle before the bowl is locked into position.n Before switching on the food processor, ensure that the blade / disc are pushed well onto the motor spindle
(taking care to avoid the sharp edges), and that the lid is correctly inserted. Do not force or block the lid mechanism.
n Always carefully insert the blade before adding the ingredients.n To grate or slice food always use the pusher(s) provided. Never push food in with your fingers or use other
utensils. Only use the spatula when the blade / disc is stationary. Avoid all contact with moving parts.n Always wait for the blade / disc to stop before removing the pusher(s) or lid.n Disconnect the appliance from the mains supply before cleaning or removing it or any of the attachments.n Always remove the bowl from the motor base before very carefully removing the blade / disc.n Never leave the appliance unattended when switched on or plugged in.n Keep hands, spatulas and other utensils away from moving blades or discs whilst appliance is in operation. Only
use the spatula once the food processor motor has stopped.

10
Instructions for Use
A Fitting & Removing the Bowls and Lid
n Place the food processor base on a dry, flat, sturdy surface.N.B. To use the medium bowl, it must be nested into the large bowl. To use the small bowl it must be nested in the medium bowl, with the medium bowl in the large bowl for operation.n Place the large work bowl over the motor spindle, ensuring that the handle of the bowl is positioned to the
left of the centre. Turn the work bowl in an anti-clockwise direction until it locks into position on the housing base.
N.B. The work bowl may be stiff during the first few times of use.n To use the medium bowl, place your thumbs in the recesses to align in the large bowl, with the pour spout
facing the back of the unit.

11
n To use the small bowl, place your thumbs in the recesses to align in the medium bowl, with the pour spout facing the back of the unit.
n The bowls lock into place to pour food easily. To remove the small and medium bowls, use the finger recesses on either side.
n To remove the large work bowl, place your left hand firmly on the housing base, hold the handle with your right hand and turn in a clockwise direction to unlock.
n Once you have fitted the selected attachment, place the lid over the work bowl by positioning it directly over the bowls, and push down on the front and back to lock into place.
Press down here
12
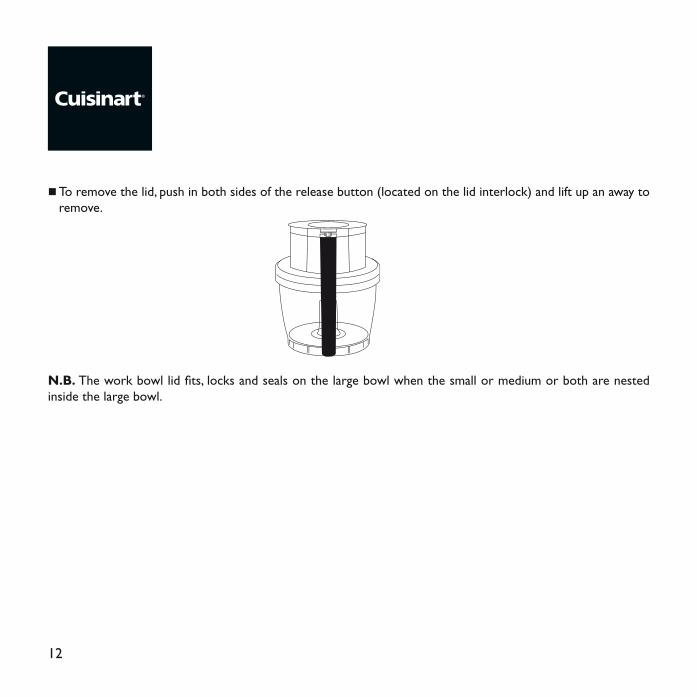
n To remove the lid, push in both sides of the release button (located on the lid interlock) and lift up an away to remove.
N.B. The work bowl lid fits, locks and seals on the large bowl when the small or medium or both are nested inside the large bowl.
13
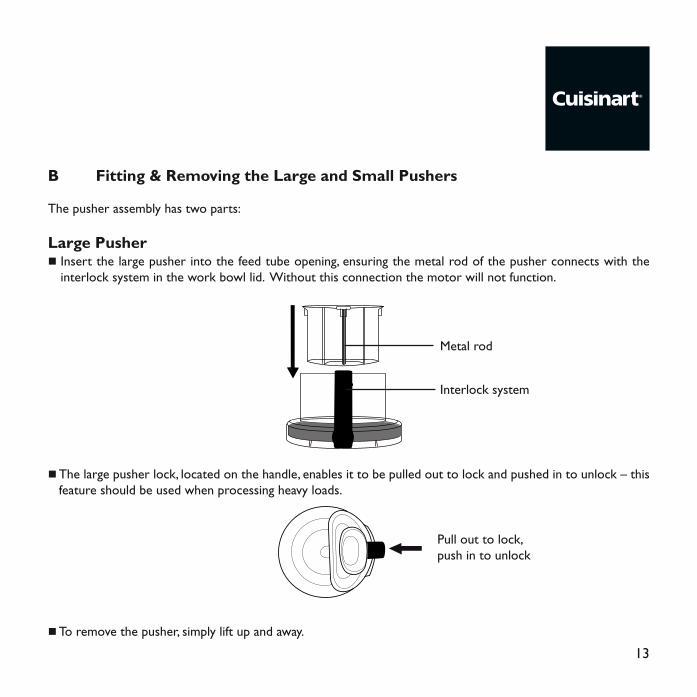
B Fitting & Removing the Large and Small Pushers
The pusher assembly has two parts:
Large Pushern Insert the large pusher into the feed tube opening, ensuring the metal rod of the pusher connects with the
interlock system in the work bowl lid. Without this connection the motor will not function.
n The large pusher lock, located on the handle, enables it to be pulled out to lock and pushed in to unlock – this feature should be used when processing heavy loads.
n To remove the pusher, simply lift up and away.
Metal rod
Interlock system
Pull out to lock, push in to unlock

14
Small Pusher n Secured with a snap-fit, the small pusher fits inside the large pusher to accommodate ingredients of all sizes.
15
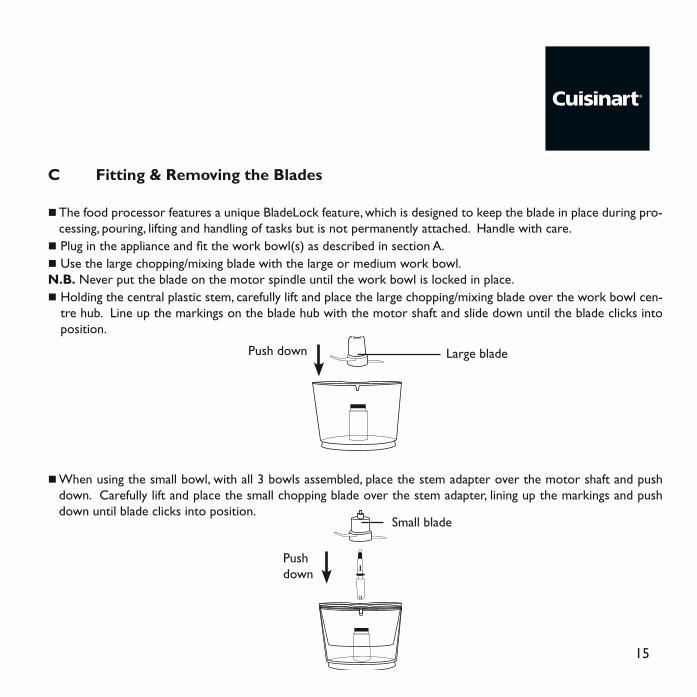
C Fitting & Removing the Blades
n The food processor features a unique BladeLock feature, which is designed to keep the blade in place during pro-cessing, pouring, lifting and handling of tasks but is not permanently attached. Handle with care.
n Plug in the appliance and fit the work bowl(s) as described in section A.n Use the large chopping/mixing blade with the large or medium work bowl. N.B. Never put the blade on the motor spindle until the work bowl is locked in place.n Holding the central plastic stem, carefully lift and place the large chopping/mixing blade over the work bowl cen-
tre hub. Line up the markings on the blade hub with the motor shaft and slide down until the blade clicks into position.
n When using the small bowl, with all 3 bowls assembled, place the stem adapter over the motor shaft and push down. Carefully lift and place the small chopping blade over the stem adapter, lining up the markings and push down until blade clicks into position.
Large blade
Small blade
Push down
Push down
16
N.B. Always insert the blade in the work bowl before adding ingredients. n Fit the lid and pushers as described in section A and B.N.B. Always wait for the blade to stop moving before removing the lid.n To remove blade, hold the central plastic stem of the blade and lift up and away from the motor spindle.
Take great care as the blade is very sharp.

17
D Fitting & Removing the Discs
N.B. The shredding and slicing discs can only be used with the large or medium work bowl.n Plug in the appliance and fit the work bowl(s) as described in section A. N.B. Never put disc on motor spindle until the work bowl is locked in place.n When using your medium or large bowl only, place the stem adapter over the motor shaft and push down.
Choose the desired disc and place it on the stem adapter matching up opening.
Fine Medium
n If using the adjustable slicing disc, use the rotating hub and indicator markings to select slicing thickness. Finger holes are also provided for inserting and removing of this disc.
Fine Medium
n If using the reversible shredding disc, determine whether the fine or medium side will be used and place down appropriately, using the finger holes.
Fine Medium
Rotating hub
Medium or fine

18
n Fit the lid and pushers as described in section A and B.N.B. Always wait for the disc to stop moving before removing the lid.
Diagram to show what accessories should be used with the multi-bowls

19
E Touch Pad Controls
Once you have correctly fitted the chosen attachment, work bowl, lid and pushers, place the ingredients in the work bowl or feed tube and use one of the following controls to start the motor.
ONOFF
PULSE
DOUGH
n ON/OFFThe ON/OFF controls allow you to stop and start the motor. Add ingredients to the work bowl, either through the feed tube or directly into the bowl. Press the ‘ON’ button and the blue LED light will illuminate and the motor will start. Press the ‘OFF’ button when finished and the motor will stop.N.B. The machine will not start operating until the large pusher is correctly inserted (refer to section B). It stops instantly when the large pusher is removed.

20
n PulseThe pulse button allows you to control the motor operation for shorter periods of time. When pressed, the motor will run until the button is released. The blue LED light will illuminate each time you press the pulse button. The blue LED On light will also be illuminated. Use the pulse function at the start of processing a few times before using the ‘ON’ button to continuously process for a smooth consistency.
n DoughThe dough control is used with the dough blade. This control is specially designed to run at an optimum processing speed for mixing and kneading dough and gives results in a fraction of the time it takes to do it by hand. Press the ‘DOUGH’ button and the blue LED light will illuminate. It is now ready to knead the dough. Press the ‘OFF’ button when finished.N.B. Only use the specially designed dough blade to knead dough. Kneading dough should only be done in the large work bowl.

21
Processing Techniques
The following section includes useful hints and tips on how to use the various attachments to achieve a number of processing results. It is recommended that you practice using these techniques before processing food to eat.
Recommended Maximum Work Bowl CapacitiesFOOD CAPACITY LARGE
WORK BOWL CAPACITY MEDIUM WORK BOWL
CAPACITY SMALL WORK BOWL
Sliced or shredded fruit, vegetables or cheese
4kg 3kg N/A
Chopped fruit, vegetables or cheese
3kg 2.5kg 690g
Puréed fruit, vegetables or cheese
3kg cooked 2kg puréed
2kg cooked 1.8kg puréed
690g cooked 340g puréed
Chopped or puréed meat, fish, seafood
1kg 1kg 220g
Thin liquid* (e.g. dressing, soup, etc)
2.7L 2L 700ml
Cake batter 3 x 20cm victoria sponge 2 x 20cm victoria sponge N/A
Cookie dough 10 dozen (based on average chocolate chip cookie recipe)
N/A N/A
White bread dough 1kg flour N/A N/A
Whole wheat bread dough
750g flour N/A N/A
Nuts for nut butter 1.2kg 900g 225g
*When processing egg based liquids, like a custard base for quiche, reduce maximum capacity by 470ml.

22
IMPORTANT: Always ensure the quantities used do not exceed the quantities recommended. Overloading may damage the attachments and/or appliance.
A Chopping and Puréeing
n Use the chopping/ mixing blade for this technique.n For best results ensure that the pieces of food you add to the work bowl are approximately the same size. i.e.
2.5cm cubed, to achieve even results.n Ensure that the lid and large pusher are locked into place before processing.
Dislodging and removing foodOccasionally, a piece of food may become wedged between the blade and the work bowl. If this happens, unplug the machine, remove the lid, lift the blade out carefully and remove the wedged piece. Empty the bowl, reinsert the blade and lock the lid and pusher into place. Press the ‘On’ button and drop the food pieces through the small feed tube opening while the machine is running. After adding a cupful this way, add the remaining food to the bowl and process in the usual manner.
To chop raw fruits and vegetables:Cut the food into 2.5cm pieces and place in the work bowl. Use the ‘Pulse’ button 3 or 4 times at a rate of 1 second on, 1 second off, until the food is coarsely chopped. For more finely chopped results, press the ‘On’ button, letting the machine run continuously until the desired consistency is reached. Check frequently to avoid over processing. Use the spatula to scrape down the sides of the work bowl if necessary.
To purée fruits and cooked vegetables:Cut the food into 2.5cm pieces and place in work bowl. Use the ‘Pulse’ button to chop coarsely, then press the ‘On’ button and process continuously until food is puréed.N.B. Cooked potatoes are an exception to this procedure. They develop a gluey texture when processed with the metal blade.

23
When making soup, you will want to purée vegetables that have been cooked in liquid. Don’t add the liquid to the work bowl, use a slotted spoon to transfer the vegetables from the pan to the work bowl. They will purée faster and smoother without liquid. Then add just enough liquid to make the purée pourable; return to the soup liquid and stir to combine.
To chop hard foods:To chop hard food like garlic and hard cheese, you will need to use the small feed tube, ensuring the lid and large pusher are locked into place (refer to ‘Instructions for Use’ Section A&B). Press the ‘On’ button and drop the food through the small feed tube while the machine is running. Small foods like garlic can be dropped in whole. Large foods like hard cheese should be cut into 2.5cm pieces and added a few pieces at a time. This method of processing gives a crushed texture to garlic, shallots and onions. Hard cheese and coconut will have the same texture as if they had been hand grated.
WARNING! Never try to process cheese that is too hard to cut with a knife. You may damage the blade or the appliance.
To chop fresh herbs:The herbs, the work bowl and the metal chopping blade must all be thoroughly cleaned and dried. Remove the stems from herbs. Add the leaves to work bowl and process, using the ‘On’ button until chopped as fine as desired.
To chop meat, poultry, fish and seafood:The food should be very cold, but not frozen. Cut into 2.5cm pieces and place in work bowl. Use the ‘Pulse’ button 3 or 4 times at a rate of 1 second on, 1 second off. If the food is not chopped fine enough, let the processor run continuously, using the ‘On’ button, for a few seconds. Check the texture often to avoid over-processing. Use a spatula to scrape food down from the sides of the bowl as necessary.

24
To purée meat, poultry, fish and seafoodThe food should be very cold but not frozen. Cut into 2.5cm pieces and place in work bowl. Use the ‘Pulse’ button 3 or 4 times at a rate of 1 second on, 1 second off, until the food is evenly chopped, then process continuously to the desired texture. Use a spatula to scrape food down from the sides of the bowl as necessary.
To chop and purée nuts:Add nuts to work bowl and use the ‘Pulse’ button 3 or 4 times until chopped as finely as desired. Check frequently to avoid nuts clumping together in a nut butter. You can also chop nuts with a shredding disc (refer to Processing Techniques, section B).To purée nuts i.e. nut butters use the ‘On’ button and let the appliance run continuously. After 2 or 3 minutes, the ground nuts will form a ball that will gradually smooth out. Scrape the sides of the bowl and continue processing until drops of oil are visible.
To whip cream with metal blade:Chill the cream well before starting, process continuously using the ‘On’ button, until cream begins to thicken, watching carefully for desired consistency.N.B. Processor whipped cream holds its shape very well, however, it will not whip to the light, fluffy consistency obtained by methods that beat in more air.
To make crumbs and crumb crusts:Cut or break bread, crackers or cookies into 2.5cm pieces and place in work bowl. Press the ‘On’ button and process continuously until pieces reach the desired texture.

25
B Slicing and Shredding using the Adjustable Slicing Disc and Reversible Shredding Disc
n Use the shredding/ slicing discs for this technique.n Never put your fingers or a spatula into the feed tube, always use the pusher. n For best results: Place the food flat side down and as far left as possible in the feed tube to prevent it from
tilting when being processed.n Food should fit snugly in the feed tube, but not so tightly that it prevents the pusher from moving.n For small quantities of food use the small pusher.
To slice or shred small round fruits and vegetables:For example, berries, radishes and mushrooms.Trim the ends flat with a knife, insert the food through the large feed tube, standing each piece on a flat end. You can fill the tube to about 2.5cm from the top (i.e. up to the ‘max’ marking on the feed tube). The bottom layer gives you perfect slices for garnish. If you want all the slices to be perfect, it’s best to process one layer at a time.
To slice or shred long fruits and vegetables:For example, bananas, celery and courgettes.Trim both ends flat and ensure the pieces are short enough to fit within the ‘max’ marking on the feed tube. Fill the feed tube with the pieces, standing them vertically and adding enough pieces so they are solidly packed and cannot tilt sideways as they are sliced or shredded.
To slice French-cut green beans:Trim the ends of the green beans. Blanching is not necessary. Stack in the large feed tube horizontally to fit with ‘max’ marking on the feed tube. Use the slicing disc, apply light pressure to the pusher and press the

26
‘Pulse’ button until beans are sliced. To make long, horizontal slices of raw courgette or carrots, use the same procedure.
To slice matchsticks or julienne strips:For example, potatoes, turnips, courgettes and carrots. Cut large fruit and vegetables horizontally (from end to end) and insert into the large feed tube. Use the slicing disc for this technique. Process the food twice – ‘double slice’ it. Apply pressure to pusher while pressing the ‘Pulse’ button until the food is sliced. You will achieve long slices. Remove the slices from the work bowl and reassemble. The slices should be assembled horizontally, with the cut edges facing down. Re-insert them in the feed tube, wedging them in tightly. Slice them again and you will obtain long julienne strips.
To slice cooked meat and poultry:The food must be very cold. If possible, use a piece of food just large enough to fit in the feed tube. To make julienne strips of cooked meats such as ham, stack slices then roll or fold them double and stand upright in the feed tube, wedging in as many rolls as possible. This technique works better with square or rectangular pieces than with round ones.
To slice uncooked meat and poultry:Cut the food into pieces to fit the feed tube. Wrap the pieces in cling film and put them in the freezer. They are ready to slice when they are easily pierced with the tip of a sharp knife, although semi-frozen and hard to the touch. Remove the cling film. Stand them in the feed tube and slice them against the grain, using firm pressure on the pusher. Or lay them flat in the feed tube, as many as will fit and slice with the grain, using firm pressure.
To slice Frankfurters, salami and other sausages:If the sausage is soft, freeze it until hard to the touch but easily pierced with the tip of a sharp knife. Hard sausages need not be frozen. Use the small feed tube if the sausage is thin enough to fit. Otherwise, cut the sausage into pieces to fill the large feed tube completely. Stand the pieces vertically, packing them tightly so they cannot tilt sideways.

27
Slicing and Shredding Cheese
Type of Cheese Chop Shred Slice
Soft Brie, Camembert Mozarella Ricotta Cottage, Cream
Yes No
Chill* No No
No
Semi Soft Blue Fontina Liederkranz Bel Paese
Yes Chill*
Chill* Chill*
Yes No
Firm Cheddar Montery Jack, longhorn Swiss, Jarlsberg Edam, Gouda Provolone
Yes Chill* Chill* Chill* Chill* Chill*
Yes Chill* Chill* Chill* Chill* Chill*
Yes
Hard Parmesan, Romano Pecorino, sapsago, asiago
Yes Room temp
Yes No
N.B. To chill, put in the freezer for 15-20 minutes or until semi frozen, hard to the touch but easily pieced with the tip of a sharp knife.

28
C Kneading Dough
n Use the metal dough blade in conjunction with the special ‘Dough’ control for kneading. n IMPORTANT: Never try to process dough that is too stiff to knead comfortably by hand.n Dough kneading should be done in the large work bowl only.
For best results:n Savoury dough is properly kneaded when it is uniformly soft, pliable and slightly sticky and leaves the inside of
the work bowl clean.n Sweet dough (containing a higher proportion of sugar, butter and/or eggs) requires less kneading after the
ingredients are mixed. Although 30 seconds is usually sufficient, 60 seconds gives better results if the appliance does not slow down. Sweet dough will not leave the inside of the work bowl clean.
n For small dough quantities (i.e. using under 500g of flour) use the metal chopping blade instead of the dough blade. Because the metal dough blade does not extend to the outside rim of the work bowl, it cannot pick up all the flour when small amounts are processed.
n Before kneading, always ensure the yeast is active (follow manufacturers instructions).n For large dough quantities that exceed the recommended quantities (refer to Processing Techniques section)
Divide and process in equal batches.
Processing dry ingredients:Put the flour in the work bowl with all the other dry ingredients. If the recipe calls for herbs, oil or solid fats like butter, add them with the flour. If you require a fine texture, add cheese, nuts etc here. Turn the appliance on and let it run for about 20 seconds.

29
Adding liquids:All liquid should be added through the small feed tube while the machine is running. Add liquid in a slow, steady stream, only as fast as dry ingredients absorb it. If liquid sloshes or splatters, stop adding it but do not turn off the machine. Wait until ingredients in bowl have mixed, then add remaining liquid slowly. Pour liquid onto dough as it passes under feed tube opening. Do not pour liquid directly onto bottom of bowl.
Follow the recipe carefully, it is important to add enough liquid to make the dough soft enough to knead.
Kneading bread dough:After the dough starts to clean the inside of the work bowl completely and forms a ball, process it for 30 seconds to knead it. Stop the appliance and test the dough to be sure it is properly kneaded. If it feels hard, lumpy or uneven, continue processing until it feels uniformly soft and pliable. Ensure the appliance is correctly assembled before restarting. For textured dough, you may add ingredients such as cheese, nuts and raisins 5 seconds before you stop kneading.
Kneading sweet dough:Process the dough for at least 30 seconds after all the ingredients are incorporated. If necessary, scrape the bowl and process for a further 5 seconds.

30
D Troubleshooting
The food is unevenly processedThe ingredients should be cut evenly into 2.5cm pieces before processing.Process in batches to avoid overloading.
Slices are uneven or slantedPlace evenly cut food into the feed tube.Apply even pressure on the pusher.
Food falls over in feed tubeLarge feed tube must be packed full for best results. If processing smaller quantities, use the small feed tube.
Some food remains on top of the discIt is normal for small pieces to remain; cut remaining bits by hand and add to processed ingredients.
The dough control button does not workThe dough control works in conjunction with the ‘On’ button. The food processor will only operate once the ‘On’ is selected after the dough function is activated.
Motor slows downAmount of dough may exceed maximum capacity of your food processor. Remove half and process in two batches.Dough may be too wet. If motor speeds up, continue processing. If not, add more flour, 1 tablespoon at a time until the motor speeds up. Process until dough cleans the side of the work bowl.
31
Blade doesn’t incorporate ingredientsAlways start the food processor before adding liquid. Add liquid in a slow, steady stream, allowing the dry ingredients to absorb it. If too much liquid is added, wait until ingredients in the work bowl have mixed, then add remaining liquid (do not turn off the appliance). Pour liquid onto dough as it passes under feed tube opening; do not pour liquid directly onto bottom of the work bowl.
Blade rises in work bowlBlade may not have been pushed down into the lock position before starting the processor.Excessively sticky dough can cause blade to rise. If this happens, reinsert blade and immediately add 2 tablepsoons of flour through the feed tube while the machine is running.
The large pusher moves when processing dough or other heavy loadsThe pusher lock feature, located above the handle, should be pulled out. Some vibration is normal.
Dough doesn’t clean inside of the work bowlAmount of dough may exceed maximum capacity of your food processor. Remove half and process in two batches.Dough may be too dry.Dough may be too wet.
Lump of dough forms on top of blade and does not become uniformly kneadedStop machine, carefully remove dough, divide it into 3 pieces and redistribute them evenly in the work bowl.
Dough feels tough after kneadingDivide dough into 2 or 3 pieces and redistribute evenly in bowl. Process for 10 seconds or until uniformly soft and pliable.

32
Dough is too dryWhile machine is running, add water, 1 tablespoon at a time until dough cleans the inside of the bowl.
Dough is too wetWhile machine is running, add flour, 1 tablespoon at a time until dough cleans the inside of the bowl.
The motor does not startThere is a safety interlock to prevent the motor from starting if it is not properly assembled. Make sure the work bowl(s) and work bowl lid are securely locked into position.If you are slicing or shredding and the above solution does not work, make sure that the food contents in the feed tube are cut below the maximum fill line so that activation rod can engage the motor.If the motor still will not start, check the power cord and outlet.
The food processor shuts off during operationThe lid may have become unlocked; make sure it is securely in position.A safety protector in the motor prevents the motor from overheating, which is caused by excessive strain. Press the ‘Off’ button and wait 10 to 15 minutes to allow the food processor to cool off before resuming.
The food processor lid becomes unlatched in the back and/or makes a loud noiseThe back of the lid becoming unlatched and any related noise, will not prevent the unit from working. Simply push down to lock the back into position.
The motor slowed down during operationThe maximum load capacity may have been exceeded. Remove some of the ingredients and continue processing.
33
It is difficult to remove the chopping/mixing blade from the work bowlThese blades have been designed to lock in the work bowl to prevent them from falling out when emptying the contents of the bowl. Using extreme care, use a little extra force to remove the blade.
The food processor vibrated/moved around the worktop during processingMake sure the rubber feed at the bottom of the unit are clean and dry. Also make sure that the maximum load capacity is not being exceeded.
The large pusher falls out when the bowl is turned upside downThe pusher lock feature, located above the handle, should be pulled out.

34
Cleaning & Maintenance
n When not in use, leave your food processor unplugged.n Do not leave the pushers locked into position otherwise you may damage the locking mechanism.n Do not run the processor for more than 20 seconds at a time.n This food processor includes a storage case with lock for safekeeping of blades and discs. Keep the blades and
discs out of the reach of children.n All parts except the housing base are dishwasher proof. We recommend washing them in the dishwasher on
the top rack. Due to intense water heat, washing the work bowl(s), lid and accessories on the bottom rack may cause damage over time. Insert the work bowl(s) and pushers upside down for drainage. Take extra care when loading and unloading blades and discs in the dishwasher.
n To simplify cleaning, rinse the work bowl(s), lid, pusher assembly and blade or disc immediately after use so food won’t dry on them.
n Openings at the bottom of the large pusher provide drainage and make cleaning easy. If food lodges in the pusher, remove it by running water through it or use a bottle brush.
n If you wash blades and discs by hand, do it carefully. When handling, use the plastic hubs on the blades and finger holes for the discs. Avoid leaving them in soapy water where they may disappear from sight. To clean the metal blade, fill the work bowl(s) with soapy water, hold the blade by its plastic centre and move it rapidly up and down on the centre shaft of the bowl.
n The work bowl(s) should not be placed in a microwave oven, as the aperture at the front of the pusher houses the metal rod that activates the motor.
n Chopping certain foods may scratch or cloud the work bowl(s).n Do not use abrasive cleaners on the housing base, simply wipe with a damp cloth and dry thoroughly. Apply
any cleaning agent to the cloth, not the base.

35
UK Guarantee
n This Cuisinart appliance is guaranteed for domestic consumer use for 20 years.n The guarantee covers defects under normal use from date of purchase and ceases to be valid in the event of
alteration or repair by unauthorised persons.n If the appliance does not perform satisfactorily due to defects of material or manufacture, it will be repaired
or replaced by the manufacturer (see ‘UK After Sales Service’ for details). n This guarantee is only valid in the United Kingdom and Eire (includes Channel Islands and Isle of Man).n No responsibility will be accepted for any damage caused in transit.n A charge may be made if goods are returned outside the relevant guarantee period or if the product is retur-
ned unnecessarily.n The manufacturer reserves the right to amend terms and specifications without prior notice. n This guarantee in no way affects your statutory rights.

36
UK After Sales Service
For further advice on using your Cuisinart Food Processor and other products in the Cuisinart range, contact the Cuisinart Customer Care Line on 0870 240 6902 (09:00 to 17:00 hrs Monday to Friday) or alternatively, email your enquiry to [email protected].
In GuaranteeFirstly, please call the Cuisinart Helpline 0870 240 6902.Return the product to the Cuisinart Service Centre at the following address:
Cuisinart Service CentreP.O. Box 506WIGANWN1 9AA
Enclose your name and address, together with proof of purchase and details of the fault. Cuisinart will either repair or replace the product, as appropriate.
Out of GuaranteeContact the Cuisinart Customer Care Line on 0870 240 6902 (09:00 to 17:00 hrs Monday to Friday) or, alternatively, email your enquiry to [email protected] for details of the standard repair or replacement charge. If you wish to proceed with the repair or replacement, return the product to the Cuisinart Service Centre at the following address:
Cuisinart Service CentreP.O. Box 506WIGANWN1 9AA
Enclose your name, address and contact number along with details of the fault.

37
Recipes
Starter & SnacksHoumous . . . . . . . . . . . . . . . . . . . . . . . . . . . . . . . . . . . . . . . . . . . . . . . . . . .39Classic Bruschetta . . . . . . . . . . . . . . . . . . . . . . . . . . . . . . . . . . . . . . . . . . . . . . .40
SoupsChunky Gazpacho . . . . . . . . . . . . . . . . . . . . . . . . . . . . . . . . . . . . . . . . . . . . . . .41Broccoli & Potato Soup . . . . . . . . . . . . . . . . . . . . . . . . . . . . . . . . . . . . . . . . . . . .42Roasted Butternut Squash . . . . . . . . . . . . . . . . . . . . . . . . . . . . . . . . . . . . . . . . . . .44French Onion Soup . . . . . . . . . . . . . . . . . . . . . . . . . . . . . . . . . . . . . . . . . . . . . .46Vegetable Soup . . . . . . . . . . . . . . . . . . . . . . . . . . . . . . . . . . . . . . . . . . . . . . . . .47
Main CoursesChicken and Vegetable Stir-Fry with Pasta . . . . . . . . . . . . . . . . . . . . . . . . . . . . . . . . . . .48Classic Meatballs . . . . . . . . . . . . . . . . . . . . . . . . . . . . . . . . . . . . . . . . . . . . . . . .50Pistachio Crusted Rack of Lamb . . . . . . . . . . . . . . . . . . . . . . . . . . . . . . . . . . . . . . . .51
Salads & Side DishesChicken Salad. . . . . . . . . . . . . . . . . . . . . . . . . . . . . . . . . . . . . . . . . . . . . . . . . .52Classic Coleslaw . . . . . . . . . . . . . . . . . . . . . . . . . . . . . . . . . . . . . . . . . . . . . . . .53

38
Sauces & DressingsBasil Pesto . . . . . . . . . . . . . . . . . . . . . . . . . . . . . . . . . . . . . . . . . . . . . . . . . . .54Simple Tomato Sauce . . . . . . . . . . . . . . . . . . . . . . . . . . . . . . . . . . . . . . . . . . . . . .55Roasted Red Pepper Sauce . . . . . . . . . . . . . . . . . . . . . . . . . . . . . . . . . . . . . . . . . . .56Hollandaise Sauce. . . . . . . . . . . . . . . . . . . . . . . . . . . . . . . . . . . . . . . . . . . . . . . .58Guacamole . . . . . . . . . . . . . . . . . . . . . . . . . . . . . . . . . . . . . . . . . . . . . . . . . . .59
Scones & BiscuitsPeanut Cookies . . . . . . . . . . . . . . . . . . . . . . . . . . . . . . . . . . . . . . . . . . . . . . . . .60Scones . . . . . . . . . . . . . . . . . . . . . . . . . . . . . . . . . . . . . . . . . . . . . . . . . . . . .61
PastryChoux . . . . . . . . . . . . . . . . . . . . . . . . . . . . . . . . . . . . . . . . . . . . . . . . . . . . .62Shortcrust . . . . . . . . . . . . . . . . . . . . . . . . . . . . . . . . . . . . . . . . . . . . . . . . . . .63Sweet Shortcrust . . . . . . . . . . . . . . . . . . . . . . . . . . . . . . . . . . . . . . . . . . . . . . . .64
Bread & PizzaBasic White Bread . . . . . . . . . . . . . . . . . . . . . . . . . . . . . . . . . . . . . . . . . . . . . . .65Pizza Dough . . . . . . . . . . . . . . . . . . . . . . . . . . . . . . . . . . . . . . . . . . . . . . . . . .66Margherita . . . . . . . . . . . . . . . . . . . . . . . . . . . . . . . . . . . . . . . . . . . . . . . . . . .67Pesto Cheese and Fresh Tomato Pizza . . . . . . . . . . . . . . . . . . . . . . . . . . . . . . . . . . . . .68
Cakes & DessertsApple Pie . . . . . . . . . . . . . . . . . . . . . . . . . . . . . . . . . . . . . . . . . . . . . . . . . . . .69Baked Lemon Cheesecake . . . . . . . . . . . . . . . . . . . . . . . . . . . . . . . . . . . . . . . . . . .70Carrot Cake . . . . . . . . . . . . . . . . . . . . . . . . . . . . . . . . . . . . . . . . . . . . . . . . . .71Chocolate Brownies . . . . . . . . . . . . . . . . . . . . . . . . . . . . . . . . . . . . . . . . . . . . . .72

39
HoumousServes 4
250g canned chick peas, drained2 cloves garlic, peeledJuice & zest 1 lemon3-4 tbsp olive oil
• Insert the large metal chopping blade into the medium work bowl of the food processor.• Add the chick peas, garlic, juice and lemon zest and process until chopped.• With the appliance running, gradually add the oil through the small feed tube until well mixed and thickened.• Serve with pita bread or as a dip for crudités.

40
Roasted Garlic and Red Pepper DipServes 4
1 ½ large bulbs garlic, cloves peeled1 tsp extra virgin olive oil2 spring onions, cut into 2.5cm pieces75g roasted red peppersFreshly ground black pepper
• Preheat oven to 190ºC/375ºF, Gas Mark 5.• Toss garlic cloves in the oil and wrap in foil. Place in the centre of the oven and roast for 1 hour. Remove from oven and leave to cool.
• Insert the large metal chopping blade into the medium work bowl. Add the cooled garlic and process until puréed.
• Scrape the work bowl, add the remaining ingredients and process until smooth. Chill for 1 hour and serve with crudités or breadsticks.

41
Chunky Gaspacho
1 garlic clove, peeled1 green chilli, deseeded and cut into 2.5cm pieces4 spring onions, trimmed and cut into 2.5cm pieces1 celery stick, trimmed and cut into 2.5cm pieces1 red pepper, cored, deseeded and quartered2 tomatoes, quartered500ml tomato juice2 tbsp lemon juice1 medium cucumber, peeled, deseeded and cut to fit feed tube Salt and freshly ground black pepper
• Insert the large metal chopping blade into the large work bowl.• Add the garlic and chilli and process until finely chopped.• Add the spring onion, celery and pepper. Pulse until roughly chopped. Transfer ingredients to a large mixing bowl.
• Add half the tomatoes to the work bowl and process until coarsely chopped. Add to mixing bowl.• Purée remaining tomatoes until smooth. With machine running, pour in half of the tomato juice through the
small feed tube. Process until combined. Add to the mixing bowl along with the remaining tomato and lemon juice and stir well.
• Insert the slicing disc into the work bowl. Stand the cucumber upright in the large feed tube and slice, using light pressure. Add to the mixing bowl with remaining ingredients, season well and stir to combine.
• Cover and chill before serving.

42
Broccoli and Potato Soup
225g cheddar cheese4 garlic cloves1 medium onion, cut into 2.5cm pieces60ml extra virgin olive oil1 tbsp sea salt2 tsp freshly ground black pepper, divided900g peeled potatoes1.8kg broccoli, stems peeled and florets separated60ml sherry1.8L hot vegetable stock1 ½ tsp lemon zest
• Insert the reversible shredding disc on the medium shredding side into the medium work bowl and shred the cheddar cheese. Remove the work bowl and reserve.
• Insert the large metal chopping blade. With the machine running, drop the garlic cloves through the small feed tube to finely chop. Add the onions to the work bowl and pulse to chop, about 10 pulses.
• Heat the olive oil in a large saucepan over a low heat.• Add the garlic and onion, with a pinch of salt and pepper. Sauté until softened for about 8 to 10 minutes.• While the vegetables are cooking, add the slicing disc adjusted to 4mm to the large work bowl. Slice the potatoes and the broccoli stems.
• Raise the heat to medium and add the potatoes, broccoli stems and a pinch of salt and pepper; sauté 2 to 3 minutes and then add the sherry. Let the sherry cook down until almost evaporated.
• Add the broth and bring to the boil. Reduce heat to a medium-low and stir in the florets, lemon zest, 230g cheddar cheese and the remaining salt and pepper. Simmer until vegetables are tender.
• Strain the soup, reserving the liquid. Place the solids into the large work bowl with the large metal chopping blade and purée until completely smooth for about 1 minute.

43
• Return purée to the saucepan over medium-low heat and stir in reserved liquid until desired consistency is achieved. Stir in remaining cheddar cheese.
• Taste and adjust seasoning accordingly.

44
Roasted Butternut Squash
2kg butternut squash (about 900g squash) halved and seeds removed1 tbsp olive oil2 medium large onions, cut into 2.5cm pieces4 tbsp unsalted butter1 tbsp light or dark brown sugar25g finely chopped fresh ginger2l vegetable stock1 ½ tsp ground nutmeg2 ½ tsp salt, divided1 tsp freshly ground black pepper½ tsp fresh thyme
• Preheat oven to 190ºC/375ºF.• Sprinkle ¼ tsp of salt over the squash and place in a shallow roasting pan. • Drizzle olive oil over flesh and into the pan.• Turn squash flesh down. Bake until squash is tender, about 45 minutes.• Insert the large metal chopping blade into the large work bowl.• Add the onions and pulse to chop, about 8 to 10 pulses.• Put butter into saucepan over medium heat.• Once the butter is melted, add the onions and ¼ tsp of salt. Sauté for 5 to 7 minutes, or until the onions are
softened.• Stir in the brown sugar, sauté for an additional 10 minutes. Add the ginger, sauté until tender and aromatic, about
6 to 8 minutes.• Add stock, roasted squash, nutmeg, remaining salt and pepper to the pot. Cover; bring to a slight boil. Once boiling uncover and let simmer for 15 to 20 minutes.
• Strain the soup, reserving the liquid.

45
• Place the solids into the large work bowl with the large metal chopping blade and purée until completely smooth, about 1 minute.
• Return purée to the saucepan over medium-low heat and stir in reserved liquid until desired consistency is achieved.
• Adjust seasoning to taste and serve.

46
French Onion SoupServes 4
7 onions, peeled and quartered1 tbsp oil50g butter1 tsp brown sugar2 tbsp plain flour415g canned beef consommé500ml beef stock1 small stick fresh bread100g cheddar cheese
• Insert the slicing disc into the large work bowl. Arrange the onions in the large feed tube and slice. Heat the oil and butter in a large pan, add the onion and sugar and stir over a medium heat for 10 to 15 minutes, or until the onion is golden brown and softened.
• Add the flour, stir over a medium heat for 1 to 2 minutes. Remove from the heat and gradually blend in the beef consommé and stock. Return to the heat and stir constantly until the soup boils and thickens. Reduce the heat to low and simmer for 5 minutes.
• Cut the bread into 2cm slices. Insert the shredding disc into the work bowl, arrange the cheese in the large feed tube and shred. Sprinkle over the bread slices and grill until the cheese melts. Serve French onion soup topped with cheese slices.

47
Thick Mixed Vegetable SoupServes 6
1 large leek, trimmed, washed and dried, cut to fit small feed tube2 medium carrots, peeled4 parsnips, peeled2 celery sticks, trimmed300g pumpkin, peeled, cut to size to fit small feed tube (or squash of your choice)4 cloves garlic, peeled2 tbsp vegetable oil1 litre chicken or vegetable stock
• Insert the slicing disc into the large work bowl. Arrange the leek in the small feed tube and slice. Transfer to a small bowl. Repeat with the carrots, parsnips, celery and pumpkin. Transfer to a separate bowl.
• Remove the slicing disc and place the large chopping blade in the large work bowl. With the processor running, drop the garlic through the small feed tube and process until finely chopped. Add to the leeks.
• Heat the oil in a large saucepan, add the leek and garlic and cook over a medium heat until softened.• Add the sliced vegetables, reduce the heat to low, cover and cook for 5 minutes. Add the stock, simmer, uncovered for 30 minutes or until vegetables are tender.
• Process the mixtures in batches until smooth, return to the pan, reheat and serve hot with crusty bread..

48
Chicken and Vegetable Stir-Fry with PastaServes 6
4 boneless chicken breasts50g parmesan, cut into 1.5cm cubes1 large garlic clove, peeled2cm piece ginger, peeled and sliced1 red pepper, cored, deseeded and cut to fit large feed tube½ yellow pepper, cored, deseeded and cut to fit large feed tube2 large carrots, peeled and cut to fit large feed tube2 ½ tsp cornflour125ml chicken stock3 ½ tbsp sesame oil250g broccoli, florets cut to serving size pieces, stems discarded3 tbsp soy sauce6 tbsp medium-dry sherry340g dry pasta e.g. fusilli or penne
• Trim the chicken of all visible fat. Cut in half crosswise, wrap in cling film and freeze for 25 minutes.• Insert the large chopping blade into the large work bowl and with the machine running, drop the parmesan
through the small feed tube and process until finely chopped. Remove and set aside. Add the garlic and ginger and process until finely chopped. Remove and reserve.
• Insert the slicing disc into the large work bowl and slice the red and yellow pepper. Place the carrots horizon-tally in the feed tube and slice. Remove and set aside.
• Remove the chicken from the freezer, place in the large feed tube, cut side down and slice, then toss in 1 ½ tbsp sesame oil and set aside.
• Combine the cornflour and chicken stock in a small bowl.
49
• In a large wok or non-stick frying pan, cook the chicken over a high heat for 4-5 minutes or until cooked through. Remove from the heat and set aside.
• Add the remaining sesame oil to the wok, when hot, add the garlic and ginger, stir fry for 10 seconds. Add the sliced carrots and stir fry for 45 seconds.
• Add the broccoli florets and sliced pepper and stir fry for another 30 seconds.• Return the cooked chicken to the pan along with the soy sauce and sherry and cook for 30 seconds. Stir in
the cornflour mixture and bring to the boil. Reduce the heat and simmer.• Cook the pasta following the packaging instructions, drain and add to wok, toss to combine.• Remove from heat, add half the parmesan and toss through, then serve topped with remaining parmesan.

50
Classic Meatballs
1 medium onion, quartered15g parsley leaves2 slices day old firm bread, torn into pieces450g boneless chuck, cut into 2.5cm pieces450g boneless pork, cut into 2.5cm pieces40g non-fat dry milk1 ½ tsp salt½ tsp ground nutmeg¼ tsp dried thyme2 large eggs60ml cold water
• Insert the large metal chopping blade into the large work bowl.• Add the onion, parsley, bread, meat, dry milk and spices to the work bowl. Pulse 4 to 6 times and then process until finely chopped.
• Add the eggs and water and pulse until just combined. • Shape the mixture into balls, 2 tablespoons each.• Arrange them in a single layer in a baking dish and bake at 190ºC/375ºF for 25 minutes or simmer in tomato sauce until cooked through.
51
Pistachio Crusted Rack of Lamb
150g shelled pistachios, roasted and salted2 lamb racks, frenched4 garlic cloves, peeled and crushed4 thyme sprigs60ml plus 2 tsp olive oil½ tsp salt½ tsp freshly ground black pepper1 tsp Dijon mustard
• Insert the small metal blade into the small work bowl. • Add the pistachios and pulse to chop, about 10 pulses, to achieve a rough, medium chop. Remove chopped nuts and reserve on a plate.
• In a shallow bowl that can accommodate the lamb, stir together the garlic, thyme and 60ml olive oil. Place lamb in the bowl. Liberally rub the lamb with the oil and sprinkle the meat all over with the salt and pepper. Let stand for 30 to 40 minutes.
• Preheat the oven to 200ºC/400ºF.• Place a 30cm frying pan over medium high heat and add the remaining olive oil. • When oil is hot and just about smoking, add the lamb. Brown both sides of the lamb well, about 5 minutes either side. If oil begins to smoke, reduce the heat slightly.
• Once lamb is well browned, rub the meat with the mustard. Roll both sides of the meat in the reserved chopped nuts to create a crust.
• Transfer racks to a baking sheet and place in preheated oven. Roast lamb for about 12 to 15 minutes. • Allow lamb to cool for 10 minutes before slicing.• To serve, slice individual chops by using a sharp knife to cut between ribs.

52
Classic Creamy Chicken Salad
1 ½ onions, cut into 2.5cm pieces1 ½ celery stalks, cut into 2.5cm pieces1.4kg poached chicken breast, cut into 2.5cm pieces250ml light mayonnaise1 ½ tsp sea salt1 tsp freshly ground pepper½ tsp paprika
• Insert the large metal chopping blade into the medium work bowl. Add the onions and celery and pulse to finely chop, about 8 to 10 pulses.
• Add the chicken and pulse about 5 to 6 times to chop. • Scrape the bowl and add the mayonnaise and seasonings; pulse to achieve desired consistency..

53
Classic Coleslaw
1 onion, peeled and quartered20g parsley5 tbsp mayonnaise1 ½ tsp red wine vinegarSalt and freshly ground black pepper1 medium carrot, peeled and cut in half crossways1 white cabbage, cored and cut into wedges
• Insert the large chopping blade into the medium work bowl. Add the onion and process until finely chopped.• Add the parsley, mayonnaise, vinegar and seasoning to taste and process until combined.• Transfer the ingredients to a bowl and set aside.• Insert the shredding disc and shred the carrot and cabbage using firm pressure.• Add the contents of the work bowl to the mixing bowl and toss to combine.• Serve immediately, or store, covered in the refrigerator for up to 24 hours.

54
Basil Pesto
100g Parmesan, cut to 2.5cm pieces3 small cloves garlic, peeled100g basil leaves4 tbsp pine nuts4 tbsp olive oilSalt and freshly ground black pepper
• Insert the small metal chopping blade into the small work bowl, add the parmesan and garlic and process until finely chopped.
• Add the basil, pine nuts and seasoning and pulse to combine.• With the appliance running, pour the oil through the small feed tube and process until combined, scrape down the bowl and process until smooth.
55
Simple Tomato Sauce
1 small onion, peeled and cut into 2.5cm pieces4 garlic cloves, peeled½ tsp dried oregano1 tsp extra virgin olive oil1 x 800g canned plum tomatoes, with juice20g fresh basil3 tbsp dry white wineSalt and freshly ground black pepper
• Insert the large chopping blade into the large work bowl and process the onion, garlic and oregano until finely chopped.
• Heat the oil in a saucepan over a medium heat; add the onion mixture and cook, stirring, for 2-3 minutes, until the onions begin to soften and the oregano becomes fragrant.
• Add the canned tomatoes with their juices, basil, wine and seasoning. Bring to the boil, reduce heat, cover and simmer for 45-50 minutes. Turn off the heat and leave to cool in the pan for 10 minutes.
• Place the sauce into the processor and pulse 15 times for a rustic sauce or process for 2 minutes for a smooth sauce. This sauce can be served with pasta.
• For a sauce to top pizza bases, return the mixture to the saucepan and simmer uncovered for 40-50 minutes, stirring regularly. Allow reduced sauce to chill before topping pizza base.
56
Roasted Red Pepper Sauce
8 medium, sweet, red peppers6 cloves garlic, unpeeled2 shallots1 ½ tsp unsalted butter1 ½ tsp extra virgin olive oil3 tbsp white wine350ml chicken stock½ tsp fresh lemon juice½ tsp saltFreshly ground black pepper
• Preheat oven to 220ºC/425ºF. Line a baking sheet with parchment paper.• Place half of the peppers on a prepared baking sheet with the garlic.• Roast in oven for 20 minutes. Remove the garlic cloves and place in a small heat proof bowl. Return tray to
oven and continue roasting peppers for an additional 30 minutes, flipping the peppers a few times so that they are evenly browned.
• Once the peppers are charred all over, place them in the bowl with the garlic and cover tightly with plastic wrap.
• Allow the peppers to cool and steam so that their skins become loose, at least 30 minutes.• Once cool, peel the skins off each pepper and remove seeds. Reserve cleaned peppers with peeled garlic
cloves.• While the peppers are roasting, cut the remaining pepper into 2.5cm pieces.• Insert the large metal chopping blade into the medium work bowl. Add the shallots and pulse to chop; remove
and reserve. Add the raw pepper pieces and pulse to roughly chop.• Place the butter and olive oil together in a large sauté pan over medium heat. Once the butter melts, add the
chopped shallots, stir and sauté for about 2 minutes to soften, not picking up any colour.

57
• Stir in the chopped raw peppers. Reduce heat to low and cover with lid.• Allow peppers to sweat for about 30 minutes, stirring occasionally. Peppers are done when they are soft.• Remove lid from pan and increase heat slightly. Add the white wine and stir until liquid is mostly evaporated,
about 2 minutes.• Add chicken stock and bring to a steady simmer and allow to reduce by half for about 5 minutes.• Place the cooked peppers and the reserved roasted peppers and garlic into the work bowl. Add lemon juice, ¼
teaspoon salt and pinch of pepper; pulse 2 to 3 times and then process for about 40 seconds, until ingredients are well combined.
• Taste and adjust seasonings accordingly.
58
Hollandaise Sauce
340g unsalted butter3 large egg yolks½ tsp dry mustard½ tsp salt¼ freshly ground black pepper2 tbsp fresh lemon juice
• Place butter in a saucepan over low heat to melt.• Insert the small chopping blade into the small work bowl. Add the yolks, mustard, salt and pepper and process
for 90 seconds.• Once the butter is melted, turn heat up to bring the butter just to a boil. • With the machine running, slowly drizzle the hot butter through the feed tube. Sauce will thicken to a mayonnaise consistency.
• When all butter has been incorporated, add the lemon juice and pulse to blend.• Taste and adjust seasoning accordingly.• Serve while still warm.

59
GuacamoleServes 4
2 large garlic cloves, peeled2 green chillies, cored, deseeded and cut into 1.5cm pieces80g fresh coriander2 spring onions, trimmed and cut into 2.5cm pieces6 avocados, peeled, stones removed6 tbsp lemon juice1 tbsp olive oilPinch of cumin½ tsp chilli powder2 medium tomatoes, quartered and seeds removedSalt and freshly ground black pepper
• Insert the large chopping blade into the large work bowl and add the garlic, chilli, coriander and spring onion. Process until finely chopped. Scrape down the work bowl.
• Add avocados, lemon juice, olive oil, cumin and chilli powder, season well and process until smooth, scraping bowl as necessary.
• Add the tomatoes and pulse about 6-8 times until finely chopped and all ingredients are combined. Serve chilled as a dip with Nachos or crudités.

60
Peanut CookiesMakes approximately 50
100g margarine, divided into 2.5cm pieces100g crunchy peanut butter100g soft brown sugar100g caster sugar2 eggs275g plain flour½ tsp baking powder½ tsp bicarbonate of sodaPinch of saltGranulated sugar
• Preheat the oven to 190°C/375°F, Gas Mark 5. Insert the chopping blade into the medium work bowl. Add the margarine, peanut butter, brown and caster sugar and eggs and mix together until thoroughly combined.
• Add the flour, baking powder, bicarbonate of soda and salt and mix until a soft dough is formed.• Remove the dough from the work bowl and roll small balls, approximately the size of walnuts. Place well apart
on a greased baking tray.• Using a fork, press down to form each cookie. Sprinkle the tops with granulated sugar and bake for approximately
15 minutes or until risen and lightly browned. Cool on a wire rack.

61
SconesMakes 10-12
200g self raising flourPinch of salt50g butter or margarine, cut into 2.5cm cubes25g caster sugar125ml milk1 egg, beaten
• Preheat oven to 220°C/425°F, Gas Mark 7. Insert the chopping blade into the medium work bowl. Add the flour, salt and butter and process until the mixture resembles fine breadcrumbs. Add the sugar and mix using a pulse action until combined.
• Remove the small pusher and with the appliance running, add the milk through the small feed tube until the mixture produces a ball of dough.
• Remove the dough and roll out to approximately 1cm thick. Using a 5cm cutter, cut into 10-12 rounds. Place on a baking tray and brush with the beaten egg.
• Bake for 8-10 minutes or until golden brown. Serve warm or cold with butter and jam.
Variations:Cheese scones: Replace the sugar with 50g grated cheeseSultana scones: Add 50g sultanas along with the sugar.
62
Choux
Makes approximately:10 éclairs (10cm)10 choux buns (5cm)20 profiteroles (3cm)
75g plain flour50g butter, cut into 2.5cm pieces125ml water2 eggs, beaten
• Preheat the oven to 200°C/400°F, Gas Mark 6.• Insert the chopping blade into the mixing medium work bowl and add the flour.• Add the butter and water to a saucepan and melt over a medium heat, bring to the boil, remove from the heat and add mixture to the flour.
• Process until the mixture forms a ball of dough, scrape the side as necessary. • Add half the beaten egg mixture and pulse to combine, then add the remaining egg and pulse until combined. The pastry should be glossy and of a piping consistency.
• Pipe to desired shape, space well apart on a baking tray and bake until golden.

63
Shortcrust
200g plain flourPinch of salt50g margarine, divided into 2.5cm cubes50g lard, cut into cubes3 tbsp cold water
• Insert the chopping blade into the medium work bowl. Add the flour, salt and fats into the bowl and process until the mixture resembles breadcrumbs.
• Remove the small pusher and with the appliance running, pour in the water gradually through the small feed tube. Continue to process until a single ball of dough is formed.
• Wrap the pastry in cling film and refrigerate for 30 minutes before use.

64
Sweet Shortcrust
150g plain flourPinch of salt50g caster sugar75g butter, cut into 2.5cm pieces1 egg, beaten
• Insert the chopping blade into the medium work bowl. Add the flour, salt, sugar and butter and process until the mixture resembles breadcrumbs.
• Remove the small pusher and with the appliance running, gradually pour in the egg through the small feed tube and process until a ball of dough is formed.
• Wrap the pastry in cling film and refrigerate for 30 minutes before use.

65
Basic White BreadMakes 1 large or 2 small loaves
700g strong white flour1 tsp easy blend dried yeast1 ½ tsp salt1 tsp sugar425ml hand hot water
• Insert the dough blade into the large work bowl and add the flour, yeast, salt and sugar and process for a few seconds to combine. Remove the small pusher and with the processor running, pour the water through the small feed tube. Once the dough starts to clean the inside of the work bowl and forms a ball, continue to process for 30-60 seconds to knead it.
• Stop the appliance and test the dough to ensure it is properly kneaded. If it feels hard, lumpy or uneven, continue processing until it feels uniformly soft and pliable.
• Turn dough out onto work surface, work into a ball, lightly with hands and place into a large polythene bag and leave in a warm place for approximately 1 ½ hours or until doubled in size.
• Remove from the bag, knock back and place in 2x 450g well greased loaf tins or 1x 900g well greased loaf tin and stand in a warm place until well risen, approximately 50 minutes.
• Place in a preheated oven, 220°C/425°F, Gas Mark 7 and bake for approximately 30-40 minutes, 35-45 minutes for a large tin, or until golden brown. The loaf should sound hollow when removed from the tin and tapped on the bottom.
• Remove from oven and turn onto a wire rack to cool.

66
Pizza DoughMakes two 30cm pizzas or four 20cm Pizzas
300g plain flour1 tsp salt1 ½ tsp easy blend dry yeast½ tsp sugar1 ½ tsp extra virgin olive oil250ml warm water
• Insert the dough blade into the large work bowl, add the flour, salt, yeast and sugar and process to combine.• Remove the small pusher and with the processor running, pour the oil and water through the small feed tube.
Once the dough starts to clean the inside of the work bowl and forms a ball, process it for 30 seconds to knead it. The dough might be slightly sticky.
• Transfer to a clean bowl and cover it with cling film that has been lightly oiled on the side that is facing the dough. Leave to rise in a warm place for approximately 45 minutes.
• Place dough on a lightly floured surface and knead. Roll into desired sizes and follow desired recipe for topping and cooking.

67
Margherita1 recipe pizza dough
170g mozzarella, well chilled18 fresh basil leaves, washed and dried170ml simple tomato sauce, reduced for pizza1 tbsp extra virgin olive oil2-3 tbsp polenta (cornmeal)
• Preheat the oven to 230°C/450°F, Gas Mark 8.• Insert the shredding disc into the medium work bowl. Using a medium pressure, shred the mozzarella. Remove
and reserve. Thinly slice basil leaves and reserve.• Sprinkle baking sheets with polenta. Roll out dough to desired sizes and place on the baking tray. Brush edges
with olive oil. Spread the bases with tomato sauce (approximately 100ml for 30cm base and 75ml for 20cm).• Sprinkle each pizza evenly with basil and cheese and bake for approximately 10 minutes, rotating once during
cooking for even browning, or until pizza is bubbling and edges are golden brown, puffed and crispy.• Remove from the oven and allow to rest on a rack for 2-3 minutes before serving. Garnish with extra basil.

68
Pesto, Cheese and Fresh Tomato Pizza1 recipe pizza dough
350g firm but ripe plum tomatoes25g parmesan, cut into 1.5cm cubes75g fresh mozzarella, well chilled50g Fontina or Gruyere cheese4 tbsp pesto2 tsp extra virgin olive oilPolenta (cornmeal) for dusting baking tray
• Preheat the oven to 230°C/450°F, Gas Mark 8.• Cut shallow ‘X’ in the bottom of each tomato and place the tomatoes into a large bowl. Boil 1.5l water and pour
over the tomatoes, blanch for 30 seconds, then immediately plunge them into iced water. When cool, peel the skins off, slice the stems from each and set aside.
• Insert the large chopping blade into the large work bowl and with the processor running, drop the parmesan cubes down the small feed tube, process for 15 seconds and leave in the work bowl.
• Insert the shredding disc into the work bowl and shred the mozzarella and Fontina (or Gruyere). Transfer the cheeses to a bowl, toss to combine and reserve.
• Insert the slicing disc into the large work bowl. Place the tomatoes in the small feed tube one at a time, and slice using light pressure. Place the sliced tomatoes on a triple thick layer on paper towels to drain.
• Sprinkle baking sheets with polenta and stand the rolled pizza bases on top. Brush edges with olive oil.• Spread the bases with pesto, using 2-3 tbsp for a 12 inch base and 1-2 tbsp for 8 inch. Divide the cheese evenly
and sprinkle onto each pizza. Top with the drained sliced tomatoes.• Bake for approximately 10 minutes, rotating once during cooking for even browning, or until pizza is bubbling
and edges are golden brown, puffed and crispy.• Remove from the oven and allow to rest on a rack for 2-3 minutes before serving.

69
Apple PieServes 6
6-8 cooking apples, peeled, cored and cut to fit feed tube2-4 tbsp sugar1 tsp ground cinnamon500g shortcrust pastry25g butter, cut into 1.5cm pieces1-2 tbsp milk
• Preheat oven to 200°C/400°F, Gas Mark 6.• Butter a 25cm pie dish.• Insert the slicing disc into the large work bowl and slice the apples using medium pressure. Toss in the sugar and cinnamon.• Roll the pastry into two 30cm circles. Press one circle into the base of the pie dish, leaving the excess to
overhang.• Layer the apple slices into the pie dish and dot with butter.• Lay the other pastry sheet over the apples and seal the edges. Cut slits in the top of the pastry.• Brush with milk and sprinkle with extra sugar. Bake for 50-60 minutes or until golden brown.

70
Baked Lemon CheesecakeServes 8
175g digestive biscuits, broken into quarters75g butter, melted25g soft brown sugarZest of 2 lemons75g caster sugar1 egg250g cream cheese2 tbsp lemon juice50g self-raising flour
• Preheat the oven to 180°C/350°F, Gas Mark 4.• Insert the large chopping blade into the large work bowl and process biscuits until they resemble fine
breadcrumbs.• Add the butter and sugar and process briefly to combine. Press the biscuit mixture into the base of a greased, loose-bottom 20cm cake tin and chill until firm.
• Place all the remaining ingredients into the large work bowl and process until smooth. Pour the mixture over the base in the cake tin and bake for 50-60 minutes or until the cheesecake is set and browned. Leave to cool then chill. Once chilled, remove from tin.
71
Carrot Cake
225g carrots, peeled and cut to fit large feed tube100g walnuts175ml vegetable oil150g caster sugar3 eggs1 tsp vanilla essence150g self-raising flour1 tsp baking powder1 tsp cinnamon1 tsp saltIcing:85g cream cheese50g butter2-3 drops vanilla essence100g icing sugar
• Preheat oven to 180°C/350°F, Gas Mark 4.• Grease and line a 20cm cake tin, insert the shredding disc into the large work bowl and shred the carrots.• Remove from the bowl and set aside.• Insert the large chopping blade into the large work bowl. Add all the remaining cake ingredients and process
until well blended. Add the carrot and mix together with a pulse action.• Turn into the cake tin and bake for approximately 1 hour 15 minutes, or until the cake springs back when gently pressed. Cool in the tin for 5 minutes and then turn out onto a cooling rack.
• For the icing, place all the ingredients into the cleaned work bowl and process until smooth. When the cake has cooled completely, spread the icing over the top and sides.
72
Chocolate brownies
50g walnuts2 large eggs200g caster sugar50g butter, melted½ tsp vanilla essence50g plain flour3 tbsp cocoa powder½ tsp baking powderPinch of salt
• Preheat oven to 190°C/375°F, Gas Mark 5.• Well grease a 20cm square tin.• Insert the large chopping blade into the medium work bowl, add the walnuts and process until roughly chopped.
Remove and set aside.• Add the eggs and sugar and process until creamy and thickened slightly. Add the butter and vanilla essence and process until thoroughly combined.
• Sieve the flour, cocoa, baking powder and salt, add to the medium work bowl and process with a pulse action until combined.
• Add the walnuts, process to combine and turn mixture out into prepared tin.• Bake for approximately 30 minutes, or until slightly springy in the centre. • Remove from the oven, leave in the tin for 10 minutes, then cut the brownies into squares and transfer to a
wire rack while still warm.

73

www.cuisinart.co.uk
IB-9/266