Embed Size (px)
Citation preview

4 - AUTOMATIC FieldCruiseTM
The Automatic FieldCruiseTM is an engine speed control system that aims at reducing fuel consumption in the sugar cane harvester.
When the system is on, it keeps the engine speed at 2000 rpm until the harvester requires more load, then automatically increasing to 2210 rpm.
4.1 - Turning ON/OFF To turn the Automatic FieldCruiseTM on or off, please follow the steps below:- On the home page, press the J icon to open the engine
information screen.
- Touch the checkbox (1) to turn the Automatic FieldCruiseTM system on or off.
5 - TRACK STEERING EQUALIZATION SETUPSet the conveyor equalization when by operating the harvester you notice it is detouring.
To open the setting page, press icon C on the home page.
Quick Reference GuideCode: CXT16333 - B5
John Deere Brasil Ltda. Avenue Eixo 01 Quadra 16, S/N
ICatalão/GO - Zip: 75709-695
Copyright © 2012 Deere & Company. All Rights Reserved
3520 & 3522 Sugar Cane Harvester Advanced Operation
Quick Reference Guide
www.JohnDeere.com.br
1 - SAFETY
1.1 - Operator’s Manual* This Quick Reference Guide does not replace that the user reads and understands the guidelines contained in the Operator’s Manual. The images provided are for illustration only. Carefully read and follow all the instructions described in the Operator’s Manual. If you have questions concerning equipment use, please contact your local John Deere Dealer.
Before operating or servicing the harvester, and for information concerning Safety, please carefully read the SAFETY SECTION in the Operator’s Manual.
2 - HOME PAGE
3 45
1 6
2
1- LH Area: indicators, guideline informa-tion, and display control.
2 - Information Lower Area3 - Base Cutter Height 4 - Base Cutter Pressure5 - Chopper Pressure6 - RH area with navigation icons of the
following screens:B - Floating Row Dividers and Contour
Base Cutter Height Control Setup
2.1 - LH AreaPress icon E to toggle the left-hand area between:A - Day/Night Screen Lighting Button B - Guidance Information and AutoTracTM Application ControlC - Machine IndicatorsD - Floating Row Divider and Contour Base Cutter Height Control
2.2 - Lower AreaWith the start switch on and the engine off, the lower area will show:
3 - HARVESTER ACTIVITY MONITORThe activity display is the harvester’s hours and distance travelled log. To go to the activity screen, follow the steps below:
- On the home page, press the J icon to open the engine
information screen.
- On the engine information screen, press icon (A) to go to the harvester activity screen.
A B C D
E
F
G
H
I
J
K
On this screen you will see the hour (A), distance travelled (B) logs, and since the last reset these are:
E - Harvester (Engine On)F - HarvestingG - Headland TurnH - Road TravelI - StandbyJ - Elevator
The log (C and D) can be reset by pressing and holding icon K for 2 seconds.
If the engine is continuously running up to 90% of the load, turn on the FieldCruiseTM by touching the checkbox (2). The system allows the operator to set the speed (3) between 1900 rpm and 2200 rpm by pressing icon C.
Note:When checking box 2, box 1 will be unchecked.
When driving the harvester on the field, press engine throttle key (A) to select the engine intermediate speed.The intermediate speed (4) may be set from 1500 rpm to 1800 rpm by pressing icon E, as required.
B D F
A C E
A B C D E F G
C - Conveyor Direction Alignment SettingD - DiagnosticsE - Home Page SettingsF - Back to Home PageG - Primary Extractor SettingsH - Alarm SettingsI - Elevator Settings J - Engine Information
A B C D
E
To change the machine indicators (C), press the indicator that will be changed to open the options box and select the desired indicator.
With the engine running:
A - Engine Hours B - Elevator HoursC - Harvesting Hours
A - LH Floating Row Crop DividerB - Contour Base Cutter Height ControlC - RH Floating Row Crop DividerD - Primary ExtractorE - ElevatorF - Automatic FieldCruiseTM
G - Cooling Fan
D - AutoTracTM Hours
E - Contour Base Cutter Height Control HoursF - Floating Row Crop Divider Hours
The icon backlight color will change according to the operation:- Green: On- Yellow: Reverse- Clear: Off
Note:With the engine on, it is possible to switch information by touching at the bottom.
Set the equalization by touching icons C and H. The setting will be represented in the chart (A) and by a number (B).C - LH Equalization IconH - RH Equalization Icon
A
B
3
4
1
2
The combine activity log can be saved on a pen drive (A) that is connected to the USB port (B), and located under the armrest.
Data is saved in a .csv file that can be opened in a spreadsheet in your computer.
A
A
A
B
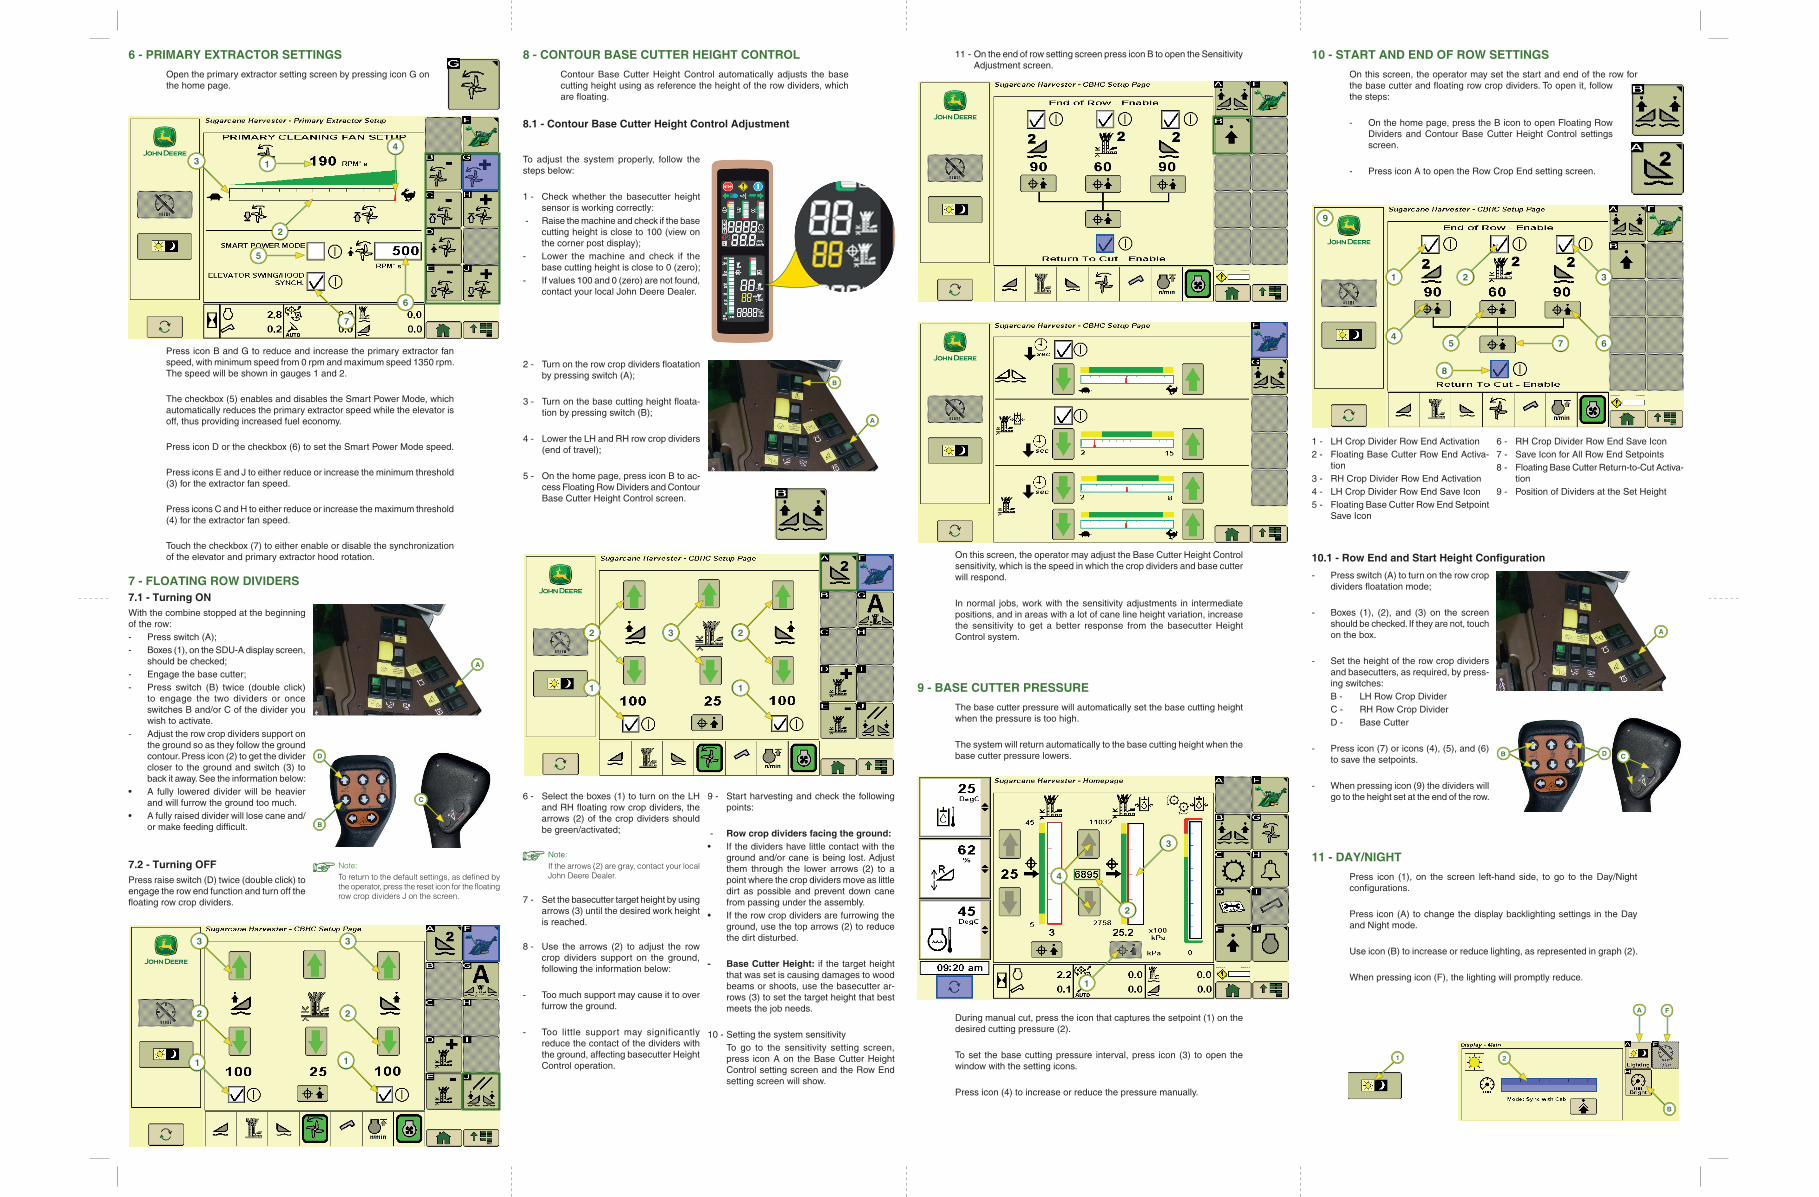
10 - START AND END OF ROW SETTINGSOn this screen, the operator may set the start and end of the row for the base cutter and floating row crop dividers. To open it, follow the steps:
- On the home page, press the B icon to open Floating Row Dividers and Contour Base Cutter Height Control settings screen.
- Press icon A to open the Row Crop End setting screen.
6 - PRIMARY EXTRACTOR SETTINGSOpen the primary extractor setting screen by pressing icon G on the home page.
Press icon B and G to reduce and increase the primary extractor fan speed, with minimum speed from 0 rpm and maximum speed 1350 rpm. The speed will be shown in gauges 1 and 2.
The checkbox (5) enables and disables the Smart Power Mode, which automatically reduces the primary extractor speed while the elevator is off, thus providing increased fuel economy.
Press icon D or the checkbox (6) to set the Smart Power Mode speed.
Press icons E and J to either reduce or increase the minimum threshold (3) for the extractor fan speed.
Press icons C and H to either reduce or increase the maximum threshold (4) for the extractor fan speed.
Touch the checkbox (7) to either enable or disable the synchronization of the elevator and primary extractor hood rotation.
A
B
A
A
2 - Turn on the row crop dividers floatation by pressing switch (A);
3 - Turn on the base cutting height floata-
tion by pressing switch (B);
4 - Lower the LH and RH row crop dividers (end of travel);
5 - On the home page, press icon B to ac-cess Floating Row Dividers and Contour Base Cutter Height Control screen.
6 - Select the boxes (1) to turn on the LH and RH floating row crop dividers, the arrows (2) of the crop dividers should be green/activated;
Note: If the arrows (2) are gray, contact your local John Deere Dealer.
7 - Set the basecutter target height by using arrows (3) until the desired work height is reached.
8 - Use the arrows (2) to adjust the row crop dividers support on the ground, following the information below:
- Too much support may cause it to over furrow the ground.
- Too little support may significantly reduce the contact of the dividers with the ground, affecting basecutter Height Control operation.
9 - Start harvesting and check the following points:
- Row crop dividers facing the ground: • If the dividers have little contact with the
ground and/or cane is being lost. Adjust them through the lower arrows (2) to a point where the crop dividers move as little dirt as possible and prevent down cane from passing under the assembly.
• If the row crop dividers are furrowing the ground, use the top arrows (2) to reduce the dirt disturbed.
- Base Cutter Height: if the target height that was set is causing damages to wood beams or shoots, use the basecutter ar-rows (3) to set the target height that best meets the job needs.
10 - Setting the system sensitivity To go to the sensitivity setting screen,
press icon A on the Base Cutter Height Control setting screen and the Row End setting screen will show.
11
2 2
3 3
XX2 XX2XX3
1 1
On this screen, the operator may adjust the Base Cutter Height Control sensitivity, which is the speed in which the crop dividers and base cutter will respond.
In normal jobs, work with the sensitivity adjustments in intermediate positions, and in areas with a lot of cane line height variation, increase the sensitivity to get a better response from the basecutter Height Control system.
To adjust the system properly, follow the steps below:
1 - Check whether the basecutter height sensor is working correctly:
- Raise the machine and check if the base cutting height is close to 100 (view on the corner post display);
- Lower the machine and check if the base cutting height is close to 0 (zero);
- If values 100 and 0 (zero) are not found, contact your local John Deere Dealer.
8 - CONTOUR BASE CUTTER HEIGHT CONTROLContour Base Cutter Height Control automatically adjusts the base cutting height using as reference the height of the row dividers, which are floating.
8.1 - Contour Base Cutter Height Control Adjustment
7.1 - Turning ONWith the combine stopped at the beginning of the row:- Press switch (A);- Boxes (1), on the SDU-A display screen,
should be checked;- Engage the base cutter;- Press switch (B) twice (double click)
to engage the two dividers or once switches B and/or C of the divider you wish to activate.
- Adjust the row crop dividers support on the ground so as they follow the ground contour. Press icon (2) to get the divider closer to the ground and switch (3) to back it away. See the information below:
• A fully lowered divider will be heavier and will furrow the ground too much.
• A fully raised divider will lose cane and/or make feeding difficult.
7.2 - Turning OFFPress raise switch (D) twice (double click) to engage the row end function and turn off the floating row crop dividers.
9 - BASE CUTTER PRESSUREThe base cutter pressure will automatically set the base cutting height when the pressure is too high.
The system will return automatically to the base cutting height when the base cutter pressure lowers.
31
4
2
5
8
7 6
10.1 - Row End and Start Height Configuration
1 - LH Crop Divider Row End Activation2 - Floating Base Cutter Row End Activa-
tion3 - RH Crop Divider Row End Activation4 - LH Crop Divider Row End Save Icon5 - Floating Base Cutter Row End Setpoint
Save Icon
C
6 - RH Crop Divider Row End Save Icon7 - Save Icon for All Row End Setpoints8 - Floating Base Cutter Return-to-Cut Activa-
tion9 - Position of Dividers at the Set Height
- Press switch (A) to turn on the row crop dividers floatation mode;
- Boxes (1), (2), and (3) on the screen should be checked. If they are not, touch on the box.
- Set the height of the row crop dividers and basecutters, as required, by press-ing switches:
B - LH Row Crop Divider C - RH Row Crop Divider D - Base Cutter
- Press icon (7) or icons (4), (5), and (6) to save the setpoints.
- When pressing icon (9) the dividers will go to the height set at the end of the row.
B D
During manual cut, press the icon that captures the setpoint (1) on the desired cutting pressure (2).
To set the base cutting pressure interval, press icon (3) to open the window with the setting icons.
Press icon (4) to increase or reduce the pressure manually.
1
3
4
2
7 - FLOATING ROW DIVIDERS
D
B
C
Note:To return to the default settings, as defined by the operator, press the reset icon for the floating row crop dividers J on the screen.
6
5
1
7
2
3
4
11 - DAY/NIGHTPress icon (1), on the screen left-hand side, to go to the Day/Night configurations.
Press icon (A) to change the display backlighting settings in the Day and Night mode.
Use icon (B) to increase or reduce lighting, as represented in graph (2).
When pressing icon (F), the lighting will promptly reduce.
1
B
2
A F
11 - On the end of row setting screen press icon B to open the Sensitivity Adjustment screen.
9