Embed Size (px)
DESCRIPTION
Indian Textile Industry
Citation preview

HOME SCIENCE
MODULE - 6BCreative Embroidery
Notes
The Design
55
29
THE DESIGN
In the last lesson you learnt about material required for doing embroidery. So whatshould be the next step? Yes, the selection of appropriate design.
Selection of colours, patterns or design in embroidery depends on individualpreferences. However, take care to select a design which is appropriate to age,sex, occasion and need. Now, what is appropriate? Let us see case of this youngmother dressed to attend a wedding in summers. She is wearing a fully embroideredbright red saree, decorated with stones, sequins and zari. Can you guess what iswrong with her choice? Yes, during summers she could have chosen a lightercolour. Keeping the age of the baby in mind she could have selected a saree withdelicate thread embroidery with decorations only at the bottom of the saree.Decorations like zari, stones, sequins etc., may scratch the baby’s delicate skin.Also, it makes the saree heavy. Surely, attending a function feeling hot and bothered,picking up not only the baby but also a heavy saree can not be enjoyable. Do younow understand the meaning of appropriate here? In this lesson, we will learnabout designs and their best possible placement on different types of clothes.
OBJECTIVES
After studying this lesson you will be able to:
� describe design and its various types;
� differentiate between motif, pattern and design;
� make possible modifications in the design;
� select appropriate design for embroidery;
� select appropriate method of transferring a design on a fabric;
� determine the suitable placement for the design.

HOME SCIENCE
MODULE - 6B
Notes
The DesignCreative Embroidery
56
29.1 DESIGN
Design has been defined as “a plan or a drawing produced to show the appearanceof something before it is made”.
In other words it is the process and art of creating, planning and making a detaileddrawing of something to be made. It can be an embroidery design or a furnituredesign, garment/fashion design, a design for a house to be built etc.
A far as embroidery is concerned we can easily say that design is a decorativepattern which aims at increasing the beauty of the article on which it will beembroidered.
TYPES OF DESIGN
Designs fall into five basic categories–
i) Geometrical designs
ii) Simplified designs
iii) Naturalized designs
iv) Stylized designs
v) Abstract designs
(i) Geometrical designs
Designs created by using various geometrical shapes, such as lines, circles, squares,rectangles, triangles etc. are called geometrical designs. It is possible to drawmany man-made objects using geometrical shapes. Look at the hut shown in thedesign. You must have been drawing this hut since childhood. Can you list thegeometrical shapes used in this? Yes these are lines, circles, rectangles, etc.
Fig. 29.1: Geometrical designs
The above designs are created using various geometrical shapes, thus are calledgeometrical designs.

HOME SCIENCE
MODULE - 6BCreative Embroidery
Notes
The Design
57
(ii) Simplified designs
These designs comprise of slight curves and few details. See the following designs,observe and compare the geometrical and simplified designs. Simple lines andcurves with few details create simplified designs.
Fig. 29.2 : Simplified designs
(iii) Naturalized designs
As the name suggests, these are the designs inspired from Nature. Patterns inNature change all the time, different seasons unfold different colours and scenes.Man is inspired by all that is happening around him. You must have seen beautifulflowers, leaves, vines, birds and animals embroidered on different garments veryclose to natural designs. Thus the pattern in naturalized designs will be very closeto Nature.
Fig. 29.3: Naturalized designs
(iv) Stylized designs
These are made to make the design look more beautiful. The design loses itsnatural form as it becomes more decorative and stylized. Thus the designs whichhave more curves and details and are away from their natural form and look morecomplicated are called stylized designs.
HOME SCIENCE
MODULE - 6B
Notes
The DesignCreative Embroidery
58
Fig. 29.4: Stylized designs
(v) Abstract
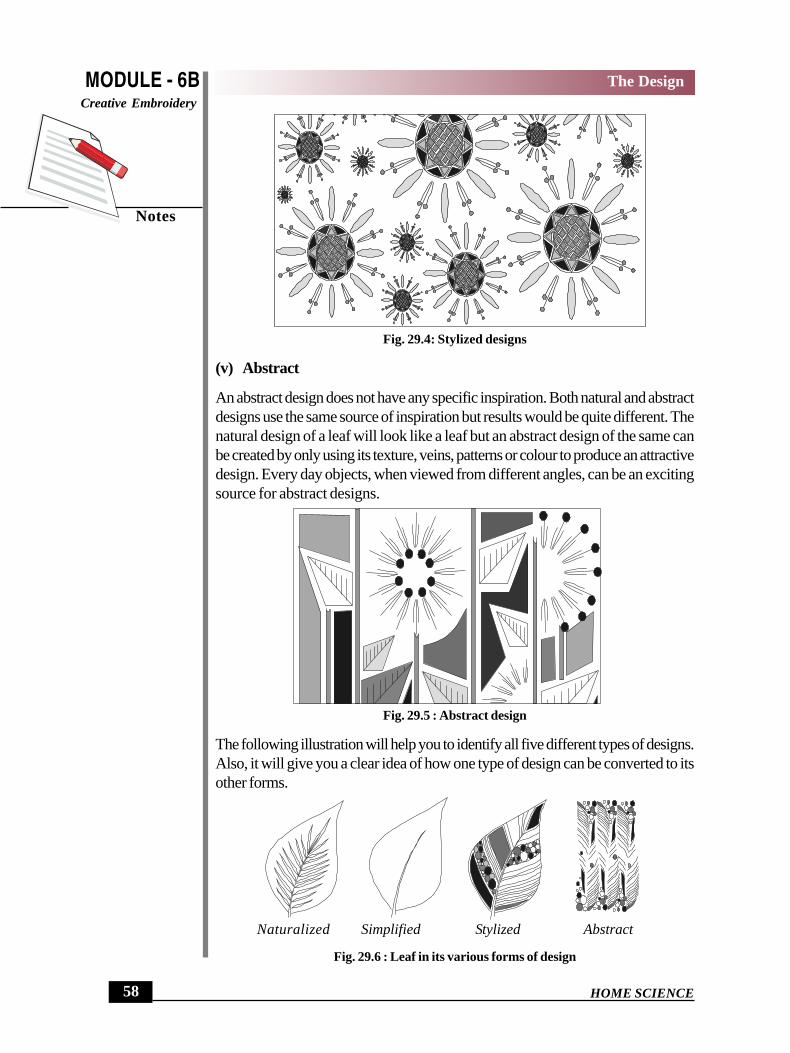
An abstract design does not have any specific inspiration. Both natural and abstractdesigns use the same source of inspiration but results would be quite different. Thenatural design of a leaf will look like a leaf but an abstract design of the same canbe created by only using its texture, veins, patterns or colour to produce an attractivedesign. Every day objects, when viewed from different angles, can be an excitingsource for abstract designs.
Fig. 29.5 : Abstract design
The following illustration will help you to identify all five different types of designs.Also, it will give you a clear idea of how one type of design can be converted to itsother forms.
Fig. 29.6 : Leaf in its various forms of design
Naturalized Simplified Stylized Abstract

HOME SCIENCE
MODULE - 6BCreative Embroidery
Notes
The Design
59
Activity 29.1 : Create a design directory. Take a practical file in whichyou can insert work sheets and collect various designs as discussed above.For example, go to the garden and look for shapes which could be used
to develop your own design such as leaf, flowers, feather, butterflies etc. Drawthem. You can also collect interesting objects like shells, pebbles, drift-wood etc.Pressed leaves, flowers and feathers can be a part of your design directory. Drawat least three design of each type. This directory will be very helpful while developingnew ideas.
Hint:
(i) Leaflets and magazines contain illustrations which can be used. Find some,cut and paste them. Suggest how you might use them, Place these in yourdesign directory.
(ii) Create a logo for your tee-shirt using letters cut from newspaper headlines.
(iii) Find and sketch cartoons, illustration of animals, toys etc. Add them to yourdesign directory.
Activity 29.2 : Shown below is the image of a feather in its natural form.Take this as an inspiration to create different types of design.
Inspiration Design development
Natural feature Stylized
Simplified AbstractFig. 29.7: Inspiration
Add these designs in your design directory.
29.2 MOTIF, PATTERN AND DESIGN
Can you draw a train, a cat or stars in a similar way? Probably not. Do you thinkyou can use all three patterns on the same garments? Make a list of garments onwhich such motifs can be embroidered.
Often the terms design, motif and pattern are used interchangeably. Let us try andunderstand what each means. You already know the meaning of design. Let’s seemotif and pattern.

HOME SCIENCE
MODULE - 6B
Notes
The DesignCreative Embroidery
60
A design starts with a motif. When a motif is repeated at certain intervals over asurface it is called a pattern. Repetition of this pattern creates a design. Certainprinciples are used when repeating the motif or the pattern to create differentdesign. A look at the following illustration will help you to realize how a motif canbe used to make a pattern and the pattern to make a design.
Fig. 29.8 : Motif, pattern and design
INTEXT QUESTIONS 29.1
1. Do you know how to use a dictionary? Find out appropriate meanings for thefollowing words used in the context of embroidery.
(i) Geometrical (ii) Naturalized (iii) Stylized (iv) Abstract
Classify the following design as geometrical, naturalized, stylized and abstract.
Fig. 29.9 ___________________
Fig. 29.10 __________________

HOME SCIENCE
MODULE - 6BCreative Embroidery
Notes
The Design
61
Fig. 29.11 __________________
Fig. 29.12 __________________
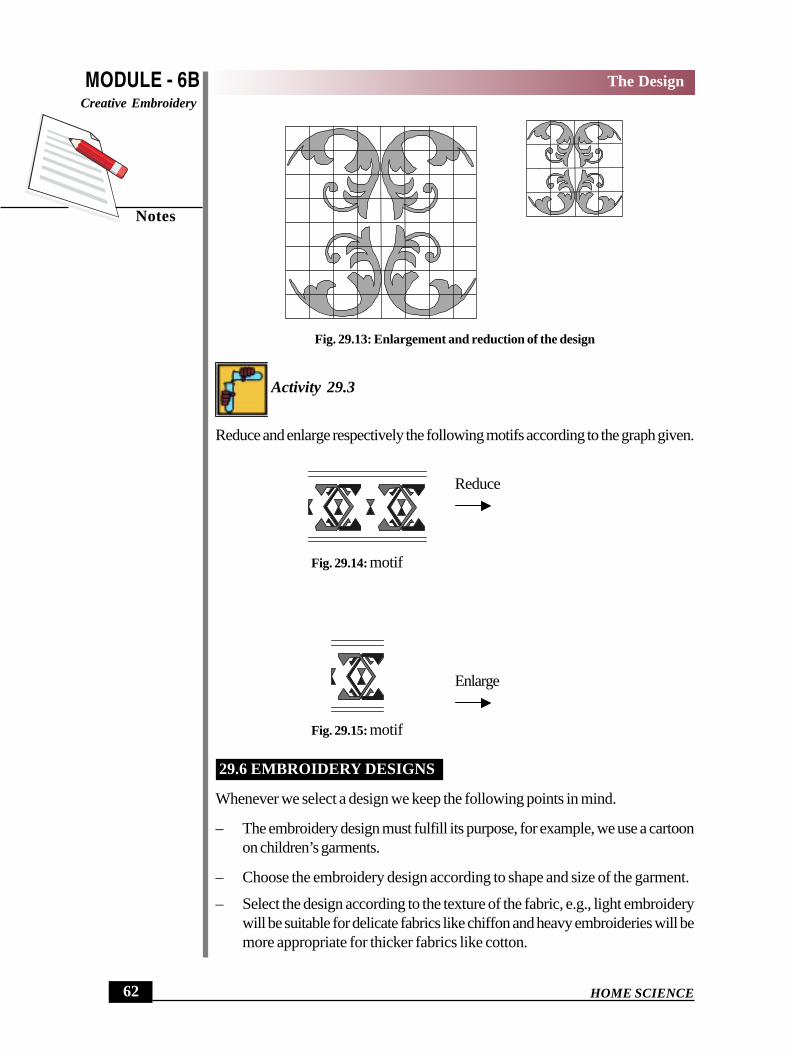
29.3 ENLARGEMENT AND REDUCTION OF A GIVEN DESIGN
Some times, a design may have to be enlarged or reduced. To understand this letus answer this question. What will you do if you have to decorate a diwan coverand a cushion cover with the same motif? Let us say that the motif used is a flower.If you select a large flower, it will look too big on the cushion cover. So, what canyou do? You can use a large flower on the diwan cover and the same flower canbe reduced to a smaller size for the cushion cover. In this way, the design size canbe made appropriate to the article size.
The idea behind enlarging and reducing a design is to be able to use one motif ondifferent sizes and shapes of articles. It sounds very simple but what do you dowhen you have a complicated design? Then you need a method to enlarge orreduce it. Let us try and learn this method step wise.
Step 1. Find a design that you would like to use in your embroidery.
Step 2. Trace it on a tracing paper.
Step 3. Use a carbon paper to transfer the tracing on to a graph paper.
Step 4. Using the squares as a guide, draw the illustrations on to large squares.
This must be done very carefully. It is only by following the position of the outlineon the squares that the drawing stays in proportion; i.e., each part is increased bythe same amount in width and height. This is because the squares are of the sameshape but are larger in size.
HOME SCIENCE
MODULE - 6B
Notes
The DesignCreative Embroidery
62
Fig. 29.13: Enlargement and reduction of the design
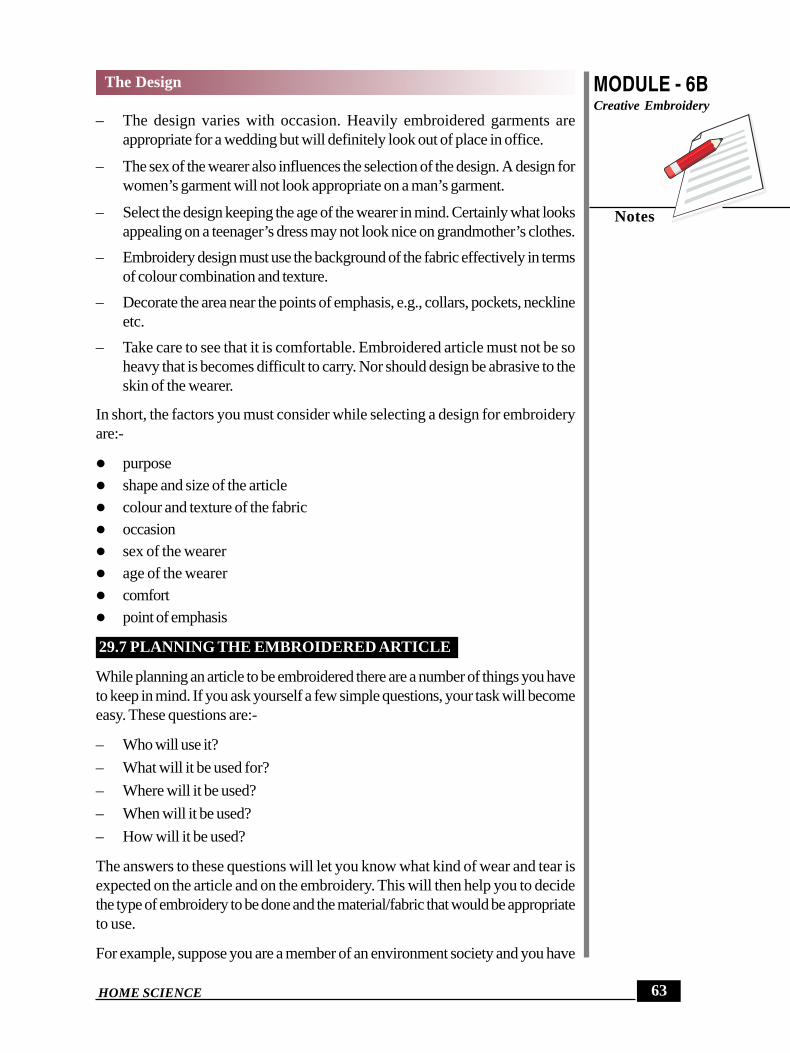
Activity 29.3
Reduce and enlarge respectively the following motifs according to the graph given.
Reduce
Fig. 29.14: motif
Enlarge
Fig. 29.15: motif
29.6 EMBROIDERY DESIGNS
Whenever we select a design we keep the following points in mind.
– The embroidery design must fulfill its purpose, for example, we use a cartoonon children’s garments.
– Choose the embroidery design according to shape and size of the garment.
– Select the design according to the texture of the fabric, e.g., light embroiderywill be suitable for delicate fabrics like chiffon and heavy embroideries will bemore appropriate for thicker fabrics like cotton.
HOME SCIENCE
MODULE - 6BCreative Embroidery
Notes
The Design
63
– The design varies with occasion. Heavily embroidered garments areappropriate for a wedding but will definitely look out of place in office.
– The sex of the wearer also influences the selection of the design. A design forwomen’s garment will not look appropriate on a man’s garment.
– Select the design keeping the age of the wearer in mind. Certainly what looksappealing on a teenager’s dress may not look nice on grandmother’s clothes.
– Embroidery design must use the background of the fabric effectively in termsof colour combination and texture.
– Decorate the area near the points of emphasis, e.g., collars, pockets, necklineetc.
– Take care to see that it is comfortable. Embroidered article must not be soheavy that is becomes difficult to carry. Nor should design be abrasive to theskin of the wearer.
In short, the factors you must consider while selecting a design for embroideryare:-
� purpose� shape and size of the article� colour and texture of the fabric� occasion� sex of the wearer� age of the wearer� comfort� point of emphasis
29.7 PLANNING THE EMBROIDERED ARTICLE
While planning an article to be embroidered there are a number of things you haveto keep in mind. If you ask yourself a few simple questions, your task will becomeeasy. These questions are:-
– Who will use it?
– What will it be used for?
– Where will it be used?
– When will it be used?
– How will it be used?
The answers to these questions will let you know what kind of wear and tear isexpected on the article and on the embroidery. This will then help you to decidethe type of embroidery to be done and the material/fabric that would be appropriateto use.
For example, suppose you are a member of an environment society and you have

HOME SCIENCE
MODULE - 6B
Notes
The DesignCreative Embroidery
64
to embroider an ecofriendly shopping bag. Let us try and answer the questionslisted above before designing this shopping bag.
Table : 29.1 : Planning An Embroidered Article
Questions What will it Qualities Suggestedasked have to stand needed materials
up to
1. Who Constant Relate Brightwill use handling by style, size coloured orit? different age and darker shades
groups embroidery of fabricto age andinterest ofthe user
2. What To carry Light in Strongwill it be weight weight yet handles e.g.used for? strong, wooden, or
water thick, smoothresistant, shouldercolour fast, strapsembroiderymust notsnag.
3. Where Exposed to Fabric and Canvas,will it be sun and rain embroidery jute etc.used? in the must be
market washable,fabric mustnot beabsorbent,or spoiledby beingdamp.
4. When Everyday in Thick and strong Cotton andwill it be bright sunlight fabric, resistant to terrycotused? without rotting strong sunlight. embroidery
or fading, threads, casement,water resistant, Khadi fabric.and resilient
5. How Rough handling Suitable size of Cotton casement,will it be used? bag and shoulder jute and strong
straps. Suitable threads and strongsize for all ages, fabric.embroidery shouldbe proportionateto the size ofthe bag.
HOME SCIENCE
MODULE - 6BCreative Embroidery
Notes
The Design
65
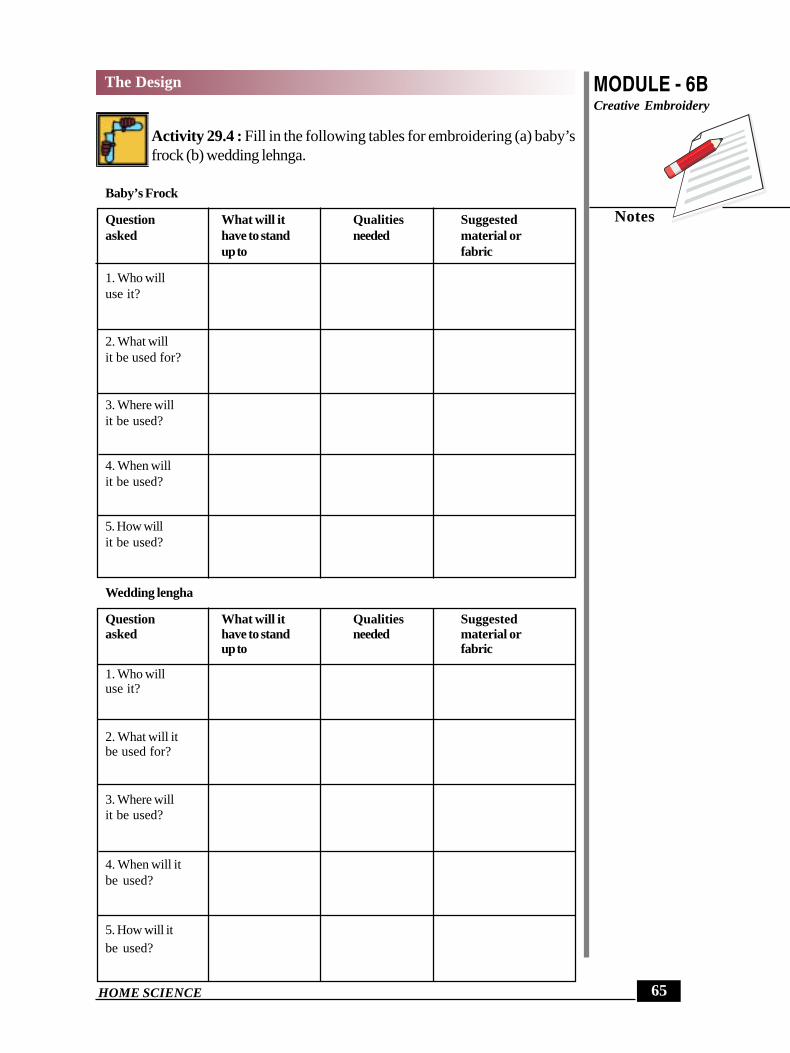
Activity 29.4 : Fill in the following tables for embroidering (a) baby’sfrock (b) wedding lehnga.
Baby’s Frock
Question What will it Qualities Suggestedasked have to stand needed material or
up to fabric
1. Who willuse it?
2. What willit be used for?
3. Where willit be used?
4. When willit be used?
5. How willit be used?
Wedding lengha
Question What will it Qualities Suggestedasked have to stand needed material or
up to fabric
1. Who willuse it?
2. What will itbe used for?
3. Where willit be used?
4. When will itbe used?
5. How will itbe used?

HOME SCIENCE
MODULE - 6B
Notes
The DesignCreative Embroidery
66
The most important things in embroidery is the design to be embroidered. You canalways create your own design. Sometimes, you may like a particular design somuch that you want to use it for embroidery. There are a number of ways by whicha design can be transferred on to the fabric. You have already learnt that thedesign can be used in the same size, can be enlarged or reduced according to therequirement. Let us now learn different techniques to transfer the design on to a
fabric.
29.4 METHODS OF TRANSFERING A DESIGN
There are 6 main methods of transfering a design.
1. Direct method2. Using carbon paper3. Back Tracing4. Using Butter paper5. Using a glass plate and light6. Using a template
Let us learn about each method one by one.
1. Direct Method
Those of you who are good at drawing designs can draw directly on fabric in freehand with a pencil. Direct method can be used conveniently on transparent or thinfabrics like lawn, organdie, nylon, georgette or full voile. Design can be drawnwith a pencil keeping the fabric tight in the embroidery hoop.
2. Using Carbon Paper
Red, green, yellow, blue and white carbon papers are available in the market.Here is how you use it to transfer designs.
(i) Place the fabric on a smooth, hard surface and anchor it with a tape.
(ii) Carefully place a carbon paper, carbon side down, between the fabric andthe design, secure it with a tape.
(iii) Place the design in the correct position and tape it in place.
(iv) Trace the design with a dry ball-point pen. Use enough pressure to transferclearly.
(v) Use white or yellow carbon on dark coloured fabric and blue carbon on lightcoloured or white fabric.
3. Back Tracing
(i) Take a design and drawn it on tracing paper.
(ii) Use bold pencil (2B, 4B) on the back side of the design and go all over thelines of the design.

HOME SCIENCE
MODULE - 6BCreative Embroidery
Notes
The Design
67
(iii) The lines should be bold so that when you touch the backside of designcarbon should come on the finger.
(iv) Tape the tracing on the fabric so that back side of the design marked bypencil faces the fabric.
(v) Trace all lines using back side of the pencil.
For geometrical or symmetrical design a quarter of it may be drawn on the tracingpaper and then the sheet can be folded into half horizontally and vertically and thedesign can be completed by tracing. This is the simplest method and does notrequire any costly equipment.
4. Using Butter Paper
This is also called the perforated pattern. This can give you a good permanentpattern, provided you keep it carefully.
(i) Trace the design on a sheet of butter paper. It is easily available in the market.
(ii) With the help of a needle or sharp pin, make small holes along the designlines. You can also run an empty sewing machine over the these lines. Keepthe holes close together.
(iii) Mark the placements on the fabric and secure the tracing on it with commonpins.
(iv) Mix a small amount of powered blue (neel) in kerosene oil. The mixtureshould be like a paste.
(v) Dip a ball of cotton in the mixture and rub it over the perforations or holes.
(vi) Remove the paper carefully and blow off any excess powder over the fabric.
5. Using a glass plate and light
(i) Place a piece of plain glass sheet on the arm rests of a chair. Place a lightedbulb under the glass.
(ii) Transfer the design on a thin paper.
(iii) Now put the paper on the glass, lay the fabric on top of the paper and outlinedirectly on the fabric with a hard pencil.
6. Using a Template
A template is a shape which is cut out of card paper. A template can be used whenyou need to place a simple design many times over a fabric.
i) Take a sheet of card paper.
ii) Draw the shape carefully on it.
iii) Cut out the pattern with a sharp blade. Your template is ready to be used.
iv) Place the template at the correct position on the fabric. Tape it securely.
v) Draw the outline with a pencil. Now remove the tape and then the template.

HOME SCIENCE
MODULE - 6B
Notes
The DesignCreative Embroidery
68
Try to use all these methods. Gradually, with practice, you will develop the abilityto select the appropriate method of transfer for each type of design and fabric.However, working neatly should be your motto. Remember, any stains on yourembroidered article will ruin the overall effect.
29.5 DESIGN PLACEMENT
You have learnt about design and its types. Let us now learn the best way to usethem to create beautiful work. You will now learn the different ways of placing adesign, so that the overall look is enhanced.
Before we start learning about different types of placement let us take the firststep. Take the garment that is to be embroidered. Measure it. Now with the helpof tailors chalk divide it into equal squares.
Fig: 29.16 : Marking lines with chalk
Now we shall learn about the placement of the motif, done in the following differentways.
Fig. 29.17 Horizontal placement Fig. 29.18 Vertical placement
Fig. 29.19 Half drop placement Fig. 29.20 Diagonal placement

HOME SCIENCE
MODULE - 6BCreative Embroidery
Notes
The Design
69
Fig. 29.21 Border placement
Activity 29.5
a. Go to the local market / tailor and collect samples of printed fabrics withdifferent placements of design and stick them in your design directory.
b. Place a motif of your choice on the given frock, mention the name of theplacement under it. File it in your design directory.
INTEXT QUESTIONS 29.2
1. Rearrange these letters to form words that describe different methods oftransferring a design.
a) EPATELMT (1word) ..............................
b) BTCAINGCRKA (2words) ..............................
c) RACNOBPPREA (2words) ..............................
d) RITCEDMHOETD (2words) ..............................
DESIGN
Types Enlargement Method of Selection of Designand reduction transfer the design placementsof the design of the design
Direct method, Horizontal,carbon paper, back vertical, half drop,
tracing, butter paper diagonal, borderglass plate and light, template
WHAT YOU HAVE LEARNT
– Geometrical– Simplified– Naturalized– Stylized– Abstract

HOME SCIENCE
MODULE - 6B
Notes
The DesignCreative Embroidery
70
TERMINAL EXERCISE
1. Identify the following placements.
Fig: 29.26 Fig: 29.27
Fig: 29.28 Fig: 29.30
2. You have to embroider a frock for your three year old niece. List the factorsyou will keep in mind while selecting a design for it.
3. Describe any two methods of transferring a design from paper onto a fabric.
4. You have selected a design of a butterfly to be used on a bedcover andpillow cover. Explain the method by which the same motif can be used onboth the articles. Show it using a graph paper.
5. Select a motif for your father’s kurta and show any two ways in which it canbe placed on it.
ANSWERS TO INTEXT QUESTIONS
29.1 (i), (iii) Geometrical; (ii), (iv) naturalized (iv), (vii) stylized (v),(viii) Abstract
29.2 1. (a) Template
(b) Back tracing
(c) Carbon paper
(d) Direct method