Embed Size (px)
Citation preview
idi 200 Architectural Drafting
Course Syllabus – 11 Week
Page 1 of 17
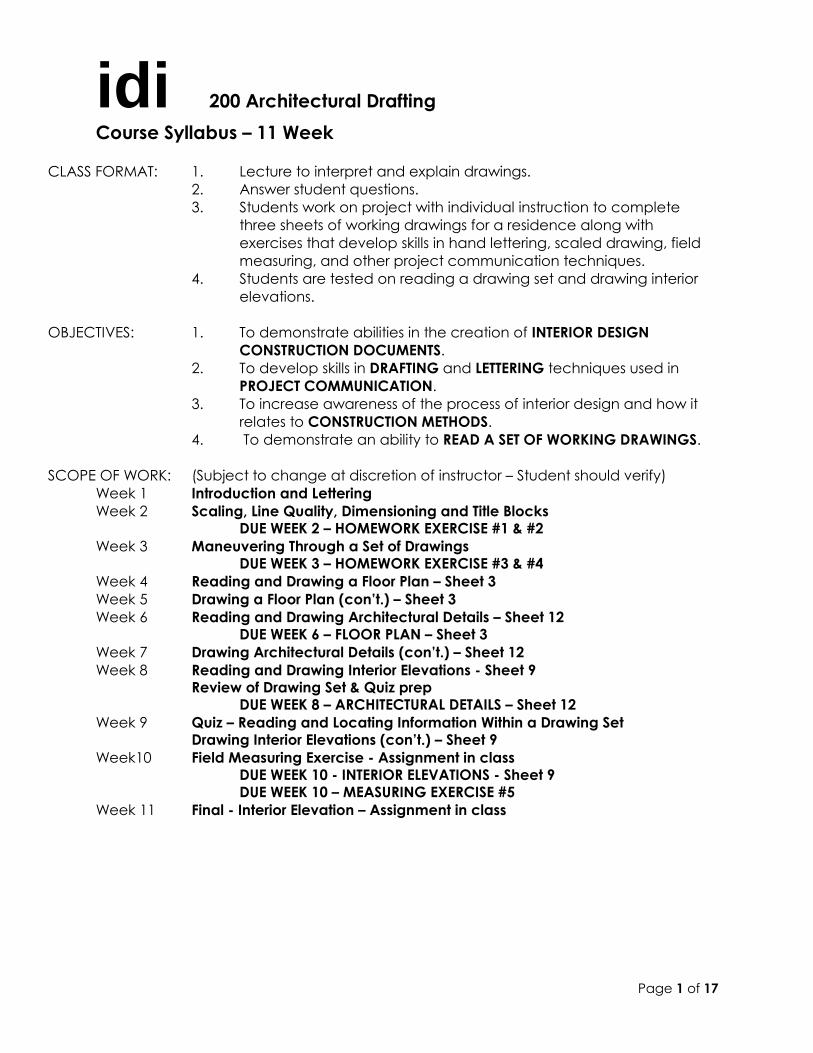
CLASS FORMAT: 1. Lecture to interpret and explain drawings.
2. Answer student questions.
3. Students work on project with individual instruction to complete
three sheets of working drawings for a residence along with
exercises that develop skills in hand lettering, scaled drawing, field
measuring, and other project communication techniques.
4. Students are tested on reading a drawing set and drawing interior
elevations.
OBJECTIVES: 1. To demonstrate abilities in the creation of INTERIOR DESIGN
CONSTRUCTION DOCUMENTS.
2. To develop skills in DRAFTING and LETTERING techniques used in
PROJECT COMMUNICATION.
3. To increase awareness of the process of interior design and how it
relates to CONSTRUCTION METHODS.
4. To demonstrate an ability to READ A SET OF WORKING DRAWINGS.
SCOPE OF WORK: (Subject to change at discretion of instructor – Student should verify)
Week 1 Introduction and Lettering
Week 2 Scaling, Line Quality, Dimensioning and Title Blocks DUE WEEK 2 – HOMEWORK EXERCISE #1 & #2
Week 3 Maneuvering Through a Set of Drawings DUE WEEK 3 – HOMEWORK EXERCISE #3 & #4
Week 4 Reading and Drawing a Floor Plan – Sheet 3
Week 5 Drawing a Floor Plan (con’t.) – Sheet 3
Week 6 Reading and Drawing Architectural Details – Sheet 12 DUE WEEK 6 – FLOOR PLAN – Sheet 3
Week 7 Drawing Architectural Details (con’t.) – Sheet 12
Week 8 Reading and Drawing Interior Elevations - Sheet 9 Review of Drawing Set & Quiz prep DUE WEEK 8 – ARCHITECTURAL DETAILS – Sheet 12
Week 9 Quiz – Reading and Locating Information Within a Drawing Set Drawing Interior Elevations (con’t.) – Sheet 9
Week10 Field Measuring Exercise - Assignment in class DUE WEEK 10 - INTERIOR ELEVATIONS - Sheet 9 DUE WEEK 10 – MEASURING EXERCISE #5
Week 11 Final - Interior Elevation – Assignment in class
idi 200 Architectural Drafting
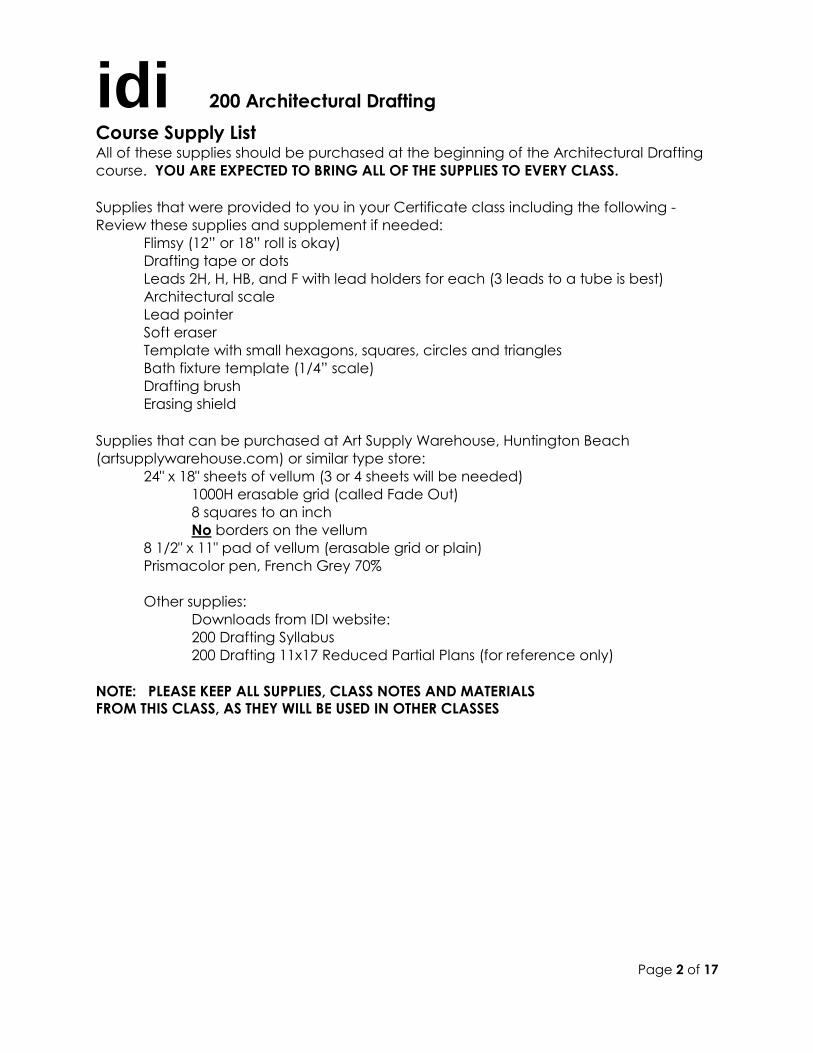
Course Supply List
Page 2 of 17
All of these supplies should be purchased at the beginning of the Architectural Drafting
course. YOU ARE EXPECTED TO BRING ALL OF THE SUPPLIES TO EVERY CLASS.
Supplies that were provided to you in your Certificate class including the following -
Review these supplies and supplement if needed:
Flimsy (12” or 18” roll is okay)
Drafting tape or dots
Leads 2H, H, HB, and F with lead holders for each (3 leads to a tube is best)
Architectural scale
Lead pointer
Soft eraser
Template with small hexagons, squares, circles and triangles
Bath fixture template (1/4” scale)
Drafting brush
Erasing shield
Supplies that can be purchased at Art Supply Warehouse, Huntington Beach
(artsupplywarehouse.com) or similar type store:
24" x 18" sheets of vellum (3 or 4 sheets will be needed)
1000H erasable grid (called Fade Out)
8 squares to an inch
No borders on the vellum
8 1/2" x 11" pad of vellum (erasable grid or plain)
Prismacolor pen, French Grey 70%
Other supplies:
Downloads from IDI website:
200 Drafting Syllabus
200 Drafting 11x17 Reduced Partial Plans (for reference only)
NOTE: PLEASE KEEP ALL SUPPLIES, CLASS NOTES AND MATERIALS FROM THIS CLASS, AS THEY WILL BE USED IN OTHER CLASSES
idi 200 Architectural Drafting
Course Policies
Page 3 of 17
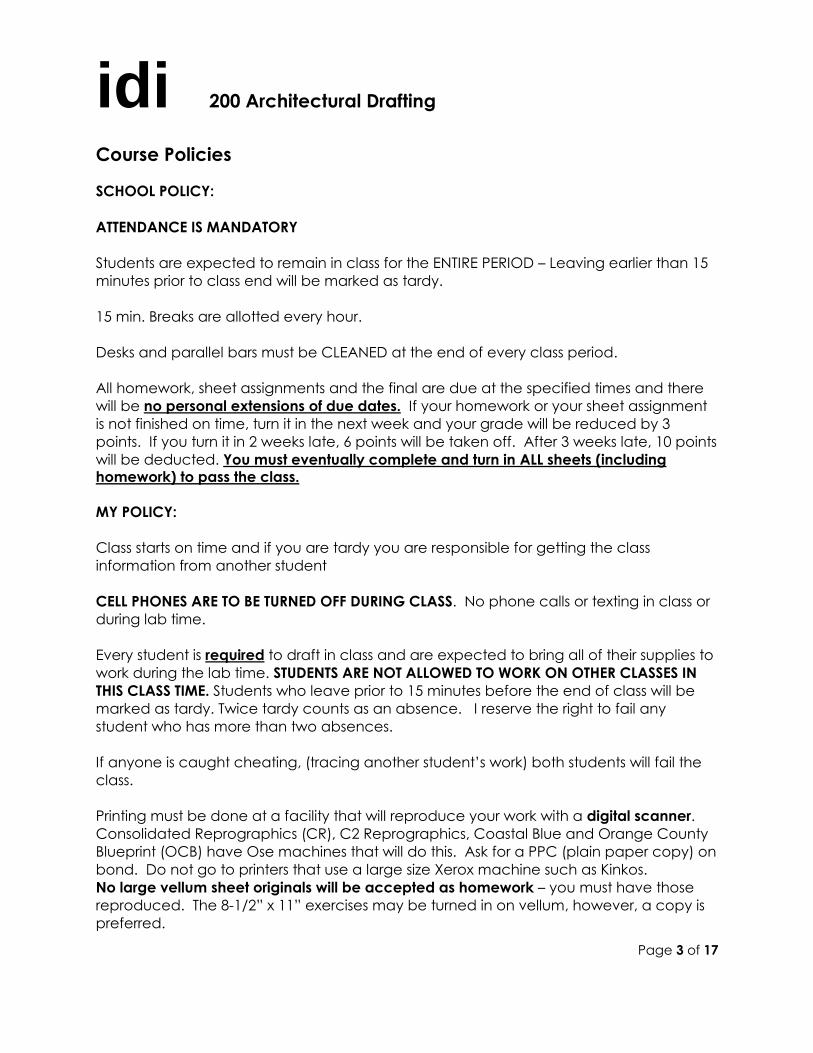
SCHOOL POLICY:
ATTENDANCE IS MANDATORY
Students are expected to remain in class for the ENTIRE PERIOD – Leaving earlier than 15
minutes prior to class end will be marked as tardy.
15 min. Breaks are allotted every hour.
Desks and parallel bars must be CLEANED at the end of every class period.
All homework, sheet assignments and the final are due at the specified times and there
will be no personal extensions of due dates. If your homework or your sheet assignment
is not finished on time, turn it in the next week and your grade will be reduced by 3
points. If you turn it in 2 weeks late, 6 points will be taken off. After 3 weeks late, 10 points
will be deducted. You must eventually complete and turn in ALL sheets (including homework) to pass the class.
MY POLICY:
Class starts on time and if you are tardy you are responsible for getting the class
information from another student
CELL PHONES ARE TO BE TURNED OFF DURING CLASS. No phone calls or texting in class or
during lab time.
Every student is required to draft in class and are expected to bring all of their supplies to
work during the lab time. STUDENTS ARE NOT ALLOWED TO WORK ON OTHER CLASSES IN
THIS CLASS TIME. Students who leave prior to 15 minutes before the end of class will be
marked as tardy. Twice tardy counts as an absence. I reserve the right to fail any
student who has more than two absences.
If anyone is caught cheating, (tracing another student’s work) both students will fail the
class.
Printing must be done at a facility that will reproduce your work with a digital scanner.
Consolidated Reprographics (CR), C2 Reprographics, Coastal Blue and Orange County
Blueprint (OCB) have Ose machines that will do this. Ask for a PPC (plain paper copy) on
bond. Do not go to printers that use a large size Xerox machine such as Kinkos.
No large vellum sheet originals will be accepted as homework – you must have those
reproduced. The 8-1/2” x 11” exercises may be turned in on vellum, however, a copy is
preferred.
idi 200 Architectural Drafting
Course Policies
Page 4 of 17
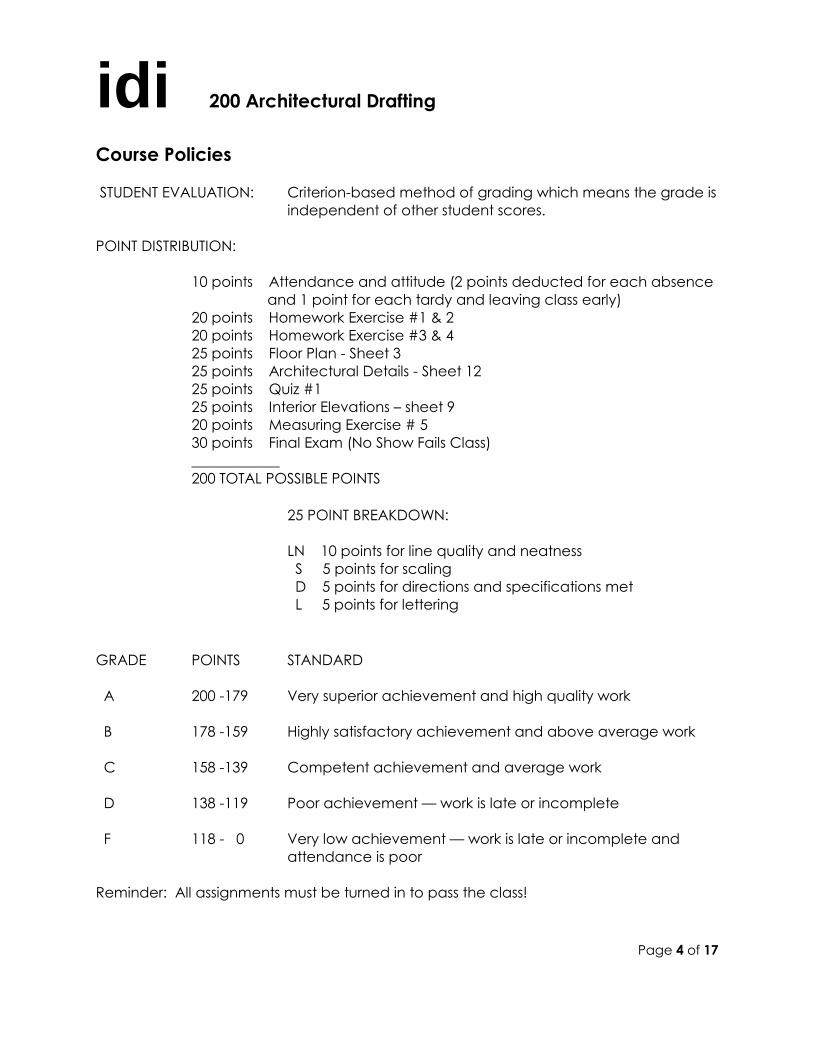
STUDENT EVALUATION: Criterion-based method of grading which means the grade is
independent of other student scores.
POINT DISTRIBUTION:
10 points Attendance and attitude (2 points deducted for each absence
and 1 point for each tardy and leaving class early)
20 points Homework Exercise #1 & 2
20 points Homework Exercise #3 & 4
25 points Floor Plan - Sheet 3
25 points Architectural Details - Sheet 12
25 points Quiz #1
25 points Interior Elevations – sheet 9
20 points Measuring Exercise # 5
30 points Final Exam (No Show Fails Class)
____________
200 TOTAL POSSIBLE POINTS
25 POINT BREAKDOWN:
LN 10 points for line quality and neatness
S 5 points for scaling
D 5 points for directions and specifications met
L 5 points for lettering
GRADE POINTS STANDARD
A 200 -179 Very superior achievement and high quality work
B 178 -159 Highly satisfactory achievement and above average work
C 158 -139 Competent achievement and average work
D 138 -119 Poor achievement — work is late or incomplete
F 118 - 0 Very low achievement — work is late or incomplete and
attendance is poor
Reminder: All assignments must be turned in to pass the class!
idi 200 Architectural Drafting
Lettering
Page 5 of 17
Legible lettering on a drawing fulfills an important requirement. Information that cannot
be revealed by graphic shapes and lines alone must be included in the form of notes,
title, dimensions and identifications to make the drawing informative and complete. The
lettering can either enhance the drawing by making it simple to interpret and pleasant
to look at or ruin an otherwise good drawing by making it difficult to read and unsightly in
appearance.
The basic block letter is the foundation of a variety of alphabets. It has the great
advantage of being a pure and neutral style, easily adaptable later on to your own
personality or that of any architecture office.
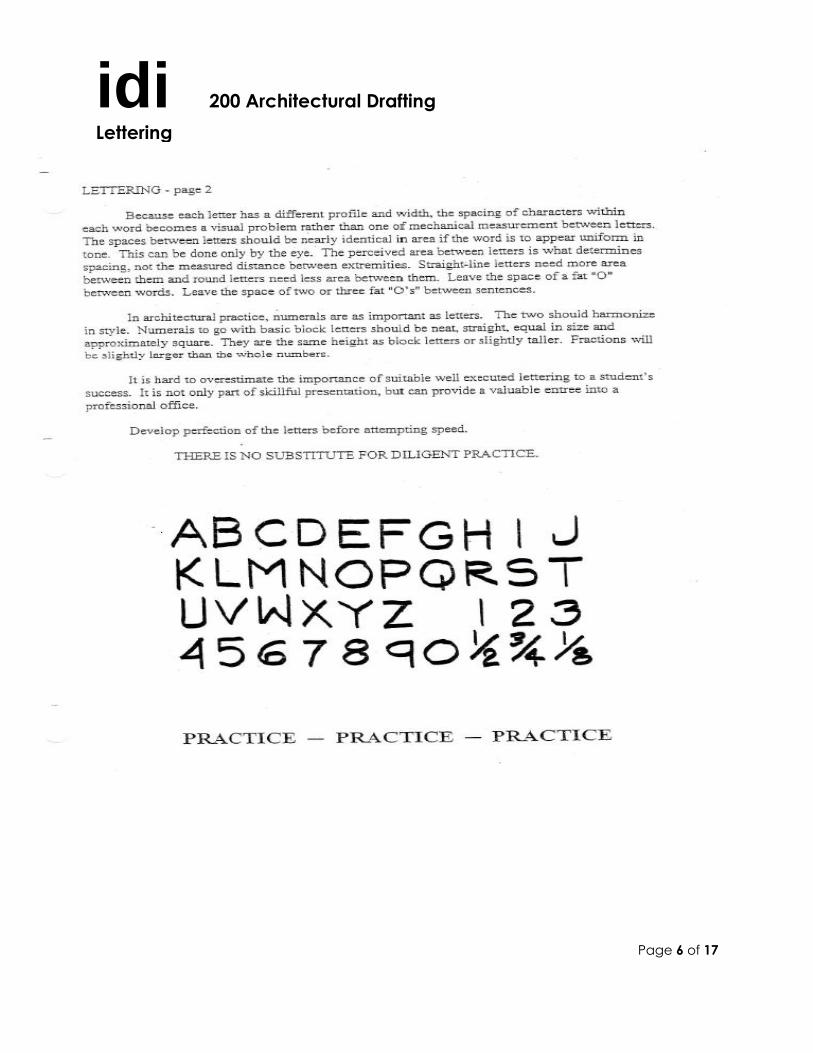
IT IS VERY IMPORTANT THAT A STUDENT THOROUGHLY LEARN THE BASIC BLOCK ALPHABET
Select an “F” drafting lead for lettering and keep the point medium sharp at all times.
Rotate the pencil continually between strokes to maintain a uniform pencil point. A
point that is too sharp is difficult to control and it breaks. A pencil that becomes too dull
produces ragged strokes.
ALL LETTERING IS DONE WITH THE AID OF PENCILED GUIDELINES. Even experienced
drafters carefully draw horizontal and vertical guidelines for their lettering. In pencil
lettering, the guidelines are always left on the drawing; therefore, care should be taken
in placing the lines neatly and lightly on the paper with a sharp “2H” lead or a non-photo
pencil.
USE A TRIANGLE FOR DRAWING ALL VERTICAL STROKES. Simply slide the triangle along
the parallel bar with your left hand as you letter; when a vertical stroke is needed, quickly
set the triangle into place and draw a perfect vertical stroke. All other strokes are made
freehand. Do not use the parallel bar for horizontal lines.
The beginning and ending of each stroke are important — emphasize them with a slight
pressure of the pencil to bring the strokes to sharp and clean-cut terminations. Eliminate
careless gaps in lettering by carefully intersecting the strokes. Make each vertical stroke
definite and firm and each curve smooth and quick. Going over a stroke twice ruins the
appearance of the letter.
Capitals are used for the majority of the lettering done on architectural drawings. One-
eighth inch letters are good for notes and one-fourth inch letters are used for titles.
Three-sixteenth inch letters can be used for minor titles such as room names. It is useful to
think of block letters as being the same size and approximately square.
idi 200 Architectural Drafting
Lettering
Page 6 of 17
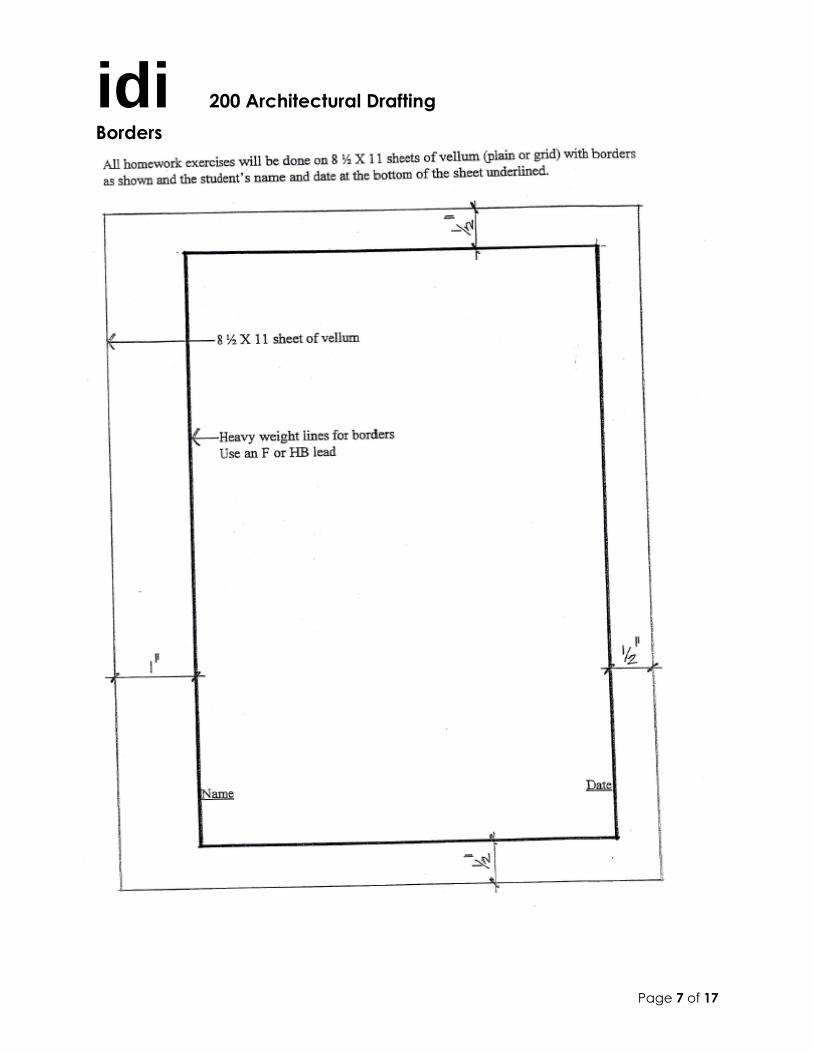
idi 200 Architectural Drafting
Borders
Page 7 of 17
idi 200 Architectural Drafting
Exercise #1
Page 8 of 17
LETTERING
On 8 ½ x 11 sheet of vellum with a border and your name and date, copy the following
using guidelines and all capital letters. Letters should be 1/8" high with 1/8" space
between each of the lines and 1/4" between each paragraph.
The first known people to develop a system of characters similar to the ones we
use for the purpose of communication were the Phoenicians. Through the ages,
these original characters have been embellished and refined but their basic
strokes and shapes have remained. We, in this country, have become
accustomed to seeing and reading a style of letter understandable to us. To
change these shapes and develop a new system of communication would
create confusion. Therefore, it is better for the drafter to learn the basic lettering
styles. This will also allow him or her to have a similar style to others working on the
same project.
As a beginning or junior drafter, your job will generally consist of making
corrections to drawings that have been drawn by others. There may not be a lot
of mental stimulation to making changes but it is a very necessary job. It is also a
good introduction to the procedures and quality standards within an office.
As your line and lettering quality improve, your responsibilities will expand. As you
gain an understanding of the drawings that you are making and confidence in
your ability, sketches will be given to you for drafting. The sketches will become
simpler as time goes by and your knowledge increases. Eventually you will be
referred to similar drawings and will be expected to make necessary adjustments
to fit these drawings to the new application.
To advance as a drafter, you will need to spend time at the construction sites
observing the buildings being built. Understanding what a craftsman must do as a
result of what you have drawn is necessary if you are to advance as a drafter.
Never forget that your drawings are a set of instructions for the builder to follow.
Using guidelines and all capital letters, copy the following using 1/4" high letters and 3/16"
spaces between each line.
FLOOR PLAN
EAST ELEVATION
SECOND LEVEL FLOOR PLAN
MECHANICAL PLAN
FINISH, DOOR AND WINDOW SCHEDULES
SECTIONS
idi 200 Architectural Drafting
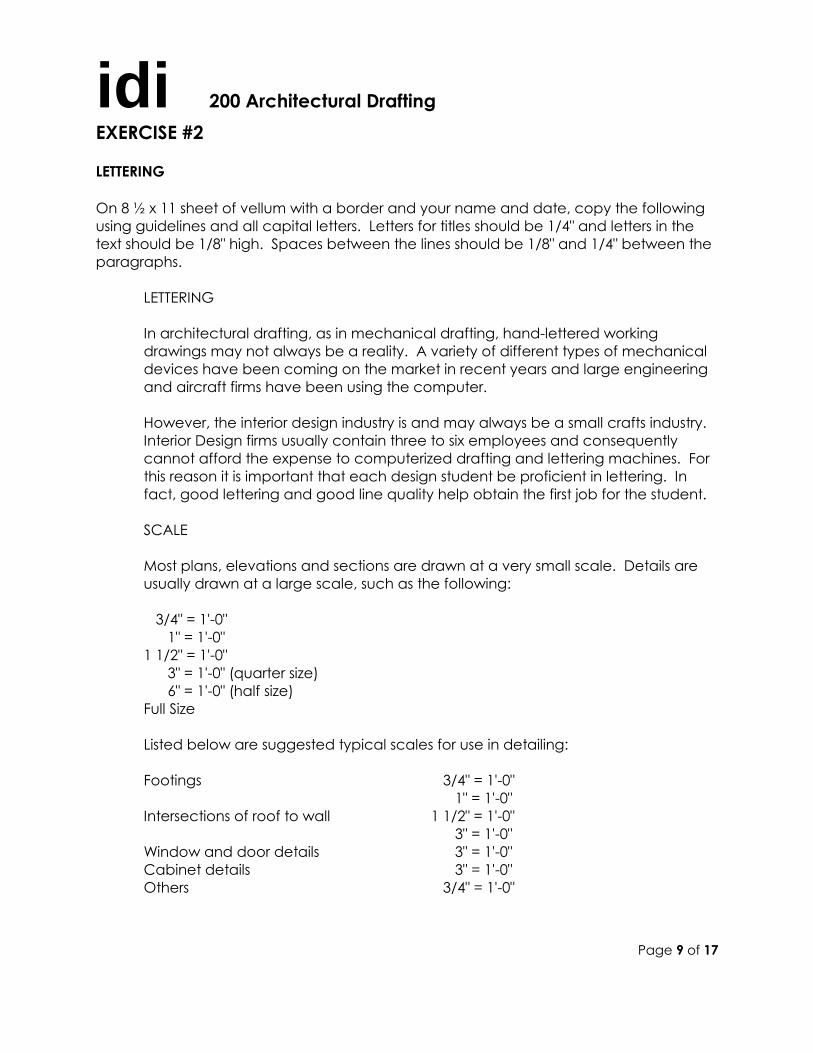
EXERCISE #2
Page 9 of 17
LETTERING
On 8 ½ x 11 sheet of vellum with a border and your name and date, copy the following
using guidelines and all capital letters. Letters for titles should be 1/4" and letters in the
text should be 1/8" high. Spaces between the lines should be 1/8" and 1/4" between the
paragraphs.
LETTERING
In architectural drafting, as in mechanical drafting, hand-lettered working
drawings may not always be a reality. A variety of different types of mechanical
devices have been coming on the market in recent years and large engineering
and aircraft firms have been using the computer.
However, the interior design industry is and may always be a small crafts industry.
Interior Design firms usually contain three to six employees and consequently
cannot afford the expense to computerized drafting and lettering machines. For
this reason it is important that each design student be proficient in lettering. In
fact, good lettering and good line quality help obtain the first job for the student.
SCALE
Most plans, elevations and sections are drawn at a very small scale. Details are
usually drawn at a large scale, such as the following:
3/4" = 1'-0"
1" = 1'-0"
1 1/2" = 1'-0"
3" = 1'-0" (quarter size)
6" = 1'-0" (half size)
Full Size
Listed below are suggested typical scales for use in detailing:
Footings 3/4" = 1'-0"
1" = 1'-0"
Intersections of roof to wall 1 1/2" = 1'-0"
3" = 1'-0"
Window and door details 3" = 1'-0"
Cabinet details 3" = 1'-0"
Others 3/4" = 1'-0"
idi 200 Architectural Drafting
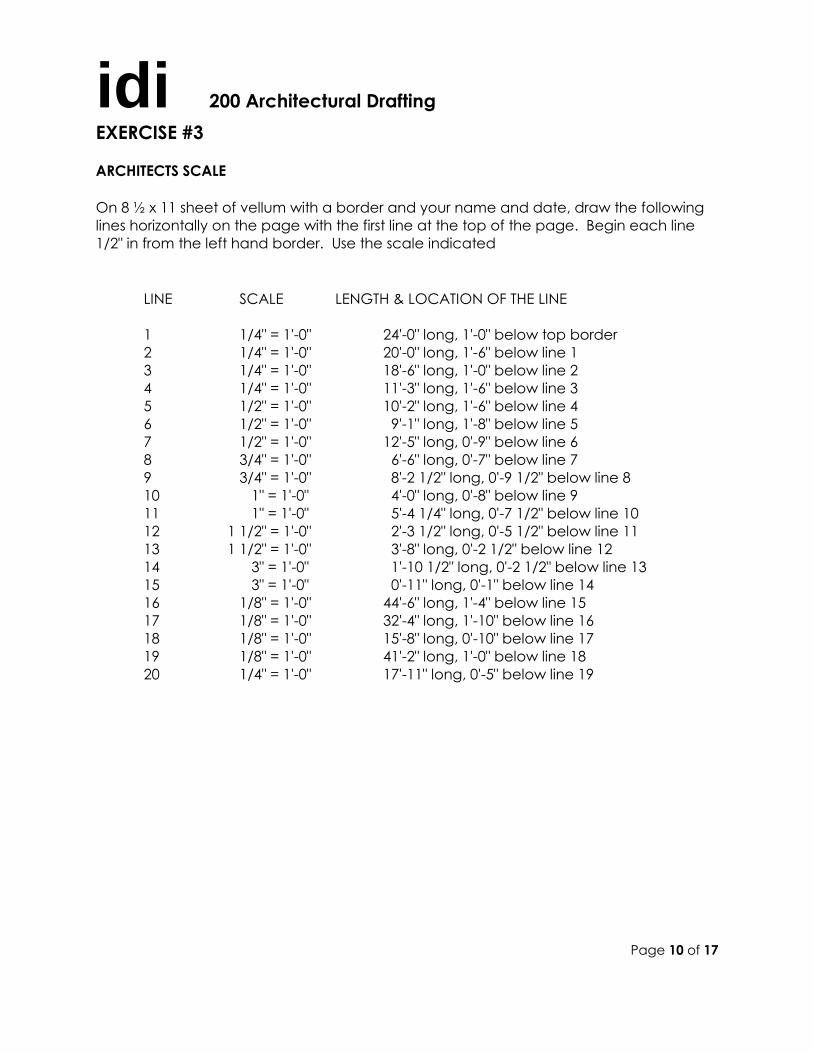
EXERCISE #3
Page 10 of 17
ARCHITECTS SCALE
On 8 ½ x 11 sheet of vellum with a border and your name and date, draw the following
lines horizontally on the page with the first line at the top of the page. Begin each line
1/2" in from the left hand border. Use the scale indicated
LINE SCALE LENGTH & LOCATION OF THE LINE
1 1/4" = 1'-0" 24'-0" long, 1'-0" below top border
2 1/4" = 1'-0" 20'-0" long, 1'-6" below line 1
3 1/4" = 1'-0" 18'-6" long, 1'-0" below line 2
4 1/4" = 1'-0" 11'-3" long, 1'-6" below line 3
5 1/2" = 1'-0" 10'-2" long, 1'-6" below line 4
6 1/2" = 1'-0" 9'-1" long, 1'-8" below line 5
7 1/2" = 1'-0" 12'-5" long, 0'-9" below line 6
8 3/4" = 1'-0" 6'-6" long, 0'-7" below line 7
9 3/4" = 1'-0" 8'-2 1/2" long, 0'-9 1/2" below line 8
10 1" = 1'-0" 4'-0" long, 0'-8" below line 9
11 1" = 1'-0" 5'-4 1/4" long, 0'-7 1/2" below line 10
12 1 1/2" = 1'-0" 2'-3 1/2" long, 0'-5 1/2" below line 11
13 1 1/2" = 1'-0" 3'-8" long, 0'-2 1/2" below line 12
14 3" = 1'-0" 1'-10 1/2" long, 0'-2 1/2" below line 13
15 3" = 1'-0" 0'-11" long, 0'-1" below line 14
16 1/8" = 1'-0" 44'-6" long, 1'-4" below line 15
17 1/8" = 1'-0" 32'-4" long, 1'-10" below line 16
18 1/8" = 1'-0" 15'-8" long, 0'-10" below line 17
19 1/8" = 1'-0" 41'-2" long, 1'-0" below line 18
20 1/4" = 1'-0" 17'-11" long, 0'-5" below line 19
idi 200 Architectural Drafting
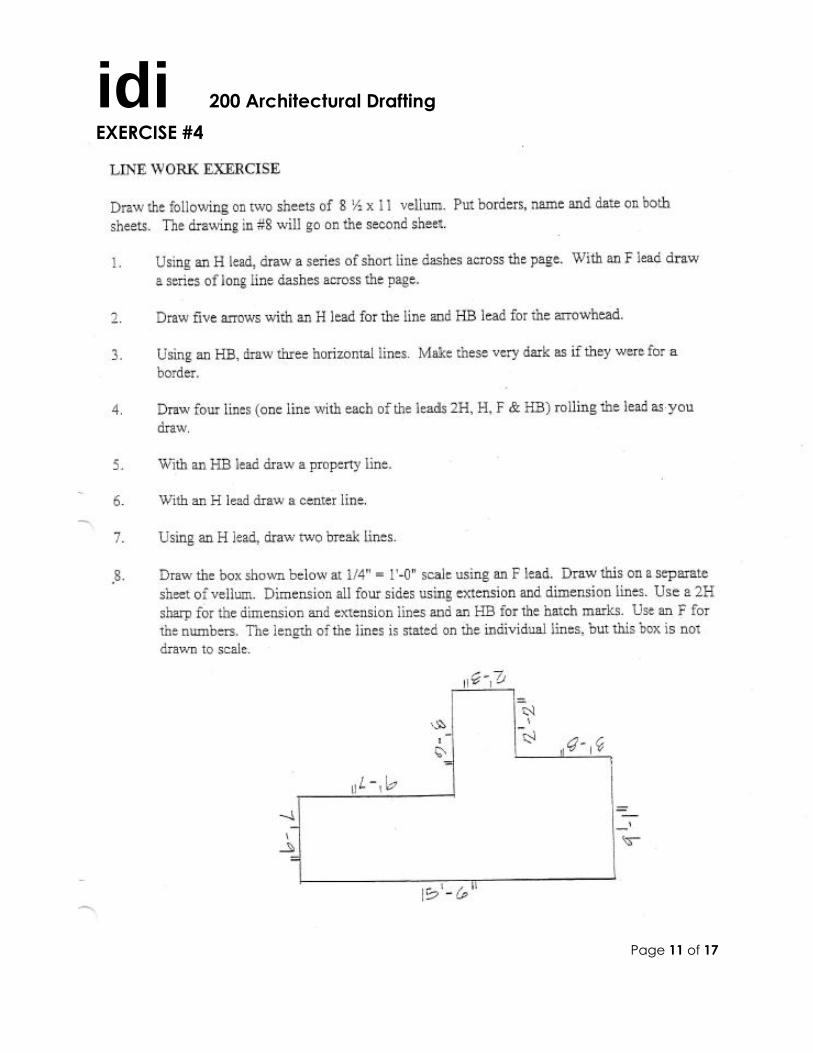
EXERCISE #4
Page 11 of 17
idi 200 Architectural Drafting
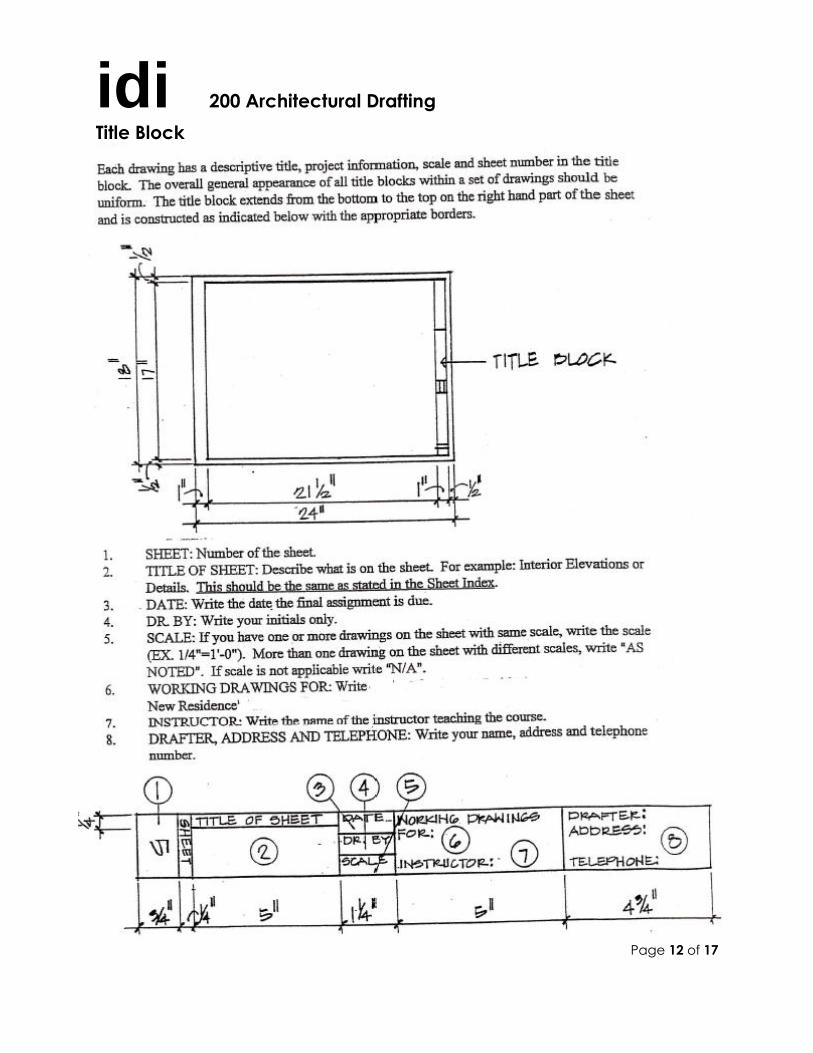
Title Block
Page 12 of 17
idi 200 Architectural Drafting
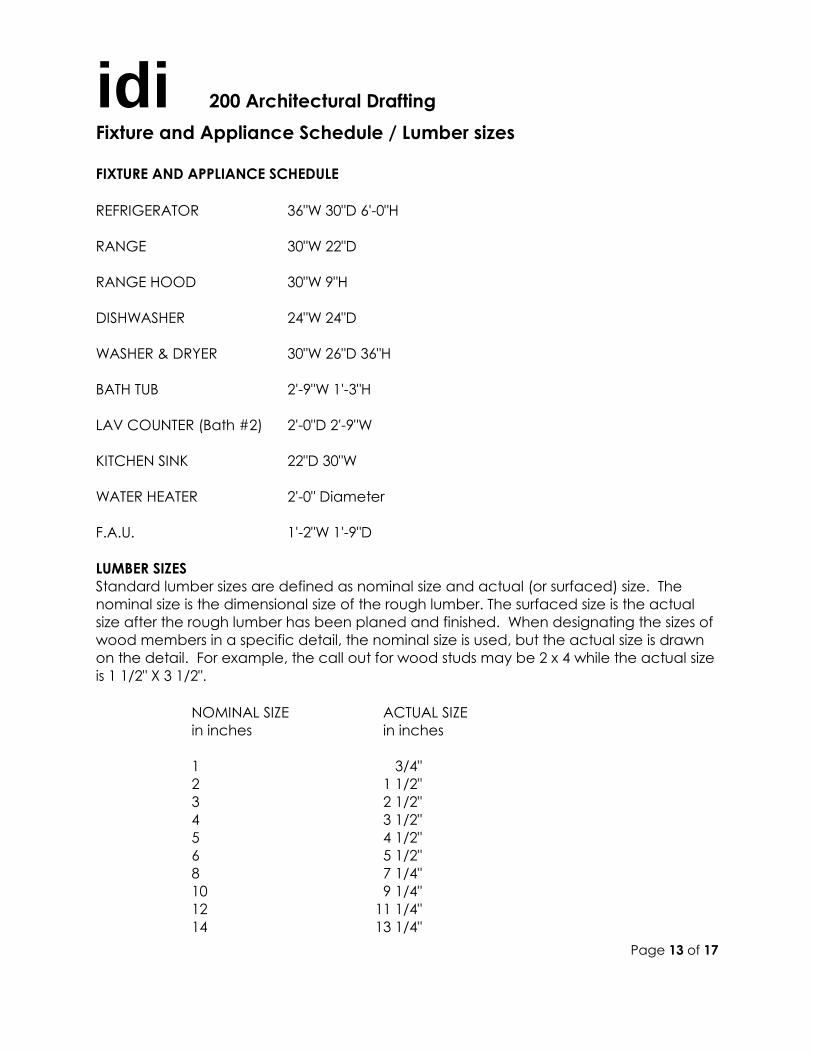
Fixture and Appliance Schedule / Lumber sizes
Page 13 of 17
FIXTURE AND APPLIANCE SCHEDULE
REFRIGERATOR 36"W 30"D 6'-0"H
RANGE 30"W 22"D
RANGE HOOD 30"W 9"H
DISHWASHER 24"W 24"D
WASHER & DRYER 30"W 26"D 36"H
BATH TUB 2'-9"W 1'-3"H
LAV COUNTER (Bath #2) 2'-0"D 2'-9"W
KITCHEN SINK 22"D 30"W
WATER HEATER 2'-0" Diameter
F.A.U. 1'-2"W 1'-9"D
LUMBER SIZES
Standard lumber sizes are defined as nominal size and actual (or surfaced) size. The
nominal size is the dimensional size of the rough lumber. The surfaced size is the actual
size after the rough lumber has been planed and finished. When designating the sizes of
wood members in a specific detail, the nominal size is used, but the actual size is drawn
on the detail. For example, the call out for wood studs may be 2 x 4 while the actual size
is 1 1/2" X 3 1/2".
NOMINAL SIZE ACTUAL SIZE
in inches in inches
1 3/4"
2 1 1/2"
3 2 1/2"
4 3 1/2"
5 4 1/2"
6 5 1/2"
8 7 1/4"
10 9 1/4"
12 11 1/4"
14 13 1/4"
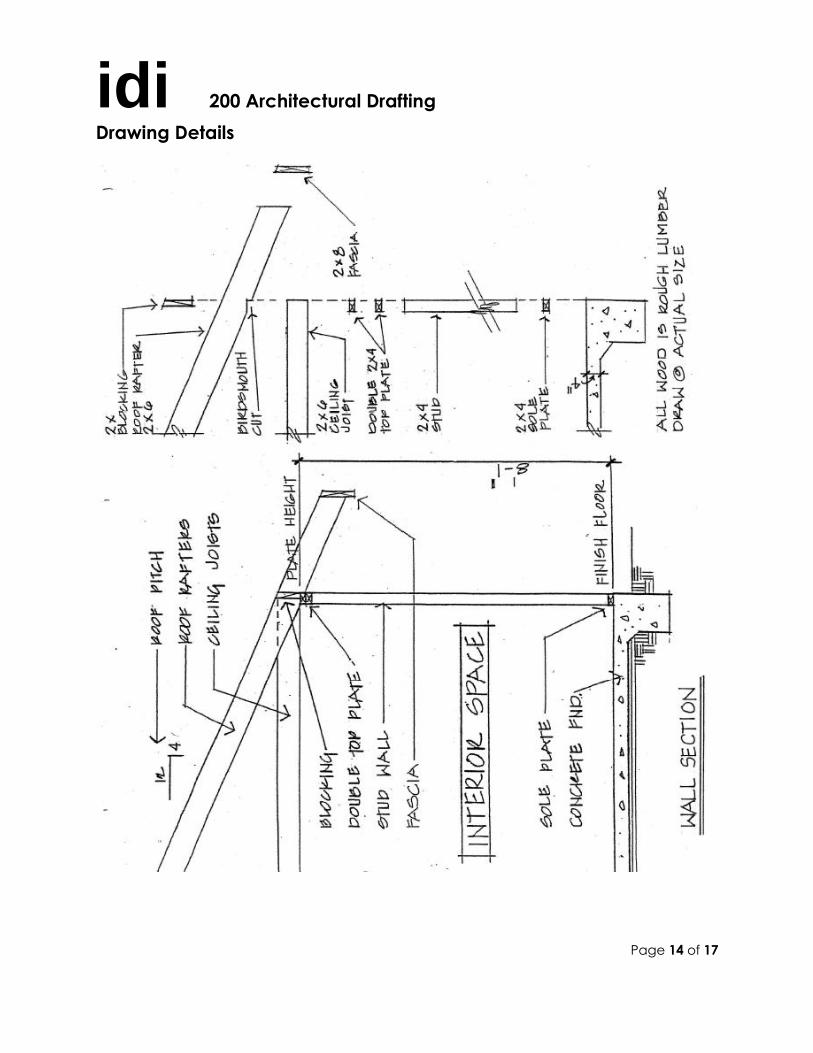
idi 200 Architectural Drafting
Drawing Details
Page 14 of 17
idi 200 Architectural Drafting
Drawing Details
Page 15 of 17
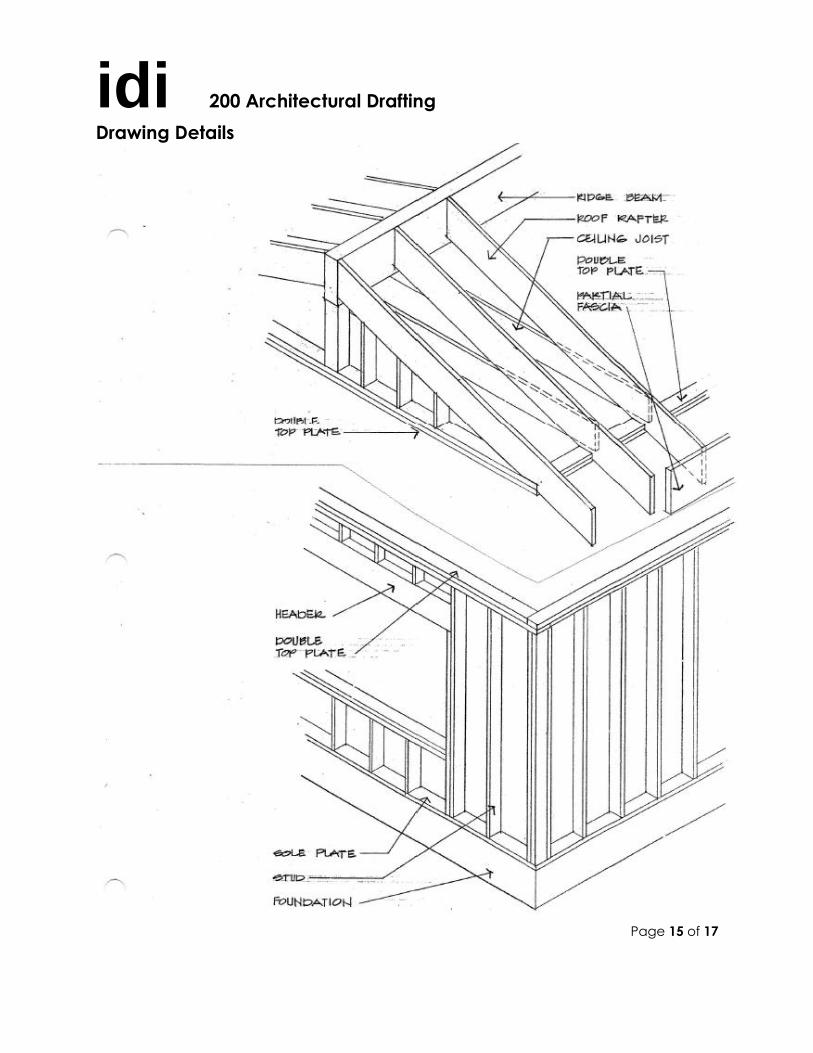
idi 200 Architectural Drafting
Drawing Details
Page 16 of 17
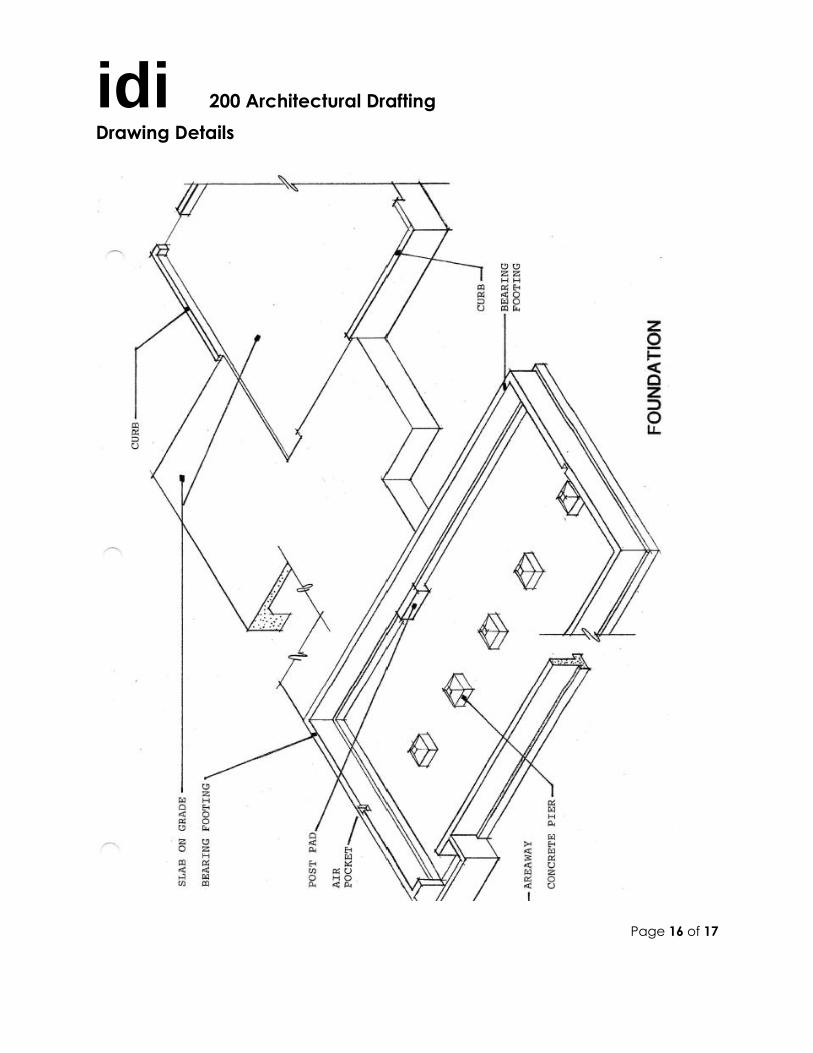
idi 200 Architectural Drafting
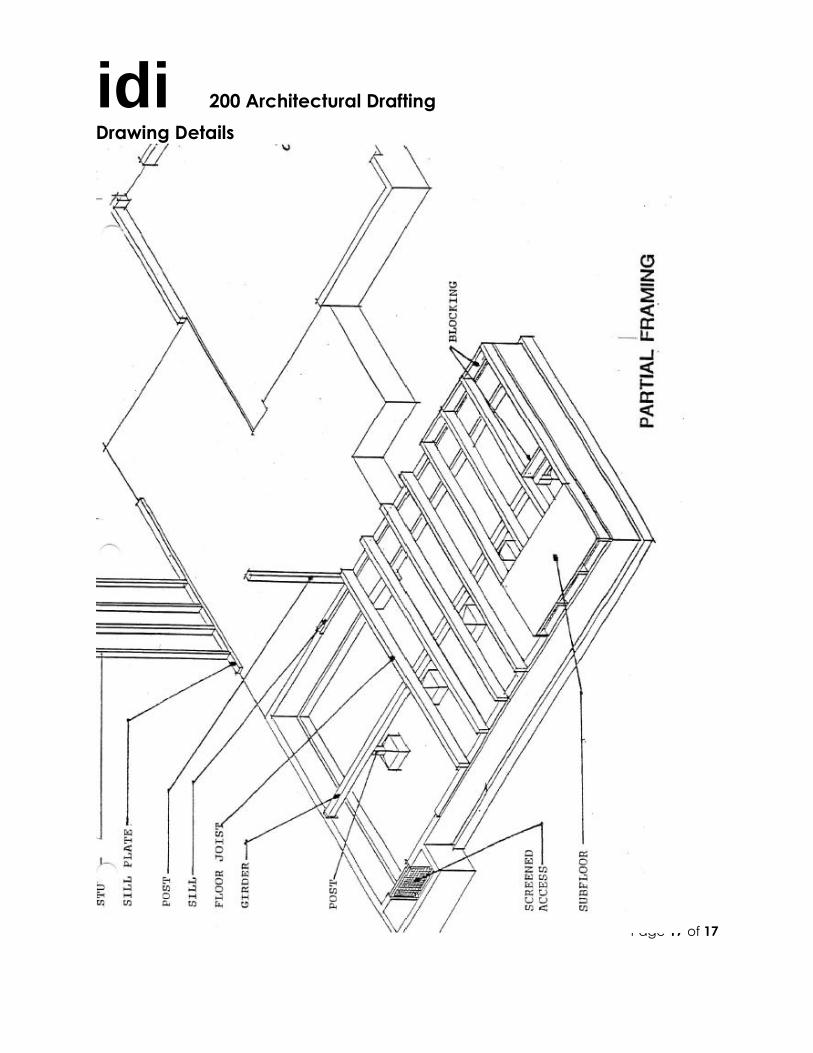
Drawing Details
Page 17 of 17