Embed Size (px)
Citation preview
30-part 20-point Stubby Stars from parallelogram modules 1
30-Part 20-Point Stubby Stars from
parallelogram modules
These diagrams show you
how to make 30-part
20-point Stubby Stars from
basic Sonobe, Darwin and
Letterbox modules, in both
alpha and beta versions,
and from Corner-pocket
Sonobe modules, but in the
alpha version only. The beta
Corner-pocket Sonobe
version is not included
because it is difficult to
assemble satisfactorily.
If you are not already
familiar with the way this
Stubby Star is assembled it is a good idea to practice putting together a
single pyramid from three modules before you try to assemble all thirty.
The story of the discovery by Steve Krimbill that 30 Sonobe modules
would go together to form the alpha version of the 20-point Stubby Star is
recorded in an article by Alice Gray in The Origamian Vol 13, Issue 3 of
1975.
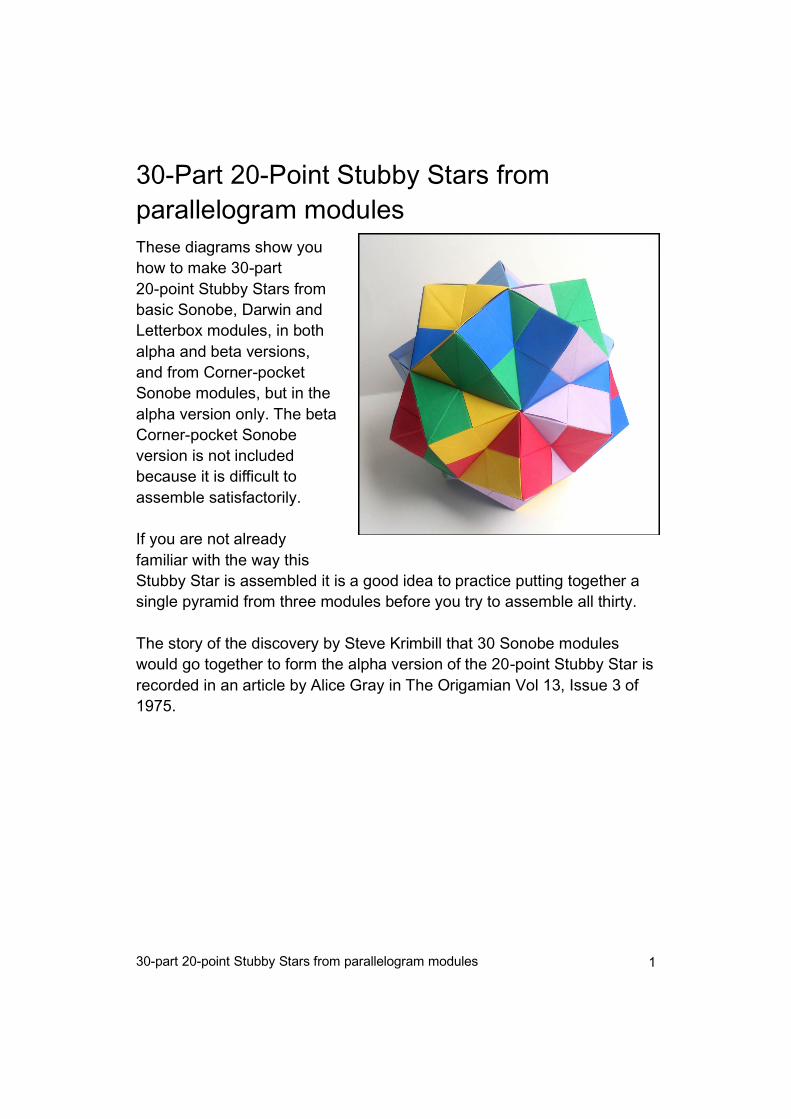
30-part 20-point Stubby Stars from parallelogram modules 2
30-part 20-point Stubby Stars from Sonobe and
Darwin modules
2. Fold the right and left points inwards as
shown, then unfold.
From alpha modules
2 1
1. Begin by turning your first module over
sideways.
4. Fold diagonally across the central
square area of the module, then unfold.
3. Turn over sideways.
5. Use the folds you made in steps 2 and
4 to collapse the module into shape.
3
5
4
6
6. The finished module should look like
this. The arrows indicate the location of
the pockets. Make all 30 modules, either
six in each of five contrasting but
complementary colours or five in each of
six colours, depending on which version
you are intending to make.
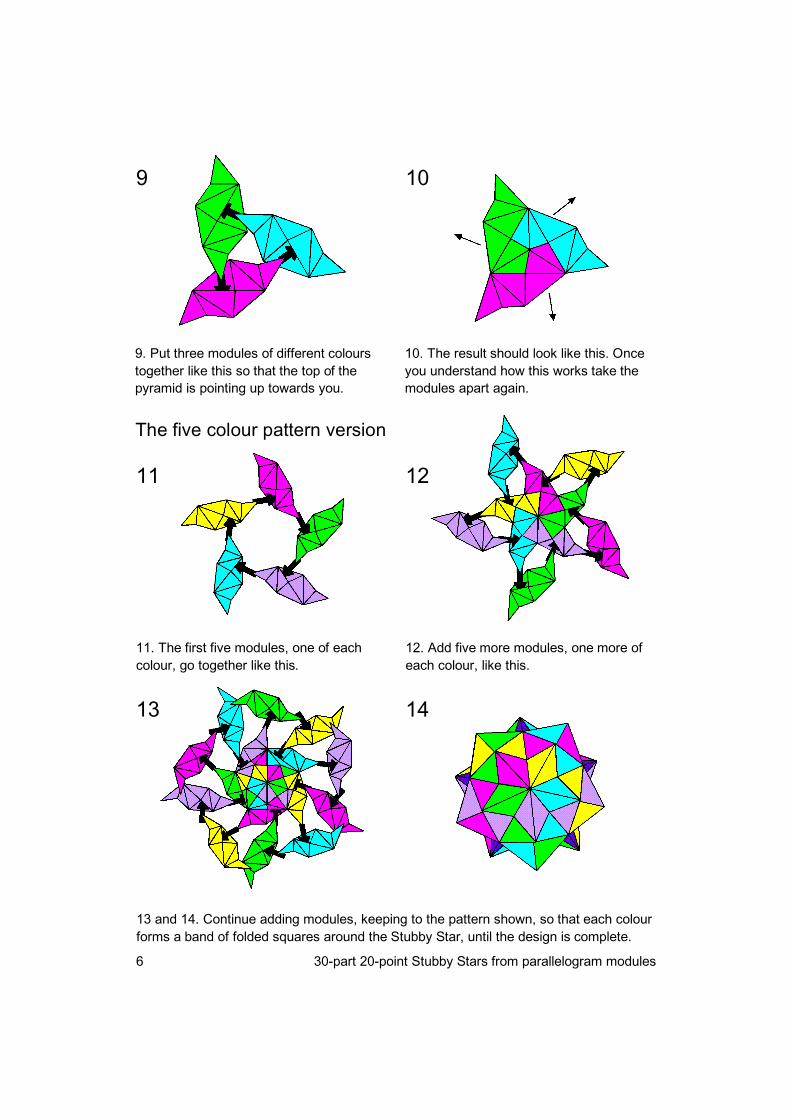
7. Put three modules of different colours
together like this so that the top of the
pyramid is pointing up towards you..
7
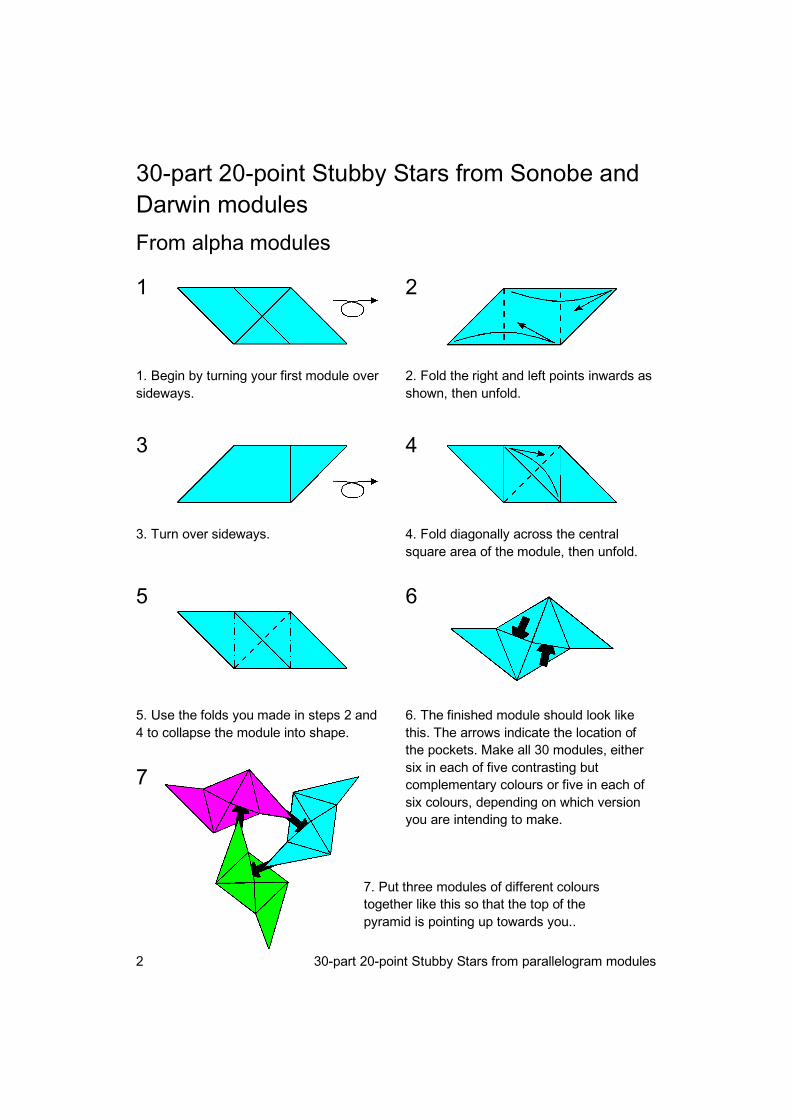
30-part 20-point Stubby Stars from parallelogram modules 3
8
8. The result should look like this. Once
you understand how this works take the
modules apart again.
The five colour pattern version
9. Put the first five modules, one of each
colour, together like this.
9 10
11 12
12. The completed five colour Stubby Star
will look like this.
11. Continue adding modules, keeping to
the pattern shown, until the Stubby Star is
complete.
10. Add the next five modules, again one
of each colour, to complete a ring of five
pyramids.
30-part 20-point Stubby Stars from parallelogram modules 4
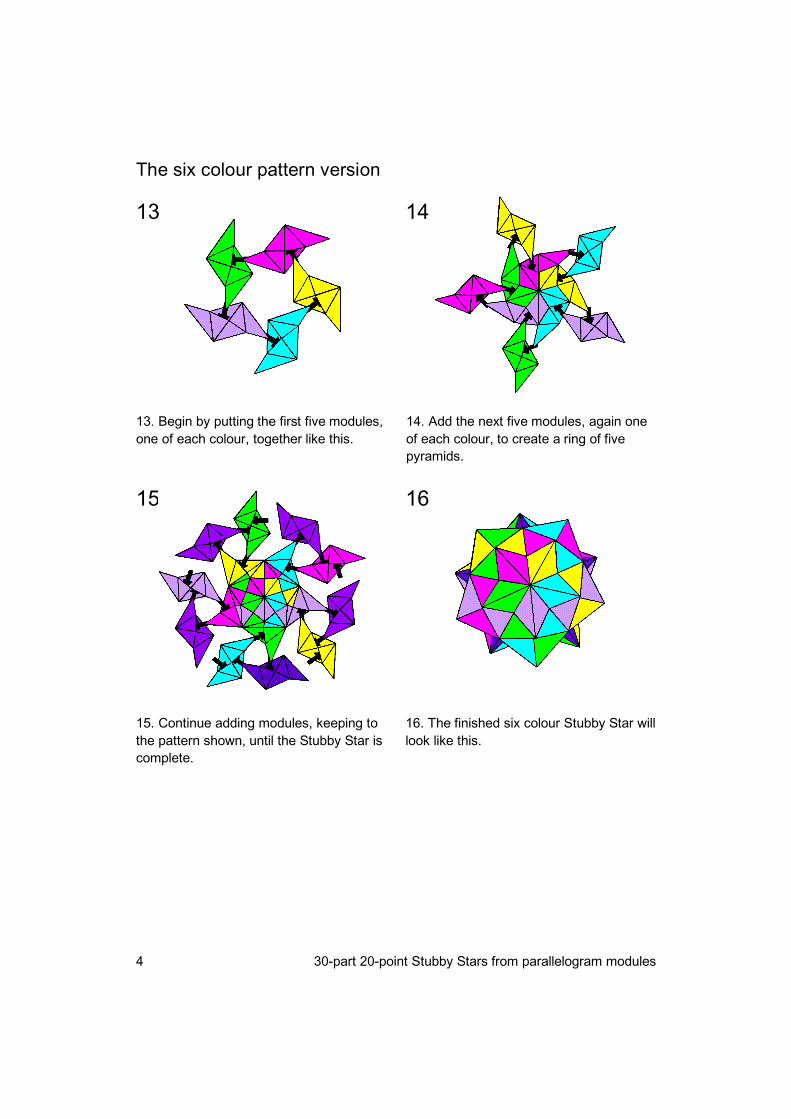
The six colour pattern version
13. Begin by putting the first five modules,
one of each colour, together like this.
14 13
14. Add the next five modules, again one
of each colour, to create a ring of five
pyramids.
16. The finished six colour Stubby Star will
look like this.
15 16
15. Continue adding modules, keeping to
the pattern shown, until the Stubby Star is
complete.
30-part 20-point Stubby Stars from parallelogram modules 5
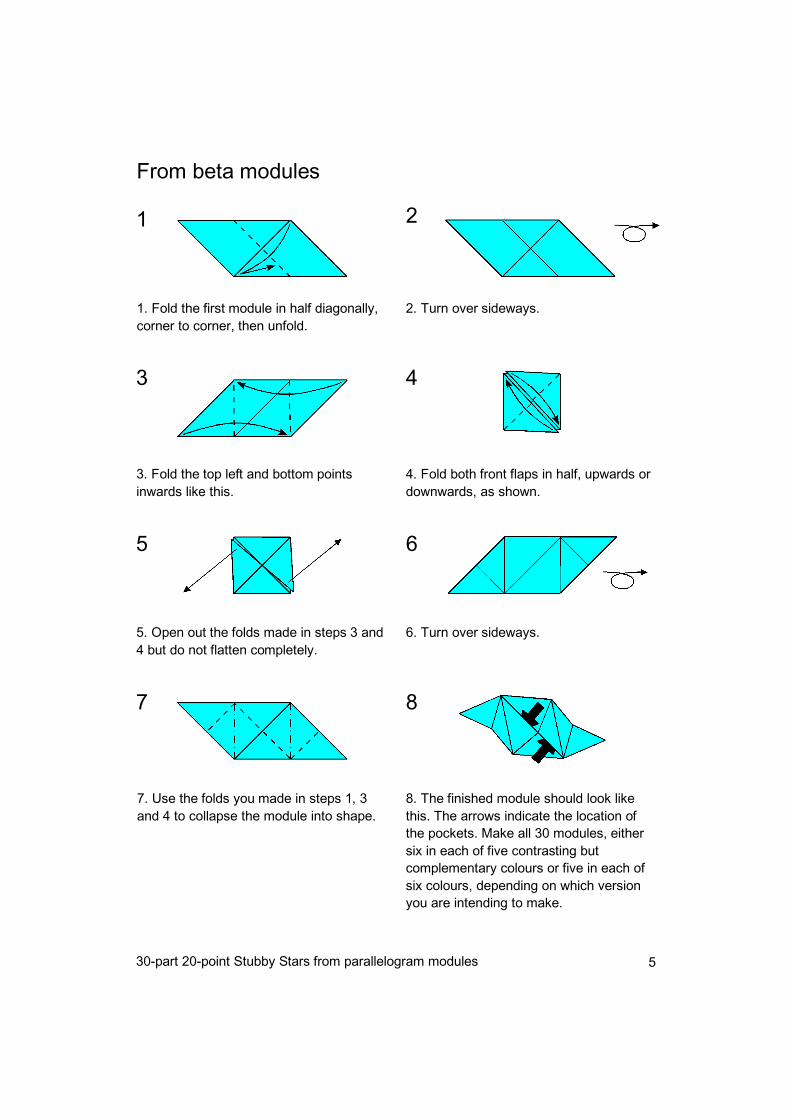
From beta modules
1
1. Fold the first module in half diagonally,
corner to corner, then unfold.
4. Fold both front flaps in half, upwards or
downwards, as shown.
3. Fold the top left and bottom points
inwards like this.
6. Turn over sideways.
5. Open out the folds made in steps 3 and
4 but do not flatten completely.
7
3
5
4
6
2
2. Turn over sideways.
7. Use the folds you made in steps 1, 3
and 4 to collapse the module into shape.
8
8. The finished module should look like
this. The arrows indicate the location of
the pockets. Make all 30 modules, either
six in each of five contrasting but
complementary colours or five in each of
six colours, depending on which version
you are intending to make.
30-part 20-point Stubby Stars from parallelogram modules 6
9 10
9. Put three modules of different colours
together like this so that the top of the
pyramid is pointing up towards you.
10. The result should look like this. Once
you understand how this works take the
modules apart again.
13
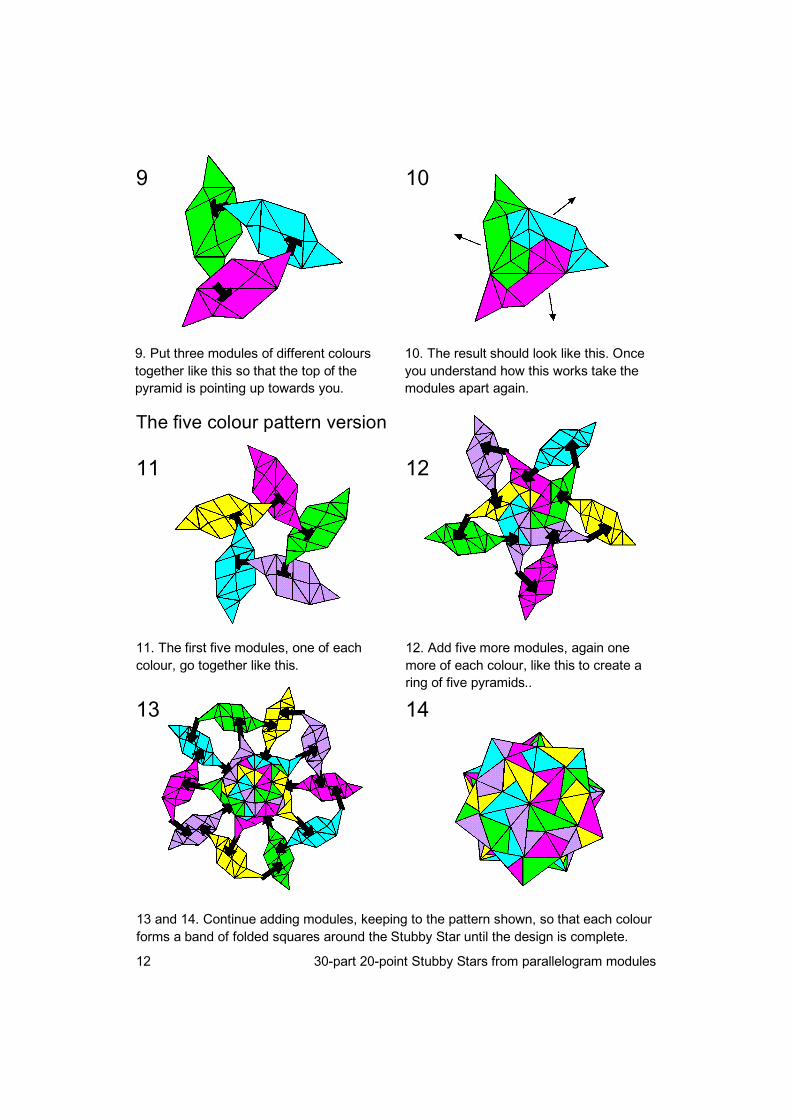
The five colour pattern version
12 11
14
12. Add five more modules, one more of
each colour, like this.
11. The first five modules, one of each
colour, go together like this.
13 and 14. Continue adding modules, keeping to the pattern shown, so that each colour
forms a band of folded squares around the Stubby Star, until the design is complete.
30-part 20-point Stubby Stars from parallelogram modules 7
16. Add another five modules, again one
of each colour, to complete a ring of five
pyramids.
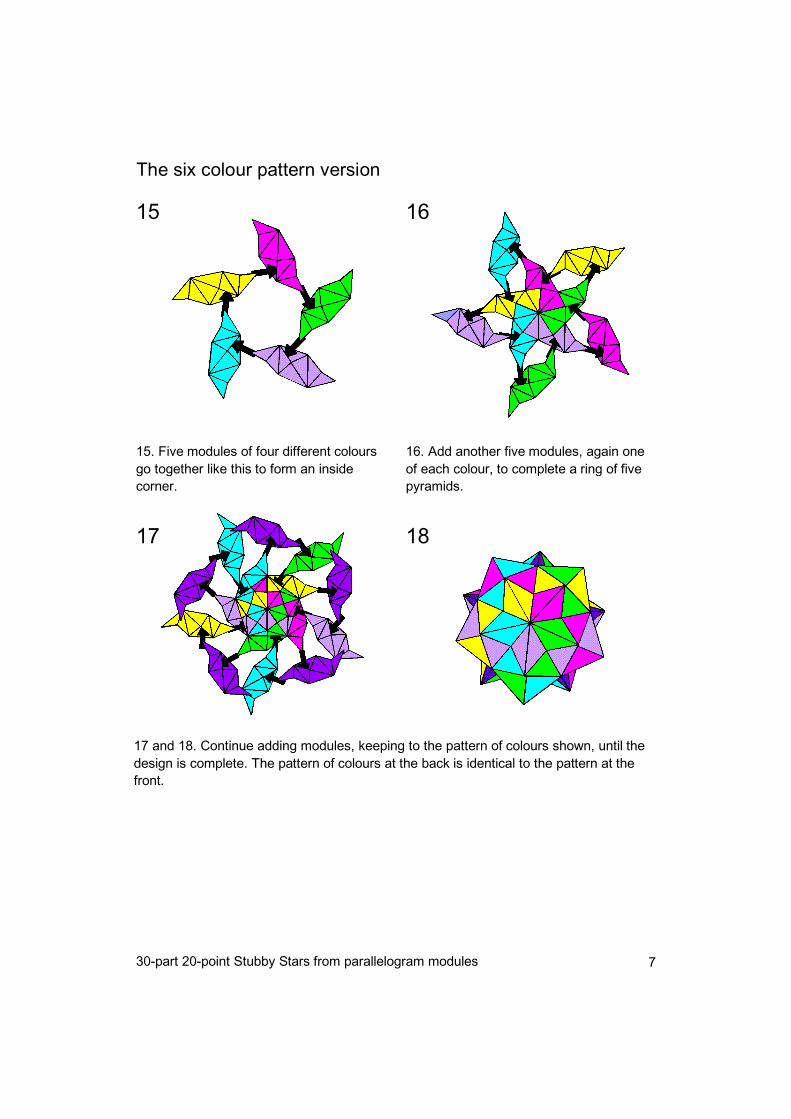
15. Five modules of four different colours
go together like this to form an inside
corner.
The six colour pattern version
17 and 18. Continue adding modules, keeping to the pattern of colours shown, until the
design is complete. The pattern of colours at the back is identical to the pattern at the
front.
16 15
18 17
30-part 20-point Stubby Stars from parallelogram modules 8
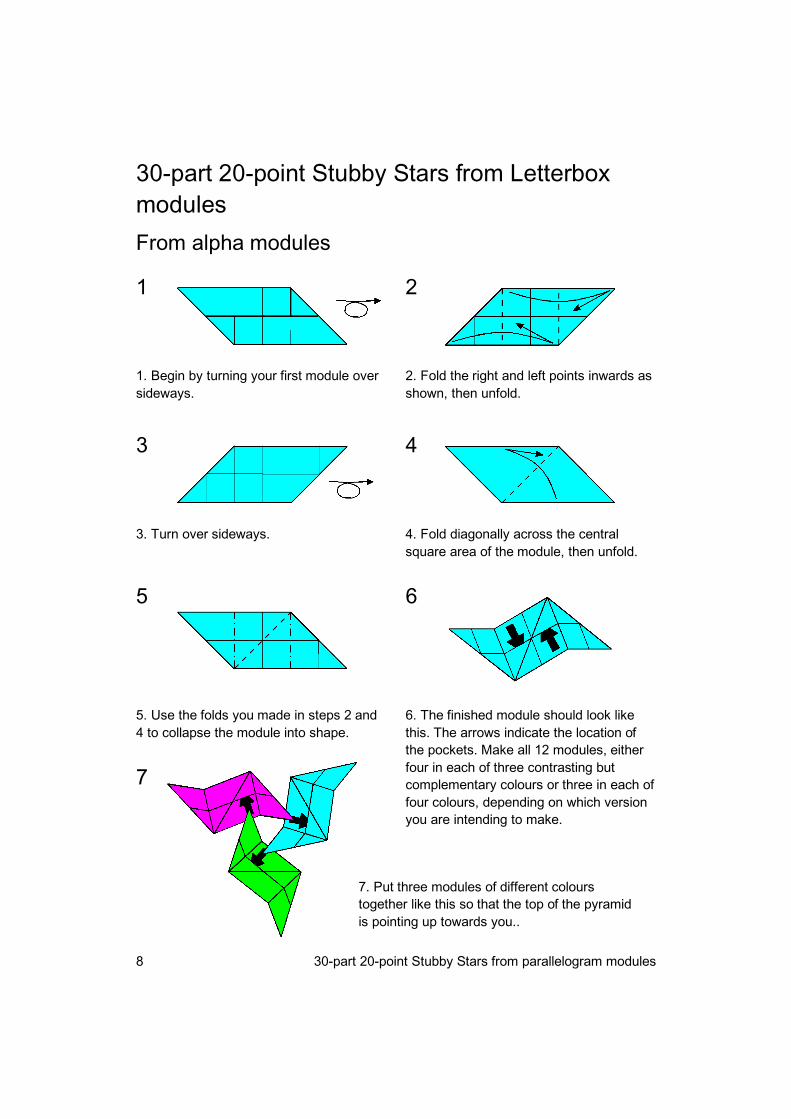
30-part 20-point Stubby Stars from Letterbox
modules
2. Fold the right and left points inwards as
shown, then unfold.
From alpha modules
2 1
1. Begin by turning your first module over
sideways.
4. Fold diagonally across the central
square area of the module, then unfold.
3. Turn over sideways.
5. Use the folds you made in steps 2 and
4 to collapse the module into shape.
3
5
4
6
6. The finished module should look like
this. The arrows indicate the location of
the pockets. Make all 12 modules, either
four in each of three contrasting but
complementary colours or three in each of
four colours, depending on which version
you are intending to make.
7. Put three modules of different colours
together like this so that the top of the pyramid
is pointing up towards you..
7
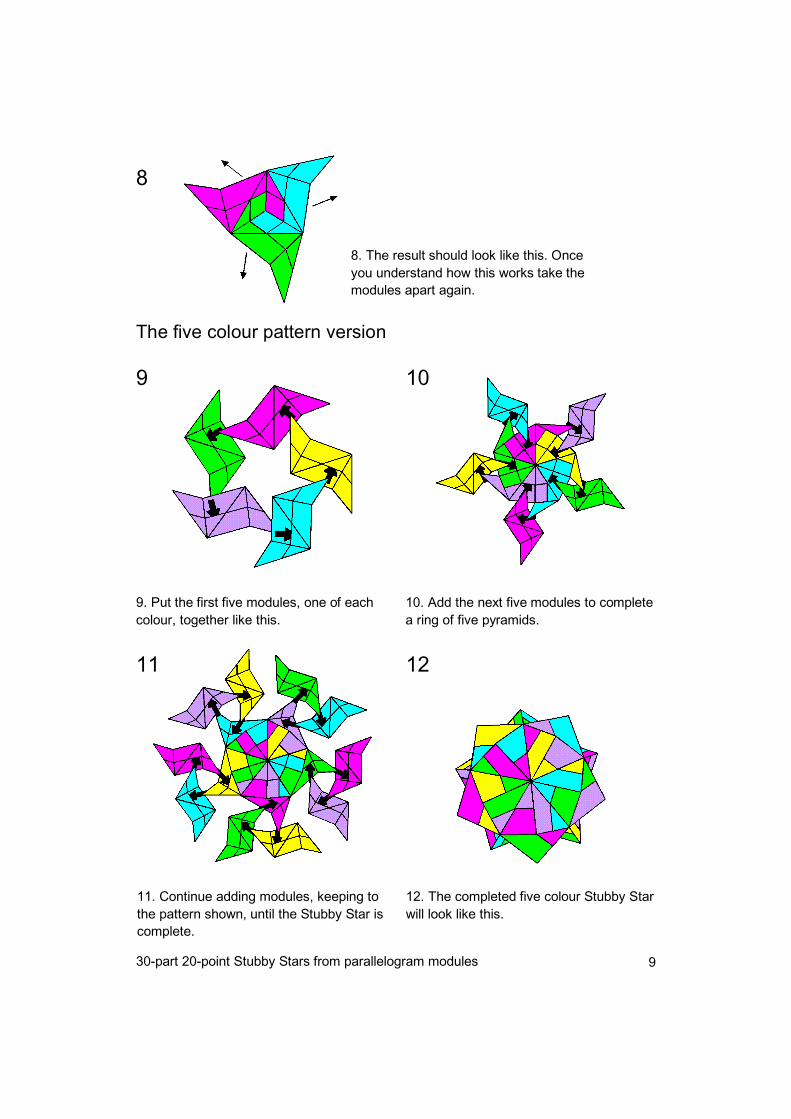
30-part 20-point Stubby Stars from parallelogram modules 9
8
8. The result should look like this. Once
you understand how this works take the
modules apart again.
The five colour pattern version
9. Put the first five modules, one of each
colour, together like this.
9 10
11 12
12. The completed five colour Stubby Star
will look like this.
11. Continue adding modules, keeping to
the pattern shown, until the Stubby Star is
complete.
10. Add the next five modules to complete
a ring of five pyramids.
30-part 20-point Stubby Stars from parallelogram modules 10
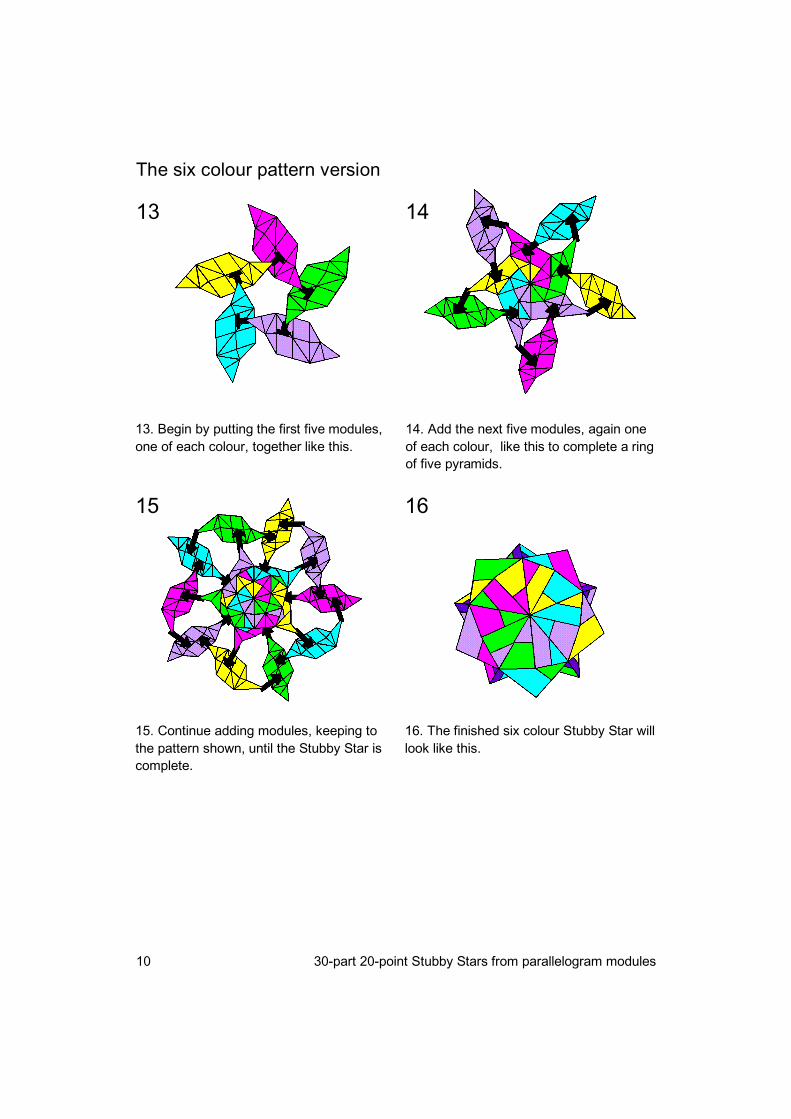
The six colour pattern version
13. Begin by putting the first five modules,
one of each colour, together like this.
14 13
14. Add the next five modules, again one
of each colour, like this to complete a ring
of five pyramids.
16. The finished six colour Stubby Star will
look like this.
15 16
15. Continue adding modules, keeping to
the pattern shown, until the Stubby Star is
complete.
30-part 20-point Stubby Stars from parallelogram modules 11
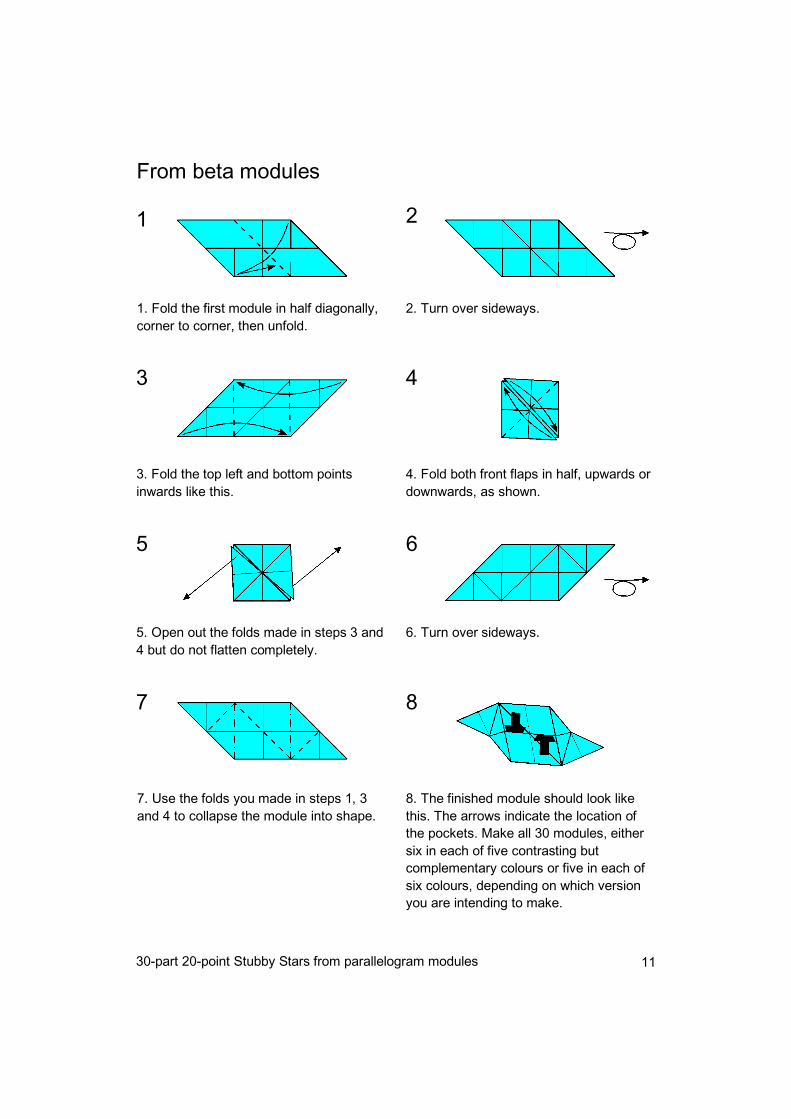
From beta modules
1
1. Fold the first module in half diagonally,
corner to corner, then unfold.
4. Fold both front flaps in half, upwards or
downwards, as shown.
3. Fold the top left and bottom points
inwards like this.
6. Turn over sideways.
5. Open out the folds made in steps 3 and
4 but do not flatten completely.
7
3
5
4
6
2
2. Turn over sideways.
7. Use the folds you made in steps 1, 3
and 4 to collapse the module into shape.
8
8. The finished module should look like
this. The arrows indicate the location of
the pockets. Make all 30 modules, either
six in each of five contrasting but
complementary colours or five in each of
six colours, depending on which version
you are intending to make.
30-part 20-point Stubby Stars from parallelogram modules 12
9 10
9. Put three modules of different colours
together like this so that the top of the
pyramid is pointing up towards you.
10. The result should look like this. Once
you understand how this works take the
modules apart again.
13
The five colour pattern version
12 11
14
12. Add five more modules, again one
more of each colour, like this to create a
ring of five pyramids..
11. The first five modules, one of each
colour, go together like this.
13 and 14. Continue adding modules, keeping to the pattern shown, so that each colour
forms a band of folded squares around the Stubby Star until the design is complete.
30-part 20-point Stubby Stars from parallelogram modules 13
16. Add another five modules, again one
of each colour, to complete a ring of five
pyramids.
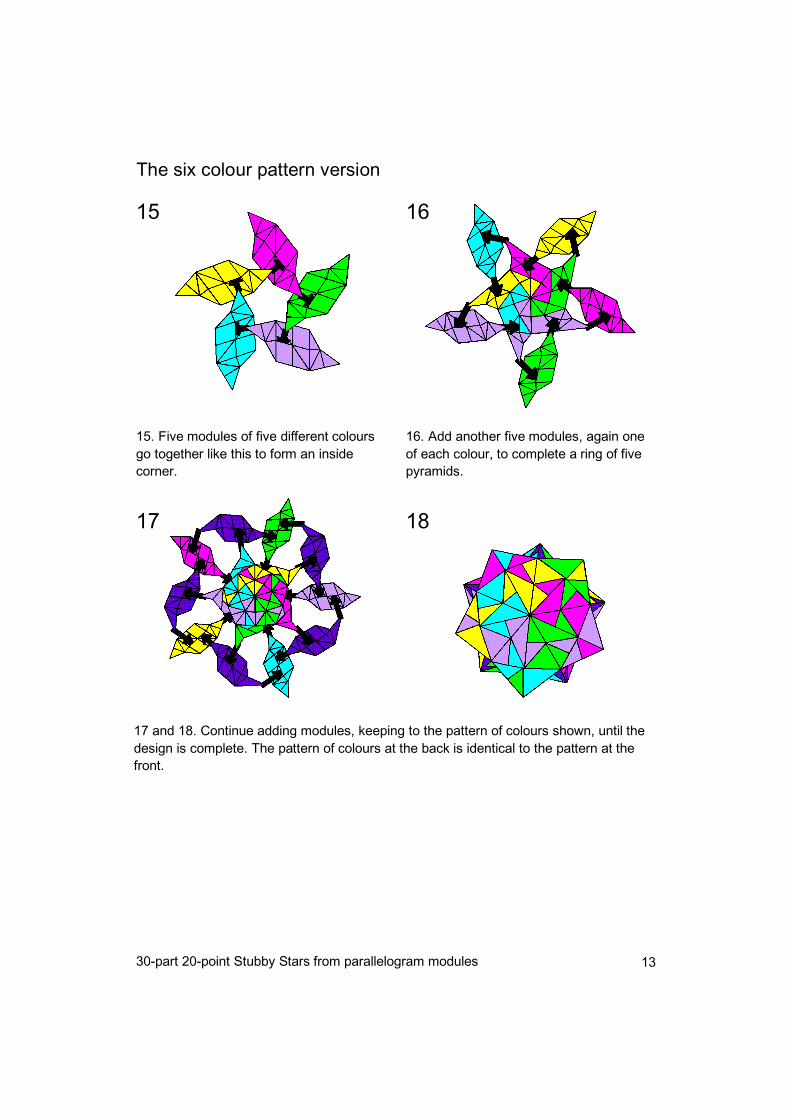
15. Five modules of five different colours
go together like this to form an inside
corner.
The six colour pattern version
17 and 18. Continue adding modules, keeping to the pattern of colours shown, until the
design is complete. The pattern of colours at the back is identical to the pattern at the
front.
16 15
18 17
30-part 20-point Stubby Stars from parallelogram modules 14
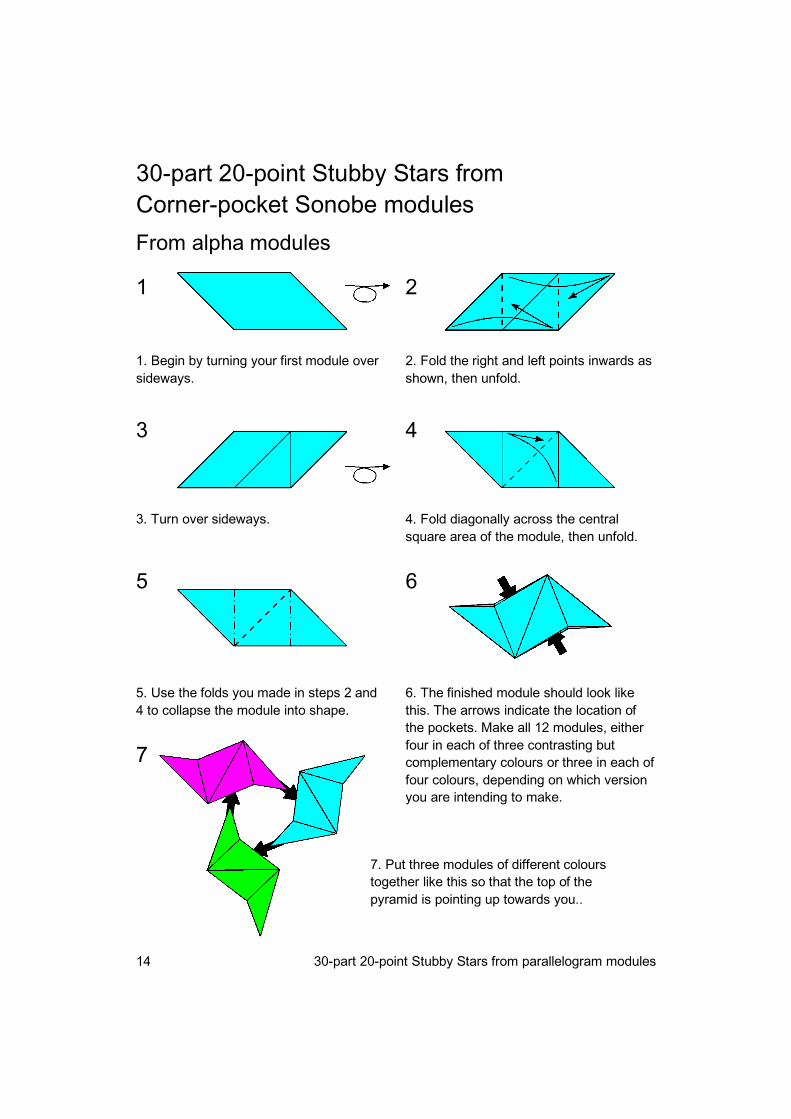
30-part 20-point Stubby Stars from
Corner-pocket Sonobe modules
2. Fold the right and left points inwards as
shown, then unfold.
From alpha modules
2 1
1. Begin by turning your first module over
sideways.
4. Fold diagonally across the central
square area of the module, then unfold.
3. Turn over sideways.
5. Use the folds you made in steps 2 and
4 to collapse the module into shape.
3
5
4
6
6. The finished module should look like
this. The arrows indicate the location of
the pockets. Make all 12 modules, either
four in each of three contrasting but
complementary colours or three in each of
four colours, depending on which version
you are intending to make.
7. Put three modules of different colours
together like this so that the top of the
pyramid is pointing up towards you..
7
30-part 20-point Stubby Stars from parallelogram modules 15
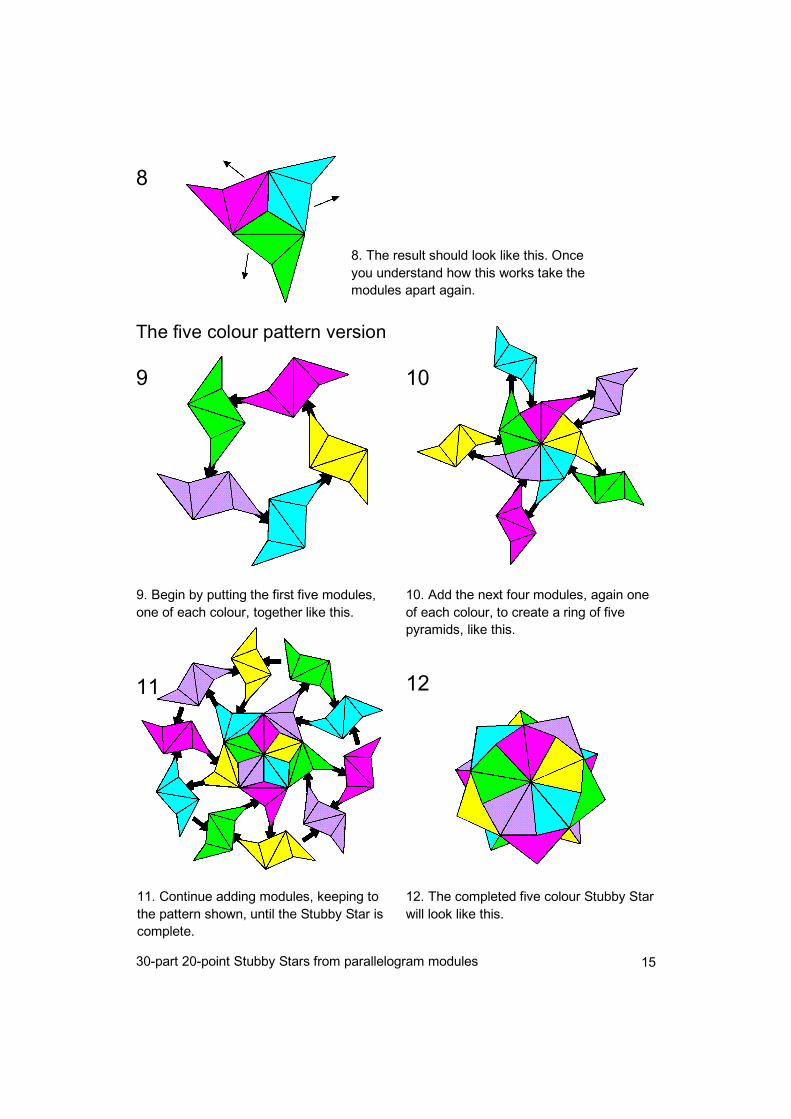
8
8. The result should look like this. Once
you understand how this works take the
modules apart again.
The five colour pattern version
9. Begin by putting the first five modules,
one of each colour, together like this.
9 10
10. Add the next four modules, again one
of each colour, to create a ring of five
pyramids, like this.
11 12
12. The completed five colour Stubby Star
will look like this.
11. Continue adding modules, keeping to
the pattern shown, until the Stubby Star is
complete.
30-part 20-point Stubby Stars from parallelogram modules 16
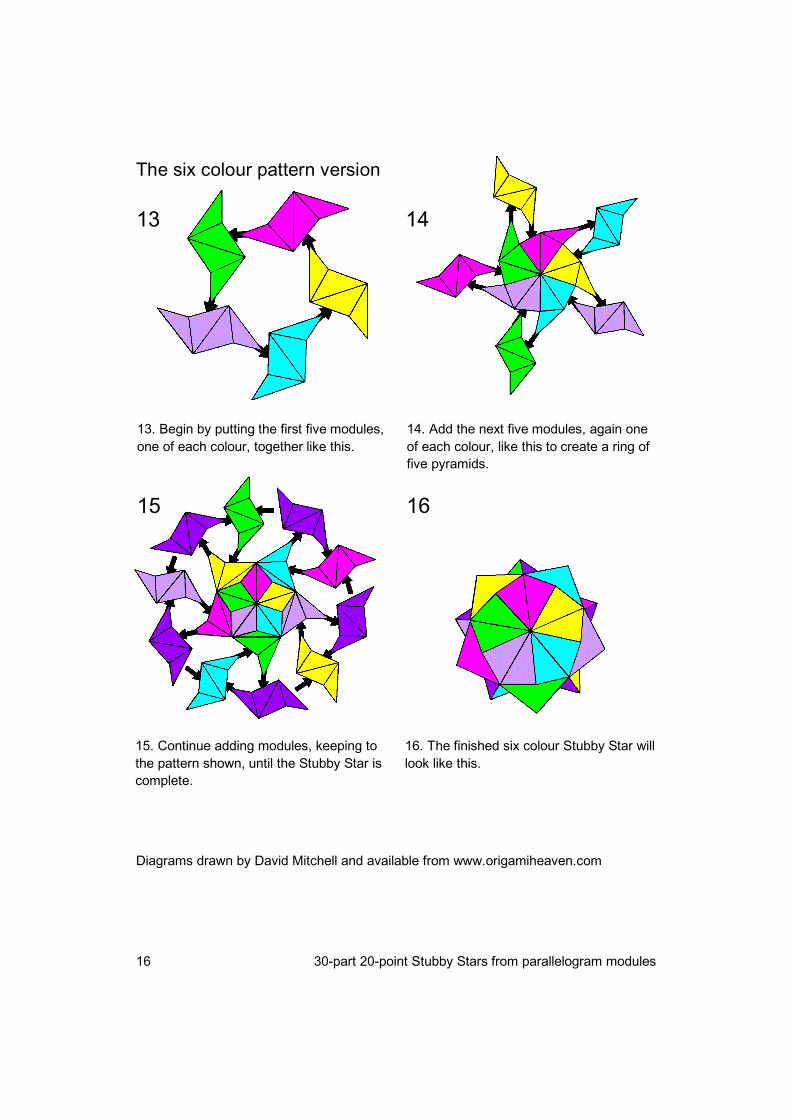
The six colour pattern version
13. Begin by putting the first five modules,
one of each colour, together like this.
14 13
14. Add the next five modules, again one
of each colour, like this to create a ring of
five pyramids.
15 16
Diagrams drawn by David Mitchell and available from www.origamiheaven.com
16. The finished six colour Stubby Star will
look like this.
15. Continue adding modules, keeping to
the pattern shown, until the Stubby Star is
complete.