Embed Size (px)
Citation preview
English
INSTRUCTION MANUAL
CANON INC. 30-2, Shimomaruko 3-chome, Ohta-ku, Tokyo 146-8501, Japan
U.S.A. CANON U.S.A. INC. One Canon Plaza, Lake Success, NY 11042-1198, U.S.A. For all inquires concerning this product, call toll free in the U.S. 1-800-OK-CANON
CANADA CANON CANADA INC. HEADQUARTERS 6390 Dixie Road, Mississauga, Ontario L5T 1P7, Canada CANON CANADA INC. MONTREAL BRANCH 5990, Côte-de-Liesse, Montréal Québec H4T 1V7, Canada CANON CANADA INC. CALGARY OFFICE 2828, 16th Street, N.E. Calgary, Alberta T2E 7K7, Canada For all inquiries concerning this product, call toll free in Canada 1-800-OK-CANON
EUROPE, CANON EUROPA N.V.AFRICA & Bovenkerkerweg 59-61, 1185 XB Amstelveen, The NetherlandsMIDDLE EAST CANON FRANCE S.A.S. 17,Quai du Président Paul Doumer, 92414 Courbevoie Cedex, France CANON UK LTD. Woodhatch Reigate,Surrey RH2 8BF, United Kingdom CANON DEUTSCHLAND GmbH Europark Fichtenhain A10, 47807 Krefeld, Germany CANON ITALIA S.p.A. Via Milano 8, 20097 San Donato Milanese, (MI), Italy CANON Schweiz A.G. Industriestrasse 12, 8305 Dietlikon, Switzerland Canon GmbH Zetschegasse 11, A-1230 Vienna, Austria CANON España,S.A. Av. De Europa,6 Alcobendas 28108 Madrid, Spain CANON Portugal S.A. Rua Alfredo da Silva,14 Alfragide 2610-016 Amadora, Portugal
CENTRAL & CANON LATIN AMERICA, INC.SOUTH AMERICA 703 Waterford Way, Suite 400 Miami, FL 33126,U.S.A.
ASIA CANON (China) Co., LTD. 15F Jinbao Building No.89 Jinbao Street, Dongcheng District, Beijing 100005, China CANON HONGKONG CO., LTD. 19/F., The Metropolis Tower, 10 Metropolis Drive, Hunghom, Kowloon, Hong Kong CANON SINGAPORE PTE. LTD. 1 HarbourFront Avenue, #04-01 Keppel Bay Tower, Singapore 098632 CANON KOREA CONSUMER IMAGING INC. Gangnam Finance Center 17F, 737,Yeoksam-Dong, Gangnam-Gu, Seoul, 135-984, Korea
OCEANIA CANON AUSTRALIA PTY. LTD. 1 Thomas Holt Drive, North Ryde, Sydney N.S.W. 2113, Australia CANON NEW ZEALAND LTD. Akoranga Business Park, Akoranga Drive, Northcote, Auckland, New Zealand
JAPAN CANON MARKETING JAPAN INC. 16-6, Kohnan 2-chome, Minato-ku, Tokyo 108-8011, Japan
© CANON INC. 2012CPA-N007-0002012.01

1
English
2
The Canon Speedlite Transmitter ST-E3-RT is a transmitter for wireless flash shooting. It can control up to 5 groups (15 units) of Canon Speedlites that have a wireless multiple flash shooting function using radio transmission. The transmitter also has dust and water resistance equivalent to EOS-1D series cameras.
Read this instruction manual while also referring to the instruction manuals of your camera and Speedlite.Before using the transmitter, read this instruction manual and the instruction manuals of your camera and Speedlite to familiarize yourself with the operations.
Using with an EOS digital camera (Type-A camera)• You can perform wireless autoflash shooting with easy operations.Using with an EOS film camera
• When using with an EOS film camera compatible with E-TTL II and E-TTL autoflash systems (Type-A camera), you can perform autoflash shooting with easy operations.
• This unit cannot be used with an EOS film camera with TTL autoflash system (Type-B camera).
Introduction
Using the transmitter with a Camera
3
Chapters
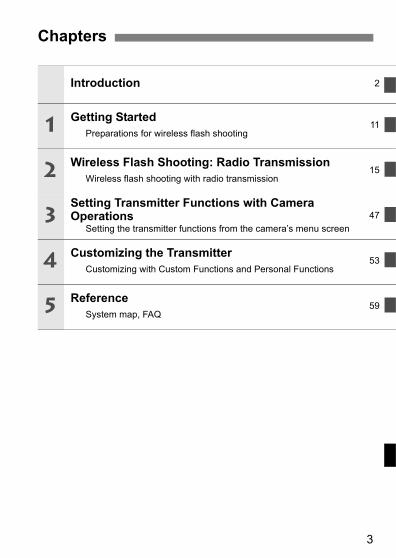
Introduction 2
Getting StartedPreparations for wireless flash shooting
11
Wireless Flash Shooting: Radio TransmissionWireless flash shooting with radio transmission
15
Setting Transmitter Functions with Camera Operations
Setting the transmitter functions from the camera’s menu screen47
Customizing the TransmitterCustomizing with Custom Functions and Personal Functions
53
ReferenceSystem map, FAQ
59
1
2
3
4
5
4
3
1
2
Introduction 2Chapters ...................................................................................................3Nomenclature............................................................................................6Conventions Used in this Manual ...........................................................10
Getting Started 11Installing the Batteries.............................................................................12Attaching and Detaching the Transmitter................................................13Turning on the Power..............................................................................13
Wireless Flash Shooting: Radio Transmission 15' Wireless Flash Shooting ....................................................................16Wireless Settings ....................................................................................20a: Fully Automatic Wireless Flash Shooting...................................24Using Fully Automatic Wireless Flash.....................................................27a: Wireless Multiple Flash Shooting with Flash Ratio ....................31q: Wireless Multiple Flash Shooting with Manual Flash Output ............34[: Shooting with a Different Flash Mode for Each Group .....................38Clearing Transmitter Settings .................................................................40Test Flash from a Slave Unit...................................................................40Modeling Flash........................................................................................41Remote Release from a Slave Unit.........................................................42Linked Shooting ......................................................................................43
Setting Transmitter Functions with Camera Operations 47Transmitter Control from Camera’s Menu Screen ..................................48
Contents
5
Contents
5
4 Customizing the Transmitter 53C / >: Setting Custom and Personal Functions ............................ 54C: Setting Custom Functions ............................................................ 56>: Setting Personal Functions ........................................................... 58
Reference 59ST-E3-RT System .................................................................................. 60Troubleshooting Guide........................................................................... 61Specifications ......................................................................................... 63Index ...................................................................................................... 70
6
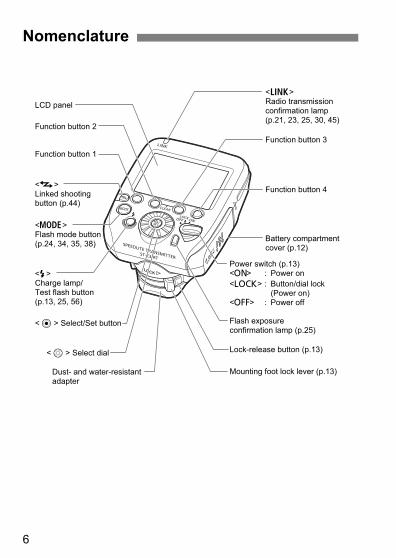
Nomenclature
<8> Select/Set button
<9> Select dial
Function button 3
Function button 4
Battery compartment cover (p.12)
Power switch (p.13)<K> : Power on<a> : Button/dial lock (Power on)<J> : Power off
<D>Radio transmission confirmation lamp (p.21, 23, 25, 30, 45)
LCD panel
Function button 2
Function button 1
Mounting foot lock lever (p.13)
Lock-release button (p.13)
Dust- and water-resistant adapter
<I>Linked shooting button (p.44)
<E>Flash mode button(p.24, 34, 35, 38)
<Q>Charge lamp/ Test flash button(p.13, 25, 56)
Flash exposure confirmation lamp (p.25)
7
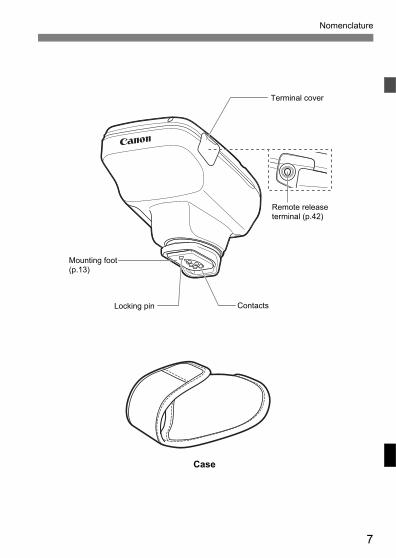
Nomenclature
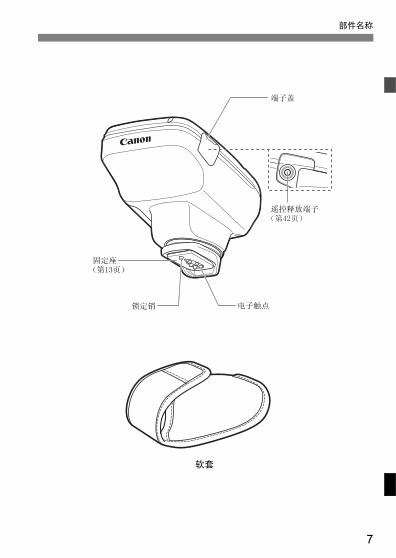
Case
Mounting foot(p.13)
Terminal cover
Remote release terminal (p.42)
ContactsLocking pin
Nomenclature 02
8
Nomenclature
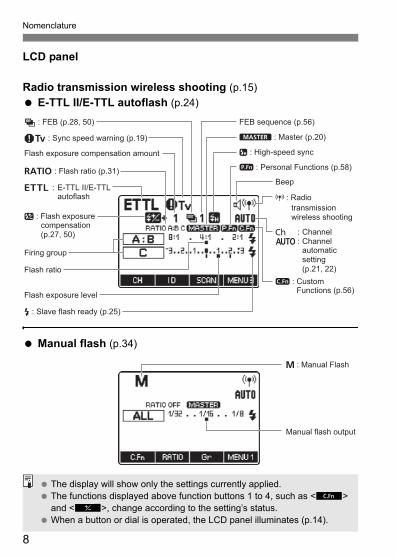
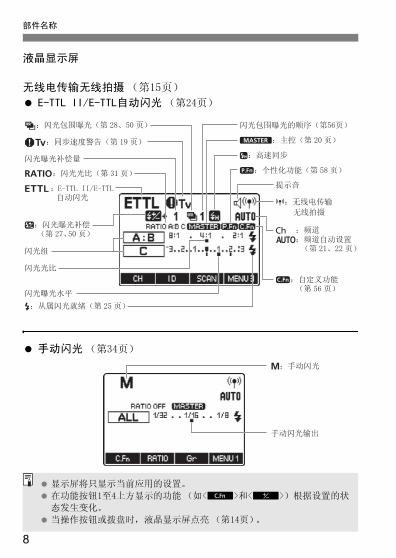
LCD panel
Radio transmission wireless shooting (p.15)E-TTL II/E-TTL autoflash (p.24)
Manual flash (p.34)
a : E-TTL II/E-TTL autoflash
Flash exposure compensation amount
Flash ratio
Firing group
, : Flash ratio (p.31)
g : FEB (p.28, 50) FEB sequence (p.56)
Beep
u : Custom Functions (p.56)
T : Personal Functions (p.58)
f : Flash exposure compensation (p.27, 50)
Flash exposure level
k : Sync speed warning (p.19) M : Master (p.20)
c : High-speed sync
' : Radio transmission wireless shooting
* : Channel) : Channel
automatic setting
(p.21, 22)
Q : Slave flash ready (p.25)
q : Manual Flash
Manual flash output
The display will show only the settings currently applied.The functions displayed above function buttons 1 to 4, such as <=> and <@>, change according to the setting’s status.When a button or dial is operated, the LCD panel illuminates (p.14).
9
Nomenclature
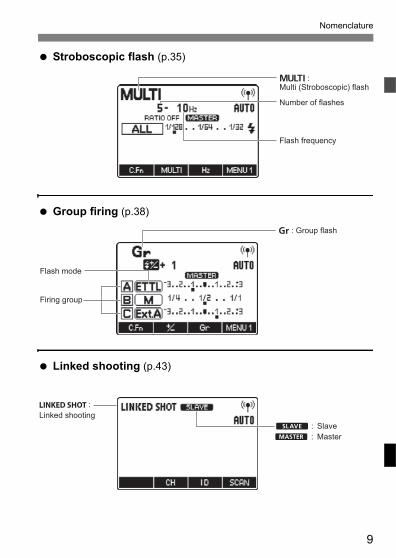
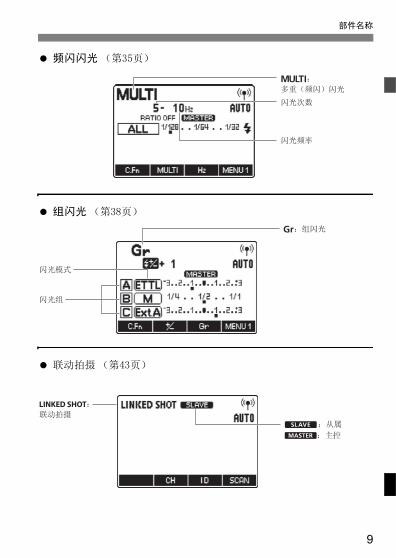
Stroboscopic flash (p.35)
Group firing (p.38)
Linked shooting (p.43)
? : Multi (Stroboscopic) flash
Number of flashes
Flash frequency
Firing group
Flash mode
[ : Group flash
x : SlaveM : Master
: Linked shooting
10
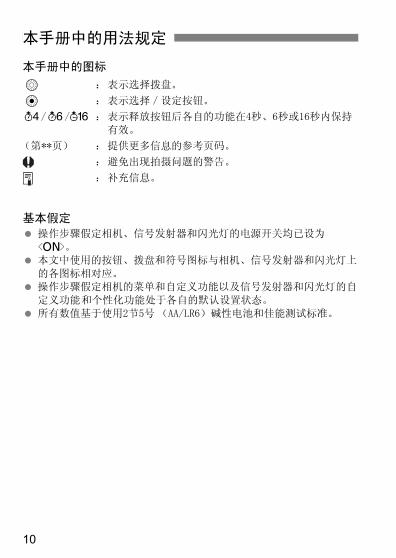
Icons in this Manual9 : Indicates the selection dial.8 : Indicates the select/set button.3/1/2 : Indicates that the respective function remains active
for 4 sec., 6 sec. or 16 sec. after you let go of the button.
(p.**) : Reference page numbers for more information.: Warning to prevent shooting problems.: Supplemental information.
Basic AssumptionsThe operation procedures assume that the power switches of the camera, transmitter and Speedlite are already set to <K>.The icons used for buttons, dials and symbols in the text match the icons found on the camera, transmitter and Speedlite.The operation procedures assume that the menu and Custom Functions of the camera and the Custom Functions and Personal Functions of the transmitter and the Speedlite are at their default settings.All figures are based on the use of two AA/LR6 alkaline batteries and Canon’s testing standards.
Conventions Used in this Manual
11
1Getting Started
This chapter describes the preparations before starting wireless flash shooting.
12
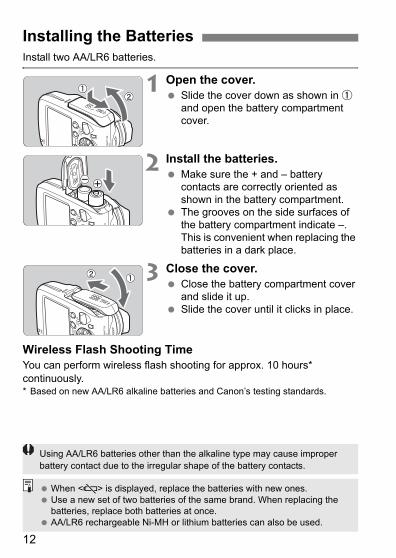
Install two AA/LR6 batteries.
1 Open the cover. Slide the cover down as shown in " and open the battery compartment cover.
2 Install the batteries. Make sure the + and – battery contacts are correctly oriented as shown in the battery compartment.The grooves on the side surfaces of the battery compartment indicate –. This is convenient when replacing the batteries in a dark place.
3 Close the cover.Close the battery compartment cover and slide it up.Slide the cover until it clicks in place.
Wireless Flash Shooting TimeYou can perform wireless flash shooting for approx. 10 hours* continuously.* Based on new AA/LR6 alkaline batteries and Canon’s testing standards.
Installing the Batteries
Using AA/LR6 batteries other than the alkaline type may cause improper battery contact due to the irregular shape of the battery contacts.
When <!> is displayed, replace the batteries with new ones.Use a new set of two batteries of the same brand. When replacing the batteries, replace both batteries at once.AA/LR6 rechargeable Ni-MH or lithium batteries can also be used.
13
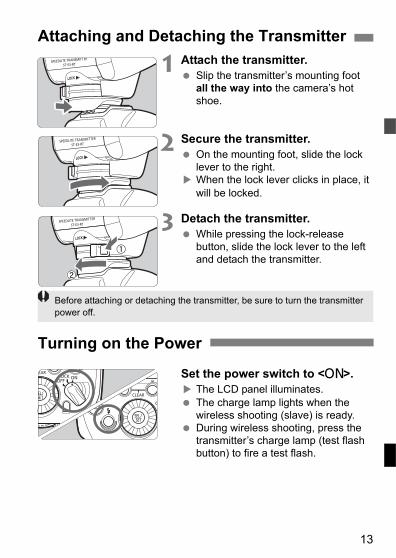
1 Attach the transmitter. Slip the transmitter’s mounting foot all the way into the camera’s hot shoe.
2 Secure the transmitter. On the mounting foot, slide the lock lever to the right.When the lock lever clicks in place, it will be locked.
3 Detach the transmitter.While pressing the lock-release button, slide the lock lever to the left and detach the transmitter.
Set the power switch to <K>. The LCD panel illuminates.The charge lamp lights when the wireless shooting (slave) is ready.During wireless shooting, press the transmitter’s charge lamp (test flash button) to fire a test flash.
Attaching and Detaching the Transmitter
Turning on the Power
Before attaching or detaching the transmitter, be sure to turn the transmitter power off.
14
Turning on the Power
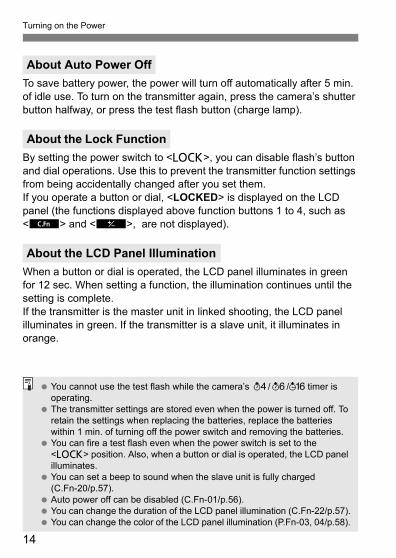
To save battery power, the power will turn off automatically after 5 min. of idle use. To turn on the transmitter again, press the camera’s shutter button halfway, or press the test flash button (charge lamp).
By setting the power switch to <a>, you can disable flash’s button and dial operations. Use this to prevent the transmitter function settings from being accidentally changed after you set them.If you operate a button or dial, <LOCKED> is displayed on the LCD panel (the functions displayed above function buttons 1 to 4, such as <=> and <@>, are not displayed).
When a button or dial is operated, the LCD panel illuminates in green for 12 sec. When setting a function, the illumination continues until the setting is complete.If the transmitter is the master unit in linked shooting, the LCD panel illuminates in green. If the transmitter is a slave unit, it illuminates in orange.
About Auto Power Off
About the Lock Function
About the LCD Panel Illumination
You cannot use the test flash while the camera’s 3/1/2 timer is operating.The transmitter settings are stored even when the power is turned off. To retain the settings when replacing the batteries, replace the batteries within 1 min. of turning off the power switch and removing the batteries.You can fire a test flash even when the power switch is set to the <a> position. Also, when a button or dial is operated, the LCD panel illuminates.You can set a beep to sound when the slave unit is fully charged (C.Fn-20/p.57).Auto power off can be disabled (C.Fn-01/p.56).You can change the duration of the LCD panel illumination (C.Fn-22/p.57).You can change the color of the LCD panel illumination (P.Fn-03, 04/p.58).
15
2Wireless Flash Shooting: Radio TransmissionThis chapter describes wireless flash shooting.For the accessories required for wireless shooting, see the system map (p.60). For the regions of use, restrictions, and precautions related to radio transmission, refer to the separate leaflet.
When the camera’s shooting mode is set to a fully automatic mode or an Image Zone mode, the operations in this chapter are not available. Set the camera’s shooting mode to V/X/W/q/5 (Creative Zone mode).
The transmitter attached to the camera is called the master unit, and a flash that is wirelessly controlled is called the slave unit.
16
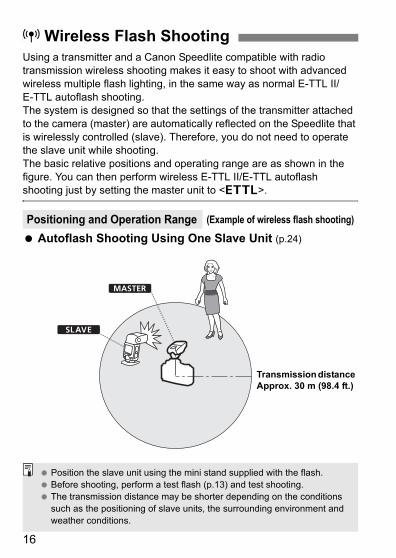
Using a transmitter and a Canon Speedlite compatible with radio transmission wireless shooting makes it easy to shoot with advanced wireless multiple flash lighting, in the same way as normal E-TTL II/E-TTL autoflash shooting.The system is designed so that the settings of the transmitter attached to the camera (master) are automatically reflected on the Speedlite that is wirelessly controlled (slave). Therefore, you do not need to operate the slave unit while shooting.The basic relative positions and operating range are as shown in the figure. You can then perform wireless E-TTL II/E-TTL autoflash shooting just by setting the master unit to <a>.
Autoflash Shooting Using One Slave Unit (p.24)
' Wireless Flash Shooting
Positioning and Operation Range (Example of wireless flash shooting)
x
M
Transmission distance Approx. 30 m (98.4 ft.)
Position the slave unit using the mini stand supplied with the flash.Before shooting, perform a test flash (p.13) and test shooting.The transmission distance may be shorter depending on the conditions such as the positioning of slave units, the surrounding environment and weather conditions.
17
' Wireless Flash Shooting
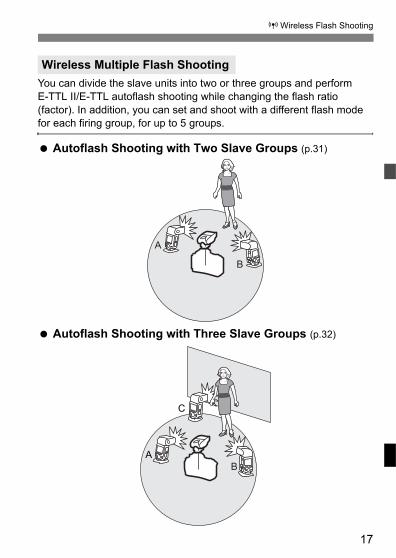
You can divide the slave units into two or three groups and perform E-TTL II/E-TTL autoflash shooting while changing the flash ratio (factor). In addition, you can set and shoot with a different flash mode for each firing group, for up to 5 groups.
Autoflash Shooting with Two Slave Groups (p.31)
Autoflash Shooting with Three Slave Groups (p.32)
Wireless Multiple Flash Shooting
A
B
AB
C

18
' Wireless Flash Shooting
Shooting with a Different Flash Mode set for Each Group (p.38)
A BC
ED
Manual flash
Manual flash
Auto externalflash metering
E-TTL II
Manual flash
* The flash mode settings are indicated only as an example.
Ceiling
19
' Wireless Flash Shooting
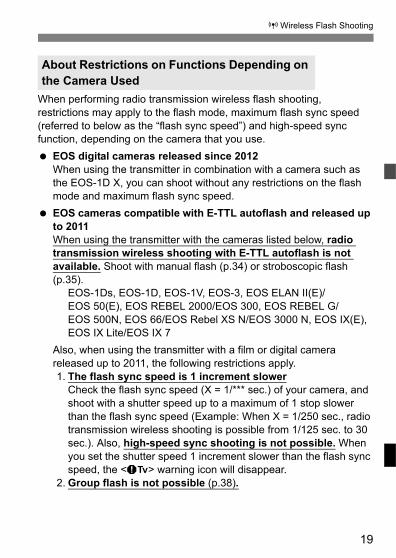
When performing radio transmission wireless flash shooting, restrictions may apply to the flash mode, maximum flash sync speed (referred to below as the “flash sync speed”) and high-speed sync function, depending on the camera that you use.
EOS digital cameras released since 2012When using the transmitter in combination with a camera such as the EOS-1D X, you can shoot without any restrictions on the flash mode and maximum flash sync speed.EOS cameras compatible with E-TTL autoflash and released up to 2011When using the transmitter with the cameras listed below, radio transmission wireless shooting with E-TTL autoflash is not available. Shoot with manual flash (p.34) or stroboscopic flash (p.35).
EOS-1Ds, EOS-1D, EOS-1V, EOS-3, EOS ELAN II(E)/EOS 50(E), EOS REBEL 2000/EOS 300, EOS REBEL G/EOS 500N, EOS 66/EOS Rebel XS N/EOS 3000 N, EOS IX(E), EOS IX Lite/EOS IX 7
Also, when using the transmitter with a film or digital camera released up to 2011, the following restrictions apply.1. The flash sync speed is 1 increment slower
Check the flash sync speed (X = 1/*** sec.) of your camera, and shoot with a shutter speed up to a maximum of 1 stop slower than the flash sync speed (Example: When X = 1/250 sec., radio transmission wireless shooting is possible from 1/125 sec. to 30 sec.). Also, high-speed sync shooting is not possible. When you set the shutter speed 1 increment slower than the flash sync speed, the <k> warning icon will disappear.
2. Group flash is not possible (p.38).
About Restrictions on Functions Depending on the Camera Used
20
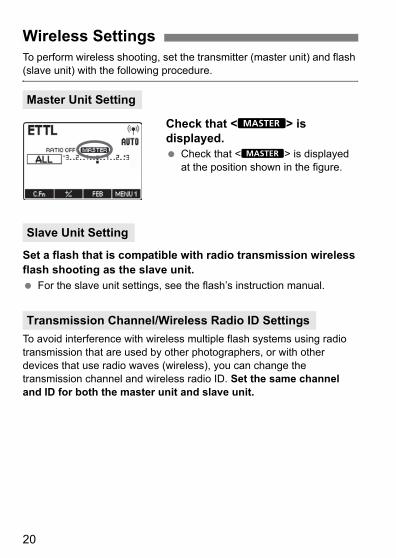
To perform wireless shooting, set the transmitter (master unit) and flash (slave unit) with the following procedure.
Check that <M> is displayed.
Check that <M> is displayed at the position shown in the figure.
Set a flash that is compatible with radio transmission wireless flash shooting as the slave unit.
For the slave unit settings, see the flash’s instruction manual.
To avoid interference with wireless multiple flash systems using radio transmission that are used by other photographers, or with other devices that use radio waves (wireless), you can change the transmission channel and wireless radio ID. Set the same channel and ID for both the master unit and slave unit.
Wireless Settings
Master Unit Setting
Slave Unit Setting
Transmission Channel/Wireless Radio ID Settings
21
Wireless Settings
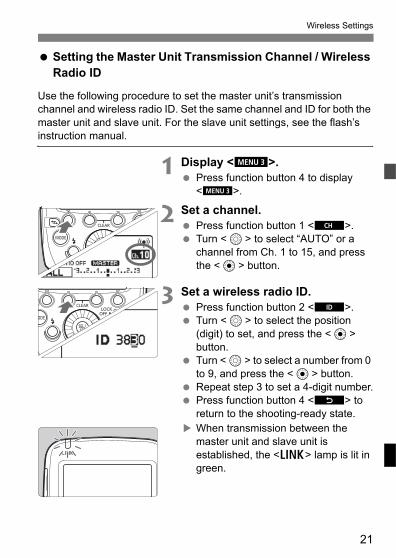
Setting the Master Unit Transmission Channel / Wireless Radio ID
Use the following procedure to set the master unit’s transmission channel and wireless radio ID. Set the same channel and ID for both the master unit and slave unit. For the slave unit settings, see the flash’s instruction manual.
1 Display <O>.Press function button 4 to display <O>.
2 Set a channel.Press function button 1 <C>.Turn <9> to select “AUTO” or a channel from Ch. 1 to 15, and press the <8> button.
3 Set a wireless radio ID.Press function button 2 <H>.Turn <9> to select the position (digit) to set, and press the <8> button.Turn <9> to select a number from 0 to 9, and press the <8> button.Repeat step 3 to set a 4-digit number.Press function button 4 <?> to return to the shooting-ready state.When transmission between the master unit and slave unit is established, the <D> lamp is lit in green.
22
Wireless Settings
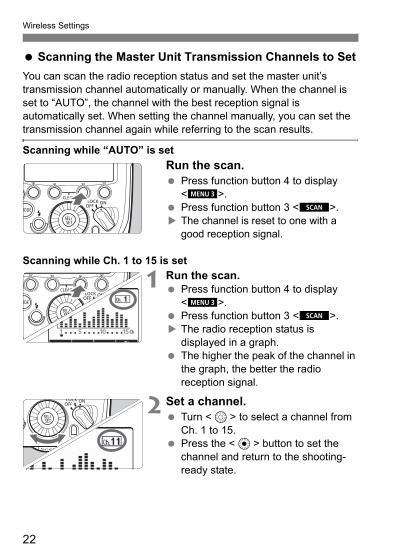
Scanning the Master Unit Transmission Channels to SetYou can scan the radio reception status and set the master unit’s transmission channel automatically or manually. When the channel is set to “AUTO”, the channel with the best reception signal is automatically set. When setting the channel manually, you can set the transmission channel again while referring to the scan results.
Scanning while “AUTO” is setRun the scan.
Press function button 4 to display <O>.Press function button 3 <W>.The channel is reset to one with a good reception signal.
Scanning while Ch. 1 to 15 is set
1 Run the scan.Press function button 4 to display <O>.Press function button 3 <W>.The radio reception status is displayed in a graph.The higher the peak of the channel in the graph, the better the radio reception signal.
2 Set a channel.Turn <9> to select a channel from Ch. 1 to 15.Press the <8> button to set the channel and return to the shooting-ready state.
23
Wireless Settings
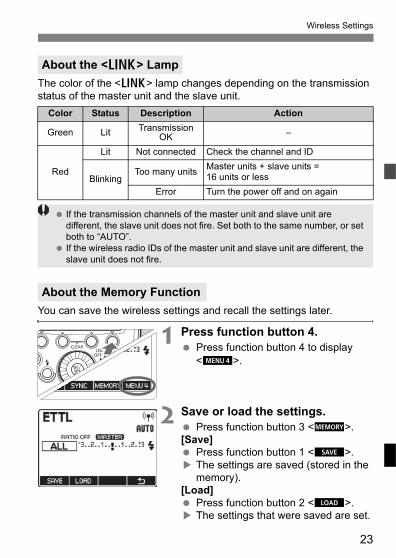
The color of the <D> lamp changes depending on the transmission status of the master unit and the slave unit.
You can save the wireless settings and recall the settings later.
1 Press function button 4.Press function button 4 to display <P>.
2 Save or load the settings.Press function button 3 <L>.
[Save]Press function button 1 <V>.The settings are saved (stored in the memory).
[Load]Press function button 2 <J>.The settings that were saved are set.
About the <D> Lamp
Color Status Description Action
Green Lit Transmission OK –
Red
Lit Not connected Check the channel and ID
BlinkingToo many units Master units + slave units =
16 units or lessError Turn the power off and on again
About the Memory Function
If the transmission channels of the master unit and slave unit are different, the slave unit does not fire. Set both to the same number, or set both to “AUTO”.If the wireless radio IDs of the master unit and slave unit are different, the slave unit does not fire.
24
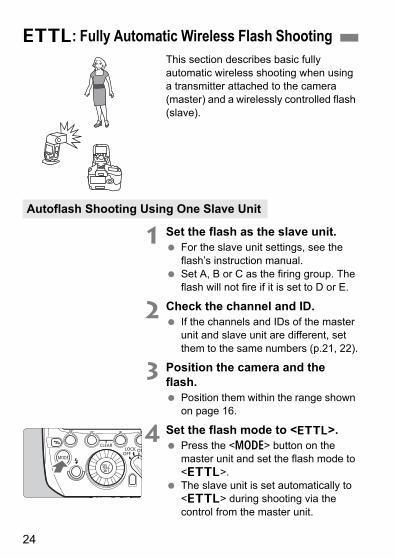
This section describes basic fully automatic wireless shooting when using a transmitter attached to the camera (master) and a wirelessly controlled flash (slave).
1 Set the flash as the slave unit.For the slave unit settings, see the flash’s instruction manual.Set A, B or C as the firing group. The flash will not fire if it is set to D or E.
2 Check the channel and ID.If the channels and IDs of the master unit and slave unit are different, set them to the same numbers (p.21, 22).
3 Position the camera and the flash.
Position them within the range shown on page 16.
4 Set the flash mode to <a>.Press the <E> button on the master unit and set the flash mode to <a>.The slave unit is set automatically to <a> during shooting via the control from the master unit.
a: Fully Automatic Wireless Flash Shooting
Autoflash Shooting Using One Slave Unit
25
a: Fully Automatic Wireless Flash Shooting
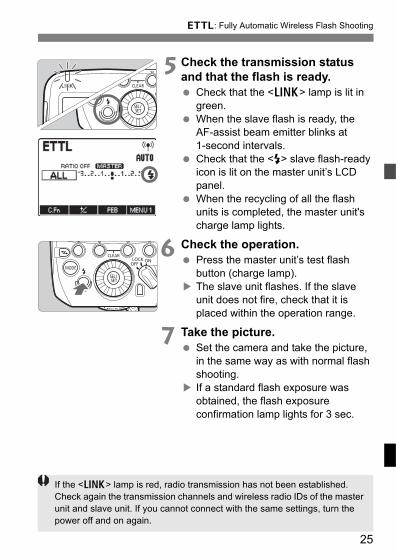
5 Check the transmission status and that the flash is ready.
Check that the <D> lamp is lit in green.When the slave flash is ready, the AF-assist beam emitter blinks at 1-second intervals.Check that the <Q> slave flash-ready icon is lit on the master unit’s LCD panel.When the recycling of all the flash units is completed, the master unit's charge lamp lights.
6 Check the operation.Press the master unit’s test flash button (charge lamp).The slave unit flashes. If the slave unit does not fire, check that it is placed within the operation range.
7 Take the picture.Set the camera and take the picture, in the same way as with normal flash shooting.If a standard flash exposure was obtained, the flash exposure confirmation lamp lights for 3 sec.
If the <D> lamp is red, radio transmission has not been established. Check again the transmission channels and wireless radio IDs of the master unit and slave unit. If you cannot connect with the same settings, turn the power off and on again.
26
a: Fully Automatic Wireless Flash Shooting
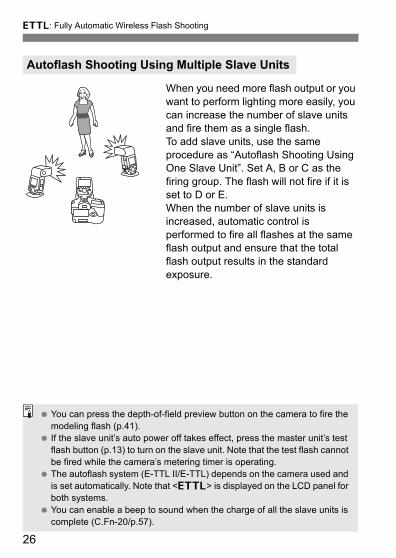
When you need more flash output or you want to perform lighting more easily, you can increase the number of slave units and fire them as a single flash.To add slave units, use the same procedure as “Autoflash Shooting Using One Slave Unit”. Set A, B or C as the firing group. The flash will not fire if it is set to D or E.When the number of slave units is increased, automatic control is performed to fire all flashes at the same flash output and ensure that the total flash output results in the standard exposure.
Autoflash Shooting Using Multiple Slave Units
You can press the depth-of-field preview button on the camera to fire the modeling flash (p.41).If the slave unit’s auto power off takes effect, press the master unit’s test flash button (p.13) to turn on the slave unit. Note that the test flash cannot be fired while the camera’s metering timer is operating.The autoflash system (E-TTL II/E-TTL) depends on the camera used and is set automatically. Note that <a> is displayed on the LCD panel for both systems.You can enable a beep to sound when the charge of all the slave units is complete (C.Fn-20/p.57).
27
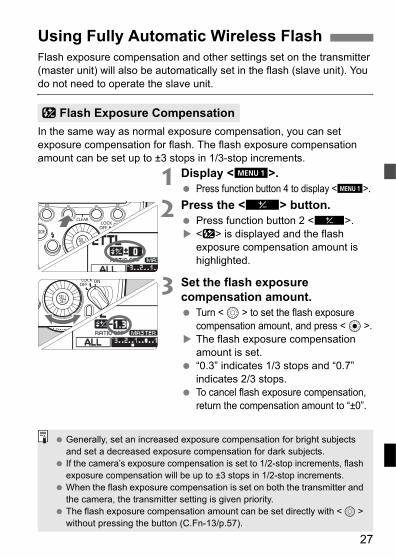
Flash exposure compensation and other settings set on the transmitter (master unit) will also be automatically set in the flash (slave unit). You do not need to operate the slave unit.
In the same way as normal exposure compensation, you can set exposure compensation for flash. The flash exposure compensation amount can be set up to ±3 stops in 1/3-stop increments.
1 Display <M>.Press function button 4 to display <M>.
2 Press the <@> button.Press function button 2 <@>.<f> is displayed and the flash exposure compensation amount is highlighted.
3 Set the flash exposure compensation amount.
Turn <9> to set the flash exposure compensation amount, and press <8>.The flash exposure compensation amount is set.“0.3” indicates 1/3 stops and “0.7” indicates 2/3 stops.To cancel flash exposure compensation, return the compensation amount to “±0”.
Using Fully Automatic Wireless Flash
f Flash Exposure Compensation
Generally, set an increased exposure compensation for bright subjects and set a decreased exposure compensation for dark subjects.If the camera’s exposure compensation is set to 1/2-stop increments, flash exposure compensation will be up to ±3 stops in 1/2-stop increments.When the flash exposure compensation is set on both the transmitter and the camera, the transmitter setting is given priority.The flash exposure compensation amount can be set directly with <9> without pressing the button (C.Fn-13/p.57).
28
Using Fully Automatic Wireless Flash
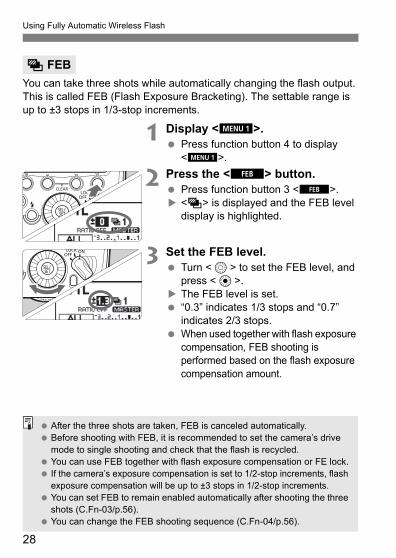
You can take three shots while automatically changing the flash output. This is called FEB (Flash Exposure Bracketing). The settable range is up to ±3 stops in 1/3-stop increments.
1 Display <M>.Press function button 4 to display <M>.
2 Press the <E> button.Press function button 3 <E>.<g> is displayed and the FEB level display is highlighted.
3 Set the FEB level.Turn <9> to set the FEB level, and press <8>.The FEB level is set.“0.3” indicates 1/3 stops and “0.7” indicates 2/3 stops.When used together with flash exposure compensation, FEB shooting is performed based on the flash exposure compensation amount.
g FEB
After the three shots are taken, FEB is canceled automatically.Before shooting with FEB, it is recommended to set the camera’s drive mode to single shooting and check that the flash is recycled.You can use FEB together with flash exposure compensation or FE lock.If the camera’s exposure compensation is set to 1/2-stop increments, flash exposure compensation will be up to ±3 stops in 1/2-stop increments.You can set FEB to remain enabled automatically after shooting the three shots (C.Fn-03/p.56).You can change the FEB shooting sequence (C.Fn-04/p.56).
29
Using Fully Automatic Wireless Flash
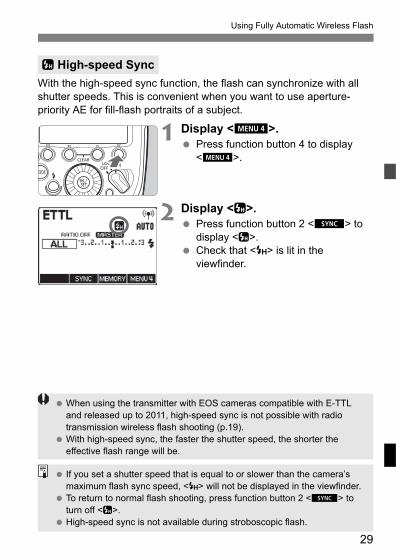
With the high-speed sync function, the flash can synchronize with all shutter speeds. This is convenient when you want to use aperture-priority AE for fill-flash portraits of a subject.
1 Display <P>.Press function button 4 to display <P>.
2 Display <c>.Press function button 2 <Y> to display <c>.Check that <F> is lit in the viewfinder.
c High-speed Sync
When using the transmitter with EOS cameras compatible with E-TTL and released up to 2011, high-speed sync is not possible with radio transmission wireless flash shooting (p.19).With high-speed sync, the faster the shutter speed, the shorter the effective flash range will be.
If you set a shutter speed that is equal to or slower than the camera’s maximum flash sync speed, <F> will not be displayed in the viewfinder.To return to normal flash shooting, press function button 2 <Y> to turn off <c>.High-speed sync is not available during stroboscopic flash.
30
Using Fully Automatic Wireless Flash
FE (Flash Exposure) lock locks the correct flash exposure setting for any part of the scene.Perform FE lock by operating the camera. For the operations, see the camera and flash’s instruction manual.
You can use two or more master units (master units + slave units = maximum of 16 units). By preparing multiple cameras with master units attached, you can shoot by changing cameras while keeping the same lighting (slave units).Note that when using two or more master units, the color of the <D> lamp varies depending on the order in which the power was turned on. The first master (main master) is green and the second and subsequent masters (sub-masters) are orange.
7: FE Lock
About Master Units
If a correct exposure cannot be obtained when FE lock is performed, <Q> blinks in the viewfinder. Move the slave unit closer to the subject, open the aperture, and perform FE lock again. You can also increase the ISO speed when using a digital camera.If the target subject is too small in the camera’s viewfinder, FE lock might not be very effective.
If the <D> lamp is red, the connection has not been established. After checking the transmission channel and wireless radio ID, turn the power of each master unit off, and turn it on.
31
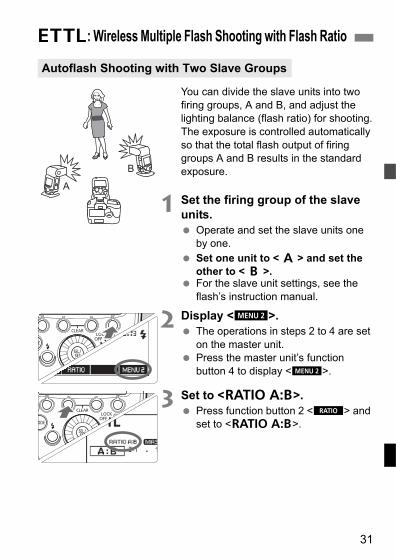
You can divide the slave units into two firing groups, A and B, and adjust the lighting balance (flash ratio) for shooting.The exposure is controlled automatically so that the total flash output of firing groups A and B results in the standard exposure.
1 Set the firing group of the slave units.
Operate and set the slave units one by one.Set one unit to <4> and set the other to <5>.For the slave unit settings, see the flash’s instruction manual.
2 Display <N>.The operations in steps 2 to 4 are set on the master unit.Press the master unit’s function button 4 to display <N>.
3 Set to <%>.Press function button 2 <T> and set to <%>.
a: Wireless Multiple Flash Shooting with Flash Ratio
Autoflash Shooting with Two Slave Groups
A
B
32
a: Wireless Multiple Flash Shooting with Flash Ratio
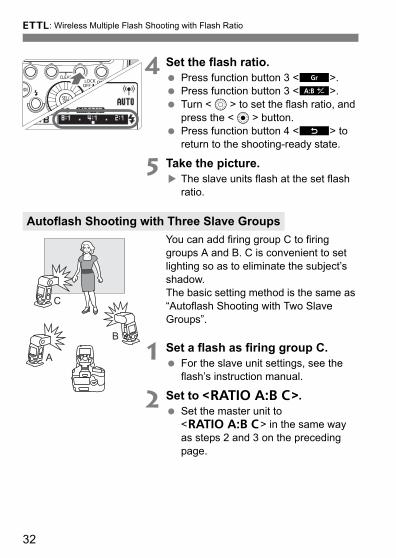
4 Set the flash ratio.Press function button 3 <F>.Press function button 3 <A>.Turn <9> to set the flash ratio, and press the <8> button.Press function button 4 <?> to return to the shooting-ready state.
5 Take the picture.The slave units flash at the set flash ratio.
You can add firing group C to firing groups A and B. C is convenient to set lighting so as to eliminate the subject’s shadow.The basic setting method is the same as “Autoflash Shooting with Two Slave Groups”.
1 Set a flash as firing group C.For the slave unit settings, see the flash’s instruction manual.
2 Set to <^>.Set the master unit to <^> in the same way as steps 2 and 3 on the preceding page.
Autoflash Shooting with Three Slave Groups
C
A
B
33
a: Wireless Multiple Flash Shooting with Flash Ratio
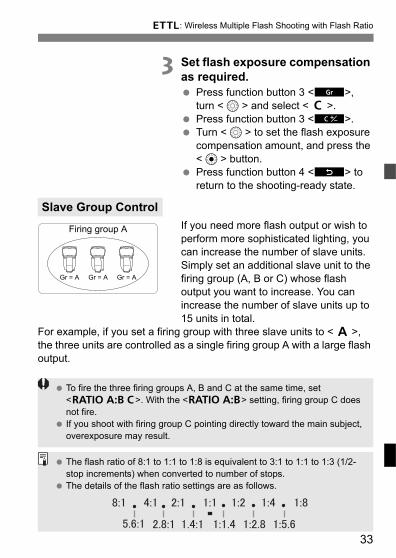
3 Set flash exposure compensation as required.
Press function button 3 <F>, turn <9> and select <6>.Press function button 3 <B>.Turn <9> to set the flash exposure compensation amount, and press the <8> button.Press function button 4 <?> to return to the shooting-ready state.
If you need more flash output or wish to perform more sophisticated lighting, you can increase the number of slave units. Simply set an additional slave unit to the firing group (A, B or C) whose flash output you want to increase. You can increase the number of slave units up to 15 units in total.
For example, if you set a firing group with three slave units to <4>, the three units are controlled as a single firing group A with a large flash output.
Slave Group Control
Gr = A Gr = AGr = A
Firing group A
To fire the three firing groups A, B and C at the same time, set <^>. With the <%> setting, firing group C does not fire.If you shoot with firing group C pointing directly toward the main subject, overexposure may result.
The flash ratio of 8:1 to 1:1 to 1:8 is equivalent to 3:1 to 1:1 to 1:3 (1/2-stop increments) when converted to number of stops.The details of the flash ratio settings are as follows.
34
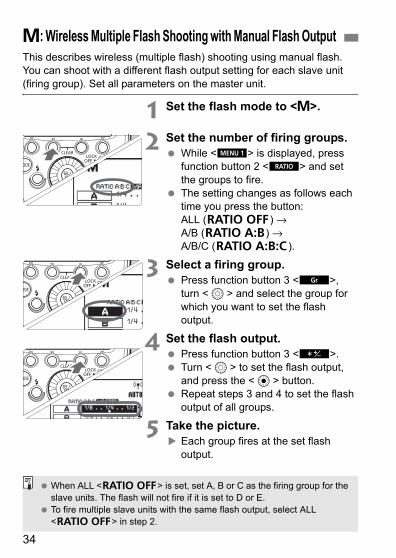
This describes wireless (multiple flash) shooting using manual flash. You can shoot with a different flash output setting for each slave unit (firing group). Set all parameters on the master unit.
1 Set the flash mode to <q>.
2 Set the number of firing groups.While <M> is displayed, press function button 2 <T> and set the groups to fire.The setting changes as follows each time you press the button: ALL (_) →A/B (%) →A/B/C (]).
3 Select a firing group.Press function button 3 <F>, turn <9> and select the group for which you want to set the flash output.
4 Set the flash output.Press function button 3 <1>.Turn <9> to set the flash output, and press the <8> button.Repeat steps 3 and 4 to set the flash output of all groups.
5 Take the picture.Each group fires at the set flash output.
q: Wireless Multiple Flash Shooting with Manual Flash Output
When ALL <_> is set, set A, B or C as the firing group for the slave units. The flash will not fire if it is set to D or E.To fire multiple slave units with the same flash output, select ALL <_> in step 2.
35
q: Wireless Multiple Flash Shooting with Manual Flash Output
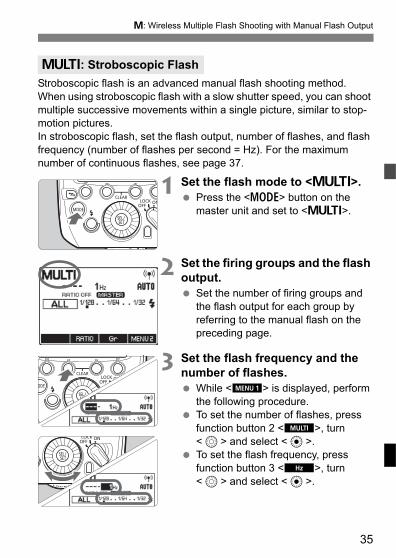
Stroboscopic flash is an advanced manual flash shooting method.When using stroboscopic flash with a slow shutter speed, you can shoot multiple successive movements within a single picture, similar to stop-motion pictures.In stroboscopic flash, set the flash output, number of flashes, and flash frequency (number of flashes per second = Hz). For the maximum number of continuous flashes, see page 37.
1 Set the flash mode to <?>.Press the <E> button on the master unit and set to <?>.
2 Set the firing groups and the flash output.
Set the number of firing groups and the flash output for each group by referring to the manual flash on the preceding page.
3 Set the flash frequency and the number of flashes.
While <M> is displayed, perform the following procedure.To set the number of flashes, press function button 2 <Q>, turn <9> and select <8>.To set the flash frequency, press function button 3 <G>, turn <9> and select <8>.
?: Stroboscopic Flash
36
q: Wireless Multiple Flash Shooting with Manual Flash Output
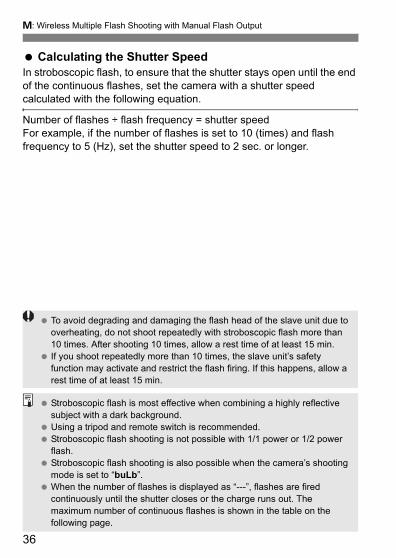
Calculating the Shutter SpeedIn stroboscopic flash, to ensure that the shutter stays open until the end of the continuous flashes, set the camera with a shutter speed calculated with the following equation.
Number of flashes ÷ flash frequency = shutter speedFor example, if the number of flashes is set to 10 (times) and flash frequency to 5 (Hz), set the shutter speed to 2 sec. or longer.
To avoid degrading and damaging the flash head of the slave unit due to overheating, do not shoot repeatedly with stroboscopic flash more than 10 times. After shooting 10 times, allow a rest time of at least 15 min.If you shoot repeatedly more than 10 times, the slave unit’s safety function may activate and restrict the flash firing. If this happens, allow a rest time of at least 15 min.
Stroboscopic flash is most effective when combining a highly reflective subject with a dark background.Using a tripod and remote switch is recommended.Stroboscopic flash shooting is not possible with 1/1 power or 1/2 power flash.Stroboscopic flash shooting is also possible when the camera’s shooting mode is set to “buLb”.When the number of flashes is displayed as “---”, flashes are fired continuously until the shutter closes or the charge runs out. The maximum number of continuous flashes is shown in the table on the following page.
37
q: Wireless Multiple Flash Shooting with Manual Flash Output
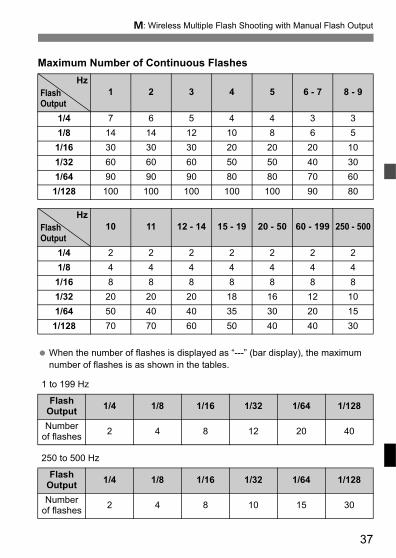
When the number of flashes is displayed as “---” (bar display), the maximum number of flashes is as shown in the tables.
1 to 199 Hz
250 to 500 Hz
Maximum Number of Continuous FlashesHz
Flash Output
1 2 3 4 5 6 - 7 8 - 9
1/4 7 6 5 4 4 3 31/8 14 14 12 10 8 6 51/16 30 30 30 20 20 20 101/32 60 60 60 50 50 40 301/64 90 90 90 80 80 70 601/128 100 100 100 100 100 90 80
HzFlash Output
10 11 12 - 14 15 - 19 20 - 50 60 - 199 250 - 500
1/4 2 2 2 2 2 2 21/8 4 4 4 4 4 4 41/16 8 8 8 8 8 8 81/32 20 20 20 18 16 12 101/64 50 40 40 35 30 20 151/128 70 70 60 50 40 40 30
Flash Output 1/4 1/8 1/16 1/32 1/64 1/128
Number of flashes 2 4 8 12 20 40
Flash Output 1/4 1/8 1/16 1/32 1/64 1/128
Number of flashes 2 4 8 10 15 30
38
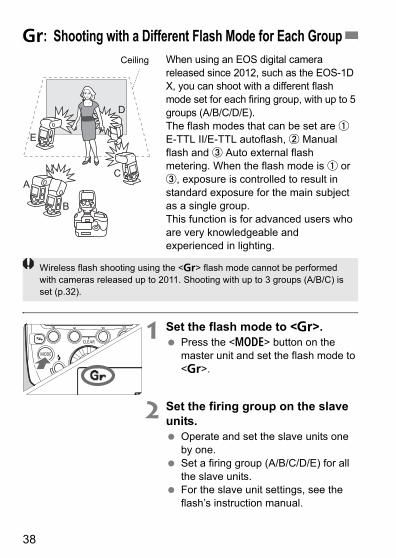
When using an EOS digital camera released since 2012, such as the EOS-1D X, you can shoot with a different flash mode set for each firing group, with up to 5 groups (A/B/C/D/E).The flash modes that can be set are " E-TTL II/E-TTL autoflash, # Manual flash and $ Auto external flash metering. When the flash mode is " or $, exposure is controlled to result in standard exposure for the main subject as a single group.This function is for advanced users who are very knowledgeable and experienced in lighting.
1 Set the flash mode to <[>.Press the <E> button on the master unit and set the flash mode to <[>.
2 Set the firing group on the slave units.
Operate and set the slave units one by one.Set a firing group (A/B/C/D/E) for all the slave units.For the slave unit settings, see the flash’s instruction manual.
[: Shooting with a Different Flash Mode for Each Group
A C
E
D
B
Ceiling
Wireless flash shooting using the <[> flash mode cannot be performed with cameras released up to 2011. Shooting with up to 3 groups (A/B/C) is set (p.32).
39
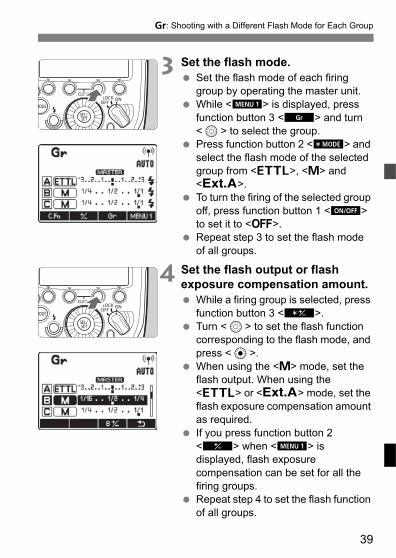
[: Shooting with a Different Flash Mode for Each Group
3 Set the flash mode.Set the flash mode of each firing group by operating the master unit.While <M> is displayed, press function button 3 <F> and turn <9> to select the group.Press function button 2 <2> and select the flash mode of the selected group from <a>, <q> and </>.To turn the firing of the selected group off, press function button 1 <R> to set it to <j>.Repeat step 3 to set the flash mode of all groups.
4 Set the flash output or flash exposure compensation amount.
While a firing group is selected, press function button 3 <1>.Turn <9> to set the flash function corresponding to the flash mode, and press <8>.When using the <q> mode, set the flash output. When using the <a> or </> mode, set the flash exposure compensation amount as required.If you press function button 2 <@> when <M> is displayed, flash exposure compensation can be set for all the firing groups.Repeat step 4 to set the flash function of all groups.
40
Clearing Transmitter Settings/Test Flash from a Slave Unit
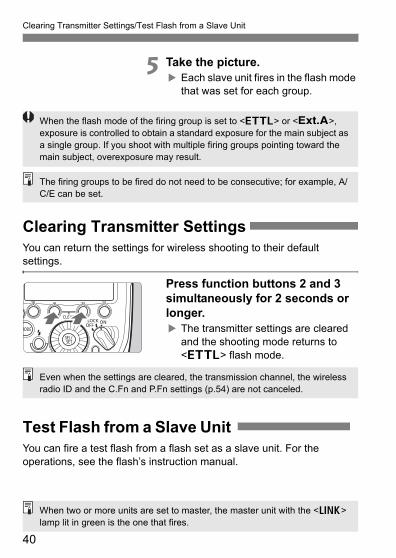
5 Take the picture.Each slave unit fires in the flash mode that was set for each group.
You can return the settings for wireless shooting to their default settings.
Press function buttons 2 and 3 simultaneously for 2 seconds or longer.
The transmitter settings are cleared and the shooting mode returns to <a> flash mode.
You can fire a test flash from a flash set as a slave unit. For the operations, see the flash’s instruction manual.
Clearing Transmitter Settings
When the flash mode of the firing group is set to <a> or </>, exposure is controlled to obtain a standard exposure for the main subject as a single group. If you shoot with multiple firing groups pointing toward the main subject, overexposure may result.
The firing groups to be fired do not need to be consecutive; for example, A/C/E can be set.
Test Flash from a Slave Unit
Even when the settings are cleared, the transmission channel, the wireless radio ID and the C.Fn and P.Fn settings (p.54) are not canceled.
When two or more units are set to master, the master unit with the <D> lamp lit in green is the one that fires.
41
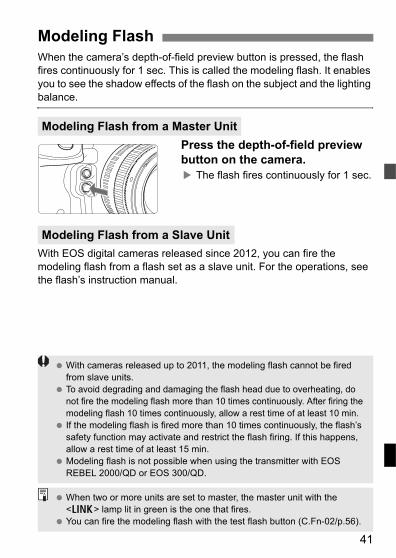
When the camera’s depth-of-field preview button is pressed, the flash fires continuously for 1 sec. This is called the modeling flash. It enables you to see the shadow effects of the flash on the subject and the lighting balance.
Press the depth-of-field preview button on the camera.
The flash fires continuously for 1 sec.
With EOS digital cameras released since 2012, you can fire the modeling flash from a flash set as a slave unit. For the operations, see the flash’s instruction manual.
Modeling Flash
Modeling Flash from a Master Unit
Modeling Flash from a Slave Unit
With cameras released up to 2011, the modeling flash cannot be fired from slave units.To avoid degrading and damaging the flash head due to overheating, do not fire the modeling flash more than 10 times continuously. After firing the modeling flash 10 times continuously, allow a rest time of at least 10 min.If the modeling flash is fired more than 10 times continuously, the flash’s safety function may activate and restrict the flash firing. If this happens, allow a rest time of at least 15 min.Modeling flash is not possible when using the transmitter with EOS REBEL 2000/QD or EOS 300/QD.
When two or more units are set to master, the master unit with the <D> lamp lit in green is the one that fires.You can fire the modeling flash with the test flash button (C.Fn-02/p.56).
42
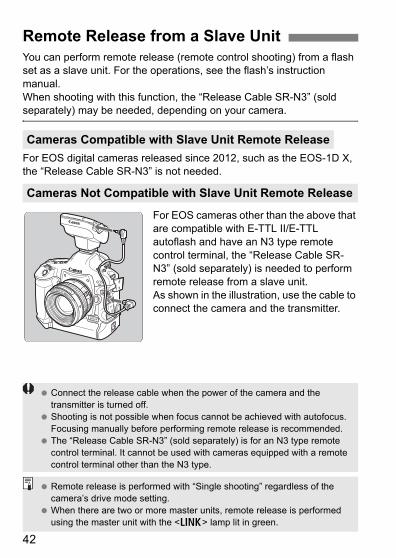
You can perform remote release (remote control shooting) from a flash set as a slave unit. For the operations, see the flash’s instruction manual.When shooting with this function, the “Release Cable SR-N3” (sold separately) may be needed, depending on your camera.
For EOS digital cameras released since 2012, such as the EOS-1D X, the “Release Cable SR-N3” is not needed.
For EOS cameras other than the above that are compatible with E-TTL II/E-TTL autoflash and have an N3 type remote control terminal, the “Release Cable SR-N3” (sold separately) is needed to perform remote release from a slave unit.As shown in the illustration, use the cable to connect the camera and the transmitter.
Remote Release from a Slave Unit
Cameras Compatible with Slave Unit Remote Release
Cameras Not Compatible with Slave Unit Remote Release
Connect the release cable when the power of the camera and the transmitter is turned off.Shooting is not possible when focus cannot be achieved with autofocus. Focusing manually before performing remote release is recommended.The “Release Cable SR-N3” (sold separately) is for an N3 type remote control terminal. It cannot be used with cameras equipped with a remote control terminal other than the N3 type.
Remote release is performed with “Single shooting” regardless of the camera’s drive mode setting.When there are two or more master units, remote release is performed using the master unit with the <D> lamp lit in green.
43
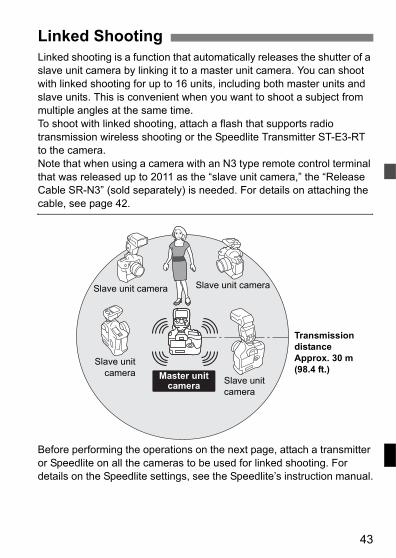
Linked shooting is a function that automatically releases the shutter of a slave unit camera by linking it to a master unit camera. You can shoot with linked shooting for up to 16 units, including both master units and slave units. This is convenient when you want to shoot a subject from multiple angles at the same time.To shoot with linked shooting, attach a flash that supports radio transmission wireless shooting or the Speedlite Transmitter ST-E3-RT to the camera. Note that when using a camera with an N3 type remote control terminal that was released up to 2011 as the “slave unit camera,” the “Release Cable SR-N3” (sold separately) is needed. For details on attaching the cable, see page 42.
Before performing the operations on the next page, attach a transmitter or Speedlite on all the cameras to be used for linked shooting. For details on the Speedlite settings, see the Speedlite’s instruction manual.
Linked Shooting
Master unitcamera
Slave unit cameraSlave unit camera
Slave unit camera
Slave unitcamera
Transmission distance Approx. 30 m (98.4 ft.)
44
Linked Shooting
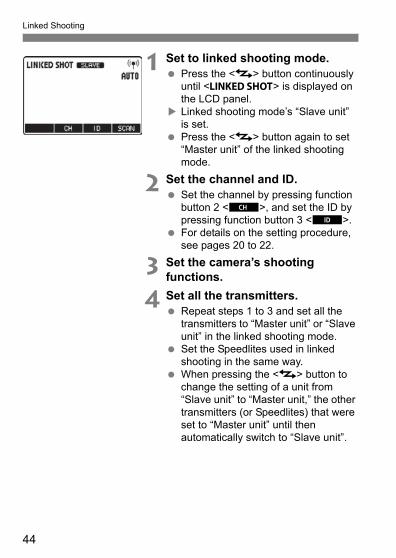
1 Set to linked shooting mode.Press the <I> button continuously until <b> is displayed on the LCD panel.Linked shooting mode’s “Slave unit” is set.Press the <I> button again to set “Master unit” of the linked shooting mode.
2 Set the channel and ID.Set the channel by pressing function button 2 <C>, and set the ID by pressing function button 3 <H>.For details on the setting procedure, see pages 20 to 22.
3 Set the camera’s shooting functions.
4 Set all the transmitters.Repeat steps 1 to 3 and set all the transmitters to “Master unit” or “Slave unit” in the linked shooting mode.Set the Speedlites used in linked shooting in the same way.When pressing the <I> button to change the setting of a unit from “Slave unit” to “Master unit,” the other transmitters (or Speedlites) that were set to “Master unit” until then automatically switch to “Slave unit”.
45
Linked Shooting
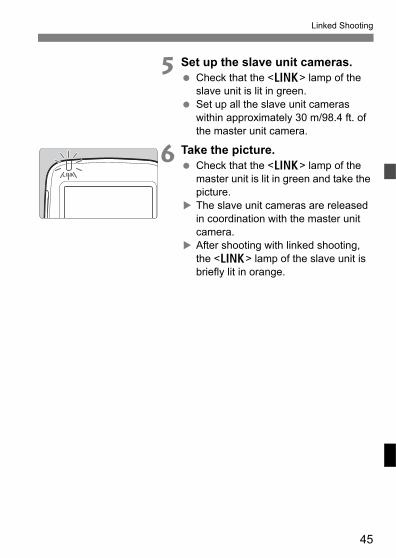
5 Set up the slave unit cameras.Check that the <D> lamp of the slave unit is lit in green.Set up all the slave unit cameras within approximately 30 m/98.4 ft. of the master unit camera.
6 Take the picture.Check that the <D> lamp of the master unit is lit in green and take the picture.The slave unit cameras are released in coordination with the master unit camera.After shooting with linked shooting, the <D> lamp of the slave unit is briefly lit in orange.
46
Linked Shooting
Shooting with manual focus is recommended for the slave unit cameras. If focus cannot be achieved with autofocus, linked shooting is not possible with the corresponding slave unit camera.There is a short time lag between the release of the slave unit camera and the release timing of the master unit camera. Perfectly simultaneous shooting is not possible.If you fire multiple flash units at the same time during linked shooting, the appropriate exposure may not be obtained or uneven exposure may result.When [Flash firing] in [Flash function settings] is set to [Disabled] (p.50), linked shooting cannot be performed.When performing linked shooting in the Live View state, set [Silent LV shoot.] on the master camera menu to [Disabled]. If [Mode1] or [Mode2] is set, the slave unit cameras will not be released.The transmission distance may be shorter depending on the conditions such as the positioning of slave units, the surrounding environment and weather conditions.The linked shooting function is the same function as the linked shooting featured by the WFT series of wireless file transmitters. However, linked shooting cannot be performed in combination with the WFT series. Moreover, the release time lag differs from linked shooting performed using the WFT series.
You can use this function as a master unit remote control for linked shooting without attaching a Speedlite or transmitter to a camera. When function button 1 <U> on the master unit is pressed, all the slave unit cameras are released.During linked shooting, the time until auto power off takes effect is 5 min.

47
3Setting Transmitter Functions
with Camera OperationsThis chapter describes how to set the transmitter functions from the camera’s menu screen.
When the camera’s shooting mode is set to a fully automatic mode or an Image Zone mode, the operations in this chapter are not available. Set the camera’s shooting mode to V/X/W/q/5 (Creative Zone mode).
48
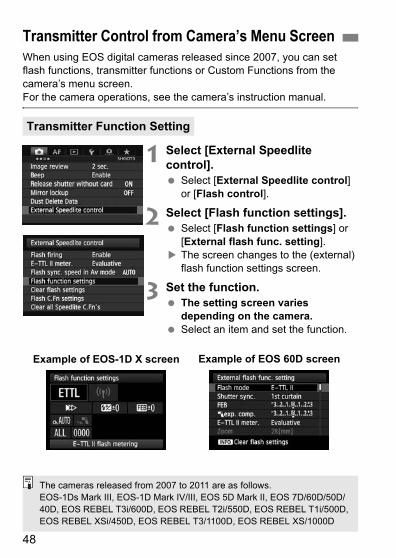
When using EOS digital cameras released since 2007, you can set flash functions, transmitter functions or Custom Functions from the camera’s menu screen.For the camera operations, see the camera’s instruction manual.
1 Select [External Speedlite control].
Select [External Speedlite control] or [Flash control].
2 Select [Flash function settings].Select [Flash function settings] or [External flash func. setting].The screen changes to the (external) flash function settings screen.
3 Set the function.The setting screen varies depending on the camera.Select an item and set the function.
Transmitter Control from Camera’s Menu Screen
Transmitter Function Setting
Example of EOS-1D X screen Example of EOS 60D screen
The cameras released from 2007 to 2011 are as follows.EOS-1Ds Mark III, EOS-1D Mark IV/III, EOS 5D Mark II, EOS 7D/60D/50D/40D, EOS REBEL T3i/600D, EOS REBEL T2i/550D, EOS REBEL T1i/500D, EOS REBEL XSi/450D, EOS REBEL T3/1100D, EOS REBEL XS/1000D
49
Transmitter Control from Camera’s Menu Screen
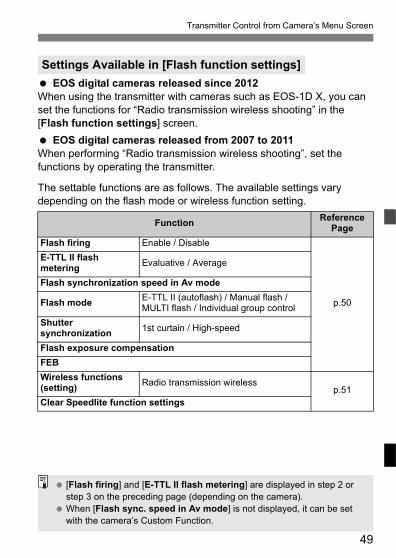
EOS digital cameras released since 2012When using the transmitter with cameras such as EOS-1D X, you can set the functions for “Radio transmission wireless shooting” in the [Flash function settings] screen.
EOS digital cameras released from 2007 to 2011When performing “Radio transmission wireless shooting”, set the functions by operating the transmitter.
The settable functions are as follows. The available settings vary depending on the flash mode or wireless function setting.
Settings Available in [Flash function settings]
Function Reference Page
Flash firing Enable / Disable
p.50
E-TTL II flash metering Evaluative / Average
Flash synchronization speed in Av mode
Flash mode E-TTL II (autoflash) / Manual flash / MULTI flash / Individual group control
Shutter synchronization 1st curtain / High-speed
Flash exposure compensationFEBWireless functions (setting) Radio transmission wireless
p.51Clear Speedlite function settings
[Flash firing] and [E-TTL II flash metering] are displayed in step 2 or step 3 on the preceding page (depending on the camera).When [Flash sync. speed in Av mode] is not displayed, it can be set with the camera’s Custom Function.
50
Transmitter Control from Camera’s Menu Screen
Flash firingTo perform wireless flash shooting, set to [Enable]. When [Disable] is set, wireless flash shooting is not available.
E-TTL II flash meteringFor normal exposures, set it to [Evaluative]. If [Average] is set, the flash exposure will be averaged for the entire scene metered by the camera. Flash exposure compensation may be necessary depending on the scene. This setting is for advanced users.
Flash synchronization speed in Av modeYou can set the flash sync speed when performing wireless flash shooting in aperture-priority AE (W) mode.
Flash modeYou can select the flash mode from [E-TTL II], [Manual flash], [MULTI flash] and [Individual group control] to suit your desired flash shooting.
Shutter synchronizationYou can select the flash firing timing/method from [1st curtain] and [High-speed synchronization]. To perform normal wireless flash shooting, set it to [1st curtain].
Flash exposure compensationIn the same way as normal exposure compensation, you can set exposure compensation for flash. The flash exposure compensation amount can be set up to ±3 stops in 1/3-stop increments.
FEBYou can take three shots while automatically changing the flash output. The settable range is up to ±3 stops in 1/3-stop increments.

51
Transmitter Control from Camera’s Menu Screen
Wireless flash functions (setting)Radio transmission wireless flash shooting is set automatically. For details, see Chapter 2.
Clear Speedlite (function) settingsYou can return the transmitter settings to their default settings.
When [Flash mode] is set to [Individual group control], you can select [E-TTL II], [Manual flash], [Auto external flash metering] or [Disable] as the flash mode for each group.When flash exposure compensation is set on the transmitter, you cannot set flash exposure compensation in the camera’s menu screen. Note that if both are set at the same time, the setting on the transmitter is given priority.
52
Transmitter Control from Camera’s Menu Screen
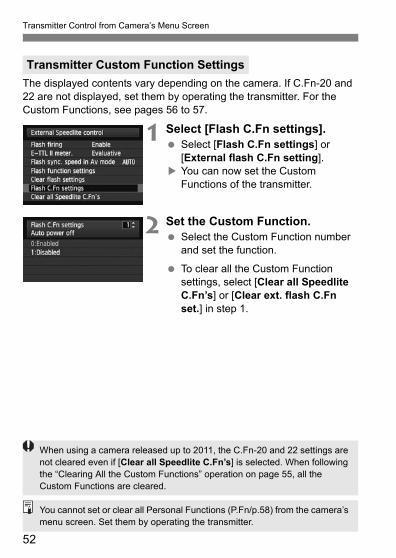
The displayed contents vary depending on the camera. If C.Fn-20 and 22 are not displayed, set them by operating the transmitter. For the Custom Functions, see pages 56 to 57.
1 Select [Flash C.Fn settings].Select [Flash C.Fn settings] or [External flash C.Fn setting].You can now set the Custom Functions of the transmitter.
2 Set the Custom Function.Select the Custom Function number and set the function.
To clear all the Custom Function settings, select [Clear all Speedlite C.Fn’s] or [Clear ext. flash C.Fn set.] in step 1.
Transmitter Custom Function Settings
When using a camera released up to 2011, the C.Fn-20 and 22 settings are not cleared even if [Clear all Speedlite C.Fn’s] is selected. When following the “Clearing All the Custom Functions” operation on page 55, all the Custom Functions are cleared.
You cannot set or clear all Personal Functions (P.Fn/p.58) from the camera’s menu screen. Set them by operating the transmitter.
53
4Customizing the
TransmitterThis chapter describes how to customize the transmitter with the Custom Functions (C.Fn) and Personal Functions (P.Fn).
When the camera’s shooting mode is set to a fully automatic mode or an Image Zone mode, the operations in this chapter are not available. Set the camera’s shooting mode to V/X/W/q/5 (Creative Zone mode).
54
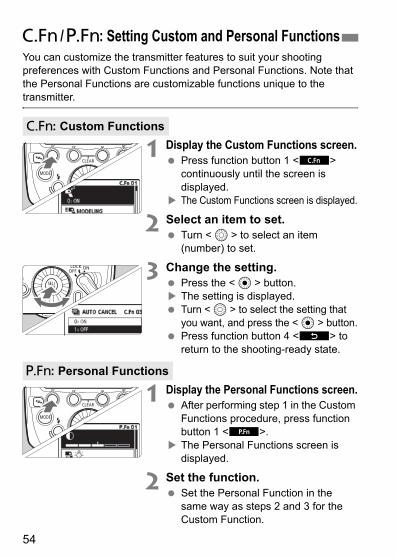
You can customize the transmitter features to suit your shooting preferences with Custom Functions and Personal Functions. Note that the Personal Functions are customizable functions unique to the transmitter.
1 Display the Custom Functions screen.Press function button 1 <=> continuously until the screen is displayed.The Custom Functions screen is displayed.
2 Select an item to set.Turn <9> to select an item (number) to set.
3 Change the setting.Press the <8> button.The setting is displayed.Turn <9> to select the setting that you want, and press the <8> button.Press function button 4 <?> to return to the shooting-ready state.
1 Display the Personal Functions screen.After performing step 1 in the Custom Functions procedure, press function button 1 <<>.The Personal Functions screen is displayed.
2 Set the function.Set the Personal Function in the same way as steps 2 and 3 for the Custom Function.
C / >: Setting Custom and Personal Functions
C: Custom Functions
>: Personal Functions
55
C / >: Setting Custom and Personal Functions
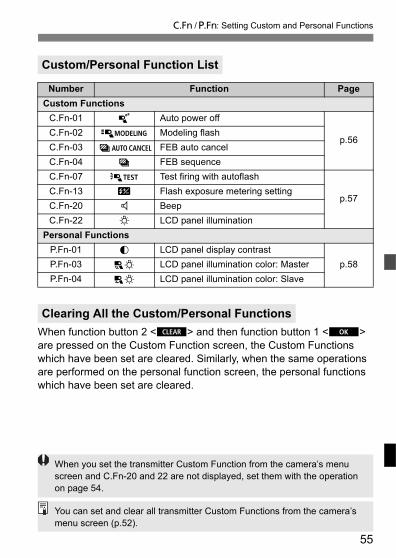
When function button 2 <3> and then function button 1 <;> are pressed on the Custom Function screen, the Custom Functions which have been set are cleared. Similarly, when the same operations are performed on the personal function screen, the personal functions which have been set are cleared.
Custom/Personal Function List
Number Function PageCustom Functions
C.Fn-01 # Auto power off
p.56C.Fn-02 $ Modeling flashC.Fn-03 ( FEB auto cancelC.Fn-04 ) FEB sequenceC.Fn-07 , Test firing with autoflash
p.57C.Fn-13 6 Flash exposure metering settingC.Fn-20 7 BeepC.Fn-22 < LCD panel illumination
Personal FunctionsP.Fn-01 @ LCD panel display contrast
p.58P.Fn-03 B LCD panel illumination color: MasterP.Fn-04 C LCD panel illumination color: Slave
Clearing All the Custom/Personal Functions
When you set the transmitter Custom Function from the camera’s menu screen and C.Fn-20 and 22 are not displayed, set them with the operation on page 54.
You can set and clear all transmitter Custom Functions from the camera’s menu screen (p.52).
56
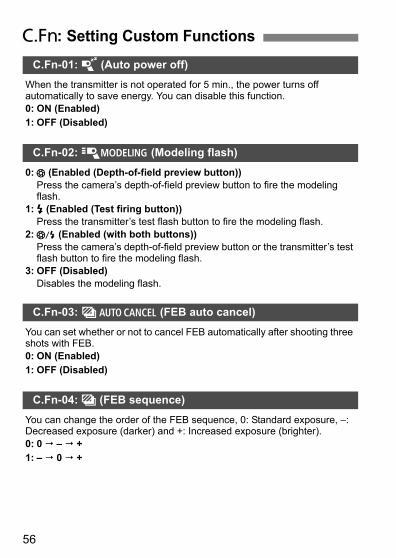
C: Setting Custom FunctionsC.Fn-01:# (Auto power off)
When the transmitter is not operated for 5 min., the power turns off automatically to save energy. You can disable this function.0: ON (Enabled)1: OFF (Disabled)
C.Fn-02:$ (Modeling flash)
0:% (Enabled (Depth-of-field preview button))Press the camera’s depth-of-field preview button to fire the modeling flash.
1: & (Enabled (Test firing button))Press the transmitter’s test flash button to fire the modeling flash.
2:' (Enabled (with both buttons))Press the camera’s depth-of-field preview button or the transmitter’s test flash button to fire the modeling flash.
3: OFF (Disabled)Disables the modeling flash.
C.Fn-03:( (FEB auto cancel)
You can set whether or not to cancel FEB automatically after shooting three shots with FEB.0: ON (Enabled)1: OFF (Disabled)
C.Fn-04:) (FEB sequence)
You can change the order of the FEB sequence, 0: Standard exposure, –: Decreased exposure (darker) and +: Increased exposure (brighter).0: 0 – +1: – 0 +
57
C: Setting Custom Functions
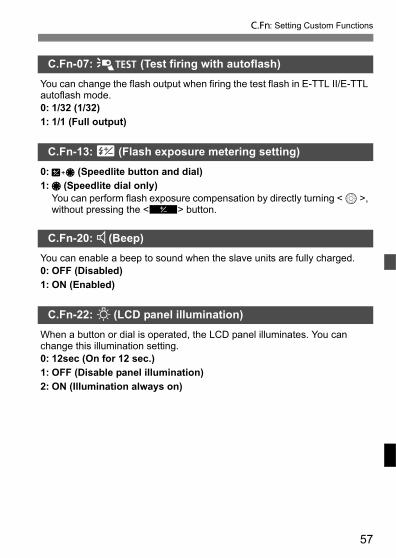
C.Fn-07:, (Test firing with autoflash)
You can change the flash output when firing the test flash in E-TTL II/E-TTL autoflash mode.0: 1/32 (1/32)1: 1/1 (Full output)
C.Fn-13:6 (Flash exposure metering setting)
0:4 (Speedlite button and dial)1:5 (Speedlite dial only)
You can perform flash exposure compensation by directly turning <9>, without pressing the <@> button.
C.Fn-20: 7 (Beep)You can enable a beep to sound when the slave units are fully charged.0: OFF (Disabled)1: ON (Enabled)
C.Fn-22:< (LCD panel illumination)
When a button or dial is operated, the LCD panel illuminates. You can change this illumination setting.0: 12sec (On for 12 sec.)1: OFF (Disable panel illumination)2: ON (Illumination always on)
58
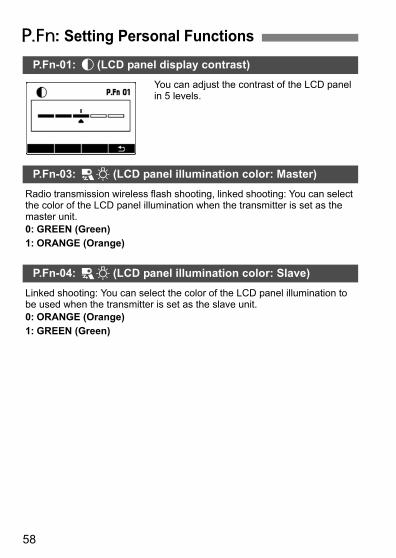
>: Setting Personal FunctionsP.Fn-01: @ (LCD panel display contrast)
You can adjust the contrast of the LCD panel in 5 levels.
P.Fn-03: B (LCD panel illumination color: Master)Radio transmission wireless flash shooting, linked shooting: You can select the color of the LCD panel illumination when the transmitter is set as the master unit.0: GREEN (Green)1: ORANGE (Orange)
P.Fn-04: C (LCD panel illumination color: Slave)Linked shooting: You can select the color of the LCD panel illumination to be used when the transmitter is set as the slave unit.0: ORANGE (Orange)1: GREEN (Green)
59
5Reference
This chapter contains a system map and frequently asked questions.
60
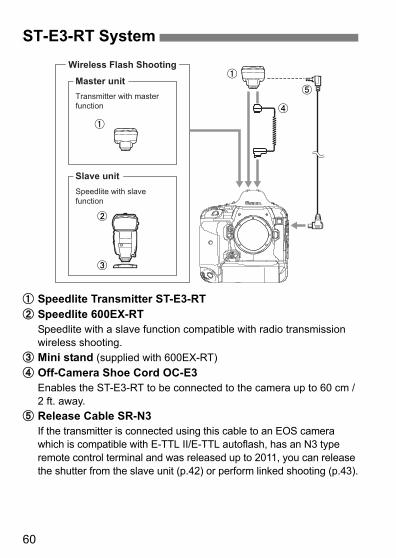
" Speedlite Transmitter ST-E3-RT# Speedlite 600EX-RT
Speedlite with a slave function compatible with radio transmission wireless shooting.
$ Mini stand (supplied with 600EX-RT)% Off-Camera Shoe Cord OC-E3
Enables the ST-E3-RT to be connected to the camera up to 60 cm / 2 ft. away.
& Release Cable SR-N3If the transmitter is connected using this cable to an EOS camera which is compatible with E-TTL II/E-TTL autoflash, has an N3 type remote control terminal and was released up to 2011, you can release the shutter from the slave unit (p.42) or perform linked shooting (p.43).
ST-E3-RT System
Transmitter with master function
Speedlite with slave function
#
$
"
%
&
Wireless Flash Shooting
Master unit
Slave unit
"

61
If a problem occurs with the transmitter, first refer to this Troubleshooting Guide. If this Troubleshooting Guide does not resolve the problem, contact your dealer or nearest Canon Service Center.
Make sure that the batteries are installed in the correct orientation (p.12).Insert the mounting foot into the camera’s hot shoe all the way, slide the lock lever to the right, and secure the transmitter to the camera (p.13).If the electrical contacts of the transmitter and camera are dirty, clean the contacts (p.7).The charge lamp lights when the wireless shooting (slave) is ready.
The transmitter’s auto power off function has activated. Press the shutter button halfway, or press the test flash button (p.14).
Check that the slave unit supports radio transmission wireless flash shooting.Set the slave unit to <'> <x> (p.20).Set the transmission channels and wireless radio IDs of the master unit and slave unit to the same numbers (p.20).Check that the slave unit is within the transmission range of the master unit (p.16).
Troubleshooting Guide
Power does not turn on.
The power turns off by itself.
The slave unit does not fire.
62
Troubleshooting Guide
If there was a highly reflective object (glass window, etc.) in the picture, use FE lock (p.30).If the subject looks very dark or very bright, set flash exposure compensation (p.27).When high-speed sync is set, the effective flash range is shorter. Position the slave unit closer to the subject (p.29).When using autoflash shooting with three firing groups A, B and C, do not fire with firing group C pointed toward the main subject (p.33).When shooting with a different flash mode setting for each firing group, do not fire with multiple firing groups set to <a> or </> pointed toward the main subject (p.40).
When the shooting mode is set to <W> and the scene is dark, slow sync is enabled automatically (the shutter speed becomes slower). Use a tripod, or set the shooting mode to <V> or fully automatic mode. Note that you can also set the sync speed in [Flash sync. speed in Av mode] (p.49).
Set the shutter speed 1 stop slower than the flash sync speed (p.19).
When an EOS camera which was released up to 2011, has an N3 type remote control terminal and is compatible with E-TTL II/E-TTL autoflash is used to perform remote release from a slave unit or when it has been set as the slave unit during linked shooting, the “Release Cable SR-N3” (sold separately) is necessary (p.42, 43, 60).
The picture is underexposed or overexposed.
The picture is very blurred.
<k> is displayed.
Cannot release from a slave unit.
63
Type
Radio Transmission Wireless Function
Specifications
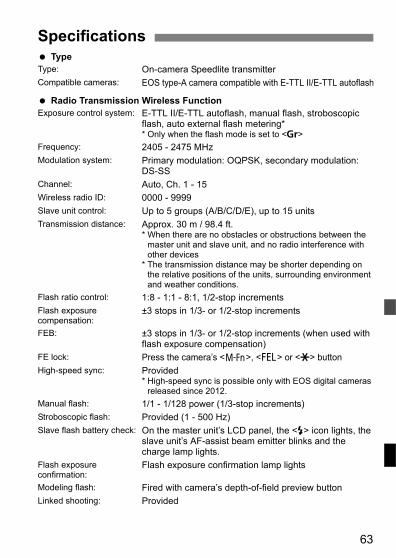
Type: On-camera Speedlite transmitterCompatible cameras: EOS type-A camera compatible with E-TTL II/E-TTL autoflash
Exposure control system: E-TTL II/E-TTL autoflash, manual flash, stroboscopic flash, auto external flash metering** Only when the flash mode is set to <[>
Frequency: 2405 - 2475 MHzModulation system: Primary modulation: OQPSK, secondary modulation:
DS-SSChannel: Auto, Ch. 1 - 15Wireless radio ID: 0000 - 9999Slave unit control: Up to 5 groups (A/B/C/D/E), up to 15 unitsTransmission distance: Approx. 30 m / 98.4 ft.
* When there are no obstacles or obstructions between the master unit and slave unit, and no radio interference with other devices
* The transmission distance may be shorter depending on the relative positions of the units, surrounding environment and weather conditions.
Flash ratio control: 1:8 - 1:1 - 8:1, 1/2-stop incrementsFlash exposure compensation:
±3 stops in 1/3- or 1/2-stop increments
FEB: ±3 stops in 1/3- or 1/2-stop increments (when used with flash exposure compensation)
FE lock: Press the camera’s <B>, <7> or <P> buttonHigh-speed sync: Provided
* High-speed sync is possible only with EOS digital cameras released since 2012.
Manual flash: 1/1 - 1/128 power (1/3-stop increments)Stroboscopic flash: Provided (1 - 500 Hz)Slave flash battery check: On the master unit’s LCD panel, the <Q> icon lights, the
slave unit’s AF-assist beam emitter blinks and the charge lamp lights.
Flash exposure confirmation:
Flash exposure confirmation lamp lights
Modeling flash: Fired with camera’s depth-of-field preview buttonLinked shooting: Provided
64
Specifications
Customizable Functions
Power Source
Dimensions and Weight
All specifications above are based on Canon’s testing standards.Product specifications and external appearance are subject to change without notice.
Custom Functions: 8Personal Functions: 3
Power source: 2 AA/LR6 alkaline batteries* AA/LR6 Ni-MH and lithium batteries also usable
Wireless flash shooting time:
Approx. 10 continuous hours* When using AA/LR6 alkaline batteries
Power saving: Power off after 5 min. of idle operation
Dimensions: Approx. 67.4 (W) x 61.5 (H) x 77.4 (D) mm / 2.7 x 2.4 x 3.0 in. (excluding the dust- and water-resistant adapter)
Weight: Approx. 110 g / 3.9 oz. (transmitter only, excluding batteries)
65
The apparatus shall not be exposed to dripping or splashing.Batteries shall not be exposed to excessive heat such as sunshine, fire or the like.Dry batteries shall not be subjected to charging.
European Union (and EEA) only.This symbol indicates that this product is not to be disposed of with your household waste, according to the WEEE Directive (2002/96/EC) and your national law. This product should be handed over to a designated collection point, e.g., on an authorized one-for-one basis when you buy a new similar product or to an authorized collection site for recycling waste electrical and electronic equipment (EEE). Improper handling of this type of waste could have a possible negative impact on the environment and human health due to potentially hazardous substances that are generally associated with EEE. At the same time, your cooperation in the correct disposal of this product will contribute to the effective usage of natural resources. For more information about where you can drop off your waste equipment for recycling, please contact your local city office, waste authority, approved WEEE scheme or your household waste disposal service. Your cooperation in the correct disposal of this product will contribute to the effective usage of natural resources and will avoid incurring administrative sanctions according to art. 50 and following of Italian legislative decree 22/97. For more information regarding return and recycling of WEEE products, please visit www.canon-europe.com/environment.(EEA: Norway, Iceland and Liechtenstein)

66
MEMO

67
MEMO

68
MEMO

69
MEMO
70
4 sec., 6 sec., 16 sec. timer .........10
AAuto external flash metering ........39Auto power off ........................14, 56
BBatteries .......................................12Beep ............................................57
CC.Fn .......................................54, 56Charge lamp ................6, 14, 25, 61Clear All .......................................55Clearing Speedlite settings ....40, 49Custom functions (C.Fn) ........54, 56
EE-TTL II (flash metering) ..............50E-TTL II/E-TTL autoflash .............16Ext.A (Auto external flash metering) .....................................................39
FFE lock .........................................30FEB ..............................................28Firing group ..........31, 32, 34, 35, 38Flash control ................................48Flash exposure compensation .....27Flash exposure confirmation lamp .................................................6, 20Flash exposure level ................8, 28Flash frequency ...........................35Flash function settings .................49Flash mode ....................8, 9, 49, 50Flash operation range ..................16Flash output .................................34Flash positions .............................16Flash ratio
Three groups (A:B C) ................32Two groups (A:B) ......................31
Flash sync. speed ....................... 50Flash sync. speed in Av mode .... 50Fully automatic wireless flash shooting ....................................... 24
HHigh-speed sync ......................... 29Hot shoe ...................................... 13
IISO speed ................................... 30
LLCD panel ..................................... 8
Density ..................................... 58Illumination ......................... 14, 57Illumination color ...................... 58
LINK ............................ 6, 23, 25, 61Linked shooting ....................... 9, 43LOCK .......................................... 14Lock function ............................... 14
MM (manual exposure) .................. 34Manual flash ................................ 34Master unit setting ....................... 20Maximum number of continuous flashes ......................................... 37Memory function .......................... 23Modeling flash ............................. 41MULTI ......................................... 35
PP.Fn ....................................... 54, 58Personal functions (P.Fn) ...... 54, 58
RRemote release ........................... 42
SScan ............................................ 22Setting functions .......................... 47
Index
71
Index
Shutter speed .............................. 19Shutter sync. ............................... 50Slave group control ..................... 33Slave unit setting ......................... 20Stroboscopic flash ....................... 35
TTest flash ........................ 13, 25, 40Transmission channel ..... 20, 21, 22Type-A camera ............................. 2
WWireless flash shooting ............... 16
Fully automatic one slave unit ........................................... 24Fully automatic three groups (A:B C) ..................................... 32Fully automatic two groups (A:B) ......................................... 31Group firing .............................. 38Manual flash ............................. 34
Wireless flash shooting time ....... 12Wireless multiple flash shooting ........................................ 17, 31, 34Wireless radio ID ................... 20, 21Wireless settings ......................... 20

The cameras and accessories referred to in this Instructions booklet are current as of January 2012. For information on compatibility with the cameras and accessories marketed after this date, contact your nearest Canon Service Center.
1
2
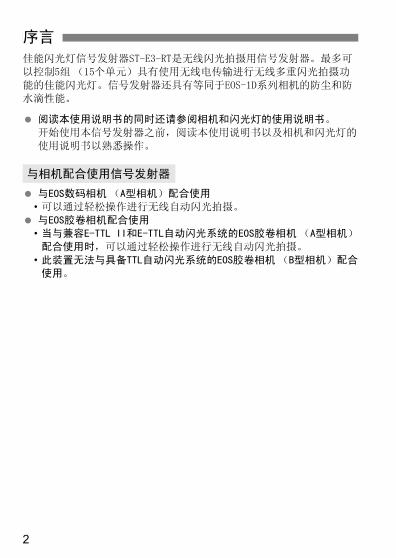
佳能闪光灯信号发射器ST-E3-RT是无线闪光拍摄用信号发射器。最多可
以控制5组 (15个单元)具有使用无线电传输进行无线多重闪光拍摄功
能的佳能闪光灯。信号发射器还具有等同于EOS-1D系列相机的防尘和防
水滴性能。
阅读本使用说明书的同时还请参阅相机和闪光灯的使用说明书。
开始使用本信号发射器之前,阅读本使用说明书以及相机和闪光灯的
使用说明书以熟悉操作。
与EOS数码相机 (A型相机)配合使用
• 可以通过轻松操作进行无线自动闪光拍摄。
与EOS胶卷相机配合使用
• 当与兼容E-TTL II和E-TTL自动闪光系统的EOS胶卷相机(A型相机)
配合使用时,可以通过轻松操作进行无线自动闪光拍摄。
• 此装置无法与具备TTL自动闪光系统的EOS胶卷相机 (B型相机)配合
使用。
序言
与相机配合使用信号发射器
3
章节
序言 2
用前准备
无线闪光拍摄的准备工作11
无线闪光拍摄:无线电传输
使用无线电传输的无线闪光拍摄15
用相机操作设定信号发射器功能从相机的菜单画面设定信号发射器功能
47
自定义信号发射器
使用自定义功能和个性化功能进行自定义53
参考
系统图、常见问题解答59
1
2
3
4
5
4
3
1
2
序言 2
章节 ...........................................................3
部件名称 .......................................................6
本手册中的用法规定 ............................................10
用前准备 11
安装电池 ......................................................12
安装和取下信号发射器 ..........................................13
打开电源 ......................................................13
无线闪光拍摄:无线电传输 15
'无线闪光拍摄 ...............................................16
无线设置 ......................................................20
a:全自动无线闪光拍摄....................................24
使用全自动无线闪光 ............................................27
a:使用闪光光比的无线多重闪光拍摄........................31
q:使用手动闪光输出的无线多重闪光拍摄........................34
[:为各组设定不同的闪光模式进行拍摄 .........................38
清除信号发射器设置 ............................................40
从从属单元进行测试闪光 ........................................40
造型闪光 ......................................................41
从从属单元进行遥控释放 ........................................42
联动拍摄 ......................................................43
用相机操作设定信号发射器功能 47
从相机的菜单画面进行信号发射器控制 ............................48
目录
5
目录
5
4 自定义信号发射器 53
C / >:设定自定义和个性化功能........................... 54
C:设定自定义功能.......................................... 56
>:设定个性化功能.......................................... 58
参考 59
ST-E3-RT 系统 ................................................. 60
故障排除指南.................................................. 61
规格.......................................................... 63
索引.......................................................... 70
6
部件名称
8
9
Ka
J
D
I
E
Q
7
部件名称
ðøºžÐ°Šý 02
8
部件名称
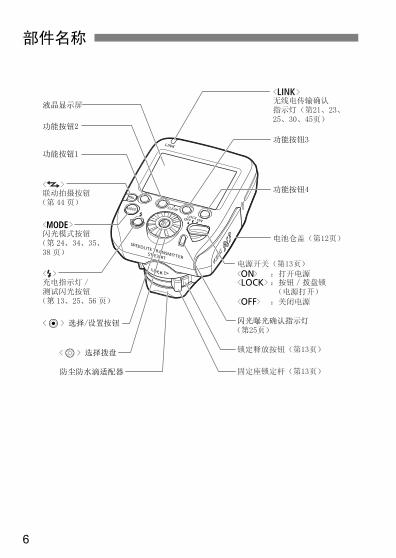
液晶显示屏
无线电传输无线拍摄(第15页)
E-TTL II/E-TTL自动闪光(第24页)
手动闪光(第34页)
a
,
g
u
T
f
k M
c
'
* )
Q
q
显示屏将只显示当前应用的设置。
在功能按钮1至4上方显示的功能(如<=>和<@>)根据设置的状
态发生变化。
当操作按钮或拨盘时,液晶显示屏点亮 (第14页)。
9
部件名称
频闪闪光(第35页)
组闪光(第38页)
联动拍摄 (第43页)
?
[
xM
10
本手册中的图标
9 :表示选择拨盘。
8 :表示选择/设定按钮。
3/1/2 :表示释放按钮后各自的功能在4秒、6秒或16秒内保持
有效。
(第**页) :提供更多信息的参考页码。
:避免出现拍摄问题的警告。
:补充信息。
基本假定
操作步骤假定相机、信号发射器和闪光灯的电源开关均已设为
<K>。
本文中使用的按钮、拨盘和符号图标与相机、信号发射器和闪光灯上
的各图标相对应。
操作步骤假定相机的菜单和自定义功能以及信号发射器和闪光灯的自
定义功能和个性化功能处于各自的默认设置状态。
所有数值基于使用2节5号(AA/LR6)碱性电池和佳能测试标准。
本手册中的用法规定

11
1用前准备
本章说明开始无线闪光拍摄前的准备工作。
12
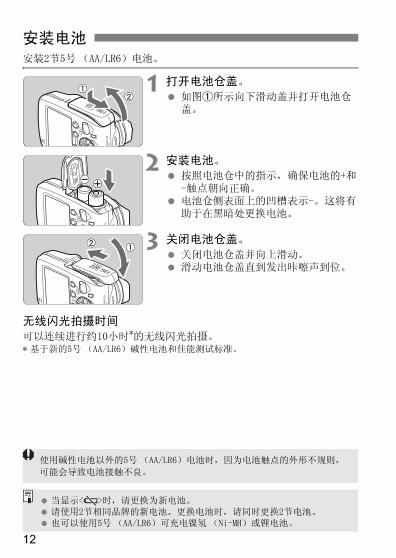
安装2节5号(AA/LR6)电池。
1 打开电池仓盖。
如图"所示向下滑动盖并打开电池仓盖。
2 安装电池。按照电池仓中的指示,确保电池的+和-触点朝向正确。电池仓侧表面上的凹槽表示-。这将有助于在黑暗处更换电池。
3 关闭电池仓盖。
关闭电池仓盖并向上滑动。滑动电池仓盖直到发出咔嚓声到位。
无线闪光拍摄时间可以连续进行约10小时*的无线闪光拍摄。* 基于新的5号(AA/LR6)碱性电池和佳能测试标准。
安装电池
使用碱性电池以外的5号(AA/LR6)电池时,因为电池触点的外形不规则,
可能会导致电池接触不良。
当显示<!>时,请更换为新电池。请使用2节相同品牌的新电池。更换电池时,请同时更换2节电池。也可以使用5号 (AA/LR6)可充电镍氢 (Ni-MH)或锂电池。
13
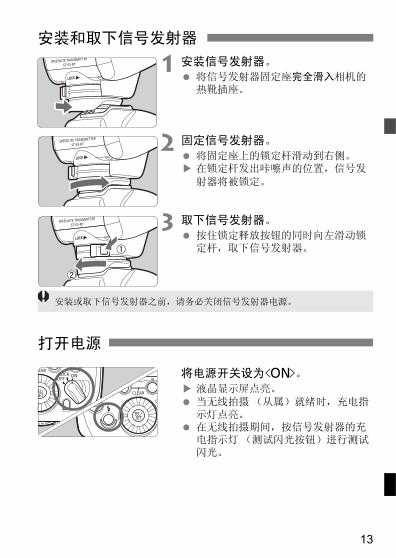
1 安装信号发射器。将信号发射器固定座完全滑入相机的热靴插座。
2 固定信号发射器。
将固定座上的锁定杆滑动到右侧。在锁定杆发出咔嚓声的位置,信号发
射器将被锁定。
3 取下信号发射器。按住锁定释放按钮的同时向左滑动锁定杆,取下信号发射器。
将电源开关设为<K>。
液晶显示屏点亮。
当无线拍摄 (从属)就绪时,充电指示灯点亮。在无线拍摄期间,按信号发射器的充电指示灯(测试闪光按钮)进行测试闪光。
安装和取下信号发射器
打开电源
安装或取下信号发射器之前,请务必关闭信号发射器电源。
14
打开电源
为节省电池电量,电源会在5分钟无操作后自动关闭。要再次打开信号发
射器,半按相机的快门按钮,或者按测试闪光按钮 (充电指示灯)。
通过将电源开关设为<a>,可以关闭闪光灯的按钮和拨盘操作。使
用此功能以防止设定信号发射器功能设置后意外地将其改变。
如果操作按钮或拨盘,会在液晶显示屏上显示<LOCKED> (显示在功能按
钮1至4上方的功能(如<=>和<@>)不会显示)。
当操作按钮或拨盘时,液晶显示屏以绿色点亮12秒。当设定功能时,照
明持续到设定结束为止。
在联动拍摄模式下如果信号发射器是主控单元,液晶显示屏以绿色点
亮。如果信号发射器是从属单元,液晶显示屏以橙色点亮。
关于自动电源关闭
关于锁定功能
关于液晶显示屏照明
在相机的3/1/2定时器工作期间,无法使用测试闪光。即使关闭电源,信号发射器设置也被保存。如果要在更换电池时保留设置,请在关闭电源开关并取出电池后1分钟内更换电池。即使在电源开关设在<a>位置时,也可以进行测试闪光。 此外,当操作按钮或拨盘时,液晶显示屏点亮。可以设定当从属单元完全充电时响起提示音 (C.Fn- 20/第57页)。可以关闭自动关闭电源 (C.Fn-01/第56页)。可以改变液晶显示屏照明的持续时间 (C.Fn-22/第57页)。可以改变液晶显示屏照明的颜色 (P.Fn-03、04/第58页)。
15
2无线闪光拍摄:无线电传输
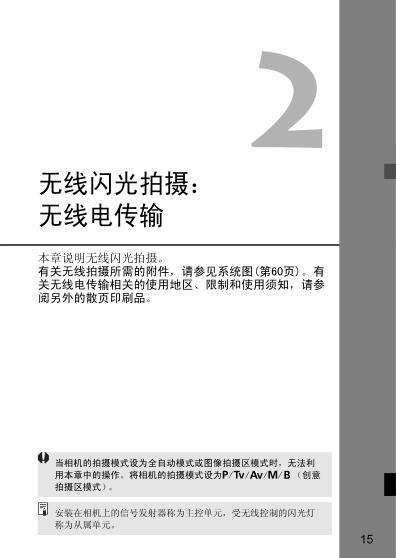
本章说明无线闪光拍摄。有关无线拍摄所需的附件,请参见系统图(第60页)。有关无线电传输相关的使用地区、限制和使用须知,请参阅另外的散页印刷品。
当相机的拍摄模式设为全自动模式或图像拍摄区模式时,无法利
用本章中的操作。将相机的拍摄模式设为V/X/W/q/5(创意
拍摄区模式)。
安装在相机上的信号发射器称为主控单元,受无线控制的闪光灯
称为从属单元。
16
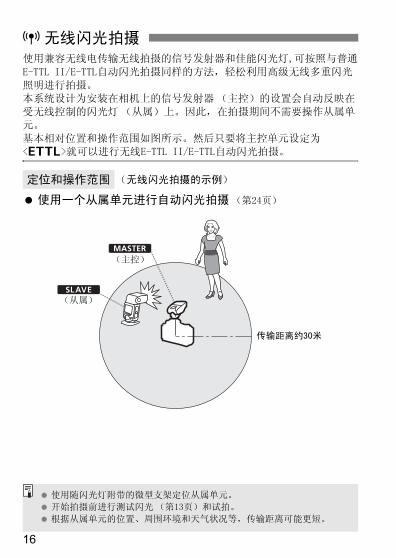
使用兼容无线电传输无线拍摄的信号发射器和佳能闪光灯,可按照与普通
E-TTL II/E-TTL自动闪光拍摄同样的方法,轻松利用高级无线多重闪光
照明进行拍摄。
本系统设计为安装在相机上的信号发射器 (主控)的设置会自动反映在
受无线控制的闪光灯 (从属)上。因此,在拍摄期间不需要操作从属单
元。
基本相对位置和操作范围如图所示。然后只要将主控单元设定为
<a>就可以进行无线E-TTL II/E-TTL自动闪光拍摄。
使用一个从属单元进行自动闪光拍摄(第24页)
'无线闪光拍摄
定位和操作范围 (无线闪光拍摄的示例)
x
M
传输距离约30米
(主控)
(从属)
使用随闪光灯附带的微型支架定位从属单元。
开始拍摄前进行测试闪光 (第13页)和试拍。
根据从属单元的位置、周围环境和天气状况等,传输距离可能更短。
17
'无线闪光拍摄
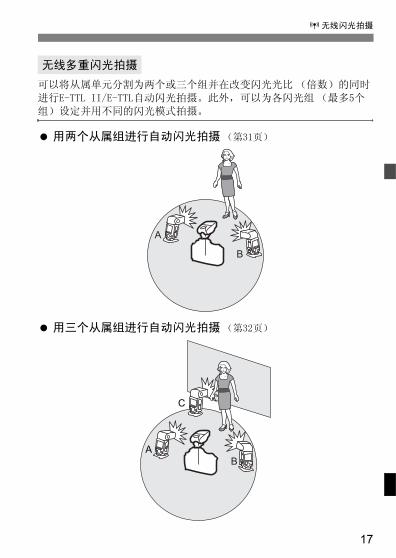
可以将从属单元分割为两个或三个组并在改变闪光光比 (倍数)的同时
进行E-TTL II/E-TTL自动闪光拍摄。此外,可以为各闪光组 (最多5个
组)设定并用不同的闪光模式拍摄。
用两个从属组进行自动闪光拍摄(第31页)
用三个从属组进行自动闪光拍摄(第32页)
无线多重闪光拍摄
A
B
AB
C
18
'无线闪光拍摄
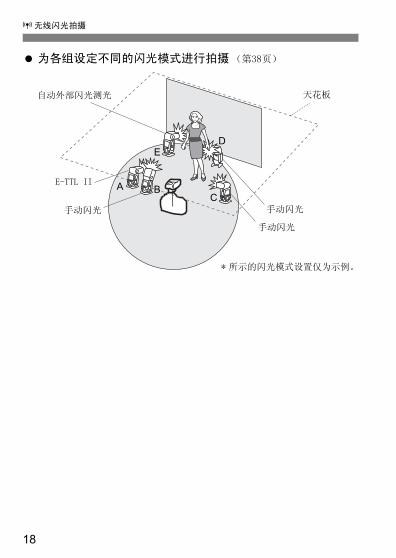
为各组设定不同的闪光模式进行拍摄(第38页)
A BC
ED
手动闪光
手动闪光
自动外部闪光测光
E-TTL II
手动闪光
* 所示的闪光模式设置仅为示例。
天花板
19
'无线闪光拍摄
当进行无线电传输无线闪光拍摄时,取决于使用的相机,闪光模式、最
高闪光同步速度 (以下简称 “闪光同步速度”)和高速同步功能可能会
受到限制。
从2012年以后发售的EOS数码相机
当与EOS-1D X等相机配合使用信号发射器时,可以不受闪光模式和最
高闪光同步速度的限制进行拍摄。
到2011年为止发售并且兼容E-TTL自动闪光的EOS相机
当与下列相机配合使用信号发射器时,无法利用使用E-TTL自动闪光
的无线电传输无线拍摄。用手动闪光 (第34页)或频闪闪光 (第35
页)拍摄。
EOS-1Ds、EOS-1D、EOS-1V、EOS-3、EOS ELAN II(E)/EOS 50(E)、
EOS REBEL 2000/EOS 300、EOS REBEL G/EOS 500N、
EOS 66/EOS Rebel XS N/EOS 3000 N, EOS IX(E)、
EOS IX Lite/EOS IX 7
此外,当与到2011年为止发售的胶卷或数码相机配合使用信号发射器
时,会有以下限制。
1.闪光同步速度变慢1档。
检查相机的闪光同步速度 (X = 1/***秒)并用最高比闪光同
步速度慢1档的快门速度拍摄 (示例:当X = 1/250秒时,可以
用1/125秒至30秒的快门速度进行无线电传输无线拍摄)。此
外,无法进行高速同步拍摄。当设定比闪光同步速度慢1档的快
门速度时,<k>警告图标会消失。
2.无法进行组闪光 (第38页)。
有关取决于使用相机的功能限制

20
要进行无线拍摄,用下列步骤设定信号发射器(主控单元)和闪光灯
(从属单元)。
检查是否显示<M>。
检查是否在图中所示位置显示
<M>。
将兼容无线电传输无线闪光拍摄的闪光灯设为从属单元。
有关从属单元设置,请参见闪光灯的使用说明书。
为了避免干扰其他摄影师所使用的无线电传输无线多重闪光系统或使用
无线电波 (无线)的其他设备,可以改变传输频道和无线无线电ID。为
主控单元和从属单元设定相同的频道和ID。
无线设置
主控单元设置
从属单元设置
传输频道/无线无线电ID设置
21
无线设置
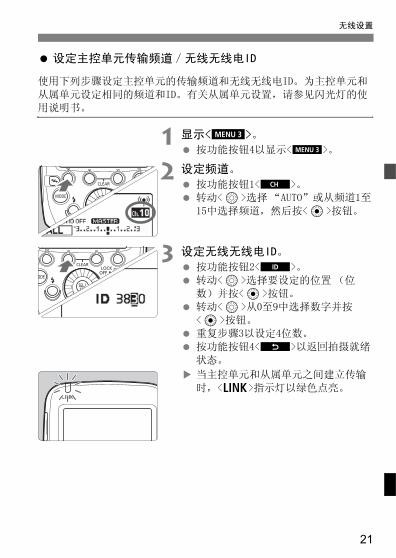
设定主控单元传输频道/无线无线电ID
使用下列步骤设定主控单元的传输频道和无线无线电ID。为主控单元和
从属单元设定相同的频道和ID。有关从属单元设置,请参见闪光灯的使
用说明书。
1 显示<O>。按功能按钮4以显示<O>。
2 设定频道。
按功能按钮1<C>。
转动<9>选择 “AUTO”或从频道1至
15中选择频道,然后按<8>按钮。
3 设定无线无线电ID。
按功能按钮2<H>。
转动<9>选择要设定的位置 (位
数)并按<8>按钮。
转动<9>从0至9中选择数字并按
<8>按钮。
重复步骤3以设定4位数。
按功能按钮4<?>以返回拍摄就绪
状态。
当主控单元和从属单元之间建立传输
时,<D>指示灯以绿色点亮。
22
无线设置
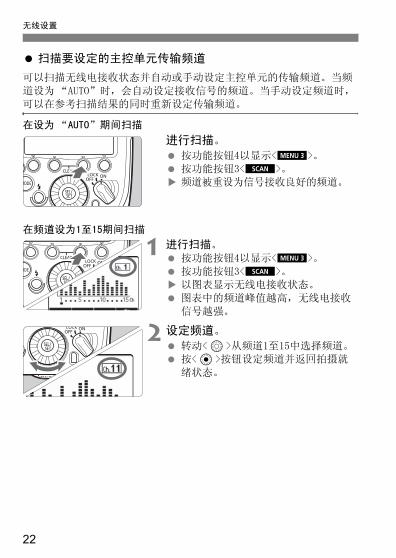
扫描要设定的主控单元传输频道
可以扫描无线电接收状态并自动或手动设定主控单元的传输频道。当频
道设为 “AUTO”时,会自动设定接收信号的频道。当手动设定频道时,
可以在参考扫描结果的同时重新设定传输频道。
在设为 “AUTO”期间扫描
进行扫描。
按功能按钮4以显示<O>。
按功能按钮3<W>。
频道被重设为信号接收良好的频道。
在频道设为1至15期间扫描
1 进行扫描。按功能按钮4以显示<O>。
按功能按钮3<W>。
以图表显示无线电接收状态。
图表中的频道峰值越高,无线电接收
信号越强。
2 设定频道。
转动<9>从频道1至15中选择频道。
按<8>按钮设定频道并返回拍摄就
绪状态。
23
无线设置
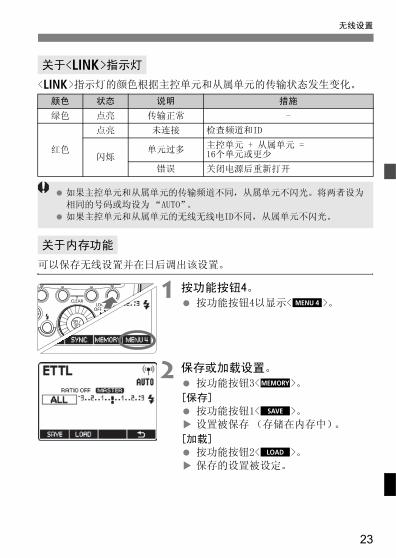
<D>指示灯的颜色根据主控单元和从属单元的传输状态发生变化。
可以保存无线设置并在日后调出该设置。
1 按功能按钮4。按功能按钮4以显示<P>。
2 保存或加载设置。
按功能按钮3<L>。
[保存]
按功能按钮1<V>。
设置被保存 (存储在内存中)。
[加载]
按功能按钮2<J>。
保存的设置被设定。
关于<D>指示灯
颜色 状态 说明 措施
绿色 点亮 传输正常 -
红色
点亮 未连接 检查频道和ID
闪烁单元过多
主控单元 + 从属单元 = 16个单元或更少
错误 关闭电源后重新打开
关于内存功能
如果主控单元和从属单元的传输频道不同,从属单元不闪光。将两者设为
相同的号码或均设为 “AUTO”。
如果主控单元和从属单元的无线无线电ID不同,从属单元不闪光。
24
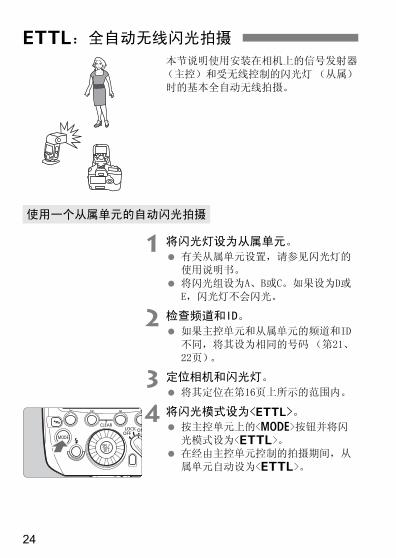
本节说明使用安装在相机上的信号发射器
(主控)和受无线控制的闪光灯(从属)
时的基本全自动无线拍摄。
1 将闪光灯设为从属单元。
有关从属单元设置,请参见闪光灯的
使用说明书。
将闪光组设为A、B或C。如果设为D或
E,闪光灯不会闪光。
2 检查频道和ID。
如果主控单元和从属单元的频道和ID
不同,将其设为相同的号码 (第21、
22页)。
3 定位相机和闪光灯。
将其定位在第16页上所示的范围内。
4 将闪光模式设为<a>。按主控单元上的<E>按钮并将闪
光模式设为<a>。
在经由主控单元控制的拍摄期间,从
属单元自动设为<a>。
a:全自动无线闪光拍摄
使用一个从属单元的自动闪光拍摄
25
a:全自动无线闪光拍摄
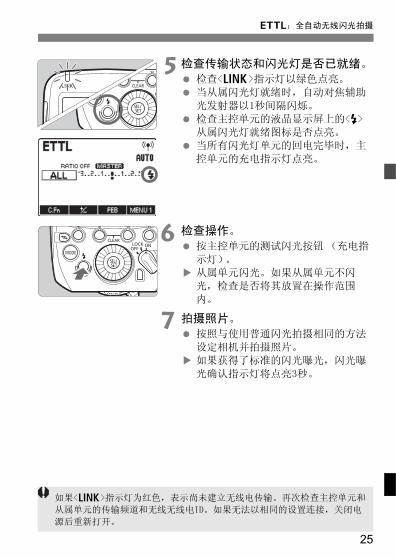
5 检查传输状态和闪光灯是否已就绪。检查<D>指示灯以绿色点亮。
当从属闪光灯就绪时,自动对焦辅助
光发射器以1秒间隔闪烁。
检查主控单元的液晶显示屏上的<Q>从属闪光灯就绪图标是否点亮。
当所有闪光灯单元的回电完毕时,主
控单元的充电指示灯点亮。
6 检查操作。按主控单元的测试闪光按钮 (充电指
示灯)。
从属单元闪光。如果从属单元不闪
光,检查是否将其放置在操作范围
内。
7 拍摄照片。
按照与使用普通闪光拍摄相同的方法
设定相机并拍摄照片。
如果获得了标准的闪光曝光,闪光曝
光确认指示灯将点亮3秒。
如果<D>指示灯为红色,表示尚未建立无线电传输。再次检查主控单元和
从属单元的传输频道和无线无线电ID。如果无法以相同的设置连接,关闭电
源后重新打开。

26
a:全自动无线闪光拍摄
当需要更大的闪光输出或想要更加轻松地
进行照明时,可以增加从属单元的数量并
将其作为单个闪光灯闪光。
要添加从属单元,使用与 “使用一个从
属单元的自动闪光拍摄”相同的步骤。将
闪光组设为A、B或C。如果设为D或E,闪
光灯不会闪光。
当增加了从属单元的数量时,执行自动控
制以使所有闪光灯以相同的闪光输出闪光
并确保总闪光输出能够达到标准曝光。
使用多个从属单元的自动闪光拍摄
可以按相机上的景深预览按钮进行造型闪光 (第41页)。
如果从属单元的自动关闭电源生效,按主控单元的测试闪光按钮 (第13
页)打开从属单元。请注意在相机的测光定时器工作期间,无法进行测试
闪光。
自动闪光系统(E-TTL II/E-TTL)取决于使用的相机并自动设定。请注意
在液晶显示屏上对两个系统均显示<a>。
可以启用当所有从属单元充电完毕时响起的提示音 (C.Fn-20/
第57页)。
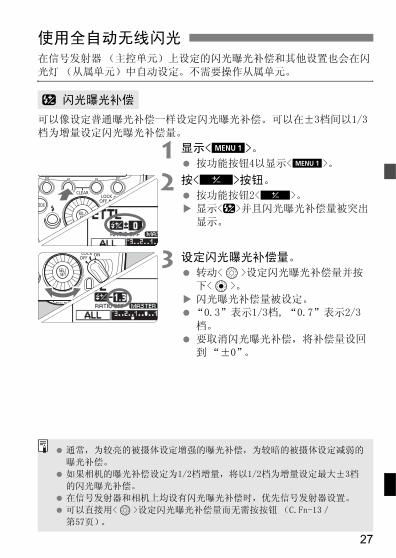
27
在信号发射器 (主控单元)上设定的闪光曝光补偿和其他设置也会在闪
光灯(从属单元)中自动设定。不需要操作从属单元。
可以像设定普通曝光补偿一样设定闪光曝光补偿。可以在±3档间以1/3
档为增量设定闪光曝光补偿量。
1 显示<M>。
按功能按钮4以显示<M>。
2 按<@>按钮。
按功能按钮2<@>。
显示<f>并且闪光曝光补偿量被突出
显示。
3 设定闪光曝光补偿量。
转动<9>设定闪光曝光补偿量并按
下<8>。
闪光曝光补偿量被设定。
“0.3”表示1/3档, “0.7”表示2/3
档。
要取消闪光曝光补偿,将补偿量设回
到“±0”。
使用全自动无线闪光
f 闪光曝光补偿
通常,为较亮的被摄体设定增强的曝光补偿,为较暗的被摄体设定减弱的
曝光补偿。
如果相机的曝光补偿设定为1/2档增量,将以1/2档为增量设定最大±3档
的闪光曝光补偿。
在信号发射器和相机上均设有闪光曝光补偿时,优先信号发射器设置。
可以直接用<9>设定闪光曝光补偿量而无需按按钮 (C.Fn-13/
第57页)。
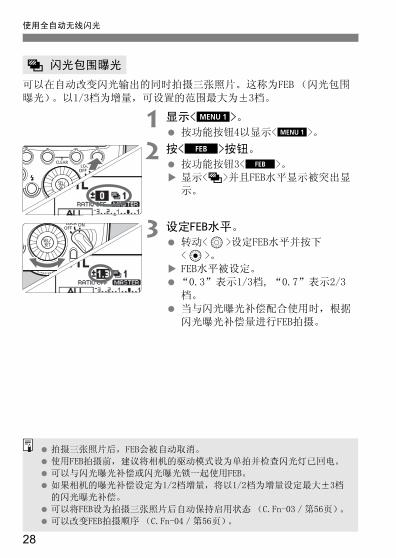
28
使用全自动无线闪光
可以在自动改变闪光输出的同时拍摄三张照片。这称为FEB (闪光包围
曝光)。以1/3档为增量,可设置的范围最大为±3档。
1 显示<M>。
按功能按钮4以显示<M>。
2 按<E>按钮。
按功能按钮3<E>。
显示<g>并且FEB水平显示被突出显
示。
3 设定FEB水平。
转动<9>设定FEB水平并按下
<8>。
FEB水平被设定。
“0.3”表示1/3档, “0.7”表示2/3
档。
当与闪光曝光补偿配合使用时,根据
闪光曝光补偿量进行FEB拍摄。
g 闪光包围曝光
拍摄三张照片后,FEB会被自动取消。
使用FEB拍摄前,建议将相机的驱动模式设为单拍并检查闪光灯已回电。
可以与闪光曝光补偿或闪光曝光锁一起使用FEB。
如果相机的曝光补偿设定为1/2档增量,将以1/2档为增量设定最大±3档
的闪光曝光补偿。
可以将FEB设为拍摄三张照片后自动保持启用状态(C.Fn-03/第56页)。
可以改变FEB拍摄顺序(C.Fn-04/第56页)。
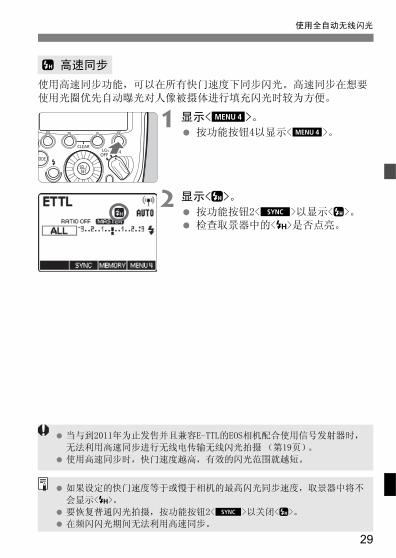
29
使用全自动无线闪光
使用高速同步功能,可以在所有快门速度下同步闪光。高速同步在想要
使用光圈优先自动曝光对人像被摄体进行填充闪光时较为方便。
1 显示<P>。
按功能按钮4以显示<P>。
2 显示<c>。
按功能按钮2<Y>以显示<c>。
检查取景器中的<F>是否点亮。
c 高速同步
当与到2011年为止发售并且兼容E-TTL的EOS相机配合使用信号发射器时,
无法利用高速同步进行无线电传输无线闪光拍摄(第19页)。
使用高速同步时,快门速度越高,有效的闪光范围就越短。
如果设定的快门速度等于或慢于相机的最高闪光同步速度,取景器中将不
会显示<F>。
要恢复普通闪光拍摄,按功能按钮2<Y>以关闭<c>。
在频闪闪光期间无法利用高速同步。
30
使用全自动无线闪光
使用FE (闪光曝光)锁,您可以为场景的各个部分锁定正确的闪光曝光
设置。
通过操作相机执行闪光曝光锁。有关操作,请参见相机和闪光灯的使用
说明书。
可以使用两个或以上主控单元 (主控单元 + 从属单元 = 最多16个单
元)。通过准备多台装有主控单元的相机,可以在保持相同照明 (从属
单元)期间更换相机进行拍摄。
请注意当使用两个或以上主控单元时,<D>指示灯的颜色根据打开电
源的顺序而有所不同。第一个主控 (主主控)为绿色,第二个和之后的
主控(副主控)为橙色。
7: 闪光曝光锁
关于主控单元
当执行FE (闪光曝光)锁时如果无法获得正确的曝光,<Q>会在取景器中
闪烁。将从属单元移近被摄体,开大光圈,然后再次执行闪光曝光锁。
当使用数码相机时,也可以增加ISO感光度。
如果相机取景器中的目标被摄体太小,闪光曝光锁可能不会十分有效。
如果<D>指示灯为红色,表示尚未建立连接。检查传输频道和无线无线电
ID后,关闭并打开各主控单元的电源。
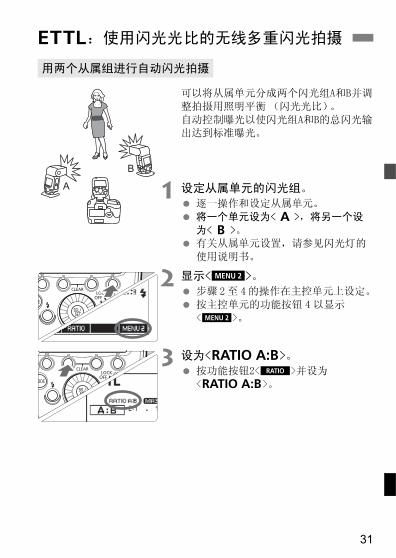
31
可以将从属单元分成两个闪光组A和B并调
整拍摄用照明平衡 (闪光光比)。
自动控制曝光以使闪光组A和B的总闪光输
出达到标准曝光。
1 设定从属单元的闪光组。逐一操作和设定从属单元。
将一个单元设为<4>,将另一个设
为<5>。
有关从属单元设置,请参见闪光灯的
使用说明书。
2 显示<N>。
步骤 2至 4的操作在主控单元上设定。
按主控单元的功能按钮 4 以显示
<N>。
3 设为<%>。
按功能按钮2<T>并设为
<%>。
a:使用闪光光比的无线多重闪光拍摄
用两个从属组进行自动闪光拍摄
A
B
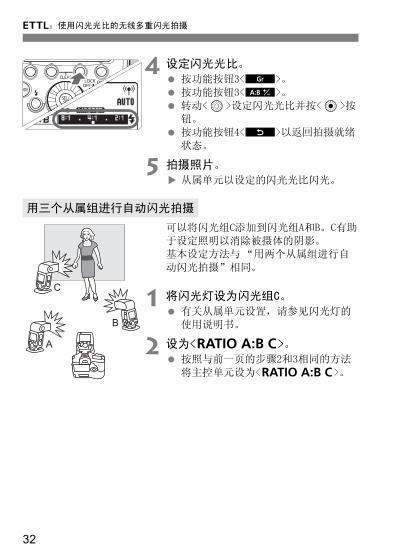
32
a:使用闪光光比的无线多重闪光拍摄
4 设定闪光光比。按功能按钮3<F>。
按功能按钮3<A>。
转动<9>设定闪光光比并按<8>按
钮。
按功能按钮4<?>以返回拍摄就绪
状态。
5 拍摄照片。
从属单元以设定的闪光光比闪光。
可以将闪光组C添加到闪光组A和B。C有助
于设定照明以消除被摄体的阴影。
基本设定方法与“用两个从属组进行自
动闪光拍摄”相同。
1 将闪光灯设为闪光组C。
有关从属单元设置,请参见闪光灯的
使用说明书。
2 设为<^>。按照与前一页的步骤2和3相同的方法
将主控单元设为<^>。
用三个从属组进行自动闪光拍摄
C
A
B
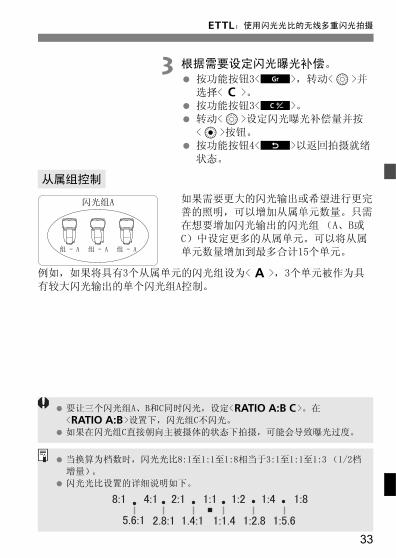
33
a:使用闪光光比的无线多重闪光拍摄
3 根据需要设定闪光曝光补偿。按功能按钮3<F>,转动<9>并
选择<6>。
按功能按钮3<B>。
转动<9>设定闪光曝光补偿量并按
<8>按钮。
按功能按钮4<?>以返回拍摄就绪
状态。
如果需要更大的闪光输出或希望进行更完
善的照明,可以增加从属单元数量。只需
在想要增加闪光输出的闪光组(A、B或
C)中设定更多的从属单元。可以将从属
单元数量增加到最多合计15个单元。
例如,如果将具有3个从属单元的闪光组设为<4>,3个单元被作为具
有较大闪光输出的单个闪光组A控制。
从属组控制
闪光组A
要让三个闪光组A、B和C同时闪光,设定<^>。在
<%>设置下,闪光组C不闪光。
如果在闪光组C直接朝向主被摄体的状态下拍摄,可能会导致曝光过度。
当换算为档数时,闪光光比8:1至1:1至1:8相当于3:1至1:1至1:3 (1/2档
增量)。
闪光光比设置的详细说明如下。
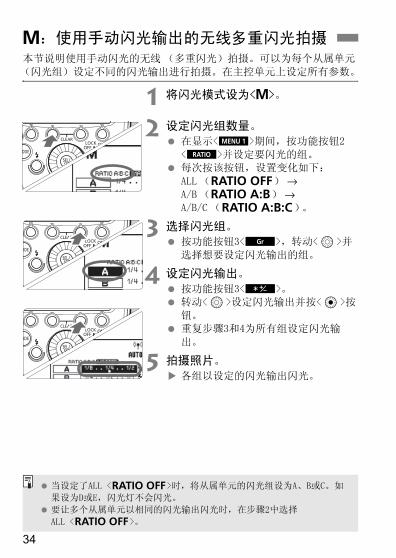
34
本节说明使用手动闪光的无线 (多重闪光)拍摄。可以为每个从属单元
(闪光组)设定不同的闪光输出进行拍摄。在主控单元上设定所有参数。
1 将闪光模式设为<q>。
2 设定闪光组数量。在显示<M>期间,按功能按钮2
<T>并设定要闪光的组。
每次按该按钮,设置变化如下:
ALL (_) →A/B (%) →A/B/C (])。
3 选择闪光组。按功能按钮3<F>,转动<9>并
选择想要设定闪光输出的组。
4 设定闪光输出。
按功能按钮3<1>。
转动<9>设定闪光输出并按<8>按
钮。
重复步骤3和4为所有组设定闪光输
出。
5 拍摄照片。
各组以设定的闪光输出闪光。
q:使用手动闪光输出的无线多重闪光拍摄
当设定了ALL <_>时,将从属单元的闪光组设为A、B或C。如
果设为D或E,闪光灯不会闪光。
要让多个从属单元以相同的闪光输出闪光时,在步骤2中选择
ALL <_>。
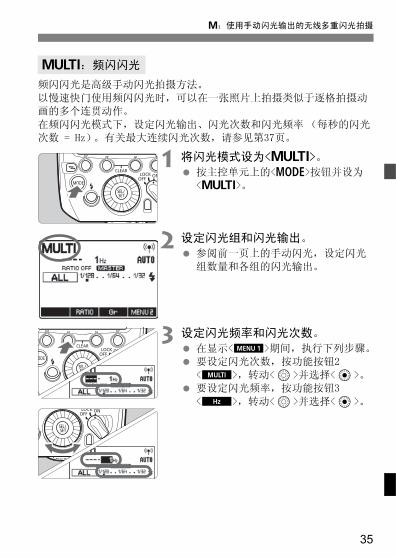
35
q:使用手动闪光输出的无线多重闪光拍摄
频闪闪光是高级手动闪光拍摄方法。
以慢速快门使用频闪闪光时,可以在一张照片上拍摄类似于逐格拍摄动
画的多个连贯动作。
在频闪闪光模式下,设定闪光输出、闪光次数和闪光频率 (每秒的闪光
次数 = Hz)。有关最大连续闪光次数,请参见第37页。
1 将闪光模式设为<?>。
按主控单元上的<E>按钮并设为
<?>。
2 设定闪光组和闪光输出。
参阅前一页上的手动闪光,设定闪光
组数量和各组的闪光输出。
3 设定闪光频率和闪光次数。
在显示<M>期间,执行下列步骤。
要设定闪光次数,按功能按钮2
<Q>,转动<9>并选择<8>。
要设定闪光频率,按功能按钮3
<G>,转动<9>并选择<8>。
?:频闪闪光
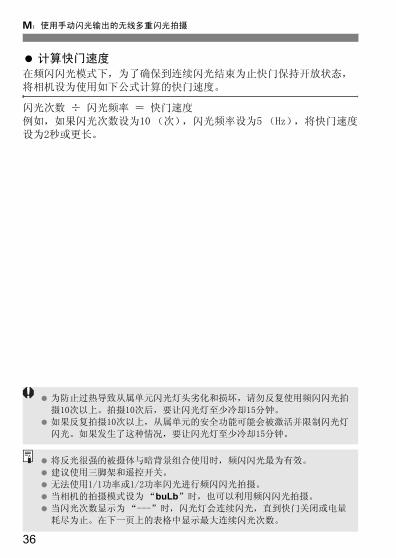
36
q:使用手动闪光输出的无线多重闪光拍摄
计算快门速度
在频闪闪光模式下,为了确保到连续闪光结束为止快门保持开放状态,
将相机设为使用如下公式计算的快门速度。
闪光次数 ÷ 闪光频率 = 快门速度
例如,如果闪光次数设为10 (次),闪光频率设为5 (Hz),将快门速度
设为2秒或更长。
为防止过热导致从属单元闪光灯头劣化和损坏,请勿反复使用频闪闪光拍
摄10次以上。拍摄10次后,要让闪光灯至少冷却15分钟。
如果反复拍摄10次以上,从属单元的安全功能可能会被激活并限制闪光灯
闪光。如果发生了这种情况,要让闪光灯至少冷却15分钟。
将反光很强的被摄体与暗背景组合使用时,频闪闪光最为有效。
建议使用三脚架和遥控开关。
无法使用1/1功率或1/2功率闪光进行频闪闪光拍摄。
当相机的拍摄模式设为 “buLb”时,也可以利用频闪闪光拍摄。
当闪光次数显示为 “---”时,闪光灯会连续闪光,直到快门关闭或电量
耗尽为止。在下一页上的表格中显示最大连续闪光次数。
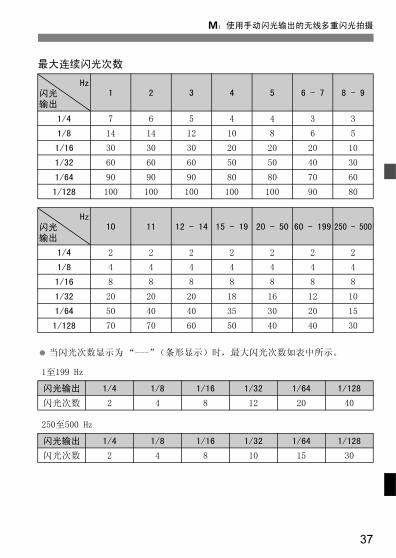
37
q:使用手动闪光输出的无线多重闪光拍摄
当闪光次数显示为“---”(条形显示)时,最大闪光次数如表中所示。
1至199 Hz
250至500 Hz
最大连续闪光次数
Hz闪光输出
1 2 3 4 5 6 - 7 8 - 9
1/4 7 6 5 4 4 3 3
1/8 14 14 12 10 8 6 5
1/16 30 30 30 20 20 20 10
1/32 60 60 60 50 50 40 30
1/64 90 90 90 80 80 70 60
1/128 100 100 100 100 100 90 80
Hz闪光输出
10 11 12 - 14 15 - 19 20 - 50 60 - 199 250 - 500
1/4 2 2 2 2 2 2 2
1/8 4 4 4 4 4 4 4
1/16 8 8 8 8 8 8 8
1/32 20 20 20 18 16 12 10
1/64 50 40 40 35 30 20 15
1/128 70 70 60 50 40 40 30
闪光输出 1/4 1/8 1/16 1/32 1/64 1/128
闪光次数 2 4 8 12 20 40
闪光输出 1/4 1/8 1/16 1/32 1/64 1/128
闪光次数 2 4 8 10 15 30
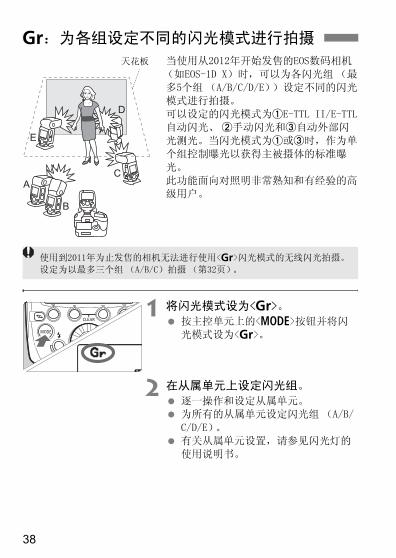
38
当使用从2012年开始发售的EOS数码相机
(如EOS-1D X)时,可以为各闪光组 (最
多5个组 (A/B/C/D/E))设定不同的闪光
模式进行拍摄。
可以设定的闪光模式为"E-TTL II/E-TTL
自动闪光、 #手动闪光和$自动外部闪
光测光。当闪光模式为"或$时,作为单
个组控制曝光以获得主被摄体的标准曝
光。
此功能面向对照明非常熟知和有经验的高
级用户。
1 将闪光模式设为<[>。
按主控单元上的<E>按钮并将闪
光模式设为<[>。
2 在从属单元上设定闪光组。
逐一操作和设定从属单元。
为所有的从属单元设定闪光组(A/B/
C/D/E)。
有关从属单元设置,请参见闪光灯的
使用说明书。
[:为各组设定不同的闪光模式进行拍摄
A C
E
D
B
天花板
使用到2011年为止发售的相机无法进行使用<[>闪光模式的无线闪光拍摄。
设定为以最多三个组 (A/B/C)拍摄 (第32页)。

39
[:为各组设定不同的闪光模式进行拍摄
3 设定闪光模式。通过操作主控单元设定各闪光组的闪
光模式。
在显示<M>期间,按功能按钮3
<F>并转动<9>以选择闪光组。
按功能按钮2<2>并从<a>、
<q>和</>中选择所选组的闪光
模式。
要关闭所选组的闪光,按功能按钮1
<R>将其设为<j>。
重复步骤3设定所有组的闪光模式。
4 设定闪光输出或闪光曝光补偿量。在选择了闪光组期间,按功能按钮3
<1>。
转动<9>根据闪光模式设定闪光功
能并按<8>。
当使用<q>模式时,设定闪光输出。
当使用<a>或</>模式时,
根据需要设定闪光曝光补偿量。
如果在显示<M>时按功能按钮2
<@>,可以为所有闪光组设定闪
光曝光补偿。
重复步骤4设定所有组的闪光功能。
40
清除信号发射器设置 / 从从属单元进行测试闪光
5 拍摄照片。各从属单元按照为各组设定的闪光模
式闪光。
可以将无线拍摄设置恢复为其默认设置。
同时按功能按钮2和3两秒钟或更长。
信号发射器设置被清除,拍摄模式恢
复为<a>闪光模式。
可以从设为从属单元的闪光灯进行测试闪光。有关操作,请参见闪光灯
的使用说明书。
清除信号发射器设置
当闪光组的闪光模式设为<a>或</>时,作为单个组控制曝光以获
得主被摄体的标准曝光。 如果在多个闪光组朝向主被摄体的状态下拍摄,可
能会导致曝光过度。
要闪光的闪光组不一定要连续,例如可以设为A/C/E。
从从属单元进行测试闪光
即使清除设置后,传输频道、无线无线电ID、C.Fn和P.Fn设置 (第54页)也
不会被取消。
当两个或以上单元设为主控时,<D>指示灯以绿色点亮的主控单元进行
闪光。
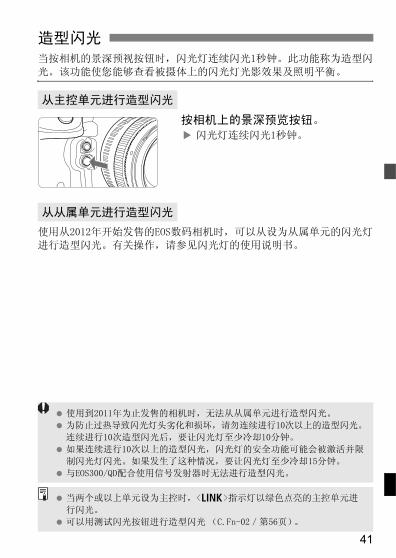
41
当按相机的景深预视按钮时,闪光灯连续闪光1秒钟。此功能称为造型闪
光。该功能使您能够查看被摄体上的闪光灯光影效果及照明平衡。
按相机上的景深预览按钮。闪光灯连续闪光1秒钟。
使用从2012年开始发售的EOS数码相机时,可以从设为从属单元的闪光灯
进行造型闪光。有关操作,请参见闪光灯的使用说明书。
造型闪光
从主控单元进行造型闪光
从从属单元进行造型闪光
使用到2011年为止发售的相机时,无法从从属单元进行造型闪光。
为防止过热导致闪光灯头劣化和损坏,请勿连续进行10次以上的造型闪光。
连续进行10次造型闪光后,要让闪光灯至少冷却10分钟。
如果连续进行10次以上的造型闪光,闪光灯的安全功能可能会被激活并限
制闪光灯闪光。如果发生了这种情况,要让闪光灯至少冷却15分钟。
与EOS300/QD配合使用信号发射器时无法进行造型闪光。
当两个或以上单元设为主控时,<D>指示灯以绿色点亮的主控单元进
行闪光。
可以用测试闪光按钮进行造型闪光 (C.Fn-02/第56页)。
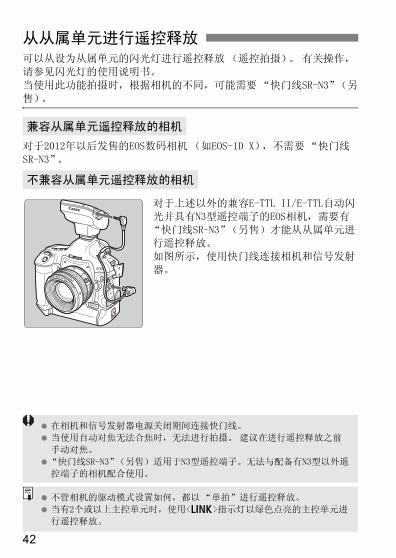
42
可以从设为从属单元的闪光灯进行遥控释放 (遥控拍摄)。 有关操作,
请参见闪光灯的使用说明书。
当使用此功能拍摄时,根据相机的不同,可能需要 “快门线SR-N3”(另
售)。
对于2012年以后发售的EOS数码相机 (如EOS-1D X),不需要“快门线
SR-N3”。
对于上述以外的兼容E-TTL II/E-TTL自动闪
光并具有N3型遥控端子的EOS相机,需要有
“快门线SR-N3”(另售)才能从从属单元进
行遥控释放。
如图所示,使用快门线连接相机和信号发射
器。
从从属单元进行遥控释放
兼容从属单元遥控释放的相机
不兼容从属单元遥控释放的相机
在相机和信号发射器电源关闭期间连接快门线。
当使用自动对焦无法合焦时,无法进行拍摄。 建议在进行遥控释放之前
手动对焦。
“快门线SR-N3”(另售)适用于N3型遥控端子。无法与配备有N3型以外遥
控端子的相机配合使用。
不管相机的驱动模式设置如何,都以 “单拍”进行遥控释放。
当有2个或以上主控单元时,使用<D>指示灯以绿色点亮的主控单元进
行遥控释放。
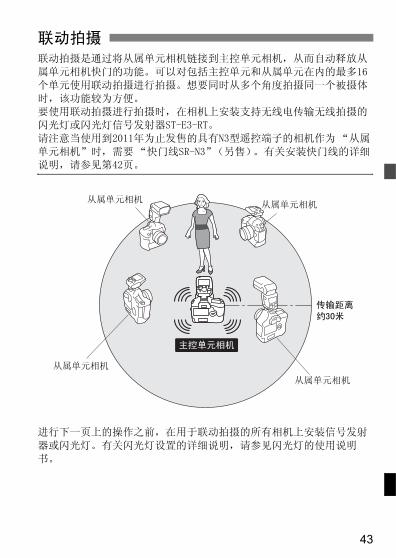
43
联动拍摄是通过将从属单元相机链接到主控单元相机,从而自动释放从
属单元相机快门的功能。可以对包括主控单元和从属单元在内的最多16
个单元使用联动拍摄进行拍摄。想要同时从多个角度拍摄同一个被摄体
时,该功能较为方便。
要使用联动拍摄进行拍摄时,在相机上安装支持无线电传输无线拍摄的
闪光灯或闪光灯信号发射器ST-E3-RT。
请注意当使用到2011年为止发售的具有N3型遥控端子的相机作为 “从属
单元相机”时,需要 “快门线SR-N3”(另售)。有关安装快门线的详细
说明,请参见第42页。
进行下一页上的操作之前,在用于联动拍摄的所有相机上安装信号发射
器或闪光灯。有关闪光灯设置的详细说明,请参见闪光灯的使用说明
书。
联动拍摄
从属单元相机从属单元相机
从属单元相机
从属单元相机
传输距离约30米
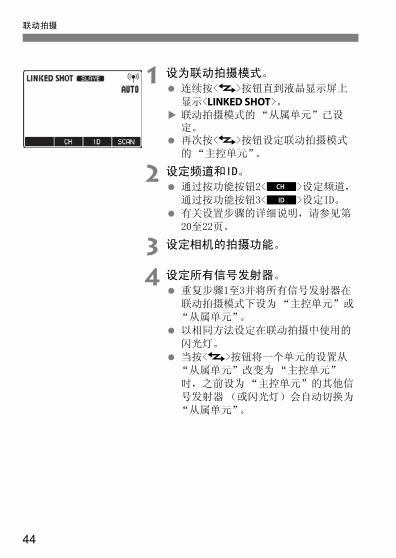
44
联动拍摄
1 设为联动拍摄模式。
连续按<I>按钮直到液晶显示屏上
显示<b>。
联动拍摄模式的“从属单元”已设定。再次按<I>按钮设定联动拍摄模式
的“主控单元”。
2 设定频道和ID。
通过按功能按钮2<C>设定频道,
通过按功能按钮3<H>设定ID。
有关设置步骤的详细说明,请参见第
20至22页。
3 设定相机的拍摄功能。
4 设定所有信号发射器。
重复步骤1至3并将所有信号发射器在
联动拍摄模式下设为 “主控单元”或
“从属单元”。
以相同方法设定在联动拍摄中使用的
闪光灯。
当按<I>按钮将一个单元的设置从
“从属单元”改变为 “主控单元”
时,之前设为 “主控单元”的其他信
号发射器(或闪光灯)会自动切换为
“从属单元”。
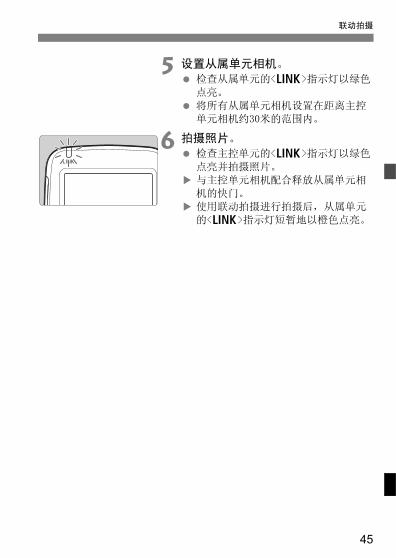
45
联动拍摄
5 设置从属单元相机。检查从属单元的<D>指示灯以绿色
点亮。
将所有从属单元相机设置在距离主控
单元相机约30米的范围内。
6 拍摄照片。检查主控单元的<D>指示灯以绿色
点亮并拍摄照片。
与主控单元相机配合释放从属单元相
机的快门。
使用联动拍摄进行拍摄后,从属单元
的<D>指示灯短暂地以橙色点亮。
46
联动拍摄
对于从属单元相机建议使用手动对焦拍摄。如果用自动对焦无法合焦,无
法使用相应的从属单元相机进行联动拍摄。
从属单元相机的快门释放与主控单元相机的快门释放时机之间有短暂的延
迟。无法进行完全同步的拍摄。
如果在联动拍摄期间让多个闪光灯单元同时闪光,可能无法获得正确的曝
光或导致曝光不均 。
当 [闪光灯功能设置]中的[闪光灯闪光]设为 [关闭]时 (第50
页),无法进行联动拍摄。
当实时显示状态下进行联动拍摄时,将主控相机菜单上的 [静音实时显
示拍摄]设为 [关闭]。如果设定了 [模式1]或 [模式2],不会释放
从属单元相机。
根据从属单元的位置、周围环境和天气状况等,传输距离可能更短。
该联动拍摄功能与WFT系列无线文件传输器的联动拍摄功能相同。然而,
无法与WFT系列配合使用联动拍摄。此外,释放时滞与使用WFT系列进行的
联动拍摄不同。
无需在相机上安装闪光灯或信号发射器,就可以将此功能用作联动拍摄用
主控单元遥控器。当按下主控单元上的功能按钮1<U>时,释放所有
从属单元相机的快门。
在联动拍摄期间,到自动关闭电源生效为止的时间为5分钟。

47
3用相机操作设定信号发射器功能
本章说明如何从相机的菜单画面设定信号发射器功能。
当相机的拍摄模式设为全自动模式或图像拍摄区模式时,无法利
用本章中的操作。将相机的拍摄模式设为V/X/W/q/5(创意
拍摄区模式)。
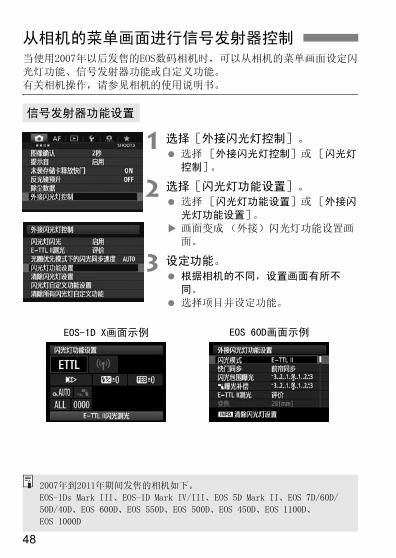
48
当使用2007年以后发售的EOS数码相机时,可以从相机的菜单画面设定闪
光灯功能、信号发射器功能或自定义功能。
有关相机操作,请参见相机的使用说明书。
1 选择[外接闪光灯控制]。
选择 [外接闪光灯控制]或[闪光灯
控制]。
2 选择[闪光灯功能设置]。选择 [闪光灯功能设置]或[外接闪
光灯功能设置]。
画面变成(外接)闪光灯功能设置画
面。
3 设定功能。根据相机的不同,设置画面有所不
同。
选择项目并设定功能。
从相机的菜单画面进行信号发射器控制
信号发射器功能设置
EOS-1D X画面示例 EOS 60D画面示例
2007年到2011年期间发售的相机如下。
EOS-1Ds Mark III、EOS-1D Mark IV/III、EOS 5D Mark II、EOS 7D/60D/
50D/40D、EOS 600D、EOS 550D、EOS 500D、EOS 450D、EOS 1100D、
EOS 1000D
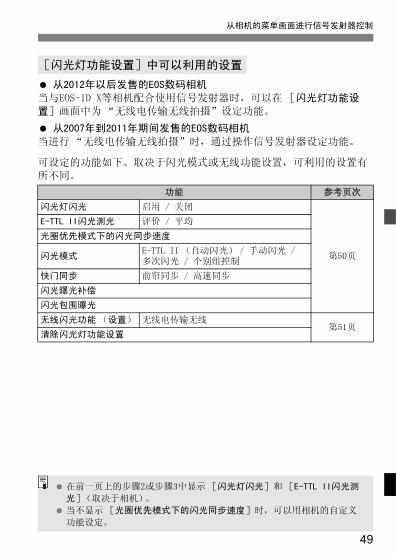
49
从相机的菜单画面进行信号发射器控制
从2012年以后发售的EOS数码相机
当与EOS-1D X等相机配合使用信号发射器时,可以在 [闪光灯功能设
置]画面中为 “无线电传输无线拍摄”设定功能。
从2007年到2011年期间发售的EOS数码相机
当进行 “无线电传输无线拍摄”时,通过操作信号发射器设定功能。
可设定的功能如下。取决于闪光模式或无线功能设置,可利用的设置有
所不同。
[闪光灯功能设置]中可以利用的设置
功能 参考页次
闪光灯闪光 启用 / 关闭
第50页
E-TTL II闪光测光 评价 / 平均
光圈优先模式下的闪光同步速度
闪光模式E-TTL II (自动闪光) / 手动闪光 / 多次闪光 / 个别组控制
快门同步 前帘同步 / 高速同步
闪光曝光补偿
闪光包围曝光
无线闪光功能 (设置) 无线电传输无线第51页
清除闪光灯功能设置
在前一页上的步骤2或步骤3中显示 [闪光灯闪光]和 [E-TTL II闪光测
光](取决于相机)。
当不显示 [光圈优先模式下的闪光同步速度]时,可以用相机的自定义
功能设定。
50
从相机的菜单画面进行信号发射器控制
闪光灯闪光
要进行无线闪光拍摄,设定为[启用]。设定了 [关闭]时,无法
进行无线闪光拍摄。
E-TTL II闪光测光
对于普通曝光,将其设为[评价]。如果设定了 [平均],闪光曝光
将对相机测光的整个场景进行平均测光。 根据场景的不同,可能需
要闪光曝光补偿。此设置面向高级用户。
光圈优先模式下的闪光同步速度
在光圈优先自动曝光 (W)模式下进行无线闪光拍摄时,可以设定
闪光同步速度。
闪光模式
可以从[E-TTL II]、[手动闪光]、[多次闪光]和[个别组控
制]中选择闪光模式以适合所需闪光拍摄。
快门同步
可以从[前帘同步]和[高速同步]中选择闪光灯闪光时机/方
法。要进行普通无线闪光拍摄,将其设为 [前帘同步]。
闪光曝光补偿
可以像设定普通曝光补偿一样设定闪光曝光补偿。可以在±3档间以
1/3档为增量设定闪光曝光补偿量。
闪光包围曝光
可以在自动改变闪光输出的同时拍摄三张照片。以1/3档为增量,可
设置的范围最大为±3档。
51
从相机的菜单画面进行信号发射器控制
无线闪光功能 (设置)
自动设定无线电传输无线闪光拍摄。有关详细说明,请参见第2章。
清除闪光灯(功能)设置
可以将信号发射器设置恢复为其默认设置。
当 [闪光模式]设为[个别组控制]时,可以选择 [E-TTL II]、[手
动闪光]、[自动外部闪光测光]或 [关闭]作为各组的闪光模式。
在信号发射器上设有闪光曝光补偿时,无法在相机的菜单画面上设定闪光
曝光补偿。请注意如果同时设定了两者,优先信号发射器上的设置。
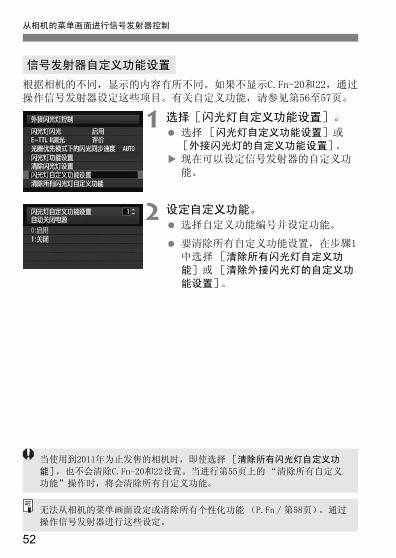
52
从相机的菜单画面进行信号发射器控制
根据相机的不同,显示的内容有所不同。如果不显示C.Fn-20和22,通过
操作信号发射器设定这些项目。有关自定义功能,请参见第56至57页。
1 选择[闪光灯自定义功能设置]。
选择 [闪光灯自定义功能设置]或
[外接闪光灯的自定义功能设置]。
现在可以设定信号发射器的自定义功
能。
2 设定自定义功能。
选择自定义功能编号并设定功能。
要清除所有自定义功能设置,在步骤1
中选择 [清除所有闪光灯自定义功
能]或 [清除外接闪光灯的自定义功
能设置]。
信号发射器自定义功能设置
当使用到2011年为止发售的相机时,即使选择 [清除所有闪光灯自定义功
能],也不会清除C.Fn-20和22设置。当进行第55页上的 “清除所有自定义
功能”操作时,将会清除所有自定义功能。
无法从相机的菜单画面设定或清除所有个性化功能 (P.Fn/第58页)。通过
操作信号发射器进行这些设定。
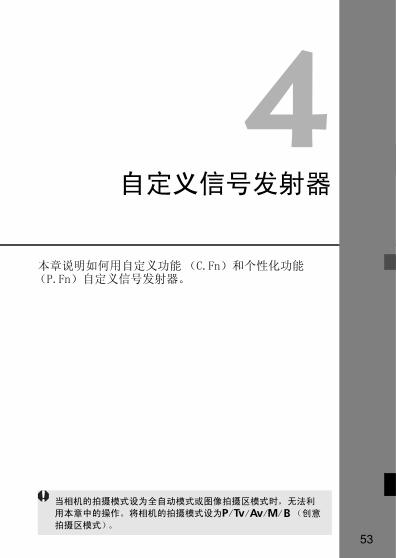
53
4自定义信号发射器
本章说明如何用自定义功能 (C.Fn)和个性化功能(P.Fn)自定义信号发射器。
当相机的拍摄模式设为全自动模式或图像拍摄区模式时,无法利
用本章中的操作。将相机的拍摄模式设为V/X/W/q/5(创意
拍摄区模式)。
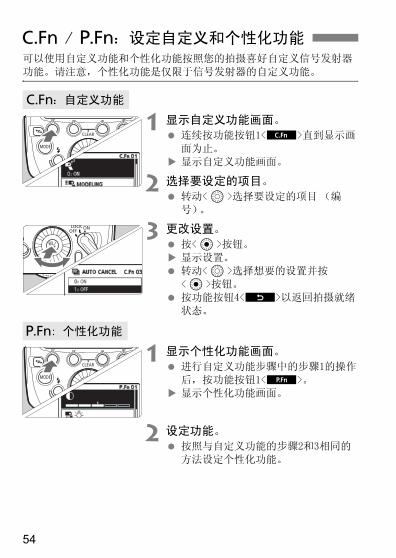
54
可以使用自定义功能和个性化功能按照您的拍摄喜好自定义信号发射器
功能。请注意,个性化功能是仅限于信号发射器的自定义功能。
1 显示自定义功能画面。连续按功能按钮1<=>直到显示画
面为止。
显示自定义功能画面。
2 选择要设定的项目。
转动<9>选择要设定的项目(编
号)。
3 更改设置。按<8>按钮。
显示设置。
转动<9>选择想要的设置并按
<8>按钮。
按功能按钮4<?>以返回拍摄就绪
状态。
1 显示个性化功能画面。进行自定义功能步骤中的步骤1的操作
后,按功能按钮1<<>。
显示个性化功能画面。
2 设定功能。
按照与自定义功能的步骤2和3相同的
方法设定个性化功能。
C / >:设定自定义和个性化功能
C:自定义功能
>: 个性化功能
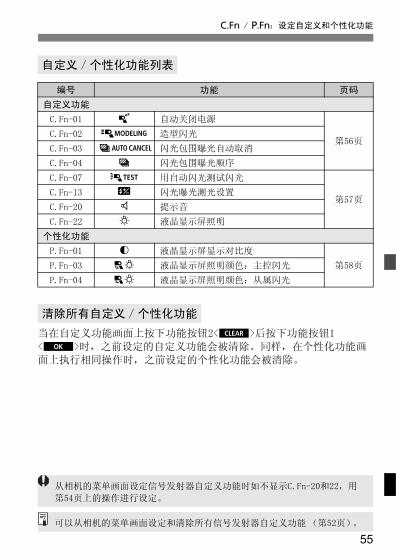
55
C / >:设定自定义和个性化功能
当在自定义功能画面上按下功能按钮2<3>后按下功能按钮1
<;>时,之前设定的自定义功能会被清除。同样,在个性化功能画
面上执行相同操作时,之前设定的个性化功能会被清除。
自定义/个性化功能列表
编号 功能 页码
自定义功能
C.Fn-01 # 自动关闭电源
第56页C.Fn-02 $ 造型闪光
C.Fn-03 ( 闪光包围曝光自动取消
C.Fn-04 ) 闪光包围曝光顺序
C.Fn-07 , 用自动闪光测试闪光
第57页C.Fn-13 6 闪光曝光测光设置
C.Fn-20 7 提示音
C.Fn-22 < 液晶显示屏照明
个性化功能
P.Fn-01 @ 液晶显示屏显示对比度
第58页P.Fn-03 B 液晶显示屏照明颜色:主控闪光
P.Fn-04 C 液晶显示屏照明颜色:从属闪光
清除所有自定义/个性化功能
从相机的菜单画面设定信号发射器自定义功能时如不显示C.Fn-20和22,用
第54页上的操作进行设定。
可以从相机的菜单画面设定和清除所有信号发射器自定义功能 (第52页)。
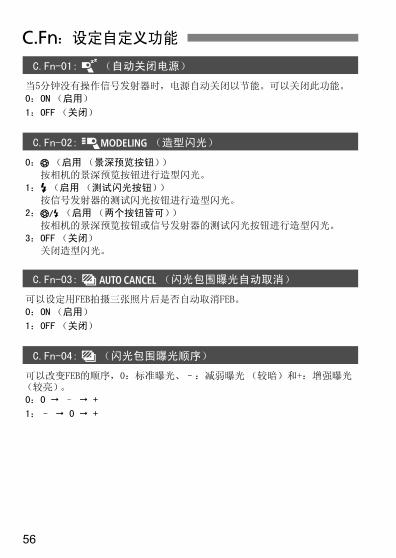
56
C:设定自定义功能
C.Fn-01:#(自动关闭电源)
当5分钟没有操作信号发射器时,电源自动关闭以节能。可以关闭此功能。
0:ON (启用)
1:OFF (关闭)
C.Fn-02:$(造型闪光)
0:%(启用 (景深预览按钮))
按相机的景深预览按钮进行造型闪光。
1:&(启用(测试闪光按钮))
按信号发射器的测试闪光按钮进行造型闪光。
2:'(启用 (两个按钮皆可))
按相机的景深预览按钮或信号发射器的测试闪光按钮进行造型闪光。
3:OFF (关闭)
关闭造型闪光。
C.Fn-03:((闪光包围曝光自动取消)
可以设定用FEB拍摄三张照片后是否自动取消FEB。
0:ON (启用)
1:OFF (关闭)
C.Fn-04:)(闪光包围曝光顺序)
可以改变FEB的顺序,0:标准曝光、–:减弱曝光 (较暗)和+:增强曝光(较亮)。
0:0 – +
1:– 0 +
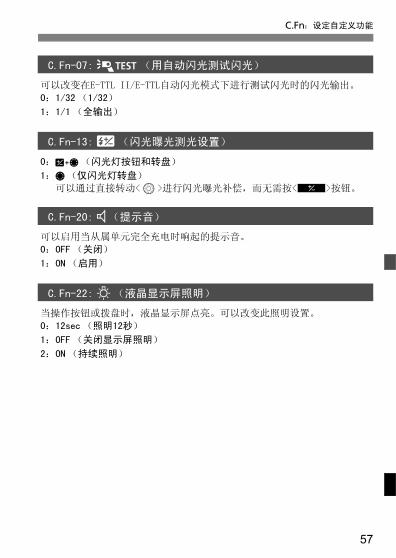
57
C:设定自定义功能
C.Fn-07:,(用自动闪光测试闪光)
可以改变在E-TTL II/E-TTL自动闪光模式下进行测试闪光时的闪光输出。
0:1/32 (1/32)
1:1/1 (全输出)
C.Fn-13:6(闪光曝光测光设置)
0:4(闪光灯按钮和转盘)
1:5(仅闪光灯转盘)
可以通过直接转动<9>进行闪光曝光补偿,而无需按<@>按钮。
C.Fn-20: 7(提示音)
可以启用当从属单元完全充电时响起的提示音。
0:OFF (关闭)
1:ON (启用)
C.Fn-22:<(液晶显示屏照明)
当操作按钮或拨盘时,液晶显示屏点亮。可以改变此照明设置。
0:12sec (照明12秒)
1:OFF (关闭显示屏照明)
2:ON (持续照明)
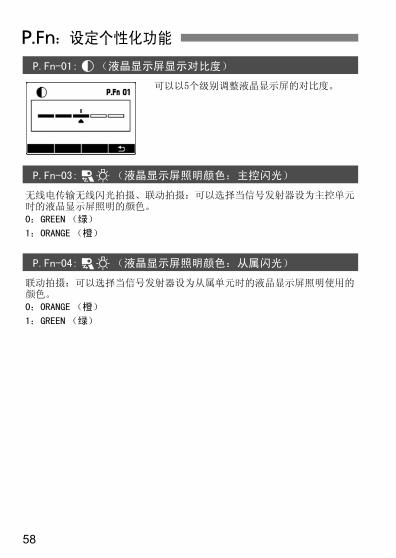
58
>:设定个性化功能
P.Fn-01: @(液晶显示屏显示对比度)
可以以5个级别调整液晶显示屏的对比度。
P.Fn-03:B(液晶显示屏照明颜色:主控闪光)
无线电传输无线闪光拍摄、联动拍摄:可以选择当信号发射器设为主控单元时的液晶显示屏照明的颜色。
0:GREEN (绿)
1:ORANGE (橙)
P.Fn-04:C(液晶显示屏照明颜色:从属闪光)
联动拍摄:可以选择当信号发射器设为从属单元时的液晶显示屏照明使用的颜色。
0:ORANGE (橙)
1:GREEN (绿)
59
5参考
本章包含系统图和常见问题解答。
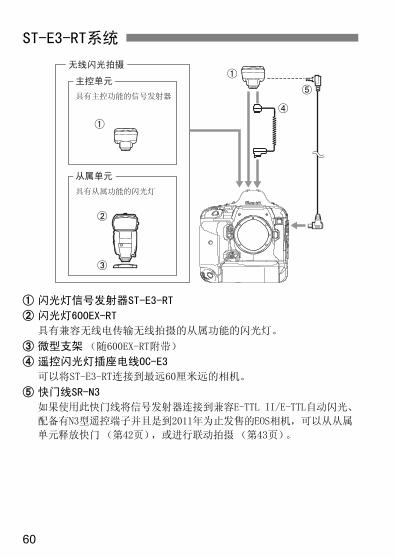
60
" 闪光灯信号发射器ST-E3-RT
# 闪光灯600EX-RT
具有兼容无线电传输无线拍摄的从属功能的闪光灯。
$ 微型支架(随600EX-RT附带)
% 遥控闪光灯插座电线OC-E3
可以将ST-E3-RT连接到最远60厘米远的相机。
& 快门线SR-N3
如果使用此快门线将信号发射器连接到兼容E-TTL II/E-TTL自动闪光、
配备有N3型遥控端子并且是到2011年为止发售的EOS相机,可以从从属
单元释放快门(第42页),或进行联动拍摄(第43页)。
ST-E3-RT系统
#
$
"
%
&
"

61
如果信号发射器发生问题,请首先参阅此故障排除指南。如果此故障排
除指南无法解决问题,请与经销商或就近的佳能快修中心联系。
确保以正确的方向安装电池(第12页)。
将固定座完全插入相机的热靴插座,将锁定杆滑动到右侧并将信号发射
器固定在相机上(第13页)。
如果信号发射器和相机的电子触点变脏,请清洁触点 (第7页)。
当无线拍摄(从属)就绪时,充电指示灯点亮。
信号发射器的自动关闭电源功能已激活。半按下快门按钮或按测试闪光
按钮(第14页)。
检查从属单元是否支持无线电传输无线闪光拍摄。
将从属单元设为<'><x> (第20页)。
将主控单元和从属单元的传输频道和无线无线电ID设为相同的号码(第
20页)。
检查从属单元位于主控单元的传输范围内(第16页)。
故障排除指南
无法打开电源。
电源自动关闭。
从属单元不闪光。
62
故障排除指南
如果照片中有反光强烈的物体(玻璃窗等),请使用闪光曝光锁(第30
页)。
如果被摄体显得太暗或太亮,请设定闪光曝光补偿(第27页)。
当设定了高速同步时,有效闪光范围较短。将从属单元放在靠近被摄体
的位置(第29页)。
当使用具有三个闪光组A、B和C的自动闪光拍摄时,不要在闪光组C朝向
主被摄体的状态下闪光(第33页)。
当为各个闪光组使用不同的闪光模式设置拍摄时,不要在设为<a>
或</>的多个闪光组朝向主被摄体的状态下闪光(第40页)。
当拍摄模式设为<W>并且场景较暗时,自动启用慢速同步(快门速度
变慢)。使用三脚架或将拍摄模式设为<V>或全自动模式。请注意,还
可以在[光圈优先模式下的闪光同步速度]中设定同步速度(第49
页)。
将快门速度设为比闪光同步速度慢1档(第19页)。
当使用到2011年为止发售的兼容E-TTL II/E-TTL自动闪光并且配备有N3
型遥控端子的EOS相机从从属单元进行遥控释放时或在联动拍摄期间将
其设为从属单元时,需要有“快门线SR-N3”(另售)(第42、43、60
页)。
照片曝光不足或过度。
照片非常模糊。
显示<k>。
无法从从属单元释放。
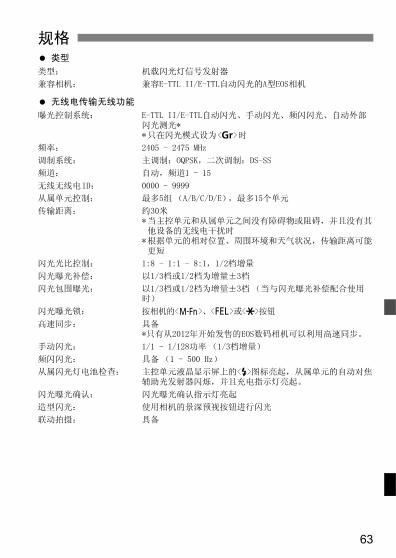
63
类型
无线电传输无线功能
规格
类型: 机载闪光灯信号发射器
兼容相机: 兼容E-TTL II/E-TTL自动闪光的A型EOS相机
曝光控制系统: E-TTL II/E-TTL自动闪光、手动闪光、频闪闪光、自动外部闪光测光**只在闪光模式设为<[>时
频率: 2405 - 2475 MHz
调制系统: 主调制:OQPSK,二次调制:DS-SS
频道: 自动,频道1 - 15
无线无线电ID: 0000 - 9999
从属单元控制: 最多5组 (A/B/C/D/E),最多15个单元
传输距离: 约30米*当主控单元和从属单元之间没有障碍物或阻碍,并且没有其他设备的无线电干扰时
*根据单元的相对位置、周围环境和天气状况,传输距离可能更短
闪光光比控制: 1:8 - 1:1 - 8:1,1/2档增量
闪光曝光补偿: 以1/3档或1/2档为增量±3档
闪光包围曝光: 以1/3档或1/2档为增量±3档 (当与闪光曝光补偿配合使用时)
闪光曝光锁: 按相机的<B>、<7>或<P>按钮
高速同步: 具备*只有从2012年开始发售的EOS数码相机可以利用高速同步。
手动闪光: 1/1 - 1/128功率 (1/3档增量)
频闪闪光: 具备(1 - 500 Hz)
从属闪光灯电池检查: 主控单元液晶显示屏上的<Q>图标亮起,从属单元的自动对焦辅助光发射器闪烁,并且充电指示灯亮起。
闪光曝光确认: 闪光曝光确认指示灯亮起
造型闪光: 使用相机的景深预视按钮进行闪光
联动拍摄: 具备
64
规格
可自定义的功能
电源
尺寸和重量
上述所有规格均基于佳能测试标准。
产品规格及外观如有变化恕不另行通知。
自定义功能: 8
个性化功能: 3
电源: 2节5号(AA/LR6)碱性电池*还可以使用5号(AA/LR6)镍氢 (Ni-MH)和锂电池
无线闪光拍摄时间: 连续约10小时*使用5号(AA/LR6)碱性电池时
节电: 5分钟无操作后电源关闭
尺寸: 约67.4 (宽)x 61.5 (高)x 77.4 (深)毫米 (不包括防尘防水滴适配器)
重量: 约110克(仅信号发射器,不包括电池)

65
原产地:请参照保修卡、产品包装箱或产品机身上的标示进口商:佳能(中国)有限公司进口商地址:北京市东城区金宝街89号金宝大厦15层 邮编100005

66
MEMO

67
MEMO

68
MEMO

69
MEMO

70
4秒、6秒、16秒定时器 ..................10A型相机 ...........................................2C.Fn.........................................54, 56E-TTL II (闪光测光)..................50E-TTL II/E-TTL自动闪光 ..............16Ext.A (自动外部闪光测光).........39ISO感光度......................................30LINK...............................6, 23, 25, 61LOCK...............................................14M (手动曝光)..............................34MULTI .............................................35P.Fn.........................................54, 58C
测试闪光 ...........................13, 25, 40充电指示灯 ..........................6, 14, 25传输频道 ...........................20, 21, 22从属单元设置 ................................20从属组控制 ....................................33D
电池...............................................12G
高速同步 .......................................29个性化功能 (P.Fn)...............54, 58光圈优先模式下的闪光同步速度 ...50K
快门速度 .......................................19快门同步 .......................................50L
联动拍摄 ...................................9, 43N
内存功能 .......................................23P
频闪闪光 .......................................35Q
清除闪光灯设置.......................40, 49全部清除 .......................................55全自动无线闪光拍摄 .....................24
R
热靴插座 ....................................... 13S
扫描 .............................................. 22闪光曝光补偿................................ 27闪光曝光确认指示灯 ................. 6, 20闪光曝光水平............................ 8, 28闪光曝光锁 ................................... 30闪光包围曝光................................ 28闪光灯操作范围 ............................ 16闪光灯功能设置 ............................ 49闪光灯控制 ................................... 48闪光灯位置 ................................... 16闪光光比两个从属组 (A:B).................... 31三个从属组 (A:B C)................ 32
闪光模式 ......................... 8, 9, 49, 50闪光频率 ....................................... 35闪光输出 ....................................... 34闪光同步速度................................ 50闪光组 .................. 31, 32, 34, 35, 38设定功能 ....................................... 47手动闪光 ....................................... 34锁定功能 ....................................... 14T
提示音 .......................................... 57W
无线多重闪光拍摄 ............ 17, 31, 34无线闪光拍摄................................ 16全自动两个从属组 (A:B)......... 31全自动三个从属组 (A:B C)..... 32全自动一个从属单元 .................. 24手动闪光 .................................... 34组闪光........................................ 38
无线闪光拍摄时间 ........................ 12无线设置 ....................................... 20无线无线电ID.......................... 20, 21
索引
71
索引
Y
遥控释放....................................... 42液晶显示屏 ..................................... 8浓度 ........................................... 58照明 ..................................... 14, 57照明颜色.................................... 58
Z
造型闪光....................................... 41主控单元设置 ............................... 20自定义功能 (C.Fn)............... 54, 56自动关闭电源 ......................... 14, 56自动外部闪光测光 ........................ 39最大连续闪光次数 ........................ 37

本使用说明书中提及的相机和附件为截至2012年1月上市的产品。关于与此日期
后上市的相机和附件的兼容性的信息,请与最近的佳能维修中心联系。
1
2
佳能無線閃光燈信號發射器ST-E3-RT是供無線閃光拍攝使用的發射器。
它可以控制高達5組 (15個單元)能以無線電傳送進行多支無線閃燈拍
攝的佳能閃光燈。發射器也有相當於 EOS-1D 系列相機的防塵與防水能力。
閱讀本說明書時,另請參考相機與閃光燈的使用說明書。使用發射器之前,請閱讀本說明書以及相機與閃光燈的使用說明書,以熟悉操
作方法。
搭配EOS數碼相機(A型相機)使用
• 您可以輕鬆地進行無線自動閃光拍攝。搭配EOS菲林型相機使用
• 與相容於E-TTL II與E-TTL自動閃光系統的EOS菲林型相機搭配使用
時 (A型相機),可以輕鬆地進行自動閃光拍攝。• 此閃光燈無法與配備有TTL自動閃光系統的EOS菲林型相機搭配使用
(B型相機)。
簡介
以相機使用發射器

3
章節
簡介 2
快速入門
準備進行無線閃光拍攝11
無線閃光拍攝:無線電傳送
採用無線電傳送無線閃光拍攝15
以相機的操作設定發射器功能從相機的功能表畫面設定發射器功能
47
自訂發射器
以自訂功能和個人功能進行自訂53
參考
系統圖,常見問題59
1
2
3
4
5
4
3
1
2
簡介 2
章節 ................................................................3
部件名稱 ............................................................6
本說明書使用慣例 ...................................................10
快速入門 11
安裝電池 ...........................................................12
安裝與取出發射器 ...................................................13
開啟電源 ...........................................................13
無線閃光拍攝:無線電傳送 15
' 無線閃光拍攝 ....................................................16
無線設定 ...........................................................20
a:全自動無線閃光拍攝 .........................................24
使用全自動無線閃光 .................................................27
a:使用閃光比例的多支閃燈無線拍攝 .............................31
q: 使用手動閃光輸出的多支閃燈無線拍攝 .............................34
[: 為各燈組設定不同的閃燈模式進行拍攝.............................38
清除發射器設定 .....................................................40
由從屬單元測試閃光 .................................................40
造型閃光 ...........................................................41
由從屬單元遙控釋放快門 .............................................42
連結拍攝 ...........................................................43
以相機的操作設定發射器功能 47
從相機功能表畫面進行發射器控制 .....................................48
目錄
5
目錄
5
4 自訂發射器 53
C∕>: 設定自訂與個人功能 ................................... 54
C: 設定自訂功能 ................................................ 56
>: 設定個人功能................................................. 58
參考 59
ST-E3-RT 系統 ...................................................... 60
故障排除指南....................................................... 61
規格............................................................... 63
索引............................................................... 70
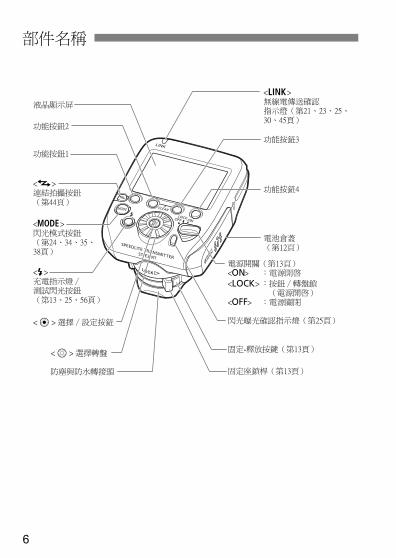
6
部件名稱
8
9
Ka
J
D
I
E
Q
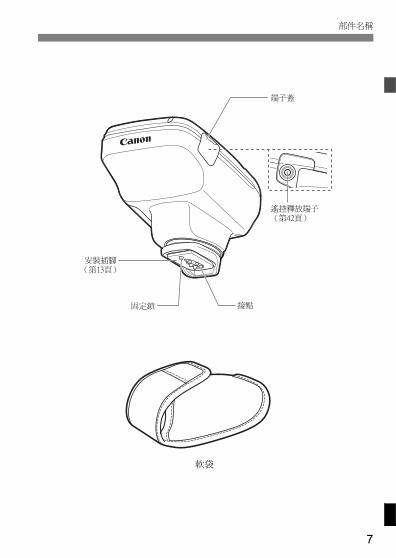
7
部件名稱
部件名稱 02
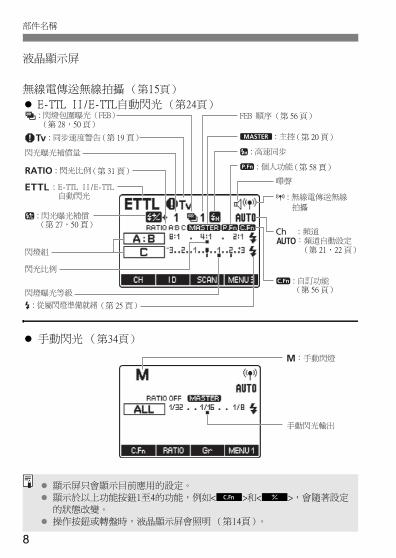
8
部件名稱
液晶顯示屏
無線電傳送無線拍攝(第15頁)
E-TTL II/E-TTL自動閃光(第24頁)
手動閃光 (第34頁)
a :
, :
g :
u :
T :
f :
k : M :
c :
' :
* : )
Q :
q
顯示屏只會顯示目前應用的設定。
顯示於以上功能按鈕1至4的功能,例如<=>和<@>,會隨著設定
的狀態改變。
操作按鈕或轉盤時,液晶顯示屏會照明 (第14頁)。
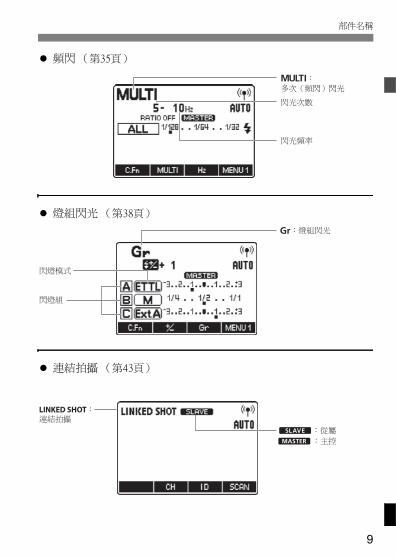
9
部件名稱
頻閃 (第35頁)
燈組閃光 (第38頁)
連結拍攝 (第43頁)
?
[
xM
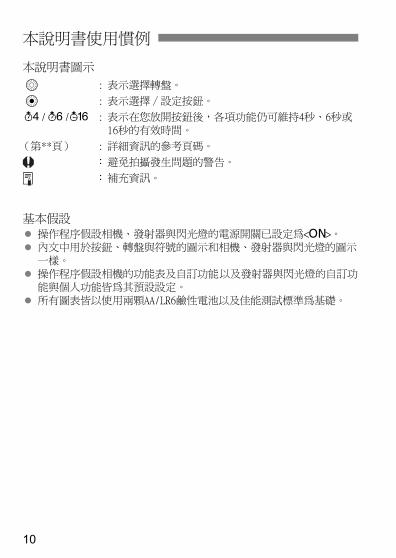
10
本說明書圖示
9 : 表示選擇轉盤。
8 : 表示選擇∕設定按鈕。
3/1/2 : 表示在您放開按鈕後,各項功能仍可維持4秒、6秒或
16秒的有效時間。
(第**頁) : 詳細資訊的參考頁碼。
:避免拍攝發生問題的警告。
:補充資訊。
基本假設操作程序假設相機、發射器與閃光燈的電源開關已設定為<K>。
內文中用於按鈕、轉盤與符號的圖示和相機、發射器與閃光燈的圖示一樣。
操作程序假設相機的功能表及自訂功能以及發射器與閃光燈的自訂功能與個人功能皆為其預設設定。
所有圖表皆以使用兩顆AA/LR6鹼性電池以及佳能測試標準為基礎。
本說明書使用慣例
11
1快速入門
本章說明開始進行無線閃光拍攝前的準備工作。
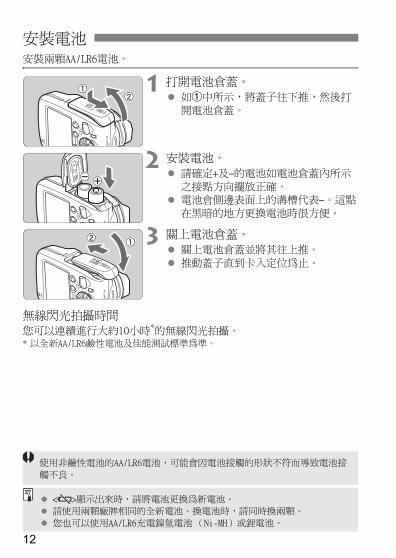
12
安裝兩顆AA/LR6電池。
1 打開電池倉蓋。如"中所示,將蓋子往下推,然後打
開電池倉蓋。
2 安裝電池。請確定+及–的電池如電池倉蓋內所示
之接點方向擺放正確。電池倉側邊表面上的溝槽代表–。這點
在黑暗的地方更換電池時很方便。
3 關上電池倉蓋。關上電池倉蓋並將其往上推。
推動蓋子直到卡入定位為止。
無線閃光拍攝時間您可以連續進行大約10小時*的無線閃光拍攝。* 以全新AA/LR6鹼性電池及佳能測試標準為準。
安裝電池
使用非鹼性電池的AA/LR6電池,可能會因電池接觸的形狀不符而導致電池接
觸不良。
<!>顯示出來時,請將電池更換為新電池。
請使用兩顆廠牌相同的全新電池。換電池時,請同時換兩顆。
您也可以使用AA/LR6充電鎳氫電池(Ni-MH)或鋰電池。
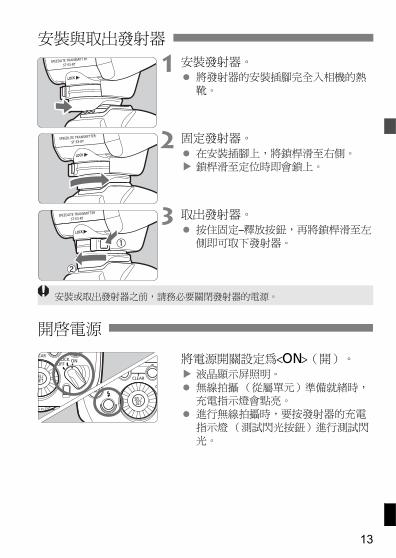
13
1 安裝發射器。將發射器的安裝插腳完全入相機的熱
靴。
2 固定發射器。在安裝插腳上,將鎖桿滑至右側。
鎖桿滑至定位時即會鎖上。
3 取出發射器。按住固定–釋放按鈕,再將鎖桿滑至左
側即可取下發射器。
將電源開關設定為<K>(開)。液晶顯示屏照明。
無線拍攝(從屬單元)準備就緒時,充電指示燈會點亮。
進行無線拍攝時,要按發射器的充電
指示燈 (測試閃光按鈕)進行測試閃光。
安裝與取出發射器
開啟電源
安裝或取出發射器之前,請務必要關閉發射器的電源。
14
開啟電源
為節省電池的電力,電源會在閒置5分鐘後自動關閉。若要再度開啟發射器電源,請將相機快門按鈕按下一半,或者按測試閃光按鈕(充電指示
燈)。
將電源開關設定至<a>,便可以停用閃光燈的按鈕與轉盤操作。請
利用這個功能防止發射器功能設定完成之後被意外變更。如果操作按鈕或轉盤, <LOCKED>會顯示於液晶顯示屏上 (顯示於按
鈕1至4上方的功能如<=>與<@>不會顯示出來)。
操作按鈕或轉盤時,液晶顯示屏會以綠色燈照明12秒鐘。設定功能時,
則會持續照明到設定完成為止。如果發射器是連結拍攝中的主控單元,液晶顯示屏會以綠色燈照明。 如
果發射器是從屬單元,液晶顯示屏會以橘色燈照明。
關於自動關閉電源
關於鎖定功能
關於液晶顯示屏的照明
相機的3/1/2計時器運作時,不能使用測試閃光。
即使電源關閉,發射器設定也會被儲存起來。若要在更換電池時保留設
定,請在關閉電源開關後的 1 分鐘內更換電池和取出電池。
即使電源開關設定至<a>位置,您也可以進行測試閃光。而且操作按
鈕或轉盤時,液晶顯示屏會照明。
您可以設定從屬單元在充滿電時發出嗶聲 (C.Fn- 20/第57頁)。自動關閉電源功能可以停用 (C.Fn-01/第56頁)。
您可以變更液晶顯示屏照明的時間長度 (C.Fn-22/第57頁)。
您可以變更液晶顯示屏照明的顏色 (P.Fn-03、04/第58頁)。

15
2無線閃光拍攝:無線電傳送
本章說明無線閃光拍攝。關於無線拍攝所需的配件,請參閱系統圖 (第60頁)。關於與無線電傳送有關的使用地區、限制以及注意事項,請參考個別的說明文件。
相機的拍攝模式設定為全自動模式或影像區域模式時,不能使用
本章中的操作。將相機的拍攝模式設定為V/X/W/q/5(創意
拍攝區模式)。
裝在相機上的發射器叫做主控單元,以無線方式控制的閃光燈叫
做從屬單元。
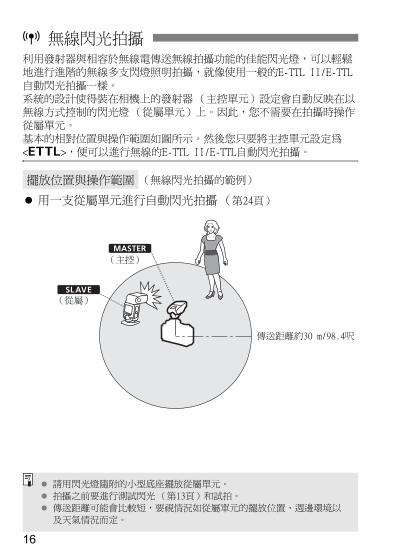
16
利用發射器與相容於無線電傳送無線拍攝功能的佳能閃光燈,可以輕鬆
地進行進階的無線多支閃燈照明拍攝,就像使用一般的E-TTL II/E-TTL
自動閃光拍攝一樣。系統的設計使得裝在相機上的發射器 (主控單元)設定會自動反映在以
無線方式控制的閃光燈 (從屬單元)上。因此,您不需要在拍攝時操作從屬單元。
基本的相對位置與操作範圍如圖所示。然後您只要將主控單元設定為
<a>,便可以進行無線的E-TTL II/E-TTL自動閃光拍攝。
用一支從屬單元進行自動閃光拍攝 (第24頁)
' 無線閃光拍攝
擺放位置與操作範圍 (無線閃光拍攝的範例)
x
M
傳送距離約30 m/98.4呎
(主控)
(從屬)
請用閃光燈隨附的小型底座擺放從屬單元。
拍攝之前要進行測試閃光 (第13頁)和試拍。
傳送距離可能會比較短,要視情況如從屬單元的擺放位置、週邊環境以
及天氣情況而定。
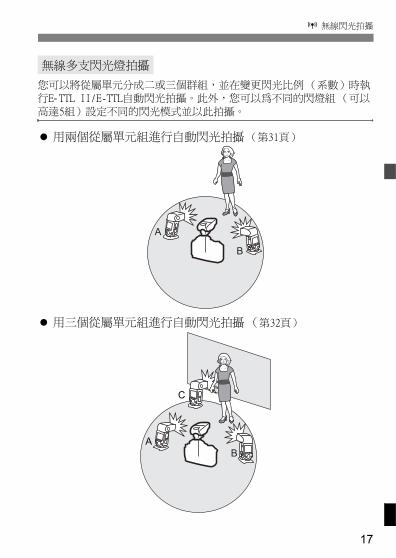
17
' 無線閃光拍攝
您可以將從屬單元分成二或三個群組,並在變更閃光比例 (系數)時執行E- TTL II/E-TTL自動閃光拍攝。此外,您可以為不同的閃燈組 (可以
高達5組)設定不同的閃光模式並以此拍攝。
用兩個從屬單元組進行自動閃光拍攝(第31頁)
用三個從屬單元組進行自動閃光拍攝 (第32頁)
無線多支閃光燈拍攝
A
B
AB
C
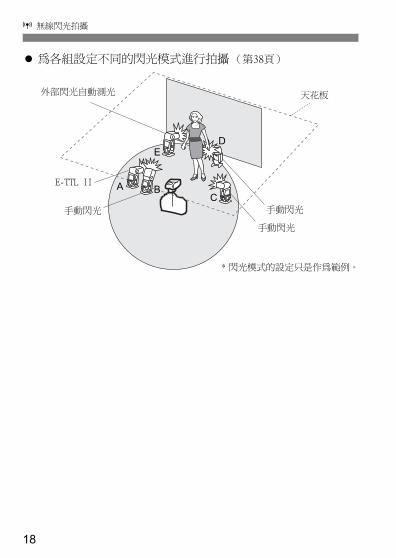
18
' 無線閃光拍攝
為各組設定不同的閃光模式進行拍攝(第38頁)
A BC
ED
手動閃光
手動閃光
外部閃光自動測光
E-TTL II
手動閃光
* 閃光模式的設定只是作為範例。
天花板
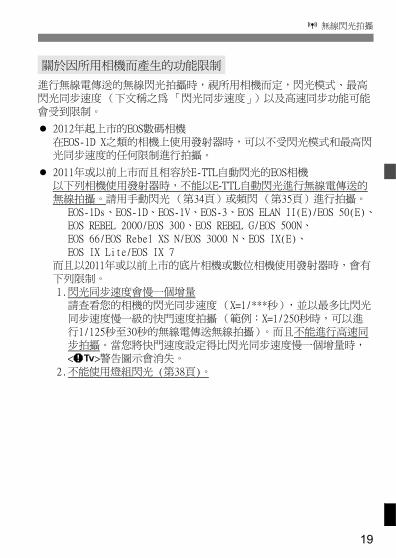
19
' 無線閃光拍攝
進行無線電傳送的無線閃光拍攝時,視所用相機而定,閃光模式、最高閃光同步速度 (下文稱之為 「閃光同步速度」)以及高速同步功能可能
會受到限制。
2012年起上市的EOS數碼相機
在EOS-1D X之類的相機上使用發射器時,可以不受閃光模式和最高閃光同步速度的任何限制進行拍攝。
2011年或以前上市而且相容於E-TTL自動閃光的EOS相機
以下列相機使用發射器時,不能以E-TTL自動閃光進行無線電傳送的無線拍攝。請用手動閃光(第34頁)或頻閃(第35頁)進行拍攝。
EOS-1Ds、EOS-1D、EOS-1V、EOS-3、EOS ELAN II(E)/EOS 50(E)、EOS REBEL 2000/EOS 300、EOS REBEL G/EOS 500N、
EOS 66/EOS Rebel XS N/EOS 3000 N、EOS IX(E)、
EOS IX Lite/EOS IX 7而且以2011年或以前上市的底片相機或數位相機使用發射器時,會有
下列限制。1.閃光同步速度會慢一個增量
請查看您的相機的閃光同步速度(X=1/***秒),並以最多比閃光
同步速度慢一級的快門速度拍攝(範例:X=1/250秒時,可以進行1/125秒至30秒的無線電傳送無線拍攝)。而且不能進行高速同
步拍攝。當您將快門速度設定得比閃光同步速度慢一個增量時,<k>警告圖示會消失。
2.不能使用燈組閃光 (第38頁)。
關於因所用相機而產生的功能限制
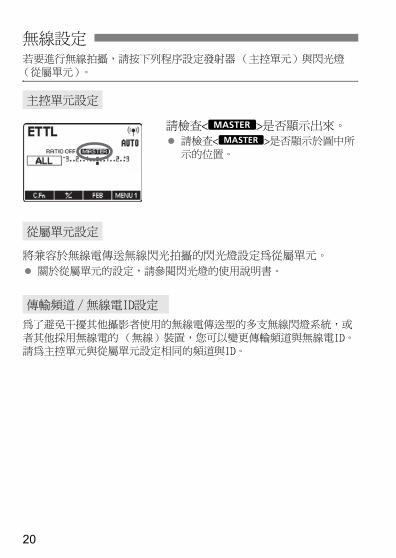
20
若要進行無線拍攝,請按下列程序設定發射器(主控單元)與閃光燈
(從屬單元)。
請檢查<M>是否顯示出來。請檢查<M>是否顯示於圖中所
示的位置。
將兼容於無線電傳送無線閃光拍攝的閃光燈設定為從屬單元。
關於從屬單元的設定,請參閱閃光燈的使用說明書。
為了避免干擾其他攝影者使用的無線電傳送型的多支無線閃燈系統,或
者其他採用無線電的 (無線)裝置,您可以變更傳輸頻道與無線電ID。請為主控單元與從屬單元設定相同的頻道與ID。
無線設定
主控單元設定
從屬單元設定
傳輸頻道∕無線電ID設定
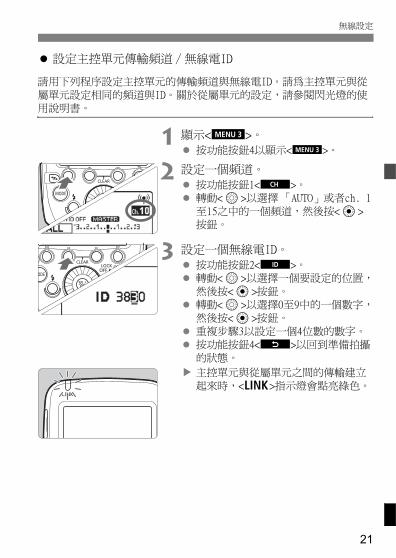
21
無線設定
設定主控單元傳輸頻道∕無線電ID
請用下列程序設定主控單元的傳輸頻道與無線電ID。請為主控單元與從
屬單元設定相同的頻道與ID。關於從屬單元的設定,請參閱閃光燈的使用說明書。
1 顯示<O>。按功能按鈕4以顯示<O>。
2 設定一個頻道。按功能按鈕1<C>。轉動<9>以選擇 「AUTO」或者ch. 1
至15之中的一個頻道,然後按<8>按鈕。
3 設定一個無線電ID。按功能按鈕2<H>。轉動<9>以選擇一個要設定的位置,
然後按<8>按鈕。轉動<9>以選擇0至9中的一個數字,
然後按<8>按鈕。
重複步驟3以設定一個4位數的數字。按功能按鈕4<?>以回到準備拍攝
的狀態。
主控單元與從屬單元之間的傳輸建立
起來時,<D>指示燈會點亮綠色。
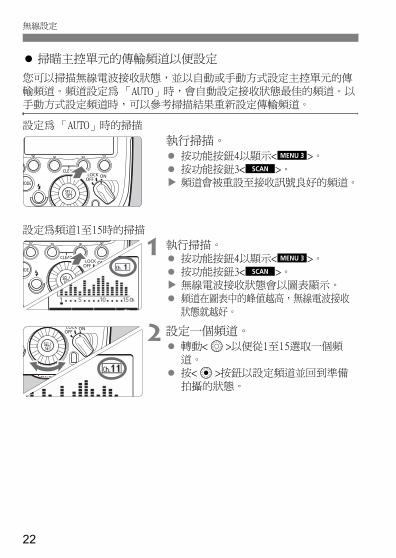
22
無線設定
掃瞄主控單元的傳輸頻道以便設定
您可以掃描無線電波接收狀態,並以自動或手動方式設定主控單元的傳
輸頻道。頻道設定為 「AUTO」時,會自動設定接收狀態最佳的頻道。以手動方式設定頻道時,可以參考掃描結果重新設定傳輸頻道。
設定為 「AUTO」時的掃描
執行掃描。按功能按鈕4以顯示<O>。
按功能按鈕3<W>。
頻道會被重設至接收訊號良好的頻道。
設定為頻道1至15時的掃描
1 執行掃描。按功能按鈕4以顯示<O>。
按功能按鈕3<W>。無線電波接收狀態會以圖表顯示。
頻道在圖表中的峰值越高,無線電波接收
狀態就越好。
2 設定一個頻道。轉動<9>以便從1至15選取一個頻道。
按<8>按鈕以設定頻道並回到準備
拍攝的狀態。
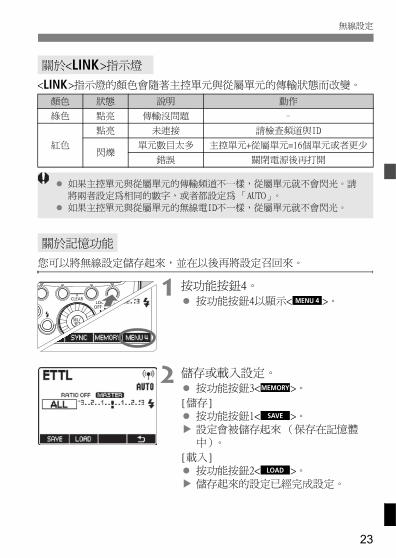
23
無線設定
<D>指示燈的顏色會隨著主控單元與從屬單元的傳輸狀態而改變。
您可以將無線設定儲存起來,並在以後再將設定召回來。
1 按功能按鈕4。按功能按鈕4以顯示<P>。
2 儲存或載入設定。按功能按鈕3<L>。
[儲存]按功能按鈕1<V>。
設定會被儲存起來 (保存在記憶體
中)。
[載入]按功能按鈕2<J>。
儲存起來的設定已經完成設定。
關於<D>指示燈
顏色 狀態 說明 動作
綠色 點亮 傳輸沒問題 –
紅色
點亮 未連接 請檢查頻道與ID
閃爍單元數目太多 主控單元+從屬單元=16個單元或者更少
錯誤 關閉電源後再打開
關於記憶功能
如果主控單元與從屬單元的傳輸頻道不一樣,從屬單元就不會閃光。請
將兩者設定為相同的數字,或者都設定為 「AUTO」。
如果主控單元與從屬單元的無線電ID不一樣,從屬單元就不會閃光。
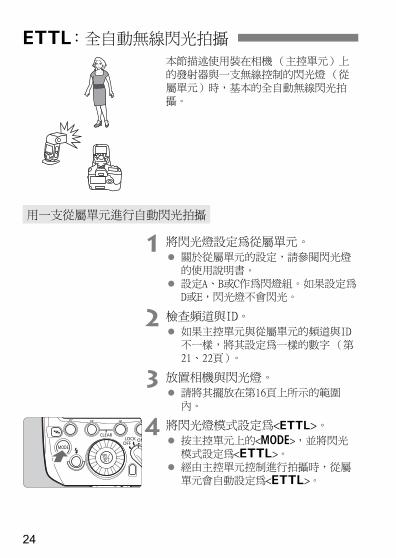
24
本節描述使用裝在相機(主控單元)上
的發射器與一支無線控制的閃光燈 (從
屬單元)時,基本的全自動無線閃光拍攝。
1 將閃光燈設定為從屬單元。關於從屬單元的設定,請參閱閃光燈的使用說明書。
設定A、B或C作為閃燈組。如果設定為D或E,閃光燈不會閃光。
2 檢查頻道與ID。如果主控單元與從屬單元的頻道與ID不一樣,將其設定為一樣的數字 (第
21、22頁)。
3 放置相機與閃光燈。請將其擺放在第16頁上所示的範圍
內。
4 將閃光燈模式設定為<a>。按主控單元上的<E>,並將閃光模式設定為<a>。
經由主控單元控制進行拍攝時,從屬
單元會自動設定為<a>。
a:全自動無線閃光拍攝
用一支從屬單元進行自動閃光拍攝
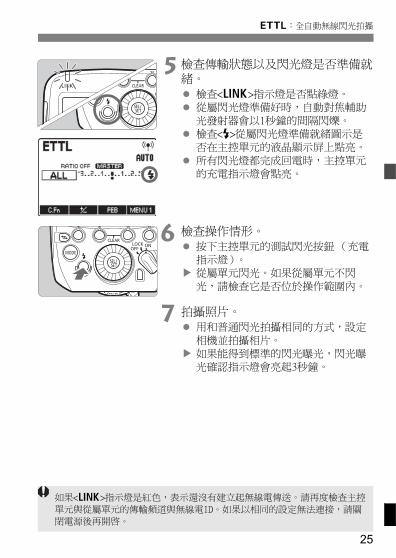
25
a:全自動無線閃光拍攝
5 檢查傳輸狀態以及閃光燈是否準備就緒。
檢查<D>指示燈是否點綠燈。從屬閃光燈準備好時,自動對焦輔助
光發射器會以1秒鐘的間隔閃爍。檢查<Q>從屬閃光燈準備就緒圖示是
否在主控單元的液晶顯示屏上點亮。
所有閃光燈都完成回電時,主控單元的充電指示燈會點亮。
6 檢查操作情形。按下主控單元的測試閃光按鈕(充電
指示燈)。從屬單元閃光。如果從屬單元不閃
光,請檢查它是否位於操作範圍內。
7 拍攝照片。用和普通閃光拍攝相同的方式,設定
相機並拍攝相片。
如果能得到標準的閃光曝光,閃光曝光確認指示燈會亮起3秒鐘。
如果<D>指示燈是紅色,表示還沒有建立起無線電傳送。請再度檢查主控
單元與從屬單元的傳輸頻道與無線電ID。如果以相同的設定無法連接,請關
閉電源後再開啟。
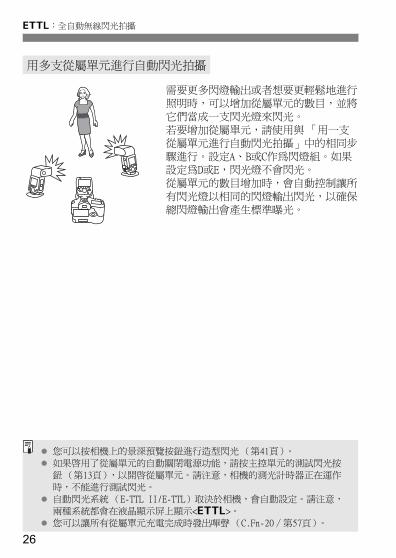
26
a:全自動無線閃光拍攝
需要更多閃燈輸出或者想要更輕鬆地進行照明時,可以增加從屬單元的數目,並將
它們當成一支閃光燈來閃光。
若要增加從屬單元,請使用與「用一支從屬單元進行自動閃光拍攝」中的相同步
驟進行。設定A、B或C作為閃燈組。如果設定為D或E,閃光燈不會閃光。
從屬單元的數目增加時,會自動控制讓所
有閃光燈以相同的閃燈輸出閃光,以確保總閃燈輸出會產生標準曝光。
用多支從屬單元進行自動閃光拍攝
您可以按相機上的景深預覽按鈕進行造型閃光 (第41頁)。
如果啟用了從屬單元的自動關閉電源功能,請按主控單元的測試閃光按
鈕 (第13頁),以開啟從屬單元。請注意,相機的測光計時器正在運作
時,不能進行測試閃光。
自動閃光系統 (E-TTL II/E-TTL)取決於相機,會自動設定。請注意,
兩種系統都會在液晶顯示屏上顯示<a>。
您可以讓所有從屬單元充電完成時發出嗶聲 (C.Fn-20∕第57頁)。
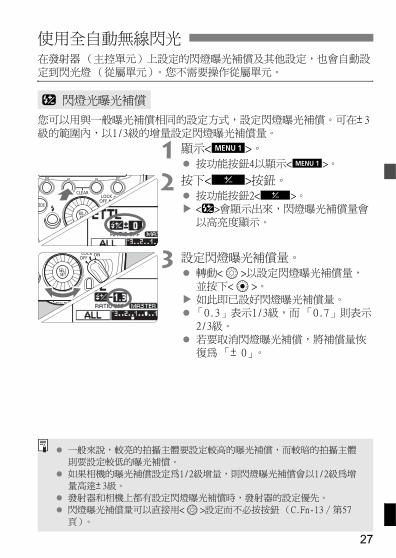
27
在發射器 (主控單元)上設定的閃燈曝光補償及其他設定,也會自動設
定到閃光燈(從屬單元)。您不需要操作從屬單元。
您可以用與一般曝光補償相同的設定方式,設定閃燈曝光補償。可在± 3
級的範圍內,以1/3級的增量設定閃燈曝光補償量。
1 顯示<M>。按功能按鈕4以顯示<M>。
2 按下<@>按鈕。按功能按鈕2<@>。<f>會顯示出來,閃燈曝光補償量會
以高亮度顯示。
3 設定閃燈曝光補償量。轉動<9>以設定閃燈曝光補償量,並按下<8>。
如此即已設好閃燈曝光補償量。「0.3」表示1/3級,而 「0.7」則表示
2/3級。
若要取消閃燈曝光補償,將補償量恢復為 「± 0」。
使用全自動無線閃光
f 閃燈光曝光補償
一般來說,較亮的拍攝主體要設定較高的曝光補償,而較暗的拍攝主體
則要設定較低的曝光補償。
如果相機的曝光補償設定為1/2級增量,則閃燈曝光補償會以1/2級為增
量高達± 3級。
發射器和相機上都有設定閃燈曝光補償時,發射器的設定優先。
閃燈曝光補償量可以直接用<9>設定而不必按按鈕 (C.Fn-13∕第57
頁)。
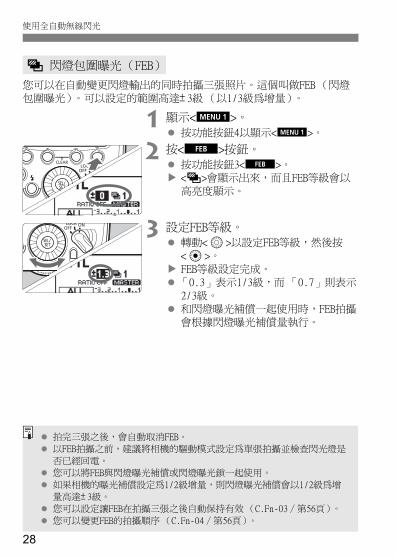
28
使用全自動無線閃光
您可以在自動變更閃燈輸出的同時拍攝三張照片。這個叫做FEB (閃燈包圍曝光)。可以設定的範圍高達± 3級 (以1/3級為增量)。
1 顯示<M>。按功能按鈕4以顯示<M>。
2 按<E>按鈕。按功能按鈕3<E>。<g>會顯示出來,而且FEB等級會以
高亮度顯示。
3 設定FEB等級。轉動<9>以設定FEB等級,然後按<8>。
FEB等級設定完成。「0.3」表示1/3級,而 「0.7」則表示
2/3級。
和閃燈曝光補償一起使用時,FEB拍攝會根據閃燈曝光補償量執行。
g 閃燈包圍曝光(FEB)
拍完三張之後,會自動取消FEB。
以FEB拍攝之前,建議將相機的驅動模式設定為單張拍攝並檢查閃光燈是
否已經回電。
您可以將FEB與閃燈曝光補償或閃燈曝光鎖一起使用。
如果相機的曝光補償設定為1/2級增量,則閃燈曝光補償會以1/2級為增
量高達± 3級。
您可以設定讓FEB在拍攝三張之後自動保持有效(C.Fn-03∕第56頁)。
您可以變更FEB的拍攝順序 (C.Fn-04∕第56頁)。
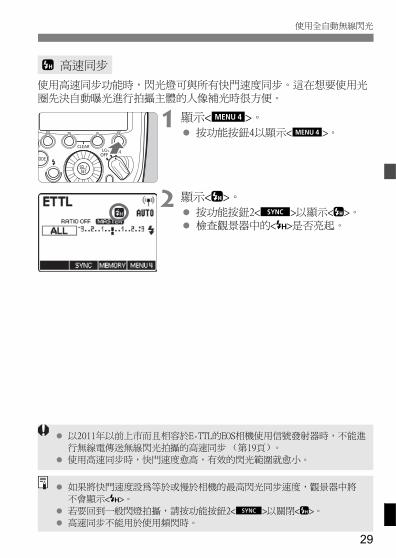
29
使用全自動無線閃光
使用高速同步功能時,閃光燈可與所有快門速度同步。這在想要使用光圈先決自動曝光進行拍攝主體的人像補光時很方便。
1 顯示<P>。按功能按鈕4以顯示<P>。
2 顯示<c>。按功能按鈕2<Y>以顯示<c>。檢查觀景器中的<F>是否亮起。
c 高速同步
以2011年以前上市而且相容於E-TTL的EOS相機使用信號發射器時,不能進
行無線電傳送無線閃光拍攝的高速同步 (第19頁)。
使用高速同步時,快門速度愈高,有效的閃光範圍就愈小。
如果將快門速度設為等於或慢於相機的最高閃光同步速度,觀景器中將
不會顯示<F>。
若要回到一般閃燈拍攝,請按功能按鈕2<Y>以關閉<c>。
高速同步不能用於使用頻閃時。
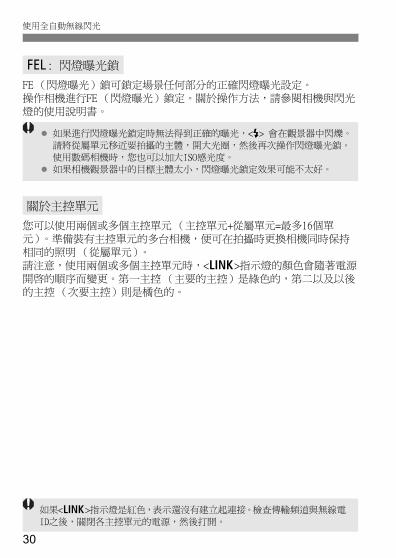
30
使用全自動無線閃光
FE (閃燈曝光)鎖可鎖定場景任何部分的正確閃燈曝光設定。操作相機進行FE (閃燈曝光)鎖定。關於操作方法,請參閱相機與閃光
燈的使用說明書。
您可以使用兩個或多個主控單元(主控單元+從屬單元=最多16個單
元)。準備裝有主控單元的多台相機,便可在拍攝時更換相機同時保持
相同的照明(從屬單元)。請注意,使用兩個或多個主控單元時,<D>指示燈的顏色會隨著電源
開啟的順序而變更。第一主控 (主要的主控)是綠色的,第二以及以後的主控 (次要主控)則是橘色的。
7: 閃燈曝光鎖
關於主控單元
如果進行閃燈曝光鎖定時無法得到正確的曝光,<Q> 會在觀景器中閃爍。
請將從屬單元移近要拍攝的主體,開大光圈,然後再次操作閃燈曝光鎖。
使用數碼相機時,您也可以加大ISO感光度。
如果相機觀景器中的目標主體太小,閃燈曝光鎖定效果可能不太好。
如果<D>指示燈是紅色,表示還沒有建立起連接。檢查傳輸頻道與無線電
ID之後,關閉各主控單元的電源,然後打開。
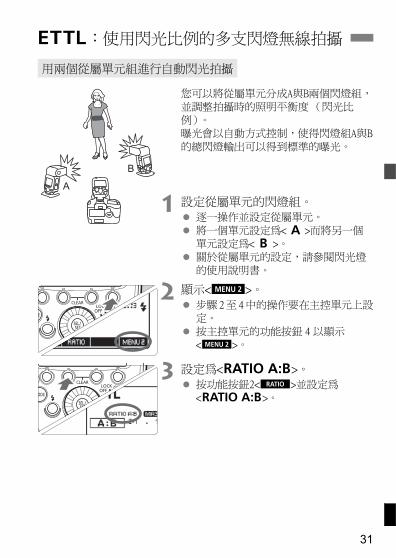
31
您可以將從屬單元分成A與B兩個閃燈組,並調整拍攝時的照明平衡度 (閃光比
例)。曝光會以自動方式控制,使得閃燈組A與B
的總閃燈輸出可以得到標準的曝光。
1 設定從屬單元的閃燈組。逐一操作並設定從屬單元。
將一個單元設定為<4>而將另一個單元設定為<5>。
關於從屬單元的設定,請參閱閃光燈的使用說明書。
2 顯示<N>。步驟2至4中的操作要在主控單元上設定。
按主控單元的功能按鈕 4 以顯示 <N>。
3 設定為<%>。按功能按鈕2<T>並設定為
<%>。
a:使用閃光比例的多支閃燈無線拍攝
用兩個從屬單元組進行自動閃光拍攝
A
B
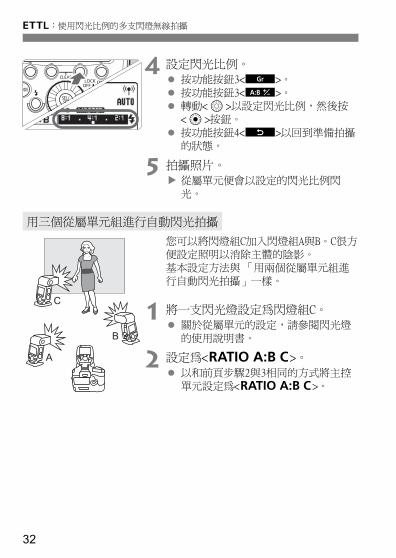
32
a:使用閃光比例的多支閃燈無線拍攝
4 設定閃光比例。按功能按鈕3<F>。
按功能按鈕3<A>。
轉動<9>以設定閃光比例,然後按<8>按鈕。
按功能按鈕4<?>以回到準備拍攝的狀態。
5 拍攝照片。從屬單元便會以設定的閃光比例閃光。
您可以將閃燈組C加入閃燈組A與B。C很方便設定照明以消除主體的陰影。
基本設定方法與「用兩個從屬單元組進行自動閃光拍攝」一樣。
1 將一支閃光燈設定為閃燈組C。關於從屬單元的設定,請參閱閃光燈
的使用說明書。
2 設定為<^>。以和前頁步驟2與3相同的方式將主控
單元設定為<^>。
用三個從屬單元組進行自動閃光拍攝
C
A
B
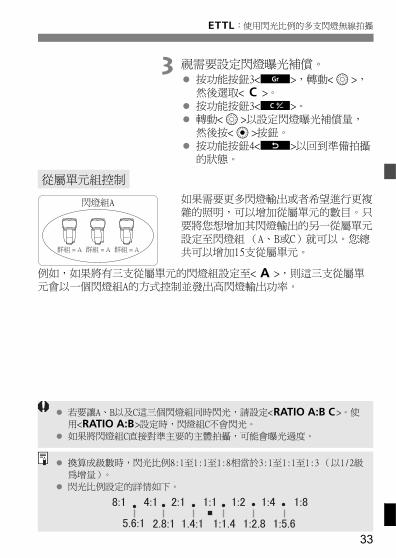
33
a:使用閃光比例的多支閃燈無線拍攝
3 視需要設定閃燈曝光補償。按功能按鈕3<F>,轉動<9>,
然後選取<6>。
按功能按鈕3<B>。轉動<9>以設定閃燈曝光補償量,
然後按<8>按鈕。按功能按鈕4<?>以回到準備拍攝
的狀態。
如果需要更多閃燈輸出或者希望進行更複雜的照明,可以增加從屬單元的數目。只
要將您想增加其閃燈輸出的另一從屬單元
設定至閃燈組 (A、B或C)就可以。您總共可以增加15支從屬單元。
例如,如果將有三支從屬單元的閃燈組設定至<4>,則這三支從屬單元會以一個閃燈組A的方式控制並發出高閃燈輸出功率。
從屬單元組控制
閃燈組A
若要讓A、B以及C這三個閃燈組同時閃光,請設定<^>。使
用<%>設定時,閃燈組C不會閃光。
如果將閃燈組C直接對準主要的主體拍攝,可能會曝光過度。
換算成級數時,閃光比例8:1至1:1至1:8相當於3:1至1:1至1:3 (以1/2級
為增量)。
閃光比例設定的詳情如下。
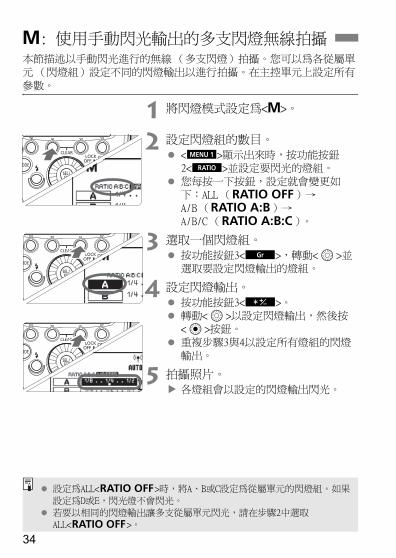
34
本節描述以手動閃光進行的無線(多支閃燈)拍攝。您可以為各從屬單
元 (閃燈組)設定不同的閃燈輸出以進行拍攝。在主控單元上設定所有
參數。
1 將閃燈模式設定為<q>。
2 設定閃燈組的數目。<M>顯示出來時,按功能按鈕2<T>並設定要閃光的燈組。
您每按一下按鈕,設定就會變更如
下:ALL (_)→A/B (%)→
A/B/C (])。
3 選取一個閃燈組。按功能按鈕3<F>,轉動<9>並選取要設定閃燈輸出的燈組。
4 設定閃燈輸出。按功能按鈕3<1>。
轉動<9>以設定閃燈輸出,然後按<8>按鈕。
重複步驟3與4以設定所有燈組的閃燈
輸出。
5 拍攝照片。各燈組會以設定的閃燈輸出閃光。
q: 使用手動閃光輸出的多支閃燈無線拍攝
設定為ALL<_>時,將A、B或C設定為從屬單元的閃燈組。如果
設定為D或E,閃光燈不會閃光。
若要以相同的閃燈輸出讓多支從屬單元閃光,請在步驟2中選取
ALL<_>。
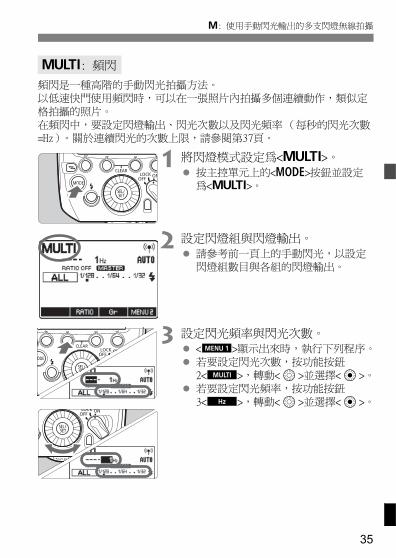
35
q: 使用手動閃光輸出的多支閃燈無線拍攝
頻閃是一種高階的手動閃光拍攝方法。以低速快門使用頻閃時,可以在一張照片內拍攝多個連續動作,類似定
格拍攝的照片。
在頻閃中,要設定閃燈輸出、閃光次數以及閃光頻率(每秒的閃光次數=Hz)。關於連續閃光的次數上限,請參閱第37頁。
1 將閃燈模式設定為<?>。按主控單元上的<E>按鈕並設定為<?>。
2 設定閃燈組與閃燈輸出。請參考前一頁上的手動閃光,以設定閃燈組數目與各組的閃燈輸出。
3 設定閃光頻率與閃光次數。<M>顯示出來時,執行下列程序。
若要設定閃光次數,按功能按鈕
2<Q>,轉動<9>並選擇<8>。若要設定閃光頻率,按功能按鈕
3<G>,轉動<9>並選擇<8>。
?: 頻閃
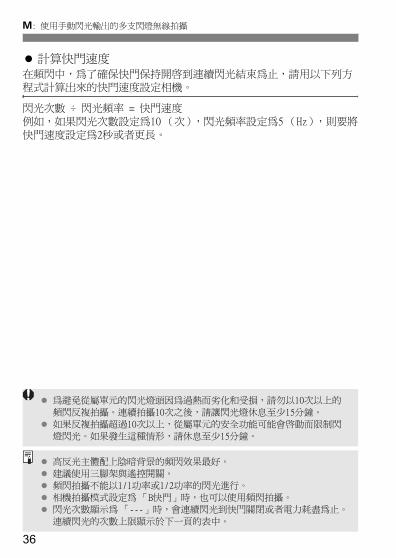
36
q: 使用手動閃光輸出的多支閃燈無線拍攝
計算快門速度在頻閃中,為了確保快門保持開啟到連續閃光結束為止,請用以下列方程式計算出來的快門速度設定相機。
閃光次數 ÷ 閃光頻率 = 快門速度
例如,如果閃光次數設定為10 (次),閃光頻率設定為5 (Hz),則要將
快門速度設定為2秒或者更長。
為避免從屬單元的閃光燈頭因為過熱而劣化和受損,請勿以10次以上的
頻閃反複拍攝。連續拍攝10次之後,請讓閃光燈休息至少15分鐘。
如果反複拍攝超過10次以上,從屬單元的安全功能可能會啟動而限制閃
燈閃光。如果發生這種情形,請休息至少15分鐘。
高反光主體配上陰暗背景的頻閃效果最好。
建議使用三腳架與遙控開關。
頻閃拍攝不能以1/1功率或1/2功率的閃光進行。
相機拍攝模式設定為 「B快門」時,也可以使用頻閃拍攝。
閃光次數顯示為 「---」時,會連續閃光到快門關閉或者電力耗盡為止。
連續閃光的次數上限顯示於下一頁的表中。
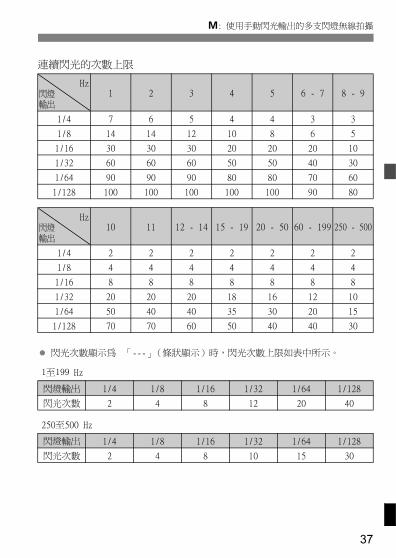
37
q: 使用手動閃光輸出的多支閃燈無線拍攝
閃光次數顯示為 「---」(條狀顯示)時,閃光次數上限如表中所示。
1至199 Hz
250至500 Hz
連續閃光的次數上限
Hz閃燈輸出
1 2 3 4 5 6 - 7 8 - 9
1/4 7 6 5 4 4 3 3
1/8 14 14 12 10 8 6 5
1/16 30 30 30 20 20 20 10
1/32 60 60 60 50 50 40 30
1/64 90 90 90 80 80 70 60
1/128 100 100 100 100 100 90 80
Hz閃燈輸出
10 11 12 - 14 15 - 19 20 - 50 60 - 199 250 - 500
1/4 2 2 2 2 2 2 2
1/8 4 4 4 4 4 4 4
1/16 8 8 8 8 8 8 8
1/32 20 20 20 18 16 12 10
1/64 50 40 40 35 30 20 15
1/128 70 70 60 50 40 40 30
閃燈輸出 1/4 1/8 1/16 1/32 1/64 1/128
閃光次數 2 4 8 12 20 40
閃燈輸出 1/4 1/8 1/16 1/32 1/64 1/128
閃光次數 2 4 8 10 15 30
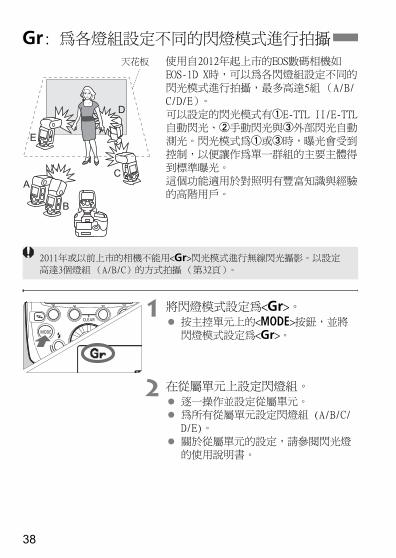
38
使用自2012年起上市的EOS數碼相機如
EOS-1D X時,可以為各閃燈組設定不同的
閃光模式進行拍攝,最多高達5組(A/B/C/D/E)。
可以設定的閃光模式有"E-TTL II/E-TTL自動閃光、#手動閃光與$外部閃光自動
測光。閃光模式為"或$時,曝光會受到
控制,以便讓作為單一群組的主要主體得到標準曝光。
這個功能適用於對照明有豐富知識與經驗的高階用戶。
1 將閃燈模式設定為<[>。按主控單元上的<E>按鈕,並將
閃燈模式設定為<[>。
2 在從屬單元上設定閃燈組。逐一操作並設定從屬單元。為所有從屬單元設定閃燈組 (A/B/C/
D/E)。
關於從屬單元的設定,請參閱閃光燈的使用說明書。
[: 為各燈組設定不同的閃燈模式進行拍攝
A C
E
D
B
天花板
2011年或以前上市的相機不能用<[>閃光模式進行無線閃光攝影。以設定
高達3個燈組 (A/B/C)的方式拍攝 (第32頁)。
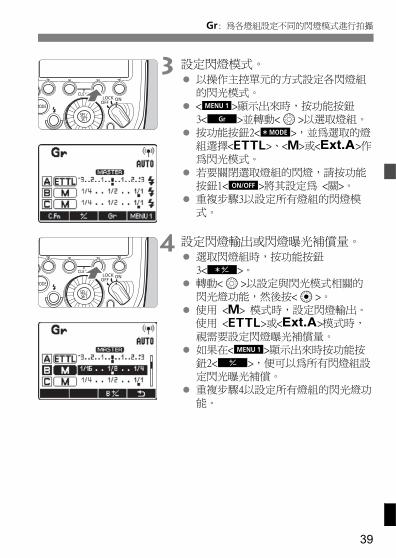
39
[: 為各燈組設定不同的閃燈模式進行拍攝
3 設定閃燈模式。以操作主控單元的方式設定各閃燈組
的閃光模式。
<M>顯示出來時,按功能按鈕3<F>並轉動<9>以選取燈組。
按功能按鈕2<2>,並為選取的燈組選擇<a>、<q>或</>作
為閃光模式。
若要關閉選取燈組的閃燈,請按功能按鈕1<R>將其設定為 <關>。
重複步驟3以設定所有燈組的閃燈模式。
4 設定閃燈輸出或閃燈曝光補償量。選取閃燈組時,按功能按鈕
3<1>。轉動<9>以設定與閃光模式相關的
閃光燈功能,然後按<8>。
使用 <q> 模式時,設定閃燈輸出。 使用 <a>或</>模式時,
視需要設定閃燈曝光補償量。如果在<M>顯示出來時按功能按
鈕2<@>,便可以為所有閃燈組設
定閃光曝光補償。重複步驟4以設定所有燈組的閃光燈功
能。
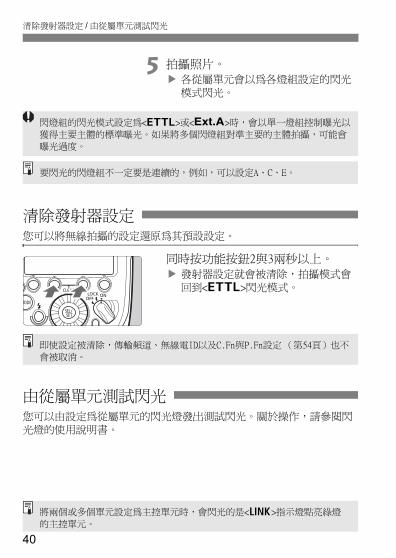
40
清除發射器設定 / 由從屬單元測試閃光
5 拍攝照片。各從屬單元會以為各燈組設定的閃光
模式閃光。
您可以將無線拍攝的設定還原為其預設設定。
同時按功能按鈕2與3兩秒以上。發射器設定就會被清除,拍攝模式會
回到<a>閃光模式。
您可以由設定為從屬單元的閃光燈發出測試閃光。關於操作,請參閱閃
光燈的使用說明書。
清除發射器設定
閃燈組的閃光模式設定為<a>或</>時,會以單一燈組控制曝光以
獲得主要主體的標準曝光。如果將多個閃燈組對準主要的主體拍攝,可能會
曝光過度。
要閃光的閃燈組不一定要是連續的,例如,可以設定A、C、E。
由從屬單元測試閃光
即使設定被清除,傳輸頻道、無線電ID以及C.Fn與P.Fn設定 (第54頁)也不
會被取消。
將兩個或多個單元設定為主控單元時,會閃光的是<D>指示燈點亮綠燈
的主控單元。

41
按下相機的景深預覽按鈕時,閃燈將連續閃光1秒鐘。這個功能叫做造型
閃光。造型閃光可讓您看到閃光在拍攝主體上的陰影效果以及照明均衡
度。
按下相機上的景深預覽按鈕。閃燈會連續閃光1秒鐘。
使用2012年起上市的EOS數碼相機,可以從設定為從屬單元的閃光燈發出
造型閃光。關於操作,請參閱閃光燈的使用說明書。
造型閃光
來自主控單元的造型閃光
來自從屬單元的造型閃光
使用2011年或以前上市的相機則不能由從屬單元發出造型閃光。
為避免閃光燈頭因為過熱而劣化與受損,請勿連續進行造型閃光10次以
上。連續進行造型閃光10次之後,請讓閃光燈休息至少10分鐘。
如果造型閃光連續進行10次以上,可能會啟動閃光燈的安全功能而限制
閃燈閃光。如果發生這種情形,請休息至少15分鐘。
以EOS300/QD使用發射器時不能進行造型閃光。
將兩個或多個單元設定為主控單元時,會閃光的是<D>指示燈點亮綠
燈的主控單元。
您可以用測試閃光按鈕發出造型閃光 (C.Fn-02∕第56頁)。
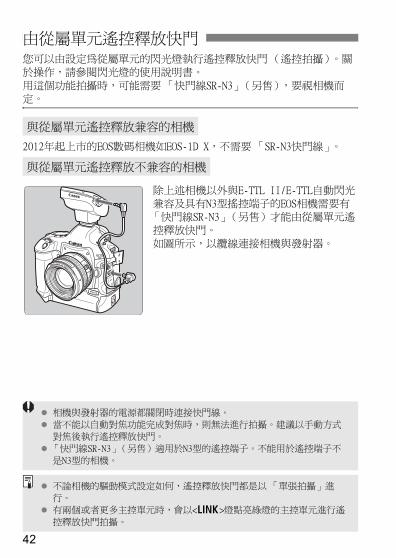
42
您可以由設定為從屬單元的閃光燈執行遙控釋放快門(遙控拍攝)。關
於操作,請參閱閃光燈的使用說明書。
用這個功能拍攝時,可能需要 「快門線SR-N3」(另售),要視相機而定。
2012年起上市的EOS數碼相機如EOS-1D X,不需要 「SR-N3快門線」。
除上述相機以外與E-TTL II/E-TTL自動閃光
兼容及具有N3型搖控端子的EOS相機需要有「快門線SR-N3」(另售)才能由從屬單元遙
控釋放快門。
如圖所示,以纜線連接相機與發射器。
由從屬單元遙控釋放快門
與從屬單元遙控釋放兼容的相機
與從屬單元遙控釋放不兼容的相機
相機與發射器的電源都關閉時連接快門線。
當不能以自動對焦功能完成對焦時,則無法進行拍攝。建議以手動方式
對焦後執行遙控釋放快門。
「快門線SR-N3」(另售)適用於N3型的遙控端子。不能用於遙控端子不
是N3型的相機。
不論相機的驅動模式設定如何,遙控釋放快門都是以 「單張拍攝」進
行。
有兩個或者更多主控單元時,會以<D>燈點亮綠燈的主控單元進行遙
控釋放快門拍攝。

43
連結拍攝是一種將從屬單元相機連結至主控單元相機以自動釋放其快門
的功能。包括主控單元與從屬單元在內,您最多可以用16個單元進行連
接拍攝。這點在您想要同時從多個角度拍攝主體時很方便。若要進行連結拍攝,請將支援無線電傳送無線拍攝的閃光燈或者無線閃
光燈信號發射器ST-E3-RT裝在相機上。請注意,使用2011年或以前上市、具有N3型遙控端子的相機作為 「從屬
單元相機」時,必須要有「SR-N3快門線」(另售)。關於安裝快門線的
詳細資訊,請參閱第42頁。
執行下一頁的操作之前,請將發射器或閃光燈安裝在所有要用來進行連
結拍攝的相機上。 關於閃光燈設定的詳情,請參閱的閃光燈使用說明
書。
連結拍攝
從屬單元相機
傳送距離約30 m/98.4呎
從屬單元相機
從屬單元相機 從屬單元相機
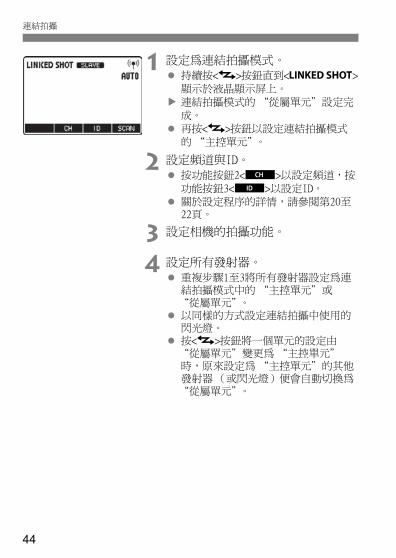
44
連結拍攝
1 設定為連結拍攝模式。持續按<I>按鈕直到<b>
顯示於液晶顯示屏上。
連結拍攝模式的“從屬單元”設定完成。
再按<I>按鈕以設定連結拍攝模式的“主控單元”。
2 設定頻道與ID。按功能按鈕2<C>以設定頻道,按
功能按鈕3<H>以設定ID。關於設定程序的詳情,請參閱第20至22頁。
3 設定相機的拍攝功能。
4 設定所有發射器。重複步驟1至3將所有發射器設定為連結拍攝模式中的“主控單元”或 “從屬單元”。以同樣的方式設定連結拍攝中使用的閃光燈。按<I>按鈕將一個單元的設定由“從屬單元”變更為 “主控單元”時,原來設定為“主控單元”的其他發射器 (或閃光燈)便會自動切換為“從屬單元”。
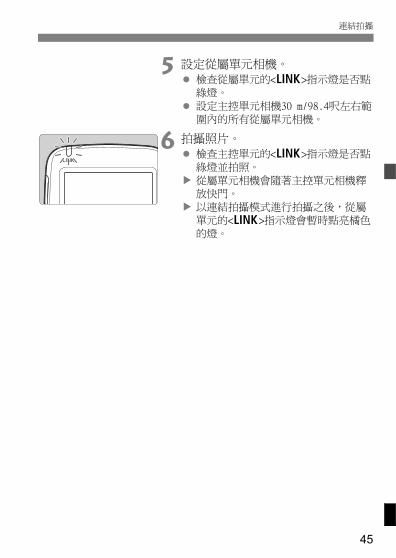
45
連結拍攝
5 設定從屬單元相機。檢查從屬單元的<D>指示燈是否點
綠燈。
設定主控單元相機30 m/98.4呎左右範圍內的所有從屬單元相機。
6 拍攝照片。檢查主控單元的<D>指示燈是否點
綠燈並拍照。
從屬單元相機會隨著主控單元相機釋放快門。
以連結拍攝模式進行拍攝之後,從屬單元的<D>指示燈會暫時點亮橘色
的燈。
46
連結拍攝
從屬單元相機建議以手動對焦方式拍攝。如果無法以自動對焦方式完成
對焦,相關的從屬單元相機就不能進行連結拍攝。
從屬單元相機與主控單元相機的快門釋放時間之間會有一點時滯。完全
同時的拍攝是不可能的事。
連結拍攝時如果同時讓多支閃光燈閃光,可能無法得到適當的曝光,或
者會造成曝光不均勻。
[閃燈功能設定]中的[閃燈閃光]設定為[關](第50頁)時,不能進行連
結拍攝。
在即時顯示狀態中進行連結拍攝時,要將主控相機功能表上的[靜音即時
顯示拍攝]設定為[關]。如果設定[模式 1]或[模式 2],從屬單元相機就
不會釋放快門。
傳送距離可能會比較短,要視從屬單元的擺放位置、週邊環境以及天氣
情況之類的情況而定。
連結拍攝功能是和無線檔案傳送器的WFT系列的連結拍攝一樣的功能。不
過,連結拍攝不能與WFT系列配合進行。而且快門釋放時滯也與使用WFT
系列進行連結拍攝時不一樣。
您可以將這個功能當成連結拍攝的主控單元遙控器使用,而不必在相機
上安裝閃光燈或發射器。按下主控單元上的功能按鈕1<U>時,所有
從屬單元相機的快門都會被釋放。
進行連結拍攝時,自動關閉電源生效所需的時間為5分鐘。
47
3以相機的操作設定發射器
功能
本章要描述如何從相機的功能表畫面設定發射器功能。
相機的拍攝模式設定為全自動模式或影像區域模式時,不能使用
本章中的操作。將相機的拍攝模式設定為V/X/W/q/5(創意
拍攝區模式)。

48
使用2007年起上市的EOS數碼相機時,可以從相機功能表畫面設定閃光燈
功能、發射器功能或自訂功能。
關於相機的操作,請參閱相機的使用說明書。
1 選取[外接閃光燈控制]。選取[外接閃光燈控制]或[閃光燈控制]。
2 選取[閃光燈功能設定]。選取[閃光燈功能設定]或[外接閃光燈
功能設定]。
畫面會變成 (外接)閃光燈功能設定畫面。
3 設定功能。設定畫面會因為相機而異。
選擇一個選項並設定功能。
從相機功能表畫面進行發射器控制
發射器功能設定
範例EOS-1D X的畫面 範例EOS 60D的畫面
2007年至2011年上市的相機如下:
EOS-1Ds Mark III、EOS-1D Mark IV/III、EOS 5D Mark II、EOS 7D/60D/50D/
40D、EOS 600D、EOS 550D、EOS 500D、EOS 450D、EOS 1100D、EOS 1000D
49
從相機功能表畫面進行發射器控制
2012年起上市的EOS數碼相機以EOS-1D X之類的相機使用發射器時,可以在[閃光燈功能設定]畫面
中設定 「無線電傳送無線拍攝」的功能。
2007年至2011年上市的EOS數碼相機
若要進行 「無線電傳送無線拍攝」,請直接操作發射器進行功能設定。
可以設定的功能如下。可以使用的設定會因為閃光燈模式或無線功能設
定而異。
[閃光燈功能設定]中可以使用的設定
功能 參考頁碼
閃光燈閃光 啟動∕關閉
第50頁
E-TTL II閃燈測光 權衡式∕平均
光圈先決模式下的閃光同步速度
閃燈模式E-TTL II (自動閃光)∕手動閃燈∕頻閃閃燈∕分組控制
快門同步 前簾同步∕高速同步
閃燈曝光補償
閃燈包圍曝光
無線閃燈功能 (設定) 無線電傳送無線第51頁
清除閃光燈功能設定
[閃光燈閃光]與[E-TTL II閃燈測光]會在上一頁的步驟2或步驟3中顯示
(視相機而定)。
[光圈先決模式下的閃光同步速度]沒有顯示出來時,可以用相機的自訂
功能設定。
50
從相機功能表畫面進行發射器控制
閃光燈閃光若要進行無線閃光拍攝,請設定為[啟動]。設定為[關閉]時,不能進
行無線閃光拍攝。
E-TTL II閃燈測光
對於一般曝光,將其設定為[權衡式]。如果設定為[平均],相機就會以整個測光場景平均計算閃燈曝光。視場景而定,可能需要閃燈曝光
補償。這項設定適合進階用戶使用。
光圈先決模式下的閃光同步速度
在光圈先決自動曝光 (W) 模式中進行無線閃光拍攝時,可以設定閃光同步速度。
閃燈模式
您可以根據適合您需要的閃燈拍攝從[E-TTL II]、[手動閃燈]、[頻閃閃燈]、以及[分組控制]選擇閃燈模式。
快門同步您可以從[前簾同步]、與[高速同步]選擇閃光時機∕方法。若要執行
一般無線閃光拍攝,請將其設定為[前簾同步]。
閃燈曝光補償您可以用與一般曝光補償相同的設定方式,設定閃燈曝光補償。可在
± 3級的範圍內,以1/3級的增量設定閃燈曝光補償量。
閃燈包圍曝光
您可以在自動變更閃燈輸出的同時拍攝三張照片。可以設定的範圍高達± 3級(以1/3級為增量)。

51
從相機功能表畫面進行發射器控制
無線閃燈功能 (設定)無線電傳送無線閃光燈拍攝會自動設定。詳情請參閱第二章。
清除閃光燈(功能)設定
您可以將發射器設定恢復為其預設設定。
當[閃燈模式]設定為[分組控制]時,您可以選擇[E-TTL II]、[手動閃
燈]、[自動外部閃光測光]或[關閉]作為各群組的閃光模式。
在發射器上設定閃燈曝光補償時,就不能在相機功能表畫面中設定閃燈
曝光補償。請注意,如果同時設定兩者,則發射器上的設定優先。
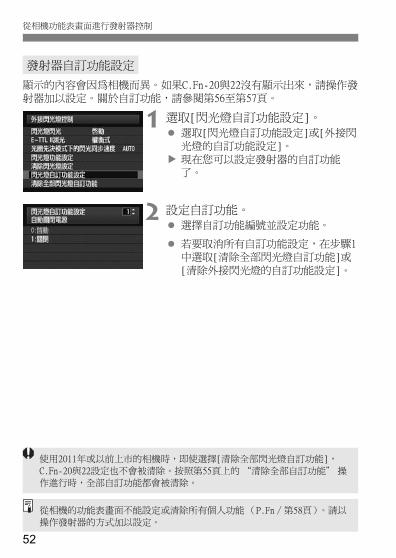
52
從相機功能表畫面進行發射器控制
顯示的內容會因為相機而異。如果C.Fn-20與22沒有顯示出來,請操作發射器加以設定。關於自訂功能,請參閱第56至第57頁。
1 選取[閃光燈自訂功能設定]。選取[閃光燈自訂功能設定]或[外接閃光燈的自訂功能設定]。
現在您可以設定發射器的自訂功能了。
2 設定自訂功能。選擇自訂功能編號並設定功能。
若要取消所有自訂功能設定,在步驟1中選取[清除全部閃光燈自訂功能]或
[清除外接閃光燈的自訂功能設定]。
發射器自訂功能設定
使用2011年或以前上市的相機時,即使選擇[清除全部閃光燈自訂功能],
C.Fn-20與22設定也不會被清除。按照第55頁上的 “清除全部自訂功能” 操
作進行時,全部自訂功能都會被清除。
從相機的功能表畫面不能設定或清除所有個人功能 (P.Fn∕第58頁)。請以
操作發射器的方式加以設定。
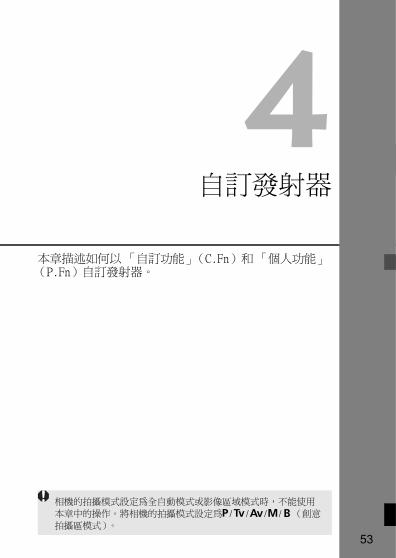
53
4自訂發射器
本章描述如何以 「自訂功能」(C.Fn)和「個人功能」(P.Fn)自訂發射器。
相機的拍攝模式設定為全自動模式或影像區域模式時,不能使用
本章中的操作。將相機的拍攝模式設定為V/X/W/q/5(創意
拍攝區模式)。
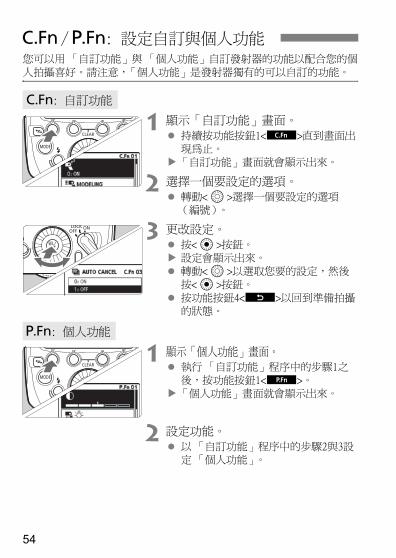
54
您可以用 「自訂功能」與 「個人功能」自訂發射器的功能以配合您的個
人拍攝喜好。請注意,「個人功能」是發射器獨有的可以自訂的功能。
1 顯示「自訂功能」畫面。持續按功能按鈕1<=>直到畫面出
現為止。「自訂功能」畫面就會顯示出來。
2 選擇一個要設定的選項。轉動<9>選擇一個要設定的選項(編號)。
3 更改設定。按<8>按鈕。
設定會顯示出來。
轉動<9>以選取您要的設定,然後按<8>按鈕。
按功能按鈕4<?>以回到準備拍攝的狀態。
1 顯示「個人功能」畫面。執行 「自訂功能」程序中的步驟1之
後,按功能按鈕1<<>。「個人功能」畫面就會顯示出來。
2 設定功能。以「自訂功能」程序中的步驟2與3設定「個人功能」。
C∕>: 設定自訂與個人功能
C: 自訂功能
>: 個人功能

55
C∕>: 設定自訂與個人功能
按下功能按鈕2<3>,然後在自訂功能表畫面上按功能按鈕1
<;>時,已經設定的自訂功能就會被清除。同樣的情形,在個人功能畫面上執行相同的操作時,已經設定的個人功能就會被清除。
自訂功能∕個人功能清單
編號 功能 頁碼
自訂功能
C.Fn-01 # 自動關閉電源
第56頁C.Fn-02 $ 造型閃光
C.Fn-03 ( FEB自動取消
C.Fn-04 ) FEB順序
C.Fn-07 , 用自動閃光測試閃光
第57頁C.Fn-13 6 閃燈曝光測光設定
C.Fn-20 7 嗶聲
C.Fn-22 < 液晶顯示屏照明
個人功能
P.Fn-01 @ 液晶顯示屏的顯示對比度
第58頁P.Fn-03 B 液晶顯示屏照明顏色:主控閃燈
P.Fn-04 B 液晶顯示屏照明顏色:從屬閃燈
清除全部自訂∕個人功能
當您從相機的功能表畫面設定發射器自訂功能而C.Fn-20與22沒有顯示出來
時,請用54頁上的操作設定。
您也可以從相機的功能表畫面設定和清除所有發射器自訂功能 (第52頁)。
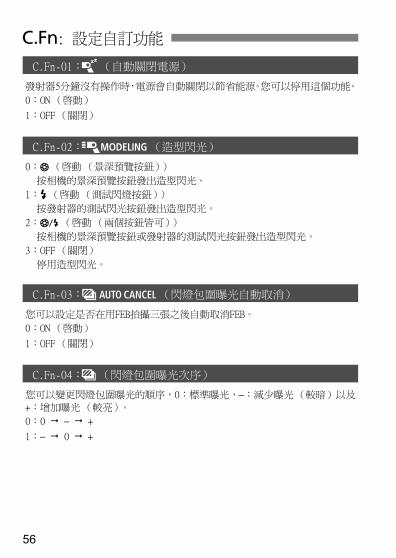
56
C: 設定自訂功能
C.Fn-01:#(自動關閉電源)
發射器5分鐘沒有操作時,電源會自動關閉以節省能源。您可以停用這個功能。
0:ON (啟動)
1:OFF (關閉)
C.Fn-02:$(造型閃光)
0:%(啟動(景深預覽按鈕))
按相機的景深預覽按鈕發出造型閃光。
1:&(啟動(測試閃燈按鈕))
按發射器的測試閃光按鈕發出造型閃光。
2:'(啟動(兩個按鈕皆可))
按相機的景深預覽按鈕或發射器的測試閃光按鈕發出造型閃光。
3:OFF (關閉)
停用造型閃光。
C.Fn-03:((閃燈包圍曝光自動取消)
您可以設定是否在用FEB拍攝三張之後自動取消FEB。
0:ON (啟動)
1:OFF (關閉)
C.Fn-04:)(閃燈包圍曝光次序)
您可以變更閃燈包圍曝光的順序,0:標準曝光,–:減少曝光(較暗)以及
+:增加曝光(較亮)。
0:0 – +
1:– 0 +
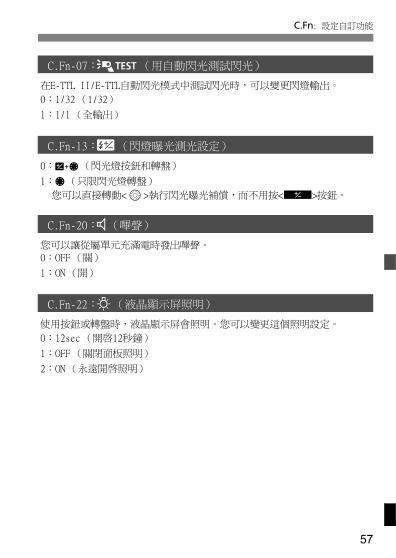
57
C: 設定自訂功能
C.Fn-07:,(用自動閃光測試閃光)
在E-TTL II/E-TTL自動閃光模式中測試閃光時,可以變更閃燈輸出。
0:1/32 (1/32)
1:1/1 (全輸出)
C.Fn-13:6(閃燈曝光測光設定)
0:4(閃光燈按鈕和轉盤)
1:5(只限閃光燈轉盤)
您可以直接轉動<9>執行閃光曝光補償,而不用按<@>按鈕。
C.Fn-20:7(嗶聲)
您可以讓從屬單元充滿電時發出嗶聲。
0:OFF (關)
1:ON (開)
C.Fn-22:<(液晶顯示屏照明)
使用按鈕或轉盤時,液晶顯示屏會照明。您可以變更這個照明設定。
0:12sec (開啟12秒鐘)
1:OFF (關閉面板照明)
2:ON (永遠開啟照明)
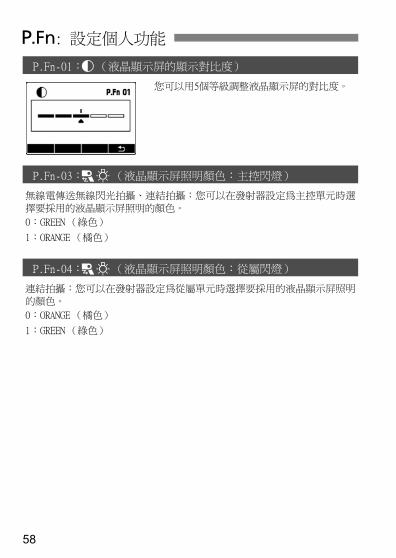
58
>: 設定個人功能
P.Fn-01:@(液晶顯示屏的顯示對比度)
您可以用5個等級調整液晶顯示屏的對比度。
P.Fn-03:B(液晶顯示屏照明顏色:主控閃燈)
無線電傳送無線閃光拍攝、連結拍攝:您可以在發射器設定為主控單元時選
擇要採用的液晶顯示屏照明的顏色。
0:GREEN (綠色)
1:ORANGE (橘色)
P.Fn-04:C(液晶顯示屏照明顏色:從屬閃燈)
連結拍攝:您可以在發射器設定為從屬單元時選擇要採用的液晶顯示屏照明
的顏色。
0:ORANGE (橘色)
1:GREEN (綠色)
59
5參考
本章包含系統圖與常見問題。
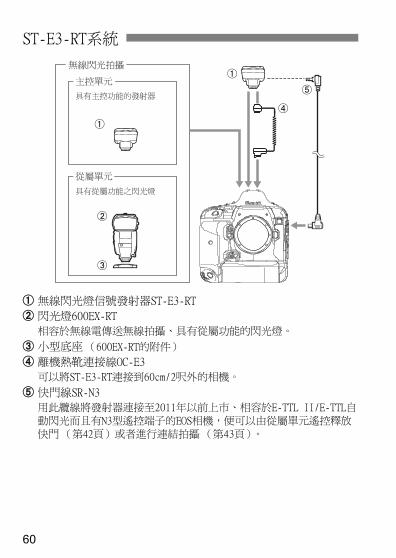
60
" 無線閃光燈信號發射器ST-E3-RT
# 閃光燈600EX-RT
相容於無線電傳送無線拍攝、具有從屬功能的閃光燈。
$ 小型底座(600EX-RT的附件)
% 離機熱靴連接線OC-E3
可以將ST-E3-RT連接到60cm/2呎外的相機。
& 快門線SR-N3
用此纜線將發射器連接至2011年以前上市、相容於E-TTL II/E-TTL自
動閃光而且有N3型遙控端子的EOS相機,便可以由從屬單元遙控釋放快門(第42頁)或者進行連結拍攝 (第43頁)。
ST-E3-RT系統
"
#
$
"
%
&
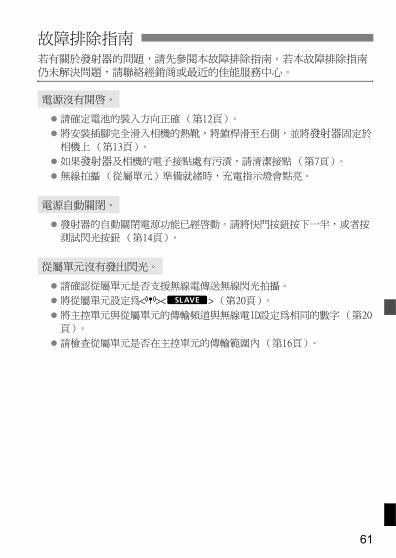
61
若有關於發射器的問題,請先參閱本故障排除指南。若本故障排除指南
仍未解決問題,請聯絡經銷商或最近的佳能服務中心。
請確定電池的裝入方向正確(第12頁)。
將安裝插腳完全滑入相機的熱靴,將鎖桿滑至右側,並將發射器固定於
相機上(第13頁)。
如果發射器及相機的電子接點處有污漬,請清潔接點(第7頁)。
無線拍攝(從屬單元)準備就緒時,充電指示燈會點亮。
發射器的自動關閉電源功能已經啟動。請將快門按鈕按下一半,或者按
測試閃光按鈕(第14頁)。
請確認從屬單元是否支援無線電傳送無線閃光拍攝。
將從屬單元設定為<'><x> (第20頁)。
將主控單元與從屬單元的傳輸頻道與無線電ID設定為相同的數字(第20
頁)。
請檢查從屬單元是否在主控單元的傳輸範圍內(第16頁)。
故障排除指南
電源沒有開啟。
電源自動關閉。
從屬單元沒有發出閃光。
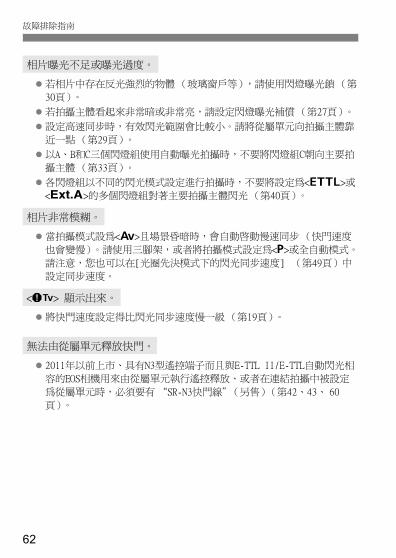
62
故障排除指南
若相片中存在反光強烈的物體(玻璃窗戶等),請使用閃燈曝光鎖(第
30頁)。
若拍攝主體看起來非常暗或非常亮,請設定閃燈曝光補償(第27頁)。
設定高速同步時,有效閃光範圍會比較小。請將從屬單元向拍攝主體靠
近一點(第29頁)。
以A、B和C三個閃燈組使用自動曝光拍攝時,不要將閃燈組C朝向主要拍
攝主體(第33頁)。
各閃燈組以不同的閃光模式設定進行拍攝時,不要將設定為<a>或
</>的多個閃燈組對著主要拍攝主體閃光(第40頁)。
當拍攝模式設為<W>且場景昏暗時,會自動啟動慢速同步(快門速度
也會變慢)。請使用三腳架,或者將拍攝模式設定為<V>或全自動模式。
請注意,您也可以在[光圈先決模式下的閃光同步速度] (第49頁)中
設定同步速度。
將快門速度設定得比閃光同步速度慢一級(第19頁)。
2011年以前上市、具有N3型遙控端子而且與E-TTL II/E-TTL自動閃光相
容的EOS相機用來由從屬單元執行遙控釋放、或者在連結拍攝中被設定
為從屬單元時,必須要有“SR-N3快門線”(另售)(第42、43、 60
頁)。
相片曝光不足或曝光過度。
相片非常模糊。
<k> 顯示出來。
無法由從屬單元釋放快門。
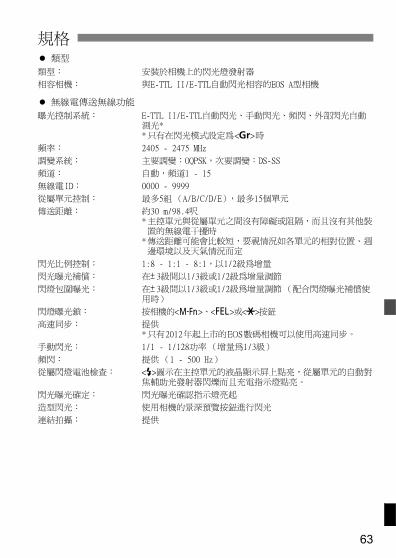
63
類型
無線電傳送無線功能
規格
類型: 安裝於相機上的閃光燈發射器
相容相機: 與E-TTL II/E-TTL自動閃光相容的EOS A型相機
曝光控制系統: E-TTL II/E-TTL自動閃光、手動閃光、頻閃、外部閃光自動測光**只有在閃光模式設定為<[>時
頻率: 2405 - 2475 MHz
調變系統: 主要調變:OQPSK,次要調變:DS-SS
頻道: 自動,頻道1 - 15
無線電ID: 0000 - 9999
從屬單元控制: 最多5組 (A/B/C/D/E),最多15個單元
傳送距離: 約30 m/98.4呎*主控單元與從屬單元之間沒有障礙或阻隔,而且沒有其他裝置的無線電干擾時
*傳送距離可能會比較短,要視情況如各單元的相對位置、週邊環境以及天氣情況而定
閃光比例控制: 1:8 - 1:1 - 8:1,以1/2級為增量
閃光曝光補償: 在± 3級間以1/3級或1/2級為增量調節
閃燈包圍曝光: 在± 3級間以1/3級或1/2級為增量調節 (配合閃燈曝光補償使用時)
閃燈曝光鎖︰ 按相機的<B>、<7>或<P>按鈕
高速同步︰ 提供*只有2012年起上市的EOS數碼相機可以使用高速同步。
手動閃光: 1/1 - 1/128功率 (增量為1/3級)
頻閃: 提供(1 - 500 Hz)
從屬閃燈電池檢查: <Q>圖示在主控單元的液晶顯示屏上點亮,從屬單元的自動對焦輔助光發射器閃爍而且充電指示燈點亮。
閃光曝光確定︰ 閃光曝光確認指示燈亮起
造型閃光: 使用相機的景深預覽按鈕進行閃光
連結拍攝︰ 提供
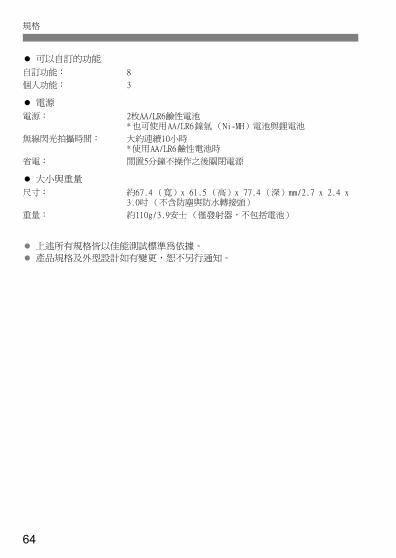
64
規格
可以自訂的功能
電源
大小與重量
上述所有規格皆以佳能測試標準為依據。
產品規格及外型設計如有變更,恕不另行通知。
自訂功能: 8
個人功能: 3
電源: 2枚AA/LR6鹼性電池*也可使用AA/LR6鎳氫(Ni-MH)電池與鋰電池
無線閃光拍攝時間: 大約連續10小時*使用AA/LR6鹼性電池時
省電︰ 閒置5分鐘不操作之後關閉電源
尺寸: 約67.4 (寬)x 61.5 (高)x 77.4 (深)mm/2.7 x 2.4 x 3.0吋(不含防塵與防水轉接頭)
重量: 約110g/3.9安士 (僅發射器,不包括電池)
65
MEMO

66
MEMO
67
MEMO

68
MEMO

69
MEMO
70
4秒、6秒、16秒計時器 ......... 10A 型相機 ...................... 2
C.Fn ..................... 54,56E-TTL II (閃燈測光)........ 50E-TTL II/E-TTL自動閃光 ....... 16Ext.A (外部閃光自動測光).... 39ISO 感光度 ................... 30
LINK .............. 6,23,25,61MULTI ........................ 35M (手動曝光)................ 34
P.Fn ..................... 54,58
四畫
手動閃光 ..................... 34
五畫
主控單元設定 ................. 20
充電指示燈 ............ 6,14,25外部閃光自動測光 ............. 39
六畫
光圈先決模式中的閃光同步速度............................. 50全自動無線閃光拍攝 ........... 24全部清除 ..................... 55
多支閃燈無線拍攝 ..... 17,31,34自訂功能 (C.Fn) .......... 54,56自動關閉電源 ............. 14,56
七畫
快門同步 ..................... 50快門速度 ..................... 19
十畫
個人功能 (P.Fn) .......... 54,58記憶功能 ..................... 23
閃光比例三組 (A:B C) ............... 32兩組 (A:B) ................. 31
閃光同步速度 ................. 50閃光燈功能設定 ............... 49閃光燈控制 ................... 48閃光頻率 ..................... 35
閃光曝光確認燈 ............ 6,20閃燈包圍曝光 ................. 28閃燈的操作範圍 ............... 16閃燈的擺放位置 ............... 16
閃燈組........31,32,34,35,38閃燈模式............8,9,49,50閃燈輸出......................34
閃燈曝光等級...............8,28閃燈曝光補償..................27閃燈曝光鎖....................30高速同步......................29
十一畫
從屬單元組控制................33從屬單元設定..................20掃描..........................22液晶顯示屏.....................8密度 ........................58
照明 ....................14,57照明顏色 ....................58
清除閃光燈設定............40,49設定功能......................47
連結拍攝...................9,43連續閃光的次數上限............37造型閃光......................41
十二畫
測試閃光..............13,25,40無線閃光拍攝時間..............12無線閃光燈拍攝................16三組全自動(A:B C) ...........32手動閃光 ....................34全自動單一從屬單元 ..........24兩組全自動 (A:B) ............31燈組閃光 ....................38
無線設定......................20
無線電ID ..................20,21
十三畫
傳輸頻道..............20,21,22電池..........................12
十四畫
嗶聲..........................57遙控釋放快門..................42
十五畫
熱靴..........................13
十六畫
頻閃..........................35
索引
71
索引
十八畫
鎖定..........................14鎖定功能......................14

本說明書中提到的相機與配件通用至2012年1月。關於此日期後上市的相機與附件
相容性的資訊,請就近與佳能服務中心聯絡。

English
INSTRUCTION MANUAL
CANON INC. 30-2, Shimomaruko 3-chome, Ohta-ku, Tokyo 146-8501, Japan
U.S.A. CANON U.S.A. INC. One Canon Plaza, Lake Success, NY 11042-1198, U.S.A. For all inquires concerning this product, call toll free in the U.S. 1-800-OK-CANON
CANADA CANON CANADA INC. HEADQUARTERS 6390 Dixie Road, Mississauga, Ontario L5T 1P7, Canada CANON CANADA INC. MONTREAL BRANCH 5990, Côte-de-Liesse, Montréal Québec H4T 1V7, Canada CANON CANADA INC. CALGARY OFFICE 2828, 16th Street, N.E. Calgary, Alberta T2E 7K7, Canada For all inquiries concerning this product, call toll free in Canada 1-800-OK-CANON
EUROPE, CANON EUROPA N.V.AFRICA & Bovenkerkerweg 59-61, 1185 XB Amstelveen, The NetherlandsMIDDLE EAST CANON FRANCE S.A.S. 17,Quai du Président Paul Doumer, 92414 Courbevoie Cedex, France CANON UK LTD. Woodhatch Reigate,Surrey RH2 8BF, United Kingdom CANON DEUTSCHLAND GmbH Europark Fichtenhain A10, 47807 Krefeld, Germany CANON ITALIA S.p.A. Via Milano 8, 20097 San Donato Milanese, (MI), Italy CANON Schweiz A.G. Industriestrasse 12, 8305 Dietlikon, Switzerland Canon GmbH Zetschegasse 11, A-1230 Vienna, Austria CANON España,S.A. Av. De Europa,6 Alcobendas 28108 Madrid, Spain CANON Portugal S.A. Rua Alfredo da Silva,14 Alfragide 2610-016 Amadora, Portugal
CENTRAL & CANON LATIN AMERICA, INC.SOUTH AMERICA 703 Waterford Way, Suite 400 Miami, FL 33126,U.S.A.
ASIA CANON (China) Co., LTD. 15F Jinbao Building No.89 Jinbao Street, Dongcheng District, Beijing 100005, China CANON HONGKONG CO., LTD. 19/F., The Metropolis Tower, 10 Metropolis Drive, Hunghom, Kowloon, Hong Kong CANON SINGAPORE PTE. LTD. 1 HarbourFront Avenue, #04-01 Keppel Bay Tower, Singapore 098632 CANON KOREA CONSUMER IMAGING INC. Canon BS Tower 5F, #168-12 Samseong-dong, Gangnam-gu, Seoul, Korea
OCEANIA CANON AUSTRALIA PTY. LTD. 1 Thomas Holt Drive, North Ryde, Sydney N.S.W. 2113, Australia CANON NEW ZEALAND LTD. Akoranga Business Park, Akoranga Drive, Northcote, Auckland, New Zealand
JAPAN CANON MARKETING JAPAN INC. 16-6, Kohnan 2-chome, Minato-ku, Tokyo 108-8011, Japan
© CANON INC. 2012CPA-N007-0012012.01