Embed Size (px)
Citation preview

34
Aim: In this lesson, you will learn: To create presentations systematically.
3. Presentations
Tejas: The inter-school competition where we have to create a presentation about computers is only 2 weeks away!Jyoti: We already have all the information which is categorized. We can use applications like Impress, Kpresenter, or PowerPoint. How do we start, should I switch on the PC and open the application? Moz: Wait, creating presentations is not just about opening the application and start typing the content. It requires some ground work in terms of thinking and planning. This can be done on a paper. Tejas: But we have collected so much information about Computers now, even planning what to present in the 10 minute slot given to us is very challenging. Looks like our presentation will have 100 pages! Moz: The presentation does not have pages, but Slides. On which Topic do you have to now prepare the presentation? Jyoti: I will prepare on “Uses of Computers” and Tejas on “History of Computers”.Moz: Before we discuss about how to create slides, note that creating effective presentations primarily involves 3 main stages/steps. Let us take Jyoti’s topic and see what goes into the 3 stages.
STAGE 1: Gather Content for the given topic (In this case you already have the content).1. Sift/go through the content that you have collected. 2. Decide the main points that you want to talk about. 3. Under each main point write the sub-points that belong to the main point.4. If you cannot think of a sub point, leave it blank and come back to it later (eg: Under the Title5. Personal uses, if you can think of only two sub-points, you can come back to it later).Under each main/sub-points, decide how you want to display the information (text/ table/ picture/ graph).6. Estimate the number of slides and approximate time for the presentation.7. At the end of Stage 1, what you have is the outline of your presentation! 8.
Scenario drawing

35
Moz: Let us see Jyoti’s outline of the presentation.
Jyoti’s outline for “Uses of Computer”
Moz: Let us now see how to create a new presentation.
Presentations can be used by teachers, students, •businessmen, any working professional.Individual pages of a presentation are called •Slides.Slides can contain text, images, charts/ graphs, •tables,video,audio,insertedfilesetc.Slide content can be • animated.Slides can look consistent by using • templates.Slide content can be • formatted just like the document content.Slides are presented by using an option called •Slide show.
Info
Uses of Computer Personal use •Internet and networking •Special purpose applications in various fields •
Uses in other devices •Personal Use
Office and Personal applications •Multimedia , games•Programming •Education •Virtual training •
Internet and Networking Communication •Information •Transactions •Education •Databases and network •
Special purpose applications Space •Medicine •Weather analysis •Communication •Defence •
Uses in other devicesTelecommunication systems •Transportation systems •Medical systems •Others •
Presentation- features
36
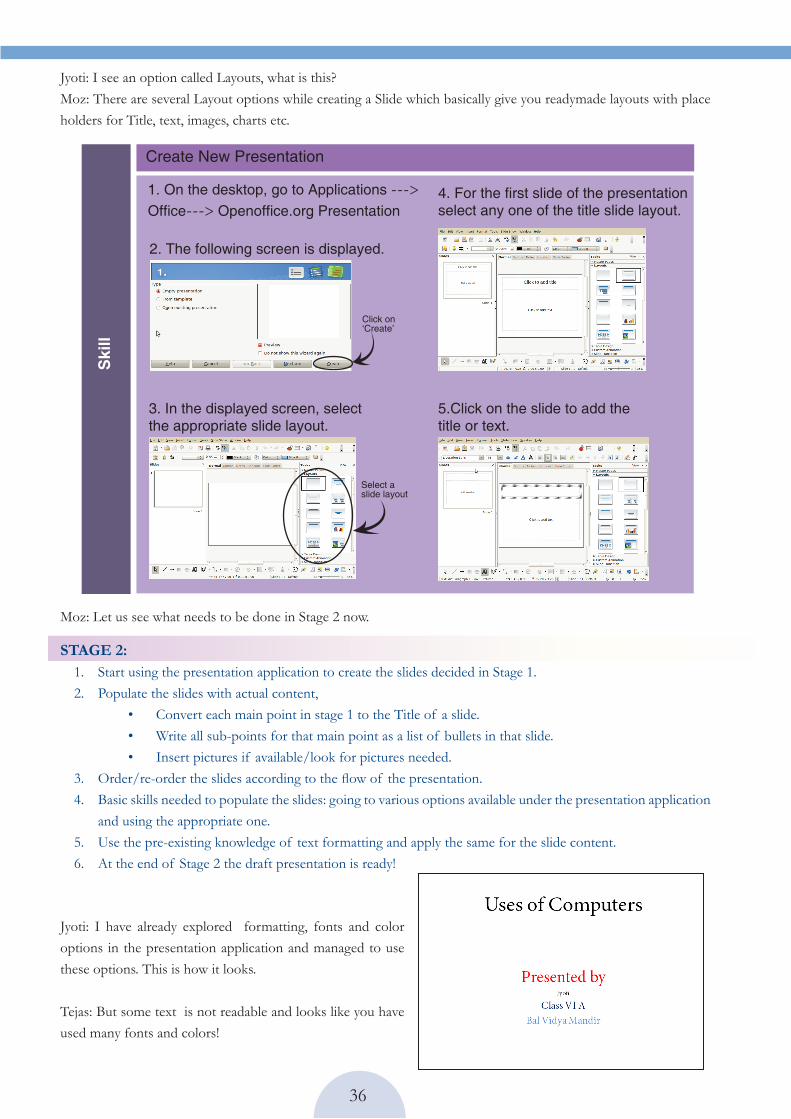
Jyoti: I see an option called Layouts, what is this?Moz: There are several Layout options while creating a Slide which basically give you readymade layouts with place holders for Title, text, images, charts etc.
Moz: Let us see what needs to be done in Stage 2 now.
Jyoti: I have already explored formatting, fonts and color options in the presentation application and managed to use these options. This is how it looks.
Tejas: But some text is not readable and looks like you have used many fonts and colors!
STAGE 2: Start using the presentation application to create the slides decided in Stage 1. 1. Populate the slides with actual content, 2.
Convert each main point in stage 1 to the Title of a slide. •Write all sub-points for that main point as a list of bullets in that slide. •Insert pictures if available/look for pictures needed. •
Order/re-ordertheslidesaccordingtotheflowof thepresentation.3. Basic skills needed to populate the slides: going to various options available under the presentation application 4. and using the appropriate one.Use the pre-existing knowledge of text formatting and apply the same for the slide content. 5. At the end of Stage 2 the draft presentation is ready!6.
Ski
ll
Create New Presentation
1. On the desktop, go to Applications ---> Office---> Openoffice.orgPresentation
2. The following screen is displayed.
3. In the displayed screen, select the appropriate slide layout.
4.Forthefirstslideofthepresentationselect any one of the title slide layout.
5.Click on the slide to add the title or text.
Click on ‘Create’
Select a slide layout

37
Moz: Your observation is correct. There are some guidelines which you should follow while creating slides . This is done in Stage 3.
STAGE 3: 3.a Content Check
Design the content of the slide in appropriate Fonts and Colours.•Do a uniformity/consistency check for all the slides.•Do a spell check/grammar check for all the content.•Do a check if too much content is written on each slide compromising on readability.•At the end of 3.a, the presentation is ready! •
3.b Visual design: It is important to pay attention to the look and feel of the slide after the content is frozen because the audience will notice it before the content.
You can make decorative changes by adding slide design templates.•You can add background images.•You can also explore and add various animation options available.•You can also create custom animations. A word of caution - do not use too many animations or variety •of animations as it can take more time and distract the audience.
3.c Give a mock presentation before the actual presentation.
Moz: Let us see some sample slides now.
SAMPLE SLIDES
Each slide should have a title.•Content in the slide should not be written in paragraphs.•Each slide should ideally have not more than 5 points.•Main points and sub points should be properly indented. •The font used for the text should be uniform across the presentation.•The title should have bigger font than the content in the slide. •Not more than two colors should be used in a single slide.•Do not read out the points exactly as written in the slides, for each point give •more information than what is presented in the slide. If you are using content from the Internet, check for copyright, or give source •of information.
Gui
delin
es
Create a Presentation

38
Moz: You have now learnt to explore more on your own about how to animate the slides, include custom animation, record narration, rehearse timings, insert background images and various options available in the presentation software. Jyoti: We have learnt to use new applications, but like Scratch programming in our earlier classes, we have not done any programming in this grade. Moz: I am glad you noticed it, in the next class you will be introduced to a new topic called Flow charts and Programming .
Ski
ll
Adding animation to the presentation
1. From the toolbar, under Slide Show select Custom Animation.
2. Side panel is displayed. Select the content on the slide which is to be animated and click on Add.
3. The following screen is displayed we can select various effects for the slide content.Click OK.
At the end of the lesson, you will be able to:
Write an outline for a given topic.•Enter content into the outline.•Check content for consistency •(font, grammar, spellings) and use design options.Follow guidelines for creating •effective presentations.
Lesson Outcome
Slide show option is to present all the slides with navigational options •[next, prev]. Slideshowalsoenablestheusertocontroltheflowofslides.•During the slide show some slides can be hidden.•
Info
Slide show

39
WORKSHEETSLevel VI Lesson
Rahul is visiting his dentist with his parents. He is anxious. In the clinic, he saw a presentation which 1. told him about the different types of teeth, care of the teeth and how dentists help to keep our teeth clean and healthy. Now he knows the importance of visiting the dentist. A dentist can use presentations to familiarize visitors about care of teeth, different procedures done on the teeth, etc.Presentations are great way to tell people about your work, passions and other interests. Here are some professions; can you tell how presentations can be used in these professions?
The teacher has given your class tomake a presentation on the life cycle of a butterfly. All the2. students have collected the necessary information. Your friends are discussing about how to make the presentation. Tanya: I will first prepare an outline and then only I will start making the presentation on thecomputer.Jasmine: I have got lot of information, making an outline will take a lot of time. I am going to start making the presentation referring to the information gathered. Thus, I can complete this quickly.Which of your friend is doing in the correct way? Give reason.
Fashion Designer:
Architect:
Traffic policeman:
3
40
WORKSHEETSLevel VI Lesson 3
Meena is given a project to do. She has to make a presentation of 3 -5 slides on the following 3. passage:TheEarth,ourplanetisthethirdnearestplanettotheSun.Insize,itisthefifthlargestplanet.TheEarth has two types of motions, namely Rotation and Revolution. The movement of the Earth on its own axis is known as Rotation. The Earth takes 24 hours (one day) to complete one rotation around its axis. As the earth is spherical in shape, only half of it gets light from the sun at a time. The portion facing the Sun experiences day and the other half which faces away from the Sun experiences night. It isduetorotationwehavedayandnight.Themovementof theEartharoundthesuninafixedpathororbit is called Revolution.Ittakes365and1⁄4days(oneyear)torevolvearoundtheSun.TheEarthisgoing around the Sun in an elliptical orbit. We have different seasons due to the change in the position of the Earth around the Sun. Can you help her to prepare the outline of the topic.
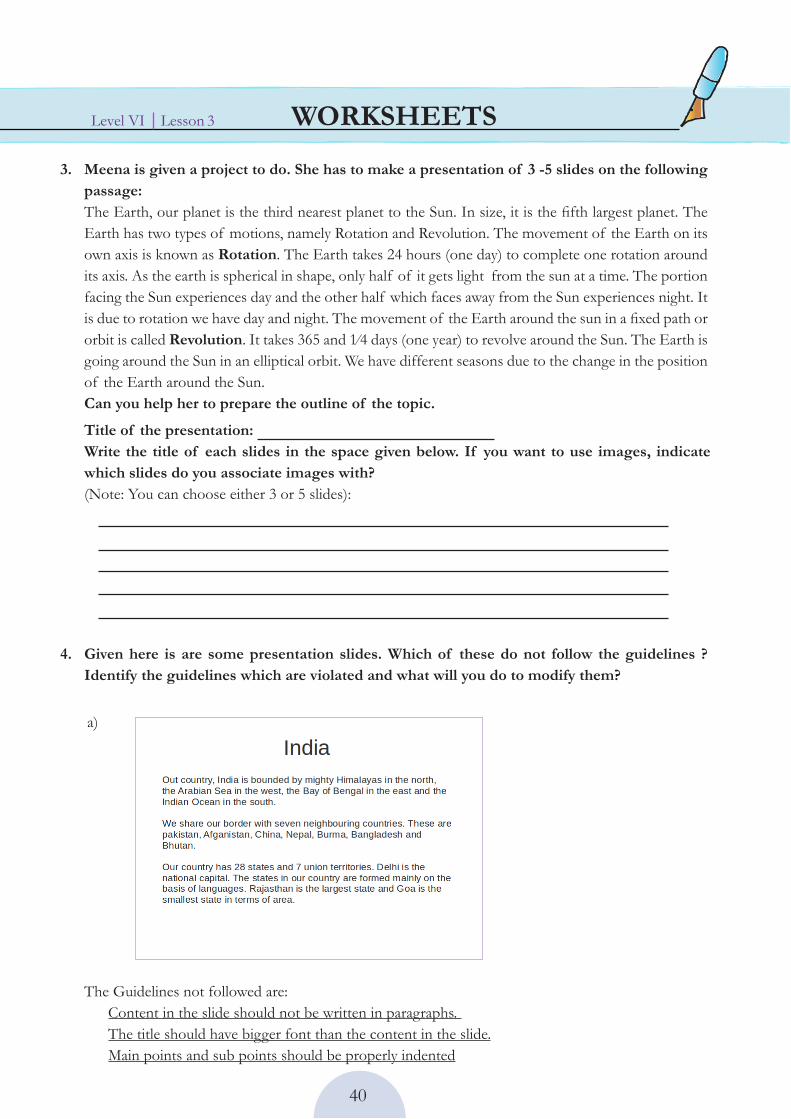
The Guidelines not followed are: Content in the slide should not be written in paragraphs. The title should have bigger font than the content in the slide. Main points and sub points should be properly indented
Given here is are some presentation slides. Which of these do not follow the guidelines ? 4. Identify the guidelines which are violated and what will you do to modify them?
Title of the presentation: Write the title of each slides in the space given below. If you want to use images, indicate which slides do you associate images with? (Note: You can choose either 3 or 5 slides):
a)

41
WORKSHEETSLevel VI Lesson 3
The Guidelines not followed are:
Slide after corrections:
Note: Decide the number of slides (in the corrected version) on the basis of the subject content in the given slide. Accordingly, the corrected slide may or may not have more than one slide.
b)
Slide after correction:

42
WORKSHEETSLevel VI Lesson 3
c)
d)
The Guidelines not followed are:
Slide after correction:

43
WORKSHEETSLevel VI Lesson
e)
The Guidelines not followed are:
The Guidelines not followed are:
3
Slide after correction:
Slide after correction:

44
Level VI LessonACTIVITY
Expl reExpl re
3
Select one of the following topics for doing activities one to four.1. Explain the model you built for science exhibition.•What I think about Computer Masti.•Imagine that you are a fashion designer/architect/cosmetic surgeon. Explain what work you do.•Safety measures to be followed while using a computer.•History of your city/towns.•
Work out the first stage of making presentation for doing the activity. The following bullets will i. help you do this.•Thinkandplanbeforedoinganactivity.•Identifywhatyouknowandwhatyoudonotknow.•Planthenumberof slidesasperthetimeallocatedforpresentation.•Prepareanoutlineof thepresentationinyournotebook.
Open a presentation application and prepare a draft presentation. Select appropriate layout that ii. matches the purpose of each slide.
Follow the guidelines of stage 3 and prepare the actual presentation. Select appropriate background iii. and custom animation if required.
Share your presentation with your classmates. [The teacher can get printouts of selected iv. presentation in handout format]
Group ActivityGoogle earth:1. Start this application and do the following activities: a. Identify locations mentioned in your Geography textbook. b. Track the path of famous travelers --- Marco Polo, Ibn Batuta.c. Markyourschool,nativeplaceof fiveclassstudents.

45
Level VI LessonACTIVITY
Expl reExpl re How can you insert/draw graphic organizer on a slide?1. Explore different views (Notes page, Outline, Slide 2. Sorter) and Master layouts available in the presentation application.
3
ProjectMy brick stacking machine1. Form groups
Create a presentation that lists the main and detailed steps for doing the above activity.2. [Note: For schools with Internet connectivity issues, the teacher can ensure that the locations available in cache memory so that students can do the above activity without Internet connectivity]

46
Teacher’sCorner
The objective of the lesson is to teach students how to plan and prepare a multimedia presentation. Begin the lesson by asking students to mention about what they do for presenting their assignments or projects given in other subjects. Tell them that a computer application, namely presentation software (impress/powerpoint) can be used for this. Inform the students that it provdies convenience, saves effort and allows them to use mulitmedia effects; all helping in better communcation with the audience.
It is important that students do not jump to use the presentation software and use the animation effects without thought on purpose and theme of presentation. Hence, caution the students against this.
Use this opportunity to revise step wise thinking and ask them how would they apply this while prepearing a presentation. The students would mention that they will gather information on the topic, open the presentation application, copy-paste content from Internet and so on. Write down these points on the board. Do not attempt to order them yourself. Now ask the students to order the different tasks in a sequence. Most likely the students would be able to cover all the points and order it well.
Summarize the above discussion and teach the students how to prepare an outline for presentation. Refer the description of stage I of the presentation creation process in the lesson for this. You can select one of the topics listed in the activity and ask students to prepare an outline for it.
Open the presentation software and give a demonstration. Ask the students to note that the different options of the menu and tool bar are similar to the one found on word processor. Tell the students that just as the word processor has pages, presentation software has slides. Teach them how to select a slide layout and enter content. Show them how to instert pictures or text from other files and format the slides. Inform the students the importance of citing the resources appropriately if they are including content downloaded from the Internet.
Teach the students to review their slides for consistency check. Ask them to read the guidelines included in the lesson. Tell them that the design (colour, font size, font type, background) of the presentation is important as it helps in clarity of communication with the audience.
You can teach them how to apply the different animation effects. Emphasize that they should select an effect that matches the theme of the presentation/slide and that over use of animation interferes with effective communication.
Further Reading:http://www.arma.org/learningcenter/facilitator/index.cfmhttp://classweb.gmu.edu/WAC/somguide/presentationguidelines.htmhttp://www.slideshare.net/satyajeet_02/how-to-make-effective-presentation
Book V
Lesson 6Level VI
Lesson 3