Embed Size (px)
Citation preview
NATO UNCLASSIFIED
Sh
are
Po
int
20
13
Use
r Tr
ain
ing
Mic
roso
ft
The SharePoint 2013 User Training has been developed by the CIS-Training Centre to train the SHAPE/NATO Staff in how to use their SharePoint Site and the features available within. Using SharePoint 2013, you can set up Web sites to share information with others, manage documents from start to finish, and publish reports to help everyone make better decisions. The SharePoint 2013 Functional Administrators course will teach you how to develop a Site, to manage, to control and to change permissions levels within.
SHAPE CIS Training Centre NCI Agency – E&T Service Line
065-44-7014 0032-65447014
NATO UNCLASSIFIED
SharePoint 2013 NATO UNCLASSIFIED
S.C.T.C. NATO UNCLASSIFIED 2
This page intentionally left blank.
Created by Mr Paul Kuijer
Training Manager
SHAPE CIS Training Centre
Created: 19th March 2015
Last Update: 02nd January 2018
SharePoint 2013 NATO UNCLASSIFIED
S.C.T.C. NATO UNCLASSIFIED 3
SharePoint 2013 User Training
CONTENTS
1 INTRODUCTON TO SHAREPOINT 2013 ............................................................................................ 5
1.1 WHAT IS SHAREPOINT 2013? .......................................................................................................... 5
1.2 SUB SITES ........................................................................................................................................ 6
1.3 KEY POINTS ......................................................................................................................................... 7
2 ACCESS THE SHAREPOINT PORTAL ................................................................................................. 9
2.1 ACCESSING NS SHAPE PORTAL ........................................................................................................... 9
2.2 ACCESSING NR-AIS (REACH) PORTAL ................................................................................................ 10
3 USING LIBRARY APPS ................................................................................................................... 11
3.1 DOCUMENT LIBRARY .................................................................................................................... 11
3.1.1 UPLOAD FILES TO THE LIBRARY ............................................................................................. 12
3.1.2 CREATE NETWORK DRIVE TO LIBRARY ................................................................................... 15
3.2 MICROSOFT OFFICE WEB APPS ..................................................................................................... 17
3.2.1 DOCUMENT PREVIEW ............................................................................................................ 17
3.2.3 WORKING ON DOCUMENTS – CHECK OUT ........................................................................... 19
3.2.3 EDIT UPLOADED DOCUMENT IN BROWSER ........................................................................... 21
3.2.4 CREATE NEW OFFICE DOCUMENT WITHIN THE LIBRARY ...................................................... 23
3.2.5 DELETE a DOCUMENT ............................................................................................................ 24
3.3 ASSET LIBRARY .............................................................................................................................. 25
3.3.1 UPLOAD MEDIA FILE .............................................................................................................. 26
3.3.2 DELETE MEDIA FILE ................................................................................................................ 31
3.4 PICTURE LIBRARY .......................................................................................................................... 32
3.4.1 UPLOAD PICTURES TO THE PICTURE LIBRARY ....................................................................... 33
3.4.2 EDIT USING MS-OFFICE PICTURE MANAGER ......................................................................... 35
3.4.3 DOWNLOAD PICTURES TO FOLDER ....................................................................................... 37
3.4.4 PICTURES SLIDES VIEW .......................................................................................................... 38
3.4.5 DELETE PICTURE FILE ............................................................................................................. 39
SharePoint 2013 NATO UNCLASSIFIED
S.C.T.C. NATO UNCLASSIFIED 4
3.5 REPORT LIBRARY ........................................................................................................................... 40
3.5.1 UPLOAD REPORTS TO THE REPORT LIBRARY ......................................................................... 40
3.5.2 OPEN REPORTS WITHIN THE REPORT LIBRARY ...................................................................... 41
4 USING LIST APPS ......................................................................................................................... 42
4.1 CALENDAR LIST ............................................................................................................................. 43
4.1.1 CREATE EVENTS ..................................................................................................................... 43
4.1.2 CONNECT CALENDAR TO MS-OUTLOOK ................................................................................ 46
4.2 DISCUSSION BOARD LIST ............................................................................................................... 48
4.2.1 POST A NEW DISCUSSION ...................................................................................................... 48
4.2.2 RESPOND TO A DISCUSSION .................................................................................................. 49
4.2.3 SET AN ALERT ......................................................................................................................... 50
4.3 SURVEY LIST .................................................................................................................................. 52
4.3.1 RESPOND TO A SURVEY ......................................................................................................... 52
4.3.2 REVIEW SURVEY RESPONSES ................................................................................................. 54
4.4 TASKS LIST ..................................................................................................................................... 55
4.4.1 CREATE NEW TASK ................................................................................................................. 55
4.4.2 PREDECESSORS ...................................................................................................................... 57
SharePoint 2013 NATO UNCLASSIFIED
S.C.T.C. NATO UNCLASSIFIED 5
1 INTRODUCTON TO SHAREPOINT 2013
1.1 WHAT IS SHAREPOINT 2013?
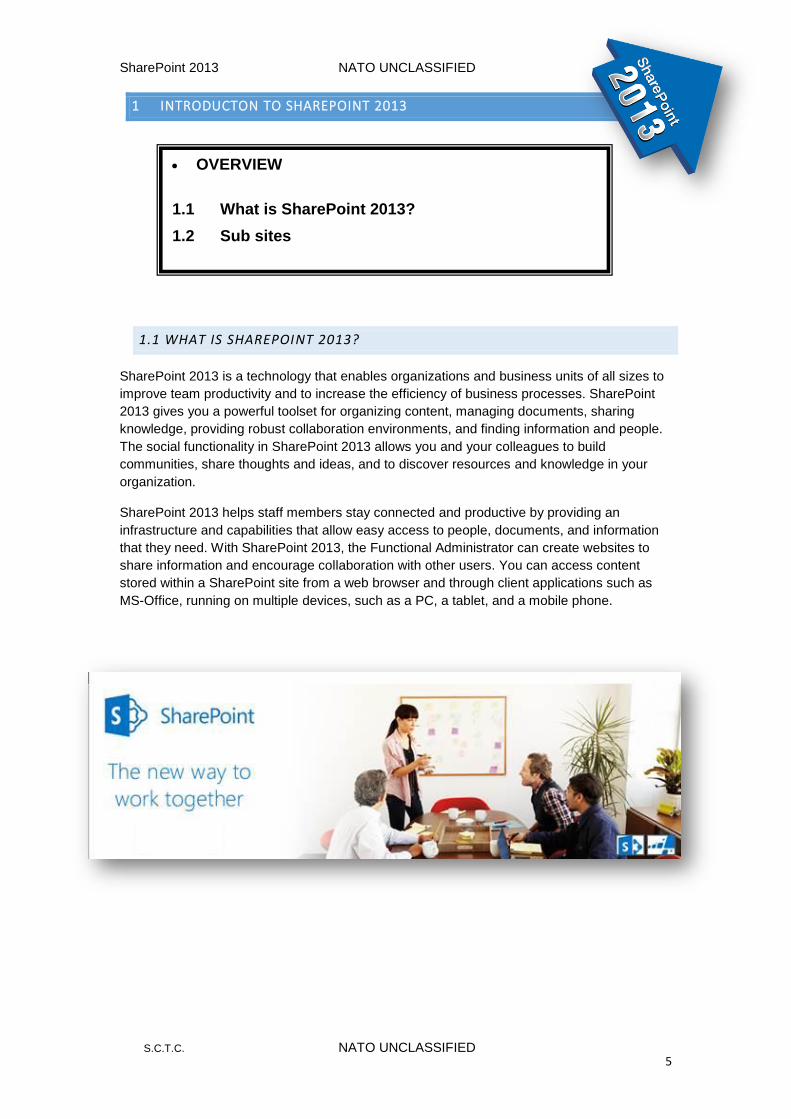
SharePoint 2013 is a technology that enables organizations and business units of all sizes to
improve team productivity and to increase the efficiency of business processes. SharePoint
2013 gives you a powerful toolset for organizing content, managing documents, sharing
knowledge, providing robust collaboration environments, and finding information and people.
The social functionality in SharePoint 2013 allows you and your colleagues to build
communities, share thoughts and ideas, and to discover resources and knowledge in your
organization.
SharePoint 2013 helps staff members stay connected and productive by providing an
infrastructure and capabilities that allow easy access to people, documents, and information
that they need. With SharePoint 2013, the Functional Administrator can create websites to
share information and encourage collaboration with other users. You can access content
stored within a SharePoint site from a web browser and through client applications such as
MS-Office, running on multiple devices, such as a PC, a tablet, and a mobile phone.
OVERVIEW
1.1 What is SharePoint 2013?
1.2 Sub sites
SharePoint 2013 NATO UNCLASSIFIED
S.C.T.C. NATO UNCLASSIFIED 6
1.2 SUB SITES
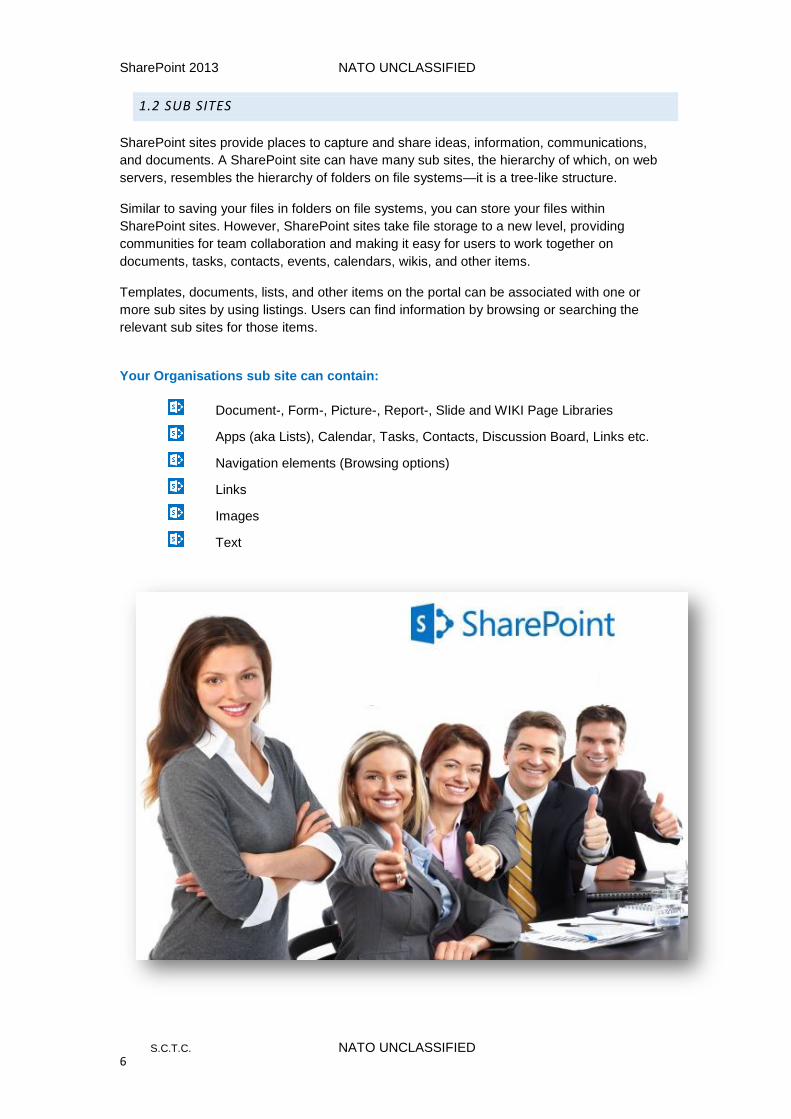
SharePoint sites provide places to capture and share ideas, information, communications,
and documents. A SharePoint site can have many sub sites, the hierarchy of which, on web
servers, resembles the hierarchy of folders on file systems—it is a tree-like structure.
Similar to saving your files in folders on file systems, you can store your files within
SharePoint sites. However, SharePoint sites take file storage to a new level, providing
communities for team collaboration and making it easy for users to work together on
documents, tasks, contacts, events, calendars, wikis, and other items.
Templates, documents, lists, and other items on the portal can be associated with one or
more sub sites by using listings. Users can find information by browsing or searching the
relevant sub sites for those items.
Your Organisations sub site can contain:
Document-, Form-, Picture-, Report-, Slide and WIKI Page Libraries
Apps (aka Lists), Calendar, Tasks, Contacts, Discussion Board, Links etc.
Navigation elements (Browsing options)
Links
Images
Text

SharePoint 2013 NATO UNCLASSIFIED
S.C.T.C. NATO UNCLASSIFIED 7
1.3 KEY POINTS
SharePoint 2013 provides a powerful set of tools for information sharing and team collaboration.
SharePoint websites provide places to capture and share ideas, information, knowledge, documents, and communications.
You can access content stored within a SharePoint site from both a web browser and through client applications such as Office.
Access to a SharePoint site is controlled through a role-based system predicated on permission levels. The five default permission levels are Read, Contribute, Design, Full Control, and Limited.
SharePoint 2013 technology can be deployed as an on-premises SharePoint installation, or as a cloud SharePoint Online solution, or as a hybrid environment that combines on-premises and cloud models. The user experience is consistent across all types of deployment.
There are varying levels of integration between different versions of Office and SharePoint 2013, with Office 2013 having the closest integration.
SharePoint 2013 NATO UNCLASSIFIED
S.C.T.C. NATO UNCLASSIFIED 8
THIS PAGE INTENTIONALLY LEFT BLANK
SharePoint 2013 NATO UNCLASSIFIED
S.C.T.C. NATO UNCLASSIFIED 9
2 ACCESS THE SHAREPOINT PORTAL
2.1 ACCESSING NS SHAPE NIP PORTAL
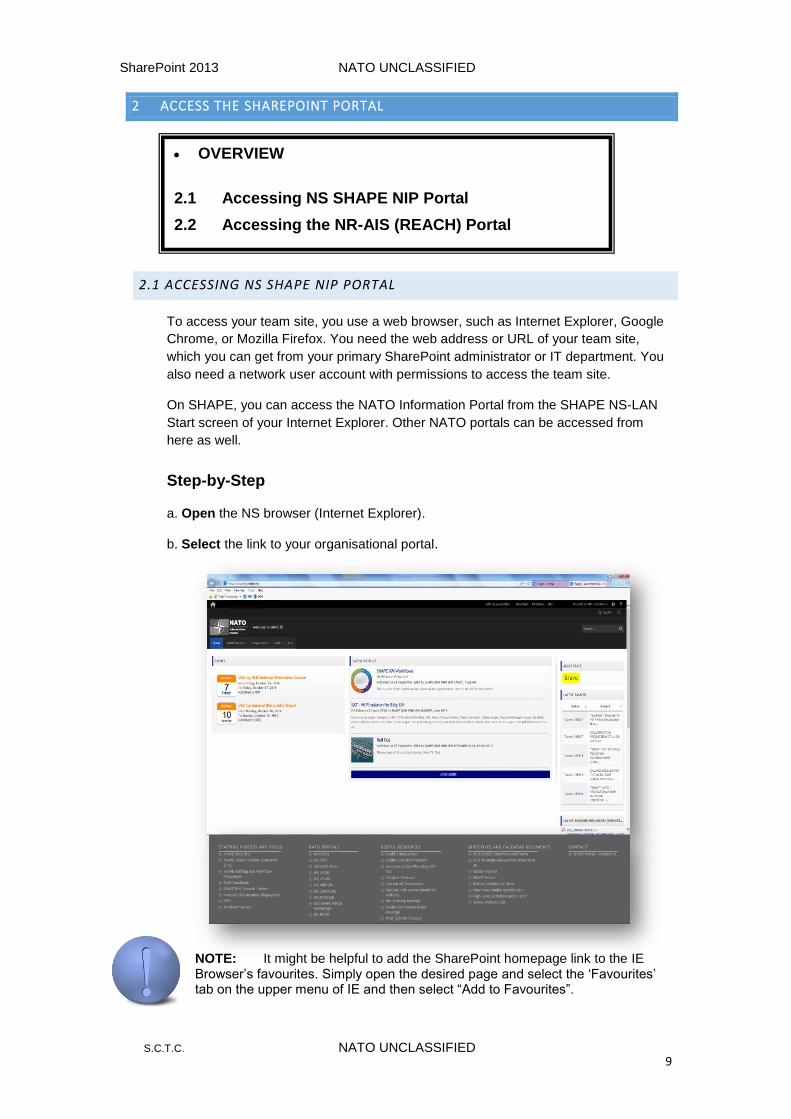
To access your team site, you use a web browser, such as Internet Explorer, Google
Chrome, or Mozilla Firefox. You need the web address or URL of your team site,
which you can get from your primary SharePoint administrator or IT department. You
also need a network user account with permissions to access the team site.
On SHAPE, you can access the NATO Information Portal from the SHAPE NS-LAN
Start screen of your Internet Explorer. Other NATO portals can be accessed from
here as well.
Step-by-Step
a. Open the NS browser (Internet Explorer).
b. Select the link to your organisational portal.
NOTE: It might be helpful to add the SharePoint homepage link to the IE Browser’s favourites. Simply open the desired page and select the ‘Favourites’ tab on the upper menu of IE and then select “Add to Favourites”.
OVERVIEW
2.1 Accessing NS SHAPE NIP Portal
2.2 Accessing the NR-AIS (REACH) Portal
SharePoint 2013 NATO UNCLASSIFIED
S.C.T.C. NATO UNCLASSIFIED 10
2.2 ACCESSING NR-AIS (REACH) PORTAL
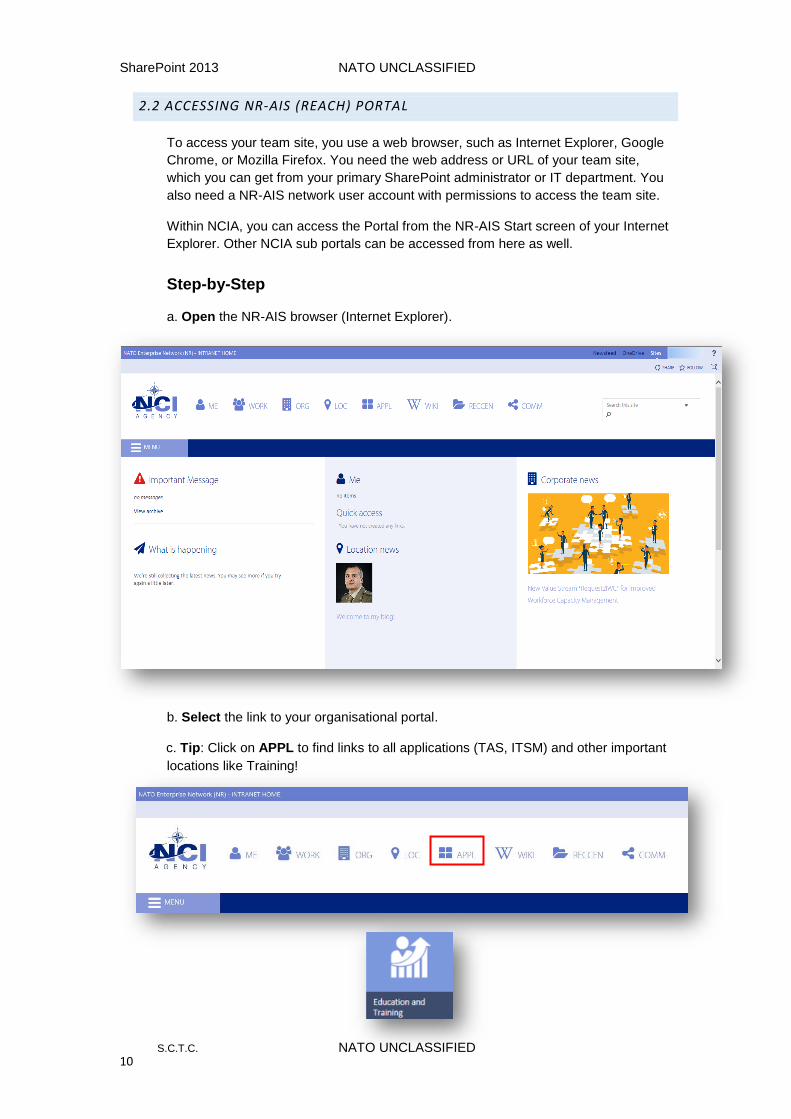
To access your team site, you use a web browser, such as Internet Explorer, Google
Chrome, or Mozilla Firefox. You need the web address or URL of your team site,
which you can get from your primary SharePoint administrator or IT department. You
also need a NR-AIS network user account with permissions to access the team site.
Within NCIA, you can access the Portal from the NR-AIS Start screen of your Internet
Explorer. Other NCIA sub portals can be accessed from here as well.
Step-by-Step
a. Open the NR-AIS browser (Internet Explorer).
b. Select the link to your organisational portal.
c. Tip: Click on APPL to find links to all applications (TAS, ITSM) and other important
locations like Training!
SharePoint 2013 NATO UNCLASSIFIED
S.C.T.C. NATO UNCLASSIFIED 11
3 USING LIBRARY APPS
3.1 DOCUMENT LIBRARY
For many file types, including documents and spread sheets, use a document library App.
A library is a location on a site where you can create, collect, update, and manage files with other team members. Each library displays a list of files and key information about the files, which helps people to use the files to work together.
You can use document libraries to store your documents on a SharePoint site, rather than on your local computer's hard drive or your personal folder (Z-drive on SHAPE NS), so that other employees can find and work with these documents more easily. Libraries are used to store files, whereas lists are used to store other types of content. Like lists, libraries contain metadata, so that you can easily filter, sort, and group items in the libraries.
OVERVIEW
3.1 Document Library
3.2 Microsoft Office Web App
3.3 Asset Library
3.4 Picture Library
3.5 Report Library
SharePoint 2013 NATO UNCLASSIFIED
S.C.T.C. NATO UNCLASSIFIED 12
3.1.1 UPLOAD FILES TO THE LIBRARY
There are several ways to add documents to a document library, including the following: Using the browser: to upload documents to the library via the SharePoint interface. Using File Explorer: to copy or move documents into the library, including dragging between your desktop, or any other location, and SharePoint. Using Drag and Drop: from any location into your Document Library (new in SP2013). In this chapter, you will use two methods: the browser and Drag and Drop.
USING THE BROWSER
Step-by-Step
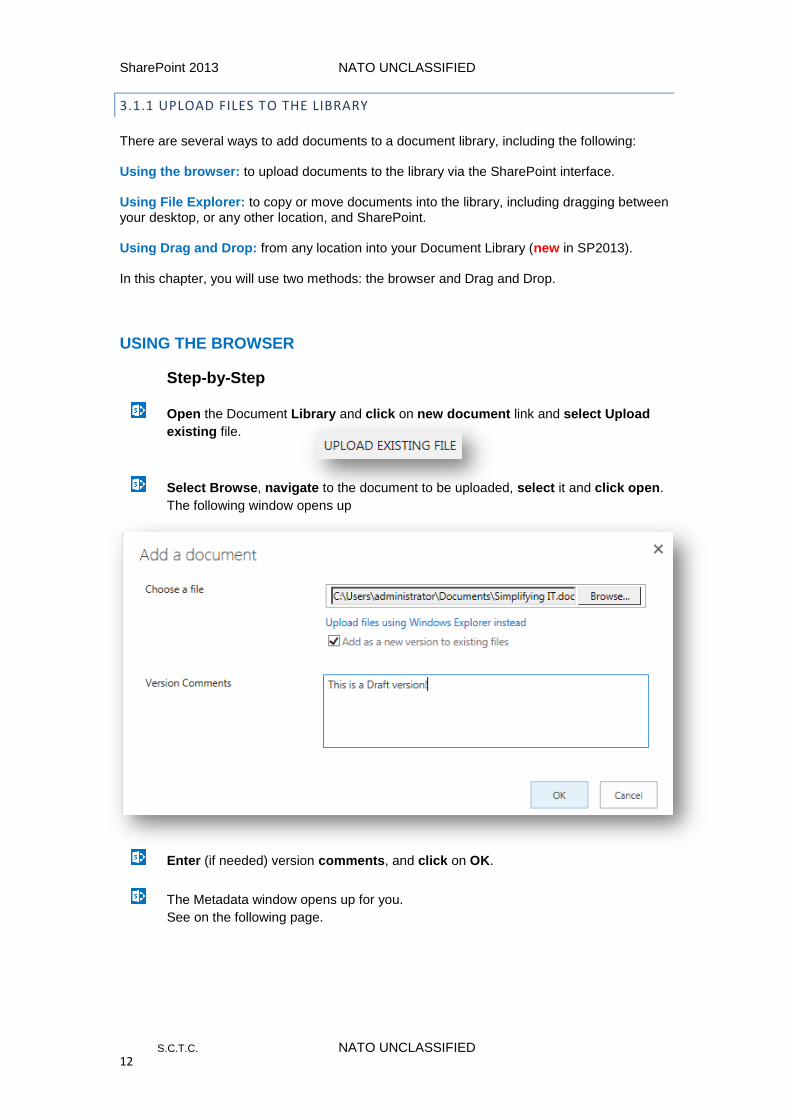
Open the Document Library and click on new document link and select Upload
existing file.
Select Browse, navigate to the document to be uploaded, select it and click open.
The following window opens up
Enter (if needed) version comments, and click on OK.
The Metadata window opens up for you.
See on the following page.
SharePoint 2013 NATO UNCLASSIFIED
S.C.T.C. NATO UNCLASSIFIED 13
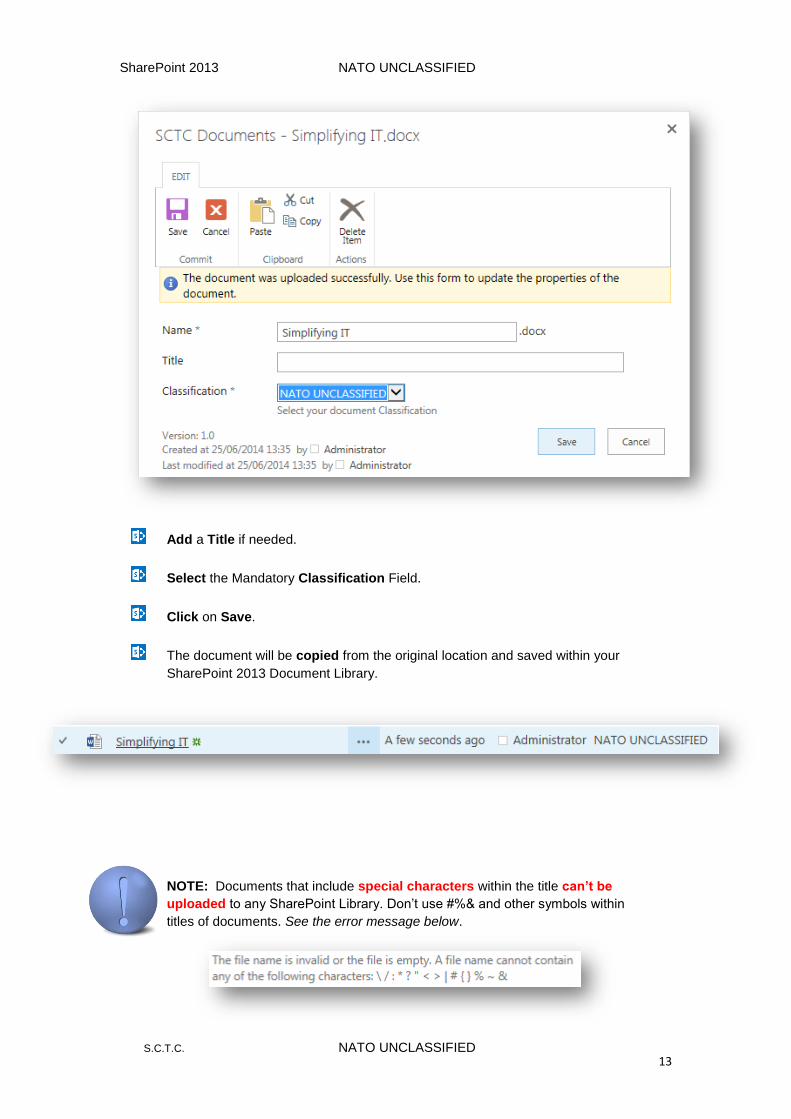
Add a Title if needed.
Select the Mandatory Classification Field.
Click on Save.
The document will be copied from the original location and saved within your
SharePoint 2013 Document Library.
NOTE: Documents that include special characters within the title can’t be
uploaded to any SharePoint Library. Don’t use #%& and other symbols within
titles of documents. See the error message below.
SharePoint 2013 NATO UNCLASSIFIED
S.C.T.C. NATO UNCLASSIFIED 14
USING DRAG AND DROP
Step-by-Step
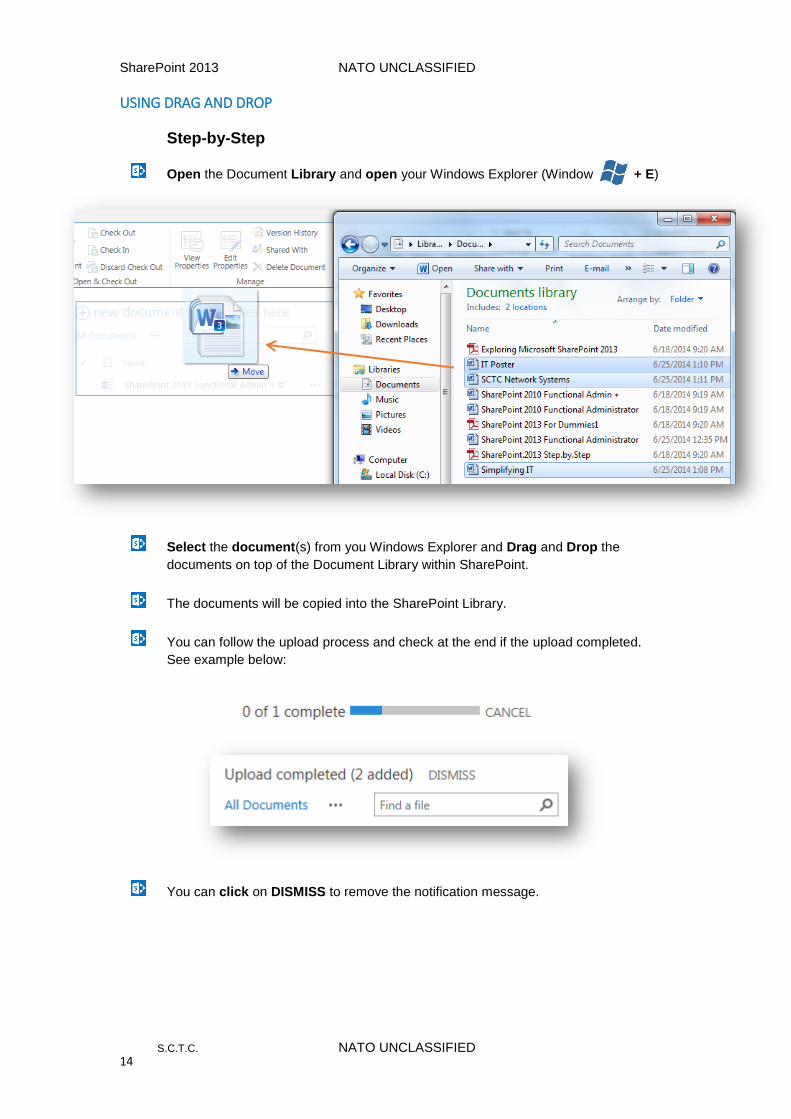
Open the Document Library and open your Windows Explorer (Window + E)
Select the document(s) from you Windows Explorer and Drag and Drop the
documents on top of the Document Library within SharePoint.
The documents will be copied into the SharePoint Library.
You can follow the upload process and check at the end if the upload completed.
See example below:
You can click on DISMISS to remove the notification message.
SharePoint 2013 NATO UNCLASSIFIED
S.C.T.C. NATO UNCLASSIFIED 15
3.1.2 CREATE NETWORK DRIVE TO LIBRARY
This section will provide useful information on how to establish a quick link in your save to dialogue box for your SharePoint Libraries using Windows 7. This will allow you to manage your documents even without using SharePoint. Furthermore you can copy and paste any document directly into your Library using this Network drive. Newly created documents can be saved directly into the SharePoint Network Drive without touching SharePoint. Documents copied and/or saved using the Network Drive will receive the default Metadata from SharePoint.
Step-by-Step
Open your Library (documents / pictures / reports).
Click on the Library Tab and click on Open with Explorer.
Within the Windows Explorer click on the yellow folder in front of the path and copy
the Url (Ctrl + C or right mouse and copy - see below).
Click on “Computer”, right Mouse click on the white area below Network Location,
and select Add a Network Location.
Click on Next.
On the following window select “Choose a custom network location” and click on
Next.
Paste the copied path in the Internet or network address (Ctrl + V).
Click on Next.
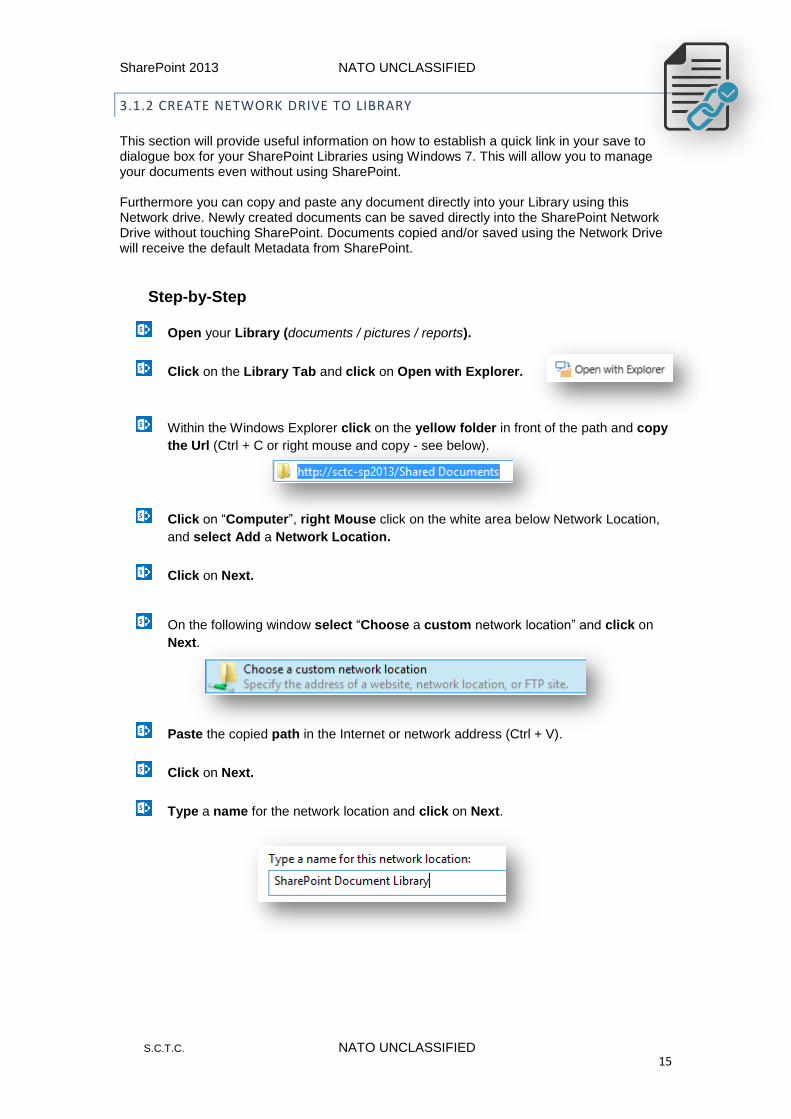
Type a name for the network location and click on Next.
SharePoint 2013 NATO UNCLASSIFIED
S.C.T.C. NATO UNCLASSIFIED 16
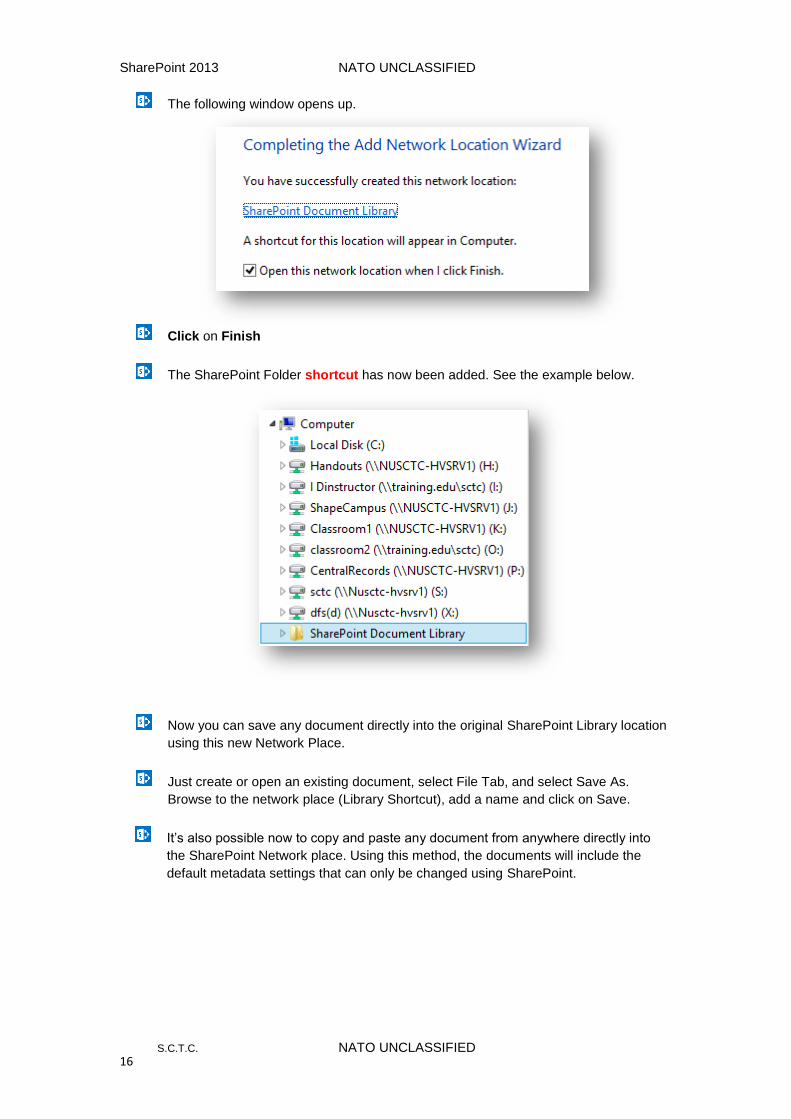
The following window opens up.
Click on Finish
The SharePoint Folder shortcut has now been added. See the example below.
Now you can save any document directly into the original SharePoint Library location
using this new Network Place.
Just create or open an existing document, select File Tab, and select Save As.
Browse to the network place (Library Shortcut), add a name and click on Save.
It’s also possible now to copy and paste any document from anywhere directly into
the SharePoint Network place. Using this method, the documents will include the
default metadata settings that can only be changed using SharePoint.
SharePoint 2013 NATO UNCLASSIFIED
S.C.T.C. NATO UNCLASSIFIED 17
3.2 MICROSOFT OFFICE WEB APPS
Office Web Apps give you a browser-based viewing and editing experience by providing a representation of an Office document in the browser. For example, when you click a docu-ment stored in a SharePoint document library, the document opens directly in the browser. The document appearance in the browser is similar to how it appears in the Office client application. While an Office Web App provides lighter editing functionality than the associated Office client application, it provides the user an opportunity to open a document for editing in the associated client application by using a button within the Office Web App page. On a SharePoint site where Office Web Apps have been installed and configured, you can view and edit Office documents in the browser from anywhere you have a connection to your SharePoint site, including mobile devices. You can also create a new Office document from within your SharePoint Library that will be saved within the Library automatically. In this chapter, I will explain the following:
A. Document Preview
B. Edit uploaded document in Browser
C. Create New Office document within the Library
3.2.1 DOCUMENT PREVIEW
Step-by-Step
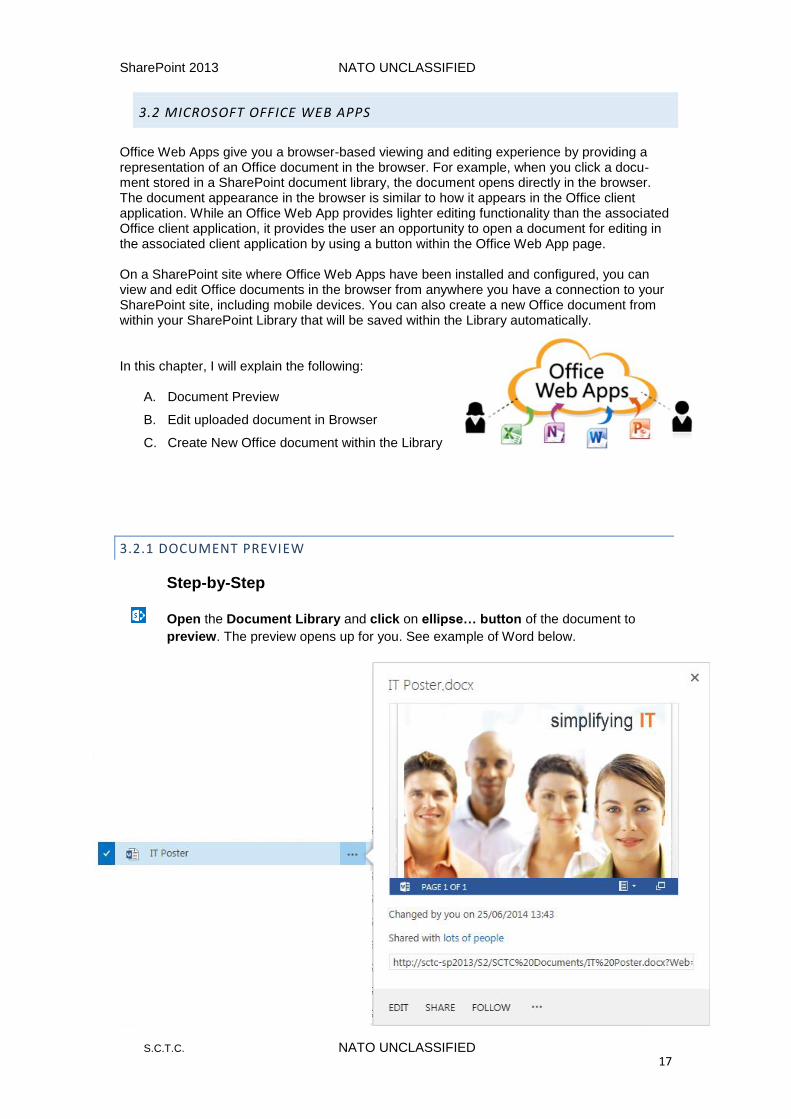
Open the Document Library and click on ellipse… button of the document to
preview. The preview opens up for you. See example of Word below.
SharePoint 2013 NATO UNCLASSIFIED
S.C.T.C. NATO UNCLASSIFIED 18
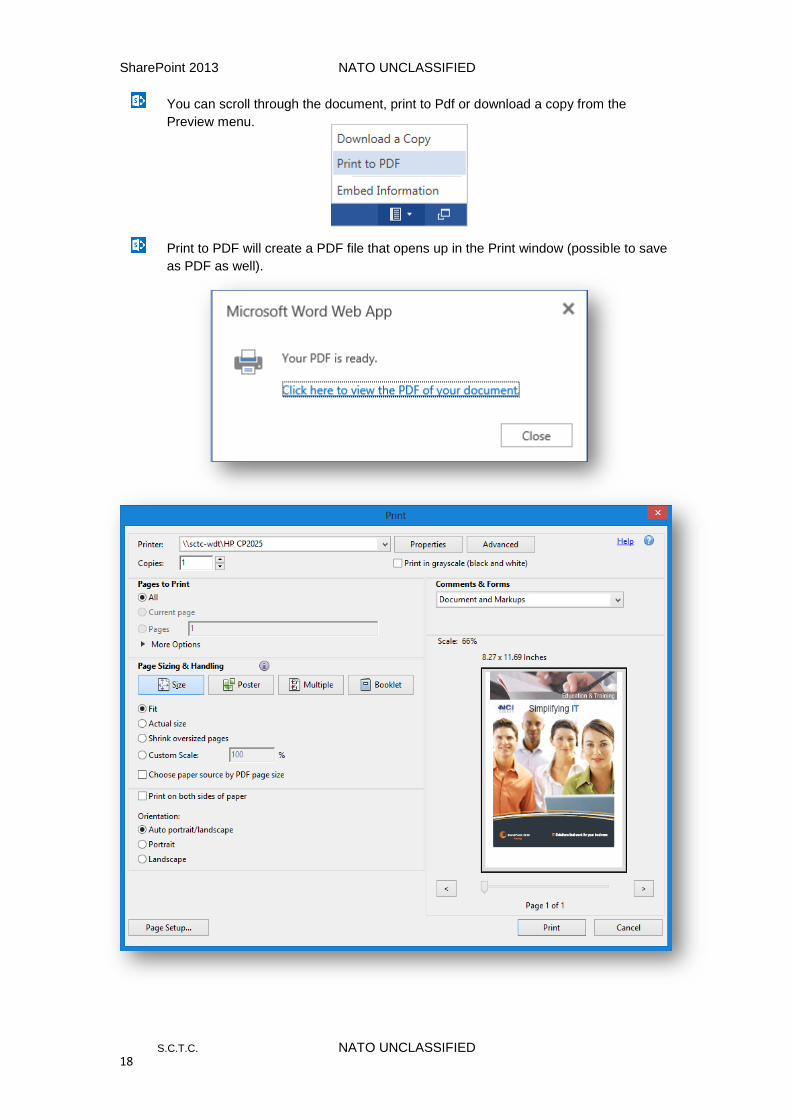
You can scroll through the document, print to Pdf or download a copy from the
Preview menu.
Print to PDF will create a PDF file that opens up in the Print window (possible to save
as PDF as well).

SharePoint 2013 NATO UNCLASSIFIED
S.C.T.C. NATO UNCLASSIFIED 19
3.2.3 WORKING ON DOCUMENTS – CHECK OUT
You should Check Out a document to work on it and then check it back in again after
you made your changes. Checking Out the document ensures that other users can’t
make changes to the document while you are working on it. The document will
become Read Only to all other users. Also you will be able to leave comments
behind when you Check In the document when finished.
To ‘Check Out’ the document from the Library;
Step-by-Step
a. Click the Open Menu button (…) for the document twice.
b. Select ‘Check Out’. See example below.
c. The document will be checked out to you (see Green Symbol below)
SharePoint 2013 NATO UNCLASSIFIED
S.C.T.C. NATO UNCLASSIFIED 20
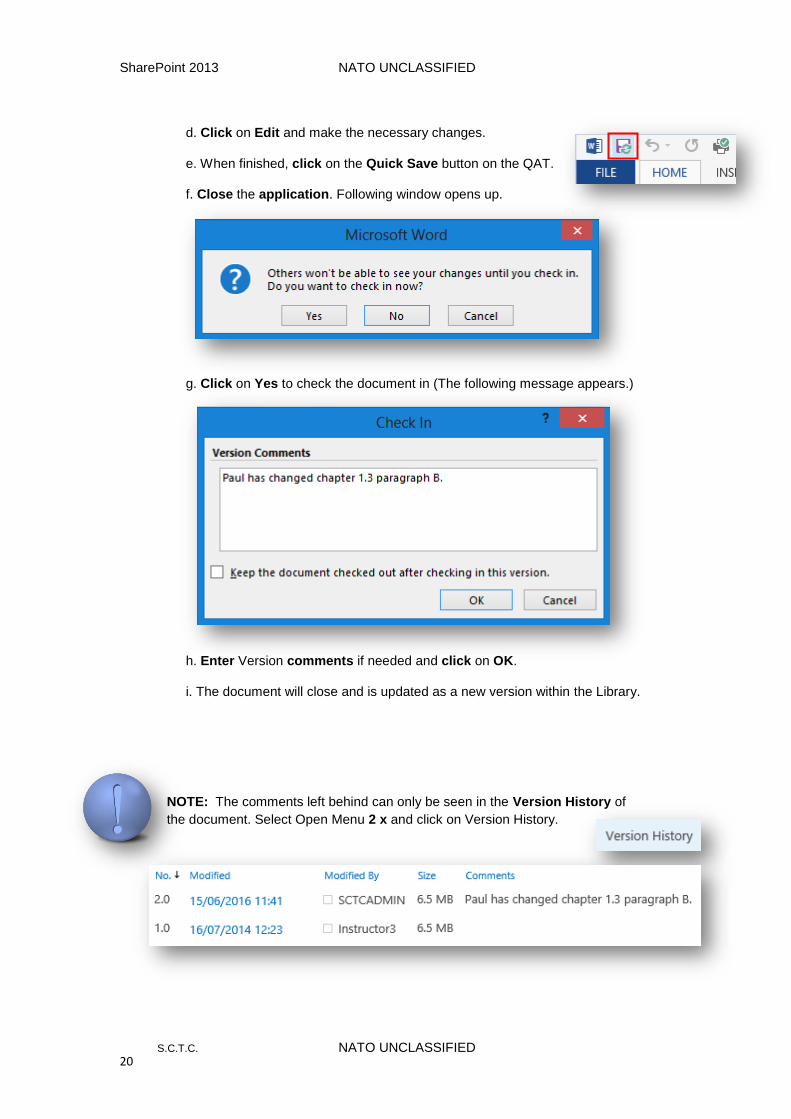
d. Click on Edit and make the necessary changes.
e. When finished, click on the Quick Save button on the QAT.
f. Close the application. Following window opens up.
g. Click on Yes to check the document in (The following message appears.)
h. Enter Version comments if needed and click on OK.
i. The document will close and is updated as a new version within the Library.
NOTE: The comments left behind can only be seen in the Version History of
the document. Select Open Menu 2 x and click on Version History.

SharePoint 2013 NATO UNCLASSIFIED
S.C.T.C. NATO UNCLASSIFIED 21
3.2.3 EDIT UPLOADED DOCUMENT IN BROWSER
Step-by-Step
Click on the document link (Title)
Your document opens up in a Browser View (see the PowerPoint example below)
Use the common navigation tools from PowerPoint, or Start Slideshow.
SharePoint 2013 NATO UNCLASSIFIED
S.C.T.C. NATO UNCLASSIFIED 22
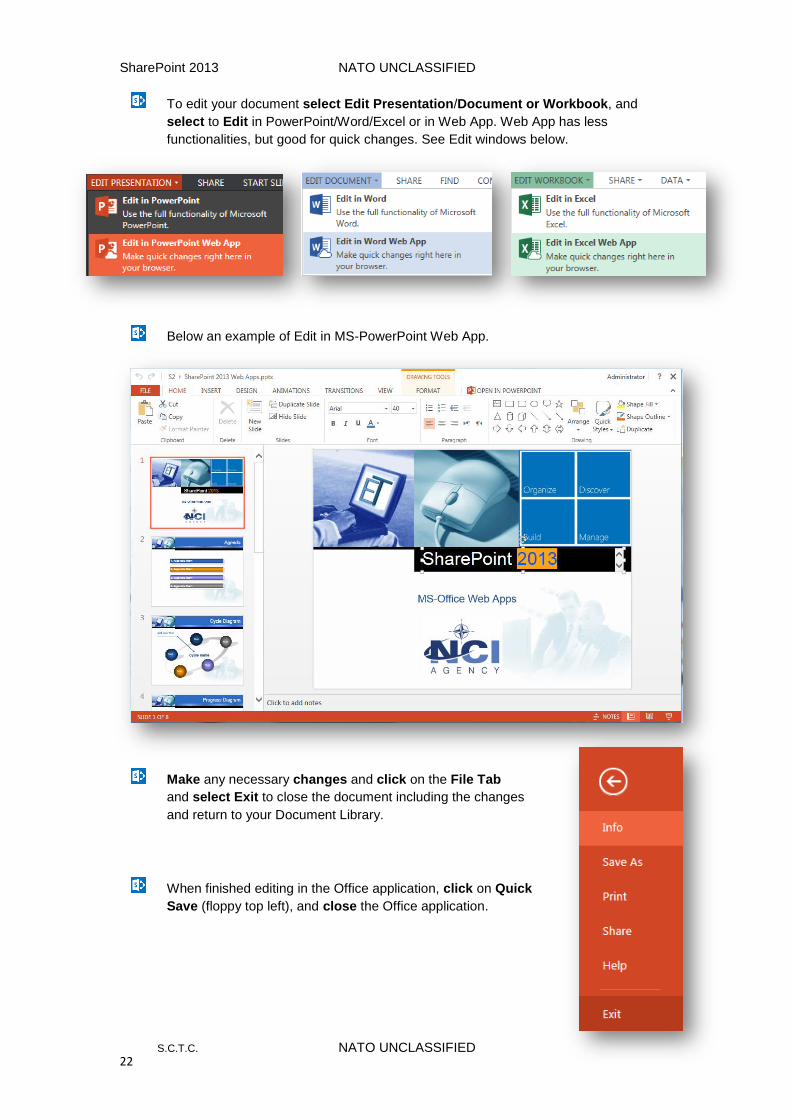
To edit your document select Edit Presentation/Document or Workbook, and
select to Edit in PowerPoint/Word/Excel or in Web App. Web App has less
functionalities, but good for quick changes. See Edit windows below.
Below an example of Edit in MS-PowerPoint Web App.
Make any necessary changes and click on the File Tab
and select Exit to close the document including the changes
and return to your Document Library.
When finished editing in the Office application, click on Quick
Save (floppy top left), and close the Office application.
SharePoint 2013 NATO UNCLASSIFIED
S.C.T.C. NATO UNCLASSIFIED 23
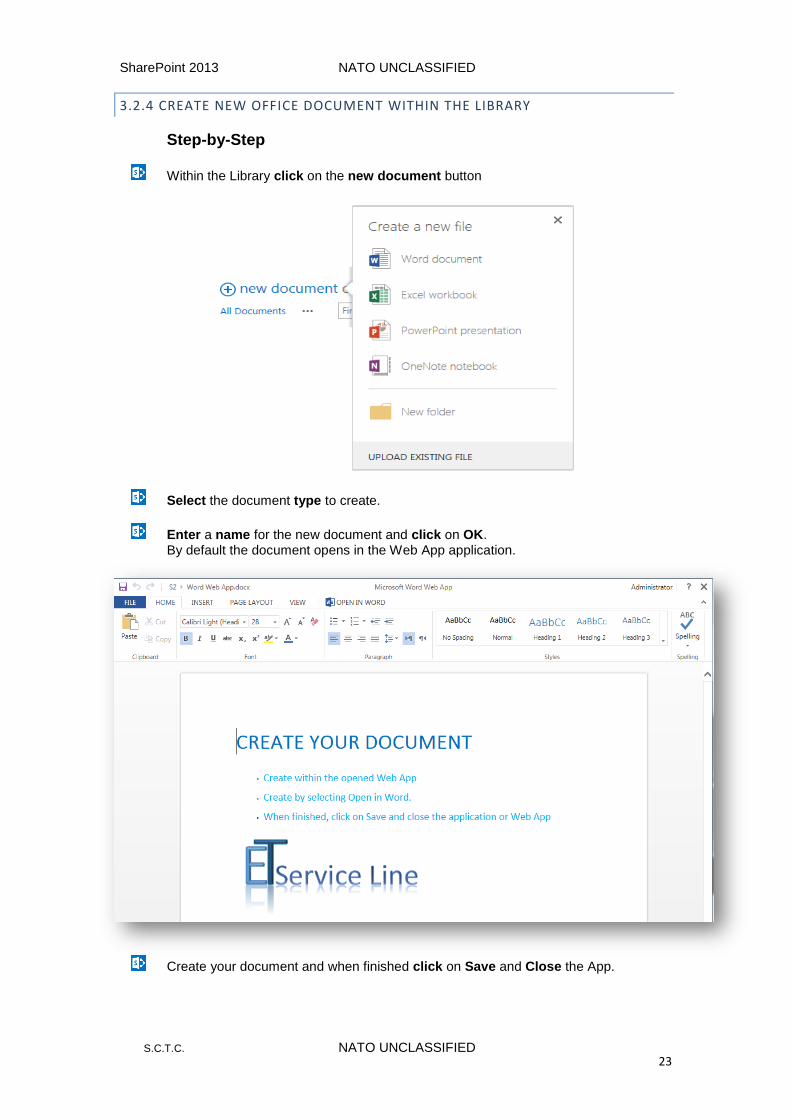
3.2.4 CREATE NEW OFFICE DOCUMENT WITHIN THE LIBRARY
Step-by-Step
Within the Library click on the new document button
Select the document type to create.
Enter a name for the new document and click on OK. By default the document opens in the Web App application.
Create your document and when finished click on Save and Close the App.
SharePoint 2013 NATO UNCLASSIFIED
S.C.T.C. NATO UNCLASSIFIED 24
3.2.5 DELETE A DOCUMENT
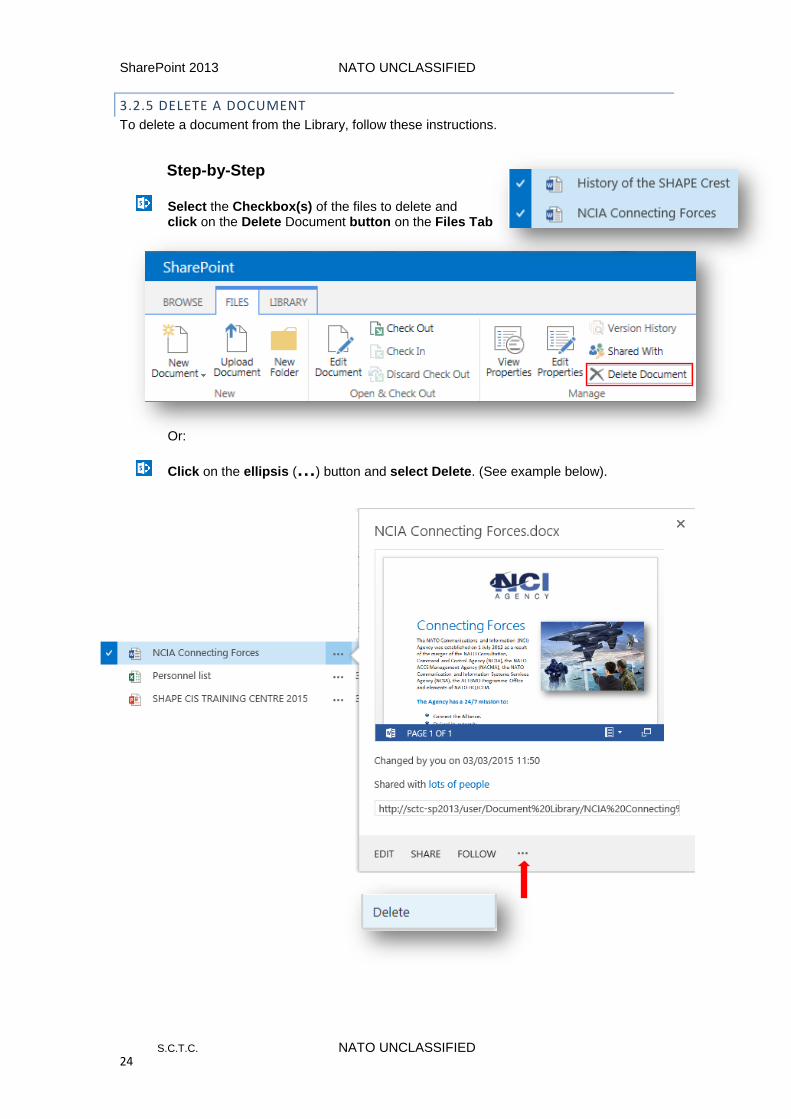
To delete a document from the Library, follow these instructions.
Step-by-Step
Select the Checkbox(s) of the files to delete and click on the Delete Document button on the Files Tab Or:
Click on the ellipsis (…) button and select Delete. (See example below).
SharePoint 2013 NATO UNCLASSIFIED
S.C.T.C. NATO UNCLASSIFIED 25
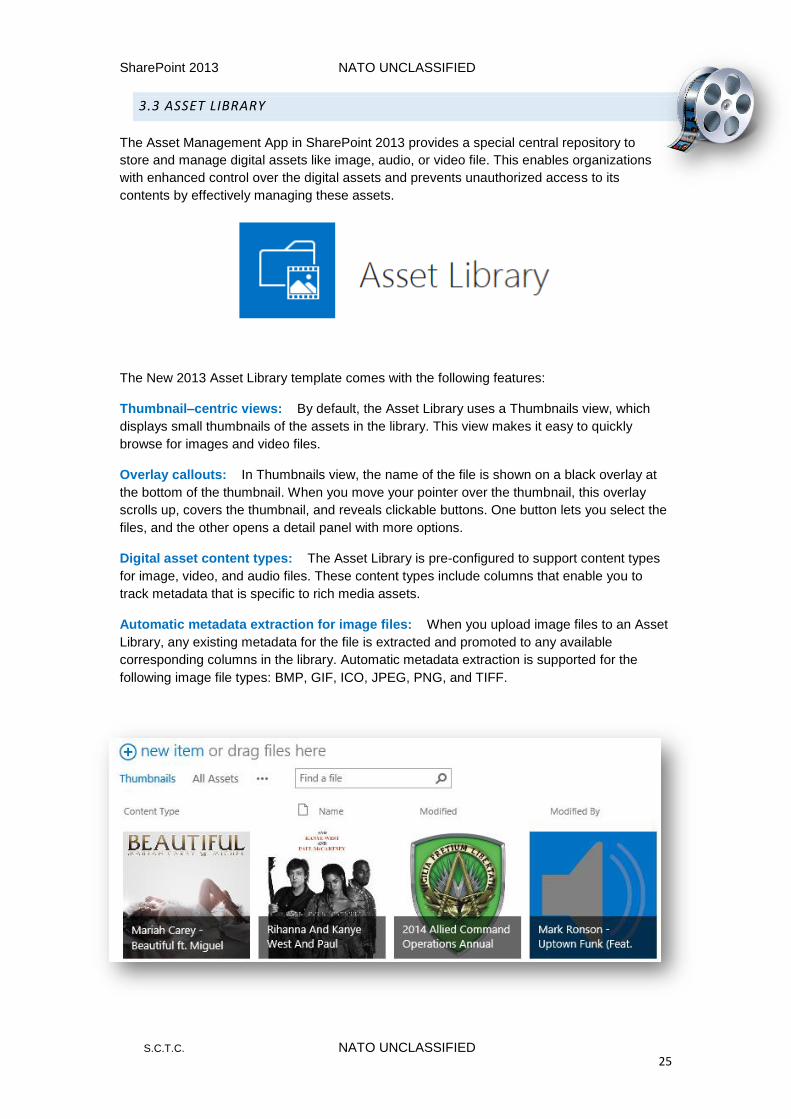
3.3 ASSET LIBRARY
The Asset Management App in SharePoint 2013 provides a special central repository to
store and manage digital assets like image, audio, or video file. This enables organizations
with enhanced control over the digital assets and prevents unauthorized access to its
contents by effectively managing these assets.
The New 2013 Asset Library template comes with the following features:
Thumbnail–centric views: By default, the Asset Library uses a Thumbnails view, which
displays small thumbnails of the assets in the library. This view makes it easy to quickly
browse for images and video files.
Overlay callouts: In Thumbnails view, the name of the file is shown on a black overlay at
the bottom of the thumbnail. When you move your pointer over the thumbnail, this overlay
scrolls up, covers the thumbnail, and reveals clickable buttons. One button lets you select the
files, and the other opens a detail panel with more options.
Digital asset content types: The Asset Library is pre-configured to support content types
for image, video, and audio files. These content types include columns that enable you to
track metadata that is specific to rich media assets.
Automatic metadata extraction for image files: When you upload image files to an Asset
Library, any existing metadata for the file is extracted and promoted to any available
corresponding columns in the library. Automatic metadata extraction is supported for the
following image file types: BMP, GIF, ICO, JPEG, PNG, and TIFF.
SharePoint 2013 NATO UNCLASSIFIED
S.C.T.C. NATO UNCLASSIFIED 26
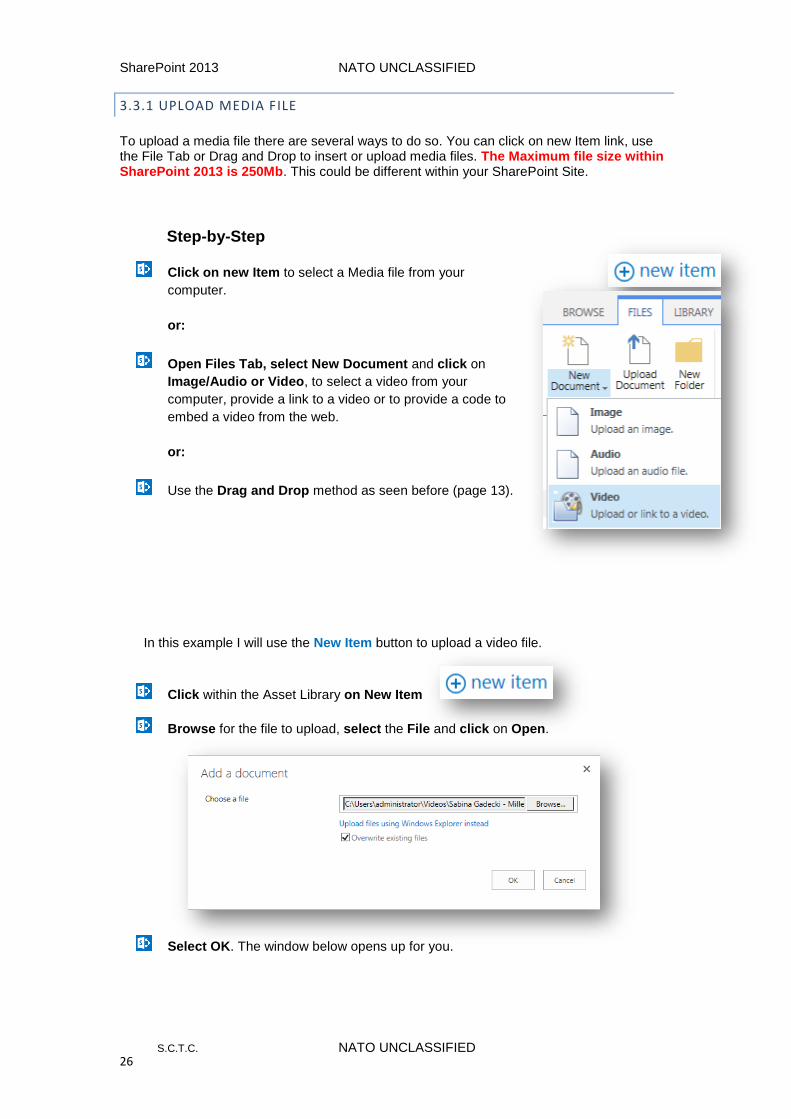
3.3.1 UPLOAD MEDIA FILE
To upload a media file there are several ways to do so. You can click on new Item link, use the File Tab or Drag and Drop to insert or upload media files. The Maximum file size within SharePoint 2013 is 250Mb. This could be different within your SharePoint Site.
Step-by-Step
Click on new Item to select a Media file from your
computer.
or:
Open Files Tab, select New Document and click on
Image/Audio or Video, to select a video from your
computer, provide a link to a video or to provide a code to
embed a video from the web.
or:
Use the Drag and Drop method as seen before (page 13).
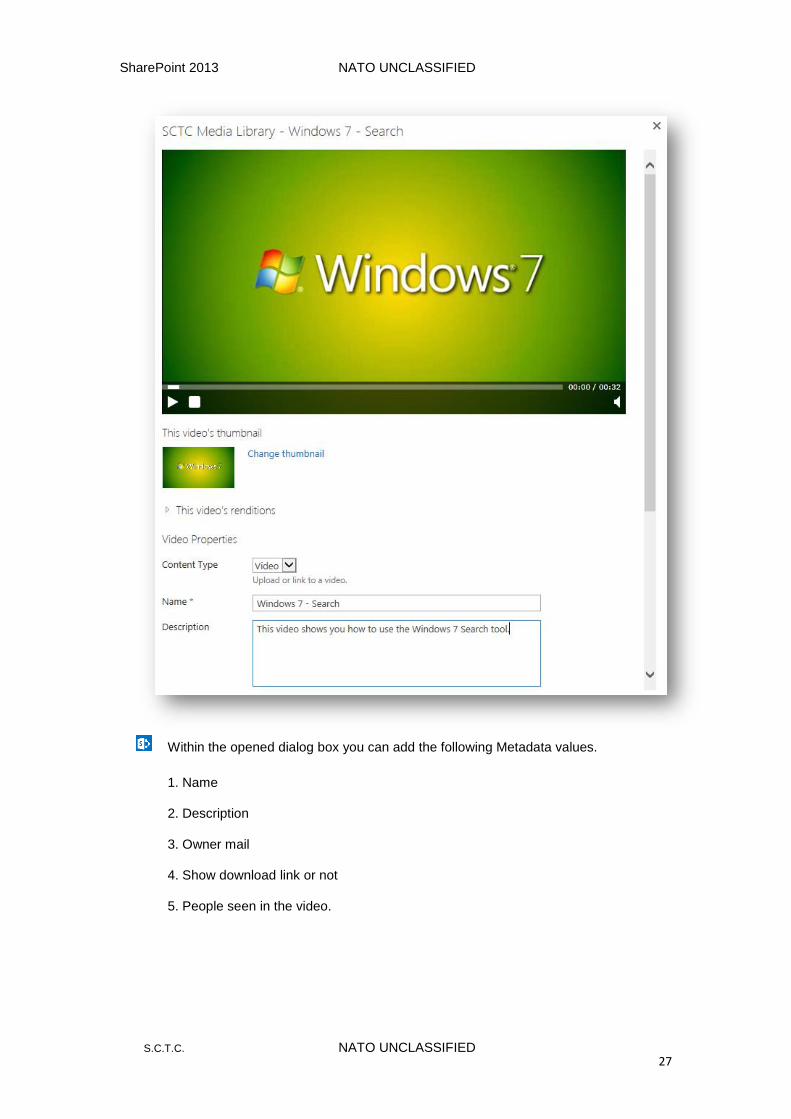
In this example I will use the New Item button to upload a video file.
Click within the Asset Library on New Item
Browse for the file to upload, select the File and click on Open.
Select OK. The window below opens up for you.
SharePoint 2013 NATO UNCLASSIFIED
S.C.T.C. NATO UNCLASSIFIED 27
Within the opened dialog box you can add the following Metadata values.
1. Name
2. Description
3. Owner mail
4. Show download link or not
5. People seen in the video.
SharePoint 2013 NATO UNCLASSIFIED
S.C.T.C. NATO UNCLASSIFIED 28
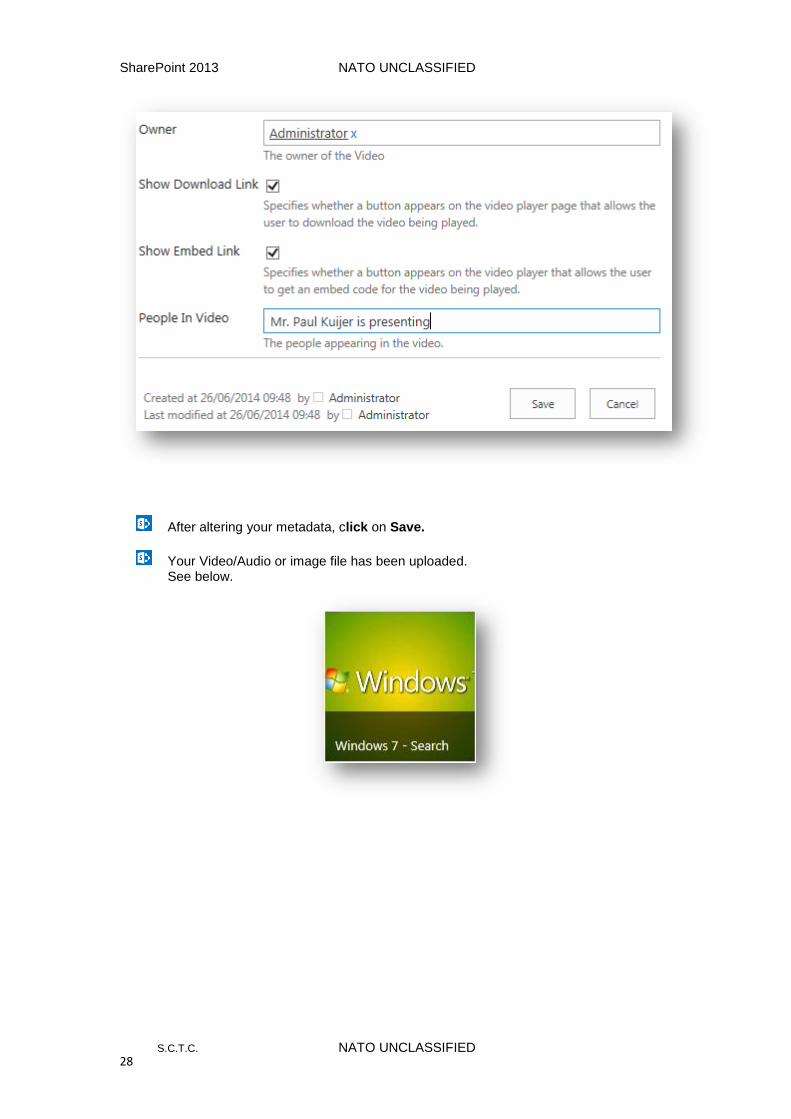
After altering your metadata, click on Save.
Your Video/Audio or image file has been uploaded. See below.
SharePoint 2013 NATO UNCLASSIFIED
S.C.T.C. NATO UNCLASSIFIED 29
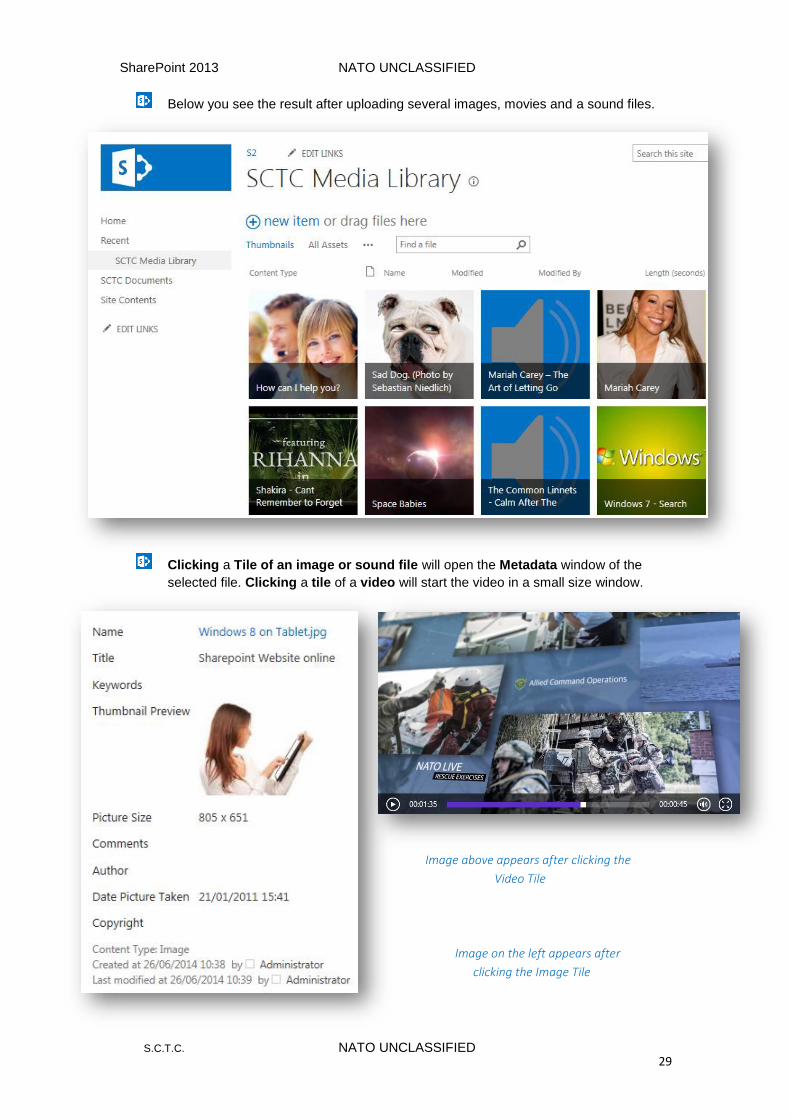
Below you see the result after uploading several images, movies and a sound files.
Clicking a Tile of an image or sound file will open the Metadata window of the
selected file. Clicking a tile of a video will start the video in a small size window.
Image above appears after clicking the
Video Tile
Image on the left appears after
clicking the Image Tile
SharePoint 2013 NATO UNCLASSIFIED
S.C.T.C. NATO UNCLASSIFIED 30
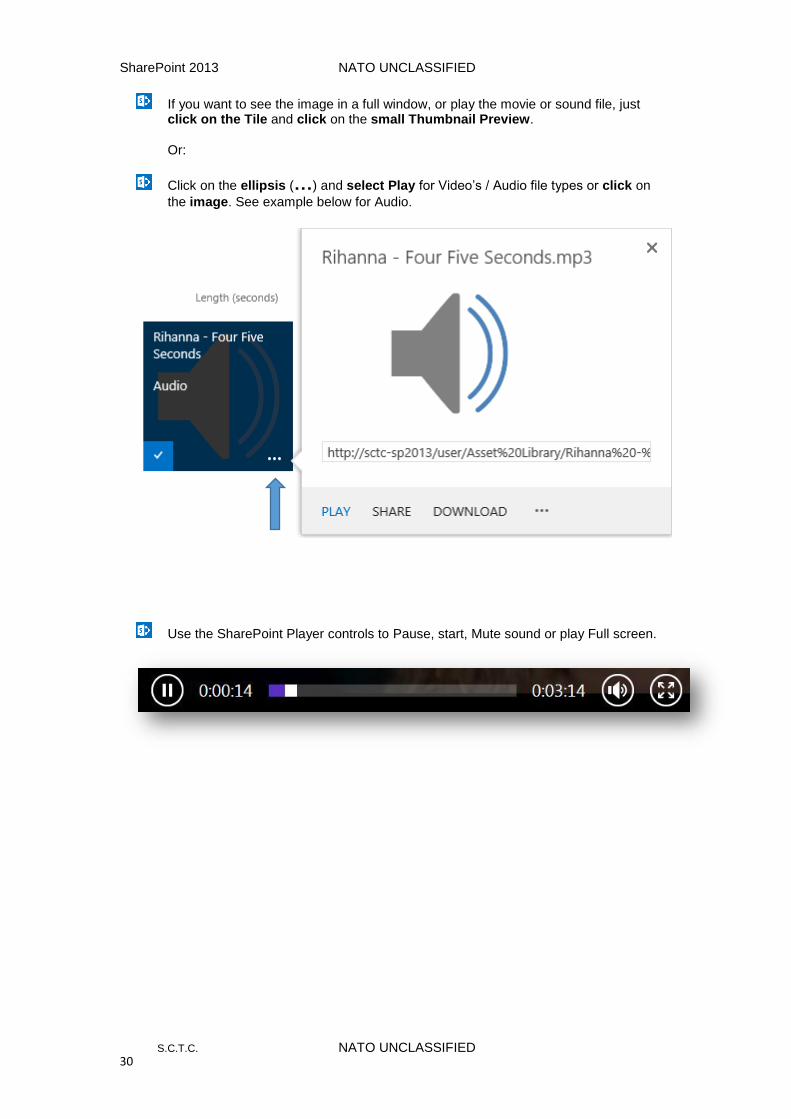
If you want to see the image in a full window, or play the movie or sound file, just click on the Tile and click on the small Thumbnail Preview. Or:
Click on the ellipsis (…) and select Play for Video’s / Audio file types or click on
the image. See example below for Audio.
Use the SharePoint Player controls to Pause, start, Mute sound or play Full screen.
SharePoint 2013 NATO UNCLASSIFIED
S.C.T.C. NATO UNCLASSIFIED 31
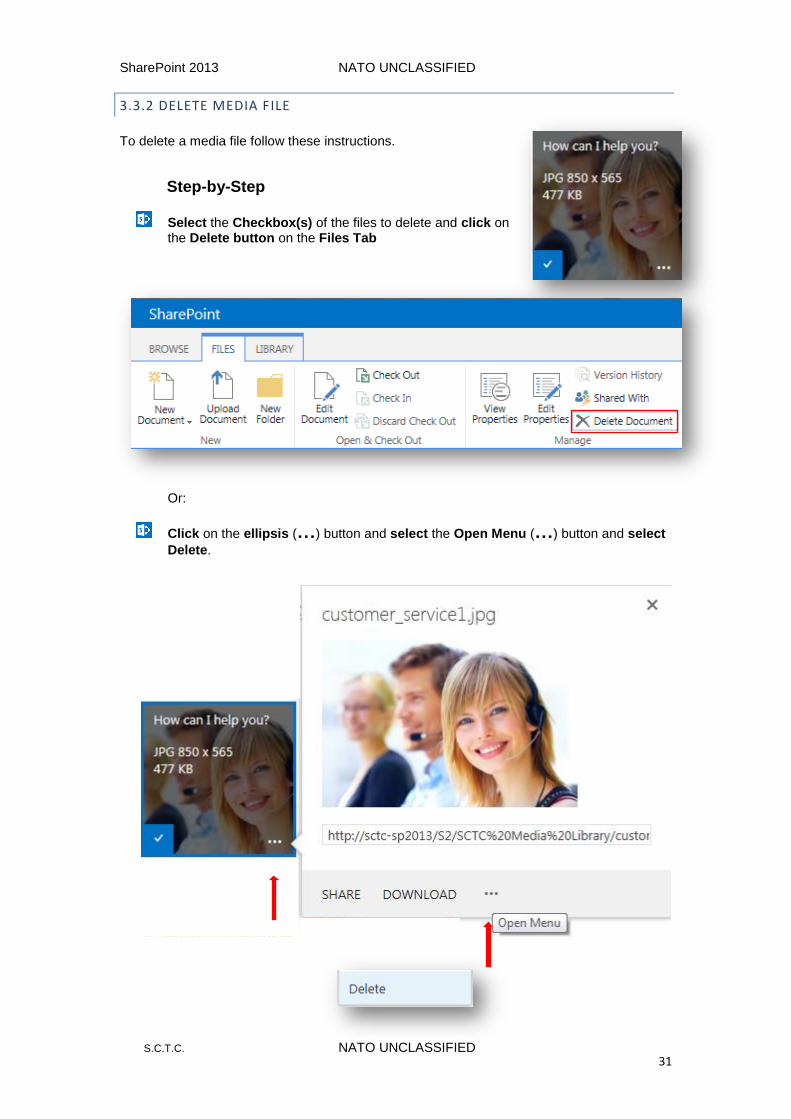
3.3.2 DELETE MEDIA FILE
To delete a media file follow these instructions.
Step-by-Step
Select the Checkbox(s) of the files to delete and click on the Delete button on the Files Tab Or:
Click on the ellipsis (…) button and select the Open Menu (…) button and select
Delete.
SharePoint 2013 NATO UNCLASSIFIED
S.C.T.C. NATO UNCLASSIFIED 32
3.4 PICTURE LIBRARY
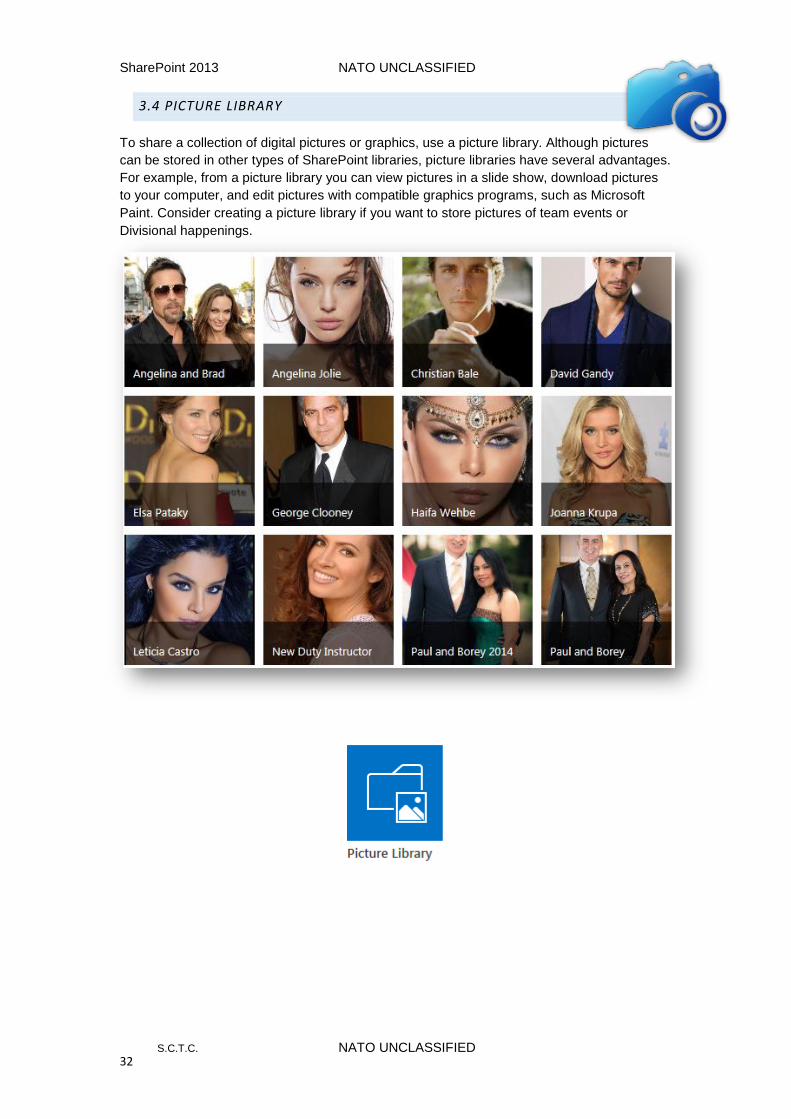
To share a collection of digital pictures or graphics, use a picture library. Although pictures
can be stored in other types of SharePoint libraries, picture libraries have several advantages.
For example, from a picture library you can view pictures in a slide show, download pictures
to your computer, and edit pictures with compatible graphics programs, such as Microsoft
Paint. Consider creating a picture library if you want to store pictures of team events or
Divisional happenings.
SharePoint 2013 NATO UNCLASSIFIED
S.C.T.C. NATO UNCLASSIFIED 33
3.4.1 UPLOAD PICTURES TO THE PICTURE LIBRARY
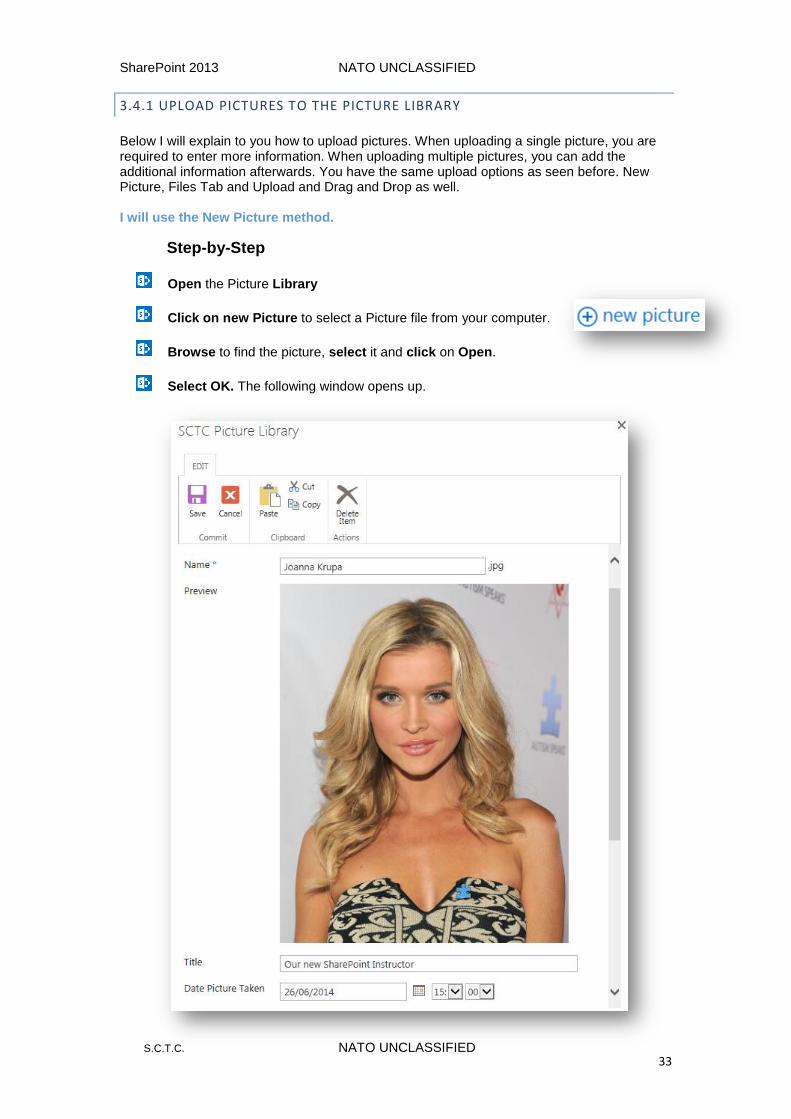
Below I will explain to you how to upload pictures. When uploading a single picture, you are required to enter more information. When uploading multiple pictures, you can add the additional information afterwards. You have the same upload options as seen before. New Picture, Files Tab and Upload and Drag and Drop as well. I will use the New Picture method.
Step-by-Step
Open the Picture Library
Click on new Picture to select a Picture file from your computer.
Browse to find the picture, select it and click on Open.
Select OK. The following window opens up.
SharePoint 2013 NATO UNCLASSIFIED
S.C.T.C. NATO UNCLASSIFIED 34
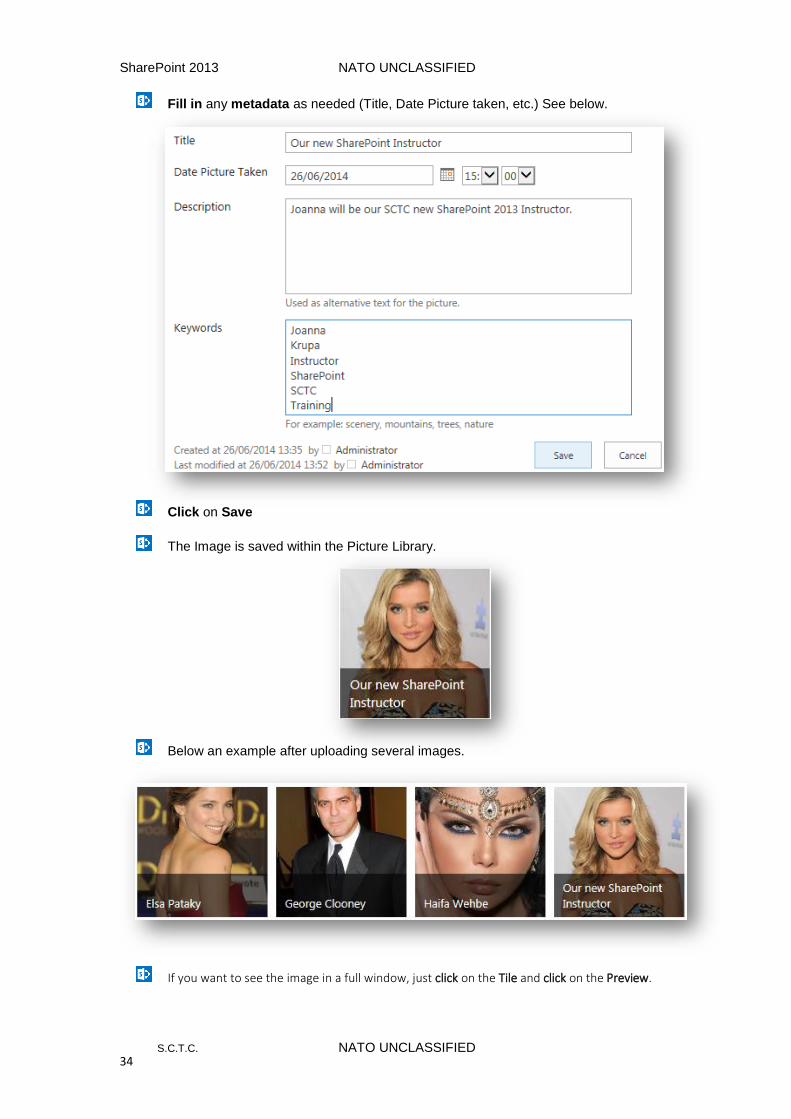
Fill in any metadata as needed (Title, Date Picture taken, etc.) See below.
Click on Save
The Image is saved within the Picture Library.
Below an example after uploading several images.
If you want to see the image in a full window, just click on the Tile and click on the Preview.
SharePoint 2013 NATO UNCLASSIFIED
S.C.T.C. NATO UNCLASSIFIED 35
PICTURE LIBRARY SPECIALS
After creation of your Picture Library and uploading of pictures/images, there are several actions available like Edit, Delete, Download a Copy and a Slideshow view. In the following chapter I will show you how to edit (change) a photo, change the view of your Library, and how to download a copy.
3.4.2 EDIT USING MS-OFFICE PICTURE MANAGER
Step-by-Step
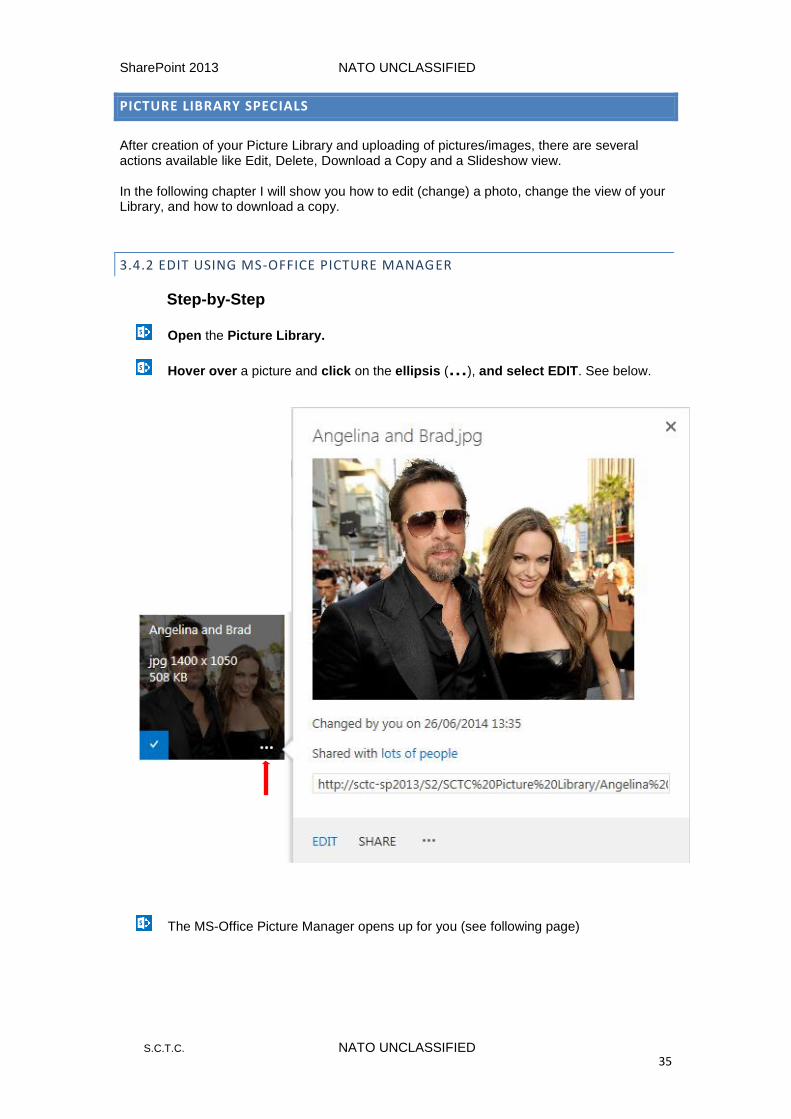
Open the Picture Library.
Hover over a picture and click on the ellipsis (…), and select EDIT. See below.
The MS-Office Picture Manager opens up for you (see following page)

SharePoint 2013 NATO UNCLASSIFIED
S.C.T.C. NATO UNCLASSIFIED 36
Select your changes (Crop, size, colour, etc.) and click on Save and Close.
Below example has been cropped and changed from colour to black and white.
SharePoint 2013 NATO UNCLASSIFIED
S.C.T.C. NATO UNCLASSIFIED 37
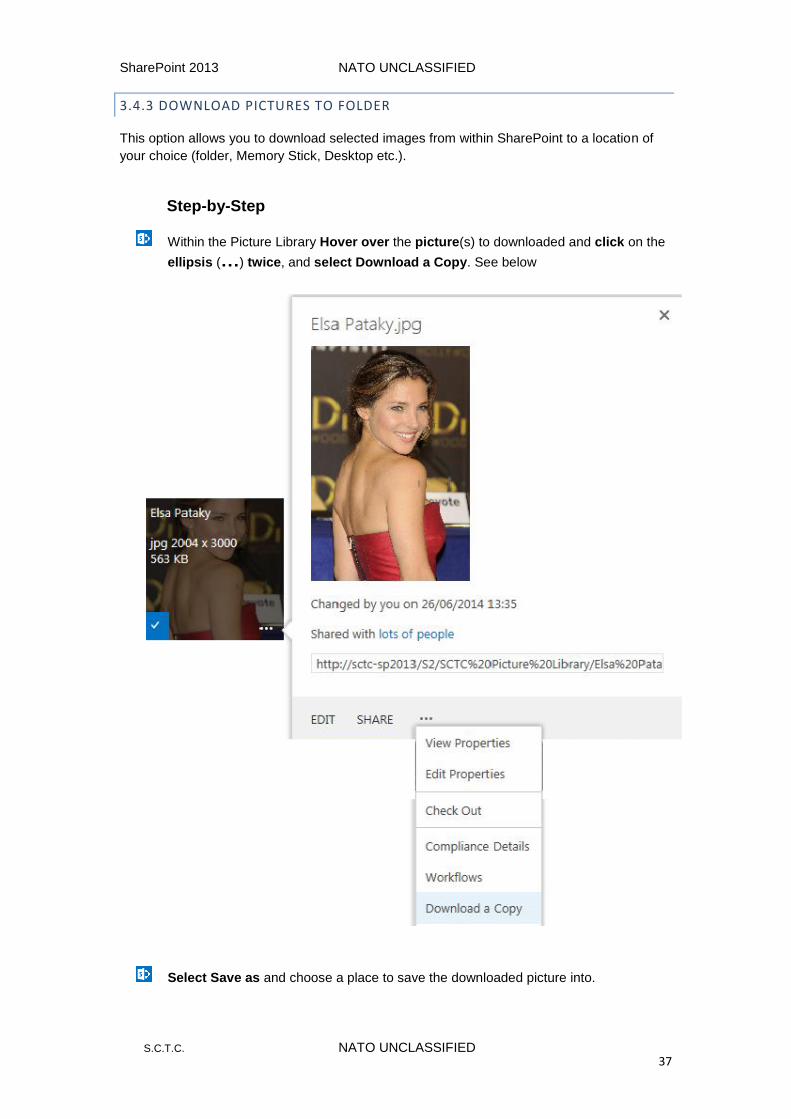
3.4.3 DOWNLOAD PICTURES TO FOLDER
This option allows you to download selected images from within SharePoint to a location of
your choice (folder, Memory Stick, Desktop etc.).
Step-by-Step
Within the Picture Library Hover over the picture(s) to downloaded and click on the
ellipsis (…) twice, and select Download a Copy. See below
Select Save as and choose a place to save the downloaded picture into.
SharePoint 2013 NATO UNCLASSIFIED
S.C.T.C. NATO UNCLASSIFIED 38
3.4.4 PICTURES SLIDES VIEW
It is possible for you and your visitors to show all pictures within a Slideshow format that
allows you to click through a series of large versions of the photos.
Step-by-Step
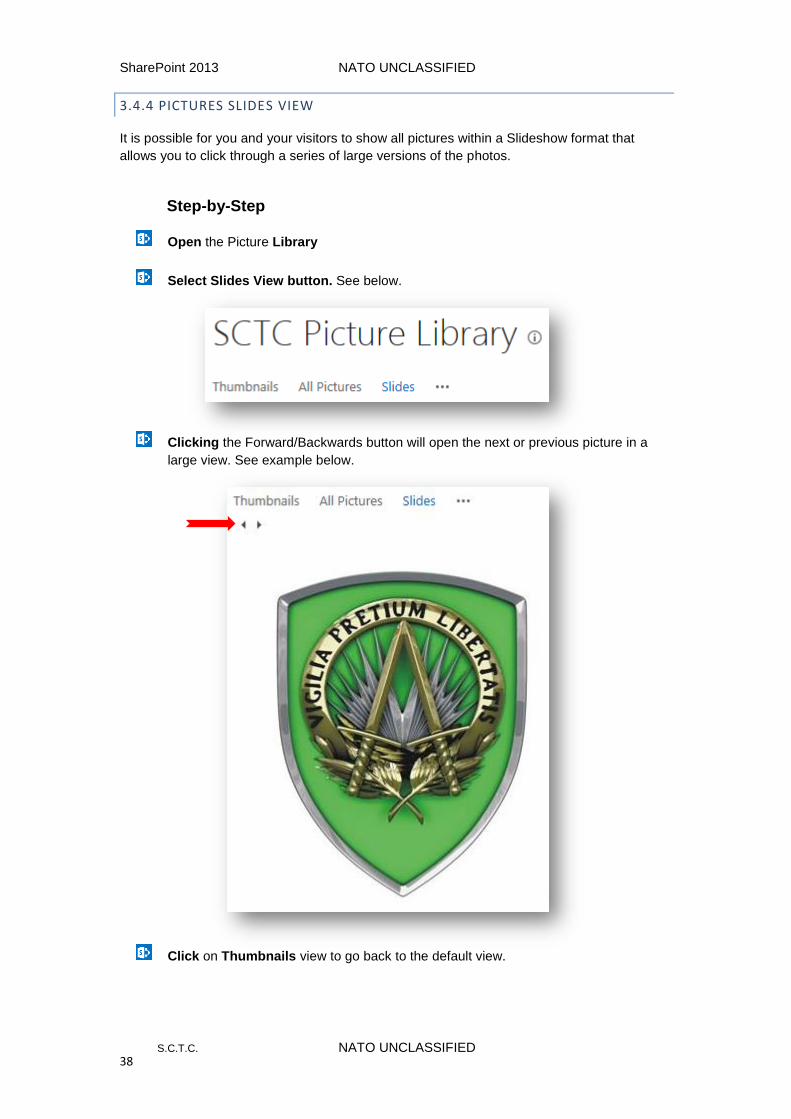
Open the Picture Library
Select Slides View button. See below.
Clicking the Forward/Backwards button will open the next or previous picture in a
large view. See example below.
Click on Thumbnails view to go back to the default view.
SharePoint 2013 NATO UNCLASSIFIED
S.C.T.C. NATO UNCLASSIFIED 39
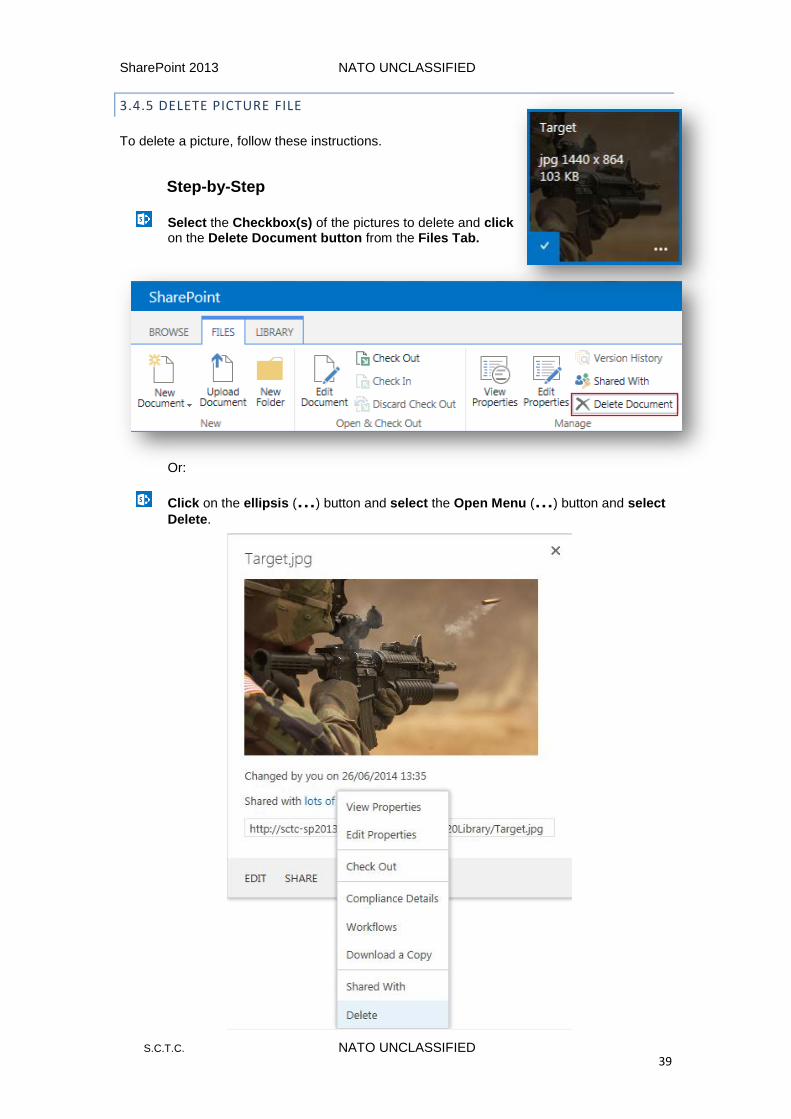
3.4.5 DELETE PICTURE FILE
To delete a picture, follow these instructions.
Step-by-Step
Select the Checkbox(s) of the pictures to delete and click on the Delete Document button from the Files Tab. Or:
Click on the ellipsis (…) button and select the Open Menu (…) button and select
Delete.
SharePoint 2013 NATO UNCLASSIFIED
S.C.T.C. NATO UNCLASSIFIED 40
3.5 REPORT LIBRARY
To simplify the creation, management and delivery of web pages, documents and key
performance indicators (KPI) of metrics and goals, use a report library. The report library is a
central place where you can create and save reports, such as Excel workbooks. When you
publish an Excel workbook to a reports library, it is single-click enabled to open in browser
view, which is a convenient way to see the workbook without adding it to a Web Parts Page.
Minor versions are set by default within the Report Library, meaning that files are not indexed
and not searchable. Microsoft calls this Draft version. To publish select “Publish a Major
Version”.
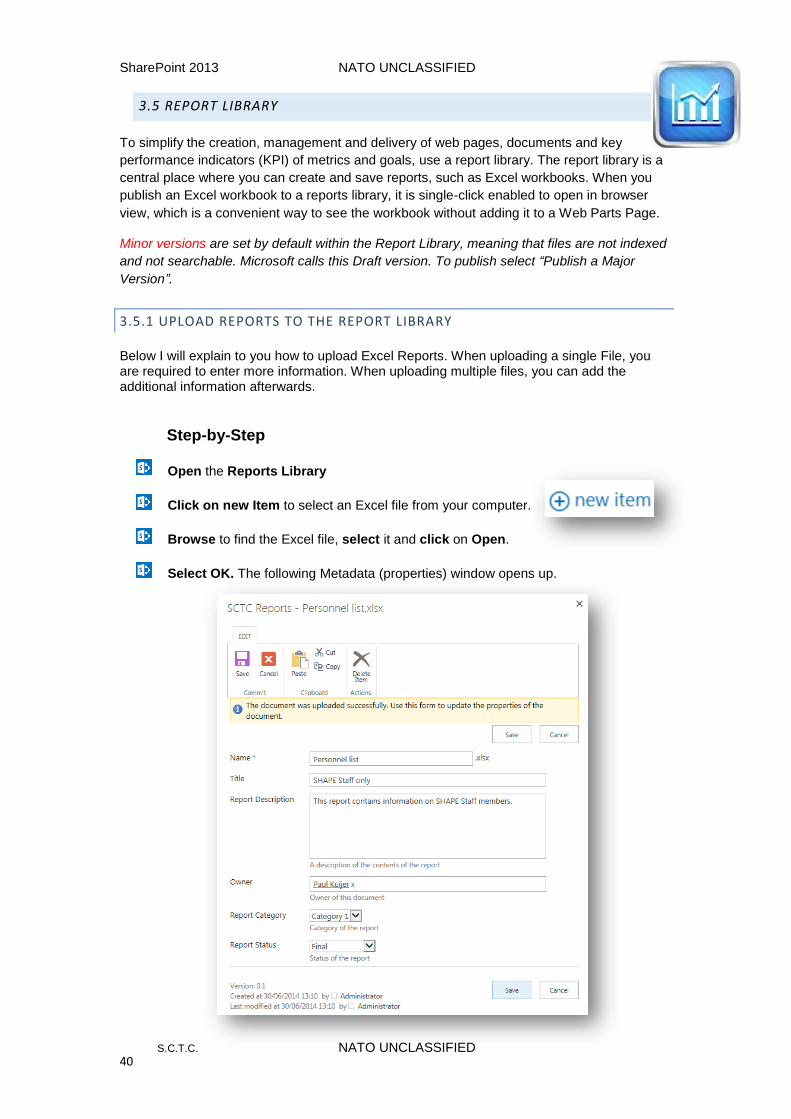
3.5.1 UPLOAD REPORTS TO THE REPORT LIBRARY
Below I will explain to you how to upload Excel Reports. When uploading a single File, you are required to enter more information. When uploading multiple files, you can add the additional information afterwards.
Step-by-Step
Open the Reports Library
Click on new Item to select an Excel file from your computer.
Browse to find the Excel file, select it and click on Open.
Select OK. The following Metadata (properties) window opens up.
SharePoint 2013 NATO UNCLASSIFIED
S.C.T.C. NATO UNCLASSIFIED 41
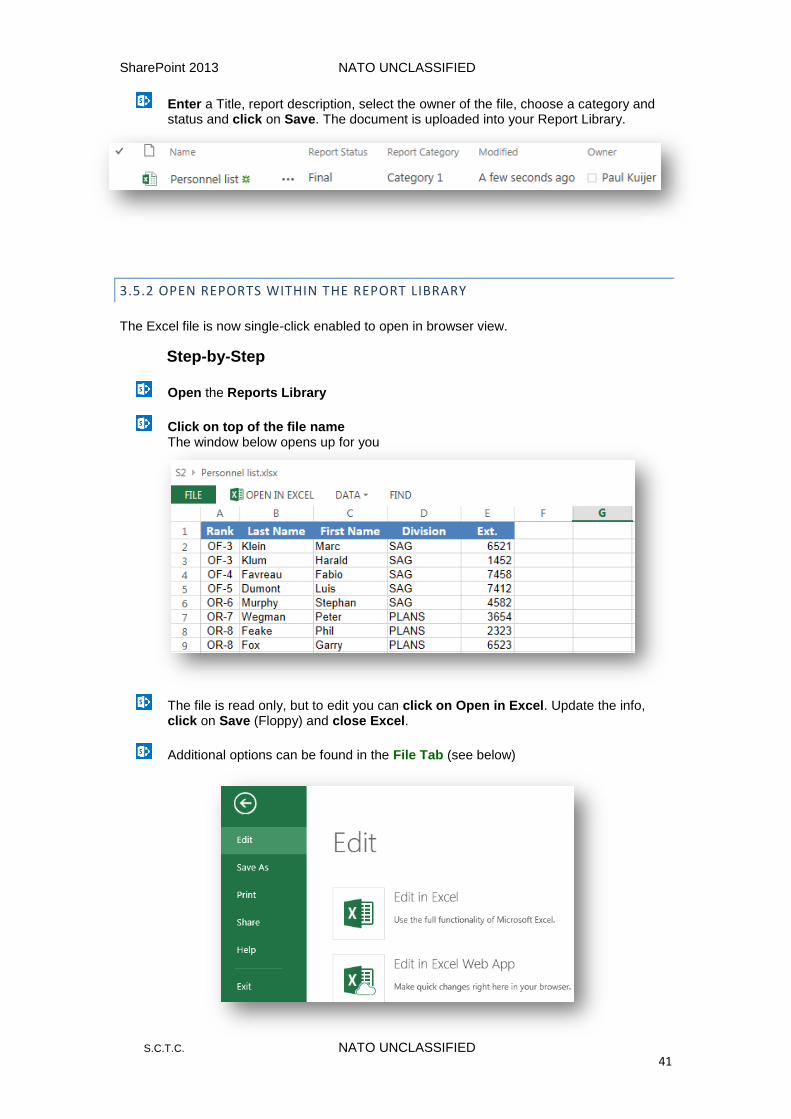
Enter a Title, report description, select the owner of the file, choose a category and status and click on Save. The document is uploaded into your Report Library.
3.5.2 OPEN REPORTS WITHIN THE REPORT LIBRARY
The Excel file is now single-click enabled to open in browser view.
Step-by-Step
Open the Reports Library
Click on top of the file name The window below opens up for you
The file is read only, but to edit you can click on Open in Excel. Update the info, click on Save (Floppy) and close Excel.
Additional options can be found in the File Tab (see below)
SharePoint 2013 NATO UNCLASSIFIED
S.C.T.C. NATO UNCLASSIFIED 42
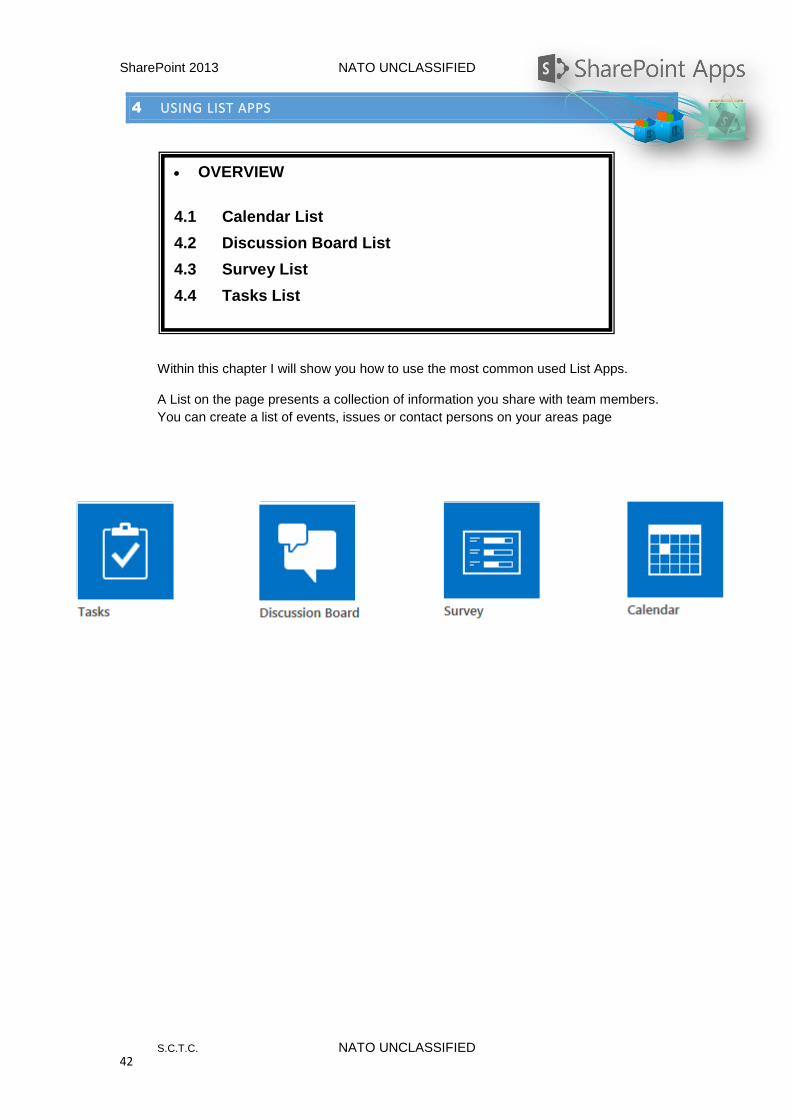
4 USING LIST APPS
Within this chapter I will show you how to use the most common used List Apps.
A List on the page presents a collection of information you share with team members.
You can create a list of events, issues or contact persons on your areas page
OVERVIEW
4.1 Calendar List
4.2 Discussion Board List
4.3 Survey List
4.4 Tasks List
SharePoint 2013 NATO UNCLASSIFIED
S.C.T.C. NATO UNCLASSIFIED 43
4.1 CALENDAR LIST
It is possible within your SharePoint Site (Division, Branch, and Section) to have a
Calendar. The Calendar can be updated and/or filled with events, appointments,
meetings etc.
4.1.1 CREATE EVENTS
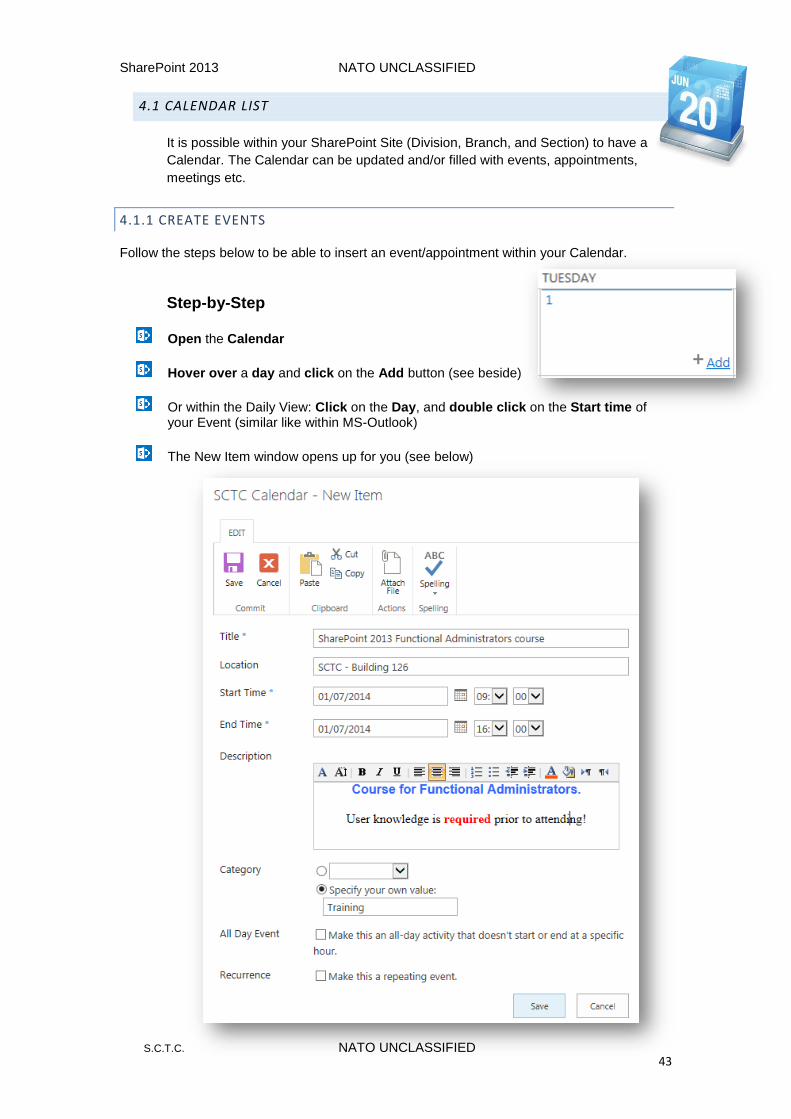
Follow the steps below to be able to insert an event/appointment within your Calendar.
Step-by-Step
Open the Calendar
Hover over a day and click on the Add button (see beside)
Or within the Daily View: Click on the Day, and double click on the Start time of your Event (similar like within MS-Outlook)
The New Item window opens up for you (see below)
SharePoint 2013 NATO UNCLASSIFIED
S.C.T.C. NATO UNCLASSIFIED 44
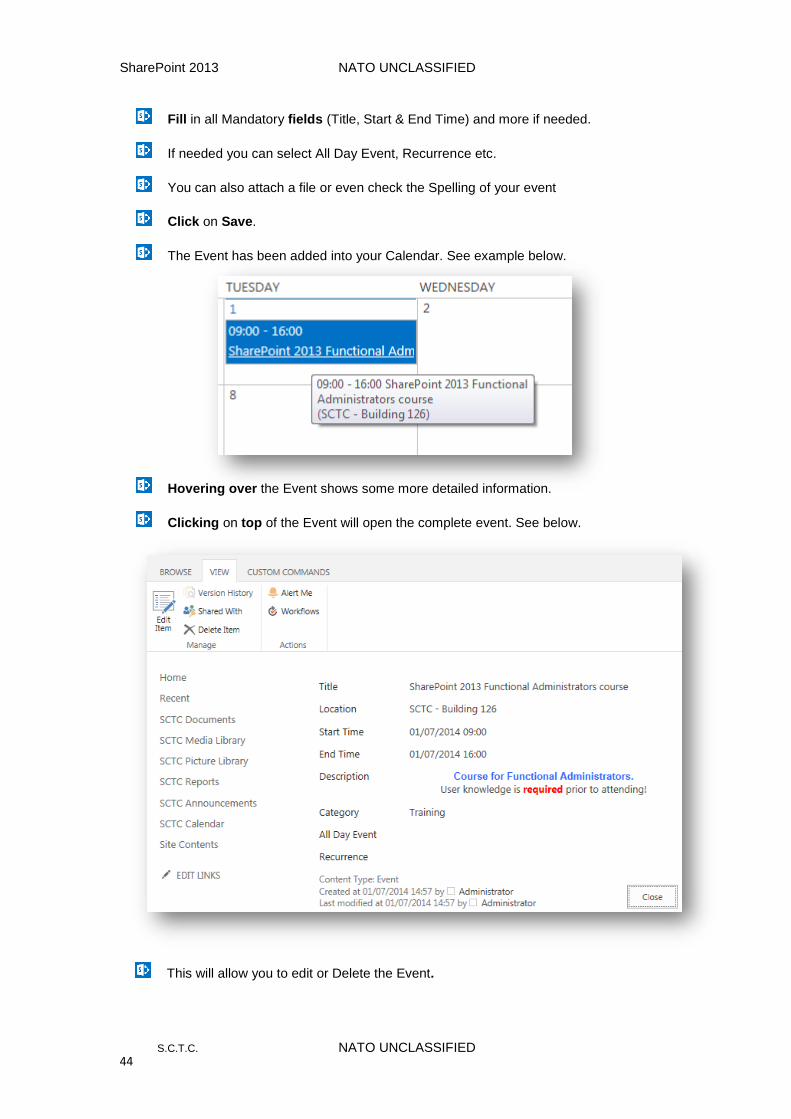
Fill in all Mandatory fields (Title, Start & End Time) and more if needed.
If needed you can select All Day Event, Recurrence etc.
You can also attach a file or even check the Spelling of your event
Click on Save.
The Event has been added into your Calendar. See example below.
Hovering over the Event shows some more detailed information.
Clicking on top of the Event will open the complete event. See below.
This will allow you to edit or Delete the Event.

SharePoint 2013 NATO UNCLASSIFIED
S.C.T.C. NATO UNCLASSIFIED 45
NOTE: On the Events and Calendar Tabs you have the functions available to
create new Events, or change the view of your Calendar.
SharePoint 2013 NATO UNCLASSIFIED
S.C.T.C. NATO UNCLASSIFIED 46
4.1.2 CONNECT CALENDAR TO MS-OUTLOOK
To view and update a shared Calendar in the SharePoint Portal in MS-Outlook, you can
connect the SharePoint Calendar to MS-Outlook. It’s also then possible to copy any
appointments or events from the MS-Outlook Calendar into your SharePoint Calendar and
vice versa.
Step-by-Step
Open the Calendar
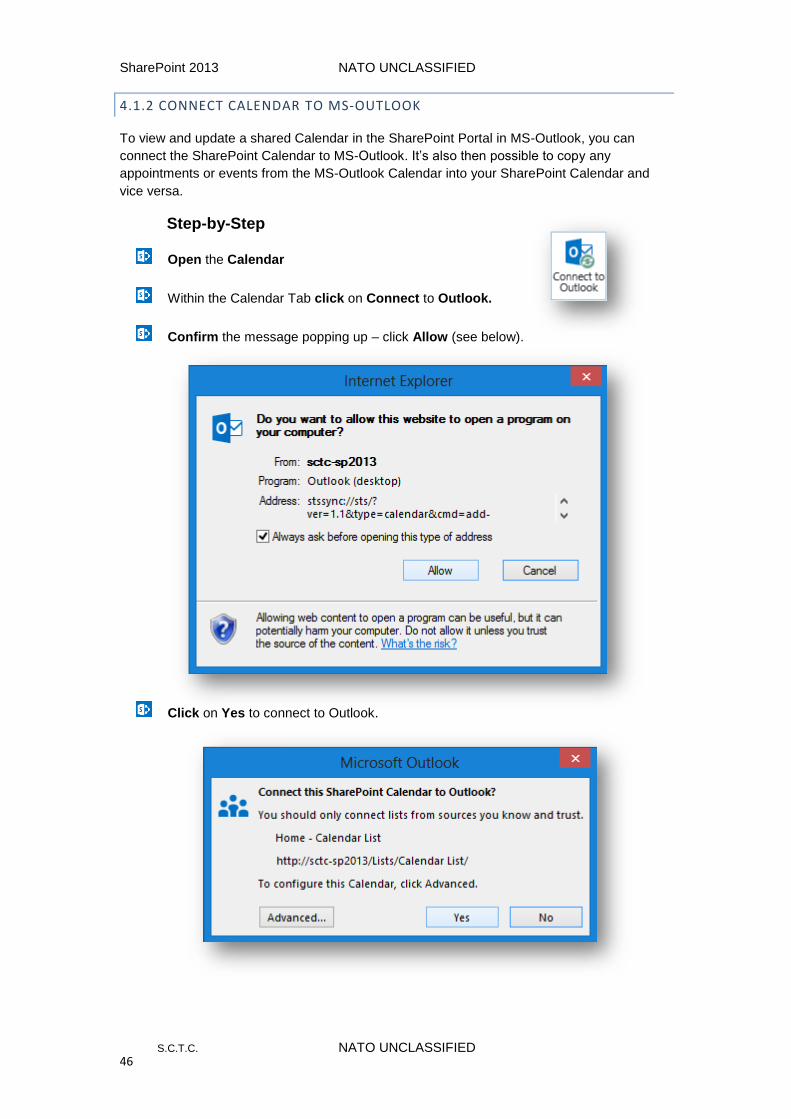
Within the Calendar Tab click on Connect to Outlook.
Confirm the message popping up – click Allow (see below).
Click on Yes to connect to Outlook.
SharePoint 2013 NATO UNCLASSIFIED
S.C.T.C. NATO UNCLASSIFIED 47
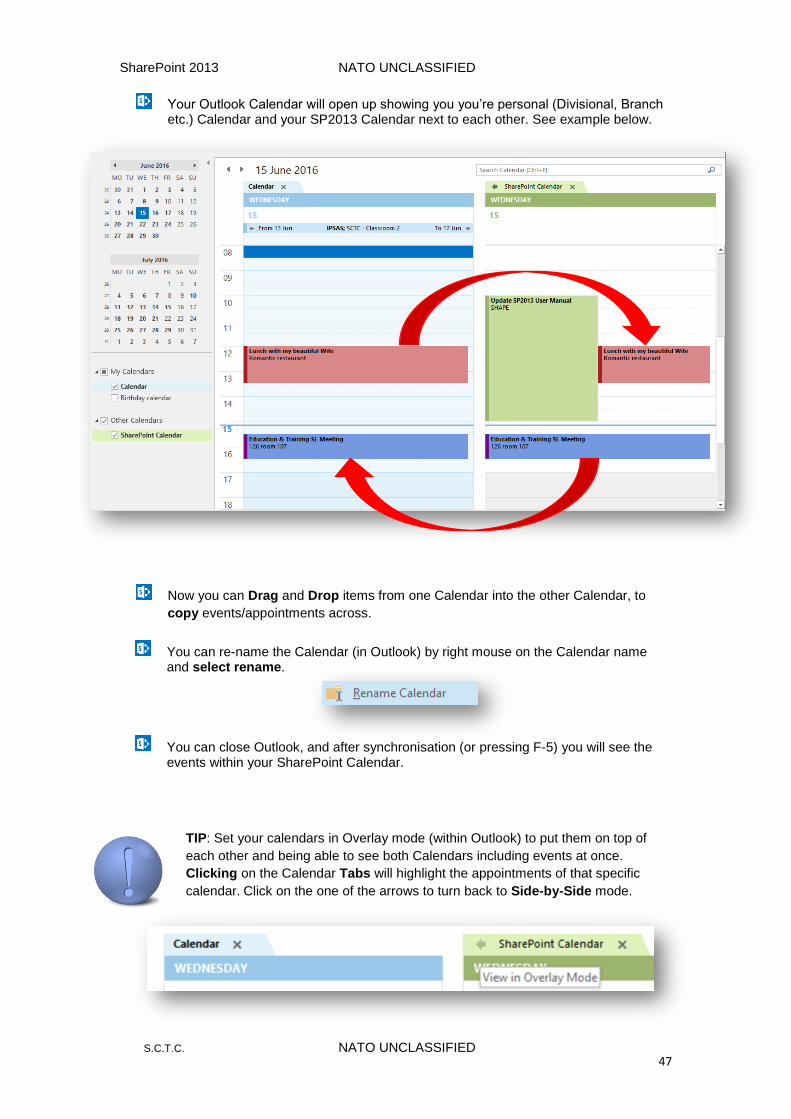
Your Outlook Calendar will open up showing you you’re personal (Divisional, Branch etc.) Calendar and your SP2013 Calendar next to each other. See example below.
Now you can Drag and Drop items from one Calendar into the other Calendar, to
copy events/appointments across.
You can re-name the Calendar (in Outlook) by right mouse on the Calendar name and select rename.
You can close Outlook, and after synchronisation (or pressing F-5) you will see the events within your SharePoint Calendar.
TIP: Set your calendars in Overlay mode (within Outlook) to put them on top of
each other and being able to see both Calendars including events at once.
Clicking on the Calendar Tabs will highlight the appointments of that specific
calendar. Click on the one of the arrows to turn back to Side-by-Side mode.
SharePoint 2013 NATO UNCLASSIFIED
S.C.T.C. NATO UNCLASSIFIED 48
4.2 DISCUSSION BOARD LIST
A discussion board (which is a list) is a place to share information and discuss
topics with other people. You can use discussion boards for a variety of purposes,
such as brainstorming goals for your project or discussing a common interest. When
you create a discussion topic or reply to an existing discussion, you can format your
text, insert a hyperlink or table, and link to a picture on the Web.
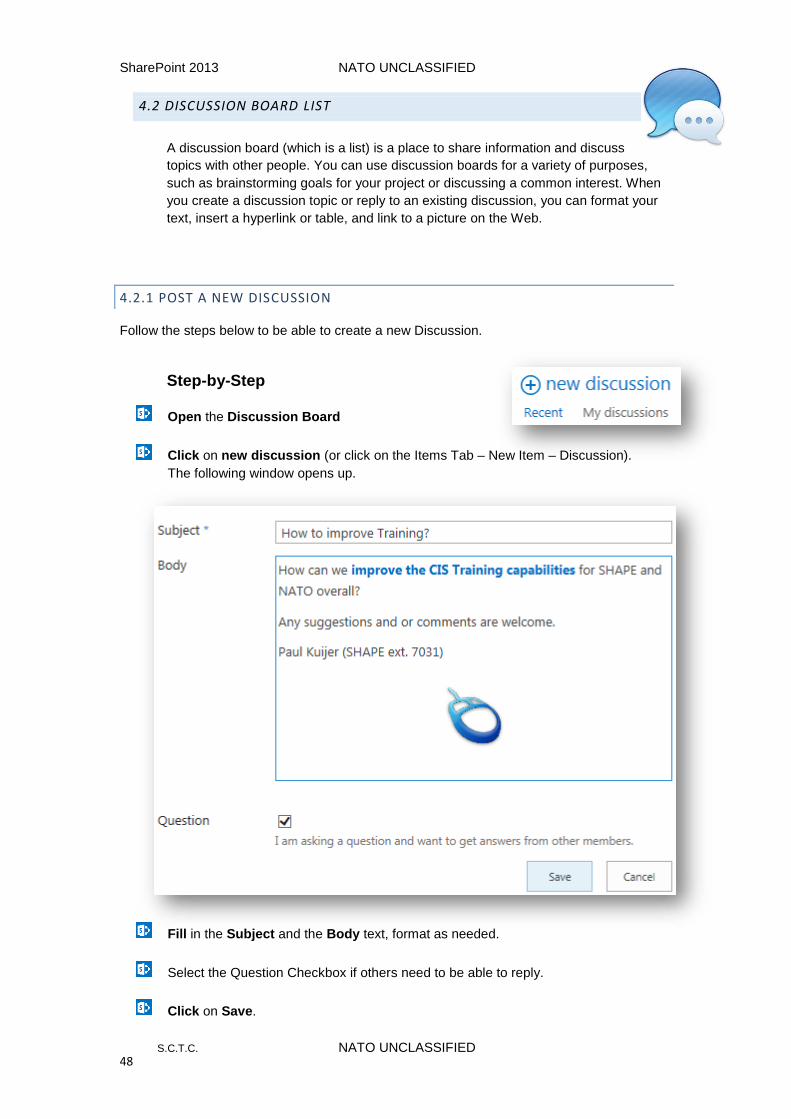
4.2.1 POST A NEW DISCUSSION
Follow the steps below to be able to create a new Discussion.
Step-by-Step
Open the Discussion Board
Click on new discussion (or click on the Items Tab – New Item – Discussion).
The following window opens up.
Fill in the Subject and the Body text, format as needed.
Select the Question Checkbox if others need to be able to reply.
Click on Save.
SharePoint 2013 NATO UNCLASSIFIED
S.C.T.C. NATO UNCLASSIFIED 49
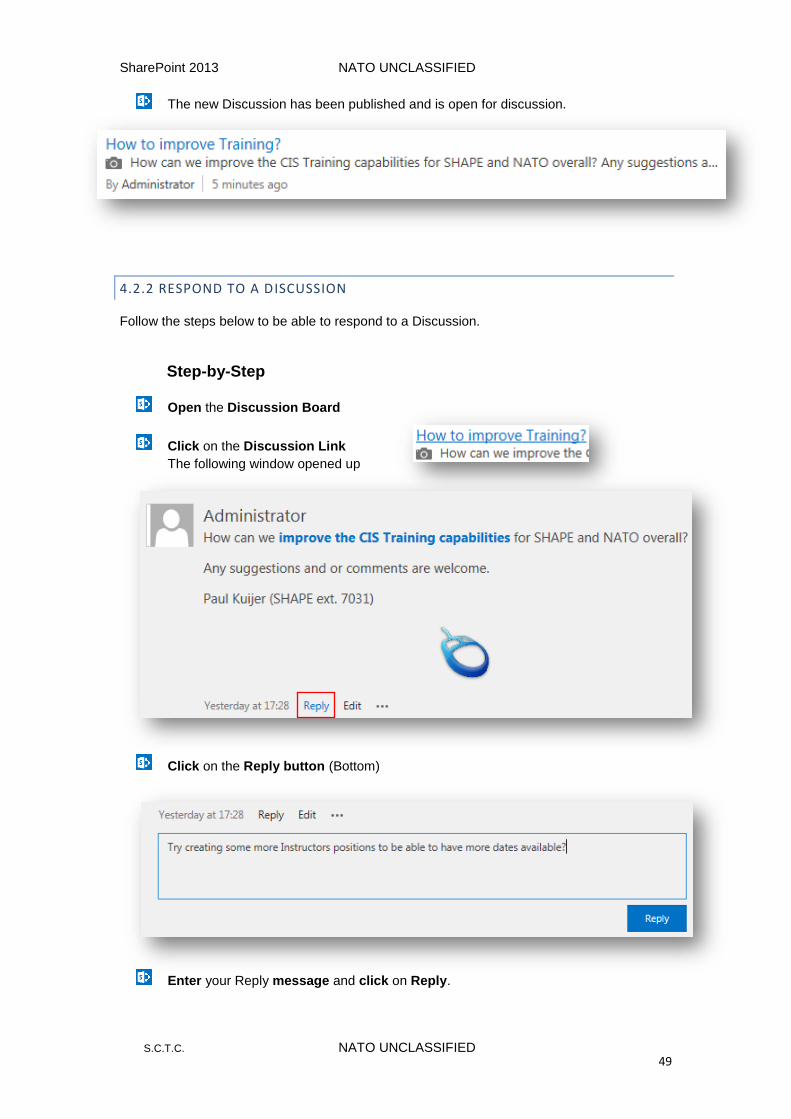
The new Discussion has been published and is open for discussion.
4.2.2 RESPOND TO A DISCUSSION
Follow the steps below to be able to respond to a Discussion.
Step-by-Step
Open the Discussion Board
Click on the Discussion Link
The following window opened up
Click on the Reply button (Bottom)
Enter your Reply message and click on Reply.
SharePoint 2013 NATO UNCLASSIFIED
S.C.T.C. NATO UNCLASSIFIED 50
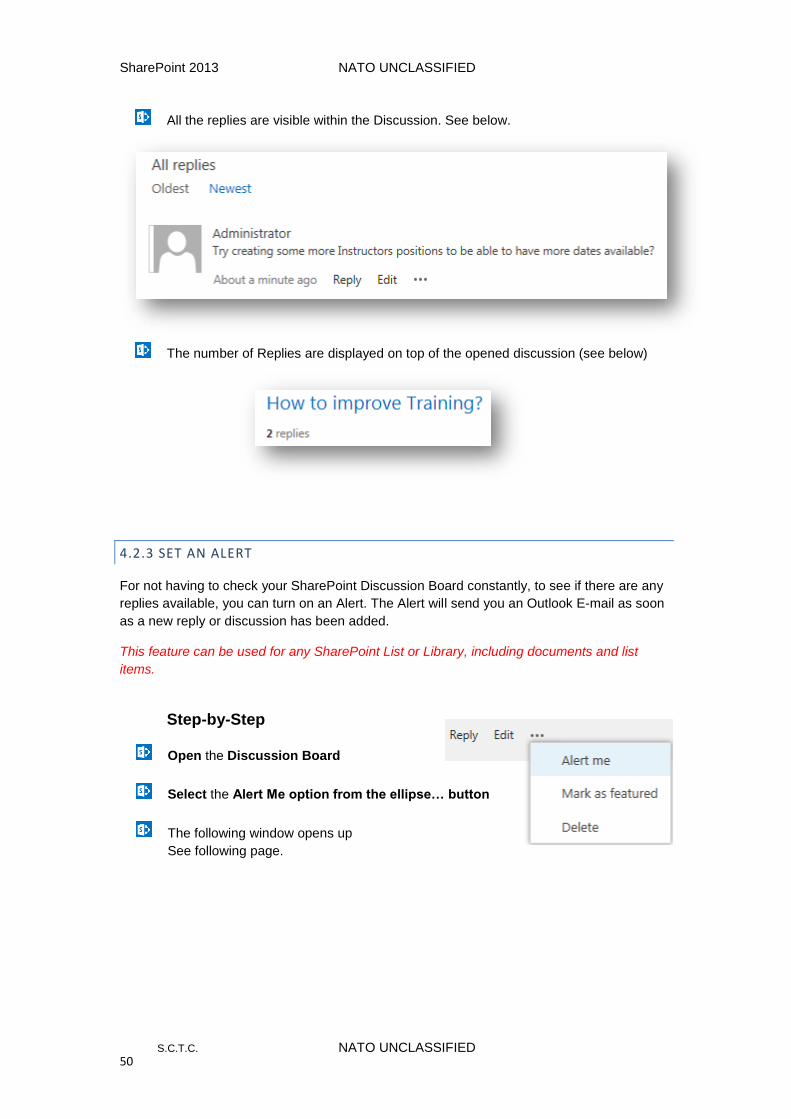
All the replies are visible within the Discussion. See below.
The number of Replies are displayed on top of the opened discussion (see below)
4.2.3 SET AN ALERT
For not having to check your SharePoint Discussion Board constantly, to see if there are any
replies available, you can turn on an Alert. The Alert will send you an Outlook E-mail as soon
as a new reply or discussion has been added.
This feature can be used for any SharePoint List or Library, including documents and list
items.
Step-by-Step
Open the Discussion Board
Select the Alert Me option from the ellipse… button
The following window opens up
See following page.
SharePoint 2013 NATO UNCLASSIFIED
S.C.T.C. NATO UNCLASSIFIED 51
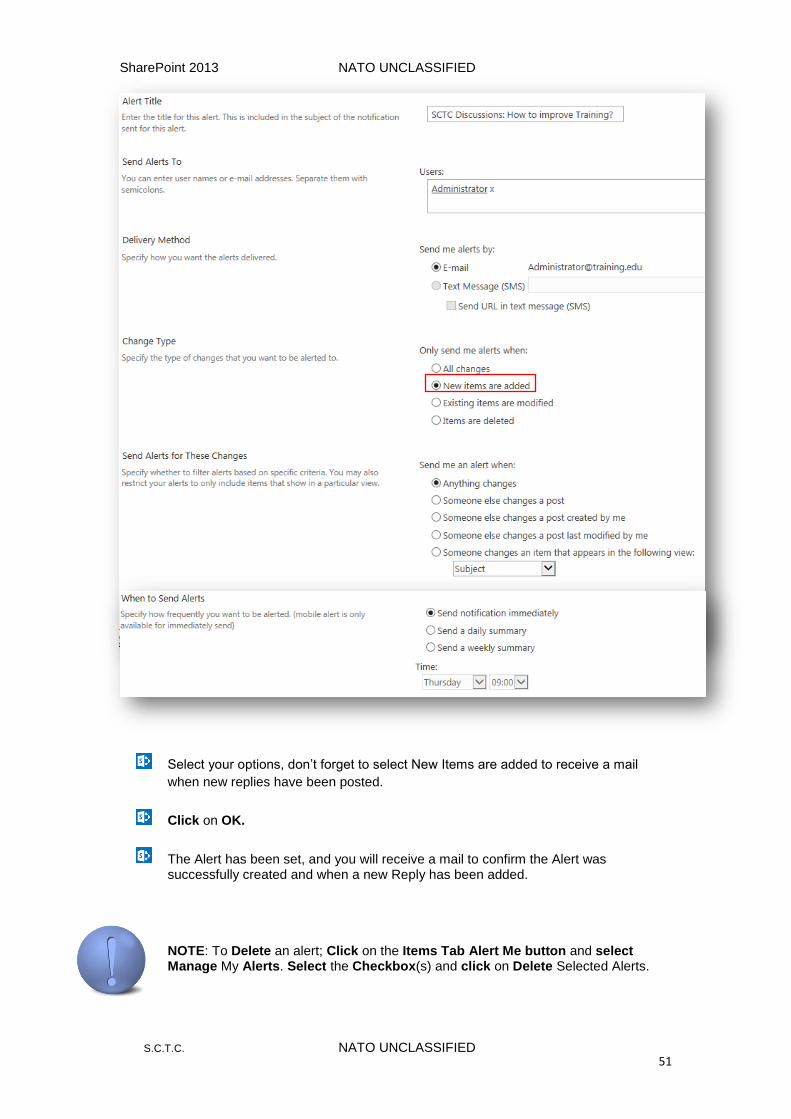
Select your options, don’t forget to select New Items are added to receive a mail
when new replies have been posted.
Click on OK.
The Alert has been set, and you will receive a mail to confirm the Alert was successfully created and when a new Reply has been added. NOTE: To Delete an alert; Click on the Items Tab Alert Me button and select Manage My Alerts. Select the Checkbox(s) and click on Delete Selected Alerts.
SharePoint 2013 NATO UNCLASSIFIED
S.C.T.C. NATO UNCLASSIFIED 52
4.3 SURVEY LIST
The Survey List is used for an appraisal/evaluation/enquiry like
Customer Satisfactory or like an Evaluation form that can be filled in by Staff
members.
In order for you to respond to the survey, you must have Contribute permission to
the survey or to the site that contains the survey. Ask your Functional Administrator if
you are not able to fill in the survey and need permissions.
4.3.1 RESPOND TO A SURVEY
The instruction below shows you how you can respond to a survey. Only users with
Contribute permissions on the Site or this Survey can respond!
Step-by-Step
Open the Survey (click on top)
Select Respond to this Survey (see window below)
The first question opens up.
SharePoint 2013 NATO UNCLASSIFIED
S.C.T.C. NATO UNCLASSIFIED 53
Select Yes or No in the Drop Down box (Yes will directly open the last window)
Select No and click on Next.
The next window opens up.
Enter your Full Name
Rate the questions by selecting the corresponding radio buttons
Click on Next (if Branching logic has been used for this question)
Enter comments if needed and click on Finish.
SharePoint 2013 NATO UNCLASSIFIED
S.C.T.C. NATO UNCLASSIFIED 54
4.3.2 REVIEW SURVEY RESPONSES
The instruction below shows you how you can Review given responses. Manually and/or
Graphically.
Step-by-Step
Open the Survey (click on top)
Click on Graphical Summary of responses Next window opens up.
NOTE: Clicking show all responses will open a window allowing you to see all
responses separately.
SharePoint 2013 NATO UNCLASSIFIED
S.C.T.C. NATO UNCLASSIFIED 55
4.4 TASKS LIST
The Task List can be used to track a task or group of tasks of work items that
you or your team (Division, Branch, Section) needs to complete.
4.4.1 CREATE NEW TASK
Follow the steps below to create new tasks.
Step-by-Step
Open the Tasks List
Click on New Task
The following window opens up.
Fill in all details and assign it to the owner of the task
Click on SHOW MORE, if more information needs to be added.
SharePoint 2013 NATO UNCLASSIFIED
S.C.T.C. NATO UNCLASSIFIED 56
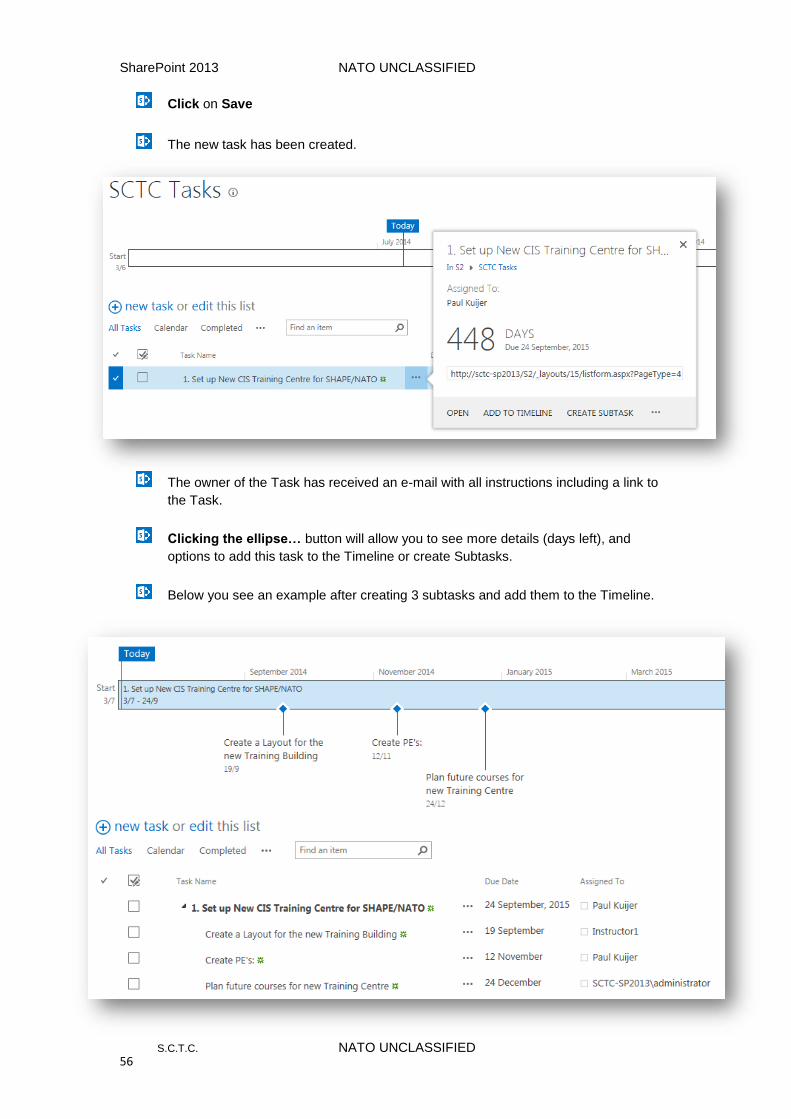
Click on Save
The new task has been created.
The owner of the Task has received an e-mail with all instructions including a link to
the Task.
Clicking the ellipse… button will allow you to see more details (days left), and
options to add this task to the Timeline or create Subtasks.
Below you see an example after creating 3 subtasks and add them to the Timeline.
SharePoint 2013 NATO UNCLASSIFIED
S.C.T.C. NATO UNCLASSIFIED 57
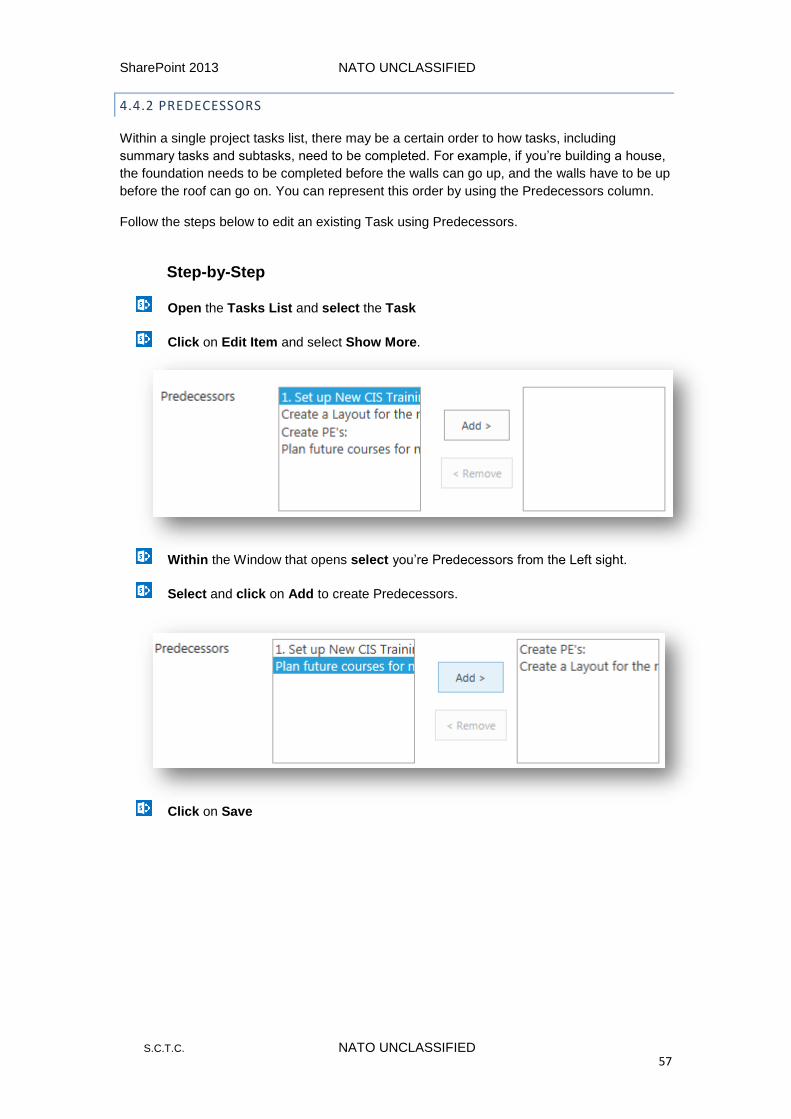
4.4.2 PREDECESSORS
Within a single project tasks list, there may be a certain order to how tasks, including
summary tasks and subtasks, need to be completed. For example, if you’re building a house,
the foundation needs to be completed before the walls can go up, and the walls have to be up
before the roof can go on. You can represent this order by using the Predecessors column.
Follow the steps below to edit an existing Task using Predecessors.
Step-by-Step
Open the Tasks List and select the Task
Click on Edit Item and select Show More.
Within the Window that opens select you’re Predecessors from the Left sight.
Select and click on Add to create Predecessors.
Click on Save
SharePoint 2013 NATO UNCLASSIFIED
S.C.T.C. NATO UNCLASSIFIED 58
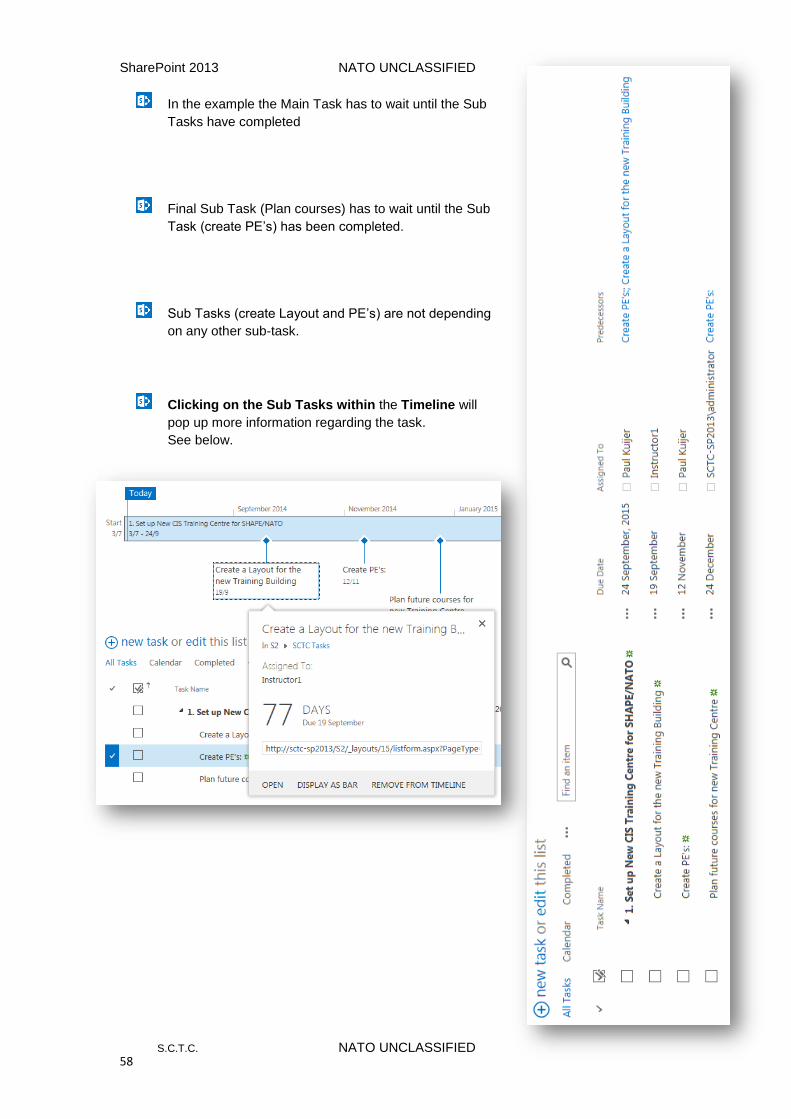
In the example the Main Task has to wait until the Sub
Tasks have completed
Final Sub Task (Plan courses) has to wait until the Sub
Task (create PE’s) has been completed.
Sub Tasks (create Layout and PE’s) are not depending
on any other sub-task.
Clicking on the Sub Tasks within the Timeline will
pop up more information regarding the task.
See below.

SharePoint 2013 NATO UNCLASSIFIED
S.C.T.C. NATO UNCLASSIFIED 59
SharePoint 2013 NATO UNCLASSIFIED
S.C.T.C. NATO UNCLASSIFIED 60
Our Courses are available to any NATO staff member whose organization has a Service
Level Agreement (SLA) with NCI Agency.
For problems: Use the F1 button (help for application problems)
Call *1-626-3177 (NCIA Centralized Service Desk) for PC or telephone technical problems only.
For application info: For more Win 7/10 and Office 2010/2016 information: On the SHAPE NIP – CIS Services Portal – Booking Systems & Request – Request Help on ...
On NR-AIS (REACH): visit NCIA Intranet – APPL – Education and training – SCTC – CBT Training.
For courses: Visit our NS-Web page: SHAPE NIP – CIS Services Portal – Booking Systems – Request a course.
NCI Agency personnel need to contact their Organizational Training Coordinators/POCs.
Visit the S.C.T.C. Webpage on the Internet:
www.shape2day.com – Community - Education – SHAPE CIS Training Centre.
Call the SHAPE-CIS-Training on ext. 7014.
For more NCIA info: Visit the (internet) web page on www.ncia.nato.int or visit the SHAPE page on www.shape2day.com
Last update 02nd January 2018.