Embed Size (px)
Citation preview
Alignment & Adjustment
Samsung Electronics 3-1
3. Alignment & Adjustment3-1 Service Instruction 1. General Adjustment :
In general, a color TV can provide ideal visual quality by adjusting the basic settings such as the vertical size, horizontal size, focus, etc.Display a black and white picture on the screen to check if the picture is clearly displayed.If there are some 'spotted' points on the screen when displaying a black and white picture, degauss the screen using the degauss coil. If the spotted points remain, re-adjust the purity and the convergence.This completes the basic performance examination.
Notice.■ These adjustments and the check list are only applied to S16C chassis-applied models.■ Only use 230V for the measurement set. It is recommended using an insulation transformer when supplying power to
the set so as to prevent shock to the set or to yourself.■ These adjustment specifications have been created on the basis of the domestic S16C chassis-applied remote control
model. Some of the contents may be changed subject to the sales location and the product specifications.
※When replacing the Module Service Instruction
1. When replacing the MAIN Board : Tilt adjustment, Focus adjustment, Screen voltage, W/B adjustment are all required. Since the settings including the Channel information,Deflection, etc. are saved to the EEPROM,recogfigure these settings when replacing the MAIN Board.
The notation of the software information : T-NARPEU-1000 refer to "NARNIA BASIC MODEL EUROPE.VER.1000"Since the settings including the Channel information, Deflection, etc. aresaved to the EEPROM, recogfigure these settings when replacing the MAIN Board.
2. When replacing the CRT Ass'y : No adjustments required
3. When replacing the front panel Master Power switch : No adjustments required
4. When replacing the Side AV Ass'y : No adjustments required
5. When replacing the PIP Module : No adjustments required
6. When replacing the Control Ass'y : No adjustments required
7. When replacing the PFC Ass'y : No adjustments required
1. To enter Service Mode, press the keys on the remote control according to the following sequence. (in Stand-by status)
Info → Menu → Mute → Power On
※ When failing to enter Service Mode, repeat the procedure above.
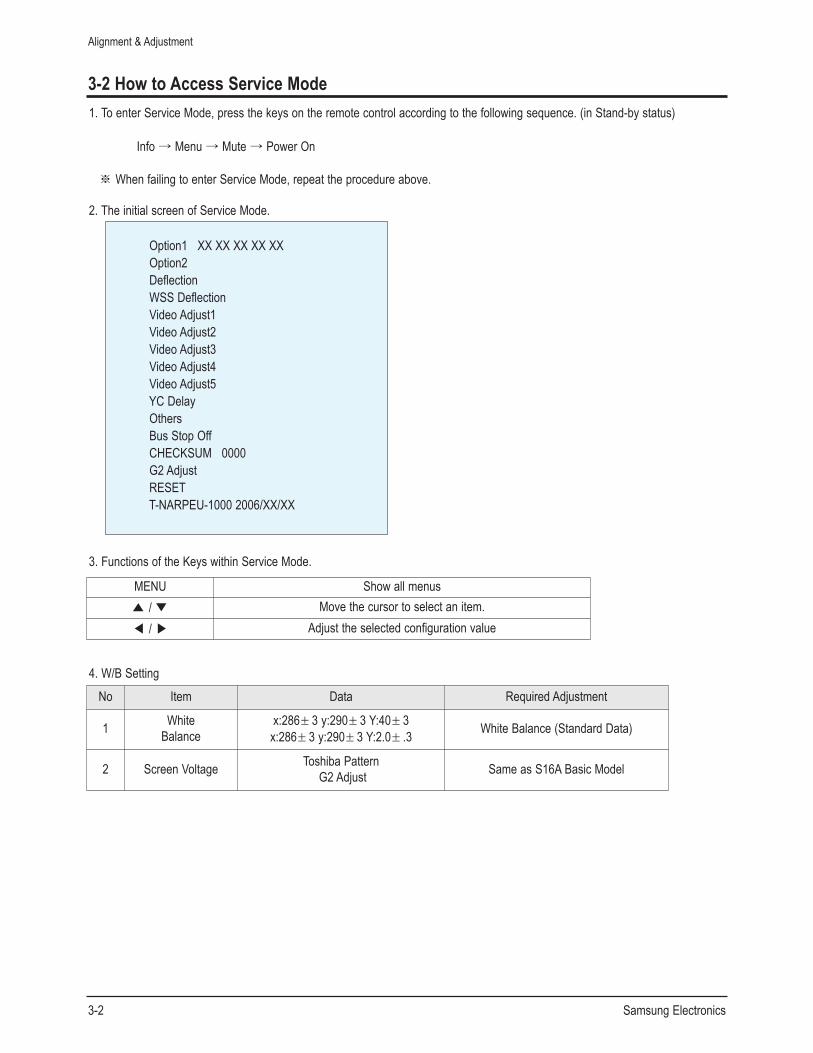
2. The initial screen of Service Mode.
3. Functions of the Keys within Service Mode.
4. W/B Setting
Alignment & Adjustment
3-2 Samsung Electronics
3-2 How to Access Service Mode
MENU Show all menus▲ / ▼ Move the cursor to select an item.◀ / ▶ Adjust the selected configuration value
Option1 XX XX XX XX XX Option2 DeflectionWSS DeflectionVideo Adjust1Video Adjust2Video Adjust3Video Adjust4Video Adjust5YC DelayOthersBus Stop OffCHECKSUM 0000G2 AdjustRESETT-NARPEU-1000 2006/XX/XX
No Item Data Required Adjustment
1 WhiteBalance
x:286± 3 y:290± 3 Y:40± 3x:286± 3 y:290± 3 Y:2.0± .3 White Balance (Standard Data)
2 Screen Voltage Toshiba Pattern G2 Adjust Same as S16A Basic Model
Alignment & Adjustment
Samsung Electronics 3-3
3-3 Factory Data
CIS21"/Ultra SLIM-CRT
Non-PIP/LNA
South East Asia21"/Ultra SLIM-CRTNon-PIP/Non-LNA
Middle East Asia21"/SLIM-CRT
Non-PIP/Non-LNARemark
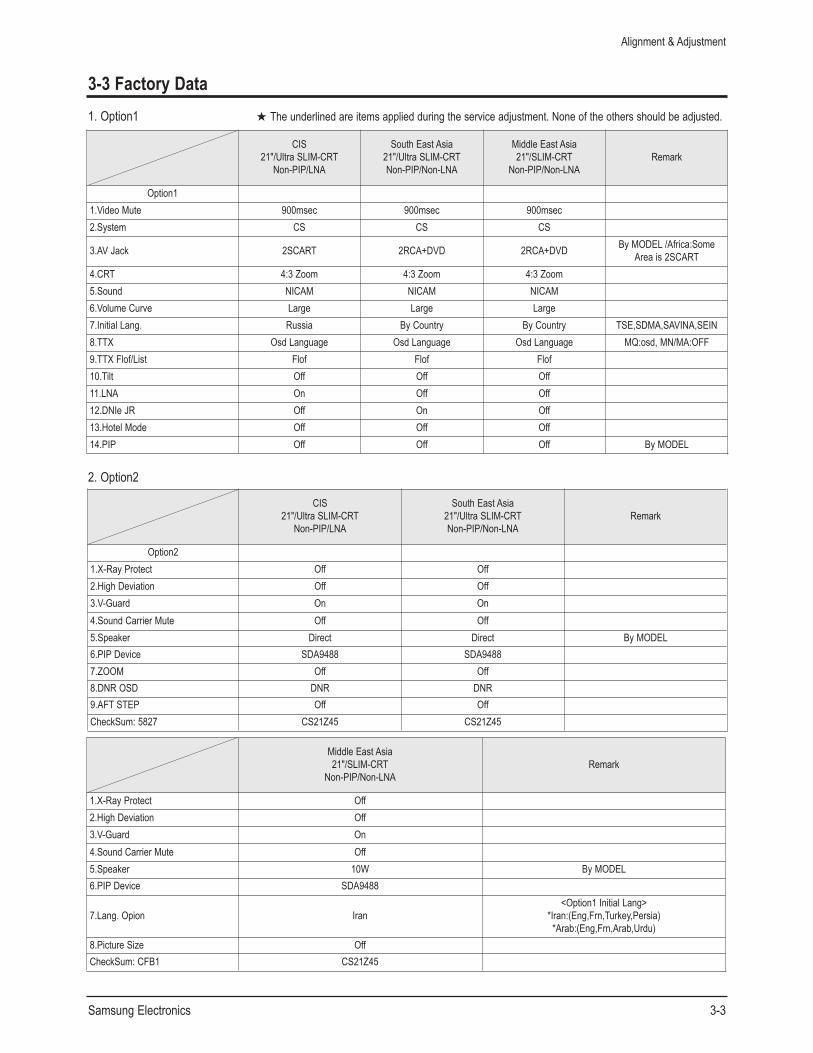
Option11.Video Mute 900msec 900msec 900msec2.System CS CS CS
3.AV Jack 2SCART 2RCA+DVD 2RCA+DVD By MODEL /Africa:SomeArea is 2SCART
4.CRT 4:3 Zoom 4:3 Zoom 4:3 Zoom5.Sound NICAM NICAM NICAM6.Volume Curve Large Large Large7.Initial Lang. Russia By Country By Country TSE,SDMA,SAVINA,SEIN8.TTX Osd Language Osd Language Osd Language MQ:osd, MN/MA:OFF9.TTX Flof/List Flof Flof Flof10.Tilt Off Off Off11.LNA On Off Off12.DNIe JR Off On Off13.Hotel Mode Off Off Off14.PIP Off Off Off By MODEL
1. Option1
2. Option2
CIS21"/Ultra SLIM-CRT
Non-PIP/LNA
South East Asia21"/Ultra SLIM-CRTNon-PIP/Non-LNA
Remark
Option21.X-Ray Protect Off Off2.High Deviation Off Off3.V-Guard On On4.Sound Carrier Mute Off Off5.Speaker Direct Direct By MODEL6.PIP Device SDA9488 SDA94887.ZOOM Off Off8.DNR OSD DNR DNR9.AFT STEP Off OffCheckSum: 5827 CS21Z45 CS21Z45
Middle East Asia21"/SLIM-CRT
Non-PIP/Non-LNARemark
1.X-Ray Protect Off2.High Deviation Off3.V-Guard On4.Sound Carrier Mute Off5.Speaker 10W By MODEL6.PIP Device SDA9488
7.Lang. Opion Iran<Option1 Initial Lang>
*Iran:(Eng,Frn,Turkey,Persia)*Arab:(Eng,Frn,Arab,Urdu)
8.Picture Size OffCheckSum: CFB1 CS21Z45
★ The underlined are items applied during the service adjustment. None of the others should be adjusted.
Alignment & Adjustment
3-4 Samsung Electronics
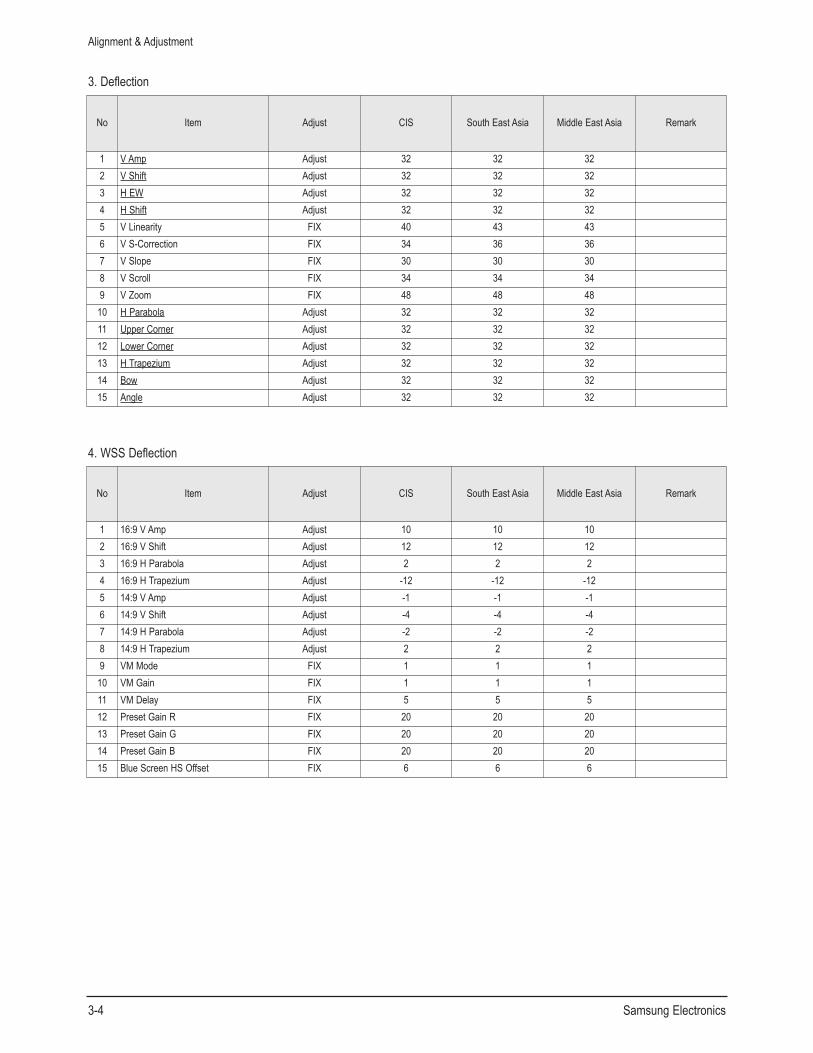
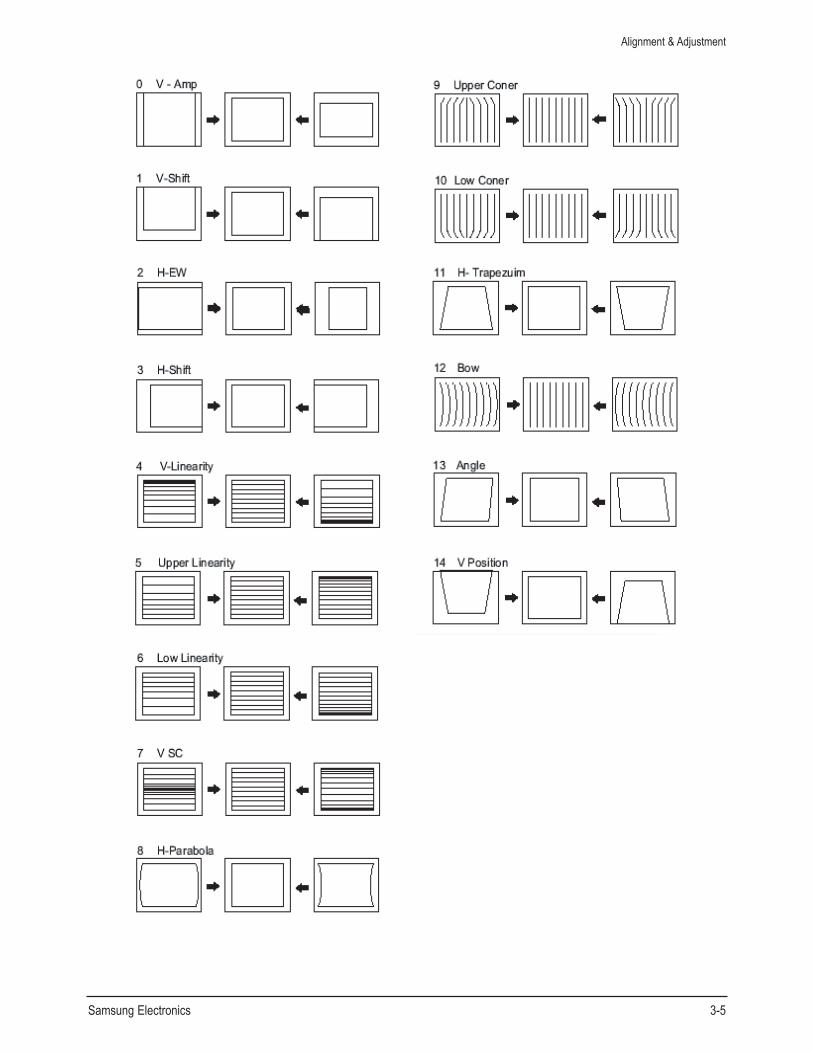
3. Deflection
No Item Adjust CIS South East Asia Middle East Asia Remark
1 V Amp Adjust 32 32 322 V Shift Adjust 32 32 323 H EW Adjust 32 32 324 H Shift Adjust 32 32 325 V Linearity FIX 40 43 436 V S-Correction FIX 34 36 367 V Slope FIX 30 30 308 V Scroll FIX 34 34 349 V Zoom FIX 48 48 48
10 H Parabola Adjust 32 32 3211 Upper Corner Adjust 32 32 3212 Lower Corner Adjust 32 32 3213 H Trapezium Adjust 32 32 3214 Bow Adjust 32 32 3215 Angle Adjust 32 32 32
4. WSS Deflection
No Item Adjust CIS South East Asia Middle East Asia Remark
1 16:9 V Amp Adjust 10 10 102 16:9 V Shift Adjust 12 12 123 16:9 H Parabola Adjust 2 2 24 16:9 H Trapezium Adjust -12 -12 -125 14:9 V Amp Adjust -1 -1 -16 14:9 V Shift Adjust -4 -4 -47 14:9 H Parabola Adjust -2 -2 -28 14:9 H Trapezium Adjust 2 2 29 VM Mode FIX 1 1 1
10 VM Gain FIX 1 1 111 VM Delay FIX 5 5 512 Preset Gain R FIX 20 20 2013 Preset Gain G FIX 20 20 2014 Preset Gain B FIX 20 20 2015 Blue Screen HS Offset FIX 6 6 6
Alignment & Adjustment
Samsung Electronics 3-5
Alignment & Adjustment
3-6 Samsung Electronics
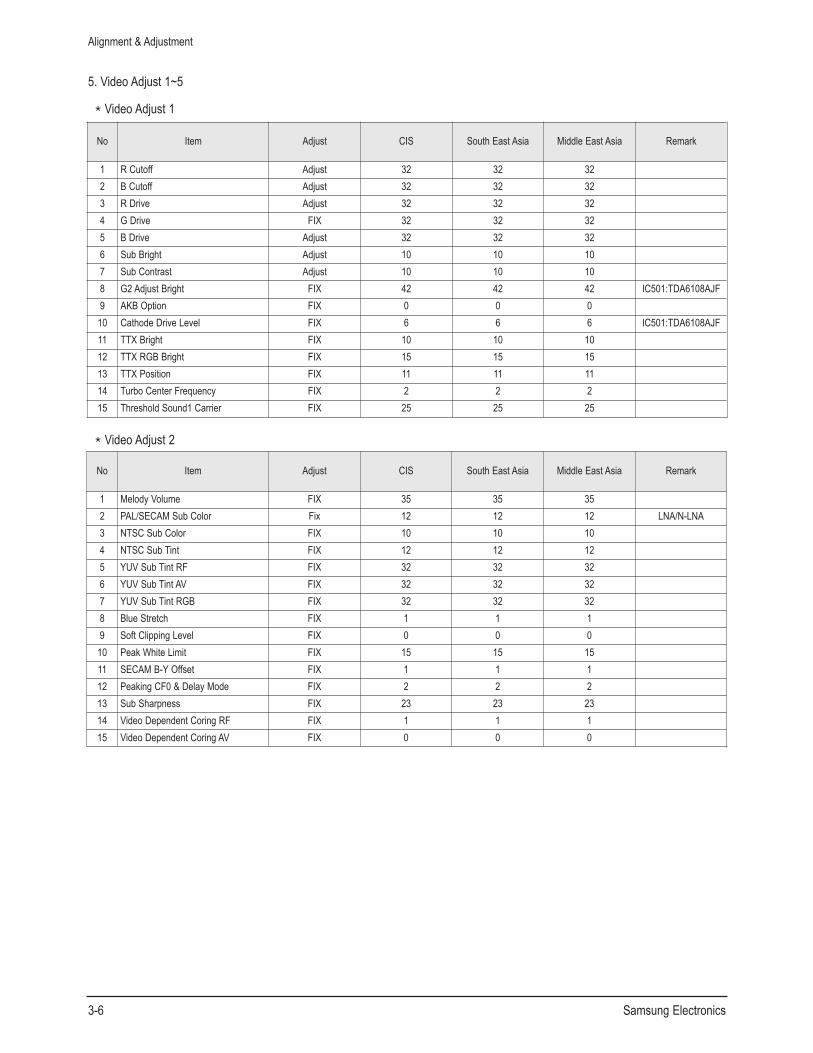
5. Video Adjust 1~5
*Video Adjust 1
*Video Adjust 2
No Item Adjust CIS South East Asia Middle East Asia Remark
1 R Cutoff Adjust 32 32 322 B Cutoff Adjust 32 32 323 R Drive Adjust 32 32 324 G Drive FIX 32 32 325 B Drive Adjust 32 32 326 Sub Bright Adjust 10 10 107 Sub Contrast Adjust 10 10 108 G2 Adjust Bright FIX 42 42 42 IC501:TDA6108AJF9 AKB Option FIX 0 0 0
10 Cathode Drive Level FIX 6 6 6 IC501:TDA6108AJF11 TTX Bright FIX 10 10 1012 TTX RGB Bright FIX 15 15 1513 TTX Position FIX 11 11 1114 Turbo Center Frequency FIX 2 2 215 Threshold Sound1 Carrier FIX 25 25 25
No Item Adjust CIS South East Asia Middle East Asia Remark
1 Melody Volume FIX 35 35 352 PAL/SECAM Sub Color Fix 12 12 12 LNA/N-LNA3 NTSC Sub Color FIX 10 10 104 NTSC Sub Tint FIX 12 12 125 YUV Sub Tint RF FIX 32 32 326 YUV Sub Tint AV FIX 32 32 327 YUV Sub Tint RGB FIX 32 32 328 Blue Stretch FIX 1 1 19 Soft Clipping Level FIX 0 0 0
10 Peak White Limit FIX 15 15 1511 SECAM B-Y Offset FIX 1 1 112 Peaking CF0 & Delay Mode FIX 2 2 213 Sub Sharpness FIX 23 23 2314 Video Dependent Coring RF FIX 1 1 115 Video Dependent Coring AV FIX 0 0 0
Alignment & Adjustment
Samsung Electronics 3-7
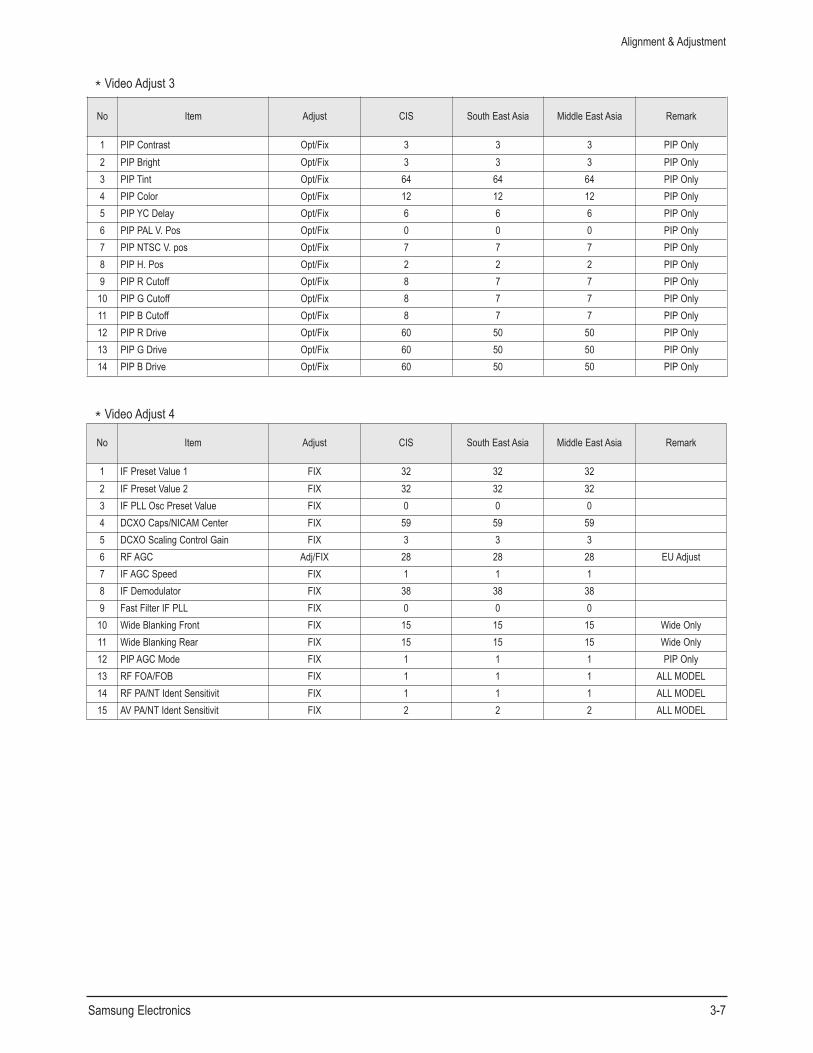
*Video Adjust 3
*Video Adjust 4
No Item Adjust CIS South East Asia Middle East Asia Remark
1 PIP Contrast Opt/Fix 3 3 3 PIP Only2 PIP Bright Opt/Fix 3 3 3 PIP Only3 PIP Tint Opt/Fix 64 64 64 PIP Only4 PIP Color Opt/Fix 12 12 12 PIP Only5 PIP YC Delay Opt/Fix 6 6 6 PIP Only6 PIP PAL V. Pos Opt/Fix 0 0 0 PIP Only7 PIP NTSC V. pos Opt/Fix 7 7 7 PIP Only8 PIP H. Pos Opt/Fix 2 2 2 PIP Only9 PIP R Cutoff Opt/Fix 8 7 7 PIP Only
10 PIP G Cutoff Opt/Fix 8 7 7 PIP Only11 PIP B Cutoff Opt/Fix 8 7 7 PIP Only12 PIP R Drive Opt/Fix 60 50 50 PIP Only13 PIP G Drive Opt/Fix 60 50 50 PIP Only14 PIP B Drive Opt/Fix 60 50 50 PIP Only
No Item Adjust CIS South East Asia Middle East Asia Remark
1 IF Preset Value 1 FIX 32 32 32 2 IF Preset Value 2 FIX 32 32 32 3 IF PLL Osc Preset Value FIX 0 0 0 4 DCXO Caps/NICAM Center FIX 59 59 59 5 DCXO Scaling Control Gain FIX 3 3 3 6 RF AGC Adj/FIX 28 28 28 EU Adjust7 IF AGC Speed FIX 1 1 1 8 IF Demodulator FIX 38 38 38 9 Fast Filter IF PLL FIX 0 0 0
10 Wide Blanking Front FIX 15 15 15 Wide Only11 Wide Blanking Rear FIX 15 15 15 Wide Only12 PIP AGC Mode FIX 1 1 1 PIP Only13 RF FOA/FOB FIX 1 1 1 ALL MODEL14 RF PA/NT Ident Sensitivit FIX 1 1 1 ALL MODEL15 AV PA/NT Ident Sensitivit FIX 2 2 2 ALL MODEL
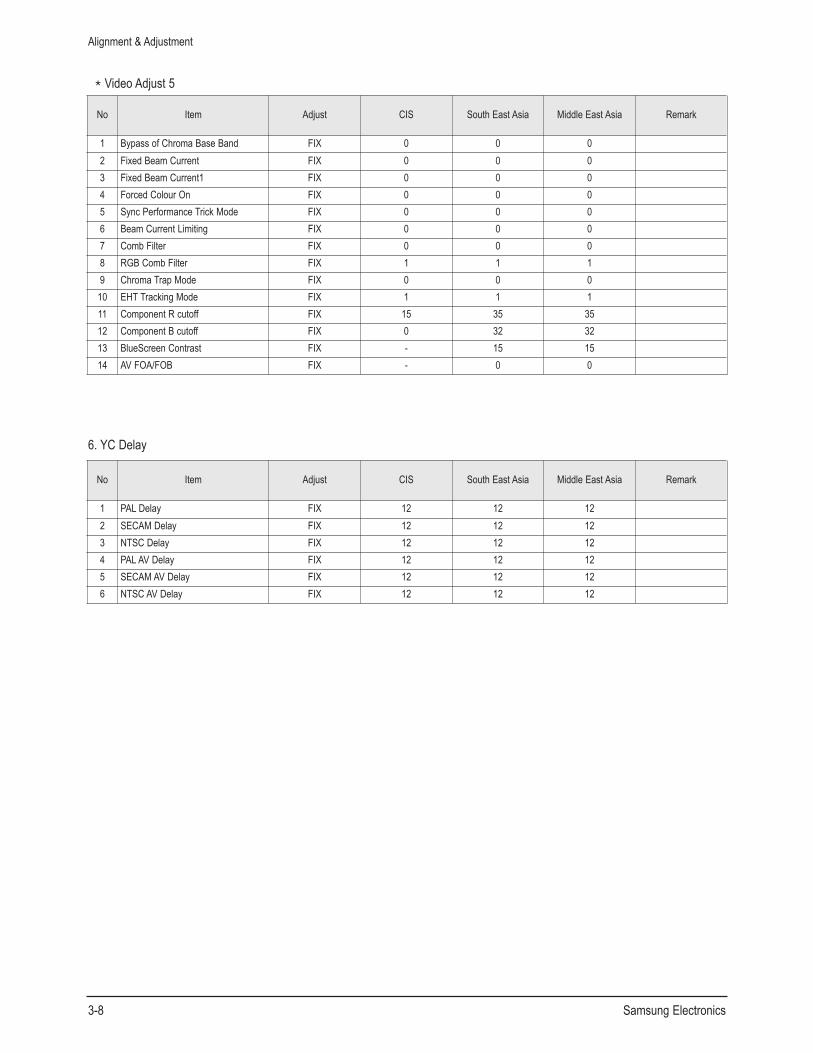
6. YC Delay
Alignment & Adjustment
3-8 Samsung Electronics
*Video Adjust 5
No Item Adjust CIS South East Asia Middle East Asia Remark
1 Bypass of Chroma Base Band FIX 0 0 0 2 Fixed Beam Current FIX 0 0 0 3 Fixed Beam Current1 FIX 0 0 0 4 Forced Colour On FIX 0 0 0 5 Sync Performance Trick Mode FIX 0 0 0 6 Beam Current Limiting FIX 0 0 0 7 Comb Filter FIX 0 0 0 8 RGB Comb Filter FIX 1 1 1 9 Chroma Trap Mode FIX 0 0 0
10 EHT Tracking Mode FIX 1 1 1 11 Component R cutoff FIX 15 35 35 12 Component B cutoff FIX 0 32 32 13 BlueScreen Contrast FIX - 15 15 14 AV FOA/FOB FIX - 0 0
No Item Adjust CIS South East Asia Middle East Asia Remark
1 PAL Delay FIX 12 12 12 2 SECAM Delay FIX 12 12 12 3 NTSC Delay FIX 12 12 12 4 PAL AV Delay FIX 12 12 12 5 SECAM AV Delay FIX 12 12 12 6 NTSC AV Delay FIX 12 12 12
Alignment & Adjustment
Samsung Electronics 3-9
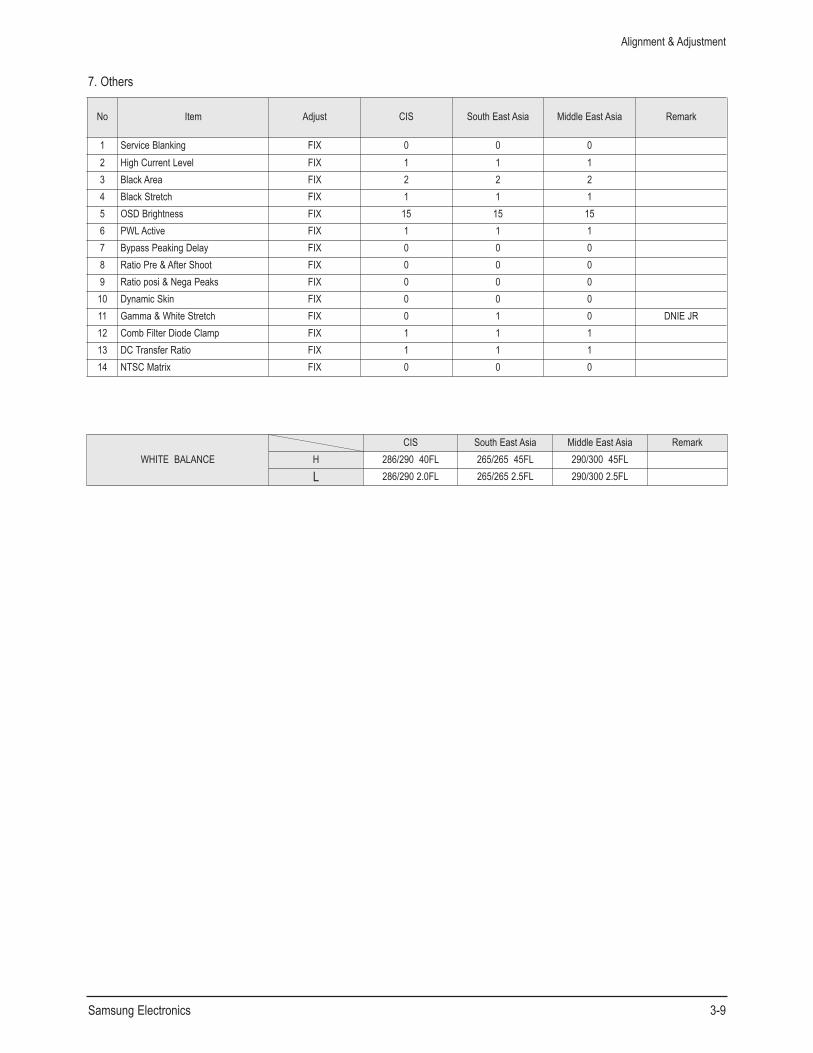
7. Others
WHITE BALANCECIS South East Asia Middle East Asia Remark
H 286/290 40FL 265/265 45FL 290/300 45FLL 286/290 2.0FL 265/265 2.5FL 290/300 2.5FL
No Item Adjust CIS South East Asia Middle East Asia Remark
1 Service Blanking FIX 0 0 0 2 High Current Level FIX 1 1 1 3 Black Area FIX 2 2 2 4 Black Stretch FIX 1 1 1 5 OSD Brightness FIX 15 15 15 6 PWL Active FIX 1 1 1 7 Bypass Peaking Delay FIX 0 0 0 8 Ratio Pre & After Shoot FIX 0 0 0 9 Ratio posi & Nega Peaks FIX 0 0 0
10 Dynamic Skin FIX 0 0 0 11 Gamma & White Stretch FIX 0 1 0 DNIE JR12 Comb Filter Diode Clamp FIX 1 1 1 13 DC Transfer Ratio FIX 1 1 1 14 NTSC Matrix FIX 0 0 0
Alignment & Adjustment
3-10 Samsung Electronics
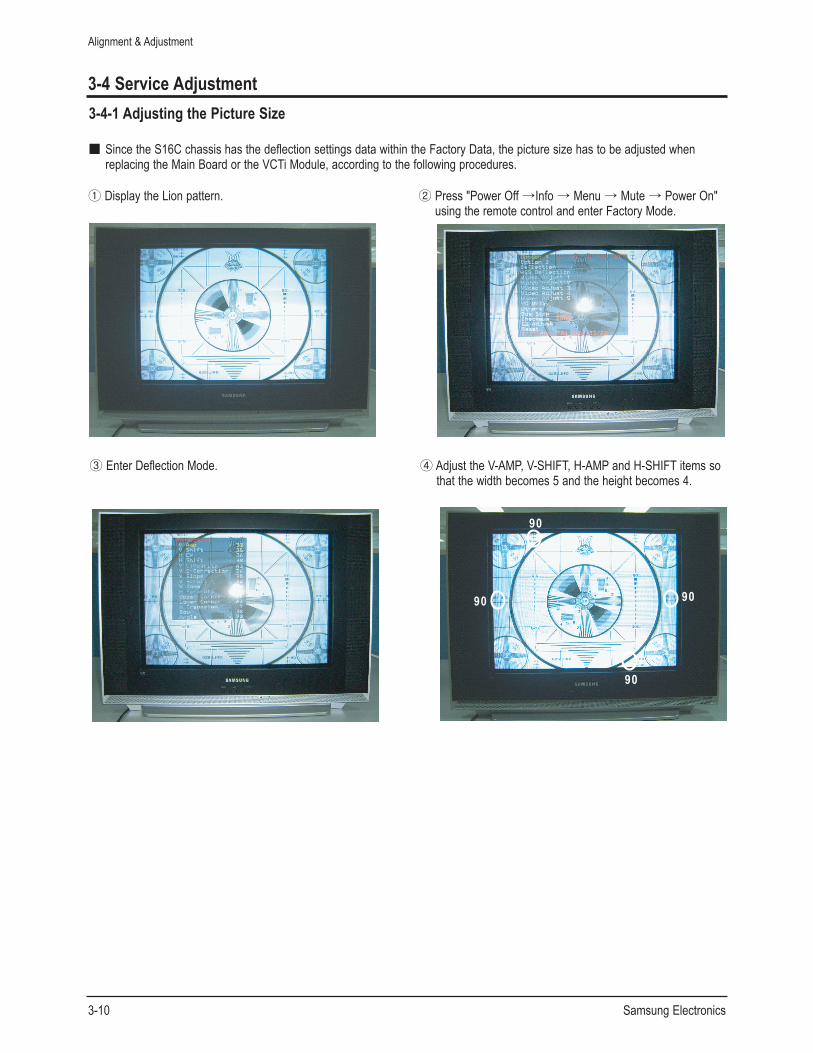
3-4 Service Adjustment3-4-1 Adjusting the Picture Size
■ Since the S16C chassis has the deflection settings data within the Factory Data, the picture size has to be adjusted when replacing the Main Board or the VCTi Module, according to the following procedures.
① Display the Lion pattern. ② Press "Power Off →Info → Menu → Mute → Power On" using the remote control and enter Factory Mode.
90
9090
90
③ Enter Deflection Mode. ④ Adjust the V-AMP, V-SHIFT, H-AMP and H-SHIFT items so that the width becomes 5 and the height becomes 4.
Alignment & Adjustment
Samsung Electronics 3-11
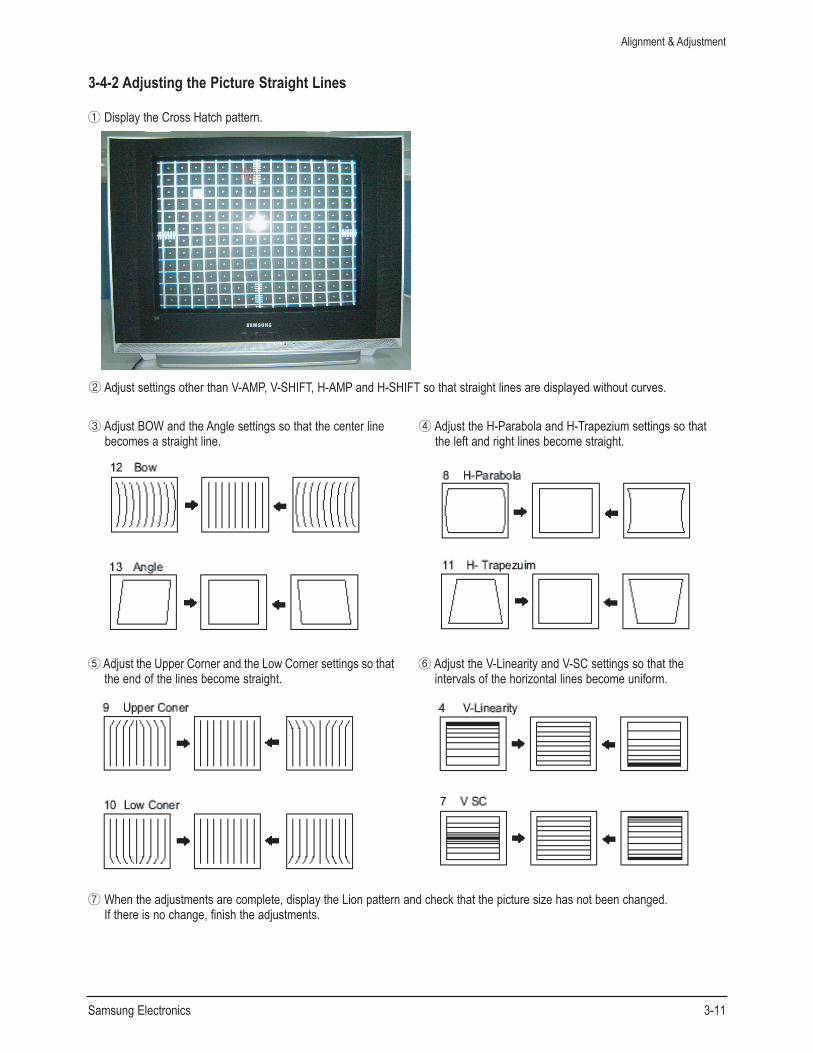
3-4-2 Adjusting the Picture Straight Lines
① Display the Cross Hatch pattern.
② Adjust settings other than V-AMP, V-SHIFT, H-AMP and H-SHIFT so that straight lines are displayed without curves.
⑦ When the adjustments are complete, display the Lion pattern and check that the picture size has not been changed.If there is no change, finish the adjustments.
③ Adjust BOW and the Angle settings so that the center linebecomes a straight line.
④ Adjust the H-Parabola and H-Trapezium settings so that the left and right lines become straight.
⑤ Adjust the Upper Corner and the Low Corner settings so thatthe end of the lines become straight.
⑥ Adjust the V-Linearity and V-SC settings so that theintervals of the horizontal lines become uniform.
Alignment & Adjustment
3-12 Samsung Electronics
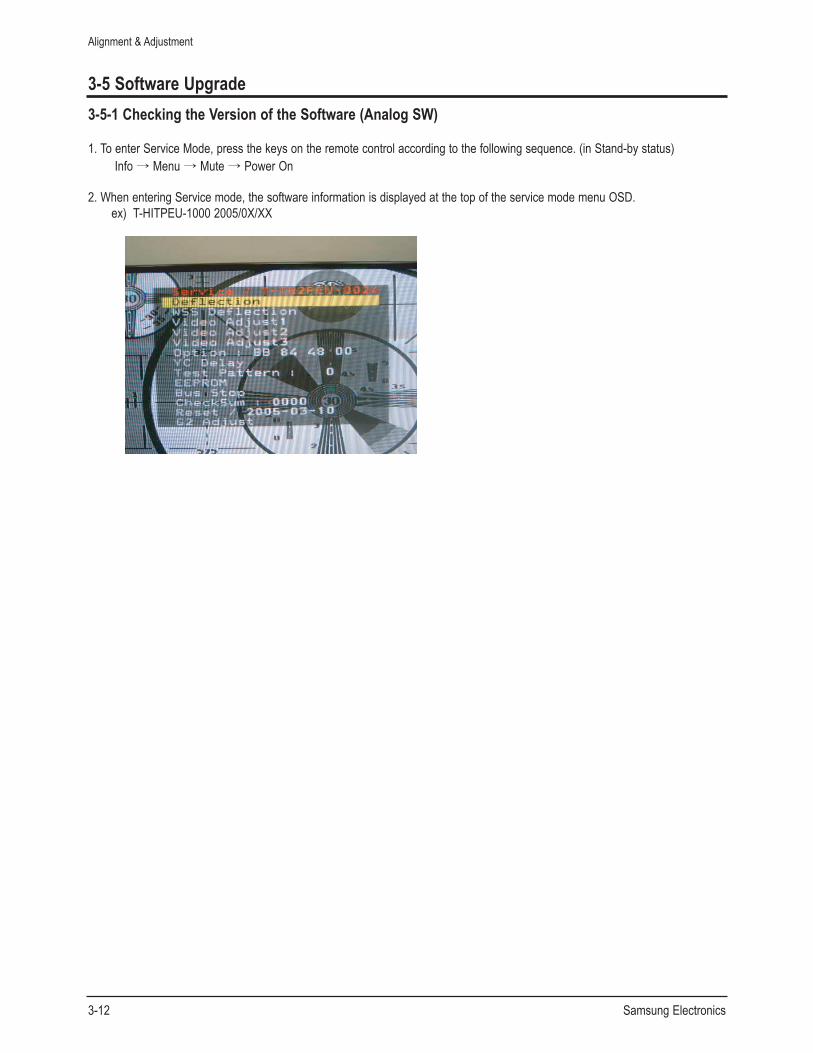
3-5 Software Upgrade3-5-1 Checking the Version of the Software (Analog SW)
1. To enter Service Mode, press the keys on the remote control according to the following sequence. (in Stand-by status)Info → Menu → Mute → Power On
2. When entering Service mode, the software information is displayed at the top of the service mode menu OSD.ex) T-HITPEU-1000 2005/0X/XX
Alignment & Adjustment
Samsung Electronics 3-13
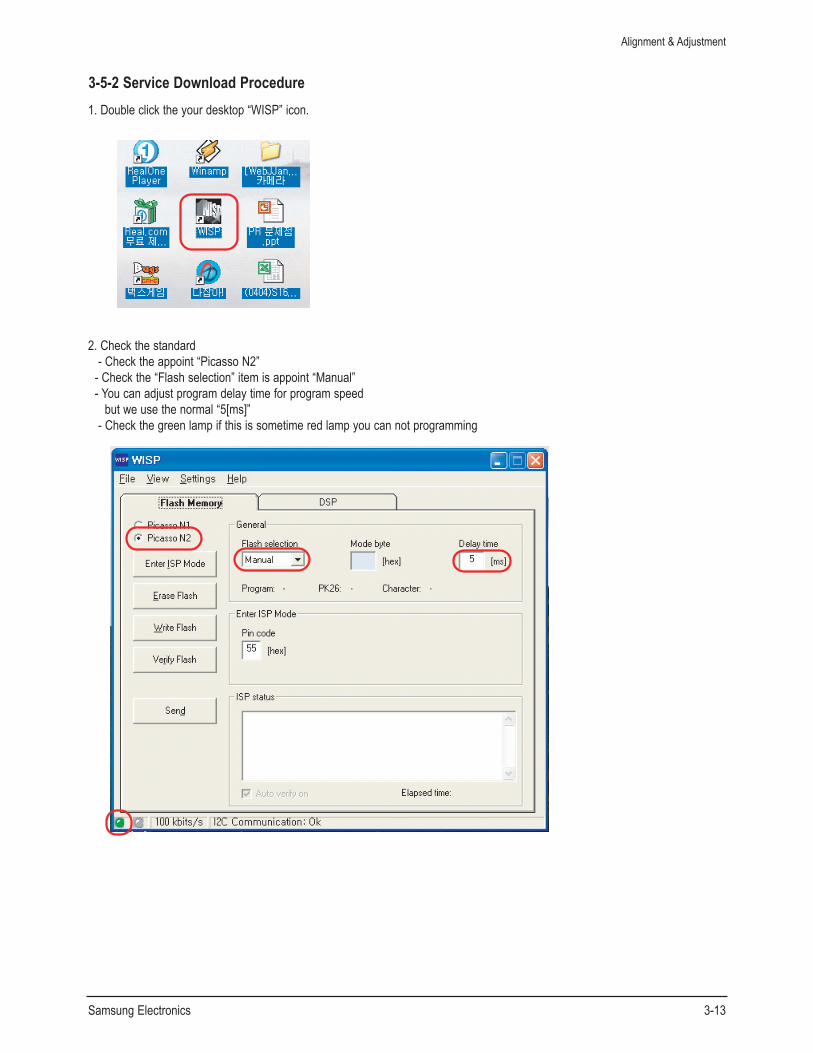
3-5-2 Service Download Procedure1. Double click the your desktop “WISP” icon.
2. Check the standard- Check the appoint “Picasso N2”
- Check the “Flash selection” item is appoint “Manual”- You can adjust program delay time for program speed
but we use the normal “5[ms]”- Check the green lamp if this is sometime red lamp you can not programming
Alignment & Adjustment
3-14 Samsung Electronics
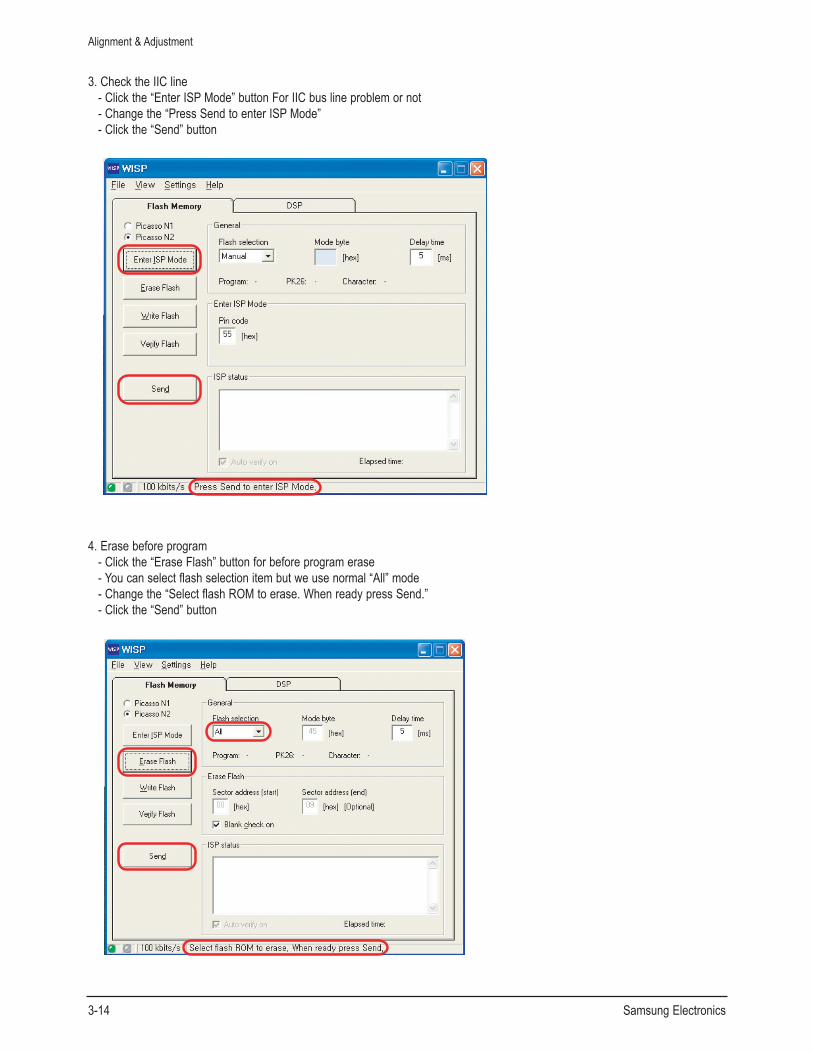
3. Check the IIC line- Click the “Enter ISP Mode” button For IIC bus line problem or not- Change the “Press Send to enter ISP Mode”- Click the “Send” button
4. Erase before program- Click the “Erase Flash” button for before program erase- You can select flash selection item but we use normal “All” mode- Change the “Select flash ROM to erase. When ready press Send.”- Click the “Send” button
Alignment & Adjustment
Samsung Electronics 3-15
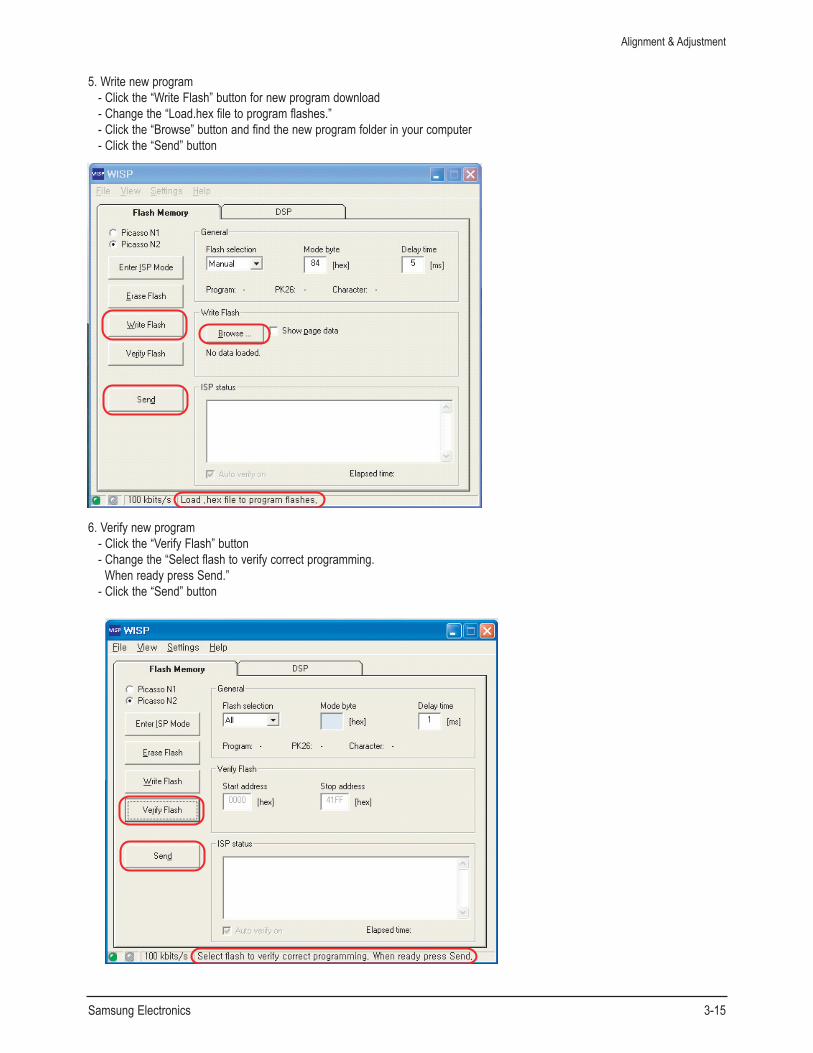
5. Write new program- Click the “Write Flash” button for new program download- Change the “Load.hex file to program flashes.”- Click the “Browse” button and find the new program folder in your computer- Click the “Send” button
6. Verify new program- Click the “Verify Flash” button- Change the “Select flash to verify correct programming.
When ready press Send.”- Click the “Send” button
Alignment & Adjustment
3-16 Samsung Electronics
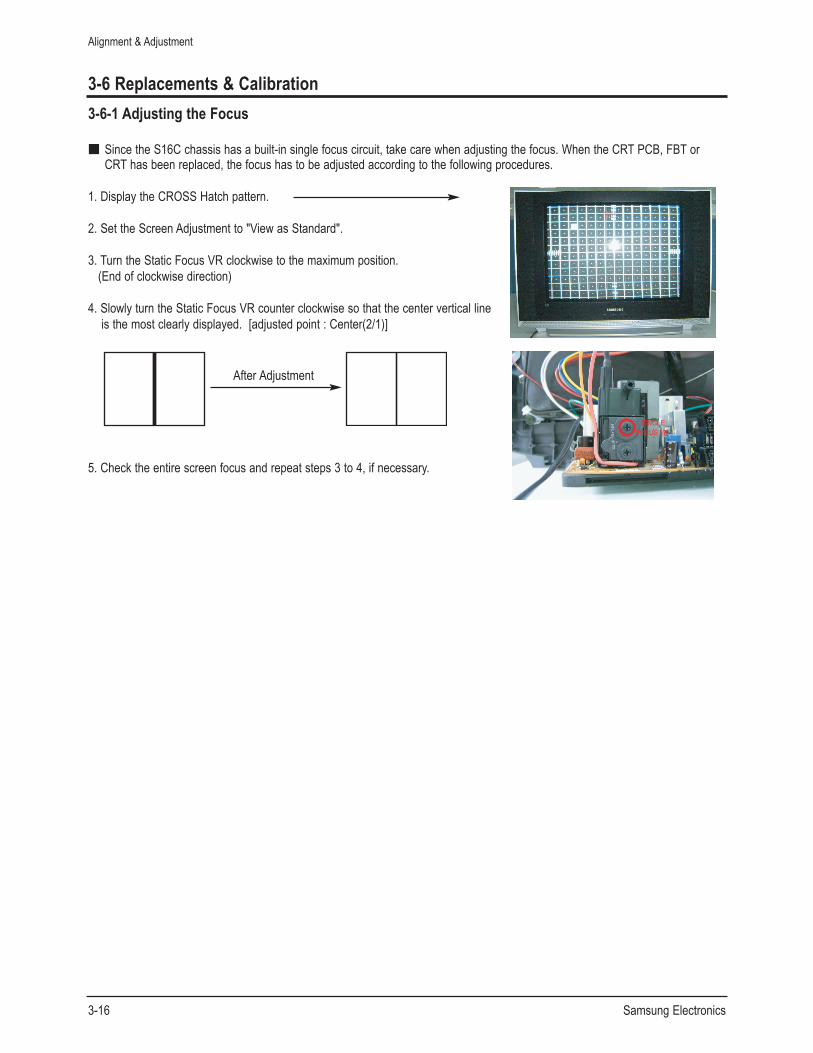
3-6 Replacements & Calibration3-6-1 Adjusting the Focus
■ Since the S16C chassis has a built-in single focus circuit, take care when adjusting the focus. When the CRT PCB, FBT or CRT has been replaced, the focus has to be adjusted according to the following procedures.
1. Display the CROSS Hatch pattern.
2. Set the Screen Adjustment to "View as Standard".
3. Turn the Static Focus VR clockwise to the maximum position.(End of clockwise direction)
4. Slowly turn the Static Focus VR counter clockwise so that the center vertical lineis the most clearly displayed. [adjusted point : Center(2/1)]
5. Check the entire screen focus and repeat steps 3 to 4, if necessary.
SINGLEFOCUS VR
Alignment & Adjustment
Samsung Electronics 3-17
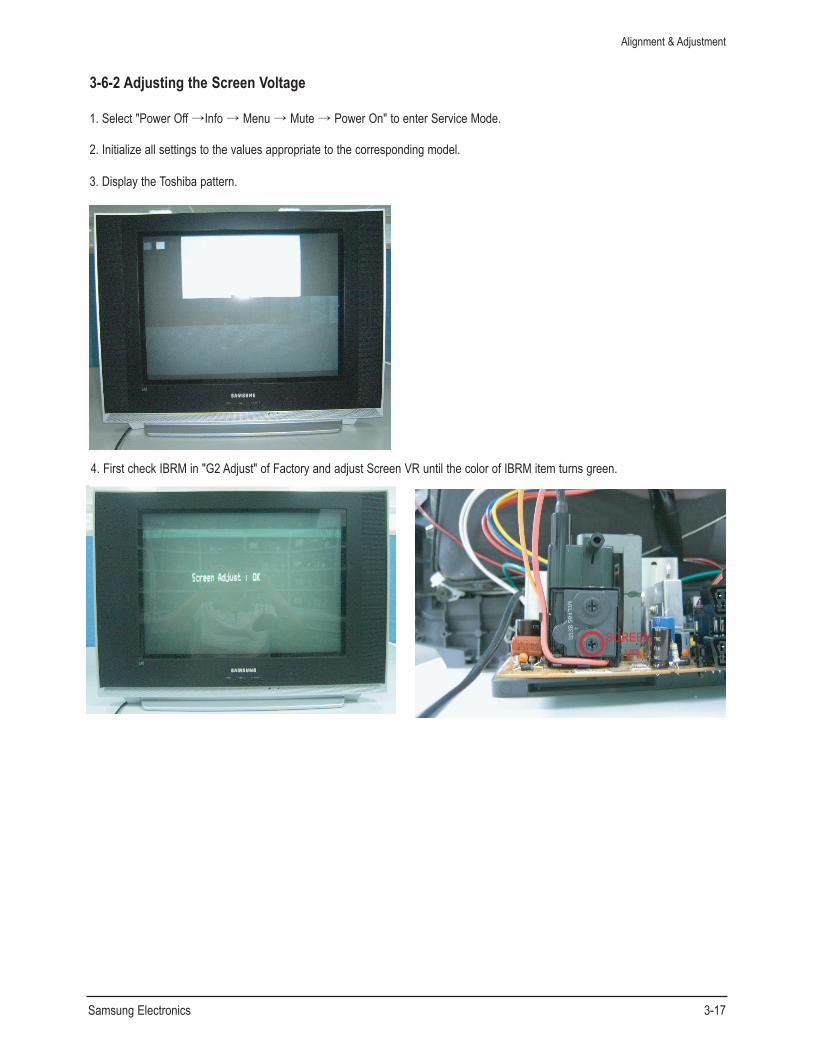
3-6-2 Adjusting the Screen Voltage
1. Select "Power Off →Info → Menu → Mute → Power On" to enter Service Mode.
2. Initialize all settings to the values appropriate to the corresponding model.
3. Display the Toshiba pattern.
SCREENVR
4. First check IBRM in "G2 Adjust" of Factory and adjust Screen VR until the color of IBRM item turns green.
Alignment & Adjustment
3-18 Samsung Electronics
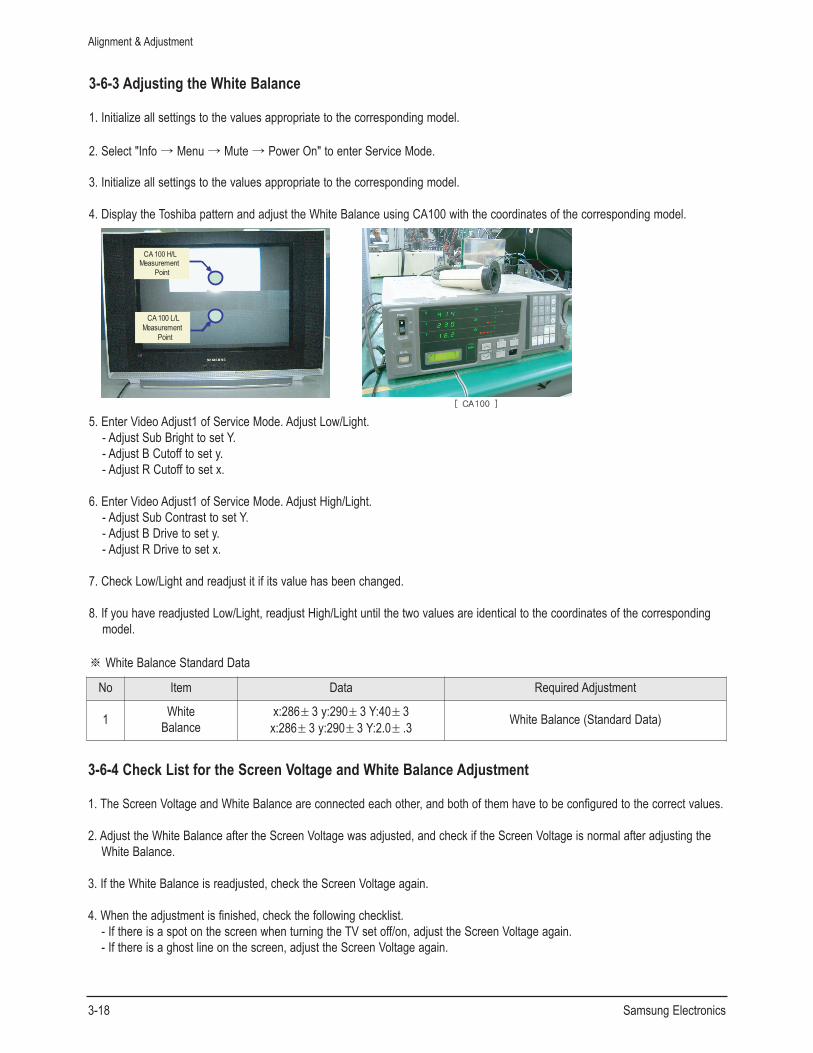
3-6-3 Adjusting the White Balance
1. Initialize all settings to the values appropriate to the corresponding model.
2. Select "Info → Menu → Mute → Power On" to enter Service Mode.
3. Initialize all settings to the values appropriate to the corresponding model.
4. Display the Toshiba pattern and adjust the White Balance using CA100 with the coordinates of the corresponding model.
5. Enter Video Adjust1 of Service Mode. Adjust Low/Light.- Adjust Sub Bright to set Y.- Adjust B Cutoff to set y.- Adjust R Cutoff to set x.
6. Enter Video Adjust1 of Service Mode. Adjust High/Light.- Adjust Sub Contrast to set Y.- Adjust B Drive to set y.- Adjust R Drive to set x.
7. Check Low/Light and readjust it if its value has been changed.
8. If you have readjusted Low/Light, readjust High/Light until the two values are identical to the coordinates of the corresponding model.
※ White Balance Standard Data
3-6-4 Check List for the Screen Voltage and White Balance Adjustment
1. The Screen Voltage and White Balance are connected each other, and both of them have to be configured to the correct values.
2. Adjust the White Balance after the Screen Voltage was adjusted, and check if the Screen Voltage is normal after adjusting the White Balance.
3. If the White Balance is readjusted, check the Screen Voltage again.
4. When the adjustment is finished, check the following checklist.- If there is a spot on the screen when turning the TV set off/on, adjust the Screen Voltage again.- If there is a ghost line on the screen, adjust the Screen Voltage again.
CA 100 H/LMeasurement
Point
CA 100 L/LMeasurement
Point
No Item Data Required Adjustment
1 WhiteBalance
x:286± 3 y:290± 3 Y:40± 3x:286± 3 y:290± 3 Y:2.0± .3 White Balance (Standard Data)