Embed Size (px)
Citation preview
Zip Tie Domes2 Frequency
Geodesic DomeAssembly Manual
Greenhouse Version(c) 2016 Zip Tie Domes
1857 Brindley Hollow RdBuffalo Valley, TN 38548
(931) 858-6892
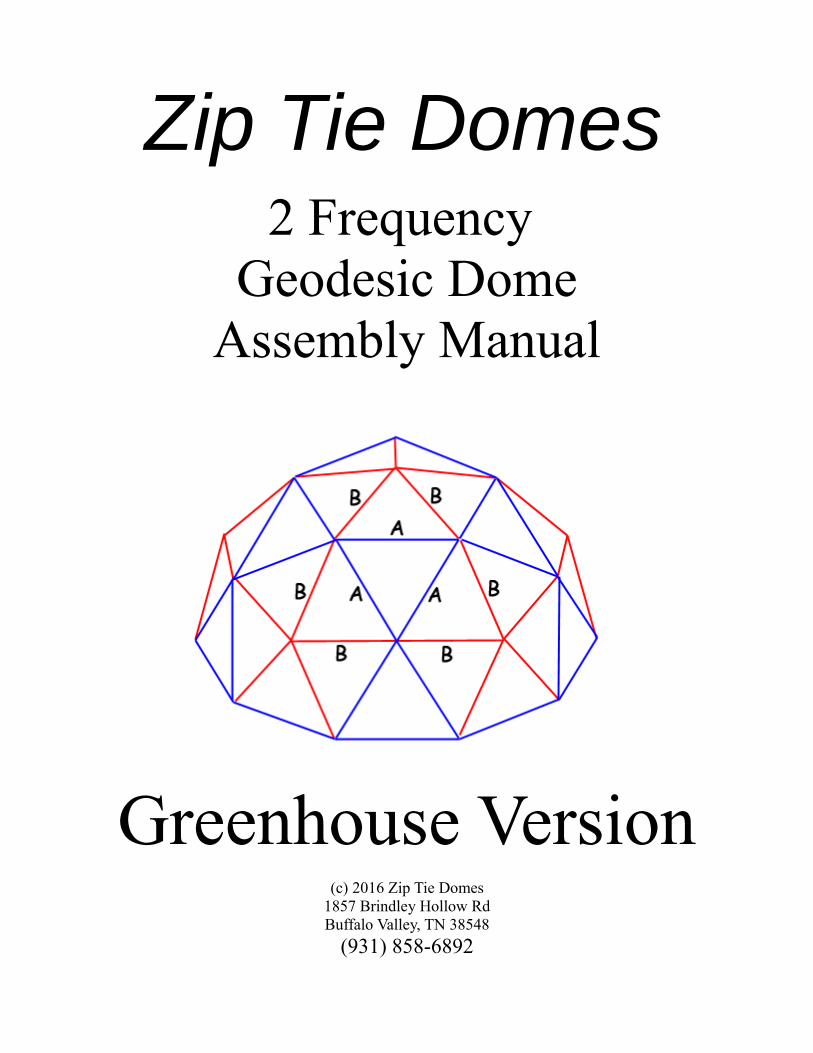
Zip Tie Domes - 2V Assembly Manual
Instructions for Assembling the 2V Frequency Geodesic Dome
Tools Needed: 8 foot Step Ladder, Wire Cutters
SAFETY RULES: Do Not Climb On the Dome. It is not designed for climbing.
Step 1. Find a level area wide enough to assemble the dome.
Page 1 of 35Zip Tie Domes 1857 Brindley Hollow Road, Buffalo Valley, TN 38548 USA
www.ziptiedomes.com - Telephone: (931) 858-6892
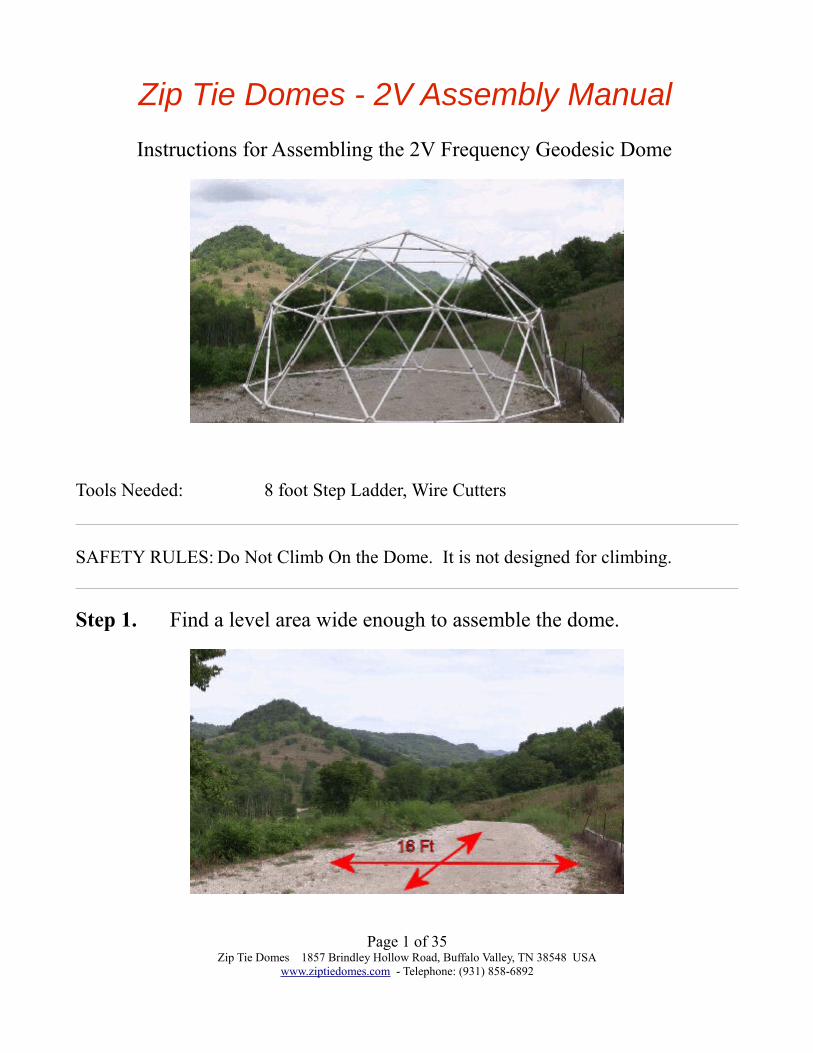
Step 2. Unpack the dome materials and place them in a convenient spot outside the area where the dome will be constructed. Use wire cutters or manually unwind the wire for releasing the struts from the restraining wires.
The package will include:
35 Blue Struts – marked with blue tape.30 Red Struts – marked with red tape.
6 Red 5-way Hubs, marked with red tape. 20 Blue 6-way Hubs, marked with blue tape.
26 Center Hubs 2” 200 Extra Heavy Duty Black Zip Ties (125 lbs)
NOTE: The 8” Extra Heavy Duty Zip Ties are rated at 125 lbs, and are black to resist ultraviolet light degradation. These 8” Heavy Duty Ties are suitable for a permanent installation.
If you are building the dome for a temporary purpose, the standard 75lb white 8” Zip Ties from your local hardware store can be used.
Page 2 of 35Zip Tie Domes 1857 Brindley Hollow Road, Buffalo Valley, TN 38548 USA
www.ziptiedomes.com - Telephone: (931) 858-6892
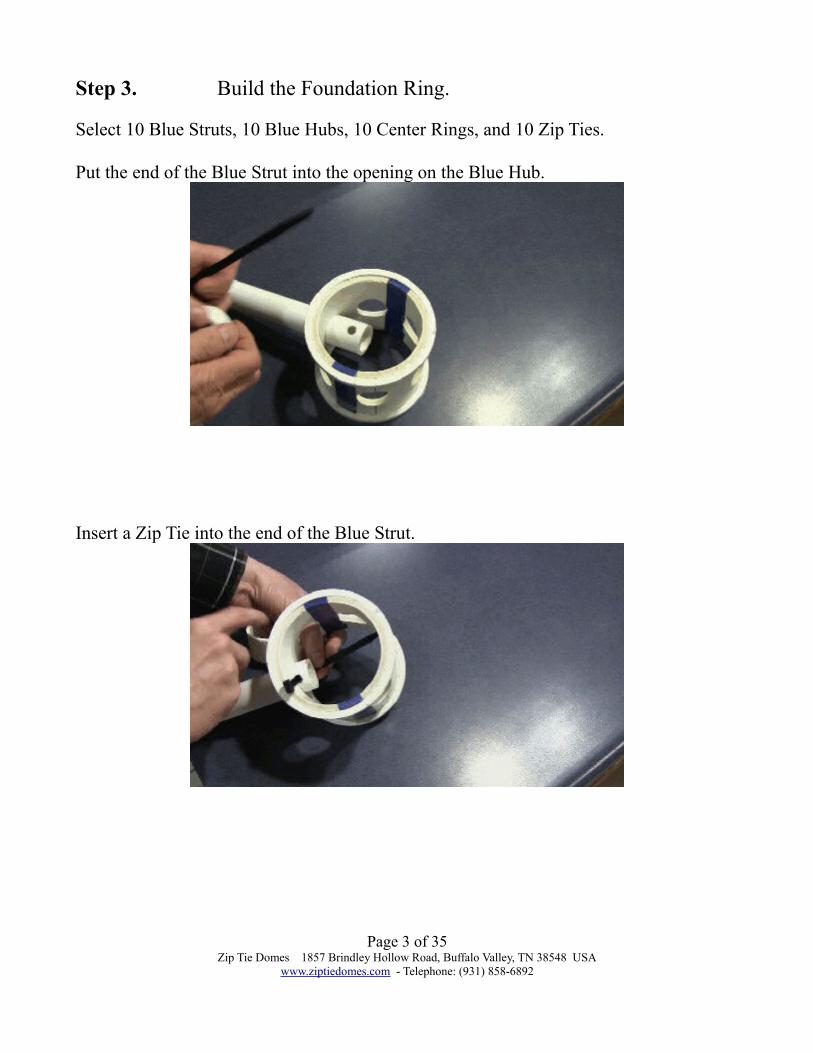
Step 3. Build the Foundation Ring.
Select 10 Blue Struts, 10 Blue Hubs, 10 Center Rings, and 10 Zip Ties.
Put the end of the Blue Strut into the opening on the Blue Hub.
Insert a Zip Tie into the end of the Blue Strut.
Page 3 of 35Zip Tie Domes 1857 Brindley Hollow Road, Buffalo Valley, TN 38548 USA
www.ziptiedomes.com - Telephone: (931) 858-6892
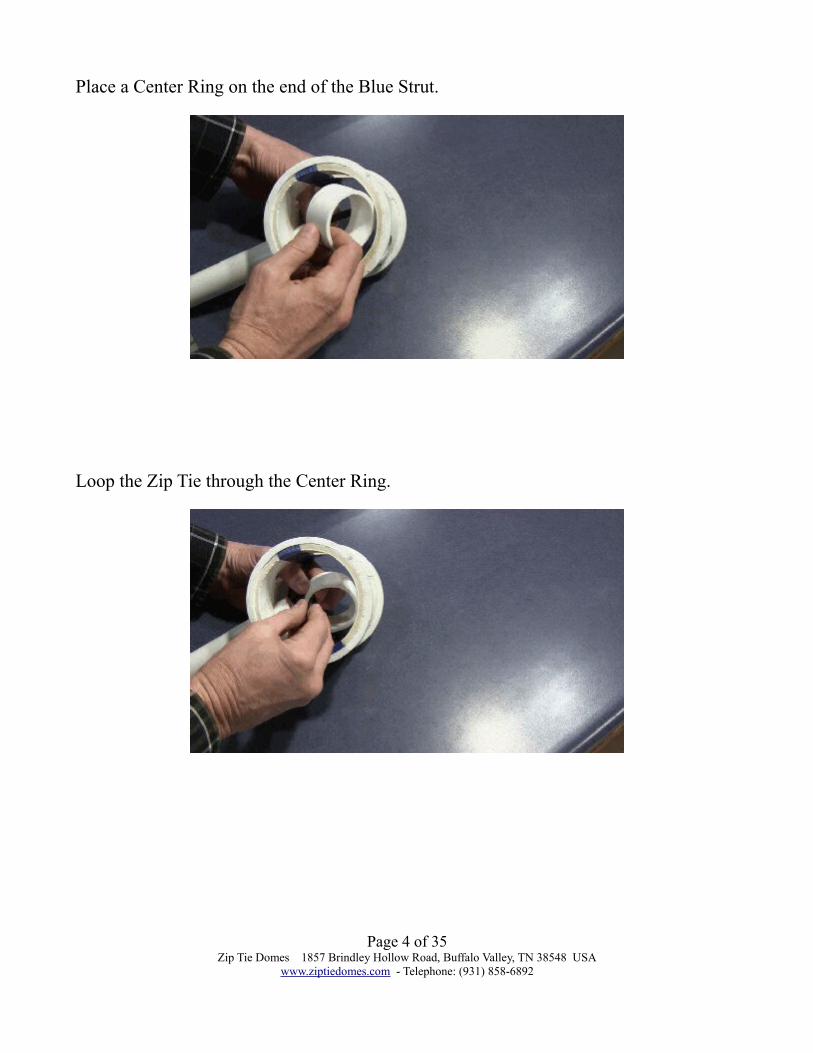
Place a Center Ring on the end of the Blue Strut.
Loop the Zip Tie through the Center Ring.
Page 4 of 35Zip Tie Domes 1857 Brindley Hollow Road, Buffalo Valley, TN 38548 USA
www.ziptiedomes.com - Telephone: (931) 858-6892
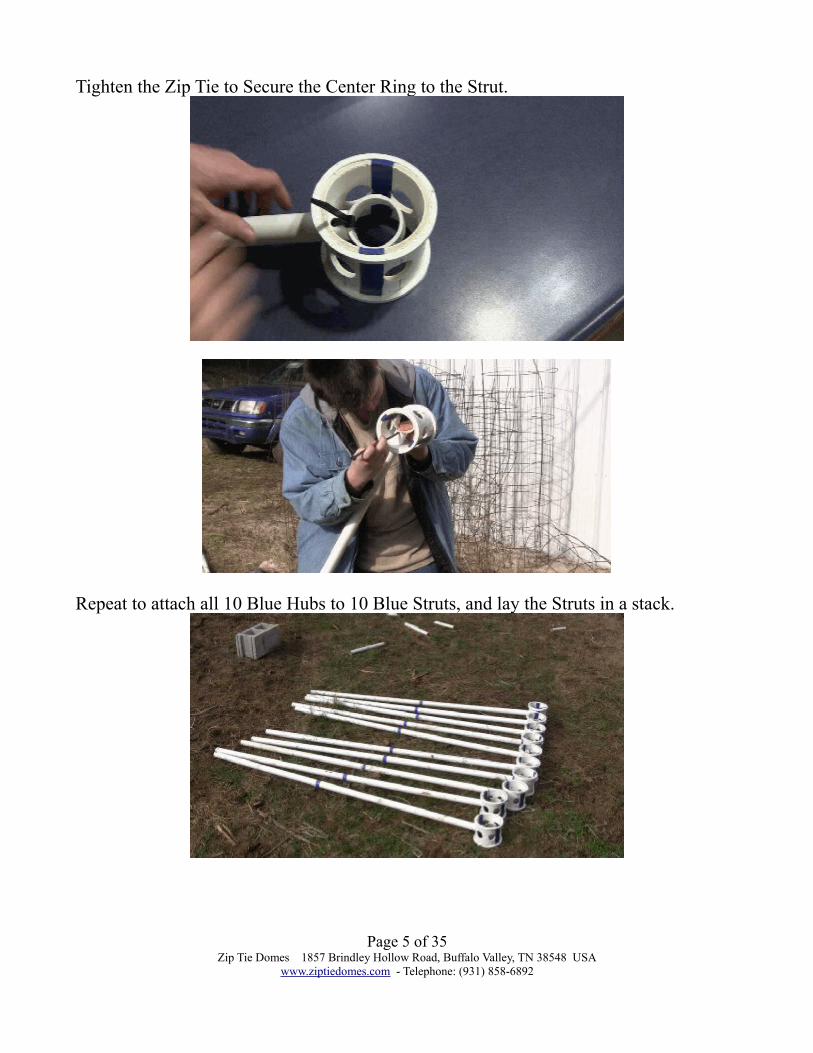
Tighten the Zip Tie to Secure the Center Ring to the Strut.
Repeat to attach all 10 Blue Hubs to 10 Blue Struts, and lay the Struts in a stack.
Page 5 of 35Zip Tie Domes 1857 Brindley Hollow Road, Buffalo Valley, TN 38548 USA
www.ziptiedomes.com - Telephone: (931) 858-6892
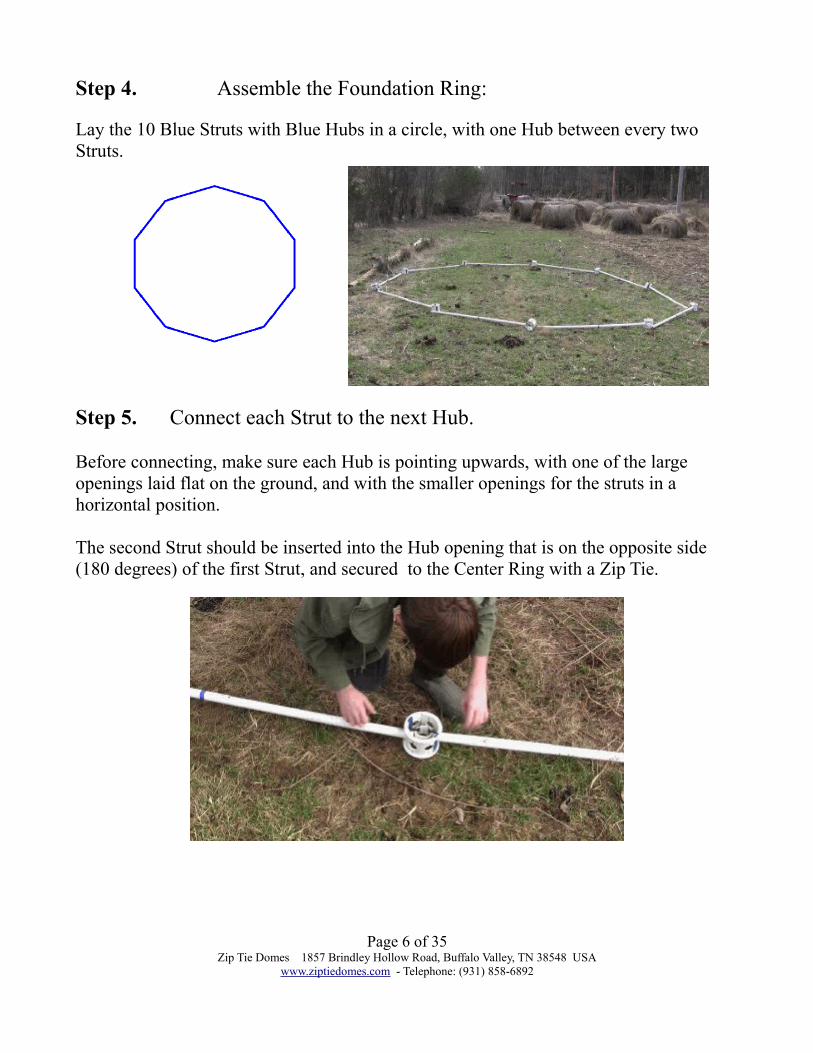
Step 4. Assemble the Foundation Ring:
Lay the 10 Blue Struts with Blue Hubs in a circle, with one Hub between every two Struts.
Step 5. Connect each Strut to the next Hub.
Before connecting, make sure each Hub is pointing upwards, with one of the large openings laid flat on the ground, and with the smaller openings for the struts in a horizontal position.
The second Strut should be inserted into the Hub opening that is on the opposite side (180 degrees) of the first Strut, and secured to the Center Ring with a Zip Tie.
Page 6 of 35Zip Tie Domes 1857 Brindley Hollow Road, Buffalo Valley, TN 38548 USA
www.ziptiedomes.com - Telephone: (931) 858-6892
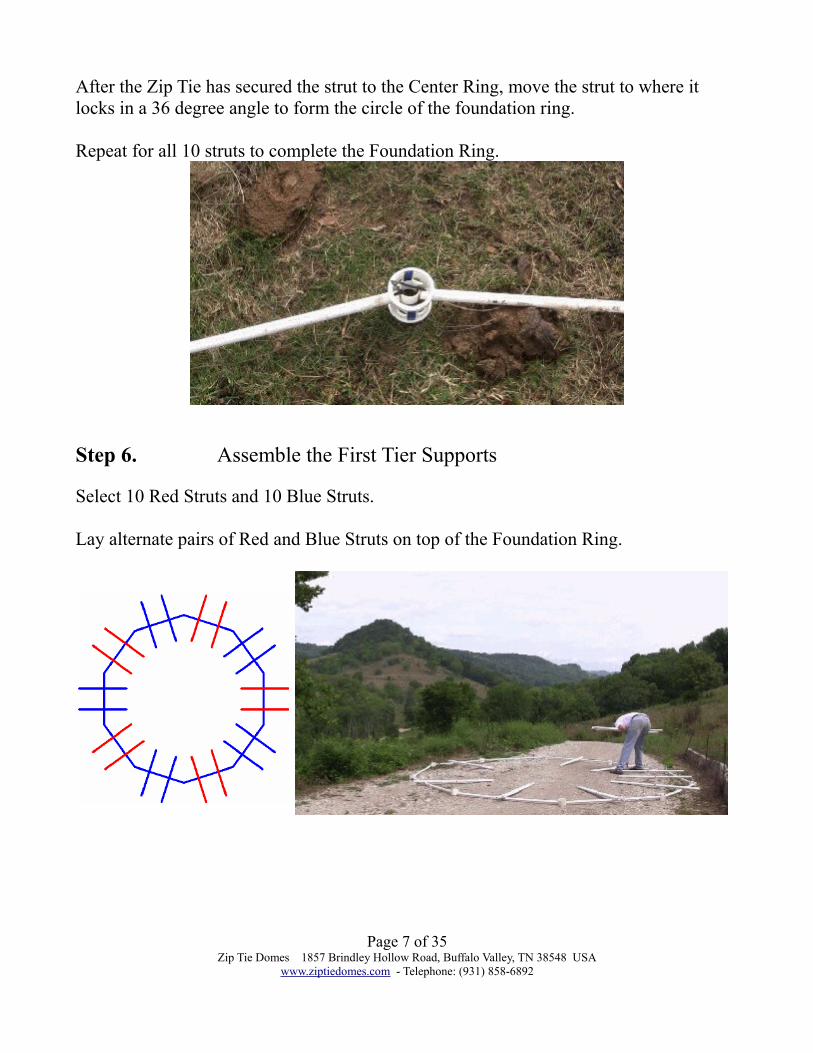
After the Zip Tie has secured the strut to the Center Ring, move the strut to where it locks in a 36 degree angle to form the circle of the foundation ring.
Repeat for all 10 struts to complete the Foundation Ring.
Step 6. Assemble the First Tier Supports
Select 10 Red Struts and 10 Blue Struts.
Lay alternate pairs of Red and Blue Struts on top of the Foundation Ring.
Page 7 of 35Zip Tie Domes 1857 Brindley Hollow Road, Buffalo Valley, TN 38548 USA
www.ziptiedomes.com - Telephone: (931) 858-6892
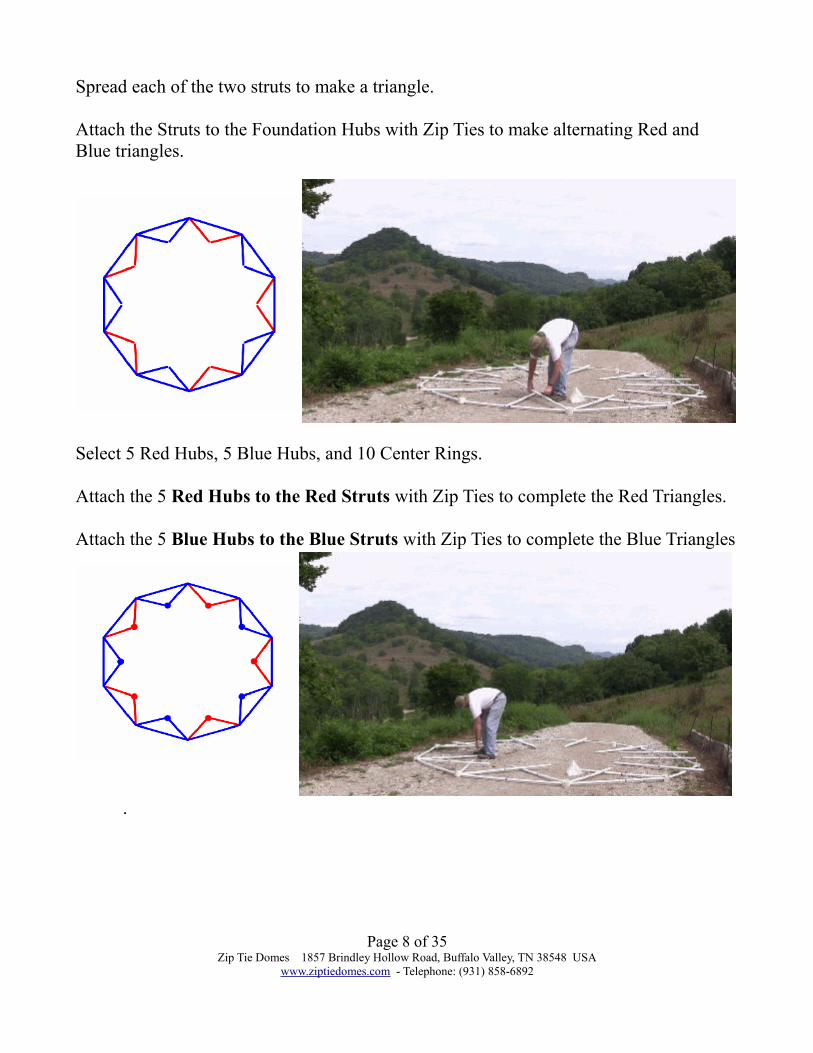
Spread each of the two struts to make a triangle.
Attach the Struts to the Foundation Hubs with Zip Ties to make alternating Red and Blue triangles.
Select 5 Red Hubs, 5 Blue Hubs, and 10 Center Rings.
Attach the 5 Red Hubs to the Red Struts with Zip Ties to complete the Red Triangles.
Attach the 5 Blue Hubs to the Blue Struts with Zip Ties to complete the Blue Triangles
.
Page 8 of 35Zip Tie Domes 1857 Brindley Hollow Road, Buffalo Valley, TN 38548 USA
www.ziptiedomes.com - Telephone: (931) 858-6892
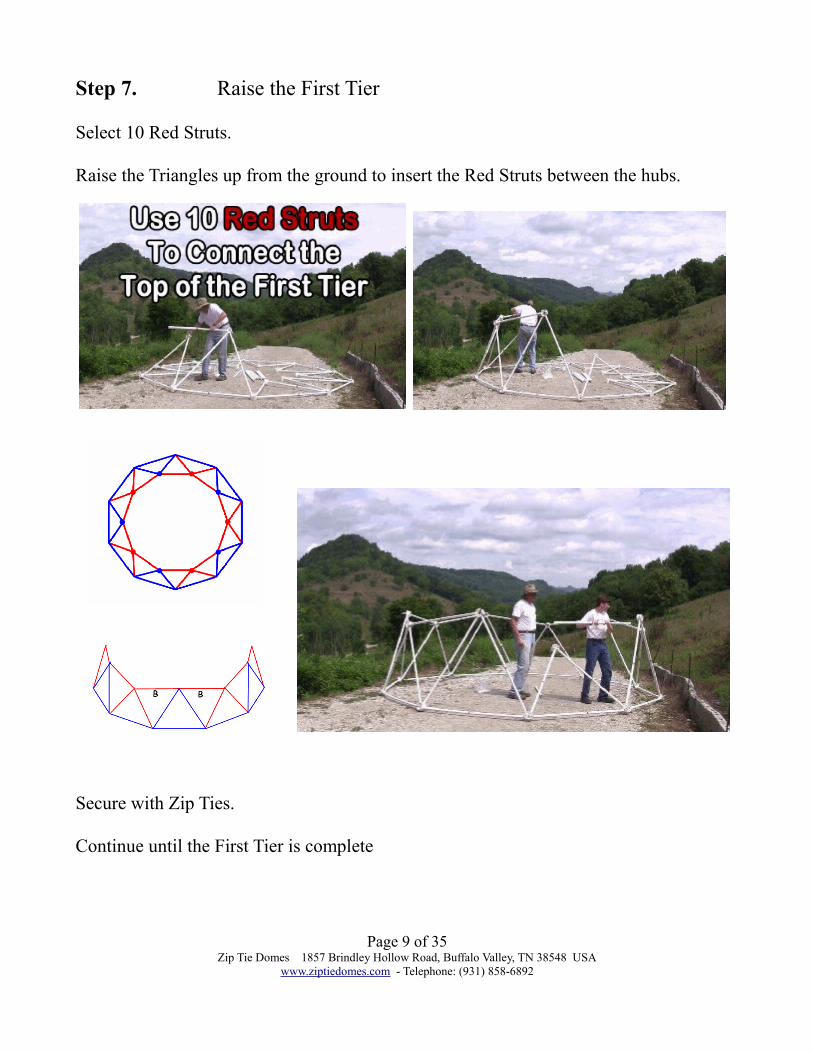
Step 7. Raise the First Tier
Select 10 Red Struts.
Raise the Triangles up from the ground to insert the Red Struts between the hubs.
Secure with Zip Ties.
Continue until the First Tier is complete
Page 9 of 35Zip Tie Domes 1857 Brindley Hollow Road, Buffalo Valley, TN 38548 USA
www.ziptiedomes.com - Telephone: (931) 858-6892
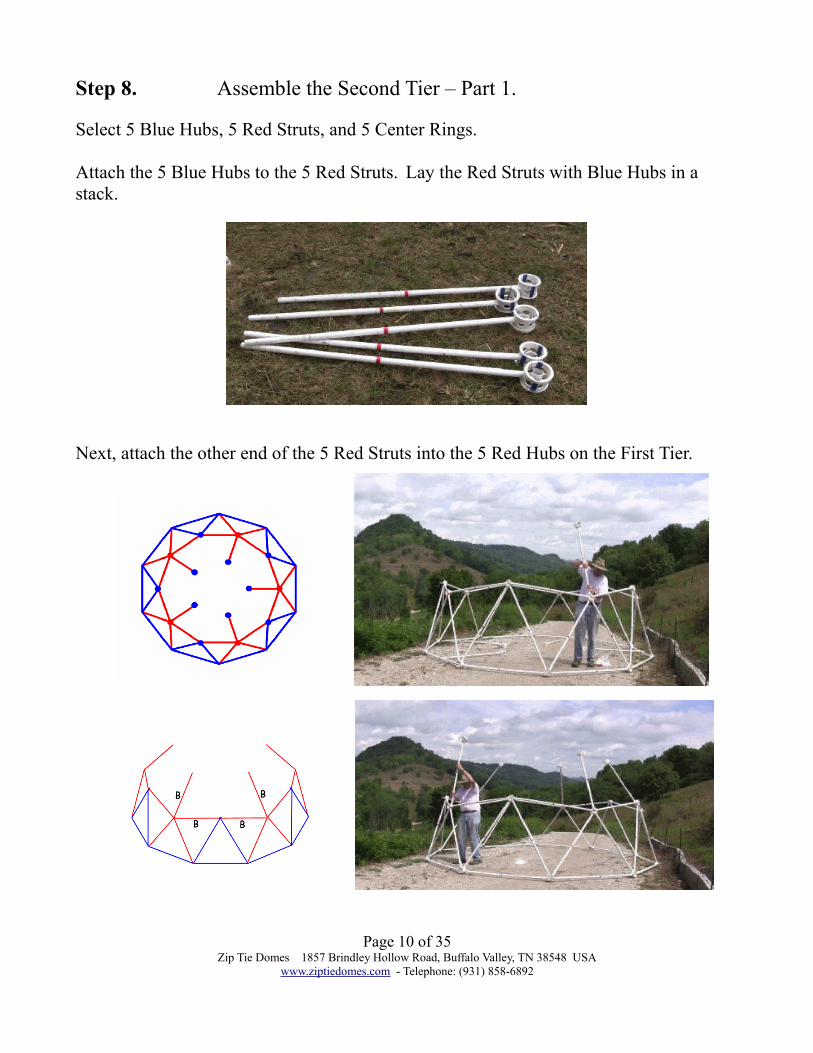
Step 8. Assemble the Second Tier – Part 1.
Select 5 Blue Hubs, 5 Red Struts, and 5 Center Rings.
Attach the 5 Blue Hubs to the 5 Red Struts. Lay the Red Struts with Blue Hubs in a stack.
Next, attach the other end of the 5 Red Struts into the 5 Red Hubs on the First Tier.
Page 10 of 35Zip Tie Domes 1857 Brindley Hollow Road, Buffalo Valley, TN 38548 USA
www.ziptiedomes.com - Telephone: (931) 858-6892
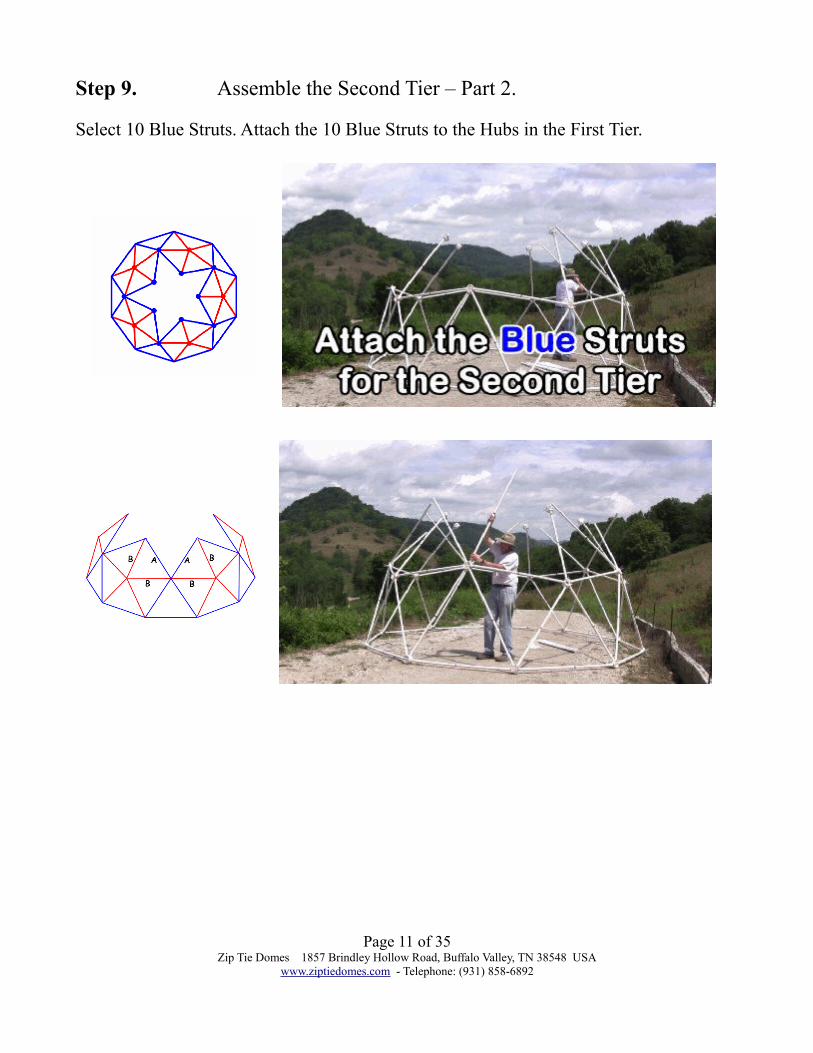
Step 9. Assemble the Second Tier – Part 2.
Select 10 Blue Struts. Attach the 10 Blue Struts to the Hubs in the First Tier.
Page 11 of 35Zip Tie Domes 1857 Brindley Hollow Road, Buffalo Valley, TN 38548 USA
www.ziptiedomes.com - Telephone: (931) 858-6892
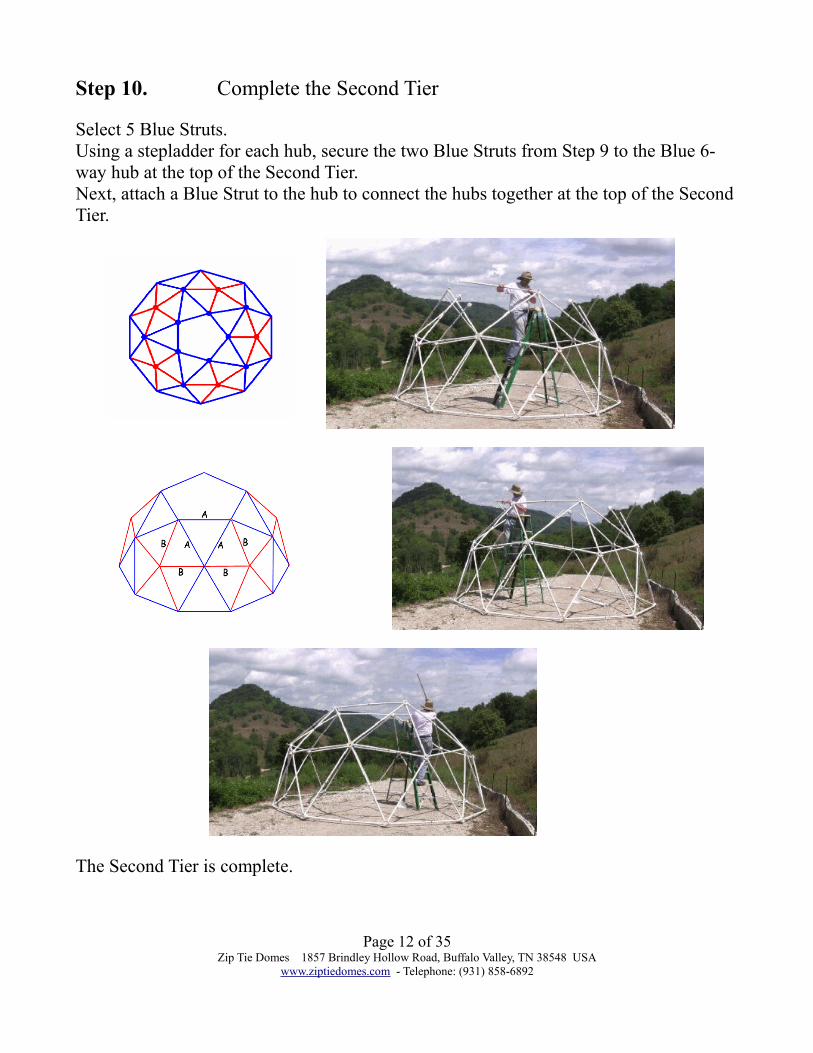
Step 10. Complete the Second Tier
Select 5 Blue Struts. Using a stepladder for each hub, secure the two Blue Struts from Step 9 to the Blue 6-way hub at the top of the Second Tier.Next, attach a Blue Strut to the hub to connect the hubs together at the top of the Second Tier.
The Second Tier is complete.
Page 12 of 35Zip Tie Domes 1857 Brindley Hollow Road, Buffalo Valley, TN 38548 USA
www.ziptiedomes.com - Telephone: (931) 858-6892
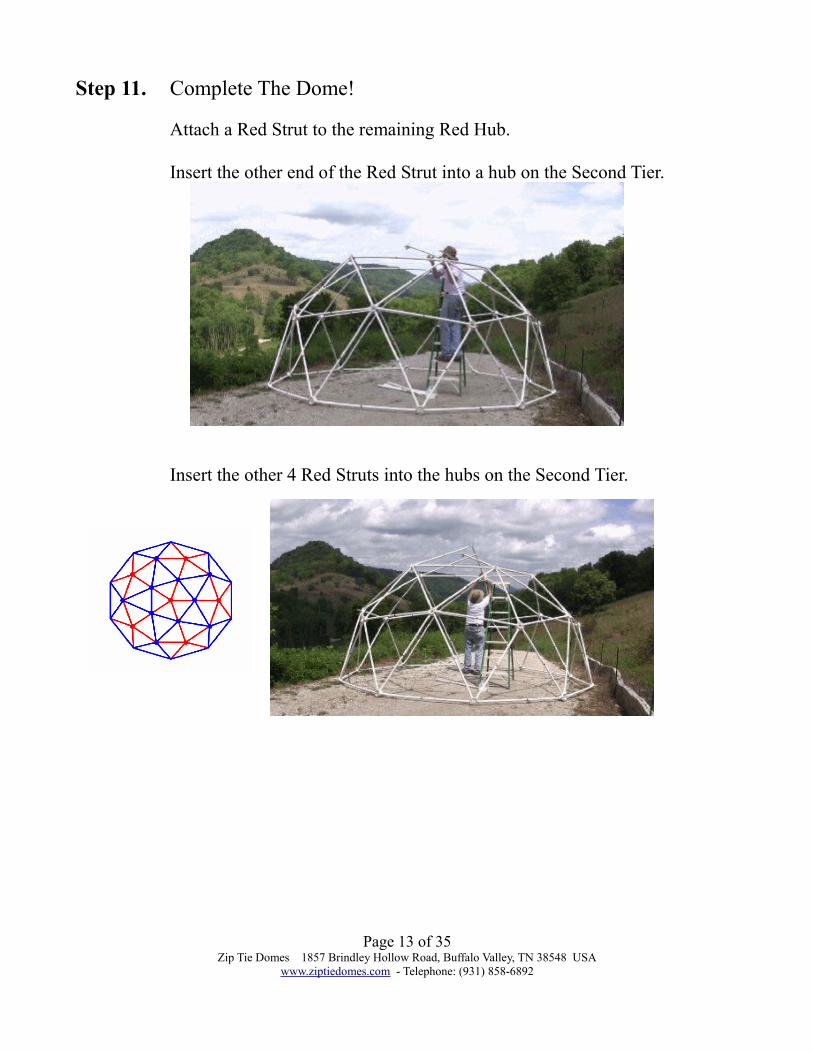
Step 11. Complete The Dome!
Attach a Red Strut to the remaining Red Hub.
Insert the other end of the Red Strut into a hub on the Second Tier.
Insert the other 4 Red Struts into the hubs on the Second Tier.
Page 13 of 35Zip Tie Domes 1857 Brindley Hollow Road, Buffalo Valley, TN 38548 USA
www.ziptiedomes.com - Telephone: (931) 858-6892
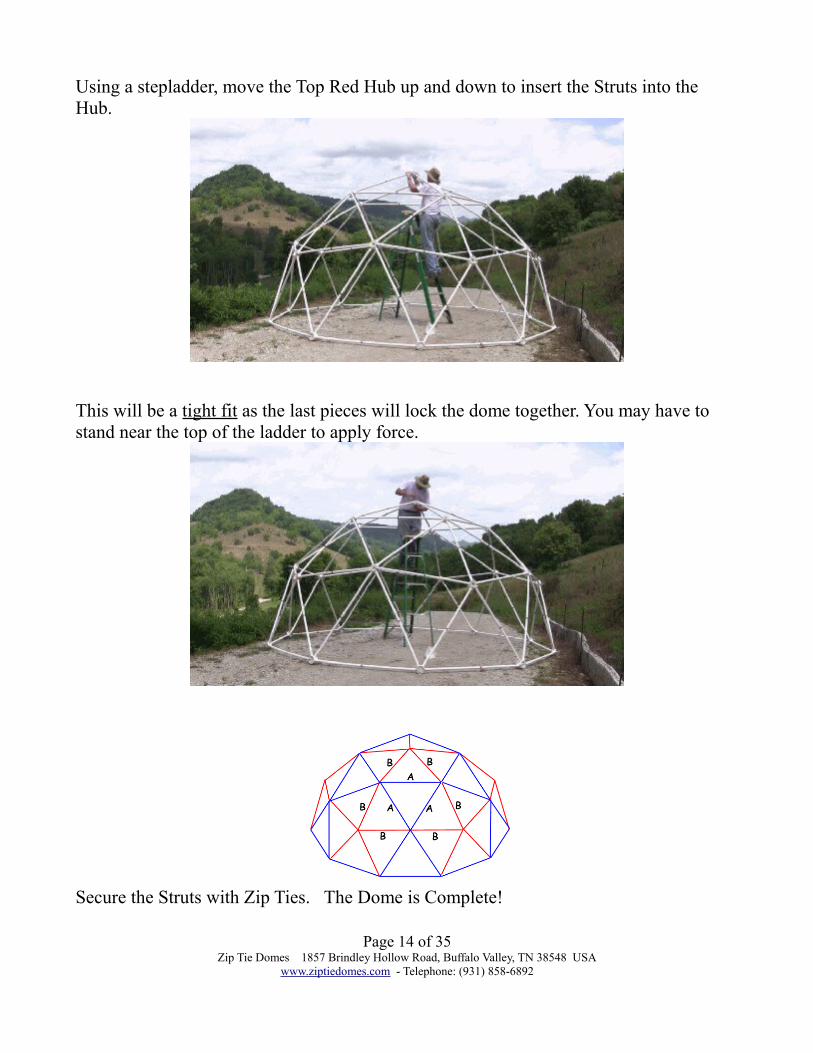
Using a stepladder, move the Top Red Hub up and down to insert the Struts into the Hub.
This will be a tight fit as the last pieces will lock the dome together. You may have to stand near the top of the ladder to apply force.
Secure the Struts with Zip Ties. The Dome is Complete!
Page 14 of 35Zip Tie Domes 1857 Brindley Hollow Road, Buffalo Valley, TN 38548 USA
www.ziptiedomes.com - Telephone: (931) 858-6892
How to Cut Your Own StrutsUse the Dome Calculator at www.ZipTieDomes.com to determine your strut lengths. The Blue struts on the calculator are always the longest struts, and this is the place to enter your data. For maximum strength, the longest struts should not be greater than 5 feet in length.
The hubs are designed for 1” PVC pipe with 1.315” OD. If you want to use 3/4” or 1” EMT conduit, upon request we will drill the hubs with the correct apertures for these ODs as a special order.
The Dome Calculator Material Utilization Chart will indicate the number of pipes that you will need to purchase.
Common sizes for 10' pipe material are:
16' 2V Dome: 35 Blue Struts – 5' length30 Red Struts - 4' 5” length
Total pieces of 10' Pipe needed: 33
10' 2V Dome: 35 Blue Struts – 3' 4” length30 Red Struts - 2' 11 3/8” length
Total pieces of 10' Pipe needed: 22
25' 3V 3/8 Dome: 50 Blue Struts – 5' length40 Yellow Struts – 4' 10 3/4” length30 Red Struts - 4' 2 3/4” length
Total pieces of 10' Pipe needed: 60
25' 3V 5/8 Dome: 80 Blue Struts – 5' length55 Yellow Struts – 4' 10 3/4” length30 Red Struts - 4' 2 3/4” length
Total pieces of 10' Pipe needed: 83
16' 3V 3/8 Dome: 50 Blue Struts – 3' 4” length40 Yellow Struts – 3' 3-1/8” length
Page 15 of 35Zip Tie Domes 1857 Brindley Hollow Road, Buffalo Valley, TN 38548 USA
www.ziptiedomes.com - Telephone: (931) 858-6892
30 Red Struts - 2' 9-7/8” lengthTotal pieces of 10' Pipe needed: 56
16' 3V 5/8 Dome: 80 Blue Struts – 3' 4” length55 Yellow Struts – 3' 3-1/8” length30 Red Struts - 2' 9-7/8” length
Total pieces of 10' Pipe needed: 41
Common sizes for 20' pipe material are:
13' 2V Dome: 35 Blue Struts – 4' length30 Red Struts - 3' 6-1/2” length
Total pieces of 20' Pipe needed: 13
19' 3V 3/8 Dome: 50 Blue Struts – 4' length40 Yellow Struts – 3' 11” length30 Red Struts - 3' 4-5/8” length
Total pieces of 20' Pipe needed: 24
19' 3V 5/8 Dome: 80 Blue Struts – 4' length55 Yellow Struts – 3' 11” length30 Red Struts - 3' 4-5/8” length
Total pieces of 20' Pipe needed: 33
How to Cut and Drill the Struts:
Mark the pipe with a marker, using a tape measure or a jig for the length.
Cut the pipe to length using a pipe cutter or chop saw.
Drill a 5/16” or 3/8” hole across each of the ends of the pipe, about 3/8” to 1/2” from thepipe ends. Use a drill press if possible.
Page 16 of 35Zip Tie Domes 1857 Brindley Hollow Road, Buffalo Valley, TN 38548 USA
www.ziptiedomes.com - Telephone: (931) 858-6892
Drill slowly so you won't crack the pipe.
The holes on each end of the pipe have to be drilled parallel to each other. If they are 90degrees off, you won't be able to attach the end of the strut to the center ring. Try to drill through the lettering on the outside of the pipe, that will help you line up the holes on each end of the strut so they are parallel to each other.
Mark the pipe with Blue, Red, or Yellow colored tape to help you distinguish them during setup.
Page 17 of 35Zip Tie Domes 1857 Brindley Hollow Road, Buffalo Valley, TN 38548 USA
www.ziptiedomes.com - Telephone: (931) 858-6892
How to Attach A Greenhouse CoveringGreenhouse Plastic can be purchased from your Farmer's Co-Op, a Greenhouse supply store, or from Farmtek at www.farmtek.com
Recommended Greenhouse Covering Sizes:
Dome Size: Covering Size:
10' Dome (5' tall) 20' x 20'
13' Dome (6' 6” tall) 24' x 24'
16' Dome (8' tall) 30' x 30'
25' 3/8 Dome (10' tall) 40' x 40'
25' 5/8 Dome (14' tall) 48' x 48'
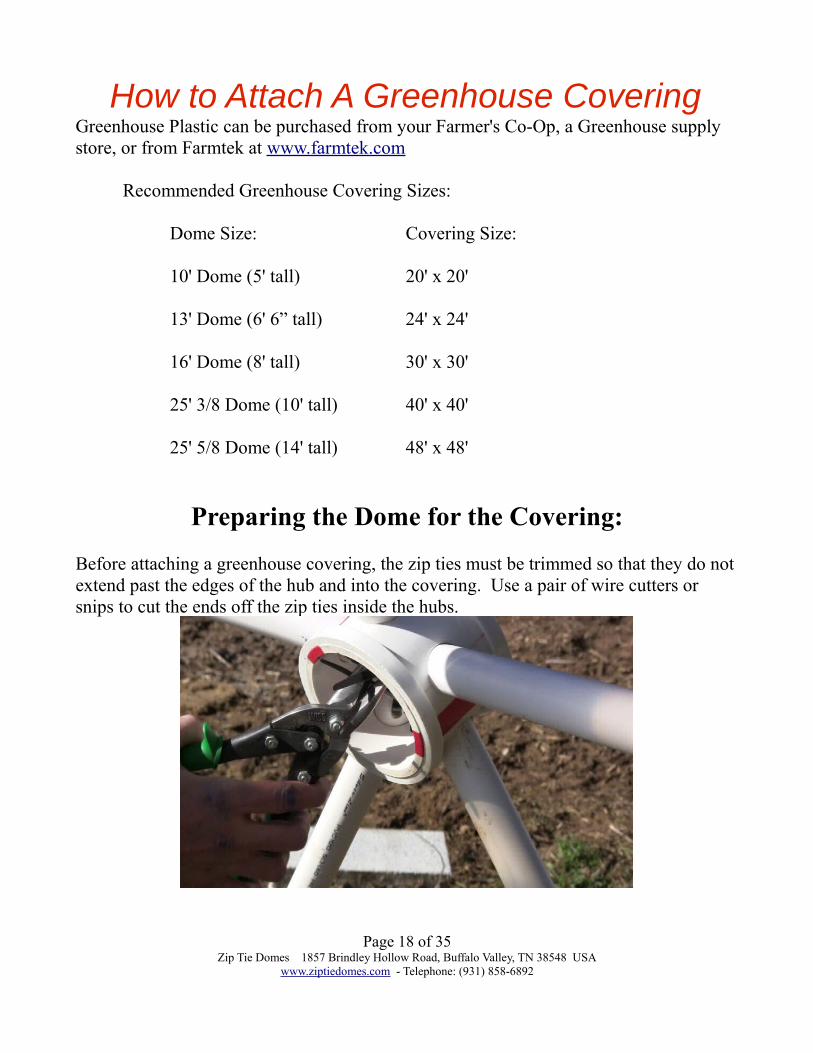
Preparing the Dome for the Covering:
Before attaching a greenhouse covering, the zip ties must be trimmed so that they do notextend past the edges of the hub and into the covering. Use a pair of wire cutters or snips to cut the ends off the zip ties inside the hubs.
Page 18 of 35Zip Tie Domes 1857 Brindley Hollow Road, Buffalo Valley, TN 38548 USA
www.ziptiedomes.com - Telephone: (931) 858-6892
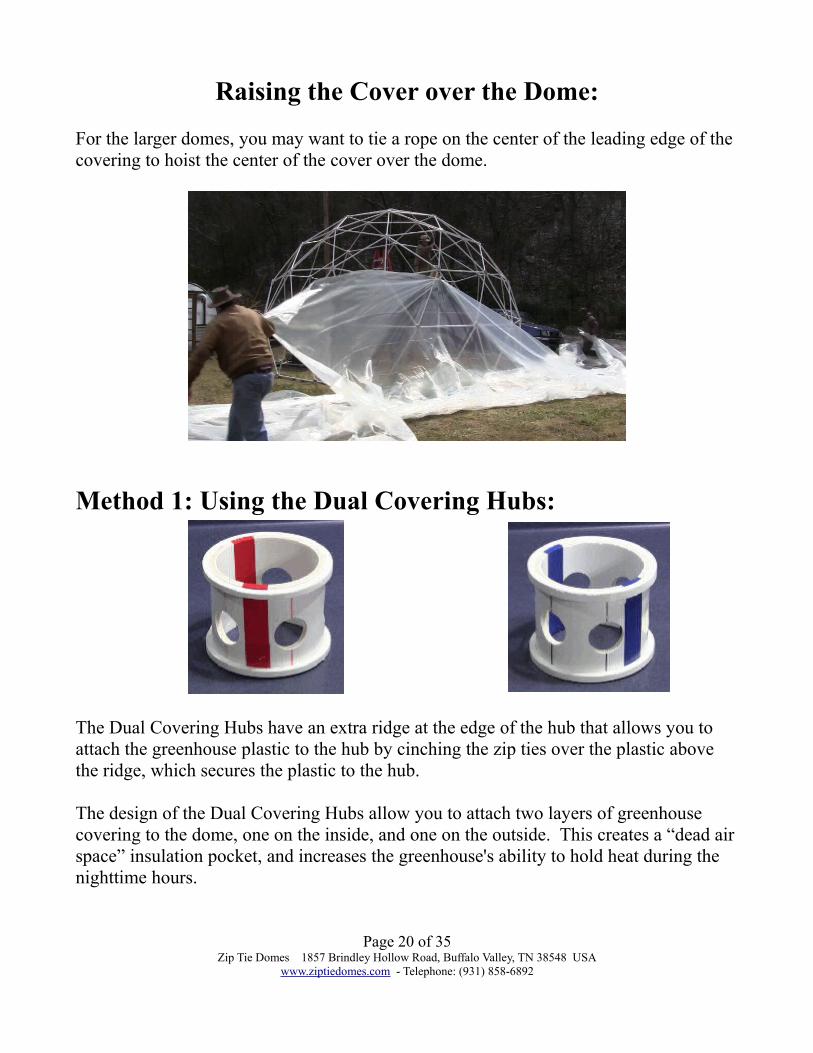
Painting or Taping the Dome to Separate the PVC from the Greenhouse Plastic
PVC pipe will slowly produce chlorine gas, which may destroy the UV light stabilizers in polyethylene greenhouse film. This chlorine gas from PVC pipe will cause certain types of 4 year greenhouse plastic to have holes and tears after the first year.
For this reason, your greenhouse plastic warranty may be voided if your greenhouse plastic comes in direct contact with PVC. Contact the greenhouse plastic manufacturer for details.
Greenhouse plastic can also be damaged by oil based paints, wood preservatives, chlorine based disinfectants, and certain pesticides, especially those containing sulfur or copper. This problem is not specific to our geodesic domes, but is evident in any type of PVC greenhouse structure.
Solution: Acrylic Latex Paint
To extend the life of your greenhouse plastic, before you attach your greenhouse plastic, use a white acrylic latex paint and paint any PVC struts and hubs that will come in directcontact with your plastic.
Alternate Solution: Clear Packing Tape
Another technique is to cover the hubs and struts with a non-PVC tape, such as clear packing tape. Applying tape over the hubs helps to smooth any rough edges that might rub against the plastic sheet.
Page 19 of 35Zip Tie Domes 1857 Brindley Hollow Road, Buffalo Valley, TN 38548 USA
www.ziptiedomes.com - Telephone: (931) 858-6892
Raising the Cover over the Dome:
For the larger domes, you may want to tie a rope on the center of the leading edge of the covering to hoist the center of the cover over the dome.
Method 1: Using the Dual Covering Hubs:
The Dual Covering Hubs have an extra ridge at the edge of the hub that allows you to attach the greenhouse plastic to the hub by cinching the zip ties over the plastic above the ridge, which secures the plastic to the hub.
The design of the Dual Covering Hubs allow you to attach two layers of greenhouse covering to the dome, one on the inside, and one on the outside. This creates a “dead airspace” insulation pocket, and increases the greenhouse's ability to hold heat during the nighttime hours.
Page 20 of 35Zip Tie Domes 1857 Brindley Hollow Road, Buffalo Valley, TN 38548 USA
www.ziptiedomes.com - Telephone: (931) 858-6892
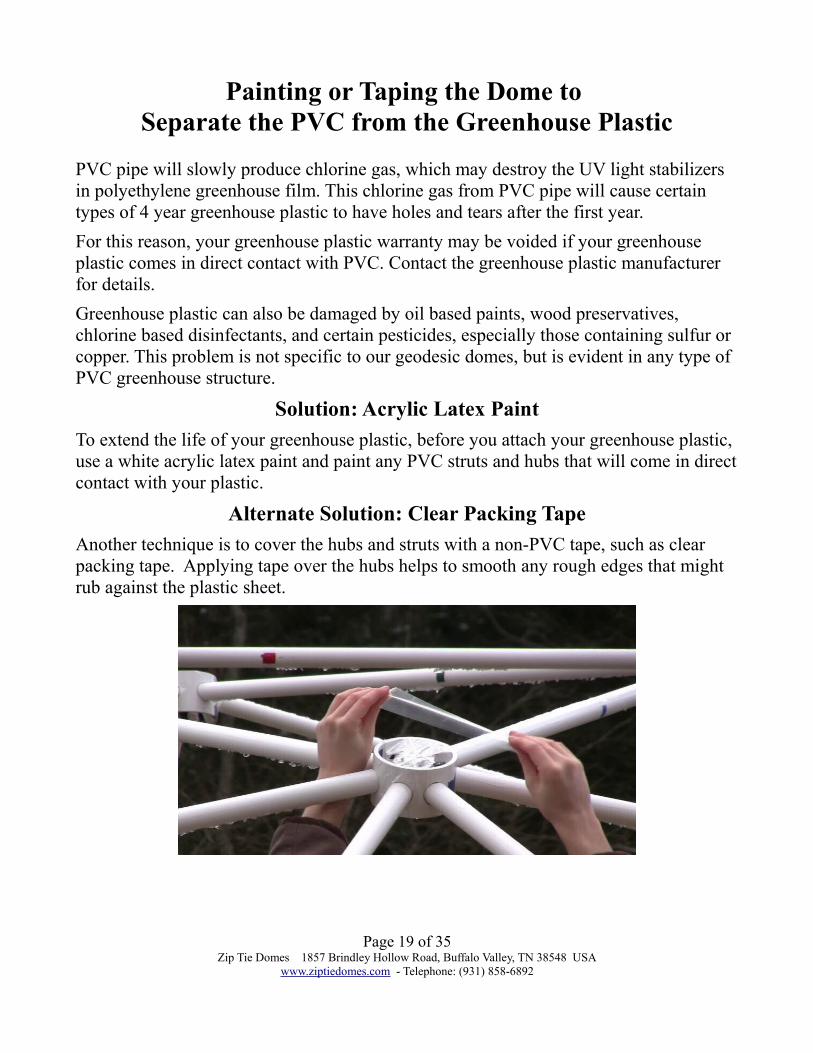
To attach the greenhouse covering to a Dual Covering Hub:
Connect 3 Heavy Duty 8” Zip Ties together in a “daisy chain” circle, with each of the Zip Tie Ratchet Knobs on the outside of the circle.
Attach the plastic to the dome by wrapping the plastic over the hub, and secure the plastic by cinching the 3 Zip Ties down over the plastic on the hub between the edge of the struts and the ridge on the outside of the hub.
Page 21 of 35Zip Tie Domes 1857 Brindley Hollow Road, Buffalo Valley, TN 38548 USA
www.ziptiedomes.com - Telephone: (931) 858-6892
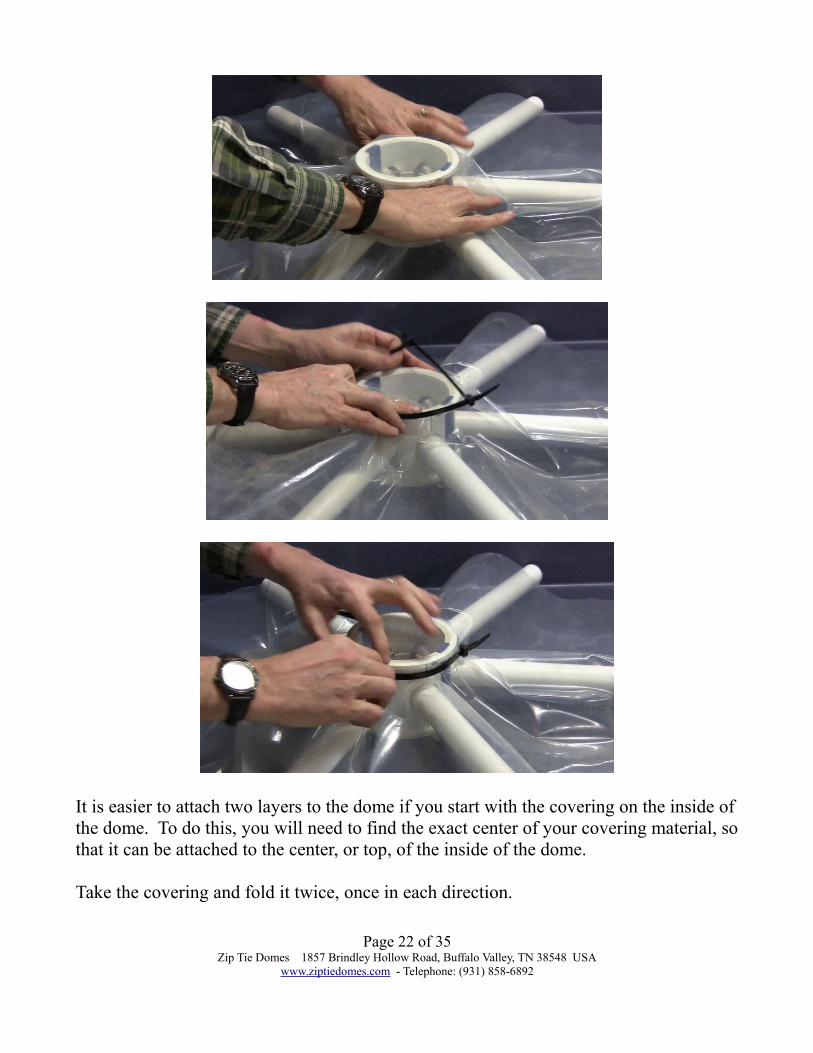
It is easier to attach two layers to the dome if you start with the covering on the inside ofthe dome. To do this, you will need to find the exact center of your covering material, sothat it can be attached to the center, or top, of the inside of the dome.
Take the covering and fold it twice, once in each direction.
Page 22 of 35Zip Tie Domes 1857 Brindley Hollow Road, Buffalo Valley, TN 38548 USA
www.ziptiedomes.com - Telephone: (931) 858-6892
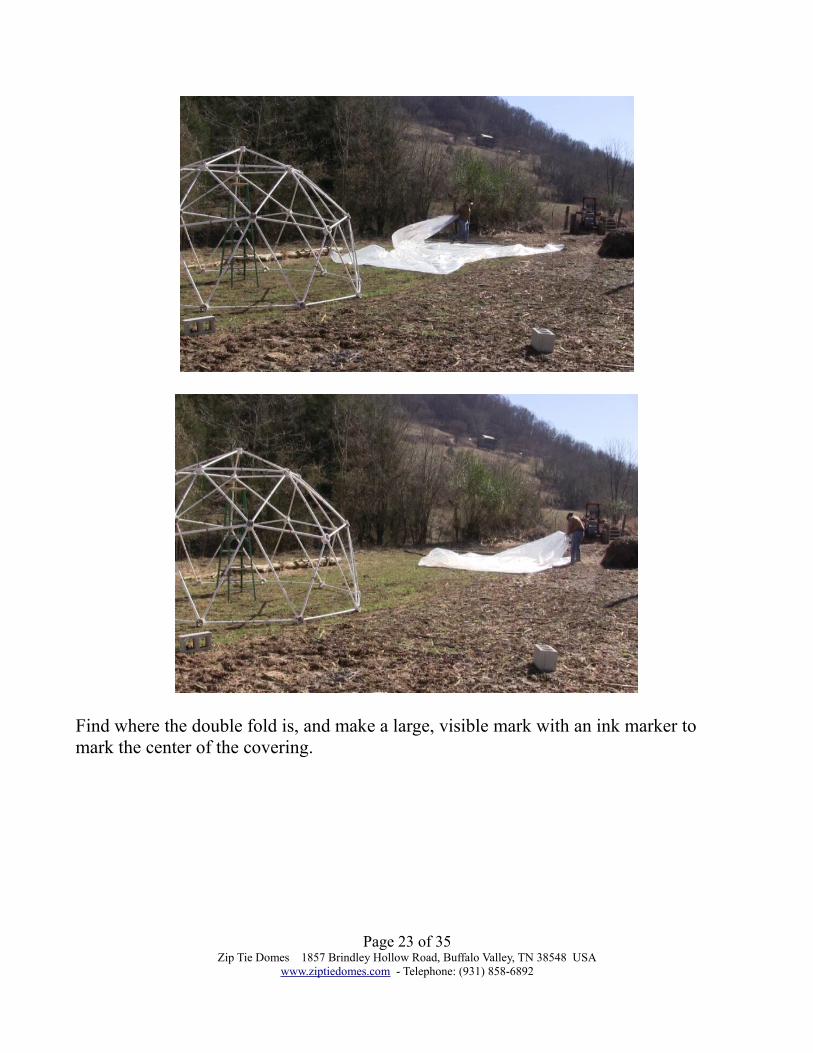
Find where the double fold is, and make a large, visible mark with an ink marker to mark the center of the covering.
Page 23 of 35Zip Tie Domes 1857 Brindley Hollow Road, Buffalo Valley, TN 38548 USA
www.ziptiedomes.com - Telephone: (931) 858-6892
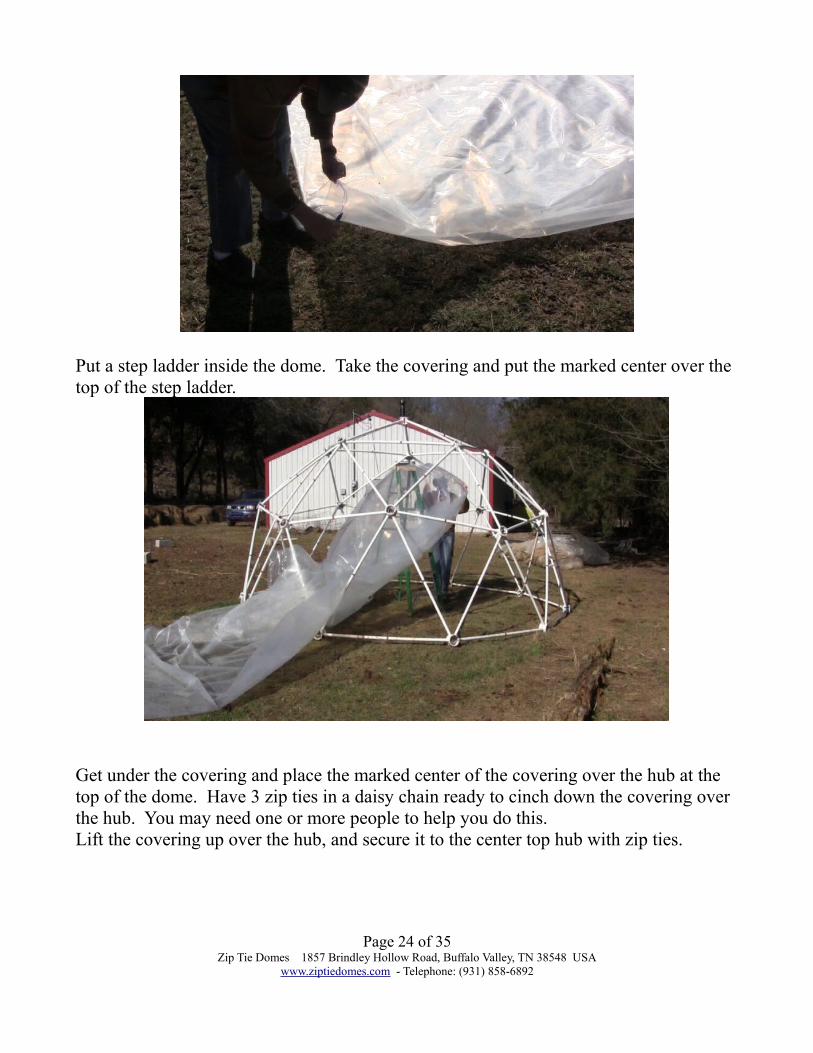
Put a step ladder inside the dome. Take the covering and put the marked center over the top of the step ladder.
Get under the covering and place the marked center of the covering over the hub at the top of the dome. Have 3 zip ties in a daisy chain ready to cinch down the covering over the hub. You may need one or more people to help you do this.Lift the covering up over the hub, and secure it to the center top hub with zip ties.
Page 24 of 35Zip Tie Domes 1857 Brindley Hollow Road, Buffalo Valley, TN 38548 USA
www.ziptiedomes.com - Telephone: (931) 858-6892
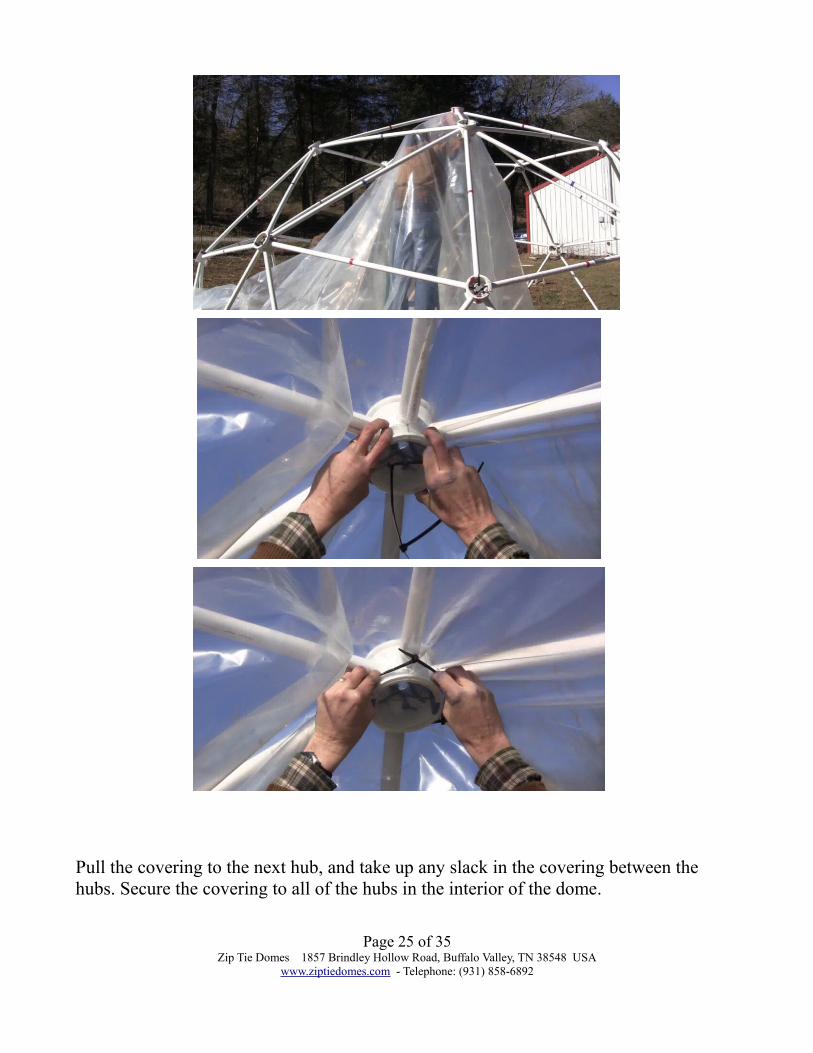
Pull the covering to the next hub, and take up any slack in the covering between the hubs. Secure the covering to all of the hubs in the interior of the dome.
Page 25 of 35Zip Tie Domes 1857 Brindley Hollow Road, Buffalo Valley, TN 38548 USA
www.ziptiedomes.com - Telephone: (931) 858-6892

Pull the outside covering over the outside of the dome. Use Zip Ties to secure the outside covering to the hubs on the sides and on the bottom of the dome.
Method 2: Using the Standard Economy Hubs
The Standard Economy Hubs do not have a ridge on the edge of the hubs for attaching two layers of greenhouse covering. With the Standard Economy Hubs, only one layer ofgreenhouse covering can be attached to the outside of the dome using Test Cap Covers and Greenhouse Clips. For an overview, please see our video at www.ZipTieDomes.com “How to Attach A Cover with Test Caps and Pleats.”The Greenhouse Clips are for attaching the greenhouse covering to the 1.315” OD PVC pipe, and can be purchased from FarmTek or a Greenhouse Supply store.
Page 26 of 35Zip Tie Domes 1857 Brindley Hollow Road, Buffalo Valley, TN 38548 USA
www.ziptiedomes.com - Telephone: (931) 858-6892
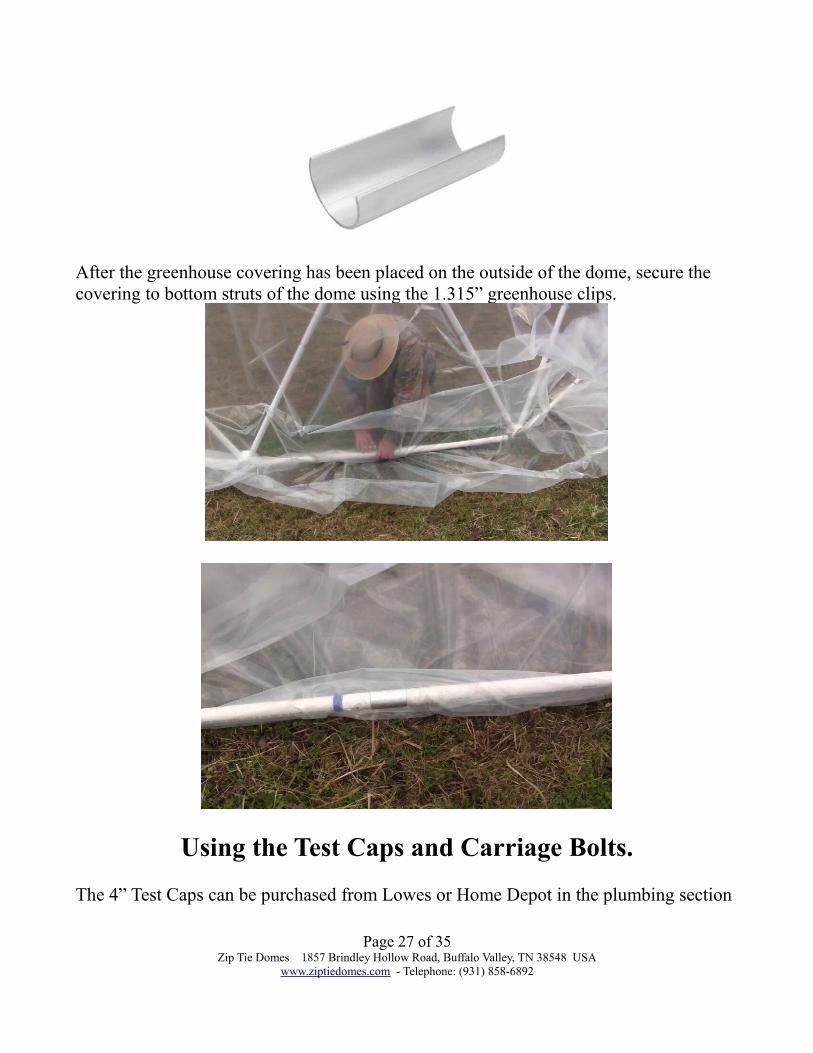
After the greenhouse covering has been placed on the outside of the dome, secure the covering to bottom struts of the dome using the 1.315” greenhouse clips.
Using the Test Caps and Carriage Bolts.
The 4” Test Caps can be purchased from Lowes or Home Depot in the plumbing section
Page 27 of 35Zip Tie Domes 1857 Brindley Hollow Road, Buffalo Valley, TN 38548 USA
www.ziptiedomes.com - Telephone: (931) 858-6892

of the store.
For the 3v 24' dome, you will need: For the 2v 16' dome, you will need:
30 Test Caps 20 Test Caps15 carriage bolts that are 5” long, 10 carriage bolts 5” longand 15 nuts and washers for the bolts. 10 nuts and washers for the bolts.
A hole needs to be drilled in the center of each Test Cap slightly larger than the diameter of the carriage bolt, so that the carriage bolt can be inserted. Assemble the Test Caps with the carriage bolts inserted.
The Test Caps and carriage bolts will be used on the hubs at the top of the first tier of thedome. Fold any excess greenhouse covering over the hubs on the top of the first tier to make a pleat. Insert the carriage bolt through the pleat, and through the center ring of the hub.
Page 28 of 35Zip Tie Domes 1857 Brindley Hollow Road, Buffalo Valley, TN 38548 USA
www.ziptiedomes.com - Telephone: (931) 858-6892
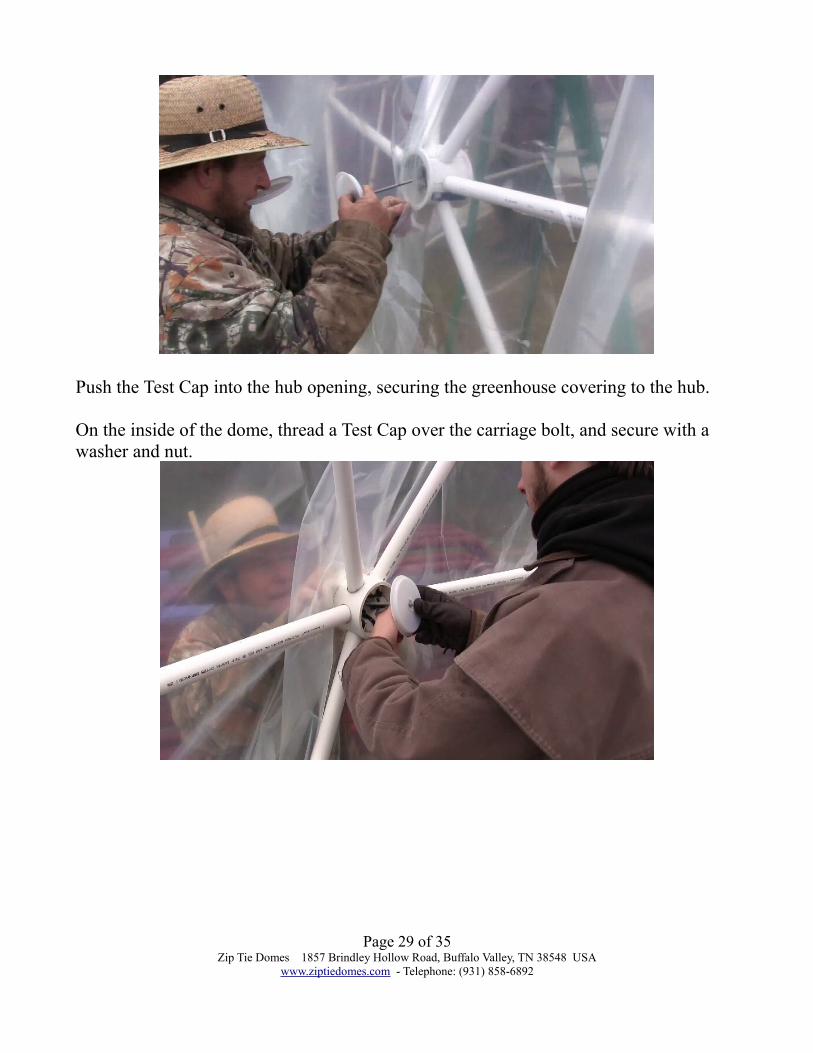
Push the Test Cap into the hub opening, securing the greenhouse covering to the hub.
On the inside of the dome, thread a Test Cap over the carriage bolt, and secure with a washer and nut.
Page 29 of 35Zip Tie Domes 1857 Brindley Hollow Road, Buffalo Valley, TN 38548 USA
www.ziptiedomes.com - Telephone: (931) 858-6892
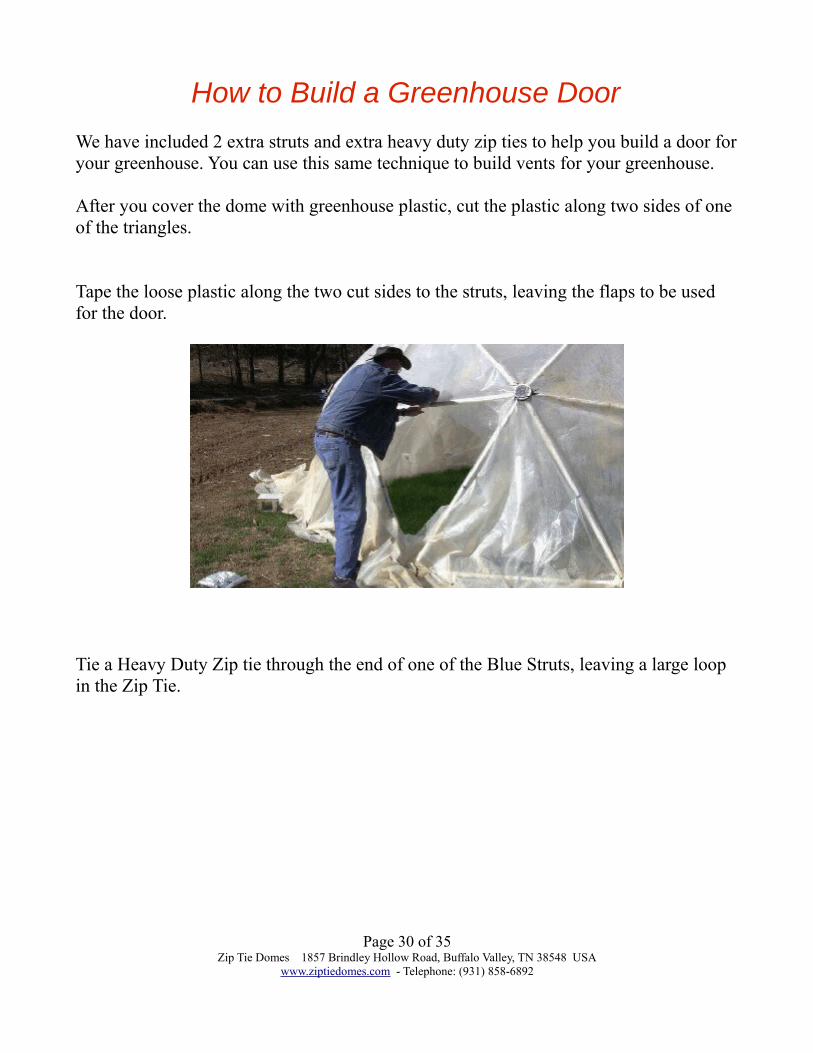
How to Build a Greenhouse Door
We have included 2 extra struts and extra heavy duty zip ties to help you build a door foryour greenhouse. You can use this same technique to build vents for your greenhouse.
After you cover the dome with greenhouse plastic, cut the plastic along two sides of one of the triangles.
Tape the loose plastic along the two cut sides to the struts, leaving the flaps to be used for the door.
Tie a Heavy Duty Zip tie through the end of one of the Blue Struts, leaving a large loop in the Zip Tie.
Page 30 of 35Zip Tie Domes 1857 Brindley Hollow Road, Buffalo Valley, TN 38548 USA
www.ziptiedomes.com - Telephone: (931) 858-6892
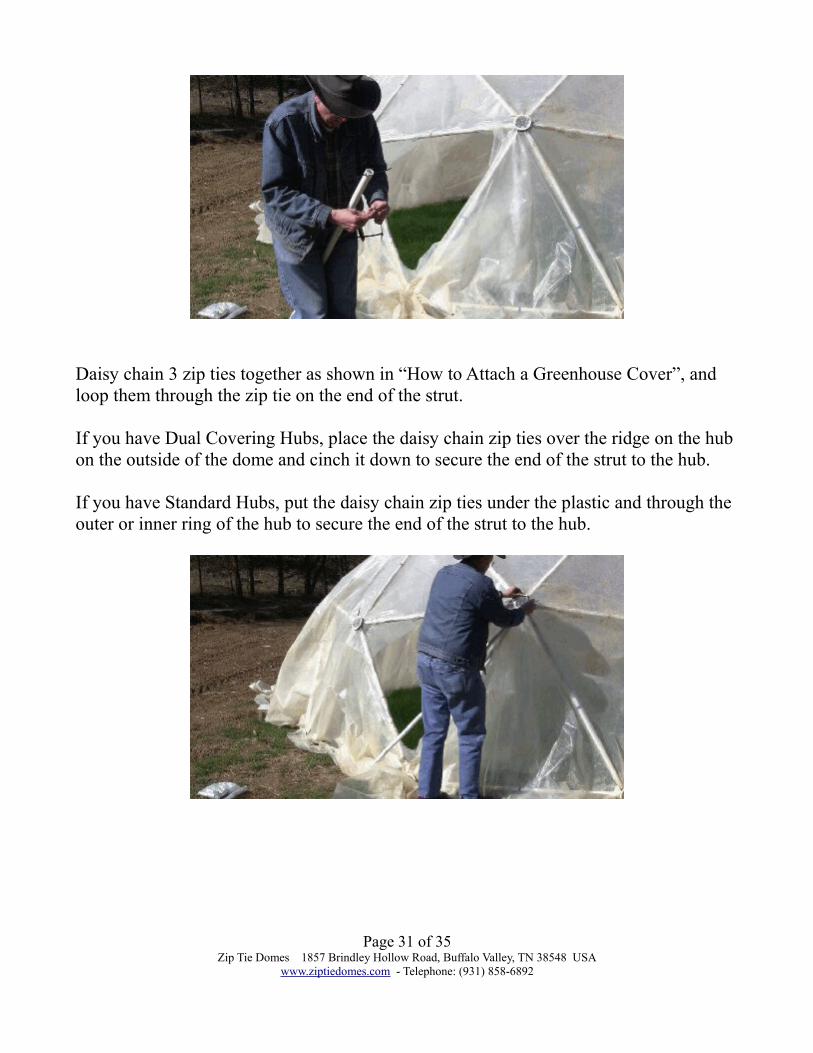
Daisy chain 3 zip ties together as shown in “How to Attach a Greenhouse Cover”, and loop them through the zip tie on the end of the strut.
If you have Dual Covering Hubs, place the daisy chain zip ties over the ridge on the hub on the outside of the dome and cinch it down to secure the end of the strut to the hub.
If you have Standard Hubs, put the daisy chain zip ties under the plastic and through the outer or inner ring of the hub to secure the end of the strut to the hub.
Page 31 of 35Zip Tie Domes 1857 Brindley Hollow Road, Buffalo Valley, TN 38548 USA
www.ziptiedomes.com - Telephone: (931) 858-6892
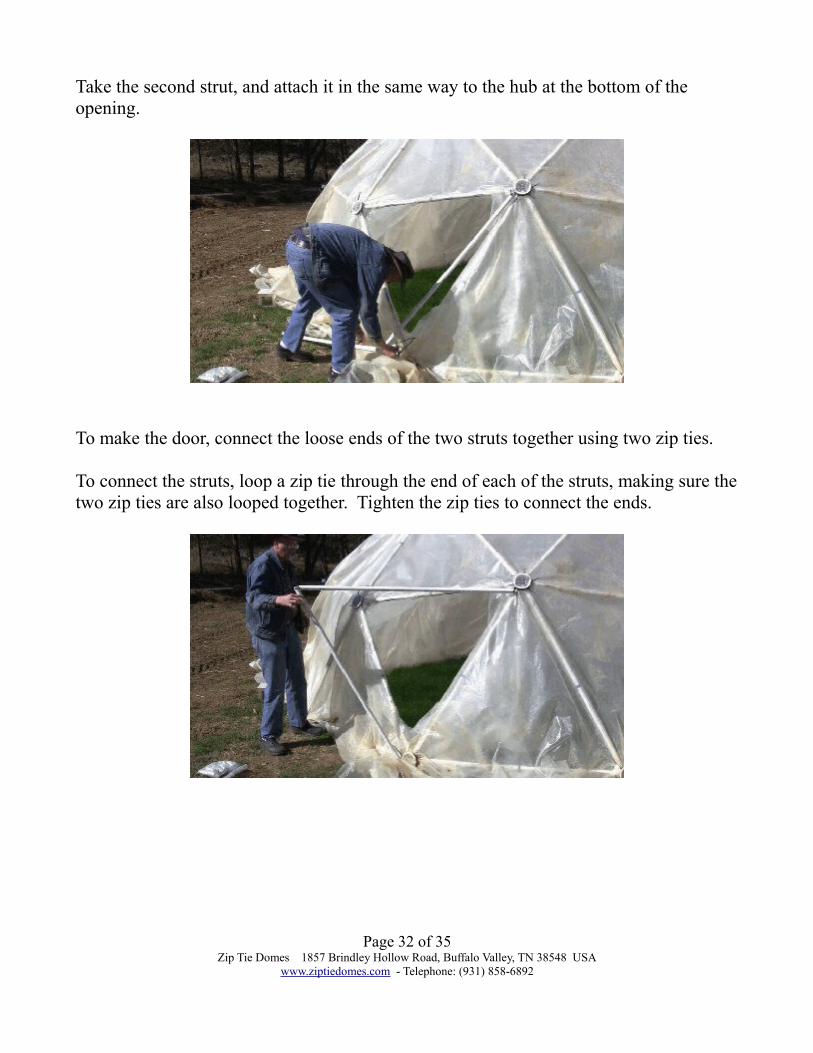
Take the second strut, and attach it in the same way to the hub at the bottom of the opening.
To make the door, connect the loose ends of the two struts together using two zip ties.
To connect the struts, loop a zip tie through the end of each of the struts, making sure thetwo zip ties are also looped together. Tighten the zip ties to connect the ends.
Page 32 of 35Zip Tie Domes 1857 Brindley Hollow Road, Buffalo Valley, TN 38548 USA
www.ziptiedomes.com - Telephone: (931) 858-6892
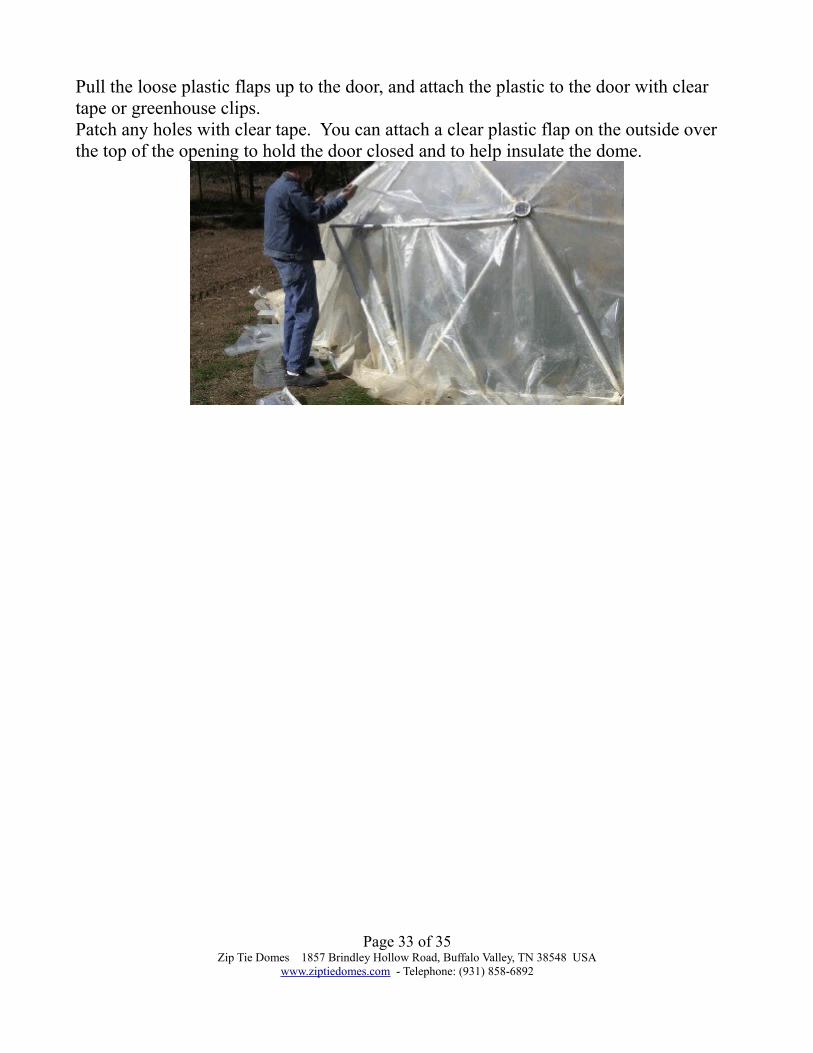
Pull the loose plastic flaps up to the door, and attach the plastic to the door with clear tape or greenhouse clips.Patch any holes with clear tape. You can attach a clear plastic flap on the outside over the top of the opening to hold the door closed and to help insulate the dome.
Page 33 of 35Zip Tie Domes 1857 Brindley Hollow Road, Buffalo Valley, TN 38548 USA
www.ziptiedomes.com - Telephone: (931) 858-6892


![[LAYOUT 3 TWO RETAIL GEODESIC DOMES populated]](https://img.pdfslide.us/doc/110x75/621a25eb6394ea7af60cc04c/layout-3-two-retail-geodesic-domes-populated.jpg)