Embed Size (px)
Citation preview
2013 Xenios LLC 82 Saint Paul Street
Rochester, NY 14604 Phone 585.325.5242 • Fax 585.325.6989
2TouchPOS Operations Reference Guide
Table of Contents
About this Document ..................................................................................... 3
Employee Operations ..................................................................................... 4
Quick Reference ................................................................................................... 4
Beginning of Shift ................................................................................................................ 4
Login & Logout .................................................................................................................... 4
Taking an order ................................................................................................................... 4
Open Existing Tab............................................................................................................... 4
Printing Check ..................................................................................................................... 4
Open Tab for Payment ........................................................................................................ 4
Adjusting Tips on Credit Cards ........................................................................................... 4
Open Tab for Splitting ......................................................................................................... 4
Comps and Spills ................................................................................................................ 4
Attach Credit Card............................................................................................................... 4
Deleting Sent Menu Items .................................................................................... 5
Bartender ............................................................................................................................ 5
Server .................................................................................................................................. 6
Adding or Adjusting Tips ....................................................................................... 7
Bartender ............................................................................................................................ 7
Server (If left blank, that employee will lose their tip). ........................................................ 8
Menu Item Hold / Release .................................................................................. 10
Reference Guide ............................................................................................................... 10
Putting Items on Hold from a Tab ..................................................................................... 10
Releasing Items from a Tab .............................................................................................. 11
Putting Items on Hold from a Table .................................................................................. 12
Releasing Items from a Table ........................................................................................... 13
Bartender End of Shift ........................................................................................ 14
Server End of Shift ............................................................................................. 14
Manager Operations .................................................................................... 15
End of Night ........................................................................................................ 15
Quick Reference ............................................................................................................... 15
End of Night Detailed Reference ........................................................................ 16
Re-Opening a Closed Tab or Table .................................................................... 20
Applying Tax Exempt .......................................................................................... 21
Common Reports ........................................................................................ 22
Cash in Drawer Report ....................................................................................... 22
Server Report ..................................................................................................... 22
Daily X Report .................................................................................................... 22
Daily Z Report ..................................................................................................... 22
Historical Server Report ..................................................................................... 22
Audit Menu Item Report ...................................................................................... 22
Historical Menu Item Report ............................................................................... 22
Historical Modifier Report ................................................................................... 23
Historical Sales Report ....................................................................................... 23
Hourly Sales Report ........................................................................................... 23
Menu Item Summary Report............................................................................... 23
Open Item Report ............................................................................................... 23
Customer Account Payment History Report ....................................................... 23
Customer Account Detail Report ........................................................................ 23
Customer Account Summary Report .................................................................. 23
Troubleshooting Guide ................................................................................ 24
Credit Cards aren’t Processing and the Internet is Down ................................... 25
Quick Reference Guide ..................................................................................................... 25
Detailed Reference ........................................................................................................... 26
Xenios LLC @2013 Page 3
About this Document
This document was written for 2TouchPOS version 3.03.4900.
Xenios LLC @2013 Page 4
Employee Operations
Quick Reference
Beginning of Shift Enter Code & Clock In
Swipe Badge
Login & Logout Login
o Enter Code & Login
o Swipe Badge
Logout
Taking an order Log in
Tabs:
o Add Items, New Tab, Send
Table Management:
o Select Table, New Check, Add
Items, Send
Logout
Open Existing Tab Tabs:
o Open Tab or Check, Add Items,
Send
Table Management:
o Select Table, Open Check, Add
Items, Send
Requisitions will be sent to bar/kitchen –
only the new adds will be sent
Printing Check Tabs:
o Highlight Tab, Print Tab, Speed
Screen
Table Management
Select Table, Print Check
Open Tab for Payment Tabs:
o Highlight Tab, Open Tab, Payment
Table Management:
o Select Table, Payment
Fast cash (Tabs Only) or Payment screen
Split payments (½ cash ½ credit)
o Use Split Payment buttons
o Process Credit Cards first.
Adjusting Tips on Credit Cards Tabs:
Must be at empty speed screen
o Payments
o Adjust Tips
Table Management:
o Adjust Tips
Open Tab for Splitting Tabs:
o Highlight Tab, Split Tab
Table Management:
o Select Table, Split Check
Transfer menu items:
o Updates original and creates new
tabs to be given to customers.
Comps and Spills Tabs:
o Open Tab, Highlight items, Delete
Table Management:
o Select Table, Open Check
Choose Transfer to Comp Tab/Spill Tab
If it was a spill, add items to tab again.
Attach Credit Card
Tabs: Highlight Tab
o Options
o Attach credit card
o Swipe card
Xenios LLC @2013 Page 5
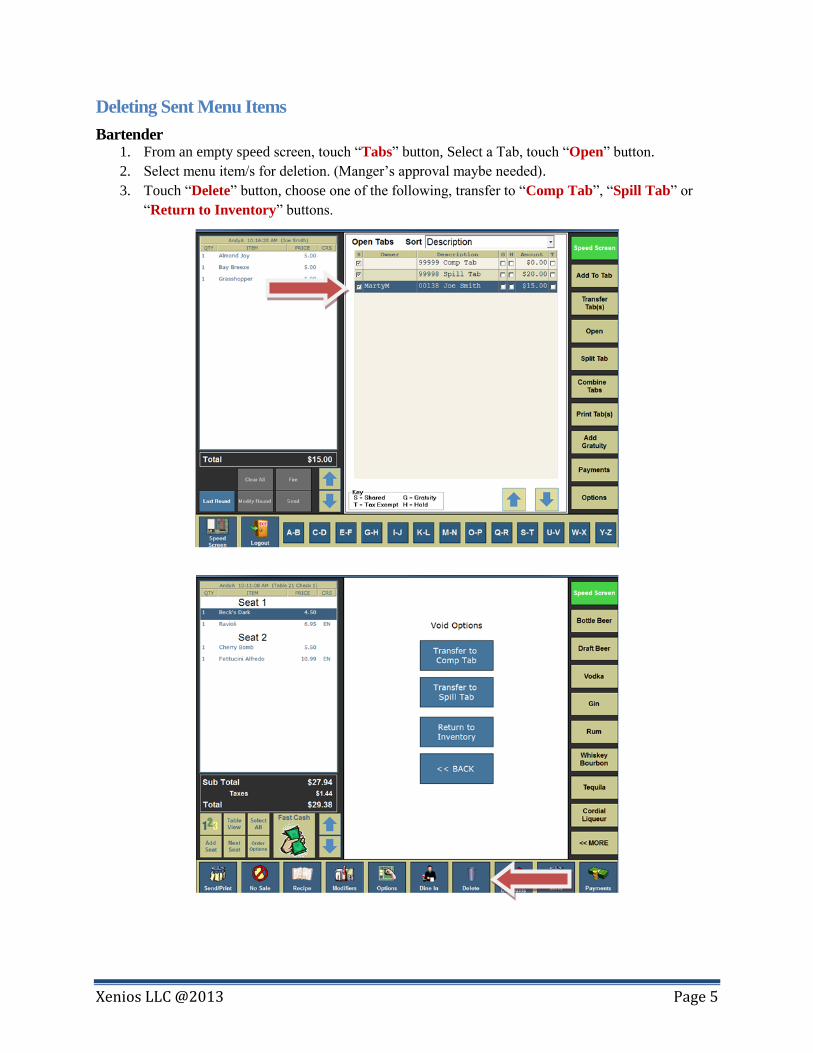
Deleting Sent Menu Items
Bartender 1. From an empty speed screen, touch “Tabs” button, Select a Tab, touch “Open” button.
2. Select menu item/s for deletion. (Manger’s approval maybe needed).
3. Touch “Delete” button, choose one of the following, transfer to “Comp Tab”, “Spill Tab” or
“Return to Inventory” buttons.
Xenios LLC @2013 Page 6
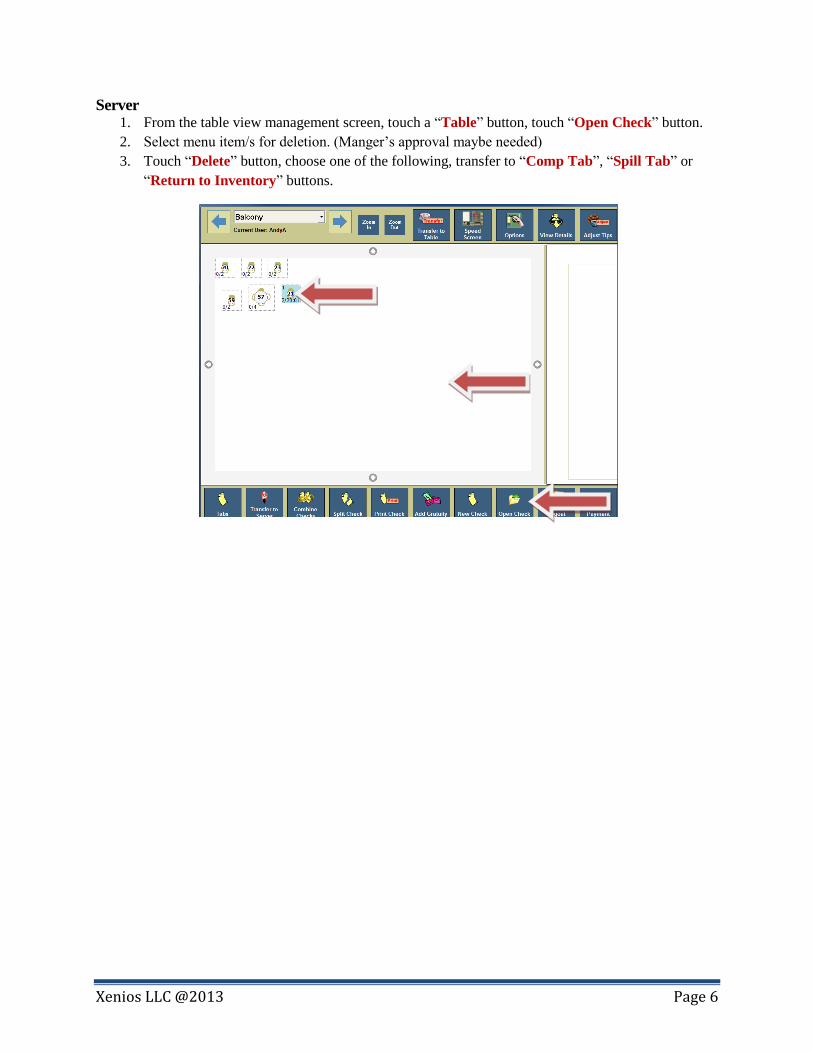
Server 1. From the table view management screen, touch a “Table” button, touch “Open Check” button.
2. Select menu item/s for deletion. (Manger’s approval maybe needed)
3. Touch “Delete” button, choose one of the following, transfer to “Comp Tab”, “Spill Tab” or
“Return to Inventory” buttons.
Xenios LLC @2013 Page 7
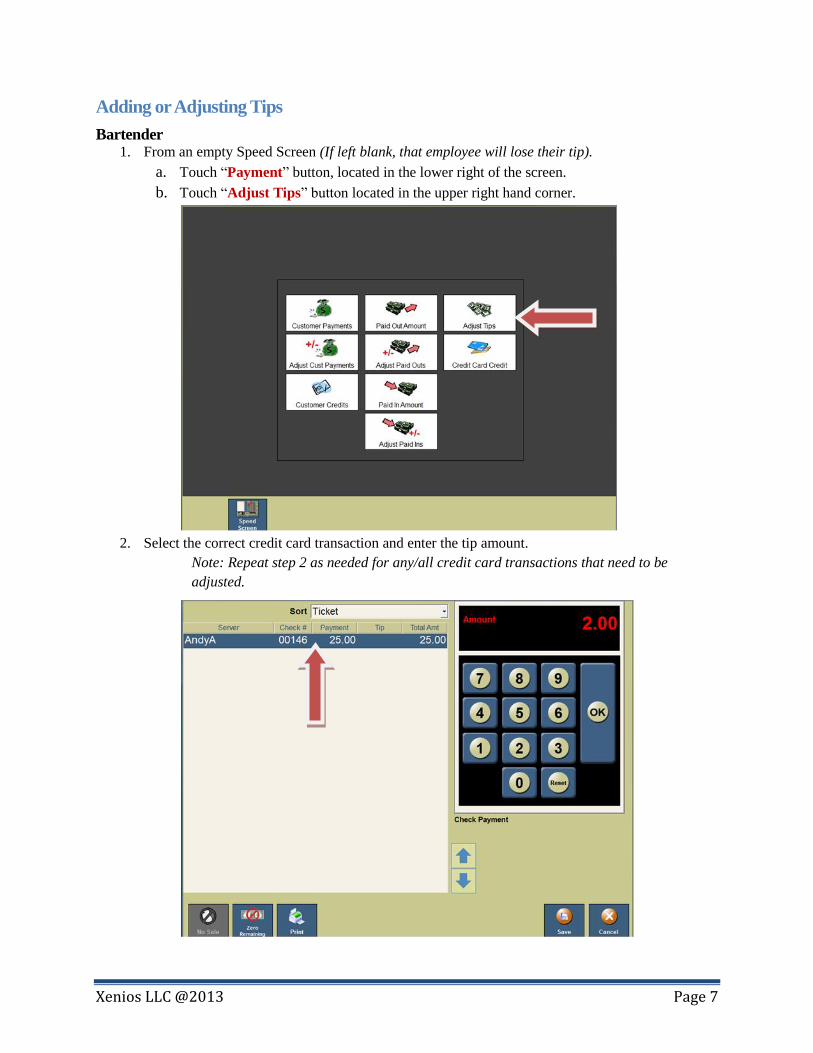
Adding or Adjusting Tips
Bartender 1. From an empty Speed Screen (If left blank, that employee will lose their tip).
a. Touch “Payment” button, located in the lower right of the screen.
b. Touch “Adjust Tips” button located in the upper right hand corner.
2. Select the correct credit card transaction and enter the tip amount.
Note: Repeat step 2 as needed for any/all credit card transactions that need to be
adjusted.
Xenios LLC @2013 Page 8
3. Touch “Save” button located in the lower right hand corner.
a. If a button appears asking whether you want to post your tips, press the “No” button.
If you press the “Yes” button, you will not be able to readjust tips that were on the screen.
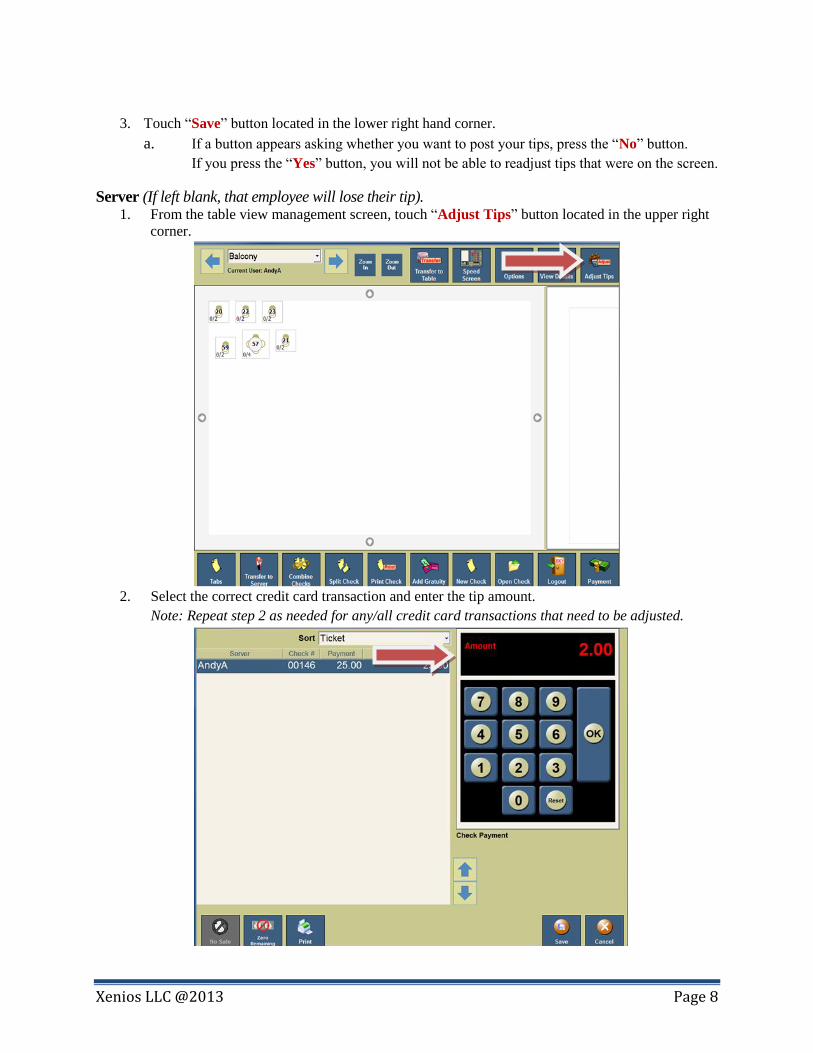
Server (If left blank, that employee will lose their tip). 1. From the table view management screen, touch “Adjust Tips” button located in the upper right
corner.
2. Select the correct credit card transaction and enter the tip amount.
Note: Repeat step 2 as needed for any/all credit card transactions that need to be adjusted.
Xenios LLC @2013 Page 9
3. Touch “Save” button located in the lower right hand corner.
a. If a button appears asking whether you want to post your tips, press the “No” button. If
you press the “Yes” button, you will not be able to readjust tips that were on the screen.
Xenios LLC @2013 Page 10
Menu Item Hold / Release
Reference Guide
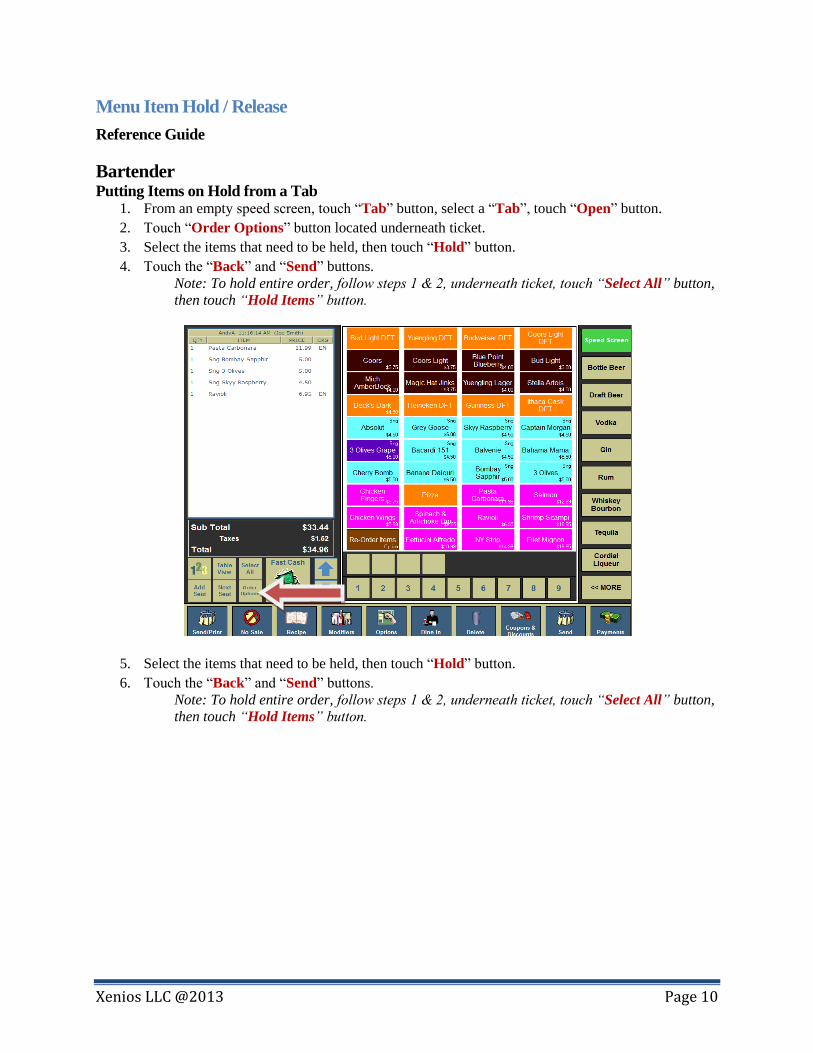
Bartender Putting Items on Hold from a Tab
1. From an empty speed screen, touch “Tab” button, select a “Tab”, touch “Open” button.
2. Touch “Order Options” button located underneath ticket.
3. Select the items that need to be held, then touch “Hold” button.
4. Touch the “Back” and “Send” buttons.
Note: To hold entire order, follow steps 1 & 2, underneath ticket, touch “Select All” button,
then touch “Hold Items” button.
5. Select the items that need to be held, then touch “Hold” button.
6. Touch the “Back” and “Send” buttons.
Note: To hold entire order, follow steps 1 & 2, underneath ticket, touch “Select All” button,
then touch “Hold Items” button.
Xenios LLC @2013 Page 11
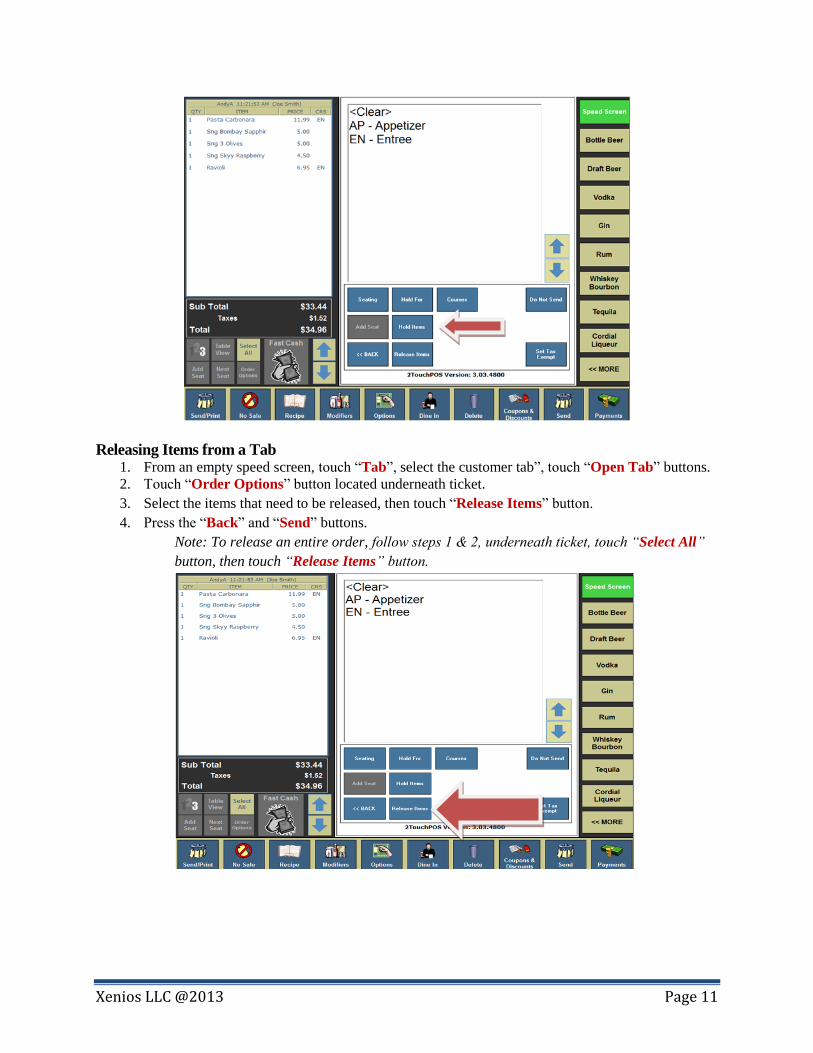
Releasing Items from a Tab 1. From an empty speed screen, touch “Tab”, select the customer tab”, touch “Open Tab” buttons.
2. Touch “Order Options” button located underneath ticket.
3. Select the items that need to be released, then touch “Release Items” button.
4. Press the “Back” and “Send” buttons.
Note: To release an entire order, follow steps 1 & 2, underneath ticket, touch “Select All”
button, then touch “Release Items” button.

Xenios LLC @2013 Page 12
Server
Putting Items on Hold from a Table 1. From the table view management screen, select a “Table”, touch “Open Check” button.
2. Touch “Order Options” button located underneath ticket.
3. Select the items that need to be held, then touch “Hold” button.
4. Touch the “Back” and “Send” buttons.

Xenios LLC @2013 Page 13
Releasing Items from a Table 1. From the table view management screen, touch a “Table”, touch “Open Check” button.
2. Touch “Order Options” button located underneath ticket.
3. Select the items that need to be released, then touch “Release Items” button.
4. Press the “Back” and “Send” buttons.
Notice the (H) shows that these items are now on Hold

Xenios LLC @2013 Page 14
Bartender End of Shift
1. Make sure all Tabs have been closed:
a. From an Empty Speed Screen, touch “Tabs” button, select the open tab, touch
“Payments” button. Process customer’s payment.
2. Make sure all tips have been adjusted: (If tips are left blank, the bartender will lose their tip).
a. From an empty speed screen, touch “Payments” button, touch “Adjust Tips” button,
select appropriate ticket, enter tip amount, touch “Save” and “Close” buttons. (Repeat
this step of all tips that need to be adjusted).
3. Make sure all money and reports has been collected from employees:
a. Bartenders run the Cash in Drawer Report.
i. Touch “Options” button, touch “Reports” button, touch either “Favorites” or
“Daily” button and “touch “Cash in Drawer Report” button, touch “Run”
button, enter starting cash amount, then print, email or save report button. Touch
“Close” button.
ii. You will be prompted “Reset Cash in Drawer Amount?” If you touch “Yes”
button, then the drawer will be ready for the next shift and ready to be initialized.
4. Logout & Clock Out.
Server End of Shift
1. Make sure all Tables and checks have been closed:
a. From table view management screen, select highlighted table, touch “Payments” button.
Process customer’s payment.
2. Make sure all tips have been adjusted: (If left blank, that employee will lose their tip).
a. From table view management screen, touch “Payments” , “Adjust Tips” buttons, then
select appropriate ticket and enter tip amount,
b. Touch “Save” and “Close” buttons. (Repeat this step of all tips that need to be adjusted).
3. Make sure all money and reports has been collected from employees:
a. Run a Server Report. Hand in your cash due.
i. Touch “Options” button, touch “Reports”, then touch either “Favorites” or
“Daily” button
ii. Touch “Server Report”, “Run” buttons,
iii. Select employee, touch “Ok” button, then print, email and/or save report. Touch
“Close” button.
4. Logout & Clock Out.
Xenios LLC @2013 Page 15
Manager Operations
End of Night
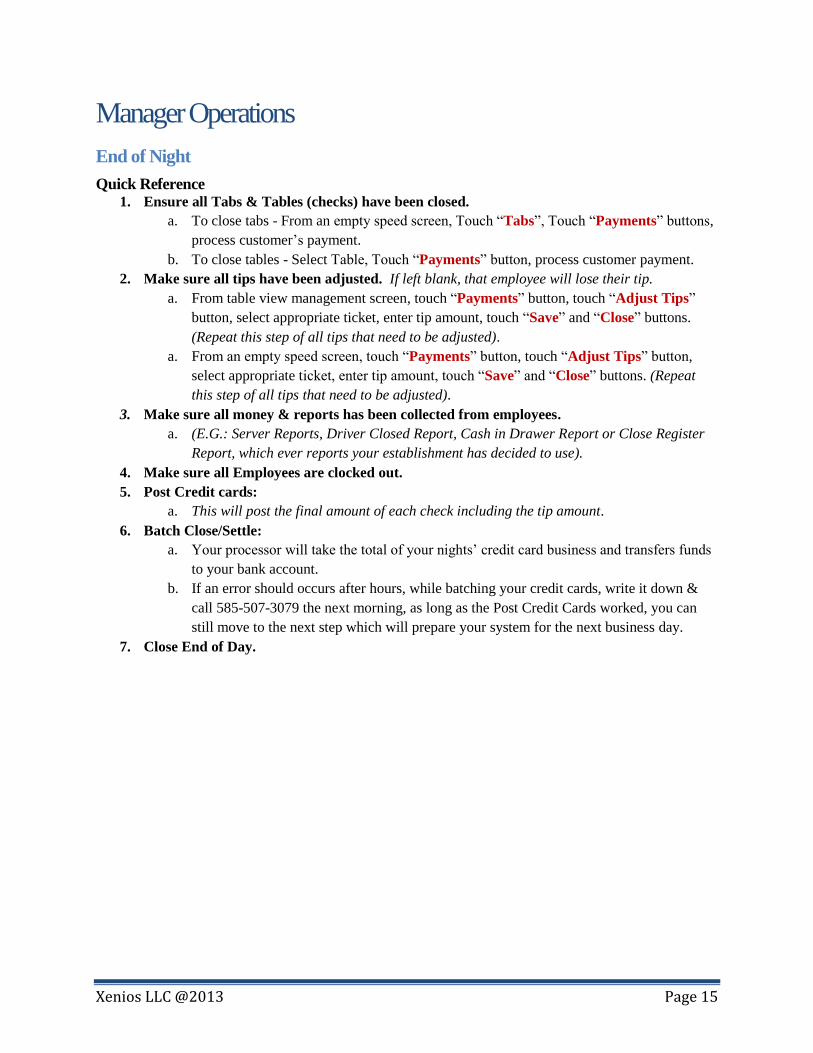
Quick Reference 1. Ensure all Tabs & Tables (checks) have been closed.
a. To close tabs - From an empty speed screen, Touch “Tabs”, Touch “Payments” buttons,
process customer’s payment.
b. To close tables - Select Table, Touch “Payments” button, process customer payment.
2. Make sure all tips have been adjusted. If left blank, that employee will lose their tip.
a. From table view management screen, touch “Payments” button, touch “Adjust Tips”
button, select appropriate ticket, enter tip amount, touch “Save” and “Close” buttons.
(Repeat this step of all tips that need to be adjusted).
a. From an empty speed screen, touch “Payments” button, touch “Adjust Tips” button,
select appropriate ticket, enter tip amount, touch “Save” and “Close” buttons. (Repeat
this step of all tips that need to be adjusted).
3. Make sure all money & reports has been collected from employees.
a. (E.G.: Server Reports, Driver Closed Report, Cash in Drawer Report or Close Register
Report, which ever reports your establishment has decided to use).
4. Make sure all Employees are clocked out.
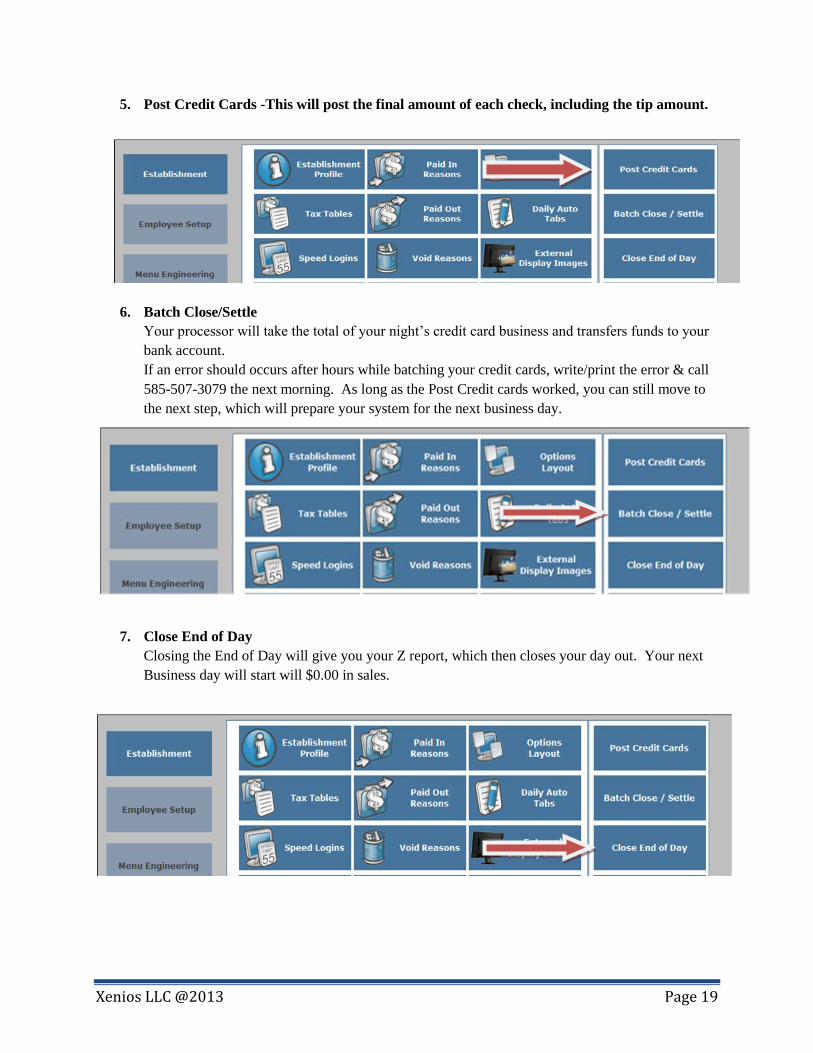
5. Post Credit cards:
a. This will post the final amount of each check including the tip amount.
6. Batch Close/Settle:
a. Your processor will take the total of your nights’ credit card business and transfers funds
to your bank account.
b. If an error should occurs after hours, while batching your credit cards, write it down &
call 585-507-3079 the next morning, as long as the Post Credit Cards worked, you can
still move to the next step which will prepare your system for the next business day.
7. Close End of Day.
Xenios LLC @2013 Page 16
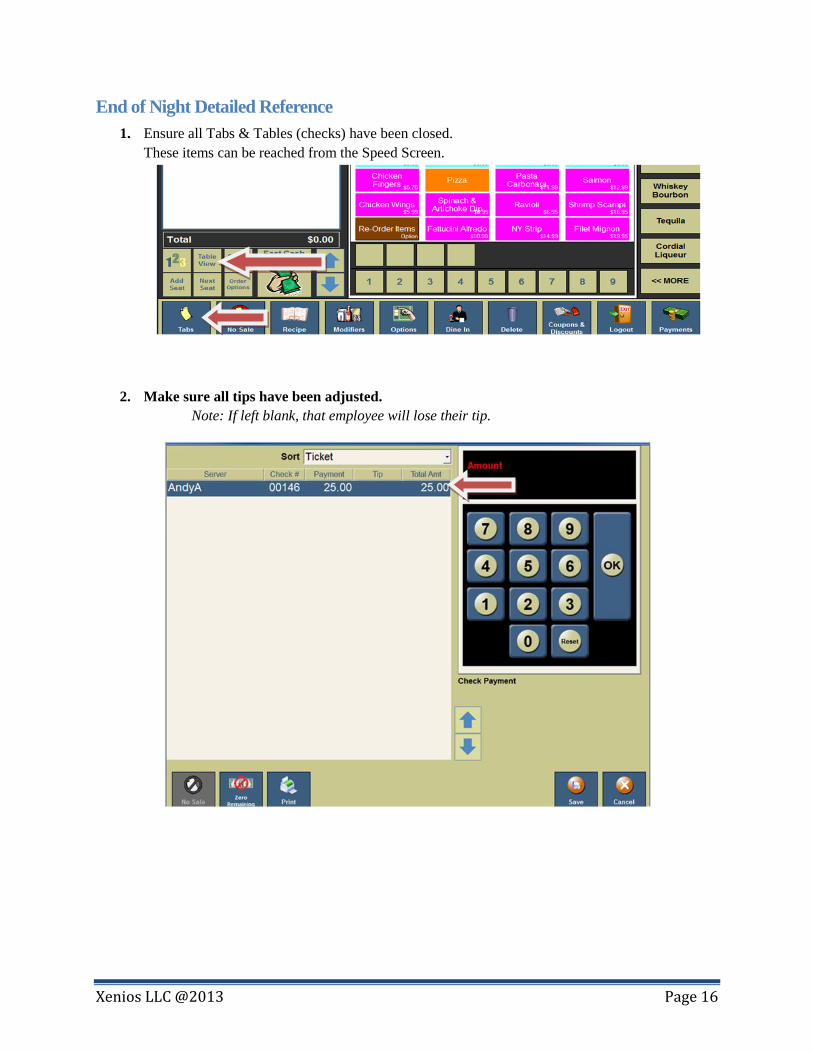
End of Night Detailed Reference
1. Ensure all Tabs & Tables (checks) have been closed.
These items can be reached from the Speed Screen.
2. Make sure all tips have been adjusted.
Note: If left blank, that employee will lose their tip.
Xenios LLC @2013 Page 17
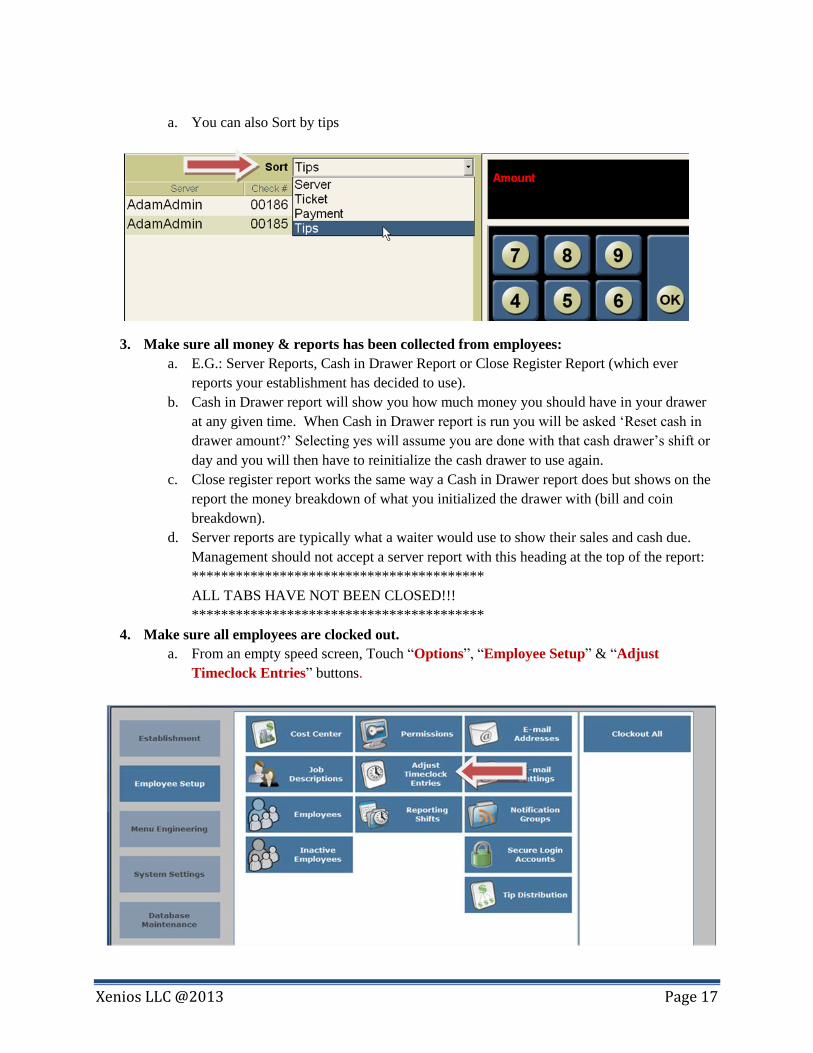
a. You can also Sort by tips
3. Make sure all money & reports has been collected from employees:
a. E.G.: Server Reports, Cash in Drawer Report or Close Register Report (which ever
reports your establishment has decided to use).
b. Cash in Drawer report will show you how much money you should have in your drawer
at any given time. When Cash in Drawer report is run you will be asked ‘Reset cash in
drawer amount?’ Selecting yes will assume you are done with that cash drawer’s shift or
day and you will then have to reinitialize the cash drawer to use again.
c. Close register report works the same way a Cash in Drawer report does but shows on the
report the money breakdown of what you initialized the drawer with (bill and coin
breakdown).
d. Server reports are typically what a waiter would use to show their sales and cash due.
Management should not accept a server report with this heading at the top of the report:
****************************************
ALL TABS HAVE NOT BEEN CLOSED!!!
****************************************
4. Make sure all employees are clocked out.
a. From an empty speed screen, Touch “Options”, “Employee Setup” & “Adjust
Timeclock Entries” buttons.
Xenios LLC @2013 Page 18
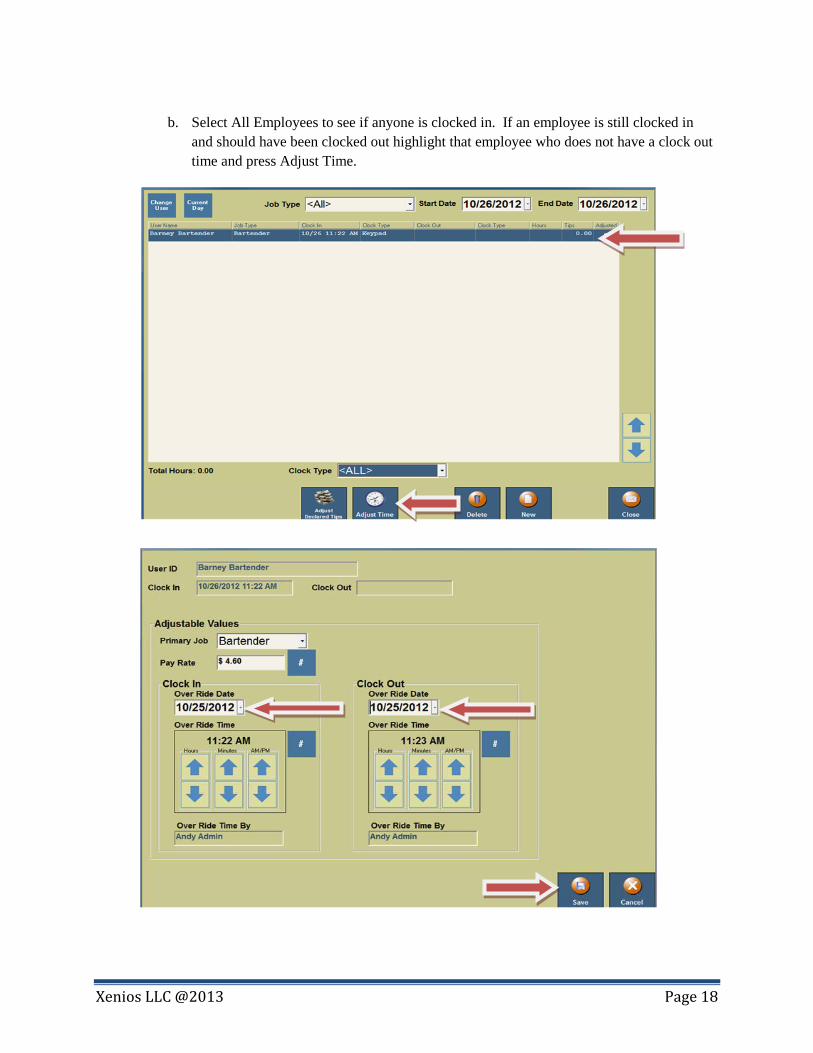
b. Select All Employees to see if anyone is clocked in. If an employee is still clocked in
and should have been clocked out highlight that employee who does not have a clock out
time and press Adjust Time.
Xenios LLC @2013 Page 19
5. Post Credit Cards -This will post the final amount of each check, including the tip amount.
6. Batch Close/Settle
Your processor will take the total of your night’s credit card business and transfers funds to your
bank account.
If an error should occurs after hours while batching your credit cards, write/print the error & call
585-507-3079 the next morning. As long as the Post Credit cards worked, you can still move to
the next step, which will prepare your system for the next business day.
7. Close End of Day
Closing the End of Day will give you your Z report, which then closes your day out. Your next
Business day will start will $0.00 in sales.

Xenios LLC @2013 Page 20
Re-Opening a Closed Tab or Table
1. From an empty speed screen, touch “Options” button.
2. Touch “Re-Open Check” button.
3. Select employee and/or station (if known).
4. Touch “Load” button located on the bottom of screen.
5. Select the check you need to re-open. Once you have selected check, you can view check
details by touching “View Details” button.
6. Touch “Open” button – this will VOID all the payment(s) and credit cards that have been
applied to that check and send that check back to an open order.
Xenios LLC @2013 Page 21
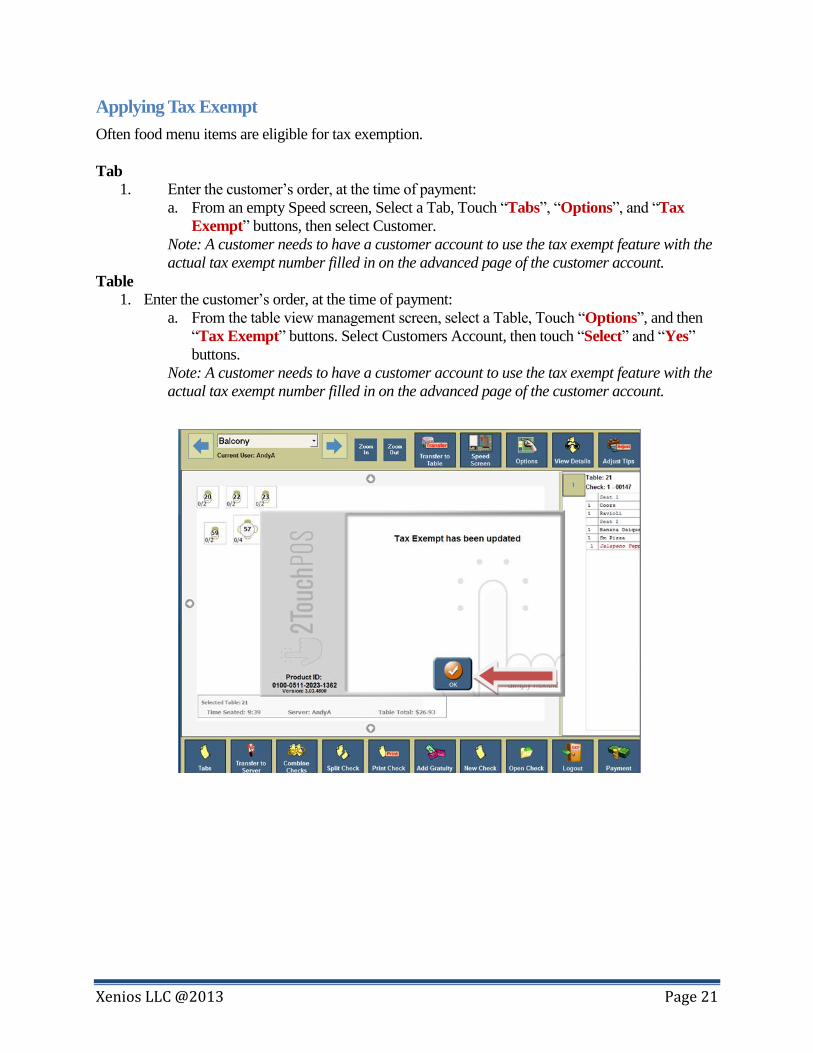
Applying Tax Exempt
Often food menu items are eligible for tax exemption.
Tab
1. Enter the customer’s order, at the time of payment:
a. From an empty Speed screen, Select a Tab, Touch “Tabs”, “Options”, and “Tax
Exempt” buttons, then select Customer.
Note: A customer needs to have a customer account to use the tax exempt feature with the
actual tax exempt number filled in on the advanced page of the customer account.
Table
1. Enter the customer’s order, at the time of payment:
a. From the table view management screen, select a Table, Touch “Options”, and then
“Tax Exempt” buttons. Select Customers Account, then touch “Select” and “Yes”
buttons.
Note: A customer needs to have a customer account to use the tax exempt feature with the
actual tax exempt number filled in on the advanced page of the customer account.
Xenios LLC @2013 Page 22
Common Reports
Cash in Drawer Report
An instant up to date overview of the current days activities associated with a specific terminal or
station. Department totals, tax, dine-in and carryout totals, types of sales, Comps & Spills, Voids,
House Accounts, Discounts and cash in drawer totals will be displayed and reported.
Server Report
An instant up to date overview of the current day’s activities associated with a specific server.
Department totals, tax, dine-in and carryout totals, types of sales, Comps & Spills, Voids, House
Accounts and Discounts are displayed in this report. Once all tabs associated with this server are
closed, this report will print and serve as the final statement for the activity and monies owed by
that individual.
Daily X Report
An overview of the current day’s activities for the entire establishment. Captures department
totals, tax, dine-in and carryout totals, types of sales, Comps & Spills, Voids, House Accounts,
discounts and totals. Running this report does not close out the totals for the day.
Daily Z Report
An overview of the current days activities for the entire establishment. Captures department
totals, tax, dine-in and carryout totals, types of sales, Comps & Spills, Voids, House Accounts,
discounts and totals. When this report is run, the totals are closed out for that business day. This
is one of the final reports of the business day.
Historical Server Report
Historical sales information by terminal or for the entire establishment. Captures department
totals, tax, dine-in and carryout totals, types of sales, Comps & Spills, Voids, House Accounts,
discounts and totals. This information can be accessed for an indefinite amount of time. This
report is based on your specified date range.
Audit Menu Item Report
Tracks quantities sold that are tracked by any auditing agency, by any date and /or time range
specified for up to a six-week period. This Report can be sorted by PLU Number, Menu Item
Description, Quantity Sold & Revenue Generated. You specify a Time and Date Range for the
report.
Historical Menu Item Report
Tracks Quantities sold, by Menu Item, by any date and /or time range specified for up to a six-
week period. Can sort by PLU Number, Menu Item Description, Quantity Sold & Revenue
Generated. You specify a Time and Date Range for the report.
Xenios LLC @2013 Page 23
Historical Modifier Report
Tracks Quantities sold, by Menu Item and Modifier, by any date and/or time range specified.
There is a six-week historical limit on this report. Can sort by PLU Number, Menu
Item/Modifier Description, and Quantity Sold & Revenue Generated. You specify a Time and
Date Range for the report.
Historical Sales Report
Historical sales information by station/terminal or entire establishment regarding; Department
totals, tax, dine-in and carry-out totals, types of sales, Comps & Spills, Voids, House Accounts,
discounts and totals based upon the selected date range. This information can be accessed for an
indefinite amount of time.
Hourly Sales Report
Identifies gross sales in dollars on an hourly interval. You specify a Date Range for the report.
Menu Item Summary Report
Shows the regular dine in price for items. This report can be sorted by PLU Number, Menu Item
Description or Price.
Open Item Report
Tracks items that rung in under the "Open Item" (beer, food, wine, etc.) button and the respective
amount that was collected for these items for the selected date range. This information is useful
when creating new "Menu Item" buttons to identify items repeatedly being rung in under an
"Open" description and price.
Customer Account Payment History Report
Gives a breakdown of the charges and credits made to a customers account over a date range.
Customer Account Detail Report
An instant up to date overview of the current day’s activities associated with a specific terminal
or station. Department totals, tax, dine-in and carryout totals, types of sales, Comps & Spills,
Voids, House Accounts, Discounts and cash in drawer totals will be displayed and reported
Customer Account Summary Report
Gives an overview of the customers with outstanding balances on their account.
Xenios LLC @2013 Page 24
Troubleshooting Guide
Symptom Cause Steps
Your product
registration has expired.
Overdue funds You will need to call 585-325-5242 x3 and speak
with the Finance Department.
Cash drawer won’t open Printer
inoperable Does the printer have paper?
Is the printer on and working?
Are the lights on the printer active?
Is the printer cover closed?
Turn the printer off and back on.
Screen is
frozen/stuck/not
moving/stalled
Your on the
Admin Screen
Hit ‘Back’
Screen is
frozen/stuck/not
moving/stalled
System is frozen Reboot the unit; hold the power button down until it
shuts off, could be up to a count of 25.
Disaster recovery mode
error appears on the
base station
System is in an
inconsistent
state
Reboot
Cannot
Receipt Printer not
working
Out of Paper
light is on
1) Sometimes the paper sensor misfires. Take
the paper out and reinsert the paper. Make
sure the lid is closed tightly.
2) Cycle the power on the printer.
Kitchen printer not
working
Paper spools but
no text is
readable
Replace the ink (Ithaca) or ribbon (Epson)
Kitchen printer not
working
Nothing
happens
Might be a loose wire. Check the connections.
Credit Cards not
Processing
Internet down Login using code 000413.
1) If the IP comes up then the internet is
connected.
a. Restart TwoTouch by loging in with

Xenios LLC @2013 Page 25
code 000927.
b. If restarting TwoTouch did not
resolve the issue, reboot the terminal.
2) If the IP comes up blank, follow the steps in
the section on “Internet is Down”.
Credit Cards aren’t Processing and the Internet is Down
Quick Reference Guide 1. Go into Credit Offline Credit Card Mode.
2. Reboot the Modem and Netgear FVS318 Firewall/Router.
a. Shutdown the Netgear FVS318 Firewall/Router and leave it powered off.
b. Shutdown your Modem and leave it off for at least 30 seconds.
c. After about 30 seconds, turn on the Modem. Make sure your Modem is connected to your phone
or cable Internet line. Wait until the ready light turns solid on the Modem; it goes through a
warm up stage. It might take up to 2 minutes to fully connect.
d. After waiting for the modem to boot up, now turn on the Netgear FVS318 Firewall/Router (goes
through a warm up stage). It might take up to 2 minutes to fully connect as well.
e. How to tell if successful: log into the system on the login screen with the number 000413. If the
terminal comes back with an IP address, problem has been solved.
3. If needed: full system reboot (restart).
a. Shutdown your server stations e.g. TwoTouch1, TwoTouch2, …
b. Shutdown your base station (e.g. TwoTouch0).
c. Shutdown the Netgear FVS318 Firewall/Router and leave it powered off.
d. Shutdown your Modem and leave it off for at least 30 seconds.
e. After at least 30 seconds, turn on the Modem. Make sure your Modem is connected to the phone
or cable Internet line. Wait until the ready light turns solid on the Modem (goes through a warm
up stage). It might take up to 2 minutes to fully connect,
f. After waiting for the Modem to boot up, now turn on the Netgear FVS318 Firewall/Router (goes
through a warm up stage). It might take up to 2 minutes to fully connect as well.
g. Turn on your base station and let the 2Touch program start up.
h. Turn on your wait stations typically the same way you turned on your base station.
i. How to tell if successful: log into the system on the login screen with the number 000413. If the
terminal comes back with an IP address, problem has been solved.
4. If a full system reboot does not get you back online, call your broadband Internet Service Provider.
Xenios LLC @2013 Page 26
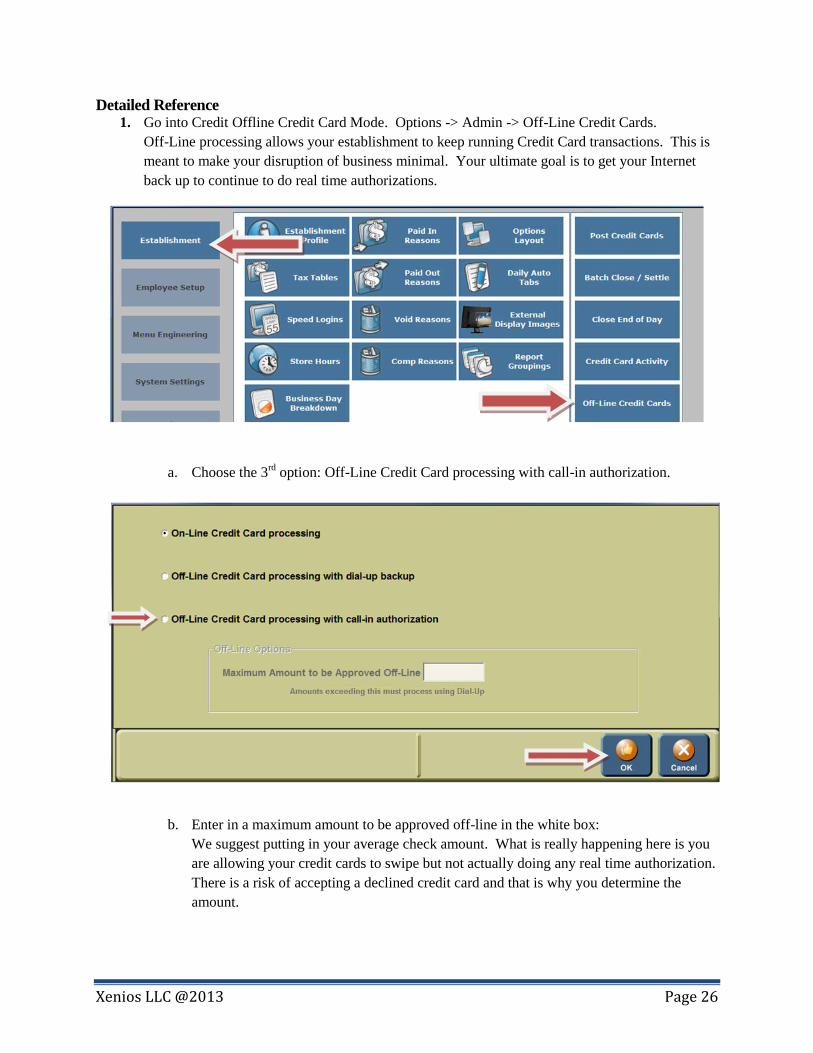
Detailed Reference 1. Go into Credit Offline Credit Card Mode. Options -> Admin -> Off-Line Credit Cards.
Off-Line processing allows your establishment to keep running Credit Card transactions. This is
meant to make your disruption of business minimal. Your ultimate goal is to get your Internet
back up to continue to do real time authorizations.
a. Choose the 3rd
option: Off-Line Credit Card processing with call-in authorization.
b. Enter in a maximum amount to be approved off-line in the white box:
We suggest putting in your average check amount. What is really happening here is you
are allowing your credit cards to swipe but not actually doing any real time authorization.
There is a risk of accepting a declined credit card and that is why you determine the
amount.
Xenios LLC @2013 Page 27
c. When a check amount exceeds your maximum amount allowed for off-line Credit Card
mode, and you have to call in the credit card transaction and enter in the given
authorization number into 2Touch POS.
i. If you have chosen Mercury Payment Systems:
a. To call in and authorize a VISA, MASTERCARD, or DISCOVER card
their phone number, 1-800- 944-1111.
b. AMERICAN EXPRESS phone number is 1-800-528-2121.
c. If you are prompted to enter a BIN number enter 023400.
d. You will then be prompted for your Merchant ID #
________________________.
e. You will then be able to continue entering in the transaction information
requested by the phone prompts, Credit Card Number, amount, tip
amount.
f. You must enter the authorization number given by the phone prompt into
2Touch POS. You might want to write it down!
ii. If you have chosen another platform that uses PCCharge:
a. Call your credit card processing company and inquire how to phone in
credit card authorizations.
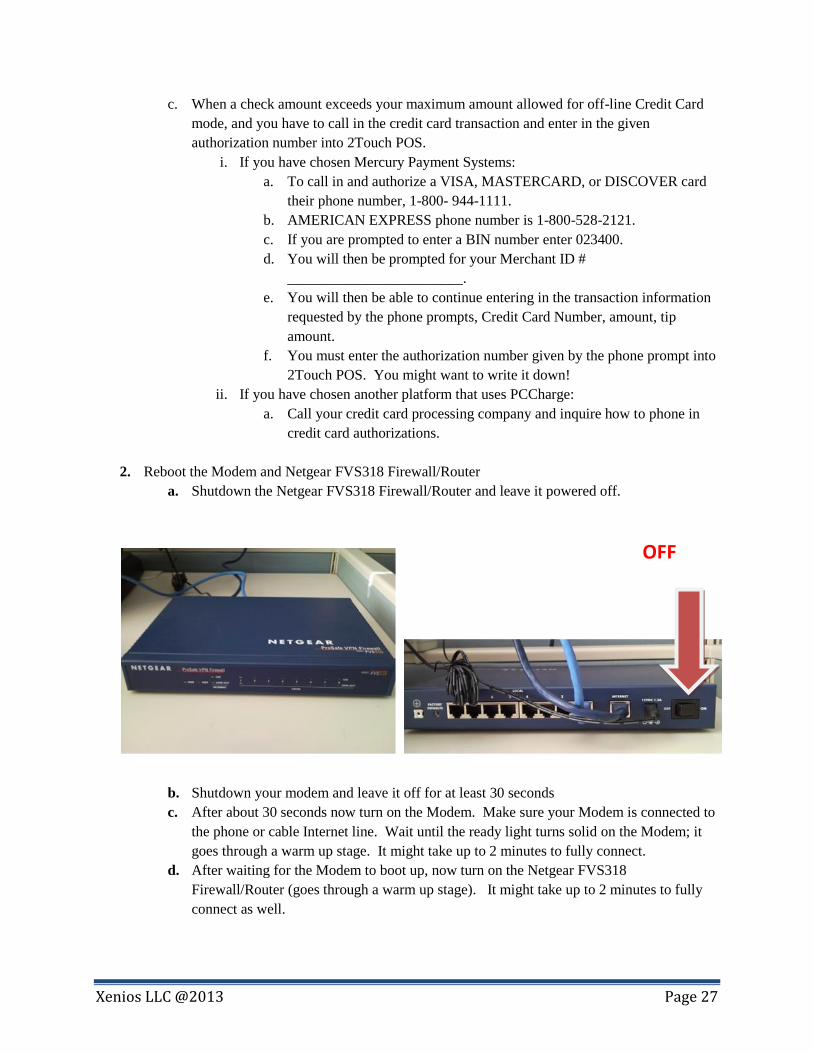
2. Reboot the Modem and Netgear FVS318 Firewall/Router
a. Shutdown the Netgear FVS318 Firewall/Router and leave it powered off.
b. Shutdown your modem and leave it off for at least 30 seconds
c. After about 30 seconds now turn on the Modem. Make sure your Modem is connected to
the phone or cable Internet line. Wait until the ready light turns solid on the Modem; it
goes through a warm up stage. It might take up to 2 minutes to fully connect.
d. After waiting for the Modem to boot up, now turn on the Netgear FVS318
Firewall/Router (goes through a warm up stage). It might take up to 2 minutes to fully
connect as well.
OFF
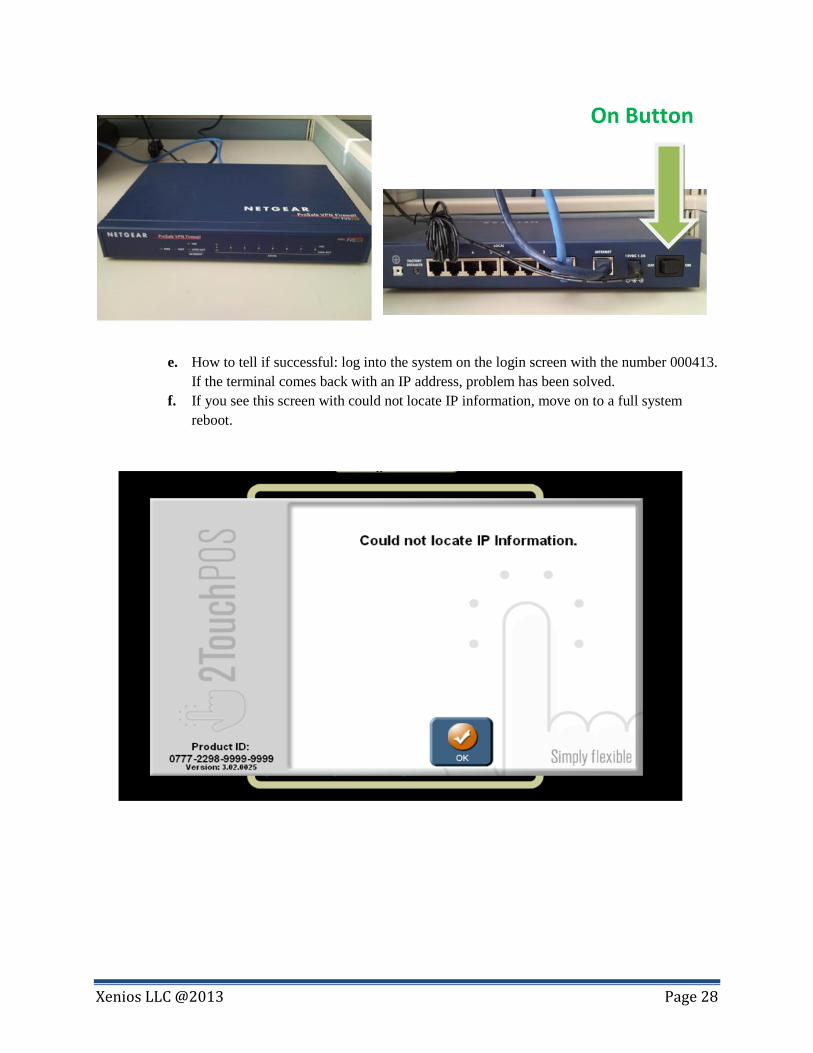
Xenios LLC @2013 Page 28
e. How to tell if successful: log into the system on the login screen with the number 000413.
If the terminal comes back with an IP address, problem has been solved.
f. If you see this screen with could not locate IP information, move on to a full system
reboot.
On Button
Xenios LLC @2013 Page 29
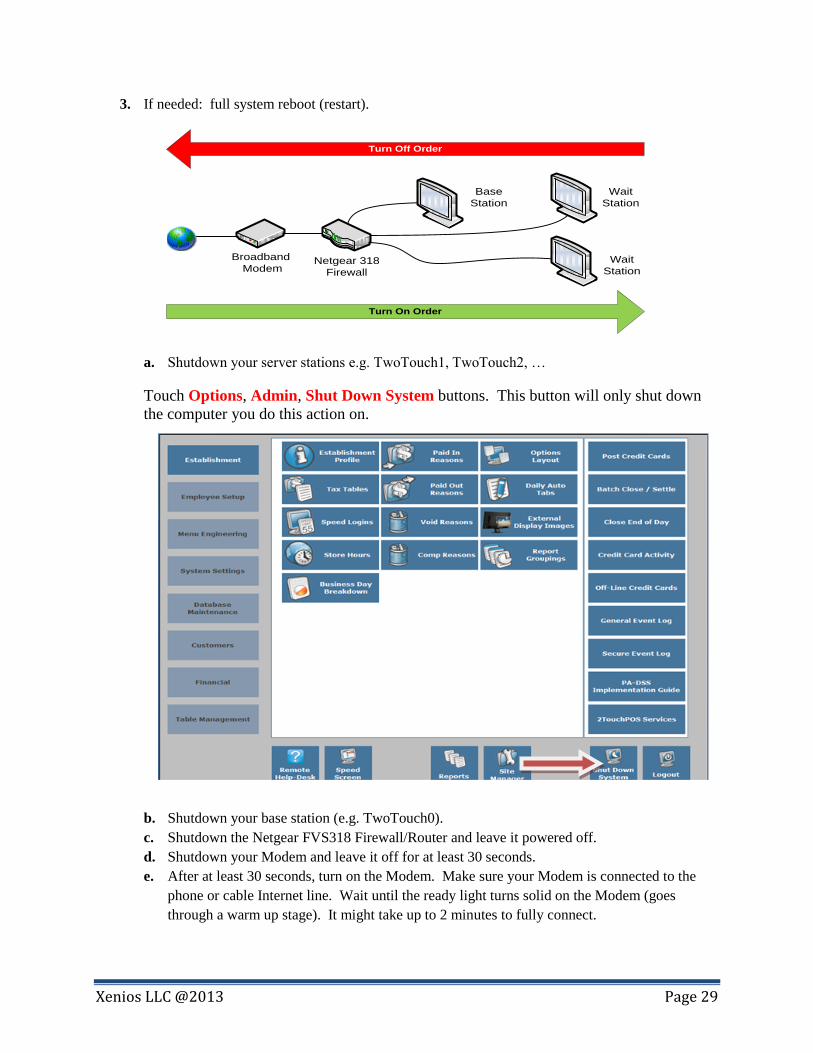
3. If needed: full system reboot (restart).
Broadband
Modem
Wait
Station
Wait
StationNetgear 318
Firewall
Base
Station
Turn Off Order
Turn On Order
a. Shutdown your server stations e.g. TwoTouch1, TwoTouch2, …
Touch Options, Admin, Shut Down System buttons. This button will only shut down
the computer you do this action on.
b. Shutdown your base station (e.g. TwoTouch0).
c. Shutdown the Netgear FVS318 Firewall/Router and leave it powered off.
d. Shutdown your Modem and leave it off for at least 30 seconds.
e. After at least 30 seconds, turn on the Modem. Make sure your Modem is connected to the
phone or cable Internet line. Wait until the ready light turns solid on the Modem (goes
through a warm up stage). It might take up to 2 minutes to fully connect.
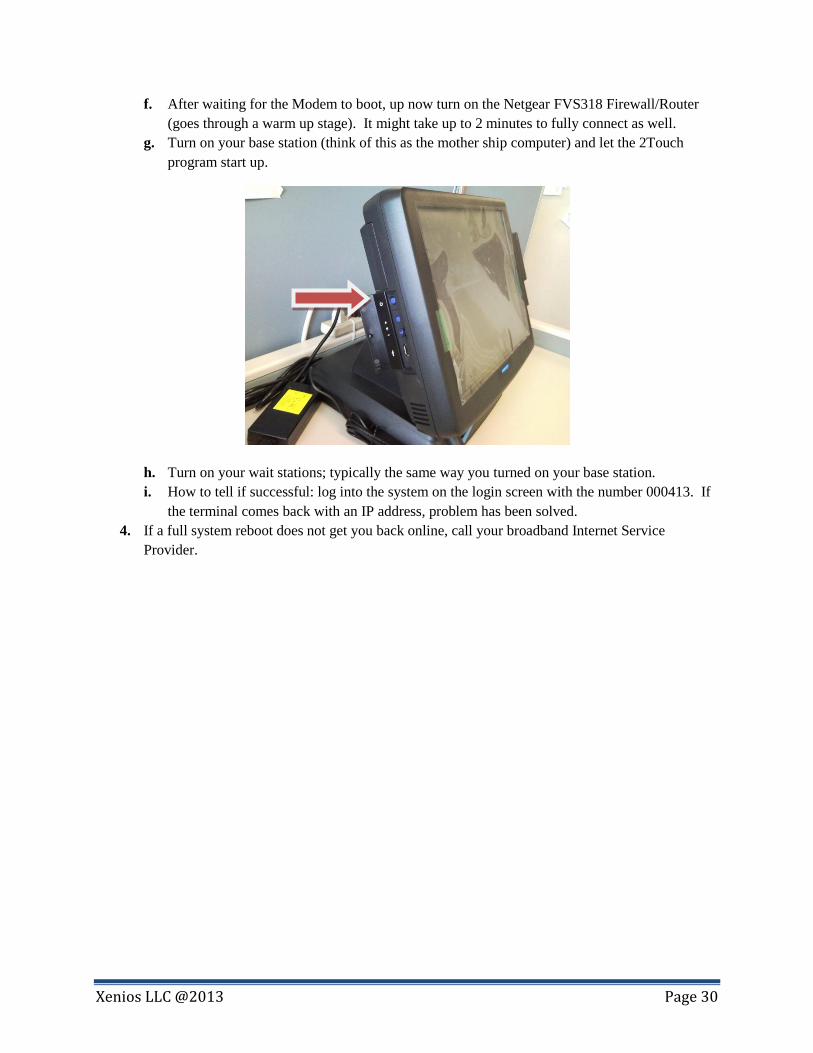
Xenios LLC @2013 Page 30
f. After waiting for the Modem to boot, up now turn on the Netgear FVS318 Firewall/Router
(goes through a warm up stage). It might take up to 2 minutes to fully connect as well.
g. Turn on your base station (think of this as the mother ship computer) and let the 2Touch
program start up.
h. Turn on your wait stations; typically the same way you turned on your base station.
i. How to tell if successful: log into the system on the login screen with the number 000413. If
the terminal comes back with an IP address, problem has been solved.
4. If a full system reboot does not get you back online, call your broadband Internet Service
Provider.