Embed Size (px)
Citation preview

GoinG Public: The Guide To CreaTinG arT in PubliC SPaCeS
2d art techniques

“color is sensibility in material form, matter in its Primordial state.”
Yves Klein
in this chaPterThis chapter will assist you with discovering the right artist tech-nique for your project. although we suggest a few methods, there is no limitation to apply your creativity and figure out new ways to add colors to any surface.
Chapter Five title page by: Will KaSSo Condry

chaPter five: 2d art techniques | 3
GoinG Public: The Guide To CreaTinG arT in PubliC SPaCeS
Practically any technique can be modified and applied to a large scale out-door project. Whether you like painting long, thin strokes with paintbrushes, tapping with sponges, or shading with spray paint, there are no limitations to how large of an area you can paint. Some techniques are better for filling large areas with one color, others for painting small details, but the most important thing is to remember that your audience experiences your large scale work of art from a great distance, and then they walk up to it and touch it. large murals and sculptures still require attention to detail and quality.
any technique takes a lot of practice to master. Thousands of hours are needed to master anything we are practicing. Whether it is tennis, chess or spray paint, it takes practice, practice and more practice to become familiar with it. Therefore, always have your black book with you and doodle, draw and play every time you are not doing anything else. You should be com-fortable with your technique, so you can focus on your art. brushes, acrylic paint, spray paint, stencils, rollers and sponges are just tools that allow you to communicate to your audience. if mastered properly they make your art shine and the audience excited about your message.
The type of surface we are working on will also determines the technique we choose to use.
before we start painting any mural, the preparation of the surface is very important. We can spend hundreds of hours painting a beautiful master-piece, but it can be quickly destroyed, if the underlying surface is dirty, wet
Tim Con Conlon used a variety of tools: aerosol, latex, paint marker, and a jigsaw to create this piece.

GoinG Public: The Guide To CreaTinG arT in PubliC SPaCeS
4 | chaPter five: 2d art techniques
or if it crumbles. Sometimes ne-glected, the site preparation is one of the most important steps in creat-ing art. Murals can be painted only on the walls that are clean, dry and free of defects. every wall must be cleaned, either by hand with large hard brushes and soap water, or with a power washer. all old paint that is peeling must be removed. if a power washer is not available, sharp tools and wire brushes are necessary.
The priming layer can be painted in any color, but it saves some work and paint if it can be incorporated into the painting as a background layer. The most common primers come in white or black. always pick exterior paint for outdoor projects. in many cases, the walls are ex-posed to harsh weather conditions, moisture, and cold temperatures. in extreme conditions, consult the manufacturer about the correct application and the right product. if the wall is holding up a mass of soil behind it, it is very common that the moisture will soak through. always paint a layer of moisture sealer that is usually used for basements and other cold and wet environments. one of the alternatives is also ma-rine paint, designed for water, but it is pricey.
at this point, your sketch is ready and you are comfortable with the layout of your mural. in order to pre-serve the layout, the sketch must be properly scaled up and transferred onto the final wall. The most com-mon approaches to achieve this are:
Grid – The sketch is divided into smaller squares. The final wall is also divided into the same num-ber of squares. These squares are much larger than the ones on the sketch. Square by square, we copy the content of each of them onto the wall. laying out the grid is a long process. This approach is advanta-geous when the sketch cannot be projected.
Projection – Simply print your sketch on a transparency when us-ing an overhead projector or scan into a computer and use an lCd projector. Project the sketch onto the wall, adjust its position and size. Then follow all the lines with chalk, a marker, or a brush. You always need power to use this technique. When outside, you can power the projector and computer with a gas generator, a car or a battery.
stencil – This approach is best for transferring small details. Project your image onto a large piece of paper or acetic sheet and outline it with a marker. Then, cut all the painted areas out with a knife or X-acto knife. When the stencil is ready,
Mike Ciccotello conquering another wall with his colorful and bold images.

chaPter five: 2d art techniques | 5
GoinG Public: The Guide To CreaTinG arT in PubliC SPaCeS
spray it lightly with a spray adhesive and attach to the final wall. Then apply a thin layer of paint and remove the stencil. This technique works well for images that are repeated often.
Posters and Parachute cloth – Same as for the stencils, but the fea-tures are colored in, not cut out . The entire mural is painted in a studio on paper or special fabric nicknamed “parachute cloth”. after completion, the paper or fabric is attached to the wall like a wall paper. The most commonly used adhesives are wheat paste, clear acrylic medium, epoxy or specialized mixtures for wallpapers.
Panels – Follow the same steps as above, but the mural is created on hard panels. The most commonly used materials are vinyl, foam boards, dibond and plywood. They must be primed and predrilled for anchors. The advan-tage of this approach is that the mural can be always removed if necessary.
freehand – Just hold your sketch in one hand, look at it and start painting with your other hand. Step back, see how it looks from distance and keep painting. one needs a lot of practice to be able to scale up a sketch freely. The grid described above helps the practice.
steP-by-steP instructions for PaintinG a muralby michael ciccotello
suPPliesabsolutely necessary:• Paint of your choice: oil, acrylic, spray paint…• Supplies to apply the paint: brushes, rollers, caps for spray paint
other supplies that could help:• Flat white paint (buff/white wash)• Paper (for sketching and notes)• Pencil• Markers• Masking/blue Painter’s Tape• roller• roller Pads (Thicker will work better on rough porous walls)• drop cloth/Tarp• buckets• Water/Water Source (big bottles of water can do the trick)• Camera
GoinG Public: The Guide To CreaTinG arT in PubliC SPaCeS
6 | chaPter five: 2d art techniques
PlanninGTo develop a sketch, working either by yourself or with a group of neigh-bors, follow the steps in Chapter 3. it doesn’t matter whether your sketch is done on a cocktail napkin or in photoshop. The important thing is that you’re thinking about your piece and considering the space that you’re applying it to.
by considering the space and ma-terials, you could save yourself a bunch of time if you think of some basic questions.
is the piece indoors or outdoors? is the surface rough and porous or smooth and flat? if it’s rough and porous you’re going to need a lot of paint. are you painting with aerosol or brush? if you’re using brushes you’re going to need a good, durable range of large brush-es- and don’t forget the rollers. (rollers are great for filling in large areas of color.)
buffinG or White WashinGif needed, put down some tarps or drop cloths to protect the ground from paint splatters and spills. buff the area with a solid flat paint. Flat white is inexpensive as well as the best color to insure that you’ll have true bright colors when you start laying color on top of your buffer layer. if you choose to use a color other than white, it will then affect every color you lay over top of it by tinting it slightly toward the base color. This can be a desired effect and you can choose to prime with a primer that is tinted your back-ground, such as sky blue.
setuP/layoutWhen laying out your design on a wall, you can utilize the approaches described above. My favorite ways are quite simple. i go right to it and just start sketching/painting the design on the wall with outlines. Sometimes, i print a photo of the wall and overlay a tracing paper sketch of the design to use as a reference. i roughly sketch/paint the design on the wall. This can be done digitally on a computer by overlay-ing your design on a digital photo of the wall.
as you sketch/paint your design, fre-quently take a look from a distance to make sure your proportions are correct and that everything is in the right spot.
be sure to take pictures as you go. i always like to look back at the prog-ress of a piece.
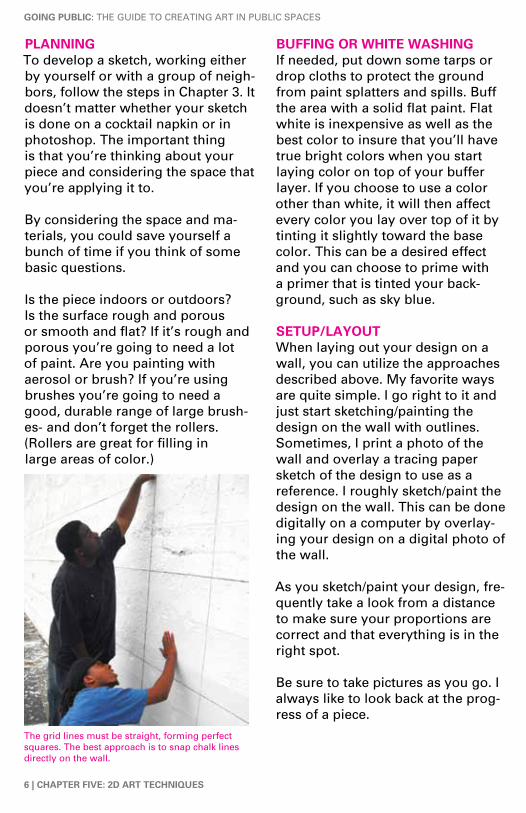
The grid lines must be straight, forming perfect squares. The best approach is to snap chalk lines directly on the wall.

chaPter five: 2d art techniques | 7
GoinG Public: The Guide To CreaTinG arT in PubliC SPaCeS
aPPlicationonce your layout is complete, start filling in large areas with color. begin layering the details of your piece. Try to work evenly across the whole piece and to not be too detailed in just one section. remember to keep checking on your work from a distance and make sure everything is in correct pro-portion and to the right scale. another trick is to bring a digital camera or camera phone. Take a picture of the piece and then look at it through your camera. it will be easier for you to notice if something doesn’t look right by looking at it this way.
touch uPare you done? Take this opportunity to go back and touch up any problem areas. You may not have another chance to do this. Make sure the piece is how you want it to be. it’s your work, so take your time and make sure it is what you want.
clean uPClean up your brushes, drop cloths, and any trash from the area. Make sure to seal up all your paint cans so they don’t dry out.
hoW to desiGn and cut a stencil by victor “Papermonster” Garcia
Stencils can be a great way to create an image that you can repeat over and over on any flat surface you like. The more you stencil, the more your eyes will be trained to turn anything into a stencil. The first step is to find a pic-ture you like and would like to cut a stencil of. This picture will serve as your template for when you cut it out of paper.
note: if you are going to use the stencil commercially, make sure you obtain proper copyrights or take the picture yourself.
i chose a photo of Michael Jackson This is a good example because you can already see simple cuts that will give you a basic shape of Kanye’s face. now, open your image into any program such as Photoshop, Gmp or other im-age editor.
Programs such as Photoshop have great filters. You can use the filters tab> sketch > stamp. once in the display (above) you can change the settings of detail and darkness. as you can see, it will make a very simple black and white stencil template which you can simplify more once you begin to draw your cuts for the final stencil. (below) using the eraser Tool with soft brush you can also take out blemishes and smooth the areas that are gray or do not look good.

GoinG Public: The Guide To CreaTinG arT in PubliC SPaCeS
8 | chaPter five: 2d art techniques
another option is the filter>sketch> photocopy effect. You can choose the amount of detail and darkness in this feature. Your final result will look like a photocopy with a large amount of detail. This is great because you can now go onto the second step and choose specific shapes that you would like to cut based off the detail you see in the image. You can now print the photo onto a manila folder or hard
sheet of paper. You can begin to cut the stencil on a hard surface, such as a hard board or table, using a pen knife or box cutter. before cutting, i prefer to draw over the printed image with marker or pen in a blue or red color (below).
Make sure when choosing your lines to not connect shapes, as it will cause the stencil to become too delicate and fall apart. after draw-ing the specific lines you would like to cut, you can begin the cutting process. Your final result will be a piece of paper with several cut out shapes. You can use spray paint or any other type of paint that will not bleed through or de-stroy your stencil. These two methods will train your eyes to better help you create stencils from simple shapes, and then to develop that style into something bigger and bolder. Prac-tice truly makes perfect, and the more you try it, the easier it will be.
Stencil done by artist, Kevin JaZi irvin. Photo by Martha Cooper.

chaPter five: 2d art techniques | 9
GoinG Public: The Guide To CreaTinG arT in PubliC SPaCeS
usinG neW technoloGies for Public art
evan roth is one of the co-founders of Graffiti research lab (or Grl), a group that pioneered the use of high-tech devices for street art and used their knowledge of modern technologies to hack both virtual and physical public spaces.
Peter: What would you tell us about the art pieces that you and James produced? What was the common denominator for all of them?
evan: a common goal of all Grl projects is to create cheap and easily rep-licated tools that give people with small means and big ideas the ability to communicate in ways in which others will pay attention.
another common thread is that we’ve used technology as a means towards spreading content. Graffiti doesn’t really need lasers, computers and digi-tal projectors. Spray paint is still the most useful tool for communicating quickly and cheaply in a city. but technology is a strong foothold in the door of popular culture. half of the top 20 most popular blogs on the internet are technology focused, and so we use technology as a way to slip in messages to a larger audience. nobody wants to listen to people talking about the importance of free culture and free speech, but if you write that message on a building with a laser and put the video on youtube, you’ll have over one million set of eyeballs. Peter: What are the advantages and disadvantages of working with projec-tors, leds, circuits etc?
evan: a big advantage and disadvantage of using projectors, lasers and leds is that they are non-permanent. We actually were never interested in making non-permanent forms of graffiti (in fact it’s quite embarrassing that

GoinG Public: The Guide To CreaTinG arT in PubliC SPaCeS
10 | chaPter five: 2d art techniques
in many circles this is what we’ve become known for). but one thing that we’ve noticed with the popularity of led Throwies and laser Tag is that once “vandalism” was removed from the conversation, we were able to talk to a much larger and more open audience. With these projects people are less turned off since property is not being “damaged”, and they are so amazed by the technology that they are willing to sit through hours of po-litical speech, curse words, graffiti tags and crudely drawn phalluses.
but, once a piece of equipment costs more money than you are willing to leave behind you are put at a disadvantage. running away carrying a digital projector and gas generator is out of the question, and you have to rely on talking rather than running away from the situation. The perfect technology project is one that creates a spectacle and communicates on a large scale, while still being cheap enough to discard and get away clean.
Peter: You guys have experience with technology. if we want to recreate your art, how comfortable do we have to be with electronics and such?
evan: not at all. More important than any familiarity with technology is a pragmatic approach to solving the most important question.... “how do i get my message up there.” often times this has less to do with writing code or building circuit boards, and more to do with treating the city the same way that computer hackers treat software. look for repeating systems in the city and tweak them. Change the intended use of everyday objects to spread your message.
For more infomation visit www.graffitiresearchlab.com
Grl artists use powerful technologies to create their pieces. Green laser is used as a giant writing pen that creates images with a light. Photos by Graffiti research lab

chaPter five: 2d art techniques | 11
GoinG Public: The Guide To CreaTinG arT in PubliC SPaCeS
Graffiti Words to KnoW:
blacKbooK –a sketch book used to practice styles and design pieces as well as collect styles and tips from other artists.
bombin – (To bomb) To do graffiti in multiple spots or many times over in a period of time. ex.”i’m going bombin” also called rockin or Crushin.
buff – (or to buff) to prime over or cover a persons marking, piece, tag etc. also can be used to describe house paint. To prime.
burner –To describe a really great piece, as in fire, a detailed piece of graffiti.
canvas – a material to paint on that is stretched and primed, in various sizes, can be shown and sold in art Shows, Galleries, and Museums.
caPs –Spray Paint nozzles to give the cans a different spray, usually fat and thin, can be measured in finger widths. There are some caps that are made for european Valve system and some for the american Valve System.
mural – Themed painting on a wall. Murals and Productions are Similar.MarKer – Smaller markers such as Sharpies and Prisma Colors are used for blackbooks. larger markers like Pilots, Mops and Streaks are used for tagging.
PasteuP – a piece that is prepared on paper (by hand, printed, or sten-ciled or painted) the glued up onto a surface. also called “Wheat Pastes” after the glue used to post them up.
Piece – a piece is a stylized representation of your name, usually repre-sents a more elaborate form of graffiti, short for “Masterpiece” although many people use it to describe anything other than a tag or throw-up.
Production – Themed mural that incorporates background, characters and/or portraits, and graffiti pieces. usually done by a crew or group of graffiti artists.
taG – Your name, moniker or symbol that represents you in the streets.ThroW-uP or Fillin – a basic either bubble (throw-up) or straight letter (fillin) one layer of paint, usually 2-3 colors, can be done relatively quickly to fill space.

GoinG Public: The Guide To CreaTinG arT in PubliC SPaCeS
12 | chaPter five: 2d art techniques
questions:
These questions will help to guide your own approach to knowledge collec-tion. Choose some or all, then figure out an approach that works for you to answer these questions before creating your own public artwork(s).
1. if you are not allowed to use spray paint, what alternative approach would you use for stenciling?
2. Why do artists use many sizes of brushes? What is the most common brush size used for painting murals?
3. how do reach the highest places of your mural? What tools do you need?
4. if you use a projector, where do you get the electrical power from?
5. What are primary and complimentary colors?

chaPter five: 2d art techniques | 13
GoinG Public: The Guide To CreaTinG arT in PubliC SPaCeS
activities:
Create a color triangle: draw a large triangle on your paper. Working with acrylic paint, place the three primary colors in the corner of the triangle. Scoop up a small amount of two neighboring colors and mix them. Place the new color in the center of the line between the two colors that you mixed. What color does this create? What is its relationship to the color in the opposite corner? repeat three times for each line of the triangle.
RED
BLUEYELLOW

GoinG Public: The Guide To CreaTinG arT in PubliC SPaCeS
14 | chaPter five: 2d art techniques
notesuSe TheSe PaGeS For reSearCh/SKeTChinG

chaPter five: 2d art techniques | 15
GoinG Public: The Guide To CreaTinG arT in PubliC SPaCeS
summary:
Murals can be created with a variety of techniques and approaches. Wheth-er you use brushes with acrylic paint or stencils with spray paint, you still have to remember important steps for preparing the wall, transferring the sketch onto the large area, and the tricks to keep your work area clean and organized. after your sketch is on the wall, start with the background and fill in all background colors. Then follow with the outline and highlights. Finally, step back and see if any of the areas must be touched up, improved, or completely changed.
notesuSe TheSe PaGeS For reSearCh/SKeTChinG