Embed Size (px)
Citation preview

TANCO AUTOWRAP 280 CS
OPERATORS HANDBOOK
WD66-280-M0207
Tanco Autowrap Ltd. Tel.: +353 (0)5997 21336Royal Oak Road, Fax: +353 (0)5997 21560Bagenalstown, E-Mail: [email protected] Co. Carlow, Internet: www.tanco.ie Ireland
- 1 -
Tanco Autowrap 280 CS Operator’s manual
WARRANTEE
Subject to hereunder provided, the sellers undertake to correct either by repair or at their election by replacement any defect of material or workmanship which occurs in any of its goods within twelve months after delivery of such goods to first user, with the exception of contractors or commercial users when warranty period is six months. In respect of Autowraps the warranty period is for 12 months or 8000 bales, whichever occurs first. In respect of Aerways, tine breakage will be assessed on an individual basis in every case. The term goods when used in this document means the article or articles described in invoices as sold by the sellers but dose not include equipment or proprietary parts or accessories not manufactured by the sellers. The sellers, however, undertake to pass on so far as they legally can to the first user the benefit of any warranty given to the sellers by the suppliers of such equipment, parts or accessories. This understanding shall not apply to:-
(a) Any goods that have been sold by the first user. (b) Any goods which have been injured by unfair wear and tear, neglect or improper use. (c) Any goods the identification marks of which have been altered or removed. (d) Any goods that have not received the basic normal maintenance such as tightening of
bolts, nuts, tines, hose connections and fittings and normal lubrication with the recommended lubricant.
(e) The use of any product on tractors exceeding the recommended horsepower. (f) Any goods that have been altered or repaired other that on instruction or with the written
approval of the seller or to which any part not manufactured or having written approval by the sellers have been fixed.
(g) Any second-hand goods or parts thereof. Any allegedly defective part or parts returned to the seller must be sent carriage paid. No claim for repair or replacement will be entertained unless upon discovery of the alleged defect written notification is sent to the Sellers giving, at the same time, the name of the Buyer from whom the goods were purchased and the date of purchase, together with the full details of the alleged defect and the circumstances involved, also the serial number of the machine etc. The sellers shall be under no liability to their Buyers and first or subsequent users of their goods or to any other person or persons for loss or damage howsoever arising in respect of either personal injuries or for arising out of, or in any other way connected with or arising from the manufactures sale, handling, repair, maintenance, replacement or use of its goods or the failure or malfunction of any of its goods. Representation and/or warranties made by any persons (including Buyers and employees and other representatives of the Seller) which are inconsistent or conflicting with these conditions are not binding upon the sellers unless given in writing and signed by a director of sales.
CLAIMS
If you wish to make a claim under the guarantee: 1: Immediately, stop using the machine. 2: A warranty claim form is available to download from our website: www.tanco.ie. This
should be filled out and e-mailed to you Tanco distributor who will forward it Tanco for processing.
3: Consult with your Tanco dealer (supplier) and have him forward your claim and the
damaged item to Tanco.
2
Tanco Autowrap 280 CS Operator’s manual
Table of Contents 1. General Safety Recommendations 3
1.1. Safety instructions 6
1.2. Safety Decals 7
2. Technical Specifications 8 3. Pre-delivery instructions 9 4. Transport Instructions 13 5. Machine Identification 13 6. Preparation of New Machine 13 7. Electrical Circuit Diagram 280 CS 14 8. Controller Manual 280 CS 15 9. Mode of Operation 280 CS 23 10. Film overlap system 26 11. Service & maintenance 27 12. Technical Diagrams
12.1. Film Threading Diagram 29
12.2. Gear Box chain drive tensioning system 30
12.3. Turntable Chain Drive tensioning system 31
12.4. Cut & Start Cylinder – recharging cylinder 32
13. Hydraulic Circuit Diagram 33 14. Closed Centre Conversion 34 15. Fault Finding 35 16. Declaration of Conformity 37
- 3 -
Tanco Autowrap 280 CS Operator’s manual
1. GENERAL SAFETY RECOMMENDATIONS Before operating the machine, always ensure that the tractor and machine meet with work safety and road traffic regulations. Basic Principles
1. In addition to recommendations given in this manual, legislation on work safety and accident prevention must also be respected.
2. Advice is indicated on the machine, specifying safety recommendations in order to prevent
accidents. 3. Before travelling on public roads, the operator must ensure that the machine conforms to road
traffic regulations. 4. Before starting work, the operator must be familiar with all the machine controls, handling
devices and their functions. Once at work, it is too late to do this! 5. Do not wear loose clothing, which could become caught up in moving elements. 6. The tractor should be equipped with a safety cab. 7. Before starting up the machine and begin work, check the surrounding area (beware of
children!). Make sure there is sufficient visibility. Keep all people and animals away from the danger zone of the machine (risk of projection!!).
8. Carrying people or animals on the machine when working or in transport is strictly forbidden. 9. Machine must only be attached to tractor using means provided and in accordance with current
Safety standards. 10. Special care should be taken when attaching or removing the machine from the tractor. 11. Before transporting the machine on public roads, ensure that all legally required guards and
indicators (lights, reflectors…) are in place and in good operations. 12. All operating controls (cords, cables, rods etc.) must be positioned so that they cannot be set
off accidently, risking accident or damage. 13. Before travelling on public roads, put the machine into it transport position as instructed in this
operator’s manual. 14. Never leave the tractor seat while the machine is operating. 15. Drive speed must be adapted to ground conditions as well as to roads and path. Always avoid
abrupt changes of directions. 16. Before operating the machine, ensure that all safety guards are firmly in place and in good
condition. If worn or damaged, replace immediately 17. Before operating the machine, check the tightness of all nuts and bolts, particularly on fixing
elements (blades tines, knives, spades etc.).
4
Tanco Autowrap 280 CS Operator’s manual
18. Keep clear of the machine operating area. 19. Warning! Danger of crushing and shearing can exist when components are operated by
hydraulic or pneumatic controls. 20. Before leaving the tractor or before adjusting, maintaining or repairing the machine, turn off
the engine, remove the ignition key and wait until all moving parts have come to a complete stop.
21. Do not stand between the tractor and the machine unless the hand break is tight and/or stops
have been placed under the wheels. 22. Before any adjustments, maintenance or repairs are carried out, ensure that the machine cannot
be started up accidentally.
ADDITIONAL RECOMMENDATIONS FOR LINKAGE MOUNTED MACHINES 1. Before attaching the machine, ensure that the front tractor axle is sufficiently ballasted. Ballast is
to be placed on the supports provided in accordance with instructions of the tractor manufacturer.
2. Do not exceed the maximum axle load or the overall transport weight prescribed by the tractor
manufacturer. 3. Precision steering, tractor adherence, road holding and efficient braking are influenced by the type
of implement, weight, ballast of front axle, ground or road conditions. It Is Therefore of utmost importance to be cautious in every given situation.
4. Be particularly cautious when turning corners, paying attention to machine overhang, length,
height and weight. SAFETY RECOMMENDATIONS FOR ATTACHING IMPLEMENTS TO TRACTOR 1. When attaching or removing the machine from the tractor, position hydraulic lift control lever in
such a way that it cannot be set off accidentally. 2. When attaching the machine to the tractor hydraulic linkage, ensure that diameter of the link pins
corresponds to the diameter of the ball joints. 3. Warning! Danger of crushing and shearing can exist in the lifting zone of the tractor hydraulic
linkage! 4. Do not stand between the tractor and the machine when operating the outer lever of the lift
mechanism. 5. In transport, the machine lift mechanism should be stabilized by the tractor tie rods, to avoid
floatation and side shifting. 6. When transporting the machine, lock the hydraulic lift control lever in place so that it cannot be
lowered accidentally.
- 5 -
Tanco Autowrap 280 CS Operator’s manual
HYDRAULIC SYSTEMS 1. Warning! Hydraulic system is under pressure. 2. When fitting hydraulic motors or cylinders, ensure that connections have been made correctly, as per
manufactures instructions. 3. CAUTION! Check whether Tractors hydraulics are open or closed centre. If you are unsure talk to
you dealer. Running with the wrong circuit configuration will cause excessive heat in the hydraulic oil and may result in damage to the tractor and machine. To change configuration See Chapter 14.
4. Before connecting hoses to the tractor hydraulics, ensure that tractor and machine circuits are not under
pressure. 5. It is strongly recommended that the operator marks the hydraulic connections between tractor and
machine to avoid making a wrong connection. Warning! Functions could be reversed (For example: lift/lower) Check hydraulic hoses regularly! Worn or damaged hoses must be replaced immediately. Replacement
parts must be in accordance with the manufactures recommendations concerning specifications and quality.
6. Should a leak be found, take all necessary precautions to avoid accidents. 7. Any liquid under pressure (particularly oil from hydraulics) can be penetrate the skin and cause severe
injury. If injured, see a doctor immediately, there could be a danger of infection. 8. Before any adjustments, maintenance or repairs are carried out, lower the machine, depressurize the
circuit, turn off the engine and remove the ignition key. MAINTENANCE 1. Before checking for any machine malfunction and before adjusting, maintaining or repairing the
machine turn off engine and remove ignition key. 2. Check tightness of nuts and bolts regularly. Retighten if necessary. 3. If the machine is raised, prop it up in a stable position before carrying out any maintenance work 4. When replacing a work part, wear protective gloves and use only standarized tools. 5. It is forbidden to discard any oil, grease or filters. These must be given to waste disposal organisations
to protect the environment. 6. Disconnect power source before any work is done to the electric system. 7. Check safety guards regularly, particularly those that are subject to wear. Replace immediately if
damaged. 8. Spare parts used must be in accordance with specifications and standards as defined by the
manufacturer. Use only genuine TANCO parts. 9. Before any electric welding is carried out on tractor or attached machine, disconnect generator and
battery terminals. 10. Repairs on elements under pressure or tension (spring, accumulators etc.), must only be carried out by
competent persons with standardised equipment.
6
Tanco Autowrap 280 CS Operator’s manual
1.1. SPECIAL SAFETY INSTRUCTIONS
1. Stop engine of the tractor before working on machine.
2. Put a suitable prop under raised platform before working in this area.
3. Always raise lift Arm and fit safety prop before transporting machine on public roads.
4. Lift Arms should always be lowered before operating turntable.
5. Ensure platform rollers are parallel to Lift Arm before arm is raised.
6. On Autowrap models fitted with hydraulic bale ramp it is essential that the hydraulic hose
is not disconnected from the hydraulic cylinder or hydraulic accumulator. This system is
charged under pressure. Also, do not attempt to open the hydraulic accumulator as this is a
pressurised unit.
OPERATING SAFETY INSTRUCTIONS
1. Operators should have their hands on the controls at all times when the machine is in use.
2. Autowrap control unit and level controls must only be operated from the tractor side only.
3. The operator must be aware of the loader at all times and must not leave the controls at any
time.
4. Keep onlookers clear of machine at all times. Danger zone is 5 meters.
5. Beware of rotating turntable and all moving parts.
6. If not operated correctly the bale could fly off the turntable. The end support rollers must
always be fitted. Do not exceed recommended turntable speed of 30 r.p.m. Mis-shapen
bales combined with excessive turntable speeds can be dangerous.
7. Care must be taken when tipping bales from the machine on sloping ground and during
subsequent handling to ensure that they do not roll, thus causing hazard.
8. Never enter between the control valve and the turntable without first disengaging the
hydraulics and stopping the tractor. THINK OF YOUR PERSONAL SAFETY AND THAT OF OTHERS AT ALL TIMES

- 7 -
Tanco Autowrap 280 CS Operator’s manual
1.2. SAFETY DECALS The following safety decals have been placed on your machine in the areas indicated. They are intended for your personal safety and for the safety of the other people working with you. Walk around your machine and note the content and locations of these warning signs. Review these decals and the operating instructions in the manual with your machine operators. Ensure that these decals are always legible. If they are not, replace them.
2. WARNING: SHARP BLADE
1. READ OPERATORS MANUAL AND SAFETY INSTRUCTOONS
3. DANGER STAND CLEAR
4. DO NOT EXCEED TURNTABLE SPEED OF 30 R.P.M. 5. BEWARE: HOSES UNDER PRESSURE AT ALL TIMES
8
Tanco Autowrap 280 CS Operator’s manual
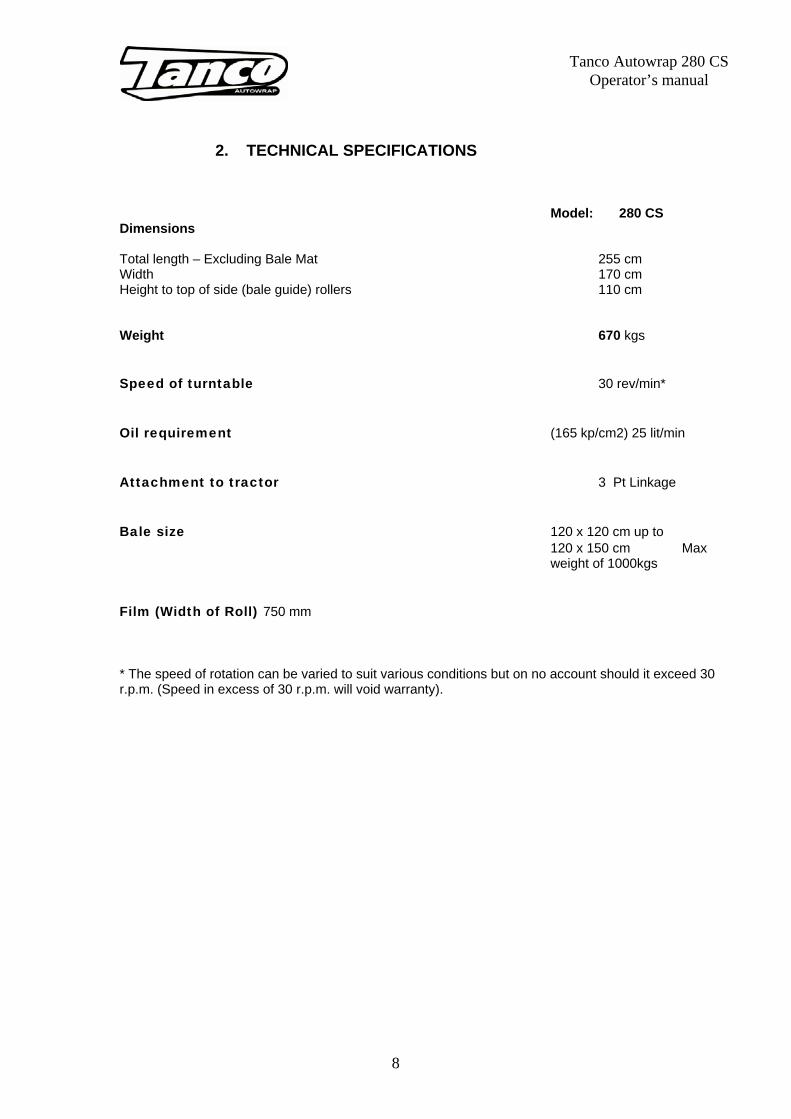
2. TECHNICAL SPECIFICATIONS
Model: 280 CS Dimensions Total length – Excluding Bale Mat 255 cm Width 170 cm Height to top of side (bale guide) rollers 110 cm Weight 670 kgs Speed of turntable 30 rev/min* Oil requirement (165 kp/cm2) 25 lit/min Attachment to tractor 3 Pt Linkage Bale size 120 x 120 cm up to
120 x 150 cm Max weight of 1000kgs
Film (Width of Roll) 750 mm * The speed of rotation can be varied to suit various conditions but on no account should it exceed 30 r.p.m. (Speed in excess of 30 r.p.m. will void warranty).
- 9 -
Tanco Autowrap 280 CS Operator’s manual
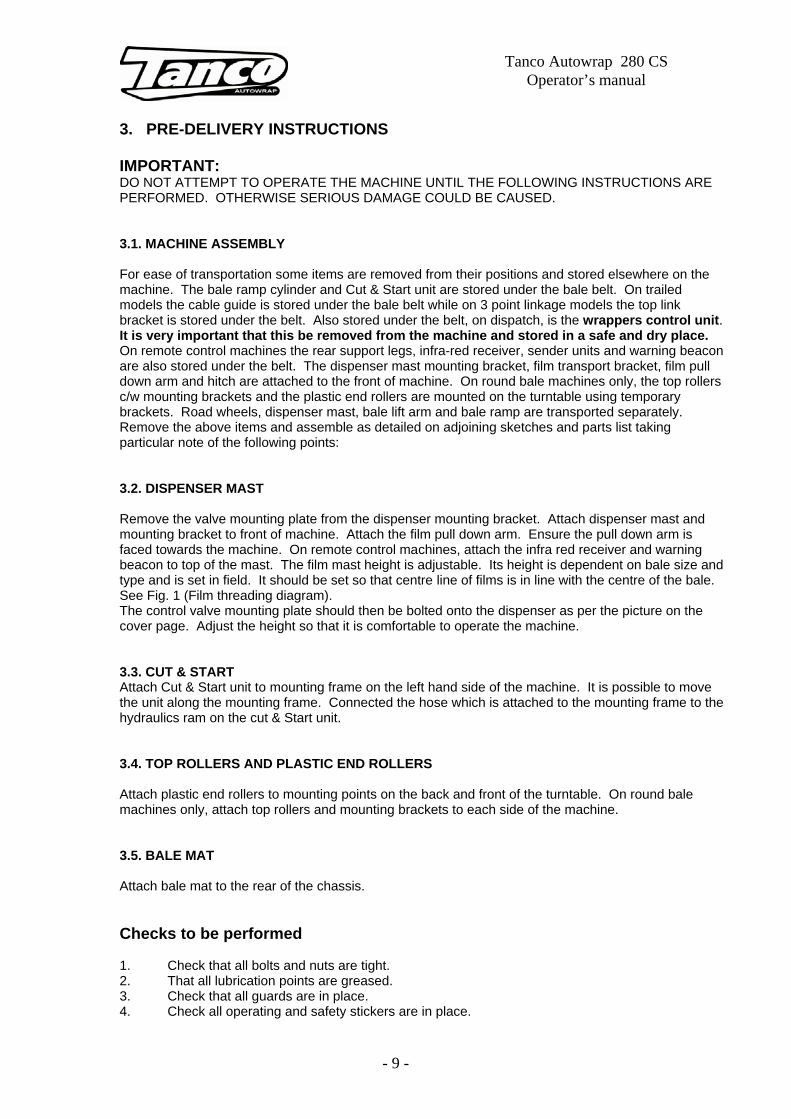
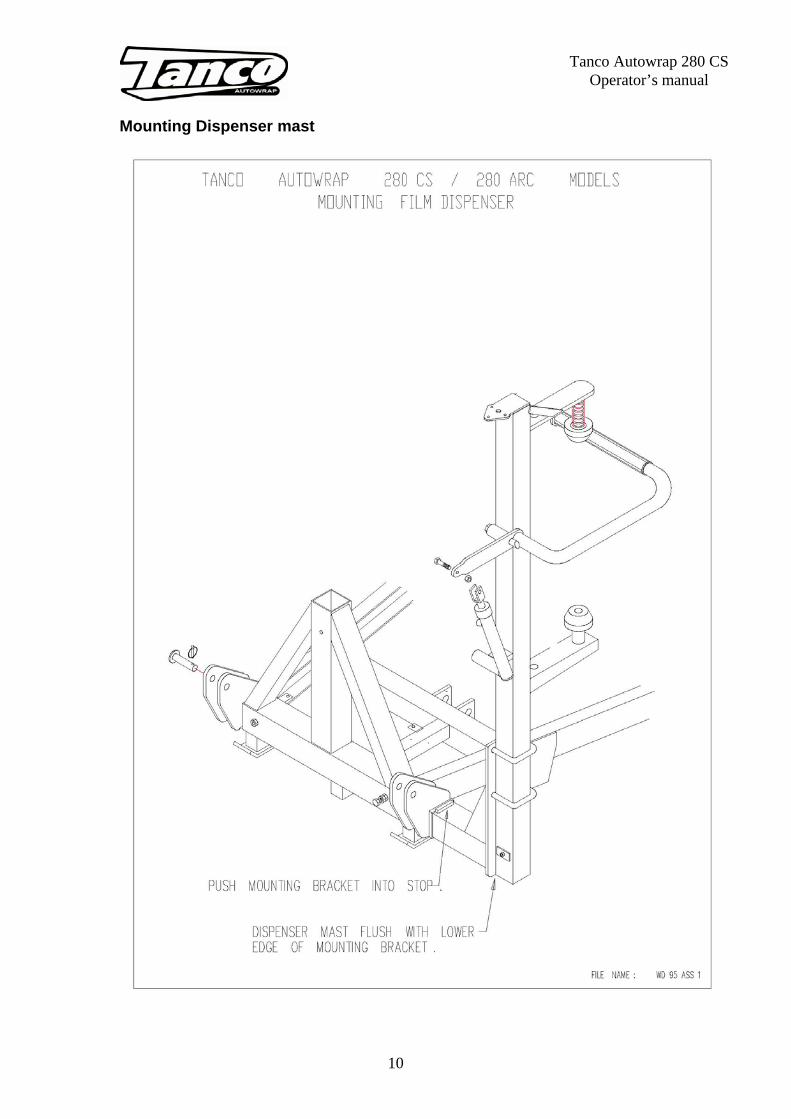
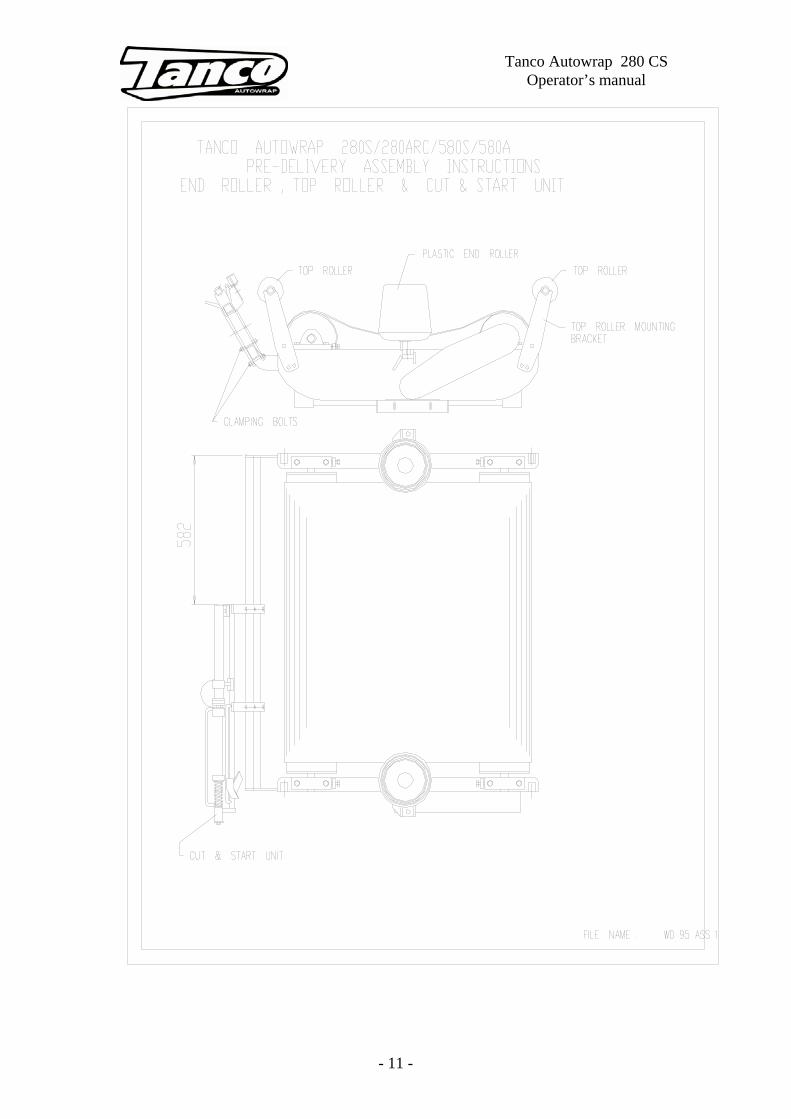
3. PRE-DELIVERY INSTRUCTIONS IMPORTANT: DO NOT ATTEMPT TO OPERATE THE MACHINE UNTIL THE FOLLOWING INSTRUCTIONS ARE PERFORMED. OTHERWISE SERIOUS DAMAGE COULD BE CAUSED. 3.1. MACHINE ASSEMBLY For ease of transportation some items are removed from their positions and stored elsewhere on the machine. The bale ramp cylinder and Cut & Start unit are stored under the bale belt. On trailed models the cable guide is stored under the bale belt while on 3 point linkage models the top link bracket is stored under the belt. Also stored under the belt, on dispatch, is the wrappers control unit. It is very important that this be removed from the machine and stored in a safe and dry place. On remote control machines the rear support legs, infra-red receiver, sender units and warning beacon are also stored under the belt. The dispenser mast mounting bracket, film transport bracket, film pull down arm and hitch are attached to the front of machine. On round bale machines only, the top rollers c/w mounting brackets and the plastic end rollers are mounted on the turntable using temporary brackets. Road wheels, dispenser mast, bale lift arm and bale ramp are transported separately. Remove the above items and assemble as detailed on adjoining sketches and parts list taking particular note of the following points: 3.2. DISPENSER MAST Remove the valve mounting plate from the dispenser mounting bracket. Attach dispenser mast and mounting bracket to front of machine. Attach the film pull down arm. Ensure the pull down arm is faced towards the machine. On remote control machines, attach the infra red receiver and warning beacon to top of the mast. The film mast height is adjustable. Its height is dependent on bale size and type and is set in field. It should be set so that centre line of films is in line with the centre of the bale. See Fig. 1 (Film threading diagram). The control valve mounting plate should then be bolted onto the dispenser as per the picture on the cover page. Adjust the height so that it is comfortable to operate the machine. 3.3. CUT & START Attach Cut & Start unit to mounting frame on the left hand side of the machine. It is possible to move the unit along the mounting frame. Connected the hose which is attached to the mounting frame to the hydraulics ram on the cut & Start unit. 3.4. TOP ROLLERS AND PLASTIC END ROLLERS Attach plastic end rollers to mounting points on the back and front of the turntable. On round bale machines only, attach top rollers and mounting brackets to each side of the machine. 3.5. BALE MAT Attach bale mat to the rear of the chassis. Checks to be performed 1. Check that all bolts and nuts are tight. 2. That all lubrication points are greased. 3. Check that all guards are in place. 4. Check all operating and safety stickers are in place.
10
Tanco Autowrap 280 CS Operator’s manual
Mounting Dispenser mast
- 11 -
Tanco Autowrap 280 CS Operator’s manual
12
Tanco Autowrap 280 CS Operator’s manual
3.7. Operational test When all above assembly and checks have been carried out, the operation of the machine should be checked as follows: NOTE: IF YOU ARE NOT TOTALLY FAMILIAR WITH THE OPERATION OF THE TANCO CONTROL SYSTEM, READ THIS MANUAL IN FULL BEFORE PROCEEDING WITH OPERATIONAL TEST. 1. Attach machine to tractor 2. Connect hydraulic hoses to D/A service on tractor. 3. Fit controller box inside cab. 4. Connect control box to the machine and connect power cable direct to the tractor battery. It is important that the leads are connected with the correct polarity. 5. Fit cable control actuator socket to convenient position in cab and locate actuators in socket 6. Lock hydraulic lever in tractor so that oil is flowing through system 7. Check function by operating function Manually. (a) Turntable rotation forward and reverse. (b) Tip up and down checking hoses are okay. (c) Check Cut and Start is functioning. 3.8. Customer checks Before despatching consult customer on the following points: 1. That machine model suits his requirements. 2. If the machine is to be operated on a tractor with a closed centre hydraulic system then a closed centre value is required, see separate instructions. 3. That the tractor machine is to be used on, can carry the 3-Point linkage machines.
- 13 -
Tanco Autowrap 280 CS Operator’s manual
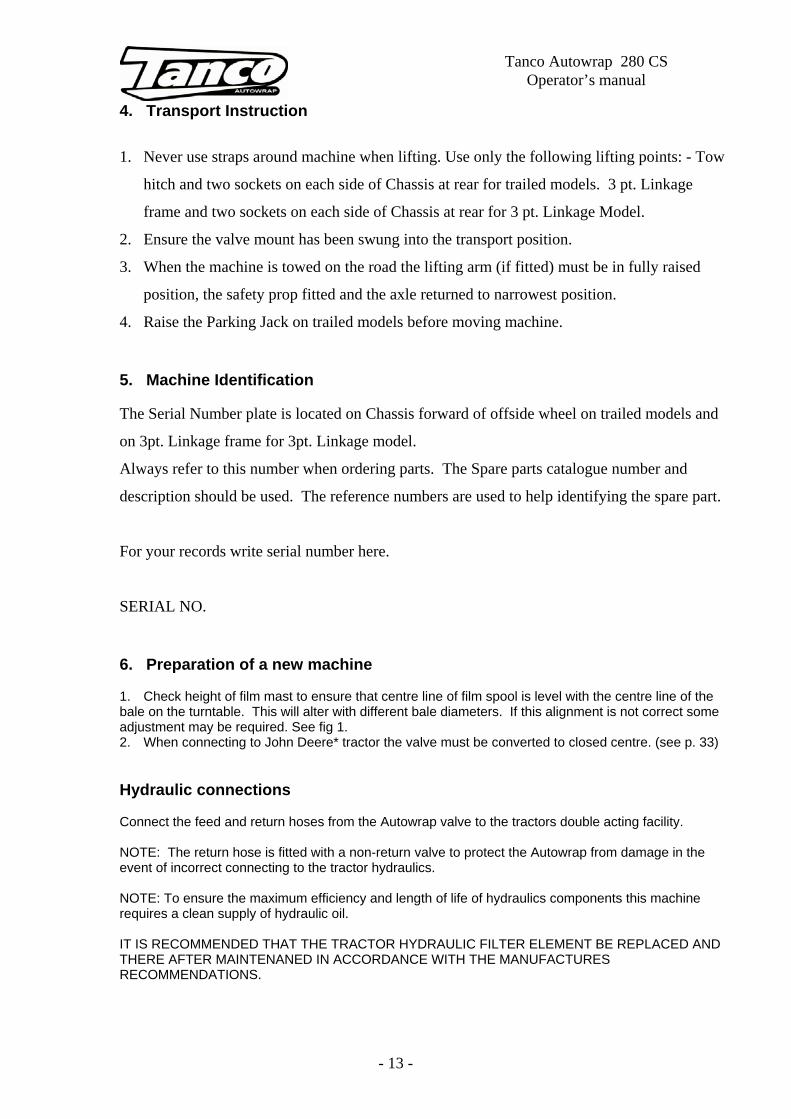
4. Transport Instruction
1. Never use straps around machine when lifting. Use only the following lifting points: - Tow
hitch and two sockets on each side of Chassis at rear for trailed models. 3 pt. Linkage
frame and two sockets on each side of Chassis at rear for 3 pt. Linkage Model.
2. Ensure the valve mount has been swung into the transport position.
3. When the machine is towed on the road the lifting arm (if fitted) must be in fully raised
position, the safety prop fitted and the axle returned to narrowest position.
4. Raise the Parking Jack on trailed models before moving machine. 5. Machine Identification The Serial Number plate is located on Chassis forward of offside wheel on trailed models and
on 3pt. Linkage frame for 3pt. Linkage model.
Always refer to this number when ordering parts. The Spare parts catalogue number and
description should be used. The reference numbers are used to help identifying the spare part.
For your records write serial number here.
SERIAL NO. 6. Preparation of a new machine 1. Check height of film mast to ensure that centre line of film spool is level with the centre line of the bale on the turntable. This will alter with different bale diameters. If this alignment is not correct some adjustment may be required. See fig 1. 2. When connecting to John Deere* tractor the valve must be converted to closed centre. (see p. 33) Hydraulic connections Connect the feed and return hoses from the Autowrap valve to the tractors double acting facility. NOTE: The return hose is fitted with a non-return valve to protect the Autowrap from damage in the event of incorrect connecting to the tractor hydraulics. NOTE: To ensure the maximum efficiency and length of life of hydraulics components this machine requires a clean supply of hydraulic oil. IT IS RECOMMENDED THAT THE TRACTOR HYDRAULIC FILTER ELEMENT BE REPLACED AND THERE AFTER MAINTENANED IN ACCORDANCE WITH THE MANUFACTURES RECOMMENDATIONS.

14
Tanco Autowrap 280 CS Operator’s manual
7. Electrical Circuit Diagram 280-CS
- 15 -
Tanco Autowrap 280 CS Operator’s manual
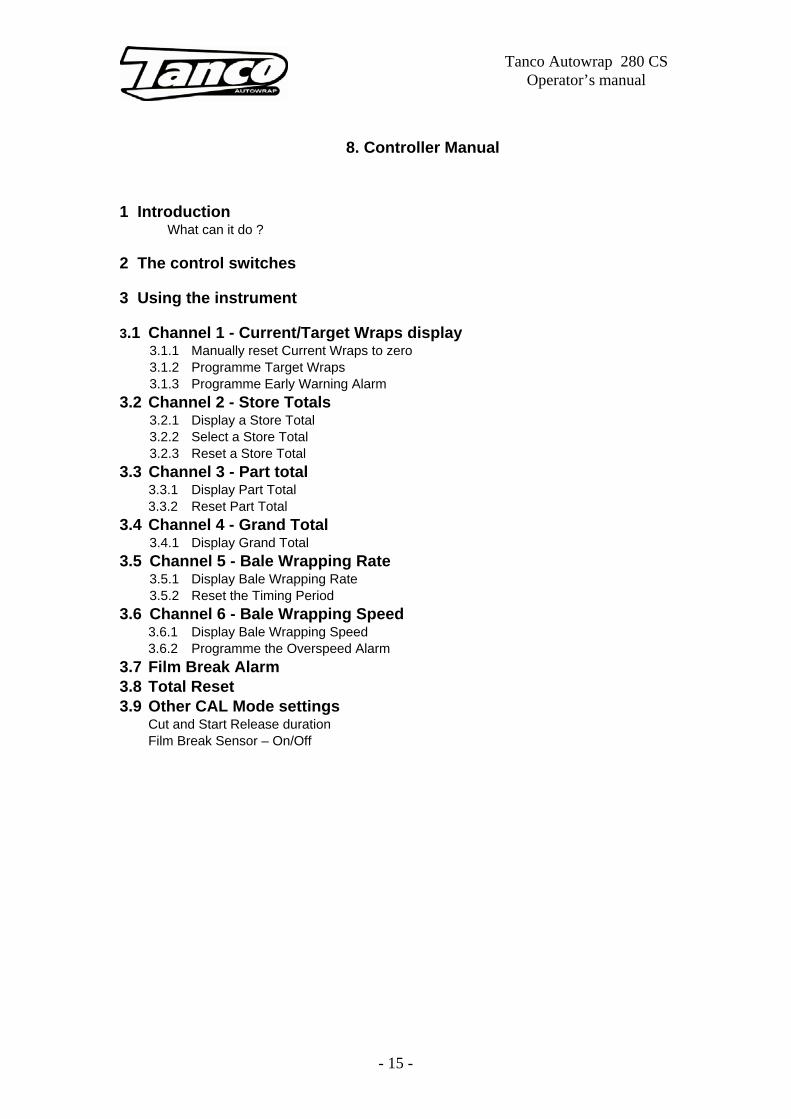
8. Controller Manual 1 Introduction What can it do ? 2 The control switches 3 Using the instrument 3.1 Channel 1 - Current/Target Wraps display 3.1.1 Manually reset Current Wraps to zero 3.1.2 Programme Target Wraps 3.1.3 Programme Early Warning Alarm 3.2 Channel 2 - Store Totals 3.2.1 Display a Store Total 3.2.2 Select a Store Total 3.2.3 Reset a Store Total 3.3 Channel 3 - Part total
3.3.1 Display Part Total 3.3.2 Reset Part Total 3.4 Channel 4 - Grand Total 3.4.1 Display Grand Total 3.5 Channel 5 - Bale Wrapping Rate 3.5.1 Display Bale Wrapping Rate 3.5.2 Reset the Timing Period 3.6 Channel 6 - Bale Wrapping Speed 3.6.1 Display Bale Wrapping Speed 3.6.2 Programme the Overspeed Alarm 3.7 Film Break Alarm 3.8 Total Reset 3.9 Other CAL Mode settings Cut and Start Release duration Film Break Sensor – On/Off
16
Tanco Autowrap 280 CS Operator’s manual
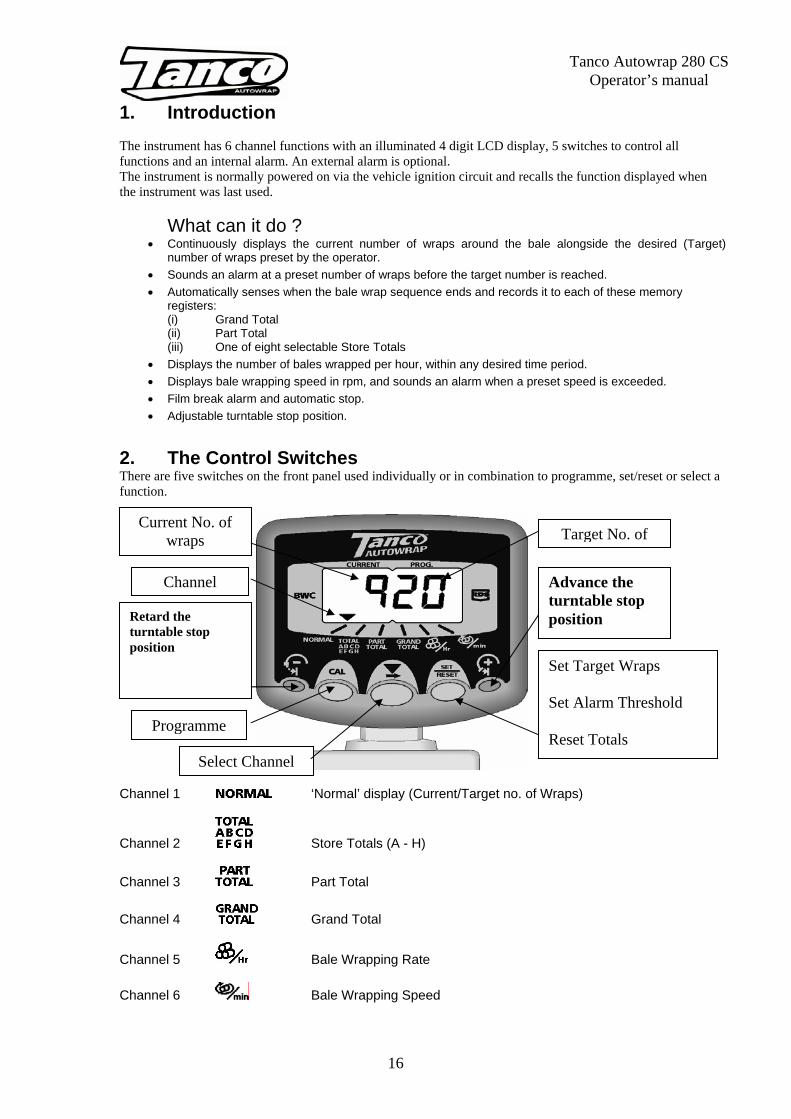
1. Introduction The instrument has 6 channel functions with an illuminated 4 digit LCD display, 5 switches to control all functions and an internal alarm. An external alarm is optional. The instrument is normally powered on via the vehicle ignition circuit and recalls the function displayed when the instrument was last used. What can it do ?
• Continuously displays the current number of wraps around the bale alongside the desired (Target) number of wraps preset by the operator.
• Sounds an alarm at a preset number of wraps before the target number is reached. • Automatically senses when the bale wrap sequence ends and records it to each of these memory
registers: (i) Grand Total (ii) Part Total (iii) One of eight selectable Store Totals
• Displays the number of bales wrapped per hour, within any desired time period. • Displays bale wrapping speed in rpm, and sounds an alarm when a preset speed is exceeded. • Film break alarm and automatic stop. • Adjustable turntable stop position.
2. The Control Switches There are five switches on the front panel used individually or in combination to programme, set/reset or select a function.
Channel 1 ‘Normal’ display (Current/Target no. of Wraps)
Channel 2 Store Totals (A - H)
Channel 3 Part Total Channel 4 Grand Total
Channel 5 Bale Wrapping Rate Channel 6 Bale Wrapping Speed
Current No. of wraps
Channel
Retard the turntable stop position
Programme
Select Channel
Target No. of
Advance the turntable stop position
Set Target Wraps Set Alarm Threshold Reset Totals
- 17 -
Tanco Autowrap 280 CS Operator’s manual
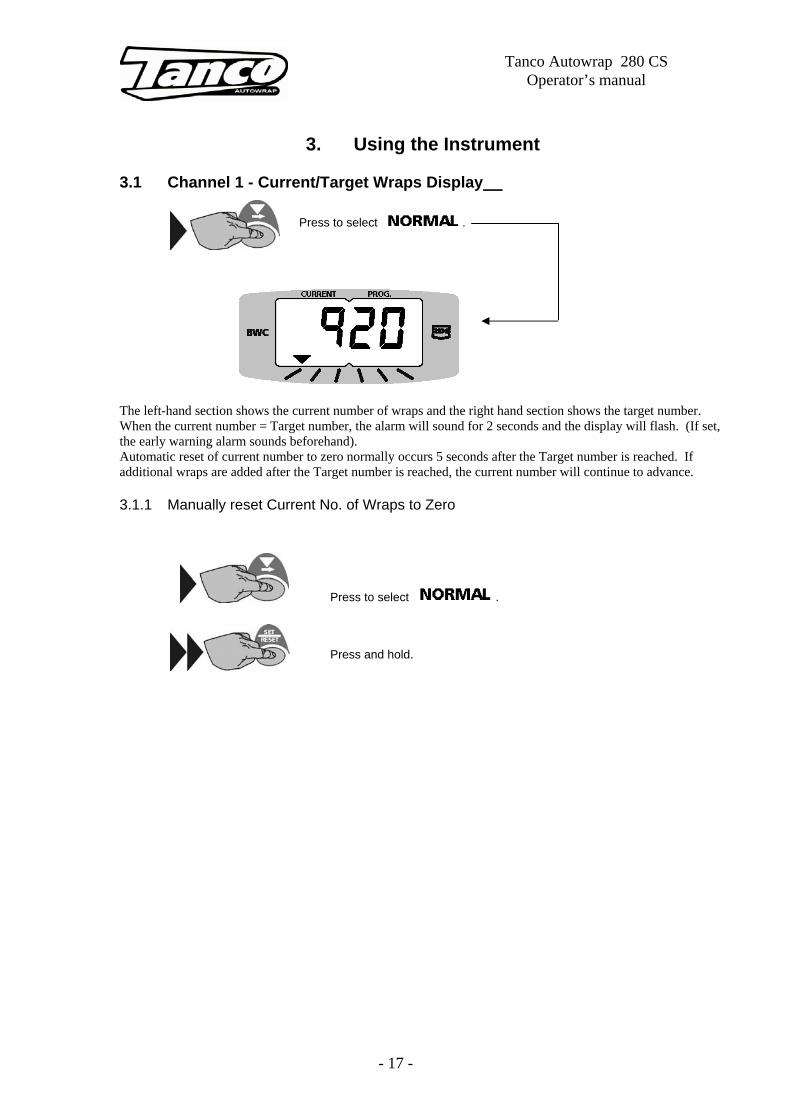
3. Using the Instrument 3.1 Channel 1 - Current/Target Wraps Display
Press to select .
The left-hand section shows the current number of wraps and the right hand section shows the target number. When the current number = Target number, the alarm will sound for 2 seconds and the display will flash. (If set, the early warning alarm sounds beforehand). Automatic reset of current number to zero normally occurs 5 seconds after the Target number is reached. If additional wraps are added after the Target number is reached, the current number will continue to advance. 3.1.1 Manually reset Current No. of Wraps to Zero
Press to select . Press and hold.
18
Tanco Autowrap 280 CS Operator’s manual
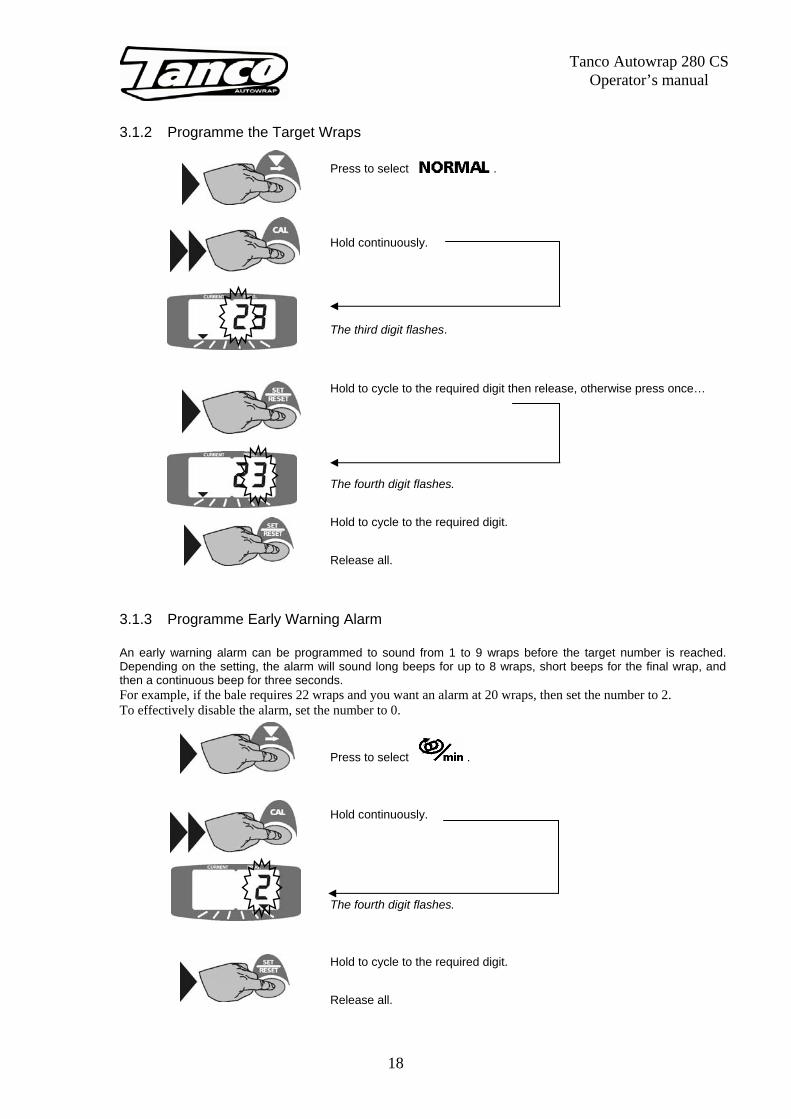
3.1.2 Programme the Target Wraps
Press to select .
Hold continuously.
The third digit flashes.
Hold to cycle to the required digit then release, otherwise press once… The fourth digit flashes. Hold to cycle to the required digit. Release all.
3.1.3 Programme Early Warning Alarm An early warning alarm can be programmed to sound from 1 to 9 wraps before the target number is reached. Depending on the setting, the alarm will sound long beeps for up to 8 wraps, short beeps for the final wrap, and then a continuous beep for three seconds. For example, if the bale requires 22 wraps and you want an alarm at 20 wraps, then set the number to 2. To effectively disable the alarm, set the number to 0.
Press to select . Hold continuously.
The fourth digit flashes. Hold to cycle to the required digit. Release all.
- 19 -
Tanco Autowrap 280 CS Operator’s manual
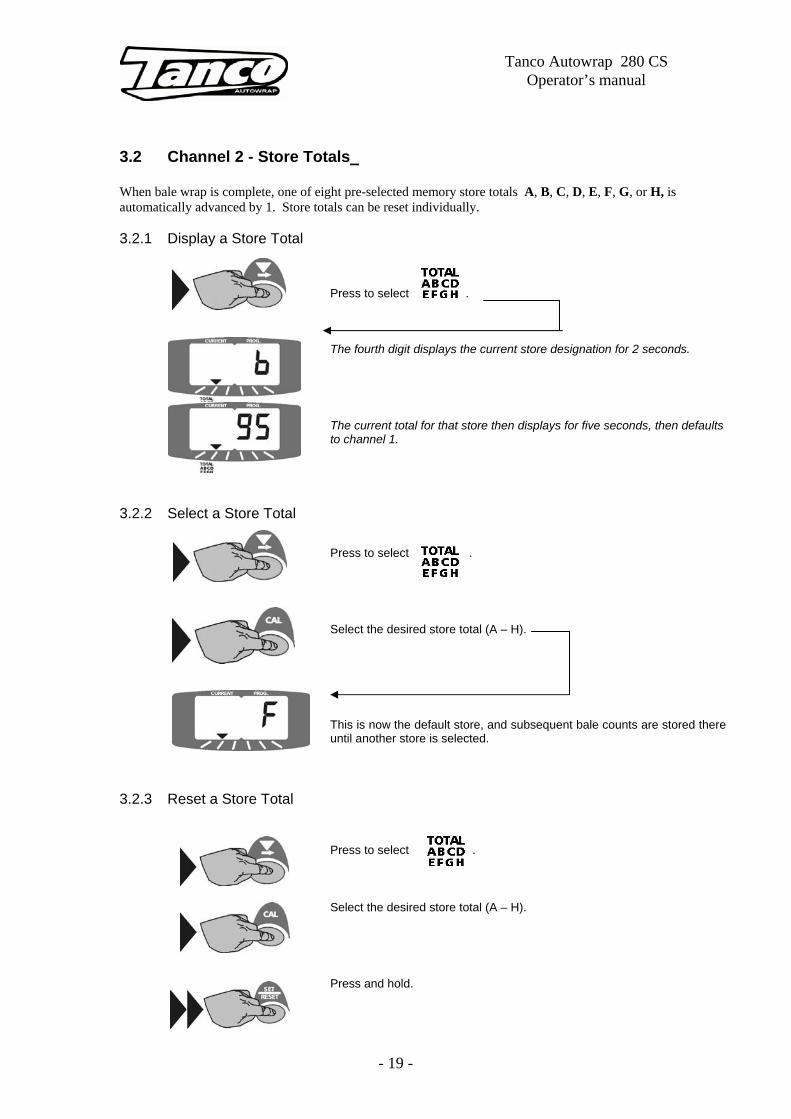
3.2 Channel 2 - Store Totals When bale wrap is complete, one of eight pre-selected memory store totals A, B, C, D, E, F, G, or H, is automatically advanced by 1. Store totals can be reset individually. 3.2.1 Display a Store Total
Press to select .
The fourth digit displays the current store designation for 2 seconds. The current total for that store then displays for five seconds, then defaults to channel 1.
3.2.2 Select a Store Total
Press to select . Select the desired store total (A – H). This is now the default store, and subsequent bale counts are stored there until another store is selected.
3.2.3 Reset a Store Total
Press to select . Select the desired store total (A – H). Press and hold.
20
Tanco Autowrap 280 CS Operator’s manual
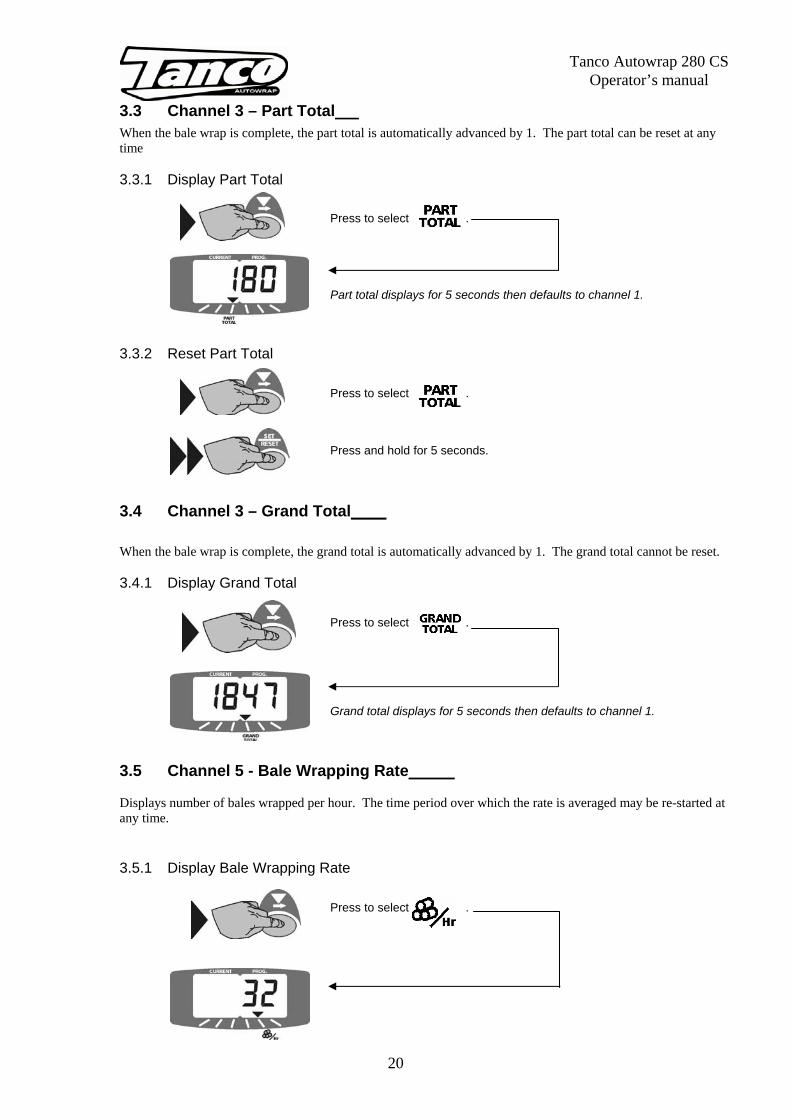
3.3 Channel 3 – Part Total When the bale wrap is complete, the part total is automatically advanced by 1. The part total can be reset at any time 3.3.1 Display Part Total
Press to select . Part total displays for 5 seconds then defaults to channel 1.
3.3.2 Reset Part Total Press to select . Press and hold for 5 seconds.
3.4 Channel 3 – Grand Total____ When the bale wrap is complete, the grand total is automatically advanced by 1. The grand total cannot be reset. 3.4.1 Display Grand Total
Press to select .
Grand total displays for 5 seconds then defaults to channel 1.
3.5 Channel 5 - Bale Wrapping Rate Displays number of bales wrapped per hour. The time period over which the rate is averaged may be re-started at any time.
3.5.1 Display Bale Wrapping Rate
Press to select .

- 21 -
Tanco Autowrap 280 CS Operator’s manual
3.5.2 Reset Timing Period
Press to select . Press and hold for 5 seconds.
3.6 Channel 6 - Bale Wrapping Speed Displays instantaneous r.p.m. of the bale wrapper at 3 second intervals in the range 10-99 r.p.m. An overspeed alarm will sound if the r.p.m. exceeds a pre-programmable limit. The display will default to this channel and flash for the duration of the overspeeding, subsequently reverting to the 'current/target wraps' display. 3.6.1 Display Bale Wrapping Speed
Press to select .
3.6.2 Programme the Overspeed Alarm
Switch power on while pressed. Release.
The third digit flashes. Hold to cycle to the desired digit, then release, otherwise press once…
The fourth digit flashes. Hold to cycle to the required digit. Release all.
22
Tanco Autowrap 280 CS Operator’s manual
3.7 Film Break Alarm Only operational where optional film break sensor is installed (see parts book). If the film should break, after 1 second the display will show “STOP”, the alarm will sound and the turntable stops. The film break alarm is only operational above a wrapping speed of 15rpm. 3.8 Total Reset If for some reason the data in the instrument is corrupted or the display shows 'PrOg' then the instrument must be totally reset. . Switch power off. . Press and hold all 3 control switches. . Switch power on. . Release all switches. All instrument settings should be returned to the factory-set values. If the display shows 'PrOg' again, the instrument may be faulty and must be returned to the manufacturer for inspection and repair. 3.9 Other CAL Mode Settings Cut and Start Release duration
Switch the power on while pressing and holding the button to enter Cal Mode 2.
Press the button to select channel 2.
The default time is 3 seconds. Press /Hold the button to change the setting. Film Break Sensor – On/Off Enter Cal Mode 2 as above.
Press the button to cycle to channel 3.
Press the button to toggle on/off.
- 23 -
Tanco Autowrap 280 CS Operator’s manual
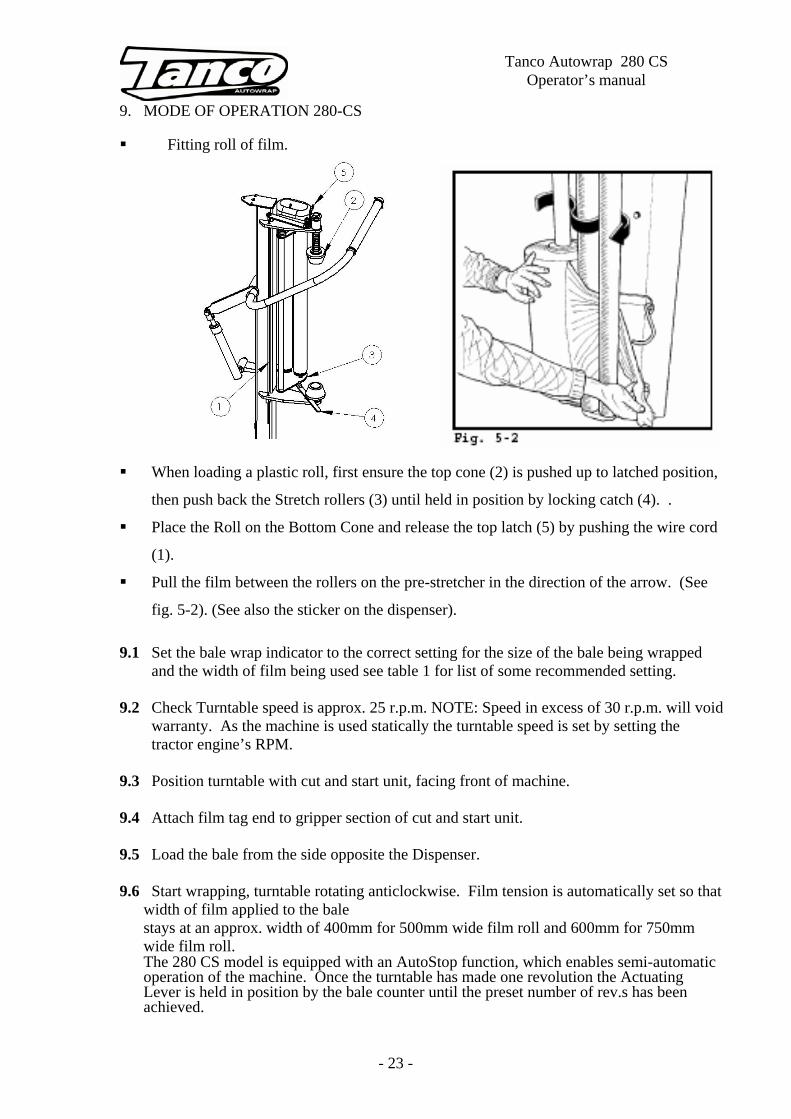
9. MODE OF OPERATION 280-CS Fitting roll of film.
When loading a plastic roll, first ensure the top cone (2) is pushed up to latched position,
then push back the Stretch rollers (3) until held in position by locking catch (4). .
Place the Roll on the Bottom Cone and release the top latch (5) by pushing the wire cord
(1).
Pull the film between the rollers on the pre-stretcher in the direction of the arrow. (See
fig. 5-2). (See also the sticker on the dispenser). 9.1 Set the bale wrap indicator to the correct setting for the size of the bale being wrapped
and the width of film being used see table 1 for list of some recommended setting. 9.2 Check Turntable speed is approx. 25 r.p.m. NOTE: Speed in excess of 30 r.p.m. will void
warranty. As the machine is used statically the turntable speed is set by setting the tractor engine’s RPM.
9.3 Position turntable with cut and start unit, facing front of machine. 9.4 Attach film tag end to gripper section of cut and start unit. 9.5 Load the bale from the side opposite the Dispenser. 9.6 Start wrapping, turntable rotating anticlockwise. Film tension is automatically set so that
width of film applied to the bale stays at an approx. width of 400mm for 500mm wide film roll and 600mm for 750mm wide film roll.
The 280 CS model is equipped with an AutoStop function, which enables semi-automatic operation of the machine. Once the turntable has made one revolution the Actuating Lever is held in position by the bale counter until the preset number of rev.s has been achieved.
24
Tanco Autowrap 280 CS Operator’s manual
After it has done the first revolution the cut and start must be opened. Do this with the lever. Note that it is not necessary to stop the sequence to do this. IMPORTANT. It is very important that this is done or integrity of the bale could be compromised.
The Lever is then automatically released and the turntable stops in the correct “Off-Loading” position.
9.7 On reaching the last wrap revolution a beeping signal from bale wrap indicator sounds
(required number of revolution has been reached) to warn the operator that the wrap cycle is complete. When it comes to the tip position the monitor automatically releases the lever and the turntable should stop in the correct position. Check that the cut and start unit is facing towards front of machine and film aligned with gripper section of cut and start unit. If not correct adjust with a small movement of the lever.
9.8 Tip bale from the machine. When the machine is almost fully tipped the operator,
activates the cut and start unit which grips and cuts the film. The operator then continues tipping the drop the wrapped bale onto the drop matt.
9.9 Lower the turntable and depending on the implement used for loading it may be desirable
to rotate anticlockwise through 90 degrees and stop with cut and start unit opposite to lift arm.
9.10 Repeat operation 5 – 9 as required. NOTE: The film end need only be attached at the start of a roll, after that, the sequence is
automatic.
- 25 -
Tanco Autowrap 280 CS Operator’s manual
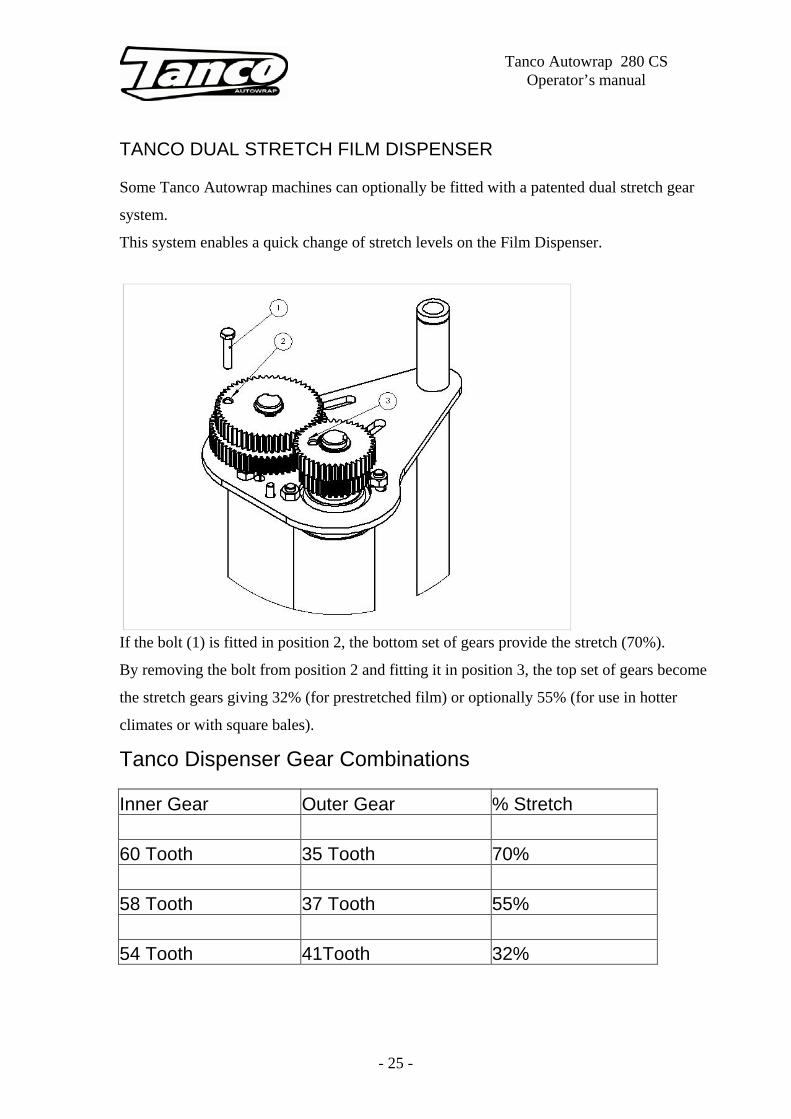
TANCO DUAL STRETCH FILM DISPENSER Some Tanco Autowrap machines can optionally be fitted with a patented dual stretch gear
system.
This system enables a quick change of stretch levels on the Film Dispenser.
If the bolt (1) is fitted in position 2, the bottom set of gears provide the stretch (70%).
By removing the bolt from position 2 and fitting it in position 3, the top set of gears become
the stretch gears giving 32% (for prestretched film) or optionally 55% (for use in hotter
climates or with square bales).
Tanco Dispenser Gear Combinations
Inner Gear Outer Gear % Stretch 60 Tooth 35 Tooth 70% 58 Tooth 37 Tooth 55% 54 Tooth 41Tooth 32%
26
Tanco Autowrap 280 CS Operator’s manual
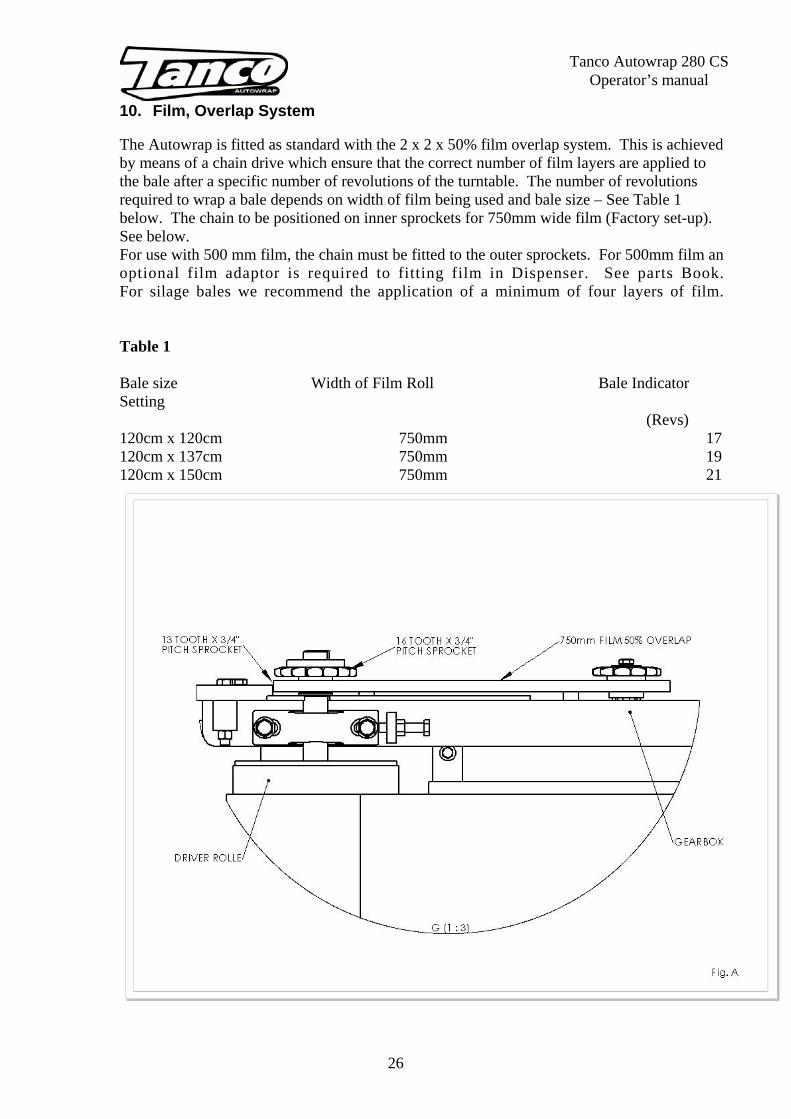
10. Film, Overlap System The Autowrap is fitted as standard with the 2 x 2 x 50% film overlap system. This is achieved by means of a chain drive which ensure that the correct number of film layers are applied to the bale after a specific number of revolutions of the turntable. The number of revolutions required to wrap a bale depends on width of film being used and bale size – See Table 1 below. The chain to be positioned on inner sprockets for 750mm wide film (Factory set-up). See below. For use with 500 mm film, the chain must be fitted to the outer sprockets. For 500mm film an optional film adaptor is required to fitting film in Dispenser. See parts Book. For silage bales we recommend the application of a minimum of four layers of film. Table 1 Bale size Width of Film Roll Bale Indicator Setting (Revs) 120cm x 120cm 750mm 17 120cm x 137cm 750mm 19 120cm x 150cm 750mm 21
- 27 -
Tanco Autowrap 280 CS Operator’s manual
Important The above recommendations are only offered as a guide to correct wrapping of silage bales and the manufactures accept no responsibility for variations that many arise and the consequence of same. They are based upon turntable speeds of up to 25 r.p.m., and a approx film width of 600mm applied to end bale when using 750mm wide film roll. It is the responsibility of the operator to ensure the correct number of wraps are applied, as variances can occur with fluctuations in speed of rotation, film quality and tensioning, shape and density of bale etc. 11.0 Service and Maintenance 1. All nuts and bolts should be tightened after one hour’s use, thereafter regularly. 2. Wheel pressure should be normally kept at 42 psi depending on bale weight and field conditions. 3. Inspection moving parts for wear on daily basis. 4. Lubrication
Drive chain & sprocket Grease every 24 hours Main rollers Grease every 24 hours Hinge pins on lift Grease every 24 hours Hinge pins on main tip frame Grease every 24 hours Hydraulic rams Grease every 24 hours Film spool assy Grease every 24 hours Dispenser gearboxes One shot of Grease every,
500 bales. See 6 Main spindle Grease even 4000-5000 bales
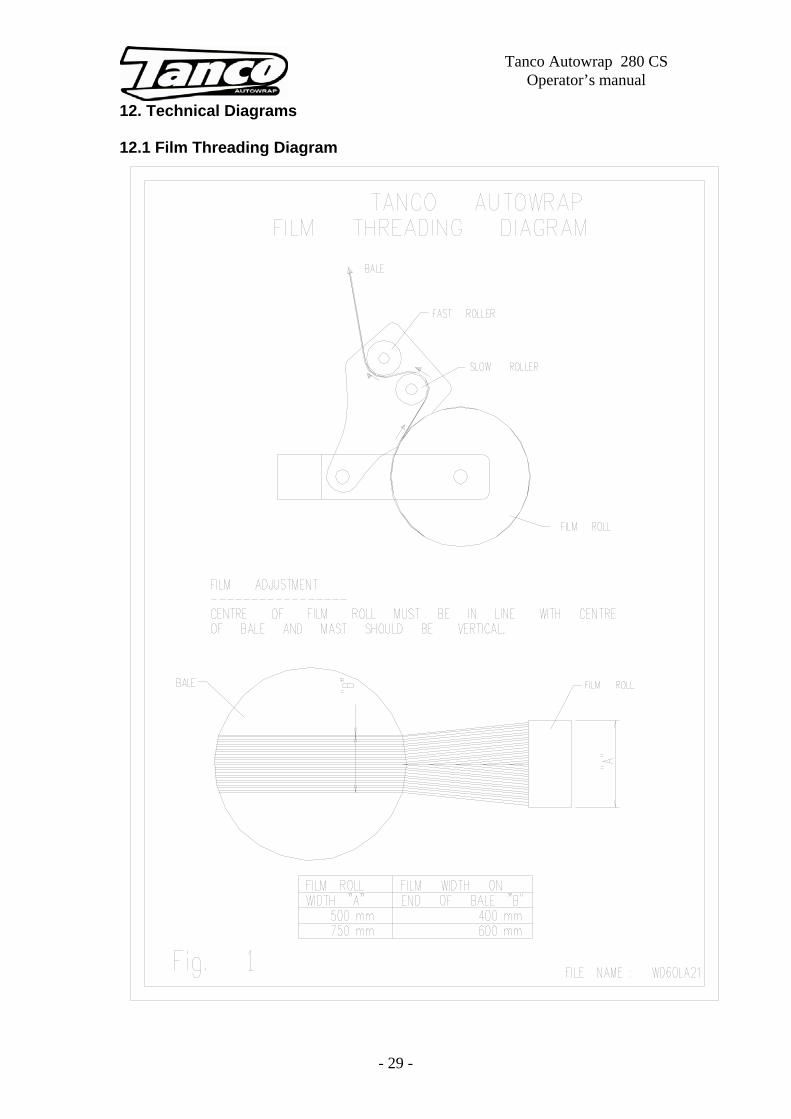
5. Adjustments Turntable drive chain: Adjust after first days work then check/adjust every 50 hours. See Fig. 8 Gearbox Drive chain: Adjust after first days work then check/adjust every 50 hours. See Fig. 2 Roller Drive chain: Adjust after first days work then check/adjust every 50 hours. See Fig. 3 Main Bale Belt: See belt tracking instructions. 6. Film Dispenser Apply P.T.F.E. based grease to gears every 2 to 3 months. 7. Film Adjustment Centre of film roll must be in line with centre of bale and the film mast should be vertical.
28
Tanco Autowrap 280 CS Operator’s manual
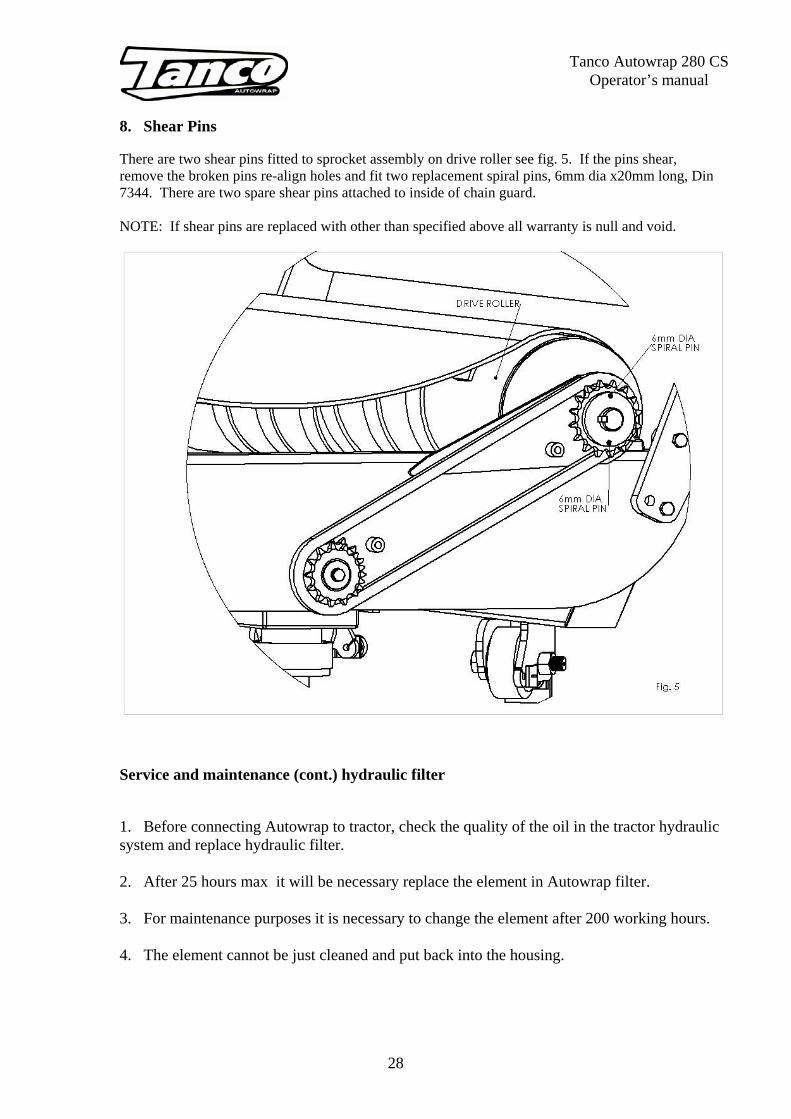
8. Shear Pins There are two shear pins fitted to sprocket assembly on drive roller see fig. 5. If the pins shear, remove the broken pins re-align holes and fit two replacement spiral pins, 6mm dia x20mm long, Din 7344. There are two spare shear pins attached to inside of chain guard. NOTE: If shear pins are replaced with other than specified above all warranty is null and void.
Service and maintenance (cont.) hydraulic filter 1. Before connecting Autowrap to tractor, check the quality of the oil in the tractor hydraulic system and replace hydraulic filter. 2. After 25 hours max it will be necessary replace the element in Autowrap filter. 3. For maintenance purposes it is necessary to change the element after 200 working hours. 4. The element cannot be just cleaned and put back into the housing.
- 29 -
Tanco Autowrap 280 CS Operator’s manual
12. Technical Diagrams 12.1 Film Threading Diagram
30
Tanco Autowrap 280 CS Operator’s manual
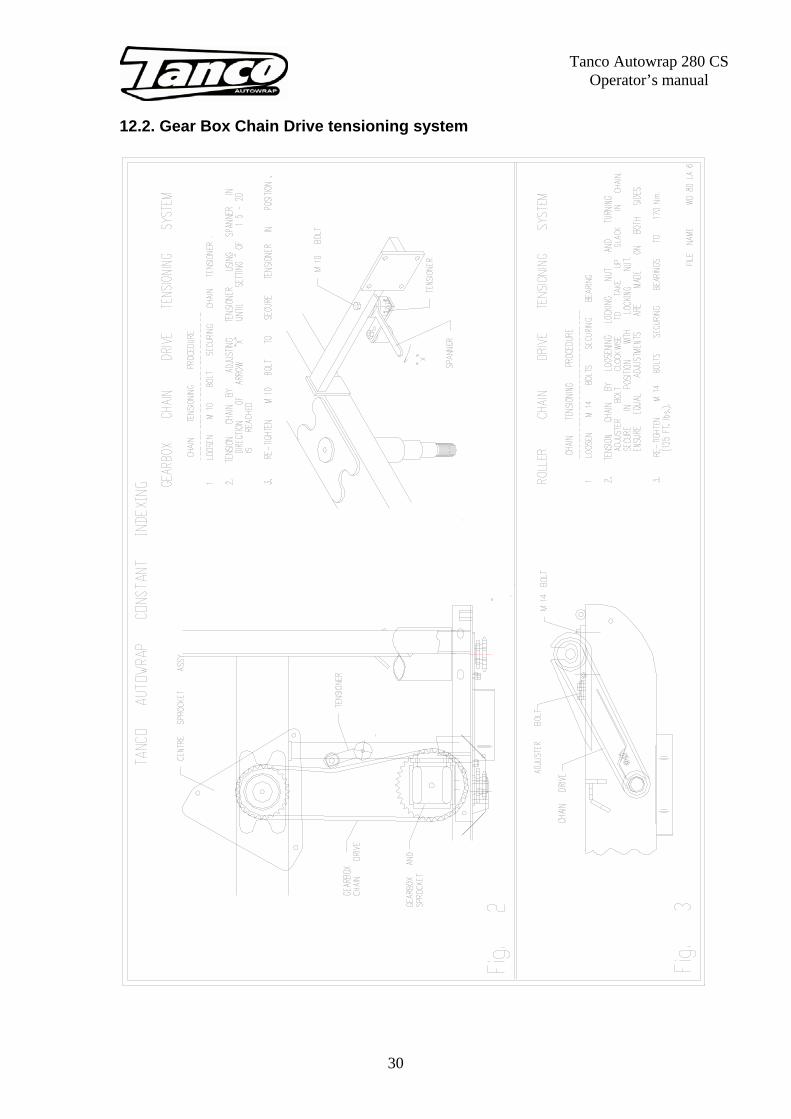
12.2. Gear Box Chain Drive tensioning system
- 31 -
Tanco Autowrap 280 CS Operator’s manual
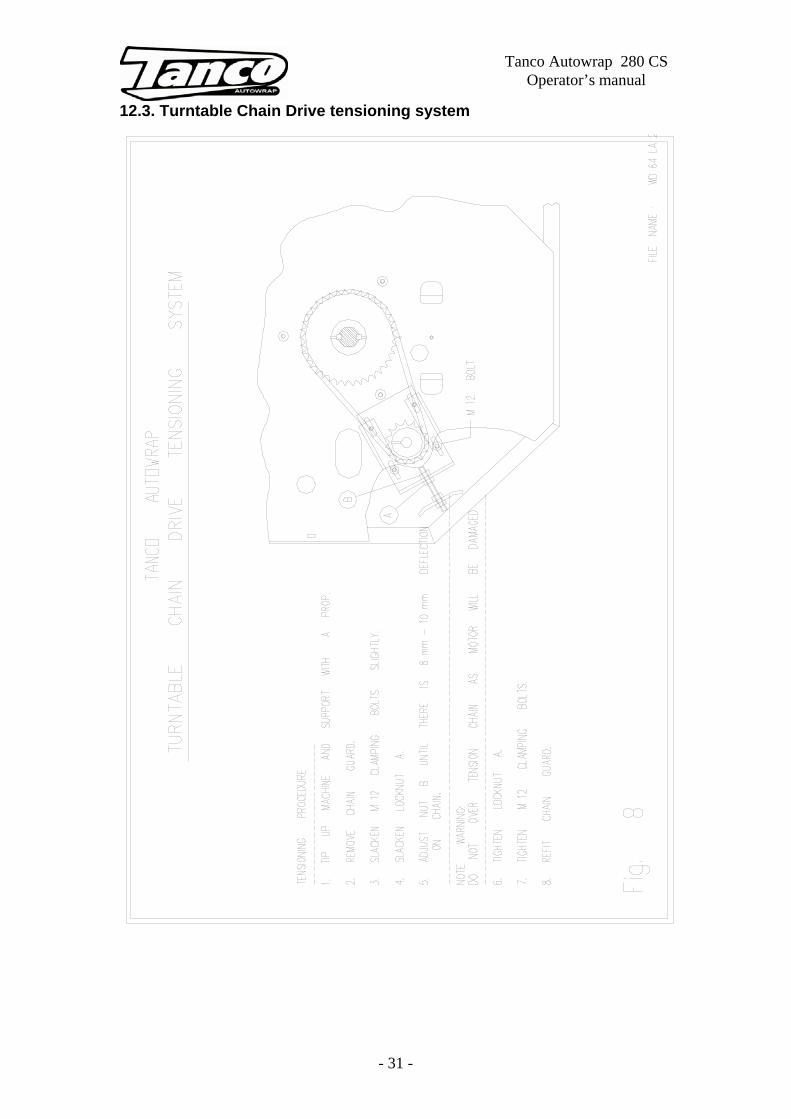
12.3. Turntable Chain Drive tensioning system
32
Tanco Autowrap 280 CS Operator’s manual
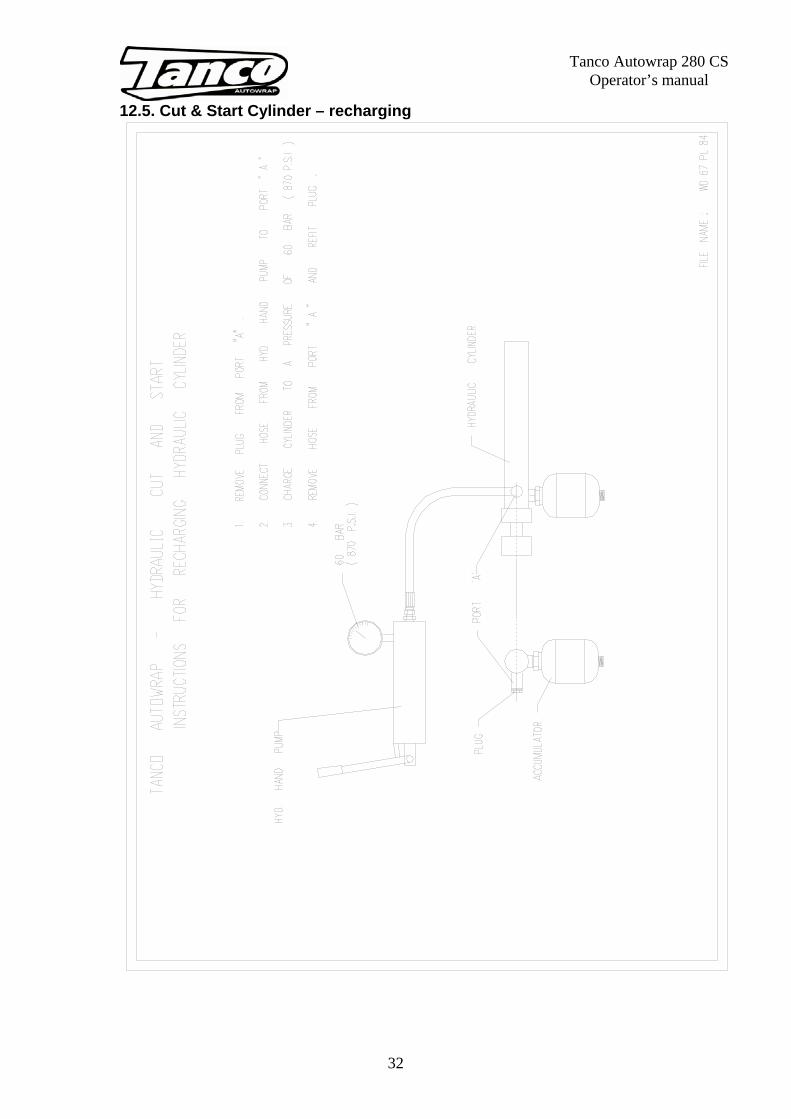
12.5. Cut & Start Cylinder – recharging
- 33 -
Tanco Autowrap 280 CS Operator’s manual
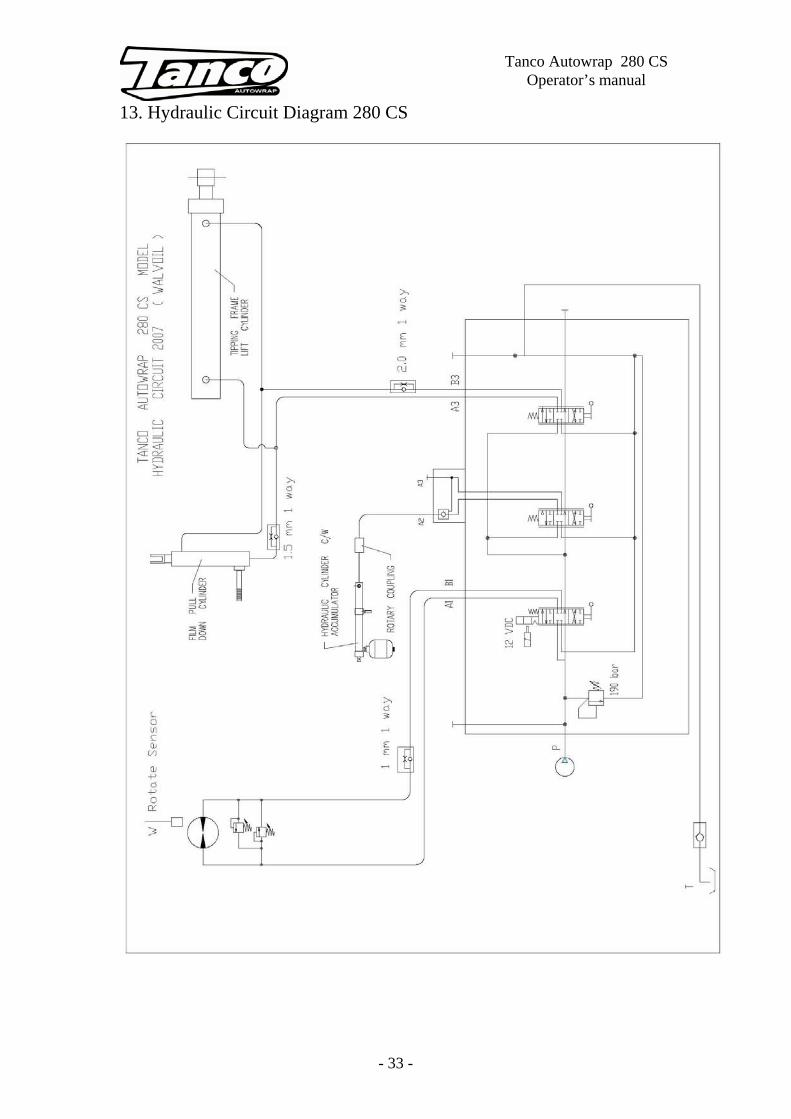
13. Hydraulic Circuit Diagram 280 CS
34
Tanco Autowrap 280 CS Operator’s manual
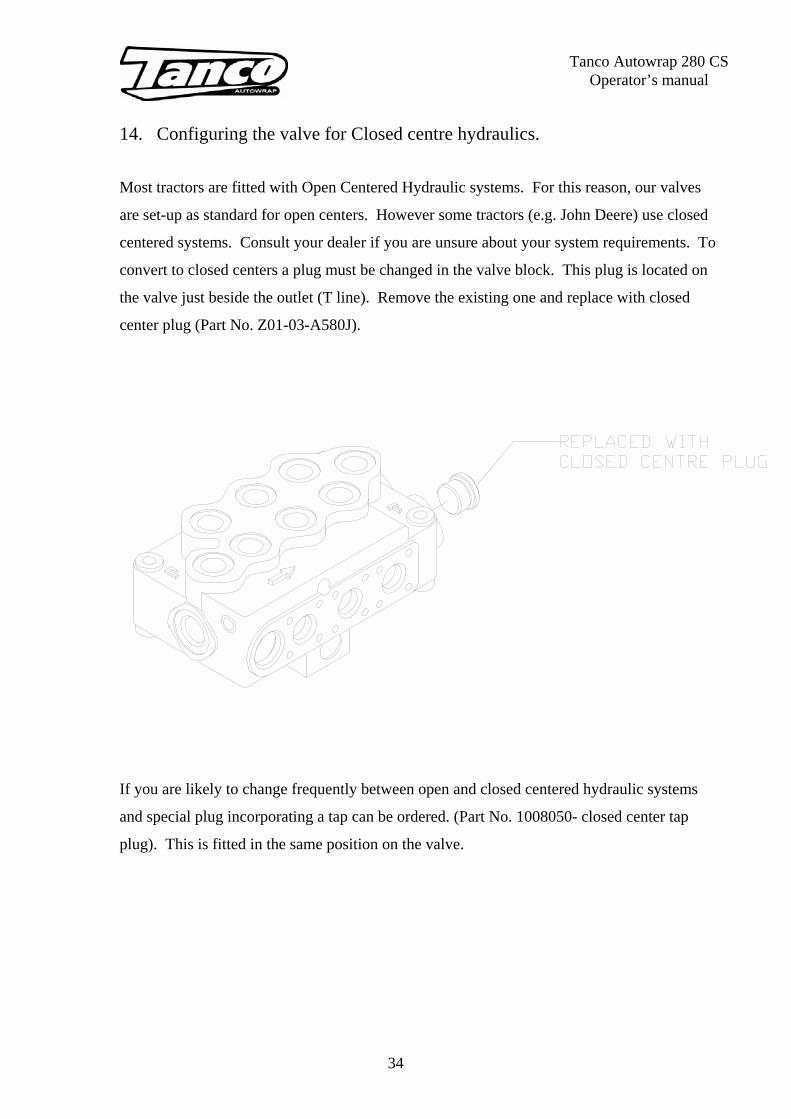
14. Configuring the valve for Closed centre hydraulics. Most tractors are fitted with Open Centered Hydraulic systems. For this reason, our valves
are set-up as standard for open centers. However some tractors (e.g. John Deere) use closed
centered systems. Consult your dealer if you are unsure about your system requirements. To
convert to closed centers a plug must be changed in the valve block. This plug is located on
the valve just beside the outlet (T line). Remove the existing one and replace with closed
center plug (Part No. Z01-03-A580J).
If you are likely to change frequently between open and closed centered hydraulic systems
and special plug incorporating a tap can be ordered. (Part No. 1008050- closed center tap
plug). This is fitted in the same position on the valve.
- 35 -
Tanco Autowrap 280 CS Operator’s manual
15. FAULT FINDING PROBLEMS Driver roller and Bale belt not driving. Film not wrapping evenly Film breaking Hydraulic bale ramp not returning to raised position after tripping off Bale. Pull down arm will not stay down on film when tipping off Bale. Hydraulic Cut & Start Cylinder will not go out all the way. Cut and Start closed and will not open. Cut & Start will not close When tipping up turntable and if it does not stop and cut but Continues Tipping up.
REMEDY Check if shear pins have sheared in sprocket on drive roller if so, Replace. Adjust the film mast, so that centre of film roll is in-line with the centre of the Bale Wash off the dispenser. Change film roll Use only recommended film. Hydraulic cylinder loss of oil pressure, Recharge see instruction Manual. Restrictor not fitted or dirt under seat of restrictor. Hydraulic pressures in tractor not high enough (bad pumps) or too much oil pressure in accumulator side of cylinder over 60 bar. Pressure lost in accumulator side of cylinder, seals leaking across, or oil leak from gland. Poppet valve open must have more than 4 revolutions of turntable before Cut & Start will close, or dirt under poppet valve Check wiring and button switch, if all wires check out ok, dirt might be the problem in the six-port diverter valve, if so disassemble and clean out with petrol or gasoline
THIS IS VERY IMPORTANT Make sure you have a good connection on the battery both positive and negative
36
Tanco Autowrap 280 CS Operator’s manual
BALE MOVEMENT ON MACHINES Ensure end rollers (black cone plastic) are in tight to bale, the bale will reduce in size during wrapping, the corner will become rounded then the bale will tend to move sideways due to central fugal force, if the rollers are too far apart the bale will move against one end, causing the belt to move in the opposite direction, always adjust the black end cone rollers, so they keep the bale central on the belt. On trailed machines adjust bale stop on the lift arm so that the bale is loaded centrally on the belt. Check that the grip-face strips are securely fixed to the drive roller. Check that the belt is the same measurement at each side, if one side is longer than the other then replace the belt. IF THE PROBLEM STILL OCCURS REMOVE THE CHAIN COVER, 1. Adjust chain so that the chain is at the correct tension 2. Measure the distance between the bearing housing and the adjuster plate (typically from 13 to19 mm) 3. Adjust the opposite end of the driver roller to achieve the same measurement. 4. Now you will find that the driver roller is parallel to the chassis. 5. Set idler roller square to driver roller, set from bearing housing to adjusting stop, it should be about 15mm at the start position. 6. If the drive belt is moving to the chain drive side, you will need to make a deeper well at the opposite end. 7. To create this deeper well first stand facing the turntable at the end of the machine with the chain at the bottom right hand corner, this corner at the chain drive is ‘A’ the top of the drive roller at the other end is ‘B’ the top of the idler at other end is ‘C’ and the bottom of the idler at your left is ‘D’. 8. Now adjust point ‘C’ inward by 10mm 9. If the problem still occurs adjust point ‘D’ outwards by 2mm at any one time. 10. When any one adjustment is made you may have to wrap a minimum of 5 new fresh bales full cycle before making any further adjustments. If making any more adjustments move only 2mm at one time and wrap 5 bales through full cycle.
- 37 -
Tanco Autowrap 280 CS Operator’s manual
16. EU DECLARATION OF CONFORMITY ACCORDING TO DIRECTIVES 89/392/336/EEC AS AMENDED Manufacture: TANCO ENGINEERING CO LTD BAGENALSTOWN CO CARLOW IRELAND CERTFIES THAT THE FOLLOWING PRODUCT: AUTOWRAP MODEL: 280 CS SERIAL NO.: To which this declaration relates, corresponds to essential requirements of the Directive 89/392/336/EEC as amended. To conform to these essential health and safety requirements, the provisions of the following harmonised standards were particularly considered: EN 292 – 1,2, EN 294, EN1152, prEN 703, prEN 811, prEN 1553, prEN 982. DATE: 14.02.2007 SIGNATURE: ____________________________ Andrew Deasy


![Series 1 240 VAC · OUTPUT SPECIFICATIONS (5) Description 10A 25A 50A 75A 90A 110A 125A Operating Voltage (47-440Hz) [Vrms] (6) 24-280 24-280 24-280 24-280 24-280 24-280 24-280 Transient](https://img.pdfslide.us/doc/110x75/60173c54b92f36193224a030/series-1-240-output-specifications-5-description-10a-25a-50a-75a-90a-110a-125a.jpg)