Embed Size (px)
Citation preview

INS
TR
UC
TIO
N M
AN
UA
L
Reg
ular
ly c
heck
hin
ge k
nobs
to
mak
e su
re t
he g
ate
is s
ecur
ely
in p
lace
.
Do
not
use
the
gate
if a
ny c
ompo
nent
s ar
e da
mag
ed o
r m
issi
ng.
Wip
e su
rfac
e w
ith a
dam
p cl
oth
or s
pong
e, u
sing
mild
det
erge
nt a
nd
cold
wat
er.
To
orde
r a
repl
acem
ent
hard
war
e ki
t (
), co
ntac
t us
at
the
add
ress
/tel
epho
ne n
umbe
r be
low
.
Colo
rs a
nd s
tyle
s m
ay v
ary.
1/19
1275
Par
k Ea
st D
rive
Woo
nsoc
ket,
RI 0
2895
1-
401-
671-
6551
© 2
019
Sum
mer
Infa
nt (
USA
), In
c.
We’
re h
ere
to h
elp!
If y
ou h
ave
ques
tions
or n
eed
assi
stan
ce,
plea
se c
onta
ct o
ur C
onsu
mer
Rel
atio
ns T
eam
at
1-40
1-67
1-65
51 o
r ww
w.su
mm
erin
fant
.com
/con
tact
Plea
se r
ead
the
follo
win
g in
stru
ctio
ns c
aref
ully
.K
eep
this
inst
ruct
ion
man
ual a
nd s
ave
for
futu
re r
efer
ence
.Fo
r te
chni
cal s
uppo
rt, c
onta
ct u
s at
or
Too
ls r
equi
red:
Phi
llips
-hea
d sc
rew
driv
er (
not
incl
uded
).Fo
r us
e w
ith c
hild
ren
from
6 -
24
mon
ths.
Kee
p sm
all p
arts
aw
ay fr
om c
hild
ren.
Adu
lt as
sem
bly
requ
ired
.Fi
ts o
peni
ngs
from
65"
- 1
41"
wid
e.
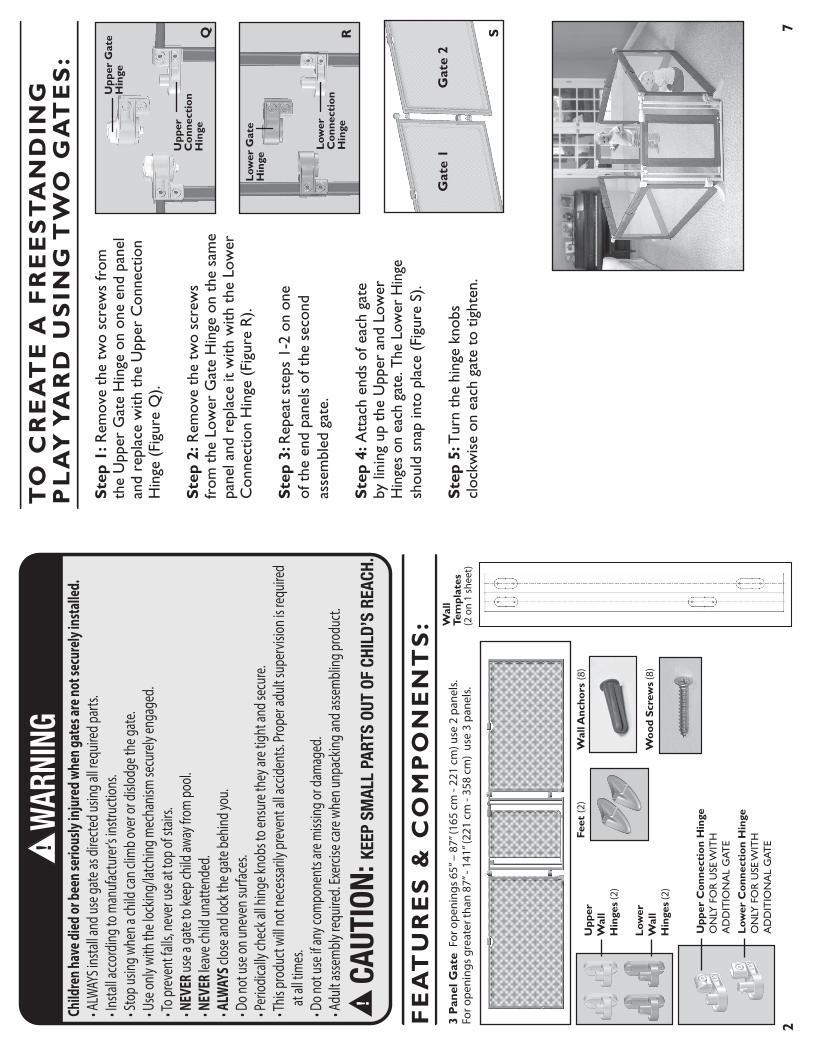
Rem
ove
the
two
scre
ws
from
the
Upp
er G
ate
Hin
ge o
n on
e en
d pa
nel
and
repl
ace
with
the
Upp
er C
onne
ctio
nH
inge
(Fi
gure
Q).
Rem
ove
the
two
scre
ws
from
the
Low
er G
ate
Hin
ge o
n th
e sa
me
pane
l and
rep
lace
it w
ith w
ith t
he L
ower
C
onne
ctio
n H
inge
(Fi
gure
R).
Rep
eat
step
s 1-
2 on
one
of
the
end
pan
els
of t
he s
econ
d as
sem
bled
gat
e.
Att
ach
ends
of e
ach
gate
by
lini
ng u
p th
e U
pper
and
Low
er
Hin
ges
on e
ach
gate
. The
Low
er H
inge
sh
ould
sna
p in
to p
lace
(Fi
gure
S).
Tur
n th
e hi
nge
knob
s cl
ockw
ise
on e
ach
gate
to
tight
en.
For
ope
ning
s 65
” – 8
7” (1
65 c
m -
221
cm) u
se 2
pan
els.
For o
peni
ngs
grea
ter t
han
87” -
141
” (22
1 cm
- 35
8 cm
) us
e 3
pane
ls.
(2 o
n 1
shee
t)
(2)
(2)
(8)
(2)
(8)
Child
ren
have
die
d or
bee
n se
riou
sly
inju
red
whe
n ga
tes
are
not s
ecur
ely
inst
alle
d.
• ALW
AYS i
nsta
ll and
use g
ate a
s dire
cted u
sing a
ll req
uired
parts
.• In
stall a
ccor
ding t
o man
ufac
ture
r’s in
struc
tions
.• S
top u
sing w
hen a
child
can c
limb o
ver o
r disl
odge
the g
ate.
• Use
only
with
the l
ockin
g/lat
ching
mec
hanis
m se
cure
ly en
gage
d.• T
o pre
vent
falls
, nev
er us
e at t
op of
stair
s.• N
EVER
use a
gate
to ke
ep ch
ild aw
ay fr
om po
ol.• N
EVER
leav
e chil
d una
ttend
ed.
• ALW
AYS
close
and l
ock t
he ga
te be
hind y
ou.
• Do n
ot us
e on u
neve
n sur
faces
.• P
eriod
ically
chec
k all h
inge k
nobs
to en
sure
they
are t
ight a
nd se
cure
.• T
his pr
oduc
t will
not n
eces
sarily
prev
ent a
ll acc
ident
s. Pr
oper
adult
supe
rvisi
on is
requ
ired
at al
l tim
es.
• Do n
ot us
e if a
ny co
mpo
nent
s are
miss
ing or
dam
aged
.• A
dult a
ssem
bly r
equir
ed. E
xerci
se ca
re w
hen u
npac
king a
nd as
sem
bling
prod
uct.
CAUT
ION:
KEEP
SM
ALL
PART
S OU
T OF
CHI
LD’S
REA
CH.
W
ARNI
NG
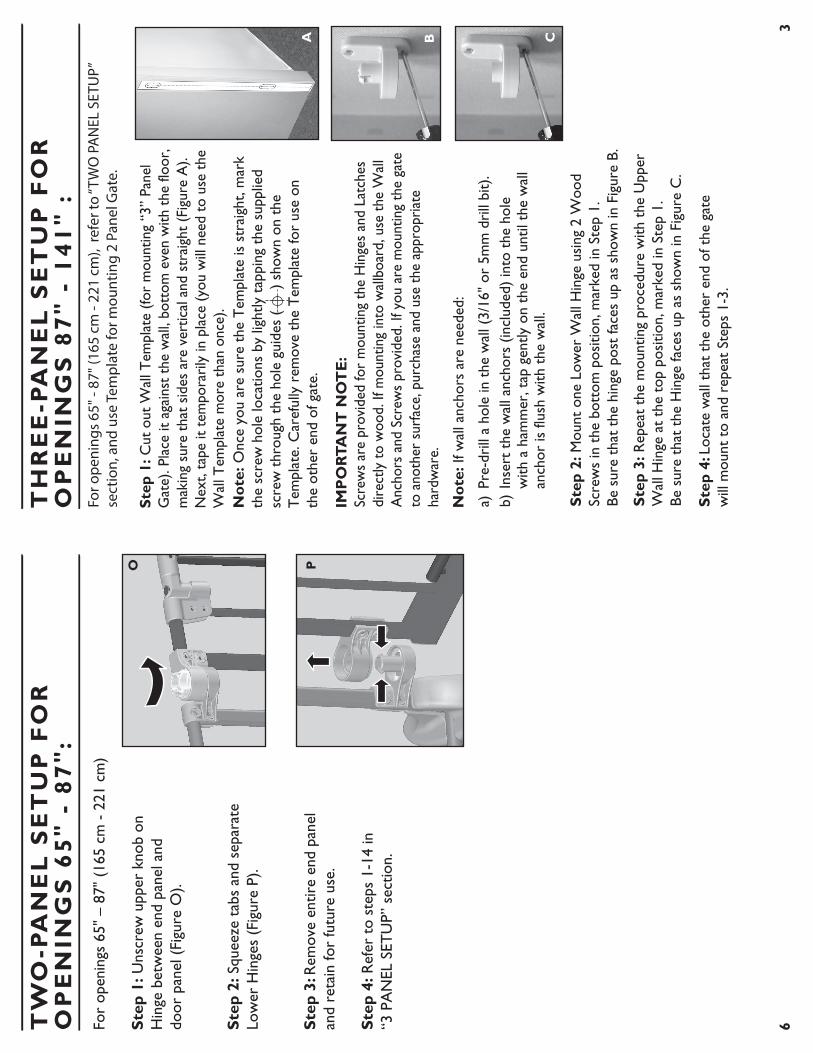
For
open
ings
65"
– 8
7" (
165
cm -
221
cm
)
Uns
crew
upp
er k
nob
on
Hin
ge b
etw
een
end
pane
l and
do
or p
anel
(Fi
gure
O).
Squ
eeze
tab
s an
d se
para
te
Low
er H
inge
s (F
igur
e P)
.
Rem
ove
entir
e en
d pa
nel
and
reta
in fo
r fu
ture
use
.
Ref
er t
o st
eps
1-14
in
“3 P
AN
EL S
ETU
P” s
ectio
n.
Cut
out
Wal
l Tem
plat
e (fo
r m
ount
ing
“3”
Pane
l G
ate)
. Pla
ce it
aga
inst
the
wal
l, bo
ttom
eve
n w
ith t
he fl
oor,
m
akin
g su
re t
hat
side
s ar
e ve
rtic
al a
nd s
trai
ght
(Fig
ure
A).
Nex
t, ta
pe it
tem
pora
rily
in p
lace
(yo
u w
ill n
eed
to u
se t
he
Wal
l Tem
plat
e m
ore
than
onc
e).
Onc
e yo
u ar
e su
re t
he T
empl
ate
is s
trai
ght,
mar
k th
e sc
rew
hol
e lo
catio
ns b
y lig
htly
tap
ping
the
sup
plie
d sc
rew
thr
ough
the
hol
e gu
ides
(
) s
how
n on
the
T
empl
ate.
Car
eful
ly r
emov
e th
e T
empl
ate
for
use
onth
e ot
her
end
of g
ate.
Scre
ws
are
prov
ided
for
mou
ntin
g th
e H
inge
s an
d La
tche
s di
rect
ly t
o w
ood.
If m
ount
ing
into
wal
lboa
rd, u
se t
he W
all
Anc
hors
and
Scr
ews
prov
ided
. If y
ou a
re m
ount
ing
the
gate
to
ano
ther
sur
face
, pur
chas
e an
d us
e th
e ap
prop
riat
e ha
rdw
are.
If w
all a
ncho
rs a
re n
eede
d:
a) P
re-d
rill
a ho
le in
the
wal
l (3/
16"
or 5
mm
dri
ll bi
t).
b) I
nser
t th
e w
all a
ncho
rs (
incl
uded
) in
to t
he h
ole
w
ith a
ham
mer
, tap
gen
tly o
n th
e en
d un
til t
he w
all
an
chor
is fl
ush
with
the
wal
l.
Mou
nt o
ne L
ower
Wal
l Hin
ge u
sing
2 W
ood
Scre
ws
in t
he b
otto
m p
ositi
on, m
arke
d in
Ste
p 1.
Be s
ure
that
the
hin
ge p
ost
face
s up
as
show
n in
Fig
ure
B.
Rep
eat
the
mou
ntin
g pr
oced
ure
with
the
Upp
er
Wal
l Hin
ge a
t th
e to
p po
sitio
n, m
arke
d in
Ste
p 1.
Be s
ure
that
the
Hin
ge fa
ces
up a
s sh
own
in F
igur
e C
.
Loca
te w
all t
hat
the
othe
r en
d of
the
gat
ew
ill m
ount
to
and
repe
at S
teps
1-3
.
For o
peni
ngs
65" -
87"
(165
cm
- 22
1 cm
), re
fer t
o “T
WO
PA
NEL
SET
UP”
sect
ion,
and
use
Tem
plat
e fo
r mou
ntin
g 2
Pane
l Gat
e.
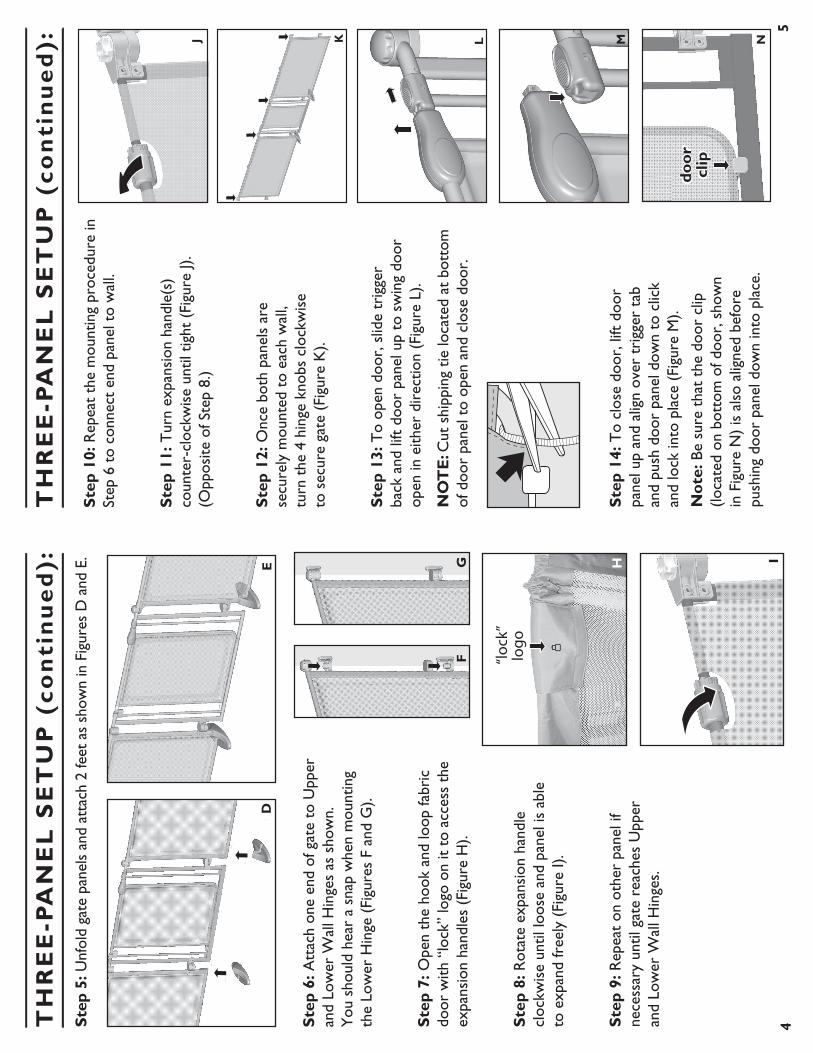
Rep
eat
the
mou
ntin
g pr
oced
ure
in
Step
6 t
o co
nnec
t en
d pa
nel t
o w
all.
Tur
n ex
pans
ion
hand
le(s
)co
unte
r-cl
ockw
ise
until
tig
ht (
Figu
re J)
.(O
ppos
ite o
f Ste
p 8.
)
Onc
e bo
th p
anel
s ar
e se
cure
ly m
ount
ed t
o ea
ch w
all,
turn
the
4 h
inge
kno
bs c
lock
wis
e to
sec
ure
gate
(Fi
gure
K).
To
open
doo
r, s
lide
trig
ger
back
and
lift
doo
r pa
nel u
p to
sw
ing
door
open
in e
ither
dir
ectio
n (F
igur
e L)
.
Cut
shi
ppin
g tie
loca
ted
at b
otto
mof
doo
r pa
nel t
o op
en a
nd c
lose
doo
r.
To
clos
e do
or, l
ift d
oor
pane
l up
and
alig
n ov
er t
rigg
er t
ab
and
push
doo
r pa
nel d
own
to c
lick
and
lock
into
pla
ce (
Figu
re M
).
Be
sure
tha
t th
e do
or c
lip(lo
cate
d on
bot
tom
of d
oor,
sho
wn
in F
igur
e N
) is
als
o al
igne
d be
fore
push
ing
door
pan
el d
own
into
pla
ce.
Att
ach
one
end
of g
ate
to U
pper
an
d Lo
wer
Wal
l Hin
ges
as s
how
n.
You
sho
uld
hear
a s
nap
whe
n m
ount
ing
the
Low
er H
inge
(Fi
gure
s F
and
G).
Ope
n th
e ho
ok a
nd lo
op fa
bric
do
or w
ith “
lock
” lo
go o
n it
to a
cces
s th
e ex
pans
ion
hand
les
(Fig
ure
H).
Rot
ate
expa
nsio
n ha
ndle
cl
ockw
ise
until
loos
e an
d pa
nel i
s ab
leto
exp
and
free
ly (
Figu
re I)
.
Rep
eat
on o
ther
pan
el if
ne
cess
ary
until
gat
e re
ache
s U
pper
and
Low
er W
all H
inge
s.
Unf
old
gate
pan
els
and
atta
ch 2
feet
as
show
n in
Fig
ures
D a
nd E
.
“lock
”lo
go