Embed Size (px)
Citation preview
ARM® Developer SuiteVersion 1.2
Developer Guide
Copyright © 1999-2001 ARM Limited. All rights reserved.ARM DUI 0056D

ARM Developer SuiteDeveloper Guide
Copyright © 1999-2001 ARM Limited. All rights reserved.
Release Information
The following changes have been made to this book.
Proprietary Notice
Words and logos marked with ® or ™ are registered trademarks or trademarks owned by ARM Limited. Other brands and names mentioned herein may be the trademarks of their respective owners.
Neither the whole nor any part of the information contained in, or the product described in, this document may be adapted or reproduced in any material form except with the prior written permission of the copyright holder.
The product described in this document is subject to continuous developments and improvements. All particulars of the product and its use contained in this document are given by ARM in good faith. However, all warranties implied or expressed, including but not limited to implied warranties of merchantability, or fitness for purpose, are excluded.
This document is intended only to assist the reader in the use of the product. ARM Limited shall not be liable for any loss or damage arising from the use of any information in this document, or any error or omission in such information, or any incorrect use of the product.
Change History
Date Issue Change
October 1999 A Release 1.0
March 2000 B Release 1.0.1
November 2000 C Release 1.1
November 2001 D Release 1.2
ii Copyright © 1999-2001 ARM Limited. All rights reserved. ARM DUI 0056D

ContentsARM Developer Suite Developer Guide
PrefaceAbout this book ............................................................................................ viiiFeedback ...................................................................................................... xii
Chapter 1 Introduction1.1 About the ARM Developer Guide ................................................................ 1-21.2 General programing issues ......................................................................... 1-41.3 Developing for the ARM .............................................................................. 1-5
Chapter 2 Using the Procedure Call Standard2.1 About the ARM-Thumb Procedure Call Standard ....................................... 2-22.2 Register roles and names ........................................................................... 2-42.3 The stack .................................................................................................... 2-62.4 Parameter passing ...................................................................................... 2-92.5 Stack limit checking .................................................................................. 2-112.6 Read-only position independence ............................................................. 2-142.7 Read-write position independence ............................................................ 2-152.8 Interworking between ARM and Thumb states ......................................... 2-162.9 Floating-point options ................................................................................ 2-17
Chapter 3 Interworking ARM and Thumb3.1 About interworking ...................................................................................... 3-2
ARM DUI 0056D Copyright © 1999-2001 ARM Limited. All rights reserved. iii
Contents
3.2 Assembly language interworking ................................................................ 3-63.3 C and C++ interworking and veneers ....................................................... 3-113.4 Assembly language interworking using veneers ...................................... 3-15
Chapter 4 Mixing C, C++, and Assembly Language4.1 Using the inline assemblers ........................................................................ 4-24.2 Accessing C global variables from assembly code .................................. 4-144.3 Using C header files from C++ ................................................................. 4-154.4 Calling between C, C++, and ARM assembly language ........................... 4-17
Chapter 5 Handling Processor Exceptions5.1 About processor exceptions ....................................................................... 5-25.2 Entering and leaving an exception ............................................................. 5-55.3 Installing an exception handler ................................................................... 5-95.4 SWI handlers ............................................................................................ 5-145.5 Interrupt handlers ..................................................................................... 5-235.6 Reset handlers ......................................................................................... 5-335.7 Undefined Instruction handlers ................................................................. 5-345.8 Prefetch Abort handler .............................................................................. 5-355.9 Data Abort handler ................................................................................... 5-365.10 Chaining exception handlers .................................................................... 5-385.11 Handling exceptions on Thumb-capable processors ................................ 5-405.12 System mode ............................................................................................ 5-45
Chapter 6 Writing Code for ROM6.1 About writing code for ROM ....................................................................... 6-26.2 Memory map considerations ...................................................................... 6-46.3 Initializing the system ................................................................................. 6-76.4 The reference C example using semihosting ........................................... 6-116.5 Loading the ROM image at address 0 ...................................................... 6-146.6 Using both scatter loading and remapping ............................................... 6-246.7 A semihosted application with interrupt handling .................................... 6-286.8 An embeddable application with interrupt handling .................................. 6-336.9 Using scatter loading with memory-mapped I/O ....................................... 6-366.10 Troubleshooting ........................................................................................ 6-436.11 Measuring code and data size .................................................................. 6-46
Chapter 7 Caches and Tightly Coupled Memories7.1 About caches and tightly coupled memory ................................................. 7-27.2 System control coprocessor ....................................................................... 7-47.3 Memory protection units ............................................................................. 7-57.4 Configuring a PU ........................................................................................ 7-77.5 Memory management units ...................................................................... 7-127.6 Configuring an MMU ................................................................................. 7-167.7 Tightly coupled memory ........................................................................... 7-19
iv Copyright © 1999-2001 ARM Limited. All rights reserved. ARM DUI 0056D

Contents
Chapter 8 Debug Communications Channel8.1 About the Debug Communications Channel ............................................... 8-28.2 Command-line debugging commands ........................................................ 8-38.3 Enabling comms channel viewing ............................................................... 8-48.4 Target transfer of data ................................................................................ 8-58.5 Polled debug communications .................................................................... 8-68.6 Interrupt-driven debug communications .................................................... 8-128.7 Access from Thumb state ......................................................................... 8-138.8 Semihosting .............................................................................................. 8-14
Glossary
ARM DUI 0056D Copyright © 1999-2001 ARM Limited. All rights reserved. v

Contents
vi Copyright © 1999-2001 ARM Limited. All rights reserved. ARM DUI 0056D

Preface
This preface introduces the ARM Developer Suite (ADS) Developer Guide. It contains the following sections:
• About this book on page viii
• Feedback on page xii.
ARM DUI 0056D Copyright © 1999-2001 ARM Limited. All rights reserved. vii

Preface
About this book
This book provides tutorial information on writing code targeted at the ARM family of processors.
Intended audience
This book is written for all developers writing code for the ARM. It assumes that you are an experienced software developer, and that you are familiar with the ARM development tools as described in ADS Getting Started.
Using this book
This book is organized into the following chapters:
Chapter 1 Introduction
Read this chapter for an introduction to the ARM Developer Suite (ADS).
Chapter 2 Using the Procedure Call Standard
Read this chapter for details of how to use the ARM/Thumb® Procedure Call Standard. Using this standard makes it easier to ensure that separately compiled and assembled modules work together.
Chapter 3 Interworking ARM and Thumb
Read this chapter for details of how to change between ARM state and Thumb state when writing code for processors that implement the Thumb instruction set.
Chapter 4 Mixing C, C++, and Assembly Language
Read this chapter for details of how to write mixed C, C++, and ARM assembly language code. It also describes how to use the ARM inline assemblers from C and C++.
Chapter 5 Handling Processor Exceptions
Read this chapter for details of how to handle the various types of exception supported by ARM processors.
Chapter 6 Writing Code for ROM
Read this chapter for details on building ROM images. These can be used in, for example, embedded applications. There are also hints on how to avoid the most common errors in writing code for ROM.
viii Copyright © 1999-2001 ARM Limited. All rights reserved. ARM DUI 0056D

Preface
Chapter 7 Caches and Tightly Coupled Memories
Read this chapter for a description of caches and tightly coupled memory on ARM systems.
Chapter 8 Debug Communications Channel
Read this chapter for a description of how to use the Debug Communications Channel (DCC).
Typographical conventions
The following typographical conventions are used in this book:
monospace Denotes text that can be entered at the keyboard, such as commands, file and program names, and source code.
monospace Denotes a permitted abbreviation for a command or option. The underlined text can be entered instead of the full command or option name.
monospace italic
Denotes arguments to commands and functions where the argument is to be replaced by a specific value.
monospace bold
Denotes language keywords when used outside example code.
italic Highlights important notes, introduces special terminology, denotes internal cross-references, and citations.
bold Highlights interface elements, such as menu names. Also used for emphasis in descriptive lists, where appropriate, and for ARM processor signal names.
Further reading
This section lists publications from both ARM Limited and third parties that provide additional information on developing code for the ARM family of processors.
ARM periodically provides updates and corrections to its documentation. See http://www.arm.com for current errata sheets and addenda.
See also the ARM Frequently Asked Questions list at: http://www.arm.com/DevSupp/Sales+Support/faq.html
ARM DUI 0056D Copyright © 1999-2001 ARM Limited. All rights reserved. ix
Preface
ARM publications
This book contains general information on developing applications for the ARM family of processors. Refer to the following books in the ADS document suite for information on other components:
• ADS Installation and License Management Guide (ARM DUI 0139)
• ADS Assembler Guide (ARM DUI 0068)
• CodeWarrior IDE Guide (ARM DUI 0065)
• ADS Compilers and Libraries Guide (ARM DUI 0067)
• ADS Linker and Utilities Guide (ARM DUI 0151)
• AXD and armsd Debuggers Guide (ARM DUI 0066)
• ADS Debug Target Guide (ARM DUI 0058)
• Getting Started (ARM DUI 0064).
The following additional documentation is provided with the ARM Developer Suite:
• *** Set the Book and Collection attributes to a supported combination *** (ARM DDI 0100). This is supplied in DynaText and PDF format.
• ARM Applications Library Programmer’s Guide. This is supplied in DynaText and PDF format.
• ARM ELF specification (SWS ESPC 0003). This is supplied in PDF format in install_directory\PDF\specs\ARMELF.pdf.
• ARM Firmware Suite User Guide (ARM DUI 0136). This is supplied in DynaText and PDF format.
• ARM Firmware Suite Reference Guide (ARM DUI 0102). This is supplied in DynaText and PDF format.
• TIS DWARF 2 specification. This is supplied in PDF format in install_directory\PDF\specs\TIS-DWARF2.pdf.
• ARM/Thumb Procedure Call Standard specification (SWS ESPC 0002). This is supplied in PDF format in install_directory\PDF\specs\ATPCS.pdf.
In addition, refer to the following documentation for specific information relating to ARM products:
• ARM Reference Peripheral Specification (ARM DDI 0062)
• the ARM datasheet or technical reference manual for your hardware device.
x Copyright © 1999-2001 ARM Limited. All rights reserved. ARM DUI 0056D

Preface
Other publications
The following book gives general information about the ARM architecture:
• ARM System-on-chip Architecture (second edition), Furber, S., (2000). Addison Wesley. ISBN 0-201-67519-6.
ARM DUI 0056D Copyright © 1999-2001 ARM Limited. All rights reserved. xi

Preface
Feedback
ARM Limited welcomes feedback on both the ARM Developer Suite, and its documentation.
Feedback on the ARM Developer Suite
If you have any problems with this book, please contact your supplier. To help them provide a rapid and useful response, please give:
• details of the release you are using
• details of the platform you are running on, such as the hardware platform, operating system type and version
• a small standalone sample of code that reproduces the problem
• a clear explanation of what you expected to happen, and what actually happened
• the commands you used, including any command-line options
• sample output illustrating the problem
• the version string of the tool, including the version number and date.
Feedback on this book
If you have any problems with this book, please send email to [email protected] giving:
• the document title
• the document number
• the page number(s) to which your comments apply
• a concise explanation of the problem.
General suggestions for additions and improvements are also welcome.
xii Copyright © 1999-2001 ARM Limited. All rights reserved. ARM DUI 0056D

Chapter 1 Introduction
This chapter introduces the ADS Developer Guide. It contains the following sections:
• About the ARM Developer Guide on page 1-2
• General programing issues on page 1-4
• Developing for the ARM on page 1-5.
ARM DUI 0056D Copyright © 1999-2001 ARM Limited. All rights reserved. 1-1
Introduction
1.1 About the ARM Developer Guide
This book contains information that will help you with specific issues when developing code for ARM-based processors. In general, the chapters in this book assume that you are using the ARM Developer Suite (ADS) to develop your code.
ADS consists of a suite of applications, together with supporting documentation and examples, that enable you to write and debug applications for the ARM family of RISC processors. You can use ADS to develop, build, and debug C, C++, and ARM assembly language programs.
The ADS toolkit consists of the following major components:
• command-line development tools
• GUI development tools
• utilities
• supporting software.
See Further reading on page ix for a list of the ADS documentation.
1.1.1 Example code
The code for many of the examples in this book is located in install_directory\examples. In addition, the examples directory contains example code that is not described in this book. Read the readme.txt for each example directory for more information. The examples are installed in the following directories:
asm This directory contains some examples of ARM assembly language programming. The examples are used in the ADS Assembler Guide.
cpp This directory contains some simple C++ examples. In addition, the subdirectory rw contains the Rogue Wave manual and tutorial examples.
databort This directory contains design documentation and example code for a standard data abort handler.
dcc This directory contains example code that demonstrates how to use the Debug Communications Channel. The example is described in Chapter 8 Debug Communications Channel.
dhry This directory contains source for Dhrystone.
dhryansi This directory contains an ANSI C version of Dhrystone.
explasm This directory contains additional ARM assembly language examples.
1-2 Copyright © 1999-2001 ARM Limited. All rights reserved. ARM DUI 0056D

Introduction
inline This directory contains examples that show how to use the inline assemblers for the C and C++ compilers. The examples are described in Chapter 4 Mixing C, C++, and Assembly Language.
interwork This directory contains examples that show how to interwork between ARM code and Thumb code. The examples are described in Chapter 3 Interworking ARM and Thumb.
mmugen This directory contains the source and documentation for the MMUgen utility. This utility can generate MMU pagetable data from a rules file that describes the virtual to physical address translation required (see Chapter 7 Caches and Tightly Coupled Memories).
picpid This directory contains an example of how to write position-independent code. See the readme.txt for a detailed description.
embedded This directory contains source code for the examples used in Chapter 6 Writing Code for ROM. The examples are targeted at the ARM Integrator™ board.
sorts This directory contains example code that compares an insertion sort, shell sort, and the quick sort used in the ARM C libraries.
swi This directory contains an example SWI handler.
ARM DUI 0056D Copyright © 1999-2001 ARM Limited. All rights reserved. 1-3

Introduction
1.2 General programing issues
The ARM family of processors are RISC processors. Many of the programing strategies that give efficient code are generic to RISC processors. For example, under the ARM-Thumb Procedure Call Standard (ATPCS) the ARM compilers pass the first four integer-sized function parameters in registers r0 to r3. Additional parameters are passed on the stack. This means that:
• it is more efficient to pass large parameters, such as structs, by reference
• it is more efficient to restrict functions to four or fewer integer-sized parameters, where possible.
In addition, as with many RISC processors, the ARM is designed to access aligned data. Accesses to unaligned data can be expensive in code size or performance. In some cases they do not work as expected. See the ARM Frequently Asked Questions list at http://www.arm.com for more information.
If you are porting legacy code from a CISC architecture it is recommended that you become familiar with general RISC programing strategies.
1-4 Copyright © 1999-2001 ARM Limited. All rights reserved. ARM DUI 0056D
Introduction
1.3 Developing for the ARM
This book gives information and example code for some of the most common ARM programing tasks. The following sections summarize the subject of each chapter:
• Using the Procedure call standards
• Interworking ARM and Thumb code
• Mixing C, C++, and Assembly Language on page 1-6
• Handling Processor Exceptions on page 1-6
• Writing Code for ROM on page 1-7
• Caches and tightly coupled memory on page 1-8
• Using the Debug Communications Channel on page 1-8.
1.3.1 Using the Procedure call standards
The ARM-Thumb procedure call standard defines register usage and stack conventions that must be followed to enable separately compiled and assembled modules to work together. There are a number of variants on the base standard. The ARM C and C++ compilers always generate code that conforms to the selected ATPCS variant. The linker selects an appropriate standard C or C++ library to link with, if required.
When developing code for the ARM, you must select an appropriate ATPCS variant. For example, if you are writing code that interworks between ARM and Thumb state you must select the -apcs /interwork option in the compiler and assembler.
If you are writing code in C or C++, you must ensure that you have selected compatible ATPCS options for each compiled module.
If you are writing your own assembly language routines, you must ensure that you conform to the appropriate ATPCS variant. See Chapter 2 Using the Procedure Call Standard for more information.
If you are mixing C and assembly language, ensure that you understand the ATPCS implications.
1.3.2 Interworking ARM and Thumb code
If you are writing code for ARM processors that support the Thumb 16-bit instruction set, you can mix ARM and Thumb code as required. If you are writing C or C++ code you must compile with the -atpcs /interwork option. The linker detects when an ARM function is called from Thumb state, or a Thumb function is called from ARM state and alters call and return sequences, or inserts interworking veneers to change processor state as necessary.
ARM DUI 0056D Copyright © 1999-2001 ARM Limited. All rights reserved. 1-5
Introduction
If you are writing assembly language code you must ensure that you comply with the interworking ATPCS variant. There are a number of ways to change processor state, depending on the target architecture version. See Chapter 3 Interworking ARM and Thumb for more information.
1.3.3 Mixing C, C++, and Assembly Language
You can mix separately compiled and assembled C, C++, and ARM assembly language modules in your program. You can use the inline assemblers in the C and C++ compilers to write small assembly language routines within your C or C++ code. However, there are a number of restrictions to the assembly language code you can write if you are using the inline assemblers. These are described in Using the inline assemblers on page 4-2. In addition, Chapter 4 Mixing C, C++, and Assembly Language gives general guidelines and examples of how to call between C, C++, and assembly language modules.
1.3.4 Handling Processor Exceptions
The ARM processor recognizes seven exception types:
Reset Occurs when the processor reset pin is asserted. This exception is only expected to occur for signalling power-up, or for resetting as if the processor has just powered up. A soft reset can be done by branching to the reset vector (0x0000).
Undefined Instruction
Occurs if neither the processor, or any attached coprocessor, recognizes the currently executing instruction.
Software Interrupt (SWI)
This is a user-defined interrupt instruction. It allows a program running in User mode, for example, to request privileged operations that run in Supervisor mode, such as an RTOS function.
Prefetch Abort
Occurs when the processor attempts to execute an instruction that has been prefetched from an illegal address. An illegal address is one at which memory does not exist, or one that the memory management subsystem has determined is inaccessible to the processor in its current mode.
Data Abort Occurs when a data transfer instruction attempts to load or store data at an illegal address.
1-6 Copyright © 1999-2001 ARM Limited. All rights reserved. ARM DUI 0056D

Introduction
Interrupt (IRQ)
Occurs when the processor external interrupt request pin is asserted (LOW) and IRQ interrupts are enabled (the I bit in the CPSR is clear).
Fast Interrupt (FIQ)
Occurs when the processor external fast interrupt request pin is asserted (LOW) and FIQ interrupts are enabled (the F bit in the CPSR is clear). This exception is typically used where interrupt latency must be kept to a minimum.
In general, if you are writing an application such as an embedded application that does not rely on an operating system to service exceptions, you must write handlers for each exception type.
In cases where an exception type can have more than one source, for example SWI or IRQ interrupts, you can chain exception handlers for each source. See Chaining exception handlers on page 5-38 for more information.
On Thumb-capable processors, the processor switches to ARM state when an exception is taken. You can either write your exception handler in ARM code, or use a veneer to switch to Thumb state. See Handling exceptions on Thumb-capable processors on page 5-40 for more information.
1.3.5 Writing Code for ROM
Many applications written for ARM-based systems are embedded applications that are contained in ROM and execute on reset. There are a number of factors that you must consider when writing embedded operating systems, or embedded applications that execute from reset without an operating system, including:
• address remapping, for example initializing with ROM at address 0, then remapping RAM to address 0
• initializing the environment and application
• linking an embedded executable image to place code and data in specific locations in memory.
The ARM core usually begins executing instructions from address 0 at reset. For an embedded system, this means that there must be ROM at address 0 when the system is reset. Typically, however, ROM is slow compared to RAM, and often only 8 or 16 bits wide. This affects the speed of exception handling. Having ROM at address 0 means that the exception vectors cannot be modified. A common strategy is to remap ROM to RAM and copy the exception vectors from ROM to RAM after startup. See Memory map considerations on page 6-4 for more information.
ARM DUI 0056D Copyright © 1999-2001 ARM Limited. All rights reserved. 1-7

Introduction
After reset, an embedded application or operating system must initialize the system, including:
• initializing the execution environment, such as exception vector, stacks, and I/O peripherals
• initializing the application, for example copying initial values of nonzero writable data to the writable data region and zeroing the ZI data region.
See Initializing the system on page 6-7 for more information.
Embedded systems often implement complex memory configurations. For example, an embedded system might use fast, 32-bit RAM for performance-critical code, such as interrupt handlers and the stack, slower 16-bit RAM for application RW data, and ROM for normal application code. You can use the linker scatter loading mechanism to construct executable images suitable for complex systems. For example, a scatter load description file can specify the load address and execution address of individual code and data regions. See Chapter 6 Writing Code for ROM for a series of worked examples, and for information on other issues that affect embedded applications, such as semihosting.
1.3.6 Caches and tightly coupled memory
Many ARM cores such as ARM920T have caches integrated onto the same chip as the CPU. Some ARM cores such as ARM966E-S have tightly coupled memory integrated onto the same chip as the CPU.
Both caches and tightly coupled memory can improve system performance and reduce power consumption by reducing off-chip memory accesses. Tightly coupled memory has more predictable real-time behavior, and requires less area of silicon than caches. Caches can provide improved performance over the whole address range.
See Chapter 7 Caches and Tightly Coupled Memories for more information.
1.3.7 Using the Debug Communications Channel
The EmbeddedICE® logic in ARM cores such as ARM7TDMI® and ARM9TDMI™ supports a debug communication channel. This enables data to be passed between the target and the host debugger using the JTAG port and a protocol converter such as Multi-ICE®, without stopping the program flow or entering debug state. See Chapter 8 Debug Communications Channel for more information.
1-8 Copyright © 1999-2001 ARM Limited. All rights reserved. ARM DUI 0056D

Chapter 2 Using the Procedure Call Standard
This chapter describes how to use the ARM-Thumb Procedure Call Standard (ATPCS). Adhere to the ATPCS to ensure that separately compiled and assembled modules can work together. The chapter contains the following sections:
• About the ARM-Thumb Procedure Call Standard on page 2-2
• Register roles and names on page 2-4
• The stack on page 2-6
• Parameter passing on page 2-9
• Read-only position independence on page 2-14
• Read-write position independence on page 2-15
• Interworking between ARM and Thumb states on page 2-16
• Floating-point options on page 2-17.
ARM DUI 0056D Copyright © 1999-2001 ARM Limited. All rights reserved. 2-1

Using the Procedure Call Standard
2.1 About the ARM-Thumb Procedure Call Standard
Adherence to the ARM-Thumb Procedure Call Standard (ATPCS) ensures that separately compiled or assembled subroutines can work together. This chapter describes how to use the ATPCS.
ATPCS has several variants. This chapter gives information enabling you to choose which variant to use.
Many details of the standard are the same, whichever variant you use. See:
• Register roles and names on page 2-4
• The stack on page 2-6
• Parameter passing on page 2-9.
2.1.1 ATPCS variants
The variants comprise a base standard modified by options that you can select independently. Code conforming to the base standard runs faster than, and occupies less memory than, code conforming to other variants. However, code conforming to the base standard does not provide for:
• interworking between ARM state and Thumb state
• position independence of either data or code
• re-entry to routines with independent data for each invocation
• stack checking.
The compiler or assembler sets attributes in the ELF object file which record the variant you have chosen. In general, you must choose one variant and then use it for all subroutines that must work together. Exceptions to this rule are described in the text.
The options are dealt with under the following headings:
• Stack limit checking on page 2-11
• Read-only position independence on page 2-14
• Read-write position independence on page 2-15
• Interworking between ARM and Thumb states on page 2-16
• Floating-point options on page 2-17.
2.1.2 ARM C libraries
There are several variants of the ARM C libraries (see ADS Compilers and Libraries Guide). The linker selects a variant to link with your object files. It selects the best variant compatible with the ATPCS options recorded in your object files. See the linker chapter in ADS Linker and Utilities Guide.
2-2 Copyright © 1999-2001 ARM Limited. All rights reserved. ARM DUI 0056D

Using the Procedure Call Standard
2.1.3 Conformance to the ATPCS
Routines compiled using the ADS compilers conform to the selected variant of the ATPCS.
You are responsible for ensuring that routines written in assembly language conform to the selected variant of the ATPCS.
To conform to the ATPCS, an assembly language routine must:
• follow all details of the standard at publicly visible interfaces
• follow the ATPCS rules of stack usage at all times
• be assembled with the -apcs options selected.
2.1.4 Processes and the memory model
ATPCS applies to a single thread of execution or process. The memory state of a process is defined by the contents of the processor registers and contents of the memory that it can address.
A process can address some or all of these types of memory:
• Read-only memory.
• Statically-allocated read-write memory.
• Dynamically-allocated read-write memory. This is called heap memory.
• Stack memory. See The stack on page 2-6.
A process must not alter the memory state of another process unless the two processes are specifically designed to cooperate.
ARM DUI 0056D Copyright © 1999-2001 ARM Limited. All rights reserved. 2-3

Using the Procedure Call Standard
2.2 Register roles and names
The ATPCS specifies the registers to use for particular purposes.
2.2.1 Register roles
The following register usage applies in all variants of the ATPCS except where otherwise stated. To comply with the ATPCS you must follow these rules:
• Use registers r0-r3 to pass parameter values into routines, and to pass result values out. You can refer to r0-r3 as a1-a4 to make this usage apparent. See Parameter passing on page 2-9. Between subroutine calls you can use r0-r3 for any purpose. A called routine does not have to restore r0-r3 before returning. A calling routine must preserve the contents of r0-r3 if it needs them again.
• Use registers r4-r11 to hold the values of a routine’s local variables. You can refer to them as v1-v8 to make this usage apparent. In Thumb state, in most instructions you can only use registers r4-r7 for local variables.
A called routine must restore the values of these registers before returning, if it has used them.
• Register r12 is the intra-call scratch register, ip. It is used in this role in procedure linkage veneers, for example interworking veneers. Between procedure calls you can use it for any purpose. A called routine does not need to restore r12 before returning.
• Register r13 is the stack pointer, sp. You must not use it for any other purpose. The value held in sp on exit from a called routine must be the same as it was on entry.
• Register r14 is the link register, lr. If you save the return address, you can use r14 for other purposes between calls.
• Register r15 is the program counter, pc. It cannot be used for any other purpose.
2-4 Copyright © 1999-2001 ARM Limited. All rights reserved. ARM DUI 0056D

Using the Procedure Call Standard
2.2.2 Register names
Table 2-1 lists the defined roles of the processor registers, and associated names. These names and their synonyms are predefined in the assembler. The compiler uses the special names and the basic register names when generating assembler language.
In addition, s0-s31, d0-d15, and f0-f31 are predefined names for registers in floating-point coprocessors. See The VFP architecture on page 2-18 and The FPA architecture on page 2-20 for more information.
Table 2-1 Register roles and names in ATPCS
Register Synonym Special Role in the procedure call standard
r15 - pc Program counter.
r14 - lr Link register.
r13 - sp Stack pointer.
r12 - ip Intra-procedure-call scratch register.
r11 v8 - ARM-state variable register 8.
r10 v7 sl ARM-state variable register 7. Stack limit pointer in stack-checked variants.
r9 v6 sb ARM-state variable register 6. Static base in RWPI variants.
r8 v5 - ARM-state variable register 5.
r7 v4 - Variable register 4.
r6 v3 - Variable register 3.
r5 v2 - Variable register 2.
r4 v1 - Variable register 1.
r3 a4 - Argument/result/scratch register 4.
r2 a3 - Argument/result/scratch register 3.
r1 a2 - Argument/result/scratch register 2.
r0 a1 - Argument/result/scratch register 1.
ARM DUI 0056D Copyright © 1999-2001 ARM Limited. All rights reserved. 2-5

Using the Procedure Call Standard
2.3 The stack
This section describes how to use the stack in the base standard. See also Stack limit checking on page 2-11.
ATPCS specifies:
• a full, descending stack
• eight-byte stack alignment at all external interfaces.
2.3.1 Stack terminology
The following stack-related terms are used in ATPCS:
The stack pointer Addresses the last value written to the stack (pushed).
The stack base Is the address of the top of the stack, from which the stack grows downwards. The highest location actually used by the stack is the first word below the stack base.
The stack limit Is the lowest address on the stack that the current process is allowed to use.
The used stack Is the region of memory between the stack base and the stack pointer. It includes the stack pointer but not the stack base.
The unused stack Is the region of memory between the stack pointer and the stack limit. It includes the stack limit but not the stack pointer.
Stack frames Are regions of memory allocated on the stack by routines for saving registers and holding local variables.
A process might, or might not, have access to the current values of the stack base and stack limit.
An interrupt handler can use the stack of the process it interrupts. In this case, it is the responsibility of the programmer to ensure that stack limits are not exceeded.
2-6 Copyright © 1999-2001 ARM Limited. All rights reserved. ARM DUI 0056D

Using the Procedure Call Standard
Figure 2-1 Stack memory layout
2.3.2 Stack unwinding
If you compile with the -g command line option, the resulting object file contains DWARF2 debug frame information. The debuggers use this information to unwind the stack when necessary during debug. This allows you to view the stack backtrace in a debugger
In assembly language, it is your responsibility to describe your stack frames using FRAME directives. The assembler uses these to generate DWARF2 debug frame information. See the Writing ARM and Thumb Assembly Language, and Directives Reference chapters in ADS Assembler Guide.
��������
�������� ��
������������
�������
���������
��������
ARM DUI 0056D Copyright © 1999-2001 ARM Limited. All rights reserved. 2-7

Using the Procedure Call Standard
2.3.3 Eight-byte alignment
For multiple transfers on some systems, eight-byte alignment of addresses can improve memory access speed. For LDRD and STRD instructions on ARMv5TE processors, 8-byte alignment is required.
Compiler-generated object files preserve 8-byte alignment of the stack at all external interfaces. The compilers set a build attribute to indicate this to the linker.
To comply with the ATPCS in assembly language, unless your object file contains no external calls, you must:
• Ensure that 8-byte alignment of the stack is preserved at all external interfaces. (The stack pointer must always move by an even number of words between entry to your code and any external call from your code.)
• Use the PRESERVE8 directive to inform the linker that 8-byte alignment is preserved (see the Directives Reference chapter in ADS Assembler Guide).
2-8 Copyright © 1999-2001 ARM Limited. All rights reserved. ARM DUI 0056D

Using the Procedure Call Standard
2.4 Parameter passing
A routine with a variable number of arguments is variadic. A routine with a fixed number of arguments is nonvariadic. There are different rules about passing parameters to variadic and to nonvariadic routines.
This section describes the base standard. For additional information relating to floating-point options, see Floating-point options on page 2-17.
2.4.1 Nonvariadic routines
Parameter values are passed to a nonvariadic routine in the following way:
1. The first integer arguments are allocated to r0-r3 in order (but see Allocation of long integers).
2. Remaining parameters are allocated to the stack in order (but see Allocation of long integers).
Warning Stack accesses are costly in code size and execution speed. Keep the number of
parameters less than five if possible.
Allocation of long integers
An integer parameter longer than 32 bits, for example a long long, might be allocated partly to a register, and partly to the stack. In this case the part allocated to the stack is allocated before any FP values, even if this does not correspond to the order in the parameter list.
Allocation of floating-point numbers
If your system has floating point hardware, FP parameters are allocated to FP registers as follows:
1. Each FP parameter is examined in turn.
2. For each parameter, the available set of FP registers is examined.
3. If one is available, the lowest-numbered, contiguous set of FP registers large enough for the parameter is allocated to the parameter.
ARM DUI 0056D Copyright © 1999-2001 ARM Limited. All rights reserved. 2-9

Using the Procedure Call Standard
2.4.2 Variadic routines
Parameter values are passed to a variadic routine in integer registers a1-a4, and on the stack if necessary (a1-a4 are synonyms for r0-r3).
The order of the words used is as if the parameter values were stored in consecutive memory words and then transferred to:
1. a1-a4, a1 first.
2. The stack, lowest address first. (This means that they are pushed onto the stack in reverse order.)
Note As a consequence, a floating-point value might be passed in integer registers, on the stack, or split between integer registers and the stack.
2.4.3 Result return
A function can return:
• A one-word integer value in a1.
• A two to four-word integer value in a1-a2, a1-a3 or a1-a4.
• A floating-point value in f0, d0, or s0.
• A compound floating-point value (such as complex) in f0-fN, or d0-dN. The maximum value of N depends on the selected floating-point architecture (see Floating-point options on page 2-17).
• A longer value must be returned indirectly, in memory.
2-10 Copyright © 1999-2001 ARM Limited. All rights reserved. ARM DUI 0056D
Using the Procedure Call Standard
2.5 Stack limit checking
Select the software stack limit checking (/swst) option unless the maximum amount of stack memory required by your complete program can be accurately calculated at the design stage.
Select the no software stack limit checking (/noswst) option only if you can accurately calculate, at the design stage, the maximum amount of stack memory that your complete program requires. This is the default.
It is possible to write assembly code in such a way that stack limit checking is irrelevant. The code in a file might not require stack limit checking, but be compatible with other code assembled either /swst or /noswst. Use the software stack limit checking not applicable (/swstna) option in this case.
2.5.1 Rules for stack limit checked code
In the stack limit checked variants of the ATPCS:
• sl must point at least 256 bytes above the lowest usable address in the stack.
Note If an interrupt handler can use the User mode stack, you must allow sufficient
space for it, between sl and the lowest usable address in the stack, in addition to the 256 bytes.
• sl must not be altered by code compiled or assembled with stack limit checking selected. (sl is altered by run-time support code).
• The value held in sp must always be greater than or equal to the value in sl.
2.5.2 Register usage with stack limit checking
You must not alter r10, or restore it, in routines assembled or compiled with the stack checking option selected. Register r10 is the stack limit pointer, sl.
In all other respects the usage of registers is the same with or without stack limit checking (see Register roles and names on page 2-4).
2.5.3 Stack checking in C and C++
If you select the software stack limit checking (/swst) option, the compilers generate object code that performs stack checking.
ARM DUI 0056D Copyright © 1999-2001 ARM Limited. All rights reserved. 2-11
Using the Procedure Call Standard
2.5.4 Stack checking in assembly language
If you select the software stack checking (/swst) option for your assembly code, it is your responsibility to write code that performs stack checking.
A leaf routine is a routine that does not call any other subroutine.
There are three cases to consider:
• Leaf routine using less than 256 bytes of stack
• Nonleaf routine using less than 256 bytes of stack
• Routine using more than 256 bytes of stack on page 2-13.
For this purpose, leaf routines include routines in which every call is a tail call.
Leaf routine using less than 256 bytes of stack
A leaf routine that uses less than 256 bytes of stack does not need to check the stack limit. This is a consequence of the rules above (see Rules for stack limit checked code on page 2-11).
For this purpose, a leaf routine can be a combination of routines with a total stack usage less than 256 bytes.
Nonleaf routine using less than 256 bytes of stack
A nonleaf routine that uses less than 256 bytes of stack can use a limit-checking sequence such as the following:
SUB sp, sp, #size ; ARM code version CMP sp, sl BLLO __ARM_stack_overflow
or in Thumb code:
ADD sp, #-size ; Thumb code version CMP sp, sl BLLO __Thumb_stack_overflow
Note The names __ARM_stack_overflow and __Thumb_stack_overflow are illustrative and do not correspond to any actual implementation.
2-12 Copyright © 1999-2001 ARM Limited. All rights reserved. ARM DUI 0056D

Using the Procedure Call Standard
Routine using more than 256 bytes of stack
In this case, a new value of sp must be proposed to the limit-checking code using a sequence such as the following:
SUB ip, sp, #size ; ARM code version CMP ip, sl BLLO __ARM_stack_overflow
or in Thumb code:
LDR r7, #-size ; Thumb code version ADD r7, sp CMP r7, sl BLLO __Thumb_stack_overflow
This is necessary to ensure that sp cannot become less than the lowest usable address in the stack.
Note The names __ARM_stack_overflow and __Thumb_stack_overflow are illustrative and do not correspond to any actual implementation.
ARM DUI 0056D Copyright © 1999-2001 ARM Limited. All rights reserved. 2-13
Using the Procedure Call Standard
2.6 Read-only position independence
A program is Read-Only Position-Independent (ROPI) if all its read-only segments are position independent.
An ROPI segment is often position-independent code (PIC), but could be read-only data, or a combination of PIC and read-only data.
Select the ROPI option to avoid committing yourself to having to load your code in a particular location in memory. This is particularly useful for routines that are:
• loaded in response to run-time events
• loaded into memory with different combinations of other routines in different circumstances
• mapped at different addresses during their execution.
2.6.1 Register usage with ROPI
The usage of registers is the same with or without ROPI (see Register roles and names on page 2-4).
2.6.2 Writing code for ROPI
When you are writing code for ROPI:
• Every reference from code in an ROPI segment to a symbol in the same ROPI segment must be pc-relative. ATPCS does not define any other base register for a read-only segment. An address in an ROPI segment cannot be stored in an ROPI segment.
• Every reference from code in an ROPI segment to a symbol in a different ROPI segment must be pc-relative. The two segments must be fixed relative to each other.
• Every other reference from an ROPI segment must be to either:
— an absolute address
— an sb-relative reference to writable data (see Read-write position independence on page 2-15).
• A read-write word that addresses a symbol in an ROPI segment must be adjusted whenever the ROPI segment is moved.
2-14 Copyright © 1999-2001 ARM Limited. All rights reserved. ARM DUI 0056D

Using the Procedure Call Standard
2.7 Read-write position independence
A program is Read-Write Position-Independent (RWPI) if all its read-write segments are position independent.
An RWPI segment is usually position-independent data (PID).
Select the RWPI option to avoid committing yourself to a particular location of data in memory. This is particularly useful for data that must be multiply instantiated for reentrant routines.
2.7.1 Reentrant routines
A reentrant routine can be threaded by several processes at the same time. Each process has its own copy of the read-write segments of the routine. Each copy is addressed by a different value of the static base register.
2.7.2 Register usage with RWPI
Register r9 is the static base, sb. It must point to the base address of the appropriate static data segments whenever you call any externally visible routine.
You can use r9 for other purposes in a routine that does not use sb. If you do this you must save the contents of sb on entry to your routine and restore it before exit. You must also restore it before any call to an external routine.
In all other respects the usage of registers is the same with or without RWPI (see Register roles and names on page 2-4).
2.7.3 Position-independent data addressing
An RWPI segment can be repositioned until it is first used. The address of a symbol in an RWPI segment is calculated as follows:
1. The linker calculates a read-only offset from a fixed location in the segment. By convention, the fixed location is the first byte of the lowest addressed RWPI segment of the program.
2. At runtime, this is used as an offset added to the contents of the static base register, sb.
2.7.4 Writing assembly language for RWPI
Construct references from a read-only segment to the RWPI segment by adding a fixed (read-only) offset to the value of sb (see DCDO in the Directives Reference chapter in ADS Assembler Guide).
ARM DUI 0056D Copyright © 1999-2001 ARM Limited. All rights reserved. 2-15

Using the Procedure Call Standard
2.8 Interworking between ARM and Thumb states
Select the /interwork option when compiling or assembling code if you want:
• ARM routines to be able to return to a Thumb state caller
• Thumb routines to be able to return to an ARM state caller
• the linker to provide the code to change state when calling from ARM to Thumb or from Thumb to ARM.
Select the/nointerwork option when compiling or assembling code if either:
• your system does not use Thumb
• you provide the assembler code to handle all changes of state.
The default is:
• /interwork if you are compiling or assembling for an ARM v5T processor
• /nointerwork otherwise.
If you select the interworking option, you can call a routine in a different module without considering which instruction set it uses. If necessary, the linker inserts an interworking call veneer, or patches the call site. This works for compiled or assembled code.
See Chapter 3 Interworking ARM and Thumb for detailed information.
2.8.1 Register usage with interworking
The usage of registers is the same with or without interworking (see Register roles and names on page 2-4).
2-16 Copyright © 1999-2001 ARM Limited. All rights reserved. ARM DUI 0056D

Using the Procedure Call Standard
2.9 Floating-point options
The ATPCS supports two different floating-point hardware architectures and instruction sets:
• The VFP architecture (see The VFP architecture on page 2-18).
• The FPA architecture (see The FPA architecture on page 2-20). This is for backwards compatibility only.
Code for one architecture cannot be used on the other architecture.
The ADS compilers and assembler have six floating-point options:
• -fpu VFP
• -fpu FPA
• -fpu softVFP
• -fpu softVFP+VFP
• -fpu softFPA
• -fpu none.
If your target system has floating-point hardware, choose VFP, softVFP+VFP, or FPA.
Use softVFP+VFP if your system has floating-point hardware, and you want to use floating-point library routines from Thumb code.
If your target system does not have floating-point hardware:
• if you require compatibility with an FPA system, or objects produced under SDT, choose softFPA
• if the module you are compiling or assembling does not use floating-point arithmetic, and you require compatibility with both FPA and VFP systems, choose none
• otherwise, choose softVFP. This is the default.
See also No floating-point hardware on page 2-21.
ARM DUI 0056D Copyright © 1999-2001 ARM Limited. All rights reserved. 2-17
Using the Procedure Call Standard
2.9.1 The VFP architecture
The VFP architecture has sixteen double-precision registers, d0-d15. Each double--precision register can be used as two single-precision registers. As single-precision registers they are called s0-s31. d5 for example, is the same as s10 and s11.
The VFP architecture does not support extended precision.
Vector and scalar modes
The VFP architecture has two modes of operation:
• Scalar mode
• Vector mode.
The ATPCS applies only to scalar mode operation. On entry to and exit from any publicly visible routine conforming to the ATPCS the vector length and vector stride must both be set to 1.
Register usage with VFP
You can use the first eight double-precision registers, d0-d7:
• to pass floating-point values into a routine
• to pass floating-point values out of a routine
• as scratch registers within a routine.
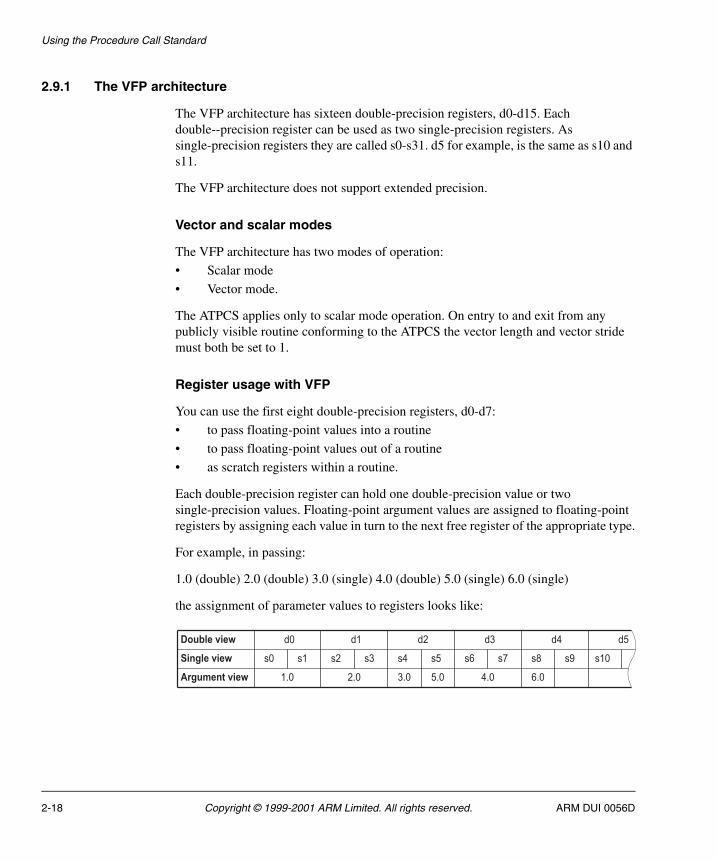
Each double-precision register can hold one double-precision value or two single-precision values. Floating-point argument values are assigned to floating-point registers by assigning each value in turn to the next free register of the appropriate type.
For example, in passing:
1.0 (double) 2.0 (double) 3.0 (single) 4.0 (double) 5.0 (single) 6.0 (single)
the assignment of parameter values to registers looks like:
���������
��� �������
� � � � � � � � � � ��
� � � � � � � �� � � �
�� ������ �� �� �� �� �� ��
2-18 Copyright © 1999-2001 ARM Limited. All rights reserved. ARM DUI 0056D

Using the Procedure Call Standard
To comply with ATPCS, if you use registers d8-d15 within a routine, you must save their values on entry and restore them before exit. You can save them using a single FSTMX instruction and restore them using a single FLDMX instruction. They are saved and restored as bit patterns, without interpretation as single or double-precision numbers. N single-precision values saved occupy N+1 words.
Format of VFP values
Single-precision and double-precision values conform to the IEEE 754 standard formats. Double-precision values are treated as true 64-bit values:
• in little-endian mode, the more significant word of a two-word double-precision value, containing the exponent, has the higher address
• in big-endian mode, the more significant word has the lower address.
Note Little-endian double-precision values in VFP are pure little-endian. This is different from FPA architecture.
Big-endian double-precision values are the same, pure big-endian, in both VFP and FPA architectures.
IEEE rounding modes and exception enable flags
The ATPCS does not specify any constraint on the state of these on entry to, or exit from, conforming routines.
ARM DUI 0056D Copyright © 1999-2001 ARM Limited. All rights reserved. 2-19

Using the Procedure Call Standard
2.9.2 The FPA architecture
The FPA architecture has eight floating-point registers, f0-f7. Each register can hold a single-precision, double-precision, or extended-precision value.
Register usage with FPA
You can use the first four floating-point registers, f0-f3:
• to pass floating-point values into a routine
• to pass floating-point results out of a routine
• as scratch registers within a routine.
To comply with ATPCS, if you use floating-point registers f4-f7 within a routine, you must save their values on entry and restore them before exit. You can save them using a single SFM instruction and restore them using a single LFM instruction. Each value saved occupies three words.
Format of FPA values
Single-precision and double-precision values conform to the IEEE 754 standard formats. The most significant word of a floating-point value, containing the exponent, has the lowest memory address. This is the same whether the byte order within words is big-endian or little-endian.
Note Little-endian double-precision values are neither pure little-endian nor pure big-endian.
IEEE rounding modes and exception enable flags
The ATPCS does not specify any constraint on the state of these on entry to, or exit from, conforming routines.
2-20 Copyright © 1999-2001 ARM Limited. All rights reserved. ARM DUI 0056D

Using the Procedure Call Standard
2.9.3 No floating-point hardware
The only difference between softVFP and softFPA is the order of words in double-precision values in little-endian mode (see Format of VFP values on page 2-19 and Format of FPA values on page 2-20).
If you specify -fpu none, you cannot use floating-point values.
Register usage with softVFP and softFPA
Each floating-point argument is converted to a bit pattern in one or two integer words as if by storing to memory. The resulting integer values are passed as described in Parameter passing on page 2-9.
A single-precision floating-point result is returned as a bit pattern in r0.
A double-precision floating-point result is returned in r0 and r1. r0 contains the word corresponding to the lower-addressed word of the representation of the value in memory.
2.9.4 softVFP+VFP
Thumb code cannot pass floating-point values in floating-point registers, as Thumb does not have coprocessor instructions.
If you have a VFP coprocessor and wish to use floating-point routines from Thumb code, select the -fpu softVFP+VFP option.
This instructs the compilers to generate code using the same parameter passing rules as for -fpu softVFP. The C library floating-point routines use VFP instructions from ARM state.
ARM DUI 0056D Copyright © 1999-2001 ARM Limited. All rights reserved. 2-21

Using the Procedure Call Standard
2-22 Copyright © 1999-2001 ARM Limited. All rights reserved. ARM DUI 0056D

Chapter 3 Interworking ARM and Thumb
This chapter explains how to change between ARM state and Thumb state when writing code for processors that implement the Thumb instruction set. It contains the following sections:
• About interworking on page 3-2
• Assembly language interworking on page 3-6
• C and C++ interworking and veneers on page 3-11
• Assembly language interworking using veneers on page 3-15.
ARM DUI 0056D Copyright © 1999-2001 ARM Limited. All rights reserved. 3-1

Interworking ARM and Thumb
3.1 About interworking
You can mix ARM and Thumb code as you wish, provided that the code conforms to the requirements of the ARM/Thumb Procedure Call Standard. The ARM compilers always create code that conforms to this standard. If you are writing ARM assembly language modules you must ensure that your code conforms.
The ARM linker detects when an ARM function is being called from Thumb state, or a Thumb function is being called from ARM state. The ARM linker alters call and return instructions, or inserts small code sections called veneers, to change processor state as necessary.
ARM architecture v5T provides methods of changing processor state without using any extra instructions. There is normally no cost associated with interworking on ARM architecture v5T processors.
If you are linking several source files together, all your files must use compatible ATPCS options. If incompatible options are detected, the linker will produce an error message.
3-2 Copyright © 1999-2001 ARM Limited. All rights reserved. ARM DUI 0056D

Interworking ARM and Thumb
3.1.1 When to use interworking
When you write code for a Thumb-capable ARM processor, you will probably write most of your application to run in Thumb state. This gives the best code density. With 8-bit or 16-bit wide memory, it also gives the best performance. However, you might want parts of your application to run in ARM state for reasons such as:
Speed Some parts of an application might be speed critical. These sections might be more efficient running in ARM state than in Thumb state. In some circumstances, a single ARM instruction can do more than the equivalent Thumb instruction.
Some systems include a small amount of fast 32-bit memory. ARM code can be run from this without the overhead of fetching each instruction from 8-bit or 16-bit memory.
Functionality
Thumb instructions are less flexible than their ARM equivalents. Some operations are not possible in Thumb state. For example, you cannot enable or disable interrupts, or access coprocessors. A state change is required in order to carry out these operations.
Exception handling
The processor automatically enters ARM state when a processor exception occurs. This means that the first part of an exception handler must be coded with ARM instructions, even if it re-enters Thumb state to carry out the main processing of the exception. At the end of such processing, the processor must be returned to ARM state to return from the handler to the main application.
Standalone Thumb programs
A Thumb-capable ARM processor always starts in ARM state. To run simple Thumb assembly language programs under the debugger, add an ARM header that carries out a state change to Thumb state and then calls the main Thumb routine. See Example ARM header on page 3-8 for an example.
ARM DUI 0056D Copyright © 1999-2001 ARM Limited. All rights reserved. 3-3
Interworking ARM and Thumb
3.1.2 Using the /interwork option
The option -apcs /interwork is available for all compilers and assemblers. If you set this option:
• The compiler or assembler records an interworking attribute in the object file.
• The linker provides interworking veneers for subroutine entry.
• In assembly language, you must write function exit code that returns to the instruction set state of the caller, for example BX LR.
• In C or C++, the compiler creates function exit code that returns to the instruction set state of the caller
• In C or C++, the compiler uses BX instructions for indirect or virtual calls.
Use the /interwork option if your object file contains:
• Thumb subroutines that might need to return to ARM code
• ARM subroutines that might need to return to Thumb code
• Thumb subroutines that might make indirect or virtual calls to ARM code
• ARM subroutines that might make indirect or virtual calls to Thumb code.
Otherwise, you do not need to use the /interwork option. For example, your object file may contain any of the following without requiring /interwork:
• Thumb code that may be interrupted by an exception. The exception forces the processor into ARM state so no veneer is needed.
• Exception handling code that may handle exceptions from Thumb code. No veneer is needed for the return.
• Thumb code that calls ARM subroutines in other files (the interworking return sequences belong to the callee, not the caller).
• ARM code that calls Thumb subroutines in other files (the interworking return sequences belong to the callee, not the caller).
3-4 Copyright © 1999-2001 ARM Limited. All rights reserved. ARM DUI 0056D

Interworking ARM and Thumb
3.1.3 Detecting interworking calls
The linker generates an error if it detects a direct ARM/Thumb interworking call where the called routine is not built for interworking. You must rebuild the called routine for interworking.
For example, Example 3-1 shows the error that is produced if the ARM routine in Example 3-3 on page 3-12 is compiled and linked without the -apcs /interwork option.
Example 3-1
Error: L6239E: Cannot call ARM symbol 'arm_function' in non-interworking objectarmsub.o from THUMB code in thumbmain.o(.text)
These types of error indicate that an ARM-to-Thumb or Thumb-to-ARM interworking call has been detected from the object module object to the routine symbol, but the called routine has not been compiled for interworking. You must recompile the module that contains the symbol and specify -apcs /interwork.
ARM DUI 0056D Copyright © 1999-2001 ARM Limited. All rights reserved. 3-5

Interworking ARM and Thumb
3.2 Assembly language interworking
In an assembly language source file, you can have several areas (these correspond to ELF sections). Each area can contain ARM instructions, Thumb instructions, or both.
You can use the linker to fix up calls to, and returns from, routines that use a different instruction set from the caller. To do this, use BL to call the routine (see Assembly language interworking using veneers on page 3-15).
If you prefer, you can write your code to make the instruction set changes explicitly. In some circumstances you can write smaller or faster code by doing this.
The following instructions perform the processor state changes:
• BX, see The branch and exchange instruction on page 3-7
• BLX, LDR, LDM, and POP (ARM architecture v5 and above only), see ARM architecture v5T on page 3-10.
The following directives instruct the assembler to assemble instructions from the appropriate instruction set (see Changing the assembler mode on page 3-8):
• CODE16
• CODE32.
3-6 Copyright © 1999-2001 ARM Limited. All rights reserved. ARM DUI 0056D

Interworking ARM and Thumb
3.2.1 The branch and exchange instruction
The BX instruction branches to the address contained in a specified register. The value of bit 0 of the branch address determines whether execution continues in ARM state or Thumb state. See ARM architecture v5T on page 3-10 for additional instructions available with ARM architecture v5.
Bit 0 of an address can be used in this way because:
• all ARM instructions are word-aligned, so bits 0 and 1 of the address of any ARM instruction are unused
• all Thumb instructions are halfword-aligned, so bit 0 of the address of any Thumb instruction is unused.
Syntax
The syntax of BX is one of:
Thumb BX Rn
ARM BX{cond} Rn
where:
Rn Is a register in the range r0 to r15 that contains the address to branch to. The value of bit 0 in this register determines the processor state:
• if bit 0 is set, the instructions at the branch address are executed in Thumb state
• if bit 0 is clear, the instructions at the branch address are executed in ARM state.
cond Is an optional condition code. Only the ARM version of BX can be executed conditionally.
ARM DUI 0056D Copyright © 1999-2001 ARM Limited. All rights reserved. 3-7

Interworking ARM and Thumb
3.2.2 Changing the assembler mode
The ARM assembler can assemble both Thumb code and ARM code. By default, it assembles ARM code unless it is invoked with the -16 option.
Because all Thumb-capable ARM processors start in ARM state, you must use the BX instruction to branch and exchange to Thumb state, and then use the CODE16 directive to instruct the assembler to assemble Thumb instructions. Use the corresponding CODE32 directive to instruct the assembler to return to assembling ARM instructions.
Refer to the ADS Assembler Guide for more information on these directives.
3.2.3 Example ARM header
Example 3-2 on page 3-9 contains four sections of code. The first implements a short header section of ARM code that changes the processor to Thumb state.
The header code uses:
• An ADR pseudo-instruction to load the branch address and set the least significant bit. The ADR pseudo-instruction generates the address by loading r0 with the value pc+offset+1. See ADS Assembler Guide for more information on the ADR pseudo-instruction.
• A BX instruction to branch to the Thumb code and change processor state.
The second section of the module, labelled ThumbProg, is prefixed by a CODE16 directive that instructs the assembler to treat the following code as Thumb code. The Thumb code adds the contents of two registers together.
The processor is changed back to ARM state. The code again uses an ADR instruction to get the address of the label, but this time the least significant bit is left clear. The BX instruction changes the state.
The third section of the code simply adds together the contents of two registers.
The final section labeled stop uses the semihosting SWI to report normal application exit. Refer to the ADS Debug Target Guide for more information on semihosting.
Note The Thumb semihosting SWI is a different number from the ARM semihosting SWI (0xAB rather than 0x123456).
3-8 Copyright © 1999-2001 ARM Limited. All rights reserved. ARM DUI 0056D

Interworking ARM and Thumb
Example 3-2
AREA AddReg,CODE,READONLY ; Name this block of code. ENTRY ; Mark first instruction to call.main ADR r0, ThumbProg + 1 ; Generate branch target address ; and set bit 0, hence arrive ; at target in Thumb state. BX r0 ; Branch exchange to ThumbProg. CODE16 ; Subsequent instructions are Thumb code.ThumbProg MOV r2, #2 ; Load r2 with value 2. MOV r3, #3 ; Load r3 with value 3. ADD r2, r2, r3 ; r2 = r2 + r3 ADR r0, ARMProg BX r0 CODE32 ; Subsequent instructions are ARM code.ARMProg MOV r4, #4 MOV r5, #5 ADD r4, r4, r5stop MOV r0, #0x18 ; angel_SWIreason_ReportException LDR r1, =0x20026 ; ADP_Stopped_ApplicationExit SWI 0x123456 ; ARM semihosting SWI END ; Mark end of this file.
Building the example
To build and execute the example:
1. Enter the code using any text editor and save the file as addreg.s.
2. Type armasm -g addreg.s at the command prompt to assemble the source file.
3. Type armlink addreg.o -o addreg to link the file.
4. Type armsd addreg to load the module into the command-line debugger.
5. Type step to step through the rest of the program one instruction at a time. After each instruction, type reg to display the registers. Watch the processor enter Thumb state. This is denoted by the T in the Current Program Status Register (CPSR) changing from a lowercase t to an uppercase T.
ARM DUI 0056D Copyright © 1999-2001 ARM Limited. All rights reserved. 3-9

Interworking ARM and Thumb
3.2.4 ARM architecture v5T
In ARM architecture v5T and above:
• There are two additional interworking instructions available:
BLX address The processor performs a pc-relative branch to address with link and changes state. address must be within 32MB of the pc in ARM code, or within 4MB of the pc in Thumb code.
BLX register The processor performs a branch with link to an address contained in the specified register. The value of bit[0] determines the new processor state.
In either case, bit[0] of lr is set to the current value of the Thumb bit in the CPSR. The means that the return instruction can automatically return to the correct processor state.
• If LDR, LDM, or POP load to the pc, they set the Thumb bit in the CPSR to bit[0] of the value loaded to the pc. You can use this to change instruction sets. This is particularly useful for returning from subroutines. The same return instruction can return to either an ARM or Thumb caller.
For more information, see ADS Assembler Guide and ARM Architecture Reference Manual.
3.2.5 Labels in Thumb code
The linker distinguishes between labels referring to:
• ARM instructions
• Thumb instructions
• data.
When the linker relocates a value of a label referring to a Thumb instruction, it sets the least significant bit of the relocated value. This means that a branch to a label can automatically select the appropriate instruction set. This works if any of the following instructions are used for the branch:
• BX in ARM architecture v4T
• BX, BLX, or LDR in architecture v5T and above.
In previous releases of ADS and SDT, it was necessary to mark data in Thumb code with the DATA directive. This is no longer necessary.
3-10 Copyright © 1999-2001 ARM Limited. All rights reserved. ARM DUI 0056D
Interworking ARM and Thumb
3.3 C and C++ interworking and veneers
You can freely mix C and C++ code compiled for ARM and Thumb, but in ARM architecture v4T small code segments called veneers are required between the ARM and Thumb code to carry out state changes. The ARM linker generates these interworking veneers when it detects interworking calls.
3.3.1 Compiling code for interworking
The -apcs /interwork compiler option enables all ARM and Thumb C and C++ compilers to compile modules containing routines that can be called by routines compiled for the other processor state:
tcc -apcs /interworkarmcc -apcs /interworktcpp -apcs /interworkarmcpp -apcs /interwork
Modules that are compiled for interworking on ARM architecture v4T generate slightly larger code, typically 2% larger for Thumb and less than 1% larger for ARM. There is no difference for ARM architecture v5.
In a leaf function, that is a function whose body contains no function calls, the only change in the code generated by the compiler is to replace MOV pc,lr with BX lr. The MOV instruction does not cause the necessary state change.
In nonleaf functions built for ARM architecture v4T, the Thumb compiler must replace, for example, the single instruction:
POP {r4,r5,pc}
with the sequence:
POP {r4,r5} POP {r3} BX r3
This has a small effect on performance. Compile all source modules for interworking, unless you are sure they will never be used with interworking.
The -apcs /interwork option also sets the interwork attribute for the code area the modules are compiled into. The linker detects this attribute and inserts the appropriate veneer.
ARM DUI 0056D Copyright © 1999-2001 ARM Limited. All rights reserved. 3-11

Interworking ARM and Thumb
Note ARM code compiled for interworking can only be used on ARM architecture v4T, or v5 and above, because other processors do not implement the BX instruction.
Use the armlink -info veneers option to find the amount of space taken by the veneers.
C interworking example
Example 3-3 shows a Thumb routine that carries out an interworking call to an ARM subroutine. The ARM subroutine call makes an interworking call to printf() in the Thumb library. These two modules are provided in Examples\Interwork as thumbmain.c and armsub.c.
Example 3-3
/********************** * thumbmain.c * **********************/ #include <stdio.h> extern void arm_function(void); int main(void) { printf("Hello from Thumb World\n"); arm_function(); printf("And goodbye from Thumb World\n"); return (0); } /********************** * armsub.c * **********************/ #include <stdio.h> void arm_function(void) { printf("Hello and Goodbye from ARM world\n"); }
To compile and link these modules:
1. Type tcc -c -apcs /interwork -o thumbmain.o thumbmain.c at the system prompt to compile the Thumb code for interworking.
2. Type armcc -c -apcs /interwork -o armsub.o armsub.c to compile the ARM code for interworking.
3-12 Copyright © 1999-2001 ARM Limited. All rights reserved. ARM DUI 0056D

Interworking ARM and Thumb
3. Type armlink -o hello armsub.o thumbmain.o to link the object files.
Alternatively, type armlink -info veneers armsub.o thumbmain.o to view the size of the interworking veneers (Example 3-4).
Example 3-4
Adding veneers to the image Adding AT veneer (12 bytes) for call to '_printf' from armsub.o(.text). Adding TA veneer (12 bytes) for call to 'arm_function' from thumbmain.o(.text). Adding AT veneer (12 bytes) for call to '__rt_lib_init' from kernel.o(x$codeseg). Adding AT veneer (12 bytes) for call to '__rt_lib_shutdown' from kernel.o(x$codeseg). Adding AT veneer (12 bytes) for call to '_sys_exit' from kernel.o(x$codeseg). Adding AT veneer (12 bytes) for call to '__raise' from rt_raise.o(x$codeseg). Adding AT veneer (12 bytes) for call to '_no_fp_display' from printf2.o(x$codeseg).7 Veneer(s) (total 84 bytes) added to the image.
ARM DUI 0056D Copyright © 1999-2001 ARM Limited. All rights reserved. 3-13

Interworking ARM and Thumb
3.3.2 Basic rules for interworking
The following rules apply to interworking within an application:
• You must use the -apcs /interwork command-line option to compile any C or C++ modules that contain functions that might return to the other instruction set.
• You must use the -apcs /interwork command-line option to compile any C or C++ modules that contain indirect or virtual function calls that might be to functions in the other instruction set.
• Never make indirect calls, such as calls using function pointers, to non-interworking code from code in the other state.
• If any input object contains Thumb code, the linker selects the Thumb runtime libraries. These are built for interworking.
If you specify one of your own libraries explicitly on the linker command line you must ensure that it is an appropriate interworking library.
3.3.3 Using two copies of the same function
You can have two functions with the same name, one compiled for ARM and the other for Thumb. However, we do not recommend this practice. In almost all cases there is no significant performance increase over having a single version of the function.
Note Both versions of the function must be compiled with the /interwork option as it is not guaranteed that the Thumb version will only be called from Thumb state and the ARM version will only be called from ARM state.
The linker allows duplicate definitions provided that one definition defines a Thumb routine and the other defines an ARM routine.
3-14 Copyright © 1999-2001 ARM Limited. All rights reserved. ARM DUI 0056D

Interworking ARM and Thumb
3.4 Assembly language interworking using veneers
The assembly language ARM/Thumb interworking method described in Assembly language interworking on page 3-6 carried out all the necessary intermediate processing. There was no requirement for the linker to insert interworking veneers.
This section describes how you can make use of interworking veneers to:
• interwork between assembly language modules
• interwork between assembly language and C or C++ modules.
3.4.1 Assembly-only interworking using veneers
You can write assembly language ARM/Thumb interworking code to make use of interworking veneers generated by the linker. To do this, you write:
• A caller routine just as any non-interworking routine, using a BL instruction to make the call. A caller routine may be assembled /interwork or /nointerwork.
• A callee routine using a BX instruction to return. A callee routine must be assembled /interwork.
This is generally only necessary in ARM architecture v4T, or if the caller and callee are widely separated or in different areas. In ARM architecture v5T, if the caller and callee are sufficiently close together, no veneers are necessary.
ARM DUI 0056D Copyright © 1999-2001 ARM Limited. All rights reserved. 3-15

Interworking ARM and Thumb
Example of assembly language interworking using veneers
Example 3-5 shows the code to set registers r0 to r2 to the values 1, 2, and 3 respectively. Registers r0 and r2 are set by the ARM code. r1 is set by the Thumb code. Observe that:
• the code must be assembled with the option -apcs /interwork
• a BX lr instruction is used to return from the subroutine, instead of the usual MOV pc,lr.
Example 3-5
; ***** ; arm.s ; ***** AREA Arm,CODE,READONLY ; Name this block of code. IMPORT ThumbProg ENTRY ; Mark 1st instruction to call.ARMProg MOV r0,#1 ; Set r0 to show in ARM code. BL ThumbProg ; Call Thumb subroutine. MOV r2,#3 ; Set r2 to show returned to ARM. ; Terminate execution. MOV r0, #0x18 ; angel_SWIreason_ReportException LDR r1, =0x20026 ; ADP_Stopped_ApplicationExit SWI 0x123456 ; ARM semihosting SWI END ; ******* ; thumb.s ; ******* AREA Thumb,CODE,READONLY ; Name this block of code. CODE16 ; Subsequent instructions are Thumb. EXPORT ThumbProgThumbProg MOV r1, #2 ; Set r1 to show reached Thumb code. BX lr ; Return to ARM subroutine. END ; Mark end of this file.
Follow these steps to build and link the modules, and examine the interworking veneers:
1. Type armasm arm.s to assemble the ARM code.
2. Type armasm -16 -apcs /interwork thumb.s to assemble the Thumb code.
3. Type armlink arm.o thumb.o -o count to link the two object files.
3-16 Copyright © 1999-2001 ARM Limited. All rights reserved. ARM DUI 0056D

Interworking ARM and Thumb
4. Type armsd count to load the code into the debugger.
5. Type list 0x8000 at the armsd command prompt to list the code. Example 3-6 shows the output.
Example 3-6
armsd: list 0x8000ARMProg 0x00008000: 0xe3a00001 .... : > mov r0,#1 0x00008004: 0xeb000005 .... : bl $Ven$AT$$ThumbProg 0x00008008: 0xe3a02003 . .. : mov r2,#3 0x0000800c: 0xe3a00018 .... : mov r0,#0x18 0x00008010: 0xe59f1000 .... : ldr r1,0x00008018 ; = #0x00020026 0x00008014: 0xef123456 V4.. : swi 0x123456 0x00008018: 0x00020026 &... : dcd 0x00020026 &...ThumbProg+0000 0x0000801c: 0x2102 .! : mov r1,#2+0002 0x0000801e: 0x4770 pG : bx r14$Ven$AT$$ThumbProg+0000 0x00008020: 0xe59fc000 .... : ldr r12,0x00008028 ; = #0x0000801d+0004 0x00008024: 0xe12fff1c ../. : bx r12+0008 0x00008028: 0x0000801d .... : dcd 0x0000801d ....+000c 0x0000802c: 0xe800e800 .... : dcd 0xe800e800 ....+0010 0x00008030: 0xe7ff0010 .... : dcd 0xe7ff0010 ....+0014 0x00008034: 0xe800e800 .... : dcd 0xe800e800 ....+0018 0x00008038: 0xe7ff0010 .... : dcd 0xe7ff0010 ....
You can see that the linker has added the required ARM-to-Thumb interworking veneer. This is contained in locations 0x8020 to 0x8028. Location 0x8028 contains the address of the routine being branch-exchanged to, with bit 0 set, 0x801D.
3.4.2 C, C++, and assembly language interworking using veneers
C and C++ code compiled to run in one state can call assembly language code designed to run in the other state, and vice versa. To do this, write the caller routine as any non-interworking routine and, if calling from assembly language, use a BL instruction to make the call (see Example 3-7 on page 3-18). Then:
• if the callee routine is in C, compile it using -apcs /interwork
• if the callee routine is in assembly language, assemble with the -apcs /interwork option and return using BX lr.
ARM DUI 0056D Copyright © 1999-2001 ARM Limited. All rights reserved. 3-17

Interworking ARM and Thumb
Note Any assembly language code or user library code used in this manner must conform to the ATPCS where appropriate.
Example 3-7
/********************** * thumb.c * **********************/ #include <stdio.h> extern int arm_function(int); int main(void) { int i = 1; printf("i = %d\n", i); printf("And now i = %d\n", arm_function(i)); return (0); } ; ***** ; arm.s ; ***** AREA Arm,CODE,READONLY ; Name this block of code. EXPORT arm_functionarm_function ADD r0,r0,#4 ; Add 4 to first parameter. BX LR ; Return END
Follow these steps to build and link the modules:
1. Type tcc -c -apcs /interwork thumb.c to compile the Thumb code.
2. Type armasm -apcs /interwork arm.s to assemble the ARM code.
3. Type armlink arm.o thumb.o -o add to link the two object files.
4. Type armsd add to load the code.
5. Type go to run the code.
6. Type list main to list the code generated for the main function.
7. Type list arm_function to list the code generated.
3-18 Copyright © 1999-2001 ARM Limited. All rights reserved. ARM DUI 0056D

Chapter 4 Mixing C, C++, and Assembly Language
This chapter describes how to write mixed C, C++, and ARM assembly language code. It also describes how to use the ARM inline assemblers from C and C++. It contains the following sections:
• Using the inline assemblers on page 4-2
• Accessing C global variables from assembly code on page 4-14
• Using C header files from C++ on page 4-15
• Calling between C, C++, and ARM assembly language on page 4-17.
ARM DUI 0056D Copyright © 1999-2001 ARM Limited. All rights reserved. 4-1

Mixing C, C++, and Assembly Language
4.1 Using the inline assemblers
The inline assembler built into the C and C++ compilers enables you to features of the target processor that cannot be accessed directly from C. For example:
• saturating arithmetic (see ADS Assembler Guide)
• custom coprocessors
• the PSR.
The inline assembler supports very flexible interworking with C and C++. Any register operand can be an arbitrary C or C++ expression. The inline assembler also expands complex instructions and optimizes the assembly language code.
Note Inline assembly language is subject to optimization by the compiler if optimization is enabled either by default or with the -O1 or -O2 compiler options.
The armcc and armcpp inline assemblers implement most of the ARM instruction set including generic coprocessor instructions, halfword instructions and long multiply. The tcc and tcpp inline assemblers implement, again with two exceptions, the full Thumb instruction set.
Note The tcc and tcpp inline assemblers are deprecated and will not be supported in future releases of the tools.
See Differences between the inline assemblers and armasm on page 4-6 for information on restrictions.
The inline assembler is a high-level assembler. The code it generates is not always exactly what you write. Do not use it to generate more efficient code than the compiler generates. Use the ARM assembler armasm for this purpose.
Some low-level features that are available to the ARM assembler armasm, such as branching by writing to pc, are not supported.
4.1.1 Invoking the inline assembler
The ARM C compilers support inline assembly language with the __asm specifier.
The ARM C++ compilers support the asm syntax proposed in the ANSI C++ Standard, with the restriction that the string literal must be a single string. For example:
asm("instruction[;instruction]");
4-2 Copyright © 1999-2001 ARM Limited. All rights reserved. ARM DUI 0056D

Mixing C, C++, and Assembly Language
The asm syntax is supported by the C++ compilers when compiling both C and C++. The asm statement must be inside a C or C++ function. Do not include comments in the string literal. An asm statement can be used anywhere a C or C++ statement is expected.
In addition to the asm syntax, ARM C++ supports the C compiler __asm syntax.
The inline assembler is invoked with the assembler specifier. The specifier is followed by a list of assembler instructions inside braces. For example:
__asm{ instruction [; instruction] ... [instruction]}
If two instructions are on the same line, you must separate them with a semicolon. If an instruction is on multiple lines, line continuation must be specified with the backslash character (\). C or C++ comments can be used anywhere within an inline assembly language block.
String copying example
Example 4-1 shows how to use labels and branches in a string copy routine.
This code is also in install_directory\examples\inline\strcopy.c.
The syntax of labels inside assembler blocks is the same as in C. Function calls that use BL from inline assembly language must specify the input registers, the output registers, and the corrupted registers. In this example, the inputs to my_strcpy() are a and b, there are no outputs, and the default ATPCS registers, r0-r3, r12, lr, and PSR, are corrupted.
Example 4-1 String copy
#include <stdio.h>void my_strcpy(const char *src, char *dst){ int ch; __asm { loop:#ifndef __thumb // ARM version LDRB ch, [src], #1 STRB ch, [dst], #1#else // Thumb version
ARM DUI 0056D Copyright © 1999-2001 ARM Limited. All rights reserved. 4-3

Mixing C, C++, and Assembly Language
LDRB ch, [src] ADD src, #1 STRB ch, [dst] ADD dst, #1#endif CMP ch, #0 BNE loop }}int main(void){ const char *a = "Hello world!"; char b[20]; my_strcpy (a, b); printf("Original string: '%s'\n", a); printf("Copied string: '%s'\n", b); return 0;}
4.1.2 ARM and Thumb instruction sets
The ARM and Thumb instruction sets are described in the ARM Architecture Reference Manual. All instruction opcodes and register specifiers can be written in either lowercase or uppercase.
Operand expressions
Any register or constant operand can be an arbitrary C or C++ expression so that variables can be read or written. The expression must be integer assignable, that is, of type char, short, or int. No sign extension is performed on char and short types. You must perform sign extension explicitly for these types. The compiler might add code to evaluate these expressions and allocate them to registers.
When an operand is used as a destination, the expression must be assignable (an lvalue). When writing code that uses both physical registers and expressions, you must take care not to use complex expressions that require too many registers to evaluate. The compiler issues an error message if it detects conflicts during register allocation.
Physical registers
The inline assemblers allow restricted access to the physical registers. It is illegal to write to pc. Only branches using B and BL are allowed. In addition, it is inadvisable to intermix inline assembler instructions that use physical registers and complex C or C++ expressions.
4-4 Copyright © 1999-2001 ARM Limited. All rights reserved. ARM DUI 0056D

Mixing C, C++, and Assembly Language
The compiler uses r12 (ip) and, in tcc and tcpp, r3 for intermediate results, and r0-r3, r12 (ip), r14 (lr) for function calls while evaluating C expressions, so these cannot be used as physical registers at the same time.
Physical registers, like variables, must be set before they can be read. When physical registers are used the compiler saves and restores C and C++ variables that might be allocated to the same physical register. However, the compiler cannot restore sp, sl, fp, or sb in calling standards where these registers have a defined role.
Note Using physical register names is not recommended, because it constrains compiler register allocation and can cause less efficient code to be generated. It is usually better to declare C local variables and use these as operands in inline assembler.
Constants
The constant expression specifier # is optional. If it is used, the expression following it must be constant.
Instruction expansion
The constant in instructions with a constant operand is not limited to the values allowed by the instruction. Instead, such an instruction is translated into a sequence of instructions with the same effect. For example:
ADD r0, r0, #1023
might be translated into:
ADD r0, r0, #1024 SUB r0, r0, #1
With the exception of coprocessor instructions, all ARM and Thumb instructions with a constant operand support instruction expansion. In addition, the MUL instruction can be expanded into a sequence of adds and shifts when the third operand is a constant.
The effect of updating the CPSR by an expanded instruction is:
• arithmetic instructions set the NZCV flags correctly.
• logical instructions:
— set the NZ flags correctly
— do not change the V flag
— corrupt the C flag.
ARM DUI 0056D Copyright © 1999-2001 ARM Limited. All rights reserved. 4-5

Mixing C, C++, and Assembly Language
Labels
C and C++ labels can be used in inline assembler statements. C and C++ labels can be branched to by branch instructions only in the form:
B{cond} label
You cannot branch to C or C++ labels using BL.
Storage declarations
All storage can be declared in C or C++ and passed to the inline assembler using variables. Therefore, the storage declarations that are supported by armasm are not implemented.
SWI and BL instructions
SWI and BL instructions must specify exactly the calling standard used. Three optional register lists follow the normal instruction fields. The register lists specify:
• the registers that are the input parameters
• the registers that are output parameters after return
• the registers that are corrupted by the called function.
For example:
SWI{cond} swi_num, {input_regs}, {output_regs}, {corrupted_regs} BL{cond} function, {input_regs}, {output_regs}, {corrupted_regs}
An omitted list is assumed to be empty, except that BL always corrupts ip, and lr. The default corrupted list for BL is r0-r3.
The register lists have the same syntax as LDM and STM register lists. If the NZCV flags are modified you must specify PSR in the corrupted register list.
4.1.3 Differences between the inline assemblers and armasm
There are a number of differences and restrictions between the assembly language accepted by the inline assemblers and the assembly language accepted by the ARM assembler. For the inline assemblers:
• You cannot get the address of the current instruction using dot notation (.) or {PC}.
• The LDR Rn, =expression pseudo-instruction is not supported. Use MOV Rn, expression instead (this can generate a load from a literal pool).
4-6 Copyright © 1999-2001 ARM Limited. All rights reserved. ARM DUI 0056D

Mixing C, C++, and Assembly Language
• Label expressions are not supported.
• The ADR and ADRL pseudo-instructions are not supported.
• The & operator cannot be used to denote hexadecimal constants. Use the 0x prefix instead. For example:
__asm {AND x, y, 0xF00}
• The notation to specify the actual rotate of an 8-bit constant is not available in inline assembly language. This means that where an 8-bit shifted constant is used, the C flag should be regarded as corrupted if the NZCV flags are updated.
• Physical registers, such as r0-r3, ip, lr, and the NZCV flags in the CPSR must be used with caution. If you use C or C++ expressions, these might be used as temporary registers and NZCV flags might be corrupted by the compiler when evaluating the expression.
• Do not use C variables with the same name as a physical register. When accessed in an __asm block, the actual register will be used instead of the variable. (It is possible to access the C variable by enclosing the name in parentheses, but this behavior should not be relied upon.)
• LDM and STM instructions only allow physical registers to be specified in the register list.
• You cannot write to pc. The BX and BLX instructions are not implemented.
• You should not modify the stack. This is not necessary because the compiler will stack and restore any working registers as required automatically. It is not allowed to explicitly stack and restore work registers.
• You can change processor modes, alter the ATPCS registers fp, sl, and sb, or alter the state of coprocessors, but the compiler is unaware of the change. If you change processor mode, you must not use C or C++ expressions until you change back to the original mode because the compiler will corrupt the registers for the processor mode to which you have changed.
Similarly, if you change the state of a floating-point coprocessor by executing floating-point instructions, you must not use floating-point expressions until the original state has been restored.
ARM DUI 0056D Copyright © 1999-2001 ARM Limited. All rights reserved. 4-7
Mixing C, C++, and Assembly Language
4.1.4 Usage
The following points apply to using inline assembly language:
• Comma is used as a separator in assembly language, so C expressions with the comma operator must be enclosed in parentheses to distinguish them:
__asm {ADD x, y, (f(), z)}
• If you are using physical registers, you must ensure that the compiler does not corrupt them when evaluating expressions. For example:
__asm { MOV r0, x ADD y, r0, x / y // (x / y) overwrites r0 with the result.}
Because the compiler uses a function call to evaluate x / y, it:
— corrupts r2, r3, ip, and lr
— updates the NZCV flags in the CPSR
— alters r0 and r1 with the dividend and modulo.
The value in r0 is lost. You can work around this by using a C variable instead of r0:
mov var,x add y, var, x / y
The compiler can detect the corruption in many cases, for example when it requires a temporary register and the register is already in use:
__asm { MOV ip, #3 ADDS x, x, #0x12345678 // this instruction is expanded ORR x, x, ip }
The compiler uses ip as a temporary register when it expands the ADD instruction, and corrupts the value 3 in ip. An error message is issued.
• Do not use physical registers to address variables, even when it seems obvious that a specific variable is mapped onto a specific register. If the compiler detects this it either generates an error message or puts the variable into another register to avoid conflicts:
int bad_f(int x) // x in r0{ __asm { ADD r0, r0, #1 // wrongly asserts that x is still in r0
4-8 Copyright © 1999-2001 ARM Limited. All rights reserved. ARM DUI 0056D

Mixing C, C++, and Assembly Language
} return x; // x in r0}
This code returns x unaltered. The compiler assumes that x and r0 are two different variables, despite the fact that x is allocated to r0 on both function entry and function exit. As the assembly language code does not do anything useful, it is optimized away. The instruction should be written as:
ADD x, x, #1
• Do not save and restore physical registers that are used by an inline assembler. The compiler will do this for you. If physical registers other than CPSR and SPSR are read without being written to, an error message is issued. For example:
int f(int x){ __asm { STMFD sp!, {r0} // save r0 - illegal: read before write ADD r0, x, 1 EOR x, r0, x LDMFD sp!, {r0} // restore r0 - not needed. } return x;}
ARM DUI 0056D Copyright © 1999-2001 ARM Limited. All rights reserved. 4-9

Mixing C, C++, and Assembly Language
4.1.5 Examples
Example 4-2 to Example 4-5 on page 4-12 demonstrates some of the ways that you can use inline assembly language effectively.
Enabling and disabling interrupts
Interrupts are enabled or disabled by reading the CPSR flags and updating bit 7. Example 4-2 shows how this can be done by using small functions that can be inlined.
This code is also in install_directory\examples\inline\irqs.c.
These functions work only in a privileged mode, because the control bits of the CPSR and SPSR cannot be changed while in User mode.
Example 4-2 Interrupts
__inline void enable_IRQ(void){ int tmp; __asm { MRS tmp, CPSR BIC tmp, tmp, #0x80 MSR CPSR_c, tmp }}__inline void disable_IRQ(void){ int tmp; __asm { MRS tmp, CPSR ORR tmp, tmp, #0x80 MSR CPSR_c, tmp }}int main(void){ disable_IRQ(); enable_IRQ();}
4-10 Copyright © 1999-2001 ARM Limited. All rights reserved. ARM DUI 0056D

Mixing C, C++, and Assembly Language
Dot product
Example 4-3 calculates the dot product of two integer arrays. It demonstrates how inline assembly language can interwork with C or C++ expressions and data types that are not directly supported by the inline assembler. The inline function mlal() is optimized to a single SMLAL instruction. Use the -S -fs compiler option to view the assembly language code generated by the compiler.
long long is the same as __int64.
This code is also in install_directory\examples\inline\dotprod.c.
Example 4-3 Dot product
#include <stdio.h>/* change word order if big-endian#define lo64(a) (((unsigned*) &a)[0]) /* low 32 bits of a long long */#define hi64(a) (((int*) &a)[1]) /* high 32 bits of a long long */__inline __int64 mlal(__int64 sum, int a, int b){#if !defined(__thumb) && defined(__TARGET_FEATURE_MULTIPLY) __asm { SMLAL lo64(sum), hi64(sum), a, b }#else sum += (__int64) a * (__int64) b;#endif return sum;}__int64 dotprod(int *a, int *b, unsigned n){ __int64 sum = 0; do sum = mlal(sum, *a++, *b++); while (--n != 0); return sum;}int a[10] = { 1, 2, 3, 4, 5, 6, 7, 8, 9, 10 };int b[10] = { 10, 9, 8, 7, 6, 5, 4, 3, 2, 1 };int main(void){ printf("Dotproduct %lld (should be %d)\n", dotprod(a, b, 10), 220); return 0;}
ARM DUI 0056D Copyright © 1999-2001 ARM Limited. All rights reserved. 4-11

Mixing C, C++, and Assembly Language
Long multiplies
You can use the inline assembler to customize functions that use long long type. Example 4-4 shows a simple long multiply routine in C.
Example 4-5 shows how you can use inline assembly language to generate different code for the same routine. You can use the inline assembler to write the high word and the low word of the long long separately.
The inline assembly language code depends on the word ordering of long long types, because it assumes that the low 32 bits are at offset 0. Change the code if compiling for big-endian.
This code is also in install_directory\examples\inline\smull.c.
Example 4-4 Multiply in C
Writing the multiply routine in C:
// long multiply routine in Clong long smull(int x, int y){ return (long long) x * (long long) y;}
The compiler generates the following code:
MOV r2,r0 MOV r0,r1 MOV r1,r2 SMULL r12,r1,r0,r2 MOV r0,r12 MOV pc,lr
r12 is corrupted in this routine. This is allowed under ATPCS.
Example 4-5 Multiply in inline assembly language
Writing the same routine using inline assembly language:
long long smull(int x, int y){ long long res; __asm { SMULL ((int*)&res)[0], ((int*)&res)[1], x, y } return res;}
4-12 Copyright © 1999-2001 ARM Limited. All rights reserved. ARM DUI 0056D

Mixing C, C++, and Assembly Language
The compiler generates the following code:
MOV r2,r0 SMULL r0,r1,r2,r1 MOV pc,lr
ARM DUI 0056D Copyright © 1999-2001 ARM Limited. All rights reserved. 4-13

Mixing C, C++, and Assembly Language
4.2 Accessing C global variables from assembly code
Global variables can only be accessed indirectly, through their address. To access a global variable, use the IMPORT directive to import the global and then load the address into a register. You can access the variable with load and store instructions, depending on its type.
For unsigned variables use:
• LDRB/STRB for char
• LDRH/STRH for short (Use two LDRB/STRB instructions for Architecture 3)
• LDR/STR for int.
For signed variables, use the equivalent signed instruction, such as LDRSB and LDRSH.
Small structures of less than eight words can be accessed as a whole using the LDM and STM instructions. Individual members of structures can be accessed by a load or store instruction of the appropriate type. You must know the offset of a member from the start of the structure in order to access it.
Example 4-6 loads the address of the integer global globvar into r1, loads the value contained in that address into r0, adds 2 to it, then stores the new value back into globvar.
Example 4-6 Address of global
AREA globals,CODE,READONLY EXPORT asmsubroutine IMPORT globvarasmsubroutine LDR r1, =globvar ; read address of globvar into ; r1 from literal pool LDR r0, [r1] ADD r0, r0, #2 STR r0, [r1] MOV pc, lr END
4-14 Copyright © 1999-2001 ARM Limited. All rights reserved. ARM DUI 0056D

Mixing C, C++, and Assembly Language
4.3 Using C header files from C++
This section describes how to use C header files from your C++ code. C header files must be wrapped in extern "C" directives before they are called from C++.
4.3.1 Including system C header files
To include standard system C header files, such as stdio.h, you do not have to do anything special. The standard C header files already contain the appropriate extern "C" directives. For example:
// C++ code#include <stdio.h>int main(){ //... return 0;}
The C++ standard specifies that the functionality of the C header files is available through C++ specific header files. These files are installed in install_directory\include, together with the standard C header files, and can be referenced in the usual way. For example:
// C++ code#include <cstdio>int main(){ // ... return 0;}
In ARM C++, these headers simply #include the C headers.
Note The C standard header files and their C++ veneer headers are available in the compiler’s in-memory file system. Refer to C compilers in the ADS Compilers and Libraries Guide for more information.
ARM DUI 0056D Copyright © 1999-2001 ARM Limited. All rights reserved. 4-15

Mixing C, C++, and Assembly Language
4.3.2 Including your own C header files
To include your own C header files, you must wrap the #include directive in an extern "C" statement. You can do this in two ways:
• When the file is #included. This is shown in Example 4-7.
• By adding the extern "C" statement to the header file. This is shown in Example 4-8.
Example 4-7 Directive before include file
// C++ codeextern "C"{#include "my-header1.h"#include "my-header2.h"}int main(){ // ... return 0;}
Example 4-8 Directive in file header
/* C header file */#ifdef __cplusplus /* Insert start of extern C construct */extern "C" {#endif/* Body of header file */#ifdef __cplusplus /* Insert end of extern C construct */} /* The C header file can now be */#endif /* included in either C or C++ code. */
4-16 Copyright © 1999-2001 ARM Limited. All rights reserved. ARM DUI 0056D

Mixing C, C++, and Assembly Language
4.4 Calling between C, C++, and ARM assembly language
This section provides examples that can help you to call C and assembly language code from C++, and to call C++ code from C and assembly language. It also describes calling conventions and data types.
You can mix calls between C and C++ and assembly language routines provided you follow the appropriate procedure ATPCS call standard. For more information on the ATPCS, see Chapter 2 Using the Procedure Call Standard.
Note The information in this section is implementation dependent and might change in future toolkit releases.
4.4.1 General rules for calling between languages
The following general rules apply to calling between C, C++, and assembly language.
You should not rely on the following C++ implementation details. These implementation details are subject to change in future releases of ARM C++:
• the way names are mangled
• the way the implicit this parameter is passed
• the way virtual functions are called
• the representation of references
• the layout of C++ class types that have base classes or virtual member functions
• the passing of class objects that are not plain old data (POD) structures.
The following general rules apply to mixed language programming:
• Use C calling conventions.
• In C++, non-member functions can be declared as extern "C" to specify that they have C linkage. In this release of ADS, having C linkage means that the symbol defining the function is not mangled. C linkage can be used to implement a function in one language and call it from another.
Note Functions that are declared extern "C" cannot be overloaded.
• Assembly language modules must conform to the appropriate ARM/Thumb Procedure Calls Standard for the memory model used by the application.
ARM DUI 0056D Copyright © 1999-2001 ARM Limited. All rights reserved. 4-17

Mixing C, C++, and Assembly Language
The following rules apply to calling C++ functions from C and assembly language:
• To call a global (non-member) C++ function, declare it extern "C" to give it C linkage.
• Member functions (both static and non-static) always have mangled names.
• C++ inline functions cannot be called from C unless you ensure that the C++ compiler generates an out-of-line copy of the function. For example, taking the address of the function results in an out-of-line copy.
• Non-static member functions receive the implicit this parameter as a first argument in r0, or as a second argument in r1 if the function returns a non int-like structure. This might change in future implementations. Static member functions do not receive an implicit this parameter.
4.4.2 Information specific to C++
The following applies specifically to C++.
C++ calling conventions
ARM C++ uses the same calling conventions as ARM C with the following exceptions:
• When an object of type struct or class is passed to a function and the object has an explicit copy constructor, the object will be copied by the calling code or by the subroutine (callee). If the constructor is overloaded the caller makes the copy. If the constructor is not overloaded, the callee makes the copy.
• Non-static member functions are called with the implicit this parameter as the first argument, or as the second argument if the called function returns a non int-like struct. This might change in future implementations.
C++ data types
ARM C++ uses the same data types as ARM C with the following exceptions and additions:
• C++ objects of type struct or class have the same layout as would be expected from the ARM C compiler if they have no base classes or virtual functions. If such a struct has neither a user-defined copy assignment operator or a user-defined destructor, it is a POD structure.
• References are represented as pointers.
4-18 Copyright © 1999-2001 ARM Limited. All rights reserved. ARM DUI 0056D

Mixing C, C++, and Assembly Language
• Pointers to data members and pointers to member functions occupy four bytes. They have the same null pointer representation as normal pointers.
• No distinction is made between pointers to C functions and pointers to C++ (non-member) functions.
Symbol name mangling
ARM C++ mangles external names of functions and static data members in a manner similar to that described in section 7.2c of Ellis, M.A. and Stroustrup, B., The Annotated C++ Reference Manual (1990). The linker unmangles symbols in messages.
C names must be declared as extern "C" in C++ programs. This is done already for the ARM ANSI C headers. Refer to Using C header files from C++ on page 4-15 for more information.
4.4.3 Examples
The following sections contain code examples that demonstrate:
• Calling assembly language from C
• Calling C from assembly language on page 4-20
• Calling C from C++ on page 4-21
• Calling assembly language from C++ on page 4-22
• Calling C++ from C on page 4-23
• Calling C++ from assembly language on page 4-23
• Calling C++ from C or assembly language on page 4-25
• Passing a reference between C and C++ on page 4-24.
The examples assume the default non software-stack checking ATPCS variant because they perform stack operations without checking for stack overflow.
Calling assembly language from C
Example 4-9 and Example 4-10 on page 4-20 show a C program that uses a call to an assembly language subroutine to copy one string over the top of another string.
Example 4-9 Calling assembly language from C
#include <stdio.h>extern void strcopy(char *d, const char *s);int main(){ const char *srcstr = "First string - source "; char dststr[] = "Second string - destination ";
ARM DUI 0056D Copyright © 1999-2001 ARM Limited. All rights reserved. 4-19

Mixing C, C++, and Assembly Language
/* dststr is an array since we’re going to change it */ printf("Before copying:\n"); printf(" %s\n %s\n",srcstr,dststr); strcopy(dststr,srcstr); printf("After copying:\n"); printf(" %s\n %s\n",srcstr,dststr); return (0);}
Example 4-10 Assembly language string copy subroutine
AREA SCopy, CODE, READONLY EXPORT strcopystrcopy ; r0 points to destination string. ; r1 points to source string. LDRB r2, [r1],#1 ; Load byte and update address. STRB r2, [r0],#1 ; Store byte and update address. CMP r2, #0 ; Check for zero terminator. BNE strcopy ; Keep going if not. MOV pc,lr ; Return. END
Example 4-9 on page 4-19 is located in install_directory\examples\asm as strtest.c and scopy.s. Follow these steps to build the example from the command line:
1. Type armasm -g scopy.s to build the assembly language source.
2. Type armcc -c -g strtest.c to build the C source.
3. Type armlink strtest.o scopy.o -o strtest to link the object files
4. Type armsd -e strtest execute the example.
Calling C from assembly language
Example 4-11 on page 4-21 and Example 4-12 on page 4-21 show how to call C from assembly language.
4-20 Copyright © 1999-2001 ARM Limited. All rights reserved. ARM DUI 0056D
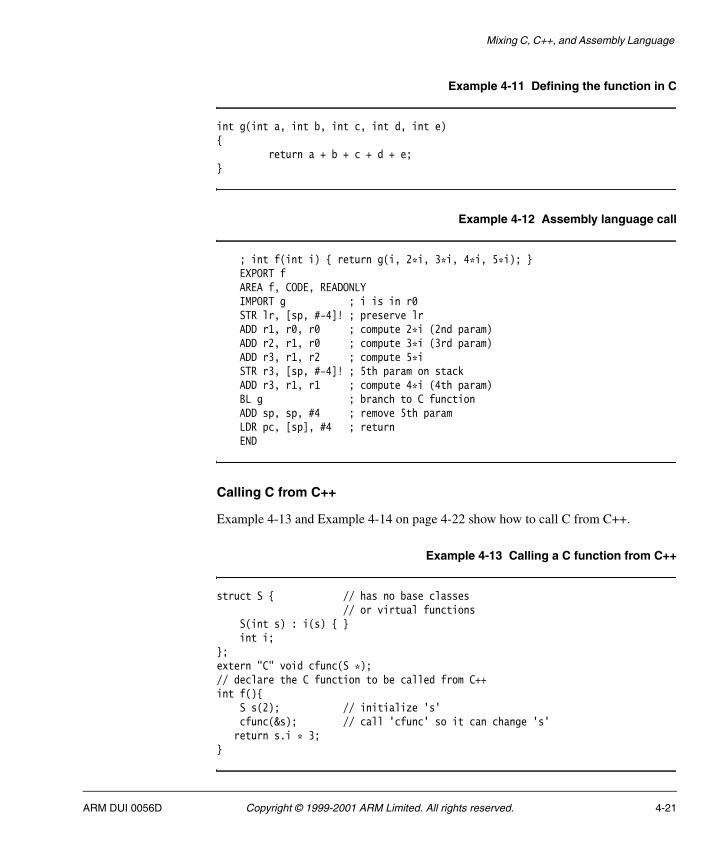
Mixing C, C++, and Assembly Language
Example 4-11 Defining the function in C
int g(int a, int b, int c, int d, int e) { return a + b + c + d + e;}
Example 4-12 Assembly language call
; int f(int i) { return g(i, 2*i, 3*i, 4*i, 5*i); } EXPORT f AREA f, CODE, READONLY IMPORT g ; i is in r0 STR lr, [sp, #-4]! ; preserve lr ADD r1, r0, r0 ; compute 2*i (2nd param) ADD r2, r1, r0 ; compute 3*i (3rd param) ADD r3, r1, r2 ; compute 5*i STR r3, [sp, #-4]! ; 5th param on stack ADD r3, r1, r1 ; compute 4*i (4th param) BL g ; branch to C function ADD sp, sp, #4 ; remove 5th param LDR pc, [sp], #4 ; return END
Calling C from C++
Example 4-13 and Example 4-14 on page 4-22 show how to call C from C++.
Example 4-13 Calling a C function from C++
struct S { // has no base classes // or virtual functions S(int s) : i(s) { } int i;};extern "C" void cfunc(S *); // declare the C function to be called from C++int f(){ S s(2); // initialize 's' cfunc(&s); // call 'cfunc' so it can change 's' return s.i * 3;}
ARM DUI 0056D Copyright © 1999-2001 ARM Limited. All rights reserved. 4-21
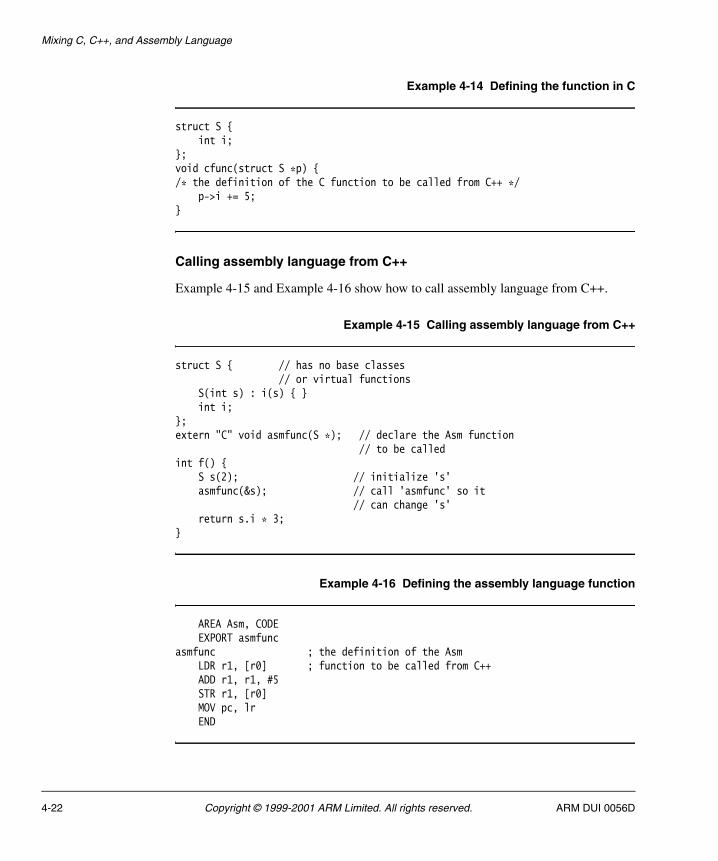
Mixing C, C++, and Assembly Language
Example 4-14 Defining the function in C
struct S { int i;};void cfunc(struct S *p) {/* the definition of the C function to be called from C++ */ p->i += 5;}
Calling assembly language from C++
Example 4-15 and Example 4-16 show how to call assembly language from C++.
Example 4-15 Calling assembly language from C++
struct S { // has no base classes // or virtual functions S(int s) : i(s) { } int i;};extern "C" void asmfunc(S *); // declare the Asm function // to be calledint f() { S s(2); // initialize 's' asmfunc(&s); // call 'asmfunc' so it // can change 's' return s.i * 3;}
Example 4-16 Defining the assembly language function
AREA Asm, CODE EXPORT asmfuncasmfunc ; the definition of the Asm LDR r1, [r0] ; function to be called from C++ ADD r1, r1, #5 STR r1, [r0] MOV pc, lr END
4-22 Copyright © 1999-2001 ARM Limited. All rights reserved. ARM DUI 0056D
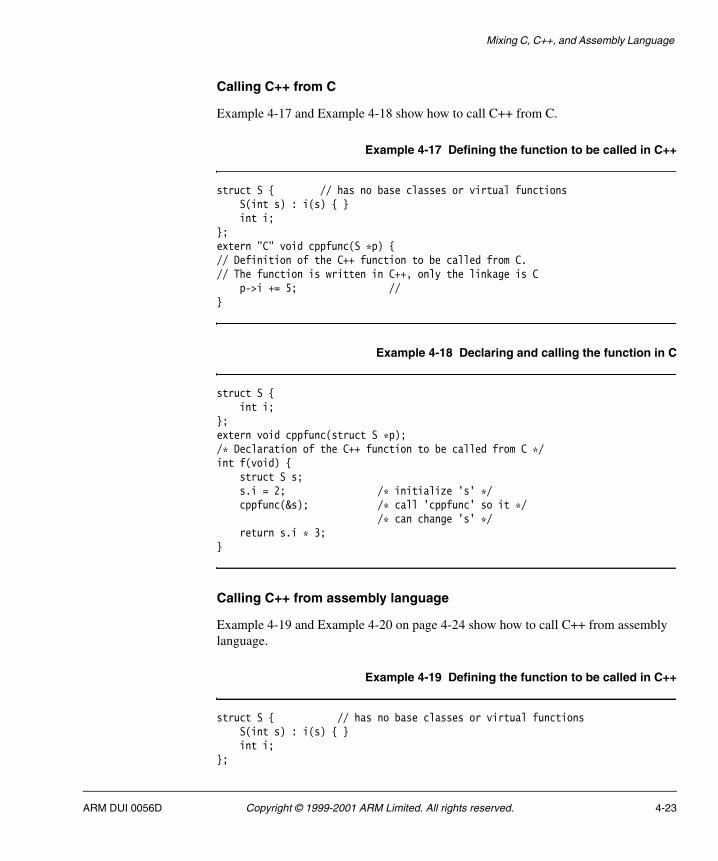
Mixing C, C++, and Assembly Language
Calling C++ from C
Example 4-17 and Example 4-18 show how to call C++ from C.
Example 4-17 Defining the function to be called in C++
struct S { // has no base classes or virtual functions S(int s) : i(s) { } int i;};extern "C" void cppfunc(S *p) { // Definition of the C++ function to be called from C.// The function is written in C++, only the linkage is C p->i += 5; //}
Example 4-18 Declaring and calling the function in C
struct S { int i;};extern void cppfunc(struct S *p); /* Declaration of the C++ function to be called from C */int f(void) { struct S s; s.i = 2; /* initialize 's' */ cppfunc(&s); /* call 'cppfunc' so it */ /* can change 's' */ return s.i * 3;}
Calling C++ from assembly language
Example 4-19 and Example 4-20 on page 4-24 show how to call C++ from assembly language.
Example 4-19 Defining the function to be called in C++
struct S { // has no base classes or virtual functions S(int s) : i(s) { } int i;};
ARM DUI 0056D Copyright © 1999-2001 ARM Limited. All rights reserved. 4-23

Mixing C, C++, and Assembly Language
extern "C" void cppfunc(S * p) {// Definition of the C++ function to be called from ASM.// The body is C++, only the linkage is C p->i += 5;}
In ARM assembly language, import the name of the C++ function and use a Branch with link instruction to call it:
Example 4-20 Defining assembly language function
AREA Asm, CODE IMPORT cppfunc ; import the name of the C++ ; function to be called from Asm EXPORT ff STMFD sp!,{lr} MOV r0,#2 STR r0,[sp,#-4]! ; initialize struct MOV r0,sp ; argument is pointer to struct BL cppfunc ; call 'cppfunc' so it can change ; the struct LDR r0, [sp], #4 ADD r0, r0, r0,LSL #1 LDMFD sp!,{pc} END
Passing a reference between C and C++
Example 4-21 and Example 4-22 on page 4-25 show how to pass a reference between C and C++.
Example 4-21 C++ function
extern "C" int cfunc(const int&); // Declaration of the C function to be called from C++extern "C" int cppfunc(const int& r) {// Definition of the C++ to be called from C. return 7 * r;}int f() {
4-24 Copyright © 1999-2001 ARM Limited. All rights reserved. ARM DUI 0056D
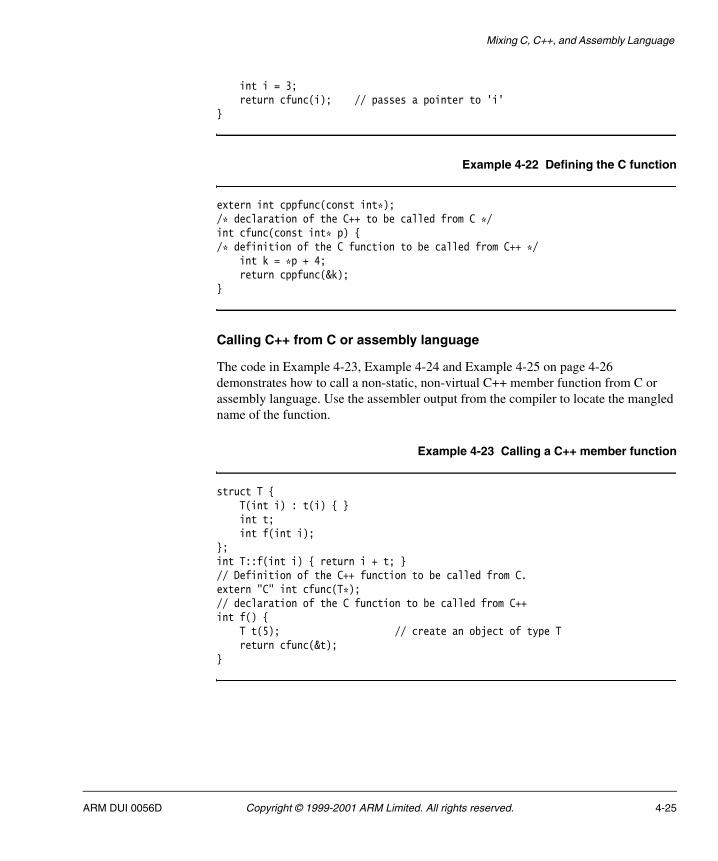
Mixing C, C++, and Assembly Language
int i = 3; return cfunc(i); // passes a pointer to 'i'}
Example 4-22 Defining the C function
extern int cppfunc(const int*); /* declaration of the C++ to be called from C */int cfunc(const int* p) { /* definition of the C function to be called from C++ */ int k = *p + 4; return cppfunc(&k);}
Calling C++ from C or assembly language
The code in Example 4-23, Example 4-24 and Example 4-25 on page 4-26 demonstrates how to call a non-static, non-virtual C++ member function from C or assembly language. Use the assembler output from the compiler to locate the mangled name of the function.
Example 4-23 Calling a C++ member function
struct T { T(int i) : t(i) { } int t; int f(int i);};int T::f(int i) { return i + t; } // Definition of the C++ function to be called from C.extern "C" int cfunc(T*); // declaration of the C function to be called from C++int f() { T t(5); // create an object of type T return cfunc(&t);}
ARM DUI 0056D Copyright © 1999-2001 ARM Limited. All rights reserved. 4-25

Mixing C, C++, and Assembly Language
Example 4-24 Defining the C function
struct T;extern int f__1TFi(struct T*, int); /* the mangled name of the C++ */ /* function to be called */int cfunc(struct T* t) { /* Definition of the C function to be called from C++. */ return 3 * f__1TFi(t, 2); /* like '3 * t->f(2)' */}
Example 4-25 Implementing the function in assembly language
EXPORT cfunc AREA cfunc, CODE IMPORT f__1TFi STMFD sp!,{lr} ; r0 already contains the object pointer MOV r1, #2 BL f__1TFi ADD r0, r0, r0, LSL #1 ; multiply by 3 LDMFD sp!,{pc} END
4-26 Copyright © 1999-2001 ARM Limited. All rights reserved. ARM DUI 0056D
Chapter 5 Handling Processor Exceptions
This chapter describes how to handle the various types of exception supported by ARM processors. It contains the following sections:
• About processor exceptions on page 5-2
• Entering and leaving an exception on page 5-5
• Installing an exception handler on page 5-9
• SWI handlers on page 5-14
• Interrupt handlers on page 5-23
• Reset handlers on page 5-33
• Undefined Instruction handlers on page 5-34
• Prefetch Abort handler on page 5-35
• Data Abort handler on page 5-36
• Chaining exception handlers on page 5-38
• Handling exceptions on Thumb-capable processors on page 5-40
• System mode on page 5-45.
ARM DUI 0056D Copyright © 1999-2001 ARM Limited. All rights reserved. 5-1
Handling Processor Exceptions
5.1 About processor exceptions
During the normal flow of execution through a program, the program counter increases sequentially through the address space, with branches to nearby labels or branch and links to subroutines.
Processor exceptions occur when this normal flow of execution is diverted, to allow the processor to handle events generated by internal or external sources. Examples of such events are:
• externally generated interrupts
• an attempt by the processor to execute an undefined instruction
• accessing privileged operating system functions.
It is necessary to preserve the previous processor status when handling such exceptions, so that execution of the program that was running when the exception occurred can resume when the appropriate exception routine has completed.
Table 5-1 shows the seven different types of exception recognized by ARM processors.
Table 5-1 Exception types
Exception Description
Reset Occurs when the processor reset pin is asserted. This exception is only expected to occur for signalling power-up, or for resetting as if the processor has just powered up. A soft reset can be done by branching to the reset vector (0x0000).
Undefined Instruction Occurs if neither the processor, or any attached coprocessor, recognizes the currently executing instruction.
Software Interrupt (SWI) This is a user-defined synchronous interrupt instruction.It allows a program running in User mode, for example, to request privileged operations that run in Supervisor mode, such as an RTOS function.
Prefetch Abort Occurs when the processor attempts to execute an instruction that was not fetched, because the address was illegala.
Data Abort Occurs when a data transfer instruction attempts to load or store data at an illegal addressa.
IRQ Occurs when the processor external interrupt request pin is asserted (LOW) and the I bit in the CPSR is clear.
FIQ Occurs when the processor external fast interrupt request pin is asserted (LOW) and the F bit in the CPSR is clear.
a. An illegal virtual address is one that does not currently correspond to an address in physical memory, or one that the memory management subsystem has determined is inaccessible to the processor in its current mode.
5-2 Copyright © 1999-2001 ARM Limited. All rights reserved. ARM DUI 0056D

Handling Processor Exceptions
5.1.1 The vector table
Processor exception handling is controlled by a vector table. The vector table is a reserved area of 32 bytes, usually at the bottom of the memory map. It has one word of space allocated to each exception type, and one word that is currently reserved.
This is not enough space to contain the full code for a handler, so the vector entry for each exception type typically contains a branch instruction or load pc instruction to continue execution with the appropriate handler.
5.1.2 Use of modes and registers by exceptions
Typically, an application runs in User mode, but servicing exceptions requires privileged (that is, non-User mode) operation. An exception changes the processor mode, and this in turn means that each exception handler has access to a certain subset of the banked registers:
• its own r13 or Stack Pointer (sp_mode)
• its own r14 or Link Register (lr_mode)
• its own Saved Program Status Register (spsr_ mode).
In the case of a FIQ, each exception handler has access to five more general purpose registers (r8_FIQ to r12_FIQ).
Each exception handler must ensure that other registers are restored to their original contents upon exit. You can do this by saving the contents of any registers the handler needs to use onto its stack and restoring them before returning. If you are using Angel™ or ARMulator®, the required stacks are set up for you. Otherwise, you must set them up yourself. See Chapter 6 Writing Code for ROM for more information.
Note As supplied, the assembler does not predeclare symbolic register names of the form register_mode. To use this form, you must declare the appropriate symbolic names with the RN assembler directive. For example, lr_FIQ RN r14 declares the symbolic register name lr_FIQ for r14. See the directives chapter in ADS Assembler Guide for more information on the RN directive.
5.1.3 Exception priorities
When several exceptions occur simultaneously, they are serviced in a fixed order of priority. Each exception is handled in turn before execution of the user program continues. It is not possible for all exceptions to occur concurrently. For example, the Undefined Instruction and SWI exceptions are mutually exclusive because they are both triggered by executing an instruction.
ARM DUI 0056D Copyright © 1999-2001 ARM Limited. All rights reserved. 5-3

Handling Processor Exceptions
Table 5-2 shows the exceptions, their corresponding processor modes and their handling priorities.
Because the Data Abort exception has a higher priority than the FIQ exception, the Data Abort is actually registered before the FIQ is handled. The Data Abort handler is entered, but control is then passed immediately to the FIQ handler. When the FIQ has been handled, control returns to the Data Abort handler. This means that the data transfer error does not escape detection as it would if the FIQ were handled first.
Table 5-2 Exception priorities
Vector address Exception type Exception mode Priority (1=high, 6=low)
0x0 Reset Supervisor (SVC) 1
0x4 Undefined Instruction Undef 6
0x8 Software Interrupt (SWI) Supervisor (SVC) 6
0xC Prefetch Abort Abort 5
0x10 Data Abort Abort 2
0x14 Reserved Not applicable Not applicable
0x18 Interrupt (IRQ) Interrupt (IRQ) 4
0x1C Fast Interrupt (FIQ) Fast Interrupt (FIQ) 3
5-4 Copyright © 1999-2001 ARM Limited. All rights reserved. ARM DUI 0056D

Handling Processor Exceptions
5.2 Entering and leaving an exception
This section describes the processor response to an exception, and how to return to the place where an exception occurred after the exception has been handled. The method for returning is different depending on the exception type.
5.2.1 The processor response to an exception
When an exception is generated, the processor takes the following actions:
1. Copies the Current Program Status Register (CPSR) into the Saved Program Status Register (SPSR) for the mode in which the exception is to be handled. This saves the current mode, interrupt mask, and condition flags.
2. Changes the appropriate CPSR mode bits in order to:
• Change to the appropriate mode, and map in the appropriate banked registers for that mode.
• Disable interrupts. IRQs are disabled when any exception occurs. FIQs are disabled when a FIQ occurs, and on reset.
3. Sets lr_mode to the return address, as defined in The return address and return instruction on page 5-7.
4. Sets the program counter to the vector address for the exception. This forces a branch to the appropriate exception handler.
Note If the application is running on a Thumb-capable processor, the processor response is slightly different. See Handling exceptions on Thumb-capable processors on page 5-40 for more details.
ARM DUI 0056D Copyright © 1999-2001 ARM Limited. All rights reserved. 5-5

Handling Processor Exceptions
5.2.2 Returning from an exception handler
The method used to return from an exception depends on whether the exception handler uses stack operations or not. In both cases, to return execution to the place where the exception occurred an exception handler must:
• restore the CPSR from spsr_mode
• restore the program counter using the return address stored in lr_mode.
For a simple return that does not require the destination mode registers to be restored from the stack, the exception handler carries out these two operations by performing a data processing instruction with:
• the S flag set
• the program counter as the destination register.
The return instruction required depends on the type of exception. See The return address and return instruction on page 5-7 for instructions on how to return from each exception type.
Note You do not need to return from the reset handler because the reset handler should execute your main code directly.
If the exception handler entry code uses the stack to store registers that must be preserved while it handles the exception, it can return using a load multiple instruction with the ^ qualifier. For example, an exception handler can return in one instruction using:
LDMFD sp!,{r0-r12,pc}^
if it saves the following onto the stack:
• all the work registers in use when the handler is invoked
• the link register, modified to produce the same effect as the data processing instructions described below.
The ^ qualifier specifies that the CPSR is restored from the SPSR. It must be used only from a privileged mode. See the description of Implementing stacks with LDM and STM in the ADS Assembler Guide for more general information on stack operations.
5-6 Copyright © 1999-2001 ARM Limited. All rights reserved. ARM DUI 0056D

Handling Processor Exceptions
5.2.3 The return address and return instruction
The actual location pointed to by the program counter when an exception is taken depends on the exception type. The return address may not necessarily be the next instruction pointed to by the program counter. This section details the instructions to return correctly from handling code for each type of exception.
Note See The return address on page 5-42 for details of the return address on Thumb-capable processors when an exception occurs in Thumb state.
Returning from SWI and Undefined Instruction handlers
The SWI and Undefined Instruction exceptions are generated by the instruction itself, so the program counter is not updated when the exception is taken. The processor stores (pc – 4) in lr_ mode. This makes lr_mode point to the next instruction to be executed. Restoring the program counter from the lr with:
MOVS pc, lr
returns control from the handler.
The handler entry and exit code to stack the return address and pop it on return is:
STMFD sp!,{reglist,lr} ;... LDMFD sp!,{reglist,pc}^
Returning from FIQ and IRQ handlers
After executing each instruction, the processor checks to see whether the interrupt pins are LOW and whether the interrupt disable bits in the CPSR are clear. As a result, IRQ or FIQ exceptions are generated only after the program counter has been updated. The processor stores (pc – 4) in lr_mode. This makes lr_mode point one instruction beyond the end of the instruction in which the exception occurred. When the handler has finished, execution must continue from the instruction prior to the one pointed to by lr_mode. The address to continue from is one word (four bytes) less than that in lr_mode, so the return instruction is:
SUBS pc, lr, #4
The handler entry and exit code to stack the return address and pop it on return is:
ARM DUI 0056D Copyright © 1999-2001 ARM Limited. All rights reserved. 5-7
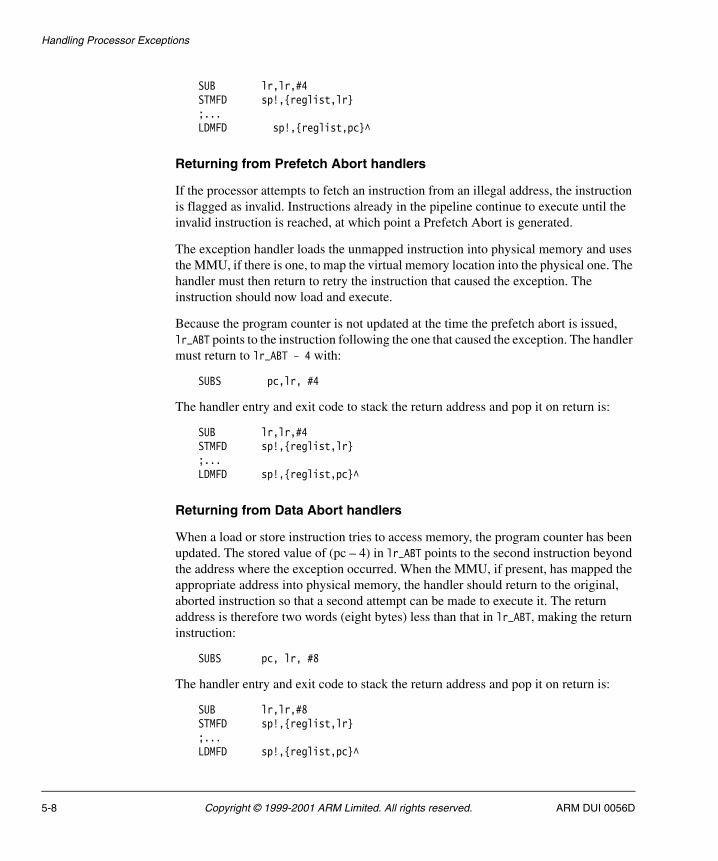
Handling Processor Exceptions
SUB lr,lr,#4 STMFD sp!,{reglist,lr} ;... LDMFD sp!,{reglist,pc}^
Returning from Prefetch Abort handlers
If the processor attempts to fetch an instruction from an illegal address, the instruction is flagged as invalid. Instructions already in the pipeline continue to execute until the invalid instruction is reached, at which point a Prefetch Abort is generated.
The exception handler loads the unmapped instruction into physical memory and uses the MMU, if there is one, to map the virtual memory location into the physical one. The handler must then return to retry the instruction that caused the exception. The instruction should now load and execute.
Because the program counter is not updated at the time the prefetch abort is issued, lr_ABT points to the instruction following the one that caused the exception. The handler must return to lr_ABT – 4 with:
SUBS pc,lr, #4
The handler entry and exit code to stack the return address and pop it on return is:
SUB lr,lr,#4 STMFD sp!,{reglist,lr} ;... LDMFD sp!,{reglist,pc}^
Returning from Data Abort handlers
When a load or store instruction tries to access memory, the program counter has been updated. The stored value of (pc – 4) in lr_ABT points to the second instruction beyond the address where the exception occurred. When the MMU, if present, has mapped the appropriate address into physical memory, the handler should return to the original, aborted instruction so that a second attempt can be made to execute it. The return address is therefore two words (eight bytes) less than that in lr_ABT, making the return instruction:
SUBS pc, lr, #8
The handler entry and exit code to stack the return address and pop it on return is:
SUB lr,lr,#8 STMFD sp!,{reglist,lr} ;... LDMFD sp!,{reglist,pc}^
5-8 Copyright © 1999-2001 ARM Limited. All rights reserved. ARM DUI 0056D

Handling Processor Exceptions
5.3 Installing an exception handler
Any new exception handler must be installed in the vector table. When installation is complete, the new handler executes whenever the corresponding exception occurs.
Exception handlers can be installed in two ways:
Branch instruction
This is the simplest way to reach the exception handler. Each entry in the vector table contains a branch to the required handler routine. However, this method does have a limitation. Because the branch instruction only has a range of 32MB relative to the pc, with some memory organizations the branch may be unable to reach the handler.
Load pc instruction
With this method, the program counter is forced directly to the handler address by:
1. Storing the absolute address of the handler in a suitable memory location (within 4KB of the vector address).
2. Placing an instruction in the vector that loads the program counter with the contents of the chosen memory location.
5.3.1 Installing the handlers at reset
If your application does not rely on the debugger or debug monitor to start program execution, you can load the vector table directly from your assembly language reset (or startup) code.
If your ROM is at location 0x0 in memory, you can simply have a branch statement for each vector at the start of your code. This could also include the FIQ handler if it is running directly from 0x1C (see Interrupt handlers on page 5-23).
Example 5-1 shows code that sets up the vectors if they are located in ROM at address zero. You can substitute branch statements for the loads.
Example 5-1
Vector_Init_Block LDR PC, Reset_Addr LDR PC, Undefined_Addr LDR PC, SWI_Addr LDR PC, Prefetch_Addr LDR PC, Abort_Addr NOP ;Reserved vector
ARM DUI 0056D Copyright © 1999-2001 ARM Limited. All rights reserved. 5-9

Handling Processor Exceptions
LDR PC, IRQ_Addr LDR PC, FIQ_AddrReset_Addr DCD Start_BootUndefined_Addr DCD Undefined_HandlerSWI_Addr DCD SWI_HandlerPrefetch_Addr DCD Prefetch_HandlerAbort_Addr DCD Abort_Handler DCD 0 ;Reserved vectorIRQ_Addr DCD IRQ_HandlerFIQ_Addr DCD FIQ_Handler
You must have ROM at location 0x0 on reset. Your reset code can remap RAM to location 0x0. Before doing this, it must copy the vectors (plus the FIQ handler if required) down from an area in ROM into the RAM.
In this case, you must use an LDR pc instruction to address the reset handler, so that the reset vector code can be position independent.
Example 5-2 copies down the vectors given in Example 5-1 on page 5-9 to the vector table in RAM.
Example 5-2
MOV r8, #0 ADR r9, Vector_Init_Block LDMIA r9!,{r0-r7} ;Copy the vectors (8 words) STMIA r8!,{r0-r7} LDMIA r9!,{r0-r7} ;Copy the DCD'ed addresses STMIA r8!,{r0-r7} ;(8 words again)
Alternatively, you can use the scatter-loading mechanism to define the load and execution address of the vector table. In that case, the C library copies the vector table for you (see Chapter 6 Writing Code for ROM).
5-10 Copyright © 1999-2001 ARM Limited. All rights reserved. ARM DUI 0056D

Handling Processor Exceptions
5.3.2 Installing the handlers from C
Sometimes during development work it is necessary to install exception handlers into the vectors directly from the main application. As a result, the required instruction encoding must be written to the appropriate vector address. This can be done for both the branch and the load pc method of reaching the handler.
Branch method
The required instruction can be constructed as follows:
1. Take the address of the exception handler.
2. Subtract the address of the corresponding vector.
3. Subtract 0x8 to allow for prefetching.
4. Shift the result to the right by two to give a word offset, rather than a byte offset.
5. Test that the top eight bits of this are clear, to ensure that the result is only 24 bits long (because the offset for the branch is limited to this).
6. Logically OR this with 0xEA000000 (the opcode for the Branch instruction) to produce the value to be placed in the vector.
Example 5-3 shows a C function that implements this algorithm. It takes the following arguments:
• the address of the handler
• the address of the vector in which the handler is to be to installed.
The function can install the handler and return the original contents of the vector. This result can be used to create a chain of handlers for a particular exception. See Chaining exception handlers on page 5-38 for further details.
Example 5-3
unsigned Install_Handler (unsigned *handlerloc, unsigned *vector)/* Updates contents of 'vector' to contain LDR pc,,[pc,#offset] *//* instruction to cause long branch to address in handlerloc *//* Function return value is original contents of 'vector'.*/{ unsigned vec, oldvec; vec = *handlerloc - (unsigned)vector - 0x8; if ((vec & 0xFFFFF000) != 0) { /* diagnose the fault */ exit (1);
ARM DUI 0056D Copyright © 1999-2001 ARM Limited. All rights reserved. 5-11

Handling Processor Exceptions
} vec = 0xE59FF000 | vec; oldvec = *vector; *vector = vec; return (oldvec);}
The following code calls this to install an IRQ handler:
unsigned *irqvec = (unsigned *)0x18;Install_Handler ((unsigned)IRQHandler, irqvec);
In this case, the returned, original contents of the IRQ vector are discarded.
Load pc method
The required instruction can be constructed as follows:
1. Take the address of the word containing the address of the exception handler.
2. Subtract the address of the corresponding vector.
3. Subtract 0x8 to allow for prefetching.
4. Check that the result can be represented in 12 bits.
5. Logically OR this with 0xe59FF000 (the opcode for LDR pc, [pc,#offset]) to produce the value to be placed in the vector.
6. Put the address of the handler into the storage location.
Example 5-4 shows a C routine that implements this method.
Example 5-4
unsigned Install_Handler (unsigned location, unsigned *vector)/* Updates contents of 'vector' to contain LDR pc, [pc, #offset] *//* instruction to cause long branch to address in `location'. *//* Function return value is original contents of 'vector'. */{ unsigned vec, oldvec; vec = ((unsigned)location - (unsigned)vector - 0x8) | 0xe59ff000 oldvec = *vector; *vector = vec; return (oldvec);}
5-12 Copyright © 1999-2001 ARM Limited. All rights reserved. ARM DUI 0056D

Handling Processor Exceptions
The following code calls this to install an IRQ handler:
unsigned *irqvec = (unsigned *)0x18;static unsigned pIRQ_Handler = (unsigned)IRQ_handlerInstall_Handler (&pIRQHandler, irqvec);
Again in this example the returned, original contents of the IRQ vector are discarded, but they could be used to create a chain of handlers. See Chaining exception handlers on page 5-38 for more information.
Note If you are using a processor with separate instruction and data caches, such as StrongARM®, or ARM940T, you must ensure that cache coherence problems do not prevent the new contents of the vectors from being used.
The data cache (or at least the entries containing the modified vectors) must be cleaned to ensure the new vector contents are written to main memory. You must then flush the instruction cache to ensure that the new vector contents are read from main memory.
For details of cache clean and flush operations, see the technical reference manual for your target processor.
ARM DUI 0056D Copyright © 1999-2001 ARM Limited. All rights reserved. 5-13

Handling Processor Exceptions
5.4 SWI handlers
When the SWI handler is entered, it must establish which SWI is being called. This information can be stored in bits 0-23 of the instruction itself, as shown in Figure 5-1, or passed in an integer register, usually one of r0-r3.
Figure 5-1 ARM SWI instruction
The top-level SWI handler can load the SWI instruction relative to the link register (LDR swi, [lr, #-4]). Do this in assembly language, or C/C++ inline assembler.
The handler must first load the SWI instruction that caused the exception into a register. At this point, lr_SVC holds the address of the instruction that follows the SWI instruction, so the SWI is loaded into the register (in this case r0) using:
LDR r0, [lr,#-4]
The handler can then examine the comment field bits, to determine the required operation. The SWI number is extracted by clearing the top eight bits of the opcode:
BIC r0, r0, #0xFF000000
Example 5-5 shows how you can put these instructions together to form a top-level SWI handler.
See Determining the processor state on page 5-43 for an example of a handler that deals with both ARM-state and Thumb-state SWI instructions.
Example 5-5
AREA TopLevelSwi, CODE, READONLY ; Name this block of code. EXPORT SWI_HandlerSWI_Handler STMFD sp!,{r0-r12,lr} ; Store registers. LDR r0,[lr,#-4] ; Calculate address of SWI instruction and load it into r0. BIC r0,r0,#0xff000000 ; Mask off top 8 bits of instruction to give SWI number. ; ; Use value in r0 to determine which SWI routine to execute. ; LDMFD sp!, {r0-r12,pc}^ ; Restore registers and return. END ; Mark end of this file.
�� �� �� �� �� �� �� �
���� ��!���!� ����� � � �
�� �������
5-14 Copyright © 1999-2001 ARM Limited. All rights reserved. ARM DUI 0056D

Handling Processor Exceptions
5.4.1 SWI handlers in assembly language
The easiest way to call the handler for the requested SWI number is to use a jump table. If r0 contains the SWI number, the code in Example 5-6 can be inserted into the top-level handler given in Example 5-5 on page 5-14, following on from the BIC instruction.
Example 5-6 SWI jump table
CMP r0,#MaxSWI ; Range check LDRLS pc, [pc,r0,LSL #2] B SWIOutOfRangeSWIJumpTable DCD SWInum0 DCD SWInum1 ; DCD for each of other SWI routinesSWInum0 ; SWI number 0 code B EndofSWISWInum1 ; SWI number 1 code B EndofSWI ; Rest of SWI handling code ;EndofSWI ; Return execution to top level ; SWI handler so as to restore ; registers and return to program.
5.4.2 SWI handlers in C and assembly language
Although the top-level handler must always be written in ARM assembly language, the routines that handle each SWI can be written in either assembly language or in C. See Using SWIs in Supervisor mode on page 5-18 for a description of restrictions.
The top-level handler uses a BL (Branch with Link) instruction to jump to the appropriate C function. Because the SWI number is loaded into r0 by the assembly routine, this is passed to the C function as the first parameter (in accordance with the ARM Procedure Call Standard). The function can use this value in, for example, a switch() statement.
You can add the following line to the SWI_Handler routine in Example 5-5 on page 5-14:
BL C_SWI_Handler ; Call C routine to handle the SWI
Example 5-7 on page 5-16 shows how the C function can be implemented.
ARM DUI 0056D Copyright © 1999-2001 ARM Limited. All rights reserved. 5-15
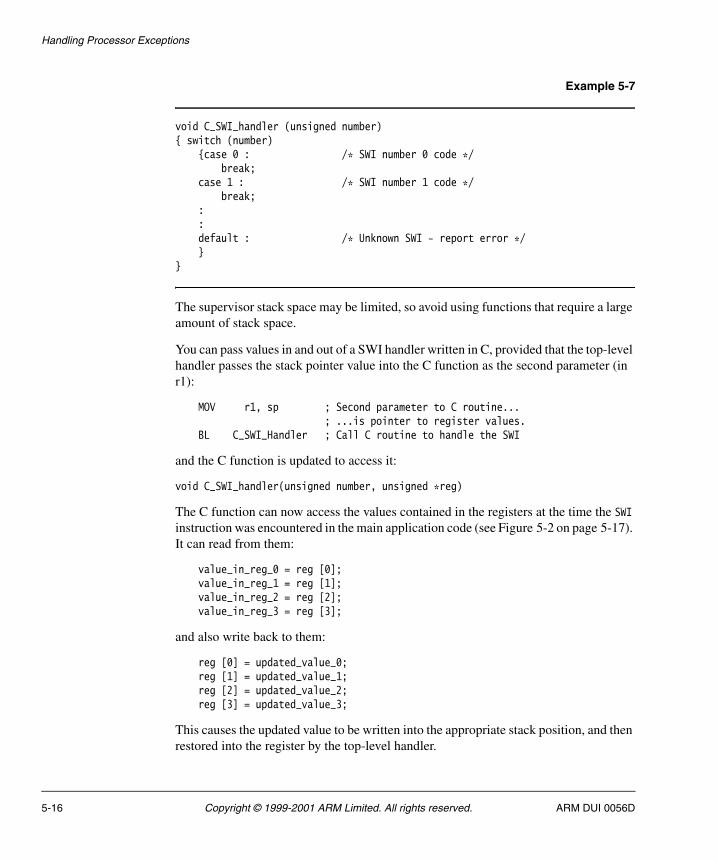
Handling Processor Exceptions
Example 5-7
void C_SWI_handler (unsigned number){ switch (number) {case 0 : /* SWI number 0 code */ break; case 1 : /* SWI number 1 code */ break; : : default : /* Unknown SWI - report error */ }}
The supervisor stack space may be limited, so avoid using functions that require a large amount of stack space.
You can pass values in and out of a SWI handler written in C, provided that the top-level handler passes the stack pointer value into the C function as the second parameter (in r1):
MOV r1, sp ; Second parameter to C routine... ; ...is pointer to register values. BL C_SWI_Handler ; Call C routine to handle the SWI
and the C function is updated to access it:
void C_SWI_handler(unsigned number, unsigned *reg)
The C function can now access the values contained in the registers at the time the SWI instruction was encountered in the main application code (see Figure 5-2 on page 5-17). It can read from them:
value_in_reg_0 = reg [0]; value_in_reg_1 = reg [1]; value_in_reg_2 = reg [2]; value_in_reg_3 = reg [3];
and also write back to them:
reg [0] = updated_value_0; reg [1] = updated_value_1; reg [2] = updated_value_2; reg [3] = updated_value_3;
This causes the updated value to be written into the appropriate stack position, and then restored into the register by the top-level handler.
5-16 Copyright © 1999-2001 ARM Limited. All rights reserved. ARM DUI 0056D

Handling Processor Exceptions
Figure 5-2 Accessing the supervisor stack
������
��
�
�
��
�� ������������
������������
������
ARM DUI 0056D Copyright © 1999-2001 ARM Limited. All rights reserved. 5-17

Handling Processor Exceptions
5.4.3 Using SWIs in Supervisor mode
When a SWI instruction is executed:
1. The processor enters Supervisor mode.
2. The CPSR is stored into spsr_SVC.
3. The return address is stored in lr_SVC (see The processor response to an exception on page 5-5).
If the processor is already in Supervisor mode, lr_SVC and spsr_SVC are corrupted.
If you call a SWI while in Supervisor mode you must store lr_SVC and spsr_SVC to ensure that the original values of the link register and the SPSR are not lost. For example, if the handler routine for a particular SWI number calls another SWI, you must ensure that the handler routine stores both lr_SVC and spsr_SVC on the stack. This ensures that each invocation of the handler saves the information needed to return to the instruction following the SWI that invoked it. Example 5-8 shows how to do this.
Example 5-8 SWI Handler
STMFD sp!,{r0-r3,r12,lr} ; Store registers. MOV r1, sp ; Set pointer to parameters. MRS r0, spsr ; Get spsr. STMFD sp!, {r0} ; Store spsr onto stack. This is only really needed in case of ; nested SWIs. ; the next two instructions only work for SWI calls from ARM state. ; See Example 5-17 on page 5-30 for a version that works for calls from either ARM or Thumb. LDR r0,[lr,#-4] ; Calculate address of SWI instruction and load it into r0. BIC r0,r0,#0xFF000000 ; Mask off top 8 bits of instruction to give SWI number. ; r0 now contains SWI number ; r1 now contains pointer to stacked registers BL C_SWI_Handler ; Call C routine to handle the SWI. LDMFD sp!, {r0} ; Get spsr from stack. MSR spsr_cf, r0 ; Restore spsr. LDMFD sp!, {r0-r3,r12,pc}^ ; Restore registers and return.
Nested SWIs in C and C++
You can write nested SWIs in C or C++. Code generated by the ARM compilers stores and reloads lr_SVC as necessary.
5-18 Copyright © 1999-2001 ARM Limited. All rights reserved. ARM DUI 0056D

Handling Processor Exceptions
5.4.4 Calling SWIs from an application
You can call a SWI from assembly language or C/C++.
In assembly language, set up any required register values and issue the relevant SWI. For example:
MOV r0, #65 ; load r0 with the value 65 SWI 0x0 ; Call SWI 0x0 with parameter value in r0
The SWI instruction can be conditionally executed, as can almost all ARM instructions.
From C/C++, declare the SWI as an __SWI function, and call it. For example:
__swi(0) void my_swi(int); . . . my_swi(65);
This allows a SWI to compiled inline, without additional calling overhead, provided that:
• any arguments are passed in r0-r3 only
• any results are returned in r0-r3 only.
The parameters are passed to the SWI as if the SWI were a real function call. However, if there are between two and four return values, you must tell the compiler that the return values are being returned in a structure, and use the __value_in_regs directive. This is because a struct-valued function is usually treated as if it were a void function whose first argument is the address where the result structure should be placed.
Example 5-9 and Example 5-10 on page 5-20 show a SWI handler that provides SWI numbers 0x0, 0x1, 0x2 and 0x3. SWIs 0x0 and 0x1 each take two integer parameters and return a single result. SWI 0x2 takes four parameters and returns a single result. SWI 0x3 takes four parameters and returns four results. This example is in Examples\SWI\main.c. and Examples\SWI\swi.h.
Example 5-9 main.c
#include <stdio.h>#include "swi.h"unsigned *swi_vec = (unsigned *)0x08;extern void SWI_Handler(void);int main( void ){ int result1, result2; struct four_results res_3;
ARM DUI 0056D Copyright © 1999-2001 ARM Limited. All rights reserved. 5-19

Handling Processor Exceptions
Install_Handler( (unsigned) SWI_Handler, swi_vec ); printf("result1 = multiply_two(2,4) = %d\n", result1 = multiply_two(2,4)); printf("result2 = multiply_two(3,6) = %d\n", result2 = multiply_two(3,6)); printf("add_two( result1, result2 ) = %d\n", add_two( result1, result2 )); printf("add_multiply_two(2,4,3,6) = %d\n", add_multiply_two(2,4,3,6)); res_3 = many_operations( 12, 4, 3, 1 ); printf("res_3.a = %d\n", res_3.a ); printf("res_3.b = %d\n", res_3.b ); printf("res_3.c = %d\n", res_3.c ); printf("res_3.d = %d\n", res_3.d ); return 0;}
Example 5-10 swi.h
__swi(0) int multiply_two(int, int);__swi(1) int add_two(int, int);__swi(2) int add_multiply_two(int, int, int, int);struct four_results{ int a; int b; int c; int d;};__swi(3) __value_in_regs struct four_results many_operations(int, int, int, int);
5.4.5 Calling SWIs dynamically from an application
In some circumstances it can be necessary to call a SWI whose number is not known until runtime. This situation can occur, for example, when there are a number of related operations that can be performed on an object, and each operation has its own SWI. In such a case, the methods described above are not appropriate.
There are several ways of dealing with this, for example, you can:
• Construct the SWI instruction from the SWI number, store it somewhere, then execute it.
• Use a generic SWI that takes, as an extra argument, a code for the actual operation to be performed on its arguments. The generic SWI decodes the operation and performs it.
5-20 Copyright © 1999-2001 ARM Limited. All rights reserved. ARM DUI 0056D

Handling Processor Exceptions
The second mechanism can be implemented in assembly language by passing the required operation number in a register, typically r0 or r12. You can then rewrite the SWI handler to act on the value in the appropriate register. Because some value has to be passed to the SWI in the comment field, it would be possible for a combination of these two methods to be used.
For example, an operating system might make use of only a single SWI instruction and employ a register to pass the number of the required operation. This leaves the rest of the SWI space available for application-specific SWIs. You can use this method if the overhead of extracting the SWI number from the instruction is too great in a particular application. This is how the ARM (0x123456) and Thumb (0xAB) semihosted SWIs are implemented.
Example 5-11 shows how __swi can be used to map a C function call onto a semihosting SWI. It is derived from Examples\embedded\embed\retarget.c.
Example 5-11 Mapping a C function onto a semihosting SWI
#ifdef __thumb/* Thumb Semihosting SWI */#define SemiSWI 0xAB#else/* ARM Semihosting SWI */#define SemiSWI 0x123456#endif/* Semihosting SWI to write a character */ __swi(SemiSWI) void Semihosting(unsigned op, char *c);#define WriteC(c) Semihosting (0x3,c)void write_a_character(int ch){
char tempch = ch; WriteC( &tempch );
}
A mechanism is included in the compiler to support the use of r12 to pass the value of the required operation. Under the ARM Procedure Call Standard, r12 is the ip register and has a dedicated role only during function call. At other times, you can use it as a scratch register. The arguments to the generic SWI are passed in registers r0-r3 and values are optionally returned in r0-r3 as described earlier. The operation number passed in r12 could be, but need not be, the number of the SWI to be called by the generic SWI.
Example 5-12 on page 5-22 shows a C fragment that uses a generic, or indirect SWI.
ARM DUI 0056D Copyright © 1999-2001 ARM Limited. All rights reserved. 5-21

Handling Processor Exceptions
Example 5-12
__swi_indirect(0x80) unsigned SWI_ManipulateObject(unsigned operationNumber, unsigned object,unsigned parameter);unsigned DoSelectedManipulation(unsigned object, unsigned parameter, unsigned operation){ return SWI_ManipulateObject(operation, object, parameter);}
This produces the following code:
DoSelectedManipulation PROC STMFD sp!,{r3,lr} MOV r12,r2 SWI 0x80 LDMFD sp!,{r3,pc} ENDP
It is also possible to pass the SWI number in r0 from C using the __swi mechanism. For example, if SWI 0x0 is used as the generic SWI and operation 0 is a character read and operation 1 a character write, you can set up the following:
__swi (0) char __ReadCharacter (unsigned op);__swi (0) void __WriteCharacter (unsigned op, char c);
These can be used in a more reader-friendly fashion by defining the following:
#define ReadCharacter () __ReadCharacter (0);#define WriteCharacter (c) __WriteCharacter (1, c);
However, if you use r0 in this way, only three registers are available for passing parameters to the SWI. Usually, if you need to pass more parameters to a subroutine in addition to r0-r3, you can do this using the stack. However, stacked parameters are not easily accessible to a SWI handler, because they typically exist on the User mode stack rather than the supervisor stack employed by the SWI handler.
Alternatively, one of the registers (typically r1) can be used to point to a block of memory storing the other parameters.
5-22 Copyright © 1999-2001 ARM Limited. All rights reserved. ARM DUI 0056D
Handling Processor Exceptions
5.5 Interrupt handlers
The ARM processor has two levels of external interrupt, FIQ and IRQ, both of which are level-sensitive active LOW signals into the core. For an interrupt to be taken, the appropriate disable bit in the CPSR must be clear.
FIQs have higher priority than IRQs in two ways:
• FIQs are serviced first when multiple interrupts occur.
• Servicing a FIQ causes IRQs to be disabled, preventing them from being serviced until after the FIQ handler has re-enabled them. This is usually done by restoring the CPSR from the SPSR at the end of the handler.
The FIQ vector is the last entry in the vector table (at address 0x1C) so that the FIQ handler can be placed directly at the vector location and run sequentially from that address. This removes the need for a branch and its associated delays, and also means that if the system has a cache, the vector table and FIQ handler may all be locked down in one block within it. This is important because FIQs are designed to service interrupts as quickly as possible. The five extra FIQ mode banked registers enable status to be held between calls to the handler, again increasing execution speed.
Note An interrupt handler must contain code to clear the source of the interrupt.
ARM DUI 0056D Copyright © 1999-2001 ARM Limited. All rights reserved. 5-23

Handling Processor Exceptions
5.5.1 Simple interrupt handlers in C
You can write simple C interrupt handlers by using the __irq function declaration keyword. You can use the __irq keyword both for simple one-level interrupt handlers, and interrupt handlers that call subroutines. However, you cannot use the __irq keyword for reentrant interrupt handlers, because it does not cause the SPSR to be saved or restored. In this context, reentrant means that the handler re-enables interrupts, and may itself be interrupted. See Reentrant interrupt handlers on page 5-26 for more information.
The __irq keyword:
• preserves all ATPCS corruptible registers
• preserves all other registers (excluding the floating-point registers) used by the function
• exits the function by setting the program counter to (lr – 4) and restoring the CPSR to its original value.
If the function calls a subroutine, __irq preserves the link register for the interrupt mode in addition to preserving the other corruptible registers. See Calling subroutines from interrupt handlers for more information.
Note C interrupt handlers cannot be produced in this way using tcc. The __irq keyword is faulted by tcc because tcc can only produce Thumb code, and the processor is always switched to ARM state when an interrupt, or any other exception, occurs.
However, the subroutine called by an __irq function can be compiled for Thumb, with interworking enabled. See Chapter 3 Interworking ARM and Thumb for more information on interworking.
Calling subroutines from interrupt handlers
If you call subroutines from your top-level interrupt handler, the __irq keyword also restores the value of lr_IRQ from the stack so that it can be used by a SUBS instruction to return to the correct address after the interrupt has been handled.
Example 5-13 on page 5-25 shows how this works. The top level interrupt handler reads the value of a memory-mapped interrupt controller base address at 0x80000000. If the value of the address is 1, the top-level handler branches to a handler written in C.
5-24 Copyright © 1999-2001 ARM Limited. All rights reserved. ARM DUI 0056D

Handling Processor Exceptions
Example 5-13
__irq void IRQHandler (void){ volatile unsigned int *base = (unsigned int *) 0x80000000; if (*base == 1) // which interrupt was it? { C_int_handler(); // process the interrupt } *(base+1) = 0; // clear the interrupt}
Compiled with armcc, Example 5-13 produces the following code:
IRQHandler PROC STMFD sp!,{r0-r4,r12,lr} MOV r4,#0x80000000 LDR r0,[r4,#0] SUB sp,sp,#4 CMP r0,#1 BLEQ C_int_handler MOV r0,#0 STR r0,[r4,#4] ADD sp,sp,#4 LDMFD sp!,{r0-r4,r12,lr} SUBS pc,lr,#4 ENDP
Compare this with the result when the __irq keyword is not used:
IRQHandler PROC STMFD sp!,{r4,lr} MOV r4,#0x80000000 LDR r0,[r4,#0] CMP r0,#1 BLEQ C_int_handler MOV r0,#0 STR r0,[r4,#4] LDMFD sp!,{r4,pc} ENDP
ARM DUI 0056D Copyright © 1999-2001 ARM Limited. All rights reserved. 5-25
Handling Processor Exceptions
5.5.2 Reentrant interrupt handlers
Note The following method works for both IRQ and FIQ interrupts. However, because FIQ interrupts are meant to be serviced as quickly as possible there will normally be only one interrupt source, so it may not be necessary to allow for reentrancy.
If an interrupt handler re-enables interrupts, then calls a subroutine, and another interrupt occurs, the return address of the subroutine (stored in lr_IRQ) is corrupted when the second IRQ is taken. Using the __irq keyword in C does not cause the SPSR to be saved and restored, as required by reentrant interrupt handlers, so you must write your top level interrupt handler in assembly language.
A reentrant interrupt handler must save the IRQ state, switch processor modes, and save the state for the new processor mode before branching to a nested subroutine or C function.
In ARM architecture v4 or later you can switch to System mode. System mode uses the User mode registers, and allows privileged access that may be required by your exception handler. See System mode on page 5-45 for more information. In ARM architectures prior to ARM architecture v4 you must switch to Supervisor mode instead.
The steps needed to safely re-enable interrupts in an IRQ handler are:
1. Construct return address and save on the IRQ stack.
2. Save the work registers and spsr_IRQ.
3. Clear the source of the interrupt.
4. Switch to System mode and re-enable interrupts.
5. Save User mode link register and non callee-saved registers.
6. Call the C interrupt handler function.
7. When the C interrupt handler returns, restore User mode registers and disable interrupts.
8. Switch to IRQ mode, disabling interrupts.
9. Restore work registers and spsr_IRQ.
10. Return from the IRQ.
Example 5-14 on page 5-27 shows how this works for System mode. Registers r12 and r14 are used as temporary work registers after lr_IRQ is pushed on the stack.
5-26 Copyright © 1999-2001 ARM Limited. All rights reserved. ARM DUI 0056D

Handling Processor Exceptions
Example 5-14
AREA INTERRUPT, CODE, READONLY IMPORT C_irq_handlerIRQ SUB lr, lr, #4 ; construct the return address STMFD sp!, {lr} ; and push the adjusted lr_IRQ MRS r14, SPSR ; copy spsr_IRQ to r14 STMFD sp!, {r12, r14} ; save work regs and spsr_IRQ ; Add instructions to clear the interrupt here ; then re-enable interrupts. MSR CPSR_c, #0x1F ; switch to SYS mode, FIQ and IRQ ; enabled. USR mode registers ; are now current. STMFD sp!, {r0-r3, lr} ; save lr_USR and non-callee ; saved registers BL C_irq_handler ; branch to C IRQ handler. LDMFD sp!, {r0-r3, lr} ; restore registers MSR CPSR_c, #0x92 ; switch to IRQ mode and disable ; IRQs. FIQ is still enabled. LDMFD sp!, {r12, r14} ; restore work regs and spsr_IRQ MSR SPSR_cf, r14 LDMFD sp!, {pc}^ ; return from IRQ. END
ARM DUI 0056D Copyright © 1999-2001 ARM Limited. All rights reserved. 5-27

Handling Processor Exceptions
5.5.3 Example interrupt handlers in assembly language
Interrupt handlers are often written in assembly language to ensure that they execute quickly. The following sections give some examples:
• Single-channel DMA transfer
• Dual-channel DMA transfer on page 5-29
• Interrupt prioritization on page 5-30
• Context switch on page 5-31.
Single-channel DMA transfer
Example 5-15 shows an interrupt handler that performs interrupt driven I/O to memory transfers (soft DMA). The code is an FIQ handler. It uses the banked FIQ registers to maintain state between interrupts. This code is best situated at location 0x1C.
In the example code:
r8 Points to the base address of the I/O device that data is read from.
IOData Is the offset from the base address to the 32-bit data register that is read. Reading this register clears the interrupt.
r9 Points to the memory location to where that data is being transferred.
r10 Points to the last address to transfer to.
The entire sequence for handling a normal transfer is four instructions. Code situated after the conditional return is used to signal that the transfer is complete.
Example 5-15
LDR r11, [r8, #IOData] ; Load port data from the IO ; device. STR r11, [r9], #4 ; Store it to memory: update ; the pointer. CMP r9, r10 ; Reached the end ? SUBLSS pc, lr, #4 ; No, so return. ; Insert transfer complete ; code here.
Byte transfers can be made by replacing the load instructions with load byte instructions. Transfers from memory to an I/O device are made by swapping the addressing modes between the load instruction and the store instruction.
5-28 Copyright © 1999-2001 ARM Limited. All rights reserved. ARM DUI 0056D

Handling Processor Exceptions
Dual-channel DMA transfer
Example 5-16 is similar to Example 5-15 on page 5-28, except that there are two channels being handled. The code is an FIQ handler. It uses the banked FIQ registers to maintain state between interrupts. It is best situated at location 0x1c.
In the example code:
r8 Points to the base address of the I/O device from which data is read.
IOStat Is the offset from the base address to a register indicating which of two ports caused the interrupt.
IOPort1Active Is a bit mask indicating if the first port caused the interrupt (otherwise it is assumed that the second port caused the interrupt).
IOPort1, IOPort2 Are offsets to the two data registers to be read. Reading a data register clears the interrupt for the corresponding port.
r9 Points to the memory location to which data from the first port is being transferred.
r10 Points to the memory location to which data from the second port is being transferred.
r11, r12 Point to the last address to transfer to (r11 for the first port, r12 for the second).
The entire sequence to handle a normal transfer takes nine instructions. Code situated after the conditional return is used to signal that the transfer is complete.
Example 5-16
LDR r13, [r8, #IOStat] ; Load status register to find which port ; caused the interrupt. TST r13, #IOPort1Active LDREQ r13, [r8, #IOPort1] ; Load port 1 data. LDRNE r13, [r8, #IOPort2] ; Load port 2 data. STREQ r13, [r9], #4 ; Store to buffer 1. STRNE r13, [r10], #4 ; Store to buffer 2. CMP r9, r11 ; Reached the end? CMPLE r10, r12 ; On either channel? SUBNES pc, lr, #4 ; Return ; Insert transfer complete code here.
ARM DUI 0056D Copyright © 1999-2001 ARM Limited. All rights reserved. 5-29

Handling Processor Exceptions
Byte transfers can be made by replacing the load instructions with load byte instructions. Transfers from memory to an I/O device are made by swapping the addressing modes between the conditional load instructions and the conditional store instructions.
Interrupt prioritization
Example 5-17 dispatches up to 32 interrupt sources to their appropriate handler routines. Because it is designed for use with the normal interrupt vector (IRQ), it should be branched to from location 0x18.
External hardware is used to prioritize the interrupt and present the high-priority active interrupt in an I/O register.
In the example code:
IntBase Holds the base address of the interrupt controller.
IntLevel Holds the offset of the register containing the highest-priority active interrupt.
r13 Is assumed to point to a small full descending stack.
Interrupts are enabled after ten instructions, including the branch to this code.
The specific handler for each interrupt is entered after a further two instructions (with all registers preserved on the stack).
In addition, the last three instructions of each handler are executed with interrupts turned off again, so that the SPSR can be safely recovered from the stack.
Note Application Note 30: Software Prioritization of Interrupts describes multiple-source prioritization of interrupts using software, as opposed to using hardware as described here.
Example 5-17
; first save the critical state SUB lr, lr, #4 ; Adjust the return address ; before we save it. STMFD sp!, {lr} ; Stack return address MRS r14, SPSR ; get the SPSR ... STMFD sp!, {r12, r14} ; ... and stack that plus a ; working register too.
5-30 Copyright © 1999-2001 ARM Limited. All rights reserved. ARM DUI 0056D

Handling Processor Exceptions
; Now get the priority level of the ; highest priority active interrupt. MOV r12, #IntBase ; Get the interrupt controller's ; base address. LDR r12, [r12, #IntLevel] ; Get the interrupt level (0 to 31). ; Now read-modify-write the CPSR to enable interrupts. MRS r14, CPSR ; Read the status register. BIC r14, r14, #0x80 ; Clear the I bit ; (use 0x40 for the F bit). MSR CPSR_c, r14 ; Write it back to re-enable ; interrupts and LDR PC, [PC, r12, LSL #2] ; jump to the correct handler. ; PC base address points to this ; instruction + 8 NOP ; pad so the PC indexes this table. ; Table of handler start addresses DCD Priority0Handler DCD Priority1Handler DCD Priority2Handler; ... Priority0Handler STMFD sp!, {r0 - r11} ; Save other working registers. ; Insert handler code here.; ... LDMFD sp!, {r0 - r11} ; Restore working registers (not r12). ; Now read-modify-write the CPSR to disable interrupts. MRS r12, CPSR ; Read the status register. ORR r12, r12, #0x80 ; Set the I bit ; (use 0x40 for the F bit). MSR CPSR_c, r12 ; Write it back to disable interrupts. ; Now that interrupt disabled, can safely restore SPSR then return. LDMFD sp!, {r12, r14} ; Restore r12 and get SPSR. MSR SPSR_csxf, r14 ; Restore status register from r14. LDMFD sp!, {pc}^ ; Return from handler.Priority1Handler; ...
Context switch
Example 5-18 on page 5-32 performs a context switch on the User mode process. The code is based around a list of pointers to Process Control Blocks (PCBs) of processes that are ready to run.
Figure 5-3 on page 5-32 shows the layout of the PCBs that the example expects.
ARM DUI 0056D Copyright © 1999-2001 ARM Limited. All rights reserved. 5-31

Handling Processor Exceptions
Figure 5-3 PCB layout
The pointer to the PCB of the next process to run is pointed to by r12, and the end of the list has a zero pointer. Register r13 is a pointer to the PCB, and is preserved between time slices, so that on entry it points to the PCB of the currently running process.
Example 5-18
STMIA r13, {r0 - r14}^ ; Dump user registers above r13. MRS r0, SPSR ; Pick up the user status STMDB r13, {r0, lr} ; and dump with return address below. LDR r13, [r12], #4 ; Load next process info pointer. CMP r13, #0 ; If it is zero, it is invalid LDMNEDB r13, {r0, lr} ; Pick up status and return address. MSRNE SPSR_cxsf, r0 ; Restore the status. LDMNEIA r13, {r0 - r14}^ ; Get the rest of the registers NOP SUBNES pc, lr, #4 ; and return and restore CPSR. ; Insert "no next process code" here.
������������������
� �
����������
�����������
� ������������ ���
5-32 Copyright © 1999-2001 ARM Limited. All rights reserved. ARM DUI 0056D

Handling Processor Exceptions
5.6 Reset handlers
The operations carried out by the Reset handler depend on the system for which the software is being developed. For example, it may:
• Set up exception vectors. See Installing an exception handler on page 5-9 for details.
• Initialize stacks and registers.
• Initialize the memory system, if using an MMU.
• Initialize any critical I/O devices.
• Enable interrupts.
• Change processor mode and/or state.
• Initialize variables required by C and call the main application.
See Chapter 6 Writing Code for ROM for more information.
ARM DUI 0056D Copyright © 1999-2001 ARM Limited. All rights reserved. 5-33

Handling Processor Exceptions
5.7 Undefined Instruction handlers
Instructions that are not recognized by the processor are offered to any coprocessors attached to the system. If the instruction remains unrecognized, an Undefined Instruction exception is generated. It could be the case that the instruction is intended for a coprocessor, but that the relevant coprocessor, for example a Floating Point Accelerator, is not attached to the system. However, a software emulator for such a coprocessor might be available.
Such an emulator must:
1. Attach itself to the Undefined Instruction vector and store the old contents.
2. Examine the undefined instruction to see if it should be emulated. This is similar to the way in which a SWI handler extracts the number of a SWI, but rather than extracting the bottom 24 bits, the emulator must extract bits 27-24.
These bits determine whether the instruction is a coprocessor operation in the following way:
• If bits 27 to 24 = b1110 or b110x, the instruction is a coprocessor instruction.
• If bits 8-11 show that this coprocessor emulator should handle the instruction, the emulator must process the instruction and return to the user program.
3. Otherwise the emulator must pass the exception onto the original handler (or the next emulator in the chain) using the vector stored when the emulator was installed.
When a chain of emulators is exhausted, no further processing of the instruction can take place, so the Undefined Instruction handler should report an error and quit. See Chaining exception handlers on page 5-38 for more information.
Note The Thumb instruction set does not have coprocessor instructions, so there should be no need for the Undefined Instruction handler to emulate such instructions.
5-34 Copyright © 1999-2001 ARM Limited. All rights reserved. ARM DUI 0056D

Handling Processor Exceptions
5.8 Prefetch Abort handler
If the system has no MMU, the Prefetch Abort handler can simply report the error and quit. Otherwise the address that caused the abort must be restored into physical memory. lr_ABT points to the instruction at the address following the one that caused the abort, so the address to be restored is at lr_ABT - 4. The virtual memory fault for that address can be dealt with and the instruction fetch retried. The handler should therefore return to the same instruction rather than the following one, for example:
SUBS pc,lr,#4
ARM DUI 0056D Copyright © 1999-2001 ARM Limited. All rights reserved. 5-35
Handling Processor Exceptions
5.9 Data Abort handler
If there is no MMU, the Data Abort handler should simply report the error and quit. If there is an MMU, the handler should deal with the virtual memory fault.
The instruction that caused the abort is at lr_ABT - 8 because lr_ABT points two instructions beyond the instruction that caused the abort.
Three types of instruction can cause this abort:
Single Register Load or Store (LDR or STR)
The response depends on the processor type:
• If the abort takes place on an ARM6-based processor:
— If the processor is in early abort mode and writeback was requested, the address register will not have been updated.
— If the processor is in late abort mode and writeback was requested, the address register will have been updated. The change must be undone.
• If the abort takes place on an ARM7-based processor, including the ARM7TDMI, the address register will have been updated and the change must be undone.
• If the abort takes place on an ARM9™, ARM10™, or StrongARM-based processor, the address is restored by the processor to the value it had before the instruction started. No further action is required to undo the change.
Swap (SWP) There is no address register update involved with this instruction.
Load Multiple or Store Multiple (LDM or STM)
The response depends on the processor type:
• If the abort takes place on an ARM6-based processor or ARM7-based processor, and writeback is enabled, the base register will have been updated as if the whole transfer had taken place.
In the case of an LDM with the base register in the register list, the processor replaces the overwritten value with the modified base value so that recovery is possible. The original base address can then be recalculated using the number of registers involved.
• If the abort takes place on an ARM9, ARM10, or StrongARM-based processor and writeback is enabled, the base register will be restored to the value it had before the instruction started.
5-36 Copyright © 1999-2001 ARM Limited. All rights reserved. ARM DUI 0056D

Handling Processor Exceptions
In each of the three cases the MMU can load the required virtual memory into physical memory. The MMU Fault Address Register (FAR) contains the address that caused the abort. When this is done, the handler can return and try to execute the instruction again.
You can find example Data Abort handler code in install_directory/examples/databort.
ARM DUI 0056D Copyright © 1999-2001 ARM Limited. All rights reserved. 5-37

Handling Processor Exceptions
5.10 Chaining exception handlers
In some situations there can be several different sources of a particular exception. For example:
• Angel uses an Undefined Instruction to implement breakpoints. However, Undefined Instruction exceptions also occur when a coprocessor instruction is executed, and no coprocessor is present.
• Angel uses a SWI for various purposes, such as entering Supervisor mode from User mode, and supporting semihosting requests during development. However, an RTOS or an application might also implement some SWIs.
In such situations there are two approaches that can be taken to extend the exception handling code:
• A single extended handler
• Several chained handlers.
5.10.1 A single extended handler
In some circumstances it is possible to extend the code in the exception handler to work out what the source of the exception was, and then directly call the appropriate code. In this case, you are modifying the source code for the exception handler.
Angel has been written to make this approach simple. Angel decodes SWIs and Undefined Instructions, and the Angel exception handlers can be extended to deal with non-Angel SWIs and Undefined Instructions.
However, this approach is only useful if all the sources of an exception are known when the single exception handler is written.
5.10.2 Several chained handlers
Some circumstances require more than a single handler. Consider the situation in which a standard Angel debugger is executing, and a standalone user application (or RTOS) which wants to support some additional SWIs is then downloaded. The newly loaded application may well have its own entirely independent exception handler that it wants to install, but which cannot simply replace the Angel handler.
In this case the address of the old handler must be noted so that the new handler is able to call the old handler if it discovers that the source of the exception is not a source it can deal with. For example, an RTOS SWI handler would call the Angel SWI handler on discovering that the SWI was not an RTOS SWI, so that the Angel SWI handler gets a chance to process it.
5-38 Copyright © 1999-2001 ARM Limited. All rights reserved. ARM DUI 0056D

Handling Processor Exceptions
This approach can be extended to any number of levels to build a chain of handlers. Although code that takes this approach allows each handler to be entirely independent, it is less efficient than code that uses a single handler, or at least it becomes less efficient the further down the chain of handlers it has to go.
Both routines given in Installing the handlers from C on page 5-11 return the old contents of the vector. This value can be decoded to give:
The offset for a branch instruction
This can be used to calculate the location of the original handler and allow a new branch instruction to be constructed and stored at a suitable place in memory. If the replacement handler fails to handle the exception, it can branch to the constructed branch instruction, which in turn will branch to the original handler.
The location used to store the address of the original handler
If the application handler failed to handle the exception, it would then need to load the program counter from that location.
In most cases, such calculations are not necessary because information on the debug monitor or RTOS handlers is available to you. If so, the instructions required to chain in the next handler can be hard-coded into the application. The last section of the handler must check that the cause of the exception has been handled. If it has, the handler can return to the application. If not, it must call the next handler in the chain.
Note When chaining in a handler before a debug monitor handler, you must remove the chain when the monitor is removed from the system, then directly install the application handler.
ARM DUI 0056D Copyright © 1999-2001 ARM Limited. All rights reserved. 5-39
Handling Processor Exceptions
5.11 Handling exceptions on Thumb-capable processors
This section describes the additional considerations you must take into account when writing exception handlers suitable for use on Thumb-capable processors.
Thumb-capable processors use the same basic exception handling mechanism as processors that are not Thumb-capable. An exception causes the next instruction to be fetched from the appropriate vector table entry.
Note This section applies only to Thumb-capable ARM processors.
The same vector table is used for both Thumb-state and ARM-state exceptions. An initial step that switches to ARM state is added to the exception handling procedure described in The processor response to an exception on page 5-5.
5.11.1 Thumb processor response to an exception
When an exception is generated, the processor takes the following actions:
1. Copies cpsr into spsr_mode.
2. Switches to ARM state.
3. Sets the CPSR mode bits.
4. Stores the return address in lr_mode. See The return address on page 5-42 for further details.
5. Sets the program counter to the vector address for the exception. The switch from Thumb state to ARM state in step 2 ensures that the ARM instruction installed at this vector address (either a branch or a pc-relative load) is correctly fetched, decoded, and executed. This forces a branch to a top-level veneer that you must write in ARM code.
5-40 Copyright © 1999-2001 ARM Limited. All rights reserved. ARM DUI 0056D

Handling Processor Exceptions
Handling the exception
Your top-level veneer routine should save the processor status and any required registers on the stack. You then have two options for writing the exception handler:
• Write the whole exception handler in ARM code.
• Perform a BX (Branch and eXchange) to a Thumb code routine that handles the exception. The routine must return to an ARM code veneer in order to return from the exception, because the Thumb instruction set does not have the instructions required to restore cpsr from spsr.
This second strategy is shown in Figure 5-4. See Chapter 3 Interworking ARM and Thumb for details of how to combine ARM and Thumb code in this way.
Figure 5-4 Handling an exception in Thumb state
��������� �������
�������������
�������������������������
�����������������
������������������� �� !�� ���
�����������������
�������������������
"� !� ��� #� ����
��� ���$�� !� %��� ������
� ���� ���$�� !� %��� ������
& ��'�� �
&#���� �
ARM DUI 0056D Copyright © 1999-2001 ARM Limited. All rights reserved. 5-41

Handling Processor Exceptions
5.11.2 The return address
If an exception occurs in ARM state, the value stored in lr_mode is (pc – 4) as described in The return address and return instruction on page 5-7. However, if the exception occurs in Thumb state, the processor automatically stores a different value for each of the exception types. This adjustment is required because Thumb instructions take up only a halfword, rather than the full word that ARM instructions occupy.
If this correction were not made by the processor, the handler would have to determine the original state of the processor, and use a different instruction to return to Thumb code rather than ARM code. By making this adjustment, however, the processor allows the handler to have a single return instruction that will return correctly, regardless of the processor state (ARM or Thumb) at the time the exception occurred.
The following sections give a summary of the values to which the processor sets lr_mode if an exception occurs when the processor is in Thumb state.
SWI and Undefined Instruction handlers
The handler's return instruction (MOVS pc,lr) changes the program counter to the address of the next instruction to execute. This is at (pc – 2), so the value stored by the processor in lr_mode is (pc – 2).
FIQ and IRQ handlers
The handler's return instruction (SUBS pc,lr,#4) changes the program counter to the address of the next instruction to execute. Because the program counter is updated before the exception is taken, the next instruction is at (pc – 4). The value stored by the processor in lr_mode is therefore pc.
Prefetch Abort handlers
The handler's return instruction (SUBS pc,lr,#4) changes the program counter to the address of the aborted instruction. Because the program counter is not updated before the exception is taken, the aborted instruction is at (pc – 4). The value stored by the processor in lr_mode is therefore pc.
Data Abort handlers
The handler's return instruction (SUBS pc,lr,#8) changes the program counter to the address of the aborted instruction. Because the program counter is updated before the exception is taken, the aborted instruction is at (pc – 6). The value stored by the processor in lr_mode is therefore (pc + 2).
5-42 Copyright © 1999-2001 ARM Limited. All rights reserved. ARM DUI 0056D

Handling Processor Exceptions
5.11.3 Determining the processor state
An exception handler may need to determine whether the processor was in ARM or Thumb state when the exception occurred. SWI handlers, especially, might need to read the processor state. This is done by examining the SPSR T-bit. This bit is set for Thumb state and clear for ARM state.
Both ARM and Thumb instruction sets have the SWI instruction. When calling SWIs from Thumb state, you must consider three things:
• the address of the instruction is at (lr – 2), rather than (lr – 4)
• the instruction itself is 16-bit, and so requires a halfword load (see Figure 5-5)
• the SWI number is held in 8 bits instead of the 24 bits in ARM state.
Figure 5-5 Thumb SWI instruction
Example 5-19 shows ARM code that handles a SWI from both sources. Consider the following points:
• Each of the do_swi_x routines could carry out a switch to Thumb state and back again to improve code density if required.
• You can replace the jump table by a call to a C function containing a switch() statement to implement the SWIs.
• It is possible for a SWI number to be handled differently depending upon the state it is called from.
• The range of SWI numbers accessible from Thumb state can be increased by calling SWIs dynamically (as described in SWI handlers on page 5-14).
Example 5-19
T_bit EQU 0x20 ; Thumb bit of CPSR/SPSR, that is, bit 5. : :SWIHandler STMFD sp!, {r0-r3,r12,lr} ; Store registers. MRS r0, spsr ; Move SPSR into general purpose register. TST r0, #T_bit ; Occurred in Thumb state? LDRNEH r0,[lr,#-2] ; Yes: load halfword and...
�� �� �� �� �� �� � � � �
�� �������
�!���!� ����� � �� � ���
ARM DUI 0056D Copyright © 1999-2001 ARM Limited. All rights reserved. 5-43

Handling Processor Exceptions
BICNE r0,r0,#0xFF00 ; ...extract comment field. LDREQ r0,[lr,#-4] ; No: load word and... BICEQ r0,r0,#0xFF000000 ; ...extract comment field. ; r0 now contains SWI number CMP r0, #MaxSWI ; Rangecheck LDRLS pc, [pc, r0, LSL#2] ; Jump to the appropriate routine. B SWIOutOfRangeswitable DCD do_swi_1 DCD do_swi_2 : :do_swi_1 ; Handle the SWI. LDMFD sp!, {r0-r3,r12,pc}^ ; Restore the registers and return.do_swi_2 :
5-44 Copyright © 1999-2001 ARM Limited. All rights reserved. ARM DUI 0056D

Handling Processor Exceptions
5.12 System mode
The ARM Architecture defines a User mode that has 15 general purpose registers, a pc, and a CPSR. In addition to this mode there are five privileged processor modes, each of which have an SPSR and a number of registers that replace some of the 15 User mode general purpose registers.
Note This section only applies to processors that implement ARM architectures v4, v4T and later.
When a processor exception occurs, the current program counter is copied into the link register for the exception mode, and the CPSR is copied into the SPSR for the exception mode. The CPSR is then altered in an exception-dependent way, and the program counter is set to an exception-defined address to start the exception handler.
The ARM subroutine call instruction (BL) copies the return address into r14 before changing the program counter, so the subroutine return instruction moves r14 to pc (MOV pc,lr).
Together these actions imply that ARM modes that handle exceptions must ensure that another exception of the same type cannot occur if they call subroutines, because the subroutine return address will be overwritten with the exception return address.
(In earlier versions of the ARM architecture, this problem has been solved by either carefully avoiding subroutine calls in exception code, or changing from the privileged mode to User mode. The first solution is often too restrictive, and the second means the task may not have the privileged access it needs to run correctly.)
ARM architecture v4 and later provide a processor mode called system mode, to overcome this problem. System mode is a privileged processor mode that shares the User mode registers. Privileged mode tasks can run in this mode, and exceptions no longer overwrite the link register.
Note System mode cannot be entered by an exception. The exception handlers modify the CPSR to enter System mode. See Reentrant interrupt handlers on page 5-26 for an example.
ARM DUI 0056D Copyright © 1999-2001 ARM Limited. All rights reserved. 5-45

Handling Processor Exceptions
5-46 Copyright © 1999-2001 ARM Limited. All rights reserved. ARM DUI 0056D

Chapter 6 Writing Code for ROM
This chapter describes how to build images for embedded applications. These images are typically programmed into ROM or flash memory. There are also suggestions on how to avoid the most common errors in writing code for ROM.
This chapter contains the following sections:
• About writing code for ROM on page 6-2
• Memory map considerations on page 6-4
• Initializing the system on page 6-7
• The reference C example using semihosting on page 6-11
• Loading the ROM image at address 0 on page 6-14
• Loading the ROM image at address 0 on page 6-14
• Using both scatter loading and remapping on page 6-24
• A semihosted application with interrupt handling on page 6-28
• An embeddable application with interrupt handling on page 6-33
• Using scatter loading with memory-mapped I/O on page 6-36
• Troubleshooting on page 6-43.
• Measuring code and data size on page 6-46.
ARM DUI 0056D Copyright © 1999-2001 ARM Limited. All rights reserved. 6-1

Writing Code for ROM
6.1 About writing code for ROM
This chapter describes how to write code for ROM, and shows different methods for simple and complex images. Sample initialization code is given, as well as information on initializing data, stack pointers, interrupts, and so on.
This chapter contains examples of using scatter loading to build complex images. For detailed reference information on the linker and scatter loading, refer to ADS Linker and Utilities Guide.
Note The examples used in this chapter target the ARM Integrator board and are located in install_directory\Examples\embedded. You can use these examples as the basis for the initialization code for your own system.
The reference examples (embed, embed_cpp, ledflash, and rps_irq) can be built in different configurations in increasing levels of complexity:
• As a simple semihosted application that links with the C libraries. This example uses the semihosting SWI functions of the C libraries for I/O. See The reference C example using semihosting on page 6-11.
• As an application that links with the C libraries and can be embedded into ROM to execute at address 0x0 using scatter loading. This example does not use the semihosting SWI functions, but instead uses a retargeting layer for I/O. See Loading the ROM image at address 0 on page 6-14.
• As an application that uses scatter loading and memory remapping to move RAM to 0x0 after initialization. See Using both scatter loading and remapping on page 6-24.
Additional files are provided to demonstrate function retargeting and processor initialization:
• retarget.c implements a retargetting layer for low level input/output
• stack.s, heap.s, uart.c, and scat_c.scf demonstrate placement of stack and heap and memory-mapped peripherals using the scatter file
• init.s demonstrates the use of lengths and offsets to initialize stack pointers for each mode
• the cache subdirectory contains cache and clock initialization code for a variety of ARM cores.
6-2 Copyright © 1999-2001 ARM Limited. All rights reserved. ARM DUI 0056D

Writing Code for ROM
CodeWarrior IDE projects are available for the examples as embed.mcp, embed_cpp.mcp, ledflash.mcp, and rps_irq.mcp.
Additional code examples and information about writing code for ROM is in the ARM Firmware Suite (AFS) example code and documentation. Refer to the following ARM publications for more details on AFS:
• ARM Firmware Suite User Guide
• ARM Firmware Suite Reference Guide.
ARM DUI 0056D Copyright © 1999-2001 ARM Limited. All rights reserved. 6-3

Writing Code for ROM
6.2 Memory map considerations
A major consideration in the design of an embedded ARM application is the layout of the memory map, in particular the memory that is situated at address 0x0. Following reset, the processor starts to fetch instructions from 0x0, so there must be some executable code accessible from that address. In an embedded system, this requires ROM to be present, at least initially, at address 0x0.
6.2.1 ROM at 0x0
The simplest layout is to locate the application in ROM at address 0 in the memory map (see Figure 6-1). The application can then branch to the real entry point when it executes its first instruction (at the reset vector at address 0x0).
Figure 6-1 Example of a system with ROM at 0x0
However, there are disadvantages with this layout. ROM is typically narrow (8 or 16 bits) and slow (requires more wait states to access it) compared to RAM. This slows down the handling of processor exceptions (especially interrupts) through the vector table. Also, if the vector table is in ROM, it cannot be modified by the code.
For more information on exception handling, see Chapter 5 Handling Processor Exceptions.
6.2.2 RAM at 0x0
RAM is normally faster and wider than ROM. For this reason, it is better for the vector table and interrupt handlers if the memory at 0x0 is RAM.
However, if RAM is located at address 0x0 on power-up, there is not a valid instruction in the reset vector entry. Therefore, you must allow ROM to be located at 0x0 at power-up (so there is a valid reset vector), but to also allow RAM to be located at 0x0 during normal execution. The changeover from the reset to the normal memory map is normally caused by writing to a memory-mapped register (see Figure 6-2 on page 6-5).
"#$%
�#$%
#&%����������
����������
����������
����������
6-4 Copyright © 1999-2001 ARM Limited. All rights reserved. ARM DUI 0056D

Writing Code for ROM
For example, on reset, an aliased copy of ROM is present at 0x0, but RAM is remapped to zero when code writes to the RPS REMAP register. For more information, refer to the ARM Reference Peripheral Specification.
Figure 6-2 Example of a system with RAM at 0x0
Implementing RAM at 0x0
A sample sequence of events for implementing RAM at 0x0 is:
1. Power on to fetch the RESET vector at 0x0 (from the aliased copy of ROM).
2. Execute the RESET vector:
LDR PC, =0x0F000004
This causes a jump to the real address of the next ROM instruction. This assembles to a position-independent instruction
LDR PC, [PC, offset]
3. Write to the REMAP register and set REMAP = 1.
4. Complete the rest of the initialization code as described in Initializing the system on page 6-7.
System decoder
ROM can be aliased to address 0x0 by the system memory decoder. A simple memory decoder might implement this as:
case ADDR(31:24) is when "0x00" if REMAP = "0" then select ROM
"#$%
#&%
#&%����������
����������
����������
����������
"#$%
�#$%
#&%���������������'���������(�(� ������
#� ����)�� ��*� ����+
,���-������#.��#/%$.�0���
#&%
ARM DUI 0056D Copyright © 1999-2001 ARM Limited. All rights reserved. 6-5

Writing Code for ROM
else select SRAM when "0x0F" select ROM when ....
6-6 Copyright © 1999-2001 ARM Limited. All rights reserved. ARM DUI 0056D

Writing Code for ROM
6.3 Initializing the system
There are two initialization stages:
1. Initializing the execution environment, for example exception vectors, stacks, I/O.
2. Initializing the C library and application (C variables for example).
For a hosted application, the execution environment was initialized when the OS starts (initialization is done by, for example, Angel, an RTOS, or ARMulator). The application is then entered automatically through the main() function. The C library code at __main initializes the application.
For an embedded application without an operating system, the code in ROM must provide a way for the application to initialize itself and start executing. No automatic initialization takes place on reset, so the application entry point must perform some initialization before it can call any C code.
After reset, the instruction located at address 0x0, must transfer control to the initialization code. The initialization code must:
• set up exception vectors
• initialize the memory system
• initialize the stack pointer registers
• initialize any critical I/O devices
• change processor mode if necessary
• change processor state if necessary.
After the environment has been initialized, the sequence continues with the application initialization and should enter the C code.
These items are described in more detail below. See Example 6-3 on page 6-16 and Example 6-4 on page 6-17 for code examples.
6.3.1 Initializing the execution environment
There are some aspects of the execution environment that must be initialized before the application starts. If the application is hosted by an operating system, the initialization will be done by the application loader. If the application runs standalone, the C library can perform the initialization of the environment and call the application entry point at main(). If you are using scatter loading, however, you must retarget __user_intial_stackheap() to initialize the stack and heap. An example of how to do this is in retarget.c.
ARM DUI 0056D Copyright © 1999-2001 ARM Limited. All rights reserved. 6-7

Writing Code for ROM
The state of ARM processor cores after reset is:
• SVC mode
• interrupts disabled
• ARM state.
Identifying the entry point
An executable image must have an entry point. An embedded image that can be placed in ROM usually has an entry point at 0x0. An entry point can be defined in the initialization code by using the assembler directive ENTRY. It is possible to have multiple entry points in an embedded application. When there are multiple entry points, one of the points must be specified as the initial entry point by using -entry. See also the section on linker selection of entry points in the ADS Linker and Utilities Guide.
If you have created a C program that includes a main() function, there is also an entry point within the C library initialization code. See also the library chapter in ADS Linker and Utilities Guide for more information on creating applications that use the library.
Setting up exception vectors
Your initialization code must set up the required exception vectors, as follows:
• If the ROM is located at address 0x0, the vectors consist of a sequence of hard-coded instructions to branch to the handler for each exception.
• If the ROM is located elsewhere, the vectors must be dynamically initialized by the initialization code. Typically this is done by copying the vector table from ROM to RAM (See Using both scatter loading and remapping on page 6-24).
See Example 6-4 on page 6-17 for a listing of typical initialization code.
Initializing the memory system
If your system has a Memory Management or Protection Unit, you must make sure that it is initialized:
• before interrupts are enabled
• before any code is called that might rely on RAM being accessible at a particular address, either explicitly, or implicitly through the use of stack.
See the code in the Examples\embedded\cache directory for examples of cache initialization code.
6-8 Copyright © 1999-2001 ARM Limited. All rights reserved. ARM DUI 0056D

Writing Code for ROM
Initializing the stack pointers
The initialization code initializes the stack pointer registers. You might have to initialize some or all of the following stack pointers, depending on the interrupts and exceptions you use:
sp_SVC This must always be initialized.
sp_IRQ This must be initialized if IRQ interrupts are used. It must be initialized before interrupts are enabled.
sp_FIQ This must be initialized if FIQ interrupts are used. It must be initialized before interrupts are enabled.
sp_ABT This must be initialized for Data and Prefetch Abort handling.
sp_UND This must be initialized for Undefined Instruction handling.
Generally, sp_ABT and sp_UND are not used in a simple embedded system. However, you might want to initialize them for debugging purposes.
You can set up the stack pointer sp_USR when you change to User mode to start executing the application.
Caution If you are using scatter loading, you must retarget the function __user_initial_stackheap() to place the stack and heap. If you do not, there might be link errors because the default implementation provided by the C library attempts to use Image$$ZI$$Limit that is not defined when scatter loading is used. See Loading the ROM image at address 0 on page 6-14 for more information on retargeting this function.
Initializing any critical I/O devices
Critical I/O devices are any devices that you must initialize before you enable interrupts. Typically, you must initialize these devices at this point. If you do not, they might cause spurious interrupts when interrupts are enabled.
Changing processor mode
At this stage the processor is still in Supervisor mode. If your application runs in User mode, change to User mode and initialize the User mode sp register, sp_USR.
ARM DUI 0056D Copyright © 1999-2001 ARM Limited. All rights reserved. 6-9

Writing Code for ROM
Changing processor state
All ARM cores, including Thumb-capable processors, start up in ARM state on reset. The initialization code (at least the reset handler) must be ARM code. If the application is compiled for Thumb, main() is Thumb code. The linker can add ARM to Thumb interworking veneers automatically to change state between the ARM initialization code and the Thumb application.
6.3.2 Initializing the application
An application is initialized by:
• initializing the nonzero writable data by copying the initializing values to the writable data region
• setting to zero the ZI writable data region.
After memory initialization, control is passed to the entry point of the application in, for example, C library code.
Initializing memory required by C code
The initial values for any initialized variables (RW) must be copied from ROM to RAM. All other ZI variables must be initialized to zero. The library initialization code called at __main performs the copying and initialization.
Note The linker assigns memory addresses for RO code, RW data, and ZI data. If a scatter-load description file is not used, the linker uses one of the default layouts. Scatter-loading examples are given in Loading the ROM image at address 0 on page 6-14 and Using both scatter loading and remapping on page 6-24.
Using the main function
When the compiler compiles a function called main(), it generates a reference to the symbol __main to force the linker to include the basic C run-time system from the ANSI C library. (The symbol __main is marked as an entry point.)
6-10 Copyright © 1999-2001 ARM Limited. All rights reserved. ARM DUI 0056D
Writing Code for ROM
6.4 The reference C example using semihosting
This example shows an application that uses the semihosting SWIs. printf() is compiled as a call to a C library function that uses a semihosting SWI to display information on the debugger console. The application consists of a single C file.
The code for main.c is in install_directory\Examples\Embedded\embed directory, and is included in Example 6-1 on page 6-12 for reference.
To build the example from the CodeWarrior IDE:
1. Use the CodeWarrior IDE project embed.mcp
2. Select Target=Semihosted.
To build the example from the command line, execute build_a.bat or follow the steps below:
1. Compile the C file main.c with one of the following commands:
armcc -g -O1 -c main.c (if compiling for ARM)
tcc -g -O1 -c main.c (if compiling for Thumb)
where:
-O1 Specifies the level of optimization.
-g Instructs the compiler to add debug tables.
-c Instructs the compiler to compile only (not to link).
2. Link the image using the following command:
armlink main.o -o embed.axf
where:
-o specifies the output file as embed.axf.
3. Use ARMulator to test the image or download the image to a development board using Multi-ICE or Angel.
6.4.1 Memory map
Figure 6-3 on page 6-12 shows the memory map of the reference example.
ARM DUI 0056D Copyright © 1999-2001 ARM Limited. All rights reserved. 6-11

Writing Code for ROM
Figure 6-3 Memory map for reference example
By default, the linker sets the start of code at address 0x8000. The RW data is placed immediately above the program code and the ZI data above the RW data.
By default, the stack pointer sp is initialized to 0x08000000 for ARMulator. If you are using a development board, you must set $top_of_memory. For example, for most (unexpanded) ARM Integrator boards, set $top_of_memory to 0x40000.
6.4.2 Sample code
The C code fragment in Example 6-1 shows the use of semihosting SWIs to output text. See the main.c source code for the definitions of demo_malloc(), demo_printf(), demo_float_print(), and demo_sprintf().
The code selected by the #ifdef EMBEDDED is used in Loading the ROM image at address 0 on page 6-14 and other examples.
Example 6-1 extract from main.c
int main(void){ printf("C Library Example\n"); #ifdef EMBEDDED/* ensure no C library functions that uses semihosting SWIs are linked */ #pragma import(__use_no_semihosting_swi) #endif demo_printf(); demo_sprintf();
��������
�������������� ���������
.��0�� *#&1#2+
�����
3��
45�����
#2�����
�������������������������������
����������������
6-12 Copyright © 1999-2001 ARM Limited. All rights reserved. ARM DUI 0056D

Writing Code for ROM
demo_float_print(); demo_malloc(); return 0;}
ARM DUI 0056D Copyright © 1999-2001 ARM Limited. All rights reserved. 6-13

Writing Code for ROM
6.5 Loading the ROM image at address 0
Scatter loading provides a flexible mechanism for mapping code and data onto your memory map. These options are described in detail in the ADS Linker and Utilities Guide.
The scatter-load description file, scat_b.scf, for this example is in install_directory\Examples\Embedded\embed.
6.5.1 Memory map
Figure 6-4 shows:
• ROM is fixed at 0x0 and is not remapped
• RAM is at 0x28000000 to hold the data, stack and heap
• memory-mapped I/O for a UART is at 0x16000000.
Figure 6-4 Memory map for simple scatter loading
6.5.2 Scatter-load description file
The scatter-load description file shown in Example 6-2 on page 6-15 defines:
• one load region, ROM_LOAD, at 0x0
• five execution regions:
— ROM_EXEC (at 0x0) contains all the read-only code, including the library code. The exception vector table in vectors.o is placed first in this region. All other read-only code (*) is placed after vectors.o.
#2�����
45�����
6����7�- /'�������7�-
%�������%�������
#2�����
8����9��������
#&%
����� �� �������
�� �������
����������
3�� #$%
���!������
8����9��������
�$#:
6-14 Copyright © 1999-2001 ARM Limited. All rights reserved. ARM DUI 0056D

Writing Code for ROM
— RAM (at 0x28000000) contains the RW and ZI data regions for the application.
— HEAP immediately above the ZI data. The object heap.o contains a symbol that is used to set up the heap base. The heap grows up from this address.
— STACKS at 0x28080000. The object stack.o contains a symbol that is used to set up the stack top. Stacks grow downward from this address.
— UART0 at 0x16000000. The object uart.o contains symbols that are used to reserve the memory-mapped I/O.
Note The UNINIT entry means that the marked regions are not zero-initialized by the C library initialization code.
Example 6-2 scat_b.scf
ROM_LOAD 0x0{ ROM_EXEC 0x0 { vectors.o (Vect, +First) * (+RO) } RAM 0x28000000 { * (+RW,+ZI) } HEAP +0 UNINIT { heap.o (+ZI) } STACKS 0x28080000 UNINIT { stack.o (+ZI) } UART0 0x16000000 UNINIT { uart.o (+ZI) }}
ARM DUI 0056D Copyright © 1999-2001 ARM Limited. All rights reserved. 6-15
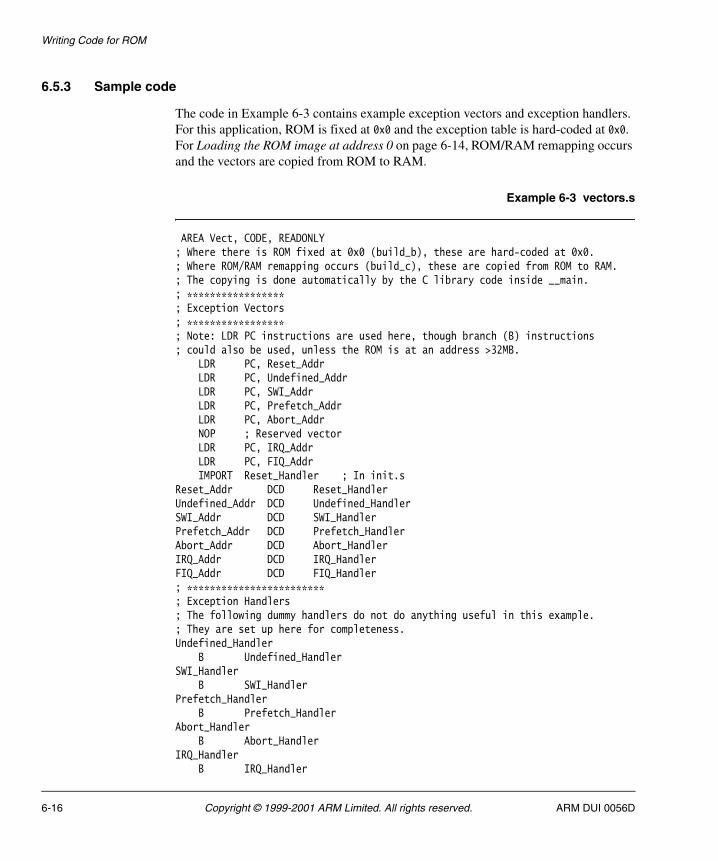
Writing Code for ROM
6.5.3 Sample code
The code in Example 6-3 contains example exception vectors and exception handlers. For this application, ROM is fixed at 0x0 and the exception table is hard-coded at 0x0. For Loading the ROM image at address 0 on page 6-14, ROM/RAM remapping occurs and the vectors are copied from ROM to RAM.
Example 6-3 vectors.s
AREA Vect, CODE, READONLY; Where there is ROM fixed at 0x0 (build_b), these are hard-coded at 0x0.; Where ROM/RAM remapping occurs (build_c), these are copied from ROM to RAM.; The copying is done automatically by the C library code inside __main.; *****************; Exception Vectors; *****************; Note: LDR PC instructions are used here, though branch (B) instructions; could also be used, unless the ROM is at an address >32MB. LDR PC, Reset_Addr LDR PC, Undefined_Addr LDR PC, SWI_Addr LDR PC, Prefetch_Addr LDR PC, Abort_Addr NOP ; Reserved vector LDR PC, IRQ_Addr LDR PC, FIQ_Addr IMPORT Reset_Handler ; In init.s Reset_Addr DCD Reset_HandlerUndefined_Addr DCD Undefined_HandlerSWI_Addr DCD SWI_HandlerPrefetch_Addr DCD Prefetch_HandlerAbort_Addr DCD Abort_HandlerIRQ_Addr DCD IRQ_HandlerFIQ_Addr DCD FIQ_Handler ; ************************; Exception Handlers; The following dummy handlers do not do anything useful in this example.; They are set up here for completeness.Undefined_Handler B Undefined_HandlerSWI_Handler B SWI_HandlerPrefetch_Handler B Prefetch_HandlerAbort_Handler B Abort_HandlerIRQ_Handler B IRQ_Handler
6-16 Copyright © 1999-2001 ARM Limited. All rights reserved. ARM DUI 0056D

Writing Code for ROM
FIQ_Handler B FIQ_Handler END
The code in Example 6-4 performs ROM/RAM remapping (if required), initializes stack pointers and interrupts for each mode, and finally branches to __main in the C library (__main eventually calls main()). On reset, the ARM core starts up in Supervisor (SVC) mode, in ARM state, with IRQ and FIQ disabled.
Example 6-4 init.s
AREA Init, CODE, READONLY; - Set up if ROM/RAM remapping required; GBLL ROM_RAM_REMAP;ROM_RAM_REMAP SETL {TRUE} ; change to {FALSE} if remapping not required; - ensure no functions that use semihosting SWIs are linked from the C library IMPORT __use_no_semihosting_swi; - Standard definitions of mode bits and interrupt (I & F) flags in PSRsMode_USR EQU 0x10Mode_FIQ EQU 0x11Mode_IRQ EQU 0x12Mode_SVC EQU 0x13Mode_ABT EQU 0x17Mode_UNDEF EQU 0x1BMode_SYS EQU 0x1F ; available on ARM Arch v4 and laterI_Bit EQU 0x80 ; when I bit is set, IRQ is disabledF_Bit EQU 0x40 ; when F bit is set, FIQ is disabled; --- System memory locationsCM_ctl_reg EQU 0x1000000C ; Address of Core Module Control RegisterRemap_bit EQU 0x04 ; Bit 2 is remap bit of CM_ctl; --- Amount of memory (in bytes) allocated for stacksLen_FIQ_Stack EQU 0Len_IRQ_Stack EQU 256Len_ABT_Stack EQU 0Len_UND_Stack EQU 0Len_SVC_Stack EQU 1024; Len_USR_Stack EQU 1024; Add lengths >0 for FIQ_Stack, ABT_Stack, UNDEF_Stack if you need them; offsets will be loaded as immediate values; Offsets must be 8 byte alignedOffset_FIQ_Stack EQU 0Offset_IRQ_Stack EQU Offset_FIQ_Stack + Len_FIQ_StackOffset_ABT_Stack EQU Offset_IRQ_Stack + Len_IRQ_Stack Offset_UND_Stack EQU Offset_ABT_Stack + Len_ABT_StackOffset_SVC_Stack EQU Offset_UND_Stack + Len_UND_Stack; Offset_USR_Stack EQU Offset_SVC_Stack + Len_SVC_Stack ENTRY
ARM DUI 0056D Copyright © 1999-2001 ARM Limited. All rights reserved. 6-17

Writing Code for ROM
; --- Perform ROM/RAM remapping, if required IF :DEF: ROM_RAM_REMAP; On reset, an aliased copy of ROM is at 0x0.; Continue execution from 'real' ROM rather than aliased copy LDR pc, =Instruct_2 Instruct_2 ; Remap by setting Remap bit of the CM_ctl register LDR r1, =CM_ctl_reg LDR r0, [r1] ORR r0, r0, #Remap_bit STR r0, [r1]; RAM is now at 0x0.; The exception vectors (in vectors.s) must be copied from ROM to the RAM; The copying is done later by the C library code inside __main ENDIF EXPORT Reset_HandlerReset_Handler; --- Initialize stack pointer registers; Enter each mode in turn and set up the stack pointer IMPORT top_of_stacks ;defined in stack.s and located by scatter file LDR r0, =top_of_stacks; MSR CPSR_c, #Mode_FIQ:OR:I_Bit:OR:F_Bit ; No interrupts; SUB sp, r0, #Offset_FIQ_Stack MSR CPSR_c, #Mode_IRQ:OR:I_Bit:OR:F_Bit ; No interrupts SUB sp, r0, #Offset_IRQ_Stack; MSR CPSR_c, #Mode_ABT:OR:I_Bit:OR:F_Bit ; No interrupts; SUB sp, r0, #Offset_ABT_Stack; MSR CPSR_c, #Mode_UND:OR:I_Bit:OR:F_Bit ; No interrupts; SUB sp, r0, #Offset_UND_Stack MSR CPSR_c, #Mode_SVC:OR:I_Bit:OR:F_Bit ; No interrupts SUB sp, r0, #Offset_SVC_Stack ; ...; --- Initialize memory system IF :DEF: CACHE IMPORT Clock_Speed ; in CMclocks.s IMPORT Cache_Init ; in the core-specific files e.g. 940T.s BL Clock_Speed BL Cache_Init ENDIF ; --- Initialize critical IO devices ; ...; --- Now change to User mode and set up User mode stack. MSR CPSR_c, #Mode_USR:OR:F_Bit ; IRQs now enabled SUB sp, r0, #Offset_USR_Stack IMPORT __main; --- Now enter the C code
6-18 Copyright © 1999-2001 ARM Limited. All rights reserved. ARM DUI 0056D

Writing Code for ROM
B __main ; note use B not BL ; because an application will never return this way END
The code in Example 6-5 implements a retarget layer for low-level I/O. Typically, this contains your own target-dependent implementations of fputc(), ferror(), and so on. This example provides implementations of fputc(), ferror(), _sys_exit(), _ttywrch(), and __user_initial_stackheap().
Semihosting SWIs are used to display text onto the console of the host debugger. This mechanism is portable across ARMulator, Angel, Multi-ICE, and EmbeddedICE. serial.c is an option that outputs characters from the serial port of an ARM Integrator board. To use serial.c, add #define USE_SERIAL_PORT to the code or compile with -DUSE_SERIAL_PORT.
Example 6-5 retarget.c
/*** This implements a 'retarget' layer for low-level IO. Typically, this** would contain your own target-dependent implementations of fputc(),** ferror(), etc.** ** This example provides implementations of fputc(), ferror(),** _sys_exit(), _ttywrch() and __user_initial_stackheap().**** Here, semihosting SWIs are used to display text onto the console ** of the host debugger. This mechanism is portable across ARMulator,** Angel, Multi-ICE and EmbeddedICE.**** Alternatively, to output characters from the serial port of an ** ARM Integrator Board (see serial.c), use:**** #define USE_SERIAL_PORT**** or compile with **** -DUSE_SERIAL_PORT*/ #include <stdio.h> #include <rt_misc.h> #ifdef __thumb /* Thumb Semihosting SWI */ #define SemiSWI 0xAB #else
ARM DUI 0056D Copyright © 1999-2001 ARM Limited. All rights reserved. 6-19

Writing Code for ROM
/* ARM Semihosting SWI */ #define SemiSWI 0x123456 #endif /* Write a character */__swi(SemiSWI) void _WriteC(unsigned op, char *c); #define WriteC(c) _WriteC (0x3,c) /* Exit */__swi(SemiSWI) void _Exit(unsigned op, unsigned except); #define Exit() _Exit (0x18,0x20026) struct __FILE { int handle; /* Add whatever you need here */}; FILE __stdout;extern unsigned int bottom_of_heap; extern void sendchar( char *ch ); /* in serial.c */int fputc(int ch, FILE *f){ char tempch=ch; /* Place your implementation of fputc here, for example write a character */ /* to a UART, or to the debugger console with SWI WriteC */ #ifdef USE_SERIAL_PORT sendchar( &tempch ); #else WriteC( &tempch ); #endif return ch; }int ferror(FILE *f){ /* Your implementation of ferror */ return EOF;}void _sys_exit(int return_code){ Exit(); /* for debugging */label: goto label; /* endless loop */}void _ttywrch(int ch){char tempch = ch; #ifdef USE_SERIAL_PORT sendchar( &tempch ); #else WriteC( &tempch ); #endif }__value_in_regs struct __initial_stackheap __user_initial_stackheap( unsigned R0, unsigned SP, unsigned R2, unsigned SL){ struct __initial_stackheap config; config.heap_base = (unsigned int)&bottom_of_heap; // defined in heap.s // placed by scatterfile config.stack_base = SP; // inherit sp from the execution environment
6-20 Copyright © 1999-2001 ARM Limited. All rights reserved. ARM DUI 0056D

Writing Code for ROM
return config;}/*Below is an equivalent example assembler version of __user_initial_stackheap It will be entered with the value of the stackpointer in r1 (as set in init.s), this does not need to be changed and so can be passed unmodified out of the function. IMPORT bottom_of_heap EXPORT __user_initial_stackheap__user_initial_stackheap LDR r0,=bottom_of_heap MOV pc,lr */
The code in Example 6-6 implements a simple polled RS232 serial driver for the ARM Integrator board. It outputs single characters on Serial Port A at 9600 Baud, eight data bits, no parity, and one stop bit. Initialize the port with init_serial_A() before calling sendchar(). To monitor the characters output from the board, use a null-modem cable to connect the Intergrator serial port A to an RS232 terminal or a PC running a terminal emulator.
Example 6-6 serial.c
#include "intgrt.h" #include "uart.h"extern struct uart uart0; #define UART0_DR uart0.dr #define UART0_RSR uart0.dr #define UART0_ECR uart0.ecr #define UART0_LCRH uart0.lcrh #define UART0_LCRM uart0.lcrm #define UART0_LCRL uart0.lcrl #define UART0_CR uart0.cr #define UART0_FR uart0.fr #define UART0_IIR uart0.iir #define UART0_ICR uart0.iir void init_serial_A(void) { /* First set the correct baud rate and word length */ UART0_LCRL = LCRL_Baud_38400; // LCRL and LCRM writes _MUST_ // be performed before the LCRH UART0_LCRM = LCRM_Baud_38400; // write as LCRH generates the
ARM DUI 0056D Copyright © 1999-2001 ARM Limited. All rights reserved. 6-21

Writing Code for ROM
// write strobe to transfer the UART0_LCRH = LCRH_Word_Length_8 | // data. LCRH_Fifo_Enabled; // /* Now enable the serial port */ UART0_CR = CR_UART_Enable; // Enable UART0 with no interrupts}void sendchar( char *ch ){ while (UART0_FR & FR_TX_Fifo_Full) ; if (*ch == '\n') // Replace line feed with '\r' *ch = '\r'; UART0_DR = *ch; // Transmit next character}
6.5.4 Building the example
You can build the example using either:
• a project file for the CodeWarrior IDE
• a batch file
• the command line.
Using the CodeWarrior IDE
To build the example from the CodeWarrior IDE, load the supplied embed project and select Target=EmbeddedScatter.
This creates:
• an ELF debug image (embed.axf) for loading into a debugger (AXD or armsd)
• a binary ROM image (embed.bin) suitable for downloading into the memory of an ARM Integrator board.
Using the command line
To build the example from the command line, execute build_b.bat or follow these steps:
1. Assemble the initialization code:
armasm -g vectors.sarmasm -g stack.sarmasm -g heap.sarmasm -g init.s
2. Compile the main example and the new retargeting files retarget.c and, optionally, serial.c with the following commands:
6-22 Copyright © 1999-2001 ARM Limited. All rights reserved. ARM DUI 0056D
Writing Code for ROM
armcc -c -g -O1 main.c -DEMBEDDEDarmcc -c -g -O1 retarget.carmcc -c -g -O1 serial.c -I..\include
where:
-D Instructs the compiler to define the symbol EMBEDDED.
-I Instructs the compiler where to find the include files.
The use of serial.c is optional. Keep this line if you want the output to be sent over the serial port of the Integrator board.
3. Link the image using the following command (all on one line):
armlink vectors.o init.o main.o retarget.o serial.o stack.o heap.o -scatter scat_b.scf -o embed.axf -entry 0x0 -info totals -info unused
where:
-entry This option defines the reset vector as the unique entry point.
-o This option specifies the output file.
-info totals
This option tells the linker to print information on the code and data sizes of each object file along with the totals for each type of code or data.
4. Run the fromELF utility to produce a plain binary version of the image:
fromelf embed.axf -bin -o embed.bin
where:
-bin Specifies a binary output image with no header.
5. Use ARMulator to test the image or download and execute the ROM image to the development board.
• For armsd use:getfile embed.bin 0x0readsyms embed.axf
• For AXD select:
File → Load Memory From File and specify embed.bin with load address 0x0.
File → Load Debug Symbols and specify embed.axf.
ARM DUI 0056D Copyright © 1999-2001 ARM Limited. All rights reserved. 6-23

Writing Code for ROM
6.6 Using both scatter loading and remapping
This section describes how to convert the application in Loading the ROM image at address 0 on page 6-14 into a more complex scatter-loading application. This example uses memory remapping to exchange the ROM and RAM regions after the application has started.
The code for this example is in install_directory\Examples\Embedded.
6.6.1 Memory map
Figure 6-5 shows:
• FLASH is at 0x24000000. An aliased copy of the FLASH appears at 0x0 on reset.
• After remapping, 32-bit RAM is at 0x0 to hold the exception vectors.
Figure 6-5 Memory map for remapping
6.6.2 Scatter-load description file
The scatter-load description file shown in Example 6-7 on page 6-25 defines one load region (FLASH) and five execution regions:
• FLASH (at 0x24000000) contains all the read-only code and data
�8����
5�������;�#2�����
45�����
�� �������
�� �������
.��0�� ����*#&�1�#2+
# ���������#/�/:
/'�������7�-6����7�-
.��0�� �����*#&�1�#2+ #&%
����� ����������
3��
.��0�� ����*#&�1�#2+
$��������(���������
������������ �������
�����#$%
�$#:����!������59&�����
6-24 Copyright © 1999-2001 ARM Limited. All rights reserved. ARM DUI 0056D

Writing Code for ROM
• 32bitRAM (at 0x0) contains the vector table from vectors.o
• HEAP (immediately above the RW/ZI data) is the start of the heap
• STACKS (at 0x40000) is the top of the stack
• UART0 (at 0x16000000) contains memory-mapped I/O.
Example 6-7 scat_c.scf
FLASH 0x24000000 0x4000000 ; The load region starts at 0x24000000 and has ; a maximum size of 0x4000000 bytes.{ FLASH 0x24000000 0x4000000 ; The load and execution addresses are the same. ; Execution region size is less than 0x4000000. { init.o (Init, +First) ; The initialization code is placed first. * (+RO) ; All other RO code and data are placed next. } ; Library code also goes here. 32bitRAM 0x0000 ; RAM starts at address 0x0. { vectors.o (Vect, +First) ; The vector table is placed first in RAM. * (+RW,+ZI) ; All other RW and ZI regions go after vectors. } HEAP +0 UNINIT ; The heap is not zero-initialized. ; The +0 specification means that the heap { ; starts immediately after RW and ZI regions. heap.o (+ZI) ; A symbol in heap.o is used set the heap base. } STACKS 0x40000 UNINIT ; The stack is not zero-initialized. { ; The top of stack address is set absolutely. stack.o (+ZI) ; A symbol in stack.o is used to set the } ; top of stack. UART0 0x16000000 UNINIT ; The UART is not zero-initialized. { ; The address is specified absolutely. uart.o (+ZI) ; The symbols in uart.o are used to reserve the } ; memory-mapped I/O.}
The program code and data is placed in Flash that resides at 0x24000000. On reset, an aliased copy of Flash is remapped by hardware to address 0x0. Program execution starts at AREA Init in init.s. The +First option is used to place this code first in the image. After reset the first few instructions of init.s remap 32-bit RAM to address 0x0. The ARM Integrator Board remaps its Flash in this way.
Most of the RO code executes from Flash. The RO execution address is the same as its load address (0x24000000), so it does not have to be moved.
ARM DUI 0056D Copyright © 1999-2001 ARM Limited. All rights reserved. 6-25

Writing Code for ROM
32bitRAM might be fast on-chip 32-bit SSRAM. Fast RAM is typically used for the stack, and for code that must be executed quickly. The exception vectors (AREA Vect in vectors.s) are relocated from Flash to the 32bitRAM execution region at address 0x0 for speed. The Vect code is placed first in the region. The RW data is relocated from Flash to the 32bitRAM execution region after the vector code. The ZI data will be created above the RW data.
6.6.3 Initialization code
Example 6-8 illustrates the code in init.s that performs ROM/RAM remapping.
Example 6-8 ROM/RAM remapping
; --- Set up if ROM/RAM remapping required GBLL ROM_RAM_REMAPROM_RAM_REMAP SETL {TRUE} ; change to {FALSE} if remapping not required ...; --- Perform ROM/RAM remapping, if required IF :DEF: ROM_RAM_REMAP; On reset, an aliased copy of ROM is at 0x0.; Continue execution from 'real' ROM rather than aliased copy LDR pc, =Instruct_2 Instruct_2 ; Remap by setting Remap bit of the CM_ctl register LDR r1, =CM_ctl_reg LDR r0, [r1] ORR r0, r0, #Remap_bit STR r0, [r1] ; RAM is now at 0x0.; The exception vectors (in vectors.s) must be copied from ROM to the RAM; The copying is done later by the C library code inside __main
The initialization code in the C library copies the RO and RW execution regions from their load addresses to their execution addresses before creating any zero-initialized areas. See also Loading the ROM image at address 0 on page 6-14.
6.6.4 Building the example
To build the example, either:
• open the supplied embed.mcp project with the CodeWarrior IDE and select the EmbeddedScatterRemap build target.
6-26 Copyright © 1999-2001 ARM Limited. All rights reserved. ARM DUI 0056D

Writing Code for ROM
• use the build_c.bat batch file or a makefile containing the following (the indented lines are a continuation of the single line above): armasm -g vectors.sarmasm -g -PD "ROM_RAM_REMAP SETL {TRUE}" init.sarmasm -g stack.sarmasm -g heap.sREM Use the following two lines to build without using the serial port. armcc -c -g -O1 main.c -DEMBEDDED -DROM_RAM_REMAParmcc -c -g -O1 retarget.cREM Use the following two lines to build using the serial port. REM armcc -c -g -O1 main.c -DEMBEDDED -DROM_RAM_REMAP -DUSE_SERIAL_PORTREM armcc -c -g -O1 retarget.c -DUSE_SERIAL_PORTarmcc -c -g -O1 uart.c -I..\includearmcc -c -g -O1 serial.c -I..\includearmlink vectors.o init.o main.o retarget.o uart.o serial.o stack.o heap.o -scatter scat_c.scf -o embed.axf -entry 0x24000000 -info totals -info unusedfromelf embed.axf -bin -o embed.bin
This creates:
• an ELF debug image (embed.axf) for loading into an ARM debugger
• a binary ROM image (embed.bin) suitable for downloading into the RAM or Flash memory of the ARM development boards.
The readme.txt file contains additional details of how the image can be downloaded to the Flash memory of an ARM Integrator Board and debugged there.
6.6.5 Additional examples of remapping
The install_directory\Examples\Embedded\ledflash directory contains a simple interrupt-driven LED flasher that runs on an ARM Integrator board. It uses ROM/RAM remapping and scatter loading.
To build the example, a batch-file (build.bat) and a CodeWarrior IDE project file (ledflash.mcp) are provided. Full instructions for downloading the code to Flash are available in the directory.
See also Using scatter loading with memory-mapped I/O on page 6-36.
ARM DUI 0056D Copyright © 1999-2001 ARM Limited. All rights reserved. 6-27

Writing Code for ROM
6.7 A semihosted application with interrupt handling
This section illustrates an Reference Peripheral Specification (RPS) based interrupt-driven timer, suitable for embedded applications. The main() function initializes and starts two RPS timers.
When a timer expires, an interrupt is generated. The interrupt is handled in int_handler.c. The code simply sets a flag and clears the interrupt. The interrupt flags are checked below in a endless loop. If a flag is set, a message is displayed and the flag is then cleared.
6.7.1 Memory map
There are no memory specification options in the linker command options and the default values are used. The code region starts at 0x08000. The RW data region and the ZI data region are placed sequentially after the code region. The stack top is 0x80000.
6.7.2 Building the example
To build the example, either:
• load the supplied rps_irq.mcp project into the CodeWarrior IDE
• use a batch file (build_a.bat) or makefile containing the following:
armcc -c -g -O1 main.c -I..\includearmcc -c -g -O1 int_handler.c -I..\includearmlink main.o int_handler.o -o rps_irq.axf -info totals
6.7.3 Sample code
The code in Example 6-9 is compiled and linked on its own and executed in the semihosting environment and Install_Handler is called to install the interrupt vector. The code in Example 6-10 on page 6-31 demonstrates an interrupt handler. The example can also be built as an embedded application with no semihosting (see An embeddable application with interrupt handling on page 6-33).
Example 6-9 Sample main.c code for rps_irq
/*** Copyright (C) ARM Limited, 2000. All rights reserved.*/ #include <stdio.h> #include <stdlib.h>
6-28 Copyright © 1999-2001 ARM Limited. All rights reserved. ARM DUI 0056D

Writing Code for ROM
#include "stand_i.h" #include "rpsarmul.h" /* EITHER: to use with the ARMulator *//* #include "intgrt.h" */ /* OR: to use with the Integrator board */int IntCT1 = 0;int IntCT2 = 0;int Count = 0; #ifndef EMBEDDEDextern IRQ_Handler(void);unsigned *irqvec = (unsigned *)0x18;unsigned Install_Handler (unsigned routine, unsigned *vector) /* Updates contents of 'vector' to contain branch instruction */ /* to reach 'routine' from 'vector'. Function return value is */ /* original contents of 'vector'. */ /* NB: 'Routine' must be within range of 32MB from 'vector'. */{ unsigned vec, oldvec; vec = ((routine - (unsigned)vector - 0x8)>>2); if (vec & 0xff000000) { printf ("Installation of Handler failed"); exit(1); } vec = 0xea000000 | vec; oldvec = *vector; *vector = vec; return (oldvec);} #endif/* Enabling and disabling interrupts Interrupts are enabled or disabled by reading the cpsr flags and updating bit 7. These functions work only in a privileged mode, because the control bits of the cpsr and spsr cannot be changed while in User mode.*/__inline void enable_IRQ(void){ int tmp; __asm { MRS tmp, CPSR BIC tmp, tmp, #0x80 MSR CPSR_c, tmp }}__inline void disable_IRQ(void){ int tmp; __asm
ARM DUI 0056D Copyright © 1999-2001 ARM Limited. All rights reserved. 6-29

Writing Code for ROM
{ MRS tmp, CPSR ORR tmp, tmp, #0x80 MSR CPSR_c, tmp }} #ifdef EMBEDDEDextern void init_serial_A(void); #endifint main(void){ #ifdef EMBEDDED #pragma import(__use_no_semihosting_swi) // ensure no functions that use // semihosting SWIs are linked in // from the C library #ifdef USE_SERIAL_PORT init_serial_A(); // Initialize serial port A #endif #endif printf("RPS Timer Interrupt Example\n"); #ifdef EMBEDDED #ifdef ROM_RAM_REMAP printf("Embedded (ROM/RAM remap, no SWIs) version\n"); #else printf("Embedded (ROM at 0x0, no SWIs) version\n"); #endif #else Install_Handler ((unsigned)IRQ_Handler, irqvec); printf("Normal (RAM at 0x8000, semihosting) version\n\n"); #endif printf("Initializing...\n"); enable_IRQ(); *IRQEnableClear = ~0; // Clear/disable all interrupts *Timer1Control = 0; // Disable counters by clearing the control bytes *Timer2Control = 0; *Timer1Clear = 0 ; // Clear counter/timer interrupts by writing to *Timer2Clear = 0 ; // the clear register - any data will work *Timer1Load = FAST_LOAD; // Load counter values *Timer2Load = MED_FAST_LOAD; *Timer1Control = (TimerEnable | // Enable the Timer TimerPeriodic | // Periodic Timer producing interrupt TimerPrescale8 ); // Set Maximum Prescale - 8 bits *Timer2Control = (TimerEnable | // Enable the Timer TimerPeriodic | // Periodic Timer producing interrupt TimerPrescale8 ); // Set Maximum Prescale - 8 bits *IRQEnableSet = IRQTimer1 | IRQTimer2; // Enable the counter timer interrupts printf("Running...\n"); IntCT1 = 0; // Clear CT 1 Flag
6-30 Copyright © 1999-2001 ARM Limited. All rights reserved. ARM DUI 0056D

Writing Code for ROM
IntCT2 = 0; // Clear CT 2 Flag Count = 0; while ( Count < 20 ) { if (IntCT1 != 0) // Timer 1 Interrupt occurred { Count++; printf("IntCT1\n"); IntCT1 = 0; // Reset the Timer 1 Interrupt Flag } if (IntCT2 != 0) // Timer 2 Interrupt occurred { Count++; printf("IntCT2\n"); IntCT2 = 0; // Reset the Timer 2 Interrupt Flag } } disable_IRQ();}
Example 6-10 Sample int_handler.c code
/*** Copyright (C) ARM Limited, 2000. All rights reserved.*/ #include "stand_i.h" #include "rpsarmul.h" /* EITHER: to use with the ARMulator */ /* #include "intgrt.h" */ /* OR: to use with the Integrator board */ /******************************************************************************* IRQHandler ** ** This function handles IRQ interrupts. In this example, these may come from ** Timer 1 or Timer 2. ** ** This handler simply clears the interrupt and sets corresponding flags. ** These flags are then checked by the main application. ** ********************************************************************************/void __irq IRQ_Handler(void){ unsigned status; status = *IRQStatus; /* Deal with source of interrupt */ /* RMC source definitions used for CT1, CT2 */ if (status & IRQTimer1)
ARM DUI 0056D Copyright © 1999-2001 ARM Limited. All rights reserved. 6-31

Writing Code for ROM
{ *Timer1Clear = 0;/* clear the interrupt */ IntCT1++; /* set the flag */ } else if (status & IRQTimer2) { *Timer2Clear = 0;/* clear the interrupt */ IntCT2++; /* set the flag */ } }
6-32 Copyright © 1999-2001 ARM Limited. All rights reserved. ARM DUI 0056D

Writing Code for ROM
6.8 An embeddable application with interrupt handling
This section describes how to convert the application in A semihosted application with interrupt handling on page 6-28 into an embeddable application. Converting the application requires additional files:
vectors.s This file contains exception vectors and exception handlers. For this example ROM is fixed at 0x0.
init.s This file performs ROM/RAM remapping (if required), initializes stack pointers and interrupts for each mode, and branches to __main in the C library. The C library code at __main eventually calls main().
ROM/RAM remapping is not used in this example. A sample scatter-load description for remapping is available in install_directory\Examples\embedded\rps_irq.
retarget.c This file implements a retarget layer for low-level I/O. Typically, this would contain your own target-dependent implementations. This example provides implementations of fputc(), ferror(), _sys_exit(), _ttywrch() and __user_initial_stackheap().
The #define USE_SERIAL_PORT selects code to output characters from the serial port of an ARM Development (PID) Board.
serial.c This file implements a simple polled RS232 serial driver for the ARM Integrator board. It outputs single characters on Serial Port A at 9600 Baud, 8 bit, no parity, 1 stop bit.
The file uart.c instantiates the uart0 structure. The scatter-loading files place this structure over the peripheral registers. See Using scatter loading with memory-mapped I/O on page 6-36 for details on defining I/O structures.
heap.s This file exports the symbol bottom_of_heap.
stack.s This file exports the symbol top_of_stacks.
To ensure that no semihosting SWI-using function is linked in from the C library, #pragma import(__use_no_semihosting_swi) is referenced from main().
ARM DUI 0056D Copyright © 1999-2001 ARM Limited. All rights reserved. 6-33

Writing Code for ROM
6.8.1 Memory map
The scatter-load descriptor file defines one load region, FLASH, and five execution regions:
FLASH The entire program is placed in ROM. The RO code executes from FLASH. The execution address of FLASH is the same as its load address (0x24000000), so it does not have to be moved.
32bitRAM The exception vector table vectors.s must appear in RAM at 0x0, so the +First command is used to place it first in the image. The RW data is relocated from FLASH to 32bitRAM above the vector code at 0x0. The ZI data is initialized in RAM above the RW data.
ROM/RAM remapping is not used in this example. A sample scatter-load description for remapping is available in install_directory\Examples\Embedded\rps_irq.
HEAP The heap is located at the end of memory used by the variables. The object heap.o contains a symbol that is used to setup the heap base.
STACKS The top of stack at 0x40000. The object stack.o contains a symbol that is used to set up the stack top.
UART0 Memory-mapped I/O at 0x16000000. The object uart.o contains symbols that are used to reserve the memory-mapped I/O. This memory is not zero-initialized.
6.8.2 Building the example
To build the example, use the build_c.bat batch file, the CodeWarrior IDE project file rps_irq.mcp with a target of EmbedScatter, or a makefile containing the following (the indented lines are a continuation of the single line above):
armasm -g vectors.sarmasm -g -PD "ROM_RAM_REMAP SETL {TRUE}" init.sarmasm -g stack.sarmasm -g heap.sREM Use the following lines to build without using the serial port. armcc -c -g -O1 main.c -I..\include -DEMBEDDED -DROM_RAM_REMAParmcc -c -g -O1 retarget.cREM Use the following lines to build using the serial port. REM armcc -c -g -O1 main.c -I..\include -DEMBEDDED -DROM_RAM_REMAPREM -DUSE_SERIAL_PORTREM armcc -c -g -O1 retarget.c -DUSE_SERIAL_PORTarmcc -c -g -O1 uart.c -I..\includearmcc -c -g -O1 serial.c -I..\includearmcc -c -g -O1 int_handler.c -I..\include
6-34 Copyright © 1999-2001 ARM Limited. All rights reserved. ARM DUI 0056D

Writing Code for ROM
armlink vectors.o init.o main.o retarget.o uart.o serial.o stack.o heap.o int_handler.o -scatter scat_c.scf -o rps_irq.axf -entry 0x24000000 -info totals -info unusedfromelf rps_irq.axf -bin -o rps_irq.bin
6.8.3 Scatter-load description file
The scatter-load description file is listed below.
FLASH 0x24000000 0x4000000{ FLASH 0x24000000 0x4000000 { init.o (Init, +First) * (+RO) } 32bitRAM 0x0000 { vectors.o (Vect, +First) * (+RW,+ZI) } HEAP +0 UNINIT { heap.o (+ZI) } STACKS 0x40000 UNINIT { stack.o (+ZI) } UART0 0x16000000 UNINIT { uart.o (+ZI) }}
6.8.4 Sample code
The retargetting code is the same as the code used in Loading the ROM image at address 0 on page 6-14. The source is available in install_directory\Examples\Embedded\rps_irq.
ARM DUI 0056D Copyright © 1999-2001 ARM Limited. All rights reserved. 6-35
Writing Code for ROM
6.9 Using scatter loading with memory-mapped I/O
In most ARM embedded systems, peripherals are located at specific addresses in memory. You often need to access a memory-mapped register in a peripheral by using a C variable. In your code, you will need to consider not only the size and address of the register, but also its alignment in memory.
ARM recommends word alignment of peripheral registers even if they are 16-bit or 8-bit peripherals. In a little-endian system, the peripheral databus can connect directly to the least significant bits of the ARM databus and there is no need to multiplex (or duplicate) the peripheral databus onto high bits of the ARM databus. In a big-endian system, the peripheral databus can connect directly to the most significant bits of the ARM databus and there is no need to multiplex (or duplicate) the peripheral databus onto low bits of the ARM databus.
The AMBA™ APB bridge uses this technique to simplify the bridge design. The result is that only word-aligned addresses should be used (whether byte, halfword, or word transfer), and a read will read garbage on any bits that are not connected to the peripheral.
6.9.1 Using pointers to access I/O
The simplest way to implement memory-mapped variables is to use pointers to fixed addresses. If the memory is changeable by external factors, for example by some hardware, it must be labelled as volatile. For example:
volatile unsigned *port = (unsigned int *) 0x40000000;
The data on the port can be accessed by:
*port = value; /* write to port */ value = *port; /* read from port */
The use of volatile ensures that the compiler always carries out the memory accesses, rather than optimizing them out. If the access was in a loop and the variable was not volatile, only one read of the memory address would be done.
This approach can be used to access 8-bit, 16-bit, or 32-bit registers, but you must declare the variable with the appropriate type for its size, int for 32-bit registers, short for 16-bit, and char for 8-bit. This ensures that the compiler generates the correct single load/store instructions, LDR/STR, LDRH/STRH, or LDRB/STRB.
6-36 Copyright © 1999-2001 ARM Limited. All rights reserved. ARM DUI 0056D

Writing Code for ROM
You must also ensure that the memory-mapped registers lie on appropriate address boundaries. Alignment must be either all word-aligned or on their natural size boundaries. The natural size of 16-bit registers is on half-word addresses. ARM recommends that all registers, whatever their size, be aligned on word boundaries, see Using arrays or structs on page 6-38.
You can use #define to simplify your code. For example, the source code in Example 6-11 produces the interleaved code in Example 6-12.
Example 6-11
#define PORTBASE 0x40000000 /* Counter/Timer Base */ #define PortLoad ((volatile unsigned int *) PORTBASE) /* 32 bits */ #define PortValue ((volatile unsigned short *)(PORTBASE + 0x04)) /* 16 bits */ #define PortClear ((volatile unsigned char *)(PORTBASE + 0x08)) /* 8 bits */ void init_regs(void){ unsigned int int_val; unsigned short short_val; unsigned char char_val; *PortLoad = (unsigned int) 0xF00FF00F; int_val = *PortLoad; *PortValue = (unsigned short) 0x0000; short_val = *PortValue; *PortClear = (unsigned char) 0x1F; char_val = *PortClear;}
Example 6-12 Output fragment from compiler using -S and -fs
AREA ||.text||, CODE, READONLY init_regs PROC;;;7 {;;;8 unsigned int int_val;;;;9 unsigned short short_val;;;;10 unsigned char char_val;;;;11 *PortLoad = (unsigned int) 0xF00FF00F;000000 e59f1024 LDR r1,|L1.44|000004 e3a00440 MOV r0,#0x40000000000008 e5801000 STR r1,[r0,#0];;;12 int_val = *PortLoad;00000c e5901000 LDR r1,[r0,#0];;;13 *PortValue = (unsigned short) 0x0000;000010 e3a01000 MOV r1,#0000014 e1c010b4 STRH r1,[r0,#4]
ARM DUI 0056D Copyright © 1999-2001 ARM Limited. All rights reserved. 6-37
Writing Code for ROM
;;;14 short_val = *PortValue;000018 e1d010b4 LDRH r1,[r0,#4];;;15 *PortClear = (unsigned char) 0x1F;00001c e3a0101f MOV r1,#0x1f000020 e5c01008 STRB r1,[r0,#8];;;16 char_val = *PortClear;000024 e5d00008 LDRB r0,[r0,#8];;;17 }000028 e1a0f00e MOV pc,lr |L1.44|00002c f00ff00f DCD 0xf00ff00f ENDP END
6.9.2 Using unions
Example 6-13 shows how to access 16-bit memory mapped peripheral registers that are aligned on word boundaries. The example uses a union to force word alignment.
Example 6-13
/* header file */typedef union { short x; int pad; } X; /* force alignment of type X to */ /* the natural alignment of int */static X *const device = (X *) 0xffff00c0; /* use of static and const enable*/ /* the compiler to better */ /* optimize the code *//* C file */void f(void) { device[2].x = 3; } /* write the value 3 to the */ /* third 16-bit value of device */
6.9.3 Using arrays or structs
The following examples show how to use arrays or structs to access peripheral registers.
Using an array of shorts
To access some 16-bit peripheral registers on 16-bit alignment, you can write:
volatile unsigned short u16_IORegs[20];
6-38 Copyright © 1999-2001 ARM Limited. All rights reserved. ARM DUI 0056D

Writing Code for ROM
For little-endian systems, this works if your peripheral controller can route the peripheral databus to the high part (D31..D16) of the ARM databus as well as the low part (D15..D0) depending on the address that you are accessing. You must check if this multiplexing logic exists in your design (the standard ARM APB bridge does not support this).
Using a struct
The advantages of using a struct over an array are:
• descriptive names can be used (more maintainable and legible)
• different register widths can be accommodated.
Padding should be made explicit rather than relying on automatic padding added by the compiler, for example:
struct PortRegs { unsigned short ctrlreg; /* offset 0 */ unsigned short dummy1; unsigned short datareg; /* offset 4 */ unsigned short dummy2; unsigned int data32reg; /* offset 8 */} iospace;x = iospace.ctrlreg;iospace.ctrlreg = newval;
Note Peripheral locations should not be accessed using __packed structs (where unaligned members are allowed and there is no internal padding), or using C bitfields. This is because it is not possible to control the number and type of memory access that is being performed by the compiler.
The result is code that is non-portable, has undesirable side effects, and will not work as intended. The recommended way of accessing peripherals is through explicit use of architecturally-defined types such as int, short, char on their natural alignment.
Using a pointer to struct/array
struct PortRegs { unsigned short ctrlreg; /* offset 0 */ unsigned short dummy1; unsigned short datareg; /* offset 4 */ unsigned short dummy2; unsigned int data32reg; /* offset 8 */};volatile struct PortRegs *iospace =
ARM DUI 0056D Copyright © 1999-2001 ARM Limited. All rights reserved. 6-39

Writing Code for ROM
(struct PortRegs *)0x40000000;x = iospace->ctrlreg;iospace->ctrlreg = newval;
The pointer can be either local or global. If you want the pointer to be global in order to avoid the base pointer being reloaded after function calls, make iospace a constant pointer to the struct by changing its definition to:
volatile struct PortRegs * const iospace = (struct PortRegs *)0x40000000;
6.9.4 Using scatter loading
The variable, array, or struct must be declared in a file on its own. When it is compiled, the object code for this file contains only data. This data can be placed at a specified address using the ARM scatter-loading mechanism. This is the recommended method for placing regions at required locations in the memory map.
Create a file, for example iovar.c that contains a declaration of the variable, array, or struct. For example:
volatile unsigned short u16_IORegs[20];
or
struct{ volatile unsigned reg1; volatile unsigned reg2;} mem_mapped_reg;
Create a scatter-load description file, called for example scatter.scf, containing the code in Sample file.
Example 6-14 Sample file
ALL 0x8000 ; one load region ALL at 0x8000{ ALL 0x8000 ; by default, everything goes into this region { * (+RO,+RW,+ZI) } IO 0x40000000 UNINIT ; register variables go here ; initial zeros are not written { iovar.o (+ZI) ; a single module is selected by name }}
6-40 Copyright © 1999-2001 ARM Limited. All rights reserved. ARM DUI 0056D
Writing Code for ROM
The scatter-load description file must be specified to the linker using the -scatter scatter.scf command-line option. The UNINIT keyword in the description file indicates that the ZI region will not be initialized with zeros when the application is reset. If you want the peripheral registers to have zero written to them on reset, omit the UNINIT keyword. The scatter-load description file creates two different regions in your image (ALL and IO). The zero-init area from iovar.o (containing your array or struct) goes into the IO area located at 0x40000000. All code (RO) and data areas (RW and ZI) from other object files go into the ALL region that starts at 0x8000.
If you have more than one group of variables (more than one set of memory mapped registers) you must define each group of variables as a separate execution region (they could, however, all lie within a single load region). Each group of variables must be defined in a separate module.
The benefits of using a scatter description file are:
• All the (target-specific) absolute addresses chosen for your devices, code, and data are located in one file and maintenance is simplified.
• If you decide to change your memory map (for example if peripherals are moved), you do not have to rebuild your entire project but only to re-link the existing objects.
For a description of scatter loading, see the ADS Linker and Utilities Guide. For a description of how to specify code and data sections from C and C++, see the section on pragmas in the ADS Compilers and Libraries Guide.
6.9.5 Code efficiency
The ARM compiler normally uses a base register plus the immediate offset field available in the load/store instruction to compile struct member or specific array element access.
The ARM instruction set, LDR/STR word/byte have a 4Kbyte range, but LDRH/STRH has a smaller immediate offset of 256bytes.
The Thumb instruction set is much more restricted in addressing range than the ARM instructions. The Thumb LDR/STR has a range of 32 words, LDRH/STRH has a range of 32 halfwords, LDRB/STRB has a range of 32 bytes. You must group related peripheral registers near to each other if possible. The compiler will generally do a good job of minimizing the number of instructions required to access the array elements or structure members by using base registers.
ARM DUI 0056D Copyright © 1999-2001 ARM Limited. All rights reserved. 6-41

Writing Code for ROM
There is a choice between one big C struct/array for the whole I/O space and smaller per-peripheral structs. There is not much difference in efficiency. The big struct might be a benefit if you are using ARM code where a base pointer can have a 4Kbyte range (for word/byte access) and the entire I/O space is less than 4KB. Smaller structs for each peripheral are more maintainable.
6-42 Copyright © 1999-2001 ARM Limited. All rights reserved. ARM DUI 0056D

Writing Code for ROM
6.10 Troubleshooting
This section provides solutions to the following common problems:
• Linker error __semihosting_swi_guard
• Setting $top_of_memory
• Vector table code eliminated on page 6-44.
• Errors with scatter-loading description files on page 6-44.
6.10.1 Linker error __semihosting_swi_guard
The linker reports __semihosting_swi_guard as being multiply defined.
Cause
The linker loaded the semihosting implementation of a function from the ANSI C library. This error message is issued if you have imported the semihosting guard symbol with #pragma import(__use_no_semihosting_swi), or called the C guard function __use_no_semihosting_swi(), and have also called a library function that uses semihosting.
Solution
This problem can be fixed in one of the following ways:
• Redefine the semihosted functions with your own implementation. The new functions are used instead of the C library versions.
• If the semihosted functions are used only when building an application version of your ROM image for debugging purposes, comment them out with an #ifdef when building a ROM image.
To locate the functions that use semihosting, link with -verbose -errors file.txt and search the output log file for occurrences of __I_use_semihosting_swi.
6.10.2 Setting $top_of_memory
The debugger internal variable $top_of_memory tells the debugger where the highest writable address is in the memory map of a remote target. By default, this address is used to place the stack and heap. The default value for $top_of_memory is 0x80000.
Different boards might have different memory maps, so $top_of_memory must be changed to one plus the address of the top of the RAM for your board. This must be done before running an application, otherwise you may experience data aborts or code crashes.
ARM DUI 0056D Copyright © 1999-2001 ARM Limited. All rights reserved. 6-43

Writing Code for ROM
For an unexpanded Integrator core module, set $top_of_memory to 0x40000.
If your board has extra DRAM modules fitted, you should change $top_of_memory appropriately.
$top_of_memory only applies to Multi-ICE and EmbeddedICE. It does not apply to Angel or ARMulator. (The top of memory for Angel is hard-coded in the porting and the stackbase in ARMulator is determined by a config file.)
6.10.3 Vector table code eliminated
By default, the linker removes code sections that are never executed, or data that is never referred to, from the final image. To see if any sections have been removed, link with the -info unused option.
Follow the steps below to ensure that the vector table is not inadvertently removed.
1. Mark all entry points with the assembler directive ENTRY. The C library has an entry point at __main().
2. Use the command-line option -entry to select one of the entry points as the image entry point. If a unique entry point is not specified, the linker warns:
Image does not have an entry point. (Not specified or not set due to multiple choices).
The recommended link options for embedded images are:
armlink obj1.o obj2.o -scatter scat.scf -info unused -entry 0x0 -o prog.axf
6.10.4 Errors with scatter-loading description files
If you encounter errors when you attempt to link using scatter-loading description file, try to simplify the build process and gradually add more complexity. Some techniques that might be useful are listed below.
Retarget __user_initial_stackheap()
__user_initial_stackheap() must be reimplemented if you are using scatter loading. Ensure that you have reimplemented the function correctly and that the new module is linked with your code. Use the reimplementation provided in the Examples directory as a starting point for your reimplementation.
Make regions large enough to hold the code and data
If you specify a maximum size in the scatter-loading description file, ensure that the size is big enough to hold the related code or data.
6-44 Copyright © 1999-2001 ARM Limited. All rights reserved. ARM DUI 0056D

Writing Code for ROM
If you specify absolute addresses for each region, ensure that the regions do not overlap.
Use an ANY specifier in the description file
If you are using very specific names to allocate code and data, you might have some code that does not match the specification and is not placed. Use the * or ANY specifications to provide a location for all unmatched code and data.
ARM DUI 0056D Copyright © 1999-2001 ARM Limited. All rights reserved. 6-45

Writing Code for ROM
6.11 Measuring code and data size
To measure code size, do not look at the linked image size or object module size, as these include symbolic information that is not part of the binary data. Instead, use one of the following armlink options:
-info sizes This option gives a breakdown of the code and data sizes of each object file or library member making up an image.
-info totals This option gives a summary of the total code and data sizes of all object files and all library members making up an image.
6.11.1 Interpreting size information
The information provided by the -info sizes and -info totals options can be broken down into:
• code (or read-only) segments
• data (or read-write) segments
• debug data.
Code (or read-only) segments
code size Size of code, excluding any data that has been placed in the code segment.
RO data Size of read-only data included in the code segment by the compiler.
This data contains:
• the addresses of variables that are accessed by the code
• floating-point immediate values
• immediate values that cannot be loaded directly into a register
• short inline strings
• the addresses of longer inline strings in RO data.
6-46 Copyright © 1999-2001 ARM Limited. All rights reserved. ARM DUI 0056D

Writing Code for ROM
Data (or read-write) segments
RW data Size of read-write data. This is data that is read-write and also has an initializing value. Read-write data occupies the displayed amount of RAM at run-time, but also requires the same amount of ROM to hold the initializing values that are copied into RAM on image startup.
ZI data Size of read-write data that is zero-initialized at image startup.
Typically this contains arrays that are not initialized in the C source code. Zero-initialized data requires the displayed amount of RAM at run-time but does not require any space in ROM.
Debug data
debug data Reports the size of any debugging data.
6.11.2 Calculating ROM and RAM requirements
The linker calculates the ROM and RAM requirements for code and data as follows:
ROM Code size + RO data + RW data
RAM RW Data + ZI data.
In addition you must allow some RAM for stacks and heap.
In more complex systems, you may require part (or all) of the code segment to be downloaded from ROM into RAM at run-time. This increases the system RAM requirements but could be necessary if, for example, RAM access times are faster than ROM access times and the execution speed of the system is critical.
ARM DUI 0056D Copyright © 1999-2001 ARM Limited. All rights reserved. 6-47

Writing Code for ROM
6-48 Copyright © 1999-2001 ARM Limited. All rights reserved. ARM DUI 0056D
Chapter 7 Caches and Tightly Coupled Memories
This chapter describes some aspects of initializing cached processors. It also describes processors with tightly coupled memory, and ARMulator models of cached processors. It contains the following sections:
• About caches and tightly coupled memory on page 7-2
• System control coprocessor on page 7-4
• Memory protection units on page 7-5
• Configuring a PU on page 7-7
• Memory management units on page 7-12
• Configuring an MMU on page 7-16
• Tightly coupled memory on page 7-19.
See also ARM Architecture Reference Manual and the Technical Reference Manual for your processor.
ARM DUI 0056D Copyright © 1999-2001 ARM Limited. All rights reserved. 7-1

Caches and Tightly Coupled Memories
7.1 About caches and tightly coupled memory
Most modern processor cores can process instructions and data much faster than off-chip memory systems can deliver them. Caches and Tightly Coupled Memories (TCMs) are different methods of improving system performance when the external memory is narrow, slower than the core, or both.
Caches and TCMs are small, fast memories closely coupled with the processor. They can:
• enable good system performance even with slow or narrow off-chip memory
• reduce total system power consumption by reducing off-chip memory accesses.
Note An uncached core is normally a better choice if off-chip memory is as fast as the core, and 32 bits wide.
7.1.1 About caches
Caches hold copies of the contents of memory locations. In general, these are memory locations that have been loaded from recently. These copies are automatically used in preference to off-chip memory.
Caches only give an advantage if the cached memory locations are used again. In a real system this is very common, for example:
• instruction loops
• frequently referenced data.
Cache operation is transparent to the programmer. However, you must initialize the core to specify what off-chip memory locations are to be cached.
7.1.2 About tightly coupled memory
TCMs replace an area of off-chip memory when they are enabled.
TCM has the following advantages when compared with caches:
• it uses about half the die area
• it gives precisely predictable real-time performance.
To take advantage of a TCM, you must consider the TCM when writing your system software. For example, you are likely to place the following in TCM:
• interrupt handling code
• data that changes frequently, such as the stack.
7-2 Copyright © 1999-2001 ARM Limited. All rights reserved. ARM DUI 0056D

Caches and Tightly Coupled Memories
For further information see Tightly coupled memory on page 7-19.
7.1.3 Models of caches and tightly coupled memory
ARMulator models of processors that have caches or TCMs include models of the caches or TCMs.
To initialize the model caches or TCMs, you can program the PU or MMU models exactly as you program the real hardware.
ARMulator Pagetable model
In addition, ARMulator includes a model, Pagetable, that can initialize the model caches or TCMs for you (see the ARMulator Basics chapter in ADS Debug Target Guide).
You can do any of the following:
• use the Pagetable model throughout your development work, unless you are writing an operating system. This option is recommended if you are writing a User Mode program.
• write your own PU or MMU programming code from the beginning
• use the Pagetable model during the early stages of development, then write your own PU or MMU programming code later.
Default initial state of ARMulator models of caches and TCMs
On initialization:
• ARMulator models of caches are enabled by the Pagetable model
• ARMulator models of TCMs are disabled.
You can change these defaults in the peripherals.ami file (see ADS Debug Target Guide).
7.1.4 Cache performance
If part of your main memory is 32 bits wide, and as fast as the core, a cache might reduce system performance.
Most systems have memory slower than the core, or narrower than 32 bits.
ARM DUI 0056D Copyright © 1999-2001 ARM Limited. All rights reserved. 7-3

Caches and Tightly Coupled Memories
7.2 System control coprocessor
CP15 is the system control coprocessor. You must write to registers in CP15 to configure your core, and any caches or TCM.
The registers in CP15 can only be accessed using the MCR and MRC instructions (for details of these instructions see the ARM Instructions chapter in ADS Assembler Guide).
For details of the registers in CP15, see ARM Architecture Reference Manual, and the Technical Reference Manual for your processor.
Note If your system has an MMU, you must also write pagetables to memory before enabling the MMU (see Configuring an MMU on page 7-16).
7-4 Copyright © 1999-2001 ARM Limited. All rights reserved. ARM DUI 0056D
Caches and Tightly Coupled Memories
7.3 Memory protection units
Protection Units (PUs) partition memory into regions. For each region you can specify:
Size Typically this might range from 4KB to 4GB.
Base address
A region must start on a memory boundary that is a multiple of its size.
Access permissions
For example, you can mark a region for read access only from User mode.
When the PU is enabled, it aborts accesses to addresses outside any defined region.
7.3.1 Harvard architecture
ARM cached Harvard cores have separate instruction and data caches, but use the same bus to access external memory. You can define the properties of memory regions for data and instructions separately.
Before you enable the PU, you must define:
• at least one memory region for instructions
• at least one memory region for data.
These can define the same region of memory.
7.3.2 Von Neumann architecture
Von Neumann cores access data and instructions over the same bus.
You must define at least one memory region before you enable the PU.
ARM DUI 0056D Copyright © 1999-2001 ARM Limited. All rights reserved. 7-5

Caches and Tightly Coupled Memories
7.3.3 Overlapping regions
You can define overlapping memory protection regions. If several memory regions map the same memory, the PU uses the highest numbered region to control access to the memory.
Figure 7-1 shows an example of memory regions. In this example, a background region covers the whole address space. The foreground regions overlap the background region.
Figure 7-1 Example memory regions
Note Instruction regions have corresponding data regions to allow for access to data contained in literal pools within code.
5�����������0����7�- "�����0����7�-
#&%
.���<���
#&%
=���0�����=���0�����
"���
,��,��#������(,��<�
#���-��������<�)���������
#���-���,��<�=�����
#������(,��<�
#������(,��<�
#������(,��<�
7-6 Copyright © 1999-2001 ARM Limited. All rights reserved. ARM DUI 0056D

Caches and Tightly Coupled Memories
7.4 Configuring a PU
To configure a PU, you must do the following:
1. Define the starting addresses and sizes of protection regions, and enable them. To do this, write to coprocessor register c6 in CP15, the system control coprocessor (see Setting protection region addresses and sizes, and enabling each region on page 7-8).
2. Set the cacheable and bufferable attributes for each region. To do this, write to CP15 registers c2 and c3 (see Setting region cacheable and bufferable flags on page 7-9).
3. Set access permissions for each region. To do this, write to CP15 register c5 (see Setting region access permissions on page 7-10).
4. Enable the caches and enable the PU. To do this, write to CP15 register c1 (see Configuring core operation on page 7-11).
Note The Pagetable model can do this for you if you are using ARMulator (see Models of caches and tightly coupled memory on page 7-3 and the ARMulator Basics chapter in ADS Debug Target Guide).
Note Details of configuration vary from core to core. See the Technical Reference Manual for your particular core.
The following examples show the general methods of programming. They do not show correct details for every core.
ARM DUI 0056D Copyright © 1999-2001 ARM Limited. All rights reserved. 7-7

Caches and Tightly Coupled Memories
7.4.1 Setting protection region addresses and sizes, and enabling each region
Example 7-1 sets the addresses and sizes of protection regions.
Note Enabling the protection regions has no effect until you enable the PU.
Example 7-1 Setting protection regions
LDR r0,=0xFFFF801D ; define ROM with base address 0xFFFF8000, size 32KB, enabled MCR p15,0,r0,c6,c1,0 ; apply this definition to data region 1 MCR p15,0,r0,c6,c1,1 ; apply the same definition to instruction region 1 LDR r0,=0xB0000039 ; define Peripherals with base address 0xB0000000, size 512MB, enabled MCR p15,0,r0,c6,c2,0 ; apply this definition to data region 2 LDR r0,=0x4000001F ; define Data with base address 0x40000000, size 64KB, enabled MCR p15,0,r0,c6,c3,0 ; apply this definition to data region 3 MOV r0,#0x1D ; define Code with base address 0x0, size 32KB, enabled MCR p15,0,r0,c6,c4,0 ; apply this definition to data region 4 MCR p15,0,r0,c6,c4,1 ; apply the same definition to instruction region 4
Coprocessor register 6
Use c6 as the first coprocessor register to select the registers for region bases and sizes.
Selects the region using the second coprocessor register number, c1-c4 in the example.
The value in the ARM register, r0 in the example, contains:
• the base address, in bits [31:12]
• bits [11:6] must be zero
• the region size in bits [5:1] (see the Technical Reference Manual for your processor for details)
• setting bit [0] enables the region.
Opcode2
Opcode2 is only used for cores with separate data and instruction regions (see the Technical Reference Manual for your processor for details).
Opcode2 must be zero if your processor does not support separate data and instruction regions. If it does support them, 0 is for data regions, 1 for instruction regions.
7-8 Copyright © 1999-2001 ARM Limited. All rights reserved. ARM DUI 0056D

Caches and Tightly Coupled Memories
7.4.2 Setting region cacheable and bufferable flags
Coprocessor register c2 of CP15 is the region cacheable flags register. Coprocessor register c3 of CP15 is the region bufferable flags register. Example 7-2 sets the cacheable and bufferable flags for each data region.
If you set a region to be cacheable:
• When you load from that region, the cache is searched. If the item is found, it is loaded from the cache. If the item is not found, a complete cache line including the required address is loaded. Some other cache line is evicted from the cache, unless there is an unused cache line available.
• When you save to that region, the cache is searched. If the item is found, the save is made to the cache. If the item is not found, the save is made to memory.
The exact effect of the bufferable flag varies (see the Technical Reference Manual for your processor for details).
Bits [7:0] of register c2 in CP15 are the cacheable flags. Opcode 2 is used to select instruction or data regions.
Bits [7:0] of register c3 in CP15 are the bufferable flags. Opcode 2 must be 0 because bufferable flags can only be used for data regions.
Operand2 specifies data or instruction regions.
Example 7-2 Setting cacheable and bufferable flags
MOV r0,#2_00011010 ; set data regions 1, 3 and 4 as cacheable, all others noncacheable MCR p15,0,r0,c2,c0,0 MOV r0,#2_00010010 ; set instruction regions 1 and 4 as cacheable, all others noncacheable MCR p15,0,r0,c2,c0,1 MOV r0,#2_00001000 ; set data region 3 as write bufferable, all others nonbufferable MCR p15,0,r0,c3,c0,0
ARM DUI 0056D Copyright © 1999-2001 ARM Limited. All rights reserved. 7-9

Caches and Tightly Coupled Memories
7.4.3 Setting region access permissions
Coprocessor register c5 of CP15 is the region access permissions register. Example 7-3 sets Region access permissions.
Operand2 specifies data or instruction regions.
Example 7-3 Setting access permissions
MOV r0,#2_1111111100 ; set data region 1, 2, 3 and 4 as full access MCR p15,0,r0,c5,c0,0 MOV r0,#2_1000001000 ; set instruction region 1 and 4 as: MCR p15,0,r0,c5,c0,1 ; Privileged Mode, full access; User Mode, read only
Table 7-1 and Table 7-2 show the meanings of the bits in the access permission register.
Note Some processors have four bits per region (see the Technical Reference Manual for your processor for details).
Table 7-1 Region bit mapping scheme
Register bit Function
[15:14] access permission bits [1:0] of area 7
[13:12] access permission bits [1:0] of area 6
[11:10] access permission bits [1:0] of area 5
... ...
Table 7-2 Region access permission bit definition
bits [1:0] Meaning
00 No access
01 Access from privileged mode only
10 Full access from privileged mode, read only from User mode
11 Full access
7-10 Copyright © 1999-2001 ARM Limited. All rights reserved. ARM DUI 0056D

Caches and Tightly Coupled Memories
7.4.4 Configuring core operation
Coprocessor register c1 of CP15 is the core configuration register. You must use a read-modify-write cycle to alter the contents of c1. Example 7-4 configures the core and enables the PU.
Example 7-4 Configuring core operation (ARM940T only)
MRC p15,0,r0,c1,c0,0 ; read core configuration register ORR r0,r0,#0xC0000000 ; set asynchronous clocks and not fastbus mode ORR r0,r0,#0x1000 ; enable instruction cache ORR r0,r0,#0x5 ; enable data cache and PU MCR p15,0,r0,c1,c0,0 ; write modified value to core configuration register
Table 7-3 shows the meanings of the core configuration bits for an ARM940T.
Note The details of the core configuration register vary from core to core. See the Technical Reference Manual for your processor for details.
Table 7-3 Core configuration register (ARM940T)
Register bits Functions
[31] Asynchronous clocking select (iA)
[30] nFastBus select (nF)
[29:14] Reserved (must be zero, or use read-modify-write)
[13] Alternate vectors select (V)
[12] Instruction cache enable flag (I)
[11:8] Reserved (must be zero, or use read-modify-write)
[7] Big-end bit (E)
[6:3] Reserved (must be one, or use read-modify-write)
[2] Data cache enable flag (D)
[1] Reserved (must be zero, or use read-modify-write)
[0] PU enable (P)
ARM DUI 0056D Copyright © 1999-2001 ARM Limited. All rights reserved. 7-11

Caches and Tightly Coupled Memories
7.5 Memory management units
Memory Management Units (MMUs):
• translate virtual addresses into physical addresses
• control memory access permissions.
If the MMU is disabled, the external address bus outputs addresses without translation.
MMUs are much more versatile than PUs. They can:
• provide fine grained control of the memory system
• relocate memory at runtime.
You can use an MMU to implement a demand-paged virtual memory system.
7.5.1 Virtual to physical address mapping
Addresses generated by the ARM processor are virtual addresses. When the MMU is enabled, it translates these virtual addresses into physical addresses. This means that you can access code or data at a chosen virtual address, when the physical address is at a different location. You can use this for various purposes, for example to allocate memory to different processes with conflicting address maps.
The translation tables are stored in main memory. In addition to holding address translations, the tables hold fields to control:
• memory access permissions for each region (see Memory access permissions and domains on page 7-14)
• flags to control whether accesses to a region are cacheable and bufferable (see Cacheable and bufferable flags on page 7-15).
Figure 7-2 on page 7-13 shows the general principle of virtual to physical address mapping.
7-12 Copyright © 1999-2001 ARM Limited. All rights reserved. ARM DUI 0056D

Caches and Tightly Coupled Memories
Figure 7-2 Virtual to physical address mapping
Warning Caches contain virtual addresses. It is your responsibility to ensure that virtual addresses from different processes are not mapped to the same physical address, unless you intend the processes to share an area of memory.
For full details of translation tables see ARM Architecture Reference Manual and the Technical Reference Manual for your processor.
8������ ��(
:��������������<����0� �<���
.<(���� ��(
#&%
#$%
#$%
8#$%
#$%
#$%
#$%
:�������������
.����,
.����=
.����$
%���0�
.����"%%�
.������������������
5:6=
":6=
ARM DUI 0056D Copyright © 1999-2001 ARM Limited. All rights reserved. 7-13

Caches and Tightly Coupled Memories
7.5.2 Memory access permissions and domains
Translation tables also hold access permission fields and a domain field.
There are 16 domains, Each region defined in the translation tables is controlled by the domain specified in the corresponding domain field.
Each domain has two bits in the domain access control register in CP15. According to the value in these bits, attempts to access regions belonging to the domain can:
• be allowed only if the permissions set in the translation table allow
• generate a domain fault
• be allowed regardless of the permissions set in the translation table.
When the processor generates a request for a memory access, the MMU checks the permissions as follows:
1. The MMU looks up the domain number in the translation table.
2. Using the domain number found in step 1, it checks the domain access permission for the domain in the domain access control register.
3. According to the value found in the domain access control register, the MMU can either:
• allow the access unconditionally
• disallow the access unconditionally
• check the region access permissions in the translation table.
This system enables you to change context easily. For each application, an operating system can:
• allow free access, restricted access, or no access to different areas of memory
• change access permissions to large numbers of regions simultaneously by changing a single entry in the domain access control register.
7-14 Copyright © 1999-2001 ARM Limited. All rights reserved. ARM DUI 0056D

Caches and Tightly Coupled Memories
7.5.3 Cacheable and bufferable flags
Translation tables also hold cacheable and bufferable flags.
If you set a region to be cacheable:
• When you load from that region, the cache is searched. If the item is found, it is loaded from the cache. If the item is not found, a complete cache line including the required address is loaded. Some other cache line is evicted from the cache, unless there is an unused cache line available.
• When you save to that region, the cache is searched. If the item is found, the save is made to the cache. If the item is not found, the save is made to memory.
The exact effect of the bufferable flag varies (see the Technical Reference Manual for your processor for details).
It is often desirable to prevent certain areas of memory being cached or buffered, for example:
• memory mapped I/O
• large arrays that you access randomly.
For full details, see ARM Architecture Reference Manual and the Technical Reference Manual for your processor.
ARM DUI 0056D Copyright © 1999-2001 ARM Limited. All rights reserved. 7-15
Caches and Tightly Coupled Memories
7.6 Configuring an MMU
To configure an MMU, you must do the following:
1. Build the translation table in memory. Translation tables include:
• virtual to physical translation
• cacheable and bufferable flags
• domain number
• access permissions.
See Building the translation table on page 7-17.
2. Store the location of the translation table in CP15 register c2 (see Setting the location of the translation table on page 7-17).
3. Enable the caches and enable the MMU by writing to CP15 register c1 (see Configuring core operation on page 7-18).
Note The PageTable model can do this for you if you are using ARMulator (see Models of caches and tightly coupled memory on page 7-3 and the ARMulator Basics chapter in ADS Debug Target Guide).
You are recommended to:
• set permissions on the translation table for privileged mode access only
• map virtual addresses to identical physical addresses for the region containing the translation table.
7.6.1 Altering the translation table during program execution
You can alter the translation table without disabling the MMU. After doing this, you must flush the Translation Lookaside Buffers (TLBs). For details, see ARM Architecture Reference Manual and the Technical Reference Manual for your processor.
7-16 Copyright © 1999-2001 ARM Limited. All rights reserved. ARM DUI 0056D

Caches and Tightly Coupled Memories
7.6.2 Building the translation table
Example 7-5 initializes a translation table that maps every virtual address to an identical physical address (this is called flat mapping). It creates a table with 4096 entries for addresses 0x000xxxxx to 0xFFFxxxxx, with full access for all regions.
Example 7-5 A flat translation table
LDR r0,=TTB ; Set start of translation table base (on 16KB boundary) LDR r1, =0xFFF ; Set loop counter for 4096 MOV r2, #2_110000000000 ; Set access permissions for full access (bits 11:10) ORR r2,r2,#2_000111100000 ; Set domain number to 15 (bits 8:5) ORR r2,r2,#2_000000010000 ; Set bit 4 to 1 ORR r2,r2,#2_000000000010 ; Set as 1MB section (bits 1:0) ; All unused bits are 0loop ORR r3,r2,r1,LSL#20 ; Build pattern into empty register STR r3,[r0,r1,LSL#2] ; Use loop counter to create individual table base addresses SUBS r1,r1,#1 ; Decrement loop counter BPL loop ; Loop until r1 goes negative
See Aliasing a ROM region at 0x0 to 0xFFF00000 on page 7-18 for an example of how to set up non-flat translations.
7.6.3 Setting the location of the translation table
Example 7-6 sets the translation table base register (c2) in CP15.
Example 7-6 Set translation table base
LDR r0,=TTB : Set start of translation table base (on 16KB boundary) MCR p15,0,r0,c2,c2,0 ; Write value to CP15 c2
ARM DUI 0056D Copyright © 1999-2001 ARM Limited. All rights reserved. 7-17

Caches and Tightly Coupled Memories
7.6.4 Aliasing a region
Example 7-7 shows how to alias a ROM region.
Example 7-7 Aliasing a ROM region at 0x0 to 0xFFF00000
LDR r0,=TTB : Set start of translation table base (on 16KB boundary) LDR r1,=0x0 ; Read first entry in translation table, which points to a 1MB section at 0x0 LDR r2,[r0,r1,LSL#2] ORR r2,r2,#2_1000 ; Set cacheable flag LDR r1,=0xFFF00000 ; Remap 0x0 to 0xFFF00000 STR r2,[r0,r1,LSL#2] MOV r0,#0xC0000000 ; Set permissions for domain 15 MCR p15,0,r0,c3,c0,0 ; Write value to CP15 c3
7.6.5 Configuring core operation
Example 7-8 sets the bits in the core control register (c1) in CP15.
Example 7-8 Set core control parameters (ARM920T only)
MRC p15,0,r0,c1,c0,0 ; Read control register ORR r0,r0,#0xC00000000 ; Set asynchronous clocking mode bits ORR r0,r0,#0x1000 ; Set enable instruction cache bit ORR r0,r0,#0x5 ; Set enable data cache and MMU bits MCR p15,0,r0,c1,c0,0 ; Write to control register
Note The details of the core configuration register vary from core to core. See the Technical Reference Manual for your processor for details.
7-18 Copyright © 1999-2001 ARM Limited. All rights reserved. ARM DUI 0056D

Caches and Tightly Coupled Memories
7.7 Tightly coupled memory
Use normal memory access instructions to access TCM. The address is the only difference between an instruction to access TCM and an access to off-chip memory.
Some cores, ARM966E-S for example, have TCM and no cache.
Other cores, ARM946E-S for example, have both TCM and caches. TCM and caches can be enabled at the same time, but in general must not map the same regions of physical memory.
Some details of ARM966E-S are described below. Details for other cores vary. For additional information see the Technical Reference Manual for your processor.
ARM DUI 0056D Copyright © 1999-2001 ARM Limited. All rights reserved. 7-19

Caches and Tightly Coupled Memories
7.7.1 ARM966E-S memory map
Figure 7-3 shows an example of a memory map of an ARM966E-S.
Figure 7-3 ARM966E-S memory map
.<(����� ��(�7�- :,%�������0
����������
��>=
��>=
����������
����������
����������
���%=
��%=
���"������
����������
����������
����������
����������
���#������
��>=
��>=
��>=
��>=
��%=
$3=�������
"�������������
"����������
"���� ��(
5�������������������
5����������������
5���������� ��(
"���� ��(
5���������� ��(
$3=������������%=
���%=$3=���������
���������� ���"������
7-20 Copyright © 1999-2001 ARM Limited. All rights reserved. ARM DUI 0056D

Caches and Tightly Coupled Memories
Multiply aliased memory
The ARM966E-S has up to 64MB of instruction memory, and up to 64 MB of data memory, in TCM.
In the example shown in Figure 7-3 on page 7-20, the implementation only has 64KB of instruction memory in TCM. This memory can be addressed at 1024 different locations, and the TCM ignores bits [25:16] for instruction fetches.
The implementation also has only 32KB of data memory in TCM. This memory can be addressed at 2048 different locations, and the TCM ignores bits [25:15] for data accesses.
Instruction and data memory
The instruction and data TCMs have independent enables.
When a TCM is disabled, all accesses to its address range result in off-chip access. Off-chip memory and TCM at the same address are completely independent.
Data accesses to instruction TCM are allowed. This is necessary to allow you to:
• use literal pools
• set software breakpoints for debugging
• download code
• write self-modifying code.
Instruction fetches from data TCM are not allowed.
Warning An attempt to load an instruction from data TCM might result in an access to off-chip memory at the same address. This is core dependent. Refer to the Technical Reference manual for your processor.
ARM DUI 0056D Copyright © 1999-2001 ARM Limited. All rights reserved. 7-21

Caches and Tightly Coupled Memories
7.7.2 Initializing the ARM966E-S
The initial configuration of the core is controlled by two input pins:
VINITHI • HIGH, the vector table is located at 0xFFFF0000
• LOW, the vector table is located at 0x0.
INITRAM • HIGH, TCM is enabled
• LOW, TCM is disabled.
These pins determine the configuration of the core on power-up, and on reset. You can override these configurations in software by writing to CP15.
You can:
• Tie both INITRAM and VINITHI HIGH.
Execution starts at 0xFFFF0000. Boot code initializes TCM, then relocates the vector table to 0x0 for improved performance.
• Tie INITRAM low, and VINITHI HIGH.
Execution starts at 0xFFFF0000. Boot code enables and initializes TCM, then relocates the vector table to 0x0 for improved performance.
• Tie both INITRAM and VINITHI LOW.
Execution starts at 0x0, in off-chip memory. Boot code must branch out of the bottom 128MB address range before TCM can be enabled and initialized.
Caution Do not tie INITRAM HIGH with VINITHI tied LOW. The result is unpredictable.
7-22 Copyright © 1999-2001 ARM Limited. All rights reserved. ARM DUI 0056D

Caches and Tightly Coupled Memories
7.7.3 ARM966E-S warm reset
You can implement a warm reset running in TCM.
INITRAM and VINITHI can be controlled by memory-mapped registers. You can then have different behavior for power-on reset and warm reset.
For example, both pins might be LOW for power on reset. Boot code reconfigures the warm reset behavior before branching to the application.
You can implement a warm reset running in TCM.
To implement a warm reset:
• TCM must be initialized
• INITRAM must be HIGH
• VINITHI must be LOW.
7.7.4 ARM966E-S performance issues
The ARM966E-S runs at peak performance when:
• executing code contained in TCM
• accessing data contained in TCM
• the write buffer is enabled.
The ARM9E core stalls:
• For one cycle, when a read from data TCM immediately follows a write to data TCM.
• For one cycle, when a data read from instruction TCM occurs.
• For two cycles, when a data write to instruction TCM occurs.
• When external memory is accessed. In this case, the number of stalled cycles depends on:
— the write buffer draining
— the external memory system.
ARM DUI 0056D Copyright © 1999-2001 ARM Limited. All rights reserved. 7-23

Caches and Tightly Coupled Memories
7-24 Copyright © 1999-2001 ARM Limited. All rights reserved. ARM DUI 0056D

Chapter 8 Debug Communications Channel
This chapter explains how to use of the Debug Communications Channel (DCC). It contains the following sections:
• About the Debug Communications Channel on page 8-2
• Command-line debugging commands on page 8-3
• Enabling comms channel viewing on page 8-4
• Target transfer of data on page 8-5
• Polled debug communications on page 8-6
• Interrupt-driven debug communications on page 8-12
• Access from Thumb state on page 8-13
• Semihosting on page 8-14.
ARM DUI 0056D Copyright © 1999-2001 ARM Limited. All rights reserved. 8-1
Debug Communications Channel
8.1 About the Debug Communications Channel
The EmbeddedICE logic in ARM cores such as ARM7TDMI and ARM9TDMI contains a debug communications channel. This enables data to be passed between the target and the host debugger using the JTAG port and a protocol converter such as Multi-ICE, without stopping the program flow or entering debug state. This chapter describes how the debug communications channel can be accessed by a program running on the target, and by the host debugger.
ADS provides the following methods of accessing the debug communications channel:
• the armsd command-line debugger
• the Channel Viewer mechanism in AXD
• Multi-ICE semihosting.
8-2 Copyright © 1999-2001 ARM Limited. All rights reserved. ARM DUI 0056D

Debug Communications Channel
8.2 Command-line debugging commands
To access the debug communications channel from a command line using armsd use the following commands:
ccin filename Selects a file containing data for reading into the target. This command also enables host to target comms channel communication.
ccout filename Selects a file to write data from the target. This command also enables target to host comms channel communication.
ARM DUI 0056D Copyright © 1999-2001 ARM Limited. All rights reserved. 8-3

Debug Communications Channel
8.3 Enabling comms channel viewing
Debug communications channel viewing is supported in AXD.
8.3.1 Comms channel viewing in AXD
To enable channel viewing in AXD, refer to the description of the Control system view pop-up menu in chapter 5 of the AXD and armsd Debuggers Guide.
To use a channel viewer in AXD, refer to the description of the Comms Channel processor view in chapter 5 of the AXD and armsd Debuggers Guide.
8-4 Copyright © 1999-2001 ARM Limited. All rights reserved. ARM DUI 0056D

Debug Communications Channel
8.4 Target transfer of data
The debug communications channel is accessed by the target as coprocessor 14 on the ARM core using the ARM instructions MCR and MRC.
Two registers are provided to transfer data:
Comms data read register
A 32-bit wide register used to receive data from the debugger. The following instruction returns the read register value in Rd:
MRC p14, 0, Rd, c1, c0
Comms data write register
A 32-bit wide register used to send data to the debugger. The following instruction writes the value in Rn to the write register:
MCR p14, 0, Rn, c1, c0
Caution Refer to the ARM10 Technical Reference Manual for information on accessing DCC registers for the ARM 10. The instructions used, positions of the status bits, and interpretation of the status bits are different for processors later than ARM9.
ARM DUI 0056D Copyright © 1999-2001 ARM Limited. All rights reserved. 8-5

Debug Communications Channel
8.5 Polled debug communications
In addition to the comms data read and write registers, a comms data control register is provided by the debug communications channel.
The following instruction returns the control register value in Rd:
MRC p14, 0, Rd, c0, c0
Two bits in this control register provide synchronized handshaking between the target and the host debugger:
Bit 1 (W bit) Denotes whether the comms data write register is free (from the target point of view):
W = 0 New data can be written by the target application.
W = 1 The host debugger can scan new data out of the write register.
Bit 0 (R bit) Denotes whether there is new data in the comms data read register (from the target point of view):
R = 1 New data is available to be read by the target application.
R = 0 The host debugger can scan new data into the read register.
Note The debugger cannot use coprocessor 14 to access the debug communications channel directly, because this has no meaning to the debugger. Instead, the debugger can read from and write to the debug communications channel registers using the scan chain. The debug communications channel data and control registers are mapped into addresses in the EmbeddedICE logic, see Viewing EmbeddedICE logic registers.
The contents of the Embedded ICE logic registers can be viewed in armsd as coprocessor 0.
8.5.1 Viewing EmbeddedICE logic registers
You can view the EmbeddedICE logic registers in AXD:
• from the GUI: click on Processor Views, click on Registers, and select EICE, EICE Watch 0, or EICE Watch 1
• from the command line: type reg EICE.
Refer to MultiICE documentation for further information.
8-6 Copyright © 1999-2001 ARM Limited. All rights reserved. ARM DUI 0056D

Debug Communications Channel
8.5.2 Target to debugger communication
This is the sequence of events for an application running on the ARM core to communicate with the debugger running on the host:
1. The target application checks if the debug communications channel write register is free for use. It does this using the MRC instruction to read the debug communications channel control register to check that the W bit is clear.
2. If the W bit is clear, the debug communication write register is clear and the application writes a word to it using the MCR instruction to coprocessor 14. The action of writing to the register automatically sets the W bit. If the W bit is set, the debug communication write register has not been emptied by the debugger. If the application needs to send another word, it must poll the W bit until it is clear.
3. The debugger polls the debug communication control register through scan chain 2. If the debugger sees that the W bit is set, it can read the debug communications channel data register to read the message sent by the application. The process of reading the data automatically clears the W bit in the debug communication control register.
Example 8-1 shows how this works. The example code is available in Install_directory\Examples\dcc\outchan.s.
Example 8-1
AREA OutChannel, CODE, READONLY ENTRY MOV r1,#3 ; Number of words to send ADR r2, outdata ; Address of data to sendpollout MRC p14,0,r0,c0,c0 ; Read control register TST r0, #2 BNE pollout ; if W set, register still fullwrite LDR r3,[r2],#4 ; Read word from outdata ; into r3 and update the pointer MCR p14,0,r3,c1,c0 ; Write word from r3 SUBS r1,r1,#1 ; Update counter BNE pollout ; Loop if more words to be written MOV r0, #0x18 ; Angel_SWIreason_ReportException LDR r1, =0x20026 ; ADP_Stopped_ApplicationExit SWI 0x123456 ; ARM semihosting SWIoutdata DCB "Hello there!" END
ARM DUI 0056D Copyright © 1999-2001 ARM Limited. All rights reserved. 8-7

Debug Communications Channel
To execute the example:
1. Assemble outchan.s:
armasm -g outchan.s
2. Link the output object:
armlink outchan.o -o outchan.axf
The link step creates the executable file outchan.axf
3. Load the image, enable comms channel viewing, and execute the image. This procedure depends on which debugger you are using. See:
• Using armsd
• Using AXD.
Using armsd
If you are using armsd:
1. Load the image into armsd with the command:
armsd -li -adp -port s=1 outchan.axf
2. Enable communication and open the output file, then execute the program:
ccout outputgo
3. Quit armsd when execution finishes. You should be able to view the file and see that transfer has occurred.
Using AXD
If you are using AXD:
1. Enable channel viewing. See the description of the Control system view pop-up menu in chapter 5 of the AXD and armsd Debuggers Guide.
2. Load the image created above into AXD.
3. Use the channel viewer in AXD. See the description of the Comms Channel processor view in chapter 5 of the AXD and armsd Debuggers Guide.
4. In the AXD main screen, select Go from the Execute menu (or press F5) to execute the image.
The data sent from the target (in this example, Hello there!) should now be displayed in the Channel Viewer window.
8-8 Copyright © 1999-2001 ARM Limited. All rights reserved. ARM DUI 0056D

Debug Communications Channel
8.5.3 Debugger to target communication
This is the sequence of events for message transfer from the debugger running on the host to the application running on the core:
1. The debugger polls the debug communication control register R bit. If the R bit is clear, the debug communication read register is clear and data can be written there for the target application to read.
2. The debugger scans the data into the debug communication read register via scan chain 2. The R bit in the debug communication control register is automatically set by this.
3. The target application polls the R bit in the debug communication control register. If it is set, there is data in the debug communication read register that can be read by the application, using the MRC instruction to read from coprocessor 14. The R bit is cleared as part of the read instruction.
The following piece of target application code, supplied in file Install_directory\Examples\dcc\inchan.s, shows this in action:
AREA InChannel, CODE, READONLY ENTRY MOV r1,#3 ; Number of words to read LDR r2, =indata ; Address to store data readpollin MRC p14,0,r0,c0,c0 ; Read control register TST r0, #1 BEQ pollin ; If R bit clear then loopread MRC p14,0,r3,c1,c0 ; read word into r3 STR r3,[r2],#4 ; Store to memory and ; update pointer SUBS r1,r1,#1 ; Update counter BNE pollin ; Loop if more words to read MOV r0, #0x18 ; Angel_SWIreason_ReportException LDR r1, =0x20026 ; ADP_Stopped_ApplicationExit SWI 0x123456 ; ARM semihosting SWI AREA Storage, DATA, READWRITEindata DCB "Duffmessage#" END
4. Create an input file on the host containing, for example, And goodbye!.
5. Assemble and link this code using the following commands:
armasm -g inchan.sarmlink inchan.o -o inchan.axf
ARM DUI 0056D Copyright © 1999-2001 ARM Limited. All rights reserved. 8-9

Debug Communications Channel
You have created an executable image in a file called inchan. Your next steps depend on your choice of debugger.
You can load the image, enable comms channel viewing, and execute the image by using:
• armsd (for command-line operation)
• AXD.
Issuing commands
If you are issuing commands:
1. Load the image into armsd using the following command:
armsd -li -adp -port s=1 inchan.axf
If you view the area of memory indata, you see its initial random contents:
examine indata
2. Enable communication and open the input file, then execute the program:
ccin inputgo
3. When execution completes, view memory again and you can see the input has been read in:
examine indata
Using AXD
If you are using AXD:
1. Enable channel viewing. See the description of the Control system view pop-up menu in chapter 5 of the AXD and armsd Debuggers Guide.
2. Load the image created above into AXD.
3. Use the channel viewer in AXD. See the description of the Comms Channel processor view in chapter 5 of the AXD and armsd Debuggers Guide.
4. In the Send field of the Channel Viewer, type And goodbye!, and click the Send button. The Left to Send counter should show the number of bytes stored for sending to the target.
If you view the area of memory indata, you see its initial contents:
examine indata
8-10 Copyright © 1999-2001 ARM Limited. All rights reserved. ARM DUI 0056D

Debug Communications Channel
5. In the AXD main screen, select Go from the Execute menu (or press F5) to execute the image.
6. When execution is complete, view memory again and you can see that the input has been read in:
examine indata
ARM DUI 0056D Copyright © 1999-2001 ARM Limited. All rights reserved. 8-11

Debug Communications Channel
8.6 Interrupt-driven debug communications
The examples given above demonstrate polling the DCC. You can convert these to interrupt-driven examples by connecting up COMMRX and COMMTX signals from the Embedded ICE logic to your interrupt controller.
The read and write code given above could then be moved into an interrupt handler.
See Interrupt handlers on page 5-23 for information on writing interrupt handlers.
8-12 Copyright © 1999-2001 ARM Limited. All rights reserved. ARM DUI 0056D

Debug Communications Channel
8.7 Access from Thumb state
Because the Thumb instruction set does not contain coprocessor instructions, you cannot use the debug communications channel while the core is in Thumb state.
There are three possible ways around this:
• You can write each polling routine in a SWI handler, which can then be executed while in either ARM or Thumb state. Entering the SWI handler immediately puts the core into ARM state where the coprocessor instructions are available. Refer to Chapter 5 Handling Processor Exceptions for more information on SWIs.
• Thumb code can make interworking calls to ARM subroutines which implement the polling. Refer to Chapter 3 Interworking ARM and Thumb for more information on mixing ARM and Thumb code.
• Use interrupt-driven communication rather than polled communication. The interrupt handler would be written in ARM instructions, so the coprocessor instructions can be accessed directly.
ARM DUI 0056D Copyright © 1999-2001 ARM Limited. All rights reserved. 8-13

Debug Communications Channel
8.8 Semihosting
You can use the debug communications channel for semihosting if you are using Multi-ICE with $semihosting_enabled=2. See the Multi-ICE User Guide for more information.
8-14 Copyright © 1999-2001 ARM Limited. All rights reserved. ARM DUI 0056D

Glossary
ADS See ARM Developer Suite.
ANSI American National Standards Institute. An organization that specifies standards for, among other things, computer software.
Angel Angel is a debug monitor that enables you to develop and debug applications running on ARM-based hardware. Angel can debug applications running in either ARM state or Thumb state.
ARM Developer Suite
A suite of applications, together with supporting documentation and examples, that enable you to write and debug applications for the ARM family of RISC processors.
ARM eXtended Debugger
The ARM eXtended Debugger (AXD) is the latest debugger software from ARM that enables you to make use of a debug agent in order to examine and control the execution of software running on a debug target. AXD is supplied in both Windows and UNIX versions.
ARMulator ARMulator is an instruction set simulator. It is a collection of modules that simulate the instruction sets and architecture of various ARM processors.
armsd The ARM Symbolic Debugger (armsd) is an interactive source-level debugger providing high-level debugging support for languages such as C, and low-level support for assembly language. It is a command-line debugger that runs on all supported platforms.
ARM DUI 0056D Copyright © 1999-2001 ARM Limited. All rights reserved. Glossary-1
Glossary
ATPCS ARM and Thumb Procedure Call Standard defines how registers and the stack will be used for subroutine calls.
AXD See ARM eXtended Debugger.
Big-Endian Memory organization where the least significant byte of a word is at a higher address than the most significant byte.
Canonical Frame Address
In DWARF 2, this is an address on the stack specifying where the call frame of an interrupted function is located.
CFA See Canonical Frame Address.
Coprocessor An additional processor which is used for certain operations. Usually used for floating-point math calculations, signal processing, or memory management.
Double word A 64-bit unit of information. Contents are taken as being an unsigned integer unless otherwise stated.
DWARF Debug With Arbitrary Record Format
EC++ A variant of C++ designed to be used for embedded applications.
ELF Executable Linkable Format
Execution view The address of regions and sections after the image has been loaded into memory and started execution.
Flash memory Non-volatile memory that is often used to hold application code.
Halfword A 16-bit unit of information. Contents are taken as being an unsigned integer unless otherwise stated.
Heap The portion of computer memory that can be used for creating new variables.
ICE In Circuit Emulator.
IDE Integrated Development Environment (Code Warrior).
Image An executable file which has been loaded onto a processor for execution.
A binary execution file loaded onto a processor and given a thread of execution. An image may have multiple threads. An image is related to the processor on which its default thread runs.
Inline Functions that are repeated in code each time they are used rather than having a common subroutine. Assembler code placed within a C or C++ program.
See also Output sections
Glossary-2 Copyright © 1999-2001 ARM Limited. All rights reserved. ARM DUI 0056D
Glossary
Input section Contains code or initialized data or describes a fragment of memory that must be set to zero before the application starts.
See also Output sections
Interworking Producing an application that uses both ARM and Thumb code.
Library A collection of assembler or compiler output objects grouped together into a single repository.
Linker Software which produces a single image from one or more source assembler or compiler output objects.
Little-endian Memory organization where the least significant byte of a word is at a lower address than the most significant byte. See also Big-endian.
Local An object that is only accessible to the subroutine that created it.
Load view The address of regions and sections when the image has been loaded into memory but has not yet started execution.
Memory management unit
Hardware that controls caches and access permissions to blocks of memory, and translates virtual to physical addresses.
MMU See Memory Management Unit.
Multi-ICE Multi-processor debug agent. ARM registered trademark.
Output section Is a contiguous sequence of input sections that have the same RO, RW, or ZI attributes. The sections are grouped together in larger fragments called regions. The regions will be grouped together into the final executable image.
See also Region
PCS Procedure Call Standard.
See also ATPCS
PIC Position Independent Code.
See also ROPI
PID Position Independent Data or the ARM Platform-Independent Development (PID) board.
See also RWPI
Profiling Accumulation of statistics during execution of a program being debugged, to measure performance or to determine critical areas of code.
Program image See Image.
ARM DUI 0056D Copyright © 1999-2001 ARM Limited. All rights reserved. Glossary-3

Glossary
Reentrancy The ability of a subroutine to have more that one instance of the code active. Each instance of the subroutine call has its own copy of any required static data.
Remapping Changing the address of physical memory or devices after the application has started executing. This is typically done to allow RAM to replace ROM when the initialization has been done.
Regions In an Image, a region is a contiguous sequence of one to three output sections (RO, RW, and ZI).
Retargeting The process of moving code designed for one execution environment to a new execution environment.
ROPI Read Only Position Independent. Code and read-only data addresses can be changed at run-time.
RTOS Real Time Operating System.
RWPI Read Write Position Independent. Read/write data addresses can be changed at run-time.
Scatter-loading Assigning the address and grouping of code and data sections individually rather than using single large blocks.
Section A block of software code or data for an Image.
See also Input sections
Semihosting A mechanism whereby the target communicates I/O requests made in the application code to the host system, rather than attempting to support the I/O itself.
SWI Software Interrupt. An instruction that causes the processor to call a programer-specified subroutine. Used by ARM to handle semihosting.
Target The actual target processor, (real or simulated), on which the application is running.
Thread A context of execution on a processor. A thread is always related to a processor and may or may not be associated with an image.
Veneer A small block of code used with subroutine calls when there is a requirement to change processor state or branch to an address that cannot be reached in the current processor state.
Word A 32-bit unit of information. Contents are taken as being an unsigned integer unless otherwise stated.
Glossary-4 Copyright © 1999-2001 ARM Limited. All rights reserved. ARM DUI 0056D

Index
AAccessing
debug comms channel 1-8, 8-2ANSI C 4-19
header files 4-19ARM architecture v5T
interworking ARM and Thumb 3-10
Assemblerinline, armasm differences 4-6inline, see Inline assemblersmode changing 3-8
Assembly languagecalling from C 4-19inline, armasm differences 4-6interrupt handlers 5-28interworking ARM and Thumb 3-6,
3-15interworking using veneers 3-15
ATPCS 2-1conformance criteria 2-3floating-point options 2-17
interworking ARM and Thumb 2-16, 3-2, 7-2
leaf routine 2-12local variables 2-4memory state 2-3parameter passing 2-4, 2-9process 2-3processes 2-15read-only position independence
2-14read-write position independence
2-15reentrant routines 2-15register names 2-5register roles 2-4ROPI 2-14RWPI 2-15stack limit checking 2-11stack terminology 2-6static base register 2-15swstna 2-11threads 2-3, 2-15variadic routines 2-10
variants 2-2ATPCS options
/interwork 3-4
BBanked registers 5-3Base classes
in mixed languages 4-18Bit 0, use in BX instruction 3-7BL instruction 4-6BX instruction 3-7, 4-7
bit 0 usage 3-7
CC
callingfrom assembler 4-17from C++ 4-17
calling assembler 4-19
ARM DUI 0056D Copyright © 1999-2001 ARM Limited. All rights reserved. Index-1

Index
global variables from assembly language 4-14
Interworking ARM and Thumb 3-11
linkage 4-17using header files from C++ 4-15
Callingassembler from C++ 4-17C from assembly language 4-17C from C++ 4-17, 4-19C++ from assembly language 4-17interworking examplesinterworking veneerslanguage conventions 4-17
Chaining exception handlers 5-38Code
density and interworking 3-3, 7-3Code size
measuring 6-46Command-line operation
of debug comms channel 8-3Comments
inline assemblers 4-3Comms channel, debug 8-1Comms data registers 8-5Constants, inline assemblers 4-5Context switch 5-31Coprocessor 14 8-5Coprocessors
Undefined Instruction handlers 5-34
CPSR 5-5C++
asm 4-2calling
from assembler 4-17from C 4-17
calling conventions 4-18data types in mixed languages 4-18string literal 4-2
DData Abort
exception 5-2handler 5-36, 5-42LDM 5-36LDR 5-36
returning from 5-8STM 5-36STR 5-36SWP 5-36
Data size, measuring 6-46Data types 4-18Debug
comms channel viewing 8-4communications channel 8-1interrupt-driven comms 8-12polled communications 8-6
Debuggerscommunicating with target 8-9
Directives, assemblerENTRY 6-8
Directives, assembly languageIMPORT 4-14
EEnabling DCC viewing 8-4Exception handlers
chaining 5-38Data Abort 5-36, 5-42extending 5-38FIQ 5-42installing 5-9installing from C 5-11installing on reset 5-9interrupt 5-23IRQ 5-42nested 5-24Prefetch Abort 5-35, 5-42reentrant 5-24Reset 5-33returning from 5-6subroutines in 5-45SWI 5-14, 5-15, 5-18, 5-42Thumb 5-40Undefined Instruction 5-34, 5-42
Exceptions 5-2Data Abort 5-8entering 5-5FIQ 5-7initialization code for ROM images
6-8installing handlers 5-9IRQ 5-2, 5-7
leaving 5-5Prefetch Abort 5-2, 5-8priorities 5-3reset 5-2response by processors 5-5returning from 5-7, 5-42SWI 5-2, 5-7SWI handlers 5-14, 5-15, 5-18Undefined Instruction 5-2, 5-7use of modes 5-3use of registers 5-3vector table 5-3, 5-9
Executionspeed 3-3, 5-23
Extending exception handlers 5-38extern "C" 4-15, 4-17, 4-19
FFault address register 5-37FIQ 5-2, 5-23
handler 5-7, 5-23, 5-42registers 5-23
Floating-pointATPCS options 2-17FPA 2-20VFP 2-18
FPAUndefined Instruction handlers
5-34FPA architecture 2-20
IIEEE 754 2-19Illegal address 5-2implicit this 4-17IMPORT directive 4-14Inline assemblers 4-2
accessing structures 4-14ADR pseudo-instruction 4-7ADRL pseudo-instruction 4-7ALU flags 4-5, 4-7, 4-8BL instruction 4-6branches 4-3BX instruction 4-7C global variables 4-14
Index-2 Copyright © 1999-2001 ARM Limited. All rights reserved. ARM DUI 0056D

Index
C variables 4-4, 4-8commas 4-8comments 4-3complex expressions 4-4constants 4-5corrupted registers 4-3CPSR 4-5C, C++ expressions 4-4, 4-7DC directives 4-6examples 4-10floating point instructions 4-7instruction expansion 4-5interrupts 4-10invoking 4-2labels 4-3LDM instruction 4-7long multiply 4-12MUL instruction 4-5multiple lines 4-3operand expressions 4-4physical registers 4-4, 4-7register corruption 4-6, 4-8saving registers 4-9sign extension 4-4stacking registers 4-9STM instruction 4-7storage declaration 4-6subroutine parameters 4-6SWI instruction 4-6writing to pc 4-2, 4-4# 4-5
Instruction expansion 4-5Instructions, assembly language
BL 4-6BX 3-7SWI 4-6, 5-14SWI (Thumb) 5-43
Interrupt handlers 5-23Interrupt-driven debug comms 8-12Interrupts
prioritization 5-30Interworking ARM and Thumb 3-1,
7-1ARM architecture v5T 3-10assembly language 3-6, 3-15ATPCS 3-2, 3-18, 7-2BX instruction 3-7C 3-12C and C++ 3-11
C and C++ libraries 3-14compiler command-line options
3-14compiling code 3-11CPSR 3-9detecting calls 3-5duplicate functions 3-14examples 3-9, 3-12, 3-16exceptions 3-3leaf functions 3-11mixed languages 3-15, 3-17, 7-2,
7-12non-Thumb processors 3-12procedure call standards 3-2, 7-2rules 3-14veneers 3-11, 3-15
IRQ 5-23handler 5-7, 5-42
IRQ exception 5-2I/O devices, ROM applications 6-9
JJTAG 1-8, 8-2Jump table 5-15, 5-43
LLabels, inline assemblers 4-6Leaf functions 3-11Leaf routine 2-12Link register 5-3Linking
and interworking 3-5, 3-11the C library 6-43
MMangling symbol names 4-17, 4-19Memory management unit 6-8Memory map
layout 6-4organization of 6-4RAM at address 0 6-4ROM at address 0 6-4
Mixed endian 2-20
Mixed language programminginterworking ARM and Thumb
3-15, 3-17, 7-2, 7-12
NNested interrupts 5-24Nested SWIs 5-18
OOperand expressions, inline assemblers
4-4
PPIC 2-14PID 2-15Pointers
data members 4-19member functions 4-19
Polled debug communications 8-6Power-up 1-6, 5-2Prefetch Abort 5-2
handler 5-35, 5-42returning from 5-8
Process control blocks 5-31Processors
responding to exceptions 5-5Protocol converter 1-8, 8-2Pure endian 2-19
RRAM
at address 0 6-4measuring requirements 6-47
Reentrant routines 2-15References 4-18Registers
debug comms channel 8-5REMAP 6-5
REMAP register 6-5Reset exception 5-2Reset exception handler 5-33
ARM DUI 0056D Copyright © 1999-2001 ARM Limited. All rights reserved. Index-3

Index
RESET vector 6-5Return address 5-7Return instruction 5-7ROM
at address 0 6-4measuring requirements 6-47
ROPI 2-14RWPI 2-15
SScalar mode 2-18Scatter load description file
examples 6-14, 6-24Scatter loading
writing code for ROM 6-14, 6-24Semihosting mode 8-14Soft reset 1-6, 5-2Software FPA emulator
Undefined Instruction handlers 5-34
Software interrupt, see SWIsSPSR 5-3, 5-5
T bit 5-43Stack terminology 2-6Stacks 5-3
initialization code for ROM images 6-9
stack pointer 5-3supervisor 5-16
Static base 2-15Storage declaration, inline assemblers
4-6String copying
assembler 4-19Supervisor mode 5-18Supervisor stack 5-16SWI exception 5-2SWI instruction 4-6, 5-14
Thumb 5-43SWIs
handlers 5-14, 5-15, 5-18, 5-42indirect 5-21returning from 5-7Thumb state 5-43
swstna 2-11Symbol names, mangling 4-17, 4-19System decoder 6-5
System mode 5-45
TTarget
communicating with debugger 8-7this, implicit 4-17Threads 2-15Thumb
access to DCC 8-13and __irq 5-24BX instruction 3-7changing to Thumb state, example
3-8code for ROM applications 6-10exception handler 5-40handling exceptions 5-40inline assemblers 4-2interworking with ARM 3-3, 7-3return address 5-42using duplicate function names
3-14
UUndefined Instruction exception 5-2Undefined Instruction handler 5-7,
5-34, 5-42User mode 5-3
VVariadic routines 2-10Vector mode 2-18Vector table 5-3, 5-9, 5-23, 5-40Vector table and caches 5-13Vectors
exception 6-8RESET 6-5
Veneers, see InterworkingVFP architecture 2-18
WWriting code for ROM
common problems 6-43critical I/O devices 6-9entry point 6-8exception vectors 6-8initialization 6-7memory for C code 6-10MMU 6-8processor mode 6-9processor state 6-10RAM at address 0 6-4ROM at address 0 6-4, 6-11ROM at its base address 6-11scatter loading 6-14, 6-24stack pointers 6-9undefined __main 6-43vector code eliminated 6-44
Numerics0-init data 6-47
Symbols$top_of_memory 6-9__semihosting_swi_guard 6-43__user_initial_stackheap() 6-9__use_no_semihosting_swi pragma
6-33, 6-43
Index-4 Copyright © 1999-2001 ARM Limited. All rights reserved. ARM DUI 0056D