Embed Size (px)
Citation preview

Jefferson, WI 53549
Safety Instructions & Operator's Manual for the
NOTE: Specifications are correct at time of printing and are subject to change without notice. * Actual sustained engine power will likely be lower due to operating limitations and environmental factors. Please refer to ‘Engine Power Rating Information’ forfurther details.
Manual No. 7101724 (I.R. 10/23/2007)TP 100-5296-IR-WB-J
22” Self-Propelled Walk Behind Mower
Models
BTP2265HW (7800267)

Thank You for purchasing this quality-built Brute product. We’re pleased that you placed your confidencein the Brute brand. When operated and maintained according to the instructions in this manual, yourBrute product will provide many years of dependable service.
This manual contains safety information to make you aware of the hazards and risks associated with themachine and how to avoid them. This machine is designed and intended only for finish cutting ofestablished lawns and is not intended for any other purpose. It is important that you read and understandthese instructions thoroughly before attempting to start or operate this equipment. Save theseinstructions for future reference.
PRODUCT REGISTRATION
IMPORTANT: KEEP THIS INFORMATION FOR YOUR PERSONAL RECORDS(Complete the following information on your Brute purchase)
Date of Purchase__________________________________________________________________
Retailer_________________________________________________________________________
Retailer's Phone Number___________________________________________________________
Equipment
Model Number______________________________________________________________
Serial Number ______________________________________________________________
Engine
Model_________________________Type__________________Trim___________________
It is very important that you register your purchase to ensure warranty coverage. Please mail yourproduct registration card to:
Brute PowerBriggs & Stratton Power Products Group, LLC900 N. ParkwayJefferson, WI 53549
Or you may register online at www.brutepower.com.
You can contact us at our website, or if you would like to speak with a Customer ServiceRepresentative, call us at the Brute Customer Relations Center. For faster service please have yourSerial Number and Model Number available.
Briggs & Stratton Yard Power Products GroupCopyright © 2007, Briggs & Stratton Corporation
Milwaukee, WI, USA. All Rights Reserved.
Brute is a trademark of Briggs & Stratton Power Products Group, LLCJefferson, WI, USA.
1
Operator SafetyFeatures and Controls
OperationM
aintenanceTroubleshooting
Warranties
Table of Contents
Operator Safety . . . . . . . . . . . . . . . . . . . . . . . . . . . . . . . . . . . . . . . . . . . . . . . .2Important Operator Safety Information . . . . . . . . . . . . . . . . . . . . . . . . . . . . . . . . . . .2
Features and Controls . . . . . . . . . . . . . . . . . . . . . . . . . . . . . . . . . . . . . . . . . . .4
Operation . . . . . . . . . . . . . . . . . . . . . . . . . . . . . . . . . . . . . . . . . . . . . . . . . . . .5Adjusting the Handle Height . . . . . . . . . . . . . . . . . . . . . . . . . . . . . . . . . . . . . . . . . . .5Grass Bag . . . . . . . . . . . . . . . . . . . . . . . . . . . . . . . . . . . . . . . . . . . . . . . . . . . . . . . . .6Side Discharge Deflector . . . . . . . . . . . . . . . . . . . . . . . . . . . . . . . . . . . . . . . . . . . . . .8Mulching Tips . . . . . . . . . . . . . . . . . . . . . . . . . . . . . . . . . . . . . . . . . . . . . . . . . . . . . .8How to Prepare the Engine . . . . . . . . . . . . . . . . . . . . . . . . . . . . . . . . . . . . . . . . . . . .9Pre-Start Checklist . . . . . . . . . . . . . . . . . . . . . . . . . . . . . . . . . . . . . . . . . . . . . . . . . .9Engine Stop Lever . . . . . . . . . . . . . . . . . . . . . . . . . . . . . . . . . . . . . . . . . . . . . . . . . .10Front Wheel Drive System . . . . . . . . . . . . . . . . . . . . . . . . . . . . . . . . . . . . . . . . . . .10Stopping the Engine . . . . . . . . . . . . . . . . . . . . . . . . . . . . . . . . . . . . . . . . . . . . . . . .10Starting the Engine . . . . . . . . . . . . . . . . . . . . . . . . . . . . . . . . . . . . . . . . . . . . . . . . .11Rules for Safe and Effective Operation . . . . . . . . . . . . . . . . . . . . . . . . . . . . . . . . . .11
Maintenance . . . . . . . . . . . . . . . . . . . . . . . . . . . . . . . . . . . . . . . . . . . . . . . . .12Engine Maintenance . . . . . . . . . . . . . . . . . . . . . . . . . . . . . . . . . . . . . . . . . . . . . . . .12Engine Tipping . . . . . . . . . . . . . . . . . . . . . . . . . . . . . . . . . . . . . . . . . . . . . . . . . . . .12Cleaning the Mower Housing . . . . . . . . . . . . . . . . . . . . . . . . . . . . . . . . . . . . . . . . .12Lubrication . . . . . . . . . . . . . . . . . . . . . . . . . . . . . . . . . . . . . . . . . . . . . . . . . . . . . . .12Adjusting the Height of Cut . . . . . . . . . . . . . . . . . . . . . . . . . . . . . . . . . . . . . . . . . . .12Removing the Drive Belt . . . . . . . . . . . . . . . . . . . . . . . . . . . . . . . . . . . . . . . . . . . . .13Adjusting the Drive Cable . . . . . . . . . . . . . . . . . . . . . . . . . . . . . . . . . . . . . . . . . . . .14Blade Service . . . . . . . . . . . . . . . . . . . . . . . . . . . . . . . . . . . . . . . . . . . . . . . . . . . . .15
Removing the Blade . . . . . . . . . . . . . . . . . . . . . . . . . . . . . . . . . . . . . . . . . . . . .15Sharpening the Blade . . . . . . . . . . . . . . . . . . . . . . . . . . . . . . . . . . . . . . . . . . . .15Checking the Level of Cut . . . . . . . . . . . . . . . . . . . . . . . . . . . . . . . . . . . . . . . . .15
Preparing the Mower for Storage . . . . . . . . . . . . . . . . . . . . . . . . . . . . . . . . . . . . . .16
Troubleshooting . . . . . . . . . . . . . . . . . . . . . . . . . . . . . . . . . . . . . . . . . . . . . . .17
Warranty . . . . . . . . . . . . . . . . . . . . . . . . . . . . . . . . . . . . . . . . . . . . . . . . . . . .18
WARNINGBattery posts, terminals and related accessories containlead and lead compounds, chemicals known to the State ofCalifornia to cause cancer and birth defects or otherreproductive harm. Wash hands after handling.
! ! WARNINGEngine exhaust, some of its constituents, and certainvehicle components contain or emit chemicals known tothe State of California to cause cancer or other reproductiveharm.
! !
2
Oper
ator
Saf
ety
www.brutepower.com
! !Important Operator Safety InstructionsWARNING: This powerful cutting machine is capable of amputating hands and feet and can throw objectsthat can cause injury and damage! Failure to comply with the following SAFETY instructions could result inserious injury or death to the operator or other persons. The owner of the machine must understand theseinstructions and must allow only persons who understand these instructions to operate machine. Eachperson operating the machine must be of sound mind and body and must not be under the influence of anysubstance, which might impair vision, dexterity or judgment. If you have any questions pertaining to yourmachine which your dealer cannot answer to your satisfaction, call the Customer Service Department.Phone: (1-800-743-4115).
Protection for ChildrenTragic accidents can occur if the operator is not alert to thepresence of children. Children are often attracted to themachine and the mowing activity. Never assume thatchildren will remain where you last saw them.1. KEEP children out of the mowing area and under thewatchful care of a responsible adult other than the operator.2. DO NOT allow children in yard when machine is operatedand turn machine OFF if anyone enters the area.3. DO NOT allow pre-teenage children to operate machine.4. ALLOW only responsible adults & teenagers with maturejudgment under close adult supervision to operate machine.5. DO NOT pull mower backwards unless absolutelynecessary. LOOK and SEE behind and down for children,pets and hazards before and while backing.6. USE EXTRA CARE when approaching blind corners,shrubs, trees, or other objects that may obscure vision.
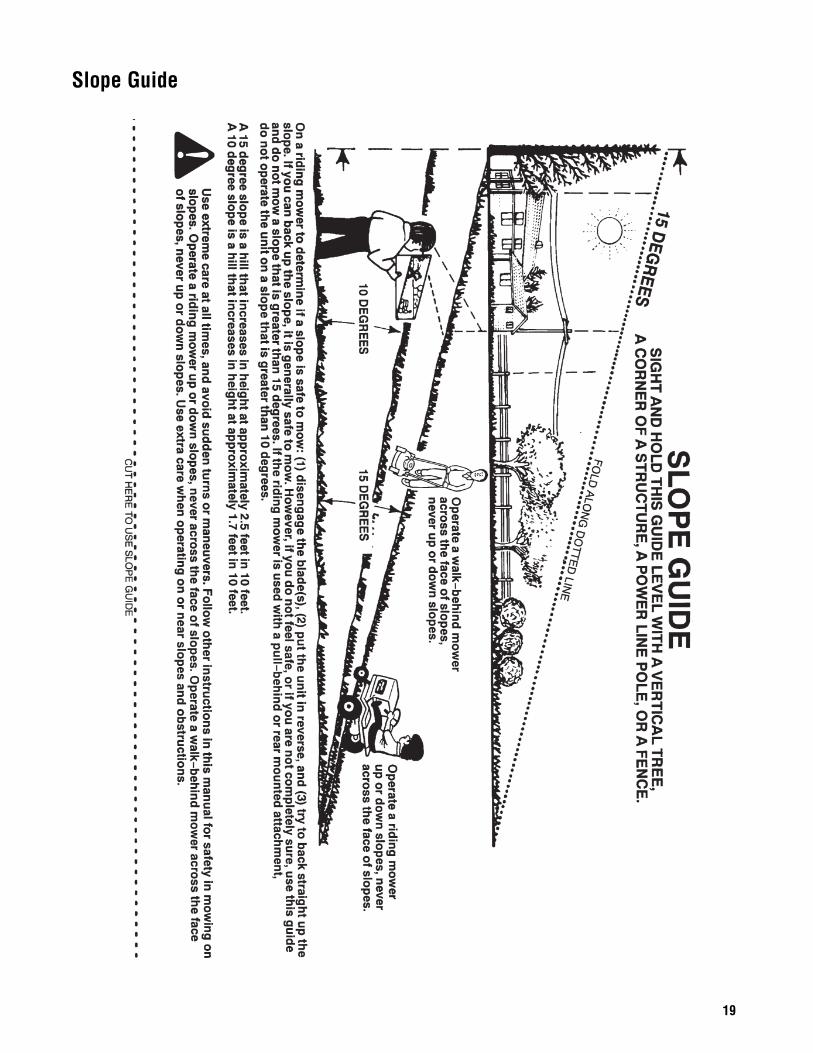
Slope Operation1. Slopes are a major factor related to slip and fall acci-dents, which can result in severe injury. All slopes requireextra caution. If you feel uneasy on a slope, DO NOT mowit.2. Mow across slopes, never up-and-down. Exerciseextreme CAUTION when changing directions on slopes. DONOT mow steep slopes or other areas where stability ortraction is in doubt. Refer to the Slope Guide at the end ofthis manual.3. Use extra care with grass catchers or other attachments;these affect the handling and the stability of the machine.
Preparation1. Read, understand, and follow instructions and warningsin this manual and on the mower, engine and attachments.Know the controls and the proper use of the mower beforestarting.2. Only mature, responsible persons shall operate themachine and only after proper instruction.3. Data indicates that operators age 60 and above, areinvolved in a large percentage of mower-related injuries.These operators should evaluate their ability to operate themower safely enough to protect themselves and othersfrom serious injury.
Preparation(Continued From Previous Column)4. Handle fuel with extra care. Fuels are flammable andvapors are explosive. Use only an approved fuel container.DO NOT remove fuel cap or add fuel with engine running.Add fuel outdoors only with engine stopped and cool. Cleanspilled fuel and oil from machine. DO NOT smoke. 5. Check the area to be mowed and remove all objects suchas toys, wire, rocks, limbs and other objects that couldcause injury if thrown by blade or interfere with mowing.Also note the location of holes, stumps, and other possiblehazards.6. Keep people and pets out of the mowing area.Immediately, STOP Blade, Stop engine and Stop mower ifanyone enters the area.7. Check shields, deflectors, switches, blade controls andother safety devices frequently for proper operation andlocation.8. Make sure all safety decals are clearly legible. Replace ifdamaged.9. Protect yourself when mowing and wear safety glasses, adust mask, long pants, and substantial footwear. DO NOTmow barefooted or with sandals.10. Know how to STOP blade and engine quickly inpreparation for emergencies.11. Use extra care when loading or unloading the machineinto a trailer or truck.12. Check grass catcher components frequently for signs ofwear or deterioration and replace as needed to preventinjury from thrown objects going through weak or tornspots.
Safe Handling of GasolineTo avoid personal injury or property damage, use extremecare in handling gasoline. Gasoline is extremely flammableand the vapors are explosive.1. Extinguish all cigarettes, cigars, pipes and other sourcesof ignition.2. Use only an approved fuel container.3. DO NOT remove fuel cap or add fuel with the enginerunning. Allow the engine to cool before refueling.4. DO NOT refuel the machine indoors.5. DO NOT store the machine or fuel container inside wherethere is an open flame, spark or pilot light such as on awater heater or other appliances.
3
Operator Safety
! !Important Operator Safety Instructions (Continued)
Safe Handling of Gasoline(Continued From Previous Page)6. DO NOT fill fuel containers inside a vehicle or on a truckor trailer bed with a plastic liner. Always place the contain-ers on the ground away from the vehicle before filling.7. Remove gas-powered equipment from the vehicle ortrailer and refuel it on the ground. If this is not possible,then refuel equipment using a portable container, ratherthan a gasoline dispenser nozzle.8. DO NOT start gas powered equipment in enclosed vehi-cles or trailers.9. Keep the nozzle in contact with the rim of the fuel tank orcontainer opening at all times until fueling is complete. DONOT use a nozzle lock-open device10. If fuel is spilled on clothing, change clothingimmediately.11. DO NOT overfill a fuel tank. Replace fuel cap and tightensecurely.
Operation1. DO NOT put hands or feet near or under rotating parts.Keep clear of discharge area while engine is running.2. STOP engine when crossing gravel drives, walks, orroads, and under any conditions where thrown objectsmight be a hazard.3. Mow only in daylight or good artificial light.4. DO NOT operate mower while under the influence ofalcohol or drugs.5. After striking a foreign object or if mower vibratesabnormally, STOP the engine, disconnect and secure sparkplug wire. Inspect the mower for any damage and repair thedamage before starting.6. DO NOT mow near drop offs, ditches or embankments.Operator could lose footing or balance.7. STAY ALERT for holes and other hidden hazards. Tallgrass can hide obstacles. Keep away from ditches,washouts, culverts, fences and protruding objects. 8. DO NOT mow on wet grass. Always be sure of yourfooting. Keep a firm hold on the handle and walk, never run.Slipping could cause injury.9. ALWAYS stay behind handle when engine (motor) isrunning.10. DO NOT leave the machine with the engine running.STOP BLADE and STOP ENGINE before leaving the opera-tors position for any reason.11. Before cleaning, repairing or inspecting make certainengine, blade and all moving parts have STOPPED.Disconnect and secure spark plug wire away from plug toprevent accidental starting.12. STOP engine and wait until the blade comes to com-plete STOP before removing grass bag and/or clearinggrass.
Operation(Continued From Previous Column)13. DO NOT operate mower without the entire grass catch-er, rear guard or other safety devices in place and working.DO NOT point discharge at people, passing cars, windowsor doors.14. DO NOT discharge material against a wall or obstruc-tion. Material may ricochet back towards the operator.15. Slow down before turning.16. Watch out for traffic when near or crossing roadways.17. DO NOT operate engine in enclosed areas. Engineexhaust gases contain carbon monoxide, a deadly poison.18. Only use accessories approved by the manufacturer.See manufacturer’s instructions for proper operation andinstallation of accessories.
Maintenance and Storage1. DO NOT store mower or fuel container inside wherefumes may reach an open flame, spark or pilot light such asin a water heater, furnace, clothes dryer or other gas appli-ance. Allow engine to cool before storing machine in anenclosure. Store fuel container out of reach of children in awell ventilated, unoccupied building.2. Keep mower and engine free of grass, leaves or excessgrease to reduce fire hazard and engine overheating.3. When draining fuel tank, drain fuel into an approvedcontainer outdoors and away from open flame.4. Keep all bolts, especially blade bolts, nuts and screwsproperly tight. Check that all cotter pins are in properposition.5. Always provide adequate ventilation when runningengine. Engine exhaust gases contain carbon monoxide, adeadly poison.6. Service engine and make adjustments only when engineis stopped. Remove spark plug wire from spark plug andsecure wire away from spark plug to prevent accidentalstarting.7. DO NOT change engine governor speed settings oroverspeed engine.8. Check grass bag assembly frequently for wear ordeterioration to avoid thrown objects and exposure tomoving parts. Replace with new bag if loose seams or tearsare evident. Replace slider or bag adapter if broken orcracked.9. Mower blades are sharp and can cut. Wrap the blades orwear heavy leather gloves and use CAUTION when handlingthem.10. DO NOT test for spark by grounding spark plug next tospark plug hole; spark plug could ignite gas exiting engine.11. Have machine serviced by an authorized BRUTE dealerat least once a year and have the dealer install any newsafety devices.12. Use only genuine BRUTE replacement parts to assurethat original standards are maintained.
4
Feat
ures
and
Con
trols
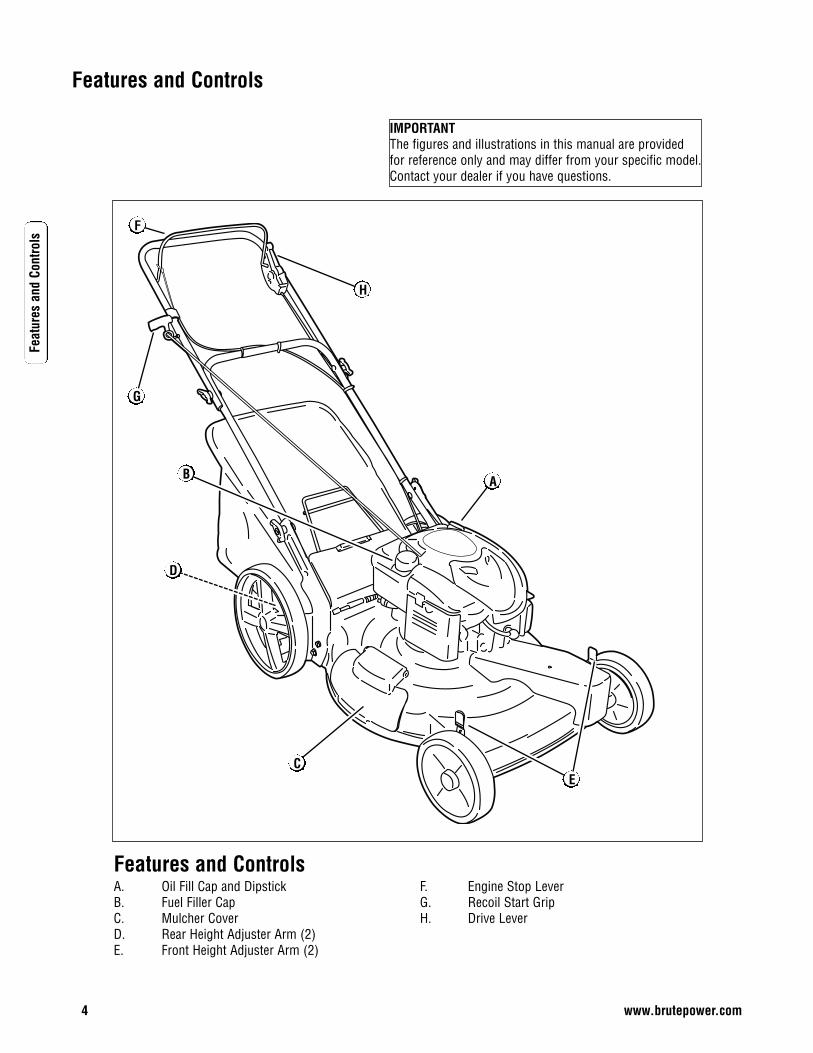
IMPORTANTThe figures and illustrations in this manual are providedfor reference only and may differ from your specific model.Contact your dealer if you have questions.
Features and ControlsA. Oil Fill Cap and DipstickB. Fuel Filler CapC. Mulcher CoverD. Rear Height Adjuster Arm (2)E. Front Height Adjuster Arm (2)
F. Engine Stop LeverG. Recoil Start GripH. Drive Lever
EC
D
G
H
F
AB
Features and Controls
www.brutepower.com
5
Operation
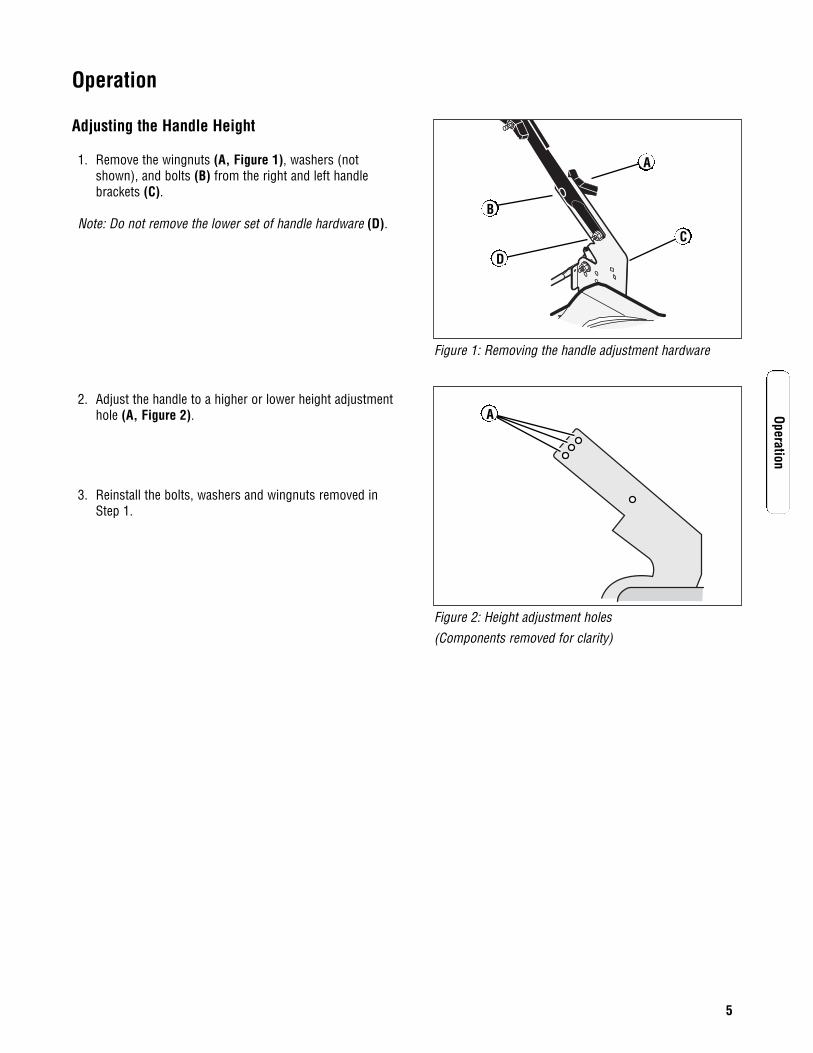
Adjusting the Handle Height
1. Remove the wingnuts (A, Figure 1), washers (notshown), and bolts (B) from the right and left handlebrackets (C).
Note: Do not remove the lower set of handle hardware (D).
2. Adjust the handle to a higher or lower height adjustmenthole (A, Figure 2).
3. Reinstall the bolts, washers and wingnuts removed inStep 1.
A
Figure 1: Removing the handle adjustment hardware
C
B
Figure 2: Height adjustment holes
D
Operation
A
(Components removed for clarity)
6
Oper
atio
n
www.brutepower.com
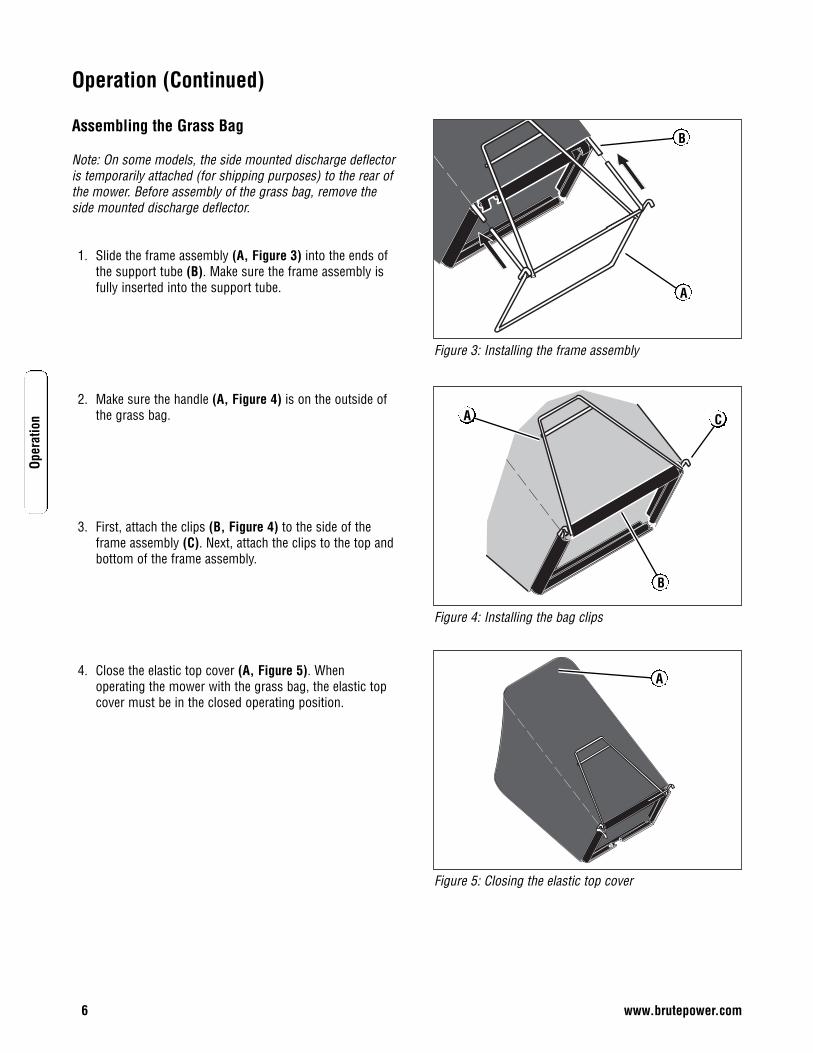
Assembling the Grass Bag
Note: On some models, the side mounted discharge deflectoris temporarily attached (for shipping purposes) to the rear ofthe mower. Before assembly of the grass bag, remove theside mounted discharge deflector.
1. Slide the frame assembly (A, Figure 3) into the ends ofthe support tube (B). Make sure the frame assembly isfully inserted into the support tube.
2. Make sure the handle (A, Figure 4) is on the outside ofthe grass bag.
3. First, attach the clips (B, Figure 4) to the side of theframe assembly (C). Next, attach the clips to the top andbottom of the frame assembly.
4. Close the elastic top cover (A, Figure 5). Whenoperating the mower with the grass bag, the elastic topcover must be in the closed operating position.
B
Figure 3: Installing the frame assembly
A
B
Figure 4: Installing the bag clips
A
Figure 5: Closing the elastic top cover
A
C
Operation (Continued)
7
Operation
Mounting the Grass Bag 1. To mount the grass bag on the mower, raise the rear
door (A, Figure 6). Holding the grass bag by the han-dle (B), mount the hooks (C) on either end of the grassbag frame assembly onto the rear door pivot rod (D).Lower the grass bag against the rear of the mower.Lower the rear door.
Important: Make sure both grass bag hooks are mounted onthe pivot rod.
WARNING: Do not use the grass bag unlessthe cover is closed.
WARNING: Check the condition of the grassbag for wear or deterioration. If worn ordamaged, replace the parts only withapproved factory replacement parts.
Emptying the Grass Bag
WARNING: Before you remove the grass bag,stop the engine. Before you remove any grassfrom the mower housing, disconnect the wirefrom the spark plug.
1. Raise the rear door to a vertical position. 2. Hold the handle of the grass bag and lift the frame
assembly. Continue to lift the frame assembly until thehooks are no longer mounted on the pivot rod. Removethe grass bag.
3. Open the top cover (A, Figure 7). Empty the grass fromthe grass bag.
4. To mount the grass bag on the mower, see “How ToMount The Grass Bag”.
Figure 6: Mounting the grass bag
A
Figure 7: Emptying the grass bag
C D
A
B
Operation (Continued)
8
Oper
atio
n
www.brutepower.com
Attaching the Side Mounted Discharge Deflector
WARNING: To prevent the engine fromstarting, disconnect the wire from thespark plug.
For shipping purposes, the side deflector was not installed.Locate the side deflector and install as follows.
1. Raise the mulcher cover (A, Figure 8). 2. Slide the two tabs (B) on the side deflector (C) under
the pivot pin. 3. Lower the side deflector. Make sure the locking tab (A,
Figure 9) goes through the slot in the side deflector.4. Lower the mulcher cover (A, Figure 10).5. Attach the wire to the spark plug.
Mulching Tips
Mulching finely cuts the grass so that the grass can be easilyrecycled. Because the nutrients are returned to the soil, thelawn will need less fertilizer. To correctly mulch the lawn,follow the tips below.
The grass must be dry. If the grass is wet, it will bedifficult to cut and cause heavy clumps of grass. The grass must not be too tall. The maximum height toeffectively cut is 4 1/2 inches. Set the height adjustersso that only the top third of the grass is cut. If the grass is more than 4 1/2 inches high, twomowings will be necessary. For the first mowing, set theheight adjusters in the highest position. Then, lower theheight adjusters for the second mowing.
Keep a sharp edge on the blade. A blade that is notsharp will cause the ends of the grass to become brown. Clean the underside of the mower housing. Grass andother debris can keep the mower from workingcorrectly.
If the quality of cut is marginal, try the following: Set the height adjusters at a higher cutting height. Cut the grass more frequently. Operate the mower at a slower ground speed. Overlap the cutting swaths instead of cutting a fullswath with each pass. Mow across the marginal areas a second time.
Figure 8: Installing the side discharge deflector
Figure 9: Side discharge deflector locking tabs
Figure 10: Releasing the mulcher cover
A
C
A
B
A
Operation (Continued)
9
Operation
Preparing the Engine
ENGINE DOES NOT CONTAIN OIL OR GASOLINE
Fill the engine with the proper amount of oil. See the enginemanufacturer’s instructions for the type of gasoline and oil touse. Before you use the unit, read the information on safety,operation, maintenance, and storage.
WARNING: Follow the engine manufacturer’sinstructions for the type of gasoline and oil touse. Always use a safety gasoline container.Do not smoke when adding gasoline to theengine. When inside an enclosure, do notfill with gasoline. Before you add gasoline,stop the engine. Let the engine cool forseveral minutes.
Note: The operation of a new engine will sometimes result ina slight amount of smoke. This smoke is caused by paint oroil on or around the muffler. This is normal and onlyexpected during initial operation.
IMPORTANT: This unit is equipped with an internalcombustion engine and must not be used on or near anyunimproved forest-covered, brush-covered or grass-coveredand unless the engine’s exhaust system is equipped with aspark arrester meeting applicable local or state laws (if any).If a spark arrester is used, it must be maintained in effectiveworking order by the operator.
In the State of California the above is required by law(Section 4442 of the California Public Resources Code).Other states may have similar laws. Federal laws apply onfederal lands. See an Authorized Service Center for a sparkarrester for the muffler.
Note: Actual sustained engine power will likely be lower dueto operating limitations and environmental factors.
Pre-Start Checklist
Before you use the mower, check the assembly of thewheels, the handle, and the controls. Make sure all thefasteners are tight. Make sure the throttle control (ifequipped) and the engine stop lever work correctly.
If the mower is equipped with height adjusters, make surethe height adjusters function properly. Before starting theengine, make sure each height adjuster is set at the desiredheight. See “Adjusting The Height Of Cut” in the Maintenancesections.
Operation (Continued)
10
Oper
atio
n
www.brutepower.com
Engine Stop Lever
Release the engine stop lever (A, Figure 11) and the engineand the blade will automatically stop. To run the engine, holdthe engine stop lever in the Operating position (B).
Before you start the engine, operate the engine stop leverseveral times. Make sure the cable moves easily.
Front Wheel Drive System
The mower has a front wheel drive system. Operate the drivesystem as follows.
1. Hold the engine stop lever in the Operating Position (A,Figure 12).
2. Push the drive lever (B) completely forward (C). Whenthe drive lever clicks, release the drive lever. The drivesystem is now engaged.
Note: To stop the engine, release the engine stop lever.
3. To disengage the drive system and stop the engine,completely release the engine stop lever.
4. To disengage only the drive system, release the enginestop lever approximately two inches. The drive systemwill disengage but the engine will continue to run.
Note: When the drive system is disengaged on a new unit, itis possible for the front wheels to rotate if lifted off theground. This is normal and will stop after one or two hoursof operation.
WARNING: For safe operation, the drivesystem must immediately disengage when thedrive lever is released. If the drive systemdoes not disengage correctly, do not operatethe mower until the drive system is adjustedor repaired by an authorized service center.
Stopping the Engine
To stop the engine, release the engine stop lever. Disconnectthe wire from the spark plug to prevent the engine fromstarting.
If the engine will not stop, hold a screwdriver against thespark plug and against the engine cooling fins. The spark willgo to ground and the engine will stop. Before you start theengine, check the engine stop cable. Make sure the enginestop cable is assembled correctly. Before you operate theunit, replace a bent or damaged engine stop cable.
Figure 11: Operating the engine stop lever
Figure 12: Operating the front wheel drive system
C
A
B
AB
Operation (Continued)
11
Operation
Starting the Engine
WARNING: The blade will rotate when the engine runs.
IMPORTANT: Before you start the engine, operate the enginestop lever several times. Make sure the engine stop cablemoves freely.
Note: The engine design does not include a throttle controlor an engine speed adjustment. The engine is set at the bestspeed for cutting grass, bagging grass, and for extendedengine life.
1. Check the oil. 2. Fill the fuel tank with regular unleaded gasoline. Make
sure the gasoline is clean. Leaded gasoline will increasedeposits and shorten the life of the valves.
Note: Do not use gasohol or methanol. Do not use premiumunleaded gasoline.
WARNING: Always use a safety gasolinecontainer. Do not smoke when adding gasolineto the fuel tank. When inside an enclosure, donot add gasoline. Before you add gasoline,stop the engine and let the engine cool forseveral minutes.
3. Make sure the spark plug wire is connected to the sparkplug.
4. Make sure the drive lever is in the disengaged position(B, Figure 14).
WARNING: To prevent an accident, make surethe drive lever is in the DISENGAGED position.When the drive lever is in the ENGAGEDposition, do not start the engine.
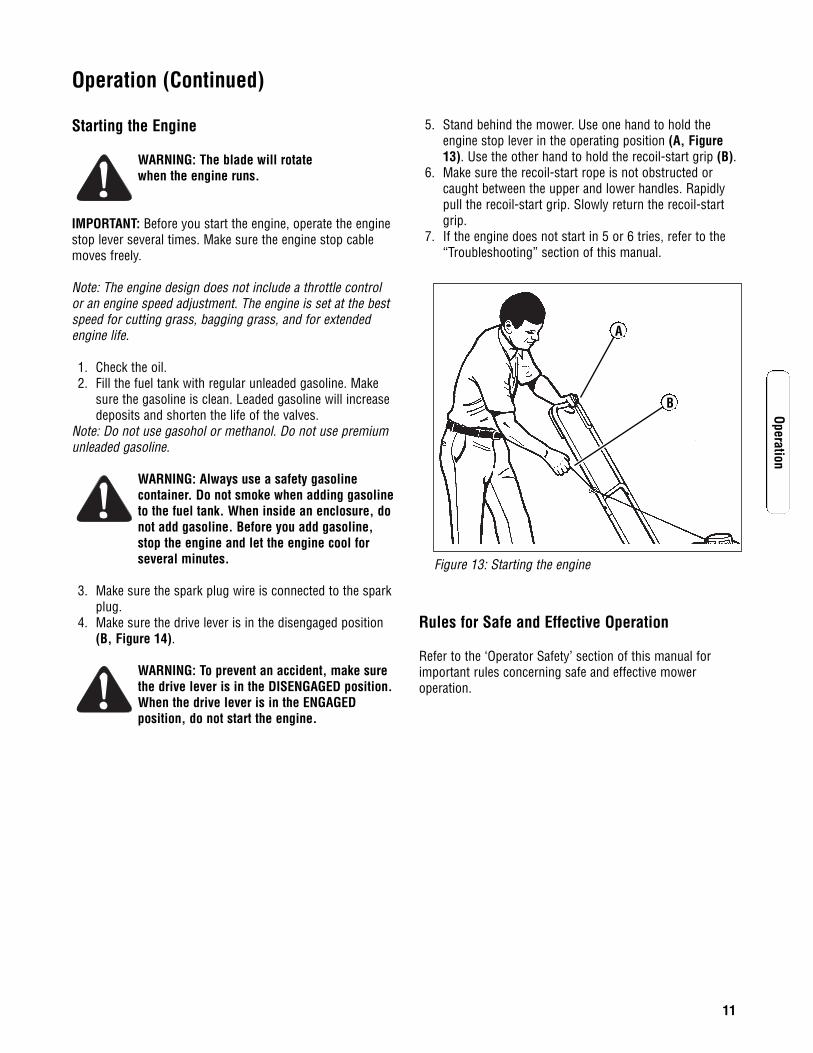
5. Stand behind the mower. Use one hand to hold theengine stop lever in the operating position (A, Figure13). Use the other hand to hold the recoil-start grip (B).
6. Make sure the recoil-start rope is not obstructed orcaught between the upper and lower handles. Rapidlypull the recoil-start grip. Slowly return the recoil-startgrip.
7. If the engine does not start in 5 or 6 tries, refer to the“Troubleshooting” section of this manual.
Rules for Safe and Effective Operation
Refer to the ‘Operator Safety’ section of this manual forimportant rules concerning safe and effective moweroperation.
Figure 13: Starting the engine
A
B
Operation (Continued)
12
Mai
nten
ance
www.brutepower.com
Engine Maintenance
Use the following maintenance section to keep your unit ingood operating condition. All the maintenance informationfor the engine is in the “Engine Instruction Book”. Before youstart the engine, read this book.
WARNING: Before you make an inspection,adjustment (except carburetor), or repair, stopthe engine and disconnect the wire from thespark plug.
Engine Tipping
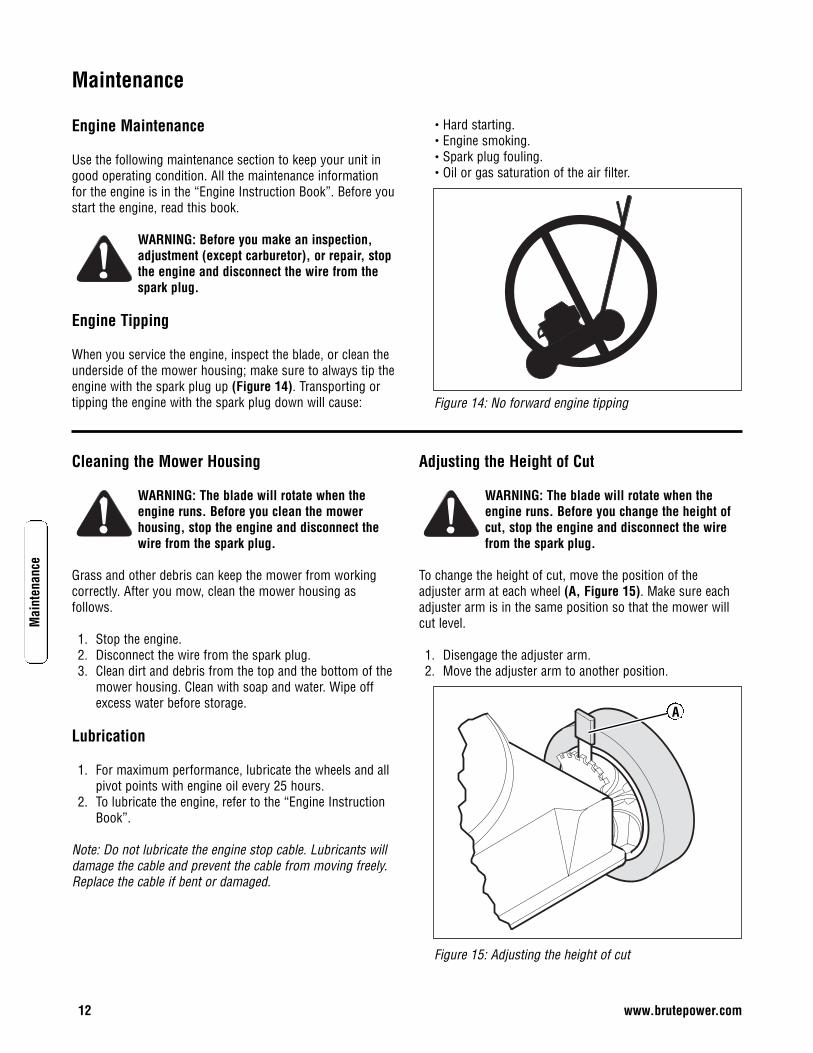
When you service the engine, inspect the blade, or clean theunderside of the mower housing; make sure to always tip theengine with the spark plug up (Figure 14). Transporting ortipping the engine with the spark plug down will cause:
Hard starting. Engine smoking. Spark plug fouling. Oil or gas saturation of the air filter.
Figure 14: No forward engine tipping
Cleaning the Mower Housing
WARNING: The blade will rotate when theengine runs. Before you clean the mowerhousing, stop the engine and disconnect thewire from the spark plug.
Grass and other debris can keep the mower from workingcorrectly. After you mow, clean the mower housing asfollows.
1. Stop the engine. 2. Disconnect the wire from the spark plug. 3. Clean dirt and debris from the top and the bottom of the
mower housing. Clean with soap and water. Wipe offexcess water before storage.
Lubrication
1. For maximum performance, lubricate the wheels and allpivot points with engine oil every 25 hours.
2. To lubricate the engine, refer to the “Engine InstructionBook”.
Note: Do not lubricate the engine stop cable. Lubricants willdamage the cable and prevent the cable from moving freely.Replace the cable if bent or damaged.
Adjusting the Height of Cut
WARNING: The blade will rotate when theengine runs. Before you change the height ofcut, stop the engine and disconnect the wirefrom the spark plug.
To change the height of cut, move the position of theadjuster arm at each wheel (A, Figure 15). Make sure eachadjuster arm is in the same position so that the mower willcut level.
1. Disengage the adjuster arm. 2. Move the adjuster arm to another position.
Figure 15: Adjusting the height of cut
A
Maintenance
13
Maintenance
Removing the Drive Belt
WARNING: Before you remove the belt,disconnect the wire from the spark plug.
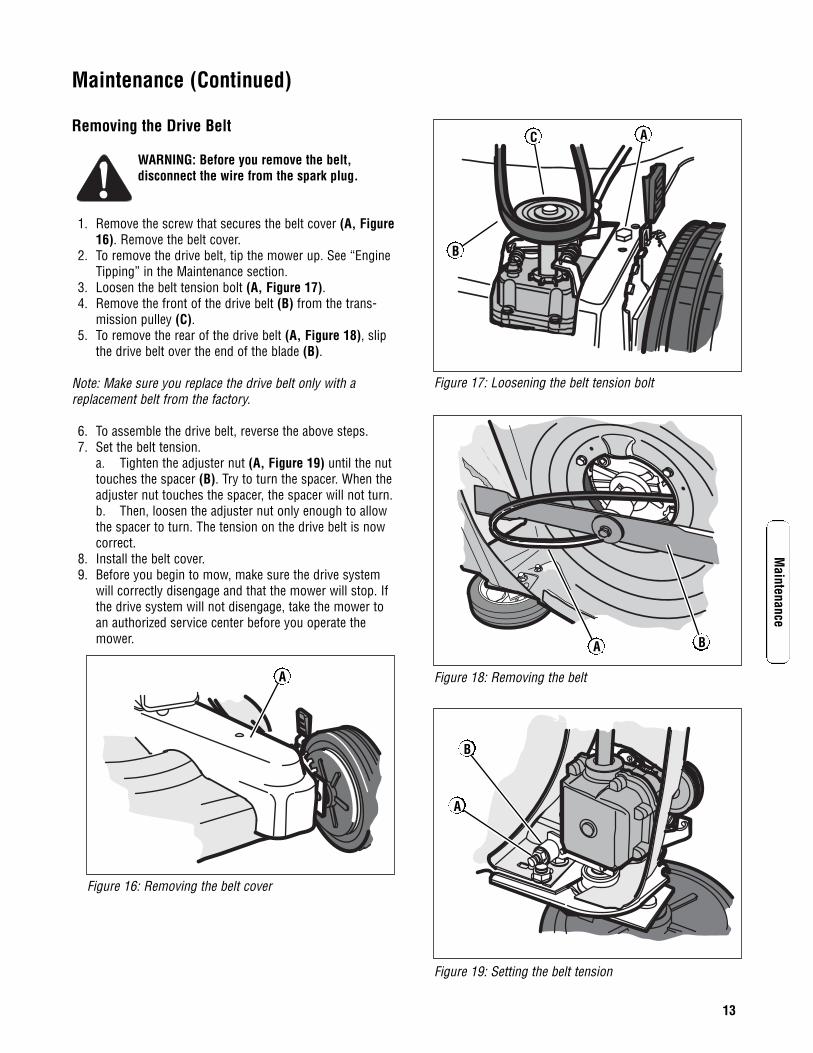
1. Remove the screw that secures the belt cover (A, Figure16). Remove the belt cover.
2. To remove the drive belt, tip the mower up. See “EngineTipping” in the Maintenance section.
3. Loosen the belt tension bolt (A, Figure 17). 4. Remove the front of the drive belt (B) from the trans-
mission pulley (C). 5. To remove the rear of the drive belt (A, Figure 18), slip
the drive belt over the end of the blade (B).
Note: Make sure you replace the drive belt only with areplacement belt from the factory.
6. To assemble the drive belt, reverse the above steps. 7. Set the belt tension.
a. Tighten the adjuster nut (A, Figure 19) until the nuttouches the spacer (B). Try to turn the spacer. When theadjuster nut touches the spacer, the spacer will not turn. b. Then, loosen the adjuster nut only enough to allowthe spacer to turn. The tension on the drive belt is nowcorrect.
8. Install the belt cover. 9. Before you begin to mow, make sure the drive system
will correctly disengage and that the mower will stop. Ifthe drive system will not disengage, take the mower toan authorized service center before you operate themower.
Figure 17: Loosening the belt tension bolt
B
Figure 18: Removing the belt
A
Figure 19: Setting the belt tension
A
Figure 16: Removing the belt cover
A
B
AC
B
Maintenance (Continued)
14
Mai
nten
ance
www.brutepower.com
Adjusting the Drive Cable
WARNING: Before you adjust the drive cable,release the engine stop lever and wait for theengine to stop.
If the drive system does not engage and disengage correctly,check the handle for correct assembly. Make sure that allparts are in good condition, not broken or bent, and that allfasteners are tight.
Worn parts and cable stretch will change the performance ofthe drive system. When you mow in high or thick grass oron hills, the drive system can slip. If the drive system isslipping, adjust as follows or take the mower to anauthorized service center.
IMPORTANT: Before you start the engine, operate the enginestop lever several times. Make sure the engine stop cablemoves freely.
Note: The engine design does not include a throttle controlor an engine speed adjustment. The engine is set at the bestspeed for cutting grass, bagging grass, and for extendedengine life.
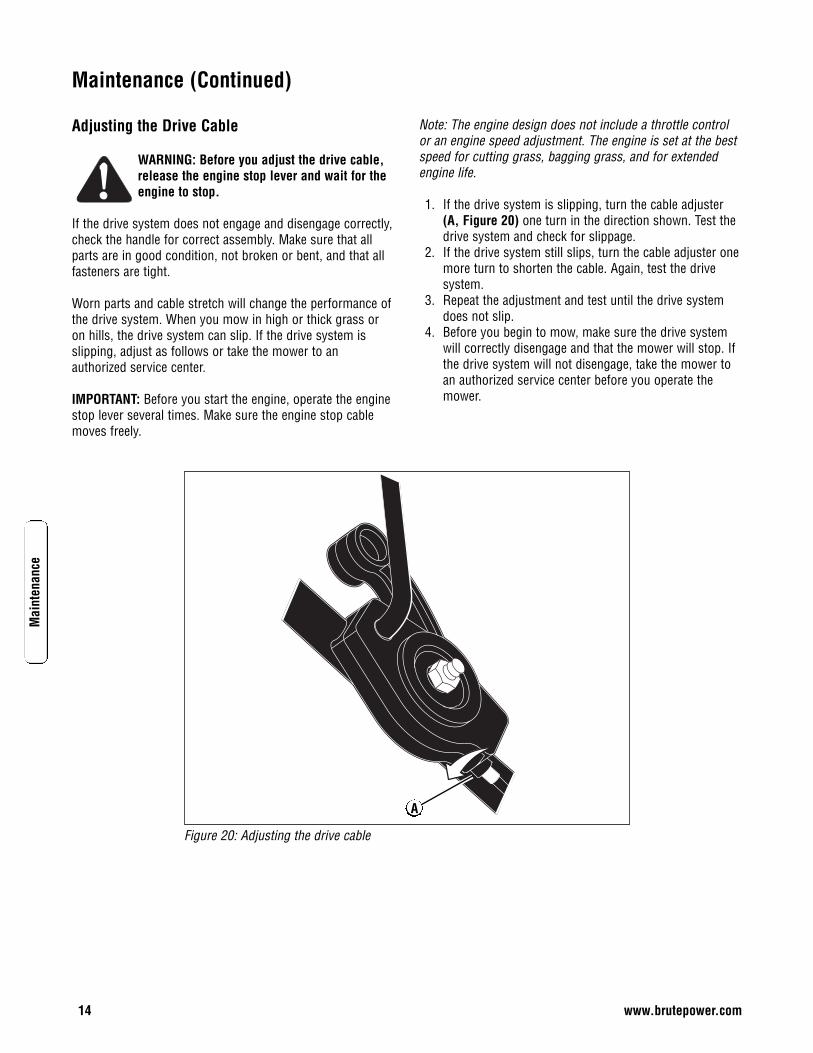
1. If the drive system is slipping, turn the cable adjuster(A, Figure 20) one turn in the direction shown. Test thedrive system and check for slippage.
2. If the drive system still slips, turn the cable adjuster onemore turn to shorten the cable. Again, test the drivesystem.
3. Repeat the adjustment and test until the drive systemdoes not slip.
4. Before you begin to mow, make sure the drive systemwill correctly disengage and that the mower will stop. Ifthe drive system will not disengage, take the mower toan authorized service center before you operate themower.
Figure 20: Adjusting the drive cable
A
Maintenance (Continued)
15
Maintenance
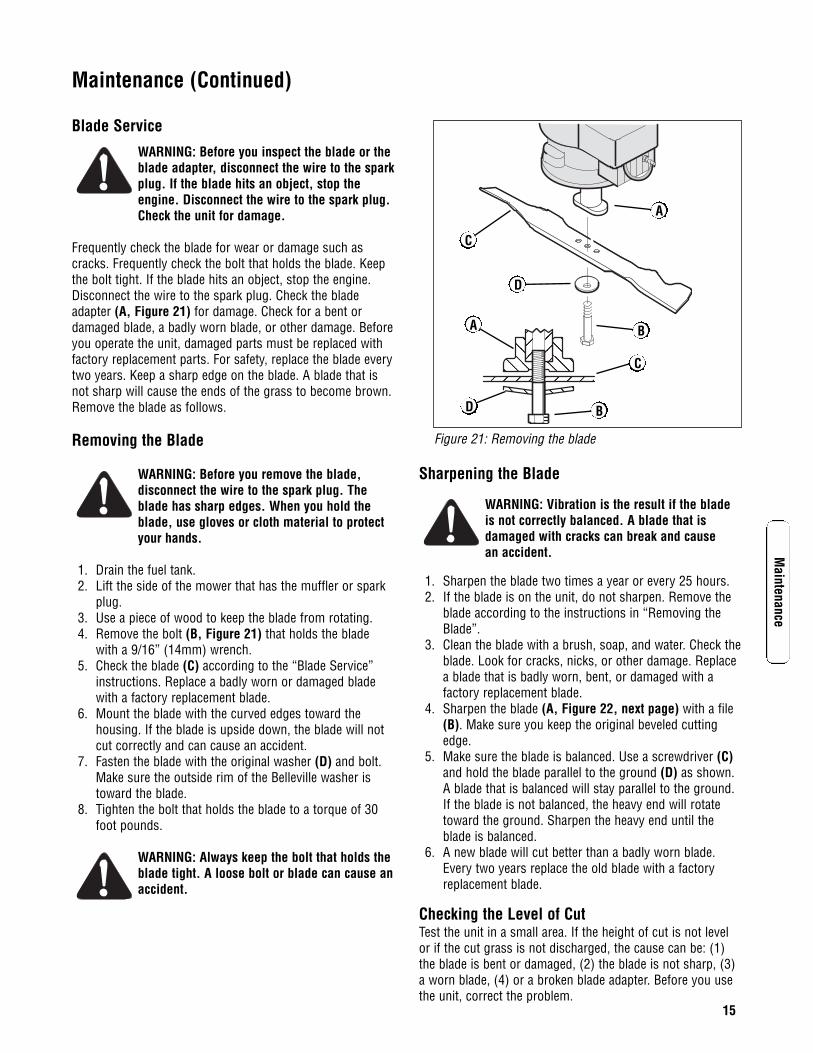
Blade Service
WARNING: Before you inspect the blade or theblade adapter, disconnect the wire to the sparkplug. If the blade hits an object, stop theengine. Disconnect the wire to the spark plug.Check the unit for damage.
Frequently check the blade for wear or damage such ascracks. Frequently check the bolt that holds the blade. Keepthe bolt tight. If the blade hits an object, stop the engine.Disconnect the wire to the spark plug. Check the bladeadapter (A, Figure 21) for damage. Check for a bent ordamaged blade, a badly worn blade, or other damage. Beforeyou operate the unit, damaged parts must be replaced withfactory replacement parts. For safety, replace the blade everytwo years. Keep a sharp edge on the blade. A blade that isnot sharp will cause the ends of the grass to become brown.Remove the blade as follows.
Removing the Blade
WARNING: Before you remove the blade,disconnect the wire to the spark plug. Theblade has sharp edges. When you hold theblade, use gloves or cloth material to protectyour hands.
1. Drain the fuel tank. 2. Lift the side of the mower that has the muffler or spark
plug. 3. Use a piece of wood to keep the blade from rotating. 4. Remove the bolt (B, Figure 21) that holds the blade
with a 9/16” (14mm) wrench. 5. Check the blade (C) according to the “Blade Service”
instructions. Replace a badly worn or damaged bladewith a factory replacement blade.
6. Mount the blade with the curved edges toward thehousing. If the blade is upside down, the blade will notcut correctly and can cause an accident.
7. Fasten the blade with the original washer (D) and bolt.Make sure the outside rim of the Belleville washer istoward the blade.
8. Tighten the bolt that holds the blade to a torque of 30foot pounds.
WARNING: Always keep the bolt that holds theblade tight. A loose bolt or blade can cause anaccident.
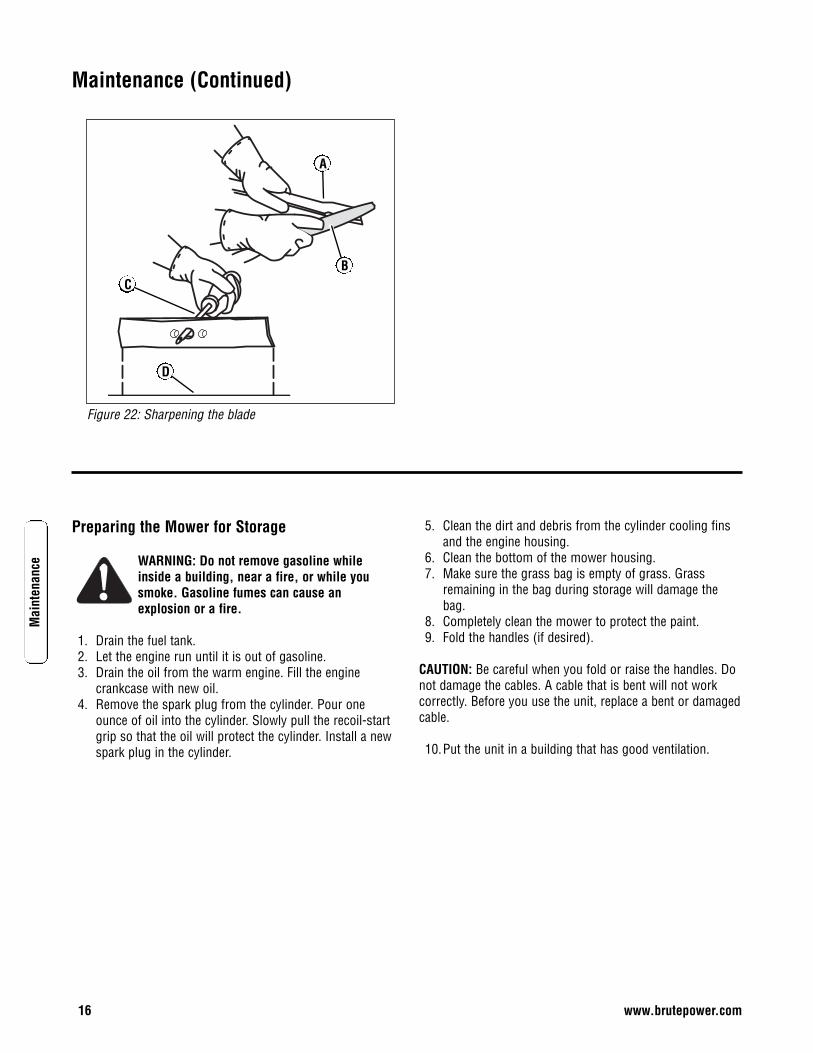
Sharpening the Blade
WARNING: Vibration is the result if the bladeis not correctly balanced. A blade that isdamaged with cracks can break and causean accident.
1. Sharpen the blade two times a year or every 25 hours. 2. If the blade is on the unit, do not sharpen. Remove the
blade according to the instructions in “Removing theBlade”.
3. Clean the blade with a brush, soap, and water. Check theblade. Look for cracks, nicks, or other damage. Replacea blade that is badly worn, bent, or damaged with afactory replacement blade.
4. Sharpen the blade (A, Figure 22, next page) with a file(B). Make sure you keep the original beveled cuttingedge.
5. Make sure the blade is balanced. Use a screwdriver (C)and hold the blade parallel to the ground (D) as shown.A blade that is balanced will stay parallel to the ground.If the blade is not balanced, the heavy end will rotatetoward the ground. Sharpen the heavy end until theblade is balanced.
6. A new blade will cut better than a badly worn blade.Every two years replace the old blade with a factoryreplacement blade.
Checking the Level of CutTest the unit in a small area. If the height of cut is not levelor if the cut grass is not discharged, the cause can be: (1)the blade is bent or damaged, (2) the blade is not sharp, (3)a worn blade, (4) or a broken blade adapter. Before you usethe unit, correct the problem.
Figure 21: Removing the blade
D
B
D
C
B
C
A
A
Maintenance (Continued)
16
Mai
nten
ance
www.brutepower.com
Figure 22: Sharpening the blade
D
CB
A
Preparing the Mower for Storage
WARNING: Do not remove gasoline whileinside a building, near a fire, or while yousmoke. Gasoline fumes can cause anexplosion or a fire.
1. Drain the fuel tank. 2. Let the engine run until it is out of gasoline. 3. Drain the oil from the warm engine. Fill the engine
crankcase with new oil. 4. Remove the spark plug from the cylinder. Pour one
ounce of oil into the cylinder. Slowly pull the recoil-startgrip so that the oil will protect the cylinder. Install a newspark plug in the cylinder.
5. Clean the dirt and debris from the cylinder cooling finsand the engine housing.
6. Clean the bottom of the mower housing.7. Make sure the grass bag is empty of grass. Grass
remaining in the bag during storage will damage thebag.
8. Completely clean the mower to protect the paint.9. Fold the handles (if desired).
CAUTION: Be careful when you fold or raise the handles. Donot damage the cables. A cable that is bent will not workcorrectly. Before you use the unit, replace a bent or damagedcable.
10.Put the unit in a building that has good ventilation.
Maintenance (Continued)
17
Troubleshooting
The engine will not start. 1. Make sure the fuel tank is filled with clean gasoline. Do not use old gasoline. 2. Make sure the wire for the spark plug is connected to the spark plug. 3. Adjust the Carburetor. Refer to the Engine Manual. 4. There is too much gasoline in the engine cylinder. Remove and dry the spark plug. Pull the recoil-start grip several times.
Install the spark plug. Connect the wire to the spark plug. Start the engine. 5. The engine is difficult to start in heavy or high grass. Move the mower to a clean dry surface. 6. Make sure the engine stop lever is in the operating position.
The engine will not stop. 1. Release the engine stop lever. 2. Check the engine stop cable. Replace the cable if bent or damaged.
Engine performance is bad. 1. Check the height of cut settings. Raise the height of cut if the grass is high. 2. Check the bottom of the blade housing. Clean the blade housing of grass and other debris. 3. Check the wire to the spark plug. Make sure the wire is connected. 4. Clean the engine cooling fins of grass and other debris. 5. Check the carburetor adjustments. Refer to the Engine Manual.6. Check the spark plug gap. Set the spark plug gap at 0.030”. 7. Check the amount of oil in the engine. Fill with oil if necessary. 8. Check the engine air cleaner. Refer to the Engine Manual. 9. The gasoline is bad. Drain and clean the fuel tank. Fill the fuel tank with clean gasoline.
Excessive vibration. 1. Remove the blade. Check the blade and balance if necessary. See the blade maintenance instructions. 2. Check for a bent or broken blade. A damaged blade is dangerous and must be replaced. 3. Check the blade adapter. Replace a broken blade adapter.4. If the vibration continues, take the mower to an Authorized Service Center.
The grass will not discharge correctly. 1. Clean the bottom of the mower housing. 2. Check for a badly worn blade. Remove and sharpen the blade. For safety, replace the blade every two years with a factory
replacement blade.
The grass is not cut even. 1. Check the height adjustment at each wheel. The height adjustment must be the same for each wheel. 2. Make sure the blade is sharp. 3. Check for a bent or broken blade. A damaged blade is dangerous and must be replaced. 4. Check for a broken blade adapter. Replace a broken blade adapter.
Troubleshooting

18
War
rant
ies
BRUTE Two Year Limited Warranty
Brute warrants to the original purchaser that this unit shall be free from defects in material and workmanship under normal use and service for a period of two(2) Years from the date of purchase; however, this warranty does not cover engines, accessories (such as snow blowers, snow blades, grass baggers andplows), transmissions, batteries and Normal Wear Parts (except as noted below) or transaxles as the companies that manufacture these items furnish theirown warranties and provide service through their authorized field service facilities. For additional information, see the warranties covering these particular parts. If you are uncertain whether your unit contains or is equipped with one or more of these parts, consult your dealer prior to purchase. Subject to theterms and conditions noted in this Limited Warranty, we shall, at our option, repair or replace at no cost to the original purchaser any part covered by thisLimited Warranty during the applicable warranty period.
In the event the battery proves defective within ninety (90) days from the date of purchase, we will replace it without charge. If the battery proves defectiveafter (90) days but within one hundred twenty (120) days from the date of purchase, we will replace it for a charge of one half (1/2) of the retail price of thebattery in effect at the time of return.
Normal Wear Parts are defined as belts, blades, blade adapters, pneumatic tires, headlights and seat covers. These parts are warranted to be free from defectsin material and workmanship as delivered with the product. Any claim for repair or replacement of Normal Wear Parts must be made within thirty (30) days ofthe date of purchase. No claims involving damage caused from material use, abuse or misuse will be honored.
This Brute Two (2) Year Limited Warranty is your exclusive remedy; however, this warranty is void or does not apply to any unit that has been tampered with,altered, misused, abused or used for rental or other commercial and/or professional (non-homeowner) uses. Your warranty does not cover minor mechanicaladjustments which are not due to any defect in material or workmanship. For assistance in making such adjustments, consult your Instruction Book.
To make a claim under this Brute Two (2) Year Limited Warranty, return the unit (or if authorized in advance, the defective part) along with your proof ofpurchase to an Authorized Service Center near you. To locate the nearest Authorized Service Center, call the Central Parts Distributor for your area shown inthe list provided with your unit or check the Yellow Page listings in your local telephone directory. If you return the entire unit, we will repair the unit. If weauthorize the return of the defective part only, we will either replace or repair the part. In the case of a defect in a transmission or differential (as distinguishedfrom a transaxle), the entire transmission or differential must be returned since they do not include user serviceable parts.
This Brute Two (2) Year Limited Warranty gives you specific legal rights, and you may also have other rights which vary from state to state. This LimitedWarranty is given in lieu of all other expressed and implied warranties including the implied warranty of merchantability and warranty of fitness for a particularpurpose. If you need additional information on this written warranty or assistance in obtaining service, call or write to the address below. The model numberalong with the CUSTOMER CARE Center 1-800 number is on the Model Number Nameplate attached to the unit.
BRUTE
Briggs & Stratton Power Products Group, LLC900 N. Parkway
Jefferson, WI 53549
www.brutepower.com
19
Slope Guide

20
Notes
www.brutepower.com

21
Notes
www.brutepower.com
Briggs & Stratton Power Products Group, LLC900 N. ParkwayJefferson, WI 53549
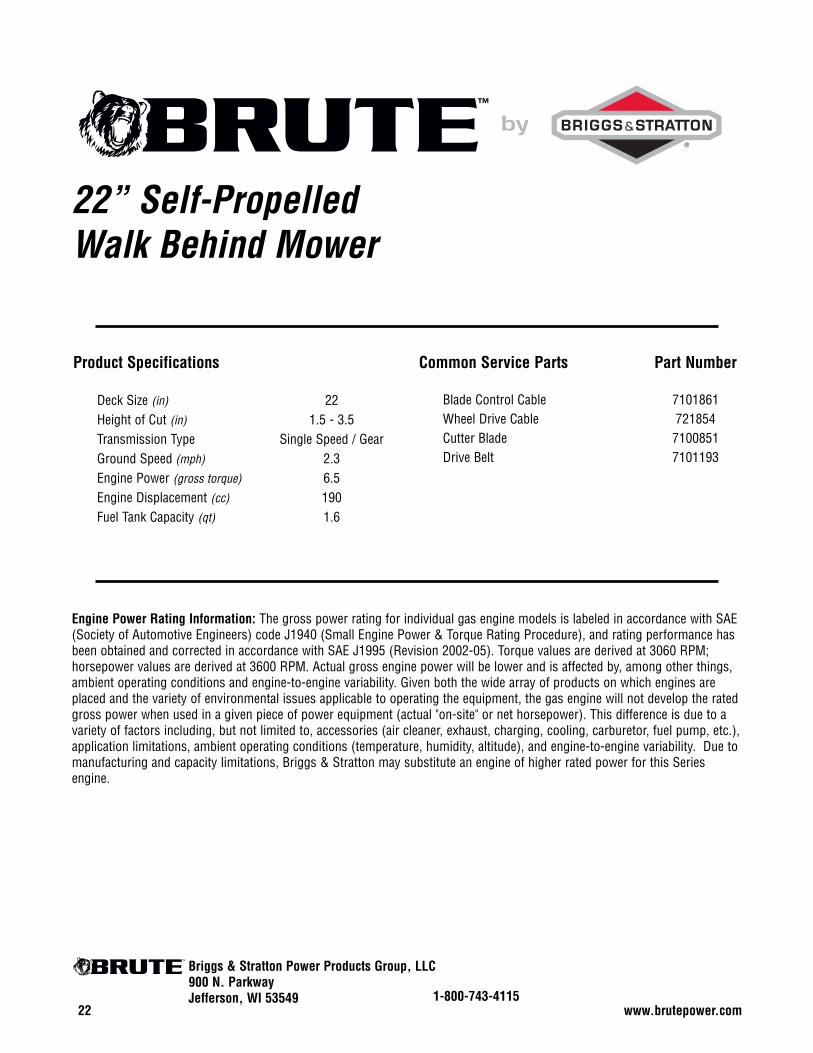
Engine Power Rating Information: The gross power rating for individual gas engine models is labeled in accordance with SAE(Society of Automotive Engineers) code J1940 (Small Engine Power & Torque Rating Procedure), and rating performance hasbeen obtained and corrected in accordance with SAE J1995 (Revision 2002-05). Torque values are derived at 3060 RPM;horsepower values are derived at 3600 RPM. Actual gross engine power will be lower and is affected by, among other things,ambient operating conditions and engine-to-engine variability. Given both the wide array of products on which engines areplaced and the variety of environmental issues applicable to operating the equipment, the gas engine will not develop the ratedgross power when used in a given piece of power equipment (actual "on-site" or net horsepower). This difference is due to avariety of factors including, but not limited to, accessories (air cleaner, exhaust, charging, cooling, carburetor, fuel pump, etc.),application limitations, ambient operating conditions (temperature, humidity, altitude), and engine-to-engine variability. Due tomanufacturing and capacity limitations, Briggs & Stratton may substitute an engine of higher rated power for this Seriesengine.
22
Common Service Parts Part Number
Blade Control Cable 7101861Wheel Drive Cable 721854Cutter Blade 7100851Drive Belt 7101193
Product Specifications
Deck Size (in) 22Height of Cut (in) 1.5 - 3.5Transmission Type Single Speed / GearGround Speed (mph) 2.3Engine Power (gross torque) 6.5Engine Displacement (cc) 190Fuel Tank Capacity (qt) 1.6
22” Self-Propelled Walk Behind Mower
1-800-743-4115