Embed Size (px)
Citation preview
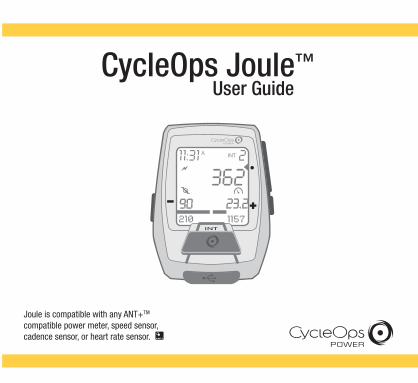
CycleOps Joule™ User Guide
Joule is compatible with any ANT+TM compatible power meter, speed sensor, cadence sensor, or heart rate sensor.
INT
211:31
362INTA
210 115790 23.2

© 2012 Saris Cycling Group, Inc.5253 Verona RoadMadison, WI 53711
All rights reserved. No part of this publication may be copied, photographed, reproduced, translated, transmitted electronically or placed on digital media without the prior written consent of Saris Cycling Group, Inc.
TrademarksSaris Cycling Group, Inc.,CycleOps, and CycleOps logo, are all registered trademarks of Saris Cycling Group, Inc. All other product, brand, or trade names used in this manual may be trademarks or registered trademarks of their respective owners.
ModificationsSaris Cycling Group, Inc reserves the right to make improvements and/or updates to the products described herein at any time without notice.
Connect your Joule with ANT+ heart rate monitors or bike sensors. For a complete listing of ANT+ certified products and their specific interoperability, visit the ANT+ product directory. http://www.thisisant.com/modules/mod_product-directory.php
This device complies with part 15 of FCC Rules and Rss-210 of IC Rules. Operation is subjected to the following two conditions:(1) This device may not cause harmful interference, and (2) This device must accept any interference received, includinginterference that may cause undesired operation. The manufacturer is not responsible for any radio or tv interference caused by unauthorized modifications to this equipment. Such modifications could void the user authority to operate the equipment.
Joule User Guide page 2

1. STARTING OUT Unpacking Compatibility Installation Battery
4
2. NAVIGATION Overview Icons Dashboards
6
3. INTERVALS Ride mode Interval mode
10
5. DATA & DOWNLOADS Download PowerAgent
15
4. MENU Menu Overview Ride History Sensor & Pairing Training Device
11
TABLE OF CONTENTS
JouleUser Guide page 3
CHAPTER
6. FAQ & TROUBLESHOOTING FAQ Troubleshooting
15
7. PRECAUTIONS Precautions
16
8. TECHNICAL SPECIFICATIONS
16
CHAPTER
9. WARRANTY
17

Joule User Guide page 4
Thank you for purchasing the CycleOps Joule. This user guide is just one of the resources to help you understand all the features the Joule has to offer.
Please visit www.cycleops.com to: • Learn more about Joule and the CycleOps System of products including stationary trainers, indoor cycles, software and power meters • Register all CycleOps products and activate warranty• View instructional videos• Sign up for the CycleOps Power newsletter your source for the latest news and technical updates from CycleOps Power
PACKAGE CONTENTS:PART QTYJoule computer 1Heart rate strap (select models) 1Stem/Handlebar mount 1Front mount 1Mount o-rings (2 sm/2 lg) 4Micro-USB cable 1Zip ties 2
CHAPTER 1: STARTING OUT
UNPACKING JOULEThe Joule is compatible with any ANT+ power meter, heart rate sensor, cadence sensor, speed sensor, or combination speed/cadence sensor. In addition to those ANT+ sensors, the Joule is also compatable with:
CycleOps 200Pro Indoor CycleCycleOps 300Pro Indoor Cycle
COMPATIBILITY

Joule is compatible with any ANT+TM compatible power meter, speed sensor, cadence sensor, or heart rate sensor.
INSTALLATIONInstalling the CycleOps Joule
BATTERYThe Joule is powered by a CR2032 coin cell battery. Typical battery life is about 300 hours of operation.
FRONT MOUNT
INT
INT
O-Rings: Crisscross under stem or handlebar, and latch on hooks
OR Zip tie around stem,through slots
STEM/HANDLEBAR MOUNT
INT
INT
CHAPTER 1: STARTING OUT
Joule User Guide page 5
3 VoltCR2032
+
INT

INT
211:31
362INTA
210 115790 23.2
[ENTER] button
* Press once to move through Dashboards* Hold for 3 seconds - Go to Menu* Selects item in Menu* Hold for 3 seconds in Menu - Go to Dashboard
Shifts “arrow” counterclockwise among the data fields
Shifts “arrow” clockwise among the data fields
Press to mark intervals* Hold for 3 seconds- Go to Interval view* Hold for 3 seconds- Go to Ride view
[PLUS] button
[MINUS] button
[INTERVAL] button
Micro-USB Port
BUTTONS FUNCTION
Joule User Guide page 6
NAVIGATION OVERVIEWThere are three buttons on the sides of the Joule and one large button below the display.
CHAPTER 2: NAVIGATION

Time
Normalized Power
Heart rate
Speed
Cadence
Current percent grade
Distance
Kilojoules
Watts/Kg
Power
ICONS MEANING ABOUT
Joule User Guide page 7
ICONSThe Joule uses icons for:
CHAPTER 2: NAVIGATION
The revolutions per minute (rpm) of the cranks at which you pedal.
The degree of inclination.
The length of the ride.
The kilojoule is a measure of energy exerted over time. It is the average power output in watts mulitplied by time in seconds divided by 1000.
Measured in watts where work is equal to force times distance.
The duration of the ride.
An estimate of the power that could have been maintained, had power been perfectly constant.
The number of heart beats per minute (bpm).
The rate of motion.
Power divided by the rider’s weight in kilograms. This compares power values from rider to rider.

Joule User Guide page 8
DASHBOARDSJoule has three dashboards, each of which is customizable in PowerAgent.
CHAPTER 2: NAVIGATION
11:31
21.5
A
194 597
INT
DASHBOARD 1
1x
1x 1xINT
Press 1x
1x
11:31
21.5
A
17.8 32.5
11:31
21.5
A
849KJ ride
1:23:31
11:31
215105
A
DASHBOARD 2
849KJ ride
1:23:31
11:31 A
129 162
11:31 A
95 129
Distance
Power
Distance
Current Cadence
Ride distance
Max HR
Current HR
Ride Distance
Current Cadence
Work
Work
Max Watts Max SpeedRide Time
Current Speed
Max Cadence
Avg Watts
43225.3
432Avg/Max Bar Graph
25.3Avg Speed
43225.3
147Ride Time
215105 147
215105 147
Avg HR Avg Cadence
1x

Joule User Guide page 9
DASHBOARDS (continued)
CHAPTER 2: NAVIGATION
11:31
-5.2 1:23:31
A
17.8 32.5
253 When average and maximum values are shown in the lower part of the display, a bar graph is shown to graphically indicate the average, maximum and current values. The bar graph can be turned off in PowerAgent.
The current value is represented by the total length of the bar graph.
The average value is represented by a line in the bar graph. Note: Gap if average if less than current, bar if average is greater than current.
-5.2 1:23:3117.8 32.5
-5.2 1:23:3117.8 32.5
1x 1x
INT
Press 1x
1x 11:31
-5.2 1:23:31
A
17.8 32.5
DASHBOARD 3
11:31 A
20.00MI
11:31 A
10287alt-ft ft-gain
23652CountdownDistance Total Ascent
Speed
Percent Grade
Percent Grade
Altitude
Average Speed Ride Time
Max Speed
Current Speed
Ride Time253
-5.2 1:23:31253
-5.2 1:23:31253
start
Average SpeedCurrent Speed
Current Speed
Average Speed
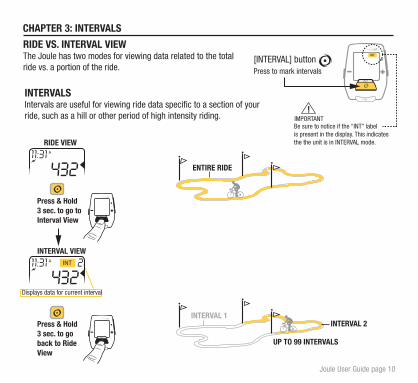
Press to mark intervals[INTERVAL] button
INTERVALSIntervals are useful for viewing ride data specific to a section of your ride, such as a hill or other period of high intensity riding.
INT
INT
INT
Press & Hold3 sec. to go toInterval View
Press & Hold3 sec. to goback to RideView
RIDE VIEW
INTERVAL VIEW
ENTIRE RIDE
11:31 A
211:31 INTA
Joule User Guide page 10
CHAPTER 3: INTERVALS
RIDE VS. INTERVAL VIEWThe Joule has two modes for viewing data related to the total ride vs. a portion of the ride.
Displays data for current interval
INT
Be sure to notice if the “INT” labelis present in the display. This indicatesthe the unit is in INTERVAL mode.
!IMPORTANT
INTERVAL 2INTERVAL 1
UP TO 99 INTERVALS
432
432

INT
Press & Hold 3 sec.
Press 1x to go forward
Press 1x to go backward11:31 A
RIDE
FROM DASHBOARD
1 oF 6MENU: RIDE
2 oF 6MENU:HISTORY
4 oF 6MENU:TRAINING
3 oF 6MENU: SENSOR
5 oF 6MENU: DEVICE
6 oF 6back:-> dash
Press • [ENTER] to select item
Press + [Plus] to move in Menu
INT
Press • [ENTER] to select sub-menu
HISTORY
SENSOR
TRAINING
DEVICE
DASH
Joule User Guide page 11
CHAPTER 4: MENU
MENU OVERVIEWEnter the Menu to review ride history, pair sensors, use the training function, and configure the device.
The RIDE menu allows you to pause, save, and clear ride data.
The HISTORY menu allows you to view averages from your past rides. HISTORY contains last ride, last 1 week, 2 weeks, 4 weeks, and all rides. You can also pick a ride to view data from a specific date.
The SENSOR menu allows you to choose between bikes, find sensors, pair sensors, manually zero a power meter, and set wheel circumference.
The TRAINING menu allows you to set a countdown timer based on distance, time or kilojoules.
The DEVICE menu allows you to set the odometer, clock, choose the units of measure, and language.
Return to Dashboard

Joule User Guide page 12
LAST RIDE
LAST 1 WK
LAST 2 WK
LAST 4 WK
ALL RIDES
PICK RIDE
BACK->MENU
PAUSE
SAVE
CLEAR
CLEAR ALL
BACK->MENU
CHAPTER 4: MENU SELECTIONS (RIDE & HISTORY)
INT
Press & Hold 3 sec.
Press 1x to go forward
Press 1x to go backward
11:31 A
FROM DASHBOARD
1 oF 6MENU: RIDE
11:31 A
Press • [ENTER] to select item
Press • [ENTER] to select sub-menu
2 oF 6MENU:HISTORY
Ride data will continue to be displayed, but it is not recorded.
For any of the rides shows details for metrics such as :
Saves ride and adds it to history.
Clears ride and deletes it. It will not be stored in history.
Deletes all ride data on device, but not history.
Return to Menu
MENU>RIDE>SELECTION RESULTSMENU>RIDE
MENU>HISTORY MENU>HISTORY>SELECTION RESULTS
T-MILES/KM T-TIMET-KJWATTS KPH/MPHH-RRPM 5-20 PEAK NPTSS IF GAINVAM
Average, maximum powerTotal timeTotal kilojoulesTotal miles/kilometersAverage, maximum speedAverage, maximum heart rateAverage, maximum cadence5 minute, 20 minute peak powerNormalized powerTraining stress scoreIntensity factorMeters/feet gained in elevationRate of elevation gain in meters per hour
Return to Menu.
Press 1x
Press the INTERVAL button while viewing history to view intervals.

other sensors
Pairs devices closest to sensor first. Hold Joule within 12” of PowerTap hubwhen in the presence of other sensors.
12” or 30cm
MENU
ZERO
PAIR
WHEEL
Performs Manual Zero
set circumf<- +>Press + or - for yourcircumference, thenpress •
Set circumference of wheel
Return to Menu
allpair: powerpair: h-rpair: cadencepair: speed
Pairs all sensorsPairs power sensorPairs heart rate sensorPairs cadence sensorPairs speed sensor
Joule User Guide page 13
CHAPTER 4: MENU SELECTIONS (SENSORS)
INT
Press & Hold 3 sec.
Press 1x to go forward
Press 1x to go backward
11:31 A
FROM DASHBOARD
Press • [ENTER] to select item
Press • [ENTER] to select sub-menu
MENU>SENSOR MENU>SENSOR>SELECTION RESULTS
3 oF 6MENU: SENSOR
Joule is compatible with many ANT+ sensors, each having a unique code.
!IMPORTANT
PROXIMITY PAIRING
which BIKE Select which bike you want to use1 2
FIND Finds paired sensorsPress 1x
Note: Enable BIKE 2 in PowerAgent

5 oF 6MENU: DEVICE
TRAIN: DISTANCE
TRAIN: TIMER
TRAIN: KJ
BACK->MENU
Joule User Guide page 14
DEV: TRIP
DEV: ALTI
DEV: CLOCK
DEV: UNITS
DEV: LANGUAGE
BACK->MENU
CHAPTER 4: MENU SELECTIONS (WORKOUT & DEVICE)
INT
Press & Hold 3 sec.
Press 1x to go forward
Press 1x to go backward
11:31 A
FROM DASHBOARD
11:31 A
Press • [ENTER] to select item
Press • [ENTER] to select sub-menu
Use the [-] [+] to setup a workout based on distanceUse the [-] [+] to setup a workout based on timeUse the [-] [+] to setup a workout based on kilojoules
Return to Menu
MENU>WORKOUT MENU>WORKOUT>SELECTION RESULTS
MENU>DEVICE MENU>DEVICE>SELECTION RESULTS
4 oF 6MENU:TRAINING
set KM/Mile
set timer
set kj
Use the [-] [+] to set the odometer
Set format & date
Set format and time
Set time that displays on screen
Use the [-] [+] to set altimeter to a known elevation
Use the [-] [+] to choose between English/Metric
Use the [-] [+] to choose a language for the device. Available languages are English, German, Italian, French and Spanish.
Return to Menu
TRIP METER
set alt, M/FT
date formattime format
SET TIME
set UNITS
Press 1x

DOWNLOADTo further configure the Joule and customize the dashboards, install PowerAgent software from www.cycleops.com/poweragent. PowerAgent also allows you to download and analyze your ride data.
INT
Micro-USBUSB
Return to Dashboard
Joule User Guide page 15
BACK->DASH
CHAPTER 4: MENU SELECTIONS (BACK TO DASHBOARD)
CHAPTER 5: DATA & DOWNLOADS
11:31 A
Return to Dashboard
MENU>BACK TO DASHBOARD MENU>BACK DASH>SELECTION RESULTS
6 oF 6back:-> dash
CHAPTER 6: FAQ & TROUBLESHOOTING
FREQUENTLY ASKED QUESTIONSFor the most current FAQ’s and troubleshooting please visit the customer support section of our website, www.cycleops.com.
Joule User Guide page 16
CHAPTER 7: IMPORTANT PRECAUTIONS
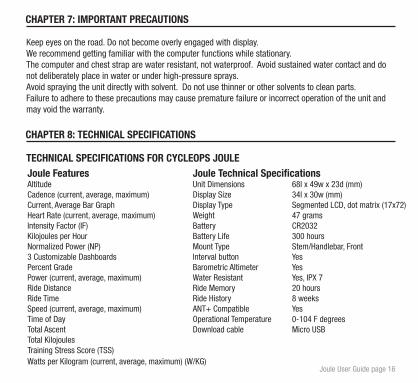
Keep eyes on the road. Do not become overly engaged with display. We recommend getting familiar with the computer functions while stationary.The computer and chest strap are water resistant, not waterproof. Avoid sustained water contact and do not deliberately place in water or under high-pressure sprays. Avoid spraying the unit directly with solvent. Do not use thinner or other solvents to clean parts. Failure to adhere to these precautions may cause premature failure or incorrect operation of the unit and may void the warranty.
CHAPTER 8: TECHNICAL SPECIFICATIONS
TECHNICAL SPECIFICATIONS FOR CYCLEOPS JOULEJoule Features Joule Technical Specifications Altitude Unit Dimensions 68l x 49w x 23d (mm)Cadence (current, average, maximum) Display Size 34l x 30w (mm) Current, Average Bar Graph Display Type Segmented LCD, dot matrix (17x72)Heart Rate (current, average, maximum) Weight 47 gramsIntensity Factor (IF) Battery CR2032Kilojoules per Hour Battery Life 300 hoursNormalized Power (NP) Mount Type Stem/Handlebar, Front3 Customizable Dashboards Interval button YesPercent Grade Barometric Altimeter YesPower (current, average, maximum) Water Resistant Yes, IPX 7Ride Distance Ride Memory 20 hoursRide Time Ride History 8 weeksSpeed (current, average, maximum) ANT+ Compatible YesTime of Day Operational Temperature 0-104 F degreesTotal Ascent Download cable Micro USBTotal Kilojoules Training Stress Score (TSS) Watts per Kilogram (current, average, maximum) (W/KG)
Press the INTERVAL button while viewing history to view intervals.

Joule User Guide page 17
CHAPTER 9: Warranty
WARRANTYIn the event that warranty service is required, original sales receipt may be required.
The Joule is warranted to the original retail purchaser to be free from defects in materials and workmanship. Warranty coverage is valid to the original purchaser only and proof of purchase will be required. • Electronics - 1 year- 2 years (Europe)
THIS WARRANTY DOES NOT COVER:• Normal wear and tear.• Any damage, failure or loss caused by accident, misuse, neglect, abuse, improper assembly, improper maintenance, or failure to follow instructions or warnings in User Guide.• Use of products in a manner or environment for which they were not designed.
LIMITATIONSThe foregoing warranties are in lieu of and exclude all other warranties not expressly set forth herein, whether expressed or implied by operation of law or otherwise, including, but not limited to, warranties of merchantability or fitness for a particular purpose. Saris Cycling Group shall in no event be liable for incidental or consequential losses, damages or expenses in connection with its exercise products. Saris Cycling Group’s liability hereunder is expressly limited to the replacement of goods not complying with this warranty or, at Saris Cycling Group election, to the repayment of an amount of the purchase price of the exercise product in question. Some states do not permit the exclusion or limitation of implied warranties or incidental or consequential damages, so the preceding limitations and exclusions may not apply to you.
PROCEDURESWarranty service will be performed by Saris Cycling Group or an authorized Saris Cycling Group Dealer. The original purchaser must provide proof of purchase. Service calls and/or transportation to and from the Authorized Saris Cycling Group Dealer are the responsibility of the purchaser.
• Saris Cycling Group will have the option to repair or replace any product(s) which requires warranty service.• Saris Cycling Group will replace any unit that is structurally defective with a new unit or replace the unit with a unit of equal value.• In the event a product cannot be repaired, Saris Cycling Group will apply a limited credit reimbursement toward another CycleOps product of equal or greater value.
CycleOps 5253 Verona Road Madison WI 53711 www.cycleops.com 20819a 12/11