Embed Size (px)
Citation preview
1
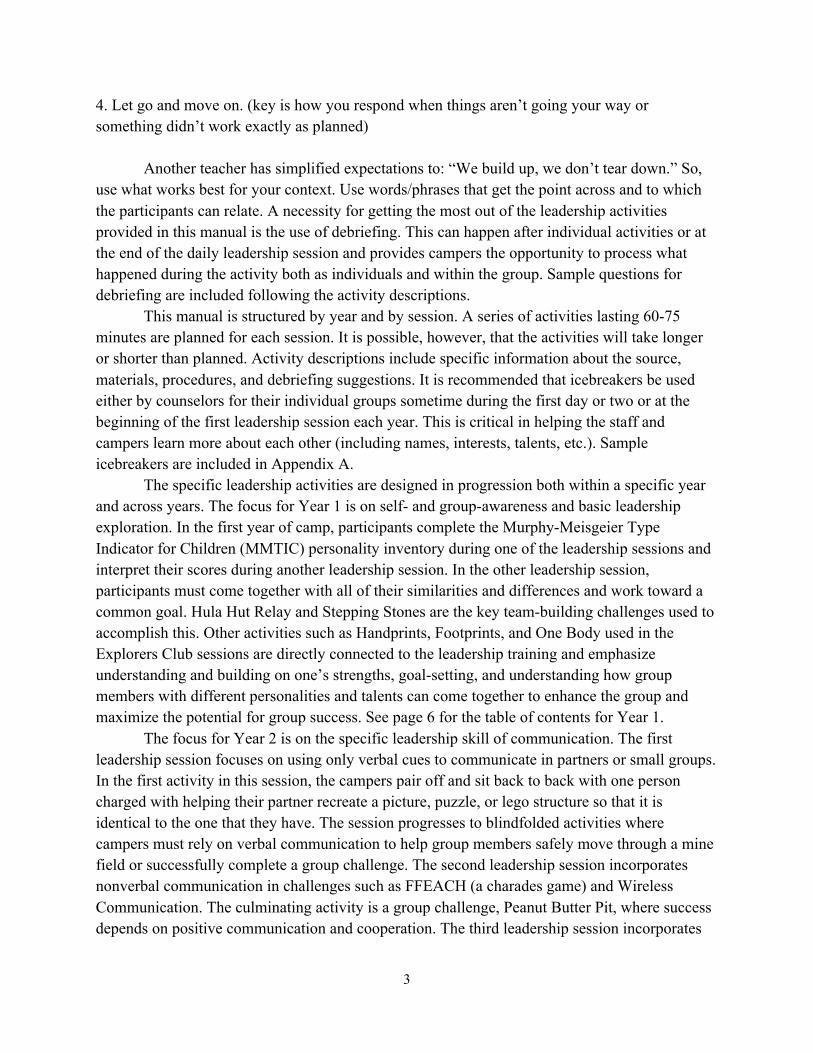
2012 Leadership
Training Manual Years 1-‐4
Tammy Schilling Department of Kinesiology Louisiana Tech University

2
Introduction and Overview
Leadership training for LA GEAR UP camps is designed to help campers learn and practice personal and interpersonal leadership skills within a supportive community of peers and mentors. The leadership style that we are espousing for La Gear Up is empowerment- and service-oriented. We want campers to experience leadership as an opportunity for “voice” and “choice” and to consider the importance of raising others up with them as leaders. This is a different philosophy than some of the more authoritarian leadership styles where there is a “leader” and “followers.” For leadership development to be most effective, the ideas and concepts should be consistent and visible throughout all camp experiences (e.g., during rec time, math tutoring, dining) and a positive leadership style should be introduced and modeled as a “way of being.” Role modeling by instructors, counselors, and other staff is critical to the success of this model. Leadership activities within each given year have been selected to promote active engagement in the leadership development process among all campers. Some of the activities (e.g., Human Ladder, Stepping Stones, and Willow in the Wind) are associated with a specific approach known as Adventure Education. Adventure experiences generally consist of physical team-building challenges that encourage the development of trust, communication, and cooperation in a fun environment. The activities will elicit different feelings for different campers and some individuals may initially be uncomfortable participating in certain activities. Campers should be encouraged to engage fully in the experience with the understanding that ultimately, each camper can choose their level of participation and challenge. This concept is called Challenge By Choice (Project Adventure, 1995, p. 9). It should be noted that this does not mean that campers can opt out of participation totally. Rather, modifications or additional roles (e.g., feedback and encouragement; hut builder) are added so that all campers remain involved in some capacity and can still contribute to the overall success of the activity or group. Another important concept used by Project Adventure, the program in which adventure activities originated, is the Full Value Contract (Project Adventure, 1995). This is essentially an agreement to respect and value all participants and their contributions. The Full Value Contract includes the following four parts (p. 7): 1. The group is committed to the group goals and any individual goals that have been shared 2. Group members agree to keep things safe – physically and emotionally 3. No put downs – of others or yourself 4. Group members agree to speak up in a respectful and positive way if they feel another person did something that got in the way of the goals of the group or an individual This Full Value Contract has been worded in a variety of ways by different teachers and adventure education leaders. For example, one version looks like this: 1. Be here now. (be present and focused; be ‘in the zone’) 2. Be safe. 3. Be respectful.
3
4. Let go and move on. (key is how you respond when things aren’t going your way or something didn’t work exactly as planned) Another teacher has simplified expectations to: “We build up, we don’t tear down.” So, use what works best for your context. Use words/phrases that get the point across and to which the participants can relate. A necessity for getting the most out of the leadership activities provided in this manual is the use of debriefing. This can happen after individual activities or at the end of the daily leadership session and provides campers the opportunity to process what happened during the activity both as individuals and within the group. Sample questions for debriefing are included following the activity descriptions. This manual is structured by year and by session. A series of activities lasting 60-75 minutes are planned for each session. It is possible, however, that the activities will take longer or shorter than planned. Activity descriptions include specific information about the source, materials, procedures, and debriefing suggestions. It is recommended that icebreakers be used either by counselors for their individual groups sometime during the first day or two or at the beginning of the first leadership session each year. This is critical in helping the staff and campers learn more about each other (including names, interests, talents, etc.). Sample icebreakers are included in Appendix A. The specific leadership activities are designed in progression both within a specific year and across years. The focus for Year 1 is on self- and group-awareness and basic leadership exploration. In the first year of camp, participants complete the Murphy-Meisgeier Type Indicator for Children (MMTIC) personality inventory during one of the leadership sessions and interpret their scores during another leadership session. In the other leadership session, participants must come together with all of their similarities and differences and work toward a common goal. Hula Hut Relay and Stepping Stones are the key team-building challenges used to accomplish this. Other activities such as Handprints, Footprints, and One Body used in the Explorers Club sessions are directly connected to the leadership training and emphasize understanding and building on one’s strengths, goal-setting, and understanding how group members with different personalities and talents can come together to enhance the group and maximize the potential for group success. See page 6 for the table of contents for Year 1. The focus for Year 2 is on the specific leadership skill of communication. The first leadership session focuses on using only verbal cues to communicate in partners or small groups. In the first activity in this session, the campers pair off and sit back to back with one person charged with helping their partner recreate a picture, puzzle, or lego structure so that it is identical to the one that they have. The session progresses to blindfolded activities where campers must rely on verbal communication to help group members safely move through a mine field or successfully complete a group challenge. The second leadership session incorporates nonverbal communication in challenges such as FFEACH (a charades game) and Wireless Communication. The culminating activity is a group challenge, Peanut Butter Pit, where success depends on positive communication and cooperation. The third leadership session incorporates
4
communication with problem-solving and memory in Direction to Direction and Swamp Island Maze. The final activity, Human Ladder, promotes use of the communication skills learned throughout camp to complete the most thrilling, death-defying challenge of Year 2 leadership training. There is an attempt to connect what the campers are learning in the leadership training to the Explorers Club sessions in Year 2. There are two main options or strategies for doing this. The first is each group’s creation of a 60 second public service announcement about the importance of going to college and how to set the stage to get there. The second is the development of group posters, similar to athletic team posters, utilizing important marketing strategies to encourage college access and preparation among middle and high school students. Unlike Year 1, the Explorers Club ideas are presented in a separate section so that the progression from day to day is clear. See page 19 for the table of contents for Year 2. The focus for Year 3 is helping participants successfully complete group challenges that require more complex leadership skills such as an understanding of and ability to promote group synergy, coordination, and trust. The first session includes a build-up of team challenges in a progression from working in a small group of 6 (Bull Ring) to a mid-sized group of 12 (Stump Jumping). The final activity, Four Corners Crossing, requires group members to work within their small group of 3 and coordinate with 3 other groups in order for the larger group of 12 to ultimately be successful. The second session begins with line-up or human shuffle challenges that require participants to have some physical contact but in simpler challenges. These lead in to trust leans that require more physical contact with the performance of each person having direct implications regarding safety and success. The final session begins with two challenges, Marble Pass and Magic Carpet Ride, which require focus and some physical contact. These are used as a lead-up to the most challenging and exhilarating activity that requires full focus and attention, Trust Fall. As with Years 1 and 2, there is an attempt to connect what campers are learning in leadership with the Explorers Club. Since 3rd year campers will be in high school the following year, there is a particular focus on college preparation. Through completion of an activity called Broken Squares, each group reviews the ABCs, is subsequently assigned a specific university to research, and is challenged to “market” their university through verbal or visual presentation to convince their peers that their assigned university is a great option for future attendance. Similar to Year 2, the description of this option for Explorers Club sessions is presented in a separate section at the end of the Year 3 leadership activities. See page 44 for the table of contents for Year 3. The focus for Year 4 continues to be on communication, cooperation, and collaboration but several activities have different roles associated with the challenge. To maximize performance and enhance the potential for success, each group must determine which members are better suited for each of the roles. Additionally, some activities that are theme-oriented are presented. There are a series of activities that are related to air or space travel (Airport, Shuttle Shuffle, Flying Astronauts, To the Moon, Stepping Stones – Shuttle Version, Starving Space
5
Station, and Mission – Martian Microbes). These should be fun and challenging and also fit with the camp themes of Aviation, Weather Balloon, and Reach for the Stars. Two other activities, the Mole and Bank Robbery, would seem to align with the investigative theme behind Grambling’s CSI camp. Remaining consistent with previous years, the Explorers Club is connected to leadership training. There are several options: 1) developing a pamphlet on collegiate or post-secondary options (with specific consideration for marketing strategies); 2) creating a poster on information about a designated university and participating in a poster session; or 3) campaign teams (organizing a campaign for a hypothetical mayoral candidate). For all options, different roles/responsibilities will need to be distributed among all group members in order to successfully complete the task. See page 57 for the table of contents for Year 4. If you have questions or suggestions, please do not hesitate to contact Tammy Schilling at 318-257-4737 or [email protected].
6
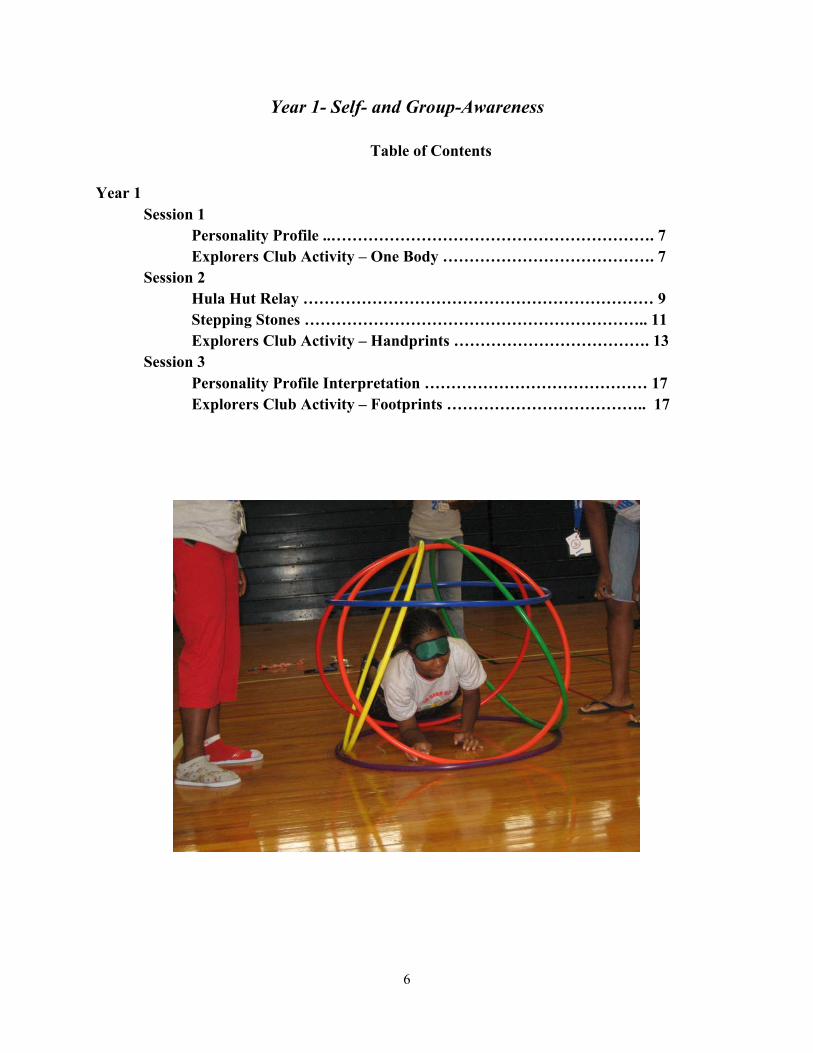
Year 1- Self- and Group-Awareness
Table of Contents
Year 1 Session 1 Personality Profile ..……………………………………………………. 7 Explorers Club Activity – One Body …………………………………. 7 Session 2 Hula Hut Relay ………………………………………………………… 9 Stepping Stones ……………………………………………………….. 11 Explorers Club Activity – Handprints ………………………………. 13 Session 3 Personality Profile Interpretation …………………………………… 17 Explorers Club Activity – Footprints ……………………………….. 17
7
YEAR 1 LEADERSHIP ACTIVITIES
The focus for Year 1 is on self- and group-awareness and basic leadership exploration. In the first year of camp, participants complete the Murphy-Meisgeier Type Indicator for Children (MMTIC) personality inventory during one of the leadership sessions and interpret their scores during another leadership session. In the other leadership session, participants must come together with all of their similarities and differences and work toward a common goal. Hula Hut Relay and Stepping Stones are the key team-building challenges used to accomplish this. Other activities such as Handprints, Footprints, and One Body used in the Explorers Club sessions are directly connected to the leadership training and emphasize understanding and building on one’s strengths, goal-setting, and understanding how group members with different personalities and talents can come together to enhance the group and maximize the potential for group success.
Session 1
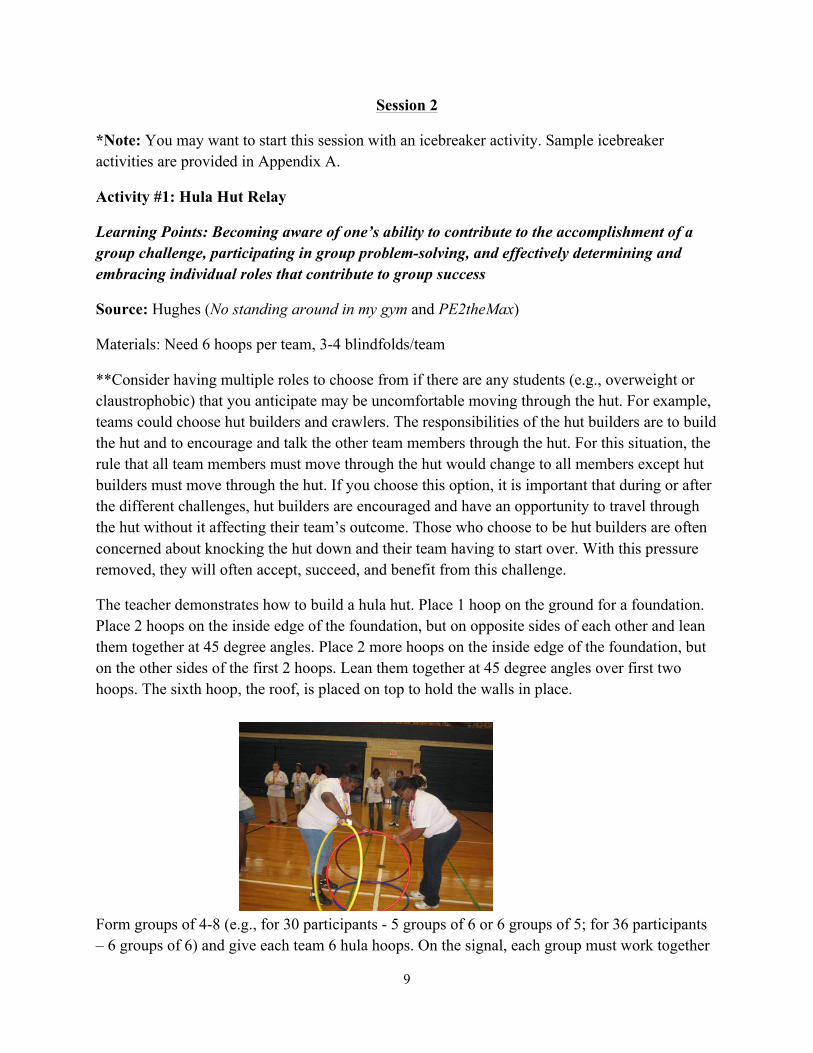
Personality Profile Learning Points: Increasing self-awareness and appreciation of personality diversity Participants complete the Murphy-Meisgeier Type Indicator for Children (MMTIC) instrument which is a personality inventory. This is administered by a trained psychologist. Explorers Club Idea following Session 1: Complete the One Body activity with emphasis on unique attributes of individuals within the larger group and how individual attributes contribute to the makeup of the group and its success. Tie this into the creation of and contribution to the Explorers Clubs during the year. Activity Description: One Body Learning Points: Becoming aware of the individual similarities and differences within a group and how individuals come together to make up a group and contribute to the group’s success Source: Jones (104 activities that build self-esteem, teamwork, communication, anger management, self-discovery, coping skills, p. 50-51) Materials: A large sheet of paper (bulletin board paper will work), black marker, colored markers, crayons, pens/pencils Divide large group into even groups of 6. Have each group member trace a body part from each person to create one complete body. If you want more detail, you can have members contribute more than one part. In the body part they contributed, they write their name and a great
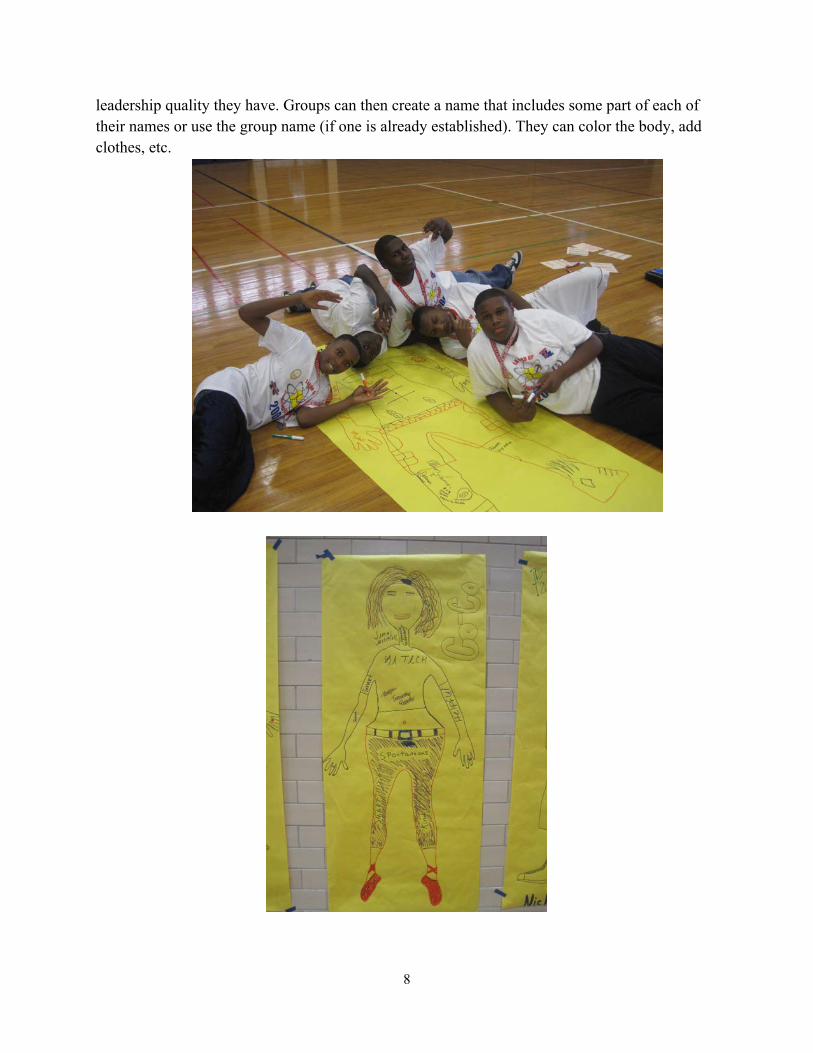
8
leadership quality they have. Groups can then create a name that includes some part of each of their names or use the group name (if one is already established). They can color the body, add clothes, etc.
9
Session 2
*Note: You may want to start this session with an icebreaker activity. Sample icebreaker activities are provided in Appendix A.
Activity #1: Hula Hut Relay
Learning Points: Becoming aware of one’s ability to contribute to the accomplishment of a group challenge, participating in group problem-solving, and effectively determining and embracing individual roles that contribute to group success
Source: Hughes (No standing around in my gym and PE2theMax)
Materials: Need 6 hoops per team, 3-4 blindfolds/team
**Consider having multiple roles to choose from if there are any students (e.g., overweight or claustrophobic) that you anticipate may be uncomfortable moving through the hut. For example, teams could choose hut builders and crawlers. The responsibilities of the hut builders are to build the hut and to encourage and talk the other team members through the hut. For this situation, the rule that all team members must move through the hut would change to all members except hut builders must move through the hut. If you choose this option, it is important that during or after the different challenges, hut builders are encouraged and have an opportunity to travel through the hut without it affecting their team’s outcome. Those who choose to be hut builders are often concerned about knocking the hut down and their team having to start over. With this pressure removed, they will often accept, succeed, and benefit from this challenge.
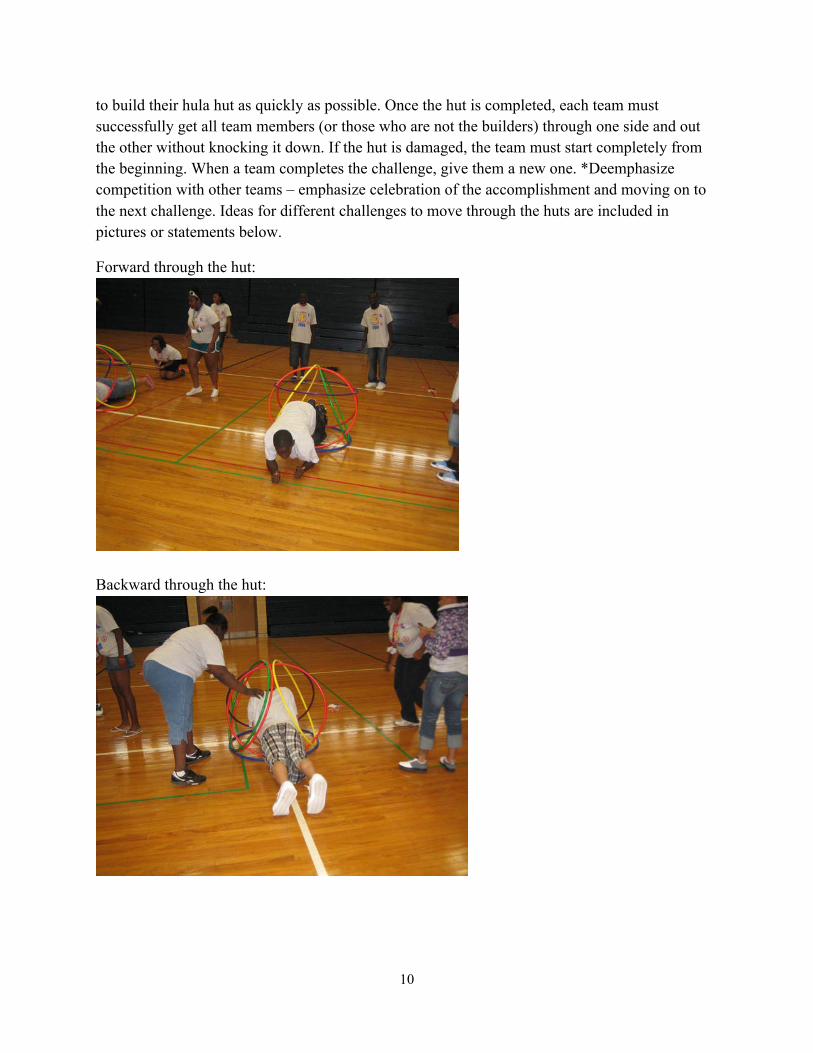
The teacher demonstrates how to build a hula hut. Place 1 hoop on the ground for a foundation. Place 2 hoops on the inside edge of the foundation, but on opposite sides of each other and lean them together at 45 degree angles. Place 2 more hoops on the inside edge of the foundation, but on the other sides of the first 2 hoops. Lean them together at 45 degree angles over first two hoops. The sixth hoop, the roof, is placed on top to hold the walls in place.
Form groups of 4-8 (e.g., for 30 participants - 5 groups of 6 or 6 groups of 5; for 36 participants – 6 groups of 6) and give each team 6 hula hoops. On the signal, each group must work together
10
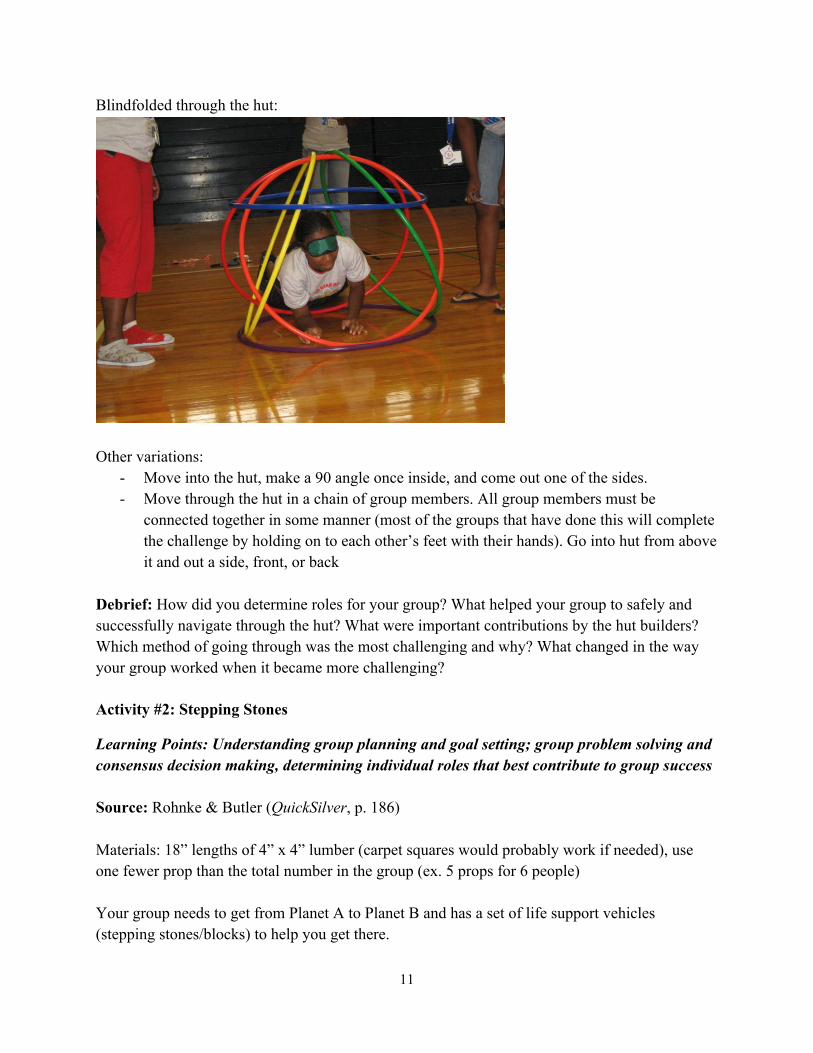
to build their hula hut as quickly as possible. Once the hut is completed, each team must successfully get all team members (or those who are not the builders) through one side and out the other without knocking it down. If the hut is damaged, the team must start completely from the beginning. When a team completes the challenge, give them a new one. *Deemphasize competition with other teams – emphasize celebration of the accomplishment and moving on to the next challenge. Ideas for different challenges to move through the huts are included in pictures or statements below.
Forward through the hut:
Backward through the hut:
11
Blindfolded through the hut:
Other variations:
- Move into the hut, make a 90 angle once inside, and come out one of the sides. - Move through the hut in a chain of group members. All group members must be
connected together in some manner (most of the groups that have done this will complete the challenge by holding on to each other’s feet with their hands). Go into hut from above it and out a side, front, or back
Debrief: How did you determine roles for your group? What helped your group to safely and successfully navigate through the hut? What were important contributions by the hut builders? Which method of going through was the most challenging and why? What changed in the way your group worked when it became more challenging? Activity #2: Stepping Stones
Learning Points: Understanding group planning and goal setting; group problem solving and consensus decision making, determining individual roles that best contribute to group success Source: Rohnke & Butler (QuickSilver, p. 186) Materials: 18” lengths of 4” x 4” lumber (carpet squares would probably work if needed), use one fewer prop than the total number in the group (ex. 5 props for 6 people) Your group needs to get from Planet A to Planet B and has a set of life support vehicles (stepping stones/blocks) to help you get there.
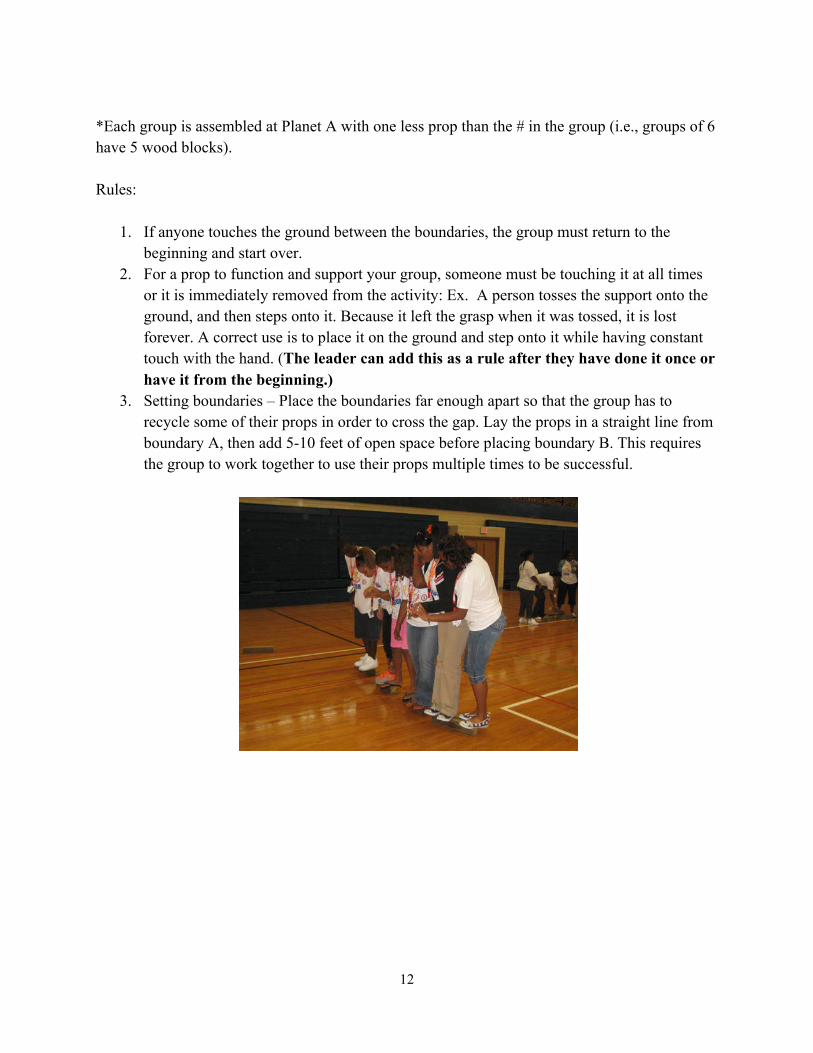
12
*Each group is assembled at Planet A with one less prop than the # in the group (i.e., groups of 6 have 5 wood blocks). Rules:
1. If anyone touches the ground between the boundaries, the group must return to the beginning and start over.
2. For a prop to function and support your group, someone must be touching it at all times or it is immediately removed from the activity: Ex. A person tosses the support onto the ground, and then steps onto it. Because it left the grasp when it was tossed, it is lost forever. A correct use is to place it on the ground and step onto it while having constant touch with the hand. (The leader can add this as a rule after they have done it once or have it from the beginning.)
3. Setting boundaries – Place the boundaries far enough apart so that the group has to recycle some of their props in order to cross the gap. Lay the props in a straight line from boundary A, then add 5-10 feet of open space before placing boundary B. This requires the group to work together to use their props multiple times to be successful.
13
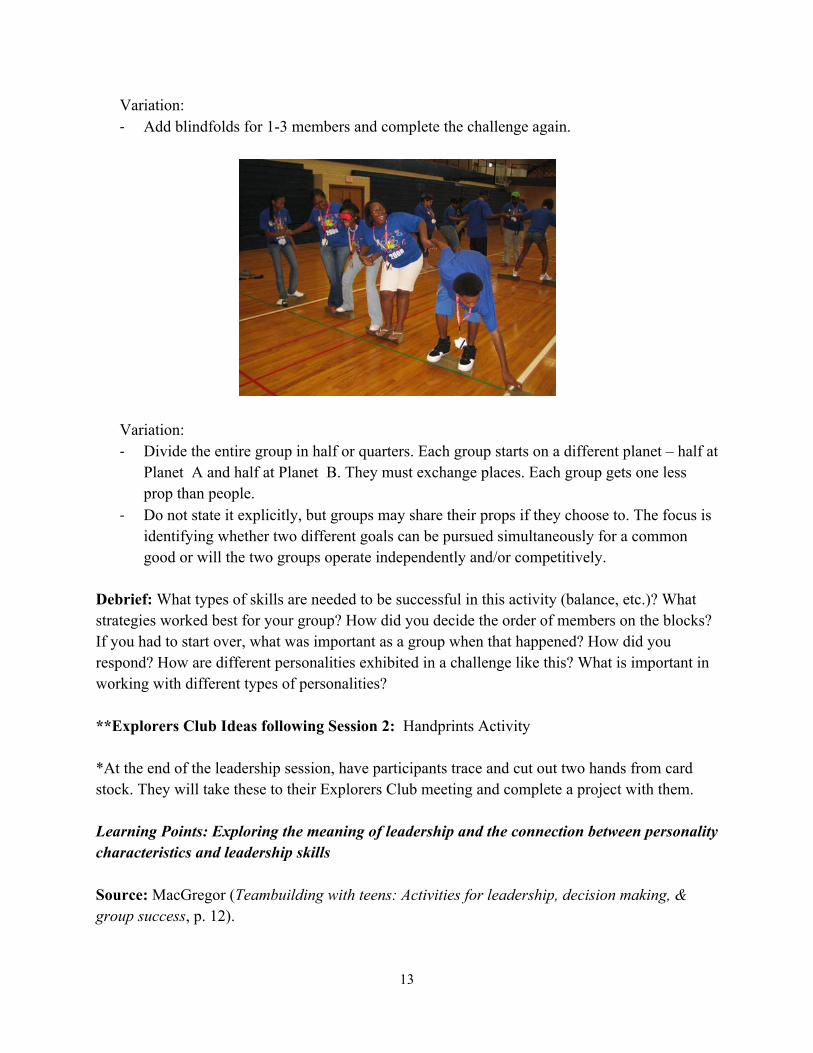
Variation: -‐ Add blindfolds for 1-3 members and complete the challenge again.
Variation: -‐ Divide the entire group in half or quarters. Each group starts on a different planet – half at
Planet A and half at Planet B. They must exchange places. Each group gets one less prop than people.
-‐ Do not state it explicitly, but groups may share their props if they choose to. The focus is identifying whether two different goals can be pursued simultaneously for a common good or will the two groups operate independently and/or competitively.
Debrief: What types of skills are needed to be successful in this activity (balance, etc.)? What strategies worked best for your group? How did you decide the order of members on the blocks? If you had to start over, what was important as a group when that happened? How did you respond? How are different personalities exhibited in a challenge like this? What is important in working with different types of personalities? **Explorers Club Ideas following Session 2: Handprints Activity *At the end of the leadership session, have participants trace and cut out two hands from card stock. They will take these to their Explorers Club meeting and complete a project with them. Learning Points: Exploring the meaning of leadership and the connection between personality characteristics and leadership skills Source: MacGregor (Teambuilding with teens: Activities for leadership, decision making, & group success, p. 12).
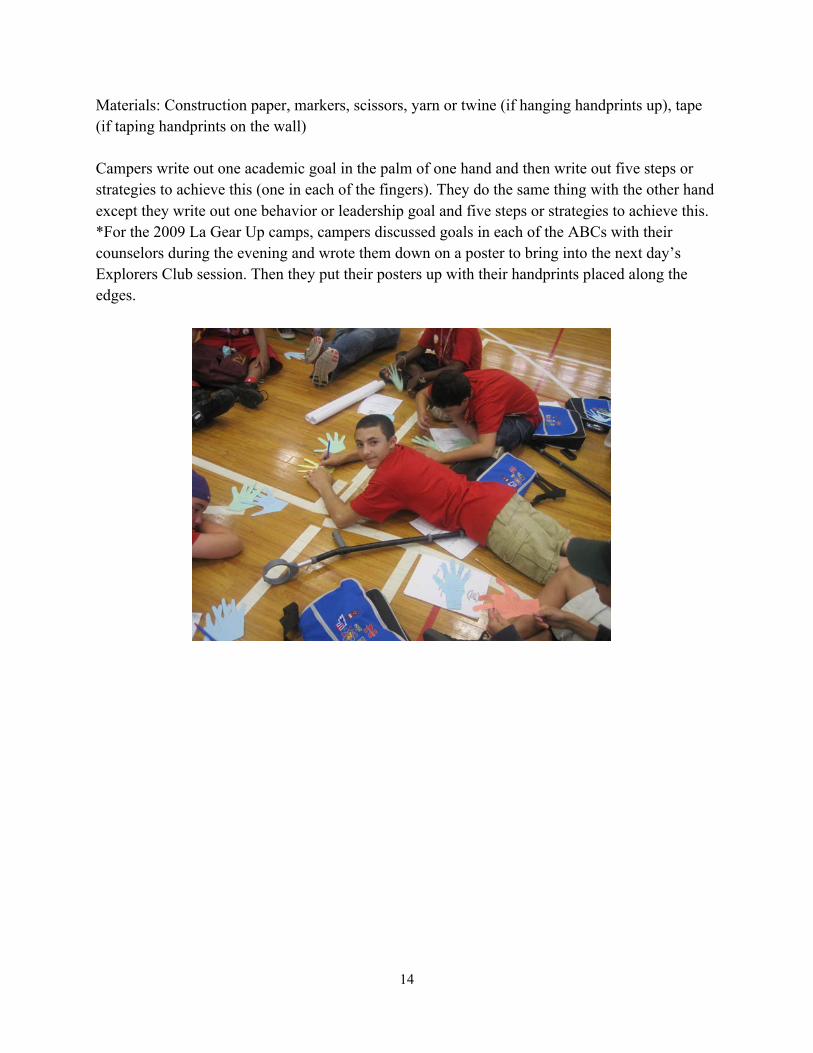
14
Materials: Construction paper, markers, scissors, yarn or twine (if hanging handprints up), tape (if taping handprints on the wall) Campers write out one academic goal in the palm of one hand and then write out five steps or strategies to achieve this (one in each of the fingers). They do the same thing with the other hand except they write out one behavior or leadership goal and five steps or strategies to achieve this. *For the 2009 La Gear Up camps, campers discussed goals in each of the ABCs with their counselors during the evening and wrote them down on a poster to bring into the next day’s Explorers Club session. Then they put their posters up with their handprints placed along the edges.

15
16
Variations: Within the fingers (thumb = 1, pinky = 5), they answer the following questions:
1. What is leadership? 2. What characteristics do good leaders have? 3. What is/are the personality characteristic(s) you most want people to use to describe you? 4. What leadership skills do you have that are related to the personality characteristic(s) you listed in #3? 5. What is the leadership trait you most want to work on? *If you choose to have them answer the leadership questions, it would be helpful to have a word wall of personality characteristics and leadership skills for the participants to look at as a prompt. See examples below.
Personality Characteristics:
Gentle Firm Reserved Talkative Determined Devoted Firm-minded Warm-hearted Peacemaker Judge Punctual Leisurely Quick Careful Wary Trusting Thinking Feeling Systematic Spontaneous Casual Planned Imaginative Realistic Forgiving Tolerant Impulsive Decisive Routine-oriented Flexible Abstract Concrete Lively Calm Builder Inventor Sociable Detached
Leadership Characteristics:
Open-minded Creative Organized Flexible Persuasive Supportive Efficient Good time manager Empowering Directive
17
Planned Casual Focused on process Focused on product Linear (step by step) Curvilinear (go with the “flow”)
Session 3
Interpretation of Personality Profile
Learning Points: Increasing self-awareness and appreciation of personality diversity
Participants are given descriptions of their profiles as determined by their responses on the Murphy- Meisgeier Type Indicator for Children (MMTIC) instrument. The profiles are interpreted generally and in relation to leadership. Focus is on the positive attributes that go along with each personality type. This process is conducted by a trained psychologist. **Explorers Club Ideas following Session 3: Complete the Footprints Activity.
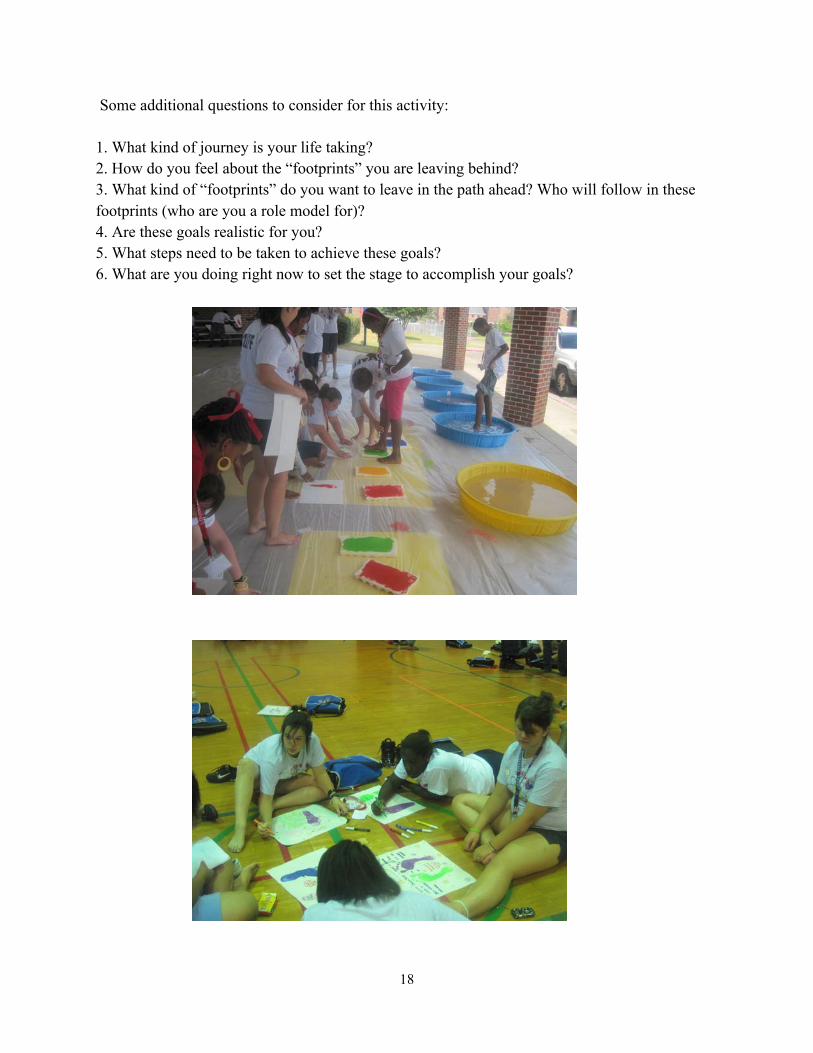
Activity Description: Footprints
Learning Points: Determining what footprint camp participants are currently leaving behind and who will be impacted by their footprints
Source: Jones (Team-building activities for every group, p. 166-167)
Materials: Washable paint for participants to make their own footprints, foam pads to use as a stamp pad for footprints, kiddie pools or some way to wash feet, bulletin board paper cut into 1’ x 1’ foot squares, markers
When we did this for the 2009 La Gear Up camp, we had them write out the following statement:
“Here walked _____(camper name)____________________ from ______(school name)_______ best remembered for __________________________________________.” We encouraged them to consider what their legacy was going to be at their school. We collected their footprints and taped them along the sidewalk on their way to the final presentation on Saturday. It was a powerful ending to camp.
18
Some additional questions to consider for this activity: 1. What kind of journey is your life taking? 2. How do you feel about the “footprints” you are leaving behind? 3. What kind of “footprints” do you want to leave in the path ahead? Who will follow in these footprints (who are you a role model for)? 4. Are these goals realistic for you? 5. What steps need to be taken to achieve these goals? 6. What are you doing right now to set the stage to accomplish your goals?
19
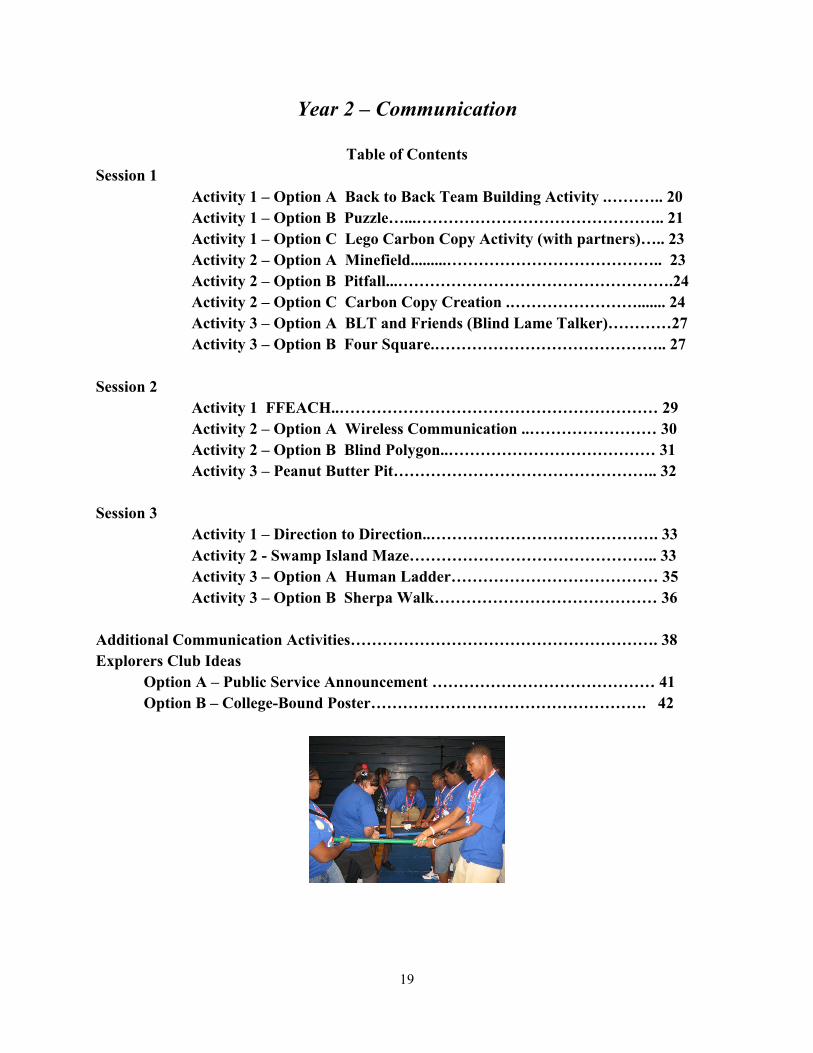
Year 2 – Communication
Table of Contents Session 1 Activity 1 – Option A Back to Back Team Building Activity .……….. 20 Activity 1 – Option B Puzzle…...……………………………………….. 21 Activity 1 – Option C Lego Carbon Copy Activity (with partners)….. 23 Activity 2 – Option A Minefield.........………………………………….. 23 Activity 2 – Option B Pitfall...…………………………………………….24 Activity 2 – Option C Carbon Copy Creation .……………………....... 24 Activity 3 – Option A BLT and Friends (Blind Lame Talker)…………27 Activity 3 – Option B Four Square.…………………………………….. 27 Session 2 Activity 1 FFEACH..…………………………………………………… 29 Activity 2 – Option A Wireless Communication ..…………………… 30 Activity 2 – Option B Blind Polygon..………………………………… 31 Activity 3 – Peanut Butter Pit………………………………………….. 32 Session 3 Activity 1 – Direction to Direction..……………………………………. 33 Activity 2 - Swamp Island Maze……………………………………….. 33 Activity 3 – Option A Human Ladder………………………………… 35 Activity 3 – Option B Sherpa Walk…………………………………… 36 Additional Communication Activities…………………………………………………. 38 Explorers Club Ideas Option A – Public Service Announcement …………………………………… 41 Option B – College-Bound Poster……………………………………………. 42
20
YEAR 2 LEADERSHIP ACTIVITIES
The focus for Year 2 is on the specific leadership skill of communication. The first leadership session focuses on using only verbal cues to communicate in partners or small groups. In the first activity in this session, the campers pair off and sit back to back with one person charged with helping their partner recreate a picture, puzzle, or lego structure so that it is identical to the one that they have. The session progresses to blindfolded activities where campers must rely on verbal communication to help group members safely move through a mine field or successfully complete a group challenge. The second leadership session incorporates nonverbal communication in challenges such as FFEACH (a charades game) and Wireless Communication. The culminating activity is a group challenge, Peanut Butter Pit, where success depends on positive communication and cooperation. The third leadership session incorporates communication with problem-solving and memory in Direction to Direction and Swamp Island Maze. The final activity, Human Ladder, promotes use of the communication skills learned throughout camp to complete the most thrilling, death-defying challenge of Year 2 leadership training. There is an attempt to connect what the campers are learning in the leadership training to the Explorers Club sessions in Year 2. There are two main options or strategies for doing this. The first is each group’s creation of a 60 second public service announcement about the importance of going to college and how to set the stage to get there. The second is the development of group posters, similar to athletic team posters, utilizing important marketing strategies to encourage college access and preparation among middle and high school students.
Session 1
Learning Points: To identify and demonstrate effective methods to communicate with others using only verbal cues in partners or small groups.
Activity #1
Option A: Back to Back Team Building Activity Source: Kelbaugh (Building Dynamic Groups Communication Team Building Activity) Materials needed: Paper and pencils for art students (put dot in center of paper for point of reference), clipboard or hard surface for drawing, sample drawings for art teachers (see Appendix B).
- Divide into partners. - Partners decide who is going to be the art teacher and who is going to be the art student. - The art teacher describes the drawing in front of them in detail so the art student can
reproduce the drawing. Variations:
- Allow art student to ask questions.
21
- Have another pair of participants observe and give feedback after the art teacher gives directions. This group tries the same activity to see if they can apply what they have learned.
Debrief: • Ask participants and/or observers to talk about what made the activity difficult and what could help the student and teacher be more successful. • What were important skills that each had to use to help it work better? (e.g., active listening, detailed, calm communication) • Ask how the lessons learned in this activity might apply to communicating with peers or teachers in school or family members at home.
Option B: Puzzle
Source: MacGregor (Teambuilding with teens: Activities for leadership, decision making, & group success, p. 77)
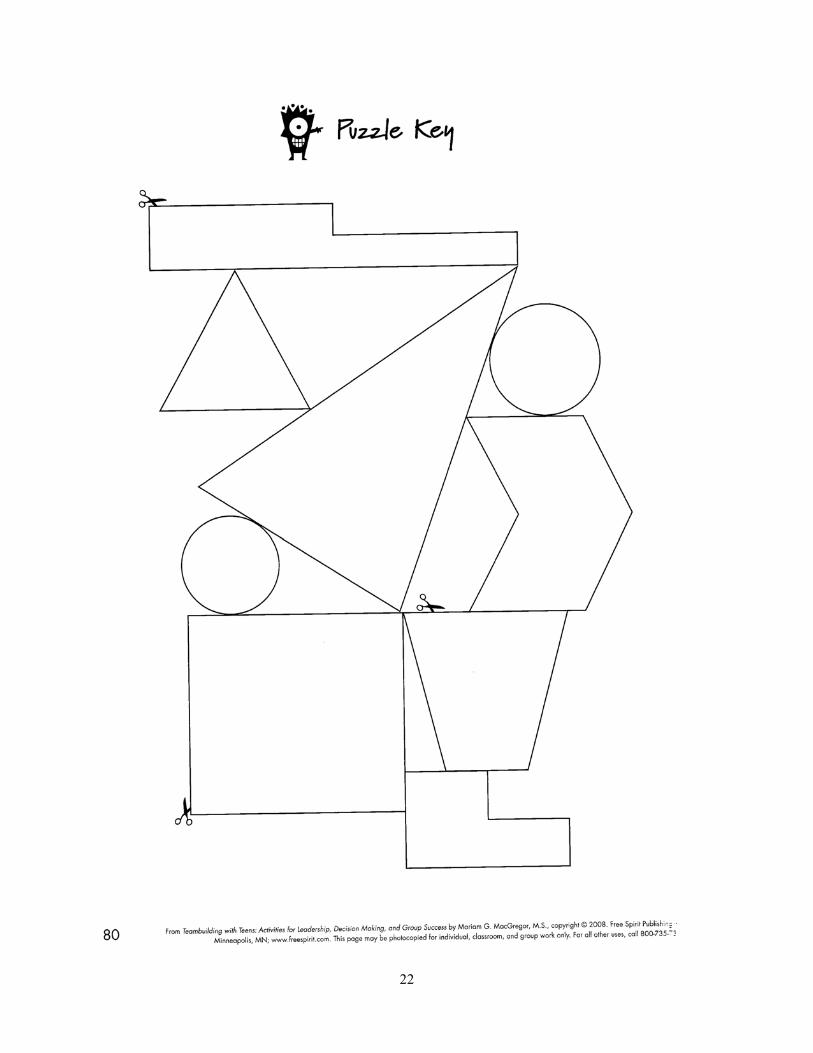
Materials needed: Card stock, scissors, sandwich bags to hold puzzle pieces, handout of the Puzzle Key (see page 6 below)
Make one copy of the puzzle key on the card stock and one on regular paper. Cut out the puzzle pieces on the card stock and put them in the sandwich bags. Keep the puzzle on the regular paper complete and use as a “Puzzle Key.” Place these in folders where the key cannot be seen. Partner A receives a copy of the completed puzzle; Partner B has back turned and receives puzzle pieces cut apart. Neither partner should be able to see what the other is doing. They have three tries to complete the puzzle:
1. Partner A gives instructions; Partner B cannot ask questions (5 min.) 2. Partner B can ask only yes/no questions (5 min.) 3. Both partners can talk freely (5 min.)
*If at any time, Partner B solves the puzzle, then Partner A should rotate the key so it is different and have Partner B try again but with the new rules.
Variation:
Have Partner A create their own design with puzzle pieces and Partner B works to duplicate it. After each try, Partner A shows Partner B the design and they compare puzzles.
Have partners switch roles.
Debrief: Describe what it was like to be in the different roles – which was harder? What would you do different? What were important skills for each role? How are these skills important in school and at home? Each time you tried to put the puzzle together, there were different rules regarding communication. How did you deal with these?
22
23
Option C: Lego Carbon Copy Activity (with partners)
Sources: CATALyST, Louisiana Tech University; http://youth-‐activities.suite101.com/article.cfm/team_building_activities_for_teens (called Building Blind)
Materials needed: identical sets of 10-15 Lego blocks in Ziploc bags for each pair (same number, type, and color of blocks)
*This is a modified version of Carbon Copy which is described below (Activity 2: Option C) and is similar to activities described above but with the use of legos as building blocks.
Both partners get their bags of legos and sit back to back. They choose who is going to be the builder first. Partner A builds a structure with their legos and then attempts to get Partner B to build an identical structure by communicating what to do with their legos.
Variations: 1. Partner A gives instructions; Partner B cannot ask questions (5 min.) 2. Partner B can ask only yes/no questions (5 min.) 3. Both partners can talk freely (5 min.)
Have partners switch roles. Debrief: Describe what it was like to be in the different roles – which was harder? What would you do different? What were important skills for each role? How are these skills important in school and at home?
Activity #2
Option A: Minefield
Source: Rohnke (The bottomless bag again, p. 52-53)
Materials needed: Variety of equipment (e.g., hoops, jump ropes, cones, bean bags, polyspots, chairs, aerobic steps) for students to create obstacles for the minefield.
Provide variety of equipment on the floor for walking around, stepping over, ducking under, etc. Have it prearranged or ask the students to rearrange all of it so that they are randomly and equally spaced within a designated rectangular space on the floor. One partner is blindfolded and the other is located outside the boundaries. The goal is to provide clear, specific directions to help their partner through the minefield without touching any of the mines. Only verbal clues are allowed – sighted player cannot touch the blind player. Allow all blindfolded players to enter the obstacle course to increase difficulty of careful movement and of being heard. If touch any
24
obstacle, the blindfolded player returns to the beginning or you can count the touches for later comparison. Switch roles.
Variations: Allow other pairs to talk loudly and try to distract the blindfolded player. Have two blindfolded players attempt to do the course hand-in-hand.
Debrief: What types of communication styles were used by the sighted participants? What worked well? What were challenges faced by those blindfolded? What types of communication developed among the blindfolded group members? What was most effective in moving through challenging obstacles?
Option B: Pitfall – (similar to Minefield)
Source: Rohnke & Butler (QuickSilver, p. 232) The setup for this activity is similar to Minefield with the addition of a pipe cleaner or other unique object placed somewhere in the midst of the random equipment. Describe the Pitfall as the area where all problems exist that cause them trouble at school, camp, where they live, etc. If appropriate, ask them to identify some of those problems. Then tell the pairs that the pipe cleaner represents a support or resource to help them get through the problem. It might be a person, an object, a class, a special skill, or a place they can go. They need to shape the pipe cleaner so they will recognize it in the midst of the Pitfall zone. Their task is to retrieve the support symbol without touching any other object.
Debrief: What types of communication styles were used by the sighted participants? What worked well? What were challenges faced by those blindfolded? What was most effective in moving through challenging obstacles (e.g., taking time, staying calm)? What types of barriers exist in our lives? What supports or resources do we have? What strategies can you use to navigate through the barriers to utilize supports or resources?
Option C: Carbon Copy Creation (*this could also be used as Activity #3 for this session)
Sources: CATALyST, Louisiana Tech University; http://youth-‐activities.suite101.com/article.cfm/team_building_activities_for_teens (called Building Blind)
Materials needed: identical sets of 20 Lego blocks in Ziploc bags for each group (same number, type, and color of blocks); one set of group task cards
25
Procedure:
1. Assemble the students into cooperative groups. 2. Explain the following task:
• Their job is to exactly duplicate the structure that you have built with 20 blocks • Each group is to use their bag of Lego blocks, which is identical to the set that
you used • The structure that they will attempt to copy is in a box hidden from them
3. Give each group a set of task cards; the group will assign the following tasks by passing out the cards within the group: “builder,” “manager,” “observer,” and “active listener.”
4. Explain the group jobs as follows: The job of the observer is to go look in the box where the teacher’s structure is, observe the structure for one minute without talking, then report back to the group. The observer MAY NOT handle the teacher’s structure! In fact, the observer may not use hands at all—they must remain behind the back or in pockets once rejoining the group. Upon returning to the group, the observer will instruct the builder on how to build the structure. The builder has two minutes to assemble the structure as directed but cannot ask questions or make comments. The observer can only give VERBAL instructions—no gestures, pointing, or touching. Only the builder can handle the Lego blocks. The manager makes sure that no one touches the blocks but the builder, and makes sure that the observer keeps his/her hands behind the back. The manager will also remind the builder not to ask questions or comment. The active listener will ask questions to clarify what the observer might be describing, as well as try and simplify directions the observer may be giving. The active listener will also rephrase what the observer might have said in an effort to clarify its meaning. When the teacher has called time at the end of the two-minute period, cards are passed in a clockwise direction and each member of the group then takes on a new role. The procedure is repeated until all members of the group have had the opportunity to function in each role. It is not necessary that the structure be disassembled after each rotation—the builder must simply follow the observer’s instructions.
5. After the group members have performed each of the four roles, the group is then allowed to choose the person they think is best at each job; the students will then assume that role and the group has one final opportunity to complete the task of replicating the teacher’s Lego structure.
6. Following the completion of the rotations, have the students either complete the worksheet provided or participate in a debriefing session for reflection.
7. Facilitate a discussion with the students about the importance of individual jobs within the cooperative groups; emphasize the need for teamwork and how each individual has strengths and weaknesses that can be used to make the team more successful.
8. After engaging the students in the whole group discussion, inform the students that the procedure will be repeated one more time, but with this one important difference—when
26
the students observe the second teacher-built structure, they will be allowed to take notes as they observe.
9. After they have completed the procedure and constructed their second structure, use this experience in the discussion to emphasize the importance of a well-kept notebook or journal.
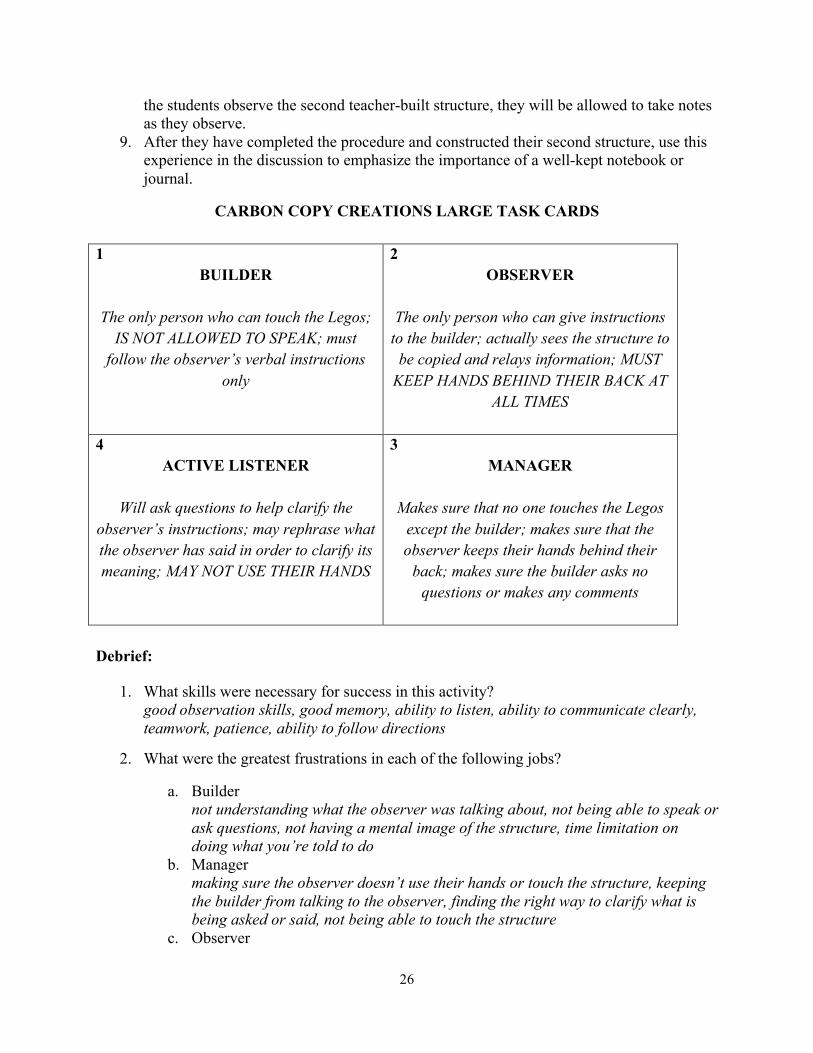
CARBON COPY CREATIONS LARGE TASK CARDS
1 BUILDER
The only person who can touch the Legos;
IS NOT ALLOWED TO SPEAK; must follow the observer’s verbal instructions
only
2 OBSERVER
The only person who can give instructions
to the builder; actually sees the structure to be copied and relays information; MUST
KEEP HANDS BEHIND THEIR BACK AT ALL TIMES
4
ACTIVE LISTENER
Will ask questions to help clarify the observer’s instructions; may rephrase what the observer has said in order to clarify its meaning; MAY NOT USE THEIR HANDS
3 MANAGER
Makes sure that no one touches the Legos
except the builder; makes sure that the observer keeps their hands behind their
back; makes sure the builder asks no questions or makes any comments
Debrief:
1. What skills were necessary for success in this activity? good observation skills, good memory, ability to listen, ability to communicate clearly, teamwork, patience, ability to follow directions
2. What were the greatest frustrations in each of the following jobs?
a. Builder not understanding what the observer was talking about, not being able to speak or ask questions, not having a mental image of the structure, time limitation on doing what you’re told to do
b. Manager making sure the observer doesn’t use their hands or touch the structure, keeping the builder from talking to the observer, finding the right way to clarify what is being asked or said, not being able to touch the structure
c. Observer
27
not being able to use hands or touch the structures, unable to keep a clear mental image in their mind, time limitation on observations, the description you give doesn’t match what the builder does, can’t take notes during observations
d. Active Listener Finding a way to correctly interpret what the observer is saying so that the builder understands it, not being able to touch the structure
3. Why was teamwork necessary for success in achieving your objective? The job was too complicated for a single individual to accomplish. People have skills in different areas—each role required different skills. The structure of the task required teamwork.
4. What would you do differently if you repeated this activity with a different structure?
Activity #3
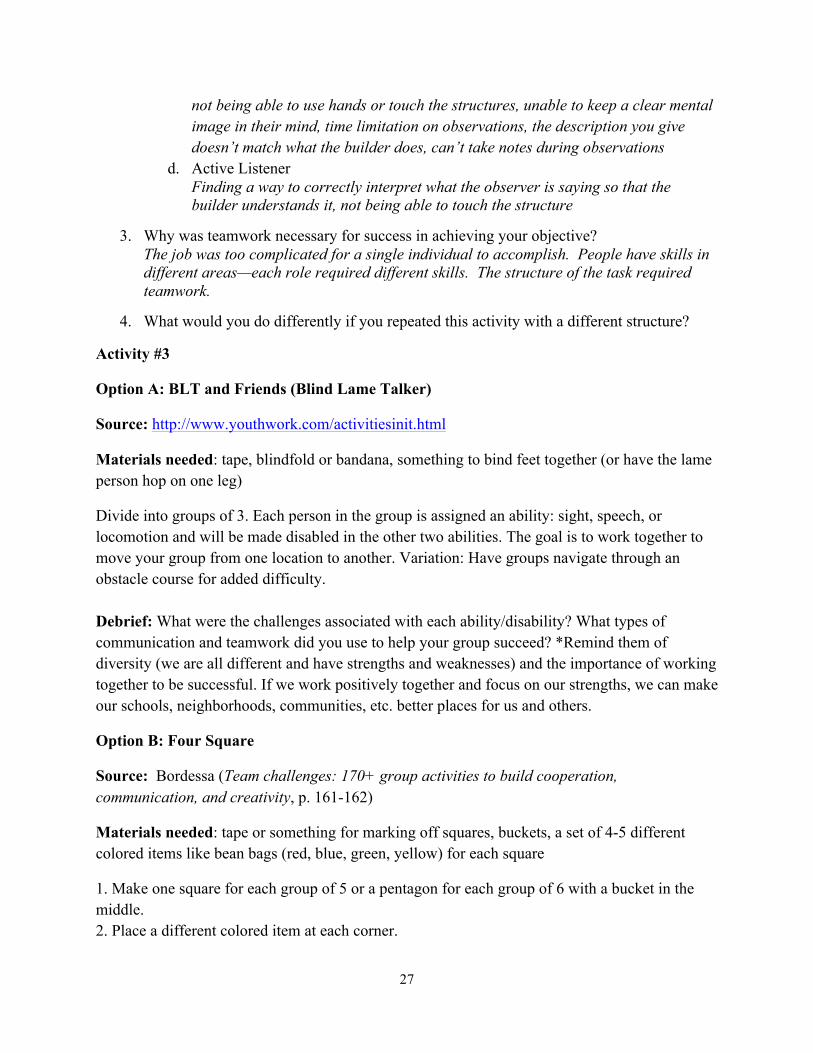
Option A: BLT and Friends (Blind Lame Talker)
Source: http://www.youthwork.com/activitiesinit.html
Materials needed: tape, blindfold or bandana, something to bind feet together (or have the lame person hop on one leg)
Divide into groups of 3. Each person in the group is assigned an ability: sight, speech, or locomotion and will be made disabled in the other two abilities. The goal is to work together to move your group from one location to another. Variation: Have groups navigate through an obstacle course for added difficulty. Debrief: What were the challenges associated with each ability/disability? What types of communication and teamwork did you use to help your group succeed? *Remind them of diversity (we are all different and have strengths and weaknesses) and the importance of working together to be successful. If we work positively together and focus on our strengths, we can make our schools, neighborhoods, communities, etc. better places for us and others.
Option B: Four Square
Source: Bordessa (Team challenges: 170+ group activities to build cooperation, communication, and creativity, p. 161-162)
Materials needed: tape or something for marking off squares, buckets, a set of 4-5 different colored items like bean bags (red, blue, green, yellow) for each square
1. Make one square for each group of 5 or a pentagon for each group of 6 with a bucket in the middle. 2. Place a different colored item at each corner.
28
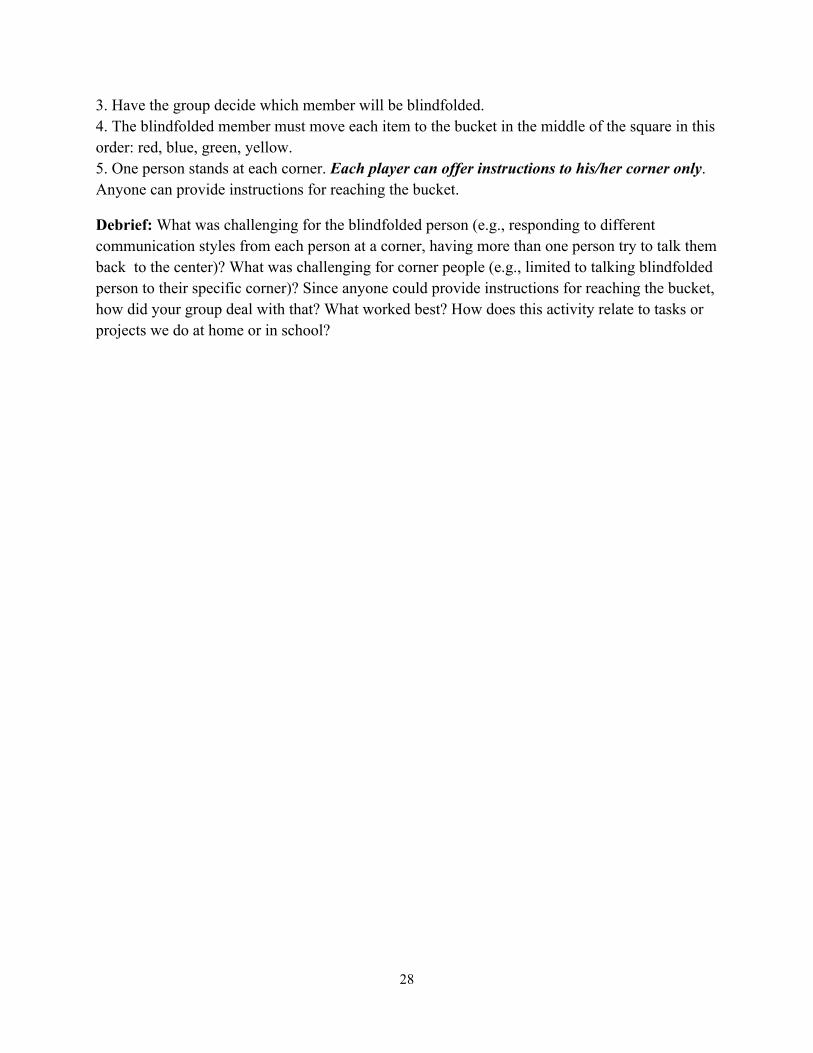
3. Have the group decide which member will be blindfolded. 4. The blindfolded member must move each item to the bucket in the middle of the square in this order: red, blue, green, yellow. 5. One person stands at each corner. Each player can offer instructions to his/her corner only. Anyone can provide instructions for reaching the bucket.
Debrief: What was challenging for the blindfolded person (e.g., responding to different communication styles from each person at a corner, having more than one person try to talk them back to the center)? What was challenging for corner people (e.g., limited to talking blindfolded person to their specific corner)? Since anyone could provide instructions for reaching the bucket, how did your group deal with that? What worked best? How does this activity relate to tasks or projects we do at home or in school?

29
Session 2
Learning points: To identify and demonstrate effective methods to communicate with others using both nonverbal (Activities 1 and 2) and verbal (Activities 1-3) cues in groups of 5-7.
Activity #1: FFEACH
Source: http://www.ultimatecampresource.com/site/camp-activity/ffeach.html
Materials needed: charade words on cards or list for each group
This is a charades game with categories of Fast Food, Electrical Appliances, and Cartoon Heroes. Groups are challenged to complete a predetermined list of items as quickly as possible.
Procedure: 1. Decide whether you will have each group member do a word from each category before moving on or whether you will mix up the words (making sure each group member gets one from each category or just doing it randomly). 2. Provide each counselor or group facilitator with the group of words. Have the groups spread out so they can’t overhear each other. 3. One group member goes to the counselor and the counselor tells them their word. 4. Once the group guesses the word, the next group member runs to the counselor for the next word. Every group member must go before anyone can repeat their turn. 5. Object is to complete the entire list.
Sample list of words: Fast Food – curly fries, pepperoni pizza, bacon double cheeseburger, McNuggets, onion rings, Whopper, buffalo wings, popcorn chicken, burrito supreme, nachos supreme, filet of fish sandwich, egg Mcmuffin, sausage and cheese biscuit, Baconator
Electrical Appliances – curling iron, fruit juicer, dishwasher, microwave, blender, hair dryer, phone charger, iron, vacuum cleaner, hand mixer, slow cooker
Cartoon Heroes – Superman, SpongeBob Square Pants, Incredible Hulk, Scooby Doo, Batman, Pappa Smurf, Wonder Woman, Iron Man, Shrek, Aqua Man, Spiderman
30
Activity #2 Option A: Wireless Communication
Materials needed: chair, hoop, hat, 3 cups, beanbag or rubber chicken, scarf, blindfold per group
Source: Ghost Ranch Ropes Course Manual, Dr. Sylvia Shirley (accessed at: http://www.ultimatecampresource.com/site/camp-activity/wireless-communication.html)
Procedure: 1. Have a specified starting line where the group is located. 2. Ask the group to select their best listener. Bring that person forward 20' and blindfold them. Tell them they cannot speak from then on until the game is over. Also tell them not to move unless told to do so. 3. Ask the group to select their best communicator. Bring them forward 10' and turn them so they face the group, who should all be standing on the starting line. The communicator is allowed to speak but may not turn around to look behind them. Starting line XXXX (group on starting line cannot talk, can only show) 10’ away C (Communicator faces the group on starting line) 10’further L (Listener has blindfold on and is facing toward C) 4. Tell the group on the starting line they may not say anything until the game is over. 5. Now produce some props- a chair, a hoop, a hat, 3 Solo cups, beanbag or rubber chicken, scarf or bandana, etc. 6. Produce a set of written instructions in individual strips. Give these instructions to the group on the starting line. Examples of instructions:
- Direct the communicator to have the listener put on a hat, sit in the chair, and pretend they are drinking out of one of the cups.
- Direct the communicator to have the listener pick up the hula hoop, hold it above their head, drop it over their body to the floor, step out of it, and pick up the beanbag (or rubber chicken) and throw it in the hoop that is now on the floor.
- Direct the communicator to have the listener pick up the scarf (or bandana), stuff it in a cup, turn the cup upside down on the court so the scarf isn’t visible, and put the hat over the cup stuffed with the scarf (or bandana).
31
- Direct the communicator to have the listener stack the cups in a pyramid on the chair and knock the cups down with the beanbag (or rubber chicken).
- Direct the communicator to have the listener to turn the chair upside down, put on the hat, and use the hula hoop as a steering wheel to drive 3 times around the chair.
- Direct the communicator to have the listener stand up, pick up the scarf and tie it around their neck, grab 2 cups and put them on each hand, pick up the chicken (with the cups on their hands), and do “The Twist.”
7. Without speaking, the group has to make the communicator understand the directions so he/she can tell the listener what to do.
Note: "Mouthing" and whispering the directions to the communicator is not permitted. Miming only! Variation: Have participants change roles. Allow the communicator to face the listener first. Then try to complete it with new instructions facing away from the listener.
Debrief: In FFEACH and Wireless Communication, some nonverbal communication was required. What were important strategies you used to help you communicate effectively without talking? What nonverbal behaviors made it easier to interpret what the person was trying to communicate? What are some positive ways we communicate nonverbally with friends, classmates, family members, etc.? What are some negative ways we communicate nonverbally?
Option B: Blind Polygon
Source: Project Adventure, Inc. (Youth leadership in action, p. 63)
Materials needed: One rope long enough for all people in the group to hold onto
Directions: 1. Blindfold all group members. 2. Place rope on the ground near their feet and ask them to find it. 3. Tell the group that the activity will be to first find the rope and then form it into different shapes. All participants must be holding on to the rope and they can talk to each other. 4. Instruct the group to make a square. 5. After some time, ask them if they feel that a square has been made. If “no,” have them continue. If “yes,” have them take the blindfolds off and look at their shape. 6. Give them a few minutes to discuss strategy for making the next shape.
Other shapes: triangle, circle, rectangle
Debrief:
1. When was communication a problem? Why?
32
2. Were some people’s ideas not listened to? Why? Does this happen in groups or projects at school? How can you help create an environment where all group members can contribute and their opinions are valued? 3. Who were some of the leaders during the activity? What did they do to show leadership? Activity #3: Peanut Butter Pit (also called Amazon Challenge)
Materials needed: 1 scooter, gymnastics mat, and jump rope for each group (5-7 group members)
Object of the game: To get your team from Point A to Point B without falling in the pit or the Amazon River, using only the equipment given to them to do so.
Directions: Divide the class into groups of 5-7 people. Each team will be given 1 rope, 1 scooter, and 1 mat to get from point A to point B. If any body parts touch the bare floor (pit or river), the team must restart. Give each team an initial minute to strategize how they are going to use the equipment. On “go”, teams will begin to make it across. *If a group makes it across, you can take away one piece of equipment (i.e., rope), blindfold some of the members, etc. as an additional challenge.
Rules: No standing on the scooter.
Variations: Let teams come up with tribal names like on “Survivor” and turn it into your very own “Survivor Challenge.”
33
Session 3
Learning Point: To identify effective planning and problem-solving strategies as a group and to achieve a challenging group goal through effective nonverbal and verbal communication Activity #1: Direction to Direction
Source: http://youth-‐activities.suite101.com/article.cfm/team_building_activities_for_teens Students work in groups of 4-6. One person starts, identifying and performing a small task (i.e. “Clap hands three times”). The next person repeats and performs the same task, then adds on one of their own (i.e. “clap hands three times, stick out tongue”). Play continues around the group, with each person performing and adding a new task to the mix. This game requires students to follow directions, focus, listen carefully, and utilize memory skills. Activity #2: Swamp Island Maze
Source: Fark, J. (1994) Swamp island maze. Team challenge: Introduction to low initiatives training. (accessed at http://www.ag.ohio-state.edu/~bdg/collaboration.html)
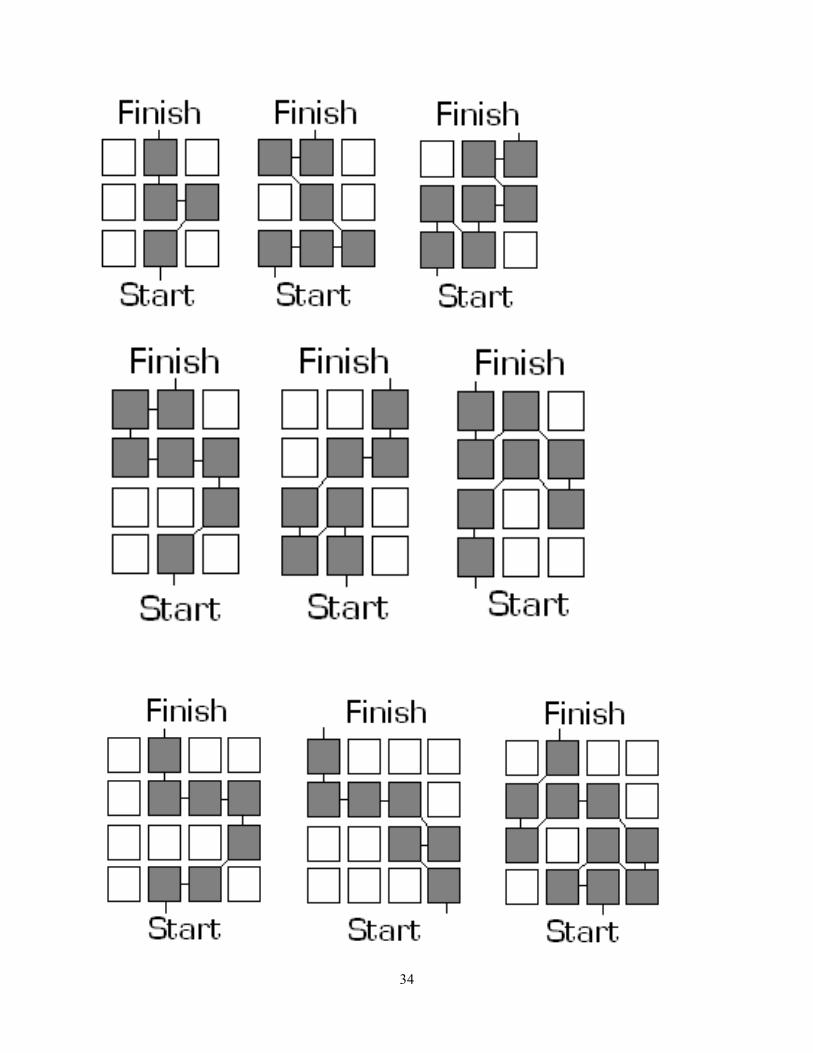
Materials needed: 20 8x10 sheets of paper and masking tape (or just gym tape – you just need spots marked off in some manner for the maze), start and finish boundary markers, squeaker toy, maps of the "safe" specified routes (see next page for samples)
Objective: To transport the entire team across the quicksand swamp using only the "safe" grass clumps in a specific order to cross the swamp. "Swampy" (squeaker toy) will confirm the "safe" island pattern as you take each step. The team member must return to the back end of the team if they step on an "unsafe" island. Team members must rotate turns attempting to discover the safe route across the swamp. There are exactly "14 " mandatory safe steps to cross the swamp. Only one person may be crossing the swamp at any one time.
Variations: -Do this activity without voice communication, no talking! -Team members must all stay on the final safe island until all team members cross the swamp. -Alter the safe clumps/route in some specific pattern (really
devious!) -Allow more than one person crossing the swamp at any one
time, probably need a separate squeaker and facilitator for each crosser.
34

35
36
Activity #3
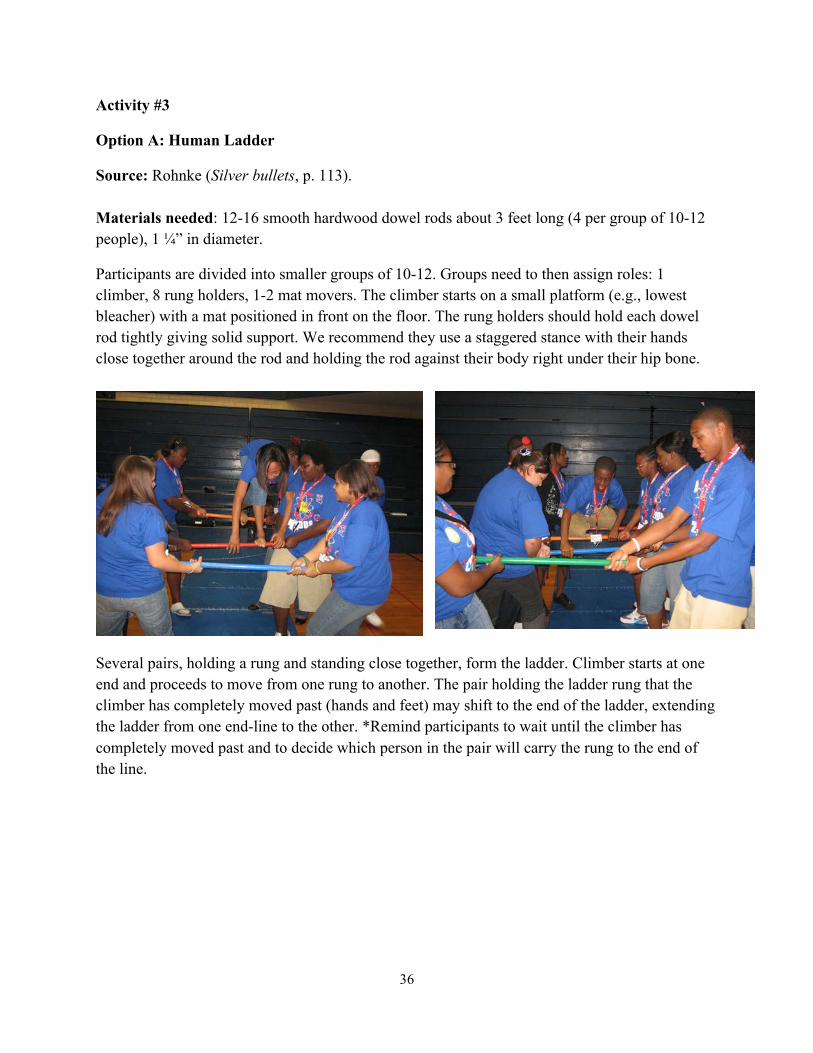
Option A: Human Ladder
Source: Rohnke (Silver bullets, p. 113). Materials needed: 12-16 smooth hardwood dowel rods about 3 feet long (4 per group of 10-12 people), 1 ¼” in diameter.
Participants are divided into smaller groups of 10-12. Groups need to then assign roles: 1 climber, 8 rung holders, 1-2 mat movers. The climber starts on a small platform (e.g., lowest bleacher) with a mat positioned in front on the floor. The rung holders should hold each dowel rod tightly giving solid support. We recommend they use a staggered stance with their hands close together around the rod and holding the rod against their body right under their hip bone.
Several pairs, holding a rung and standing close together, form the ladder. Climber starts at one end and proceeds to move from one rung to another. The pair holding the ladder rung that the climber has completely moved past (hands and feet) may shift to the end of the ladder, extending the ladder from one end-line to the other. *Remind participants to wait until the climber has completely moved past and to decide which person in the pair will carry the rung to the end of the line.
37
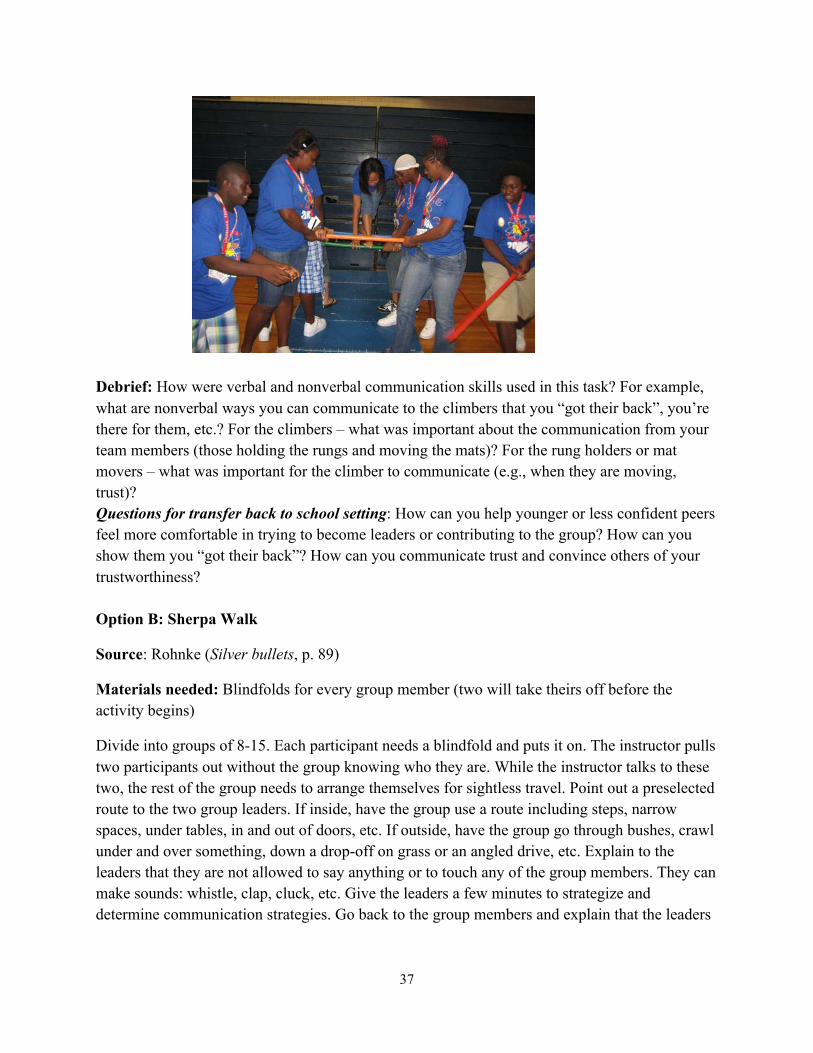
Debrief: How were verbal and nonverbal communication skills used in this task? For example, what are nonverbal ways you can communicate to the climbers that you “got their back”, you’re there for them, etc.? For the climbers – what was important about the communication from your team members (those holding the rungs and moving the mats)? For the rung holders or mat movers – what was important for the climber to communicate (e.g., when they are moving, trust)? Questions for transfer back to school setting: How can you help younger or less confident peers feel more comfortable in trying to become leaders or contributing to the group? How can you show them you “got their back”? How can you communicate trust and convince others of your trustworthiness? Option B: Sherpa Walk
Source: Rohnke (Silver bullets, p. 89)
Materials needed: Blindfolds for every group member (two will take theirs off before the activity begins)
Divide into groups of 8-15. Each participant needs a blindfold and puts it on. The instructor pulls two participants out without the group knowing who they are. While the instructor talks to these two, the rest of the group needs to arrange themselves for sightless travel. Point out a preselected route to the two group leaders. If inside, have the group use a route including steps, narrow spaces, under tables, in and out of doors, etc. If outside, have the group go through bushes, crawl under and over something, down a drop-off on grass or an angled drive, etc. Explain to the leaders that they are not allowed to say anything or to touch any of the group members. They can make sounds: whistle, clap, cluck, etc. Give the leaders a few minutes to strategize and determine communication strategies. Go back to the group members and explain that the leaders
38
will soon return but are unable to say anything or touch anyone. Let the group know that you will be attending them to help with spotting.
*After the group is finished, you can have the leaders take them back through the route with the blindfolds off. This gives them an opportunity to share reactions, etc.
Debrief: What strategies did the sherpas come up with before the challenge? During the challenge – what adjustments were made? What did the sherpas do that helped the blindfolded group members? What did the blindfolded group members do that made the sherpas job easier? What could have been done differently? This activity involves a lot of trust for both groups. How did you accomplish this? How can you communicate trust and convince others of your trustworthiness?
39
Additional Communication Activities 1. Line Up Challenges
Sources: Bordessa (Team challenges: 170+ group activities to build cooperation, communication, and creativity, p. 173, 186) Project Adventure, Inc. (Youth leadership in action, p. 118)
Materials needed: Blindfolds for each participant
1. Blindfold all participants. 2. Have them line up in order of height (shortest to tallest) without talking.
Variations: A. Line up in order of age or birth month without blindfolds. B. Write a letter or number on each index card – there should be no duplicates. Give each participant a card. They should not tell anyone what their card says. Blindfold the participants and have them line themselves up in order without speaking.
2. Human Shuffle
Source: MacGregor (Teambuilding with teens: Activities for leadership, decision making, & group success, p. 48)
Materials needed: 1” x 6” x 8’ planks (one for every 5-6 participants) or court tape marking off a thick line/beam (2-3” wide)
The challenge is for participants on one side of the line to exchange places with participants on the other side without stepping off the path. Participants can move forward but not backward and they will change places exactly with the participants on the other side. For example, a participant that is third in line on one side will end up third in line on the other side. The goal is to create a mirror reflection of each group on the other side. Participants should first look across and see who is in the same spot on the other side of the line. Allow participants to step off the line if need be to see who they will switch places with. Give the group time to ask questions and strategize.
*If a person steps off at all, the group must start over again. Safety should be emphasized.
Variation: Give the group a time limit (e.g., 25 minutes) to accomplish the challenge. If they are unable to complete the task, give them additional time to strategize. Or, have them negotiate for extra time in 2 minute increments.
40
Debrief: 1. How much time did your group spend on strategizing? Do you feel you spent too much or not enough time strategizing? 2. Did certain participants emerge as leaders? If so, how did this work for the group? If not, how would the challenge have gone if one person did all the directing and the others followed? 3. How did participants introduce new ideas and make suggestions? How did it feel when others did or did not listen to your ideas? 4. What did you learn about your group’s communication? About your group’s decision-making? 5. If the group had to start again because someone stepped off the line, how did the group react? How did you work together?
3. Traveling Teams
Source: MacGregor (Teambuilding with teens: Activities for leadership, decision making, & group success, p. 69)
Materials needed: Objects (e.g., hula hoops, cones and jump ropes for hurdles, chairs, tunnels, collapsible dome cones) for building three obstacle courses, blindfolds or bandanas
Divide the larger group (30-36 participants) into three smaller groups. Show the smaller groups their designated obstacle course. Have them determine the path they think the course follows. Then, divide into even smaller groups of three participants. Two members of each group will be sighted and one member will be blindfolded. The responsibility of the sighted members is to get the blindfolded member through the course safely and successfully. Each member gets the opportunity to be sighted and blindfolded so the course will be navigated three times by each group. Small groups should be spaced out by 1-2 minutes so they are not running into each other. Remind the groups that it is not a race but a challenge to get all group members through the course in a safe manner.
Variation: Have each small group create an image for the course (e.g., another planet, the ocean, something realistic like getting a group project going). As the guides lead the traveler, they can create a story for each obstacle they meet (e.g., rock, island, difficulty in scheduling a facility). Have them describe surroundings in detail (sounds, smells, colors, etc.) and focus on communication within their group while avoiding being distracted by other groups.
4. Create a Shape
Source: Bordessa (Team challenges: 170+ group activities to build cooperation, communication, and creativity, p. 187-188)
Materials: 20 ft. lengths of heavy string with ends tied together to form a loop, index cards and a container, blindfolds
41
1. Draw a variety of shapes on the cards. 2. Have one participant draw a card out of the container. 3. Each group member holds on to the string. 4. Show the drawn card to each member. 5. Have groups create the shape with the string with their eyes closed. Group members cannot let go of the string. 6. Once group members have come to an agreement about when the shape is finished, they can open their eyes.
Variation: Have participants face away from the center of the circle or hold the string with only one hand.
42
Explorers Club Ideas – Year 2
Learning and practice of communication skills during the leadership sessions should be connected to the Explorers Club session to help La Gear Up campers understand how leadership skills should be transferred beyond the camp. There are two main ideas for doing this in Year 2. The first is using effective verbal communication skills to develop and perform a scripted public service announcement. The second is using effective communication strategies to develop La Gear Up posters (similar to university athletic team posters) that provide information regarding college access and preparation. The following information is a brief description of how each Explorers Club session may play out across the week in connection with the leadership activities. Option A: Public Service Announcement (60 seconds) Each small group of campers (5-7) will develop a 60 second public service announcement. They should be reminded that there are different roles to be played by group members in the success of this challenge. For example, some will be better as speakers. Others will be better with word-smithing and writing the script. Timers are important as well to keep everyone on track and to help with continuity. Session 1 1. Campers are introduced/reminded of the ABCs. 2. The letter of the year is C. Leadership is going to focus on Communication and the Explorers Club sessions will focus on using Communication to promote College Preparation. 3. The goal for this session is to determine the overall message and critical parts of the message to communicate. For example, use the prompts: What are the benefits of attending college? (top 3) What steps should you take to make college an option? (3-5 most important) *Tie this in to what campers have learned in Pathfinders earlier in the day. Session 2 1. Campers are reminded of the “message” they are trying to communicate. 2. Campers are reminded of the verbal communication skills that were demonstrated during leadership. 3. The goal for this session is to determine “how” to communicate the message so that it is age-appropriate, motivating, inspiring, etc. *It would also be helpful if they could start working on the script that will be used. Remind campers of the various roles. It is unlikely there will be enough time for all to be speakers. Session 3 1. Campers are reminded of the message and effective communication strategies they came up with yesterday. 2. The goal for this session is to develop/refine their script and rehearse.
43
Session 4 1. The goal for this session is successful performance of the public service announcements. This can be done in a number of ways: a. local or university radio station – the plan at La Tech is to do recordings of all groups at the university using on a DAT recorder from a radio station with the top group recording their PSA at the radio station studio b. do recordings using cheaper recording equipment c. have groups perform in front of the larger group (like skits) 2. Regardless of the performance mode used, feedback on the message and communication of that message should be given to campers. The scripts should also be copied and provided to each camper and Dr. Beer at Louisiana Tech University so he can distribute those to Explorers Club sponsors during professional development workshops. Campers’ names and school affiliations should be listed at the top of each script. Campers should also be reminded to keep their copy for use back in their Explorers Clubs at school.
Option B: College-Bound Poster Each small group of campers (5-7) will create a College-Bound poster similar to university athletic team pictures. As much as possible, we would like the campers to come up with important information to be included. Some ideas to consider would be: the ABCs on each of the side and top/bottom borders – just the words as reminders, important dates for college preparation (maybe a “Know How to Go” Tour). Again, it’s trying to get the campers to come up with ideas for design, information, etc. and having some suggestions/ideas to help them. Session 1 1. Campers are introduced/reminded of the ABCs. 2. The letter of the year is C. Leadership is going to focus on Communication and the Explorers Club sessions will focus on using Communication to promote College Preparation. 3. The goal for this session is to determine the overall message and critical parts of the message to visually communicate in a poster. What does a college student look like? How can you communicate through the poster that college students are diverse, of all ages/shapes/personalities/interests so that all middle and high school students can relate? *Tie this in to what campers have learned in Pathfinders earlier in the day. Session 2 1. Campers are reminded of the “message” they are trying to communicate. 2. The goal for this session is to determine “how” to communicate the message so that it is age-appropriate, motivating, inspiring, etc. What other important information should be included on the poster and how? Campers will be working on their

44
strategies for wording, design, etc. and developing a solid sketch on a poster or bulletin board paper. Session 3 1. Campers are reminded of the message and effective communication strategies they came up with yesterday. 2. The goal for this session is to complete their design template on the computer and to make final plans for the photo shoot. Session 4 1. The goal for this session is to complete the photo shoot and insert photos into the design templates. *If PowerPoint slide is used and a poster machine is available, then the posters can actually be printed that night and hung up for Saturday’s presentation. 2. Copies of the design templates should be made for each camper.
45
Year 3 – Group Coordination and Trust
Table of Contents
Session 1 Activity 1 – Bull Ring…………………………………………...……….. 45 Activity 2 – Stump Jumping …...……………………………………….. 47 Activity 3 – Four Corners Crossing…………………………………….. 47 Session 2 Activity 1 - Option A Line-up Challenges……………………………… 48 Activity 1 – Option B Human Shuffle……………..…………………… 49 Activity 2 – Trust Lean – Partner…….………………………………… 49 Activity 3 – Trust Lean - Groups of 3 ..……..………………………….. 50 Activity 4 – Willow in the Wind ………………………………………… 50 Session 3 Activity 1 – Marble Pass …………..……………………………………. 52 Activity 2 – Magic Carpet Ride .……………………………………….. 53 Activity 3 – Trust Fall ………………...………………………………… 53 Explorers Club Ideas Session 1 - Broken Squares Activity...……..……………………………………. 54 Sessions 2-4 ……………………….……………………………………………… 56

46
Year 3 Leadership Activities The focus for Year 3 is helping participants successfully complete group challenges that require more complex leadership skills such as an understanding of and ability to promote group synergy, coordination, and trust. The first session includes a build-up of team challenges in a progression from working in a small group of 6 (Bull Ring) to a mid-sized group of 12 (Stump Jumping). The final activity, Four Corners Crossing, requires group members to work within their small group of 3 and coordinate with 3 other groups in order for the larger group of 12 to ultimately be successful. The second session begins with line-up or human shuffle challenges that require participants to have some physical contact but in simpler challenges. These lead in to trust leans that require more physical contact with the performance of each person having direct implications regarding safety and success. The final session begins with two challenges, Marble Pass and Magic Carpet Ride, which require focus and some physical contact. These are used as a lead-up to the most challenging and exhilarating activity that requires full focus and attention, Trust Fall. As with Years 1 and 2, there is an attempt to connect what campers are learning in leadership with the Explorers Club. Since 3rd year campers will be in high school the following year, there is a particular focus on college preparation. Through completion of an activity called Broken Squares, each group reviews the ABCs, is subsequently assigned a specific university to research, and is challenged to “market” their university through verbal or visual presentation to convince their peers that their assigned university is a great option for future attendance.
Session 1 Learning Points: Understanding group problem-solving and decision making; developing effective group synergy, communication, and coordination; adapting to increased difficulty of challenges (e.g., coordination of smaller groups within a larger team) Activity #1: Bull Ring Source: Fark, J. (1994) Bull ring. Team challenge: Introduction to low initiatives training. (Available from Ohio State University Leadership Center, 109 Agricultural Administration Building, 2120 Fyffe Road, Columbus, OH 43210) This activity can also be found at the following link: http://www.ag.ohio-state.edu/~bdg/communication.html Materials needed: 6-10 bull rings (4 to 6 participants for each bull ring), tennis or wiffle balls for each group, obstacles that participants can move through (we use cones for zig-zagging, aerobic steps or folded up mats to travel over, and standing hula hoops to travel through), tennis canisters or water bottle to place ball on as final goal,
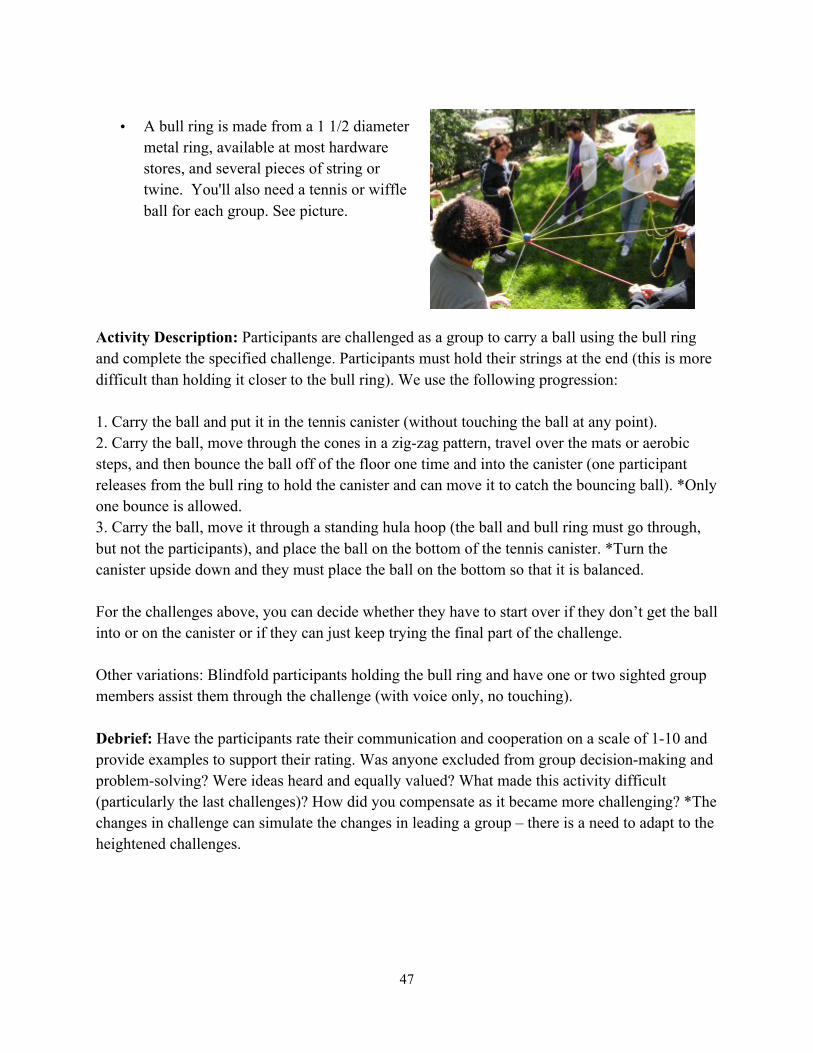
47
• A bull ring is made from a 1 1/2 diameter
metal ring, available at most hardware stores, and several pieces of string or twine. You'll also need a tennis or wiffle ball for each group. See picture.
Activity Description: Participants are challenged as a group to carry a ball using the bull ring and complete the specified challenge. Participants must hold their strings at the end (this is more difficult than holding it closer to the bull ring). We use the following progression: 1. Carry the ball and put it in the tennis canister (without touching the ball at any point). 2. Carry the ball, move through the cones in a zig-zag pattern, travel over the mats or aerobic steps, and then bounce the ball off of the floor one time and into the canister (one participant releases from the bull ring to hold the canister and can move it to catch the bouncing ball). *Only one bounce is allowed. 3. Carry the ball, move it through a standing hula hoop (the ball and bull ring must go through, but not the participants), and place the ball on the bottom of the tennis canister. *Turn the canister upside down and they must place the ball on the bottom so that it is balanced. For the challenges above, you can decide whether they have to start over if they don’t get the ball into or on the canister or if they can just keep trying the final part of the challenge. Other variations: Blindfold participants holding the bull ring and have one or two sighted group members assist them through the challenge (with voice only, no touching). Debrief: Have the participants rate their communication and cooperation on a scale of 1-10 and provide examples to support their rating. Was anyone excluded from group decision-making and problem-solving? Were ideas heard and equally valued? What made this activity difficult (particularly the last challenges)? How did you compensate as it became more challenging? *The changes in challenge can simulate the changes in leading a group – there is a need to adapt to the heightened challenges.
48
Activity #2: Stump Jumping
Source: Fark, J. (1994) Stump jumping. Team Challenge: Introduction to low initiatives training. (Available from Ohio State University Leadership Center, 109 Agricultural Administration Building, 2120 Fyffe Rd, Columbus, OH 43210) This activity can also be found at the following link: http://www.ag.ohio-state.edu/~bdg/team_building.html Materials needed: Paper plates or carpet squares (one for each member of the group – approx 10-12 members/group); tape to put on bottom of plates so they will not shift Activity Description: The “stumps” are placed in a circle approximately 6” to 8” apart, one per participant. The object is for the participants to move from stump to stump without falling or stepping off until they return to their original stump. If they step off, they start over as a group. *Time each attempt and have them try to beat it each time. Safety rule: No carrying. Variations: No two people can be touching the same stump at the same time (must jump with
both feet). Go opposite directions. Hop on one foot; alternate feet. Debrief: What are important things that must happen for this activity to be successful? How did the communication work in your group? How was timing and coordination accomplished? Was physical support provided? How? Activity #3: Four Corners Crossing Materials needed: Paper plates or carpet squares that can be placed on the ground and stepped on by one or two people; about 40 items are needed per group of 12 Activity Description: Place the paper plates in a diagonal pattern. There should be two diagonal paths (can be straight, curve, or twist) running from corner to corner and crossing in the middle. They should be about the same distance. Divide the team of 12 into 4 smaller groups of 3 and assign one small group to each corner. Here are the rules: 1. Each group must travel from your corner to the opposite corner. 2. You may not touch the ground and may only travel by stepping on the spots. If you touch the ground, you must go back to your original corner and start over.
49
3. Spots may not be picked up and moved. 4. A spot becomes activated once someone steps on it. As long as someone is touching it, it will stay in activation and can be used. Once an activated spot becomes deactivated (no one is touching it after the initial touch), it floats away (leader removes it) and it can no longer be used for the remainder of the challenge. 5. Your team is successful when all members of all 4 groups are standing in the corner opposite the one they started from. *The best solution is for each small group to travel on one path to the middle, then share spots in the middle, keeping at least one person on the middle spots until everyone has a chance to cross over. Debrief: Did your team work with the other teams or did you just make your own plan? Did you have to think about others during the process? How did you communicate to other groups what you needed or could offer to make the challenge work?
Session 2 Learning Point: Demonstrating effective verbal and nonverbal communication skills; developing an understanding of appropriate physical contact for achieving a group challenge; developing and showing trust and trustworthiness in small groups Activity #1: Line Up Challenges
Sources: Bordessa (Team challenges: 170+ group activities to build cooperation, communication, and creativity, p. 173, 186) Project Adventure, Inc. (Youth leadership in action, p. 118)
Materials needed: 1” x 6” x 8’ planks (one for every 5-6 participants) or court tape marking off a thick line/beam (2-3” wide); blindfolds for each participant
Activity Description: The challenge is to have participants line up in a certain order on the beam according to the specified instructions. Progression: A. Line up in order of age or birth month without blindfolds. Participants are not allowed to talk to each other. B. Line up in order of height (shortest to tallest) with blindfolds (can specify without talking).
50
C. Write a letter or number on each index card – there should be no duplicates. Give each participant a card. They should not tell anyone what their card says. Blindfold the participants and have them line themselves up in order without speaking.
Option B: Human Shuffle
Source: MacGregor (Teambuilding with teens: Activities for leadership, decision making, & group success, p. 48)
Activity Description: The challenge is for participants on one side of the line to exchange places with participants on the other side without stepping off the path. Participants can move forward but not backward and they will change places exactly with the participants on the other side. For example, a participant that is third in line on one side will end up third in line on the other side. The goal is to create a mirror reflection of each group on the other side. Participants should first look across and see who is in the same spot on the other side of the line. Allow participants to step off the line if need be to see who they will switch places with. Give the group time to ask questions and strategize.
*If a person steps off at all, the group must start over again. Safety should be emphasized.
Variation: Give the group a time limit (e.g., 25 minutes) to accomplish the challenge. If they are unable to complete the task, give them additional time to strategize. Or, have them negotiate for extra time in 2 minute increments. Debrief: Talk to participants about the diverse types of communication used in the beam challenges and how important timing, coordination, focus, and patience were. Those will be key in the trust activities that follow.
Activity #2: Trust Lean – Partner Source: http://www.wilderdom.com/games/descriptions/TrustLean.html Activity Description: Ask participants to find a partner of similar height and weight; same-sex pairs are not essential but may be preferred considering the physical contact of this activity. One person in the pair will be the faller and one the catcher. Teach (instructions and physical demonstration) both positions to all participants before putting them into the actual activity. It is helpful to do this in mass formation with all of the participants demonstrating the positions and the communication so you can make sure they have them down. Catcher– staggered stance one foot in front of the other (knees bent), both hands up with palms
out and elbows bent, "give" with the weight, taking it mostly through the legs Faller – feet together, tight body and butt, cross arms in front, link fingers, and wrap around
under the chin
51
Establish clear communication “Catcher Ready?” “Ready. Fall On.” “Falling.” “OK.” Start with small falls (participants are closer together), then build. Switch catchers and fallers. *Make sure that all participants are comfortable in the role they are asked to perform. They should not be forced to perform any position with which they are not comfortable. *If you do not think they are ready, you need to hold them out. Activity #3: Trust Lean – Groups of 3
*Same as with 2 except you have one catcher in front and one behind. The faller totters back and forth. Catcher in front will place their hands on the inside of the shoulder blades. Start with small angle and allow more of a fall, if comfortable (will depend on the size of the faller and catchers). **Both catchers must communicate with faller. (“Ready. Fall On.”, etc.)
Debrief: In small groups, ask participants to share:
What made you feel trusting? (e.g., clear communication, positive encouragement, etc.)
What made you feel less trusting (e.g., laughing/joking, lack of communication, etc.)
o Invite people to contribute to a group discussion about what things their partner did to make them feel more or less trusting.
How was the second activity different than just falling backward and working with a partner? What were things the catchers did to increase your comfort level? Anything that was less helpful? How did the catchers feel? Did you feel different being in front or behind the faller?
Activity #4: Willow in the Wind – Groups of 7-8 Source: http://www.wilderdom.com/games/descriptions/WillowInTheWind.html Learning Point: Developing group planning, demonstrating effective communication skills, developing and showing trust and trustworthiness in a group of 6-8 Activity Description: This activity is similar to the trust lean but is completed in a circle. One person is in the middle (willow) with their eyes closed. He/she does a trust lean and is passed
52
around the group of catchers that form the outer circle. The group should be taught correct spotting technique.
- One foot in front of the other (balanced, staggered stance) - Arms outstretched, elbows slightly bent, fingers loose - Ready and alert
• Important: Ensure the group is tight, should-to-shoulder, arms outstretched (elbows
slightly bent). In this position, hands should almost touch the person standing in the middle. This ensures that the initial fall will be very gentle. Gradually the group can ease back to allow a more expansive lean. Distribute large and small people evenly, to avoid weak points in the circle.
Willow technique:
- Feet together - Arms crossed, fingers linked, and hands wrapped under chin - Keep butt tight and body straight - Eyes closed (can present this as an option)
The final step before leaning is the communication between the “willow” and the group. This is similar to the trust leans.
o Willow: "Catchers ready?" o Group: "Yes. Fall on." o Willow: "Falling." o Group: "OK"
• The "willow" should allow him/herself to be passed around by the group as long as
she/he likes (usually a couple of minutes). When he/she has had enough, simply open eyes, communicate with the group that she/he is stopping, stand up, and thank the group.
Debrief: How did it initially feel to begin falling? Did you have concerns? What things helped you trust the group members? Catchers’ feelings? What are important things to remember if you are one of the catchers? What could happen if you are not serious about your role as a catcher and then become a faller? *Can ask how they felt different than with partner or groups of three or can individually rate out of 10 how supported they felt by the group -- and show this to the group by holding the number of fingers up. This allows the facilitator to draw out more objectively which people felt supported and what else the group might do to support more people.
53
Session 3 Learning points: Demonstrate effective communication, group planning and decision making, restraint, and persistence in order to identify and implement effective problem-solving strategies; demonstrate trust and trustworthiness in a larger group Activity #1: Marble Pass Source: Unknown. This activity can be found at the following link: http://www.ag.ohio-state.edu/~bdg/team_building.html Materials needed: Multiple pieces of PVC pipe ¾ or 1” diameter about 10-15” long (one per group member) and a marble that will roll easily through the PVC pipe. Activity Description: The object is for the group to roll the marble through the PVC pipe from a starting line to a bucket/can that is at least twice as far from the start as the sum of all the PVC pieces. The starter will place the marble in the first PVC pipe at the starting line. Rules: 1. Only the starter may touch the marble. 2. You may not move your feet with the marble in your pipe. 3. You may not place your fingers over the end of your pipe. 4. If at any time anyone but the starter touches the marble, anyone moves their feet with the marble in their pipe, or the marble falls out of the pipe, the whole team must go to the beginning and start all over. Variations: Keep time on each attempt and try to break the record.
Allow each participant to use only one hand. Use a lighter object (bead, bean, etc.) or heavier object (small steel ball). Debrief: How did your group planning go? Did you agree on a start to finish plan? Did you follow it? Did your strategy work? If not, what was at fault? What did you do to compensate? Was communication excellent, good, okay, or bad? How could it have been better? Activity #2: Magic Carpet Ride Source: Sachs, B. & zumFelde, P. (1998) Magic carpet ride. Let me grow in peace- team challenge-asset building. (p. 10). (Available from Lutheran Social Services, T793 State Route 66, Archbold, OH 43502)
This activity is also available at the following link: http://www.ag.ohio-state.edu/~bdg/collaboration.html
54
Materials needed: One plastic tarp (from local hardware store) for every 12-18 participants Activity Description: Participants stand on one side of the tarp and are challenged to turn it over so they are standing on the other side without anyone touching the floor or ground in any way. No one may lift anyone off the sheet at any time. Debrief: What was the strategy your group used? Whose idea was it? Were there multiple solutions that were thrown out? What was important for your group to achieve this challenge? Activity #3: Trust Fall Source: Rohnke, K. Silver bullets. p. 80 Activity Description: One participant falls backward off of a platform, table, or bleacher into the arms of a prepared group of 12-14 spotters standing on level ground. The platform should be 6 feet or less. The spotters are divided into two groups facing each other. Each line of catchers stands shoulder to shoulder with arms extended and palms up. Hands are alternated with the catchers in the opposite line in order to form a secure landing area. Catchers should NOT grasp hands or wrists. Assign a counselor or staff member to stand on the platform with the volunteer about to fall. That person is responsible for making sure the faller is spatially aligned with the catchers; holding arms in appropriate manner to prevent spontaneous flying elbows; and tilting head back as a means of remaining rigid. Their arms should be interlocked as they were for the previous trust falls/leans. The platform proctor should also rearrange spotters if it appears there is a strength or size discrepancy in opposing spotters or remove spotters that are not ready. The proctor asks the group if they are ready and directs them to look at the faller. The fall follows immediately. Once the faller is caught, there is a plan for getting them to their feet. The catchers at the front of the line can lower their hands slowly. There can be a spotter that is not a member of either line helping here as well. Other catchers need to hold up the torso. Make an attempt to achieve 100% participation even if that means standing on the platform and looking down at the catchers. Do not leave a participant standing on the platform more than a few minutes. The participant must decide to either go or not within a reasonable time frame – if they climb down, they will respect that their decision was respected. *If some participants complain that the starting height is too high, offer them as low a starting height as desired so they are included in the activity. *Instructor should be in the catching line so they can catch the faller or at least slow them down if something goes wrong. After they have caught a few fallers, the instructor can remove themselves from the line while watching what is happening.
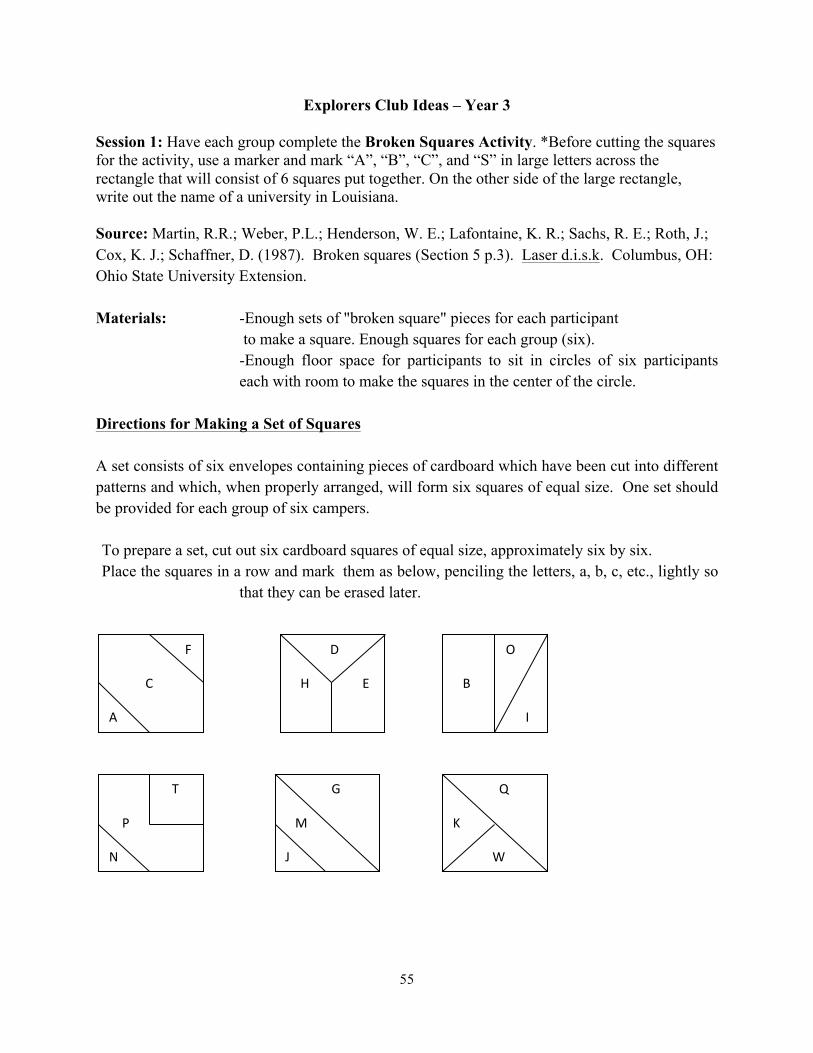
55
Explorers Club Ideas – Year 3
Session 1: Have each group complete the Broken Squares Activity. *Before cutting the squares for the activity, use a marker and mark “A”, “B”, “C”, and “S” in large letters across the rectangle that will consist of 6 squares put together. On the other side of the large rectangle, write out the name of a university in Louisiana. Source: Martin, R.R.; Weber, P.L.; Henderson, W. E.; Lafontaine, K. R.; Sachs, R. E.; Roth, J.; Cox, K. J.; Schaffner, D. (1987). Broken squares (Section 5 p.3). Laser d.i.s.k. Columbus, OH: Ohio State University Extension. Materials: -Enough sets of "broken square" pieces for each participant
to make a square. Enough squares for each group (six). -Enough floor space for participants to sit in circles of six participants
each with room to make the squares in the center of the circle. Directions for Making a Set of Squares
A set consists of six envelopes containing pieces of cardboard which have been cut into different patterns and which, when properly arranged, will form six squares of equal size. One set should be provided for each group of six campers. To prepare a set, cut out six cardboard squares of equal size, approximately six by six. Place the squares in a row and mark them as below, penciling the letters, a, b, c, etc., lightly so
that they can be erased later.
F
C
A
Q
K
W
T
P
N
G
M
J
O
B
I
D
H E
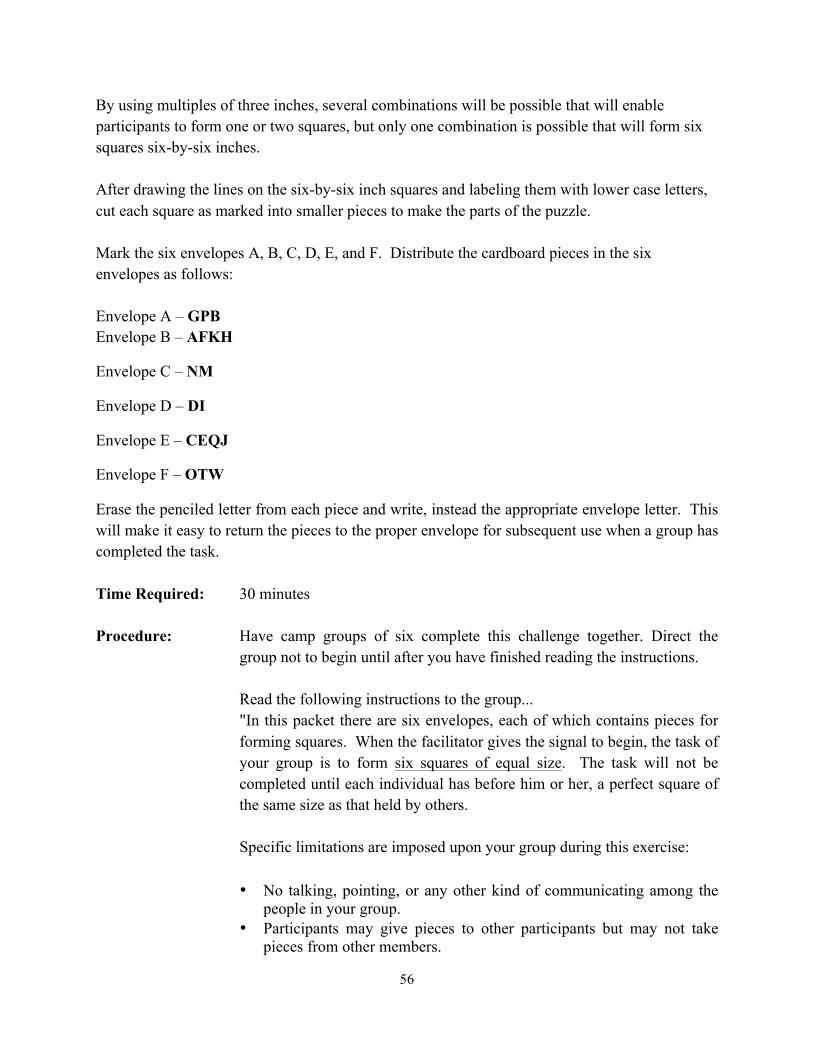
56
By using multiples of three inches, several combinations will be possible that will enable participants to form one or two squares, but only one combination is possible that will form six squares six-by-six inches. After drawing the lines on the six-by-six inch squares and labeling them with lower case letters, cut each square as marked into smaller pieces to make the parts of the puzzle. Mark the six envelopes A, B, C, D, E, and F. Distribute the cardboard pieces in the six envelopes as follows: Envelope A – GPB Envelope B – AFKH
Envelope C – NM
Envelope D – DI
Envelope E – CEQJ
Envelope F – OTW
Erase the penciled letter from each piece and write, instead the appropriate envelope letter. This will make it easy to return the pieces to the proper envelope for subsequent use when a group has completed the task. Time Required: 30 minutes Procedure: Have camp groups of six complete this challenge together. Direct the
group not to begin until after you have finished reading the instructions. Read the following instructions to the group... "In this packet there are six envelopes, each of which contains pieces for forming squares. When the facilitator gives the signal to begin, the task of your group is to form six squares of equal size. The task will not be completed until each individual has before him or her, a perfect square of the same size as that held by others. Specific limitations are imposed upon your group during this exercise: • No talking, pointing, or any other kind of communicating among the
people in your group. • Participants may give pieces to other participants but may not take
pieces from other members.
57
• Participants may not simply throw their pieces into the center for others to take; they have to give the pieces directly to one individual.
• It is permissible for a member to give away all the pieces to his/her puzzle, even if he/she has already formed a square.
Give the signal to "begin working." With the help of any observers make sure that the rules are observed throughout the activity. After completion, ask some or all of the following questions to help them process their group work. • Who was willing to give away pieces of the puzzle? • Did anyone finish his/her puzzle then somewhat divorce
himself/herself from the struggles of the rest of the group? • Was there anyone who continually struggled with his or her pieces, but
yet was unwilling to give any or all of them away? • How many people were actively engaged in mentally putting the
pieces together? • Did anyone seem especially frustrated? • Was there any critical turning point at which time the group began to
cooperate? • Did anyone try to violate the rules by talking or pointing as a means of
helping fellow members solve their puzzle? After debriefing, have them put all of the squares together with tape. They will see the A, B, C, and S. Have them write out examples of goals for each category. *On the back of their rectangle, they will see the name of a university. That is their assigned university for the rest of the week.
Session 2: Have multiple computer labs available for use, if possible. With the help of their counselors, campers will conduct research on their assigned university. Their goal is to find out interesting facts about their university and any other information that would convince their peers to consider attending their university (e.g., different majors offered, athletic success). This should be a marketing exercise. *They will need to compile this information into a user-friendly and visually appealing format. Session 3/4: Groups present their information verbally (through a presentation, skit, etc.) and/or visually (through a tri-fold similar to what they would see at a College Night). Six groups will present on Wednesday and the remaining six groups will present on Thursday.
58
Year 4 – Distribution of Roles in Team Challenges
Table of Contents Sample Activities Activity 1 – Airport...…………………………………………...………… 58 Activity 2 – Flying Astronauts or Apes - Partners……………………… 59 Activity 3 – Flying Astronauts or Apes – Group ….…………………… 59 Activity 4 - To the Moon………………………………………………… 60 Activity 5 - Shuttle Shuffle………………………………………………. 61 Activity 6 – Stepping Stones – Shuttle Version…………………………. 62 Activity 7 – Starving Space Station……………………………………… 63 Activity 8 – Mission – Martian Microbes……………………………….. 62 Activity 9 – The Ultimate Survivor Challenge………………………….. 64 Activity 10 – Traffic Jam………………………………………………… 65 Activity 11 – House of Cards…………………………………………….. 68 Activity 12 – The Mole…………………………………………………… 68 Activity 13 – Bank Robbery……………………………………………... 69 Considerations for Activities……………………………………………………………. 70 Debriefing Strategies…………………………………………………………………….. 71 Explorers Club Ideas Option 1 – Developing a Collegiate or Post-Secondary Options Pamphlet.….. 74 Option 2: Creating a poster on information about a designated
university and participating in a poster session………………… 75 Option 3: Campaign Teams……………………………………………………… 76 Resources ………………………………………………………………………………… 79 Appendix A – Icebreaker Activities …………………………………………………..... 81 Appendix B – Sample Drawings for Back to Back Draw Activity…………………... 90
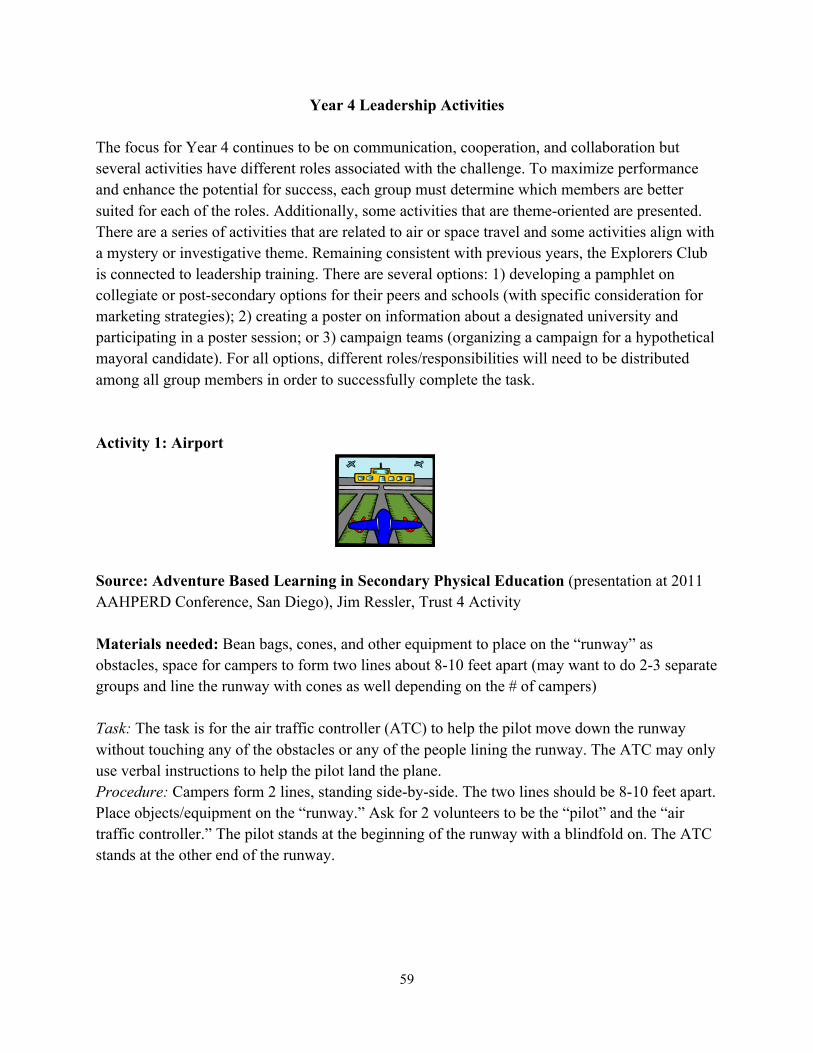
59
Year 4 Leadership Activities
The focus for Year 4 continues to be on communication, cooperation, and collaboration but several activities have different roles associated with the challenge. To maximize performance and enhance the potential for success, each group must determine which members are better suited for each of the roles. Additionally, some activities that are theme-oriented are presented. There are a series of activities that are related to air or space travel and some activities align with a mystery or investigative theme. Remaining consistent with previous years, the Explorers Club is connected to leadership training. There are several options: 1) developing a pamphlet on collegiate or post-secondary options for their peers and schools (with specific consideration for marketing strategies); 2) creating a poster on information about a designated university and participating in a poster session; or 3) campaign teams (organizing a campaign for a hypothetical mayoral candidate). For all options, different roles/responsibilities will need to be distributed among all group members in order to successfully complete the task. Activity 1: Airport
Source: Adventure Based Learning in Secondary Physical Education (presentation at 2011 AAHPERD Conference, San Diego), Jim Ressler, Trust 4 Activity Materials needed: Bean bags, cones, and other equipment to place on the “runway” as obstacles, space for campers to form two lines about 8-10 feet apart (may want to do 2-3 separate groups and line the runway with cones as well depending on the # of campers) Task: The task is for the air traffic controller (ATC) to help the pilot move down the runway without touching any of the obstacles or any of the people lining the runway. The ATC may only use verbal instructions to help the pilot land the plane. Procedure: Campers form 2 lines, standing side-by-side. The two lines should be 8-10 feet apart. Place objects/equipment on the “runway.” Ask for 2 volunteers to be the “pilot” and the “air traffic controller.” The pilot stands at the beginning of the runway with a blindfold on. The ATC stands at the other end of the runway.
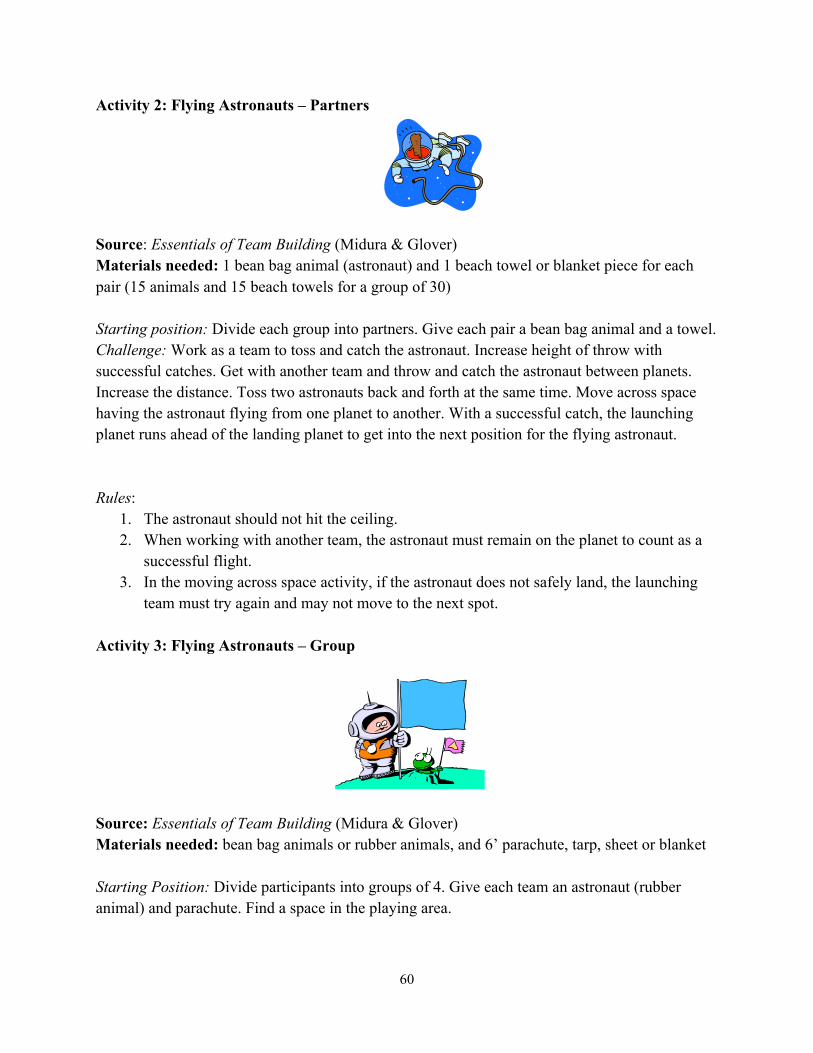
60
Activity 2: Flying Astronauts – Partners
Source: Essentials of Team Building (Midura & Glover) Materials needed: 1 bean bag animal (astronaut) and 1 beach towel or blanket piece for each pair (15 animals and 15 beach towels for a group of 30) Starting position: Divide each group into partners. Give each pair a bean bag animal and a towel. Challenge: Work as a team to toss and catch the astronaut. Increase height of throw with successful catches. Get with another team and throw and catch the astronaut between planets. Increase the distance. Toss two astronauts back and forth at the same time. Move across space having the astronaut flying from one planet to another. With a successful catch, the launching planet runs ahead of the landing planet to get into the next position for the flying astronaut. Rules:
1. The astronaut should not hit the ceiling. 2. When working with another team, the astronaut must remain on the planet to count as a
successful flight. 3. In the moving across space activity, if the astronaut does not safely land, the launching
team must try again and may not move to the next spot. Activity 3: Flying Astronauts – Group
Source: Essentials of Team Building (Midura & Glover) Materials needed: bean bag animals or rubber animals, and 6’ parachute, tarp, sheet or blanket Starting Position: Divide participants into groups of 4. Give each team an astronaut (rubber animal) and parachute. Find a space in the playing area.
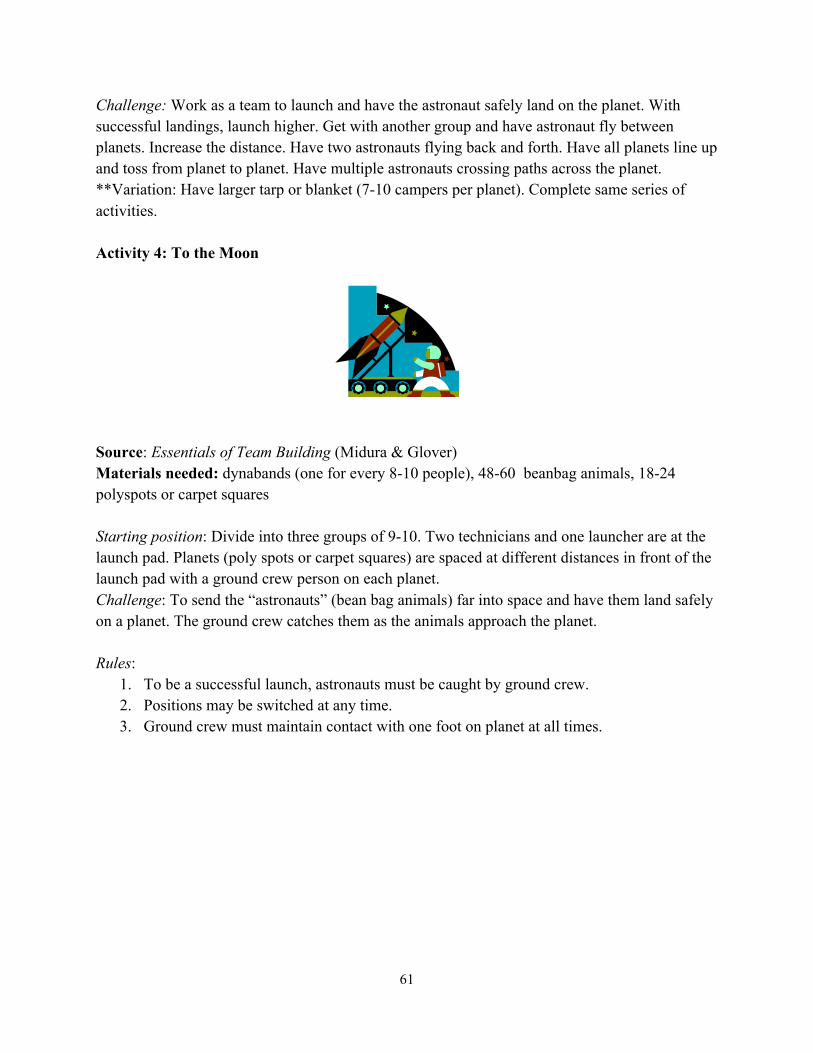
61
Challenge: Work as a team to launch and have the astronaut safely land on the planet. With successful landings, launch higher. Get with another group and have astronaut fly between planets. Increase the distance. Have two astronauts flying back and forth. Have all planets line up and toss from planet to planet. Have multiple astronauts crossing paths across the planet. **Variation: Have larger tarp or blanket (7-10 campers per planet). Complete same series of activities. Activity 4: To the Moon
Source: Essentials of Team Building (Midura & Glover) Materials needed: dynabands (one for every 8-10 people), 48-60 beanbag animals, 18-24 polyspots or carpet squares Starting position: Divide into three groups of 9-10. Two technicians and one launcher are at the launch pad. Planets (poly spots or carpet squares) are spaced at different distances in front of the launch pad with a ground crew person on each planet. Challenge: To send the “astronauts” (bean bag animals) far into space and have them land safely on a planet. The ground crew catches them as the animals approach the planet. Rules:
1. To be a successful launch, astronauts must be caught by ground crew. 2. Positions may be switched at any time. 3. Ground crew must maintain contact with one foot on planet at all times.
62
Activity 5: Shuttle Shuffle
Source: Adventure Based Learning in Secondary Physical Education (aka Don’t Touch Me!) (presentation at 2011 AAHPERD Conference, San Diego), Jim Ressler, Trust 4 Activity Materials needed: hula hoops
Activity description: There is a need to switch crews on the shuttle in order to complete the designated mission. The current crew is on one side of the portal (hula hoop) and the replacement crew is on the other side. To successfully and quickly complete the shuttle shuffle, some body part of each crew member must touch inside the portal as he/she moves to the other side and there can be no physical contact with any other current or replacement crew member during the shuffle. Any rule infraction results in a three-second penalty added to the group’s final time Activity 6: Stepping Stones - Shuttle Version Source: Rohnke & Butler (QuickSilver, p. 186) Materials: 18” lengths of 4” x 4” lumber (carpet squares would work if preferred), use and equal number or one fewer prop than the total number in the group (ex. 5-6 props for 6 people) You are on the crew of a special shuttle launch that included the first ever flight of two blind students. On the way back from its mission, you have had mechanical failure resulting in an emergency landing on an unknown planet. Two of your crew members are injured and can use only one arm. Two of your crew members are in shock and will not speak. Your group needs to find a way to successfully use your life support vehicles to move across space to Earth considering the specific challenges of each member (2 are blind, 2 cannot speak, 2 can use only one arm). If at any point, a life support vehicle is not touched by someone, you lose it to the gravitational pull of the universe. *Each group is assembled at the unknown planet with the same number of props as the # in the group (i.e., groups of 6 have 6 wood blocks). Rules:
4. If anyone touches the space between the boundaries, the group must return to the beginning and start over.
63
5. Two team members must be blindfolded, two team members are mute, and two team members do not have the use of their arms. Communicate within your group to determine which team members will take on each role and where they will be placed in the group as you move across the toxic land to Earth.
6. For a prop to function and support your group, someone must be touching it at all times or it is immediately removed from the activity: Ex. A person tosses the support onto the ground, and then steps onto it. Because it left the grasp when it was tossed, it is lost forever. A correct use is to place it on the ground and step onto it while having constant touch with the hand.
7. Setting boundaries – Place the boundaries far enough apart so that the group has to recycle some of their props in order to cross the gap. Lay the props in a straight line from boundary A, then add 5-10 feet of open space before placing boundary B. This requires the group to work together to use their props multiple times to be successful.
Activity 7: Starving Space Station
Source: Essentials of Team Building (Midura & Glover) Materials needed: 4 long jump ropes for each group of 8-10 campers, one basketball, and one cone for the basketball to sit on Starting Position: The group stands outside a 10-foot (3 meter) circle (basketball jump circle). The cone is in the middle of the circle with the ball on top of it. Challenge: The group must remove the bag of supplies (ball) from the cone without allowing the ball to touch the floor inside or outside the circle. The group must find at least three different ways to remove the ball. At least one method must involve group members flinging the supplies so that they have to catch it in the air. They must use the ropes to retrieve the supplies from the cone. Rules:
1. If the ball touches the floor, either inside or outside the circle, it is considered to have flown into outer space.
2. One group member must retrieve it, take it to the supply cart, and get another one. Group members may not cross the line with any part of their body.
3. The cone may not be moved. 4. The teammate taking the ball to the supply cart and putting another one on the cone may
not manipulate the ropes while they are in the circle.
64
Activity 8: Mission - Martian Microbes (Marble Pass with a different story line)
Source: This activity can be found at the following link: http://www.ag.ohio-state.edu/~bdg/team_building.html Materials needed: Multiple pieces of PVC pipe ¾ or 1” diameter about 10-15” long (one per group member) and a marble that will roll easily through the PVC pipe. Activity Description: There has been evidence of life on Mars and the rocks on Mars contain microbes that will give scientists critical information regarding this life. To get the microbes back in their original form, the rocks must travel through specially-designed tubes and be placed into the receptacle. Your challenge is to retrieve as many rocks as possible. If the rock (marble) touches the ground, it has been contaminated and is no longer viable for study. Rules: 1. Only the starter may touch the marble. 2. You may not move your feet with the marble in your tube. 3. You may not place your fingers over the end of your tube. 4. If at any time anyone but the starter touches the marble, anyone moves their feet with the marble in their tube, or the marble falls out of the tube, the whole team must go to the beginning and start all over. Variations: Keep time on each attempt and try to break the record.
Allow each participant to use only one hand. Use a lighter object (bead, bean, etc.) or heavier object (small steel ball). Debrief: How did your group planning go? Did you agree on a start to finish plan? Did you follow it? Did your strategy work? If not, what was at fault? What did you do to compensate? Was communication excellent, good, okay, or bad? How could it have been better?
65
Activity 9: The Ultimate Survivor Challenge
Materials needed: Lego sets (1 for every 2 people = 3 per group), 6 different colors of small party bags (www.partycity.com – SKU 166726 – orange example) (4-6 bags per group), small rope to knot around bags, Velcro bands to tie around legs of 2 people to keep them connected, 24 blindfolds, 24 cones (4 x 6 colors) or some other materials to section off area for Lego-building
Activity Description
1. Mix up blocks from three Lego sets into 4-5 different bags of the same color. Do this for every group of campers (6 groups = 4-6 bags of 6 different colors). Cut small rope into 12-20” pieces and burn the ends so it doesn’t unravel. Tie each bag with a section of rope and make several knots so that it is more challenging for campers to get the blocks out. Make a square on the floor for each group using cones (same color), tape, or rope.
2. Put bags out in maze of obstacles (tie on net, put on top or under tables, tie to legs of chairs, etc.).
3. Explain to each group that they will need to determine various roles for each member in their group.
-‐ Callers – one group member; responsible for giving instructions to blindfolded members for retrieval of the bags for their group (each group has one color to retrieve)
-‐ Maze-blazers – four group members divided into pairs that are blindfolded and attached at the leg; responsible for following the callers’ instructions to retrieve a bag and bring it back to the designated area; each pair rotates
-‐ Knot-master – one group member; responsible for untying the bags and releasing blocks into the designated area as each bag is returned
4. Once they have assigned roles, group members will help maze-blazers with blindfolds and Velcro strips for their legs.
5. Groups begin at the same time. One pair can go into the maze at a time. Caller will direct them to the bag and back. When they get back, the knot-master will untie the bags and release all blocks into the marked area. The next pair will go out and caller will direct them to a bag and back and so forth until all bags have been retrieved.
6. Once all bags are back and Legos are in the marked area, the group divides into pairs. One person will be the communicator and the other will be the builder. They position themselves back to back. The leader or counselor will provide the pictures for each
66
communicator. The communicator looks at the picture and tells the builder how to place the Legos so that they exactly replicate the blocks in the picture.
7. If a pair or group finishes early, they can switch roles and complete the activity similar to Back to Back. The communicator will use the Legos to build something of their choice and the builder will replicate that according to the verbal instructions provided.
Activity 10: Traffic Jam
Source: Global Challenge Activities and Initiatives, Heifer Foundation, Ken Herren
Objective/Skills Learned: Problem solving through communication - Leadership - Full participation.
Sequencing: Mid-level initiatives Group Structure: If the group is larger than 20 or so, consider splitting into 2 groups
- The group size does not have to be an even number - Works for mature junior high groups or any age
Time Frame: Estimate 30 – 40 minutes, depending on group size Props: Polyspots or carpet squares, the number of group plus one Instructions: To set up, place spots in a U shape
- You stand on the middle spot and have the group stand on all the other spots. (If there has already been a division on the group i.e. team cheer or thumb division, have one team be on one side of you and the other on the other side of you).
- Explain that the rules or motions are like that of the game “checkers.” They can only move in one direction. They can move one spot over into an empty spot or they can jump one person to the empty spot. - If they get to a point where no more moves can be made, someone says “beep beep” and everybody has to start over. - They cannot pick up the spots and move them. They cannot move from the one end spot to the other across the U. - The goal of the game is to get everyone switched from one side to the other. - The facilitator must step off the middle spot so the game can begin. The middle spot starts off as the open spot. The middle spot does not always need to be the open spot, but you don’t need to tell the group that at the outset. - You will often be asked if this activity is possible - yes it is. There are no
tricks. The game can be done following the rules as they are. - This can take groups a while, over an hour, and be rather frustrating or they can figure it out in ten minutes. Sequencing can be tricky for that reason.
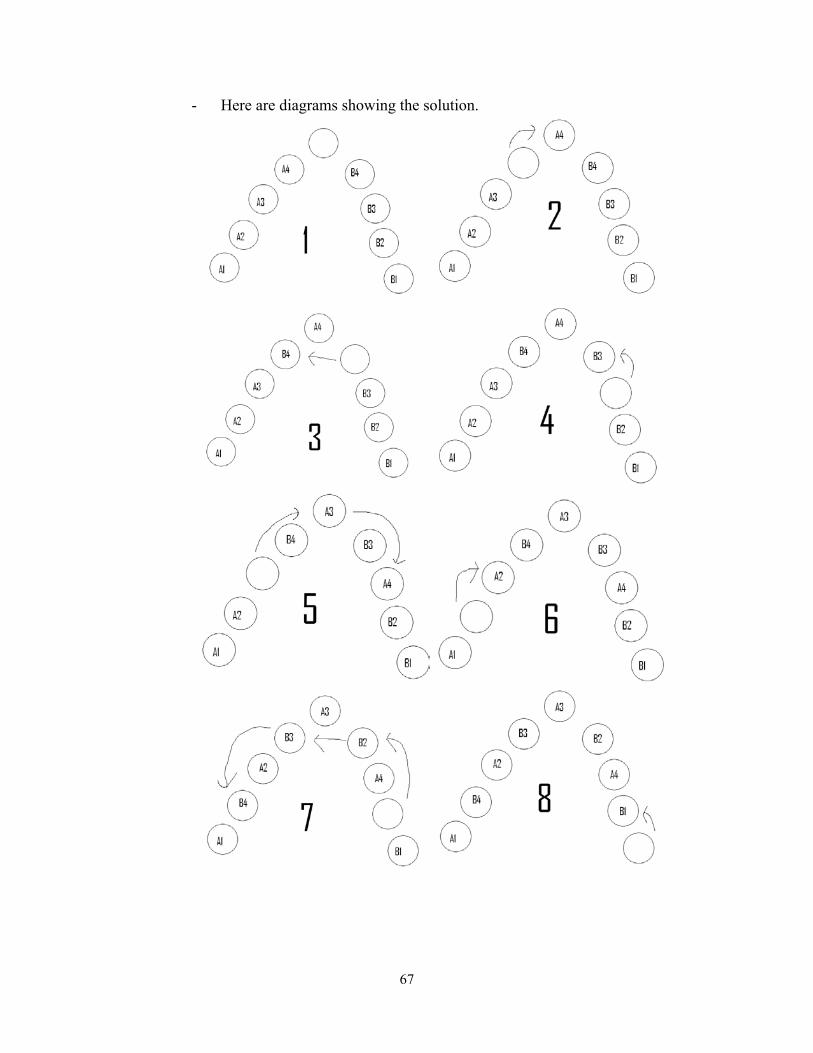
67
- Here are diagrams showing the solution.
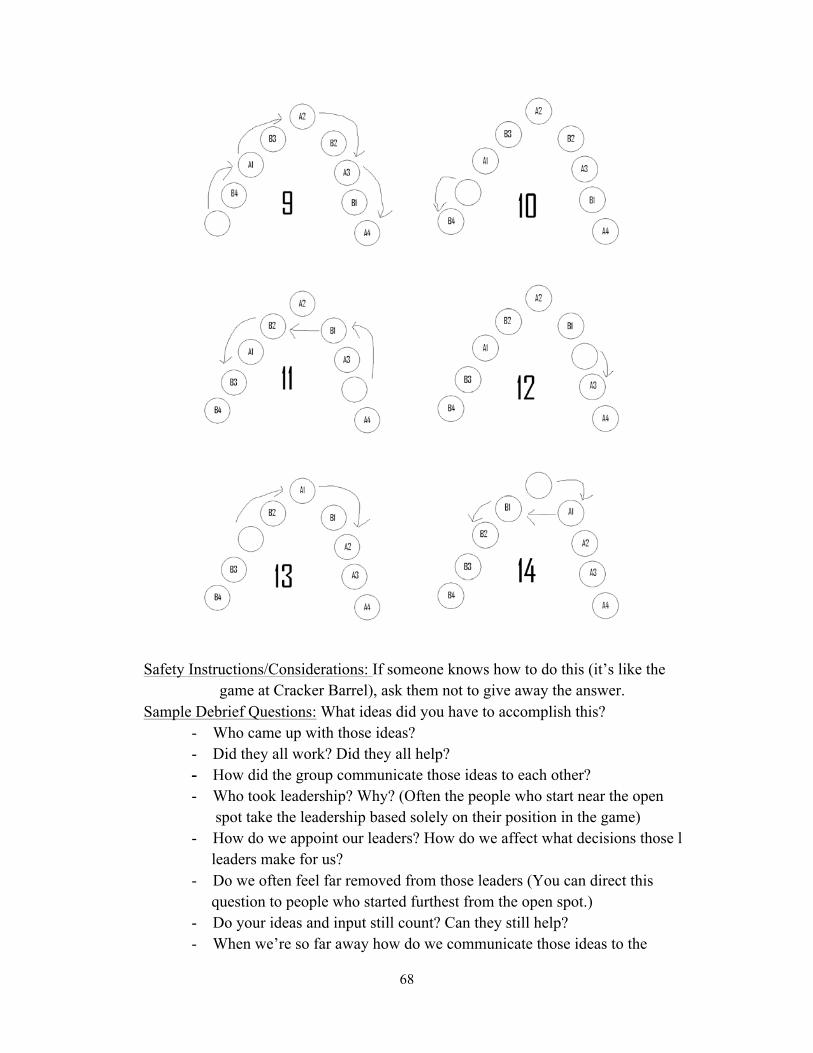
68
Safety Instructions/Considerations: If someone knows how to do this (it’s like the game at Cracker Barrel), ask them not to give away the answer. Sample Debrief Questions: What ideas did you have to accomplish this? - Who came up with those ideas? - Did they all work? Did they all help? - How did the group communicate those ideas to each other? - Who took leadership? Why? (Often the people who start near the open spot take the leadership based solely on their position in the game)
- How do we appoint our leaders? How do we affect what decisions those l leaders make for us? - Do we often feel far removed from those leaders (You can direct this question to people who started furthest from the open spot.) - Do your ideas and input still count? Can they still help? - When we’re so far away how do we communicate those ideas to the
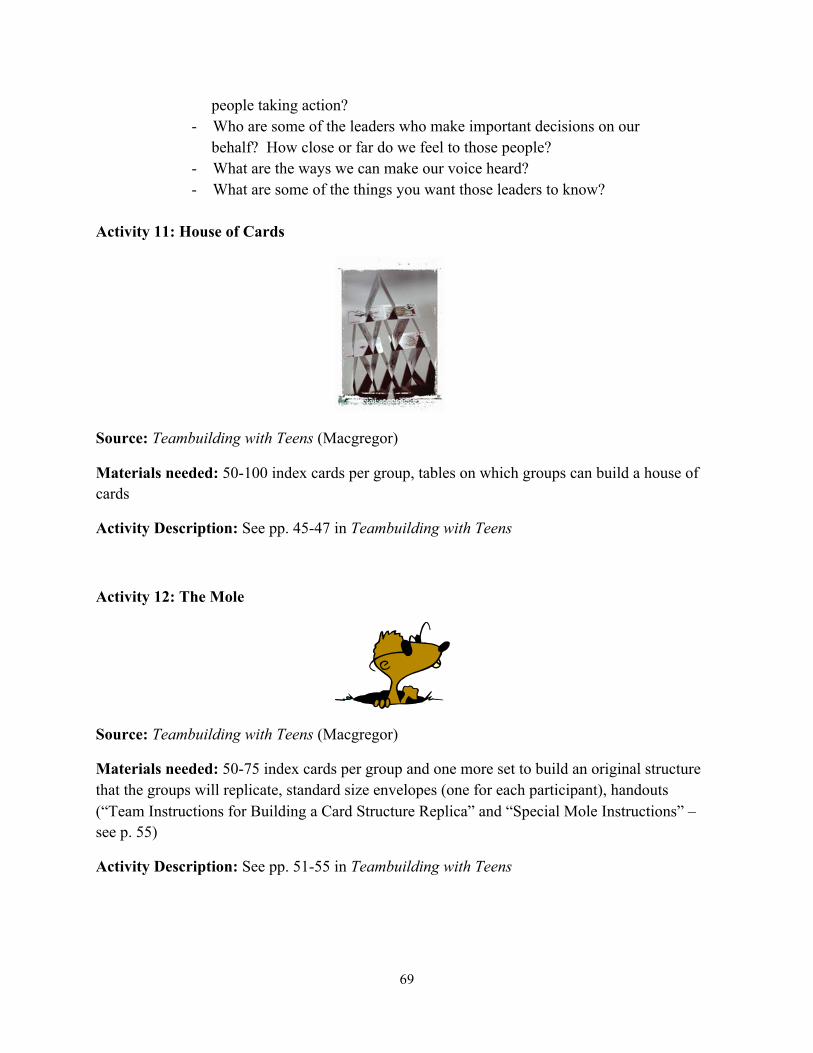
69
people taking action? - Who are some of the leaders who make important decisions on our behalf? How close or far do we feel to those people? - What are the ways we can make our voice heard? - What are some of the things you want those leaders to know?
Activity 11: House of Cards
Source: Teambuilding with Teens (Macgregor)
Materials needed: 50-100 index cards per group, tables on which groups can build a house of cards
Activity Description: See pp. 45-47 in Teambuilding with Teens
Activity 12: The Mole
Source: Teambuilding with Teens (Macgregor)
Materials needed: 50-75 index cards per group and one more set to build an original structure that the groups will replicate, standard size envelopes (one for each participant), handouts (“Team Instructions for Building a Card Structure Replica” and “Special Mole Instructions” – see p. 55)
Activity Description: See pp. 51-55 in Teambuilding with Teens
70
Activity 13: Bank Robbery
Source: Teambuilding with Teens (Macgregor)
Materials needed: Handouts (“Bank Robbery Clues” – pp. 140-141 and “Bank Robbery Key” – p. 142)
Activity Description: See pp. 138-142 in Teambuilding with Teens
71
Considerations for Activities – Year 4
Activities that use Carpet Squares or Blocks
Swamp Island Maze Stump Jump Stepping Stones – Shuttle Version 4 Corners Crossing To the Moon Traffic Jam Activities that use index cards or card stock cut into the size of an index card
The Mole House of Cards Sample Progression of Activities:
Session 1
Flying Astronauts (Partners) Flying Astronauts (Groups) To the Moon Session 2
Shuttle Shuffle Stepping Stones – Shuttle Version Four Corners Crossing Session 3 Mission – Martian Microbes Ultimate Survivor Challenge
72
Examples of Debrief Strategies
Source: Adventure Based Learning in Secondary Physical Education (presentation at 2011 AAHPERD Conference, San Diego) James D. Ressler; Paul Stuhr; Sue Sutherland; Kevin Lorson; Alison Brian Headliners Get students into pairs and give each pair a piece of paper and some crayons or markers. Tell the students to create a headline about the activity that they just completed. You can focus the topic of the headline more if you want to bring up particular issues – e.g. how did the group communicate, how did you work together to solve the task etc. Give the students time to complete the headline and then ask each group to share their headline and explain what it means to them. You can also provide students with some newspapers and they can select a headline from the paper that best represents their experience. This strategy takes a little longer but can help students who do not think quickly on their feet. Crumpled Paper Each student will receive an identical piece of paper. Students will write anything they want about the activity, themselves, or the group. Students will throw them into the center circle and mix them up. Everyone takes a piece of paper from the center circle and reads it aloud to the group. With older students you can have them give an interpretation what is written (helps with perspective taking). If someone gets their own, they read it anyway. Caution students not to use anyone’s name in their writing. Balloon Drawings Each student will receive a balloon and a marker. Students will draw a picture on the balloon that represents their feelings, thoughts, emotions, actions etc during the activity. Each student will show their balloon and describe the picture to the rest of the group. Feeling/Chiji/Expression Cards: Spread the cards out on the ground in front of the group so they can see some words and pictures. Choose the card that best represents an experience, feeling, though, or emotion that they had during the activity. Each person will show their card and share what it represents to them Snapshot There are a whole stack of (imaginary) photos laid out in front of them that were taken of them during the activity. If they were allowed to take only one picture home with them to put on their wall or refrigerator, what would it be? Do a full round to allow all students to share their “picture”.
73
Yard Stick/Ruler Have a ruler to pass around. Each student can show how they rate the activity by touching a number and sharing why they touched that number. Drawings Have students draw a picture on a piece of paper that represents their experience. Students will then show the group their picture and describe its meaning. Statue Each student will strike a pose related to an aspect of the activity and others will view each of the poses for a period of 15 seconds. Each student will explain the meaning of their pose Beach Ball Write questions on a beach ball, such as: “Something that went well”, or “Someone who showed leadership and why.” Throw the ball to whoever wants it. Each person answers whichever question is closest to them or that their left thumb is on etc. Paper Plates Give everyone a paper plate and a marker…They draw a face on the paper plate in regard to how they think things went, how they felt, etc.; Students can present their drawing to peers or to the entire group Thumbs up, thumbs to the side, and thumbs down Rate how we (or you) did, and say why you rated it that way The Magic Circle Everyone gets really close in a circle. Shuffle to the right. Someone says “stop” and says one quick thing about how things went. Then shuffle to the left until someone says “stop” and says something that happened. Keep going until people run out of things to say, or you run out of time. Rocks Pass around a bag of rocks and tell students to take as many as they want from the bag. Once each student has at least one rock tell them that for each rock they took they will explain one thing about the activity to the group. If students took more than three rocks you may want to limit them to explaining three things. Give them time to think and then do a round robin or ask for volunteers to share.
74
Faces Pass around laminated sheets and each student will choose one picture that represents how they felt during the activity, or their experience of the activity. Having more than one sheet of pictures will help this activity go a little faster. Traffic Light Each student chooses either the red, amber, or green light to represent what they thought about the activity and then explains why. Green light = full speed ahead, amber = proceed with caution, red = stop!
75
Explorers Club Ideas – Year 4
Option 1 – Developing a Pamphlet on Collegiate or Post-Secondary Options
Session 1: Explain that Explorers Club will entail the creation of a marketing pamphlet for their peers and schools. Each pamphlet will include 6 panels. There are two options for the pamphlet: 1) marketing a Louisiana university or 2) marketing post-secondary options in Louisiana. Divide camper groups into smaller groups of 3. Each small group should decide which of the two options they are going to work on and the research responsibilities for each member. Suggested information for the panels is included below.
A. Marketing a Louisiana University (can be the specific one where camp is held or another one)
Panel 1 – Cover (hook) -‐ Colors, mascot, accomplishments/famous graduates, etc.
Panel 2 – Exciting programs -‐ Colleges/degrees offered
Panel 3 – Student Life -‐ Recreation -‐ Athletics -‐ Fraternities/Sororities -‐ Arts/Theater -‐ Local attractions
Panel 4 – Student Life (part 2) -‐ Housing -‐ Meal options -‐ Popular restaurants (within walking and outside of walking distance)
Panel 5 – Making it Happen (MIH) -‐ Admissions requirements -‐ Costs
o Tuition o Fees
-‐ Financial Aid o Scholarships, TOPS o Grants, Loans
Panel 6 – Final Details -‐ Map of Louisiana and where La Tech is located -‐ Contact Information -‐ Louisiana Connect (https://www.louisianaconnect.org/)
76
B. Marketing Post-Secondary Options in Louisiana (can be related to a specific region within the state – Baton Rouge)
Panel 1 – Cover (hook)
-‐ Your future -‐ Diverse careers (ones that are related to different educational options – 2 year, 4 year,
vocational/technical training, etc.)
Panel 2 – Benefits of pursuing post-secondary opportunities -‐ Pay (stats) -‐ Benefits – insurance, retirement -‐ Health benefits
Panel 3 – Vocational/Technical Options
Panel 4 – 2 yr. Programs and Institutions (Samples)
Panel 5 – 4 yr. Programs and Institutions (Samples)
Panel 6 – Louisiana Connect (https://www.louisianaconnect.org/)
Session 2: Go to the computer labs or various offices on campus to gather information for each panel.
Begin pamphlet design (first and last panel). Session 3: Complete research and pamphlet design. Session 4: Present your pamphlet to other groups and receive/give feedback. Option 2: Creating a poster on information about a designated university and participating in a poster session Session 1: Universities are assigned/selected. The poster template is explained. There are four sections:
1. General University Information (includes information such as the mission statement, # of degrees offered, # of students, athletic conference, mascot, alma mater, school colors)
2. Admissions Requirements (includes information such as assured information criteria, application requirements)
3. Majors of Interest (includes the majors of interest for each campers and the associated department and college)
4. Interesting Facts (includes information about the university and the town)
77
Consider pictures to include and colors (e.g., school colors).
Session 2: Have multiple computer labs available for use, if possible. With the help of their counselors, campers will be assigned specific sections and conduct research on their assigned university. Their goal is to have all of the information they need by the end of this session. *They will need to select appropriate and important information but also consider information that would make their university appealing to their peers. Session 3: Groups finish the design of their poster using the information they have collected. They should consider how to make their poster visually appealing and attractive in order to market their university.
Session 4: Participate in a poster session. Six groups will participate in one poster session and the other six groups will be in another poster session. One group at a time will present to the other five groups, counselors, staff members, etc. If time is limited, make smaller poster sessions of three groups. *Encourage group members to have a cheer or rap for their specific university to enhance interest.
Option 3: Campaign Teams Source: MacGregor (Teambuilding with teens: Activities for leadership, decision making, & group success, p. 82) Learning Points:
-‐ Understanding of the preferred leadership qualities for public leaders -‐ Problem-solving and decision-making in the best interest of group goals -‐ Learning about working together with others who have different perspectives and biases -‐ Organizing a presentation and public speaking
Materials needed: construction paper, poster board or banner papers; scissors; masking tape; markers, paints, or crayons; small slips of paper and an empty shoe box; handouts of the different candidates Optional: streamers, balloons, other decorative supplies Session 1: Assign each group a candidate. Each group develops the candidate’s profile. “You’ve received the basic description of candidates for your city’s mayoral election. Each of your groups is a campaign team for one candidate; it’s your job to get your candidate elected. First, you need to fully develop your candidate’s profile – the person’s description, background, and experience – based on the handout you’ve received. In the time we have today, you will give
78
your person a name and fill in the other missing information on the profile.” Then you will select who on your team will take on different roles for the campaign (candidate – 1, campaign manager – 1, speechwriter – 1, publicist – 1, marketing and promotion – 2). Sessions 2/3: “Formulate a campaign plan to explain why your candidate is the right person for the job, put together promotional posters, and write a 2- to 3-minute campaign speech for your candidate to deliver. The introductions, campaign speeches, and election will take place at your next meeting. At that meeting, your team will have 5 minutes to campaign – to get your points across through the candidate’s speech and other efforts. You’ll be able to display your posters, introduce your candidate to the voters, and use the profile you’ve completed to tell why she or he is the best person to be mayor. If you want, you can bring in music or even write a song about your candidate – whatever you think will get people excited about voting for him or her. Remember, you will only have a few minutes to get your message across.” Staff should respond to questions and monitor groups during their work. If space allows, have groups hang promotional posters in the room or hallway. With 10 minutes left, indicate they need to wrap up. At the end of Session 3, remind groups that the next meeting will be when they will present their campaigns to convince the group that their candidate is best for the job. Candidates need to be prepared to effectively deliver their speeches. Session 4: Overview: 1. Teams set up campaign tables 2. Teams present candidate profile and speech 3. Voting occurs (teams cannot vote for their own candidate) 4. Winner announced (if you have time, the winner can make an acceptance/victory speech) 5. Debriefing on process Each team has five minutes to present the profile they have developed and for candidate speeches. Remind the group that they will vote for a candidate but that they may not vote for their own candidate. After presentations, pass out slips of paper for voting. Collect and count the votes. Announce the winner and allow the winning group to celebrate. Allow time for teams to acknowledge the work of other teams. Recognize everyone’s work and remind them of good sportspersonship.
79
Debrief: 1. What was it like to make a candidate on paper real? 2. What stereotypes did you overcome regarding your candidate’s background and abilities? Were there characteristics that were too challenging to overcome? 3. Did your team make good decisions in the campaign? How were roles distributed? 4. Do you think candidates for leadership positions should be held to a higher standard than other people? Why or why not? 5. Did the best candidate win? Why or why not?

80
Resources Bordessa, K. (2006). Team challenges: 170+ group activities to build cooperation, communication, and creativity. Chicago, IL: Zephyr Press. Fark, J. (1994) Team challenge: Introduction to low initiatives training. (Available from Ohio State University Leadership Center,109 Agricultural Administration Building, 2120 Fyffe Road, Columbus, OH 43210) Holland, J.L. (1973). Making vocational choices: A theory of careers. Englewood Cliffs, NJ; Prentice Hall. http://wilderdom.com/games/NameGames.html. (2 Truths and a Lie, Everything You Ever Wanted to Know About One Another, and Point and Shoot Name Games) http://www.wilderdom.com/games/descriptions/TrustLean.html http://www.wilderdom.com/games/descriptions/WillowInTheWind.html http://www.ag.ohio-state.edu/~bdg/. (Ohio State Leadership Center – Building Dynamic Groups home page; includes the following links: Ice Breakers, Facilitation Activities, Visioning Activities, Collaboration Activities, Communication Activities, TeamBuilding) http://www.group-games.com/team-building/commonalities-and-uniquities.html http://www.youthwork.com/activitiesinit.html. (BLT and Friends Activity) http://www.ultimatecampresource.com/site/camp-activity/ffeach.html. (FFEACH Activity) http://www.ultimatecampresource.com/site/camp-activity/wireless-communication.html. (Wireless Communication Activity) http://youth-activities.suite101.com/article.cfm/team_building_activities_for_teens. (Building Blind Activity, Direction to Direction Activity) Hughes, J.D. (2003). No standing around in my gym. Champaign, IL: Human Kinetics. Hughes, J.D. (2005). PE2theMax: Maximize Skills, Participation, Teamwork, and Fun. Champaign, IL: Human Kinetics. Jones, A. (1998). 104 activities that build self-esteem, teamwork, communication, anger management, self-discovery, coping skills. Lusby, MD: Rec Room Publishing, Inc. Jones, A. (2002). More team-building activities for every group. Rec Room Publishing. Jones, A. (1999). Team-building activities for every group. Richland, WA: Rec Room Publishing, Inc. Kelbaugh (Building Dynamic Groups Communication Team Building Activity) Back to Back Team Building Activity MacGregor, M. (2008). Teambuilding with teens: Activities for leadership, decision making, & group success. Minneapolis, MN: Free Spirit Publishing. Martin, R.R.; Weber, P.L.; Henderson, W. E.; Lafontaine, K. R.; Sachs, R. E.; Roth, J.; Cox, K. J.; Schaffner, D. (1987). Broken squares (Section 5 p.3). Laser d.i.s.k. Columbus, OH: Ohio State University Extension. Project Adventure, Inc. (1995). Youth leadership in action. Dubuque, IA: Kendall/Hunt Publishing Company. Rohnke, K. (1984). Silver bullets. Dubuque, IA: Kendall/Hunt Publishing Company.
81
Rohnke, K. (1994). The bottomless bag again (2nd ed.). Dubuque, IA: Kendall/Hunt Publishing Company. Rohnke, K., & Butler, S. (1995). QuickSilver. Dubuque, IA: Kendall/Hunt Publishing Company. Sachs, B. & zumFelde, P. (1998) Magic carpet ride. Let me grow in peace- team challenge-asset building. (p. 10). (Available from Lutheran Social Services, T793 State Route 66, Archbold, OH 43502) Scannell, E.E. & Newstrom, J. W. (1991) Coat of Arms. Still more games trainers play.
(pp.289-291). New York: McGraw Hill.

82
Appendix A
Icebreaker Activities 1. Martian Names Source: MacGregor (Teambuilding with teens: Activities for leadership, decision making, & group success, p. 8)
Materials: Paper, markers or something to write with
Story line: You have just landed on Mars and need to introduce yourself to the Martian tour guide. Martian language is the opposite of ours so you must change your name: last name first, first name last, each spelled backward, letter by letter. Every name also means something special according to the person who has that name. Consider things that are important for meaning such as special quotes, talents, unique personal characteristics, or other interests.
Examples: Earth Name: Sarah Jones Martian Name: Senoj Haras, which means “enjoys taking long trips and hiking with friends.”
Earth Name: Javier Martinez Martian Name: Zenitram Reivaj which means “a very loyal friend and a good son.”
Stay in large group or divide into smaller groups and have them go around and introduce themselves (Martian and Earth names). *You can also have them answer additional questions like: What do you hope to gain from camp? What will you contribute to the group?
2. Human Treasure Hunt
Source: Rohnke & Butler (QuickSilver, p. 78-79)
Create a form that has the following list and a line for participants to sign. Have the participants circulate throughout the group and identify a different person for each fact on the list:
a. Is born in the same month as you. b. Is born in a different parish than you. c. Has participated in an extracurricular activity at school (what: ) d. Has the same number of siblings e. Has traveled outside of Louisiana (where: ) f. Can play a musical instrument g. Has had surgery before or been in the hospital in the last two years h. Has a unique skill or talent i. Has been in a parade (why: )
83
j. Has been in their school or city newspaper (why: ) k. Knows someone famous (who: ) l. Has been an officer in a school, church, or community organization m. Has flown on a plane before n. Volunteers for an organization or cause in their community (what: ) o. Spends a lot of time with a grandparent or great-grandparent
3. How We Differ
Source: Rohnke & Butler (QuickSilver, p. 77)
Materials: One paper per group.
Categories – all 1 point, can earn bonus points as indicated
One point: For each different birthday month. 5 pts. – born on a holiday For each birth parish represented. 5 pts. – born out of state For each shoe size over 11 or under 5. 2 pts. – wearing tennis shoes For visiting each of the following: State Capitol in Baton Rouge, New Orleans, downtown Natchitoches, any state park, farmer’s market, Louisiana Tech library 5 pts. – for three 7 pts. – for four For each sibling, living or deceased. Includes adopted, step, and half-sibling. 10 pts. – twins For each state visited. Requires 24-hour stay. 10 pts. – for 3 or more For each first or last name starting with the letters Z, Q, K, or U 7 pts. – for X letters For each person not wearing a watch. 3 pts. – no jewelry For each person who can roll their tongue. 7 pts. – if you can turn your tongue upside down (in your mouth!) For each person who knows every word to the Soulja Boy song 10 pts. – if at least 2 group members dance to the song while it is sung by another group member For all those wearing less than 3 different colors in their clothing. 5 pts. – if wearing only one color
84
4. One Common Goal
Source: Jones (Team-building activities for every group, p. 31)
Materials: Paper, pens/pencils
Divide into groups of 2-6 people. Give each group paper and pen/pencil and have them make a list of all the things that are common traits among all team members. Set a time limit. Ask each group to read their list to the other groups.
5. Toss-A-Name Game Source: Rohnke (The bottomless bag again, p. 8)
Break up into 3 groups of 10. The leader says their first name and passes a ball (tennis or fleece) to the right or left. This continues until everyone has said their name. When the leader gets the ball back, they call out someone’s name in the circle and toss them the ball. That person calls someone else’s name out and tosses it. This continues until you begin to get a feel for all names in the group. Start up another ball. Add a third and fourth ball. Stop occasionally and rotate a third of the group to another group. *As a finale, have all individuals mingle about with the number of balls equal to 1/3 of the people (10 for this group). Use a rubber chicken or stuffed animal of some sort as well to add variation.
6. Point & Shoot An ideal name game finale, Point & Shoot puts people on the spot for learning names. Split the group in half. Have two volunteers hold a blanket or groundsheet between the two groups. Group members gather together, to plan and avoid being seen by the other group. The group sends one member to crouch close to the blanket and be involved in the shoot-out. The holders count "1, 2, 3" aloud then drop the blanket. Each contestant tries to say the other person's name first. Whoever is the winner "captures" his/her challenger for the winner's team. The blanket goes up again -- continue until one team captures all of the other team. http://wilderdom.com/games/NameGames.html
7. Everything You Ever Wanted to Know About One Another
• A somewhat challenging and intimate get-to-know-you activity
• Best for small groups e.g., 3 to 6 • Involves fun, interesting, self-
disclosure by sharing answers to some honest, quirky questions
• Establish initial trust amongst group
Equipment: Copies of the 10 get-to-know-you questions Brief Description: This activity involves small groups sharing answers to 10 somewhat challenging and intimate questions, including responses to "hypothetical situations" e.g., what
85
members before using this activity; could be incorporated with trust building activities
• Allow plenty of time • Consider making the activity optional
and/or allowing small groups to do the activity when and where they feel like it; this increases the sense of owning the experience and takes seriously the level of honesty and potential intimacy the activity can generate
• Adapt and edit the questions to suit your particular group
would you do if you had $1 million to spend in 24 hours.
Everything You Ever Wanted to Know about One Another 1. If you were to choose a new name for yourself, what would
it be? 2. If you were given an extra $10 in change at Walmart, what
would you do with it and why? 3. What’s the biggest lesson you’ve learned from your past
relationships or friendships? 4. What’s one of your worst habits? 5. What was the best day of the past week for you - why? 6. What are you wearing today which is most reflective of
who you are? 7. Choose a unique item that you brought to camp and explain
why you brought it. 8. If you could change one thing about your physical
appearance what would it be and why? 9. Share one of your most embarrassing moments. 10. If you were given a million dollars and 24 hours to spend it in, (no depositing it in the bank or investing it) what would you buy?
Source: http://wilderdom.com/games/descriptions/EverythingYouEverWantedToKnowAboutOneAnother.html
86
8. All My Neighbors A fun, moving-around activity that breaks the ice, pumps up the energy, and loosens people up. Supplies: Something to use as a place marker for each individual (a name tag, a napkin, a note card). Number of people: Works well in small or large groups (12-60 people). Directions: Ask participants to form a shoulder-to-shoulder standing circle and then have each person take a step back. Give each participant a place holder which they should place at their feet. The leader takes a place in the center of the circle. The facilitator says: “This activity is similar to the game of musical chairs that you played as a child. As you’ll notice, there is one less place than people in the group. That’s why I’m in the center of the circle. So, I’ll begin in the center of the circle, but my task is to try and find a place on the outside of the circle and have someone else end up without a place. The way I’m going to do that is to make a statement that is TRUE for me. For example, if I am wearing tennis shoes, I might say ‘All my neighbors who are wearing tennis shoes.’ If that statement is also true for you, then you must come off your place and find another spot in the circle. I could also say something like ‘All my neighbors who love to swim,’ and if that’s true for you on the outside of the circle, you must move and find a new place. You may not move immediately to your right or left and you may not move off your space and return to it in the same round. OK. I’ll start.” When you think people have had enough, simply say “OK, this is the last round.” Give a round of applause to the last person who ends up in the center.
9. 2 Truths & a Lie Source: http://www.wilderdom.com/games/descriptions/TwoTruthsAndALie.html
• A different kind of get-to-know-you activity which is engages and challenges each group member in a fun way
• Particularly useful as an icebreaker, e.g. can be used as a opener for a workshop/conference.
• For large groups (e.g., 30+), it is best to split into smaller group sizes. • Hand out cards or paper and pens (or if participants bring their own, that's fine) • Explain that in this activity each person write two truths and a lie about themself and then
we will try to guess each other's lie. The goal is to: a) convince others that your lie is truth (and that one of your truths is the lie) and b) to correctly guess other people's lies.
• Allow approx. ~5+ minutes for writing 2 truths & a lie - this isn't easy for a lot of people - there will some scribbling out, etc. The slower people will probably need to be urged along to "put anything you can think of" down. Allocate 5-8 minutes, but you will probably need to urge people along.
• Announce that we will now walk around and chat to one another, like a cocktail party, and ask about each other's truths and lies. The goal is to quiz each about each statement to help determine which are the truth and which is the lie, whilst seducing other people into thinking that your own lie is a truth. At the end we will caste our votes and find out the truth.
87
• Emphasize that people should not reveal their lie, even if it seems others might have guessed.
• Allow min. 10-15 minutes of conversation time. • Gather together in a circle. Start with one person who reads their three statements aloud
(to remind everyone). Then read the statements again, stopping to allow a vote for each one. e.g., "I am Turkish. Who thinks that is a lie? [Vote] I am vegetarian. Who thinks that is a lie? [Vote] I have a metal pin in my right leg. Who thinks that is a lie? [Vote]. OK, my lie was "I am vegetarian."" The facilitator will need to help each person out, especially intially until the basic format is understood. The facilitator may add drama and reinforcement, etc. for correct guesses, tricky statements, etc.
• The exercise can be run competitively, e.g., count up how many correct guesses of other people's lies and take away the number of people who correctly guesses your own lie. Highest score wins (honesty counts!).
10. Commonalities and Uniquities
Source: http://www.group-games.com/team-building/commonalities-and-uniquities.html
Form groups of five to eight people and give them two sheets of paper and a pencil or pen.
The first part of the activity is Commonalities, where each subgroup compiles a list of the things they have in common. In order for it to make the list, it must apply to everyone in the subgroup. You want to avoid writing things that people can see (e.g. “everyone has hair,” or “we are all wearing clothes”). Try to get them to dig deeper. After about 5 minutes, have a spokesperson from each subgroup read their list.
Then, depending on your goals for the session, you can have half of each subgroup rotate to another group for Uniquities or you can leave everyone in the same group.
On the second sheet of paper have the kids record Uniquities, meaning that each item applies to only one person in the group. The group tries to find at least 2 Uniquities for each person. After 5-7 minutes, you can have each person say one of their Uniquities or have a person read them one by one, having others try to guess who it was. (Again, you want to go beyond the superficial, avoiding those things that people can readily see).
This is an excellent team-building activity because it promotes unity, gets people to realize that they have more in common than they first might realize. The awareness of their own unique characteristics is also beneficial in that people can feel empowered to offer the group something unique. 11. Group Juggling Source: The Ohio State University Extension, Building Dynamic Groups, 2009. http://www.ag.ohio-state.edu/~bdg/team_building.html
88
Objective: To teach responsibility and the importance of caring about others.
Equipment needed: 10 – 15 soft objects of different size, weight, and shape, such as nerf balls, koosh balls, stuffed toys, beach ball, tape balls, tennis balls.
Directions: Members of the group are asked to throw balls or other objects around a group trying not to drop any. Step 1: Leader tosses ball underhanded to someone across the group. They in turn, throw it to someone else, etc., until everyone has caught and thrown the ball. Say the name of person you are throwing to and remember who it is. Step 2: Practice! Always throw to the same person, say their name before throwing, concentrate on person throwing to you. Step 3: Add additional balls (objects). Time how long it takes for one object to make it around. Count number of drops. Try to improve as a whole group. Reverse direction. If a ball is dropped or missed, let it go. Safety: Make sure all objects are soft and will not hurt someone if (when) contact is made. Make sure everyone tosses the ball underhand – look at your teammate when throwing and catching. 12. Giants, Wizards and Elves
Purpose: This is a team approach to the ancient game of ROCK, PAPER,
SCISSORS. It is a great game to use with a group to encourage communication and teamwork.
Procedure: The key to the game is this:
Wizards cast spells on giants. Giants squish elves. Elves are small and quick and outsmart wizards. The game begins with teams huddling together, deciding which creatures the team will be. The entire team must be the same creature at the same time. As soon as the teams have decided on their creature, they line up face to face with the opposing team, in rows about four feet apart. On the leader's command team members jump to their pose. A point is scored on the basis of which creature beats which. If both teams form the same creature, no point is scored and teams return to their huddle to decide their next team move. The first team to score 5-7 points wins. Keep games
89
short. Sides can be scrambled, and the game played again to avoid any emphasis on competition.
Motions: Giants - Stand tall. Arms straight over head. Fingers curled ready to grab. Voices give a loud "growl."
Wizards - Crouch slightly. Arms extended, fingers extended to cast spell.
Eyes lurk behind arms. Voice a wizardry "hiss." Elves - Crouch down on haunches. Hands and arms in front puppy style.
Voice one loud "ha." Variation: You could use different names and motions such as: Bear – stand tall with arms over head and growl Fish – palms together in front making the motion of swimming Mosquito – hand on nose with pointer finger out and say ‘ztt!’ Reference: Martin, R.R.; Weber, P.L.; Henderson, W. E.; Lafontaine, K. R.; Sachs, R. E.; Roth, J.; Cox, K. J.; Schaffner, D. (1987). Wizards, giants and elves (Section 2 p.13). Laser d.i.s.k. Columbus, OH: Ohio State University Extension. 13. Coat of Arms Objective: To give participants the opportunity to value their unique characteristics
while also honoring overall similarities among group members. To help camp participants appreciate where other group members are coming from and to understand others’ perspectives while also identifying characteristics that are common across all group members.
Instructions: Give each group member (6) one part of the coat of arms. In their part, they need to write their name, their hometown or school, their interests, and what career/job they are interested in. In the center have an additional
piece on which they can write their group name and 3-4 similarities across group members. (may have to allow characteristics that 3-4 group members share instead of all group members)
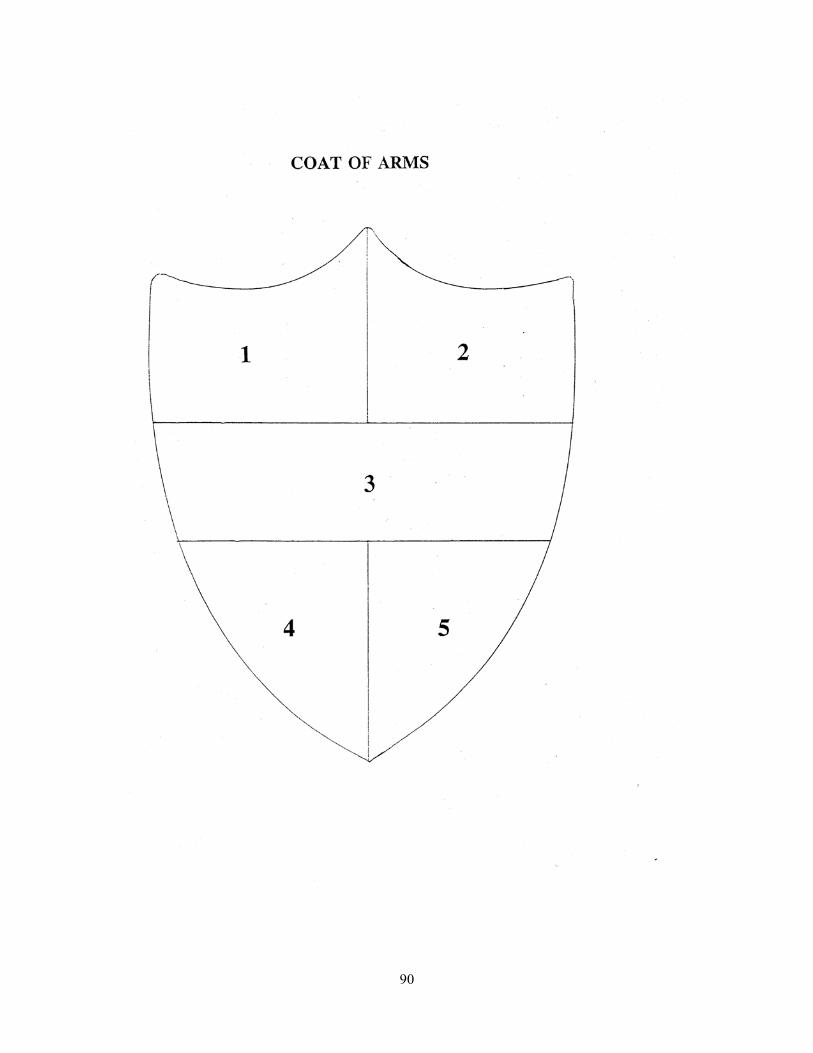
90
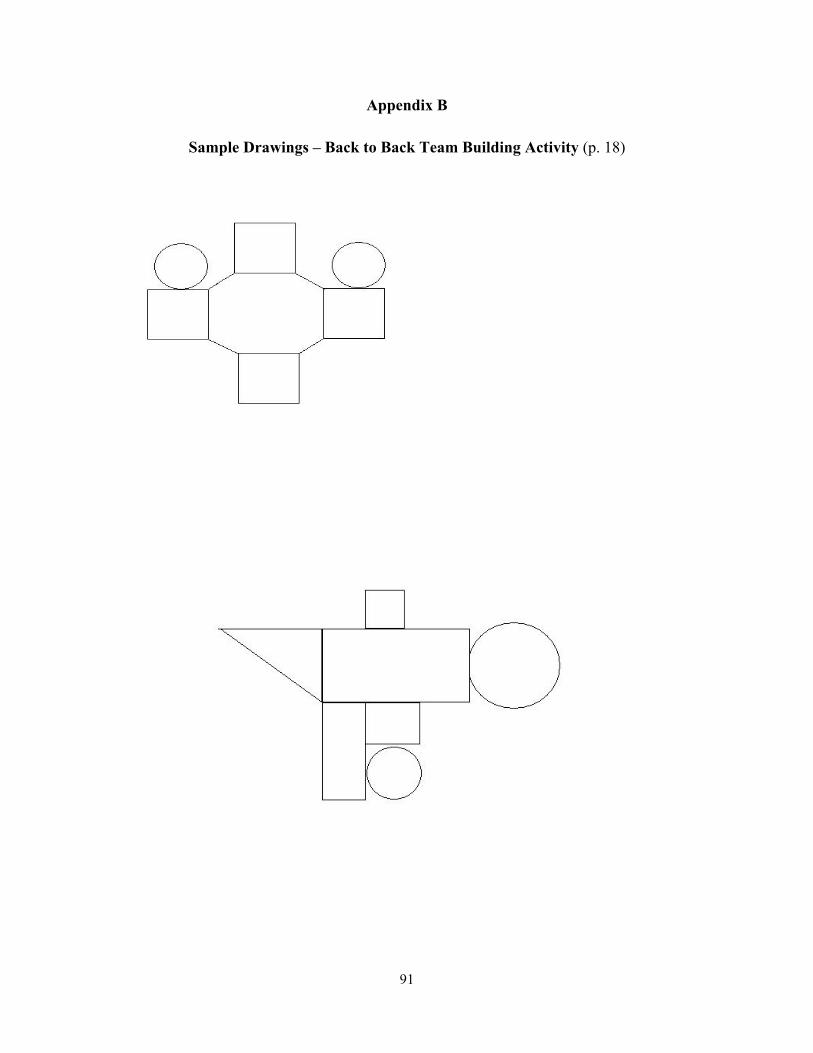
91
Appendix B
Sample Drawings – Back to Back Team Building Activity (p. 18)


![PN50A550 PN58A550 TrainingManual [TM]](https://img.pdfslide.us/doc/110x75/55cf9dae550346d033aeafac/pn50a550-pn58a550-trainingmanual-tm.jpg)