Embed Size (px)
Citation preview

Page 1 of 16
2010 Outlook Web App Client Overview
The upgrade to Microsoft Exchange 2010 includes an updated web-based e-mail client, OWA. OWA stands for “Outlook Web App” and gives you access to your district e-mail (your e-mail @sdccd.edu). It is available from any PC with access to the Internet. To access the new client, you will continue to use the current link, mail.sdccd.edu. There are two types of OWA clients – PREMIUM and LIGHT. The premium version is displayed when you use a supported web browser (Internet Explorer 7 or later, recent versions of Firefox and Google Chrome on Windows, Mac and Linux, and Safari on Mac OS X.). The light version is automatically displayed when you use an unsupported browser, including IE6 and older. The new OWA client provides most of the features available in the full Outlook client, such as Conversation View, Rules and Alerts, Mailbox Searches, and access to your Mailbox Quota. You can also do things like change your network password which was formerly only available while being logged in to a District computer. The first screen you will see is the Sign in page.
There are several options listed as well as boxes to enter your User name and Password. Your User name is the Login ID you use to log on your work computer, and the Password is the same password used for that login ID. The other options include: 1. This is a public or shared computer – Use this option when checking e-mail on a public computer you do not
own or have not been assigned by IT. This option will delete any temporary files or cookies that get downloaded during your OWA session.
2. This is a private computer – Use this option on your work PC or your PC at home. This option will save any of
your settings into a cookie file, so your settings will be saved when you log out. The inactivity timer will also wait longer to log you out due to inactivity. The Outlook Web App premium client provides a similar experience to using the full desktop e-mail client like Outlook or Entourage for Mac. Many desktop e-mail client conventions are used, such as drag-and-drop, right-click context menus and Outlook’s preview pane.

Page 2 of 16
Reviewing the Outlook Web App Window
Folders & Left Navigation Bar On the left hand side of the browser, is the folder list. This shows your e-mail folders including your Inbox, Drafts,
Sent Items, Notes, Junk E-Mail and Deleted Items. You can also right click in this area to rename, delete or create new folders. The navigation bar is below the folders and allows you to switch between your mail, calendar, tasks, or
public folder views. Inbox / Message Listing & OWA toolbar In the center of the browser is the Inbox / message list. Above the message listing is the OWA toolbar with options
to create a new message, delete a message, move a message, filter and change your view, along with search options. Preview Pane On the right hand side of the browser window is by default, the preview pane. This displays the selected message
along with common options such as reply, reply all or forward ( ). Sign Out The sign out link is in the upper right-hand corner next to your mailbox account name. Click on sign out to exit your
mailbox. Outlook Help The small question mark in the circle is the Outlook Help button. Clicking on it will open an additional window with
Help topics listed or you may enter a specific topic to search for help on.
Folders & Left
Navigation Bar
Inbox /
Messages
OWA Toolbar &
Search bar
Preview Pane with Reply,
Reply all, Forward
Sign
Out
Outlook
Help

Page 3 of 16
Sending a Message To compose a new message click on the New message button above the Inbox / message listing:
The new message window will open. If it does not, ensure you have the pop-up blocker disabled for
https://mail.sdccd.edu.
Click the TO… or CC… and select the person to send an e-mail to. You may access the District’s address book or
your contacts, but not both at the same time.
You can also type in a name or partial name in the TO box and click the “Check Name” button and OWA will
return a result set based on your search query. For example, to send e-mail to John Smith, type “JOHN” or “SMITH”, and then click the Check Name button. OWA will return all the people with either John or Smith in their name. To select, single click the name of the person from the search results. Because of the similarity between OWA and Outlook this document does not cover all the options available when creating and sending a message. For more help on this subject, refer to the online help by clicking the question mark in the circle on the top right of the new message window.
Page 4 of 16
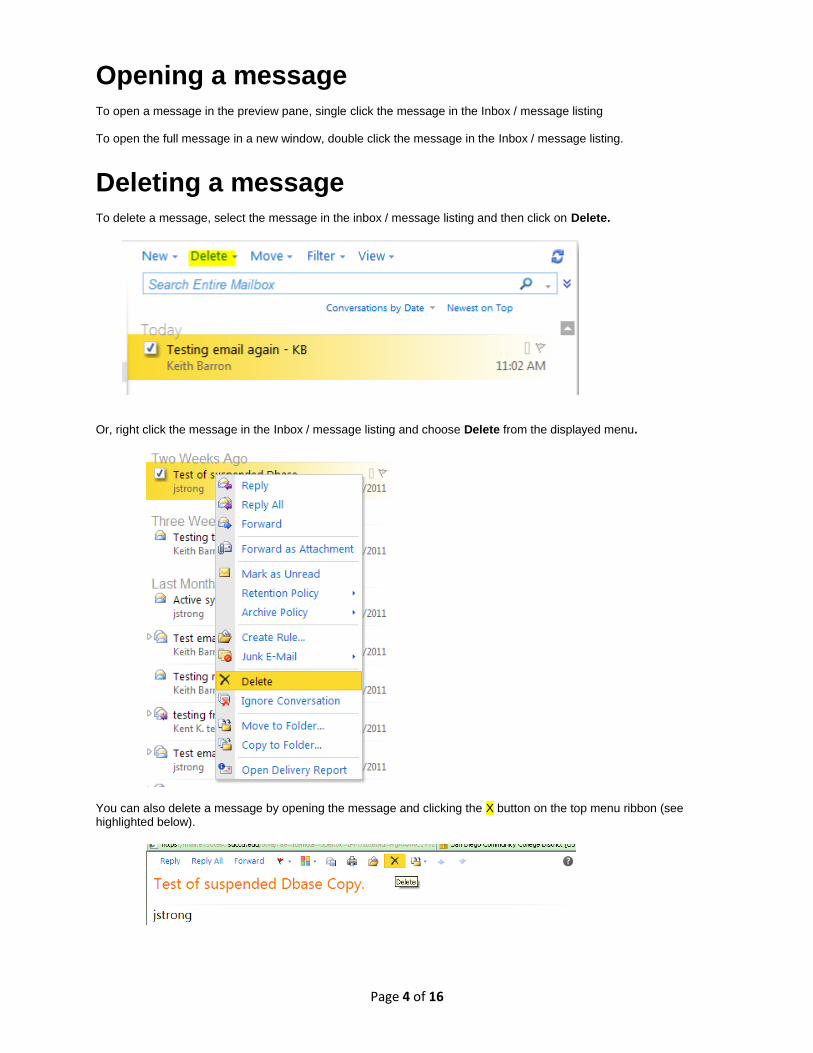
Opening a message To open a message in the preview pane, single click the message in the Inbox / message listing To open the full message in a new window, double click the message in the Inbox / message listing.
Deleting a message To delete a message, select the message in the inbox / message listing and then click on Delete.
Or, right click the message in the Inbox / message listing and choose Delete from the displayed menu.
You can also delete a message by opening the message and clicking the X button on the top menu ribbon (see highlighted below).

Page 5 of 16
Creating Folders Folders can be used to organize e-mail. To create a new folder, right click on the parent folder (such as your Mailbox or the Inbox folder) and choose Create New Folder.
A new folder is created and you then type in the new folder name and press OK.
Searching Your Mailbox You can search your mailbox using the powerful search facility built into Outlook Web App. To access the search functionality, click in the area directly below the New / Delete/ Move toolbar in your message listing and enter any search term you wish to find in your inbox, and then press the magnifying glass icon to begin your search:

Page 6 of 16
Selecting Multiple Messages You may want to delete or move multiple messages together. To do this, select multiple messages and perform an action on all of them. To select multiple messages, select the first message using the left mouse button, hold down the Shift key and click the left mouse button again on the last message you wish to select (all messages will be highlighted like below). Note: Holding down the Ctrl key while clicking messages with the mouse, selects multiple messages one at a time.
Now, right click on one of the highlighted messages and choose an action to perform on all the selected messages (such as delete, mark as read/unread, move to folder, etc.).

Page 7 of 16
Conversation View The Conversation view is a new way of viewing e-mail in Outlook Web App that allows you to see message threads grouped together. This can help reduce the clutter in your mailbox. A conversation is a grouping of sent and received e-mails all dealing with the same e-mail subject. Sent Items are also included within the groupings. A typical conversation will display in the reading pane similar to the image below:
To switch off the Conversation View, click View and uncheck Use Conversations.
Reading Pane You may not wish to see the right-hand side previews of messages before you open them. To switch off (or back on) the Reading Pane, click View and change the Reading Pane to Off, Right, or Bottom.

Page 8 of 16
Setup Automatic Replies (Out-of-Office) You can setup an “Out of Office” automatic reply on your e-mail account to let senders know you may not read their e-mail for a certain amount of time. To setup an Automatic Reply, first click the Options button in your mailbox:
Next, click Set Automatic Replies…
You can choose to switch automatic replies on or off, choose the time period to send them in and set the text of the message to send. You have the option to create a message for other District senders and a different one for senders outside (external) the District. You can also control which external senders will receive automatic replies by using your Contacts list. When you are finished editing your Automatic Reply remember to click Save to ensure it is set.

Page 9 of 16
E-mail Signatures You may wish to include a portion of text such as your name, organization and contact details in each message you send. To do this, you can setup an e-mail signature. To setup an e-mail signature, click Options in your mailbox.
Click See All Options then click Settings. In the section titled E-Mail Signature, you can compose the text to use as
a signature and choose to automatically include it on your messages. When you are happy with the text, remember to click Save to keep your changes.
Checking Your Email Storage Limit To check your mailbox size at any time, hover the mouse over the Mailbox name (usually your name). A box similar to the example below will display with mailbox space used information.

Page 10 of 16
Setup Inbox Rules You can setup “Inbox Rules” to organize e-mail, delete specific messages as they are received, or forward messages on to another e-mail address. Inbox Rules are automatic instructions that tell OWA and Outlook what to do when a specific condition is met. For example, you can set up a rule that moves a message from someone to a subfolder. Please keep in mind that rules set up in OWA cannot be pointed at a PST file (Personal Folder). Only folders available in OWA can be used in these rules. Some rules will only work in the full Outlook client. These will display grayed out and cannot be modified within OWA. To setup an Inbox Rule, first click the Options button in your mailbox (next to the Help button):
Next, click Create an Inbox Rule...
The Inbox Rules page will open and display current rules. You may create, edit, or delete rules from this page.
See the specific example starting on the next page, detailing how to setup an Inbox Rule to forward your District e-mail to your personal e-mail. To return to your mail, click on My Mail.

Page 11 of 16
Inbox Rule - Forward SDCCD E-mail to Personal E-mail
- To setup an Inbox Rule, first Click the Options button in your mailbox (next to the Help button):
- Next, Click Create an Inbox Rule...
- The Inbox Rules page opens and displays current rules. Click on New… to create a new rule

Page 12 of 16
- The New Inbox Rule Wizard opens in a new Window with some options available
- Click in the Select one box under “ * When the message arrives, and: “
Next, Click on “[Apply to all messages]”.

Page 13 of 16
- Click in the Select one box under “Do the following“
- Then, Click on “Redirect the message to…”
- The Address Book will open. Type your email address in the To -> and then Click OK

Page 14 of 16
- The New Inbox Rule Wizard screen re-displays. Click on “More Options”
- The “Name of the rule:” box displays. Enter a new rule name and then Click Save
Page 15 of 16
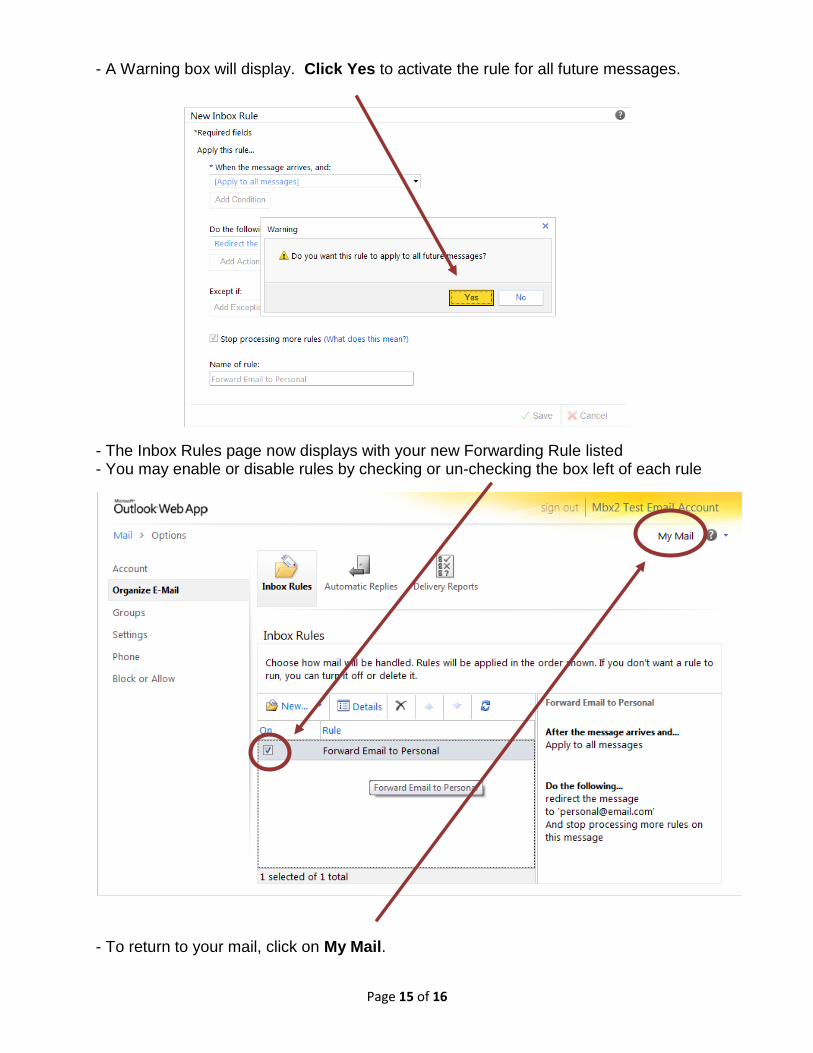
- A Warning box will display. Click Yes to activate the rule for all future messages.
- The Inbox Rules page now displays with your new Forwarding Rule listed - You may enable or disable rules by checking or un-checking the box left of each rule
- To return to your mail, click on My Mail.

Page 16 of 16
Caution – If you get the warning message below, it means you have one or more
rules that were turned off using your Outlook Client. When modifying rules within
OWA, those rules will be deleted, so OWA warns you and gives you a change to
cancel.