Embed Size (px)
Citation preview

#201 Migun-Techno-World, 533 Yongsan-Dong, Yuseong-Gu, Daejeon-City, KOREA 305-500 Tel: 82-42-861-1687, 1688 Fax: 82-42-861-1689 http://www.coxem.com E-mail: [email protected]

Table of contents
Before using this Product, Please be sure to the Caution and Warning in Section 6.
1. Components ---------------------------------------------------
2. Names of parts
2-1. Front Side --------------------------------------------------
2-2. Back Side ---------------------------------------------------
3. How to use Ion Coater
3-1. Using Buttons ----------------------------------------------
3-2. Sequence of Coating --------------------------------------
3-3. Coating -----------------------------------------------------
3-4. Time to reach the Vacuum --------------------------------
3-5. Checking Error ---------------------------------------------
4. Replacing the Target -----------------------------------
5. Cleaning the Vacuum unit (Chamber) ----------------
6. Caution and Warning ----------------------------------
2
3
4
6
6
7
8
9
10
11
12
1

1. Components
Ion Coater Rotary Pump
Power Cable User Manual
2
※ Other Targets than provided by default (Pu) should be purchased separately.

2. Names of Parts
1) Vacuum Unit (Chamber, Target)
2) Main Body Case
3
2-1. Front Side
1
2

1) Vacuum Unit (Chamber and Target) 2) Display LCD 3) Touch Buttons
• Start : - Start Coating with a beef : Press the button for 2~3seconds. - Emergency Stop : Press the button for 3~5 seconds in Coating progress. • Up & Down Arrow : Change Target, Current, Time values. • Set : Select items of Target, Current and Time.
4) Soft Push Power Button for Off/On LED display - OFF (Press the Push button for 2~3 sec in Setup mode, then turned off LED with a beef.) - ON (In the Off state, press the Push button.)
4
2-2. Top Side
1
2 3
4

1) Main Power Cord and Switch. 2) Fuse Holder 3) Power Cord for Rotary Pump 4) Vacuum Valve Connector - Connect the Rotary Pump Hose and the Vacuum Valve
using by NW16 Clamp. ※ Request A/S when moving the installation; #201 Migun-Techno-World, 533 Yongsan-Dong, Yuseong-Gu, Daejeon-City, KOREA 305-500 Tel : 82-42-861-1687, 1688 Fax : 82-42-861-1689 http://www.coxem.com E-mail: [email protected]
2-3. Back Side
5
1 2 3 4

3. How to Use Ion Coater
3-1. Self Diagnosis
6
First, "ON“ the Main Power Switch on the back side.
1) ① POWER OK! with Power Check Beep.
2) ② Vacuum Sensor OK! with Vacuum Check Beep.
3) ③ Touch Program OK! with Switch Check Beep.
4) Enter into Set Mode, at the end of the 3 steps Self Diagnosis above.
① ② ③

1) Main power switch "ON"
2) Setting mode : If main power is On, Enter into Setup mode on LCD.
4) Setting Current : ① Select Current by pressing Set
button in Setup Mode. ② Set Coating Current Values by
Up, Down buttons. ③ Range : 1 ~ 9㎃ (1㎃ increments)
5) Setting Coating Time : ① Select Time by pressing Set
button in Setup Mode. ② Set Coating Time Values by Up,
Down buttons. ③ Range : 10 ~ 300sec (5 second
increments)
3-2. Using Buttons (shown in Section 2-2)
7
6) After setting Target, Current and Time, press Start button 2~3 sec,
then Coating is started with beep sound.
- Emergency Stop : Press Start button 3~4sec during Coating, then
stopped with displaying “CANCEL”.
7) In the main power “ON” state, you can off LED by pressing the
Soft Push Power button during Setup Mode. - OFF (Press the Push button for 2~3 sec in Setup mode, then turned off LED with a beef.) - ON (Press the Push button in the Off state.)
<Fig. 1>
<Fig. 2>
<Fig. 3>
3) Setting Target : ① Set Target using by Up, Down
buttons in Setup Mode.
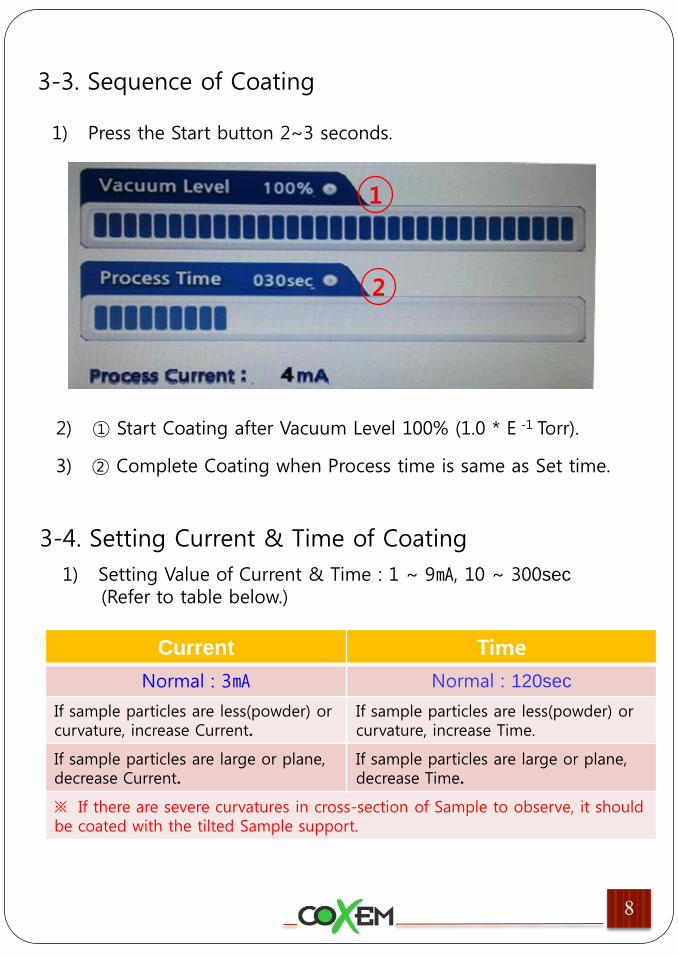
1) Press the Start button 2~3 seconds.
2
1
2) ① Start Coating after Vacuum Level 100% (1.0 * E -1 Torr).
3) ② Complete Coating when Process time is same as Set time.
3-3. Sequence of Coating
1) Setting Value of Current & Time : 1 ~ 9㎃, 10 ~ 300sec
(Refer to table below.)
3-4. Setting Current & Time of Coating
8
Current Time
Normal : 3㎃ Normal : 120sec
If sample particles are less(powder) or curvature, increase Current.
If sample particles are less(powder) or curvature, increase Time.
If sample particles are large or plane, decrease Current.
If sample particles are large or plane, decrease Time.
※ If there are severe curvatures in cross-section of Sample to observe, it should be coated with the tilted Sample support.
3-5. Time to reach Vacuum 1.0*E -1 Torr:
1) within 3 minutes.
3-6. Check Errors
1) “V-Sensor Error": Generated Vacuum Fault. Request A/S. 2) “Touch SW Error": Generated touch program error. Request A/S.
※ Request A/S : #201 Migun-Techno-World, 533 Yongsan-Dong, Yuseong-Gu, Daejeon-City, KOREA 305-500 Tel : 82-42-861-1687, 1688 Fax : 82-42-861-1689 http://www.coxem.com E-mail: [email protected]
7
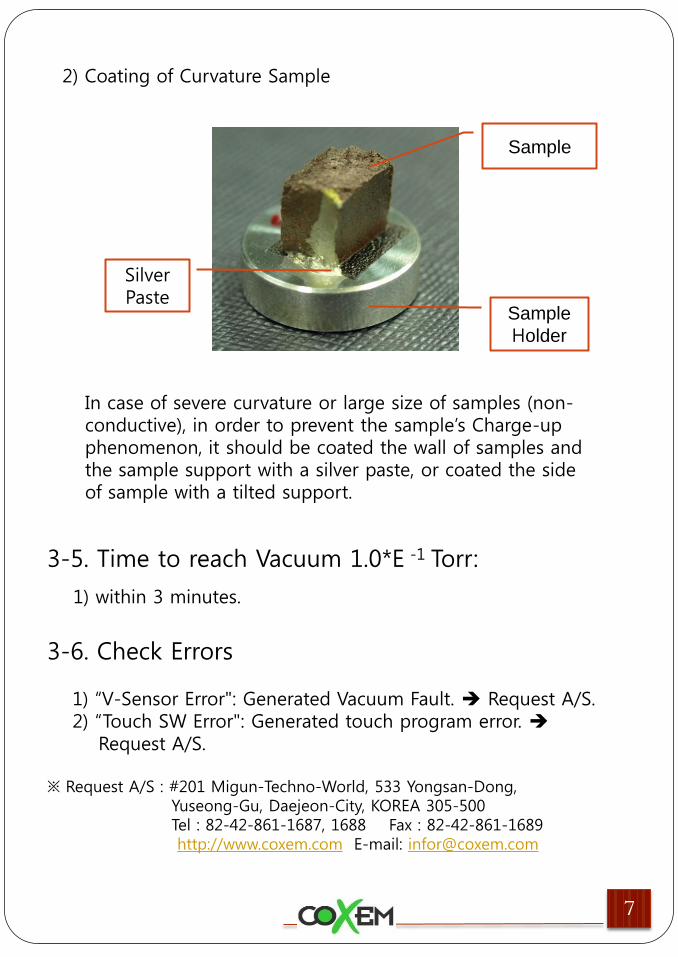
Sample Holder
Silver Paste
Sample
2) Coating of Curvature Sample
In case of severe curvature or large size of samples (non-conductive), in order to prevent the sample’s Charge-up phenomenon, it should be coated the wall of samples and the sample support with a silver paste, or coated the side of sample with a tilted support.

1) ① Confirm Target set in Setup Mode.
2) ② Thickness Coated
3) ③ Coating Time
4) ④ Setting Current Value
5) After completion of Coating, press any button to re-enter into Setup Mode.
※ After using Coating 50th, when “Clean Message” is displayed, separate the Chamber and verify Chamber status, and re-use after Cleaning. (Refer to Chapter 5.)
3-7. Complete Coating
9
① ② ③ ④
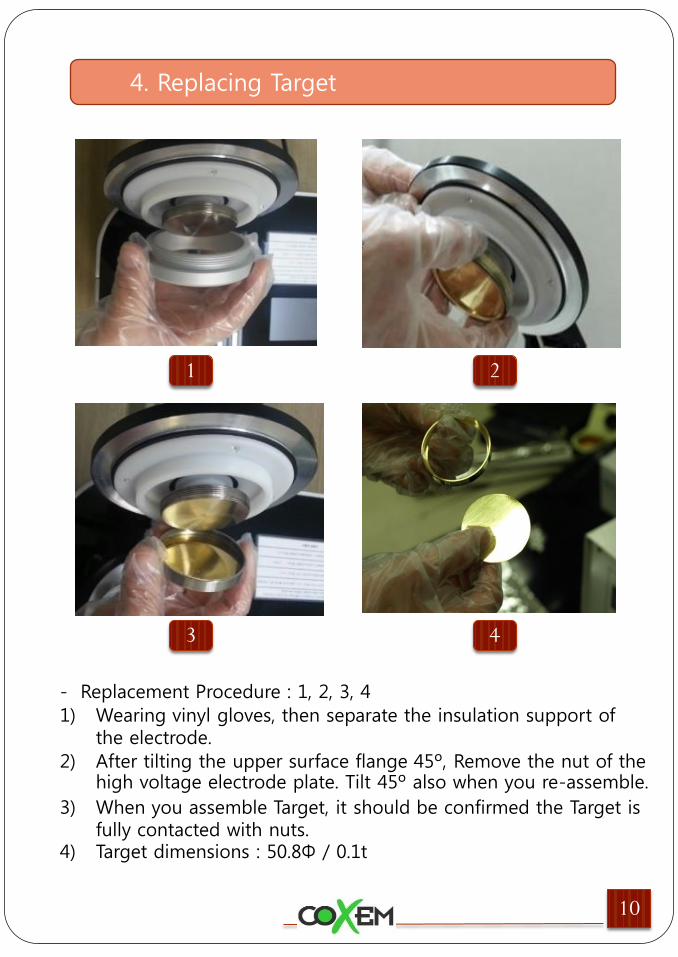
4. Replacing Target
1 2
3 4
10
- Replacement Procedure : 1, 2, 3, 4
1) Wearing vinyl gloves, then separate the insulation support of the electrode.
2) After tilting the upper surface flange 45º, Remove the nut of the high voltage electrode plate. Tilt 45º also when you re-assemble.
3) When you assemble Target, it should be confirmed the Target is fully contacted with nuts.
4) Target dimensions : 50.8Φ / 0.1t

5. Cleaning Vacuum Unit (Chamber)
1 2 3
6 5 4
11
- Replacement Procedure : 1, 2, 3, 4, 5, 6, 7
1) Should prepare cleaning air (dust removal), alcohol and wiper occurs less lint and dirt for precision equipment.
2) To apply an appropriate amount of alcohol to the wiper.
3) To clean the inside of contaminated Chamber.
4) To clean Rubber Pad after separation from Chamber.
5) To clean the Up/Down flange surface of Chamber.
6) Blow out dust all on the surface and flange which has been cleaned.
7) After applying grease to Rubber Pad inside, it should be combined with Chamber glass to re-use.
12
6-1. CAUTION
1. Should be careful on the bending of the vacuum hose at the time of installation and use. (May take a long time to vacuum.)
2. Before installing, make sure the ground wire is connected to the
consent outlet.
3. By rotating the sample stand depending on the height of the sample,
the distance between the target and the height of sample should be
maintained at 2~3㎝.
4. If the pump does not work, make sure the power switch of the pump.
5. Periodically, the target and vacuum devices should be cleaned of dust.
6. Vacuum can take a long time in case of re-use, right after awaiting in
the air for more than two days without using Coater.
1. If necessary the emergency stop during the real Coating progress,
Do not turn off the Main Power switch, but press the Start button
for 3~5 seconds to stop safely working of Coater.
2. Do not disassemble or re-assemble on your own needs. There is a
risk of electric shock. When you have a problem, please contact us
at the following;
6-2. WARNING
#201 Migun-Techno-World, 533 Yongsan-Dong, Yuseong-Gu, Daejeon-City, KOREA 305-500 Tel: 82-42-861-1687, 1688 Fax: 82-42-861-1689 http://www.coxem.com E-mail: [email protected]

7. Thickness Rate Graph
13
( Au Target )
( Pt Target )
( Pd Target )

8. Photos Measured by FE-SEM
14
PT Grain (x200,000)
Au Grain (x200,000)

9. Sample Photos Measured (FE-SEM)
15
Carbon Powder (x50K, x100K)
Fiver (x50K, x100K)
Si Wafer (x50K, x100K)

10. Specifications of SPT-20
16
Specifications of SPT-20
Power Consumption AC 220V, 300W
Weight 10 Kg
Dimension 420 mm (W)x220 mm (D)x230 mm (H)
Rotary Pump 24 L/min(60Hz), AC 220V, 100 W, 9Kg
Diameter of Target 50.8 mm
Operating Vacuum About 0.1 Torr
Maximum Ion Voltage ~ 3 KV
Ion Current 1 ~ 9 mA
Coating Time 10 ~ 300 sec (5 sec/step)
※ Request A/S if you have any problem; #201 Migun-Techno-World, 533 Yongsan-Dong, Yuseong-Gu, Daejeon-City, KOREA 305-500 Tel : 82-42-861-1687, 1688 Fax : 82-42-861-1689 http://www.coxem.com E-mail: [email protected]