Embed Size (px)
DESCRIPTION
This is a scanned version of the owners manual for the Mazda Protege
Citation preview

A Word to Mazda Owners
Thank you fo. choosing a Mazda. We atMazda design andbuild vehicles withcomplete customer satisfaction in mind.
To help ensure enjoyable and trouble freeoperation ofyour Mazda. read thismanual carefully and follow ils
An Authorized Mazda Dealer knowsyourvehicle best. So when maintenanceor seNice is necessary, thafs the place togo.
Our nationwide network of Mazdaprofessionals is dedicated to providingyou with the bestpossible service.
We assure you that all of us at Mazdahave an ongoing interest in yourmotoring pleasure and in your fullsatisfaction with your Mazda product.
Mazda Motor CorporationHIROSHIMA, JAPAN
02000 Mazda Motor CorporationPrinted in Japan Oct.2000 (Printi)@
Impoflant Notes About This Manual
Keep this manual in the glove box as a handy reference for fte safe and enjoyable use of your Mazda. Should you resell thevehicle.leave lhis nanuai with iifor the nexl owner
Please be aware that this manual applies to all models. equipment.rnd options. As aresult, you may find some explanationsfor equipmentnot installed on yourvebicle.
A1l specifications and descriptions are accurate al the time ofprinting. Because improvement is a constanl goal at Mazda, weresen'e the rightto make changes in specifications at any time without notice and without obligatron.
Air Conditioning and the Environment
Your Mazda's genuine air conditioner is filled witb Rl34a. a refrigerant that has been found not to damage lhe eanh\ ozonelayer. If the air conditioner does not operate properly, consult an Authorized Mazda Dealer.

How to Use This Manual
We want to help you get rhe most drivingpleasure from your vehicle. Yourowner'smanual, when read from cover to cover.can do that in many ways.
Illusrations complement the words of themanual to best explain how to enjoy yourMazda By reading yourmanual, you canfind out about the features, imponantsafety infonnation, and driving undervarious road conditions.
Index: A good place to start is the Index,an alphabetical listing of all informationin your manual.
Sections: This inanual has elevensections. Sections 1 through l0beginwith a brief list of contents, so you canusually tell at a glance if thal section hasthe information you want.
You'lt find several WARNINGS.CAUTIONS, and NOTES in the manual.
A warurnrcA }yARNING indicates a situation intehich serious i j ry ot death coudnsuk ifthe *arni s k isnored.
Ac,turroNA CALITION indicates a situation inwhich bodily injury or damage to
]our vehicle, orboth, could result iflhe caution is ignored.
NOTD
A NOTE proYides information andsometimes suggests how to makebetter us€ ofyour vehicle.
The above symbol in this manual means''Do not do this " or "Do not let thishappen".
s

How to Use This Manual
€+;o o:
.*'""".^
Graphicsymbols:Some of the following symbols are used to identifycontrols and displays on lourvehicle.
e'trwlIM{'\
4*
aw,*
7
ff
-
n- CS
**
'r___ruCHECK)tr
^
ff)}@
WNl:M
w*
zt).4,
-,\-/, ..
^Etil*
\;,(O)BRAKE
-


Table of Contents
Your Vehicle at a Glance
----
E
Maintenance
--
E


Your Vehicle at a Glance
YaM Ma?ia h d cohplerwhi.le, but the
design throushout coksi.lets taar sdfert and.ahlbrt partuount. This rcq4ifts naht.antroh, lotks, sraphic srnbok, nechanitusand anenities that need ta be understaod for
Se.tion I iIustrctes this infomalion to
faftilidnze lou with what iee.ls ta be knovnto help ndke toff tuabnnq safet ond easier,
Interior Oveniew t 2
Dashboard Overview I 3
Doors 1 4Luggage Companment l- 6
l-l

Your Vehicle at a Glance
Interior Overview
slnroof swnchcs* (page 3-24)
ReNieq miror (pag. 3 23)
vrn) minorlprge 5 4lJ
(page 2 30)
shilt lever (paBe 5 6) Front ear (page 2 2) Clove box (pa8e 5-39)
t-2
Your Vehicle at a clance
Dashboard Orerview
wiper and ssher leeei (Fge 5 35)Hazard Naming fa)her!{'Lh (p,ge b 2)In{rumenr cluster eage 5 :0)
Lighi conrol/Tun signah Andio systen (pa8e s-s6)
cenler console (t!ge 5-4o)

Your Vehicle at a Glance
OuGde mircrlprge I 2l I
Power aindow switches*
Outside nimr (paBe 3-21)
Froot (Passenger's side)

Your Vehicle at a clance
Your Vehicle at a Glarce
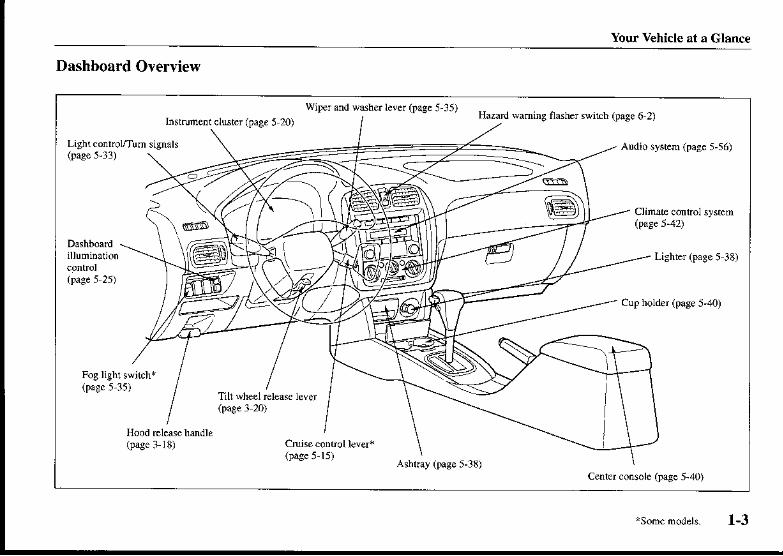
Luggage Compartment

Essential Safety Equipment
P.rsanat salery ani coaJort are ||hat nake.lrivins tour Mavla d pleasurdbleerpendce. Sectioh 2 describd esehtidlinJbmatia Ji, optihal sqfe divins incLl.lineseats, seat bek stslhs and the supplenehtal
Front Sears 2 2Rearsear 2- 5
SeatBelt Systems 2- IChild ResEaint 220
LAICH Child-Restrainl Systens 2 21Supplemental Restnint Systems 2 30
2-l

Essential Safety Equipment
Front Seats
I Seat Slide
To move a seat forward or backward.raise the lever and slide the seat to thedesired position.
A waRlrnrcSecuin! seats:Adjustable seats a d seatbacks thatare not securetr tatched arcdangero s.In a s dde stot orcouhion, the seat or seatbackcouldnow,caasing i jut!. Make sure theodjustable conpon.nts of the seatare lo.ked in place br attenpting tosline the seatforward and backwaand rocking the seatb.ck.
AwtnNmcDriv e r's S e at Ad i ustme nt:Adjusting the bit'er\ seat v,hile thewhicle is mo'ing is dangenus.Thedivet couA bse contrct oJ thewhick and have an occident. Adj|stthe dtuet's seat onlr whenthe

Essentbl Safety Equipment
I Head Restraint
I Seat Recline
To change lhe sealback angle. leanfonvard slightly while raising the l€verThen lean back to the desired positionand release ihe lever.
Make sure the leverreturns to its originalposition and the seatback is locked inplace by attempting to push it fo.ward
AwenNmcReclinins:Sittins in a nclined position whilethe rehicle it nofing is dangerousbecause lou tlon't get the fullprotection from seat behs. Duringsunnen brukins ot a cotlision, )oucan sline under the lap belt andsuffet seious intemat injudes. ForDuxinun pdecnon, sit u'ell back
A wanlrnrcHead Restraints Adj stme t:Driying with the head rcstrahttiadjusted too low or rcnoved isdangerous. With no support behitulrour head, rour ne.k could besedoustr injured in a collision.Alwars dnre with the heotr rcstraintsinsetledwhen seats arc beine usedand ,nake surc thet a.e prcperl!adjusted.
ACAUTIONWhen retuming a real reclinedseatback to its upright position, makesure you support lhe seatback whileoperating lbe seatback lever Iftheseatback is nol supporled, irwill flipforward suddenly and could causelnjufy.

Bssential Sfety Eqnipmeni
@\t--lG-6\\:+:lb_ @
V Height adjustment
To raise a head restraint. pull it up to the
To lowe. lhe head reslrainl. press thestop-catch release. $en push rhe head
Adjust tbe head restraint so tha! the topparallels the top of the passenger's earsinever lhe passenger's neck.
I Seat Tilt* (Driver's Seat)
The seat bottom angle can be adjustedbyrotaiing rhe dial. Th€ front dial lilts ihefront of $e seat bottom upward.
The seat bottom angle can be adjusted byrotating the dial. The rear dial tihs therear of the seal bottom upward.
2-4 'sonemodels.

Eslential Safety Equipment
Rear Seat
Aw,cnMNcSta.kingCaryo:Sta.king luggage ot other cargohigherthatt the seatbacks ol puttinethings on the real package trat isdansercus. Durins sunden brukinsot aco ision,objectt can beconeprojectiles thrt nar hit and injurcpassengers. Don't stack thingshigher tha the seatbdcks or putthings on the rcar package trat.
AwtnumcSecuring Seats:
Adjustable seats a d seatbacks thalarc not securcb latched arcdangerou,'.In a sudden stop orcollision,the sedt or seatback couklnow, causins injury Make surc thealljustable tonponen* of the seatare lo&ed in place bJ attenpting tosude the seatfotwa and backwordand rccking the seatback. I Split-Folding Rear Sealback
To provide nore space in the lrunk:
l. Unfasten lhe Iap porlion ofiherear center seat belt (page 2 16).
2. Pull the lock release up and fold theseatback forward.

Essential Safety Equipment
To relum the seatbacks !o their original
1 . Lift the seatback and pusb it firmly
2. Fasten ihe lap portion of therear center sear beit (page 2,16).
AcaurroNDon't let the rear-center seat t€lttongues or buckles g€l caughtbetween th€ seatback and the rearpackage tray.
ACAUTIONDon'r ler the seat belt orbuckle getcaughibetween the seat botlom andseatback when tblding the seat. Theseatbelt and buckle could beoamageo.
NOTE
W})en you return ihe seatbacks iotheir original position:
. Make sure the seatbacks aresecurely latched by rocking the
. Make sure lhe rear seat belts can bepulled out of the retmctors. If a beltis iocked, firmly pull and release it.then slowly pull it out again.
NOTE
. Unlock the sealback before youfold it forward (page 2-8).
. Wben folding the rear,rightsealback, the rear center seat beltdoesnl have to be unfasiened.
2-6

Essential SafetJ Equipment
A wanlvnvcUnk'cked Seatback:A seatback plart an irynrtant rola i,trour prctection in a rehi.le. Leavirrgthe seatback unlocked is dangerout asit can alloui passengers to be ejeded orthmvn aroutrd a d baggage to stikeoccupa ts i a suAkn stop orcollbi , rcsuxing in sewre injwr.Afrer rctuming th? seat at anf line,even when there are no otherpassengers, ro.k ttu seatbeck to nnkeswe itis locked i place.
A waRlrlvcP a s s e n qsralLLfu ldalslalbaeL!Driving with a passe ger on the
fotded 'eatback
is danserous.Auor)ing a child to sit up on thefoued seatbatk rrhile the whicle ismoving k particulaflr dangerour. Ina su.Uen stop or ewn a minor.o ision, a chiU not in a oper seator chiu-restraint srstem and seatbett could be thnwn fonra , backor eye out of the ca. .esultins insenous injuries or death.The chiuor othel objecs itt the baggage anacould be thrcwn into otheroccupants&nd cause senous injur!. Neveralk'|| a passengerto sitor stand onthe fotded seatbock v,hile the vehicle
AWARNINGChildft and the Fotding RearJs46iPlaring vith the folding reot seats isdangercus. 1:he foldiig rcarseatbacks cannot be folded doi'tlJion inside the luggagecomparlment Do not give the carkers to chidrc and do not a otrthen to plar in the whi.lc.

Essential Safety Equipment
I Rear S€atback Inck
To lock orunlock a seatback, move ihe
NOTE
The seatback locks are part of thelrunk security systen (page 3- I ,1).
Seat Belt System
Sealbelts help to decrease the possibilityof severe injury during accidents andsLrdden stops. Mazda recommends ihatlhe driver and all passengers always wear
All of the seat belt retractors are designedto keep rhe lap/shoulder belts out oi theway when not n use.
The driver's seatbelthas no provisionsfo! child-restraint syslems and has onlyan emergency locking mode. The drilernay wear ir comfortably, and iiwill lockduring a collision.
However, the front passenger\ seat andrear lap/shoulder belt retractors oper4te intwo modes, energency locking mode andfor child'resrainr systens, automatic
Emergency locking mode
lf the belt has fully rerracled, il willalways be in ihe emergency lockingmode until you move it into automaticlocking node by pulling the belt all theway oul io its full leng$.In theemergency locking mode, the bellremains comfortable on the occupant andthe retractorwill lock in position during a
If the belt feels tight and hinderscomforoble movement while rhe vehicleis slopped or in motion. you may be inthe aubmatic locking mode because youhave pulled the belt too far out. To reiurnto the more comfonable emergencylocking mode, wait until you can stop thevehicle in a safe area, retract the beltfully to convert it back to emergencylocking mode and then again extend it
2-8

Ess€ntial Safety Eq pment
Automatic locking mode
Always use the automalic locking mode1() keep the child restajnt system fromshifting to an unsafe position in the eventof an accident. To get the seat bell imolhe automaric locklng nrode. pull irall rheway out and connect it as instl-ucted onthe child-resaaint system. hwill retractdown to tle child'restraint system andslay locked on it. See the section on chlldrestraint (page 2-20).
AwannmcNot Weafing Seat Belts:Not *'ean g a seat bek is ext emelrdengerc s. Dunng a co ision,occuqants not wearing reat beltscould hit someone or things i ridethe rehi.le or even be thrown out oIthe rehicle.Ther could be seiourlrinjurcd ot even kilted.In the sanecollision, occupants treaing seatbelts \|oua be nuch sder Atwarsweartoo seatbelt and ruke surca occupants arc prcpe r
A warurnrcSeat Belt Danared Duing anAccident:Usins a danaged seat belt isdangerous. A accident.oulddanage the belt webbing in use. Adanaged seat belt cannot proridea.lequate protection in a collision.Hare a Authorized Mazla Dealerinspe.tall seatbelt slstems in useduring an accident before the! .re
2-9

Ess€ntial Safety Equipm€nt
zTr-
-O-li\ __/ \ ,-/ \.- _/ .
AclurroNBelt relraclion may become difficultifdre belts and rings are soiled. so try
I S€at Belt Warning LighvBeep
Ifthe driver\ seat belt is not fasrenedwhen ihe ignilion switch is lumed to theON position, abeep will sound for about6 seconds and the seat bell warning lightwillremain on llnlil the belt is faslened.
If the system does not operate correc y,consult an Aulhorized Mazda Dealer
A wan-rrrylrc
T\'isted Seat Belt!:T*isted seat belts an dange.ous.Ina cotLsion, the fuU t'i hofthebehisn't tvailable toabsorb the inryct.This puts nore force on the bonesbeneath the belt,t!'hich co A breakthemot cause other seious injury o.death. Don'twear tvisted seat bel^.
I\ WARN/NG
One Belt.One Passenser:Usins one seat bell for n ore than oneperson ot a time is .lange.ou!. A seatbelt uted in this wor can't ryrcad theinpact forces prcpertr and the twopassengerc coud be crushed togetherand senoufu injuled or ewn ki .d.Never use one belt for norc than one
2-to

Essential Safety Equipment
I [roni Seat Belt Pr€tensioner andLoad Limiting SJstems
For oprimum protection, the driver andfront passenger seat belts are equippedwith pretensioner and load limiting
In moderute or greai€r frontal ornear-frontal accidents, the froni air bagand pretensioner sysiems deploysimulianeously. The preiensioners takeup slack in the front seat belts as ihe airbags are expanding. The load limiringsysten releases belt webbing in acontrolled manner 1o reduce beit force onthe occupan!'s chest.
AwtnuweI nc o ne ct P ositioni seltlLLDlb3!and Front Passenger Seat BeI^:Incofiect posi.tioning ofthe d 'erand front passenger seat behs isda ge.ous. lryithout pmryrpositioning, the front pretensionerand load liniting systems .Mnotprovide a.Ieq ate pfttection in ana.cident and this coud result itlsenous injury. Wear seat belts onlras recommended in this orjner's
AwnnumcModilicarion or resnng of thePntensioner S!stem:Modihing the components or wiingof the pretensioner srstem, i cludingthe use of electronic testi g derices isdangercus. You couw accidenblractbate il or make it inoperablctrhich
"'ould Fevent i1 fron
act ating in an accine t. Frontoccupants couu be seriouslr injwed.Neyer modify the compo ents orvinng, or use electrcnic testi gdeices on the prctensinner swkm,
2-tl

Essential Safety Equipment
NOTE
The pretensioner system will onlyaclivate in a moderale or greaterfronral or neaFfrontal collision. Itwill not aclivate in side or rear
Some snoke (non-toxic gas) willbe released when the air bags andpretensioners deploy. This does notindicate a fire. This gas normallyhas no effect on occupants,howevet those with sensilive skinmay experience light skiniritation. If r€sidue from thedeployment of the air bags or thefront pretensioner system gets onthe skin or in the eyes. wash it off
The seat belt pretensioners willonly function once. Aft.-r they areexpended. they will not work againand must be replaced immediately,even if tbere was no front seatoccupant seated at the time.
A wamrnrcP rcte nsion e r S r ste n Di spalal:I nproper disposal of theprctensione. s!ttem or a tehi.le withnon4eatti'ated prcte sioners i!dange,ous. Unless all saf.t!prccedures ore Iottoved, injur!couu result. Ask an Authoi$dMazila Dealer how to safel! .lisposeof the pretensioner srsten or hov toscrap a front pntensioner-equipped I Front Seat Belts
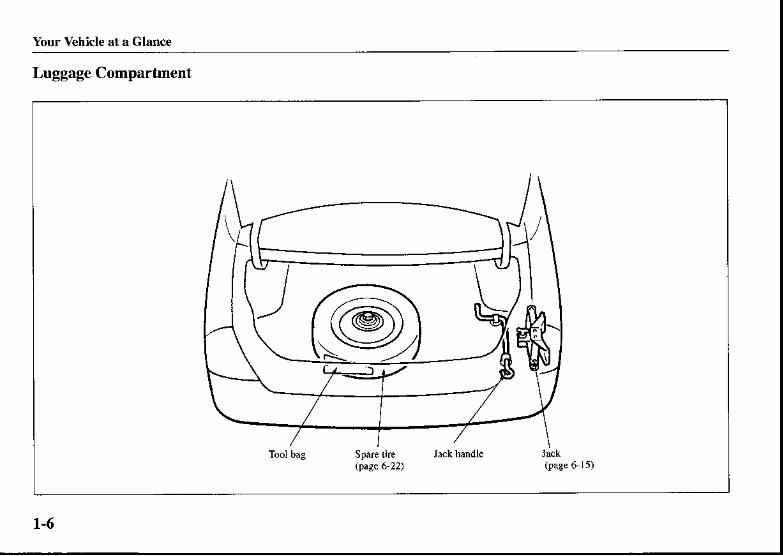
To fasten:
l Grasp the buckle and tongue.
2. Slowly pull out the lap/shoulder belt.
3. Insen the tongue into the buckle until
4. Make sure tbe shoulder belt is snuglyfitted against your body.
2-12

Essential Safety Equipment
AwtnMNcPositioning the Shoul4er Portion olthe Seat Belt:I nproper positioniag oI the shouderpoftion of the seat belt is dangerous.An inproperry positio ed belt wiAprcvide liale or no protection i aco ision. Abears nake sure theshouAer portio of the seat beh ispositioned across Jol1r shouuer an lnaar rour neck, but newr underJour am,onrowneck,or on rour
Adjust ihe height of $e shoulderbelrif|he seat belttouches your neck, if itcrosses your am instead ofyourshoulder. To raise the shoulder beltadjuster, push the adjuster up. To lowerthe sboulder belt adjuster push rhe buttonslide it down. Make sure the ddjuster is
2-t3
Essential Safety Equipment
A I,yARNING
P osition ing the LaLPortioa4l\hcSea, Belt:The lap portion of the seat belt womtoo high is da gerous.In a co ision,this would concentrate the impactlorce directlr o the abdoninal arca,cauting teiow injury. Wear the lappo.tion of ,he beh snuglr and as lotr
Depress lhe button on the buckle.
NOTE
If a belt does not fully retract, inspectii for kinks and twists-
I Rear Seat Belts
V Outboard positions la/shoulder belt
To fasten:
I . Cmsp the tongue and pull it to thedesiredlength.
2. Insert this tongue into the buckle unrilyou hear a click.
3. Make sure the shoulder belt is snuglyfitted against your body.
2-t4

Ess€ntisl Safety Equipment
T}e retractor will take up excess belr and
To unfastenr
Depress the button on the buckle.
NOTE
If a belt do€s not fully r€rract, jnspeclii for kinks and twists.
AwtnvlrycPosinonina the Shotaer Pottion o!the Seat Belt:Inpnper positioning of the shoddetpoftion of the seat beh is dangercus.An improperlr positioned belt.tellproyide liUle or no prckction in acomsion. Alwars nuke i rethethouder ponion o! the seat belt ispositioned acnss Jour shouider andnear Jour neck, but newt un lerlour arm, on lour neck, or on lour
A w,mlrascPositioning the LaLPation of theSeat Belt:The lap portinn of the seat belt womtoo high h dangercus.Ina collision,thir wouu co centrate the impactJbrce dircctlr on the abdoninal ffea,ca sinS senous injury. Wear the lapportion of the belt snuglr and as low
2-15

Ess€ntial Safett Equipment
A wamrnrcFanenins the Rear-Centel Seat BeltOnl! with one BueHe:Fastening the .eat-ce ter seat beltonlr with one buckte is dangerous. Ifonlr one pair oI seat bett tongue .n lbuckle, either tongue (A) and a chorbuckle (B) or tonsue (C) and.nchorbuckle (D), is faste ed, the seat beltcannot providefu protection. In asu(Aen stop or collision, the usercouu slide un.ler the belt and suJfers.nous injunes. Al','ars nake surethat both pain of seat belt tonguesand buckles aslaste ed properlr.
V R€aHent€r position lap/shoulderbelt
To use the rear-center belt:
Before using the rear-cenler lap/shoulderbelt make sure tongue (A) and anchorbuckle (B) are fastened.
To fasten:
1. Grasp ihe buckle (D) and longue (C).
2. Slowly pull our the lapshoulder bett.
3. lnsert the tongue (C) inro the buckle(D) unlil you hear a click.
2.16

Essential Safety Equipment
To fasten the lap bet portion:
Grasp tongue (A) and jnsen it into theanchor buckle (B) unlil you hear aclick.It is now secure for passengeruse.
NOTE
After retuming lhe rear-left seatback10 i1s upright position. fasten the lapportion of the belt.
Depress the button on the buckle.
To unfasten the lap portion:
Insen a small object in the anchor buckle(B) slot. such as a key.
NOTE
Always unfasten the lap portion of thebeli before folding the rearleftseatback. kaving the lap portion ofthe belt fastened could cause damage
2-17

Frsential Safety Equipment
AwtnvtucUnnecessarr Ute ofa Exte der:Usi g a seatbelt ertendq when not
ecesrary is dtngercus-The seat beltwiA be bo long a d notfrt properb|In an accdent, the seat belt rill notprcride adequate prcte.tion and foucouu be senouslt injured. Onlr usethe extender when i.t is rcquircdtofasten the s.at belt prcperlr.
I Seat Belt Extender
lfyour seat belt is not longenough, evenwhen fully extended, a seatbelt extendermay be available to you at no chargefrom your Authorized Mazda Dealer.This exienderwill be only for you andfor ihe panicula.r vehicle and seat. Evenif it plugs into other seat belts. it may nothold in the critical momentofa crash.When ordering an extender, only orderone ftat provides the necessary additionallength to fasten the seat belt properly-Please conlact your Authorized MazdaDealer for more information.
AWARNINGUsino an InpropcrE landq:Asing a seat belt extendet that it fo"another peno,t ot a different rehicleor seat is dtnge0us.The seat beltwill not provide adequate pmtectiona d the usercoua be serioustrinj red in an accident. Onlr use theextender prcvided for rou and for theparticular rehicle and seat. NEVERuse the extenderin a diliennt
2-r8

Essentiai Safet! Equipmenr
A waruurlrcUsin! an Extender Thtit ir Too Lone:Using an efiender that is too lotg isdangercus. The seat belt will notfitproperl). In an accident, the seat berwi not protiide adequate protectionaul lou could be seiousl! injured.Don't use the ertendet or choose o eshorter in length if the distutncebetwee the extender's bucklc a dthe cente. of the user's bodJ is kss
I Pregnsnt Women and Persons withSerious Medical Condltions
Pregnan!wonen should wear seat belts.Ask your doctor foi specificrecommendations. The lap belt should beworn SNUGLY AND AS LOw ASPOSSIBLE OVER TI{E HIPS.
Persons with serious medical conditionsalso should wear seatbelts. Check wiihyour doctor for any special instnrctionsregarding sp€cific medical condjtions.
2-19
Ess€niial Safety Equipment
NOTE
Your Mazda is equipped with LATCHlower anchors for allachment ofspecially designed LATCHchild-restraint systens in $e outboardrear seats. Anachment of LATCHchild restralnt sysiems should all filthe oulboard positions. A childrestrainl system with LAICHanachments cannor be installed in therear center positionunless the seatbelts are used instead. When usingthese anchors to secure achild-resiraini syslem, refer to"LATCH Child-Restraint Systens"(paze 2-21).
A wanlrnrcHolding a Chia white the Vehicte itMoing:Hodins a chiu in rour atms vhiletha whicle is noins is ext.enelrdangercus. No nutter ho$, strong theperson nut be,he or she cannot houonto a chiU i asudden stop ortolision and it coud res ltinseious injury or death to the child orother o.cupants. Ewn in a moalerateaccident, the child mar be exposed toab bas Iorces that couA nsult inserious injury or daath to the child,or the chiu nat be slanned into theadult, injuing the adult. Altroltsecuft a chid in a ptupe.c hild-re straint s r ste n.
Child Restraint
I Child Restraint Precautions
Statistics confirm that the rear seai is thebest place for all children up io 12 yearsof age-tbe more so with a supplenentalrestraint system (air bagt.
A wamrnrcOne BeIt- One Passenger:Using o e seat belt|br more thano e person ata tine is dangercus. Aseat belt used i,t this Ha! can'tspread the impactforces ploperryonil the twopassengers couu becrushed together attd seriouslrinjured ot even ki ed. Neret use onebeltlor nore than one person at a
2-20
Essential Safety Equipm€nt
A wanlunycP I opcdize lf eltild.R e s t ruhtSJst rr..
For eJfective prctection in r.hicleaccidents and s dden stops, a childnust be prcperlr rcsbained using aseat belt or chiA-restraint s}ste,ldependins o ase and ske. If not,the chid coud be seriouslr injuredor eren killed in an accident.
Ac.lurroNA seat bel!or child-restralnt sys|emcan become very hot in a closedvehicle during warm weafter. Toavoid burning yourselfor a child,check them before you oryourchild
V Small children
You are required by law to use achild'restr3int system for childrcn in theU-S. and Canada. Small children,generally those who are four years old or)ounger and who weigh under l8 kg (4O1b). riding in your vehicle. rnus! beprotected by child-restraint systems madeespecially forchildrcn. Check your localand state or provincial laws for specificrequirenents regarding $e safety ofchildren riding in tour vehicle.
V Older children
A child who has outgrcwn child-restraintsystems should sit in the rear and use seatbelts, both lap and shoulder.Iftheshoulder belt crosses the neck orface.move lhe child closer to the center ofrhevehicle in the outboard seats. and rowardsthe buckle on the right if rhe child isseated in the cenier sea!.
2-21

Essential Safety Equipnent
A waRlrnrcFo ow the Manufacturcr\Instructions and Alwa\s Keep the
C hid-Restraint Slstem BucuedDp!4!An unsecured chiA-rcstraint srstenis dangerous.In a sadden stoporaco ision it could now caasingsefious injury ordeathtothe chiu or
Make sure the child-.estraint sJstenis proryrb secured in pLaceaccording to the chiuaestni tsrstem ma ufacturer's instructions.When not in use, nmore itlrom thewhicle o4.tun it with a seat belt, orbt.h i! dogn to BOTH LATC H
I Child-Restraint Syst€ms
Wlatever child resrrarnr system youconsider. please pick fte appropriat€ onefor the age and size ofthe child, obeystate law and follow the inslructions tha!come with the individual child-rcstraint
A rear facing child-restraint sysl,emshould NEVER be used in the front seatbecause ii would be too close to the airbag. The front passenger's seat is also theleast prefened seat fbr otherchild-restraint systems.
A wenlgr.r'rc
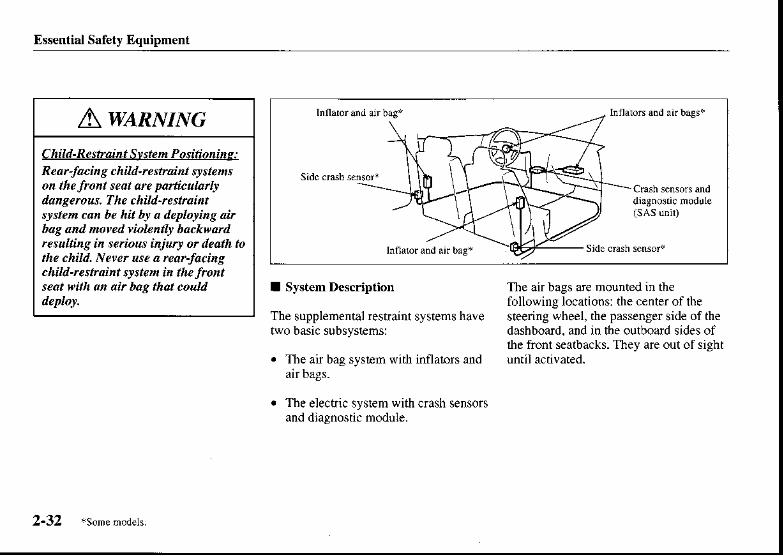
Reaft F ac ing C hild- Re etuint S! ste n :Rearfacins child-lestnint srst nson the tont seat are partic ul4rlrdan ge rcu t. The c hiuae straintsrstem can be hit br a deploring airbag and moved iole tlr ba.krardrcsulting in seious injury or death tothe chid. NEVER use a rcarfacinschiu-restruint srsten in thefrcntseat $,ith an air bag that coLA
2-22

Ess€ntial Safety Equipment
I Installing Child-Restraint Slstems
Accident statistics reveal that achild issafer in the rear sea1. The frontpassengeas seat is cl$fly rhe worstchoice for any child under 12, and withrearfacing child-restraint systems il isclearly unsafe due to airbags.
Some child-restraint systems now comewith tethers and therefore must beinstdled on lhe seais thai take tethers tobe effective. In your Mazda. tetheredchild-restraint systems can only beaccommodated in tbe three positions on
Sorne child-restraint systems also emplo]specially designed LAfCH attachmenls;refer to "LATCH Child-RestraintStslems" (page 2 27).
Awtnu^tcTethercd C hia-Resttuint S$temswo* Onb on Rear Seat:Insto ation of a tether equippedchiu-rcstraint ststem in the fuo tNtsenger\ seat delbats the safetrdes;gn ofthe srsten and wi resultin an incleased chonce ofseiousinju.r if the chiaaestruint srstensoes foNad without benefit ofbeing tethercd. Place tether equipped.hild-restruint slstens wherc therc
AwenumcSeating Positiotr t!,ith S le Ab Bag:A owing anrone to lean orer oragainst the front door is dangercus.If the yehicle b equrrped h,ith sideair boes, the inpact of an infutingside ab bag could cause seriousWury or death to the percon.Chiuren arc norc likelr to sleepinthe vehicle; when ther do,ther aRnofe at sk in the ffont passenge.'sseat that has a side air bag becausethe! nu! slump owr i,tto th. poth oIthe seatba.k-nounted air bag. If achiucan't be seated in the rear, donot a oh, the chid to lean ovat oragdinst the front door, eve if thechid is seated in a chiA-ftstraint
2.23

Essential Safety Equipment
3. Inspect this function before each useof lhe child-restraint system. Youshould notbe able to pull the sboulderbeh outofthe relracior while thesystem is in rhe auromatic lockingmod€. When you remove tbechild restraint system. be sure the beltfully retracts lo retum the system toemergency locking mode beforeoccupants use ihe seal belts,
V Rear seat child-r€straint systeminstallation (Lap'/shoulder belt)
Follow lhese instructions when using achild restraint syslem, unless you areauaching a LATCH equipp€dchild-restrain! system to the rear LATCHlower anchors. Refer to "LATCHChild-Restraint Systems" (page 2-27).
l. Secure the child-restraint sysien withthe lap podon of the I adsboulder belt.See fte instructions on thechild restraint system for beli routing
2- To gel ihe retraclor inlo the automaticlocking mode. pull the shoulderbellporrion of the seat belt until the entirelength of the belt is out of iheretractor Push the child restrainisystem firmly into $e vehicle seat. Besure lhe belt retracts as snugly as
possible. Clicking from the retraciorwill be heard during retra.iion iftheslslem is in the aulomatic lockingmode. If the belt does noi lock the seatdown tight. repeat th's step.
NOTE
Follow the child resiraini syslemmanufacturer's instructions caref ully.lf you are not sure whetber you hav-- aLATCH system or tether, check in thechild-restraint system manufacturer'sinstructions and fbliow themaccordingly. Depending on the type ofchild resiraint system. itmay notemploy seat belts which are inautomaric locking mode.

Essential Safety Equipment
For earngbl sal ror rear len $d
4. Ifyour child restrainisysiem requiresthe use ofa |elher strap, hook thel,ether strap by following thenranulacturer's inslructions.
V If you must use th€ FRONT SEATfor children
Ifyou cannot put ali children in the rearseal. al least put lhe smallest in the rearsea! and be sure the largest child up fronruses lhe shoulderbelt over rhe shoulderDo not put reaFfacing cbjld,resrrainrsystems on the fronr passenger's seat.This seat is also not set up for tetber€dcbild-restraint sysrems. put them in oneof the tbree rear seat posirions set up wiih
Don't allow anyone 10 sleep against theright front door if you have an optionalside airbag. itcould cause seriousinjuries to an out ofposition occupant.As children more often sleep in cars, it isbetler to put them in the rear seai_ Ifins(alling tbe child-restraint system onthe front seat is unavoidable, follow rhesenstruclions when using a front-facingchild reslraint system in the front
:sone modek. 2-25

Essential Safety Equipment
AwtnNuvcRe ar- F acing C hild-Re sttuint S! ste n :Rearfacing child-restraint srstenso the lront seat are particula jdange rcu s. T he c hild-re straintsrstem can be hit b! a deploring airbag and nowd violentlr backwaresulting in senous i jury or death tothe chid. Newt use a rear-locingchild-rcstraint trsten in the frcntseat eilh anair bae thatcould
To check ifyour Mazda front seats haveside air bags'every Mazda side air bagwill have a"SRS Air Bag" label on theou$oard shoulder of the liont seats.
rl^wl,nr,uucSeatins Position vith Side Air Bag:A oeing anrone to lean orq o.aeainst the front door is dangercus.If the t'ehi.le b equipped with sideair bags, the impact of an i,tlatingside ab bag couu cause senousinjury or deoth to the person.Children are more likelt to sleep inthe t'ehick; h,hen the! do, the! aremore at .isk in the front passenger'sseat thet has a side ab bag becausethej mal slump o't into the path ofthe seatback-nounted 4h bae. If achu can't be seated in the nar, donot dlow the chiA b kan over oragainst the fmnt door, eren if thechiu k seated in a .hid-.estraint
A wanlunvcFrcnt Passenger's Seat Posuion:As tot whicle has front air bags anddoublr so becaue !oa. whi.le hasside ab bass, a frcnt-tacins.hu-restraint slsren shouu be pa onthe front seat onry ,'ehen it isunavotlable- Ahta]s mow the seat as
Iar ba* as possibla, because the forceof a deploJing oir bag cou.lt causeserb s injuq or daath to the chiw
2-26

Eslential Safe!] Equipment
3. To gel the reEaclor into dle automaticlocking mode, pull dre sboulder tEltponion of the seat belt unhl fte entirelength of lbe belt is out of ine retactorPush ille child resfaint system finirlyinto he vehicle seat Be sure the belrrctracts as snugly 3s possible. Clickingfrom dre reu?clor will be heard duringrchction if lhe syslem js in aubmaticlocking rnode. If dre belt does not l(rkdle seat down righ! reFat rhis srep.
4. hspec! ihis lincrion before each use ofdre child restrain! sysrem. You should norbe able to prtl the shoulder b€lt out oflhe reu€clcr while fie system is in iheauircmatic lffking mode. When yourcmove the ciild restsaint system, besure tlle belt fully rctracrs io letum thesystem trc emelgency locking modebefore ecuparts use the seat belts.
LATCH Child-RestraintSystems*
Your Mazda is equipped wilh LATCHlower anchors for attachment ofspeciallydesigned LATCH clrild restraint systemsin the outboard rear seats. Attachment ofLAICH child-restraint slstems should allfit the outboard positions. Achildreslraint system with LAICHaltachments cannot be installed in therear cenler position unless the seat behs
Both anchors must be used, otherwise rheseatwillbounce around and pur the childin danger. Some LATCH child,restraintsystems must also be used in conjuncrionwirh a tether to be effecrive. If they havea tether you must use it to better assureyour child's safety.
V Front pass€ng€r's seatchild-restraint system installation(Laplshoulder belt)
l. Slide $e seatas far back as possible.
2. Secure the child reshaint system wih thelap poiion of lhe lapshoulder beli. Seethe insmctions on the chlld restrainrsystem for bell routing instructions.
NOTE
Follow the child resmint sysemmanulacnnef s instuctions carefu lly.Depending on lhe type of child-restraintsystem. 11 may not employ seat belrswhich arc in automatic lftking mode.
son. n.oer . 2-27

Ess€ntial Safety Equipment
Aw,qnNucAttachins T||o Chiu-Restmi tSlstens to the Sane LATCH LowerAn.hor:Attaching tt'o child-restraint slstemtto the sane LATCH lover anchor isdangerous. In a.olision, onean.hor na! not be strong enough tohold two child-nst,aint slstenattachnents an.I na! break, causingserious Wury or death.Ifrou usethe seat position for anotherchild-restraint s$ten when otoutboard LATCH position isoccupie.l, use the cente. reat beltsinstead, and the tether iftether
Awz^nxmcM an ufactu.e r's I n s tru.tion s forChild-Rertnint S!sten:An unsecured chiu-.est.aint ststemis dangercus.In a sudden stop oracollision it coud nove causingserious injur! ot de.th tothe.hiA or
Make sun the chid-rcstruint srstenis ptupe t sec red in placeaccording to the child-rcstnints! ste m ma n ufac tu rc r' \ in t truc tion r.
A waR.rrnrca nsecurcd C hid-Resttuint Slsten:An unsecurc.l child-restrai t sJstemis dangerous. I a sudden stop or aco ision it could nove ceusingserious injury or death to the child or
Fo oi' the chiA-restroint sfstemnanufacturet's instructions on beU.outing to secure the seat just as louwoud vith a child in it so thatnobod) ii tempted to put a chiu inan inprowrb secured seot later on.When ot ]n use, rcnove it|ronthevehicle or fatten it h'ith a seat beh, orlatth it dovn to BOTH LATCH

Essential Safety Fiquipment
.{-+Awl.nr,rilvcLATC H C hi ld- R e s traint S! ste ns :N ot foltov ing the chiH- rc stnhtsr s te n nan ufac tarer's instructionswhen instaling the thid-rertnintsrstem ts dangerous. If seat belts ot aforcisn object p.erent the chia-resbai t slstemfron behg secwel!auached to the LATCH lowetanchors and the chiLl-restraintsrsten it insta ed inprcpe )', thechiu-restftint tlstem couA mow in. sudden stop or.o ition cauiingseious injury or death to the thid or
When instaling the chiu-restraintslstem, make sure therc are no seatbetts .rrforcign objects near otaround the LATCH lower anchors.Alwars fo0ow the chiu-resttuintsr stem manufactule r's in struction s.
NOTE
The markings above the LATCHlower anchors indicate the locationsof LAICH lower anchors for theattachment of a child resrraint system.
2. Secure the child-restfaint system usingBOTH LATCH lower anchors,following the child-restraint systemmanufacturer's instruction.
I Child-Restraint System lnstallationProcedure (Using the LATCH
L Expand the area belwe€n rhe seatbottom and the seatback sligbdy toverify the iocalions of the LATCH
t-tq

Bssential Safety Equipment
3. Ifyour child-restraint system caneequipped with a tether, tbatprobablymeans it is very impotanr to properlysecure the tether for child safety,please carefully follow thechild-restraint system manuf ac!urer'sinstruclions when installing tethers.Only lhe 3 rear seatpositions on lhisvehicle are set up for tethers, allLATCH child-restraint systems are
fully compatible only witlr the tworear oumoalo sea6.
Supplemental Restraint Systems
I The fmnt and side supplementalrestraint systems include 4 dr bags.They are located in:
. The steering wheel
. The passeng€r side dashboard*
. The outbosrd sid€s of th€ fmnt
These systems operale independendydepending on the lype ofaccideniercounteredi botb side air bags are notlikely to deploy ln the same accidentbecause a vehicle is not often hit frombolh sides. The front and side air bagsysiems will not normally deploy duringthe sane type of accident unless acombinalion of frontal and side impacts
In a front end or side impact, the air bagsupplemental restraint systems are
designed to provide only supplemenlalprotection for the driver and front seatpassenger. seat bells must still be wom.
2-30 *sone nodeh.

Essential Safery Equipment
Aw,qn^til,{cAir Bags without Seat Bela:Dependi g onlr on the air bags forp.otettion duing an accident isdangerous. Alone, air bags ma! notprcvent seious inider. Theawropnak ab bags can be erye.tedto in|tate onlr during atontal, sineor neat-ftontal collision of at leastnoderate force. Uehicte occupantsshouA al'vars wear seat beks.
Without seat beli usage. the air bagscannot provide adequate protecliondu'ng an accident. Seaibelt usag-. is
. Keep the passenger away from aninflating air bag.
. Reduce the possibility of injuriesduring an accident that is nol designedfbr air bag inflation. such as roll-over
Reduce the possibility ofinjuries infronlal or side collisions that a.re notsevere enough to activate the air bags-
Reduce the possibility ofbeing thrown
Reduce the possibiliry ofinjuries tolower body and legs during anaccident because the airbags allowsno protecnon to trrese parts.
Hold the driver in a position whichallows better control of the vehicle.
Small children, those under 18 kg (10 lb),should be protected by a child restraintsysten (page 2-20).
Awz.nutueChild in the Frcnt Seat:Placing a chiu, 12 rears or under, inthefn t seat is dangercus.The childcouu be hit br a deploti gairbagand be seiouslt injurcd or ewnki ed. A sleeping chiA is morc likelrto lean agdinstthe doot and be hit brthe side air bag in a moderate,right-sine c ollis ion. Wheneverpossible,al|'ars secure a ehid 12
rears and under on the /ea. seat withan apprcpriate chil.l4estruint slstemfor the child's age and size.Never use a rear-facinschild-restruint sytem on the hontseat with an ab bag that could
2-3I
Essential Safety Equipment
AwtnNnteC hild- Re straint S $te n P ositioning :Rea*faci g child-restraint srstenron thefront seat are patticula rdanee rous. T he c hiu-re straintsrsten cM be hit br a deploti g airbag and noved iolentl| batkvardrcsuttins in serious injurr or death tothe cdld. Net'er se a rcar-facingchild-nstraint srsten in the ftontseat *ith & air bag that couu a System D€scription
The supplemental restraint systems havetwo basic subsyst€ms:
. The air bag sysl,em with inflalors andarr bags.
. The electic system with cmsh sensorsand dlagnostic module.
The air bags are mounted in thefollowing locations: the center of thesteering wheel, the passenger side ofthedashboard. and in tbe outbodrd sides ofihe fronl seatbacks. They are out of sight

Essential Safety Equipmenr
Awnnt'tmeSeanng Positiotr with Front AitE!c$Sittinq too close to the ait baqstorage compatlme nts or placinghands orfeeton then is extremelrdangenus. Flont ab bass infute|'ith grcatforce and speed.Seious injunes couu otcut ifsomeone is too close.The dirershouu alwars hold onto onb the rimof the steerins vheel. The ftont seatpassenger shouu keep both feet onthe floor Front seat occupantsshoutd sdjust thet sea^ as fff backas possible and alwars sit upnghtryainst the seatbacks with seat beAs
I How the Air Bags Work
When airbag cr3sh sensors detect afrontal or side impact of greater ihanmodera!€ tbrce. an electrical curent issent to the inflators. Nitrogen and argongases are produced to inflate the airbags.Alter the inflalion, the airbags quickly
The airbags will functjon only once.After that. the air bags will not workagain and must be replaced.
Only an Authorized Mazda Dealer can

Essential Safety Dquipment
NOTE
w})en an air bag deptoys. a loudinflation noise canbe heard and somesmoke will be relersed.Neidrer is likely to cause injury.however. lhe texture of the air bagsmay cause light skin injuries on bodyparls not covered with clothingthrough friction.
AIryARNlNGSeating Positionwith Side Air Bags:Sitting too ctose to the sde air bagstorage conpa4ments or plecinghands on them is extrenel!dangerous. A side air bag inllatesvith gnat for.e and speed dircctl|out of the outboard sho Aer of thefront teat and.rpandt atons theftont door on the side the cat h hit.Sefious injur! coutd occut ifsoneone is sitting too ctose to thedoor orleaning agai sta wi dotr ittthe frcnt seats or if rcat seotocc pants srab the sines ol the fronlseatbacks. Furthemorc, sleeping upagainst the .loor ot hanging out thediver\aide wi,tdow while driringcould block the side air bag andelininate the adra tages ofsqrplemental prctectinn. Give thesae abbags room to vork br siftingin the centerofthe seat whil. thewhi.Ie is moving vith seat belts
A waRlsnrcHot Ai Bag I llaton:Hot ab bag inJlaton are dangero s.
InmediatelJ altet inflation, theinflators in the skenng wheel,doshboad ot the seatbacks are veryhot, Youco aget bumed. Don'ttouch the inte al conponents oftheai bag storase anas after the bags

Ess€ntial Safety Equipment
Awz.nxmcModification of the Suppkraea@!Restraint Srsten:Modifring the co,nponents o. wbingof the Mpplenental restruitt srstemis da gerolts. you couu accidentall!actfuate it or make it inoryrable-Don't nake an! nodi|ications to thesupplemental rcsttuint slstem. Thisincludes instaling tnn, badges, oranrthi g eke overthe ab bagstorage arcas. It alx' inclu./lesinstolling extru electic equipment oor near slstem components orwiring.An Authorized Maz.la Dealer canprori.le the special cdrc needed inthe renowland i stalanon offrotttseats.It is inpoiant to pntect theside oi. bag witins and connectionsto assure that the bags do notaccidentlr deplo) and that the seatsletain an undanaged ab bae
Awl.nrylr,tcInsta ation o! Front-EndEqaitaeal:Insta ation offto t-end equipnent,such as frontal pntection bal(kangoroo bar, bul bar, push ba\etc.), snoflplo*, or $'i ches, isdangerous. The air bag cnsh sensorsrsten couhl be affected. This co A.ause ab bags to infute
eryectedlJ, or it co A prevent lheair bass fron intladns dudns anaccident. Front occupants could besenounr injured. Never install anrfront"end equipnent to Jow vehicte.
AwantawcFront Air Bag Storage Arcas:Attachins an object to a front ab basstoruge area or placing sonething infront of it is danserous.ln anaccident, the object could intederevith ftont ab bas infiation andWurc the oecuponts.Ali'ars keep the frcnt ail bag sto.ageaftasftee of objects.

Essential SafetJ Equipment
Aw,qnl,{tucUsing SeatCorers:Using a seat covet on the front seatsb dansercus.In a severc sdecolisiott, the seat coten couAinteterc with the sine ab basinflanon and seious it'junes couarcrult. Never use seat.owrs on the
AwtnumcSide Ab Bag Storage Arcas:Attachi,tg things to the s.at in such avar os to corer the outboard side ofthe seat i a ! va! it.langerous.Inan accident the object cou.Id intederc
'a,ith the site air bag, vhith i futes
lmn the ouJboad sine of the frot'tseats, inpeding the added protectionof the side ab bag srsten orredirccting the air bag nt a ear thatis dangercus. Funhermorc,the bagcould be cut open sw$,hg a&autLDo not hang netbags,nry pouchesor back pads vith sde rtaps on thefront seats. AIwaJt keep the sde airba8 stonSe areas in rowfrcnt seats
free to deplor in the erent of a sAe
AwnnrymcDanoged Air Bag Sensors:
D,irins with danaged air hagsensors is dansercus. A co ision,even one ot st.ong e ough to inJlatethe at brys,couudanuge these sors.Iftherevas a subsequentcollision, a dantged sensor wouunot ittfiate the air bagt. Abals havean Authonzed Mazda Dealel inspectthe s upplzmental restraint srstens
Ess€ntial Safety Equipment
Awlnr,uucS ustlatiglA4ja!fucntrAdjusnns the rehicle suspension isdangercLs. If the whick's height orth. suspension is changed, thewhicte w'll be unable to a.cu teIJdetect a collision rcsulting inincorrcct or unexpected air bagdeplornent and the possibiuq of
ACAUTIONTo prevent damage to the side air bagwiring. don'!place Iuggage or otherobjecis under the front seats.
Essential Safety Eq ipment
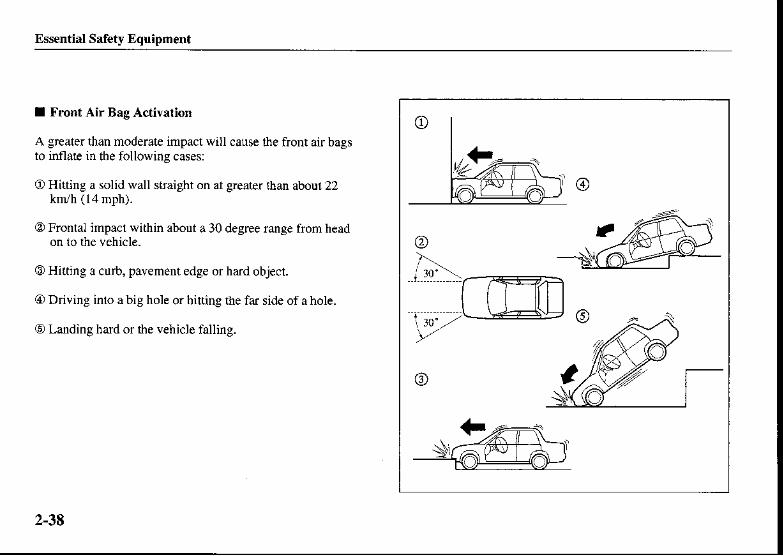
I Front Air Bag Activation
A greater than moderate impact will cause the front air bagsto inflale in tbe following cases:
O Hitting a solid wall straight on at greater lhan about 22kn/h (l.l mph).
O Frontal impacl within about a 30 degree range frorn head
@ Hitting a curb, pavement edge or hard object.
@ Driving inlo a big hole or bitting the far side of a hole.
@ Landing hard or the vehicle falling.
2-38

Essential Safety Equipment
I Limitations to Front Air Bag Activation
Depending on the severity ofimpacr, fte front air bags maynot inflate in the following casesi
aD Impacts involving trees orpoles cause severe cosmeticdamage but may nothave enough impacr to aciivate the airbag
O Rear-ending or running under a truck's tail gate may notprovide the stopping force necessary for air bag
@ Frontal offset impactto the vehicle may not provide thesbpping tbrce necessary for airbag deployment.
2-39

Essenrial Safeb Equipment
I Non-ActiYation of Front Air Bags
Frcnt ajr bags will not normally inflate in the following casesi
O Collision from the rear.
O Vehicle roll over, may deploy the side air bag(s) bul notthefront air bags.
O Impacl to ihe side, bul iirnay deploy a side airbag.
2-40

Essential Safety Equipment
I Side Air-Bag Activation
Greater than moderate jmpact to one side of rhe vehicle(driver orpassenger side areat will cause aside airbag roinflate, but itwill notnormally deploy lhe fronl airbags.

Essential Safety Equipment
I Limitations to Side Air Bag Activation
Depending on ihe severily of impact, a side air bag may noiinflaie in the following cases:
O Fronlal olTset impact may not provid€ enough side impactto deploy a side air bag.
O Side impacts involving trees or poles can cause severecosmedc damage but may not have enough impact force toactivate a ail bag,
O Vehicle roll-over may not provide €nough side force rodeploy the side air bags.
@ Side impacts wilh two-wheeled vehicles may not provideenough force to deploy a side airbag.
@
2-42

Ess€ntial Safety Equipment
I Non-Acttvation ofside Air-Bags
A side air bag will not normally inflare in the following casesi
O Collision from the rcar.
@ Collision from the front, bul it may deploy tbe front airbags.

Essential Safety Equipment
I Constant Moniloring
The following components of th€supplemenral reslraint systems aremonitored by a diagnoslic systen:
. SAS unit
. Airbag modules
. Side air bag crash sensors*
. Front se3t belt pretensioners
. Relai,ed wiring
A diagnoslic module continuouslynronilors the systems' readiness. Thisbegins when lhe ignjtion switch is lumedto the ON posilion and continues whilethe vehicie is being driven.
V Supplemental restraint systemwa.ning light
If the supplemental restaint system isOK, the SRS wsming llghl cones onwhen the ignition switch is tumed to theON position or after the engine is cranked.After aboui 6 seconds it go€s out.
A system malfunction js indicated whenthe SRS warning light conslantly flashes,siays on or doesn t come on at all. If anyof these occur, consult an AuthorizedMazdaDealer as soon as possible. Thesystem may not work in an accident.
AwtnuwcS e V- S e r v i c i n s t h e S upnle4ealaLRestruint S!stems:
Self-senicing or tampeing with thesqpkmental resttuint sistems isdsngercus, An ab bag couAaccidenta r acti,ate or beconedisabkd. This couU .ause seiouti junes. Never tanper with thesuppleme tal rcstruint slstems andalwars how a Authoized MazlaDealer pe4om. semi.ins and
2-44 "so.".oaa'.

B$€ntial Safety Equipment
A waRlrnrcRenoving InknolParts:Remot ing the ftont seat, frontdashboard, the steering $'heel orpafts co taining ab bag sensors isdangercus. These Wrrs containessentialair bag pafts. The air bagcouuo.cidenta r actiwte and causeserious injuries. A, 'ats hav..nAuthorked Mazda Deater rcnove
Aw,qnumcAi Bao Disposal:Inpropet disposol of an air bag or avehicle with lire ab bags in it can beextremelr .Iangercus. Unless aIsaletr prceedures are fonowed,injury can rcsult Ask an AuthoizedMazda Dealer ho|| to safelr disposeof an air bas or how to scnp an airbag equipped vehicle.
I Maintenance
The supplemenlal reslraint system ismaintenancejiee. But if any of thefollowing occurs, iake your vehicle to anAuthorized Mazda Dealer as soon aspossible:
. The supplemental restmint systemwarning light flashes.
. The supplemental restraint systemwarning ligbt stays on.
The suppiemental restraint system$,aming ligbt stays off when theigniiion switch is turned to the ONposltlon.
The air bags inflate
NOTE
Should you sellyour Mazda. we urgeyou 1() tell ihe new ownerofitssupplemental rcsraint systems andthal familiarizarion with allinstructions about them. from theOwner\ Manual. is important.
2.45


Knowing Your Mazda
Secutu, tokes ftanr foths and b veryituportant to a\9aer aad tc4pants. Sedioh 3descibes the saJe \|a! to use roul Mazda:kq,s, locks, ||indows aa.l intetiot lightiag.
Kels 3- 2D@rlocks 3- 2
Keyless En|r) Slstem 3 6Powerwindows 3ll
Trunk Lid 3-14Trunk Release Handle 3 16
Hood Release 3'18Fuel'FillerLid 3- 19
Fuel-FiUercap 319srer'ng wheel 3-20
MiroF 3-21
Sunroof 3-24Interior Lights 3-26
Map Lights 3-28Trunkl-i8ht 3 28
3-l

Knowins Your Mazda
Keys Door Locks
E rcy coae numUer pure
The keys operate all locks.
A code number is stamped on the plateattached ro rhe key sel; detach this plateand store it in a safe place (not in thevehicle) for use if you need to make a
Also wriie down $e code number andkeep ir in another safe and handy place,but not in the vehicle.
Ifyour key is lost, consult yourAuthorized Mazda Dealer with the code
1-t
I Locking Unlmking with KeJ
Any front door can be locked or unlockedwith a key.
Turn the key towaJd the front to unlock.toward the back to lock.
A wanlvnrcKers andChiuren:Leaving chiurcn in a vehicla withthe ienition ker is da gercus.Thkcould rcsult in soneone being badlti jurcd or eren kilkd. TheJ couuplat pith power,'indovs or othercontrols, or even make the whictemove. Don'tleave the kert in Jourt'e hicle v' ith c hiure n.

Knowing Your Maz da
$'--q,---+1/ ll*(#
I Locking, Unlockine with Door-LockButton
To lock any door from the inside, pushdown tbe door-lock button.
To unlock. puil it up.
To lock any door with the doorlockbutton trom the outside, push down thedoorlock bution and close the door.
NOTE
W})en locking ihe doors this way, becareful not to leave the key inside lhe

Knowing Your Mazda
A wanlvnvcUnatten.led C hid.en and Pets:Leav; g a thiA ora animalunattendedin a pa*ed vehicle hdangercus. In hot veathette,nperat res i side a t,ehide canbecone hish enoush to cause braindanage o. ete,t deoth. Alwars takea childrcn and aninuts vithlou orkave a rcsponsible person vith then.
NOTE
Always renove the key from theignition switch, clos€ all windows,and lock all doors when leaving yourvehicle unattended. This discouragesintruders and thieves.
I Porer Door Locks*
V Locking, unlocking with key
All doors lock automatically when anydoor is locked wilh a key. AIIdoorsunlock wben the driver's door isunlocked and ihe key is held in theunlock position. Also, all doors unlockwhen the passenger's door is unlocked.
*KL-r'-'-
Aw.qnr,w,{cUnlocked Doors:Untocked doory in a novins yehicleaft dansercus. Passensen canfaout ifa door is accidentoll! openedand can nore easilt be throtrn out inan accident. So keepa doots locked

Knowing Your Mazda
NOTE
Holding $e key in the unlockedposition in the driver's door iock forabout a second trnlocks all doors. Tounlock only the driver's door, insert akey into the driver's door lock andtum the key briefly to the unlockposition and then immediately retumit to the center position.
A wanlrnrcKers andChituen:Leavingchiuft in a yehicle u)iththe ig tion ker is daneerous. Thiscouu resAlt in soneone being baflyinjhndoreten kitted- TheJ couapla! with power windows or otherco,ttrols, or even make the whiclenove. Don't leave the kels in rourrehicle with child.en.
V Locking, unlocking wilh doorJockswitch
Ail doors lock automatically whenLOCK is pushed. They all unlock lvhenthe unmarked pan of tle doorlock

Knosing Your Mazda
Keyless Entry System*
This system locks and unlocks the doors.It can also help you signal for attention inan emergency. Press ihe bulton siowly
If the transmilter does not operatewhen pressing a button or theoperation range becomes too small,the bali,ery may be dead. To installa new battery, refbr to Maintenance(page 3 9).
Addilional transmitters can beobtained at an Authorized MazdaDealer Up to 3 additionalrransmilters can be used wirb thekeyless entry system per vebicle.Bring all aansmitters to anAuthorized Mazda Dealer when theelectronic codes need to be res€t.
AclurroNTo avoid damage to the transmiiter,do not drop ii, get ll wet, or expose itto heat or sunlighl.
I Rear Door Child Safety Lock
This lock is intended to help preventchildren from accidentalll op€ning $erear doors. Use it whenever a child ridesin the vehicle.
lfyou slide ihe child safety lock to ihelock posiiion before closing that door, thedoor cannot be opened from the inside.The door can be opened only by liftingthe outside handle.
NOTE
Tbe keyless entry system isdesigned to operate up to about2.5 n (8 ft) from the center of drevehicle, but this may vary becauseof local conditions.
The system doesn t operate whenthe ignition switch is in tbe ON
(Continued)
3-6 sonc doder,.

Knosing Your Mazda
NOTE
This device conplies wiih pari 15 ofthe FCC Rules and wirb RSS-210 oflndustry Canada. Operation is srbjectto the following two conditions: (l)This device may noicause harrntulinterference, and (2) this device mustaccept dny interf€rence received.including interference thai may causeundesired operation- (Outsidetransmisslons may rnomentarilyinterfere widl the device\ operation.)
V Irck button
To lock the doors, press the LOCK
To confirm rhat all the doors have beenlocked, press the LOCK button againwilhin 5 s€conds.Iflbey are closed andlocked, the horn will sound.
I TtansmitterNOTE
Confirm thal all the doors are lockedvisually or aurally by use of thedouble click.

Knowins Your Mazda
V Unlock button
To unlock the driver's door, press theUNLOCK button.
To unlock all the doors, press .heUNLOCK butlon again within 5 seconds.
NOTtr
After unlocking with the transmitler.all doors will automatically lock ifone is not opened wilhin about 30
V ! Panic button
You can use the ! bufton to rum on thealarm. wbich allows you to signal forattention in an emergency.
NOTE
The alarm will work whether anydoor is open or closed.
Turning on the alarm
Pressing the ! button once will sound thehom intermittendy and flash lheheadlights and hazard warning lights forabou12 minutes and 30 seconds.
Turning off the alarm
Press any button on the transmitter
NOTE
When all doors and the boot areclosed, push the LOCK buuon. Thehazard waming flasher will flashone time to indicate thal the doorsand ibe boot are locked.
wlen ihe UNLOCK butun ispressed. the hazard waming flasherwill flash twice to indicate rhat tbe
Il the LocK and uNLocK buttonafe pressed sequentially, tbe tumand lane chang€ indicalors and thehazard waming flasher may notflash correcily.
3-8

Knowing Your Mazda
I Mainlenance AcaurroNDanger ofexplosion if battery isincorreclly replaced.
Replace only with the same typebattery (page 3-10).
Dispose of used batFries accordingro the fbllowing instructions.
. Insulate lhe ptus and ninusterminal of the battery by usingcellophane or equivalent tape.
. Never disassemble.
. Never throw rhe balteries into
, Never deform or crush.
AclurroNMake sure the batlery is installedwith the correcl pole facingupward. Battery leakage couldoccur if it is not insralled conectly.
When repiacing the bartery. becarelirl notto bend $e elecrricalterminals or get oil on them. Alsobe careful not to gel din in thelransmjtter as it could damage it.
V Replacing the *ansmitte. batiery
L Insen a small screwdriver inlo the slotand gently pry op€n the transmilter

Knowing Your Mazda
B
2. Press the portion of the balteryindicaled bt A and remove the baltery
3. Install a new ballery (CR2025 or theequivalent) into the front portion ofihe holder witb the positive pole (+)facing up. Press on the B portion oflhe battery io set the bati,ery.
4. Align the fronl and back covers andsnap the transmitter shur.
AclurroNDo notpress any butlons whenreplacing the batiery. The electroniccode could be aliered and cause thekeyless entry system to malfunction.
If the keyless entry syslem fails tooperat€, coniact an Aulhorized MazdaDealer.
3-10
Knowing You. Mazda
Power Windows*
V Service
Ifyou have a problem wiih the keylessentry system. consult an AurhorizedMazdaDealer.
Ifyour transmitteris losr or stolen, bringall remaining transmilt€rs to anAuthorized MazdaDeaier as soon aspossible for a replacenenl and to makethe lostor stolen transmitier inoperative.
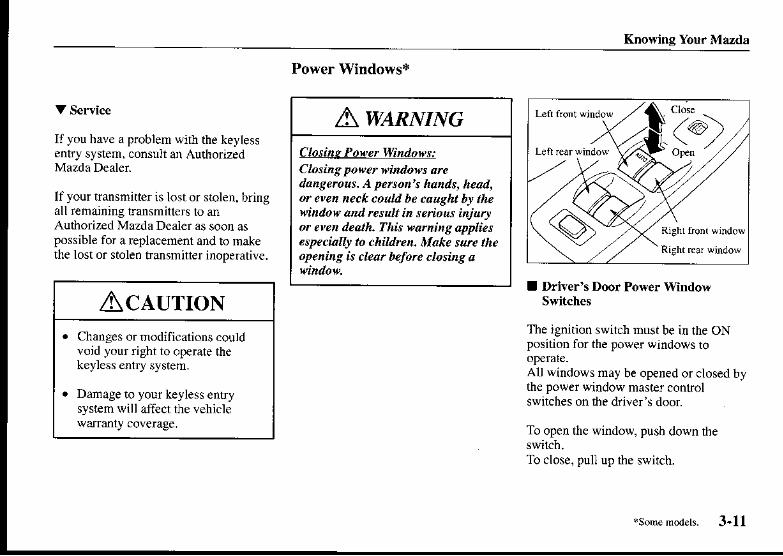
I Driver's Door Power WindowSwitches
The ignition switch must be in the ONposition for the power windows to
All windows nay be opened or closed bythe power window master controlswitches on the driver's door.
To open the windou push down iheswilch.To close. pul] up the swilch.
AwnnumeC losinq Pay er Windotr s :Ctosing power vi dows arcdangerous. A penon\ han^, head,or even neck co A be caught br thevindoe and rcsultin setious injuryor even deatL This waning appliesespecialr to chiuren, Make sure theopeninS is cleal befo.e closing a
AclurroN. Changes or modificalions could
void your right to operate thekeyless entry system.
. Damage to youl keyless enrysyst€m willaffect the vehiclewarramy coverage.
.so..,noaa.. 3-11

Knowing Your M^z da
V Auto-opening (Driver's window)
To fully open the window aulomatically,push rie switch completely down.
To stop the window panway. pull up tbeswitcb and then release it.
I Po$er Windo$ Lock Switch
Vr'ith the lock switch in the unlockedposition. all power windows on each door
with the lock switch in tbe lockedposition, only the driver's door powerwindow can be operated.
AclurronTo prevent burning out the fuse anddamaging the power wmdow system.donl open orclose more than lwo
<Q:
eA waRlrnrc
Ani te tional Window Operation:Unintentional windofl operution isdangerous. A peryon's hands, head,or neck coud be caught br thewindow and.esult in senou: injury,Unkss a wssenger needs to operatea h,indo\9, kcep the power ,'indovlock svilch i the locked position.
3-t2

Knowing Your Mazda
I Passense.-Door Pow€r WindowSwitch
The ignition switch must be in the ONposition for tbe power windows to
To open the window, push down the
To close the window. pull up the switch.
I Rear Door Powe. Window Switch
To open a window, push the lower part ofits switch inward. To close, push the
3-13

Knowine Your Mazdt
Tfunk Lid
I Key-Opemted T|unk
To open the trunk lid, ins€rt the key intothe slot and tum itclockwise.
To close, use both hands to pusb tbe liddown until lhe lock snaps shul. Don'tslam it.
Then pull up on it to make sure it\
I Remote Ttunk Lid Release
To release the trunk lid from inside thevehicle. pull up the release levernext to
AwtnumcopcaAryafuBdE Laast@Ethaust gas in the cabin of a
'ehicleis dangerous. This g.s co tains CO(..tfion nonoide), $'hich iscolorletr, odo ess, and highlfpoisonous. If inhaled, it ca causeloss of consciousness and death.Because erhaustgas can geti to thecabin through an ope trunk, keepthe trunk ctosed when diving.
3-14

Knowing Your Mazda
I lhunk S€curit]
In some situalions you may want toprevenl the trunk from being opened withthe remote trunk release lever,
Give your key only to someone you rrusr.
To secure ihe trunk iid,lock the rearseaibacks (page 2-8). push ihe trunk locklever up, and close the trunk.
To cancel the secuity feaiure, insen thekey inio the lock, lum the key clockwise.and push the trunk lock lever down.
ffi._r
3-15

Knowing Your Mazda
A waRlrnrcope4lrs4Llitu4dlliLeaving the tnnk lid open o.leatingchildnn in the vehide irith the ke),sis dangercus. Childrcncoud ownthe tt nk nn and climb insderes lting in possible inj ryordeathfron heat eqosurc. Close the trunklirl,Io.k the ftar seatba(ks and donot allow chiurcn to pla! insida the
Trunk Release Handle
Your vehicle is equipped with a trunkrelease handle that provides a means ofescape for children and adults in theevent they become locked inside the
No mauer how careful adulb might bewith keys and locking theircars, parentsshould be aware rhat children nay beempted to play lroud vebicles and userhe trunk as a hiding place.
Adults are advised to faniliarizethemselves with the operation andlocation of the release hardle so tbat allchildren can be told abou! it in anappropriale way, keeping ln rnind thatmost vehicles don t have such handles.
To open the trunk lid from the inside, pullthe illuminated "T" slapedhandle. Tbehandle is made ofmaterial tbat will glowfor hours in th€ darkness of the trunkfollowing a brief exposure to ambientlight-
The "T" shaped handle is located on theinside of tlle trunk lid.
3-16

AwtnumcUnanended C hildnn and Pets:Letring chidren or animalsunattendzd in a parked vehicle isdansero s. Babies teft neepins andkids ||ho lock thenselves in cars ort unks can die very quicklr hon heatprostntion. Don't leaw y rchidren ot pets abne in t car a! anrtime. Don't leave the carj the rearfolding seats or the trunk anlocked.Alwats keep the carfron being atunpn g place to plar br lockingdoo.s, trunk and reqr seats andkeeping the kers ||h.re childrenvon't pla! trith them.
Knowing Your Mazda
3-17
AcaurroNAlways keep the handle finnlyaltached to the holder and in therecessed position. No! securing thehandle this way could allow itto snagluggage in the trunk and open thetrunk lid.

Knowing Your Mzz da
Hood Release
1 . with the vehicle parked. pull therelease handle 1() unlock the hood.
2. Puli the safery catch up and lift the 3- Use the support rod to hold ihe hood
Before closing the hood, secure the rod inits clip.
Check under the hood aJea to makece(ain all filler caps are in place andatl loose icms (e.g. tools, oilcontainers, etc.) have b€en removed.
Close the hood so ihat it locks
3-18
Knowing Your Mazda
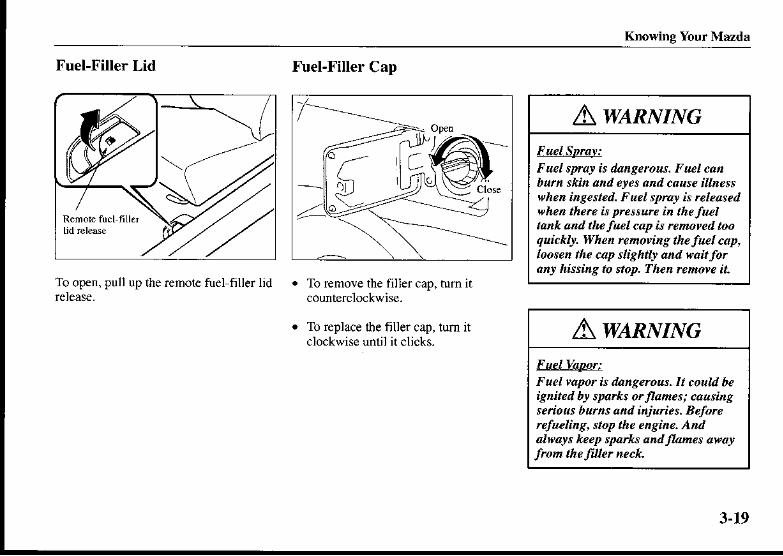
Fuel-Filler Lid
To open. pull up the remote tuel filler lid
Fuel-Filler Cap
To remove the filler cap, tum it
To replace lhe filler cap. tum itclockwise until it clicks-
AwanumeF uel SpByF uel sprar is dangercus. Fuel cattbu ski and eres andcause i nessvhen inqested. F uel sprar h rclcasedN'hen therc is pressurc in the fueltank and the fuel cap is nnoved tooqui.kry. Whe renot'i g the fuel cap,loosen the cap slightlr and wait fo.ary hissing to stop. Then remove it.
Awanr,tmcFuelUaporFuel yapor X dangerous.It coud beignit.d br spa*s orflames; causilgsenous bftns and injunes. Betorcnfuelins, stop the ensine. A dalvars keep sparks and funes awarfrcm the friler neck.
3-19

Kno*ing Your Mazda
Steering Wheel
I Tilt Whe€l
To change the angle of tbe steeringwheel. stop the vehicle, pull the tili wheelrelease lever under the steering columndown, adjus! lhe wheel. lhen push therelease lever up to lock the column.
Afler adjusting. pusb tbe whe€l up anddown to be certain it's locked beforedriving.
AcaurroNAlivays use only a designated Mazdafuel cap or an approved equivaleni.available a! Authorized MazdaDealers. The wrong cap can result in aserious malfunction of the tuel andemission control systems.It may alsocause the checkengine lighi in theinstrument cluster to illuminate.
Aw,qnvrucAdjusting the Steefins Wheel:Adjustinq the steeing wheel $,hilethe whitle is moving is dtngercus.Mot'ing it can wrr easib cause thediyer to abnptlr tur,t to the left orright. This can lead to loss of untlotor an accident. Newr adjust thesteenng *heel white the vehicle is
Ac.qurroNMake sure the fuel-filler cap istightened securely. The check enginelight cones on when the cap isn'ttightened securely. If the light rernainson (even after you have tightened thecap securely, driven, and restarted theengine several timet. it may indjcatea different problem. Conlact anAuftorized Mazda Dealer as soon aspossible.
3-20

Knowing Your Mazda
Mirrors
I Outside Mirrors
Check the mirrors' angles before driving.
I Horn
To sound the bom, press the paddedportion of the steering wheel.
Check the hom's operation regularly.
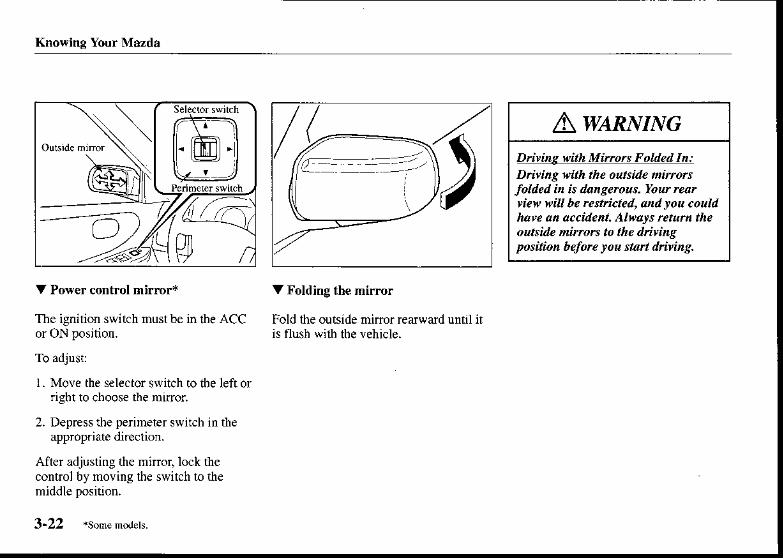
V Manual control mirrof
To adjust, move the mirror's controlIever,just inside the door
AwarurnrcC ont'e x Mirror (Passenger Sine
Trpd;Changing lanes with.'ut taking itttoaccount the attual distance of therehicle nt he conver nitor isdanserc s. You coud have a seriousaccident. What lou see in the conwtnir.oris closer tha,t itappean. Beiu.e to look ove. )oarshouder or tocheck rot inside niftot before
so...oa.r' 3-21
Knowing Your M6zda
7- -- -.4tl_ -_-,/
AwtnNntcDriving with Minors Folded In:Dtit'ing t'ith the ourside niftorsfolded in is dtnsercus. Yow narviev, will be rcstricted, and rou couldhaw an accident. AleaJS rcturn theoutside mirrors to the divingposinon beforc rou sta dnvins.
----1--),nL)24\w
V Power control mirror*
The igniiion switch must be in lbe ACCor ON position.
To adjust:
l. Move the selector switch to tbe left orright to choose tle miror.
2. Depress the perineter switch in theappropriate direction.
After adjusting the mirror,lock thecontrol by moving the switch to themiddle position.
3-22 .somenoaers.
V Folding the mirror
Fold the outside minor rearward until iiis flush with tbe vehicle.

Knowing Your Mazda
Awz.nNntcBtocked View:Caryo stacked higher thdn theseathacks is dangerous. It can hlockpu view in the rcaniew ninor,
't'hich night cause rou to hit another
car vhen changing lanes. Don'tsta.k things higher tha the
I Rearview Mirror (With Day/NightFunction)
Before driving. adjust the reaNiewmirror to center on the scene lhrough therear window- Do tlris with the day/nigh!lever in lhe day position.
Push rbe lever forward for day driving.Pull it back to reduce glare fromheadlighis.
l-tl

Knowing Your Mazila
Sunroof*
I Sunrcof Operation
The sunroofcan be opened or closedelectrically only when the ignirion swilchis in the ON position.
To open to any posiiion, press the rear ofthe slide switch located on tle righl sideof the overhead console.
To close, press the front of the dide
The rear of the sunroof can be tilted opento provide more ventilation,
To tilt, push dle rear of fte tilt switchlocated on fte left side of the overhead
To close, push the front ofthe tilt switch.
3-24 .sone moaeu

Knowing Your Mazda
Aw,qnutxcExtendinqlkLqcalLlrArns Th.ough the Sunroof:Extending the head, an$, or otherpafts of th. bodr throuqh thesunrool is dangerous.The heod orams .ould hit sonething while therehicle is noin* This.oald causedeath or tedous injury. Don\letpassengen stand up or extendanrthing through the oryn sunroofwhite the vehicle is novine.
Aw,qnumcClosins the Sunrcof:A.loring sunrcofb dangercus. Thehands, head, or ewn eckofaperson - erpeci0 rachiA'couldbecauSht in itas it closes,causingseno s i jury orerendeath. Makesurc the openntg is clear beforeclosing the sunrcof.
NOTE
After washing your Mazda or after arain, wipe the water off tbe sunrcofbefore operating i!.
I Sunshade
The sunshade canbe opened and closedby hand when ihe sunroof is closed.
Tle sunshade opens automatically whenthe sunroofis opened. butmustbe closedby hand.

Knosing Your Mazda
ACAUTIONThe sunshade do€sn'1rilr. To avoiddanaging the sunshade, don'tpush up
Interior Light
'ripe A
ON
OFF -DOOR
ON
Light oftLight on when any door is
Light on
3-26

Knowing Your M^zda
NOTE
(With Illuminated Entry System)W}len the swirch is in dre DOORposition. lhe interior iightcomes on
. about 30 seconds after rhe driver'sdoor is unlocked and the ignition
. about 15 seconds after the key isremoved from the ignition.
The light also goes out when:
. ihe ignition switch is lumed to theON position.
. the driver's door is locked.
When the interior light comes onbyopenlng a door. it goes out about 15seconds after the door is closed.
(Conlinued)
EYen if the door is not closed, thelightgoes out afrer about 5 minutes.

Knowing Your Mazda
Map Lights*
T)pr A
The map ljghls are switcled on or off bypressing the switches.
Trunk Light*
The trunk light is on when tbe lid is openand off when it\ closed.
3-28 some nodd!.

Protecting Your Mazda
Mostpeople lik to sde norer. With anautatuobile rehicle, that cah be done insererat vars ?ah ns lrst dar ofopetutioft.Prcbablr tops on the li ofcosrefrciercr isusing the risht kiad oJIuel .h1l usine that fuel
Se.tioh 1 explains how ta do this. l'uther, ndiscusses proper loadihe atul how to rcspondta wrsual divihg cordnia6. hakoillusltutes wherc inportant rehicl.inJomation labe ls tur be Joun.l.
Fuel Requhenents 4- 2Enission Control System 4- 3
Engine Exhaust + 4Beforo Driving + 6
Break{D Period + 6Money-Saving Suggesions 4- 7Special Driving Condilions + E
vehicle Infomation Labels +12
4-l

Protecting Your Mazda
Fuel Requirements
Vebicles with catalyiic converte$ mus!use ONLY UNLEADED FLEL, whichwill reduce exhaust emissions and keepspark plug fouling to a minimum.
Your Mazda wiil perform best wirllregular unleaded fuel havinS an octanerating (antiknock index) ofat least 87
[(R+M)/2 method].
Fuel with alower rating could cause iheemission conirol system to loseeffectiveness.It could also cause engineknocking and serious engine damage.
U.S. federal law requires thatoctaneratings be posted on gasoline station
Gasoline blended wlth oxygenaies suchas alcobol or ether compounds aregenerally referred to ai oxygenated fuels.The common gasoline blend that can beused with yourvehicle is ethanol blendedal no more than 109,.Casoline containing alcohol, such as
etbanol or methanol, may be morkeledunder the name "Gasohol".
AclurroNNEVER USE LEADED FUEL
It is harmful to the cataiytic convenerThe lead will accumulate on theoxygen sensor and the catalyst inside
This will result in a malfunction ofihe emission control system, causing
Ac.turroNYofi vehicle can only use oxygenatedfuels containing no more than 1090
ethanol by volume. Damage to yourvehicle may occur when ethanolexceeds this recommendation, or ifthe gasoline conlains any methanol.Stop using gasohol of any kind ifyourvehicle engine js perfonning poody.
4-2

Protecting Your Mazda
AcnurroNNever add fuel system additives.Never add cleaning agents other thanthose specified by Mazda. Othercleaning agents and additives maydamage the system. Consult anAutborized Mazda Dealer
Emission Control System
Your vehicie is equipped wirb anemission control system (the catalyticconvener is pan of this system) thatenables your vehicle to comply wilh U.S.ex}laust emissions rcquirements.
Under U.S- federal law. any nodificationto the original,equipment emissioncontrol system before the first sale andregistration of a vehicle is subject totr€nalties. ln some staies, suchmodification made on a used vehicle isalso subject to penalties.
Vehicle damage and drivability problensresuiting from the use ofthe followingmay notbe covered by tbe Mazda
I ) Gasohol containing more rhan I 07.
2) Gasotine or gasohol coniaining
3) L€aded fuel or leaded gasohol
Aw,qnnmcPafiing OwrThin?s That Burn:Pa*ins over or neat anfihinginfiannable, such et dry gra$, isdongerous. Et)en with the e gineturned ofi, the exhaust srstem couwigfite it because the exhaust srstengets vry hot duing nornal use. Aftsulting frrc couu cause seriousWury or death. Newr park over ornear a tthing i,ttlamnrbte.
4-3

Proiecting Your Mazda
Engine Exhaust(Carbon Monoxide)
AcaurroNIgnoring lhe following precautionscould cause lead to accumulate on thecatalyst inside the converteror causetbe conve(erto getvery hot. Eithercondition will damage the convenerand cause poor perfomance.
. USE ONLY UNLEADED FUEL.
Don't drive your Mazda with anysign of engine nalfunclion.
Don't coast wiih the ignltion
Don'tdescend steep grades in gearwidr the ignition switch turned off.
Don't operate the engine athighidle for more than 5 minutes.
(Continued)
. Don'! tamper with the emissionconlrol syslem. All inspections andadjustments must be made by aqualified technician.
. Don'1try to push start orpull-shn
A waRlrnscCafto Monoxde:E gine erhaust is danserous.Thissas contains cafion nonoxAe GO),trhich is colorless,odo ess,andpoisonous. When inhaled, it cancause loss ofconsciousness anddeath. If rou sneA exhaust gasinside ron whicle,keepa vindowsfull! open and co tact dn AuthorizedM azda D e ale r im n e diat e lr.

Protecting Your Maz da
AwnnvtucExhaustGas in Enclosed Area:Running the engine inside a,tenclosed arca,such as a garuse, isdangercus. Exhaust gas, whicheontains poisono us ca.bonhonoidq couu easil! enter thecabin. Loss of consciousness or ewndeath coul.l o.cur. Do,t't run theetgine when i side an encloseduea.
AwlnNnlcIdling *'ith the Windows Chsed:Ethaust gas is dangerout. Whenjour vehicle is stopped with thewittdotrs closed and the enginerunnins fot a lons nne in an openarea, ethaust gas, which containspohonous carbon monoidq couwe ter the cabi . Loss ofconsciousness or even death couwoccur. OWn the windows or anjustthe heatirg o. tooling srstem to druw
A warurnrcSnov, Blocking the EfidustGas:Running the engine when a vehickis stopped in deep snow is dangetuus.The exhaust pipe couA be blocked btthe Nno\ alloving exhaust gas toenter the cabin. Becawe exhoust gascontains pokono s caftonno oxide, anrone in the cabin couwbe injurcd ot kitkd. Cteat the snotfron underneath a d around rourrehicle b.forc sbrting the engine.

Protecting Your Mrzdg
Before Driving
I Belore Getting In
. Be sure the windows, outsidemirror(s), and outside lights a.re clean.
. Inspect inllation pressures andcondition of tires-
. Look under the vebicle for any sign of
. If you plan to back up, make surenothing will be in your way.
I After Getting In
. Are all doors closed and locked?
. Are tbe inside and outside mirorsadj'rsGd?
. Is everyone\ seat belt faslened?
. Do all the lights work?
. Check all gauges.
. Check all waming lights when theignition switch is lumed 1() the ONposirion.
. Release ihe parking brake and makesure the brate waming lighlgoes off
Always be lhoroughly f:rmiliar with yourMazda.
Break-In Period
No special break-in is necessary, but afew precautions in the firs! 1,000 km(600 miles) may add to the peformance.economy, and life of your Mazda.
. Don'trace the engine.
. Don't maintain one consiantspeed forlong.
. Donl drive constantly at full th.ottleor high engine rpm for exlended
. Avoid unnecessary hard stops.
. Avoid full throule starts.
NOTE
Engine oil, engine coolanl,brake/clutch fluid, washer fluid. andother fluid levels shouldbe inspecteddaily, weekly, or at refueling,dependjng on the fluid. SeeMaintenance, Section 8.
4-6

Protecting Your Mrzda
Money-Saving Suggestions
How you operate your Mazdadetermineshow far it will travel on a tank offuel.Use these suggestions 1o help save noney
. Avoid long warm ups. Once rheengme runs smoothly. begin driving.
Keep tbe wheels in correct alignment.
Keep windows closed at high speeds.
Slow down when driving incrosswinds and headwinds.
Keep the engine tuned. Follow themainlenance schedule (page 8-3) andhave an Authorized Mazda Dealerpefbrm inspections and sewicing.
Use the air condiiioner only when
Slow down on rough roads.
Keep the lires properly inflated.
Don'l carry unnecessary weight.
Don't rest your foot on tbe brake pedalwhile driving.
Awantur,teCoasting:Tuning off the engine to coast downahi b dangercus.Thk causes thetoss oI power steenng and powerbruke control. AnJ lnss of stee.ing orbruking contnl could @use anactident New. turn off the engineand coast dot'n a hill.
4-7
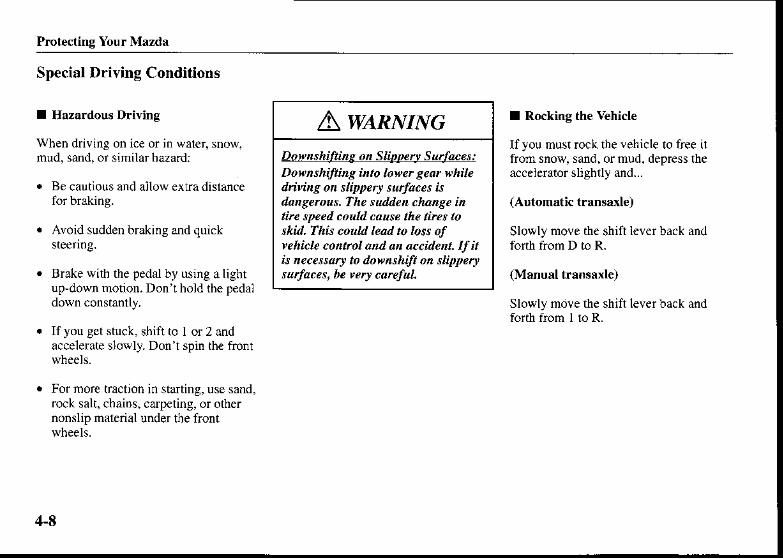
Protecting Your Mazda
AwenvmcDownshi[tine o Slipp4rLs]!4heellDo*nshifting into lowet geor whileddvins on slipper| swfaces isdansercus.The sunnen .hanse intirc speed c/ruld couse the tirer toski.d. This co A kad to loss ofvehicle co nol and an accident. If ilis necessary to doenshi.ft on slipperysudaces, be wry csrcfut.
Special Driving Conditions
I Hazardous Driving
When driving on ice or in water. snow.mud, sand, or similar bazard:
. Be cautious and allow extra dislanceforbraking.
. Avoid sudden braking and quicksteering.
. Brake witlr the pedal by using a lightup-down motion. Don'thold the pedal
. Ifyou get stuck. sbif! to I or 2 andaccelerate slowly. Don'i spin the front
. For more traction in starting, use sand,rock sali, chains, carpeting, or othernonslip material under tbe front
I Rocking the Vehicle
Ifyou must rock the vehicle to free itfrom snow, sand, ormud. depress theaccelerator slightly and...
(Automatic transa{e)
Slowly move the shift lever back andfonh from D to R-
(Manual transaxle)
Slowly move the shift leverback andforth from I 1() R.
4-8

Protecting Your Mazda
Aw,qntaxospiatiaglLcMElls:When the vehicle b stuck, spinni gthe wheels tt high speed hddngetuus.The spinning tirc couworefieat and explode.This couucause seioui injuies. Don't spin thewheels at nore than 56 kt tlh (35nph), ond don't allot!' anlone tosta d behi d a wheel when pushing
I Winter Driving
. Carry emergency gear. including tlrechains. window scraper. flares, a snallshovel,jumper cables, and a small bag
. Ask a Mazda dealer !o pedorm thefollowing precautions.
. Have the proper ratio of dntifreeze in
. Inspecl rhe battery and irs cables. Coldreduces battery capacity.
. Use only cold-wea$er engine oil(page 8 16).
. Inspect ihe ignition systen for damageand loose conneclions.
. Use washerfluid made wiihantifreeze-but don t use enginecoolanl antifreeze for washer fluid(page 8 27).
. Donl use the parking brake if il mightfreeze. Insiead. shifr to P wirh anautomatic transaxle and to I orR witha manual iransaxle. Block the rear
AcaurroNToo much rocking nay cause engineoverheating, transaxle failure, and liredamage.
4-9
Protecting Your Mtzda
V Snow tires
1.6 and 2.0-liter engines
Your vehicle is originally equipped witiall season radials designed to be used allyear around.In some exfeme c]imatesyou may find itnecessary to replace themwith snow ftes during the winier monlhsto furlher improve tr3ction on snow and
I.8-liter engine
Your vehicle is originally equipped withsummer iires designed for optimurntraclion on wet and dry roads. If yourvehicle is to be used on snow and icecovered roads, you may find it necessa.'y
10 replace the original equipnenl lireslith snow lires, during the winter monfts.
Use snow tircs on all four wh€€ls.
Don't go faster than 120 km/h (75 npl).Inflate snow tires 28 kPa (0.3 kgflcmz, 4psi) more tlran reconnended on the tire
4-10
pressure label (driver's doot, but nevernore than the rnaxinun cold-tirepressure sbown on lhe tires-
NOTE
Check out local regulaiions befbreusing studded tires.
V Tire chains
Check tocal regulations befbre using tire
Install the chains on the front lires.Don't use chains on the rear tires.Use only sAE Class "S" chains, and
To install the chains:
1. Remove the wheel covers, or the chainbands will scratch ihem.
2. Secure the chains on the front rires as
tightly as possible. Always tbllow thechain manufacturer\ instructions.
3. Retighten the chains after drivingl/2-l km (1/4 l/2 mile).
AwlnlutleMLri eTire Trtet:Using tircs dwrent in size orDpe kdangercus. Yow vehicle\ hatu ittgcoul.l be greatl! affected an.l resuhin an accident. Use onlt the sanesize a d trpe nfts (snow, radial, orno -rudiat) on a iour vheets.

Protecting Your Mazda
AclurroNChains may scratch or chipalurninum wheels. lnstall tirechains.on steel wheels only.
Chains may affect handling.
Don t go faster than 50 knr,/h (30mph) or tbe chain manufacturerkrecomm€nded limit. whichever is
Drive carefully and avoid bumps,holes. and sharp tums.
Avoid locked wheel braking.
Don ! use chains on the temporarytire; it may result in damage to ftevehicle and 10 ihe tire.
Don ! use chains on roads tha! arefree ofsnow or ice. The tires andchains could be darnaged-
I Drivi.s in Flooded A.eas I Ttailer Towing
Never tow a trailer with your M.zda.
AclurroNMake sure water does not enter thevehicle interior or fte engine area,The vebicle interior could becomewet or the engine could be damaged.
AWARNINGDririnp with W.t Brakes:Diving v'ith wet brukes isdangerc s. I ncrcased stoppingdittunce or the vehicle pulling to oneside hen braki g could.esultin aserious accident Light braking willindicate vhether the brakes hawbeen a|Jected Dry the brakes btdriring rery slovtr ond applring thebrakes ligh r until brakepeiotnance fttu.ns to norn.l.
4-11

P.otecting Yo r Maz.la
Vehicle Information Labels
I OYerloading
Th€ vehicle iden.ification number legallyidentifiesyour vehicle. The number is ona plate attached ao ihe left top side of tbedashboard. This plate can easily be seen
$rough the windshield.
Chassis number
A waR^rnrrc
Uehicle Load Weisht:The gross afle wigtu tunne(GAWR) and the srcss vehicte weishtrating (GWYR) of row vehicle arcon the Motor Uehicle SafetrStandad Lnbel on the diver's .Ioorftune. Exceeding these rutings cancause an accident otvehbte danuse.You can estinate the wight of !ou.Ioad br t'eighing the items (orpeopk) beforc puttins then in thewhicle. Be careful not to ot eioan
4-12

1A and 2.o-liter
Vehicle emission controlinformation label*
Pmtecting Your Mazda


Driving Your Mazda
Opetutine ra,r vehick requnes a goodunderstan lifts of the naty cofttrols !a, nuslkfto\9 and use. Se.tioh 5 describes a thb instep'byrt.p infomatian Iron "se
af theisnition s||it.h ta ctuise .artol antl brdkjne.
Alsa highlishted ate th. Bearchil ahd shi.tin?nodes, porer steerin4, ihsrtutuents annSauges, wamings ahtl indicatars. \|ih.lshieldvipets, and intenor ftaturcs. you' ll lhdcanplete details dbout the advan edardio
Ignidon SwilchPosirions 5- 2StaninS the Engine 5 4
ManualTransaxte Operanon 5, 5
Aulonatic Transaxle 5- 6Brake System 5-t I
Power Steering 5-14Cruise Control 5 15
Insfument Cluster 5-20cau8es 5-22
Dashboard Illuminanon 5 25Waminglights/Beeps 5-26
Lighnng Control and Tum Signah 5-33Windshieid wipe6 and Washer 5 35
Rear Window Def.osre!LighterAshlray
Srorage CodpartmenrsCup Holdes
SunvisosVaniry Miror
Clinrte Control SystenRadio Reception
Safely CenificationAN'/FM Radio
ANTFM Radio wirh CompactDisc PlayerAntnna
5-385-38
5-395-405,.11
5,4t5-A5525545-565-57586
5-1

Driving Your Mazda
Ignition Switch Positions
I ACC (Accessory)
The steering wheel unlocks and someelectrical accessories will operate.
I LOCK
The steering wheel locks to pro@ctagainst theft. only in this posidon can the
ON
ACC
toNThis is lhe normal runningposition afterrhe engine is statted. The waming lights(except brakes) should be inspectedbefore the engine is started (page 5-26).
I START
The engine is started in this position. Itwiil crank until you release the key; thenit retums 1() the ON position. The brakewarning light can be checked aft€r lheengine is started (page 5-26).
{.t
V Manual transaxle
Wlen tuming the ignilion switch to theLOCK position. push the key in at theACC position.

Driving Your Mazda
NOTE
If tuming tfte key is difficult, jigglethe steering wheel from side to side-
V Automatic transaxle
When tuming the ignition switch to theLOCK position, keep the shift lever in P
Aw,cnullcRenoving the Ke!:It's d4 gerous to remow the ke!fiom the lgnitiott switch tthile thevehicle is moting. Remoi gthekerallows the steenng wheel to lock. voureill lose skenng contnl and aseious acctuIent coud oceuiRedove the ker only when the NOTE
If the ignition switch is in ille LOCKorACC position. abeep will soundwhen any door is opened.
Aw,cm,{tucNot SexinLthe Parking Bmke:Leaving the .livet's seat withou1setting the pa*ing brcke isdange rcus. U nexpe cted w hiclenoyenent coua occu.t'ifthe pa*insbmke is not set.This eouuca se a,tac.ident. Beforc tearins the driver'sseat, alvors set the parking brakeand nuke surc the sNft lerer is in P\)ith an aulonmti. tra saieolinIor R with a manual transaio.

Driring Your Mn da
Starting the Engine
1. Occupanls should fasten their seatbe1ts.
2. Make sure the parkingbrake is on.
3. Depress ihe brake pedal.
4. (Manu6l transaxle)
Depress the clutcb pedal all the wayand shifl into neutral.K€ep $e pedal depressed whilecranking the engine.
(Automatic rransaxle)
Put the vehicle in park (P). Ifyou mustresiart the engine whjle ihe v€hicle ismoving, shifi into neutral (N).
6. After slaning the engine, lel it idle forabout 10 seconds.
NOTE
In extremely cold wealhe! below18"C (0'F), or after the !'ehicle has
stood idle several days, le! lhe enginewarm up without operating the
5. Tum th€ ignition switch to the STARTposition and hold (up to l0 seconds ata tirne) until ihe engine shns.
NOTE
The starter will nol operate.-.
. If the shift lever is not in P or N
. Ifthe clutch pedal is not pusheddown all lhe way (manual).
Ac.turroNDon't try the slari,er for more ihan 10
seconds at a time.Ifthe engine stallsor fails to start, wait 10 secondsbefore trying again- Olherwise, youmay damage the starler and drain the
5.4

Driving Your Mazda
Manual Transaxle 0peration
NOTE
Whethercold or warm, the engineshould be staned witlout use of the
If the engine fails to start, it may beflooded (excessive fuel in the engine).
Follow this procedure:
I - Depress the accelerator all the wayand hold it there.
2. Tum the ignition switch to the STARTposition and hold iithere foruptol0 seconds. If the engine starts, releaselhe key and accelerator immediaclybecause the engine will suddenly revup.
3. Ifthe engine fails to start, crank itwithout using ihe accelerator-for up
I Manual Transa\le Shift Pattern
The shift pattem of the iransa{le isconventional, as shown,
Press the clutch pedal all the way downwhile sbifting; then release il slowly.
A safely feature prevents accidentaishifling from 5 to R. The shifi lever mustbe pu! in neulral before being shifted toR,
135FfrI?/4 e
NOTE
. Make sure the vehicle is stoppedbefoie shiiting to R.
. If shiftinC into reverse is difficult.shift into neutral, release the clutchp€dal, and try again.
AcaurroNKeep your foot off the clutcb pedalexcept wben shifting gears. Also,donl use the clutcb ro hold thevehicle on an upgrade. This will avoidneedless clutch wear and damage.
5-!

Driving Your Mszda
Automatic TransaxleI Automatic Tla saxle Controls
Shift lererTo prevenr unsafe shifting
Pa -- -tr)^ - .lll o*".,*,riih v fl^ Forsele!rmBerherathre-
N o VI \Peed or rns \need rr .dle
:: ir Overdrive (O/D) OFI indicato.This lieht codes on *hen lhe overdnve
1O
Shift pattern indicatorShows shift leler positjon
+otl
Indicates that you must depress the bnke pedal and. hold in the lo.k rleasebutton to shift (The ignilion swiich nustbe in tne ACC orON position.)
The shiftlevercan be sbifted fteely into any positionindicated by the 1l arow.
Indicates irrat you musthold in the lock-release burcn to shift.
0/DOFF
ooo5.6
Driving Your Mazda
I Transexle Rang€s
The shifl lever mustbe in P or Nro
V P (Park)
P locks the aansaxie and prevenrs rhefiont wheels from roiaring.
V N (Neutral)
In N, the wheels and transaxle are notlocked. The vehicle will roll freely evenon the slightest incline unless the parkingbrake or brakes are on.
V R (Reverse)
In posiiion R, the vehicle moves onlybackward. You mustbe at a complerestop before shifting from R, excepr asexplained under Rocking rhe Vehicle(page 4-8).
AcaurroNshifting into P orR while ftevehicle is moving can damage your
Shifiing into a driving gear orreverse wh€n the engine is runningfaster than idle can damage rhe
AwtnwwcHoUing the Vehicle with P:Setting the shift lewr to the Pposition without using the pa*ingbrake to hoA the vehicle isdansenut. If P faik to how, thewhicle couA move and ca teanaccdent. To hou the vehick, set theshift lever to P AND set the parkins
AWARNINGShiftine.from N ot P:It\ danselou' to shilt ton N ot Pinto a driring eear when the engineis runni g faster than Ule. If this isdone, the vehi.le couu moves dde l!, causing an accident orseioLt inju.r. If the e gi eisrunning faster than ink, don't shiltfrcmN orP i toadriyitggear,

Driving Your Mazda
VD(D ve)
D is the nonnal driving position. From astop, the transaxle will automaticallyshift through a 4-gear sequence.
V 2 (Second)
The 2 position is helpful when driving inheavy, slow'moving traiTic and climbinghills, for engine braking assistwhengoing downhills, or for stariing on slicksurfaces and other situations where gendeacceleration may be necessary. Do notexceed 100 knth (62 rnpb) in the 2posrhon.
V I (Low)
Use the I position for maximum power inhard-pulling siiuations. or for clirnbingand descending very sleep grades. Do notexceed:18 knr./h (30 mph) in the I
I Drivins Tips
V Passing
For extra power when passing anoihervehicle or climbing steep grades, depressthe acceleraior fu]Iy. The transaxle willshift 10 a lower gear, depending onvehicle speed.
V Climbing steep grades from a stop
To climb a steep grade from a stopped
1. Depress the brake pedal.
2. Shift !o D or 1 depending on the loadweighl and grade steepness.
3. Release all brrles while gradually
V Descending steep grades
Wben descending a sleep grade, shif! to 2or l, depending on load weight and grade
steepness. Descend slowly, using thebrakes only occasionally lo prevent themfrom overheating.
5-8

Driving Your Mazda
And fbr a smoother rid€ with lessshifting, don't use ir when:
. Going up a steep grade.
. Driving in slop and go traffic.
. Pullinc heavy loads.
To turn off the overdrive, push thebuiton.The transaxle will then shift through athree gear sequence in D.
Shifl pa(ems without overdrive:
D - lst,2nd, 3rd2:2ntll-lst
0/DOFF
oooV Overdrive-off indicator
This lightcomes on when the overdrive
AclurroNIf fte overdrive-off indicator lightflaslres, lh€ transaxle has an electricalproblen. Continuing 10 drive yourMazda in this condition could causedamage to your transaxle- Consult anAuthorized Mazda Deaier as soon aspossible.
5-9
I Overdrive
V OYerdrive operation
In D, the transaxle automatically slifts tooverdrive. which irnp.oves fuel econorny
To allow engine braking when goingdown a steep grade, nake sure theoverdrive butlon is in the offposition.
Driving Your Mazda
To turn it on, push lhe button again.
Shift pattems rvith overdrive:
D : I st. 2nd, 3.d, 4th2-2I],dl-lsi
I Shift-Irck Syst€n
For your safety. the automatic transaxlehas a shift-lock, which preYentsshlfting out of P unless the brake pedalis depr€ssed.
To shif! from Pi
l. Depress and hold the bral(e pedal.
2. Start fte engine.
3- Push and hold the lock-release button.
4. Move the shifl lever.
When the ignition switch is in theLOCK position, the transaxlecannot be shifted from P.
To be sure the vehicle is in park.the ignition key cannot ber€moved unless the shift lever isin P,
5-10

Drivins Your Mazda
Brake System
I Foot Brake
Your Mazda has power-assisted brakesthar adjust aulomalicalty through normal
Should power-assist fail, you can stop byapplying greater force than normal to thebrake pedal. But tbe distance rcquired iostop will be greater than usual.
AwnnutxcRiding the Brakes:Divins'a,ith rourfoot continuoustron the brake pedalor steadilrapplyins the brakes for tonsdistances is dtngercus.This causesot'e.heated brakes, resulting irllonger stoppilg tlbtanees or eventotal bruke failure. This couu ca6eloss of vehicle contrcl and a seiousac cide nt. Av oid contin uo usappticanon of the bnkes. Shift to alo\'ers.ar when going down st ephills.
Awl.numeDritine flith Wet B kes:
Driving with wet brakes isdangero us. I nc.e as e d stoppingdistance ot the vehicle puling to o e
sine when brakins couu rcsult in aseious accident. Lisht brakinc wiltindicate whather the bnkes h0vebeen alfected. Dr! the brakes b!driving very slowlt and applJing thebrakes lightlr untit brakepeiomance is nonut.Awl'nutue
Dnring with the Engine Off:Continuing to d.ive when the engineis stalled or turned oJf is drrngerout.B.dking $'i rcquire more efoft, annthe brake's pover-assist couu bedepleted if rou punp the brake. Thisvi caure toneer stopping dkti cesor eyen a accident. Don't coatinuediving when the engine is stalled ortuned off, frnd a safe pla& to rtop,
5-11

Driving Your Mazda
Awl.ntuNcDtit'ins $'ith Wom Disc Pads:Drivins wilh wom disc pans isdansercus. The brukes couulail andcause a seious acci.dent. As soon as
lou hear a screeching oise consultan Authoriaed Maula Deolei
I Brake Pad Wear Indicator
wlen the disc brake pads become wom,the built-in wear indicators contact thedisc plates. This causes ascreechingnoise to warn that rhe pads should bereplaced.
When ]ou be3r this noise. consult anAuthorized Mazda Dealer as soon as
I Parking Brake
To set the parking brake, depress ihebrake pedal; lhen pull ihe brake handlefully upward.
To release i!. pull the handle up and pressthe bunon. Depress the brake pedal: thenlower tbe handle to the release positionwhile holding in $€ butlon. Release thepedal when it's safe to do so.
5-12

Drivins Your Mazda
AclurroNDriving wiih the pa*ing brake onwill cause excessive lvear of the brakelinings or pads.
(o)BRAKE
^.-)^1,\__/\,/\__/.
I Brake System Warning Light
If fte brake waming iighi sLays on afterthe parking brake is fully released. $ebrake system has amalfunction. Refer tow:ming LightYBeeps (page 5 26).
I Antilock Brake Syst€n (ABS)
The ABS control unil continuouslynonitors the speed of each wheel. If oneis about lo lock up, r}le ABS responds byautomatically releasing and reapplying
The driver will feel a slight vibraiion inthe brake pe&al and may bear a chatteringnoise from ihe brake system. This isnormal when the ABS operates. Don'tpump fte brakes, continue to press downon the brake pedal.
5-r3

Driving Your Mazdr
Power Steering
Power steering is only operable when theengine is running. If the engine is off orif the power steering system isinoperable. you can still sieet but itrequires more physical effort.
If ihe steering feels rigid during normaldriving, consuli an Authorized MazdaDealer.
NOTI
w}len lhe engine is jump-started, anunevenness of rpm occurs and theABS warning light comes on. This isdue to a lack of baltery capaciry anddoesn't indicaie a malfunction.
Have the battery recharged as soon as
possible.
NOTf,
If the ABS waming light stats onwbile you're driving. the ABSconlrol unithas detecled a systemmalfunction. If ftis occurs, yourbrakes will function normally as if$e vehicle hadno ABS. Shouldtbis happen, consull an AuthorizedMazda Dealer as soon as possible.
Braking distances may b€ longeron loos€ surfaces (snow or gravel.for example) which usually have ahaJd foundation. A vehicle with anormal braking sysl,em may requireless dislance to stop under theseconditions because the tires willbuild up a wedge of surface layerwhen the wheels skid.
Awl^nNmc4rgThe ABS canrct conpensate forunsafe and .eckless driving,excessn e speed, .^itgati s (fottor)insa othe. whicle tooclosel!),a dhtdroplrnins (rcduced tire ftictionand rcad contact because of watet onthe rcad surface). You can sn havea acdden . So don't relr o ABSasa substitutefor safe dni g. AcaurroN
Never hold the steering wheel to theextreme left or right for more thanfive s€conds widr the engine runnine.This could damage th€ power steeing
5.r4

Driving Your Mazda
Cruise Control*
With cruise control, you can set andautomalically maintain any speed ofmore than abour.l0 knvh (25 mph).
d;+=-!1.;,Ti
To activar,e ihe sysr,em, push the CRUISEMAIN switch.
To deactivate the system. push rhe swirchagaln,
Aw,qnuNcCruise Cont.ol Use:
Using cruise controlin the fo owingconditions .ould couse rou to lose.ontrot ofthe vehicle:
. Heatt ot unsteonr tuJIic
. Slippery or winding rcah
. Sinilar rcstri.tions that reCubeinconsiste tspeed
Don't se cruise control in these
AwnnumcCruise Main Switch:Leavi gthe CRUISE MAIN su,itcho when ot using the cruise contftlit da gerous as it mar be si'itchedon accitentb. This couw resuh inloss of tiehicle contnl. Keep theCRUISE MAIN switch oJJ whencrube control is not in use.
tsome n.dcls. 5.15
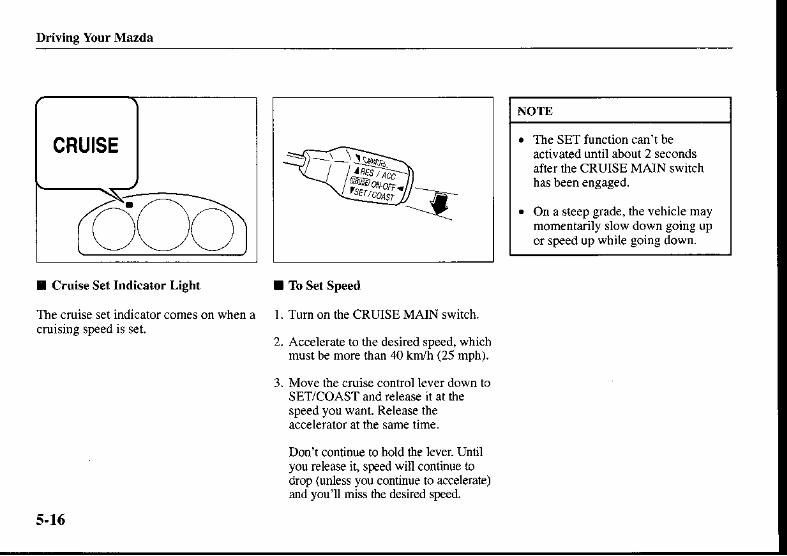
Driving Your Mazda
CRUISE
oooI C.uise Set Indicator Light
The cruise set indicator comes on when acruising speed is set.
^*$l;=-ltr;;ff;
I To Set Speed
1. Turn on the CRUISE MAIN switch.
2. Accelerate to the desired speed, whicbnustbe nore than 40 kdh (25 nph).
3. Move the cruise control lever down toSET/COAST and release il at thespeed you wanl. Release theaccelerator at the same lime.
Donl continue to hold lhe lever Untilyou relea-ce it, speed will continue !odrop (unless you continue to accelerate)and you'tl miss tlte desired speed.
NOTE
The SET function can't beactivated unlil about 2 secondsafter ihe CRUISE MAIN switchhas been engaged.
On a sieep grade, the vehicle maymomentarily slow down going upor speed up while going down.
5.16

Drivine Your Mazda
stk
NOTE
Cruise control will cancel at about 15kr/h (9 mph) below t})e presel speedor b€low 40 kn/h (25 mph).
-"$t*1a.,,?
I To Cancel
To tum off the system, use one ofthese
. Push the CRUISE MAIN swirch.
. Sligh y depress the brake pedal.
. Pull the lever towaJd you.
. (Manual transsrle)Depress lhe clutch pedal.
The system is off when lhe ignilion is off-
I To Increase Cruising Speed
Follow either of these procedures.
. l. Move the conlrol lever up roRES/ACC and hold it. Your vehiclewill accelerate.
2. Release the leverat rhe desiredspeed you wani.
. L Accelerate to the desired speed.
2. Move the control lever down toSET/COAST and release itimmediately.
5-17

Driving Your Maz d!
Your vehicle has a tap up feature thatallows you to increase your cunent speedin increments of 1.6 km/h (1 mph) by a
momentary tap of the control leverMultiple taps will increase yourvehiclespeed 1 .6 knth ( I mph) fo. each tap.
I Accelemting with C.uise ControlOn
Accelerat€ if you want to speed uptemporarily when the cruise control is on.Greater speed will not interfere with it orchange fte set speed.
Take your foot ofi the accelemtor torelum to the set speed.
d';T1I;;:;
I To Decrcase Cruising Speed
Move the control lever down toSET/COAST andhold it. Release thelever at the desired speed.
5-18

Driving Your Mazda
Your vehicle has a tap-down feature thatallows you to decrease your currentsp€ed in decrements of 1.6 krth (l mph)by a momentaJy tap of the control lever.Multiple taps will decrease yourvehiclespeed 1.6 knth (1 mph) for each tap.
=_\i#t&1a.#
NOTtr
With an automatic lransaxle vehicle.the gear is automatically electedwhen going uphill.
I To Resume Cruising Speed atMore Than 40 km^ (2s nph)
Il someihing besides the CRUISE MAINwas used to cancel ffuising speed and thesysiem is slili activated, the most rccentset sp€ed will automaaically resume whenthe control lever is moved up to rheRES/ACC position, then released. Ifvehicle speed is below 40knh (25mph),rncrease the vehicle sp€ed up to 40kn/h(25nph) and rnove the lever up to theRES/ACC position.
5.19

Driving Your Mazda
Instrument Cluster
I Gauge Location
':L,- Z.P;_' 9i
,E
$ D'P- eln
5.20
Odoner€r md Tnp MeEr
J waler TenFrllue Gauge
5

Driving Your Mazda
I Wa.ning[ndicato. Light Locations
Bmke System Wming Light
2
3 ChrreingSrnem Wm'nB Lighr
Eneine Oil lrssuR wm'nC tighr
5
6
1 DooFAjarwam'ns tisht
8 Anddk Bnre Syscm (ABS) wding Lishr
9 supplmrrl R$Fainl Sysl.n wming Lieht
Headlight High Beam Indicator Lieh!
O/D OFF Ind'caLor L ghr
Cruise Set Indicator Light:
,some moders. 5-21

Driving Your Maz da
Gauges
I Speedometer
The speedometer indicates the speed oflhe vehicle.
I Odometer and Thip Meter
The ignilion swilch must be in the ON
The display node can be changed fromodometer to trip meter A to trip meter Band ihen back to odometerby pressinglhe selector. The selec&d mode will bedisplayed.
ro)\Y/
NOTE
The display mode can be changedwhile the vehicle is stopp€d for abouta l0 minute period after the door isopened or the ignition switch is in theACC or LOCK position.

Driving Your Mazda
oDo
E
When trip meter A is selected, TRIP Awill be displayed. When meler B isselectred, TRIP B wjll be displayed.
The trip meter records the rolal distancethevehicle is driven until ihe meter isagain rcset. Retum it ro "0.0" by boldingthe selector depressed for more than Isecond. Use this meter to measure tripdistances and in to compute fuel
V Odom€ter
When this mode is selectred, ODO will bedisplayed-
The odometer recods the rotal distancefte vehicle has been driven.
V Tfip meter
The trip meier can record rhe totaldistance of two trips. One is recorded inarp meter A, and the other is recorded intnp meter B.
For instance, trip meter A can rccord thedistance from ihe point of origin, and rripmeter B can record the dislance fromwhere the fuel tank is filled.
Wlen trip meter A is selected. pressingthe seiector again wi6in one second willchange to trip meierB mode.
NOTE
Only the lrip meters record ienthsof kiloneiers (rniles).
The trip record will be erased
. The power supply is intefiupted(blown fuse orthe baltery is
. The vehicle is driven over 999.9km (mite).
s-23

Ddving You. Marda
AclurroNDriving wift an overheated enginecan cause serious engine damage(page 6-2).
I Water T€mperature Gauge
The water lemperature gauge sbows lhetemperature of the ergine coolant,
If the needie exceeds normal rangetoward H, it indicates overheating.
I Fuel Gauge
The fuel gauge shows approximately howmuch fuel is i!1the lank. We recommendkeeping ihe tant over 1/4 full. When thelow fuel waming light illuminates orwhen the needle is near E, refuel as soonaspossible.
H.\
=
st til= //'->) ?
= .Y') /-""'-4-r^-*-"
5-24

Drivine Your Maz da
Dashboard Illumination
Ac.lurroNDon't run ihe engine wirh dletachoneter needle in the RED ZONE.
This may cause severe enginedamage.
I Tbchometer
The lachom€ler shows engine sp€ed inthousands of revolutions per minute(ryrn).
When the parking lights orheadlighrs areon, rotate th€ thumb-wheel to adjust thebrighhess of lhe dashboard lighrs.
5-25

Drit ing Your Mazda
Warning LightVBeeps
I Warning Lights Inspection
Inspect lhe waming lights by turning theignilion switch !o the ON position withth€ engine offand the parking brake on.Consult an Authorized Mazda Dealerabout any light thai doesn't come on.
If the brake system waming light is offwhen dre ignition switch is in the STARTposition, have the system inspectedby anAuthorized Mazda Dealer
After starting the engine, make sure allwarning lights are off.Ifone stays on. it'ssignaling for attenlion.
The brake syslem waming lighr sbouldgo off when the parking brake is released.
I Brak€ System WsmingLight
Low brake fluid level warning
You may notice that ihe pedal is harder topush or tlat it may go closer to the floor.Ineirher case, jt will take longer to stopthe vehicle.
l. With the engine stopped. check thebrake fluid level immediately and addfluid as required (page 8 23).
2. After adding fluid, check the lightagain.
Ifthe waming light remains on, or ifthe brakes do not operate properly, donot drive the vehicle. Have it towed toan Authorized Mazda Dealer.
Even ifihe light goes off, have yourbrake system inspected as soon aspossibte.
This waming lightcomes on when theignition switch is tumed to the ONposition. Wlen the parking brake is notapplied. itgoes out after about2 seconds.
This waming has the following functions:
V Parking brak€ warning
The light cones on when the parkingbrake is applied with fte ignition switchin the START orON position.Ilgoes offwhen $e parking brake is fully released.
V Low brake fluid levelwarning/Elect.onic b.ake forcedistribution system warning
lf the light stays on after the parkingbrake is fully released, you may have a
Drive to $e side of the road and park offthe right of way.
5-26

Driving Your Mazda
A wanlvnucABS Warn;ng Light and BrukeWaming Light on at the Same Time:Dtiving when the bmke ststenvaning light and ABS waning lightare on at the tante time h dange.ous.When both lighs are o , the narvheels cottld lock nore quicklr in anemerSen.r stop than nder nornul
Don'td ye with both liqhts on, and.o tact an Authoized Mazde Dealerto htve the brukes inspected as soon
Electronic brake forc€ distributionsysrcm warnmg
Iftbe electronic brake force distributioncontrol unit determines that somecomponents ar€ operating incorreciiy, thecontrol unit may tum tbe brake systemwaming light on.In this case, the ABS warning lightcomes on at the same time. (page 5 30)
I S€at Belt Waming Ligh,Beep
If the driver\ seat belt is not fastenedwhen the ignition switch is ium€d to theONposition, a beep will sound for about6 seconds and the seat belt warning lightwill remain on until the belt is fastened.
If the system does not operate conectly,consult an Authorized Mazda Dealer
Aw,cmuvcBratu Waming Light:Diring vith the brake srstehlvarni g liehr on is dangerous. Itin.licates that Jour btukes ma! notwo* ttaA ot that thet couatonpletel! fail at onr 6ne. I thisnght rcmains on, have the brukesinspe.led innediatelr. Don't ditewith this light on, and contact anAuthorized Mazda Dealer to hate thebmkes inspectedas soon as possible.
5-27

Driving Your Mazda
I Charging System warningLigbt Ac.turroN
Don't drive with a loose or brokenaltemator belt. The engine couldoverheat because thisbelt aiso drives
I Ensine Oil PressureWarning Light
This waming light indicates lowoil pressure.
t;]ergineThis waming light indicates a
maifunction of the allemalor or of thecnargrng sys€m.
Ifthe ligbt comes on while driving:
1 . Drive to the side of the road and parkoff the right of way.
2. Tum off the engine. Inspect thealternator drive belt for looseness and
3. Ifit's OK, the charging system has aproblem. Consull an AuthorizedMazda Dealer as soon as possible.
If the lightcomes on while driving:
1 . Drive to the side of ihe road and parkoff the right-of-way.
2. Tum off the engine and insp€ct theengine oil level (page 8-16). If il'slow, add oil.
3. Check the lighr.
lf the light remains on even after youadd oil, have yourvebicle towed to lhenearest service station or to arAuthoriz€d Mazda Dealer.
5-28

Driving Your Mazda
AclurroNDon't run the engine if oil pressure islow.I! could result in extensive
I Low Fuel Warning Lisht
This warning light in the fuel gaugesignals that the fuel tank will soon be
Celfuel as soon as possible.
I Check Engine Light*
Ifthis lightcomes on while driving. thevehicle Inay have a problem. It is
imporiant to nole the driving conditionswhen the light came on and consult anAuthorized Mazda Dealer
The checkengine light may come on inthe fbllowing cases:
. Tbe fuel tank level being very low orapproaching emply.
. The engine's electrical system has aproblem.
. The emission control systemhas a
. The firel filler cap is missing or nottightened securely.
If the check engine light flashescontinuously, decrease you! speed andconsult an Authorized Mazda Dealer as
"su...oa"r,. 5-29

Driving Your Mazda
I Door-Aiar warnine Lieht a- I4+
This warning light comes on when anydoor isn't securely closed.
I Antilock Brak€ Svstem f^ lI ABsr warning iight L(q9/
The waming lighl slays on for a fewseconds when lhe ignition swilch isturned io the ON position.
If the ABS warning light stays on whileyou're driving. lhe ABS control unithasdetected a system malfunction. If thisoccurs, your brakes will functionnormally as jfthe vehicle had no ABS.Should this happen. consult anAuthorized Mazda Dealer as soon as
Possible.
NOTE
When the engine isjump slarled tocharge the battery, uneven rpm occursand the ABS waming lighl comes on.This is due to a weak battery, not amalfunction.
Recharge the barcry.
AwnnumcABS Warning Light and BnkeWaning Light on at the Sane Tine:Driring when the bruke tlttenwanins lisht and ABS u'amins lishtale on at the same time is dangerous.When both lights are on, the rearwheels couu bck nore quicktr in tnemerge t! stop than under nornul
Don't dnve with both Aghb on, andcontact an Authoized Mazla Dealerto hare the braket inspected as soon
5-30

Dri!ing Your Mazda
A wanlsnrcS e lf-S en icing the S uarkacala!ResttuintSrstem:Seryaenicittg o. tatnpe.i g ||ith thetupplemental restraint slstem isda geftus.The ab bags couldaccinentaltr acnvatu or beconedisabled. This could couse viousWunes. Nerer tanper with thesupplemental restraint srstem andalwars have an Authoized Ma.laDealet peiom alt senicins and
I Supplemental RestraintSystem Warning Light
I Ignition Key Reminder
If the ignition swnch is in the LOCK orACC position, a beep wiU sound when
I Lights-On Reminder
Iflights are on and the key is remov€dfrom the ignition switch, a beep willsound when any door is opened.
Iflhe supplementat restraint system isOK, the warning light comes on when theignition switch is turned to the ONposition or after the engine is cranked.Afler about 6 seconds it go€s out.
A system malfunction is indicated whenlbis light constantly flashes. stays on ordoesn'lcome on at ail.lfone of theseoccur. consult an Authorized MazdaDealer as soon as possible. The slstemmay not work ln an accident.
5-31

Driving Your Mazda
I Heedlight Hish-Beam E^I I O/DOFF Indicetor Lighr 0/D I Cruise Ser Indicator Lishr* [Jlndicator Light =\) ( Auromatic Transa\ler off l-'---
This light comes on lvhen a cruisingThis ligbt indicates one oftwo thingsr This light comes on when the overdrive speed is ser.
has been tumed off.. Tbe higb-beam headlights are on.
. The tum signal lever is in theflash to pass position. Ac.quuoN
If the overdrive-off indicator lighiflashes, the trarsaxiehas an eleclricalproblem. Continuing ro drive yourMazda in this condition could causedamage to tour rransaxle. ConsultanAutho.ized Mazda Dealer as soon aspossibl€.
5-32 'so-" ^oo.r'.

Driving Your Mazda
LightingSignals
Control and Turn
V Lights-on r€minder
If the lights :re on and rhe key jsremoved fiom the ignition switch. abeepwill sound when any dooris opened.
NOTE
To prevent discharging the battery,don'tleave the lights on while theengine is off.
I Headlights
To 1um on the lights, turn the knob on rheend of the control leve.
The firs! stop turns on rhe taiiligbts-dashboard lights. parklng lights, licenseIights, and side-maJker lights.
The second stop turns on the headlights,taillights, daslboard lighrs, parkinglighls, license lighls, and side-markertigh!s.
V Headlight highnow beam
Push ihe lever iorward for high beams.Pull it back for low.
The high-beam indicator light on thedashboard is blue.
5-33

Driving Yotrr Mazda
V Lane-change signals
Move $e lever slightly towaJd thedirection of th€ change-unlit th€indicator flashes andhold it drere.ltwill r€tum io the offposition when
NOTE
Ifan indicatorlighl stays on withoutflashing or jf il flashes abnormally.$e tum signal bulb tnay be burned
V Flashing the headlights
To flash the headlights, pull the leverfully toward you. The headlight switchneed notb€ on, and the leverwill relurnto the normal position when released.
The high-beam indicaior light on $edashboard is blue.
I Tirrn and Lsne-Change Signals
V T|lrn signal
Move ihe signal lever down (for a lefttum) or up (for a right lurn) to fte stopposition. The signal will self-cancel afterthe turn is completed.
Green indicalors on $e dashboard showwhich signal is workiry.
lfthe indicator light continues !o flashafter a tum, manually retum the lever toits original position.
5-34

Driving Your Mazda
Windshield WiDers andWasher
I Fog Lights+
Use this switch lo 1um on the fog lights.They help you to see as well as to be
To turn on the fog lights, first turn on theheadlight switch. Then press the fog ligh!switch. To turn ihe fog lights off, pr€ssthe fog light switch again or turn iheheadljght switch off.
I Windsbi€ld Wipers
The ignition switch nusi be in the ON
Turn the wipen on by pulling the lever
INT lntermittentI Normal2 Fast
V One-touch wipers
For a single wiping cycle, push the leverup to MIST.
"sonenoders. 5-35

Driving Your Mazda
I Windshield Wasber
The ignition switch musibe in the ON
Pull the levertoward you and hold ittospray washer fluid.In rhe OFFor INTposition, the wipers will be actrvateduntilthe lever is released.
Ifthe washer doesn 1 work. inspect ihefluid level (page 8-27).Ififs OK. consultan Authorized Mazda Dealer
NOTE
Because heavy ice and snow can jamthe wiperblades, the wiper motor isprotected by a circuit breaker. Thismechanism will automalically stopoperadon offie blades, but only for
If this happens, turn off the wiperswitch and park off the right-of'way.After 5 mlnules, tum on lhe switchand the blades should op€ratenormally. If lhey don't, consult anAuthorized Mazda Dealer as soon aspossible.
A wamrnrcFroze Washer FtuA:asinc windshied washer fluin infreezing temperuturcs is da gemuL1:he vashetluid couu frceze on thewindshieA and block your vision.You coud hore on accident. Don'tuse the flashet *'ithoutfrrst waming
5-36

Driving Your Mazda
AclurroNDon't use sharp inslruments orwindow cleaners with abrasives roclean the inside of the rear windowsurface. They mal damage tbedefroster grid inside the window
Rear Window Defroster
The rear defroster clears frost, fog, andthin ice from the rearwindow
The ignition switch must be in the ON
Push lhe switch to lurn on $e rearwindow defroster; rhe indicator lighr will
Push the switch again to turn it off.
NOTE
This defroster is not designed formelting snow Ifthere is anaccumulation of snow on the rearwindow, brush il off before using ihe
5-37

Driving Your Mazda
Lighter
To operate the lighter. press it in andrelease it. Wlen ready for use, itautomatically pops out.
If the engine is off.lhe ignition swilchmust be in lhe ACC or ON position fbrthe lighter to operate.
To remove, op€n and push down on thelock spring.
Ac,tuuoNDonl use ashtrays for trash. Youmight start a fire.
AcaurronDon't hold the lighr,e! in because it
Donl use the lighFr socket forplug-in accessories such as shaversand cofiee pots. They may danageit or cause eleclrical failure. Useonly a genuine Maz da ligbter
If ihe lighter doesr \ pop outwithin 30 seconds. remove it loprevent oYerlreatmg.
5-38

Driving Your Mazda
A wamrnrcOpen Storaee Box:Diving with a storage box open isdangerous. To rcduce the possibiuryof injury in an accident or a suddenstop, keep the storagc boxes closed
AclurroNIn hot weather, don't leavecombustible ma|erials or objectswhich witl deforn in exlreme heatsuch as lighters and glasses in the
Storage Compartments
I Glove Box
To open the glove box. pull the latch
The door has a lock. insert the key andtum ir clockwise to lock.counterclockwise to unlock,
5-39

Driving Your Mazda
Cup Holder
I Center Console
To open, pull the release catch.
To use the cup holder, op€n the lid.
AwtnnnteUsingtheCup HoU.r:Asing the cup holder to hod hotliquids v'hile the vehicle is novins isdanserous. II the contents spilt, roucould be scaded. Never use the cupholder to hou hot liquds while the
5-40

Dri!ing Your Mazda
Sunvisors
>'''.''...''''..-'. 4*-aa- i'--......?-......-,
When you need a sunvisor.lower it foluse in front or swing jt 1() the side.
Vanity Mirrors
To use the vanity lnirror. iower thesunvisor and pull the mirror cover up.
rl
5-4r

Driving Your Mazda
Climate Control System
I Op€rating Tips
V Operating the climate control
Op€rate the climate control system withthe engine tunning.
V Clearing the air inlet
Clear all obstructions like leaves, snowand ice from dre bood and the air inl€t in$e cowling grille to improve iie systemefficiency.
V Foggy windows
The windows may fog upeasily in hunidweather, Use the climate control syslemto defrost lhe windows,
To help defrost the windows. operate theair conditioner ro dehumidify the air.
V Outside/Recirculated air position
Use the outsid€ air position in nornalconditions. The recirculated air positioncan be used temporarily when driving ondusty roads or for quick cooljng of the
V Parking in dir€ct sunlight
Iflhe vebicie has been parked in directsunlight during hotweathe! open ihewindows 10 let warm air escape. then nrnthe climate control system.
V Not using for a long period
Run the air conditioner at least once amonth to keep internal paJts lubricated.
V Check the rcfrigerant beforeweather gets hot
Have the air coditioner checked beforethe weather gets hot. Lack of refrigeranlmay make the air conditioner lessefficient. Consult an Authorized MazdaDealer for refrigerant inspectron.
The optional air conditioner is filled withR I 3 4a, a refrigeranr that will not damage
If ihe air conditioner is low on refrigerantor has a malfunction, consult anAuthorized Mazda Dealer.
5.42

Driving Your Mazda
I Selectins the Airflow Mode
When lou want air to When you want air tothe face and the floor:
Whe[ you want airmainly to tbe floor:
W})en you wanr air 10
the floor and defroslthe windshield:
defrost thewindshield:
Mode
Airflow
'some nodek. 5-43

Driving Your Mazda
/l.]i==T=m..tnl-r--lil rl\\LUflffit
tctrmrr-t7/---f---
I Vent Operation
V Directins airflow
You can direct air flow by moving the
N.OTE
When using fte air conditioner. mistmay come out from the vents. This isnot a sign of trouble but a result ofhumid air being suddenly cooled.
V Aqiusting the amount of airftow
These vents can be opened by rotaiingthe vertical wheels up or closedbyrotating lhem down,

Driving Your Mazda
I Control Plnel
Fan conuoldial(pase 5 46rPear windos LlefrosEr stritch ipage 5.17r
TenpedtuE conrol djal (page 5 46) An i.hke sehrorswn.h (page 5.46) Mode selectoi dial (page 5 ,1?)
(O G.,ztG o
*sonenoaers. 5.45

Driving Your Mazda
/6fcord \\ r7i Hd
v___/
O€,,z.GO
V tran control dial
This dial allows variable fan speeds.
0 Fan offI -Low speed2
-Medium low speed
3 Mediurn high speed,l
-High speed
V Tempe.aturc control dial
This dial controls temperature. Tum itclockwise for hot and counterclockwise
V Air intake sel€cto. switch
This switch controls the source of airente ngthe vehicle.
Press the switch to alternate betweenfte ra and 6 positions. The indicatorlight for the selected mode willilluminate.
It is recommended that under normalconditions the switch b€ kept in lhe
5-46

Driving Your Mazda
A wenlrnrcThe Recirculated Air Position:Using the a position in cowi)eather will cause the elass to fogup. Your vision viA be hamper.d,which couu kad to a senoutaccdenL Do not use the.6 positinn
.6 Outslde air position
Outside air is taken into the vehicle. Usethis position for normal venrilation andnearng.
6 Recirculated air position
Outside air is shu! ofl Air within th€vehicle is recirculacd-
This position can be used when drivingon a dusly road or in similar conditions-It also helps to provide quickercooling of
@V Mode selector dial
Turn the mode selector dial to selectairflow rnode (page 5-43).
5-47
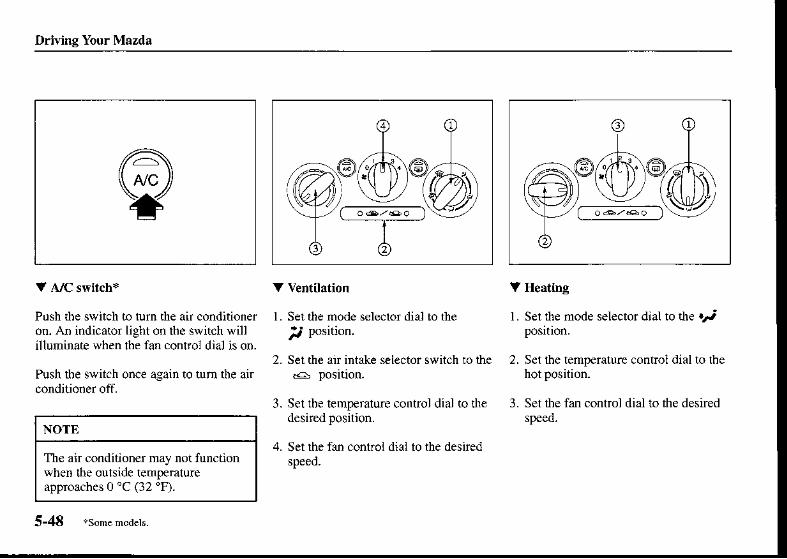
Driving Your Mazds
lA\ A/C i/Y
V Arc switch*
Push $e switch io lurn the air conditioneron. An indicator light on tbe switch willilluminate when the fan control dial is on.
Push tbe switch once again to tum the air
V Ventilation
l Ser the mode selector dial to the
P' Posnion.
2. Sel rhe air intake selector switch ro ihe
3. Set lbe temperatLrre control dial to thedesired position.
4. Set rhe fan conlrol dial to the desiredspeed.
V Heating
l Sel the mode selector dial to the .l
2. Set ihe temperature control dial to thehotposition.
3. Set the fan control dial ro ihe desired
NOTE
The air condinoner rnay not functionwhen the outside temperatureapproaches 0 'C (32 "F).
5-48

Driiing Your Mazda
NOTtr
ln the iposrlion. the outside airrs automatically selected.
If the windshield fogs up easily. serthe mode selector dial tothe iri
Ifcooler air is desired at face level.set the mode seleclor dial atlhe r' position and adjusi ihetemperature conlrol dial tomaintain maximum comforr.
The air to the floor is wa.rmer thanair to the face (except wben dletemperalure control dial is set atthe extr€me hot orcold position).
?? ?
.@-*M@)l-(,
5. Adjust the fan control dial andtemperature control dial to mainrainmaximum comfori.
V Cooling (with air conditioner)+
l. Set the mode seleclor dial to the
, Posrlion.
2. Set the i,emperarure conrol dial to rhedesired position.
3. Set the fan control dial to the desired
.1. Turn on the air conditioner.
5.49
Ac.q.urroNWben using the air conditioner whiledriving up long hills or in heavylraffic, closely monitor thetempefalure gauge,The air conditioner may cause engineoverheating. If the gauge indicaresoverheating, tum lhe air condilionerofi (Refer io Overbeating on page6 2.)

Driving Your Mazda
NOTE
. Wlen maximum cooling is desired,set $e tempenture conrrol dial iothe extreme cold posiiion and setthe air intake selector swiich to the6 position, then set the fanconlrol dial to the position 4.
. If warmer air is desired at floorlevel, set the mode selector dial atthe .' position and adjust thet€mperature control dial tilmaintain maximum comfort.
. The air to $e floor is warmerthana; to the face (excepl when thetemp€ranre control dial is set attbe exrreme hor or cold posirion).
V Windshield dehosting anddefogging
L Set tbe mode selector dial to the @
2. Set rhe temperature control dial to thedesired position.
3. Set the fan contol dial to the desiredspeed.
Awl'nnmcFosev Windshieu:Using the @ potition |'ith thetemperutun cond set to the coldposition wilt couse the odsiAe ol theglass to fog up. Your yhion wiv behanpercd, r'hich could lead toaserious accAent. Set the tenryraturccontrcl to the hot or varm positionvhen usittg the @ positiott.
5-50

Driving Your Mazda
For maximum d€frosting. ser tbetemperature control dial to iheextreme hot position and the fancontrol dial to position 4-
If warm air is desired ar the floots€t the mode selector dial ro the
rp rcsition.
In the @or lPposition, rheoutside air is automalicallyselected. The air intake selectorswitch camor b€ changed to the
3. Set the temperature control dial to rhedesir€d position.
4. Sel ihe fan control dial ro the desired
5. Tum on the air conditioner.
V Dehumidifying(with air couditioner)*
Operate the air conditioner in cool orcold weather to help defog lbewindshietd and side windows.
L Sei the mode selector dial ro ihedesired position.
2. Set the air intake selecror switch ro r}le
"sonenoaers. 5-51

Driving Your Mazda
Radio Reception
I AM Characteristics
V Station mixing
AM signalsbend around such tbings as
buildings or mountains and bounce offthe ionosphere. Therefore. lhey can reachlonger distances than FM signals.Because oflhjs. lwo stations maysomedmes be picked up on the samefrequency at the same time.
I FM Characteristics
An FM broadcasirange is usually about4G-50 km (25-30miles) from thesource. Because ofextra coding neededto break ihe sound into two channels,siereo FM has even less range t}anmonaural (non stereo) FM.
Signals from an FM ransmitter alesimilar to beams oflightbecause they donot bend around corners. but they doreflect. Unlike AM signals, FM signalscannot iravel b€yond the horizon.Therefore. FM stations cannot bereceived al the great distances possiblewith AM reception.
Al'nospheric conditions can also affectFM receplion. High humidity will causepoor receplion. However, cloudy daysmay provide beller r€ception than cleardays.
100 200 rm i60-120niles
5-52

Driving Your Mazda
V Multipath noise
Since FM signals can be reflected byobstructions, ii is possible to receive boththe direci signal and rhe reflecred signalat the sane time. This causes a slightdelay in reception and may be heard as abroken sound or a distortion. Thisproblem may also be encountered whenjn close proximity to tbe transmittrer.
V trlutter^kip noise
Sjgnals from an FM transmitlermove instraighl lines and become weal( in valleysbetween tall buildings, mountains. andother obstacles. Wlen a vehicle passeslhrough such an area. lhe recepiionconditions may change suddenly.resulting in annoying noise.
V Weak signal noise
In suburban areas, broadcast signalsbecome weak because of distance fromthe lransmitter. Reception in such fringeareas is chaJacterized by sound breatup.
5-5-t

Driiing Your Mazda
Safety Certification
This CD player is made and lested tomeel exacting safety standards.It meets FCC requirements and complieswiih safety perfonnance standards of theU.S- Deparlment ofHea h and HumanServices.
V Stmng signal nois€
This occurs very close to a transmiltertower The broadcast signals areextremely slrong, so the result is noiseand sound breakup at the radio receivet
V Station drift nois€
When a vehicle reaches the area of twoslrong stations broadcasting at similarfrequencies. the original siadon may betemporaJily lost and ihe second stationpicked up. At this tine tbe.e will b€ somenoise from this disturbance.
5-54

Driving Your Mazda
AclurroNThis CD player should not beadjusr€d or repaired by anyoneexcept qualified service personnel.If serv icing required, contacr anAuthorized Mazda dealer.
Use of controls or adjustmenls orperformance of procedures otherthan those specified herein mayresult in hazardous radiationexposur€- Never operal€ the CDplayer with the top case of the unit
Changes or modifications notexpressly approved by Maz da rnayvoid the user's authority to operatethis equipment.
NOTE
For CD player section:This device complies with part 15 ofthe FCC Rules. Operarion is subjectto the following two condilions: ( I )This device may nor cause harmfutinierference, and (2) this device mustaccept any interference received,including interference that may causeundesired op€ration.
NOTT]
This equipmenthas been rested andfound to comply with rhe limits for aClass B digital device. pursuant topart 1 5 of rhe FCC Rules. Theselimits are designed to proyidereasonable protection againsr harmfulincrference in a rcsidenlialinstallation. This equipmenrgenelates, uses, and can ndiate radiofrequency energy and, if not insialledand used in accordance with themstruchons, may cause harmfulinterfbrence to radio communicaaions.However, there is no guaraniee thatinrertarence will not occur in aparticular installation.

Driving Your Mazda
AM/FM Radio+
Illustration is ofa Eprcsenrative audio unit.
SeeIL tuning/Ttuk down* r/
*r Use tbh buton if a cassete tape player, MD player, cD player or cD changer is connecred ro this unit.
flifl&9ffi8lHffffiE &ffi trB,K"
5-56 .s....oaet'.

Driving Your Mazda
AM/FM Radio with ComDact Disc Plaver*
Illustration is of a representative audio unit.
/ Dis trpbuuon. Repeat butron
Progranlr/R$dom button Fast lorwdd buuon*r Use ftis bunon if 3 cassette tape player, MD plaler or CD changer is connected to this unit.
urlstst'8,ffiHHs.Bgg.B"
'Some nodek. 5-5/

Driving Your Mazda
f$l_lI PaPowEi \AY
I Power ON/OFF
Tum the ignilion swirh !o the ACC or ON
Press the power/volum€ knob to lum tbeaudio slstem on. Press the power/volumeknob again 1<) tum the audio system off.
V Volume adjustment
Turn the power/volume knob to adjusi
V Audio sound adjustment
1. Press the audio control knob to selectbars, mid range, treble, fade otbalance control. The selected funclionwill be indicated.
9r i-r lI
9
9
NOTE
To prevent the baitery from beingdischarged. do not leave the audiosyscm on for a long period when theengine is not running.
5.58

Driving You. Mazda
NOTE
About 5 seconds after selecting anymode, ihe volume funciion will beautomatically selected. To reset bass,mid-range, a€ble, fade, and balance,press the audio control knob for 2seconds. The unit will beep and "CL"will be displayed.
Bass control
To adjusl the bass, selectBASS byprcssing the audio conlrol knob. "BASS"will be dnplayed.
Tum lhe audio control knob to the rightto increase bass, to the l€ft 10 decrease it,The level will be displayed.R€lease ihe audio conirol knob wben thedesired level bas been reached.
Mid-rang€ conhol
To adjust the mid-range, selecl MID bypressing the audio control knob. "MID"will be displayed.
Turn the audio control knob to the rightto increas€ mid-range, to the left todecrease it. The level will be displayed.Release the audio control knob when thedesired level has been reached.
2. Tum the audio control knob to adjustthe selecled tunction; bass, mid raflge,treble, fade or batance.
s-59

Ddving Your Mazda
Tr€ble conlrol
To adjust the treble. select TREB bypressing the audio controi knob. "TREB 'will be displayed.
Tum the audio contol knob io ihe rightto increase rreble, to the left lo decreaseit. The level will be displayed.Release the audio control knob when thedesired level has been reached.
Fader control
To adjust the sound distribution betweenfiont and rear speakers. select FADE bypressing ihe audio control knob. "FADE'will be dispiayed.
Turn the audio control knob to the rightto shift the sound to the rear, to the left roshift $e sound to the front. The level willbe displayed.Rel€ase the audio control knob when lhedesired level has been reached.
Balance control
To adjusr the sound dislribuiion belweenleft and right speakers, select BALbypressing the audio control knob. 'BAL"will be displayed.
Turn tbe audio conrol knob to the rigbtto shift the sound to the righl, to the leftto shift the sound !o lhe left. The levelwill be displayed.Release the audio control knob when lhedesired level has been reached- I Clock
V Setting the time
The clock cln be set at any time when lheignition switch is in lhe ACC or ON
I . To adjusr the lime, press the clockbutlon for about 2 seconds until abeep
2. Tbe clock s cunenitime will flashunlil the time is set.
5-60
tc."*-l-+-

Driving Your Mazda
f---]-/" ** li t-
/*orto."frl
3. To advance the hours, press ihe hoursel button ( H ) to advance themjnules, press the minute setbutton( M ) while the time is flashing.
4. Press the clock button again to start
NOTE
lf the power supply to the unit isintrerrupred (if the fuse blows or ftevehicle's battery is disconn€cted), theclock will need 1() be reset.
l_--'---------a-::---| '{.J H I I '{H(a I
lnItl\,, \,2f-J.-=frn- T---.El!-frI
NOTE
If the time is not adjusted while theclock's current time is flashing (ifneilber the H nor M is pressed). andth€ clockbutton ispressed a secondtime, the minut€s will be set to 00. Iffte clock s current time selting iswithin the lauer pan of dle hour (from30 to 59 min). tbe hour se$ing willautomatically advance one hour.
V Changing the display mode
The disptay on the unit can be changedby pressing the clock bution. Thisaltemates the dhplay between tirne andaudio. When the clock mode has beens€lechd, the time will be displayed.
fc.o"*-i-+-
NOTE
Ifaudio operarion is selected whiletle time mode is on, the selectedaudio mode will be displayed for tenseconds, then the display will revert
5-61

Driving Your Mazda
Choos€ AM by pressing the AM buttonand FM by pressing the FM1/2 button.
The selected mode will be indicated.IfFM stereo is being received, "ST" willbe displayed.
V Tbning
The radio has the following tuningrnethods: Manual, Seek. Scan, Presetchann€I, and Auto memory luning.The easiest way to tune stalions is to setthem on preset channels.
NOTtr
If the power supply is interrupted(fuse blows or the battery isdisconnected), the presel channels
I Operating the Radio
To operate the radio. tum the ignitionswitch to the ACC orON position.
V Radio ON
Press the AM or FM1/2 button io tum th€
NOTD
If the FM broadcast signal becomesweak, reception automaticallychanges from STEREO to MONO forreduced noise, and the "ST" indicatorwill go out.
5-62
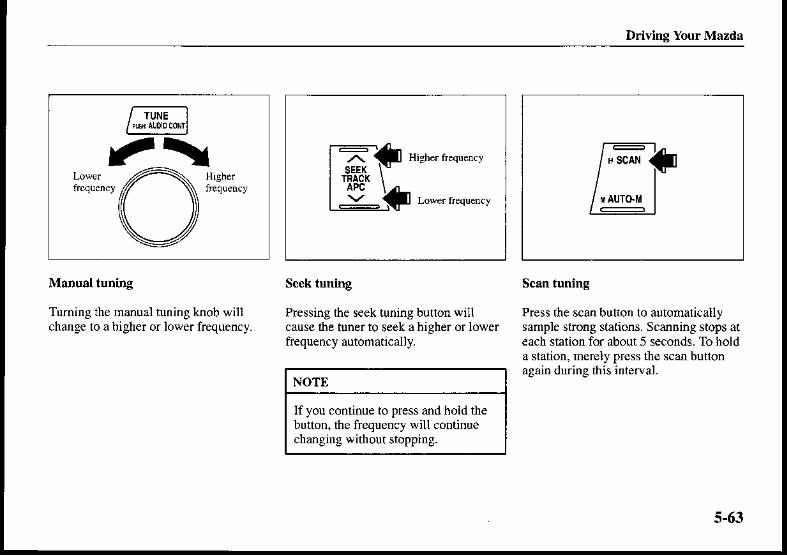
Driving Your Mazda
-rulu_l/ru{Auo0coMl
!t\#,x"*4l::iH.,
Vi'** lFtl
/ MAUTGM I
Manual tuning
Turning the manuat tuning knob willchange to a bigher or lower frequency
Seek tnning
Pressing the seek tuning button willcause the tuner to se€k ahigher or lowerff€quency automalically.
NOTE
If you continue to press and hold thebunon, the frequency will continuechanging without stopping.
Scan tuning
Press the scan button to automaticallysample strong slations. Scanning stops ateach station for about 5 rconds. To holda staiion, mereiy press the scan butlonagain during this interr'al.
5-63

Driving Your Mazdt
To tune one jn fie memory, selectAM.FMl, or FM2 and then press its chann€lprese! button. The station frequency andthe channel number will be displayed.
NOTE
If the power supply is interrupted(fuse blows or the battery isdisconnected). the preset channels
Preset cbannel tuning
The six preset channels can be used tostore 6 AM and 12 FM stations.
To set a channel first selecr AM, FMl. orFM2. Tune to lhe station you want anddepress a channel preset button for about2 seconds uniil abeep is heard. Thepreset channel number and siationfrequenc! will be displayed.The station is now held in lbe memory.Repeat this operation for the otherslations and bands you wan110 slore.
5.64
Auto memor! tuning
This is especially useful when driving inan area wbere the local stalions are notknown- Addiiionat AI4/FM slations canbe stored wirhout dislurbing thepreviously set channels.
Press and hold the auto memory buitonfor about 2 seconds until a beep is heard;the system will automatically scan andtemporarily store the six strongeststations of each selected band in that
/ HscAN I
II/,*t"u ft

Driving Your M^zda
f- vor-lI sPowEF \
6)YAfter scanning is completed. ihestrongest station will be luned and itsfrequency displayed.Press and release the auto memory bultonio recall stations from the auto sioredstations. One stored station will beselected each time; its frequency andchannel number will be displayed.
I Operating the Cassette Tsp€Player*
To operate the cassette tape player, tumthe ignition switch to the ACC or ON
V Cassette tape insert
Inserl the cassette tape into the slot, openedge to lhe right and casseue tape willbegin play and "TAPE will bedisplayed. At $e end of iie cassere rape.the unit automatically reverses cassettetape platWhen is lir. the cassette tap€t top sideis playing. Wlen V is lii, the bottom sideis on,
NOTE
If no stations can be tuned afterscanning operatjons, "A" wiii bedisplayed.
V Radio OFF
Press the power/volume knob to tum offthe radio.
NOTE
Press lhe power/volum€ knob again tolisten to the frequency last tuned to.
NOTE
W}jen a metal rape is inserted, theplayer will automatically compensatefor it and "MTL" will be displayed.
"sonenoaets 5-65

Driving Your Mazda
t-;-l?"'
til;l-fiV Playing
Press the casselc tape play button tostaltplaying when a cassette tape is inthe unit.Ifthere isn't a cassette tape in$e unit wben lhe cassette tape playbutton is pressed. "NO TAPE'will flashon and off in sequence.
V Dolby noise reduction
When using a tape with Dolby NR+,pushthe D0 button. The DO symbol will bedisplayed. To play a tape without DolbyNR, push the bulton once again.
* Noise reduction system manLrfacturedunder license fiom Dolby LaboratoriesLicensing Corporation.
Dolby and the double D syrnbol DOare trademarks of Dolby LaboratoriesLicens jng Corporation.
V Fast forward/Rewind
Press lhe fast forward button 1<)
fast-forward.Press rhe rewind button to rewind.To stop this operation and play ihecassetie tape, press the button again.
NOTE
Vften the cassette tap€ ends duringfa$ forward or rewind, itautonatically stops and starts playing.
5-66

Driving Your Mazda
If APC det€cts 15 s€conds of blank spaceit will automatically advance ihe tape to
NOIT
APC may not operate properly if. A tape was recorded at atow level.. A tape has long, silena intervals.. A tape is alive recording.. A tape has very short intervals of
less than 3 seconds.V Reversing
Press the program bulton to changecassette rape-playing direction.
V APC (Automatic Program Control)
APC is used to find the beginning ofeither the n€xt prograrn or the one beingplayed.
Press the APC button ( A ) to thebeginning of ihe next selection.Press the APC button ( v ) to theb€ginning ofthe one being played.To stop ahis op€ration and play th€cassetie lape, press the button again.
NOTE
When lhe cassette tape ends, the unitauiomatically reverses play.
F,"B",Fl-f I:lftI SEEK \-
tE_,t
5-67

Driving Your Mazda
NOTtr
RPI may not operate properly if. A tape was recorded at a low
level.. A tape has 1ong, silent intervals.. A tape is a live recording.. A tape has very short intervals of
less than 3 seconds.
V Repeat play V Stopping
This operation makes itpossible to listen Press the power/volume knob to sropto a selecfion repeatedly. cassette tape play.
Press lhe repeat bulton during play. Thecunent selection playing will be repealed("RPT" will be displayed).Press the rep€at butlon once agajn to
FI-ft"'"""'-l
a
5-68

Driving Your Mazda
V Ejecting the cassette tape
Prcss the cassette tape eject button 10
elect the cassette tap€.
I Operating Tips for Cassetle Tapeplayer
V Cleaning the cassette tape player
The tape head, capsbns, and pinch rollerswill gather oxide residue from cassetretapes. This can caus€ weak or waveringsounds and damage to the cassetG tapesand player Use a good qualityh€ad cleaning rape or a liquid cleanercassette tape to remove it,Should the unit not opemte normally,consult an Aulhorized Mazda DealerNever aatempt 10 repai it or ins€lr ascrewdriver or anything else.
V Handling the cassette tape player
The following precautions should be
. Do not spill any liquid on the audio
NOTE
The cassene rape can be ejected whenthe ignition switch is in the OFF
ry
5.69

Driving Your Mazda
Do not leave a cassette tape in the tap€player slot when not in use. Remove itcompletely to perml the slot door 1()
close and to protect the mechanismfrom dust.
Store cassette tape away from extremeheat, magnetic fields, and directsunlight. Protect the exposed cassettetape from dirt and damage. Storecassettre tapes intheioriginal cases orother protective cases.
Insert only cassette tapes into the do1.If objects other than cassetie tapes areinserted. iley may damage the player.
. Do not insert any objects, other thancassette tap€, into the slot,
If the casselG lape is loose, it mayproduce poor sound or Pertormanceduring playback. Use a p€ncil orsometbing similar to remove anyslack.
Only cassette tapes that play no longerthan 90 minutes should be used.Cassette tape exceeding 90 ninutes arethin and rnay easily br€ak.
5-70
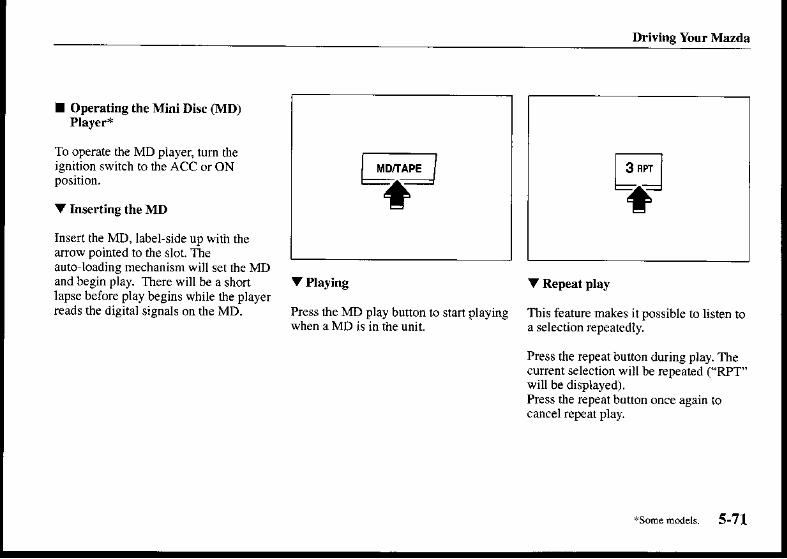
Driving YouI Mazda
I Operating the Mini Disc (MD)Plsyer*
To operate the MD player lum thejgnition switch to ihe ACC orON
V Inserting the MD
Inser! the MD. label-side up with thearrow poinGd ro the slor. Tbeauto loading mechanism will set ihe MDandbegin play. There will be a shonlapse before play begins while ihe playerreads the digital signals on the MD.
V Plaling
Press the MD play button 10 starl playingwhen aMD is in the unit.
V Repeat play
This feature makes itpossible ro listen toa selection repeatedly.
Press the repeatbulton during play. Thecunenrselection will be repealed (.RPT"witl be dispiayed).Press the repeat button once again rocancel repeat play.
t* ;l-+- FI-f
so.".r^r.r'. 5-71

Driving Your Mazda
NOTE
If lhe unil is left in scan, normal playwill resume where scan was sel€cted.
VRandom play V Music scan
This feaMe aliows the MD player to This feature helps to find a program byrandomly select the order of the songs. playing about the first 10 seconds of each
track.Press the random button during play. The Press the scan button during play ao startnext selection wiil be randomly selected scan play operation (the lrack number("RDM" wiU be displayed). will flash).Press the rundom button once again to Press the scan button once again tocancel random play. cancel scan play.
r---^/"** 3tl
/ sAuTo'M I
[," oc-l
*;=
5-72

Driving Your Mazda
ftf- voi_fI Rseov,EF \AV
V Tfack search
Press the track up button once ro skipforward 1() the beginning of the next
Press the tack down button once {o skipback to the beginning of rhe cuffeni
V Faslforward/Reverse
Press and hold the fasi-forward bunon toadvance through a track al high speed.Press and hold $e reverse button toreverse lhrough a aack at high speed.
V Stopping
Press the power/volume knob to siop MDplav.
5-73

Drivins Your Mazda
Long disc or song titlesWhen disc or song ritlesexceed l0lettersor numerals, press ihe display button todisplay the remaining part of$e title.
V Changing the MD display
To change the MD display during MDplay, press and hold the djsplay butonfor about half a second to advancethrough each of the following dispiays:
- Song title 'Disc title 'No display I
V Ejecting the MD
Press the MD ejecr button to e.iect lheMD.
NOTE
Ifftere is no song or disc titlerecorded on the MD, 'NO TITLE"will be displayed.
17#
l;1#

Driving Your Mazda
I Error Indications
If you see an e|ror indication on thedisplay, find the cause in the charl. If youcannot clear the error indication, take thevehicle to an Authorized MazdaDealer.
I Operating the Compact Disc (CD)Player*{n-Dash CD Changer*
To operale the CD player/in-dash CDchanger. tum lhe ignilion switch to rheACC or ON position.
V Inserting the CD (CD player)
Ins€n the CD into the slot,label-side up.The autoloading mechanism will ser theCD rnd begin play. There will be a shonlapse before play begins white the playerreads the digital signals on the CD.The disc in indicator wilt illuminate andihe track number will be displayed.
CHECK MD
lnsert the MD prcperly. If the code does notdisappee, consuh an Authorized Mazda Deale.
MD is defadve Check the MD for scmtches ando. soiling
Some models. 5- /5

Ddvine Your M^zda
V Inserting th€ CD(In-dash CD chane€r)
The CD must be label side up wheninserting. The autoloadjng mechanismwill set the CD and begin play. There wiube a shon lapse before play begins whilethe ptayer reads the digital signals on theCD.The disc number and th€ track numberwill be displayed.
Multipl€ inse ion
1 . Press and hold the load button forabout 2 seconds until a beep is heard.
2. when "ln" is displayed. insert the CD.
3. w1len "In" is displayed again, insertthe next CD.
NOTE
A CD cannot be insert€d white rhedisplay reads "WAIT." A beepingsound can be heard during thiswaiting time. Simullaneously pressingthe power/volume knob and the toadbutton for about 2 seconds will tumthis beeping sound ON or OFF.
Normal insertion
1 . Press the load button.
2. Wlen "ln" is displayed, insert lhe CD.
NOTE
The firsr-inserted CD willbe playedautomatically when:
. No CD is inserted within 15
s€conds afcr "In" is display€d.
. The CD trays aie full.
E4ll LoAD | \L-+-r
5-76

Driving Your Mazda
Inserting CDs into desired tray
L Pr€ss and hold the load button foraboul2 seconds until a be€p is heaid.
2. Press tbe channel preset button for thedesired tray number within 5 secondsafter the beep is h€ard.
3. Wlen "ln" is displayed, inserl the CD.
NOTE
The CD can not be inserled to thedesired tray nurnber if the number isalready occupied.
V Playing
Press the CD play button to stanplayingwhen a CD is in the unit.
V Repeat play
This feaiure makes itpossible to listen toa selection r€peairedly.
Press the repeat bulton during play. Thecunenr selection will be repeated c'RPr"will be displayed).Press the repeat button once again tocancel repeat play.
T----tL---J-+- F]-f

Driving Your Mazda
V Random play
This fealure allows the CD player torandomly select lhe ord€r of the songs.
Press the random button during play. Thenext selection will be randomly selecled("RDM" wiu be displayed).Press the random button once again to
V Music scan
This feature helps to find a prograrn byplaying about the first 10 seconds of each
Press the scan button during play to stanscan play operation (the track numberwill flash).Press the scan button once again to
V Disc s€arch (In.dash CD changer)
Press the disc up button ( ^ ) to skip
foRard to ahe beginning of the next CD.Press the disc down buaton ( V ) to skipback ao the beginning of the previousCD.
NOTE
If the unit is lef. in scan, normal playwill resume where scan was selected.
5-78
/'"* alII/ MAUTo I
f,"r*l|]']-l-f

Driving Your Mazda
ffi"--"'lE-S"***
V Thack search
Press the track up button once to skipforward to the beginning of the nexi
Press tle track down bulon once ro skipback to the beginning of the cunenl
V Fast-forward,/Reverse
Press and hold ihe fast forward button toadvance through a lrack at high speed.Press and hold tbe reverse button toreverse through a lrack at high speed.
V Stopping
Press the power/volume knob to stop CDplay.
l--/or_lI PBTWEF \AY

Driving Your Mazda
V Ejecting the CD Ej€cting CDs from desir€d tray(ln-desh CD changer) nunber
Normsl ejection l. Press and hold the CD eject bution forabout 2 seconds until a beep is heard.
I. Press th€ CD eject buuon.The disc number and "OUT" will be 2. Press the channel prese! bulton for thedisplayed. desired CD number within 5 seconds
afrer ahe beep is beard.2. Pull out rhe CD.
3. Pull out the CD.
V Ejecting the CD (CD player)
Press th€ CD eject butlon to eject the CD.
NOTE
When lhe CD is ejected during play,the next CD will be playedautomatically.
5.80
i:l| ^ tiL--+:l

Ddving Your Mazda
Multiple ejection
I . Press and hold the CD eject bunon forabout 2 seconds until abeep is heard.
2- Wait 5 seconds or press the CD ejectbutton again within 5 seconds after thebeep is heard.
3. Pull out the CD, ihen the next CD willbe ejected.
I Operating the CD Changer*(Except In-Dash) wilh Contmls onthe Msin Audio Unit
The CD changer can be connected to themain audio unit and operated by thecontrols on lhe main unit. Regardingoperation of the cD changer irself, pleaserefer to the instructions altached to ihechangef.
NOTE
Operating fte CD changer isgenerally the same as that of the CDplayer except for the insert and ejecttuncnons (pases 5-7s 5 79).
V Disc search
Press the disc up button ( A ) to skipforward to lhe beginning of the next CD.Press the disc down butaon ( V ) to skipback lo the beginning of the previousCD.
NOTE
CDs will be ejected staning withthe one with tbe lowest number
All CDs in the tray will be ejeci,ed
CDs can be ejected when iheignition switch is off. Press andhold the CD eject button for aboui2 seconds and all CDs will ejecl.
+sone frodeh. 5-81

Driving Your Mazda
I Ermr Indications
If you see an enor indication on thedisplay, find tle cause in the chart.Ifyoucannot clear the enor indication. take rhevehicle to an Auihorized Mazda Dealer.
I Operating Tlps for CDPlayer^n-Dash CD Changer
V Cond€nsation phenomenon
Immediaiely after tuming on the heaterwhen the vehicle is cold, the CD oropdcal components (prism and lens) inthe CD player/changer may becomeclouded with condensation. At this time.tl]e CD will ejecr immediately whenplaced in the unit. A clouded CD can beconected simply by wiping it wi$ a softcloth. Clouded optical componenls willclear naturally in about an hour. Waii fornormal operation to rctum beforeattempting to use the unit.
V Handling the CD player/tn-dash CDcnanger
The following precautions should be
CHECK CDCD is insefted upside down
Insen the CD propedy. If the code does noldisappear, consuh an Authorized Mazda Dealer
CD is defecnve Check the CD for scEtches and/orsoiling
5-U

Driving Your Mazda
. Do not spill any liquid on the audio . Do not insert any objects, other thanCDs, into the sloi.
. The CD revolves at high speed wiihinthe unit. Def€ctive (cracked or badlybent) CDs should never be used.
5-83
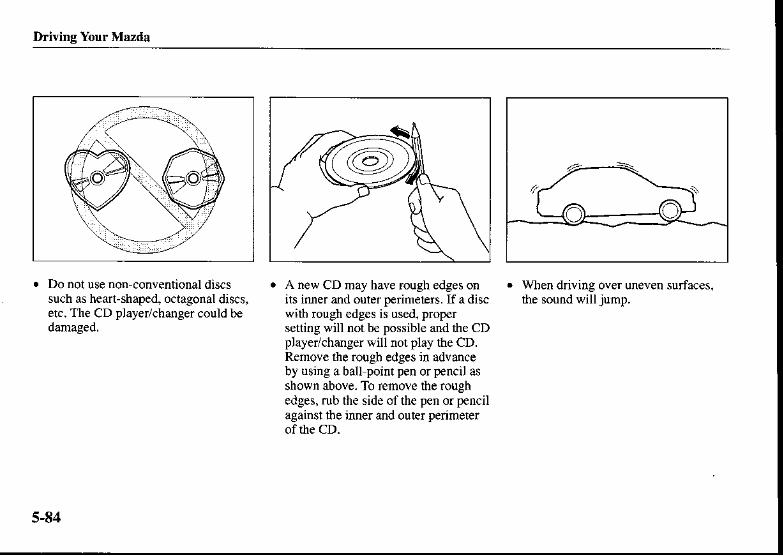
D ving Your Mrzda
. Do not use non-conventional discssuch as heart-shaped, octagonal discs,etc. The CD player/changer could bedarnased.
. A new CD may have rough edges onits inner and outer perirneteis. If a discwitl rough edges is used. propersetting will not b€ possible and the CDplayer/changer will not play the CD.Remove the rough edges in advanceby using aball point pen orpencil as
shown above. To remove the roughedges, rub the side of the pen or pencilagainst tle inner and outer peimeterof the cD.
. wlen driving over uneven surfaces.the sound willjump.
5-84

Driving Your Mazda
NCOMPACT
reJ[5GOIGITAL AUDIO
. The CD player/changer has beendesigned 1() play CDs bearing theidentification logo as shown. No otherdiscs can be played.
*h,\S -- ,,6&B€ sure neYer to toucb ihe signalsurface when handling the CDs. Pickup a CD by grasping the outer edge orthe edge of lhe hole and the outeredge.
Do not siick paper or tape on the CD.Avoid scratching the reverse side (theside without a label).
Dust, finger smudges, and din candecrease ine amount of light reflecr,edfrom the signal surface, thus affectingsound quality. If ibe CD shouldbecome soiled. gendy wip€ il with asoft cloth from lhe cenrer of the CD todle edse.
Do not use r€cord sprays. antistaticagents, or household spray cleaners.Volatile chemicals such as benzine andihinner can also damage th€ surface ofthe CD and must not be used.Anything that can damage, warp, orfog plaslic should never be used toclean CDs.
CDs. like traditional audio records, aremade of plastic. To avoid warping,keep the CDs in their cases and do notstore lhem where they will be exposedto direct sunlight.
5-85

Driving Your Mszda
Antenna
The CD player/changer ejects the CDif the CD is inserted upsid€ doirn.Also dirly an{Vor defective CDs may
8 cm (3 in) CDs and CD accessories(e.g. 8 cm disc adapter) cannot be usedin the CD player/changer
Do not insertcl€aning discs in the CDplayer/changer.
Do not inserl any disc with a peel-off The manual antenna must be raised andlowered by hand.
AcaurronTo prevent from damagiqg theantenna. retract it before entering acar wash facjlity or passing beneath alow ov€rhead cleamnce.
5-86

In Case of an Emergency
B?cause an eheryek !can occw anltine,w.stMgtt urse lou to becofte JMiliar vith thisse.tid af torr Mnual.]t provides helpfulinlbrution on \rhat ta do if the enginearerheats, if lou have a ||at tite, and t the
You wilt alsolnd out,hat to do iJroucontont a probleft in the ekctti.ot slsten:and, therc's sone guidance anthe correclral ta tot lour Mada.
Hazmd wamingFlsher 6- 2Olerbeatin-e 6 2
Emergency Staning 6- 4Fuses 6- 6
Towing 6-12Flat Ilrc 6-14
6-1

In Case of an Em€rg€ncy
NOTE
The tum signals don't work whenthe hazard waming lights are on.
Check local regulations about tbeuse of hazard waming lights whileihe vehicle is being towed. Theymay forbid it.
Hazard Warning Flasher
6.2
Overheating
If the temperature gauge indicatesoverheating, you experience power loss,or you hear a loud knocking or pingingnoise, the engine is probably too hot.
If this happens:
l Drive safely ro the side of the road andpark off the right-of-way.
2. Put a vehicle with an automaticrransaxle in park G), a rnanualtransaxle in neutral.Apply the parking brake.
3. Tum offthe air conditioner
The hazard warning lights wam otherdrivers ihat your vebicle is a traffichazard and that they musl take extremecaution when near il.
The hazard warnins ligbts should alwaysbe used when you stop on or near a
Depress the hazard warning swirch andall four tum signals willflash at once.

ln Ca5€ of an Emergenry
5. Check th€ coolant level.Ifit\ low.look for leaks in theradiator hoses and connections, heaterhoses and connections, radiator, andwarcr pump.If you find a leak or oiher damage, orifcoolant is still leaking, stop theengine and call an Authorized MazdaDealer
If you find no problems, the engine iscool. and no leaks are obvious,carefully add coolant as requir€d (page8,19).
4. Check whethercoolant or steam isescaping trom under lhe hood or fromthe engine compartment.
If steam is coming from rhe enginecomp.nmeni. donit go near the frontof the vehicle. Stop the engine. Thentum rhe ignition switch to the ONposition without sGning lbe engine.The radiator cooling fans will st2n to
lf neither coolant nor steam isescaping, open the bood and idle theengine until it cools.If this doesn'tlower the temperature, stop the engineand let i! cool.
A wARNlNcStean lrom Owrheated Engine:Ste.nfron an overheated eneine 6dangerous. The esuping steamcou.ld senouslt bum rou.Open thehood ONLY after steam is no longerercapi gf.om the engine.
Awl^nNntcC oo lin e:SrtlelLtcaps:When the engine and radiator arehot, scalding coolant an,l steam nu!shoot out uttder pntswe and causelerious i jury. Don't.emove eithercoolinS srstem cap when the engi e
and ndiator are hot.
Ac.lurrollIf the engine contirues to overheat orfrequently overheats, have the coolingsysiem inspected. The engine couldbe seriously damaged unless repairs
6-3

In Ca5€ ofan Enereency
Emergency Starting
I Jump-Starting
Jump-starting is dangerous if doneincoffectly. So follow the procedurecarefully. If you feel unsure abouljump'starting, we strongly recommendftat you have a competent seNiceiechnician do the work.
AwarumvcBatte n -Re late d E tolosio :Flames and sparks near open bafterycels are dangemus. Hrdrogen gas,produced daing no.nal batteryowration, couu ignite a dcausethebattery to explode. An explodingbafterr can cau:e seriou: b rns andinj nes. Keep a funes, it'ctudinsctsatettes, and sparks awa| fronAc.rurroN
Use only a 12 V booster system. Youcan damage a 12 V start€r, ignitionsysiem, and other electrical partsbeyond repair wi$ a 24 V powersupply (two 12 V batteries in series ora 24 V motor g€neralor set).
Awtnuntc.l unp.Studiaz,J unpntading a frozen battery orone t'ith a lo* fluid lel'el k.Iangenus.It hu! rupture orexplode, cawing sedous i jury.Don'tjunp-staft afrozen batterr o.one with a Iofl fluid lewl.
6-4

In Case of an Emergency
AwamrnrcConnecting to Negative Terminal:Comecti g the end of the secondcable to the nesatn'e Q teminat ofthe distharged batteA is dangemus.A spark couu.aase the gas sroundthe battery to explode and injuresomeone. Connect the cable to apoi t awa! from the battery.
Comect cables in nDnerical orderdd di$onnect in EveN orde.
l. Make sure the boosier battery is 12 Vand ftat its negative rreminal isgrounded.
2. If re booster battery is in anothervehicle, don'tallow the vehicles totouch. Turn off the engine of tl)evehicle with the booster battery and allunnecessary electrical loads in both
3. Connect llle jumper cables in the exactsequence as in the illustration,
(1) Connectone end ofa cable to thepositive terminal on the dischargedbattery ('.
(2) Auach dle o$er end to $e pos_irive
terminal on fte boosler batEry (E).
(3) Connect one end of the oth€r cableto the negative lerminal of thebooster battery (9.
(4) Connect the orher end to a solid,starionary, exposed melallic point(for example, dre engine hanger)away from the discharged battery
4. Stan the engine of the booster vehicleand run it a f€w minul€s- Then startlbe engine of the other vehicle.
5. W}len finished, carefuliy disconnectlhe cables in the reverse orderdescribed in Step 3.
Awlnr,uNeCo,tecting.IvnpelteabkJbaMoing Pad:Connecting ajumper cablz ear orto a moving part is dangemus. Thecable couu get caught when theengine starts and cause seiousi4urr, Never connect a jumper coblcto o. near on! parl that motes.
6-5

In Cas€ of an En€.sency
Fuses
I Push-Starting
You can't start a vehicle with anautomatic transaxle by pushing it.
AclurroNYou shouldn't push-start a vehiclethat has a manual transaxle, It candamage the emission control system,
A wamrnrcTowinqal?LieklalaalLTowing a ,ehicle to start it isdangercus. The vehi.le being towedcouuswsefotwa vrhen its ensinestarts, causinq the t$,o vehictes toco ide. The occupantt couu bei jured- Never to*' a I'ehble to staftx.
Your vehicle's electrical system is
If any lighls, accessories, or controlsdon't work, inspect the appropdaiecircuit protector. If a fuse has blown. theinside element will b€ melted.
tf the sarne fuse blows asain, avoid usingthat system and consull an AuthorizedMazda Dealer as soon as possible.
I Fuse Replacement
If the electricai sysrem doesn 1 work, firstinspect fuses on the driver's sid€.
I - Tum off the ignilion switch and other
2. Open the fuse panel.
3. Pull rhe fuse straightoutwith rhe fusepuller provided on.he fuse panel.
6-6

ln Cas€ ofan Emergency
ffi ffiAcluuoN
Always replace a fuse with one of thesame rating. Otherwise you maydamage the electric system.
.{. lnspect it and replace ifit\ blown.
5. Push in anew fuse of the same rating,and make sure it fits tightly. If itdoesn't, have an Authorized MazdaDealer insiall it.
If you have no spare fuses, borrow one ofthe same rating from a circuit notessential to vehicle operation. such as theRADIO c;cuit.
If the headlights or other electricalcomponenls don\ work and lhe iuses inthe cabin are OK. inspect rhe fuse blockunder the hood.Ifafuse is blown, il mustbe replaced. Follow th€se steps:
1. Tum off the ignition switch and all
2. To remove the fuse btock cover,unhook it a:rd lift up on tbe side withdle tab.
6-7

ID Case of an Emergency
€
W
3. Ifa fuse is blown, replace it with anew one of the srune rating.
When replacing the 100A fuse:
l. Turn off the ignilion switch.
2. Renove the negative baatery terminal.
3. Remove nuts A and B.
zl. Lift fte fuse block and remove the Cbolts-
5. Replace the fuse with a new one of thesame mting.
6. Install in the reverse order of removal.
6.8

In Case of an Emergency
I Fuse Panel DescriDtion
tr88E80HBEHEEHEE
F'H
EE
E
V Fuse block (Engin€ compartment)
DESCRIPTIONFUSD
RA1.ING PROTECIED COMPONDNT
HEATER
2 (ABS)For pmrection of vanons ci(uirs*
l IC KEY lor pole.lio of veious cimiB
5 (CLOw)
6
COOLINC 30A
BTN Inlerior lights, Power dooi lock+
9 Addrtronrl rool,ng lan for r'r rondirion.r'
INJORFIP
(r'JC)
(sTsrc)
HORN
TAIL
(HEADC U) Foi piote.rion of vfjos c;cuits
(FOC) For protecion of vdious cncuns
'sune nodek. 6-9

In Case of an Emergency
6-10
DESCRIPIION FUSERATING PROTECTED COMPONENT
STOP
20 HEAD R
21 HEAD.L
22
23
24 MAIN For pmErim ofall circuis

In Case of an Emergency
000oooo8o^n'd u n
3nt
V Fuse panel (Driver's side)
DESCRIPNON IAISD RATING PROTECTED COMPONENT
(s/\rRM) For pmleclion of vdious .ircuirs
2 (wcLN) 20A For proleclion of vrious ci(uitil (RADIO)
(A/C)
5 (R.WIPER) Fo! prolection of ! anous circu i ts
Inlenor teis, Tnni lighc
(DOOR LOCX)
12 (" wtND)
tl WIPER windshield wipes and wdher
ENCINE
t5 METER
(P/WIND)
"s"...oa"rs. 6-11

In Case of an Emergency
Towing
We recommend thal towing b€ done onlyby an Authorized MazdaDealer oracommercial tow truck service.
Proper lifting and towing are necessary toprevent damage to the vehicle. Sta€ andlocal laws nust be followed.
A towed vehicle usually should have itsfront wheels off the ground. Ifexcessivedamage or other conditions prevent ihis,
Wlen towing with the rear wheels on lheground. release the parking brake.
6-r2
AclurroNDon't 1ow the vehicle backward withdnving wheels on the ground. Thismay cause internal danage to the
Ac.rurroNDonl tow with sling tlpe equipnent-This could damage your vehicle. Usewheel lift or flatbed equipment.

In Case of an Emergency
AclurroNThe towing hook should be usedonly in an emergency (to get tbevehicle out ofaditch or a snowbank, for example).
When using the towing book,always pull ihe cable or chah in aslraighl direclion *ith respeci tothe hook. Apply no sideways force.
AcaurroNDon't use the hook loops und€r iheftont and rear for lowing. They aredesigned ONLY for tying down thevehicle when it's being transported.Using th€m for towing will damage

ln Cas€ ofan Emergency
Flat TireI Tire, Jack, Jack Handle, and Tool Storage

In Cas€ ofan Emerg€ncy
V To rcmove thejack
Turn the wing bolt counterclockwise.
V To secure the jack
Perform the remoyal proc€dure in
V To remove the spare tire
Tum the tire hold-down boltcounterclockwise wift dre lug wrench.
6-15

In Case of an Emeryency
I Changing a Flat Tire
NOTE
If the following occurs while dril,ing,it could indicate a flat tire.
. Sl€ering becomes difficutt.
. The vehicle begins to vibrate
. The vehicle pulls in one direction.
To change a flat tire, follow procedure 1
tbrough 15 carefully.If you have a flat tire, drive slowly to alevel spot that is lvell off the road and outof the way of iraffic to change the tire.Stopping in lraffic or on the shoulder of abusy road is dangerous.
Awamrnrc.Iackin" a Uehicle:
Chansins a tte is dansenus if notdo e pnperlr. The whicle can sWof the jack and senoustr injwe
Be su.e tofo o|| the directionsforchangine a tire, and nevet get undera whicle that it st ppofied onry br a
6-16

In Case of an Emergency
I . Park on a level surface off theright of,way and firmly set theparking brake.
2. Pul avehicle with an automatictransaxle in pa.k (P), a manualtransaxle in reverse (R), and turn off
3. Tum on the hazard warning flasher
4. Have everyone getoutofthe vehicleand away from the vebicle and traffic.
5. Remove lhejack,jack handle,luglvrench, and spare rire.
6. Block the wheel diagonally oppositethe flat tire. When blocking a frontwheel, place the block in fronr of rhetire. When blocking a rear wheel,place the block behind the tire.
7. Pry off the wheel cover* with thebeveled end of the lug wrench.
NOTE
Force the end of the wrench firmlybetween wheel and cover, or removalwill be difficult.
Ac.rurroNWlen installing the wheel covetalign the norch wiih the tire valve.
/..uJ/n\vl-DQla
*so...od.h. 6-17

In Case of aD Emergency
8. Loosen $e lug nuts by turning themcounterclockwise one tum each. butdon't remove any until ihe tire hasbeen raised off the groud.
9. Place tbe jack under the jackingposition closest io tbe tire beingcbanged.
AwtnvmeI nc orrc ct.l ackin g P osition :Attenptilg tojack the rehicle inpositions other than thosenconne ded inthk Iu ual isdansenus. The rehicle couu slip offthejack and senoustr injure or evenkill someone. Use onlr the front andrcarjacking positioN recomme ded
A waRlrnscInuapcr,latkUsing a jack that isn't desiened foryo r Mazda codd be dengercus. Therehick coua snp olf the jack a dseiouslr inj rc someone. Use o ltthejack ptovided dth rou Mozda.
6-18

ln Case of an Em€rgency
A wLR.nrnyc
Pla.ing Objects Under the .Iack:J.ckins the vehicte iith an objectu derthejack it dangerous. Thejack coutd sup a d soneone coud besenousl! injured br the jack or thefathns vehicte. Nert place objects
''-^,/A)
@10. Insenthejack handle into thejack
and turn ir clockwise until the tirejust clears the ground, less than 25rnm (l in). Betore removins the lugnuts, make sure your Mazda is fimlyin position and thal it cannot dip or
11. Remove the lug nuts by turning rhemcounterclockwise; then remoYe the
12. Mount ihe spare tire.
13. Install the lug nurs with the bevelededge inward; tighten them by hand.
14. Tum the jack handlecounterclockwise and lower thevehicle. Use the lug wrench toiighten lhe nuis in the order shown.
If you're unsure of how lighl the nuNshould be, have them inspected at aservice station. The specified torqueis 9010 120 N.m (9.0 to 12.0 kgf.rn.65 ro 87 ft.lbo.
6-19

In Case of an Emergency
AwtnNmcLoose Lug Nuts:InproperlJ or looselr tighte ed lugnuts arc da gerous. The i'heel $uldt!'obble or cone off. This coud nsultin loss of whicle co,ttnl and cause aserious accinent. AI$'aJ! sec rcIrand coftectlj dghten the lug nuts.
A wanlrnrcIncornct Tire Air Prcssure:Diving on tir.s with incorrect airp.esrure ls dangercus.Tircs withinco ect pressure .oua affe.thandling and resnlt in an accinent.Don't.live vith any tires that hateincoftect air prcssure. When youcheck the rcsuhrnrc's air pressure,check the sparc tire, too.
AwaR^rrnrcMetdc St(dl and Lug NulJ:Becauw the wheel studs and l g nutson lour Mazda hare netri. thrcads,usntg a o -netric nut isdongetu s. On a metric stu,l, itvo A not secu.e the wheel andt'ould danage the stud, which coddcause the ,heel to slip olf and causean accident. Be swe to reinstall thesame n ts tou remored or replacethem with metric nuts of the same

ln Cas€ ofsn Emergency
,6
(@).:)F ri'e (rame
I Locking Lug Nuts*
Ifyour vehicle has optional antitheftwheel lug nuas, one on each wheel willlock and you must use a special key tounlock them. This key is attached to thelug wrench and is stored with the sparelire. Regisler ihem with the locknanufaclurer by filling out lhe cardprovided in rbe glove box and mailing itin the accompanying envelope. If youlose your key, consult an AuthorizedMazda Dealer or use tle lockmanufacturer's order form, which is widrlhe registration card.
d--Gffi15. Store the damaged tire, using the
convenlional tire hold-down boltsupplied in (he tool bag 1() hold ir inplace. Tum the tir€ clarnp upsidedown liom ahe temporary spare tireposition. Repair the damaged tire andreplace ihe spare with it as soon aspossible.
V Tb rcmove an antith€ft lug nut
L Get the key for the locking lug nut.
2. Place it on top of the nut, and be sureto hold the key square to it. If you holdthe key at an angle, you may damageboth key and nut. Don't us€ apower
3. Place the lug wrench on top ofthe keyand apply pressure. Tum the wrenchcounterclockwise.
NOTE
To prevent $ejack,jack handle, andtool bag from rattling, store themproperly.
.soD€ modeh. 6-21

In Case of sn Emergency
V To replace the nut
l Place the key on top of the nut.
2. Place ihe lug wrench on top of the key.apply pressure, and tum itclockwise.
I Spare fir€
Your Mazda has a temporary spare tire.Ii\ lighier and smaller than aconventional tir€, is designed only foremergency use and should be used onlyfor VERY shon periods. Temporaryspares should NE\.ER b€ used for longdrives or extended periods.
A wamrnrcDiving with a Tenpotury Spa&n&on Ic. or Snow:Dit'ing with a sparc nrc on th. ftont(dtivins) wheek on ice or sno$,isdancerous- Handlins N'iA beaffected. You couu bse contot ofthe vehicle and hat'e an accident. Putthe spa.e tirc on the rcar axle an,lnove a rcgubr tbe to the Imnt.
6.22

In Case of an Emerg€ncy
AclurroNTo avoid damage 1o the temporaryspare or to the vehicle, observe thefollowing:
. Donlexceed 80 k,r/h (50 nph).
. Avoid driving over obstacles. Also.donl drive through an automaticcar wash- This tire\ diameter issmaller than a conventional tire's,so the ground cl€aranc€ is reducedabout 25 mm (l in).
. Don't use atire chain on this tirebecause it won't fi t properly.
. Don t use your t€mporary spare onany other vehicle; it has beendesigned only for your Mazda.
. Use only one temporary spare dr€on yourvehicl€ at the same time,


Appearance
Thk sectian.features care, ihside aftd out. of,a"t Ma.da...haw b.st to kep r.leananrl
Ae awarc thdt appedrdrce is not the anlyrcasan Iar cleanliness. Road Btine tends toeat owal at the fteML sa keeping loartehi.le tlean in the wat SectianT presclibeswill help prerent its ea r deteriorotion and
How to Minimize Envircnmental Paint Danage 7-Eiterior Ca.e 7-lnterior Care 7
z4
7-l

How to MinimizeEnvironmental Paint Damage
The paintwork on your Mazda representsthe lates! technical developments incomposition and methods of application.
Environmental hazards, however. canbarm the paint\ protective properties. ifproper care rs nor uKen.
Here are some examples of possibledamage, \rith lips on how to prevent
I Etching Caused by Acid Rstn orIndustrial Fallout
Industrial pollutants and vehicleemissions drift into the air and mix witt)rarn or dew to form acids. Thes€ acidscan settle on a vehicle's finish. As thewater evaporates, the acid becomesconcentrated and can damage the finish.And the longer ihe acid remains on thesurface, lhe greater $e chance is fordamage,
It is necessary io wash and wax yourvehicle to preserve its finish according tothe instructions inlhis section. Thesesteps should be taken immediately afteryou suspectthat acid rain has settled onyourvehicle's finish.
I Dsmrge C6us€d by Bird Dropping,Insects, or Tf€e Sap
Bird droppings contain acids.If thesearen't removed they cao eat away theclear and colorbase coatofihe vehicle\
When insects stick lo the paint surfaceand decompose, corrosive compoundsform. These can erode rhe clear and colorbase coat of the vehicle's painlwork ifthey are not removed.
Tree sap will harden and adherepermanently to the paint finish. If youscratch rhe sap off while it is hard, somevehicle paintcould come off with it.
Appesrance Care
It is necessaJy to have yourMazdawashed and waxed to preserve its finishaccording to the instructions in thissection. This should be done as soon as
Bird droppings canbe removed with asoft sponge and waier. If you aretraveling and these are not available. amoistened tissue may also take care ofthe problem. The cleaned areashould bewaxed according to the instructions in
Insects ,nd tree sap are best removedwith a soft sponge and water or acommercially available chemical cleaner
Ano{her method is to cover the affectedarea with dampened newspaper for one tolwo hours. Afterremoving thenewspapet rinse off the loosened debris
I Water Marks
Rain. fog, dew, and even tap waier cancontain harnful minerals such as sali andlime.lf noisture containing theseminerals se(les on the vehicle andevaporates, lbe minenls wiil concentrateand harden to form white rings. The nngscan darnage yourvehicle's finish.
V Prevention
It is necessary to wash and wax yourvehicle to preseNe its finish according tothe instructions in ihis section. Thesesteps should be taken imnediately afreryou find water marks on your vehicle\finish.
I Paint Chippins
Paint chipping occurs when gravel isthrown in ihe airby another vehicle'stires hits your vehicle.
V How to avoid paint chipping
Keeping a safe distance between you andthe vehicle ahead reduces the chances oihaving your painl chipped by flyinggravel.

Appearance Car€
NOTE
The paint chipping zone varieswith the speed of the vehicle. Forexample, when traveling at 90km/h (56 mph), fte paintchippingzone is 50 m (164ft).
In low temperatures a vehicle'sfinish hardens. This increases thechance of paid chipping.
Chipped paint can lead io rustfbrming on your Mazda. Beforeihis happens, repair lhe damage byusing Mazda touch-up paintaccording 10 the instructioN in thiss€ction. Failure to repair thealTected area could lead to seriousrusting and expensive repairs.
Exterior Care
Follow all label and container dircctioflswhen using a chemical cleaner or polish.Read aU wamings and cautions.
I Mainhining the Finish
V Washing
To help proGct the finish from rust anddete omtion, wash your Mazdathoroughly and frequently, at least once amonth, with lukewarm or cold water.
If the vehicle is washed improperly, thepaint surface could be scmtched. Here aresome examples ofhow scmtching could
Scratches occur on lhe paint surface
. The vehicle is washed withoul firstinsing ofi din and other foreign
. The vehicle is washed wirh a rough,dry, or dirty cloth.
. The vebicle is washed at a car washihat uses brush€s ihat are diny or too
7-4

. Cleansers or wax containing abrasives Take your vehicle only to a car washthat keeps its brushes well maintained.
Don't use abrasiv€ cleans€rs orwaxthat contain abrasives.
Pay special attention to removing salt,dirt, mud, and other foreign materialfrom dre underside of the wings. andmake surc the drain holes in the loweredges of the doors and rocker panels are
Insects, tar, tree sap, bird droppings,indusidal fallout, and similar depositscan damage the finish if noi removedimmediately. When prompt washing withptajn warer is inetrective, use a mild soapmade for use on vehicles,
Thoroughly rinse off all soap withlukewarm or cold water. Don't allowsoap to dry on the finish-
After washing the vehicle, dry il with aclean chamois 0o prevent water spotsfrom forming.
To minimize scraiches on the vehicle'spaintfinish:
. Rinse off any dirt or other foreignmalterusing lukewarm or cold water
. Use plenty of lukewarm or cold waterand a soft cloth when washing th€Yehicle. Do not lse a nylon cloth.
. Rub gently when washing or drying$e vehicle.
NOTE
. Mazda is not responsible forscratches caused by aulomatic carwashes or improper washing.
. Scratches are more noticeable onvehicles with darker painr finishes.
Ac.rurroNDon't use steel wool, abrasivecleaners, or strong detergentscontaining highly alkaline or causncagents on chrome-plaled oranodized aluminum paris. This maydamage the protective coating; also,cleaners and detrerg€nts maydiscolor or deteriorate the paint.
To Fevert damaging the antenna,retract it before entering a car washfacility or passing beneath a low

V Waxing
Your vehicle needs to be waxed whenwater no longer beads on the finish.Always wash and dry lhe v€hicle beforewaxiog it.In addition to dre yehicle body,wax ihe metal trim to mainrain ils lusier.
1 . Us€ wax whicb contains no abrasives.waxes containing abrasive willremove paint and could damage brightmetal parts.
2. Use a good grade of natural wax formetallic. mica. and solid colors.
3- When waxing. coatevenly with thesponge supplied ora soft cloth.
4. Wipe off lhe wax wilh a sofl cloih.
NOTE
A spoa remover to remove oil, tar. andsimilar materials will usually also takeoff the wax, Rewax these areas even ifthe rest of the vehicle doesn't need it.
A wanlsnscDiyins dth Wet Brakes:Driving with wet brukes isdang e rc us. I nc rc a s e d s toppingdistance or the vehicle pulling to onesLle rhe btukittg coud rcsultin aserious a.cilent. Light braki g N)iIL
indicate whether the brukes hat ebeen alIe.ted. Dry the brakes btdiving very slovlr and applying thebrakes Eshtlr until brakepeforntnce ir nornat.
7-6

I Repairing Damage to the trinish
Deep scratches or chips on the finishshould b€ repaired prompdy. Exposedmetal quickly rusts and can lead to major
I Bright-Metal Maintenance
. Use tar remover to remove road tarand insects. Never do this with a knifeor similar tool.
. To preyent corrosion on brighl-m€talsurfaces, apply wax or chromepreseraative and rub it to a high luster.
. During cold weaiher or ir coastalareas, cover bright metal parts wiih acoating of wax or preservative heavierthan usual. It would also help to coatthem with noncorrosive petroleumjelly or some other protective
I UnderbodyMaintenance
Road chemicals and salt used for ice andsnow removal and solvents us€d for dustcontol may collect on the underbody. ffnot removed, they will speed up rustingand deterioration of such unde$ody partsas fuel lines, frame, floor pan, andexhaust system, even though these partsmay be coated with anti-corrosivematerial.
Thoroughly flush ihe underbody andwheel housings with tukewam or coldwaier at the end of each winter. Try alsoro do this ev€ry month.
Pay special attention io dtese areasbecause they easily hjde mud and dirt.Itwill do morc harm than good to w€tdown lhe road g.ime without r€moving
The lower edges of doors, rocker panels,and frame members have drain boles thatshould not be clogged. Water trappedthere will cause rusting.
AclurroNIf your Maz da is damaged and needsmetal parts repaired or replaced, makesule the body shop appliesanti-corosion materials to ali palls,both repaired and new. This willprevent them from rusting.

Appearance Care
I Aluminum Wheel Mainr€nance
A protective coating is provided over thealuminun wheets. Special care is neededto prot€ct this coating.
A waRlrnrcDn inr flith Wet Brukes:Drhing with wet brukes isdang e rcus. I nc rc a s e.l s toppingdbtance or the l'ehicle p IIi gtoo esde vhen brukins couA result in aserinus accident. Light bruking wilindicate whether the b&kes hayebee allected- Dry the brakes brdiring w.r slowlr and appbing thebtukes ligh r u til brukeperlomance k notnaL
NOTE
Don't use a wire brush or anyabrasive clear,er. poiishingcompound. or solvent on aluminumwheeh. They may damage tbecoanng,
only use a mild soap or neutraldetergent and always use a spongeor soft cloth to ciean the wheels.Rinse $oroughly with lukewarmor cold water. Also, be sure toclean ihe whe€ls after driving ondusty or salted roads. This helps
Avoid washing your vehicle in anautomatic car wash that useshigh-speed or hard bnrshes.
If your aluminum whe€ls loselustet wax lhe wheels.
7-8

App€arance Care
Interior Care
I Dashboard Precautions
Prevent caustic solutions such as perfumeand cosmetic oils from contacting thedashboa.rd. They'll damage and discolorit. If ihese solutions g€1 on rhe dashboard,wipe rhem off immediately.
I Cleaning the Upholstery andInterior Thim
V Vinyl
Remove dust and loose dirt from vinylwith a whisk broom ot vacuum cleaner.Clean vinyl with a leather-and-vinyl
V Leather
Real leather isnl uniform and may havescars, scratches, and wrinkles. Clean itwith a leather cleanerormild soap.
Wipe it with a damp sofr cloth; tben dryand buff it with a dry soft cloth.
V Fabric
Remove dust and loose dirt from fabricwith a whisk broom or vacuum cleanerClean it with a mild soap soluaion goodfor upholstery and carpets. Remove freshspots immedialely with a fabric spot
To keep the fabric looking clean andfresh, take care of it. Otherwise its colorwillbe affected, itcan be stained easily,and its fire-resistance may be reduced.
AclurroNUse only recommended cleaneN andprocedures. Others may affectappearance and fire-resistance.
7-9

Appearance Care
I Cleaning the Lap/Shoulder Belt I Cl€sning the Window InteriorcWebbing
If th€ windows become covered with anClean the webbing with a mild soap oily. greasy, or waxy film, clean themsolution recommended for upholstery or with glass cleaner Follow the directionscarp€ts. Follow instructions. Don't bleach on rhe containeror dye the webbingt this may weaken it.
Afler cleaning th€ belts, thoroughty drytbe belt webbing and make sure there isno renaining moisture before retracting
AclurroNDon,t scrap€ or scnlch the inside ofthe rear window. You may damage therear window defroster grid.
A waRlsnscDantaoed Seat Belr:Using danaged seat belts isdansercus.In a collision, danusedbelts cannot prov le adequateprctettion. Haw lot r AuthorizedMazdo Dealer rcplace danaged belts
7 -t{)
Maintenance
Because rorr Mazld h a larse pie.e ofihtitute nachinery, it needs rcguLat carc inthe lom aJMintenance atul senicins. Monyowers prekt b .1o nuth of this wtk
So Se.tioa 8 has beeh prepared as a SuAeJolthe operata/ ||ho wdnts ta self seni.e suchhind jobs as chansins the ensine oil.replacihS balbs antl wipet blada, chdryingthe batter!,ahd ntatiag the ties-ALlnainteance sche.lules arc iaclude.l, alohgtutth i$tructions ak how to nake regrlarinspectians af su.h things as fuid levels.
InlrodDction 8- 2Scheduled Maintenance 8, 3
Owner Maintenance 8-12
8-1

Maintenance
Introduction
Be exlremely careful to prevent injury toyourself and otlers and damage to yourvehicle when using this nanual forinspection and maintenance.
Ifyou're unsure about any procedure itdescribes, we strongly urge you to have areliable and qualified service shopperform the work, preferably anAutl]orized Mazda Dealer
Factorylrained Mazdatechnicians andgenuine Mazda parts are best for yourvehicle. Without this expertise and theparts that have been designed and madeespecially for your Mazda, inadequale,incomplete, and insufficienl s€rvicingmay result in problems. This could leadto vehicle damage or an accident andinjuries.
For expert advice and quality servic€,consult an Authorized Mazda Dealer.
Tbe owner should retain evidence thatproper maintenance has b€en performed
A claim againsl a warranly will notqualify if it results from lack ofmaintenance and not from defectivematerial or authorized Mazdaworkmanship.
Any auto repair shop using partsequivalent to your Mazda's originalequipment may perform maintenance.But we .ecomm€nd that it always bedone by an Authorized Mazda Dealerusing genuine Maz da parts.
a-2

Maintenance
Scheduled Maintenance (Except Chile)
Follow Schedule I if $e vehicie is operated mainly where rcne of the foltowing conditions appl,.If any do apply, follow Scbedule 2 (Puerto Rico residents follow Schedule 2).
. Repeated short-distance driving
. Driving in dusty conditions
. Driving with extended use ofbrakes
. Driving in areas where salt or orher corrosive materials are us€d
. Driving on rougb or muddy roads
. Extended periods of idling or low-speed operation
. Driving for long periods in cold temperarur€s or extremely humid climat€s
NOTE
Afi,er the described period, continue ro follow ihe described maintenance at ihe recommended intervals_
8-3

Schedule II : Ins pec t dd re pa n cled, adju sl. or Eplace i l necessary, (Oil temear.d air filr€r c md b€ cleaned u sing the air blow nethod. )
-.-.- MAINTENANCE--,--_ INTERVAL
MAINTDNAXCE -".\ITEM -'\
Nunbe. of dontLs o. tiloneters iniles). vhicherer coms li6t18 30 36 4
t2 x 72
(7.s) o5) (.2L5) {30) (37.s) (s25) (60)
IInspect at 96,000 kn (@,00o nil€6)
Replrce €rerr 168,000 tn (105,000 ntle,I I
R R R R R R R R
R R R R R R R R
I IReplace at ffret 72,000 kn (,15,000 nil6) o. 36 nonths iaft€r thar, erer'.|l|,004 *n (30,000 nil€s) or 24 months
I T
R R
t IH6es dd iub.s ror e6hsion*l I
R R
B6k lines. hoses and conadons I II II I
Accordina lo state ed federal Egulalions, failure to p€rfom nairtendce on lhese ilens will .ot loid your enissions wmlies. Howeler, Medaecombends lhal all mainlendce seFices be pedomed at tne Fcomnended dne or lilonetrage (bil€ag.) p.riod to ensuE lons-tem eliability.
8-4

Mainlenance
Schedule I (Cont'd)I: Inspect and €pair, cl€an, adjun. or epllce if necessdy.
----_ MAINTENANCE--_--_ TNTERVAL
MAINIENANCE -..\ITEM
Numb€r of monahs or kflomelts (miles). *hicheu on€s firet
t2 18 l0 t6 42 :18
tz 36 48 60 84
(7.5) os) (.2r5) (30) (37.s) (.rsl (60)
Steering operalioo and linkages I I!rcnt susFnsion ball.joints I I
I IBolK and nuts on ch6sn rd body I IErhaust system heat shields I I
L L L L L L L LRefrigerdr anounr (if i,nalled) I I I ICofrpre$or operadon (it installcd) I I I
8-5

Maint€nance
Schedule 2Insp€ctodEpan.ckm,adjust,orEplaceiine.essary.(Oil-pemeatedaifiliercannolbecleanedusingrheai. blowbelndl.)
-..\ MAINIENANCE..-.- INTERVAL
MAINTENANCE ---\IIEM -.\
Nunber ol monlhs or kilometers (niles). whichercr con4 li.st
t2 4 23 36
l6 48 56 72 80 aa 96
(10) os) I2T) (25) i30) (3s) i4s) (s0) (60)
IIspe.t ot 96,00{ km (60,000 mlles)
Replace €rery 163,000 km ir0500{ niles)
I IR R R R R R R R R R R R
R€plaaev€r! 5!d,0 tm ll,0{,0 mil€t url nonlhs
R R R R R R R R R R
I IRepl&e l( ti.sl 72,00{ kn (45,000 nil6) or 36 monlhs ;afae. that, eve.y 48,000 km 130,00i) niles) or 24 nonths
I I I I I I II I
I*r R I*r R
T IHoles dd rubes to. enrronti T
R R
Accodinglo state dd fedenl Egulations. failure to Dedom bainlenmce on $e* iteds will not void tour emi$ions waruries. Ho*ever, Mudaeconnends drat all naintenmce senices be p€rfomed ar $e @onnended ijme or kilonelrage (nilease) period to ensue long tem @liabihtIr lhe vehiclc is opemtei in cold dislricts { below l8 degreDs C (0 degEes F) }, Eplace tne limin8 bell al96-010 lin (60,000 niles).
8-6

Mrintenance
Schedule 2 (Cont'd)InsFe.r and Epair, cled. adjust, o. repl-e if n{essary.
-..\ MAINTENANCE---.- INTERVAI-
MAINTENANCE -.-\.
Nunber or monlhs or lilomete.s inilesl. whicheve. .ones li.st8 t2 l6 20 28 36
l6 48 56
(s) (r0) (15) (20) (25) (30) (35) (.10) (4s) (s0) (ss)
I t I T I I I IBnke lines, hoscs and conections
Bnke and clrtcb lluid lelel I I I I I I T I
Tte innation prcssle and fie rcar I I I I I I IStee ne operalion md linkages
Powei sGerine nuid lelel I I I T I IFront suspension ball joinrJ
Bohs and nurs on chr$is dd body
Exhausl syslem hear shi€lds
t, L L L L L L L L L L LI T I I I
Rerrigeimr amount (if installed)
conp€sor opcnrion (ir insralled)

Maintenance
Scheduled MaintenanceServices (Chile)
After the described period,continue to fbllow the describedmaintenance at the recommended
As ihe resull of visual examinalionor functional measurement of a
systen's operanon (perfornance),correct. clean, or replace asrequired. (Inspecl, and if necessaryreplace the air filter)
Emission control and related systems
The ignilion and fuel systems are highlyimponant to the emission control systemand to efficienlengine operation. Don'ttanper with them.
All inspections and adjustments mustbernade by aqualified technician. westrongly recommend that all servicingrelated to these syslems be done by anAuthorized Mazda Dealer.
8-8

Maintenance
lnspal: lnsp{t and .lm, Epair, adjnn. or Eplace if necessary .
(Oil-pemear€d aif filter cNor beclemedusing lhe air blow nelnod.)
MAINTENANCEINTERVAL
MATNTENANCDITEM
Number ol monrns or km (mileO. shicherer comes lirst
l: l3 .t0 36 :13 6{) 12 7A 84 90
20 3{ 50 ll0 120 r30 ts0(12) (13) (:a) (30) (36) g2) (.r8) (s4) (60) (66) o2) (?8) (34) (e0) (96)
I6pect €re.J 100,000 kn (60,000 nil€6) o. 60 nonlhs
t I I IR R R R
R R R R R
Elaporative srslen (if insraued) I I II T I I I I I I
Repbce ekrJ 100,000 kn (60,00{ miles)
R R R R R R R R R R R R R R R
R R R R R R R R R R R R R R
I I T I
I R R t R R
I I T I
"2:
Also inspecl md adjust rhe powei steering and aircondition€r dnle belts. ifinslalled.ReplacementottheriningbcllisrequiB!ateveryl00,000k6(60,000niler.Fail!reloeplacethetidingbeltnayFsultindanagetorhe€nsinc.If the rehicle is openled under el of lne follo*ing conditions, chdee lne enAinc oil dd oil filrei 6orc onen dd Econnended inreNals.a) Drivins in dusty cdditions.b) Extended percds of idling oi low speed operation.c) Drivin-s ior long pqiod in cold Gmperatues o.driving rcgularly al shon distance only.I f the veh icle is operated in lcry d! sry or s andy areas, inspect ard il nc.e$aiy. cle o or e place rhe lir fi lter noe onen rhan lhe Hom mend€d inten als.
8-9

(Cont'd)t : Insp€cr Insped ud cle@, rcpair, adjust, or Eplme if naessdy .
MAINTENANCEINTDRVAL
MAINTENANCEITDM
Numbe. of months or km (miles). whichev€r @m€s lirsil3 9l 72 7a
s0 80 100 110 tm 130 l.t0 150 160
(6) (12) (r3) \A) (3iJ) {36) (42) (4r) (s) (60) (66) (:12) (78) (84) (90) (96)
E.C.R. syslen (if insralled) I T t IBatery electrollte level and spaific gnvity I t I I
I I t I I I I I IBdke lines, hoses and com{tions I t I I
I I R I T R I I I I R
I I t I I I I T II I I I I t I I T I
Power bralie unil and hoses T I I II I I I I I I I I I
I I I IPowr serina fluid dd lircs I I I I I I I I t ISrering op€ralion md gar housing I I I ISlc€ring lrnkae€,lie rod e.ds and ms I I I I
R R
Autonalic lrmsxle nuid lelel t I IAulonaic tmsaxk nuid R
Fronr md rear suspension dd ball joinls I I35: Ifrhe brakes !@ uedextensively (foi eranple. coinuous had driving orbountain dnvine) oririhe vehicle h op€rated in exlEmely hunid climales, cndge
lhe bE\e fllid annually,
8-10

Maintenance
(cont'd)I:L:
Inspccr: Inspect @d cled. epair, adjust, or replee ir necessary .
LubricaF T: Tighten
"6i This h a full function check ofelcctrical sts|eds such as lights, qiper and washer sysGns (including riper bladet, md poser*indows.
MAINTENANCDINTERVAL
MAINTENANCI]ITEM
Nnmbe. of months or km lnlles). whichever con6 fNt6 t2 l8 u 30 42 54 60 66 7a 8il 90 96
10 20 30 50 70 80 100 110 120 1J0 140 150 160
o2) (13) (a) (30) (36) (12) (48) (s4) (60) (66) o2J (78) (84) (901 (96)
I IExhaust sy$en hcar shields I I
T T T T T T T TBults eJ nuL on chsesrd bftlt T T T T T T 1 T
I I I II I I I I
Body condition (for rust, corcsion bd Frioniion)
(including spae dE, *idl inflation pEsue adjusmenoI I I I T
L L L L L L L LI I I I I I I T I
8-ll

Owner Maintenance
I Owner Maintensnce Schedule
The owner or aqualified servicei,echnician sbould make thes€ vehicleinspections at lhe indicated inteNals toensure saf€ and dependable operation.
Bring any problem to fte attention of anAuthorized Mazda Dealer or qualifiedseNice technician as soon as possible.
V When refueling
. Brake and clutch fluid level(page 8'23)
. Engine coolantlevel(page 8 19)
. Engine oil level(page 8 17)
. Washerfluid lev€l(page 8-27)
V At least monthly
. Tire inflation pressures(pase 8-34)
V At least twice a Jear(for example, every spring and fall)
. Automatic transaxle fluid level(page 8-2s)
. Power steering lluid level(page 8 2a)
You can do lhe following scheduledmaintenance items if you have somenechanical ability and a few basic toolsand ifyou closely follow the directions inihis manual.
. Air filter(page 8-28)
. Engine coolani(page 8 19)
. Engine oil and oil filter(page 8 18)
8-12

Maintenance
I Owner Maintenance Precautions
Inproper or incomplete service mayresult in problems. This secrion givesinstructions only for items easy to
Improper owner maintenance during thewarranty period may affect warrantycoverage. For details, read the separateMazda Warranty statement provided witht})e vehicle.Ifyoule unsure about anyservrcjng or mainGnance procedure, haveit done by an Authorized Mazda Deater
As explained in the Introduction (page8 2), s€veral procedure can b€ doneonly by aqualified service technician
Awz.ntuueEkdncal Fa a d EngineInspection:Inspecting the e gi e viththeignition switch in the ON positiott isdangercus. The cooling fal couVcome on unexpectedly et)en vhen theengine isn't running. You couu besenouslr injurcd br the fan. Tum theigfiition switch off and rcnoye thekey fron the ignition rwitch whenlou ittspect the engine.
Awl.ntuveM ainte nance Procedures :P.torning nuintenance u,ork on avehicte is da,'serous if not doneproperlr. You can be seriouslrit'jwed *'hile petormins sonenaintena ce ocedure. II tou tacksufrcient knob,kdse and experienceor the proper tools and equipment todo the work, heve it do e br aquawed technician.
AwnRlrnrtcRunning the Enoine:Working under the hood l.t'ith theengine runni g iN dangercu'Itbecones even norc da ge.ous vhen)ou weorjewelry or loose clothi g.Either can become entanglcd innoving Wrts e d rcsuh in ir.jurr.Therclorc, if rou nust run thee gine while wo*ing under thehood, make ce ain that yu remoreaa jevelry kspecialb ''nss,bracelets, watches, and necHaces)and alt ne.kries, scaryes, and similarloose clothing before getting near theensi e or coolins Ian.
8.13

Maintenance
1.6-liter engine
Autonaric rderle nuid lerel dipsti.t (only for aulonatic ttusaxle)
I Engine Compartnent Overview
8-14

Maintenanc€
1.8 and 2.0-liter ergines
Auronam tdsdle unid-level dipsrict (only for aulonaric rrdsdle)
Bmte/Clntch nuid ftsnon
a/
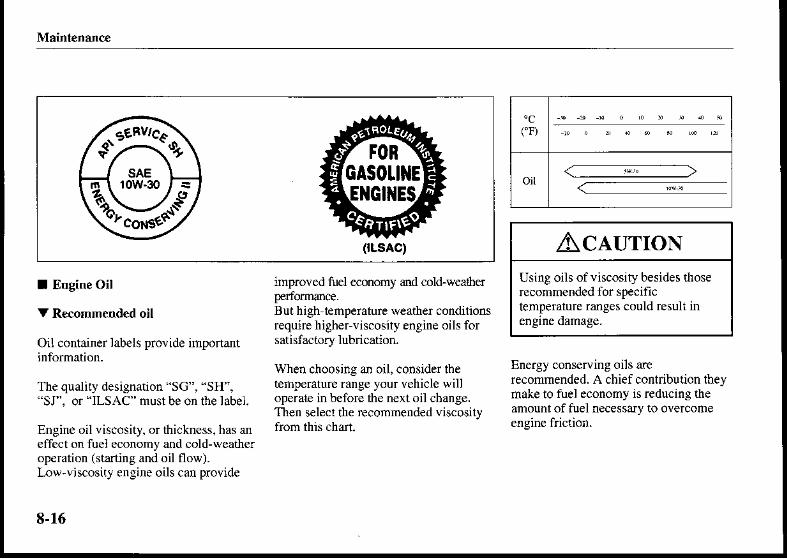
Maintenance
".u{,-
0LsAc)
I Engine Oil
V Recommended oil
Oil container labels provide important
The quality designation "SG", "SH","SJ". or "ILSAC" rnustbe on the label.
Engine oil viscosity. or thickness. has aneffect on fuel economy and cold-weathe!op€ration (starting and oil flow).Low-vjscosity engine oils can provide
8-16
improved tuel econony and cold-weaher
But high iemperature weather condilionsrequirehigher viscosity engine oils forsatisibctory lubrication.
When choosing an oil. consider tbetemperature range your vehicle willoperar,e in before rie next oil cbange.Then selecr the recommended viscosily
AclurroNUsing oils ofviscosiry besides thoserecommended for specifictemperalure ranges could result inengine damage.
Energy conserving oils arerecommended. A chief contribulion theymake to fuel economy is reducing theamount of fuel necessary to overcomeengine friction.
oil

Maintenance
NOTE
The distance belween L and F on thedipstick .epresents the fouowing
1.0 L (1.05 US qt,0.87lmp q0
V Inspecting engine oil level
1. Be sure the vehicle is on a lev€l
2. Warm up the engine to normaloperating temperature.
3. Tum it offand wai!5 ninutes for theoil to return to fte oil pan.
4. Pull outthe dipsrick, wipe it clean, andreinsert it iully.
5. Pull it out again and examjne fte level.It's OK between L and F.
But ifit's near at or below L, addenough oil to bring the level to F.
6. Male sure the O'ring is posirionedproperly before reinsening tbedipstick.
Ac.luuoNDon't add engine oil overF. This maycause engine damage-
A'"" -tltloKllLN -Lli
U
A.,, fl=l*lllLow ---Ll-l
U
8-17
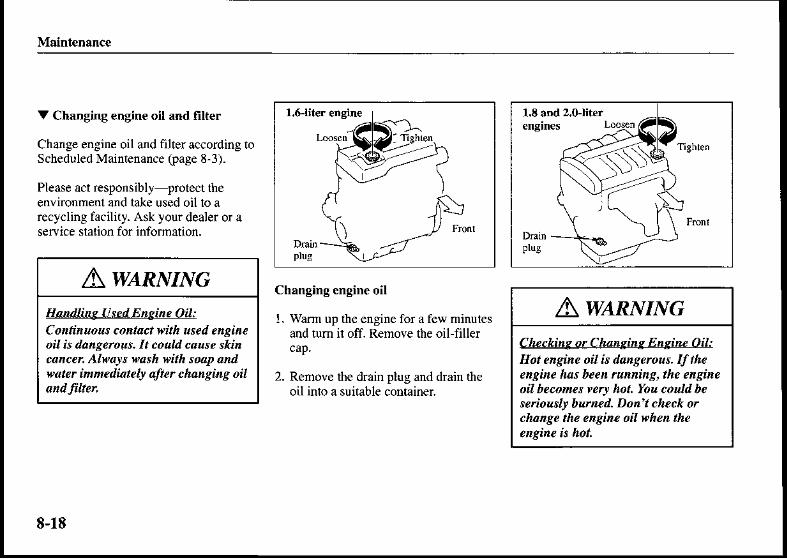
Maintenance
V Changing engine oil and filter
Change engine oil and filter according toScheduled Maintenance (page 8-3).
Please act responsibll protect theenvironment and ta.ke used oil to arecycling faciliiy. Ask yourdealer or as€rvice stalion for information.
Changing engine oil
I . warm up the engine for a few minutesand ium ir off. Remove the oil-filler
2. Remove the drain plug and drain fteoil into a suitable container.
engines
A wnRlrnrtcHandling Used E gine Oil:Continuous contact with used engineoil is dangerous. It coud cause skincancer Alwars wash with soap andwater innediateb after chansins oil
AwnnNmeCheckins orChansins Ensine Oil:Hot ensine oil is dansercus. II theengine h^s been running, the engineoit becomes very hot. You could beseiousl! bur ed. Don't check orchange the engine oil when the
8-18

Maintenence
3.
1.
Replace the plug iighdy after the oilhas thoroughly drained.
Fill the engine with new oil to the Fmark on the dipstick.
S€curely replace the oil-filler cap.
Slart the engine and inspecl around thedrain plug for leaks.
Tum il off and wait 5 minutes for theoil to reiurn to ihe oil pan.
Check the oil level and fitl to the F markifnecessary,
Oil capacity (General reference only.)
1.6-liter engine:3.0 L (3.2 US qt, 2.6 ftnp qt)
1.8 and 2.o-lit€r ensines:3.3 L (3.5 US qt,2.9Imp qt)
5.
NOTE
Use only specified engine oil (page
8 16).
Changing oil fflter
Because you need a special tool toretighten the filter, an Authoriz€d MazdaDealer should do the work.
I Engine Coolant
V Inspeciing coolant level
A waruvnrcHot Engine:A hot ensine h danserous. I! theensine has been runnins, pa.ts ofthe engine compartment can becomeyery hot. You couu be b rned. Don'tinspect the coolant slstem or addcoola t r'hen the engine is hot
8-19

Maint€nance
Inspect the antifreeze protection and Do not overlill,coolant level in the coolant reservoir at
V Changing coolant
leasl once a year at the beginning of the If new coolan! is required fiequently, Change coolant according to Sch€duledwinter season-and before traveling consult an Authorized Mazda Dealer Maintenance (page 8-3).where temperatures may drop belowfreezlng.
Inspect the condition and connections ofall cooling system and heaterhoses.Replace any ihat are swollen or
The coolanr should be at fuil in theradiator and between the FULL andLOW marks on the coolant r€s€rvoirwhen the engine is cool.
Ifit's ator near LOW add enoughcoolant to the coolant reservoir toprovide freezing and corrosion proiectionand to bring the level to FULL.
AclurroNRadiator coolant will damage paint.Rinse ll offquickly.
8-20

Ac.turronUse only soft (demineralized)waler in the coolant mixturc. Waterihat conlains minerals will cutdown on the coolant's
Don't add only water. Aiways adda proper coolant mixiure.
The engine has aluminum parts andmust be protected by anethylene-glycot-based coolant toprevent conosion and freezing.
DO NOT USE alcohol or melh3noianlifreeze. DO NOT MIX alcoholormethanol with lhe coolant. Thiscould damage the cooling system.
Don't use a solution that containsmore than 60 Eo aniifreeze.This would reduce effectiveness.
Maintenance
For mixture percenlage:
8-21
AwnnvnveRemoving the Cooling SrstemCap,Removing the cooling srsten capordrain plug while the engine isrunnins or hot is dansenus.Thismight lead to cooling slstem an.leng;ne danage and couA rcsultisenous injury fron escapins hotcoolant or steam.Tum off the engineand wat unfl it\ cool. Eren then, beverr careful when nnovins the capor dtuitt plug. Wrap a thitk clotharound it and slowlr tun itcountenbckwise to the frst stop.Step back vhile the Uessure escapes.When Jou'rc sure a theprcss.eisgon., pr.ss .lown on the cap - stillusing a cloth - tun the cap, and

Msintenance
t'"n,."!_.-
$\".,*
Ib change coolant (Manual trans le)
I. Remove the cooling system cap.
2. Only when the engine is cool,loosenthe radiator drain plug and drain thecoolaflt into a suitable container.
3. With the drain plug loose but not fullyremoved, flush out the system withfunning waier.
4. Drain the sysi,em cornpletely andretighten the plug. Add as muchethylene'glycol-based coolani andwater as necessary to provide freezingand corrosion protection.
In extremely cold climates, add theamount recommended in the coolantmanufacturer\ instruciions.
5. Run lhe engine at idle with the coolingsystem cap off. Slowly add additionalcoolant ifnecessary,
6. At this point, wait unlil the enginereaches normal operating tempenture;then depress the accelerator two orthree times. Add more coolant, ifnecessary, until lhe system is full.
7. Install the cooling system cap. Inspectall connections for leaks. Inspect thelevel in dre coolant res€rvoir one more
Ib change coolsnt(Automatic transaxle)
l Remove the cooling system cap.
2. Only when the ergine is cool, removelhe radiator drain plug and drain thecoolant into a suitable container.
3. Flush out the system with running
8.22

Maintenance
4. Drain the system completely. Insertand tighten ihe plug. Add as nuchethylene gllcol,bas€d cootant andwater as necessary to provide ffeezingand corrosion prot€clion.
In exlremely cold climates. add theamount rccommended in lhe coolantmanufacturcr's instructions.
5. Run the engine at idie with the coolingsysten cap off. Slowly add additionalcoolant if necessary.
6. At this point, wait until the enginereaches normal operating temperatureithen depress the accelerator two ortbree times. Add more coolant. ifnecessary, until rhe system is full.
7. Install the cooling system cap. Inspectall connections for leai(s. Inspecr thelevel in the coolant reservon one more
brake/clutch system inspectred by anAuthorized Mazda Dealer.
AcaurroNBrake and clutch fluid will damagepainted surfaces. If brake or clurchfluid does get on a painted surface,wip€ it off immediately.
I Inspecting Brakerclutch Fluid L€v€l
The brakes and clutch draw fluid from
Inspect the fluid level in the reseNoirreguiarly. If it's low, add flriid until itreaches MAX. It should be kepl at MAX.
Before adding fluid, thoroughly clean the
The l€vel normally drops withaccumuiated distance. a condirionassociated with wear of brake and clutchlinings.Ifit isexcessively low. have the
Aclurror,lUsing nonspecified brake and clutchfluids Gee chan, page 10,2) willdamage the systems. Mixing differentfluids will also damage thern.
If the brakdclutcb system frequentlyrequires new fluid, consult anAuthorized Mazda Dealer
4.23

Ifnew fluid is required frequendy,consult an Authorized Mazda Dealer.
AclurroNTo avoid damage to the powersteering pump. donl operate thevehicle for long periods when thepower steering fluid level is low.
NOTE
Use specified power steering flujd(chart, page l0-2).
I Insp€cting Power Steering FluidLevel
Inspect lhe fluid level in &e reservoir ateach engine oil change with the engineoff and cold. Add fluid ifnecessary: itdoes not require periodic changing.
The level must be keptbetween MIN andMAX.
Visually examine the lines and hoses for
A waruvnscSpilkdB!4Lc4uidrSpi zd bmke lluid is dangercur. If itgets in !o0 eles, thef co ld beseria ib inj red- Il thit hawn\imnediatelr iush lour eres wirh hnterand get nedical attentio,L Brake l idspilbd on a hot engine couu cause afft. Be careftl n., to spi bmke fiuuon rowself or on the engine.
A wanrrnrcLow Brakelclutch Fluid Levets:Lou' brakelclutch Jluid lewls couldbe datgetuus. Low levels couldsignal btuke Ii ine ,'ear or a brakesrsten teak. Your brckes couA failand c.use an accident lfroufrndaloia' fluid lerel, hate the bnkes and
8.24

Maintenance
I lnspecting Automatic TransaxleFluid Level
The automatic transa{le fluid levelshould be inspected regularly. Measure it
The volume offluid changes with ihetemperature. Fluid mustbe checked atidle without driving at normal operating
L Park on a level surface and set theparking brake flnnly.
2. Idle ihe engine aboul two minucs.Push down on tbe brake pedal.
3. Move ihe shiftlever through alt rangesand set it at P
.+. With $e engine still idling, pull outthe dipstick. wipe itclean. and put itback.
5. Pull i! out again.
The proper fluid level is marked on the
4.25
Awl^nvmeS udde n Ue hicle More nent:Shiftins the shift tevet $,ilhout firstdepressing the bmke pedal kda gerous.The whicle coud movesuddenu and cause a a.cdent.Make sun the bnke pedal is appliedbefore shtftins the rhift lewn
Ac.lunoNLow fluid level causes lransaxleslippage. Overfilling can causefoaming,loss offlL d, and
Use sp€cified fluid (page l0-2). Anonspecified fluid could result intransaxle malfunction and failure.

Maintenance
Use the cold scale only as a
If outsid€ temperalure is lowerthanabout 20"C (70'F), stalt fie engineand insp€ct the fluid level after theengine reacbes operaiing
If the vehicle has been driven foran extended period at high speedsor in city traffic in hot lveathe!inspect the level only afierstopping the engine and allowingthe fluid to cool for 30 ninutes.
Fully insert the dipstick. W}Ien addingfluid, inspect with the dipstick to malesure it doesn't pass full.
NOTE
Inspect both sides of the dipstick for
V Fluid hot scale A
Wlen the vehicle has been driven and thefluid is at normal operating temperature.about 65oC (150oF), the level nusrbebetween Full and lnw.
V Fluid cold scale B
W}len the engine has not been runningand the outside temperature is about20"C (70'F), the level rnuslbe betweenFull and Low.
Funtlo l(tl u.,""- lilr "
8-26

Maint€nance
_<---.--..-.-- A waRlnarcS ubs titute Washer F lnid:Using tudiator antifreeze as vatherlluid is dansemus. If sprared on thewindshieu, it
'.rilt dirty the
*indshieu, allect Jour visibw andcouA result in an accident. Use onlrrtindshieu vashetflui.d ot pl&inwater in the reservoi.
I Body Lubrication
All moving points of the body, such asdoor and hood hinges and locks, shouldbe lubicated each time the engine oil ischanged. Use a nonfreezing lubricanr onlocks during €old weather.
Make sure the engine hood's secondarylatch keeps the hood from opening whenthe primary latch is released.
I Inspecting Washer fluid Lev€l
Inspectfluid level in ihe washer fluidreservoiq add fluid if necessary.
The iop of lhe float should be betweenFULL and LOW.
Use plain waterjffluid is unavailabie.But use only washerfluid in cold weatherto prevent it from freezing.
4.27

Maintenance
NOTtr
If tle vehicle is operated in very dustyor sandy areas. replace the filter moreoften than recommended intervals.
AclurroNDon'tdrive witiout an air filter Thiscould resuli in excessive engine wear.I Maintaining the Air Filter
A viscous paper airfilterfits inside theair cleaner housing, as shown.It'sbeenspecjally treated and should not becleaned and reused. Replace it when
l. Unfasten the clamps.
2. Lift off the air filter cover and r€movethe filler.
3. Wipe insid€ ihe air cleaner housingwith a damp clotb.
4. Replace tbe filter
5. Install in the reverse order ofremoval.
Replace the filter according to ScheduledMaintenance (page 8-3).
8-28

Ac.lurronHot waxes applied by automatic carwashes have been known to affect thecieanab jliry of windows.
I Mainiaining wiper Blades Ac.luuoNTo prevent damage to lbe wiperblades, don't use gasoline, kerosene.paint thinne! or other solvents on or
I Replacing Windshietd Wiper Blades
When the wipers no longer clean well.the blades are probably wom or cracked.Replace lhem.
AclurroNTo prevent damage lo the wiper armsand other components. don'tmove thewip€rs by hand.
Contamination of either the windshield or$e blades with foreign matter can reducewiper effectiveness, Common sources areinsecis, tree sap, and hot wa\ aeaimentsusedby some commercial car washes,
If the blades are nor wiping properly,clean lhe window and blades with a goodcleaner or mild detergent; then rinsethoroughly wiih clean waier. Repeat if
8-29

Maintenance
Raise the wiper arm and tum the bladeassembly to expose the plastic lockingclip.
Compress the clip and sljde theassembly downward; iben lift il off ihe
3. Hold the end of rhe rubber and puiluntil the tabs are free of the metalsuppon.
4. Remove the metal stiffeners from theblade rubb€r and installdlem in new
Ac.turroNTo prevent damag€ to the windshield,don't let rhe wiper arm fall on i1.
8-30
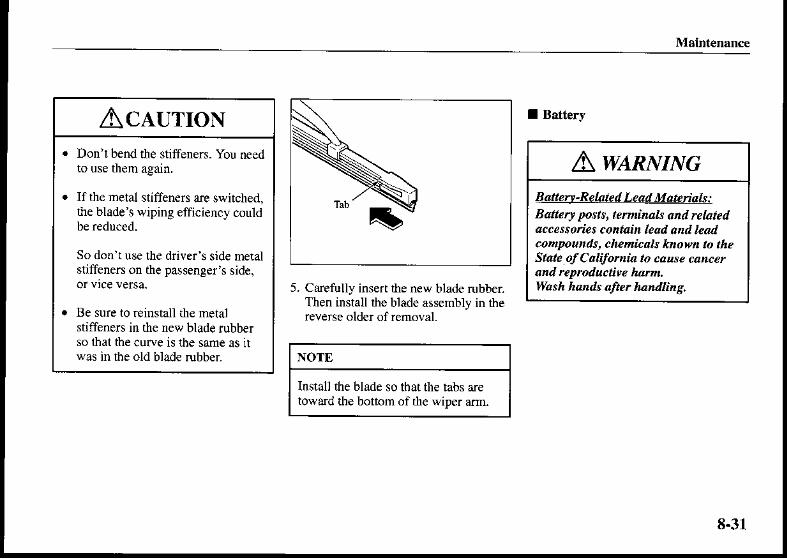
Msintenance
ACAUTIONDon'lbend the stiffeners. You needto use them again,
If the metal stiffeners are switched,the blade's wiping efficiency could
So don'tuse the driver's side meralstiffeners on the pa,jsenger's side,
Be sure to reinstall the metalstiffeners in |he new blade rubberso ihat the cuNe is ibe same as itwas in ihe old blade rubber
I Battery
5. Carefully insert the new blade rubber.Then install tlte blade assembly in ihereverse older of removal.
NOTtr
Insiall the blade so tha! the rabs aretoward the bottom of the wiper arm.
Awl.nvnlcB atte n - Re la t e d L e a d M ate rtuls :Baltery posts, teminals an l relateilaccestories cont&in lead an,l leatrcompound!, ch2nicals knot'tt to theState ofcalifo ia to cause cancerand rcprcductite hum,wash hands ofter han ins,
8-31
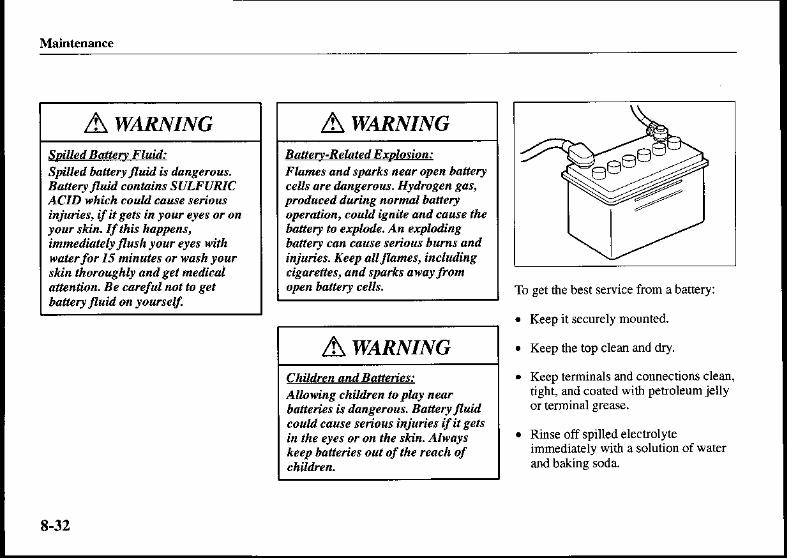
To get the best service from a battery:
. Keep it securely mounted.
. Keep the top clean and dry.
. Keep terminals and connections clean,tight, and coated with petroteumjellyor terminal grease.
. Rinse off spilled electrolyteimmediately with a solulion of waterand baking soda.
A wa-nlrnscB a tte ry - Re la t e d E xpl9si94Flames and sparks near open botte.rcells arc dangercw. Hrdroge gas,pm!*'ced during otmal batteryoperulion, couu isnite a dcausethebattery to explode. An explodingbattery can cause seious burns anal
Auries, Keep ollfiamer, i cludingcigarettes, and spafts awar fron
AwnnlmcSpilled Battery Fluid:SNled bottetr fluid i dansercus.Bafteryjl id contains SULFURICACID which tuuA cause seriot"Wwies, il it sets in row eres ot onr o u skin. If this happe ns,innediateb Jlush rour eres with$'ate4or 15 ninutes or wash roulskin thoroughb and get nedi&laltentio . Be carcful not to getbattery fluA on yursev.
AwnntlivcChildnn and Battenes:A owing chimren to pla! nearbatteies is dangenus. Batterr fluA.oud cause seious injwies ifit getsin the eres or on the skin. Al*arskeep batteries out of the nach of
8-32

Maintenance
. If the vehicle will not be used for anextended time, disconnect the battery
a Tires
For reasons of prop€r periormance.safety, and better fuel economy, alwaysmaintain recommended tire infl ationpressures and stay \rifiin therecommended load limits and weightdistribution.
A wanlrnrcAsins Wrcns-Sbad Tires:Asing anJ other tire size than ,ihat isrpecifrcd fot row Mazta (pase 10-s)is dangerous. It coua seriousl!affect i.de, hmdling, grou dclearunce, tire clearunce, andspeedometer calibrution. Thk couucaute Nu to hare sn accident. Useon0 tircs that are the conect sizespecifred lor low Mazda.
Aw,qnuweUsing DwredT ire Trpes:Dneins pu whick u'ith dWrc ttrpes of tifts is dangenus.It couucause poor htndling ond poorbraking; leading to loss of cotttlol.Except N'hen using the ten poruryspare tire, use onlr the sane tJpetires (radial, bits-belted, bios-trpe)
8-33

Maintenance
NOTE
Warm tires normally exceedrecommended pressures. Don'trelease air from warm tires to
Underinflation can cause reducedfuel economy and poor sealing ofthe lire bead, which will deforrnthe wheel and cause separation oftire from dm.
Overinflation can produce a harshride and a greater possibiliry ofdamage from road hazards.
Keep your tire pressure al ihecoffect levets. If one frequentlyneeds inflating, have it inspected.
AwnnwmcIncoftect Tin Inlhtion:owrtnflanon or undennflation oftires is dangercus. A6'ene ha dA gor ututpected tirc lailure couldresult in a seious occAent. Atwarsiniate the tires to the cornctprcssure (pase 10-5).
V Tire inflation pressure
Inspect all tire pressures monthly(includjng tbe spare) when the lires ar€
cold. Maintain recommended pressuresior rhe best ride, lop handling, and
Refer 1o the specification charts (page10 s).
8.34

o@@b?t>Do nor include (TEMPORARY USE ONLY
V Tire rotation
To equalize tread wear. rotate rhe tiresevery 6000 km (3.750 nilet, or soonerif iffegular wear develops. Duringrotation, inspect them for correct balance.
Also, inspect them for uneven wear anddamage. Abnormal wea. is usuallycaus€d by one or a combination of thefollowing:
. Inconect tire pressure
Improper wheel alignment
Out of-balance wbeel
. Severe braking
After rotation, bring all tire pressures tospecification (page 10,5) and inspeci rheIug nuts for tightness.
Nrtllftl"(Jfri
V Replacing a tire
lfa tire wears evenly. a wear indicatorwill appear as a solid band across lheiread. Replace the tire when this happensYou may need to replac€ it before rheband is across the entire tread.
8-35

Maintenance
V Temporary spsre tire
Insp€cl the temporary spare tire at leastmonthly to make sure it's properlyinflated and stored.
The temporary spare tirc js easier tohandte because of its constuction. lt islighter and smaller than a conventionaltire and should be used only for anem€rgency and onty for a short distance.
Use ihe lemporary only until theconventional tire is repaired, whichshouldbe as soon as possible.
Maintain its pressure at,120 kPa (60 psi).
A wanlsnrcWornTires:D6'ing vith won tires isdangercus.Reduc e d b rukins, stee ins, andtruction could rcsult in M accidentAli'ars L\e tires thal are in good
AcaurroN. Don'tuse your temporary spare
tire rim with a snow tire or aconventional tire. Neither willproperly fit and could drmage bothiire and rim.
. The temporary spare tire has a
tread life of up to 4,8tJo km (3,000niles), depending on roadconditions and driving habits.
. Wlen the tread wear solid-bandindicator appears, replace the tirewilh the sarne type of temporaryspare.

Maini€nance
AclurroNA wrong sized wheel may adYerselyaffect
. Tire fit
. wleel and bearing life
. Ground clearance
. Snow chainclearance
. Speedometer calibration
. Headlight aim
V Replacing a wheel
When replacing a wheel, male sure thenew one is the same as the originalIactory wheel in diameter, rim width, andoflsel.
Proper tire balancing provides the bestriding comfort and helps reduce treadwear. Oul of'balance tires can causevibration and uneven wear, such ascupping and flat spots.
Do nol louch tne glass surface
I Replacing a Headlight Bulb
Your Mazda's headlights havereplaceabl€ halogen bulbs.A wamrnrc
asinr a wrcns-Sized Wheel:Asing a turong-si&d wheel isdangem s. Brakw and hantrlinecouu be aflected,leani g to loss ofcontrcl and an accuent. Alwars utewheels of the coftect ske on rour

Maintenance
A IyARNING
ChiUrc and Halogen B lbs:Plati tg
'a'ith a halogen bulb i
dansenus. Serious Aunes couu bectused br dnpping o halogen bulbor brcakine i.t sone other war.Afuals kzep halogen bulbs out of the
Awz.nuntcH a n d li n g H ato eLg-!!lbt;When a halogen bulb breaks, it isdangerous. These bulbs containpftssunaed gas. If o eisbrok.n,itwi explode and seious injuriescould be caused bt the lbittg glars.If the glass pottion is touched vithbaft hands, bod| oil coua cause thebulbtoow eat and explode whenIit. Net,et touch the glass pottion ofthe bulb if ith jou. ba.e hon.ls andalpaJs wear ete pmtection whehandlins ot workins anund halosenbulbs.
\r>.t
L Make sure $e headlight switch is off.
2. Lift the hood and find the bulb in lherear ofthe headtight body.
3. Detach the electsical connector fromthe bulb by squeezing the tabs andpulling it to the rear.
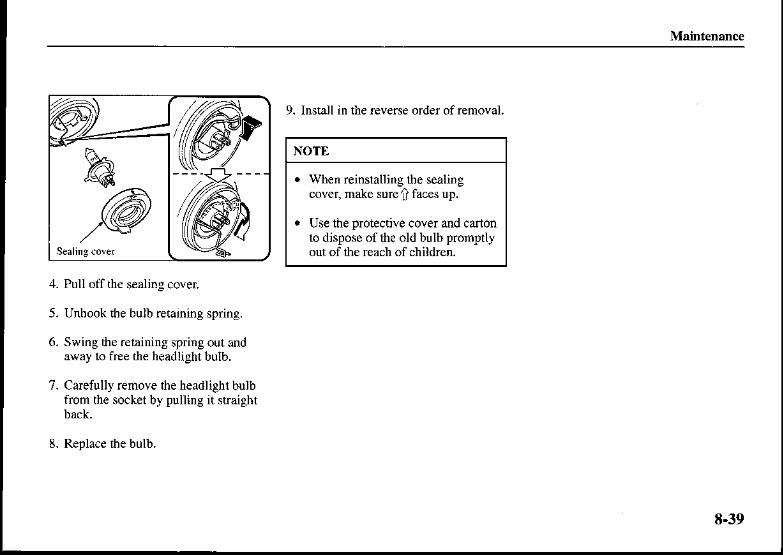
Maintenance
%,.-s:t,
/@
9. Install in the reverse order of removal.
NOTE
. When reinstalling the sealingcover, make sure ? faces up.
. Use the proteciive cover and cartonto dispose of the old bulb promptlyout of the reach of children.
4- Pull off the sealing cover.
5. Unhook the bulb retaining spring.
6. Swing the relaining spring our andaway 10 free the headlighrbulb.
7. Carefully remove the headlighlbulbfrom the socket by pulling it straight
8. Replace ihe bulb.
8-39

Maintenance
I Replacing a Bulb (Front)
Fmnt-turn signal lights/
--'9:
To replace the fog light bulbs, contact an Authorized Mazda DealerThe number in ( ) shows the bulb number
8-40

Maintenance
I Replacing a Bulb (Interior)
O Interior light (Type B) 8w (-)@ Map light (t'pe B) sw (-)

Maintenance
*ffi)ffi
ffivWuffi+ffi
ffi+WI Rear Bulb Acc€ss
To replace the tun-signal light,brakelighytaillight, side-marker light orback-up ligbt bulb, the trunk end trimmust be removed and ihe insid€ covermust be partially opened.
1. Pull the center section of tle plasticreiainer and remove rhe retainers andthe trunk end trim.
2. Remove the inside cover's plasticretainers and partially open the inside
a-42

I Replacing a Bulb (Rear)
O Brske lightvTaillights 2r6w (7u3)@ Rear-side marker lights 3.8W (194) @ ReaFtum signal lights 21W (-)
2rw (1uo)
O,W!?*
*ffi2-Th€ numb€r in ( ) shows fie buib number.


Who tocohsuhabouta Noblen; what to do iflourehicte has a safery defect: ||hat\9arranties pbtecr torr vehicle: .ltieitugautside the Uhited Statet atui Cano.la:a.l.lihg equipnent; tirc qualitt €.ades:'lhb hthe kind af cohsuher idorwtion lou ll fnd
CDsromer AssistanceMazda Importer/Distributors
Wmnties for Your MazdaOutside the Uniled SBtes and Canada
Add-On Non Genuine Parts and AccesoriesUniforn TiE Quaiity GEdins System (UTQGS)
Reponine Safery DefectsSenice Publicarions
929-5969-69-79-8
911
9-1

Customer Information
Customer Assistance (U.S.A.)
Your complete and permanent satisfaction is our business. we are here to sewe you. Al1 AuthorizedMazda Dealers have the knowledge and the tools to k€ep your M^zda vehicle in rop condition.
If you have any questions or recommendations for improvement regarding th€ service of your Mazdavehicle or s€rvicing by Mzz da Dealer personnel, we reconmend that you |ake ihe following steps:
STEP l: Contact Your Mazda Dealer
Discuss lhe malter with an Aulhorized Mazda Dealer This is tbe ouickestandbest wav toaddre\\ rhe r5,ue. ll your concem ha\ no{ been resolred b) he CLiSTOMER RELATIbNS.SALES, SERVICE, or PARTS MANAGER, $en please contact the CENERAL MANAGERof the dealership or the OWNER.
#a
STEP 2: Call the Mszda National Customer Assistance Center #800
ff for any reason you feel the need for furlher assistance after contacting your dealership man-agement, call Mazda North American OperationJ Customer Assistance Center toll free atl
I (800) 222-5500In order to serve you efficienlly and effectively, please help us by providing ihe following
l. Your name, address, and telephone number2. Year and nodel ofvehicle3. Vehicle Identification Number ( 17 digits, noted on your registration or title or located on
the uDrerdiver's side comer of the dash)
5.Purchase date and current mileageYour dealer's name and locationYourqueslion(s)
w

Customer Inlormation
If you would like to write a letter, please address it io the foltowing, Atft Customer Assistarce, which corresponds with your srate
This way, we can be sure to respond to you as efficiently as possible. Tbat is our goal.
Ifyou live outside $e U.S.A., please conract your nearest Mazda Distriburor
REGIONAL OFFICE AREAS COVERED
Mazda North American Operalions7755 lrvine Center DriveIN;^e. C A 9261A-2922PO. Box 19734Irvine, CA 92623-9734

Customer lnformation
Customer Assistance (Puerto Rico)
Your compleie and permanent satisfactioq is our business. That is why ali Authoized Mazda Dealers bave the knowledge and thetools to keep your Mazda vehicle in top condition.
If you have any questions or recommendations for imprcvement regarding ahe seNice of your Mazda vehicle or servicing byMazda Dealer personnei, we recommend that you take the following steps:
STEP IDiscuss tbe matter with an Authorized MazdaD€aler This is the quickest and best way to address the issue. If your concem hasnot been resolved by the CUSTOMER RELATIONS, SALES, SERVICE, or PARTS MANAGER, then please contact theGENERAL MANACER of tbe dealenhip or the OWNER.
STEP 2If, afGr following STEP I , you feel the need for further assistanc€, please contact your area's Mazda representative (Indicated onrhe next page).
Please help us by providing the following information:I . Your name, address, and telephone number2. Year and model ofvehicle3. vehicle ldentification Number (17 digits, noted on your registration or tide or located on the upper driver's side comer of the
dash)4. Purchase date and cunent mileage5. Your dealer's name and location6. Yourquestion(s)
9-4

Customer Information
Mazda Importer/Distributors
U.S.A. (Importer/Distributor)
Mazda North American Operations7755 haine Center Drivelrr'ine, CA 92618-2922P.O. Box 19734lwine, C492623 9?31TEL| 1 (800) 222 5500 (in U.S.A.)
(949) 727-1990 (ourside U.S.A.)
(Distribntor in each area)
CANADA
M^z da Canada Inc.305 Milner Avenue, Suite 400Scarborough, Ontario MIB 3V4 CanadaTEL: I (800) 263-4680 (in Canada)
(416) 609 9909 (outside Canada)
PUERTO RICO
Plaza Motors Corp. (Maz& de Puerto Rico)PO. Box 362722. San Juan. Puer.o Rico 00936-2722TEL: (787) ?88 9300
GUAM
Thiple J Motors157 South Marine Drive, Tanuning,GUAM 9691I USAPO. Box 6066 Tamuning, Guam 96931TEL: (671) 649-6555
SAIPAN
Paciffc lnternational Marianas, Inc.(d.b.a. Midway Motors)P.O. Box 887 Saipan, MP 96950TEL: (6"70) 234't524
AMERICAN SAMOA
Polynesia Motors, Inc.PO. Box 1120, Pago Pago, Arnerican Samoa 96799TEL: (684) 699-9347

Customer Informstion
Warranties for Your Mazda
. New Vehicle Limited Waffanty
. Safety Restrainr Syslem Limited
. Anti-prforanon Limited Waranty
. Federal Emission Control Warranty
-Emission Defect Warranty
Emission Perforrnance Warranty
. California Enission Control Warranty(ifapplicable)
. Replacement Parts and AccessoriesLimited Warranty
Outside the United States andCanada
Government regulations in the UnitedStates require that automobiles meetspecific emission regulations and safetystandards. Ther€fore, vehicles built foruse in rhe United States. its territories,and Canada may differ from those sold in
The differences may make it difficult oreven impossible for yourvehicle to receive satisfactory servicing in other coun'tries, We strongly recommend that youNOT take your Mazda outside these
You may have these problems if you do:
. Recommended fuel may teunavailable. Any kind of ieaded fu€lor low-octane fuel will affect vehicleperformance and damage th€ ernissioncontrols and engine.
. Prop€r repair facitilies, lools. teslingequipment. and rcplacement parts may
The Mazda wananty applies only toMazda vehicles registered and normallyoperated in the unitred states, iisterdtories, and Canada.
NOTE
Detailed warranty information isprovided with your Mazda.
9-6

Customer Information
Add-On Non-Genuine Parts andAccessories
Non-genuine pans and accessories forMazda vehicles can b€ found in stores.These may fit your vehicle, but they arenot approved by the Mazda for us€ withMazda vehicles. W}len you installnon genuine parts or accessories, theycould affect your vehicle's performanceor safety system; the Mazda warranlydoesn tcoverrhis. Before you install anynon-genuine parts or accessories, consultan Authorized Mazda Dealer.
Mazda assumes no responsibility fordeath, injury, or expenses that may resultfrom the instatladon of add on non genu-ne pans or accessofles.
AwaruvavcInsta ation of Non-Genuine Parts orAccessories:Insta ation of non-senuine parts oraccessoies is .langetuus. Impnpe !dengned parts or accessories couAseiouslJ o,ffect !ou. rehicle\Wrfornu ce ot safeg slstem. Thitcouu cause rou to haw an accinento. incresse lour chances of Wuiesid an accident. Alv'ats consult anAttthoized Mazda Dealer beforc fouinsta ott-ge uine pafts or
A wemrnvcAdd-On Electical and ElectonicEouipa@alirIncoftectlr chMsing or installi ginprcper add-on equipment orchoosinga inproper i sta erisdangerous. Essential slstems couddamaged, cauNing e gine stolling,ab-bas (SRS) actn'afion, ABSinoctivanon, oraJirc in the vehicte.Be very csreful in choosins andin stauing add-on e le cticalequipnelt, such as nobiletelephones, trio-N)a! radios, stereosfstens, and car abrn slstems.
9-7

Cuslomer Informalion
Uniform Tire Quality GradingSystem (UTQGS)
This information relates to the tiregradjng system developedby the U.S.National Highway Traffic SafetyAdministration for grading tires by treadwear, traction, and temperature
I ltead Wear
The tread wea.r grade is a comparativenting based on $e wear rate of the tirewhen tested under controlled conditionson a specified govemment test course.For example, a tire graded I 50 wouldwear one-and-a-half times as well on thegovemment course as a tire gmded l0o.
The relative performance of tires dependsupon the actual conditions of their us€,howeve! and may depart significandyfrom the nom because of valiations indriving habits, service practices and dif-ferences in rcad characteristics and cli-
I Tlacaion-AA, .\ B, C
'fte tracdon grades, from highest to low,est, are AA, A, B. and C. These grades
9.8
r€present fte tire's abilily to stop on wetpavement as measured under controlledconditions on sp€cified govemment testsurfaces of asphalt and concrete. A dremarked C Inay have poor traction perfor-
WARNING:The tructioi glade assigned to this tircis based o blaki g (slraight ahea.l)tractio tests a d does not includeac.elerudon co edne tunind,hJdropla i g, or peak trcction
I Temperature-A, B, C
The lemperature graales are A (the high-est), B, and C, represent the tiret resis-tance to the generation of heat and itsability to dissipate heat when tested un-der conlrolled conditions on a specifi€dindoor laboratory iest wheel. Sustainedhigh temperature can cause the materialof lhe tire 1o degen€rate and reduce tirelife, and excessive temperatures can leadto sudden tire failure.
Grade C conesponds to alevel ofperformance which all passenger vehicletires must me€t under the Federal MotorVehicle Safety Standard No. 109. GradesB and A represenl higher levels ofperfoamance on the laboraiory test wheelthan $e minimum required by law.
WARNING:The tenperulure srude for this tbe isestablished fof a tie th4t B pfope rinlated and not ove oaded Excessivespeed, undefit Jlation, or excessiveIoading, either separat b or incombination, con cause heat buiuapa .l possible tirc faiure.
These grades will be added to the side-walls of passenger vehicle tires over thenext several years according to asched,ule €stablished by the NHTSA and thetire manufacturels.
The grade of tires available as standard oroptional equipment on Mazda vehiclemay vary with respect to grade.

Ctstom€r Information
ALL PASSENGER VEHICLE TIRESMUST CONFORM TO THESECRADES AND TO ALL OTHERFEDERAL TIRE-SAFETYREQUIREMENTS,
TREADWEAR 2OO TRACTION AATEMPERATURE A
i'\\
Reporting Safety Def€cts
If you believe that your vehicle has adefect which could cause a crash or couldcause injury or death, you shouldimnediately inforn the NationalHighway Trafiic Safety Adminisrration(NHTSA) in addition to nolifying MazdaMotor Corpomrion (Your Mazdalmporte/Distributor).
If NHTSA receives similar complaints, ilmay open an invesrigation. and if ir findsthat a safeiy defectexists in a group ofvehicles. it may order a recall and reme-dy campaign. However, NHTSA cannorbecome involved in indivjdual problernsbetween you, your dealer, or Mazda Mo-tor Corporation (Your Mazda Importer/Disiributor).
Unifonn Tire Quality Grading
Quality grades can be found where appli-cable on the tire sidewall between treadshoulder and ma\imum section width.
Tfeadwear 200 Tiaction AA
9-9

Customer Information
To conlacl NHTSA. you may either callthe Auto safety Hodine toll,free at1 (800) 424-9393 (or 366-0123 inWashington, D.C. area) or wriie to:NHTSA, U-S. Departmenl ofTransponation. Washington, D.C. 20590.You can also obrain orher informationabout motor vehicle safety from theHotline.
(Note)Ifyou live in the U.S.A., all correspon-dence to Mazda Motor Corporationshould be forwarded .o:
Mazda Nonh American Operalions7755, Irvine CenterDriveh v ine, C alif omia 926 1 a -2922P.O. Box 19734lNine. C A 92623-9734Customer Assistance Centeror toll fr€e at I (800) 222-5500
lfyou live oubide of the U.S.A., pleasecontact fie nearest Mazda Dislributorshown on page 9-5 in this bookler.
9-10

Customer Informalion
Service Publications
Factory authorized Mazda service publicarions are available for owners who wish rodo some of their own maintenance and repair
When requesting any of our publicarions $rough an Authorized Mazda Dealer. refer
If they don't have what you need in stock, they can order ir for you.
WORKSHOP MANUAL:Covers recommended maintenance and repair procedures of the drive rrain, body and
WIRING DIAGRAMIProvides eiectrical schematics as well as component locarion for the entire elecrricalsysrem.
OWNER'S MANUAI,:This booklel contains information regarding the proper care and op€ralion of ]ourvehicle. This is not a technician's rnanuat.
PUBLICATION ORDER NUMBER PUBLICATION DESCRIPTION
9999 95 0l78 01 2001 WORKSHOP MANUAL Gnslish)
999 95 0lgc 0l 2001 WIRING DIAGRAM GnAIhh)9999 95 038C 0l (Except Pueno Rico) 2OOI OWNER'S MANUAL
9-ll


Specifications
Lubricant Quality
EngineElectrical System
Light Bulbs
to- 210,2to- 2l0- 3
to- 4104r0- 5t0- 5r0,5
l0-1

Specificaiion!
Dimensions
* Refer to the recommended SAE viscosily numbers on page
8 16.GV.!VR| Gross Vehicle Weight RatingGAWR: Gross Axle weight Rating
Lubricant Quality
ILSAC
sG @crH/ consflins tr)
SH (Enegr Consening tr) GF-I
SJ GF II
API Senice GL 4 or GL 5(sAE 75W90)Above l0'C (50'F)API S€dice GL'4 or GL-5(sAE 80W-90)
Automatic transaxle fl uid ATF M{Il or-equivalent
ATF M-III or eqDilalenr(e.g. Dexron* II)FMVSSIt6DOT-3
Overall length 4450 \175.2)
r,705 (67.1)
Olerall heighl t,4i0 (55.5)
t.47O 15',7 .9)
1,470157.9)
2,6r0 (ro2.8l
Weights
Model 1.8 and 2.O-liter
GVWR 1,600 (3,527) t,653 (3,644)
850 (1,874) 883 (1,947)
760 0,675) 780 (1.?20)
t0-2

Specilications
EngineModel
Type DOHC- l6V inline. 4cylinder
?8.0 x 83.6 nm(3.07 x 3.29 in)
81.0 x 85.0 mm(1.27 x 3.35 in)
83.0 x 92.0 mm(.3.27 >< 3.62ln)
1.598 nl(1,598 cc.97.5 cu in)
i.8.lOml(1,840cc. 112.2cu in)
l.991ml(1,991 cc, 121.5 cD in)
9.0 9.1

Specificstions
Electrical SvstemModel 1.6-liter engine
1.8 and 2.0-liter
Battery 12V , 40Arv5HR I2V_4OAI'5LIRl2v 52AI'5HR
l2v-70A l2v-80At2v 1.0 kw t2v-1.0 kw
NGK ZFR5F IIZI'R6F II
BXR5E-]IBXR6E-] I
DENSO KJl6CRllKJ2oCRIl
K16PR UIIKzOPR-UI I
CHAMPION RC8YC4RCloYC4
MAZDA BPl3 r8 110BPl4l8 110
Spark-plug gap 1.0 1.I nn(0.03H.043 in)
Capacities roximate QuantitiesUnit
L US qt Imp qt
Eng'ne 3.2 3.4 2.8
3.0 3.2 2.6
z.u3.5 3.7 3.1
3.3 3.5 2.9
1.6 - 6.0 6.3 5.3
5.5 5.8 4,E
1.8 and2.0-
7.5 7.9 6.6
6.9 7.3 6.1
2.7 2.9 2.4
7,2 '7.6 6.3
L US gal8ar
1.6-liter engine 50 13.2 l l,0
1.8 and 2.0liter engine 55 14.5 t2.l
Check oil and fluid levels with dipsticks or reservoir gauges.
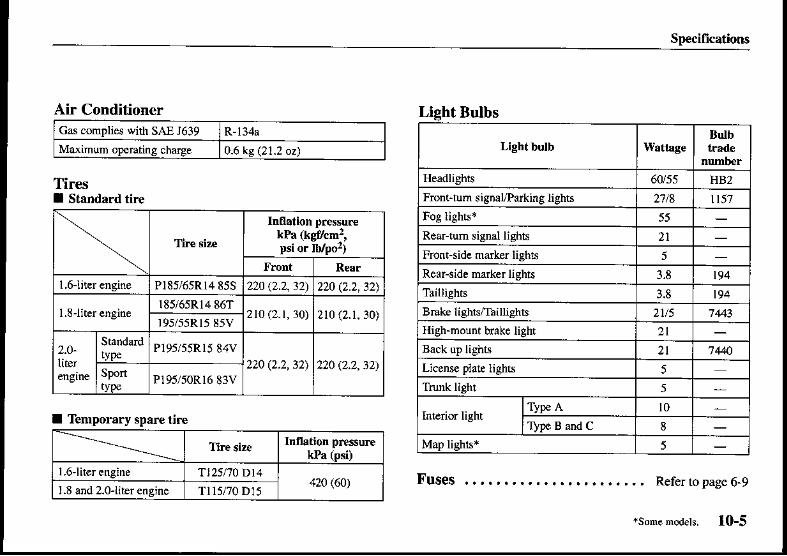
Specifications
Air ConditionerGas complies with SAX J639 R-134a
Maxinum openting charye 0.6 kg (21.2 oz)
TiresI Standard tire
Fuses . . , . . . . . . . . . Refer to page 6-9
kPa r kgflcm-t.
Pl85/65R14 85S 220 \2.2, ]2) zzo (2.2,32)
lE5/65R14 867210 (2_1, 30) Zl0 (2.1.30)
r95/55R15 85V
2.O- Pl95/55R15 84V22O (2.2,32) zzo (2.2,32)
SponPt95/50R16 83V
Bulbs
Lieht bulbBulb
HeadliBhls 6(V55 HB2
Frcnr-rum signaUParking lighrs 27ta ll57Fog tights* 55
Rear-tum signal lights 21
Front-sidc marker lighrs 5
Rear-side marker lights 3.8 194
Tailligh!! 3.8 194
BEke lighr.fi.illights 2|5 7443
High-mount b6ke lighr 2lBack up lights 2l 1440
Licens€ plae lights 5
Trunk lighr 5
Interior lightType A l0TYpe B md c 8
Map lidts* 5
I Temporary spar€ tire
k?a (osi)
' 25t70Dt442O <@)
I .8 and 2.otiter engine Tl15/70 DI5
,s".e roaet'. 10-5


Index
ll-l

Page
A
Add'On Non Genuine Paris and
Accesories .................. -. -.. 9 7
Air Bag Restnint Syslem
Supplenental Resfiaint Syslem . . . . . 2-3O
waminglight ................... 5-31
Aluminun Wheel Maintenance ........ 7-8
Ant€nna ......................... 5-86Antil@kBEke System (ABS) ........ 5 13
Waminglight .......-........-.. 5 30
Ashtmy.......-.................. 5-3E
ADdio System .... -. ......... - 5 56,5 57
Drivinglips...........-.......... 5 8
Fluid level . . . . . . . . . . . . . . . . . . . . . . 8-25
Overdnve ....................... 5-9
Shift-locksystem ................ 5-10
Transaxleranges .................. 5-7
Page
B
Battery .......................... 8-31
Charging system waming light .... -. 5 28
Jumpstaning ..........-...... -.. 6-4Beforc Driling
Afte! getringin ..-... -..-..-.......1-6Beforc g€ltingin ..,.,..,.,.,.,.,.. +6
Body Lubrication ...... - -... -...... a-27
Antilo.kbrakesysten (ABS) .. -.... 5 13
Pluidlevel ...................... E-23
Foo! brake . . . . . . . . . . . . . . . . . . . . . . 5 I IPad wear indicator . . . . . . . . . . - . - . . 5 12
ParKngbrake ......... -...... -.. 5-lZSystem weinS light -.. .. -.. -. ... 5-26
BEaklnPeriod ......-....-........ +6BrighrMetal Mainiemnce, -. -....,.., 7-7
Headright......................- 8,37
Red........................... 8-43
Buld Replacenenr, Front,
interior ..................... 8-40, 8-41
Page
C
Capacities.............-.......... l0-4
(see Emission Conrol Slstem)CenterConsole.................... 5-40
Chains ....-.....--...-...-...... 4-10
ChangingaFlatTirc--.....-....... - 6 16
ChdgiDgCoolani ............-.... 8'20Chdging the Oil .................. 8-18
Cheging Systen wamjng Light .. .. .. 5-28
Check Engine Light . . . . . . . . . . . - . . . . 5-29
Ct'ecking
Automatic transaxlefluid ]evel...... 8-25
Brake/clulch fluid level............ E-23
Coolant1eveI.................... 8'19Engineoillevel .................. 8-l?Power steering fluid level ..........8-24washer fluid level . . . . - . . . . . . . - . . . 8'27
Child Restnint, P@autions. ......... 2-20Child Safety t-ockforRearD@r.. -. -.. 3-6
Child-RestFinr Syst€mr............. 2-22Installing ....-................ -. 2-23
CigareueLighter .................. 5-3E
Ciean'ngDashb@rd....................... 7-9Laphhoulderbeltwebbing -........ 7-10
rt-2

lndex
PageUphohtery and inlerior ffin . . . . . . . . . 7 9Windowinterio$................. 7-lO
Cumate Control Systen . . . .. .. .. .. . .5 ACoolan!, Engine
Adding .,.,.,,..-.....,....,.,, 8 19
Changing....-.................. 8-20Inspecting ....-.............-... 8-19
Cruise Control . . - . - . . . . . . . . . . . . . . . 5 15
CupHolder...............-....... 5-:lO
Customer Assistance . . . . - . . . . . . . 9-2, 9-4Customerlnfomation :.............. 9-l
D
DashboardIllunination .........-.-. 5 25
Dashboard Ovedjew ................ l-3Dashbosrd Precautions.... ...... -.. -. 7 9Day/Night Minor.....-.... -....... 3-23
Rearwindow............ ........ 5 37
DoorLocks......-.-............... 3 2Door-AjeWanine Lighr............ 5-30Doos ...-..............-...-..... l-4Driling in Fl@ded Areas.......... .. 4ll
Page
E
Energency StartingJump-sBning .................... 6-4Push-starting ......-..,.,..,.,,.,. 6 6
Emission Control System .. . .... ... .. . +3Engine Compaiment Oveniew. -. -... 8-14Engine Coolant
Addingcoolant .................. 8 19
Changingcoolan! ................ 8-20Inspectingcoolantlevel ........... 8-19Overheann9................ -..... 6 2
Engine Coolanr Tenperature cauge
Engine ExhaDst(carbon Monoxide) . ......... .. .. .. . +4Engine Oil
Changingengineoilandiilter ...... 8-18Inspecting engine oil level . . . . . . . . . 8- I 7Re.onnendedoil .... -. -......... 8-16
Engine Oil Pressure waming Light . . . . 5-28
EngineSrat1ing..................... 5,4Exhaust (Carbon Monoxide) .. .. ... .. . +4ExteriorCarc .............,........ 7,4
page
F
FinishDanase .............. -......'7-7Flashea Hazard Wamine ... . -. .... .. .6 2Flat Tlre . . . . . . . . . . . . . . . . - . . . . . . . . 6 t 4
Automanc hnsaxle ,.,..,.... ..,. 8-25Biake/clutch .................... 8-23Powersteering.....-......... -... 8,24Washer............. -... ........ a-27
FogLights ....................... 5,35Foot Bmke .................. -. -.. 5- llFront Seat Belt Pretensioner and LoadLimiling Systems .................. 2-llFron! Seat Belts . . . . . . . . . . . . . . . . . . . 2-t2
Headrcshinr .................... 2-lReline . . . . . . . . . . - . - . . . . . . . . . . . . 2 3
Slide .-......................... 2-zIlt(driver'sseao ............. -. -. 2-4
FuelGauge....................... 5 24Fuel Requircments . .... . -. -. -.. . .. .. +2Fuel-FillerCap.................... 3-19Fuel'FillerLid .................... 3-19Fuses ............................ 6-6
Fusepaneldescription . . ......... 6 9Replacement ..................... 6 6
11-3

lndex
Page
G
Gauges
Fuel . . . . . . . . . . - . . . . . . - . . . . . . . . . 5 24
Odometerand tlipmeter,.. ...,.... 5-22
Spedometer .................... 5-22
Tachometer,...,.,,.,.,,.,.,,.,. 5-25
Watertenpenture... -............ 5-24
cloveBox ....................... 5'39
H
Halogen Bulb . . . . . - . . . . . . . . . . . - . - . 8 3?
Hazard waming Flasher . . . . . . . . . . . . . . 6-2
Hazardous Driving . . .. .. . .. .. .. . .. .. +8Headlight Bulb Replacement......... E-37
Headlights ....-.-......-......... 5-33
Higb'beam indicator light....... -.. 5-32
HoodReleak .-...... -............ l-18Hom ............................ 3'21
How to Minimire Environnental Paint
Damage .,.,.,......,..,.,.,..,.,. 7-2
Damage caused by bird dropping. insects,
or tree sap . . . . . . . . . . . . . . . . . . . . . . . 7-2
Etchingcaused by acid rain or industrial
fallout .......................... 7-2
tt4
Page
Paint chipping . . . . . . . . . . . . . . . . . . . . 1-3 JWalermarks .........-.-......... 7-3
IIgnition KeyReminder ............. 5-31
Ignition SwitchPositions ............. 5-2InCaseof Emergercy ............... 6'l
Cruiseset....................... 5 3?
Headlight high'bean...... ........ 5-32o/D(overdrive) oFF ............. 5'32
Autonatic traDsaxle fluid lev€l . .. . .. 8'25BEke/clutch fluid level .. .. . .. .. ... 8-23
Coolanr level . . . . . . . . . - . . . - . . . . . . 8-19
Engine oil level . . ............. 8-17
Power steering fluid level . . . . . . . . . . 8-24wdher fluid level . . . . . . . . . . . . . . . . I 27
Instrument Cluster . . . . . . . . . . . . . . . . . 5 20
Inleriorcarc....................... 7-9
lnteriorLight ......-.... -. -....... 3-26
Interior Oveniew . .. . .. . .. .. .. . .. .. . l-z
Jack md Tml Storage . . . . . . . . . . . . . . 6 14
Junp'Sarting...................... 6-4
KKeylessEntrySystem ............... 3-6
Maintemnce ..................... 3'9Tmnsnitter - . . . . . . . . . . . . . . . . . . . . . 3-1
Kets .....-....................... 3-2
LLabelInfomation ................. +12LAICH Child'RestnintSyslem . . - .. .. . . . .. .. .. ...... .. ..2-2'1Lane'Change Signals ............... 5-34Light
Interior ........................ 3 26
Map......................-.-.- 3 28
Trunk.......................... 3-28
Lighler ..............-.....-..-.. 5-38
Lighting Control
LightsFog .-......................... 5-35

Index
Page
HeadIi8hts .....................- 5-33
Onreminder .................... 5-31
LockingLugNuts ........... -..... 6 2lLow Fuel Waming Lighr . - . . - . - . - . . . 5-29LugNuts. Locking ................. 6,21
LuegageCompanment.-.... -........ 1,6
M
Maintaining the Air Filler . , . . , . , . . , . 8-28MainlainingtheFinish...... -. -...... l-4Maintaining wiper Blades ........ -.. 8'29Maintenance....................... 8'l
Introduction.................... -. 8 2
Owner.................-......-. 8'8Scheduled ....................... 8 3
Opemtion ....................... 5'5Shiftpattem,..................... 5-5
MapLighrs...-................... 3-28
Outsidemirors .................. 3-21
Powerfold in outside nircrs ......322Rearviewmiror ................. 3-21Vanity - . . . . . . . . . . . . . . . . . . . . . . . . 5-41
Money-Saving Suggestions ... .. ..... . +7
Page
oOdomeler and Trip Meter. . ... .. ... .. 5-22
Oil(see Engine)
Outlide Mirmrs .. .......... .. ... ..1-2rOu$ide Ue Uniled States and
canada ........................... 9-6Overheating - . . . . . . . . . . . . . . . . . . . . . . 6-2Overloading -........... . ......... +12
Precautions ..................... 8-13Schedule ....................... 8-12
page
P
PainrDamage................... -.. 7-2
Damage caused by bird dropping, insers,or tree sap , . , , , , , , . , . , . . . . . . . . . . . '7-2
Etching caused by acid rain or industrial
fallout .......................... 7-2Waier marks . . . . . . . . . . . . . . . . . . . . . 7-3
Park'ngBrake..... -............... 5-12PowerControl Minor............... 3-22Power Door L@ks . . . . . . . . . . . . . . . . . . 3-4Powersteering...............-.... 5-14Power Steering Fluid l€vel . . . . . . . . . . 8-24Powerwirdows ................... 3'll
Driver'sdoor.................... 3-llLockswitch..................... 3-12PassengeFDoor.. -............... 3-13
Reardoor..... -................. 3-13
PEgnant Women . . . . . . . . . . . . . . . . . . 2-19Push-SBning ...................... 6-6
ll-5

Index
page
R
Radio Reception . . . . . . . . . ........5-52Rear DoorChild Safety Lack.......... 3-6
RearSeat ..-.-.................... 2-5
Rear Seatback lock .. -.... -. -.... -. 2'8splirfolding _ . . . . . . . . . . . . . . . . . . . . 2-5
Rear Seat B€Its .,.,,,,... ,... -.... .2-14RearWindow Defrosier ............. 5-37Reaniew Minor (DayiNisho ....... - 3'23Repairing Damage to theFinhh........ 7-7
Replacing
Bulb(ree).............. -....... 8'43Buld(front. interiot ......... 8'4O, 8'41Headlightbulb... _............... 8-37'Iire ........................... 8 35
wheel . . . . . . . . . . . . . . . . . . . . . . . . . 8'37windshield wiper bndes . . . . . . . . . . . 8 29
Rockingthe Vehicle ..... -............L8
Page
S
SafetyCenificatior ..., -...,.,,,,., 5-54ScheduledMaintenance .............. 8'3Sear BeltExtender,.,,,,-...,.,,.,...,.,, 2-18
Front .,.,-.................,.,, 2-12F.ont sea! belt prcEnsioner and loadinglimiting systens . . . . . . . . . . . . . . . . . 2 I IPregnan!women ................. 2-19
Rear-..-.-......-..-........... 2-11System,-........................ 28wminglightbeep .......... -.... 5 27
Front,,.,..,............., -,.,,. 2-2Rear.,....,.,.,,.,.,,.,.,....,.. 2-5
SenicePublications. -.... -...... -.. 9-11
Snow lires ....................... +10Sparcf ire ......... -.... - .... 6-22,8 36Special Driving Conditions
Drivinginfloodedareas ........... +llHazddousdrivin8...... -.......... +8Rockingthe vehicle .... -.......... +8Winterdriving.................... 49
Specifications..................... l0-1Airconditioner .................. l0-5Capacities ...................... l0-4
Page
Dimensions ..................... l0'2Electricalsystem................. l0-4Engine ,.,...,.,............ .. -. l0-3Ligh! bulbs ................. -... l0-5LDbricanrqualily................. l0-2]:res .......................... 105Weighrs .,...,.,................ l0-2
SFedometer........... -.......... 5-22
Staningth€Engino.................- 5-.4
Hom ..-....................... 3-21'Illt wheei . . . . . . . . . . . . . . . . . . . . . . 3-20
StoFge Compartrnents.............. 5-39
Sunroof, Opention....... .......... 3-24Sunshade ........................ l-25Sunvnors ....-.-................. 5'41
Supplemental Restnint System
Constantmonitoring .,...,.,....,. 2-44Frontairbag etivalion .,,..,....,. 2-38
How the air bags work . . . . . . . . . - . . 2 33
Linitations rc side air bag
activation........,.,.,...,...... 2-42
Maintenance,,,..,.,.,.,.,.,..,, 2-:15
Non-acrivarion of side air'bags . -. -.. 2'43
Sjde air'bag activation . . . . . . . . . . . . 2-41
Systemdescription ............... 2-32
wamingligiit ....... -........... 5'31
l1-6

Index
Page
T
Tacbometer,.,..,..............,.. 5 25
Tempomr! SpareTire .............. 8-36TlhSteering ..........-........... l-20
Chains .-..................-.... 410FlartiE . . . . . - . . , . , , . , . . , , , . . . . . 6 l:llnflation plessurc ................ 8 34Replac€ment .................... 8-35
RoBtion........................ 8-35
Snow tires . . . . , . , . , , . , , . . . . . . , . . +10Spe.......................... 8-16Sparetire -............... -. - -. -. 6 22
Tool Stora8e....................-. 6 14
Towing ............... -.......... 6-12TnilerTowing .................... +llTEnsaxleRanges, Automldc ..-...... 5-7
TEnsaxle, Automatic . .. . . ... .. .. , .. . 5-6
Tnnsaxle, Manual . . . . . . . . . . . . . . . . . . 5 5Tmnsmission (see Transaxle)
TripMeter ....................... 5-23Ttunk Lid
Key operatedlrunk ..............- 3 14
Remote lrunk lid release . . .. .. ... .. 3-14Trunkseuity..,....,.,,.,...-.. 3 15
Trunk Light - . - . . . . . . . . . . . . . . . . . . . 3-28
Page
Trunk Release Handle .............. 3-16Tum and l-ane-Change Signals ....... 5-34TumSignal....................... 5-34
U
Underbody Maintenance . . . . . . . . . . . . . 7-7Unifom Tire Qulily Grading Systen(UTQAS)
Tenperature-AA. A. B, C . . . . . . . . . . 9-8Tra.tion-A,B. C..,.,.,.,..,.,,... 9 8Treadwear .,..,.,.,.,........... 9-8
vVanityMirors .................... 5-41
Vehicle Infomation Labeh . . . . . . . . . . +12
wwaming LighttBeeps
Antilockbrake system (ABS) ....... 5-30Bnke systen.................... 5-26Charging systen ................. 5'28Ch{ken9ine.................... 5-29
Page
D@Fajar....................... 5,30Engine oil prcsurc ............... 5-28Ignition key reminder .......... -.. 5,31Lights'onrcminder ............... 5,31
Low fuel . . . . . . . . . . . . . . . . . . . . - . - 5 29Seat belt , . , , , . , . . . . . . . . . . . . . . . , . 5-2'7
Supplemental rcstraint systen . . . . . . 5-3 I
Wamingiights inspection .......... 5-26Wamnties for Your Mazda . . . . . . - . . . . 9-6washing ................. -........ 7-4WaterTempenture Gauge ........... 5-24waxing .......... -................'7-6Wheel Replacement - . . . . . . . . . . . . . . . 8-37windshieldwasher ................ 5-36Windshield washer Fluid Level .......8-27windshield wiper Blades
Replacement...........-... -...... 8-29windshieldwipers...... -... -...... 5-35WinterDriving................... - - +9
Maintaining..................... 8 29Windshield ..................... 8 29
tt-7