Embed Size (px)
Citation preview
2002 Civic GX Online Reference Owner's Manual Supplement Use these links (and links throughout this manual) to navigate through this reference. For a printed owner's manual, click on authorized manuals or go to www.helminc.com. Refer to Civic Sedan for topics not covered.
Contents
Owner's Identification Form
Introduction .....................................................................................................................................................2
Instruments and Controls.............................................................................................................................3 Instrument panel indicator and gauge, and how to use dashboard and steering column controls.
Before Driving .................................................................................................................................................7 What gasoline to use, how to break-in your new car, and how to load luggage and other cargo.
Driving .............................................................................................................................................................15 The proper way to start the engine, shift the transmission, and park, plus towing a trailer.
Maintenance ...................................................................................................................................................20 The Maintenance Schedule shows you when you need to take your car to the dealer.
Taking Care of the Unexpected.................................................................................................................38 This section covers several problems motorists sometimes experience, and how to handle them.
Technical Information .................................................................................................................................42 ID numbers, dimensions, capacities, and technical information.
Authorized Manuals (U.S. only).................................................................................................................47 How to order manuals and other technical literature.
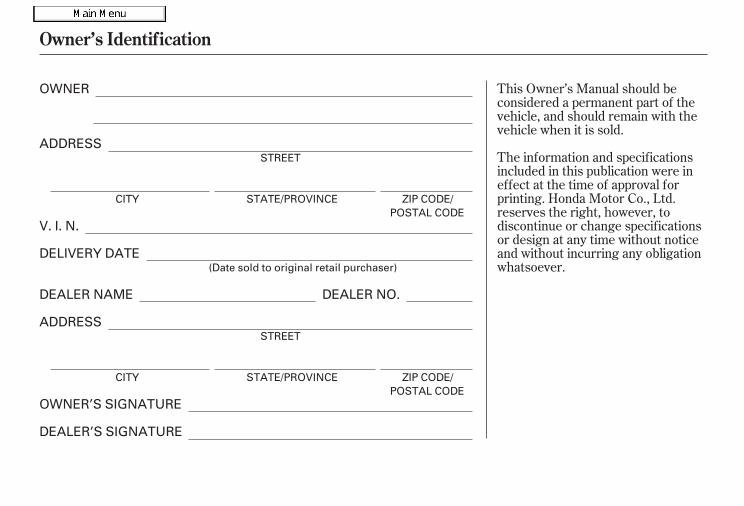
This Owner’s Manual should beconsidered a permanent part of thevehicle, and should remain with thevehicle when it is sold.
The information and specificationsincluded in this publication were ineffect at the time of approval forprinting. Honda Motor Co., Ltd.reserves the right, however, todiscontinue or change specificationsor design at any time without noticeand without incurring any obligationwhatsoever.
Owner’s Identif ication
OWNER
ADDRESS
V. I. N.
DELIVERY DATE
DEALER NAME DEALER NO.
ADDRESS
OWNER’S SIGNATURE
DEALER’S SIGNATURE
STREET
CITY STATE/PROVINCE ZIP CODE/POSTAL CODE
(Date sold to original retail purchaser)
STREET
CITY STATE/PROVINCE ZIP CODE/POSTAL CODE
01/07/31 16:18:41 31S5W610_001
Your Civic GX runs on CompressedNatural Gas (CNG), a highlypressurized version of the sameclean-burning natural gas used inmany homes. Because natural gasdoes not contain impurities such assulfur, the production of oxides ofsulfur (SOx) and soot pollutants iseliminated. Using CNG as a fuel alsominimizes the amount of CO in theengine exhaust, producing muchlower emissions than a conventionalgasoline-powered vehicle.
Your Civic GX operates andperforms like a gasoline-poweredCivic. However, there are a fewdifferences you should be aware of.In addition to reading the CivicSedan owner’s manual, please readthis supplement carefully tounderstand the operation and uniquefeatures of your Civic GX.
You will find important safetyinformation in this supplement andin the owner’s manual. Thisinformation alerts you to potentialhazards that could hurt you or others.Please read it carefully.
2
Introduction
2
01/07/31 16:18:54 31S5W610_003
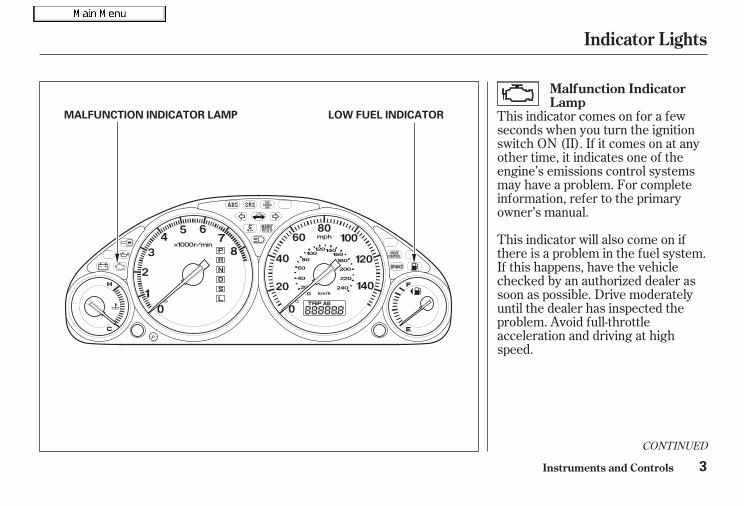
This indicator comes on for a fewseconds when you turn the ignitionswitch ON (II). If it comes on at anyother time, it indicates one of theengine’s emissions control systemsmay have a problem. For completeinformation, refer to the primaryowner’s manual.
This indicator will also come on ifthere is a problem in the fuel system.If this happens, have the vehiclechecked by an authorized dealer assoon as possible. Drive moderatelyuntil the dealer has inspected theproblem. Avoid full-throttleacceleration and driving at highspeed.
CONTINUED
Indicator Lights
Instruments and Controls
Malfunction IndicatorLamp
3
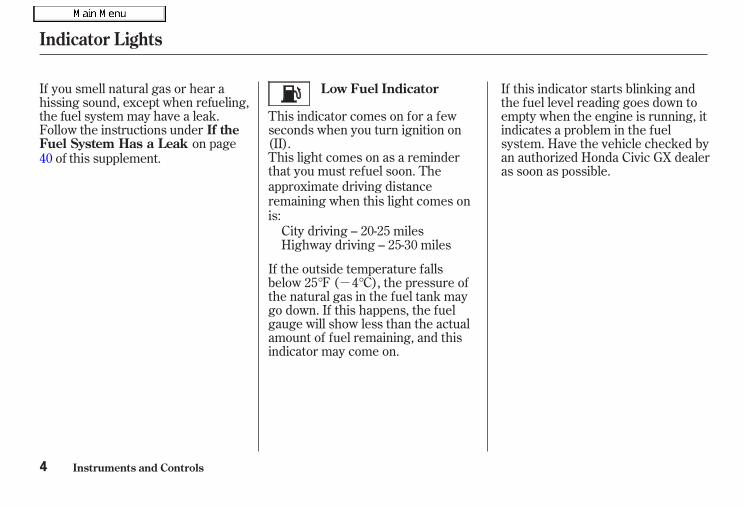
LOW FUEL INDICATORMALFUNCTION INDICATOR LAMP
01/07/31 16:19:01 31S5W610_004
-
If you smell natural gas or hear ahissing sound, except when refueling, the fuel system may have a leak. Follow the instructions under
on page
This indicator comes on for a fewseconds when you turn ignition on(II).This light comes on as a reminderthat you must refuel soon. The
If the outside temperature fallsbelow 25°F ( 4°C), the pressure ofthe natural gas in the fuel tank maygo down. If this happens, the fuelgauge will show less than the actualamount of fuel remaining, and thisindicator may come on.
If this indicator starts blinking andthe fuel level reading goes down toempty when the engine is running, itindicates a problem in the fuelsystem. Have the vehicle checked byan authorized Honda Civic GX dealeras soon as possible.
40 of this supplement.
Indicator Lights
Instruments and Controls
If theFuel System Has a Leak
Low Fuel Indicator
4
01/07/31 16:19:08 31S5W610_005
approximate driving distanceremaining when this light comes onis:
City driving – 20-25 milesHighway driving – 25-30 miles
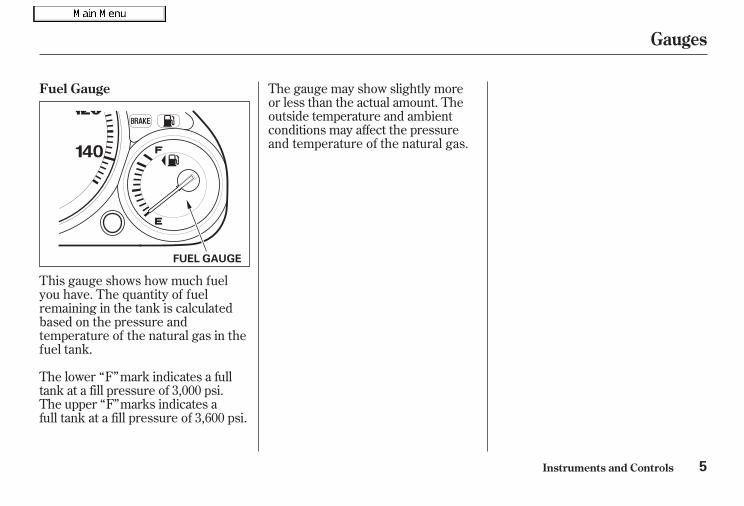
This gauge shows how much fuelyou have. The quantity of fuelremaining in the tank is calculatedbased on the pressure andtemperature of the natural gas in thefuel tank.
The lower “ F” mark indicates a fulltank at a fill pressure of 3,000 psi.The upper “ F” marks indicates afull tank at a fill pressure of 3,600 psi.
The gauge may show slightly moreor less than the actual amount. Theoutside temperature and ambientconditions may affect the pressureand temperature of the natural gas.
Gauges
Instruments and Controls
Fuel Gauge
5
FUEL GAUGE
01/07/31 16:19:15 31S5W610_006
Unlike the standard Civic, only twopeople can ride in the rear seat. Theyshould sit in the outer seatingpositions and wear the lap/shoulderbelts. There is no center seat belt.
Instruments and Controls
Rear Seat
6
01/07/31 16:19:18 31S5W610_007
The main component of compressednatural gas is methane, a highlyflammable, colorless gas. While it isthe same gas that is burned ineveryday home appliances such askitchen stoves and water heaters,the CNG in your car is stored underhigh pressure (maximum 3,600 psi/24,800 kPa).
The CNG fuel system in your Civic,including the tank and hose, hasbeen designed to hold gas at thispressure. It has also been tested forsafety. You should never smell gasor hear a hissing sound unless youare refueling. If you smell gas orhear a hissing sound at any othertime, you need to shut down the fuelsystem. Follow the instructions onpage .
Your Civic GX is designed to operateon Compressed Natural Gas (CNG).The natural gas you use to refuelmust meet NFPA-52 and SAE J1616standards for fuel composition andquality.
If you use a fuel that does not meetthese standards, you may feel adecrease in engine power and yourcar’s emissions controls may bedamaged.
33
Fuel
Before Driving
Compressed Natural Gas (CNG)
7
Compressed natural gas isflammable and highly explosive.You could be killed or seriouslyinjured if leaking natural gas isignited.
If you suspect a leak, have yourvehicle immediately inspectedand repaired by an authorizedHonda Civic GX dealer.
01/07/31 16:19:26 31S5W610_008
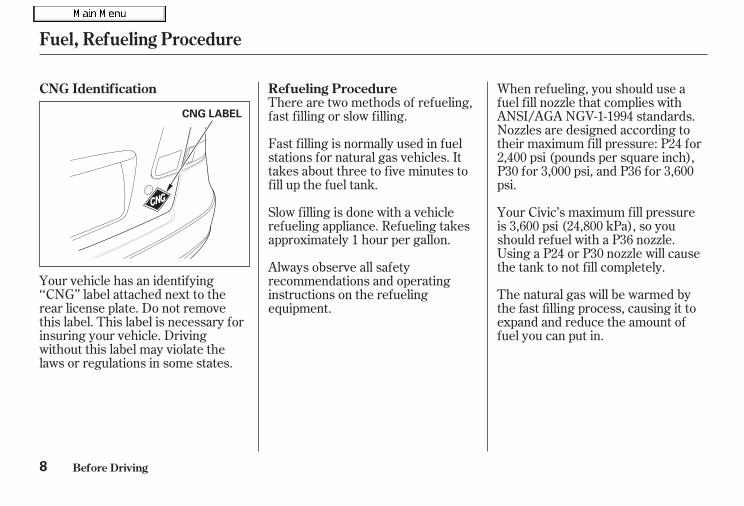
Your vehicle has an identifying‘‘CNG’’ label attached next to therear license plate. Do not removethis label. This label is necessary forinsuring your vehicle. Drivingwithout this label may violate thelaws or regulations in some states.
There are two methods of refueling,fast filling or slow filling.
Fast filling is normally used in fuelstations for natural gas vehicles. Ittakes about three to five minutes tofill up the fuel tank.
When refueling, you should use afuel fill nozzle that complies withANSI/AGA NGV-1-1994 standards.Nozzles are designed according totheir maximum fill pressure: P24 for2,400 psi (pounds per square inch),P30 for 3,000 psi, and P36 for 3,600psi.
The natural gas will be warmed bythe fast filling process, causing it toexpand and reduce the amount offuel you can put in.
Your Civic’s maximum fill pressureis 3,600 psi (24,800 kPa), so youshould refuel with a P36 nozzle.Using a P24 or P30 nozzle will causethe tank to not fill completely.
Slow filling is done with a vehiclerefueling appliance. Refueling takesapproximately 1 hour per gallon.
Always observe all safetyrecommendations and operatinginstructions on the refuelingequipment.
Fuel, Refueling Procedure
Before Driving
CNG Identification Refueling Procedure
8
CNG LABEL
01/07/31 16:19:36 31S5W610_009
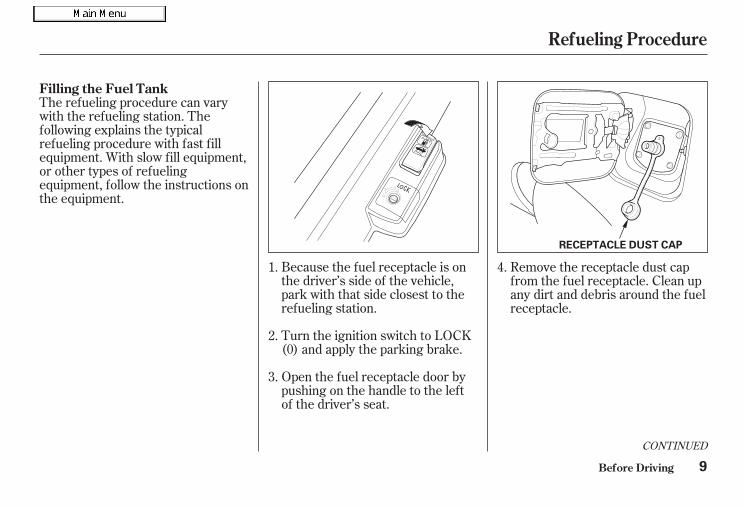
Because the fuel receptacle is onthe driver’s side of the vehicle,park with that side closest to therefueling station.
Turn the ignition switch to LOCK(0) and apply the parking brake.
Open the fuel receptacle door bypushing on the handle to the leftof the driver’s seat.
The refueling procedure can varywith the refueling station. Thefollowing explains the typicalrefueling procedure with fast fillequipment. With slow fill equipment,or other types of refuelingequipment, follow the instructions onthe equipment.
Remove the receptacle dust capfrom the fuel receptacle. Clean upany dirt and debris around the fuelreceptacle.
1.
2.
3.
4.
CONTINUED
Refueling Procedure
Before Driving
Filling the Fuel Tank
9
RECEPTACLE DUST CAP
01/07/31 16:19:45 31S5W610_010
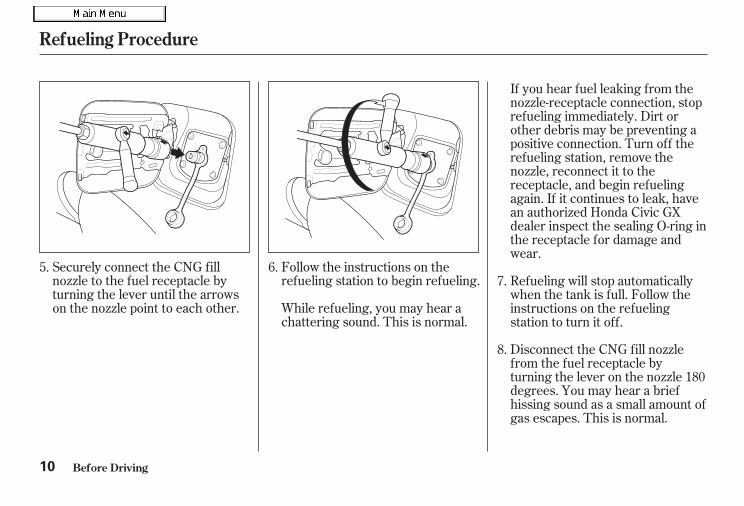
Follow the instructions on therefueling station to begin refueling.
Securely connect the CNG fillnozzle to the fuel receptacle byturning the lever until the arrowson the nozzle point to each other. While refueling, you may hear a
chattering sound. This is normal.
If you hear fuel leaking from thenozzle-receptacle connection, stoprefueling immediately. Dirt orother debris may be preventing apositive connection. Turn off therefueling station, remove thenozzle, reconnect it to thereceptacle, and begin refuelingagain. If it continues to leak, havean authorized Honda Civic GXdealer inspect the sealing O-ring inthe receptacle for damage andwear.
Disconnect the CNG fill nozzlefrom the fuel receptacle byturning the lever on the nozzle 180degrees. You may hear a briefhissing sound as a small amount ofgas escapes. This is normal.
Refueling will stop automaticallywhen the tank is full. Follow theinstructions on the refuelingstation to turn it off.
5. 6.7.
8.
Refueling Procedure
Before Driving10
01/07/31 16:19:55 31S5W610_011
Push the fuel receptacle doorclosed until it latches.
If you are not sure how to operatethe refueling station, ask forassistance.
Put the receptacle dust cap on thefuel receptacle securely. To obtain information about the
locations of Compressed Natural Gas(CNG) refueling stations, contact theNatural Gas Vehicle Coalition(NGVC) at (202)824-7360.
9.
10.
Refueling Procedure
Before Driving
Refueling Station Information
11
01/07/31 16:20:02 31S5W610_012
On line: www.afdc.doe.gov
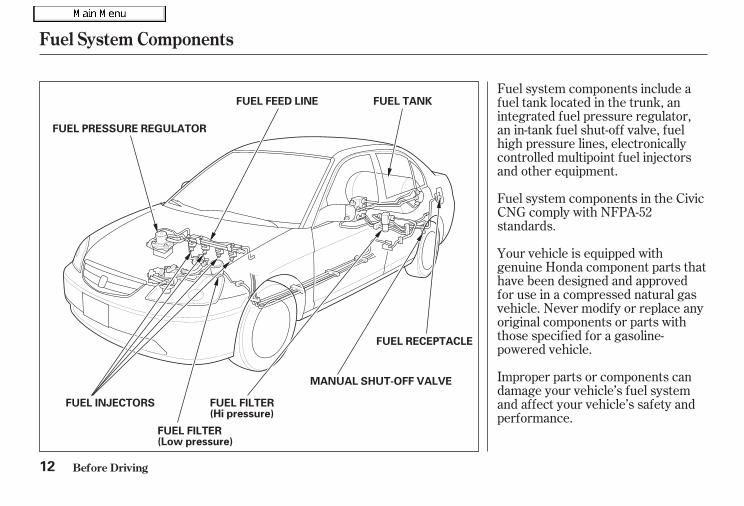
Fuel system components include afuel tank located in the trunk, anintegrated fuel pressure regulator,an in-tank fuel shut-off valve, fuelhigh pressure lines, electronicallycontrolled multipoint fuel injectorsand other equipment.
Fuel system components in the CivicCNG comply with NFPA-52standards.
Your vehicle is equipped withgenuine Honda component parts thathave been designed and approvedfor use in a compressed natural gasvehicle. Never modify or replace anyoriginal components or parts withthose specified for a gasoline-powered vehicle.
Improper parts or components candamage your vehicle’s fuel systemand affect your vehicle’s safety andperformance.
Before Driving
Fuel System Components
12
FUEL INJECTORS
FUEL PRESSURE REGULATOR
MANUAL SHUT-OFF VALVE
FUEL TANKFUEL FEED LINE
FUEL RECEPTACLE
FUEL FILTER(Hi pressure)
FUEL FILTER(Low pressure)
01/07/31 16:20:10 31S5W610_013
CONTINUED
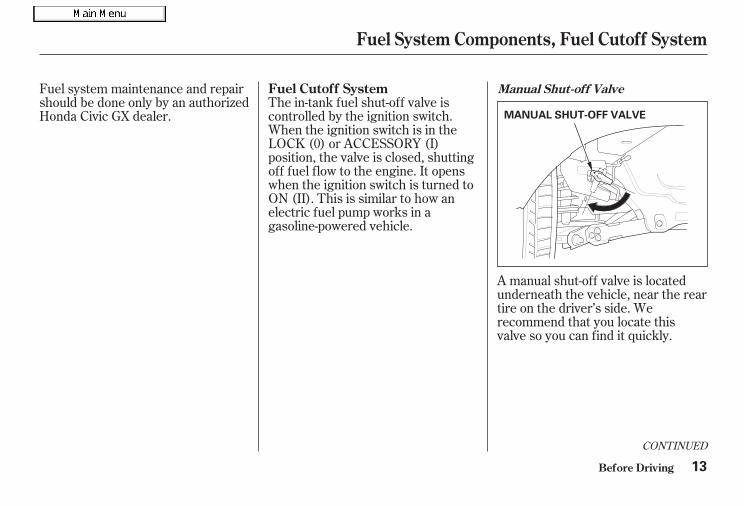
A manual shut-off valve is locatedunderneath the vehicle, near the reartire on the driver’s side. Werecommend that you locate thisvalve so you can find it quickly.
The in-tank fuel shut-off valve iscontrolled by the ignition switch.When the ignition switch is in theLOCK (0) or ACCESSORY (I)position, the valve is closed, shuttingoff fuel flow to the engine. It openswhen the ignition switch is turned toON (II). This is similar to how anelectric fuel pump works in agasoline-powered vehicle.
Fuel system maintenance and repairshould be done only by an authorizedHonda Civic GX dealer.
Before Driving
Fuel System Components, Fuel Cutoff System
Manual Shut-off ValveFuel Cutoff System
13
MANUAL SHUT-OFF VALVE
01/07/31 16:20:18 31S5W610_014
Do not carry large, heavy or pointedobjects in the trunk. They maydamage the fuel tank.
The maximum load you can carry inyour car is 635 lbs (288 kg). Thatfigure includes the total weight offour occupants (driver and threepassengers), their cargo, and anyaccessories. The maximumrecommended weight for cargo inthe trunk is 35 lbs (16 kg).
The fuel tank is located in the trunk,with a partition between the fueltank and the cargo space.
When you store small items in thetrunk, secure them so they will notshift while you are driving. Looseitems can fly over the partition anddamage the fuel tank and fuelsystem components.
To turn off the valve, turn the leverone-quarter turn clockwise. Turn itcounterclockwise to turn the valveback on.
Turn off the valve if you ever suspecta fuel leak or are involved in anaccident.
Before Driving
Fuel Cutoff System, Carrying Cargo
Carrying Cargo
14
01/07/31 16:20:26 31S5W610_015
- -
CONTINUED
Apply the parking brake.
In cold weather, turn off allelectrical accessories to reducethe drain on the battery.
Make sure the shift lever is inPark. Press on the brake pedal.
If the engine does not start within15 seconds, or starts but stallsright away, repeat step 5 with theaccelerator pedal pressed half-waydown. If the engine starts, releasepressure on the accelerator pedalso the engine does not race.
An engine is harder to start in coldweather. The thinner air found athigh altitude above 5,000 feet (1,600meters) adds to the problem.Use the following procedure:
Turn off all electrical accessoriesto reduce the drain on the battery.
Make sure the MalfunctionIndicator Lamp goes out beforeyou turn the ignition key to theSTART (III) position.
If the outside temperature is below4°F ( 20°C), the engine may be
harder to start. In this case, use thestarting procedure for cold weatherat high altitude described in the nextcolumn.
Without touching the acceleratorpedal, turn the ignition key to theON (II) position. You may hear aclick from the in-tank fuel shut-offvalve.
Make sure the MalfunctionIndicator Lamp goes out beforeyou turn the ignition key to theSTART (III) position.
Turn the ignition key to START(III). If the engine does not startright away, do not hold the key inSTART (III) for more than 15seconds at a time. Pause for atleast 10 seconds before tryingagain.
If the engine still does not start,press the accelerator pedal all theway down and hold it there whilestarting. As before, keep theignition key in the START (III)position for no more than 15seconds. Return to step 6 if theengine does not start. If it starts,lift your foot off the acceleratorpedal so the engine does not race.
1.
2.
3.
4. 1.
2.
5.
6.
7.
Starting the Engine
Driving
Starting in Cold Weather at HighAltitude (Above 5,000 feet/1,600 meters)
15
01/07/31 16:20:42 31S5W610_016

Push the accelerator pedal half-way to the floor and hold it therewhile starting the engine. Do nothold the ignition key in START(III) for more than 15 seconds.When the engine starts, releasethe accelerator pedal gradually asthe engine speeds up and smoothsout.
If the engine fails to start in step 3,push the accelerator pedal to thefloor and hold it there while youtry to start the engine for no morethan 15 seconds. If the enginedoes not start, return to step 3.
Honda’s Continuously Variableautomatic transmission’s uniquedesign provides a smooth, constantflow of power. It is electronicallycontrolled for more precise operationand better fuel economy.
This indicator on the instrumentpanel shows which position the shiftlever is in.
3.
4.
Driving
Starting the Engine, Automatic Transmission (CVT)
Continuously VariableTransmission (CVT)
Shift Lever Position Indicator
16
01/07/31 16:20:51 31S5W610_017
CONTINUED
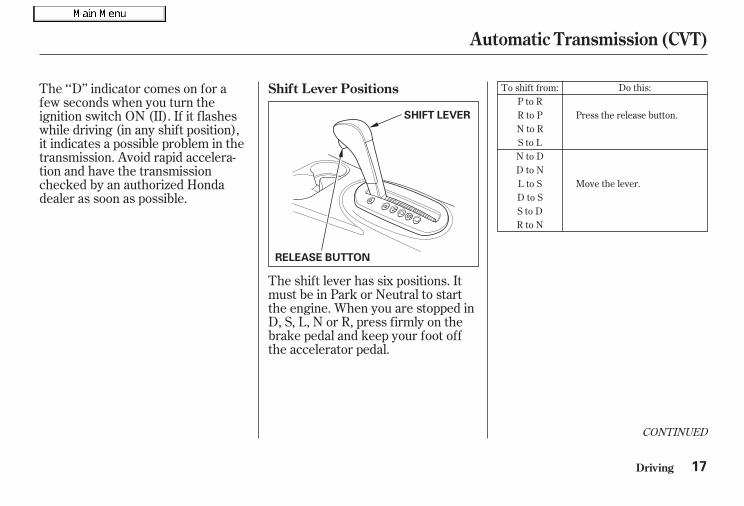
The ‘‘D’’ indicator comes on for afew seconds when you turn theignition switch ON (II). If it flasheswhile driving (in any shift position),it indicates a possible problem in thetransmission. Avoid rapid accelera-tion and have the transmissionchecked by an authorized Hondadealer as soon as possible.
The shift lever has six positions. Itmust be in Park or Neutral to startthe engine. When you are stopped inD, S, L, N or R, press firmly on thebrake pedal and keep your foot offthe accelerator pedal.
To shift from:P to RR to PN to RS to LN to DD to NL to SD to SS to DR to N
Do this:
Press the release button.
Move the lever.
Driving
Shift Lever Positions
Automatic Transmission (CVT)
17
RREELLEEAASSEE BBUUTTTTOONN
SSHHIIFFTT LLEEVVEERR
01/07/31 16:20:59 31S5W610_018
-
-
-
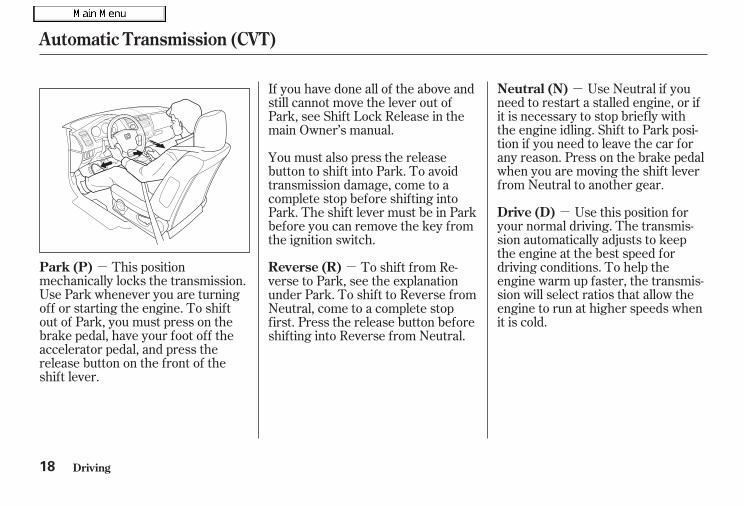
-This positionmechanically locks the transmission.Use Park whenever you are turningoff or starting the engine. To shiftout of Park, you must press on thebrake pedal, have your foot off theaccelerator pedal, and press therelease button on the front of theshift lever.
Use Neutral if youneed to restart a stalled engine, or ifit is necessary to stop briefly withthe engine idling. Shift to Park posi-tion if you need to leave the car forany reason. Press on the brake pedalwhen you are moving the shift leverfrom Neutral to another gear.
Use this position foryour normal driving. The transmis-sion automatically adjusts to keepthe engine at the best speed fordriving conditions. To help theengine warm up faster, the transmis-sion will select ratios that allow theengine to run at higher speeds whenit is cold.
If you have done all of the above andstill cannot move the lever out ofPark, see Shift Lock Release in themain Owner’s manual.
You must also press the releasebutton to shift into Park. To avoidtransmission damage, come to acomplete stop before shifting intoPark. The shift lever must be in Parkbefore you can remove the key fromthe ignition switch.
To shift from Re-verse to Park, see the explanationunder Park. To shift to Reverse fromNeutral, come to a complete stopfirst. Press the release button beforeshifting into Reverse from Neutral.
Driving
Automatic Transmission (CVT)
Park (P)
Neutral (N)
Drive (D)
Reverse (R)
18
01/07/31 16:21:07 31S5W610_019
-
-
When the vehicle reaches themaximum speed in any shift position,you may feel the engine cut in andout. This is caused by a limiter (112mph, 180 km/h) in the engine’scomputer controls. The engine willrun normally when you reduce thespeed below the maximum.
The CVT shifts automatically tomaintain proper engine speed in anyshift position.
Selecting Secondshifts the transmission into a lowerrange of ratios for better accelera-tion and increased engine braking.Use Second when you are goingdown a steep hill, or in stop-and-godriving.
To shift to Low, pressthe release button on the front of theshift lever. Use Low to get morepower when climbing, and formaximum engine braking whengoing down steep hills.
For faster acceleration when in D, Sor L, the transmission willautomatically ‘‘kick down’’ to a lowerrange of ratios by pushing theaccelerator pedal to the floor.
Automatic Transmission (CVT)
Maximum Allowable SpeedsSecond (S)
Low (L)
Driving 19
01/07/31 16:21:15 31S5W610_020
The Maintenance Schedule specifieshow often you should have yourCivic GX serviced and what thingsneed attention. It is essential thatyou have your car serviced asscheduled to retain its high level ofsafety, dependability, and emissionscontrol performance.Refer to the important safetyprecautions and instructions in theprimary owner’s manual.
The fuel system is under highpressure (maximum 3,600 psi/24,800kPa). It has no user-serviceable parts,and its components must not bemodified. Whenever maintenance isrequired, take your car to anauthorized Honda Civic GX dealer,or a qualified NGV technician.
The services and time or distanceintervals shown in the maintenanceschedule assume you will use yourcar as normal transportation forpassengers and their possessions.You should also follow theserecommendations:
Follow the Maintenance Schedulefor Severe Conditions if you driveyour car MAINLY under one ormore of the following conditions.
Avoid exceeding your car’s loadlimit. This puts excess stress onthe engine, brakes, and manyother parts of your car. The loadlimit is shown on the label on thedriver’s doorjamb.
Operate your car on reasonableroads within the legal speed limit.
Drive your car regularly over adistance of several miles(kilometers).
Service your car according to thetime and mileage periods on one ofthe Maintenance Schedules on thefollowing pages.
Maintenance Schedule
Maintenance
Which Schedule to Follow:
20
Tampering with, or improperlymaintaining the high-pressurefuel system can cause adangerous condition in whichyou can be seriously hurt orkilled.
Never attempt to modify the fuelsystem, and always havemaintenance performed by anauthorized Honda Civic GXdealer.
01/07/31 16:21:25 31S5W610_021
#
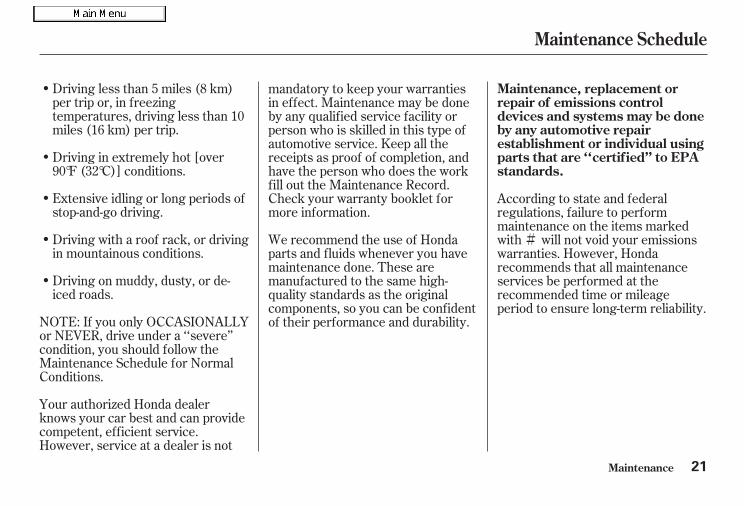
Driving less than 5 miles (8 km)per trip or, in freezingtemperatures, driving less than 10miles (16 km) per trip.
Driving in extremely hot [over90°F (32°C)] conditions.
Extensive idling or long periods ofstop-and-go driving.
Driving with a roof rack, or drivingin mountainous conditions.
Driving on muddy, dusty, or de-iced roads.
NOTE: If you only OCCASIONALLYor NEVER, drive under a ‘‘severe’’condition, you should follow theMaintenance Schedule for NormalConditions.
Your authorized Honda dealerknows your car best and can providecompetent, efficient service.However, service at a dealer is not
mandatory to keep your warrantiesin effect. Maintenance may be doneby any qualified service facility orperson who is skilled in this type ofautomotive service. Keep all thereceipts as proof of completion, andhave the person who does the workfill out the Maintenance Record.Check your warranty booklet formore information.
We recommend the use of Hondaparts and fluids whenever you havemaintenance done. These aremanufactured to the same high-quality standards as the originalcomponents, so you can be confidentof their performance and durability.
According to state and federalregulations, failure to performmaintenance on the items markedwith will not void your emissionswarranties. However, Hondarecommends that all maintenanceservices be performed at therecommended time or mileageperiod to ensure long-term reliability.
Maintenance Schedule
Maintenance
Maintenance, replacement orrepair of emissions controldevices and systems may be doneby any automotive repairestablishment or individual usingparts that are ‘‘certif ied’’ to EPAstandards.
21
01/07/31 16:21:35 31S5W610_022
-
****
#
*
# #
*
*
#
*
Maintenance22
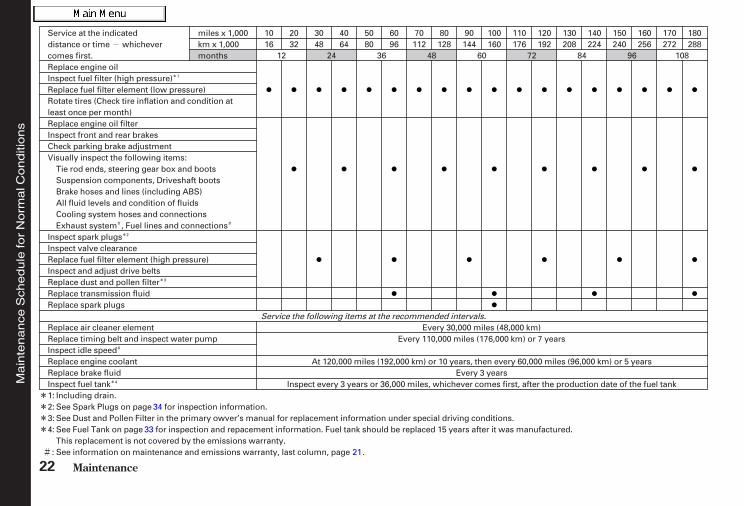
Service at the indicateddistance or time whichevercomes first.
miles x 1,000km x 1,000months
Service the following items at the recommended intervals.Every 30,000 miles (48,000 km)
Every 110,000 miles (176,000 km) or 7 years
At 120,000 miles (192,000 km) or 10 years, then every 60,000 miles (96,000 km) or 5 yearsEvery 3 years
Inspect every 3 years or 36,000 miles, whichever comes first, after the production date of the fuel tank
Replace engine oilInspect fuel filter (high pressure)Replace fuel filter element (low pressure)Rotate tires (Check tire inflation and condition atleast once per month)Replace engine oil filterInspect front and rear brakesCheck parking brake adjustmentVisually inspect the following items:
Tie rod ends, steering gear box and bootsSuspension components, Driveshaft bootsBrake hoses and lines (including ABS)All fluid levels and condition of fluidsCooling system hoses and connectionsExhaust system , Fuel lines and connections
Inspect spark plugsInspect valve clearanceReplace fuel filter element (high pressure)Inspect and adjust drive beltsReplace dust and pollen filterReplace transmission fluidReplace spark plugs
Replace air cleaner elementReplace timing belt and inspect water pumpInspect idle speedReplace engine coolantReplace brake fluidInspect fuel tank
1016
2032
3048
4064
5080
6096
70112
80128
90144
110176
120192
130208
140224
100160
150240
160256
170272
180288
Including drain.See Spark Plugs on page for inspection information.See Dust and Pollen Filter in the primary owver’s manual for replacement information under special driving conditions.See Fuel Tank on page for inspection and repacement information. Fuel tank should be replaced 15 years after it was manufactured.This replacement is not covered by the emissions warranty.See information on maintenance and emissions warranty, last column, page .
24 48 7212 36 60 84 96 108
1:2:3:4:
: 21
34
33
1
2
3
4Main
tenance
Sch
edule
for
Norm
alC
onditi
ons
01/07/31 16:21:58 31S5W610_023
□□□□□□□□□□□□
□□□□□□□□□
□
□
□
□
□□
□
□□
□□
□
□
□□
#
#
*
*
*
*
*
#
**
*
#
Maintenance 23
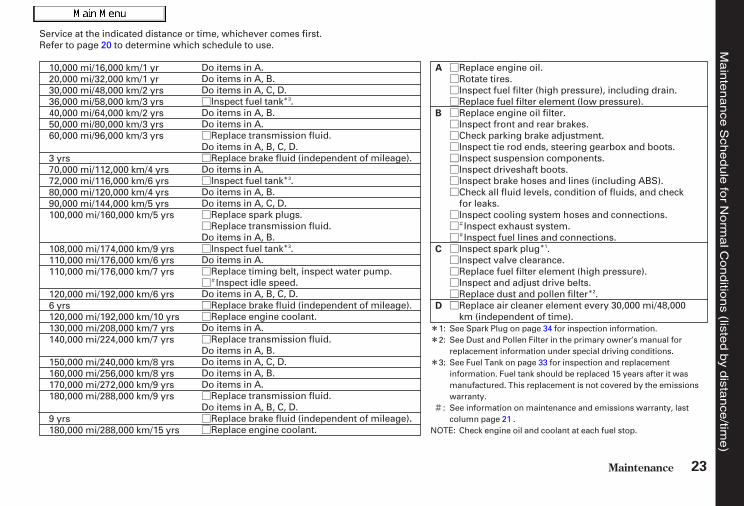
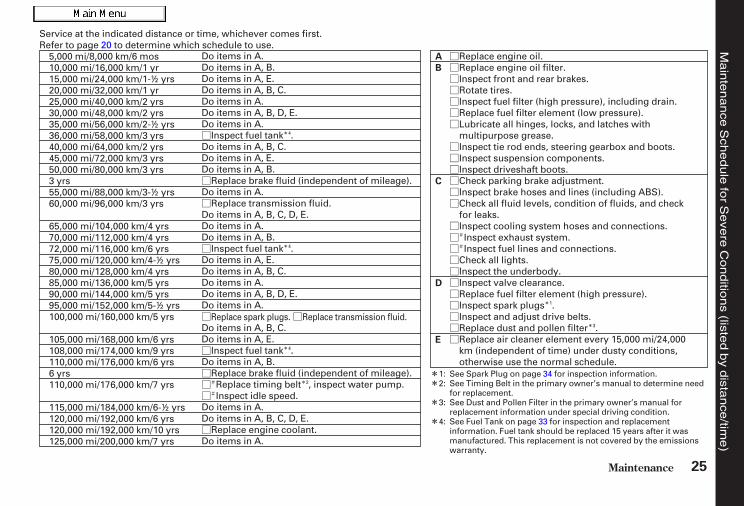
A
B
C
D
Service at the indicated distance or time, whichever comes first.Refer to page 20 to determine which schedule to use.
10,000 mi/16,000 km/1 yr20,000 mi/32,000 km/1 yr30,000 mi/48,000 km/2 yrs36,000 mi/58,000 km/3 yrs40,000 mi/64,000 km/2 yrs50,000 mi/80,000 km/3 yrs60,000 mi/96,000 km/3 yrs
3 yrs70,000 mi/112,000 km/4 yrs72,000 mi/116,000 km/6 yrs80,000 mi/120,000 km/4 yrs90,000 mi/144,000 km/5 yrs100,000 mi/160,000 km/5 yrs
108,000 mi/174,000 km/9 yrs110,000 mi/176,000 km/6 yrs110,000 mi/176,000 km/7 yrs
120,000 mi/192,000 km/6 yrs6 yrs120,000 mi/192,000 km/10 yrs130,000 mi/208,000 km/7 yrs140,000 mi/224,000 km/7 yrs
150,000 mi/240,000 km/8 yrs160,000 mi/256,000 km/8 yrs170,000 mi/272,000 km/9 yrs180,000 mi/288,000 km/9 yrs
9 yrs180,000 mi/288,000 km/15 yrs
Replace engine oil.Rotate tires.Inspect fuel filter (high pressure), including drain.Replace fuel filter element (low pressure).Replace engine oil filter.Inspect front and rear brakes.Check parking brake adjustment.Inspect tie rod ends, steering gearbox and boots.Inspect suspension components.Inspect driveshaft boots.Inspect brake hoses and lines (including ABS).Check all fluid levels, condition of fluids, and checkfor leaks.Inspect cooling system hoses and connections.Inspect exhaust system.Inspect fuel lines and connections.
Inspect spark plug .Inspect valve clearance.Replace fuel filter element (high pressure).Inspect and adjust drive belts.Replace dust and pollen filter .Replace air cleaner element every 30,000 mi/48,000km (independent of time).
Do items in A.Do items in A, B.Do items in A, C, D.
Inspect fuel tank .Do items in A, B.Do items in A.
Replace transmission fluid.Do items in A, B, C, D.
Replace brake fluid (independent of mileage).Do items in A.
Inspect fuel tank .Do items in A, B.Do items in A, C, D.
Replace spark plugs.Replace transmission fluid.
Do items in A, B.Inspect fuel tank .
Do items in A.Replace timing belt, inspect water pump.Inspect idle speed.
Do items in A, B, C, D.Replace brake fluid (independent of mileage).Replace engine coolant.
Do items in A.Replace transmission fluid.
Do items in A, B.Do items in A, C, D.Do items in A, B.Do items in A.
Replace transmission fluid.Do items in A, B, C, D.
Replace brake fluid (independent of mileage).Replace engine coolant.
1
2
3
3
3
Check engine oil and coolant at each fuel stop.
See Spark Plug on page 34 for inspection information.See Dust and Pollen Filter in the primary owner’s manual forreplacement information under special driving conditions.See Fuel Tank on page 33 for inspection and replacementinformation. Fuel tank should be replaced 15 years after it wasmanufactured. This replacement is not covered by the emissionswarranty.See information on maintenance and emissions warranty, lastcolumn page 21 .
NOTE:
1:2:
3:
:
Main
tenance
Sch
edule
for
Norm
alC
onditio
ns
(listed
by
dista
nce
/time)
01/07/31 16:22:06 31S5W610_024
-
*
# #
*
*
*
#
*
**#
* **
Maintenance24
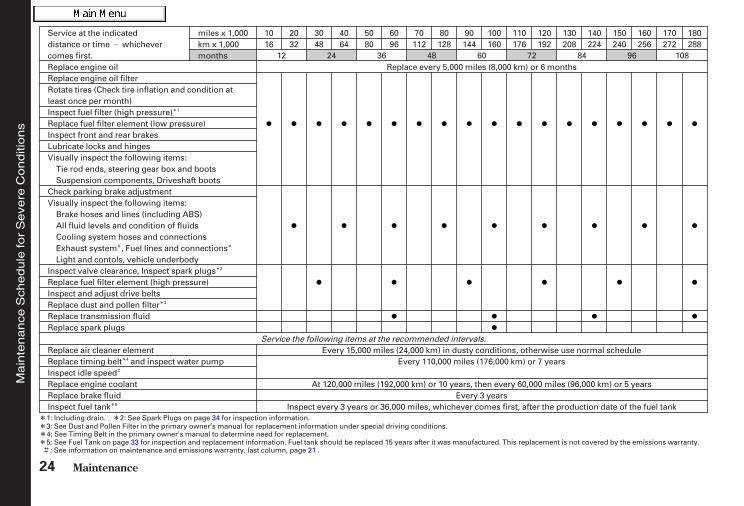
Service at the indicateddistance or time whichevercomes first.
miles x 1,000km x 1,000months
Inspect every 3 years or 36,000 miles, whichever comes first, after the production date of the fuel tankEvery 3 years
At 120,000 miles (192,000 km) or 10 years, then every 60,000 miles (96,000 km) or 5 years
Every 110,000 miles (176,000 km) or 7 yearsEvery 15,000 miles (24,000 km) in dusty conditions, otherwise use normal schedule
1016
5080
70112
90144
110176
130208
150240
170272
Replace every 5,000 miles (8,000 km) or 6 months
Service the following items at the recommended intervals.
Replace engine oilReplace engine oil filterRotate tires (Check tire inflation and condition atleast once per month)Inspect fuel filter (high pressure)Replace fuel filter element (low pressure)Inspect front and rear brakesLubricate locks and hingesVisually inspect the following items:
Tie rod ends, steering gear box and bootsSuspension components, Driveshaft boots
Check parking brake adjustmentVisually inspect the following items:
Brake hoses and lines (including ABS)All fluid levels and condition of fluidsCooling system hoses and connectionsExhaust system , Fuel lines and connectionsLight and contols, vehicle underbody
Inspect valve clearance, Inspect spark plugsReplace fuel filter element (high pressure)Inspect and adjust drive beltsReplace dust and pollen filterReplace transmission fluidReplace spark plugs
Replace air cleaner elementReplace timing belt and inspect water pumpInspect idle speedReplace engine coolantReplace brake fluidInspect fuel tank
2032
3048
4064
6096
80128
100160
120192
140224
160256
180288
24 48 7212 36 60 84 96 108
1
2
3
4
5
4: See Timing Belt in the primary owner’s manual to determine need for replacement.5: See Fuel Tank on page 33 for inspection and replacement information. Fuel tank should be replaced 15 years after it was manufactured.: See information on maintenance and emissions warranty, last column, page 21 .
This replacement is not covered by the emissions warranty.
1: Including drain. 2: See Spark Plugs on page 34 for inspection information.3: See Dust and Pollen Filter in the primary owner’s manual for replacement information under special driving conditions.
Main
tenance
Sch
edule
for
Seve
reC
onditi
ons
01/07/31 16:22:31 31S5W610_025
□□□□□□□
□□□□□□
□□□□□□□□□□□
□
□
□
□
□ □
□
□□□
□
#
#
*
*
*
*
*
# *
#
**
*
*
Maintenance 25
A
B
C
D
E
Service at the indicated distance or time, whichever comes first.Refer to page 20 to determine which schedule to use.
5,000 mi/8,000 km/6 mos10,000 mi/16,000 km/1 yr15,000 mi/24,000 km/1-½ yrs20,000 mi/32,000 km/1 yr25,000 mi/40,000 km/2 yrs30,000 mi/48,000 km/2 yrs35,000 mi/56,000 km/2-½ yrs36,000 mi/58,000 km/3 yrs40,000 mi/64,000 km/2 yrs45,000 mi/72,000 km/3 yrs50,000 mi/80,000 km/3 yrs3 yrs55,000 mi/88,000 km/3-½ yrs60,000 mi/96,000 km/3 yrs
65,000 mi/104,000 km/4 yrs70,000 mi/112,000 km/4 yrs72,000 mi/116,000 km/6 yrs75,000 mi/120,000 km/4-½ yrs80,000 mi/128,000 km/4 yrs85,000 mi/136,000 km/5 yrs90,000 mi/144,000 km/5 yrs95,000 mi/152,000 km/5-½ yrs100,000 mi/160,000 km/5 yrs
105,000 mi/168,000 km/6 yrs108,000 mi/174,000 km/9 yrs110,000 mi/176,000 km/6 yrs6 yrs110,000 mi/176,000 km/7 yrs
115,000 mi/184,000 km/6-½ yrs120,000 mi/192,000 km/6 yrs120,000 mi/192,000 km/10 yrs125,000 mi/200,000 km/7 yrs
Replace engine oil.Replace engine oil filter.Inspect front and rear brakes.Rotate tires.Inspect fuel filter (high pressure), including drain.Replace fuel filter element (low pressure).Lubricate all hinges, locks, and latches withmultipurpose grease.Inspect tie rod ends, steering gearbox and boots.Inspect suspension components.Inspect driveshaft boots.Check parking brake adjustment.Inspect brake hoses and lines (including ABS).Check all fluid levels, condition of fluids, and checkfor leaks.Inspect cooling system hoses and connections.Inspect exhaust system.Inspect fuel lines and connections.
Check all lights.Inspect the underbody.Inspect valve clearance.Replace fuel filter element (high pressure).Inspect spark plugs .Inspect and adjust drive belts.Replace dust and pollen filter .Replace air cleaner element every 15,000 mi/24,000km (independent of time) under dusty conditions,otherwise use the normal schedule.
Do items in A.Do items in A, B.Do items in A, E.Do items in A, B, C.Do items in A.Do items in A, B, D, E.Do items in A.
Inspect fuel tank .Do items in A, B, C.Do items in A, E.Do items in A, B.
Replace brake fluid (independent of mileage).Do items in A.
Replace transmission fluid.Do items in A, B, C, D, E.Do items in A.Do items in A, B.
Inspect fuel tank .Do items in A, E.Do items in A, B, C.Do items in A.Do items in A, B, D, E.Do items in A.
Do items in A, B, C.Do items in A, E.
Inspect fuel tank .Do items in A, B.
Replace brake fluid (independent of mileage).Replace timing belt , inspect water pump.Inspect idle speed.
Do items in A.Do items in A, B, C, D, E.
Replace engine coolant.Do items in A.
See Spark Plug on page 34 for inspection information.See Timing Belt in the primary owner’s manual to determine needfor replacement.See Dust and Pollen Filter in the primary owner’s manual forreplacement information under special driving condition.See Fuel Tank on page 33 for inspection and replacementinformation. Fuel tank should be replaced 15 years after it wasmanufactured. This replacement is not covered by the emissionswarranty.
1:2:
3:
4:
1
3
4
4
4
2
Replace spark plugs. Replace transmission fluid.
Main
tenance
Sch
edule
for
Seve
reC
onditio
ns
(listed
by
dista
nce
/time)
01/07/31 16:22:38 31S5W610_026
□
□
□
□
#
Maintenance26
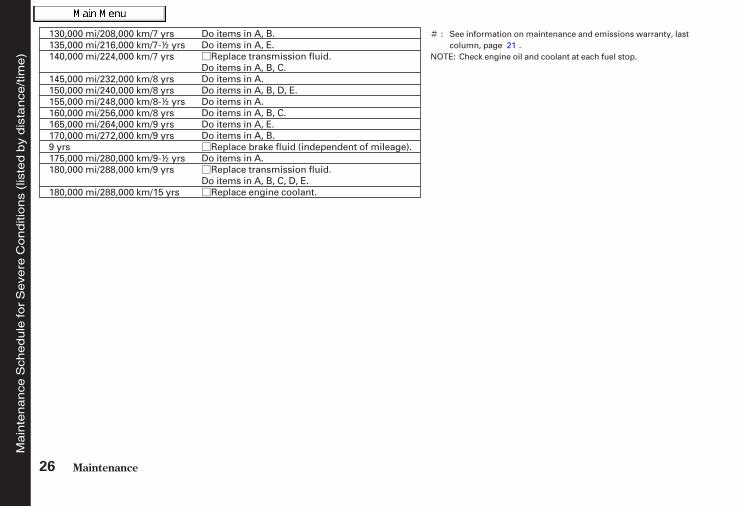
130,000 mi/208,000 km/7 yrs135,000 mi/216,000 km/7-½ yrs140,000 mi/224,000 km/7 yrs
145,000 mi/232,000 km/8 yrs150,000 mi/240,000 km/8 yrs155,000 mi/248,000 km/8-½ yrs160,000 mi/256,000 km/8 yrs165,000 mi/264,000 km/9 yrs170,000 mi/272,000 km/9 yrs9 yrs175,000 mi/280,000 km/9-½ yrs180,000 mi/288,000 km/9 yrs
180,000 mi/288,000 km/15 yrs
Do items in A, B.Do items in A, E.
Replace transmission fluid.Do items in A, B, C.Do items in A.Do items in A, B, D, E.Do items in A.Do items in A, B, C.Do items in A, E.Do items in A, B.
Replace brake fluid (independent of mileage).Do items in A.
Replace transmission fluid.Do items in A, B, C, D, E.
Replace engine coolant.
See information on maintenance and emissions warranty, lastcolumn, page .
Check engine oil and coolant at each fuel stop.NOTE:
:21
Main
tenance
Sch
edule
for
Seve
reC
onditi
ons
(lis
ted
by
dis
tance
/tim
e)
01/07/31 16:22:43 31S5W610_027
CONTINUEDMaintenance
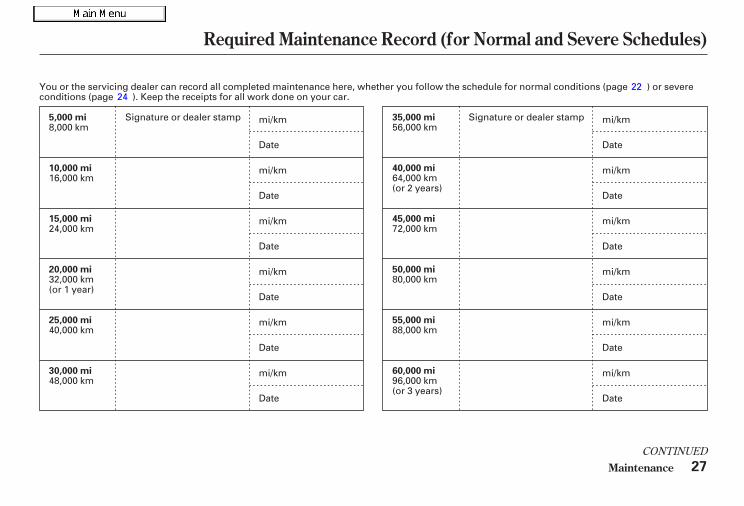
Required Maintenance Record (for Normal and Severe Schedules)
27
5,000 mi
10,000 mi
15,000 mi
20,000 mi
25,000 mi
30,000 mi
35,000 mi
40,000 mi
45,000 mi
50,000 mi
55,000 mi
60,000 mi
Signature or dealer stamp Signature or dealer stamp8,000 km
16,000 km
24,000 km
32,000 km(or 1 year)
40,000 km
48,000 km
56,000 km
64,000 km(or 2 years)
72,000 km
80,000 km
88,000 km
96,000 km(or 3 years)
You or the servicing dealer can record all completed maintenance here, whether you follow the schedule for normal conditions (page ) or severeconditions (page ). Keep the receipts for all work done on your car.
mi/km
mi/km
mi/km
mi/km
mi/km
mi/km mi/km
mi/km
mi/km
mi/km
mi/km
mi/km
Date
Date
Date
Date
Date
Date Date
Date
Date
Date
Date
Date
2224
01/07/31 16:22:53 31S5W610_028
Maintenance
Required Maintenance Record (for Normal and Severe Schedules)
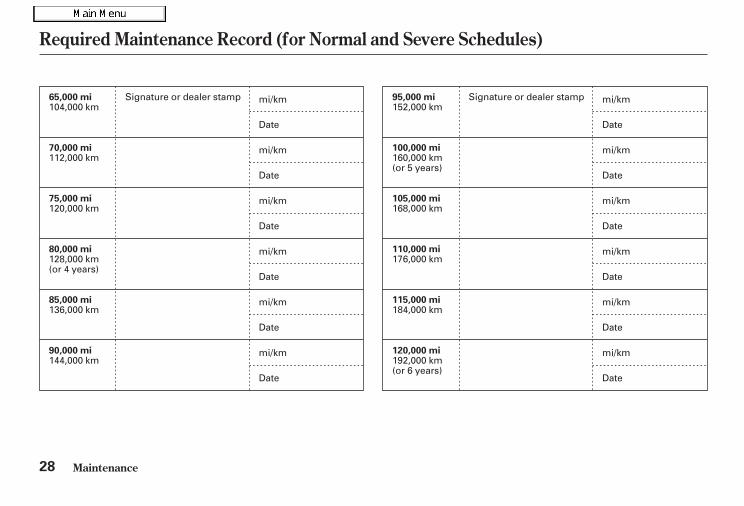
28
65,000 mi
70,000 mi
75,000 mi
80,000 mi
85,000 mi
90,000 mi
95,000 mi
100,000 mi
105,000 mi
110,000 mi
115,000 mi
120,000 mi
Signature or dealer stamp Signature or dealer stamp104,000 km
112,000 km
120,000 km
128,000 km(or 4 years)
136,000 km
144,000 km
152,000 km
160,000 km(or 5 years)
168,000 km
176,000 km
184,000 km
192,000 km(or 6 years)
mi/km
mi/km
mi/km
mi/km
mi/km
mi/km mi/km
mi/km
mi/km
mi/km
mi/km
mi/km
Date
Date
Date
Date
Date
Date Date
Date
Date
Date
Date
Date
01/07/31 16:23:00 31S5W610_029
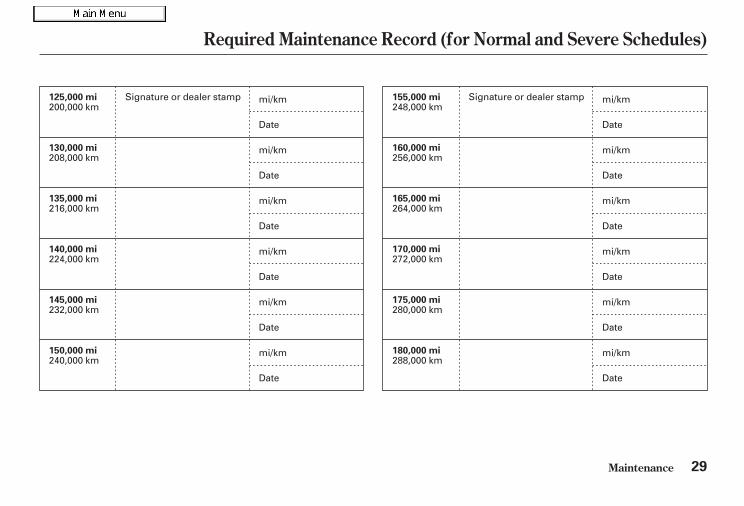
Required Maintenance Record (for Normal and Severe Schedules)
Maintenance 29
125,000 mi
130,000 mi
135,000 mi
140,000 mi
145,000 mi
150,000 mi
155,000 mi
160,000 mi
165,000 mi
170,000 mi
175,000 mi
180,000 mi
Signature or dealer stamp Signature or dealer stamp200,000 km
208,000 km
216,000 km
224,000 km
232,000 km
240,000 km
248,000 km
256,000 km
264,000 km
272,000 km
280,000 km
288,000 km
mi/km
mi/km
mi/km
mi/km
mi/km
mi/km mi/km
mi/km
mi/km
mi/km
mi/km
mi/km
Date
Date
Date
Date
Date
Date Date
Date
Date
Date
Date
Date
01/07/31 16:23:08 31S5W610_030
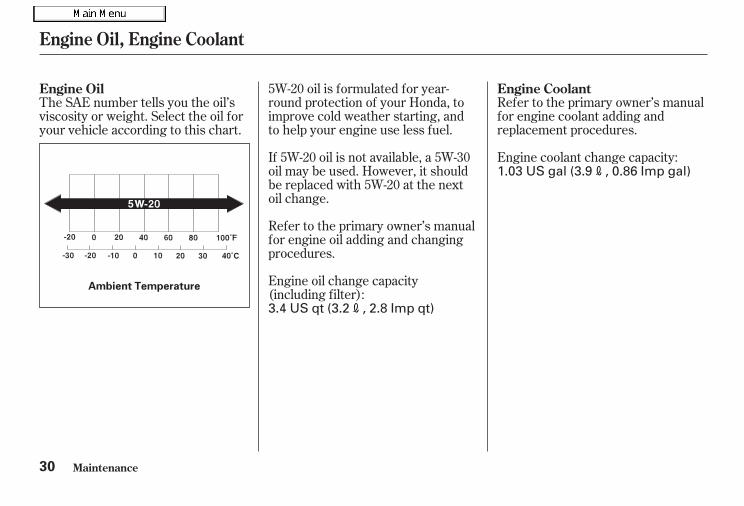
Engine coolant change capacity:
Refer to the primary owner’s manualfor engine coolant adding andreplacement procedures.
5W-20 oil is formulated for year-round protection of your Honda, toimprove cold weather starting, andto help your engine use less fuel.
If 5W-20 oil is not available, a 5W-30oil may be used. However, it shouldbe replaced with 5W-20 at the nextoil change.
Refer to the primary owner’s manualfor engine oil adding and changingprocedures.
Engine oil change capacity(including filter):
The SAE number tells you the oil’sviscosity or weight. Select the oil foryour vehicle according to this chart.
Engine Oil Engine Coolant
Engine Oil, Engine Coolant
Maintenance30
Ambient Temperature
1.03 US gal (3.9 , 0.86 Imp gal)
3.4 US qt (3.2 , 2.8 Imp qt)
01/07/31 16:23:20 31S5W610_031
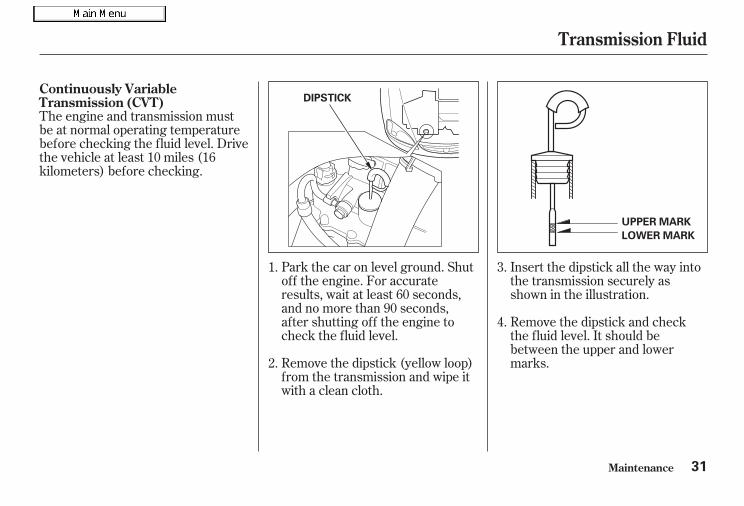
The engine and transmission mustbe at normal operating temperaturebefore checking the fluid level. Drivethe vehicle at least 10 miles (16kilometers) before checking.
Park the car on level ground. Shutoff the engine. For accurateresults, wait at least 60 seconds,and no more than 90 seconds,after shutting off the engine tocheck the fluid level.
Remove the dipstick (yellow loop)from the transmission and wipe itwith a clean cloth.
Insert the dipstick all the way intothe transmission securely asshown in the illustration.
Remove the dipstick and checkthe fluid level. It should bebetween the upper and lowermarks.
1.
4.
3.
2.
Continuously VariableTransmission (CVT)
Transmission Fluid
Maintenance 31
UUPPPPEERR MMAARRKK
LLOOWWEERR MMAARRKK
DDIIPPSSTTIICCKK
01/07/31 16:23:28 31S5W610_032
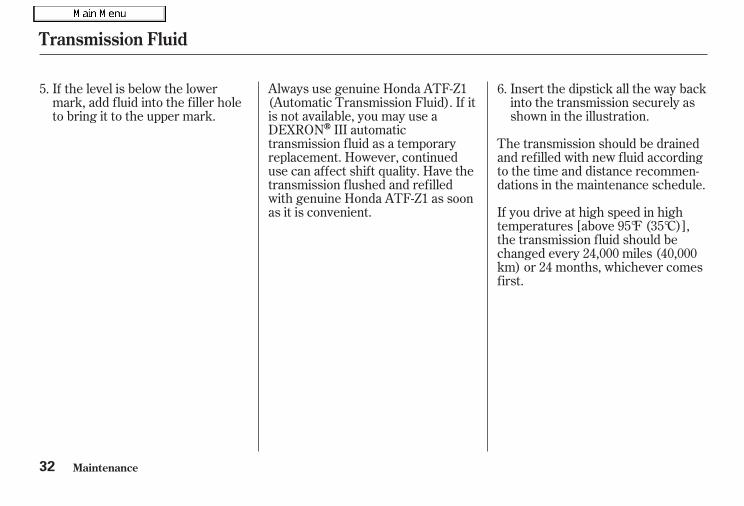
Always use genuine Honda ATF-Z1(Automatic Transmission Fluid). If itis not available, you may use aDEXRON III automatictransmission fluid as a temporaryreplacement. However, continueduse can affect shift quality. Have thetransmission flushed and refilledwith genuine Honda ATF-Z1 as soonas it is convenient.
If the level is below the lowermark, add fluid into the filler holeto bring it to the upper mark.
Insert the dipstick all the way backinto the transmission securely asshown in the illustration.
The transmission should be drainedand refilled with new fluid accordingto the time and distance recommen-dations in the maintenance schedule.
If you drive at high speed in hightemperatures [above 95°F (35°C)],the transmission fluid should bechanged every 24,000 miles (40,000km) or 24 months, whichever comesfirst.
5. 6.
Transmission Fluid
Maintenance32
01/07/31 16:23:35 31S5W610_033

You should also have the fuel tankinspected after a collision.
Have a qualified technician replacethe fuel tank. Do not reuse the oldfuel tank.
The fuel tank meets the safetystandards of NGV-2/NFPA-52/DOTNHTSA FMVSS 304. The fuel tankshould be inspected every threeyears after the production date ofthe fuel tank. Have a qualifiedtechnician inspect the fuel tank fordamage or leaking.
The fuel tank should be replacedfifteen years after it wasmanufactured. The expiration dateof the fuel tank is on a label on thefuel tank and on a warning label inthe engine compartment.
Fuel Tank
Maintenance 33
HOOD
FUEL TANK
CNG TANK EXPIRATION DATE
CNG TANK EXPIRATION DATE
FUEL TANK
01/07/31 16:23:53 31S5W610_034
+-
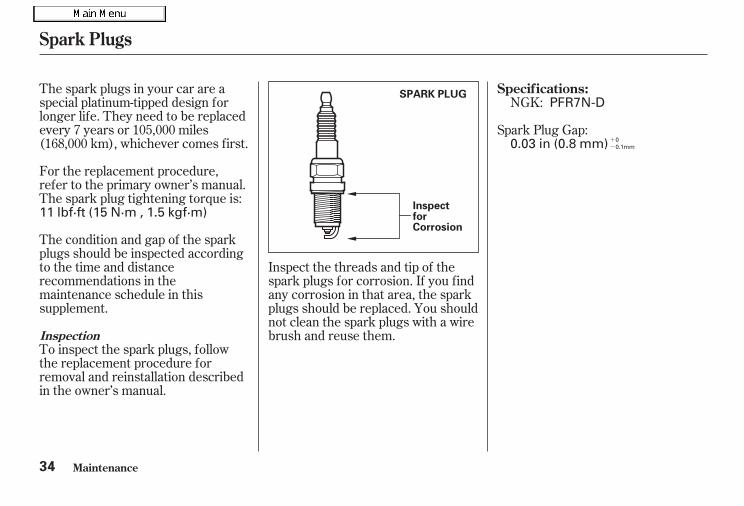
The spark plugs in your car are aspecial platinum-tipped design forlonger life. They need to be replacedevery 7 years or 105,000 miles(168,000 km), whichever comes first.
For the replacement procedure,refer to the primary owner’s manual.The spark plug tightening torque is:
The condition and gap of the sparkplugs should be inspected accordingto the time and distancerecommendations in themaintenance schedule in thissupplement.
To inspect the spark plugs, followthe replacement procedure forremoval and reinstallation describedin the owner’s manual.
Inspect the threads and tip of thespark plugs for corrosion. If you findany corrosion in that area, the sparkplugs should be replaced. You shouldnot clean the spark plugs with a wirebrush and reuse them.
Spark Plug Gap:
NGK:
Inspection
Specifications:
Spark Plugs
Maintenance34
InspectforCorrosion
SPARK PLUG
0.03 in (0.8 mm)
11 lbf·ft (15 N·m , 1.5 kgf·m)
PFR7N-D
00.1mm
01/07/31 16:24:02 31S5W610_035

Tire pressures for high speed drivingare shown below. Honda stronglyrecommends that you not drivefaster than posted speed limits andconditions allow.
The recommended cold tirepressures for most normal drivingconditions is shown below.
The compact spare tire pressure is:
These pressures are also given onthe tire information label on thedriver’s doorjamb.
Tire Size Cold Tire Pressurefor Normal Driving
Tire SizeCold Tire Pressurefor Speeds over 100mph (160 km/h)Front/Rear:
Front/Rear:
Tires
Maintenance 35
30 psi (210 kPa ,2.1 kgf/cm )
P185/70R14 87S
P185/70R14 87S
35 psi (240 kPa ,2.4 kgf/cm )60 psi (420 kPa , 4.2 kgf/cm )
01/07/31 16:24:13 31S5W610_036
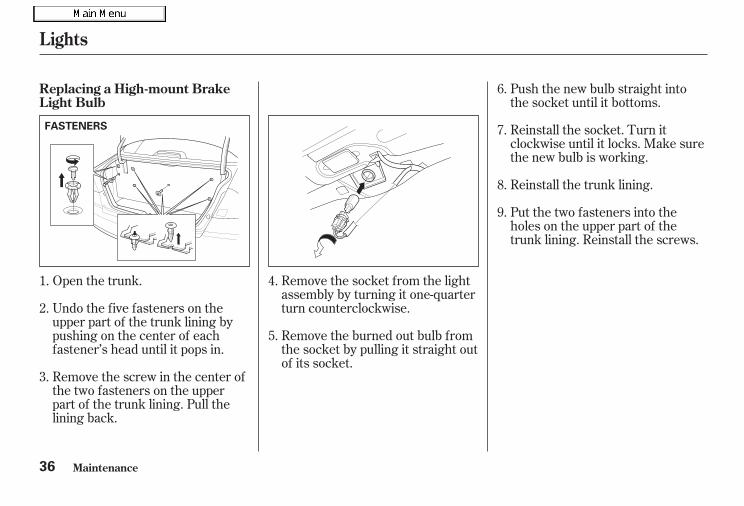
Open the trunk. Remove the socket from the lightassembly by turning it one-quarterturn counterclockwise.
Reinstall the socket. Turn itclockwise until it locks. Make surethe new bulb is working.
Reinstall the trunk lining.
Undo the five fasteners on theupper part of the trunk lining bypushing on the center of eachfastener’s head until it pops in.
Remove the burned out bulb fromthe socket by pulling it straight outof its socket.
Push the new bulb straight intothe socket until it bottoms.
Remove the screw in the center ofthe two fasteners on the upperpart of the trunk lining. Pull thelining back.
Put the two fasteners into theholes on the upper part of thetrunk lining. Reinstall the screws.
1.
2.
3.
4.
5.
6.
7.
8.
9.
Replacing a High-mount BrakeLight Bulb
Lights
Maintenance36
FASTENERS
01/07/31 16:24:25 31S5W610_037
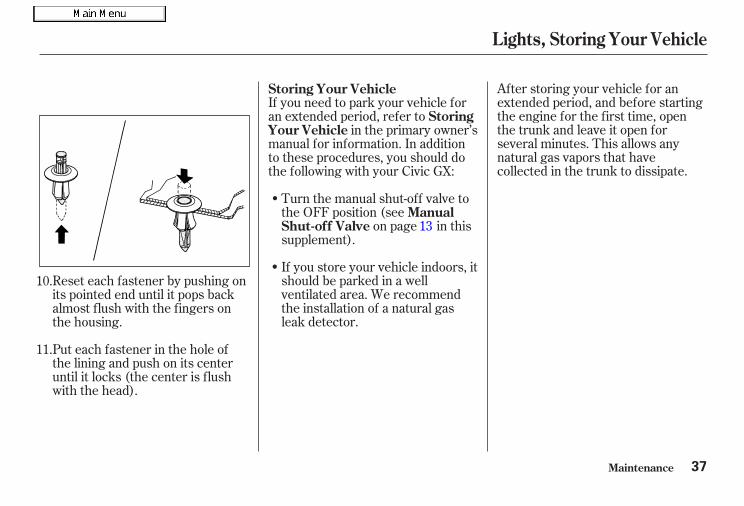
If you store your vehicle indoors, itshould be parked in a wellventilated area. We recommendthe installation of a natural gasleak detector.
After storing your vehicle for anextended period, and before startingthe engine for the first time, openthe trunk and leave it open forseveral minutes. This allows anynatural gas vapors that havecollected in the trunk to dissipate.
Put each fastener in the hole ofthe lining and push on its centeruntil it locks (the center is flushwith the head).
Reset each fastener by pushing onits pointed end until it pops backalmost flush with the fingers onthe housing.
Turn the manual shut-off valve tothe OFF position (see
on page in thissupplement).
If you need to park your vehicle foran extended period, refer to
in the primary owner’smanual for information. In additionto these procedures, you should dothe following with your Civic GX:
13
11.
10.
Storing Your Vehicle
ManualShut-off Valve
StoringYour Vehicle
Lights, Storing Your Vehicle
Maintenance 37
01/07/31 16:24:35 31S5W610_038
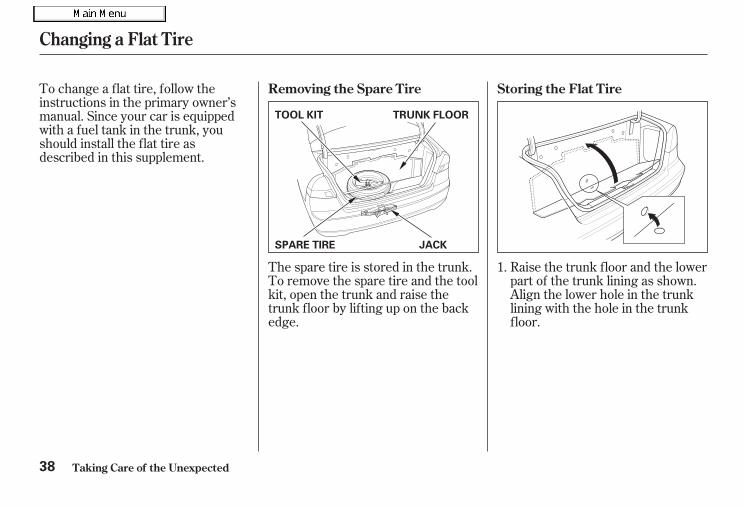
To change a flat tire, follow theinstructions in the primary owner’smanual. Since your car is equippedwith a fuel tank in the trunk, youshould install the flat tire asdescribed in this supplement.
The spare tire is stored in the trunk.To remove the spare tire and the toolkit, open the trunk and raise thetrunk floor by lifting up on the backedge.
Raise the trunk floor and the lowerpart of the trunk lining as shown.Align the lower hole in the trunklining with the hole in the trunkfloor.
1.
Removing the Spare Tire Storing the Flat Tire
Changing a Flat Tire
Taking Care of the Unexpected38
TOOL KIT
SPARE TIRE
TRUNK FLOOR
JACK
01/07/31 16:24:42 31S5W610_039
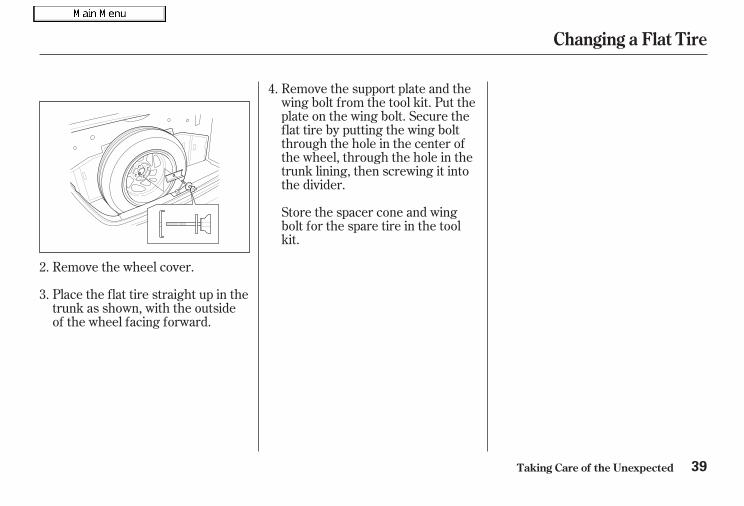
Remove the wheel cover.
Place the flat tire straight up in thetrunk as shown, with the outsideof the wheel facing forward.
Remove the support plate and thewing bolt from the tool kit. Put theplate on the wing bolt. Secure theflat tire by putting the wing boltthrough the hole in the center ofthe wheel, through the hole in thetrunk lining, then screwing it intothe divider.
Store the spacer cone and wingbolt for the spare tire in the toolkit.
2.
3.
4.
Changing a Flat Tire
Taking Care of the Unexpected 39
01/07/31 16:24:50 31S5W610_040
You may detect a slight natural gasodor for a few moments afterrefueling. This is normal. You shouldnot be able to smell natural gas atany other time. If you do, or if youhear a hissing sound, your vehicle’sfuel system may have a leak.
If this happens, follow thesedirections:
Park your vehicle in a well-ventilated area and apply theparking brake.Keep heat, sparks, and flame away.Open all the windows and thetrunk lid for ventilation.
Turn the ignition switch to theLOCK (0) position.
Turn the manual shut-off valve tothe OFF position to shut off thenatural gas (see
on page in thissupplement).
You cannot continue driving. Yourvehicle should be towed to anauthorized Honda Civic GX dealer(see in theprimary owner’s manual).
1.
2.
3.
13Manual Shut-off
Valve
Emergency Towing
If the Fuel System Has a Leak
Taking Care of the Unexpected40
Compressed natural gas isflammable and highly explosive.You could be killed or seriouslyinjured if leaking natural gas isignited.
If you suspect a leak, have yourvehicle immediately inspectedand repaired by an authorizedHonda Civic GX dealer.
01/07/31 16:24:58 31S5W610_041
Do not jump start your vehicle if yoususpect a natural gas leak. If yousmell natural gas or hear a hissingsound, the fuel system may have aleak that needs to be repaired by anauthorized technician.
If the fuel system is not leaking ordamaged, you can jump start thevehicle. Refer to the primary owner’smanual for the jump startingprocedure.
Turn the manual shut-off valve to theOFF position and have your vehicletowed to an authorized Honda CivicGX dealer (seein the primary owner’s manual).
Emergency Towing
Jump Starting
Taking Care of the Unexpected 41
01/07/31 16:25:04 31S5W610_042
*
*
*
*
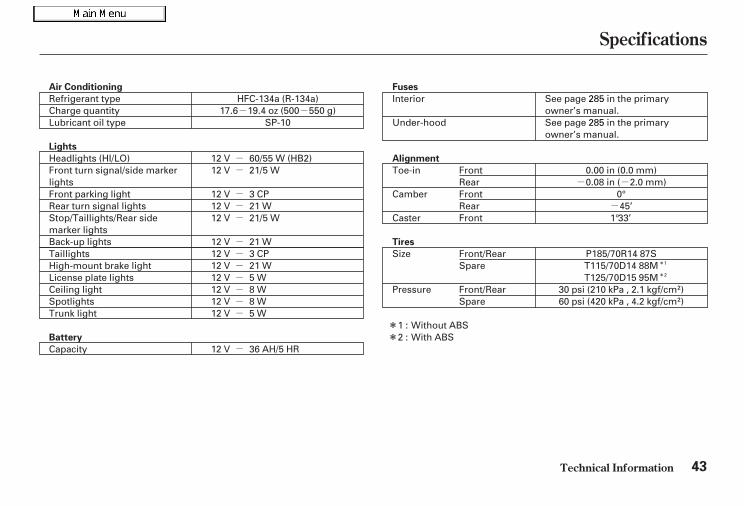
Specifications
Technical Information42
Dimensions
Weights
Engine
Capacities
LengthWidthHeightWheelbaseTrack
Gross vehicle weight rating See the certification label attachedto the driver’s doorjamb.
Type
Bore x StrokeDisplacementCompression ratioSpark plugs
174.6 in (4,435 mm)67.3 in (1,710 mm)56.9 in (1,445 mm)103.1 in (2,620 mm)57.9 in (1,470 mm)57.9 in (1,470 mm)
101.7 cu-in (1,668 cm )
3,000 psi: 7.2 gasoline gallons equivalent (GGE)
2.95 x 3.72 in (75.0 x 94.4 mm)
Water cooled 4-strokeSOHC 4-cylinder
compressed natural gas engine
12.5:1See spark plug maintenancesection page 27 .
2.6 US qt (2.5 , 2.2 Imp qt)
6.0 US qt (5.7 , 5.0 Imp qt)3.3 US qt (3.1 , 2.7 Imp qt)4.4 US qt (4.2 , 3.7 Imp qt)3.2 US qt (3.0 , 2.6 Imp qt)3.4 US qt (3.2 , 2.8 Imp qt)
1.32 US gal (5.0 , 1.10 Imp gal)
1.03 US gal (3.9 , 0.86 Imp gal)
Fuel tank service pressureFuel tank capacity
Enginecoolant
Engine oil
Automatictransmissionfluid (CVT)Windshield washer reservoir
Including the coolant in the reserve tank and that remaining in theengine.Reserve tank capacity:Excluding the oil remaining in the engine.
0.21 US gal (0.8 , 0.18 Imp gal)
FrontRear
1 :
2 :
3,600 psi (24,800 kPa) at 70°F (21°C)
3,600 psi: 8.0 gasoline gallons equivalentChange
Total
Change
Without filterTotal
ChangeTotal
1
2
Automatic (CVT)
Automatic (CVT)
Including filter
01/07/31 16:25:18 31S5W610_043
- -
- -
-
**
--
---
-------
-
*
*
Specifications
Technical Information 43
Air Conditioning Fuses
Alignment
Tires
Lights
Battery
HFC-134a (R-134a)17.6 19.4 oz (500 550 g)
SP-10
12 V12 V
60/55 W (HB2)21/5 W
12 V 8 W12 V 5 W12 V 21 W12 V 3 CP12 V 21 W
12 V 21/5 W12 V 21 W12 V 3 CP
Refrigerant typeCharge quantityLubricant oil type
See page 285 in the primaryowner’s manual.
Interior
Under-hood See page 285 in the primaryowner’s manual.
Toe-in
Camber
Caster
0.00 in (0.0 mm)0.08 in ( 2.0 mm)
0°45’
1°33’
Size
Pressure
P185/70R14 87ST115/70D14 88MT125/70D15 95M
30 psi (210 kPa , 2.1 kgf/cm )60 psi (420 kPa , 4.2 kgf/cm )
Headlights (HI/LO)Front turn signal/side markerlightsFront parking lightRear turn signal lightsStop/Taillights/Rear sidemarker lightsBack-up lightsTaillightsHigh-mount brake lightLicense plate lightsCeiling lightSpotlightsTrunk light
12 V12 V
8 W5 W
Capacity 12 V 36 AH/5 HR
FrontRearFrontRearFront
Front/RearSpare
Front/RearSpare
1 : Without ABS2 : With ABS
1
2
01/07/31 16:25:38 31S5W610_044
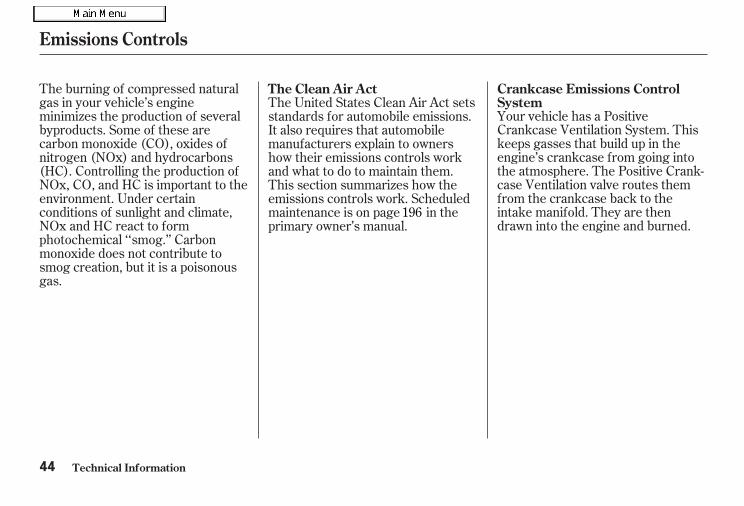
Your vehicle has a PositiveCrankcase Ventilation System. Thiskeeps gasses that build up in theengine’s crankcase from going intothe atmosphere. The Positive Crank-case Ventilation valve routes themfrom the crankcase back to theintake manifold. They are thendrawn into the engine and burned.
The burning of compressed naturalgas in your vehicle’s engineminimizes the production of severalbyproducts. Some of these arecarbon monoxide (CO), oxides ofnitrogen (NOx) and hydrocarbons(HC). Controlling the production ofNOx, CO, and HC is important to theenvironment. Under certainconditions of sunlight and climate,NOx and HC react to formphotochemical ‘‘smog.’’ Carbonmonoxide does not contribute tosmog creation, but it is a poisonousgas.
The United States Clean Air Act setsstandards for automobile emissions.It also requires that automobilemanufacturers explain to ownershow their emissions controls workand what to do to maintain them.This section summarizes how theemissions controls work. Scheduledmaintenance is on page in theprimary owner’s manual.
196
The Clean Air Act Crankcase Emissions ControlSystem
Emissions Controls
Technical Information44
01/07/31 16:25:45 31S5W610_045
The emissions control systems aredesigned and certified to work to-gether in reducing emissions tolevels that comply with the Clean AirAct. To make sure the emissionsremain low, you should use only newgenuine Honda replacement parts ortheir equivalent for repairs. Usinglower quality parts may increase theemissions from your vehicle.
The emissions control systems arecovered by warranties separate fromthe rest of your vehicle. Read yourwarranty manual for more informa-tion.
The exhaust emissions controlsinclude four systems: PGM-FI,Ignition Timing Control, ExhaustGas Recirculation, and Three WayCatalytic Converters. These foursystems work together to control theengine’s combustion and minimizethe amount of HC, CO, and NOx thatcomes out the tailpipe. The exhaustemissions control systems areseparate from the crankcaseemissions control system.
The PGM-FI System uses sequentialmultiport fuel injection.It has three subsystems: Air Intake,Engine Control, and Fuel Control.The Powertrain Control Module(PCM) uses various sensors todetermine how much air is goinginto the engine. It then controls howmuch fuel to inject under all operat-ing conditions.
This system constantly adjusts theignition timing, reducing the amountof HC, CO and NOx produced.
The three way catalytic convertersare in the exhaust system. Throughchemical reactions, they convert HC,CO, and NOx in the engine’s exhaustto carbon dioxide (CO ), dinitrogen(N ), and water vapor.
2
2
Replacement Parts
Exhaust Emissions Controls
PGM-FI System
Ignition Timing Control System
Three Way Catalytic Converters
Emissions Controls
Technical Information 45
01/07/31 16:25:56 31S5W610_046

-
*
*
*
*2002
HON
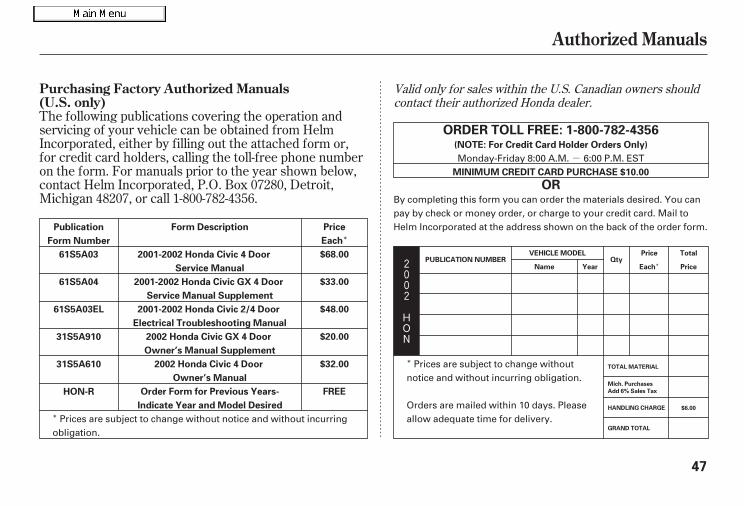
The following publications covering the operation andservicing of your vehicle can be obtained from HelmIncorporated, either by filling out the attached form or,for credit card holders, calling the toll-free phone numberon the form. For manuals prior to the year shown below,contact Helm Incorporated, P.O. Box 07280, Detroit,Michigan 48207, or call 1-800-782-4356.
Valid only for sales within the U.S. Canadian owners shouldcontact their authorized Honda dealer.
Purchasing Factory Authorized Manuals(U.S. only)
Authorized Manuals
47
ORDER TOLL FREE: 1-800-782-4356
OR
(NOTE: For Credit Card Holder Orders Only)
MINIMUM CREDIT CARD PURCHASE $10.00
Publication
Form Number
61S5A03
61S5A03EL
31S5A910
31S5A610
HON-R
Form Description
Service Manual
2001-2002 Honda Civic GX 4 Door
Service Manual Supplement
2001-2002 Honda Civic 2/4 Door
Electrical Troubleshooting Manual
2002 Honda Civic GX 4 Door
Owner’s Manual Supplement
2002 Honda Civic 4 Door
Owner’s Manual
Order Form for Previous Years-
Indicate Year and Model Desired
Price
Each
$68.00
$33.00
$48.00
$20.00
$32.00
FREE
PUBLICATION NUMBERVEHICLE MODEL
Name YearQty
Price
Each
Total
Price
GRAND TOTAL
HANDLING CHARGE
Mich. Purchases
Add 6% Sales Tax
TOTAL MATERIAL
$6.00
Monday-Friday 8:00 A.M. 6:00 P.M. EST
By completing this form you can order the materials desired. You canpay by check or money order, or charge to your credit card. Mail toHelm Incorporated at the address shown on the back of the order form.
Prices are subject to change withoutnotice and without incurring obligation.
Orders are mailed within 10 days. Pleaseallow adequate time for delivery.Prices are subject to change without notice and without incurring
obligation.
01/07/31 16:26:09 31S5W610_048
2001-2002 Honda Civic 4 Door
61S5A04
-
-
-
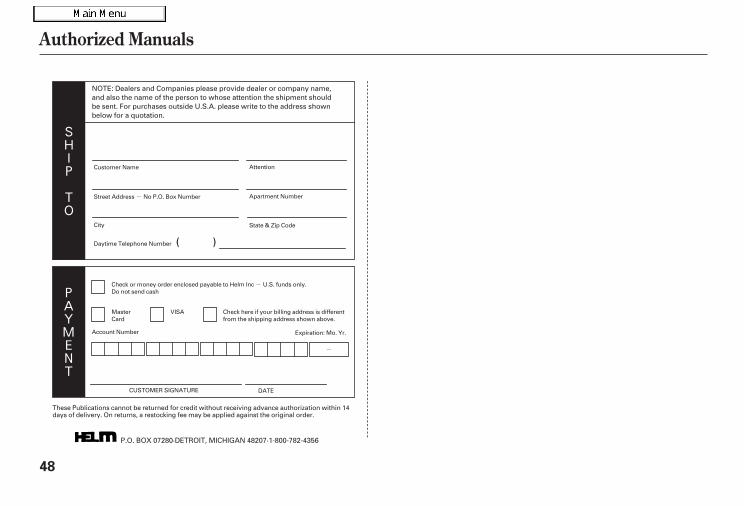
SHIP
TO
PAYMENT
Authorized Manuals
48
NOTE: Dealers and Companies please provide dealer or company name,and also the name of the person to whose attention the shipment shouldbe sent. For purchases outside U.S.A. please write to the address shownbelow for a quotation.
P.O. BOX 07280·DETROIT, MICHIGAN 48207·1-800-782-4356
Customer Name Attention
Apartment Number
State & Zip CodeCity
Daytime Telephone Number
Check or money order enclosed payable to Helm Inc U.S. funds only.Do not send cash
MasterCard
VISA Check here if your billing address is differentfrom the shipping address shown above.
Account Number Expiration: Mo. Yr.
CUSTOMER SIGNATURE DATE
Street Address No P.O. Box Number
( )
These Publications cannot be returned for credit without receiving advance authorization within 14days of delivery. On returns, a restocking fee may be applied against the original order.
01/07/31 16:26:14 31S5W610_049