Embed Size (px)
Citation preview
Lionel Dash-9Diesel LocomotiveOwner’s Manual
71-8252-2502/00 Rev.
LIONEL
INSTRUCTION SH
EET
®featuring and

2
Table of contents
Transformer operationsRunning your Dash-9 with a Lionel transformer 3Locking your Dash-9 into a single operational state 4Using your Dash-9 Electrocoupler in the non-command environment 4Installing the Lionel no. 610-5906-001 sound activation button 5
Maintaining and servicing your Dash-9Lubricating your Dash-9 6Adding fluid to your Locomotive’s smoke generator 7Replacing your Dash-9’s lamps 8
TrainMaster ® Command operationsYour Dash-9’s Railsounds™system—the basics 9Experiencing the range of your Dash-9’s Railsounds™system 10The Command™control environment 11Running your Dash-9 in the TrainMaster® Command environment 12CAB-1 numeric keypad commands for your Dash-9 13Tuning your Dash-9’s performance 14Assigning your Dash-9 a new ID# 15Reprogramming R2LC circuit boards to restore or change features 15Lionel Service 16
• Two powerful flywheel equipped can motors
• Digital TrainMaster Command™
controlled• RailsoundsTM digital — sound system• Tire-Traction• Die-cast ElectroCouplers
• Illuminated headlights/rear light/interior light/ditch lights
• CrewTalk (in command)• TowerCom (in command)• Diesel smoke generator• Directional lighting
You purchased a tough, durable loco-motive—the Dash-9 diesel locomotive
built by Lionel. From the crisp detail andexpert decoration on the outside to the brute
power under the hood, the Lionel Dash-9 isready for duty on your model railroad.Experience the superiority of today’s Lionel.
Congratulations!

3
33Move ‘em out!• Get your Dash-9 moving. Press the DIR button on your CAB-1 remote or
Lionel transformer. This sequences the Lionel R2LC reverse unit to the next oper-ating state.
• Adjust track voltage until your Dash-9 moves at your desired speed. Toincrease speed, increase track voltage. To decrease speed, reduce voltage. To stopthe locomotive, cut track power.
• See page 4 for information on locking your Dash-9 in a singleoperating state
Place your Dash-9 locomotives on Lionel or Lionel-compatible O gauge track.
22 Power up your Dash-9 with your transformer.• Your Dash-9 is designed to operate on 8-18 volts alternating current.
Virtually all Lionel and Lionel-compatible alternating-current transformers aresuitable.
• Do not power your Dash-9 with direct current (DC). Damage to sensi-tive electronic components may occur.
• When you first power up your track, your Dash-9’s headlights will illu-minate. At this point, the locomotive is in neutral. This occurs when placing theDash-9 on your railroad for the first time. When your train is first powered up,the default state will be neutral and the default direction is forward. This meanswhenever you power up your engine the engine will remain in neutral, andwhen the power is removed and again applied, the train will move forward. Thiscondition holds true if the engine is being powered up for the first time or if theengine has been powered down longer than five seconds.
Note!
11
Running your Lionel Dash-9 with a Lionel transformer
Transformer operations

4
Using your Dash-9 Electrocoupler in the non-Command environment
To use your Dash-9 Electrocoupler in thenon-Command environment, you must
first couple a piece of rolling stock equippedwith Lionel magnetic couplers directly to
your Dash-9’s electrocouplers. The magneticcoupler on the rolling stock will then reactto the magnetic field generated by a Lionelremote-control track section (available sep-arately). Place your rolling stock’s coupler“trigger disc” over the central coil of aremote-control track section and pressuncouple on the controller. The magneticfield pulls the disc downward, and the cou-pler opens.
Your Dash-9 electrocouplerswill NOT open manually or byusing a remote-control tracksection
Magnetic coupler on the rolling stock coupledto the rear of your Dash-9
Note!Remote-controltrack section
Transformer operations
To select a single operational state foryour Lionel Dash-9 (example: forward
o n l y ) , y o u c a n d e a c t i v a t e t h e R 2 L C ’ssequencing function with the reverse unitcontrol switch.
Get your locomotive moving in thedesired direction, then slow it
down without stopping. Set the reverse unitcontrol switch to PROGRAM. The Dash-9 isnow “locked” into your chosen direction.
When you no longer want single-directionoperation, just slide the reverse unit controlswitch back to RUN.
Locking your Dash-9 into a single operational state
Smoke Unit (see page 7 for details)
RUN
PGM
SMKNO SMK

Installing the Lionel no. 610-5906-001 sound activation button
To operate the bell and horn sounds whenoperating your Dash-9 with conventional
transformers, you’ll need to install the Lionel
no. 610-5906-001 sound activation button(available separately). Connect the button(s)as shown below.
5
Transformer operations
For AC transformers lacking a horn/whistle button (two no. 5906s required)
Lionel no. 610-5906-001sound activation button foractivating the bell
Lionel no. 610-5906-001sound activation button (for horn)
Lionel no. 610-5906-001sound activation button (for bell)
Black wire
Red wireRed wireattach to ground terminal
attach to power terminalto your transformer
The no. 610-5906-001 sound activation button (available separately) works withany Lionel AC transformer except no. 6-4690 Type MW. Transformers made byother manufacturers may not be compatible with Railsounds.
Note!
attach to ground terminalattach to power terminal
Red wire
to your transformer
Customer’s wireBlack wire
Note!All track power must feed through“Sound Activation Button”Do not bypass button
For AC transformers with a horn/whistle button

6
Lubricating your Dash-9
Help your Lionel Dash-9 lead a long andproductive life on your railroad by
maintaining it properly. We recommend you purchase a Lionel
Lubrication and Maintenance Kit (no. 6-62927), available from your Lionel dealer.Two basic rules to keep in mind: never over-lubricate (a small amount will do), andavoid getting grease or oil on the Dash-9’swheels or your track. You’ll know
your Dash-9 requires lubrication when visu-al inspection reveals dryness on the partsindicated in the illustration. Remove accu-mulated dirt and dust before lubricating,and always lubricate any locomotive emerg-ing from prolonged storage.
Maintaining and servicing your Dash-9
Body MountScrews
RailsoundsVolume Adjust
Screw
SNDNO SND
RUN
PGM
SMKNO SMK
Body Mount Screws
Oil Bearings(sparingly)
Grease Gears(sparingly)
OilBearings
(sparingly)
GreaseGears
(sparingly)
Body Mount Screws
7
Adding fluid to your Locomotive’s smoke generator
Your Locomotive is equipped with asmoke generator that produces safe,
clean white smoke during operation. The smoke generator requires the periodic
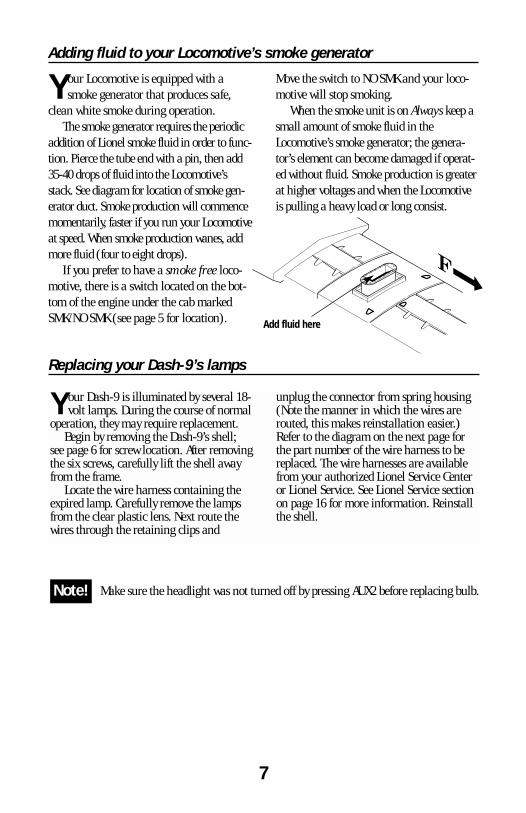
addition of Lionel smoke fluid in order to func-tion. Pierce the tube end with a pin, then add35-40 drops of fluid into the Locomotive’sstack. See diagram for location of smoke gen-erator duct. Smoke production will commencemomentarily, faster if you run your Locomotiveat speed. When smoke production wanes, addmore fluid (four to eight drops).
If you prefer to have a smoke free loco-motive, there is a switch located on the bot-tom of the engine under the cab markedSMK/NO SMK (see page 5 for location).
Move the switch to NO SMK and your loco-motive will stop smoking.
When the smoke unit is on Always keep asmall amount of smoke fluid in theLocomotive’s smoke generator; the genera-tor’s element can become damaged if operat-ed without fluid. Smoke production is greaterat higher voltages and when the Locomotiveis pulling a heavy load or long consist.
Make sure the headlight was not turned off by pressing AUX2 before replacing bulb.
Replacing your Dash-9’s lamps
Your Dash-9 is illuminated by several 18-volt lamps. During the course of normal
operation, they may require replacement. Begin by removing the Dash-9’s shell;
see page 6 for screw location. After removingthe six screws, carefully lift the shell awayfrom the frame.
Locate the wire harness containing theexpired lamp. Carefully remove the lampsfrom the clear plastic lens. Next route thewires through the retaining clips and
unplug the connector from spring housing(Note the manner in which the wires arerouted, this makes reinstallation easier.)Refer to the diagram on the next page forthe part number of the wire harness to bereplaced. The wire harnesses are availablefrom your authorized Lionel Service Centeror Lionel Service. See Lionel Service sectionon page 16 for more information. Reinstallthe shell.
Add fluid here
Note!

8
Replacing your Dash-9’s lamps
To replace your Dash-9’s interior lights, cutthe two leads of the expired lamp andremove it from the lamp holder in the motorshroud. Route the two leads from the newlamp up and through the lamp holder,reversing the path taken to remove theexpired lamps. Cut approximately 1/4˝ ofinsulation off of each lead, twist the two
leads together. Wrap this connection withinsulated tape to ensure a secure connec-tion. Before you reinstall the cab, put yourDash-9 on the track and power it up to verifythat the connection you made is a good one.When you have verified that your missionwas a success. Reinstall the cab and get backon the track!
Rear Bulbs Dash-9Part #610-8238-029
Rear
Front
Front Ditch Lights Dash-9
Rear Harness
Front HarnessHarness Locationin Dash-9
Front Lights Dash-9’sPart #610-8241-019
Interior LightsPart #610-8238-039
Note! The ditch lights and the frontlights are in the same harness,part no. 610-8241-019.

Your Dash-9’s Railsounds system—the basics
Lionel Railsounds is the most realisticmodel railroad sound system in the
world. Your Dash-9 Railsounds upgrade fea-tures digital samples for the ultimate inrealism.
When you first apply track power, theDash-9’s Railsounds system delivers anauthentic start-up sequence, followed by thesounds of the locomotive at idle. As the
Dash-9’s speed increases, the RPMs movethrough four levels of roar. Sounds return toidle only after the locomotive has come to acomplete halt.
To silence the diesel roar (horn and bellremain unaffected), slide the Railsoundsswitch on the underside of the locomotive toNO SND (see page 5), before powering upthe locomotive.
9
Installing a 9-volt alkaline bat-tery in your Dash-9.
Note!
Note!
Note!
Note!
Please remove protective cover from battery clip
Although Railsounds is powered by track voltage, the battery is required foruninterrupted operation and shutdown sequences. Use only alkaline batteries.
Discontinue locomotive power for 10 seconds before changing the RailsoundsON/OFF switch position.
If Railsounds “drops out” during track power interrupts (direction change),replace the battery.

10
W ith Railsounds, you experience thesounds of real railroading like never
before. Simply put, it’s the most sophisticat-ed, authentic model railroad sound systemin the world.
• Four diesel-roar levels. Your Dash-9’s speed determines the level of dieselRPM roar—automatically, if you pre-fer: idle, half throttle, three quarters orfull-speed output.
• MultiHorn™. A different horn soundat different speeds—a Railsoundsexclusive.
• Mechanical bell. Press BELL on yourCAB-1 or transformer to begin the effect,again to discontinue.
• Reverse unit reset sound. Powerdown your track, wait for 3-5 seconds,and listen for the air-release sound—that’s the Dash-9 telling you its LionelCommand reverse unit has just reset toforward operation.
• Shutdown sequence. No other modelrailroad sound system shuts down likeRailsounds. Turn off track power, andafter the air-release reset sound, youhave two seconds to restart your Dash-9.If you’re done with operations,Railsounds will commence with a realis-tic diesel shutdown sequence about twoseconds after the air-release reset occurs.
Experiencing the range of your Dash-9’s Railsounds system
Notes on Railsounds
• Turn the volume knob clockwise orcounter clockwise in the location shownon page 6 to adjust sound output.
• Listen for incidental locomotive soundsduring Railsounds operation. They’reautomatic and, of course, authentic.
• The 9-volt alkaline battery you installedensures continuous Dash-9 diesel roar.
• Longer track-power interruptions(including locomotive derailments)cause Railsounds to shut down afterabout 7 seconds.
• For even more authentic Railsoundseffects, operate in the TrainMasterCommand environment.

11
TrainMaster Command operationsThe Command control environment
L ionel T rainMaster Command is theadvanced model railroad control system
from Lionel. Your upgraded Dash-9 isequipped with a Liontech Command reverseunit.
TrainMaster Command gives you thepower to operate multiple Command-
equipped locomotives on the same track, atthe same time.
To operate in Command, you needa Command Base and a CAB-1remote. Find them both at your authorizedLionel retailer.
Place your Dash-9 on Lionel or Lionel-compatible O gauge track.• Make sure track power is OFF before placing on the track.• Make sure your Lionel Command Base is ON and its communica-
tions wire is connected to the COMMON post on your Lionel transformer orthe U on any of your installed PowerMasters.
• Once positioned on the track, increase track voltage to FULL.
22 Address your Dash-9 using CAB-1.
• Press ENG and 1 on the numeric keypad of your CAB-1 remote. Thiscommand is sent by CAB-1 to the Command Base, which then translatesyour command into digital code. That code is sent around your railroad’soutside rails in the form of a digital “halo.” All Command-equippedLionels listen to this digital communication, but they do not respond untilthey hear their individual ID number—in this case, “1.”
• The digital language of TrainMaster Command—and not trackpower—controls the actions of Command-equipped Lionels.Track power is simply like gasoline in the tank of your car—it gives youthe power to go places, but it doesn’t tell you where to go or how fast to getthere.
• All Command upgrades come factory-programmed with anID# of “1.” To change the ID# of your Dash-9, see page 15.
33 Move ‘em out!
• Throttle up or press any command button on CAB-1. Your Dash-9 willrespond to your every command. Read on.
11

12
Running your Dash-9 in the TrainMaster Command environment
Press AUX2 to turnyour Dash-9’s head-light on and off.
Activates keypad.
Press HALT to shut downall Power-Master electri-cal output on your rail-road. Stops allCommand-equippedLionels in operation.
Turn the THROTTLE to the right to accelerate, left todecelerate.
Y our Command-equipped Dash-9 comes factory-programmed
with an ID# of “1.” To get yourDash-9 in action, set PowerMastersto CMD or set all power supplies onfull. Press ENG and “1” on CAB-1.Turn the throttle or press any com-mand button; your Dash-9 is readyfor Command operations.
address Locomotive #1
PowerMasters set to CMD or traditionalpower supplies ON FULL
Press ENG
Press 1 (the ID#)
Throttle up/press any command button
Example
CAB-1 commands for your Dash-9
Press WSTL/HRN to activatethe Dash-9 horn. release itto discontinue.MultiHorn dieselhorn sound.
Press DIR—the locomotivedecelerates to a completestop; turn the throttle up,and the locomotive willaccelerate in the new, oppo-site direction. THERE IS NONEUTRAL STATE. Diesel air-release sound.
Press BELL once to activatethe bell, again to discontin-ue. Diesel mechanicalbell sound.
Press and hold BOOST forextra power. Release BOOSTand return to the Dash-9’sprevious speed.
Press and hold BRAKE toslow down or stop. ReleaseBRAKE and return to theprevious speed. Squealingbrake sounds.
Front coupler releases.Coupler releasesounds.
Rear coupler releases.Coupler releasesounds.
AUX 2
AUX 1

13
W hen you press AUX1 onCAB-1, you turn the
numeric keypad into 10 com-mand buttons. The keypad letsyou control extra command fea-tures (until you press any top-
row button like SW, ACC, RTE,TR, or ENG). Railsoundssounds in bold italic.(Upgrade required forthese).
CAB-1 numeric keypad commands for your Dash-9
TrainMaster Command operations
0 Stops and resets the Dash-9’s. Resetsthe Dash-9’s direction to FORWARD.Resets Railsounds to automatic RPMoperation. Horn blows. RPMsreturn to automatic.
1 Raises the volume of Railsounds.Sound volume increases.
2 CrewTalk™ is the .sound of inaudiblewalkie-talkie communication.
3 Raises Railsounds RPM level. Starts up Railsounds. RPMsincrease. Startup sequencecommences.
4 Lowers the volume of Railsounds.Sound volume decreases.
5 Activates the Railsounds shutdownsequence. Just like the real thing, yourDash-9’s RPMs must be at idle forshutdown to occur. Press 6 repeatedlyto lower RPMs until they won’t descendfurther. Your locomotive is now at idle.Press 5 to initiate the shutdown
sequence, following Crewtalk sound.Crewtalk sounds, Diesel shut-down commences. Remember, thehorn, bell, and RPMs will not sounduntil you restart Railsounds.
6 Lowers Railsounds RPM level. RPMs decrease.
7 TowerCom™ is an audible announce-ment that includes that engine’s roadnumber and/or name. There is a Foursecond delay in this function.
8 Smoke offCrewtalk sounds
9 Turns on the smoke generator. Pressand hold 9 (10 seconds maximum) toinitiate Smoke Boost™ — it super-heats the smoke generator andenhances smoke output when you startrunning your steam locomotive. Seenotes on filling or turning off thesmoke generator on page 8.Crewtalk sounds
DIESELENGINERESET
VOLUME
SMOKE
RPMS
SHUT
CREWTALK
TOWERCOM
DOWN
OFF ON
➠
➠➠
➠
START-UP
AUX1
AUX1-9 only works if the smoke unit switch is in the on position.Note!
14
Tuning your Dash-9’s performance
MOMENTUMTrainMaster Command’s momentum fea-
ture simulates the labored performance of alocomotive pulling a heavy load. Press L, M,or H (located under CAB-1’s removablepanel) for light, medium, or heavy momen-tum. The Dash-9’s R2LC remembers thissetting until you change it. For quick loco-motive response, choose L.
BRAKING AND BOOSTINGThere’s more to starting and stopping
than just turning the CAB-1 throttle. Use theBOOST and BRAKE command buttons—they give you incremental control of speedand are the superior way to handle grades,gradual stops-and-starts, and more. Plus,using BRAKE in the Command environmentgives you a bonus Railsounds effect—theultra realistic sound of squealing brakes.
SOUND QUALITYTo achieve your preferred Railsounds
master volume level, we recommend youadjust your Dash-9 volume control set screw(see page 6 for location). Turn the set screwleft or right to reach the desired volumelevel.
For quick remote-control of volumebelow the master setting—for example,muting—use the CAB-1 numeric keypad’svolume control. Press AUX1 and then 4 onthe numeric keypad to lower overallRailsounds output.
HIGH VOLTAGE SETTINGPress SET, headlight will flash. Get your
locomotive moving to the maximum speedyou want it to run, press BOOST. Use this tokeep your locomotive from excess-speedderailing. Turn off the high voltage settingby pressing SET, then BOOST, holding eachfor one second.
STALLMake your Dash-9 feel more responsive by
setting a “stall” voltage. Get your locomo-tive moving, then press SET; the Dash-9 willstop. Turn the throttle clockwise to get thelocomotive moving, then decrease speeduntil the locomotive just stops. Then pressSET again; the R2LC remembers the stallsetting until you change it. To clear stall,press SET twice, holding it for one secondeach time.
These settings will be lost when you assign a new engine ID number.Note!
TrainMaster Command operations

Assign a new I D# to yourCommand-equipped Dash-9
Command Base ONPlace the Dash-9 on trackPowerMasters set to CMD ortraditional power supplies ON FULL
Set the Dash-9 reverse unit control switch to PROGRAM
Turn track power on (PowerMasters):
Press BOOST
Program the Dash-9 with a new ID#:
Press ENG
Press a number you choose (the ID#)
Press SET
Set the reverse unit control switchto FORWARD/RUN
Your Dash-9 set remembers its ID# forever;change it any time with these steps
Example
We recommend that you choose an easy toremember ID# for your engine. Some possibili-ties are part of the engine road number, yourage, any two digit number that is not used byanother engine. Write the number on a smallpiece of tape and put this on the bottom of thefuel tank to aid in remembering.
As your fleet of Command-equippedLionels grows, you’ll want to give your
Dash-9 a more individualized number.Choose from any between 1 and 99. To makethings easy, use a portion of your Dash-9’scab number.
Turn the Command Base ON and placethe Dash-9 on track. Power up, then set theDash-9’s reverse unit control switch to PGM(see the illustrationon page 5). Using CAB-1,press ENG, the locomotive ID# (you select:?), then press the SET button located underCAB-1’s removable panel. Hear the hornblow (or see the headlight flash ifRailsounds is off); that’s the R2LC confirm-ing the new ID#. Set the reverse unit controlswitch to RUN. Your Dash-9 is ready foroperations with its all-new ID#.
Assigning your Dash-9 a new ID#
Reprogramming R2LC circuit boards to restore features
STEP 1: Move switch on locomotive fromrun to program.
STEP 2: Turn on Command Base.
STEP 3: Place locomotive on track, thenturn on power to track.
STEP 4: Press “ENG” then input locomo-tive’s ID#. Press “SET”
STEP 5: Press “ENG”, then the ID#,“AUX1”, then press 8 for your locomotive.
STEP 6: Turn off power to track, wait tenseconds.
STEP 7: Remove locomotive from track,move switch from program to run.
STEP 8: Place locomotive back on track,turn power on to track.
STEP 9: Press “ENG” and ID#, then oper-ate as normal.
Due to the inevitable derailments, static,and the negative nature of electricity,
it is possible that your R2LC could somedaylose its setup program.The symptoms of this
condition would be unresponsiveness incommand mode. This can be easily reme-died by “reprogramming” your R2LC usingthe following steps.
To program your R2LC as a diesel locomotive with smoke, follow these steps.(These steps will also restore programming which is accidentally lost due tostatic, numerous derailments, etc.)
Note!
Limited Warranty/Lionel Service
This Lionel product including all mechanicaland electrical components, moving parts,motors and structural components, except
for light bulbs, is warranted to the original con-sumer-purchaser, for one year against originaldefects in materials or workmanship when pur-chased through an authorized Lionel merchant.
This warranty does NOT cover normal wearand tear, light bulbs, defects appearing in thecourse of commercial use, or damage resultingfrom abuse or misuse of the product by the pur-chaser. Transfer of this product by the originalconsumer-purchaser to another person voids thiswarranty. Modification of this product voids thiswarranty.
Any warranted product which is defective inoriginal materials or workmanship and is deliveredby the original consumer-purchaser to LionelL.L.C. or an authorized Lionel L.L.C. service center,together with proof of original purchase, will at theoption of Lionel L.L.C. be repaired or replaced,without charge for parts or labor. In the event thedefective product cannot be repaired, and areplacement is not available, a refund of the origi-nal purchase price will be granted. Any productson which warranty service is sought must be sentfreight or postage prepaid, as transportation andshipping charges are not covered by the warranty.
In no event shall Lionel L.L.C. beliable for incidental or consequen-tial damages.
Some states do not allow the exclusion or lim-itation of incidental or consequential damages, sothe above exclusion may not apply to you.
This limited warranty gives you specific legalrights, and you may have other rights which varyfrom state to state.
Instructions for Obtaining ServiceIf service for this Lionel L.L.C. product is
required, bring the item, along with your datedsales receipt and completed warranty information
to the nearest Authorized Lionel Service Center.Your nearest Lionel Service Center can be found bycalling 1-800-4-Lionel, or by contacting ourWebsite @ www.Lionel.com
If you prefer to send it back to Lionel L.L.C. forfactory repair, you must first call 810-949-4100 orFAX 810-949-5429 or write to Customer Service,P.O. Box 748 New Baltimore, MI 48047-0748 stat-ing what the item is, when it was purchased andwhat seems to be the problem. You will be sent areturn authorization letter and label to assureyour merchandise will be properly handled uponreceipt.
Once you have received your return authoriza-tion and label, make sure that the item is packedto prevent damage during shipping and handling.We suggest that you use the products originalpackaging. This shipment must be prepaid andwe recommend that it be insured.
Please make sure you have followed all of theabove instructions carefully before returning anymerchandise for service.
Warranty InformationPlease complete the information below and
keep it, along with your dated sales receipt. Youmust present this and your dated sales receiptwhen requesting warranty service.
Name ____________________________
Address ____________________________
Place of Purchase ____________________
Date of Purchase ____________________
Product Number ______________________
Product Description____________________
________________________________
© 2000 LIONEL LLC, CHESTERFIELD MI 48051-2493UNITED STATES OF AMERICA