Embed Size (px)
Citation preview
2 CV4 2CV6 Owner's Manual - CONTENTS
CONTENTS
Notices
Important Points
Driving
Maintenance
Minor Repairs
Miscellaneous Information
Service-station Reminder
2 CV4 - 2 CV6
ALPHABETICAL INDEX
07516 JULY 1975
AZ-KB AZ-KA 2 CV4 2 CV6
file:///Users/tonyjackson/Dropbox/citroen/2CV/2CVhandbook/index.html31/03/2013 22:28
2 CV4 2 CV6 Owner's Manual - NOTICES
NOTICES
Positions are described as Right-Hand (RH) or Left-Hand (LH), as seen by a person standing behind the car and looking forward towards the bonnet (hood).
Descriptions of the various items fitted to the car cover standard fittings and optional extras. The inclusion of a description does not therefore imply that the item described is fitted to all models for any particular model.
2 CV4 - 2 CV6
[Contents] [Notices] [Important Points] [Driving] [Maintenance] [Minor Repairs] [Miscellaneous Information]
file:///Users/tonyjackson/Dropbox/citroen/2CV/2CVhandbook/notices.html31/03/2013 22:28
2 CV4 2 CV6 Owner's Manual - IMPORTANT POINTS
IMPORTANT POINTS
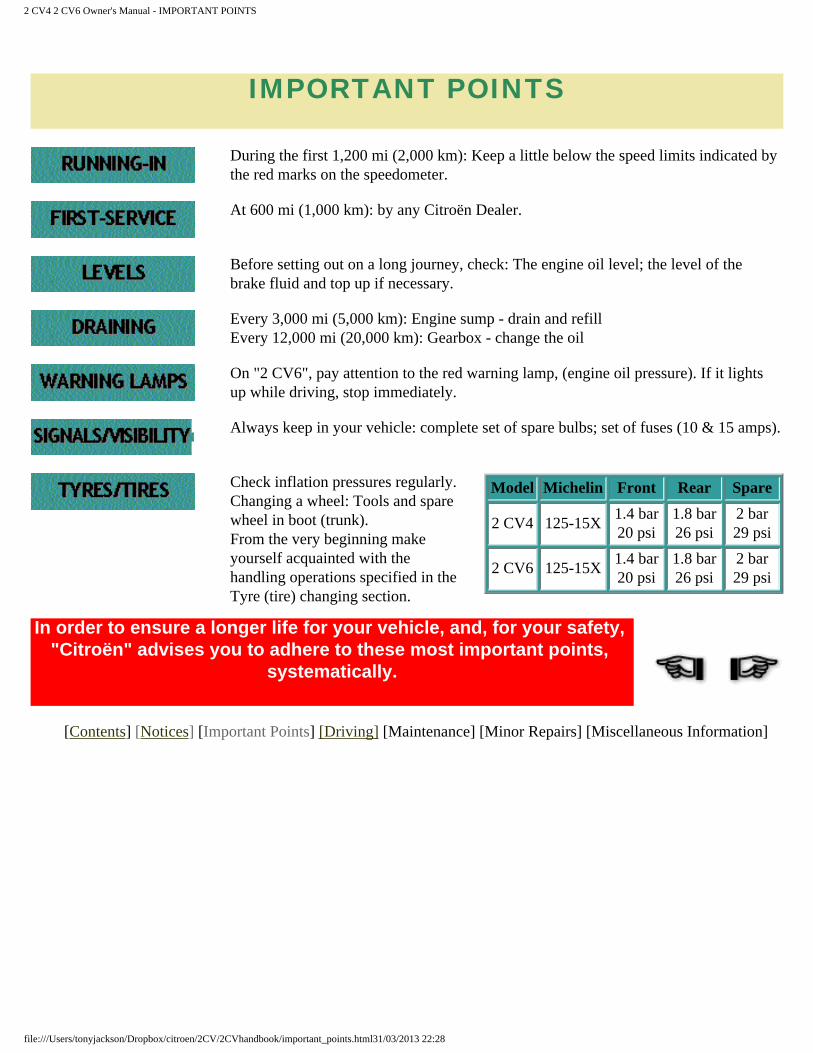
During the first 1,200 mi (2,000 km): Keep a little below the speed limits indicated by the red marks on the speedometer.
At 600 mi (1,000 km): by any Citroën Dealer.
Before setting out on a long journey, check: The engine oil level; the level of the brake fluid and top up if necessary.
Every 3,000 mi (5,000 km): Engine sump - drain and refill Every 12,000 mi (20,000 km): Gearbox - change the oil
On "2 CV6", pay attention to the red warning lamp, (engine oil pressure). If it lights up while driving, stop immediately.
Always keep in your vehicle: complete set of spare bulbs; set of fuses (10 & 15 amps).
Check inflation pressures regularly. Changing a wheel: Tools and spare wheel in boot (trunk). From the very beginning make yourself acquainted with the handling operations specified in the Tyre (tire) changing section.
Model Michelin Front Rear Spare
2 CV4 125-15X1.4 bar 20 psi
1.8 bar 26 psi
2 bar 29 psi
2 CV6 125-15X1.4 bar 20 psi
1.8 bar 26 psi
2 bar 29 psi
In order to ensure a longer life for your vehicle, and, for your safety, "Citroën" advises you to adhere to these most important points,
systematically.
[Contents] [Notices] [Important Points] [Driving] [Maintenance] [Minor Repairs] [Miscellaneous Information]
file:///Users/tonyjackson/Dropbox/citroen/2CV/2CVhandbook/important_points.html31/03/2013 22:28
2 CV4 2CV6 Owner's Manual - DRIVING
DRIVING
This first section contains all you need to know about driving your car and taking advantage of the comfort it offers: the panel instruments are all described here, so that you can find out the meaning of their signals with a minimum of effort, should the need arise.
We also advise you to read here before taking the car on the road for the first time.
DRIVING2 CV4 - 2 CV6
Opening and locking: Doors, Boot, Bonnet
Driving Position: Controls and accessories (LH) Controls and accessories (RH)
Dashboard instruments Seats, rear-view mirrors, seat belts
Starting: Anti-theft, ignition, starter
Gears, clutch, brakes
Signals and visibility: Lights, signals, windscreen wipers/
washer
Air conditioning: Ventilation, heating, de-misting
Comfort: Folding canvas hood
Accessories
07516 JULY 1975
AZ-KB AZ-KA 2 CV4 2 CV6
file:///Users/tonyjackson/Dropbox/citroen/2CV/2CVhandbook/driving.html (1 of 2)31/03/2013 22:28

2 CV4 2CV6 Owner's Manual - DRIVING
[Contents] [Notices] [Important Points] [Driving] [Maintenance] [Minor Repairs] [Miscellaneous Information]
file:///Users/tonyjackson/Dropbox/citroen/2CV/2CVhandbook/driving.html (2 of 2)31/03/2013 22:28
2 CV4 2CV6 Owner's Manual - MAINTENANCE
MAINTENANCE
This section deals with the small points which are essential to ensure the good condition of your car: checking levels, keeping and eye on the tyres, washing the bodywork ...
Other maintenance operations, such as greasing, oil changes, adjustments - which the Citroën network will competently carry out for you, through is special Service Stations - form the subject of the "Maintenance Guide", which was supplied with the vehicle when originally delivered.
MAINTENANCE2 CV4 - 2 CV6
Levels: Oil, Brake Fluid - Checks and Topping
Up
Mechanical and Electrical
Bodywork
Interior
07516 JULY 1975
AZ-KB AZ-KA 2 CV4 2 CV6
[Contents] [Notices] [Important Points] [Driving] [Maintenance] [Minor Repairs] [Miscellaneous Information]
file:///Users/tonyjackson/Dropbox/citroen/2CV/2CVhandbook/maintenance.html31/03/2013 22:28
2 CV4 2CV6 Owner's Manual - MINOR REPAIRS
MINOR REPAIRS
You should consult this section should any difficulties, such as a puncture or a sparking plug which needs changing, arise.
If, however, it concerns a malfunction indicated by one of the instruments, you should go here.
MINOR REPAIRS2 CV4 - 2 CV6
Replacing a Wheel
Adjusting the Headlamps
Replacing a Bulb
Replacing a Fuse
Replacing the Battery
Replacing a Sparking Plug
Using the Starting Handle
Towing the Car
07516 JULY 1975
AZ-KB AZ-KA 2 CV4 2 CV6
[Contents] [Notices] [Important Points] [Driving] [Maintenance] [Minor Repairs] [Miscellaneous Information]
file:///Users/tonyjackson/Dropbox/citroen/2CV/2CVhandbook/minor_repairs.html31/03/2013 22:28
2 CV4 2CV6 Owner's Manual - MISCELLANEOUS INFORMATION
MISCELLANEOUS INFORMATION
Your attention is particularly drawn to the sections entitled "Running-in" and "Servicing and Guarantee".
If you are travelling abroad, the translations into 4 languages of the servicing dats will be of use to you at service-stations.
These sections will also enable you, if you so desire, to learn more about your car by referring to the section entitled "General Technical Specifications".
MISCELLANEOUS2 CV4 - 2 CV6
Running-in, servicing, guarantee
Driving and running cost
Towing a trailer
Vehicle identification
Replacement parts
Travelling abroad
General Technical Specifications
07516 JULY 1975
AZ-KB AZ-KA 2 CV4 2 CV6
[Contents] [Notices] [Important Points] [Driving] [Maintenance] [Minor Repairs] [Miscellaneous Information]
file:///Users/tonyjackson/Dropbox/citroen/2CV/2CVhandbook/miscellaneous.html31/03/2013 22:28
2 CV4 2CV6 Owner's Manual - REMINDER FOR SERVICE-STATION - ENGLISH
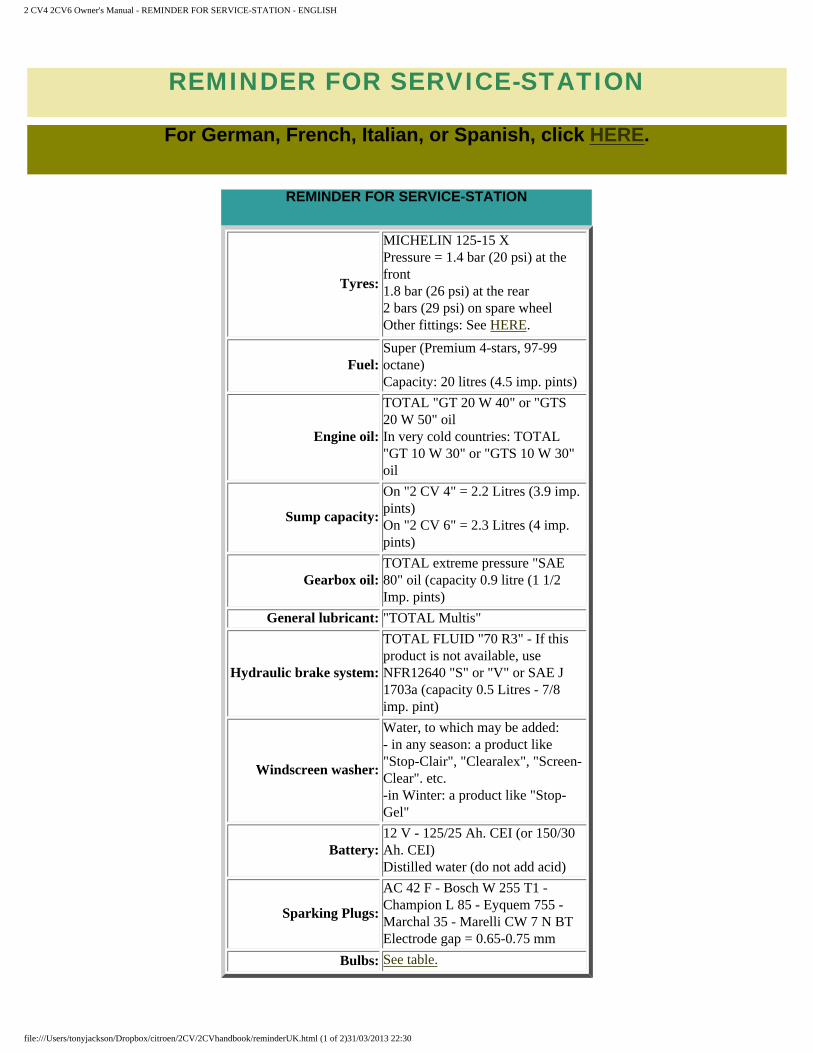
REMINDER FOR SERVICE-STATION
For German, French, Italian, or Spanish, click HERE.
REMINDER FOR SERVICE-STATION
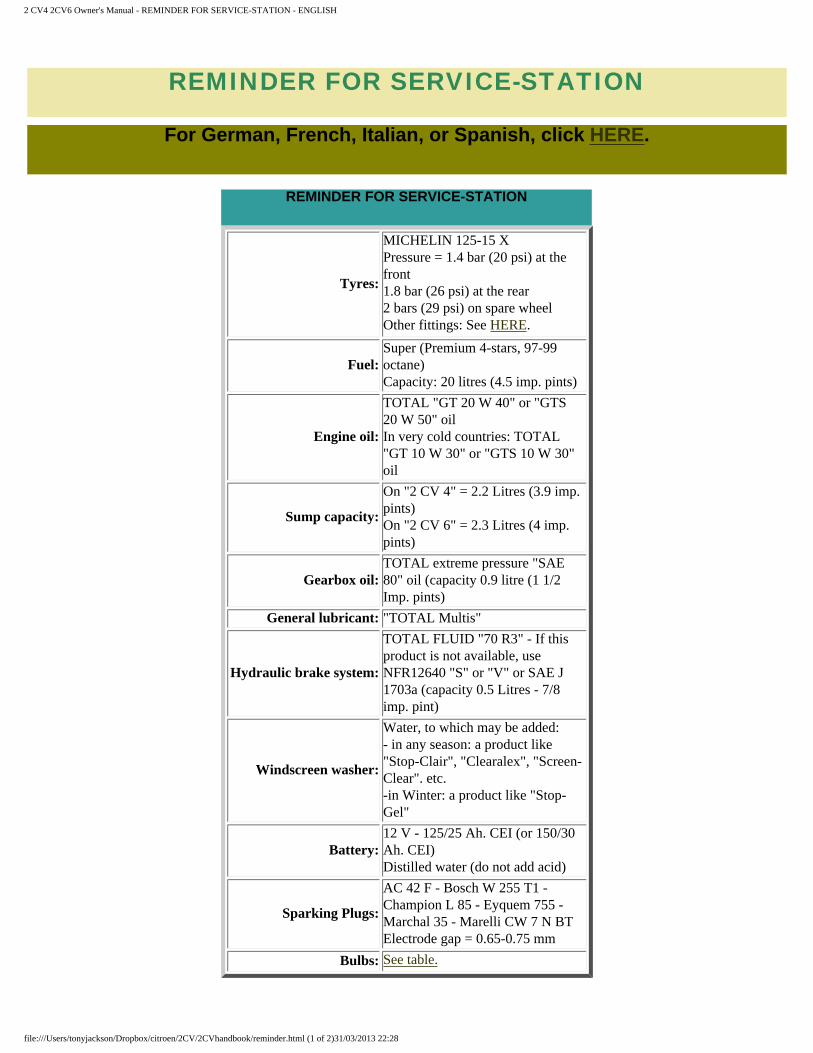
Tyres:
MICHELIN 125-15 X Pressure = 1.4 bar (20 psi) at the front 1.8 bar (26 psi) at the rear 2 bars (29 psi) on spare wheel Other fittings: See HERE.
Fuel:Super (Premium 4-stars, 97-99 octane) Capacity: 20 litres (4.5 imp. pints)
Engine oil:
TOTAL "GT 20 W 40" or "GTS 20 W 50" oil In very cold countries: TOTAL "GT 10 W 30" or "GTS 10 W 30" oil
Sump capacity:
On "2 CV 4" = 2.2 Litres (3.9 imp. pints) On "2 CV 6" = 2.3 Litres (4 imp. pints)
Gearbox oil:TOTAL extreme pressure "SAE 80" oil (capacity 0.9 litre (1 1/2 Imp. pints)
General lubricant: "TOTAL Multis"
Hydraulic brake system:
TOTAL FLUID "70 R3" - If this product is not available, use NFR12640 "S" or "V" or SAE J 1703a (capacity 0.5 Litres - 7/8 imp. pint)
Windscreen washer:
Water, to which may be added: - in any season: a product like "Stop-Clair", "Clearalex", "Screen-Clear". etc. -in Winter: a product like "Stop-Gel"
Battery:12 V - 125/25 Ah. CEI (or 150/30 Ah. CEI) Distilled water (do not add acid)
Sparking Plugs:
AC 42 F - Bosch W 255 T1 - Champion L 85 - Eyquem 755 - Marchal 35 - Marelli CW 7 N BT Electrode gap = 0.65-0.75 mm
Bulbs: See table.
file:///Users/tonyjackson/Dropbox/citroen/2CV/2CVhandbook/reminder.html (1 of 2)31/03/2013 22:28
2 CV4 2CV6 Owner's Manual - REMINDER FOR SERVICE-STATION - ENGLISH
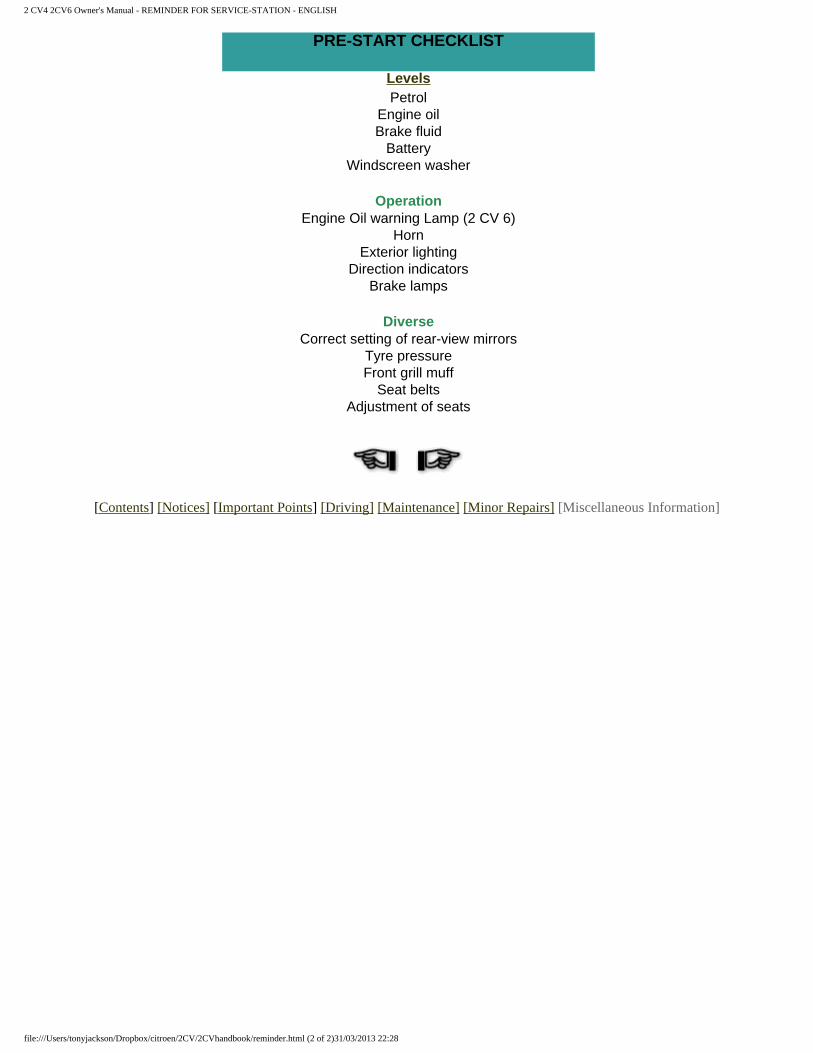
PRE-START CHECKLIST
Levels Petrol
Engine oil Brake fluid
Battery Windscreen washer
Operation Engine Oil warning Lamp (2 CV 6)
Horn Exterior lighting
Direction indicators Brake lamps
Diverse Correct setting of rear-view mirrors
Tyre pressure Front grill muff
Seat belts Adjustment of seats
[Contents] [Notices] [Important Points] [Driving] [Maintenance] [Minor Repairs] [Miscellaneous Information]
file:///Users/tonyjackson/Dropbox/citroen/2CV/2CVhandbook/reminder.html (2 of 2)31/03/2013 22:28
2 CV4 2CV6 Owner's Manual - ALPHABETICAL INDEX
2 CV 4 2 CV 6 OWNER'S MANUAL
Alphabetical Index
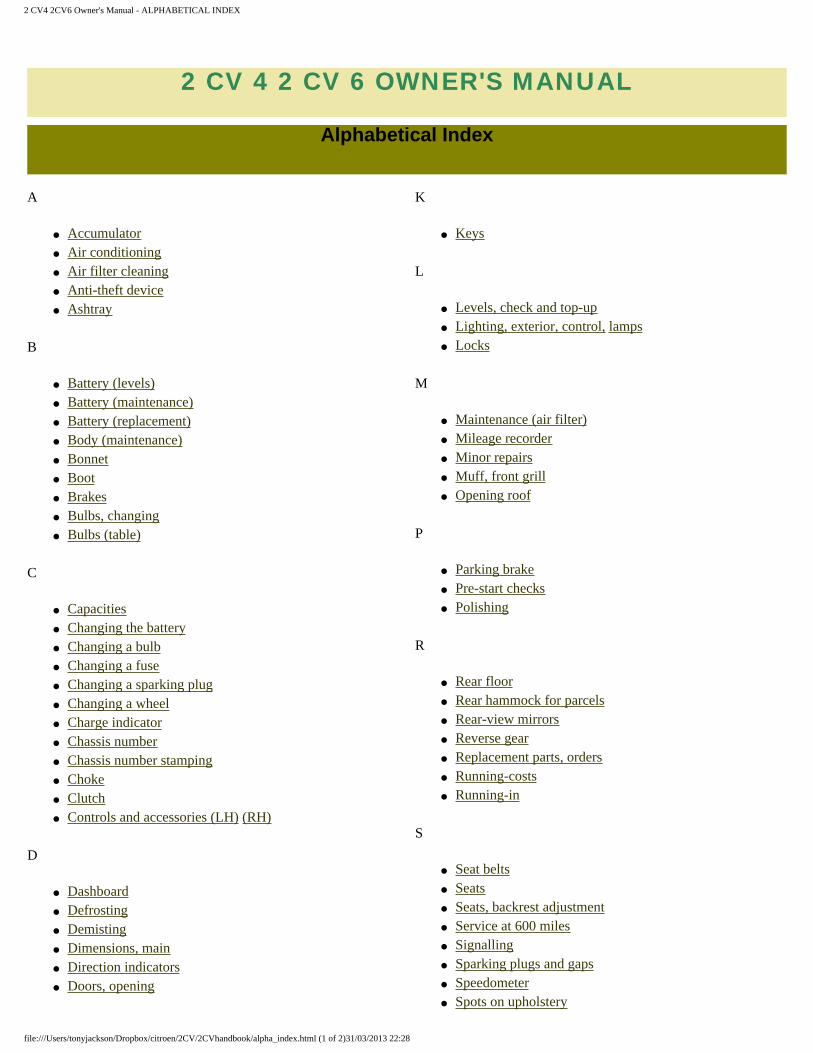
A
● Accumulator● Air conditioning● Air filter cleaning● Anti-theft device● Ashtray
B
● Battery (levels)● Battery (maintenance)● Battery (replacement)● Body (maintenance)● Bonnet● Boot● Brakes● Bulbs, changing● Bulbs (table)
C
● Capacities● Changing the battery● Changing a bulb● Changing a fuse● Changing a sparking plug● Changing a wheel● Charge indicator● Chassis number● Chassis number stamping● Choke● Clutch● Controls and accessories (LH) (RH)
D
● Dashboard● Defrosting● Demisting● Dimensions, main● Direction indicators● Doors, opening
K
● Keys
L
● Levels, check and top-up● Lighting, exterior, control, lamps● Locks
M
● Maintenance (air filter)● Mileage recorder● Minor repairs● Muff, front grill● Opening roof
P
● Parking brake● Pre-start checks● Polishing
R
● Rear floor● Rear hammock for parcels● Rear-view mirrors● Reverse gear● Replacement parts, orders● Running-costs● Running-in
S
● Seat belts● Seats● Seats, backrest adjustment● Service at 600 miles● Signalling● Sparking plugs and gaps● Speedometer● Spots on upholstery
file:///Users/tonyjackson/Dropbox/citroen/2CV/2CVhandbook/alpha_index.html (1 of 2)31/03/2013 22:28
2 CV4 2CV6 Owner's Manual - ALPHABETICAL INDEX
● Driving position
E
● Engine, data● Engine, number plate● Engine, oil level● Engine, oil, warning lamp
F
● Fuel, filling up● Fuel gauge● Fuse boxes● Fuses
G
● Gearbox● Gear changing● Gear lever● Glass (plastic)● Guarantee
H
● Hazard warning device● Headlamps, adjustment● Headlamps, controls● Heating● Horns● Hydraulic fluid
I
● Identification of car● Ignition● Interior lamp● Instruments
● Starting engine● Starting engine with handle● Steering wheel (cleaning)● Stopping the engine
T
● Tar, removal● Technical data● Temperature, interior● Touching-up paintwork● Towing the car● Towing a trailer● Transmission● Travelling abroad● Tyre pressures● Tyres● Tyres (wear indicators)
U
● Upholstery, cleaning
V
● Ventilation
W
● Warning lamp● Washing the car● Water, battery, windscreen washers● Weights● Wheel, changing (brace)● Wheels, changing round● Windscreen washer, control● Windscreen washer, filling● Windscreen wipers● Window, cleaning● Winkers (Direction indicators)
[Contents] [Notices] [Important Points] [Driving] [Maintenance] [Minor Repairs] [Miscellaneous Information]
file:///Users/tonyjackson/Dropbox/citroen/2CV/2CVhandbook/alpha_index.html (2 of 2)31/03/2013 22:28
2 CV4 2CV6 Owner's Manual - DASHBOARD INSTRUMENTS
DRIVING
DRIVING POSITION
Dashboard Instruments
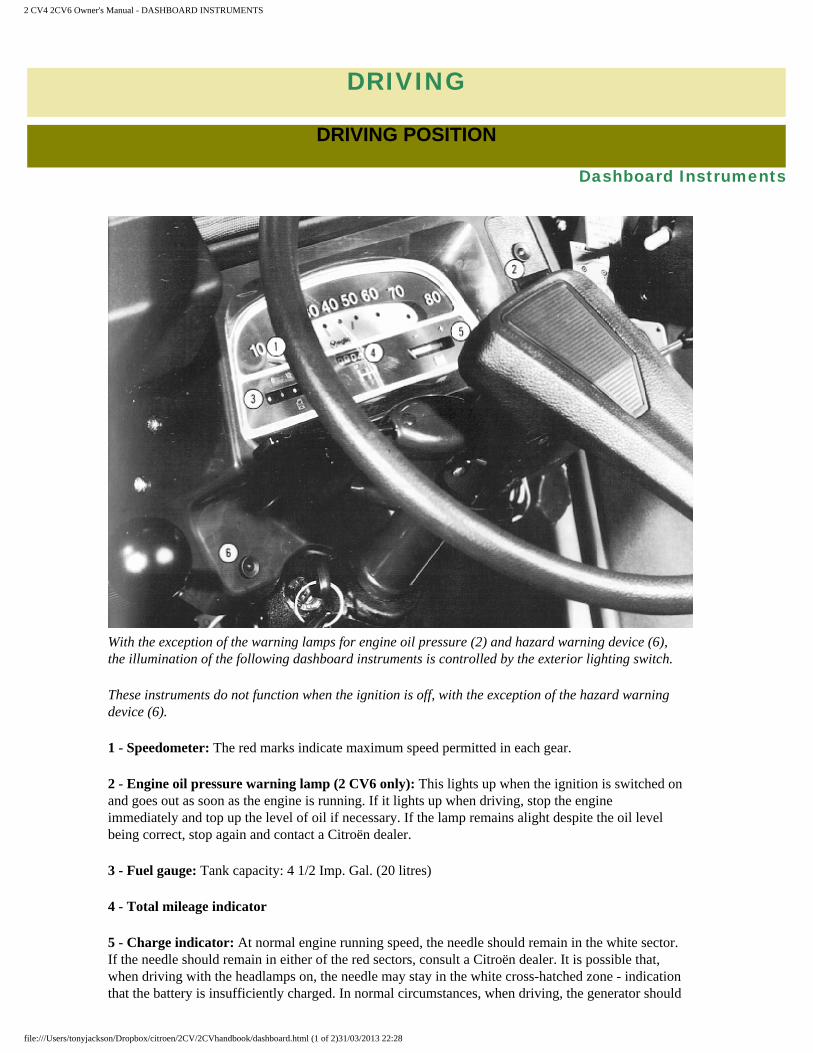
With the exception of the warning lamps for engine oil pressure (2) and hazard warning device (6), the illumination of the following dashboard instruments is controlled by the exterior lighting switch.
These instruments do not function when the ignition is off, with the exception of the hazard warning device (6).
1 - Speedometer: The red marks indicate maximum speed permitted in each gear.
2 - Engine oil pressure warning lamp (2 CV6 only): This lights up when the ignition is switched on and goes out as soon as the engine is running. If it lights up when driving, stop the engine immediately and top up the level of oil if necessary. If the lamp remains alight despite the oil level being correct, stop again and contact a Citroën dealer.
3 - Fuel gauge: Tank capacity: 4 1/2 Imp. Gal. (20 litres)
4 - Total mileage indicator
5 - Charge indicator: At normal engine running speed, the needle should remain in the white sector. If the needle should remain in either of the red sectors, consult a Citroën dealer. It is possible that, when driving with the headlamps on, the needle may stay in the white cross-hatched zone - indication that the battery is insufficiently charged. In normal circumstances, when driving, the generator should
file:///Users/tonyjackson/Dropbox/citroen/2CV/2CVhandbook/dashboard.html (1 of 2)31/03/2013 22:28
2 CV4 2CV6 Owner's Manual - DASHBOARD INSTRUMENTS
charge the battery and within two hours the needle should return to the white zone. If this does not occur, consult a Citroën dealer.
6 - Hazard warning lamp: Flashes throughout the operation. If it does not function, check the direction indicators.
[Contents] [Notices] [Important Points] [Driving] [Maintenance] [Minor Repairs] [Miscellaneous Information]
file:///Users/tonyjackson/Dropbox/citroen/2CV/2CVhandbook/dashboard.html (2 of 2)31/03/2013 22:28
2 CV4 2CV6 Owner's Manual - DRIVING
DRIVING
OPENING and LOCKING
Doors, Boot (trunk), Bonnet (hood)
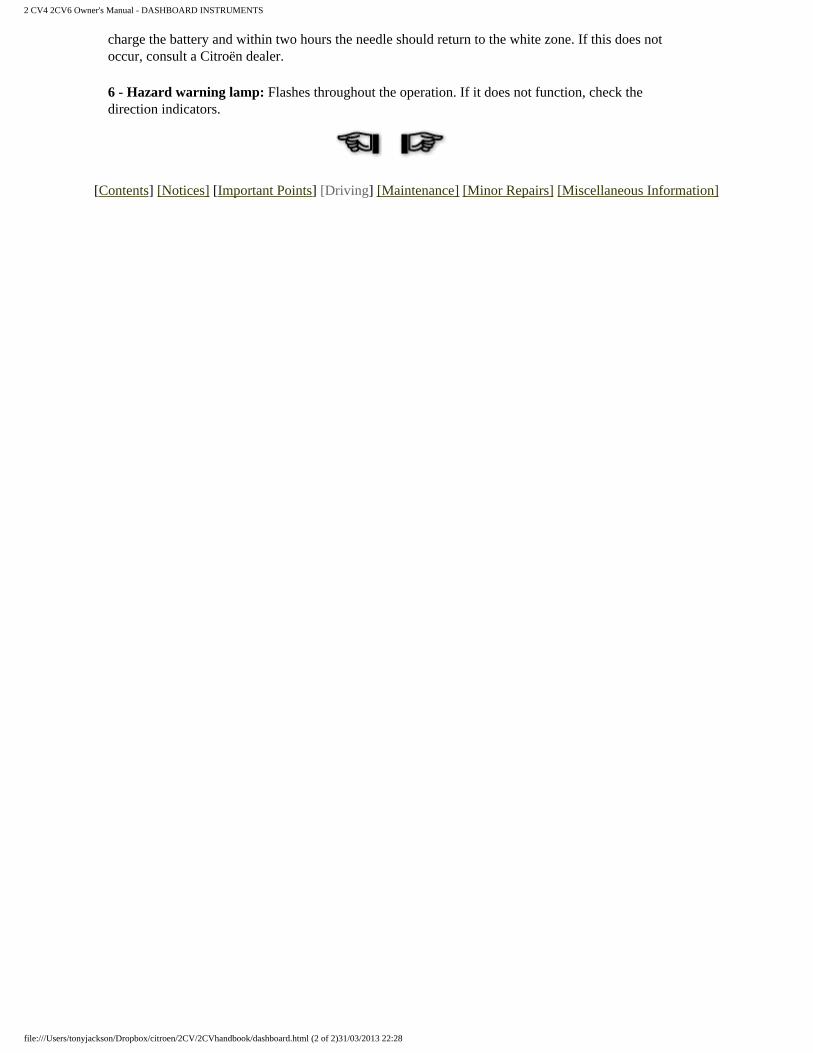
KEYS (Fig. 1)
The larger key (1) operates the "Anti-theft-ignition-starter" device. The smaller key (2) locks the front side doors and the boot lid.
We recommend that note be taken of the key numbers in the space provided in the "Maintenance Guide" which came with the car when originally delivered or in a suitable spot for your convenience.
Fig. 1
Keys 1 - Anti-theft-ignition-starter 2 - Front side doors, boot lid
SIDE DOORS
From the outside:
To open: Turn the handle downwards. To lock: With the key (for front doors only)
From the inside:
To open: Front doors: raise the lever situated at the front of the doors. Rear doors: (Fig. 2): press the lever (1) To lock: Lower the catch (2) (rear side doors only) To unlock: Raise the catch (2) (rear side doors only)
Fig. 2
Rear side doors (inner door handle)
1 - Opening 2 - Locking
3 - Access for hand
BOOT (TRUNK) LID (Fig. 3 & 4)
To open: Insert the side door key into lock (1). Unlock and turn the handle (2), the lid will open slightly. Completely raise the lid and keep it open by engaging the end ot its stay (3) in the support (4). To shut: Withdraw the stay from its support, secure it on the lid and lower the lid slowly while holding it. To lock: Use the side door key. With the lid locked, the handle should turn loosely. To remove: The boot lid can be removed completely by raising it to its maximum extent and by sliding it in its hinges towards the left or right.
Never drive the car with the boot lid open, supported by its stay.
Fig. 3
Boot Lid 1 - Lock
2 - Handle (opening)
file:///Users/tonyjackson/Dropbox/citroen/2CV/2CVhandbook/doors_boot_bonnet.html (1 of 2)31/03/2013 22:28
2 CV4 2CV6 Owner's Manual - DRIVING
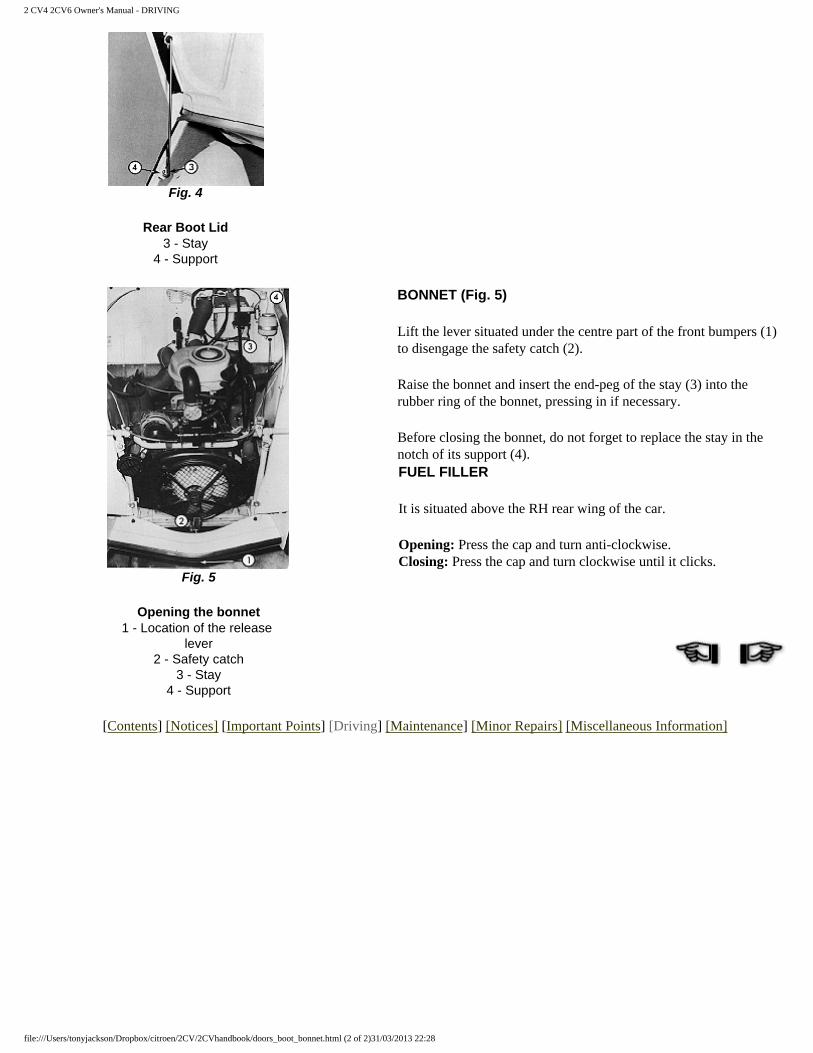
Fig. 4
Rear Boot Lid 3 - Stay
4 - Support
BONNET (Fig. 5)
Lift the lever situated under the centre part of the front bumpers (1) to disengage the safety catch (2).
Raise the bonnet and insert the end-peg of the stay (3) into the rubber ring of the bonnet, pressing in if necessary.
Before closing the bonnet, do not forget to replace the stay in the notch of its support (4).FUEL FILLER
It is situated above the RH rear wing of the car.
Opening: Press the cap and turn anti-clockwise. Closing: Press the cap and turn clockwise until it clicks.
Fig. 5
Opening the bonnet 1 - Location of the release
lever 2 - Safety catch
3 - Stay 4 - Support
[Contents] [Notices] [Important Points] [Driving] [Maintenance] [Minor Repairs] [Miscellaneous Information]
file:///Users/tonyjackson/Dropbox/citroen/2CV/2CVhandbook/doors_boot_bonnet.html (2 of 2)31/03/2013 22:28
2 CV4 2CV6 Owner's Manual - DASH(LH)
DRIVING
DRIVING POSITION
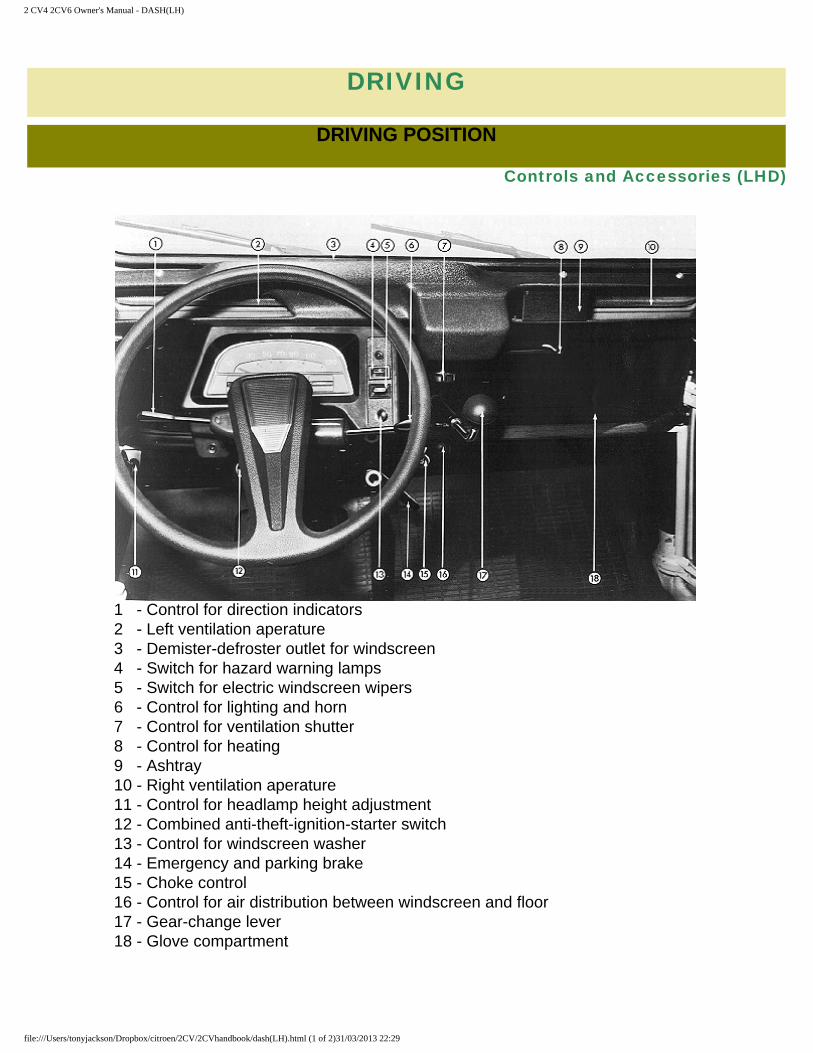
Controls and Accessories (LHD)
1 - Control for direction indicators 2 - Left ventilation aperature 3 - Demister-defroster outlet for windscreen 4 - Switch for hazard warning lamps 5 - Switch for electric windscreen wipers 6 - Control for lighting and horn 7 - Control for ventilation shutter 8 - Control for heating 9 - Ashtray 10 - Right ventilation aperature 11 - Control for headlamp height adjustment 12 - Combined anti-theft-ignition-starter switch 13 - Control for windscreen washer 14 - Emergency and parking brake 15 - Choke control 16 - Control for air distribution between windscreen and floor 17 - Gear-change lever 18 - Glove compartment
file:///Users/tonyjackson/Dropbox/citroen/2CV/2CVhandbook/dash(LH).html (1 of 2)31/03/2013 22:29

2 CV4 2CV6 Owner's Manual - DASH(LH)
[Contents] [Notices] [Important Points] [Driving] [Maintenance] [Minor Repairs] [Miscellaneous Information]
file:///Users/tonyjackson/Dropbox/citroen/2CV/2CVhandbook/dash(LH).html (2 of 2)31/03/2013 22:29
2 CV4 2CV6 Owner's Manual - DASH(RH)
DRIVING
DRIVING POSITION
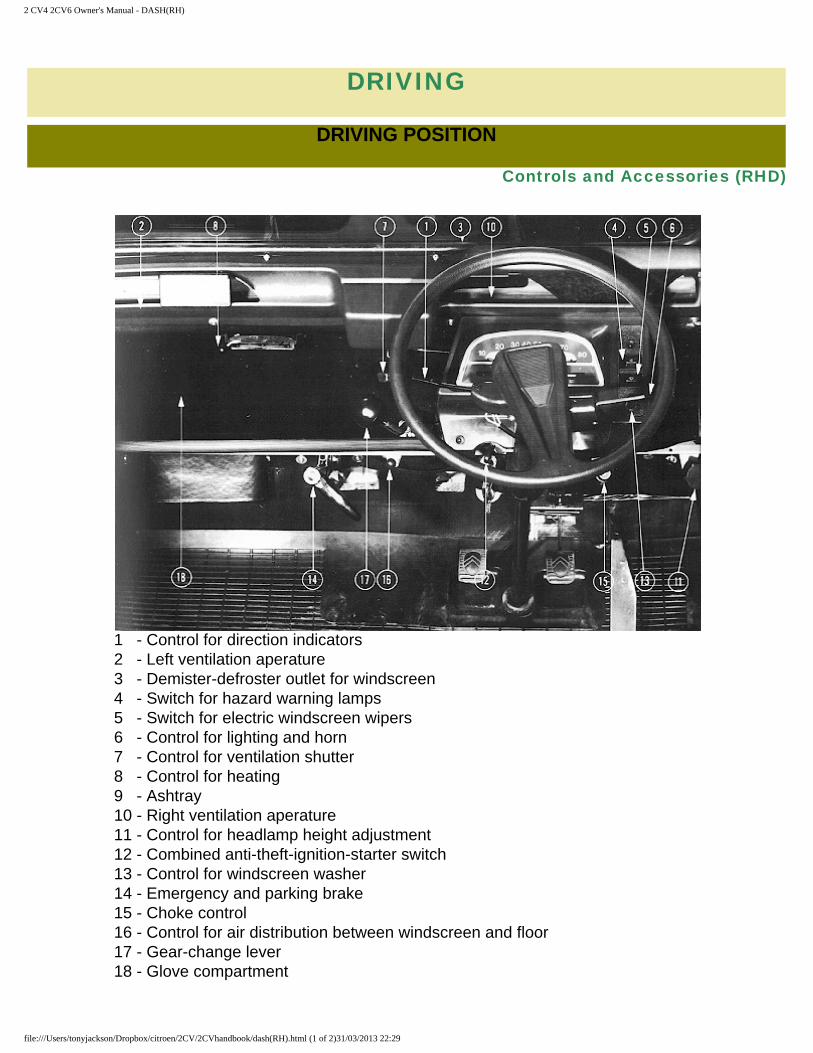
Controls and Accessories (RHD)
1 - Control for direction indicators 2 - Left ventilation aperature 3 - Demister-defroster outlet for windscreen 4 - Switch for hazard warning lamps 5 - Switch for electric windscreen wipers 6 - Control for lighting and horn 7 - Control for ventilation shutter 8 - Control for heating 9 - Ashtray 10 - Right ventilation aperature 11 - Control for headlamp height adjustment 12 - Combined anti-theft-ignition-starter switch 13 - Control for windscreen washer 14 - Emergency and parking brake 15 - Choke control 16 - Control for air distribution between windscreen and floor 17 - Gear-change lever 18 - Glove compartment
file:///Users/tonyjackson/Dropbox/citroen/2CV/2CVhandbook/dash(RH).html (1 of 2)31/03/2013 22:29

2 CV4 2CV6 Owner's Manual - DASH(RH)
[Contents] [Notices] [Important Points] [Driving] [Maintenance] [Minor Repairs] [Miscellaneous Information]
file:///Users/tonyjackson/Dropbox/citroen/2CV/2CVhandbook/dash(RH).html (2 of 2)31/03/2013 22:29
2 CV4 2CV6 Owner's Manual - SEATS, MIRRORS, SEAT BELTS
DRIVING
DRIVING POSITION
Seats, Rear-view Mirrors, Seat Belts
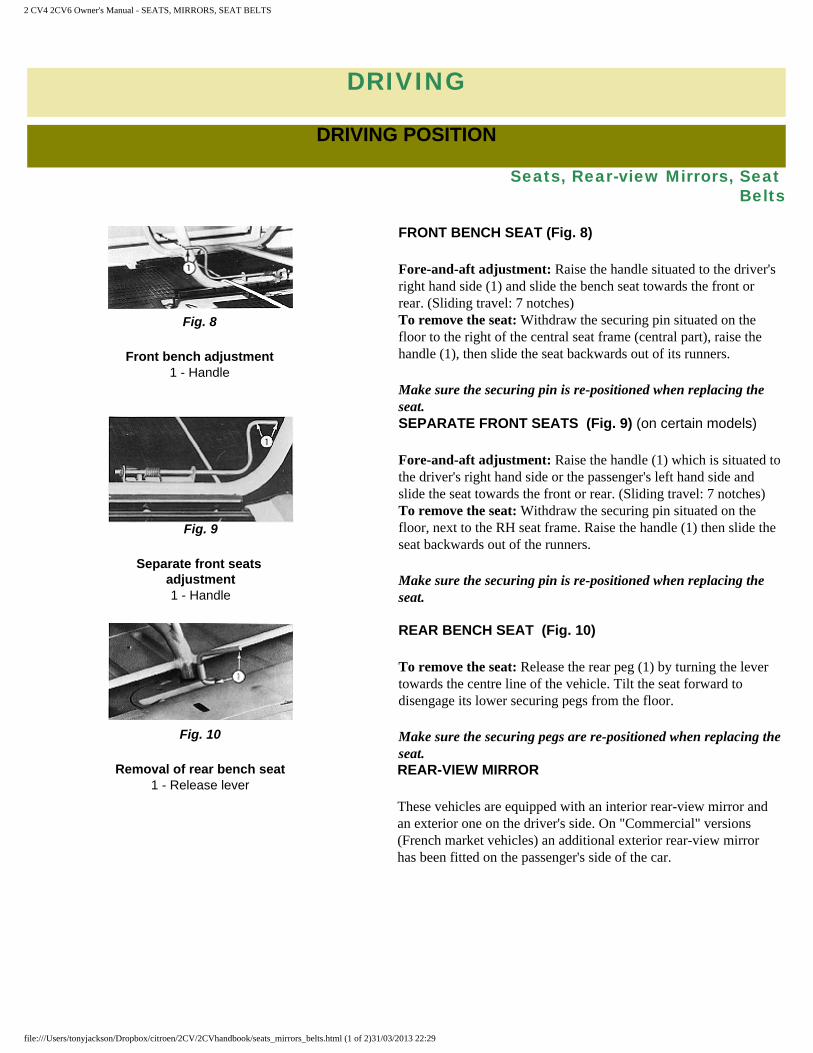
FRONT BENCH SEAT (Fig. 8)
Fore-and-aft adjustment: Raise the handle situated to the driver's right hand side (1) and slide the bench seat towards the front or rear. (Sliding travel: 7 notches) To remove the seat: Withdraw the securing pin situated on the floor to the right of the central seat frame (central part), raise the handle (1), then slide the seat backwards out of its runners.
Make sure the securing pin is re-positioned when replacing the seat.
Fig. 8
Front bench adjustment 1 - Handle
SEPARATE FRONT SEATS (Fig. 9) (on certain models)
Fore-and-aft adjustment: Raise the handle (1) which is situated to the driver's right hand side or the passenger's left hand side and slide the seat towards the front or rear. (Sliding travel: 7 notches) To remove the seat: Withdraw the securing pin situated on the floor, next to the RH seat frame. Raise the handle (1) then slide the seat backwards out of the runners.
Make sure the securing pin is re-positioned when replacing the seat.
Fig. 9
Separate front seats adjustment 1 - Handle
REAR BENCH SEAT (Fig. 10)
To remove the seat: Release the rear peg (1) by turning the lever towards the centre line of the vehicle. Tilt the seat forward to disengage its lower securing pegs from the floor.
Make sure the securing pegs are re-positioned when replacing the seat.
Fig. 10
Removal of rear bench seat 1 - Release lever
REAR-VIEW MIRROR
These vehicles are equipped with an interior rear-view mirror and an exterior one on the driver's side. On "Commercial" versions (French market vehicles) an additional exterior rear-view mirror has been fitted on the passenger's side of the car.
file:///Users/tonyjackson/Dropbox/citroen/2CV/2CVhandbook/seats_mirrors_belts.html (1 of 2)31/03/2013 22:29
2 CV4 2CV6 Owner's Manual - SEATS, MIRRORS, SEAT BELTS
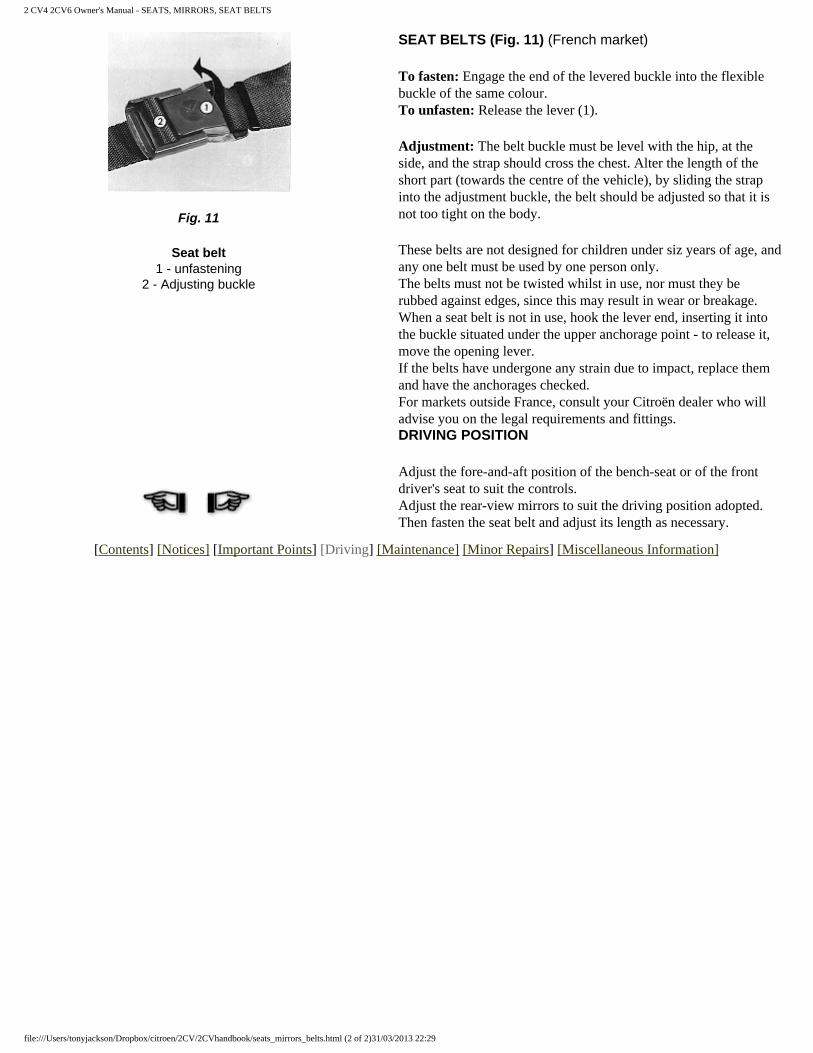
SEAT BELTS (Fig. 11) (French market)
To fasten: Engage the end of the levered buckle into the flexible buckle of the same colour. To unfasten: Release the lever (1).
Adjustment: The belt buckle must be level with the hip, at the side, and the strap should cross the chest. Alter the length of the short part (towards the centre of the vehicle), by sliding the strap into the adjustment buckle, the belt should be adjusted so that it is not too tight on the body.
These belts are not designed for children under siz years of age, and any one belt must be used by one person only. The belts must not be twisted whilst in use, nor must they be rubbed against edges, since this may result in wear or breakage. When a seat belt is not in use, hook the lever end, inserting it into the buckle situated under the upper anchorage point - to release it, move the opening lever. If the belts have undergone any strain due to impact, replace them and have the anchorages checked. For markets outside France, consult your Citroën dealer who will advise you on the legal requirements and fittings.
Fig. 11
Seat belt 1 - unfastening
2 - Adjusting buckle
DRIVING POSITION
Adjust the fore-and-aft position of the bench-seat or of the front driver's seat to suit the controls. Adjust the rear-view mirrors to suit the driving position adopted. Then fasten the seat belt and adjust its length as necessary.
[Contents] [Notices] [Important Points] [Driving] [Maintenance] [Minor Repairs] [Miscellaneous Information]
file:///Users/tonyjackson/Dropbox/citroen/2CV/2CVhandbook/seats_mirrors_belts.html (2 of 2)31/03/2013 22:29
2 CV4 2CV6 Owner's Manual - ANTI-THEFT, IGNITION, STARTER
DRIVING
STARTING
Anti-theft, Ignition, Starter
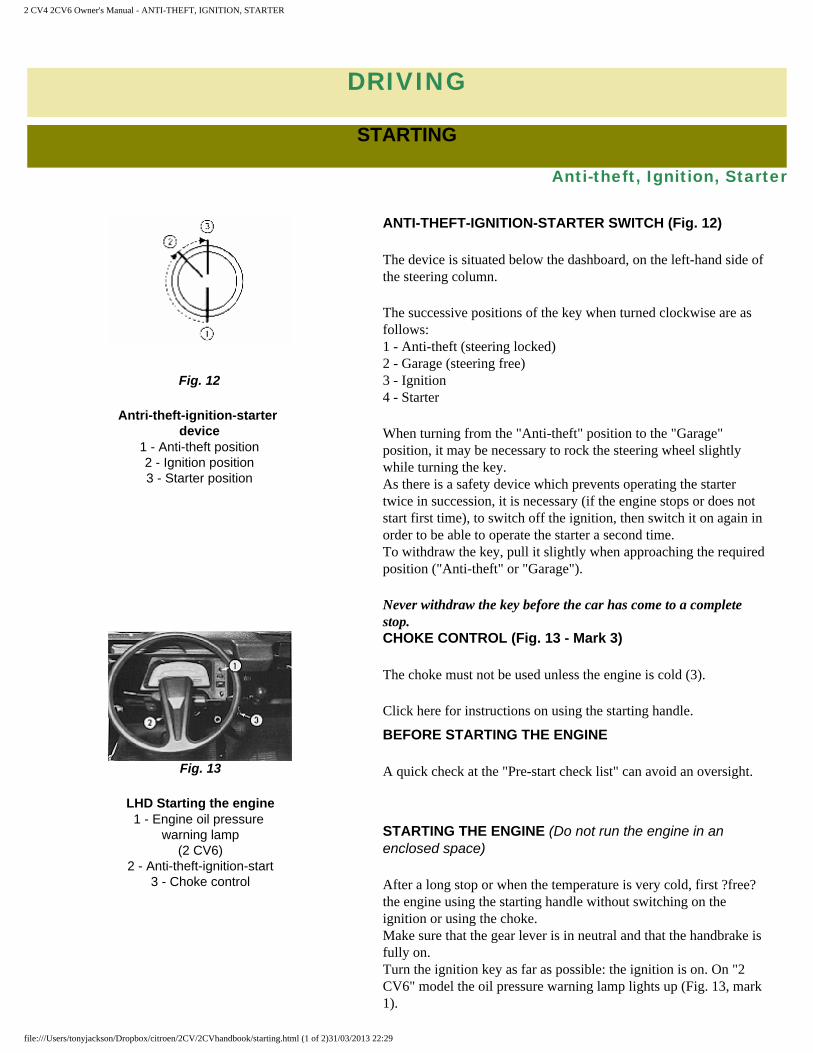
ANTI-THEFT-IGNITION-STARTER SWITCH (Fig. 12)
The device is situated below the dashboard, on the left-hand side of the steering column.
The successive positions of the key when turned clockwise are as follows: 1 - Anti-theft (steering locked) 2 - Garage (steering free) 3 - Ignition 4 - Starter
When turning from the "Anti-theft" position to the "Garage" position, it may be necessary to rock the steering wheel slightly while turning the key. As there is a safety device which prevents operating the starter twice in succession, it is necessary (if the engine stops or does not start first time), to switch off the ignition, then switch it on again in order to be able to operate the starter a second time. To withdraw the key, pull it slightly when approaching the required position ("Anti-theft" or "Garage").
Never withdraw the key before the car has come to a complete stop.
Fig. 12
Antri-theft-ignition-starter device
1 - Anti-theft position 2 - Ignition position 3 - Starter position
CHOKE CONTROL (Fig. 13 - Mark 3)
The choke must not be used unless the engine is cold (3).
Click here for instructions on using the starting handle.
BEFORE STARTING THE ENGINE
A quick check at the "Pre-start check list" can avoid an oversight.Fig. 13
LHD Starting the engine 1 - Engine oil pressure
warning lamp (2 CV6)
2 - Anti-theft-ignition-start 3 - Choke control
STARTING THE ENGINE (Do not run the engine in an enclosed space)
After a long stop or when the temperature is very cold, first ?free? the engine using the starting handle without switching on the ignition or using the choke. Make sure that the gear lever is in neutral and that the handbrake is fully on. Turn the ignition key as far as possible: the ignition is on. On "2 CV6" model the oil pressure warning lamp lights up (Fig. 13, mark 1).
file:///Users/tonyjackson/Dropbox/citroen/2CV/2CVhandbook/starting.html (1 of 2)31/03/2013 22:29
2 CV4 2CV6 Owner's Manual - ANTI-THEFT, IGNITION, STARTER
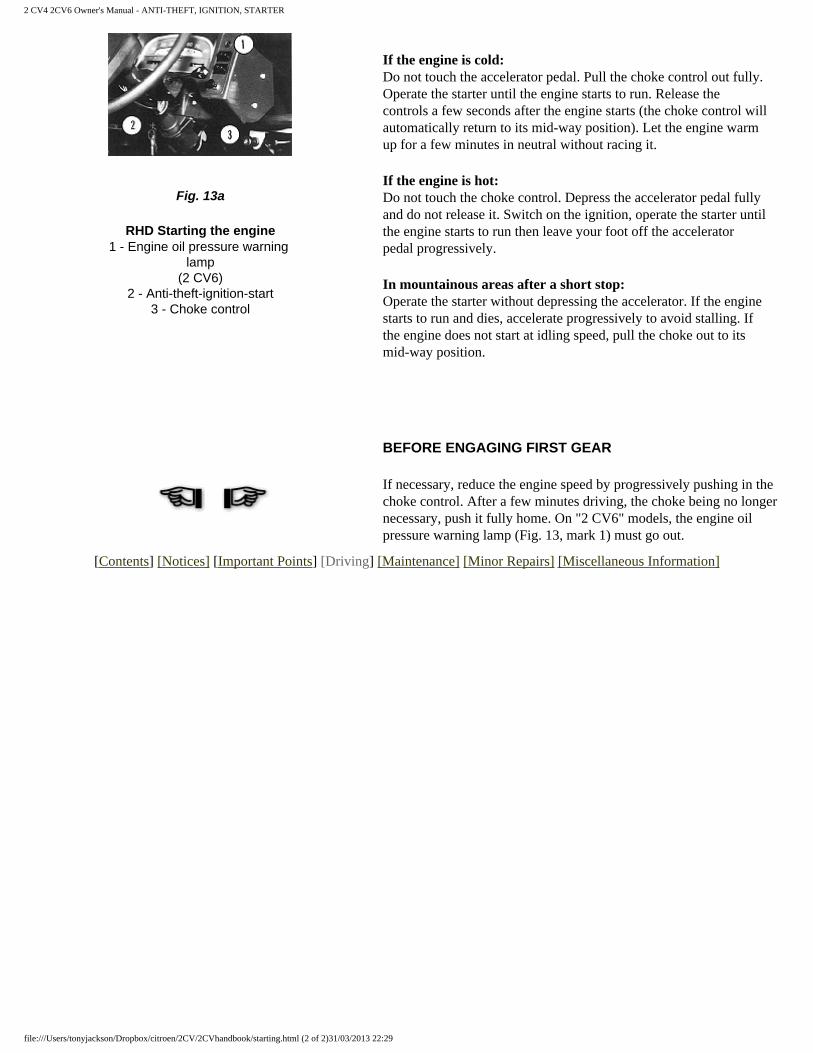
If the engine is cold: Do not touch the accelerator pedal. Pull the choke control out fully. Operate the starter until the engine starts to run. Release the controls a few seconds after the engine starts (the choke control will automatically return to its mid-way position). Let the engine warm up for a few minutes in neutral without racing it.
If the engine is hot: Do not touch the choke control. Depress the accelerator pedal fully and do not release it. Switch on the ignition, operate the starter until the engine starts to run then leave your foot off the accelerator pedal progressively.
In mountainous areas after a short stop: Operate the starter without depressing the accelerator. If the engine starts to run and dies, accelerate progressively to avoid stalling. If the engine does not start at idling speed, pull the choke out to its mid-way position.
Fig. 13a
RHD Starting the engine 1 - Engine oil pressure warning
lamp (2 CV6)
2 - Anti-theft-ignition-start 3 - Choke control
BEFORE ENGAGING FIRST GEAR
If necessary, reduce the engine speed by progressively pushing in the choke control. After a few minutes driving, the choke being no longer necessary, push it fully home. On "2 CV6" models, the engine oil pressure warning lamp (Fig. 13, mark 1) must go out.
[Contents] [Notices] [Important Points] [Driving] [Maintenance] [Minor Repairs] [Miscellaneous Information]
file:///Users/tonyjackson/Dropbox/citroen/2CV/2CVhandbook/starting.html (2 of 2)31/03/2013 22:29
2 CV4 2CV6 Owner's Manual - GEARS, CLUTCH, BRAKES
DRIVING
Driving
Gears, clutch, brakes
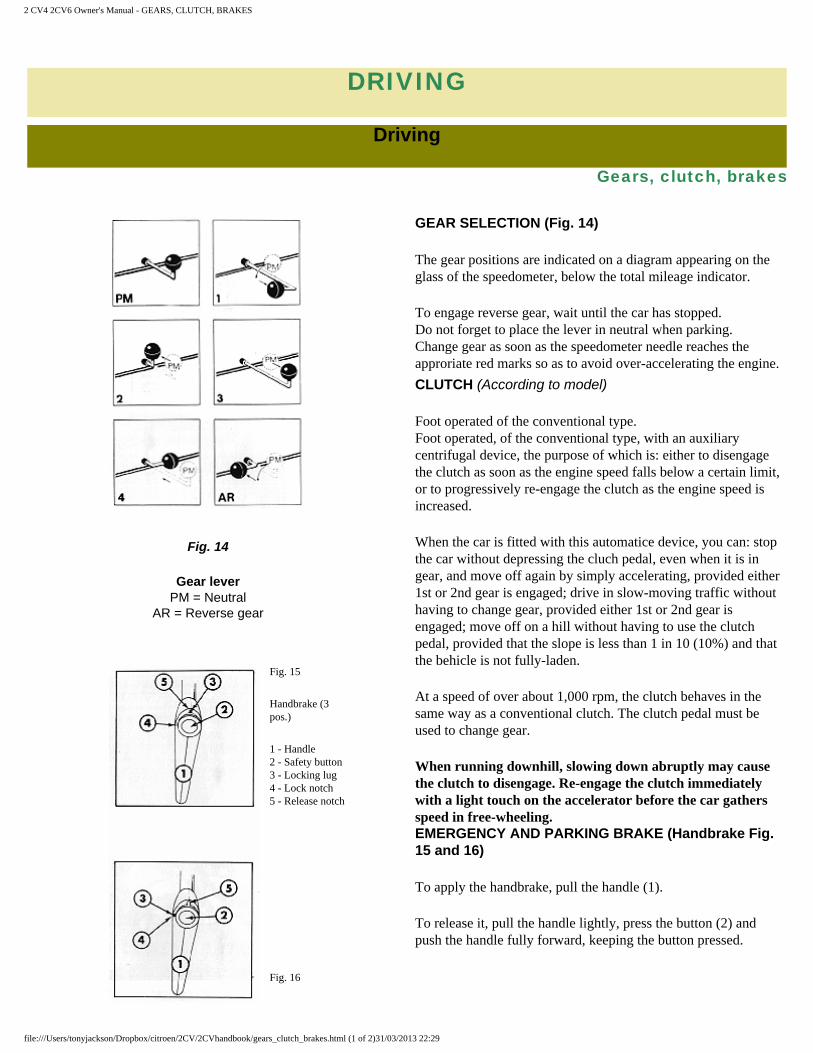
GEAR SELECTION (Fig. 14)
The gear positions are indicated on a diagram appearing on the glass of the speedometer, below the total mileage indicator.
To engage reverse gear, wait until the car has stopped. Do not forget to place the lever in neutral when parking. Change gear as soon as the speedometer needle reaches the approriate red marks so as to avoid over-accelerating the engine.
CLUTCH (According to model)
Foot operated of the conventional type. Foot operated, of the conventional type, with an auxiliary centrifugal device, the purpose of which is: either to disengage the clutch as soon as the engine speed falls below a certain limit, or to progressively re-engage the clutch as the engine speed is increased.
When the car is fitted with this automatice device, you can: stop the car without depressing the cluch pedal, even when it is in gear, and move off again by simply accelerating, provided either 1st or 2nd gear is engaged; drive in slow-moving traffic without having to change gear, provided either 1st or 2nd gear is engaged; move off on a hill without having to use the clutch pedal, provided that the slope is less than 1 in 10 (10%) and that the behicle is not fully-laden.
At a speed of over about 1,000 rpm, the clutch behaves in the same way as a conventional clutch. The clutch pedal must be used to change gear.
When running downhill, slowing down abruptly may cause the clutch to disengage. Re-engage the clutch immediately with a light touch on the accelerator before the car gathers speed in free-wheeling.
Fig. 14
Gear lever PM = Neutral
AR = Reverse gear
Fig. 15
Handbrake (3 pos.)
1 - Handle 2 - Safety button 3 - Locking lug 4 - Lock notch 5 - Release notch
Fig. 16
EMERGENCY AND PARKING BRAKE (Handbrake Fig. 15 and 16)
To apply the handbrake, pull the handle (1).
To release it, pull the handle lightly, press the button (2) and push the handle fully forward, keeping the button pressed.
file:///Users/tonyjackson/Dropbox/citroen/2CV/2CVhandbook/gears_clutch_brakes.html (1 of 2)31/03/2013 22:29
2 CV4 2CV6 Owner's Manual - GEARS, CLUTCH, BRAKES
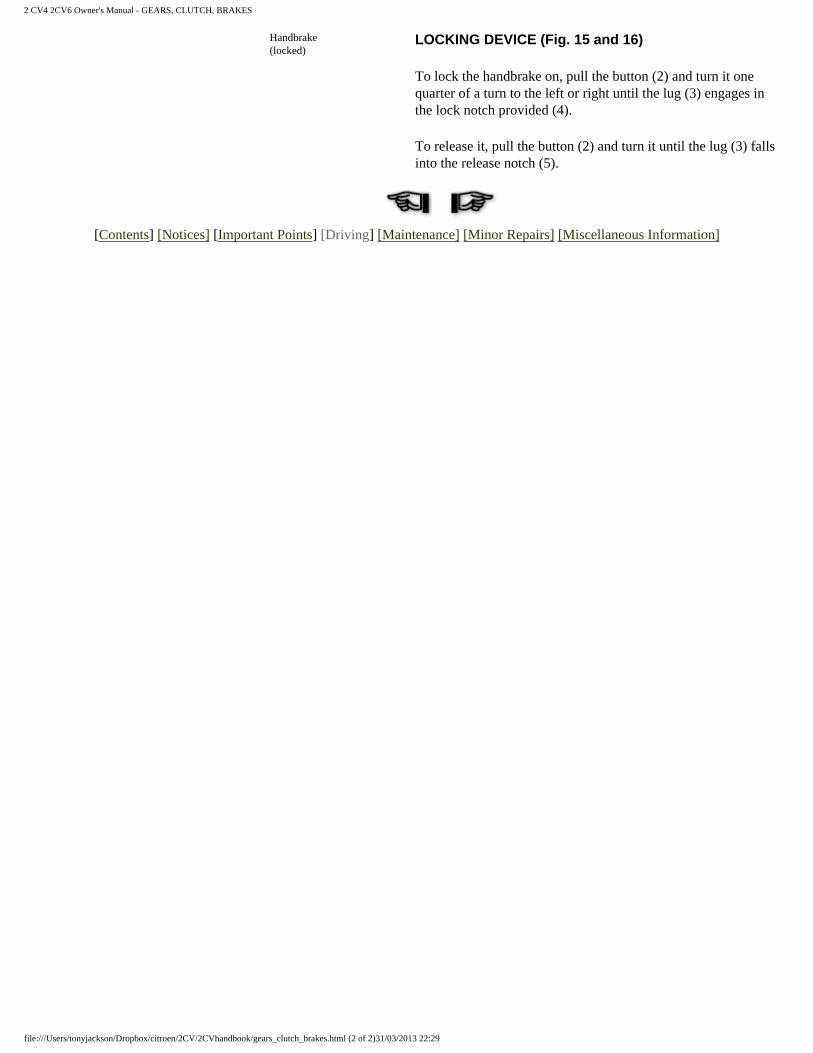
Handbrake (locked)
LOCKING DEVICE (Fig. 15 and 16)
To lock the handbrake on, pull the button (2) and turn it one quarter of a turn to the left or right until the lug (3) engages in the lock notch provided (4).
To release it, pull the button (2) and turn it until the lug (3) falls into the release notch (5).
[Contents] [Notices] [Important Points] [Driving] [Maintenance] [Minor Repairs] [Miscellaneous Information]
file:///Users/tonyjackson/Dropbox/citroen/2CV/2CVhandbook/gears_clutch_brakes.html (2 of 2)31/03/2013 22:29
2 CV4 2CV6 Owner's Manual - LIGHTS, SIGNALS, WIPERS, WASHER
DRIVING
Signals and Visibility
Lights, signals, windscreen wipers, windscreen washers
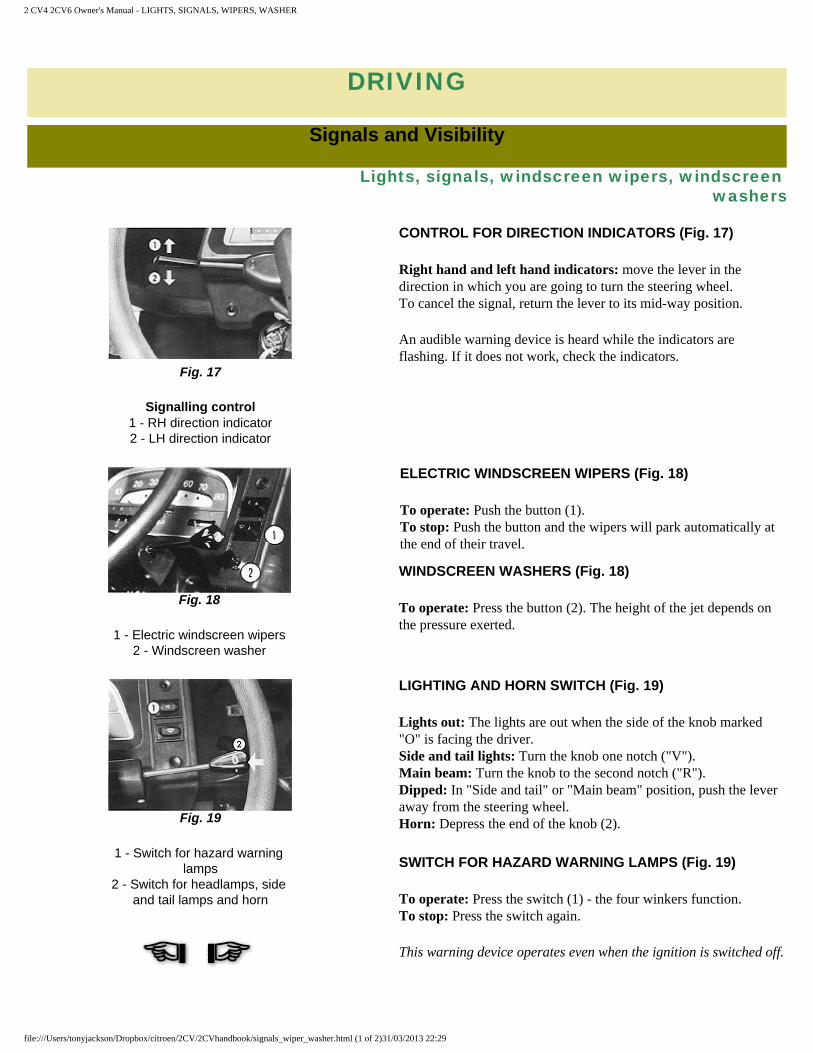
CONTROL FOR DIRECTION INDICATORS (Fig. 17)
Right hand and left hand indicators: move the lever in the direction in which you are going to turn the steering wheel. To cancel the signal, return the lever to its mid-way position.
An audible warning device is heard while the indicators are flashing. If it does not work, check the indicators.
Fig. 17
Signalling control 1 - RH direction indicator 2 - LH direction indicator
ELECTRIC WINDSCREEN WIPERS (Fig. 18)
To operate: Push the button (1). To stop: Push the button and the wipers will park automatically at the end of their travel.
WINDSCREEN WASHERS (Fig. 18)
To operate: Press the button (2). The height of the jet depends on the pressure exerted.
Fig. 18
1 - Electric windscreen wipers 2 - Windscreen washer
LIGHTING AND HORN SWITCH (Fig. 19)
Lights out: The lights are out when the side of the knob marked "O" is facing the driver. Side and tail lights: Turn the knob one notch ("V"). Main beam: Turn the knob to the second notch ("R"). Dipped: In "Side and tail" or "Main beam" position, push the lever away from the steering wheel. Horn: Depress the end of the knob (2).Fig. 19
1 - Switch for hazard warning lamps
2 - Switch for headlamps, side and tail lamps and horn
SWITCH FOR HAZARD WARNING LAMPS (Fig. 19)
To operate: Press the switch (1) - the four winkers function. To stop: Press the switch again.
This warning device operates even when the ignition is switched off.
file:///Users/tonyjackson/Dropbox/citroen/2CV/2CVhandbook/signals_wiper_washer.html (1 of 2)31/03/2013 22:29

2 CV4 2CV6 Owner's Manual - LIGHTS, SIGNALS, WIPERS, WASHER
[Contents] [Notices] [Important Points] [Driving] [Maintenance] [Minor Repairs] [Miscellaneous Information]
file:///Users/tonyjackson/Dropbox/citroen/2CV/2CVhandbook/signals_wiper_washer.html (2 of 2)31/03/2013 22:29
2 CV4 2CV6 Owner's Manual - VENTILATION, HEATING, DE-MISTING
DRIVING
Air Conditioning
Ventilation, heating, de-misting
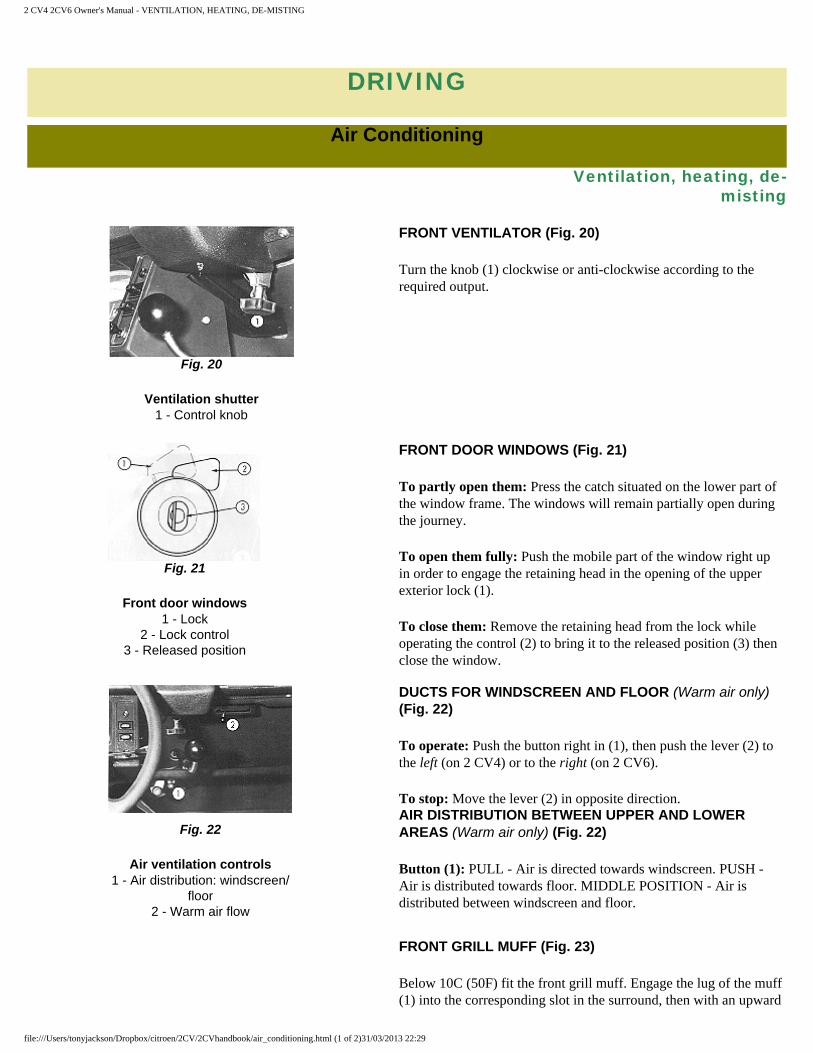
FRONT VENTILATOR (Fig. 20)
Turn the knob (1) clockwise or anti-clockwise according to the required output.
Fig. 20
Ventilation shutter 1 - Control knob
FRONT DOOR WINDOWS (Fig. 21)
To partly open them: Press the catch situated on the lower part of the window frame. The windows will remain partially open during the journey.
To open them fully: Push the mobile part of the window right up in order to engage the retaining head in the opening of the upper exterior lock (1).
To close them: Remove the retaining head from the lock while operating the control (2) to bring it to the released position (3) then close the window.
Fig. 21
Front door windows 1 - Lock
2 - Lock control 3 - Released position
DUCTS FOR WINDSCREEN AND FLOOR (Warm air only) (Fig. 22)
To operate: Push the button right in (1), then push the lever (2) to the left (on 2 CV4) or to the right (on 2 CV6).
To stop: Move the lever (2) in opposite direction. AIR DISTRIBUTION BETWEEN UPPER AND LOWER AREAS (Warm air only) (Fig. 22)
Button (1): PULL - Air is directed towards windscreen. PUSH - Air is distributed towards floor. MIDDLE POSITION - Air is distributed between windscreen and floor.
Fig. 22
Air ventilation controls 1 - Air distribution: windscreen/
floor 2 - Warm air flow
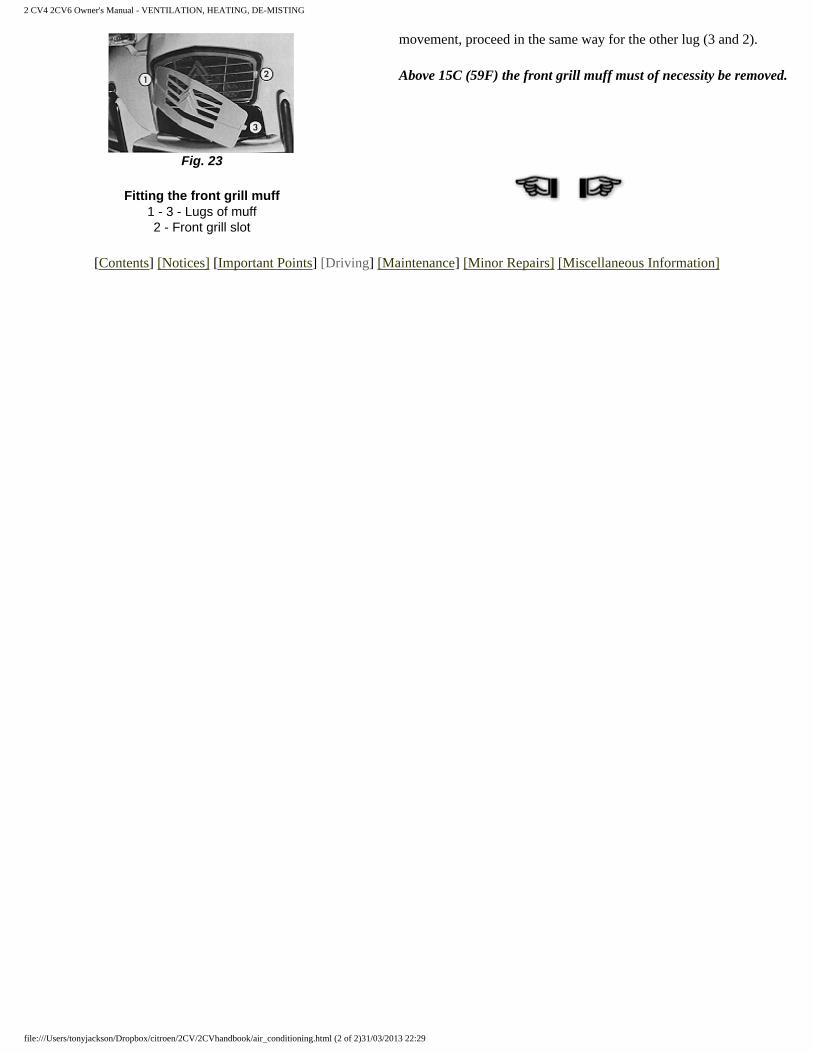
FRONT GRILL MUFF (Fig. 23)
Below 10C (50F) fit the front grill muff. Engage the lug of the muff (1) into the corresponding slot in the surround, then with an upward
file:///Users/tonyjackson/Dropbox/citroen/2CV/2CVhandbook/air_conditioning.html (1 of 2)31/03/2013 22:29
2 CV4 2CV6 Owner's Manual - VENTILATION, HEATING, DE-MISTING
movement, proceed in the same way for the other lug (3 and 2).
Above 15C (59F) the front grill muff must of necessity be removed.
Fig. 23
Fitting the front grill muff 1 - 3 - Lugs of muff 2 - Front grill slot
[Contents] [Notices] [Important Points] [Driving] [Maintenance] [Minor Repairs] [Miscellaneous Information]
file:///Users/tonyjackson/Dropbox/citroen/2CV/2CVhandbook/air_conditioning.html (2 of 2)31/03/2013 22:29
2 CV4 2CV6 Owner's Manual - FOLDING CANVAS HOOD
DRIVING
Comfort
Folding canvas hood
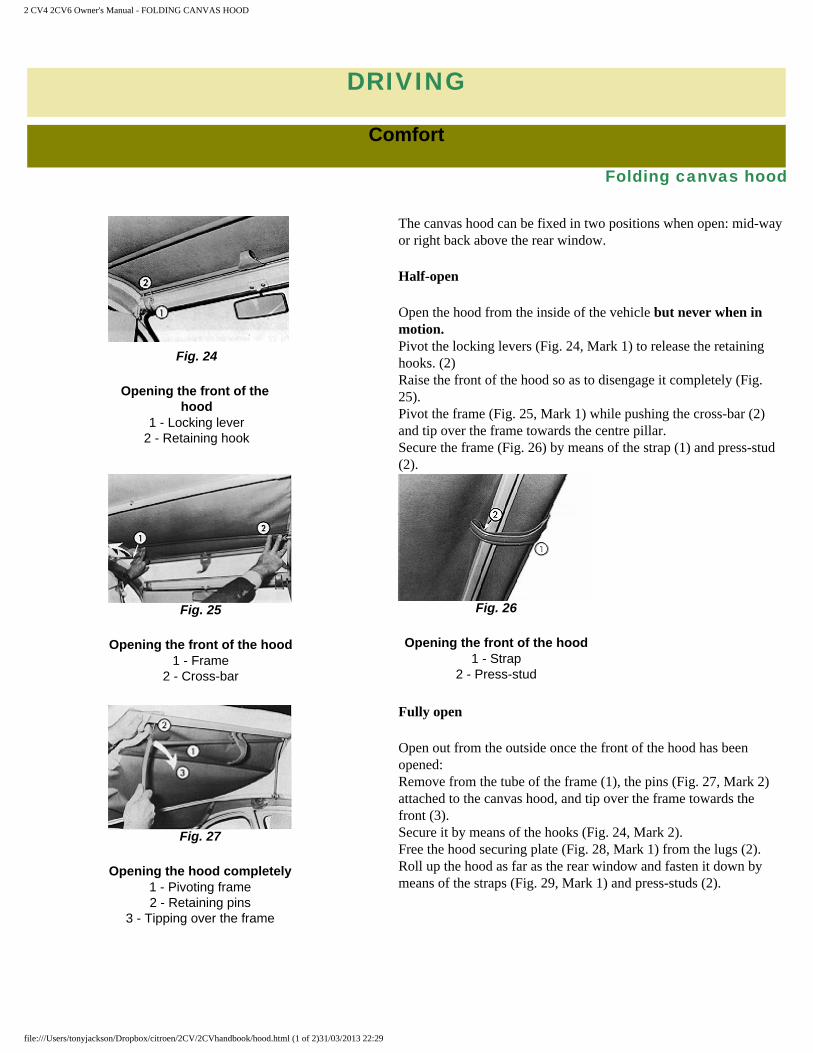
The canvas hood can be fixed in two positions when open: mid-way or right back above the rear window.
Half-open
Open the hood from the inside of the vehicle but never when in motion. Pivot the locking levers (Fig. 24, Mark 1) to release the retaining hooks. (2) Raise the front of the hood so as to disengage it completely (Fig. 25). Pivot the frame (Fig. 25, Mark 1) while pushing the cross-bar (2) and tip over the frame towards the centre pillar. Secure the frame (Fig. 26) by means of the strap (1) and press-stud (2).
Fig. 24
Opening the front of the hood
1 - Locking lever 2 - Retaining hook
Fig. 26
Opening the front of the hood 1 - Strap
2 - Press-stud
Fig. 25
Opening the front of the hood 1 - Frame
2 - Cross-bar
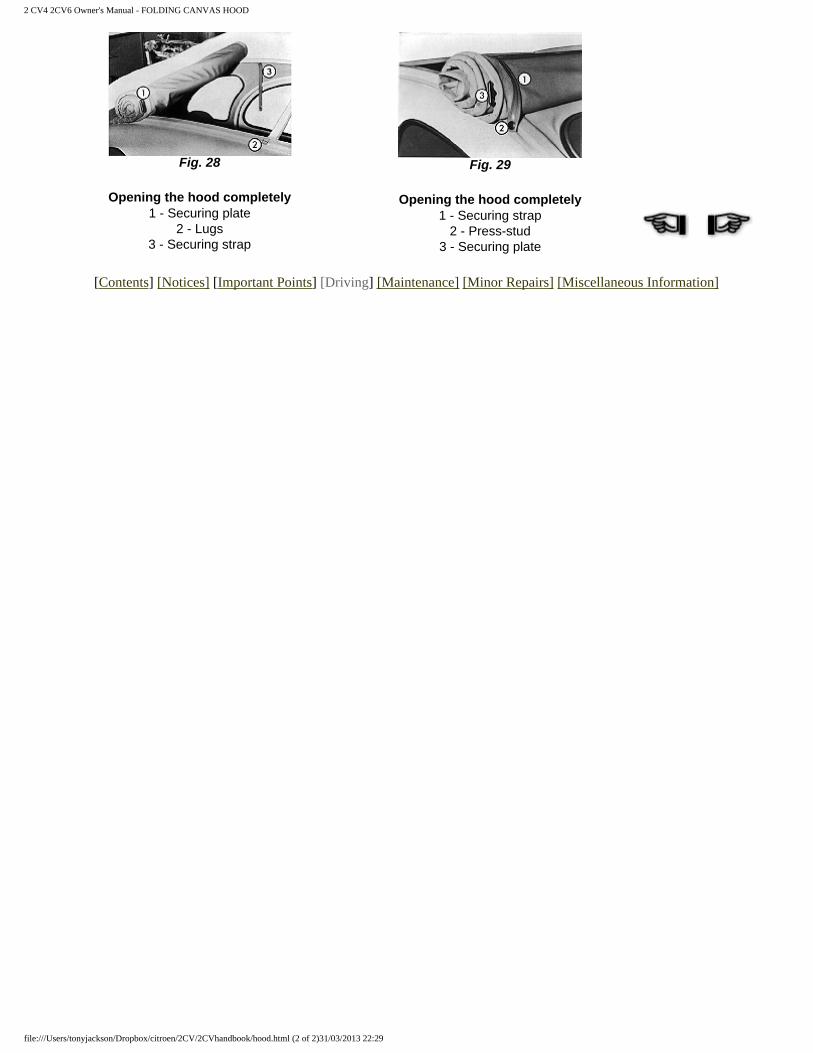
Fully open
Open out from the outside once the front of the hood has been opened: Remove from the tube of the frame (1), the pins (Fig. 27, Mark 2) attached to the canvas hood, and tip over the frame towards the front (3). Secure it by means of the hooks (Fig. 24, Mark 2). Free the hood securing plate (Fig. 28, Mark 1) from the lugs (2). Roll up the hood as far as the rear window and fasten it down by means of the straps (Fig. 29, Mark 1) and press-studs (2).
Fig. 27
Opening the hood completely 1 - Pivoting frame 2 - Retaining pins
3 - Tipping over the frame
file:///Users/tonyjackson/Dropbox/citroen/2CV/2CVhandbook/hood.html (1 of 2)31/03/2013 22:29
2 CV4 2CV6 Owner's Manual - FOLDING CANVAS HOOD
Fig. 28
Opening the hood completely 1 - Securing plate
2 - Lugs 3 - Securing strap
Fig. 29
Opening the hood completely 1 - Securing strap
2 - Press-stud 3 - Securing plate
[Contents] [Notices] [Important Points] [Driving] [Maintenance] [Minor Repairs] [Miscellaneous Information]
file:///Users/tonyjackson/Dropbox/citroen/2CV/2CVhandbook/hood.html (2 of 2)31/03/2013 22:29
2 CV4 2CV6 Owner's Manual - ACCESSORIES
DRIVING
Comfort
Accessories
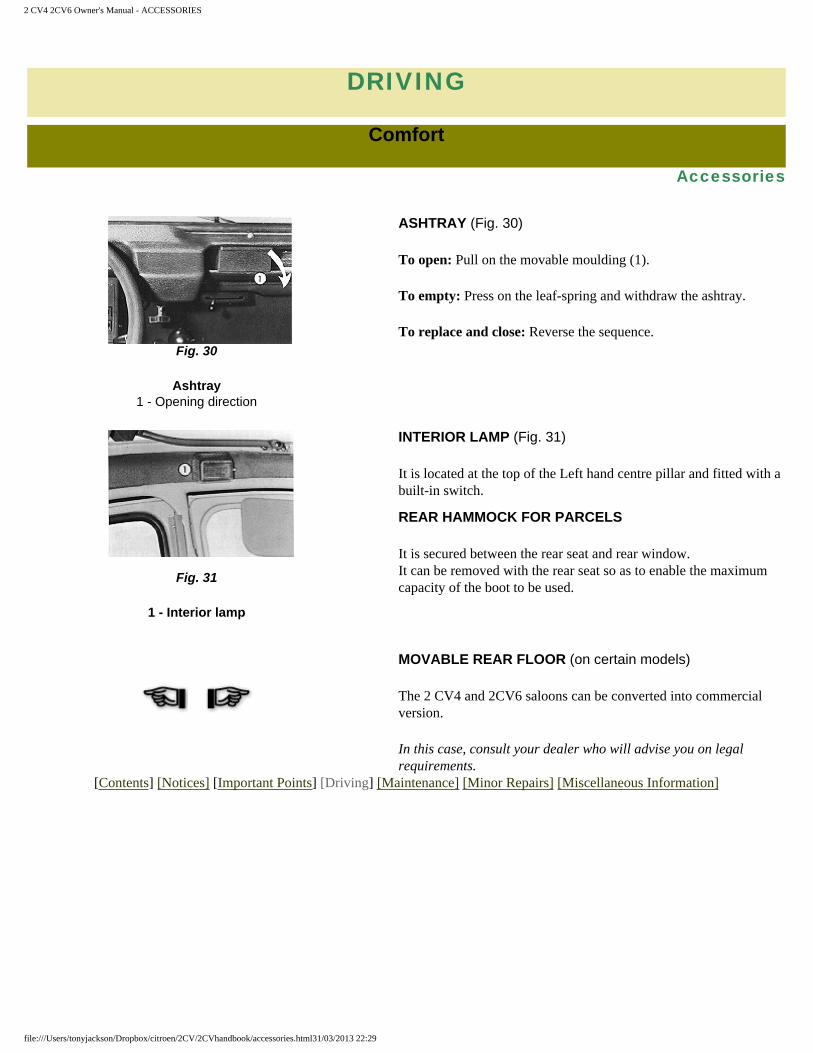
ASHTRAY (Fig. 30)
To open: Pull on the movable moulding (1).
To empty: Press on the leaf-spring and withdraw the ashtray.
To replace and close: Reverse the sequence.Fig. 30
Ashtray 1 - Opening direction
INTERIOR LAMP (Fig. 31)
It is located at the top of the Left hand centre pillar and fitted with a built-in switch.
REAR HAMMOCK FOR PARCELS
It is secured between the rear seat and rear window. It can be removed with the rear seat so as to enable the maximum capacity of the boot to be used.
MOVABLE REAR FLOOR (on certain models)
The 2 CV4 and 2CV6 saloons can be converted into commercial version.
In this case, consult your dealer who will advise you on legal requirements.
Fig. 31
1 - Interior lamp
[Contents] [Notices] [Important Points] [Driving] [Maintenance] [Minor Repairs] [Miscellaneous Information]
file:///Users/tonyjackson/Dropbox/citroen/2CV/2CVhandbook/accessories.html31/03/2013 22:29
2 CV4 2CV6 Owner's Manual - CHECKS & TOPPING UP
MAINTENANCE
Levels
Checks and Topping up
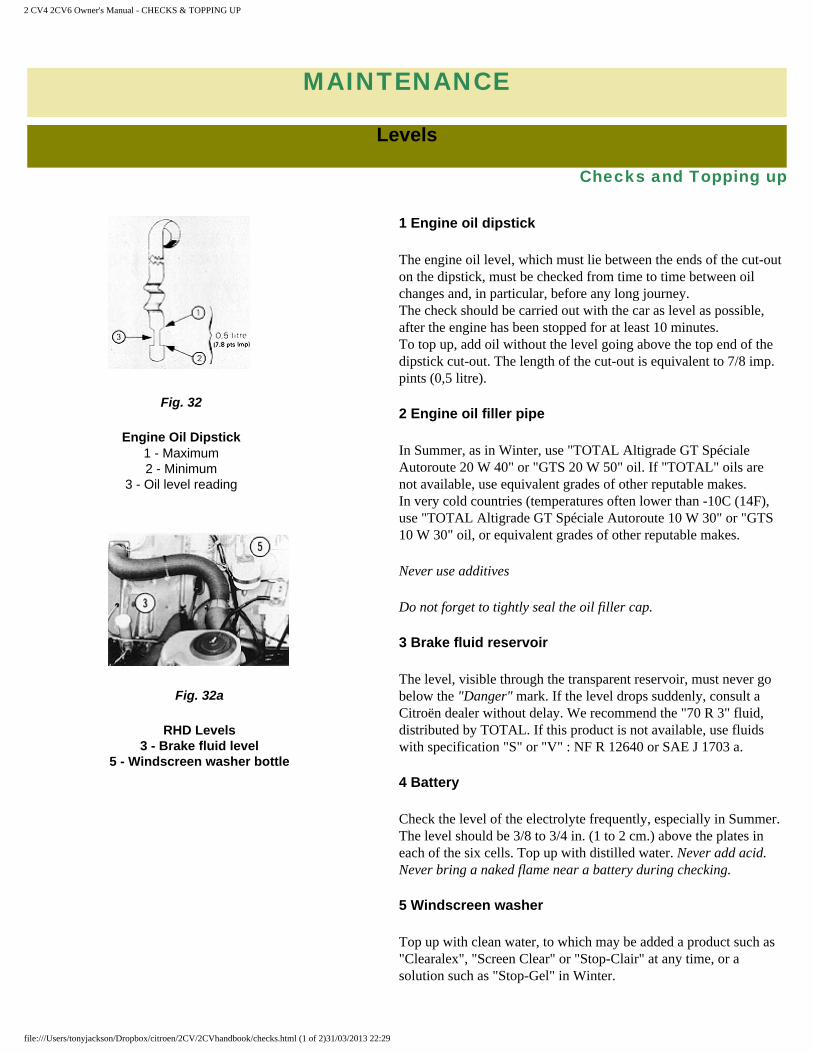
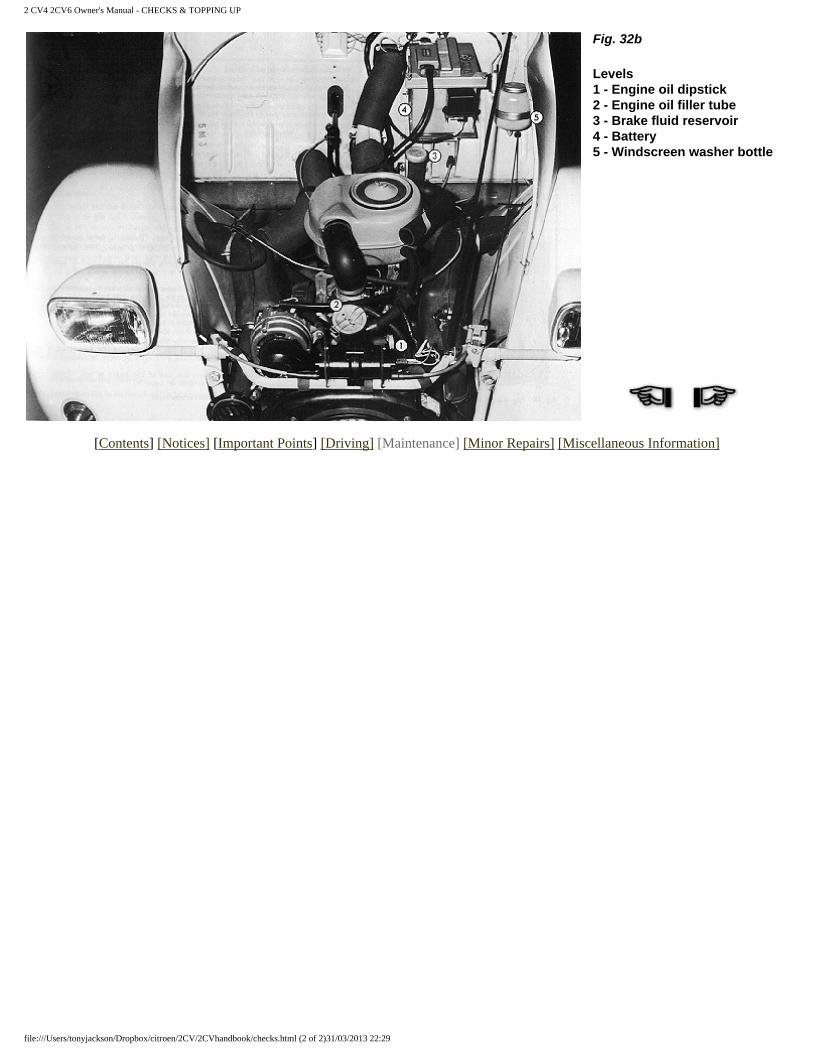
1 Engine oil dipstick
The engine oil level, which must lie between the ends of the cut-out on the dipstick, must be checked from time to time between oil changes and, in particular, before any long journey. The check should be carried out with the car as level as possible, after the engine has been stopped for at least 10 minutes. To top up, add oil without the level going above the top end of the dipstick cut-out. The length of the cut-out is equivalent to 7/8 imp. pints (0,5 litre).
2 Engine oil filler pipe
In Summer, as in Winter, use "TOTAL Altigrade GT Spéciale Autoroute 20 W 40" or "GTS 20 W 50" oil. If "TOTAL" oils are not available, use equivalent grades of other reputable makes. In very cold countries (temperatures often lower than -10C (14F), use "TOTAL Altigrade GT Spéciale Autoroute 10 W 30" or "GTS 10 W 30" oil, or equivalent grades of other reputable makes.
Never use additives
Do not forget to tightly seal the oil filler cap.
3 Brake fluid reservoir
The level, visible through the transparent reservoir, must never go below the "Danger" mark. If the level drops suddenly, consult a Citroën dealer without delay. We recommend the "70 R 3" fluid, distributed by TOTAL. If this product is not available, use fluids with specification "S" or "V" : NF R 12640 or SAE J 1703 a.
4 Battery
Check the level of the electrolyte frequently, especially in Summer. The level should be 3/8 to 3/4 in. (1 to 2 cm.) above the plates in each of the six cells. Top up with distilled water. Never add acid. Never bring a naked flame near a battery during checking.
5 Windscreen washer
Top up with clean water, to which may be added a product such as "Clearalex", "Screen Clear" or "Stop-Clair" at any time, or a solution such as "Stop-Gel" in Winter.
Fig. 32
Engine Oil Dipstick 1 - Maximum 2 - Minimum
3 - Oil level reading
Fig. 32a
RHD Levels 3 - Brake fluid level
5 - Windscreen washer bottle
file:///Users/tonyjackson/Dropbox/citroen/2CV/2CVhandbook/checks.html (1 of 2)31/03/2013 22:29
2 CV4 2CV6 Owner's Manual - CHECKS & TOPPING UP
Fig. 32b
Levels 1 - Engine oil dipstick 2 - Engine oil filler tube 3 - Brake fluid reservoir 4 - Battery 5 - Windscreen washer bottle
[Contents] [Notices] [Important Points] [Driving] [Maintenance] [Minor Repairs] [Miscellaneous Information]
file:///Users/tonyjackson/Dropbox/citroen/2CV/2CVhandbook/checks.html (2 of 2)31/03/2013 22:29
2 CV4 2CV6 Owner's Manual - MECHANICAL AND ELECTRICAL
MAINTENANCE
Maintenance
Mechanical and Electrical
Periodic Maintenance Operations
These are indicated in the "Maintenance Guide", which accompanied the car when first delivered. We would recommend you to adhere to the frequencies indicated and would remind you that we recommend "TOTAL" lubricants.
All mixtures and experiments are forbidden, and, in particular, the use of oil additives of any kind, as these may lead to serious trouble.
Never grease or lubricate the rubber mounted link situated under the bonnet, above the gear change lever. Never grease or lubricate the gear change lever.TYRES: "MICHELIN" (Do not use tyres other than those we recommend.)
Series fitted: 125-15 X Authorized series: 135-15 X, 125-15 X (M+S), 135-15 X (M+S), 135-15 ZX
Pressures: 20 psi (1,4 bar) at front, 26 psi (1,8 bar) at rear, 29 psi (2 bars) on spare wheel.
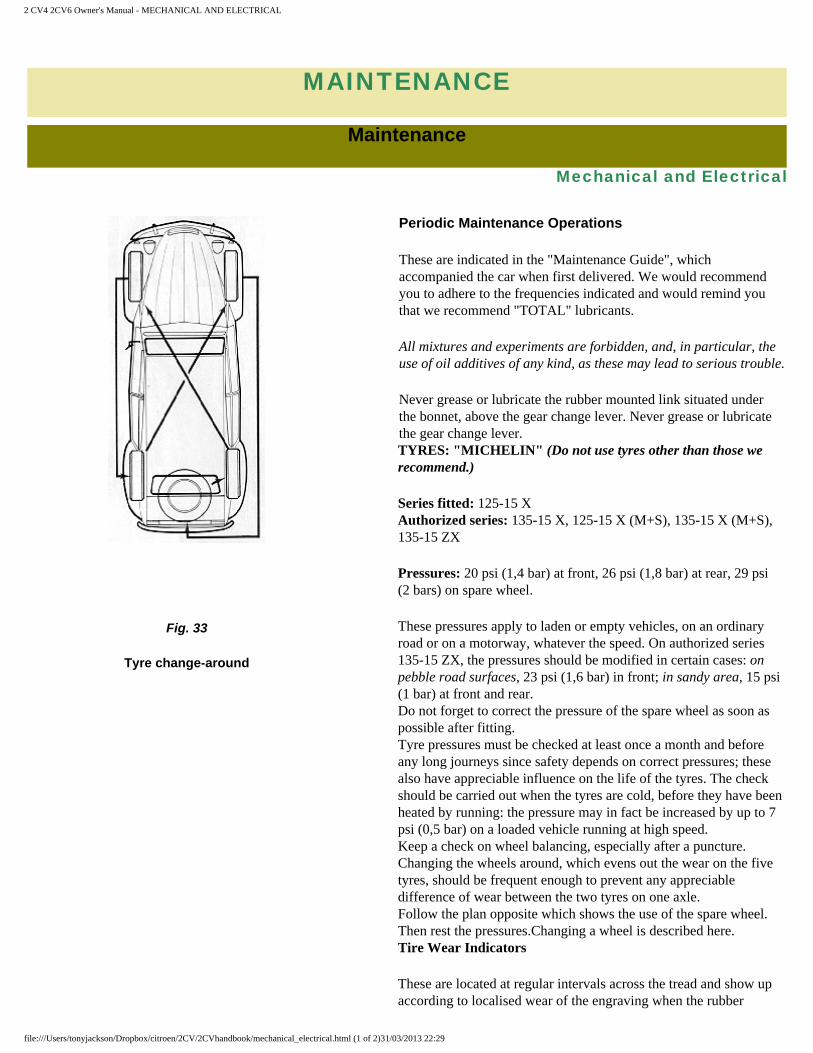
These pressures apply to laden or empty vehicles, on an ordinary road or on a motorway, whatever the speed. On authorized series 135-15 ZX, the pressures should be modified in certain cases: on pebble road surfaces, 23 psi (1,6 bar) in front; in sandy area, 15 psi (1 bar) at front and rear. Do not forget to correct the pressure of the spare wheel as soon as possible after fitting. Tyre pressures must be checked at least once a month and before any long journeys since safety depends on correct pressures; these also have appreciable influence on the life of the tyres. The check should be carried out when the tyres are cold, before they have been heated by running: the pressure may in fact be increased by up to 7 psi (0,5 bar) on a loaded vehicle running at high speed. Keep a check on wheel balancing, especially after a puncture. Changing the wheels around, which evens out the wear on the five tyres, should be frequent enough to prevent any appreciable difference of wear between the two tyres on one axle. Follow the plan opposite which shows the use of the spare wheel. Then rest the pressures.Changing a wheel is described here.
Fig. 33
Tyre change-around
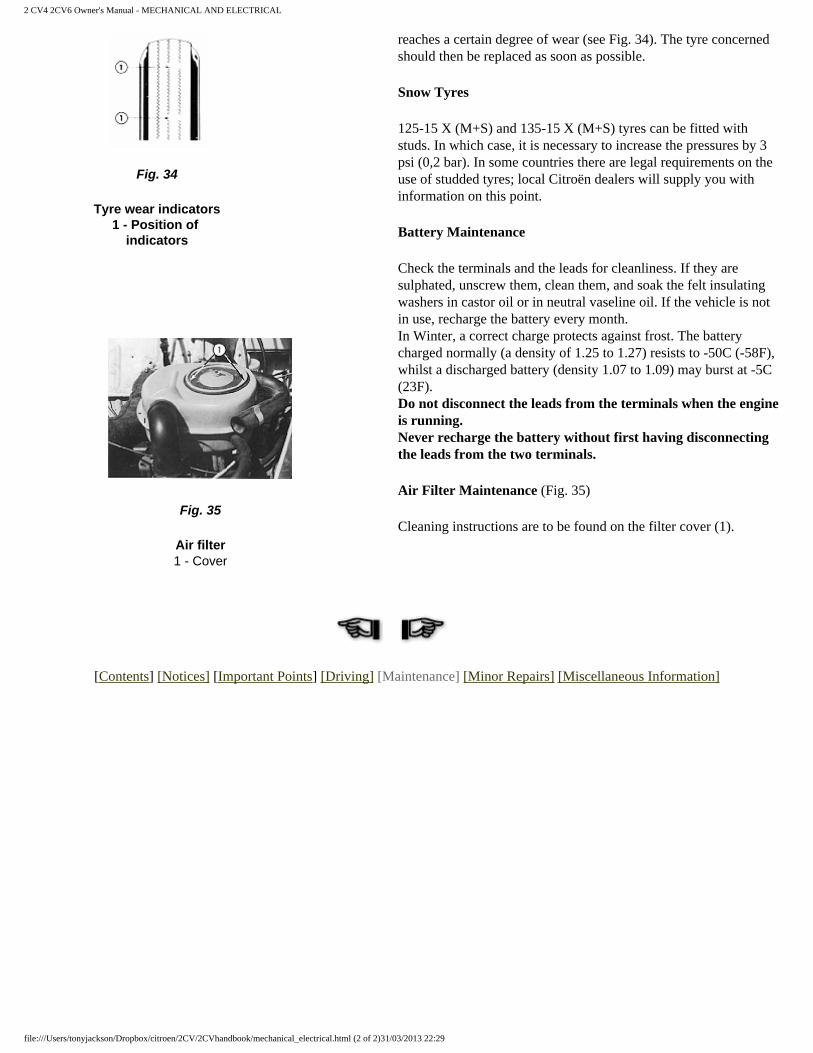
Tire Wear Indicators
These are located at regular intervals across the tread and show up according to localised wear of the engraving when the rubber
file:///Users/tonyjackson/Dropbox/citroen/2CV/2CVhandbook/mechanical_electrical.html (1 of 2)31/03/2013 22:29
2 CV4 2CV6 Owner's Manual - MECHANICAL AND ELECTRICAL
reaches a certain degree of wear (see Fig. 34). The tyre concerned should then be replaced as soon as possible.
Snow Tyres
125-15 X (M+S) and 135-15 X (M+S) tyres can be fitted with studs. In which case, it is necessary to increase the pressures by 3 psi (0,2 bar). In some countries there are legal requirements on the use of studded tyres; local Citroën dealers will supply you with information on this point.
Battery Maintenance
Check the terminals and the leads for cleanliness. If they are sulphated, unscrew them, clean them, and soak the felt insulating washers in castor oil or in neutral vaseline oil. If the vehicle is not in use, recharge the battery every month. In Winter, a correct charge protects against frost. The battery charged normally (a density of 1.25 to 1.27) resists to -50C (-58F), whilst a discharged battery (density 1.07 to 1.09) may burst at -5C (23F). Do not disconnect the leads from the terminals when the engine is running. Never recharge the battery without first having disconnecting the leads from the two terminals.
Air Filter Maintenance (Fig. 35)
Cleaning instructions are to be found on the filter cover (1).
Fig. 34
Tyre wear indicators 1 - Position of
indicators
Fig. 35
Air filter 1 - Cover
[Contents] [Notices] [Important Points] [Driving] [Maintenance] [Minor Repairs] [Miscellaneous Information]
file:///Users/tonyjackson/Dropbox/citroen/2CV/2CVhandbook/mechanical_electrical.html (2 of 2)31/03/2013 22:29
2 CV4 2CV6 Owner's Manual - BODYWORK
MAINTENANCE
Maintenance
Bodywork
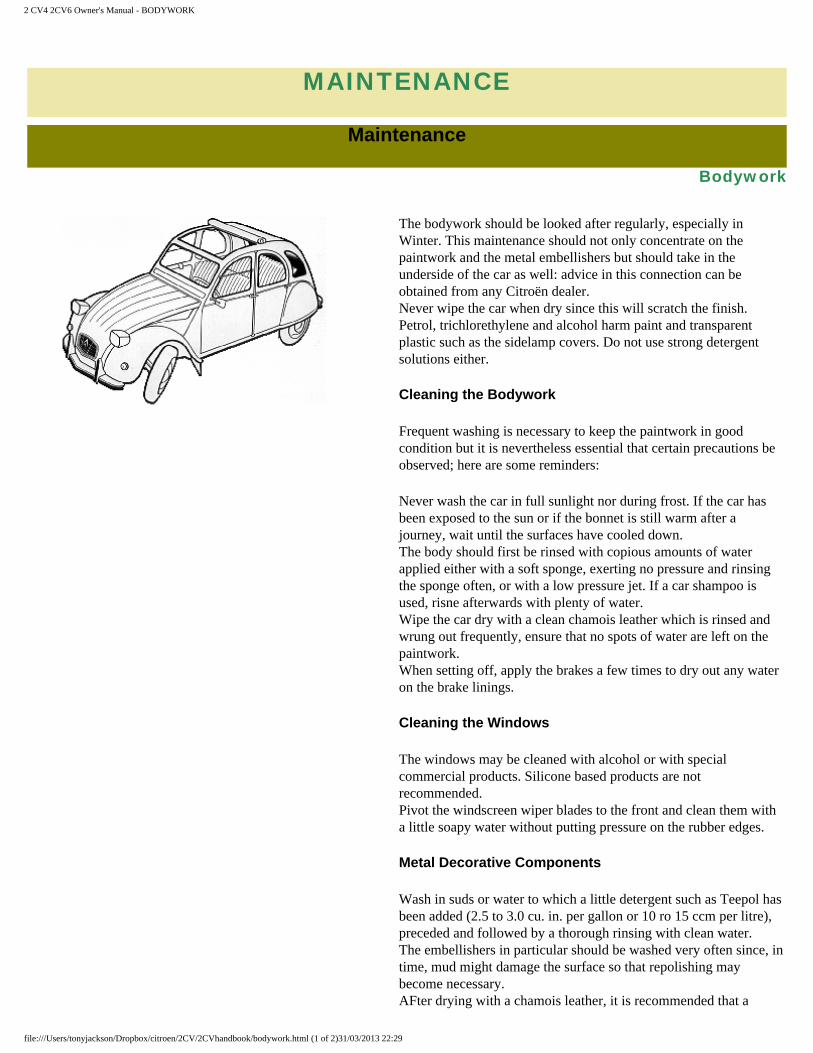
The bodywork should be looked after regularly, especially in Winter. This maintenance should not only concentrate on the paintwork and the metal embellishers but should take in the underside of the car as well: advice in this connection can be obtained from any Citroën dealer. Never wipe the car when dry since this will scratch the finish. Petrol, trichlorethylene and alcohol harm paint and transparent plastic such as the sidelamp covers. Do not use strong detergent solutions either.
Cleaning the Bodywork
Frequent washing is necessary to keep the paintwork in good condition but it is nevertheless essential that certain precautions be observed; here are some reminders:
Never wash the car in full sunlight nor during frost. If the car has been exposed to the sun or if the bonnet is still warm after a journey, wait until the surfaces have cooled down. The body should first be rinsed with copious amounts of water applied either with a soft sponge, exerting no pressure and rinsing the sponge often, or with a low pressure jet. If a car shampoo is used, risne afterwards with plenty of water. Wipe the car dry with a clean chamois leather which is rinsed and wrung out frequently, ensure that no spots of water are left on the paintwork. When setting off, apply the brakes a few times to dry out any water on the brake linings.
Cleaning the Windows
The windows may be cleaned with alcohol or with special commercial products. Silicone based products are not recommended. Pivot the windscreen wiper blades to the front and clean them with a little soapy water without putting pressure on the rubber edges.
Metal Decorative Components
Wash in suds or water to which a little detergent such as Teepol has been added (2.5 to 3.0 cu. in. per gallon or 10 ro 15 ccm per litre), preceded and followed by a thorough rinsing with clean water. The embellishers in particular should be washed very often since, in time, mud might damage the surface so that repolishing may become necessary. AFter drying with a chamois leather, it is recommended that a
file:///Users/tonyjackson/Dropbox/citroen/2CV/2CVhandbook/bodywork.html (1 of 2)31/03/2013 22:29
2 CV4 2CV6 Owner's Manual - BODYWORK
product like "ABEL PROTEGE CHROME", or other proprietary chrome-polishes, be applied as a protection for the polished metal finish.
Spots of Tar on the Bodywork
These should be removed as soon as possible. Do not scrape off and do not use petrol or a spot remover for cloth, but a special tar remover, such as "ABEL", or other proprietary tar removers.
Polishing the Paintwork
Polishing is not recommended for metallic paintwork, because of the risk of rings appearing. On the other hand, for non-metallic paintwork, it is recommended to carry out polishing at the end of Winter. For this, the body must be perfectly clean and dry. Use products that are only slightly abrasive, I.E. liquid polishes (e.g. "ABELISSME") and follow the manufacturer's instructions.
Slight Damage to the Paintwork
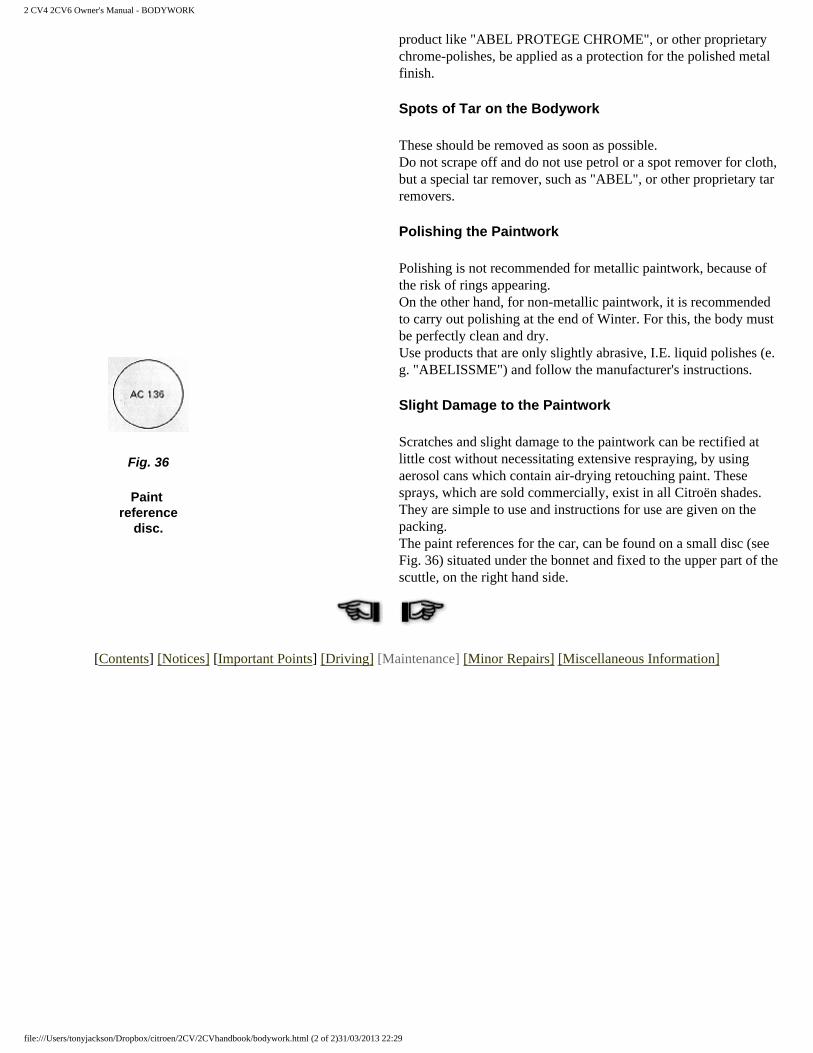
Scratches and slight damage to the paintwork can be rectified at little cost without necessitating extensive respraying, by using aerosol cans which contain air-drying retouching paint. These sprays, which are sold commercially, exist in all Citroën shades. They are simple to use and instructions for use are given on the packing. The paint references for the car, can be found on a small disc (see Fig. 36) situated under the bonnet and fixed to the upper part of the scuttle, on the right hand side.
Fig. 36
Paint reference
disc.
[Contents] [Notices] [Important Points] [Driving] [Maintenance] [Minor Repairs] [Miscellaneous Information]
file:///Users/tonyjackson/Dropbox/citroen/2CV/2CVhandbook/bodywork.html (2 of 2)31/03/2013 22:29
2 CV4 2CV6 Owner's Manual - INTERIOR
MAINTENANCE
Maintenance
Interior
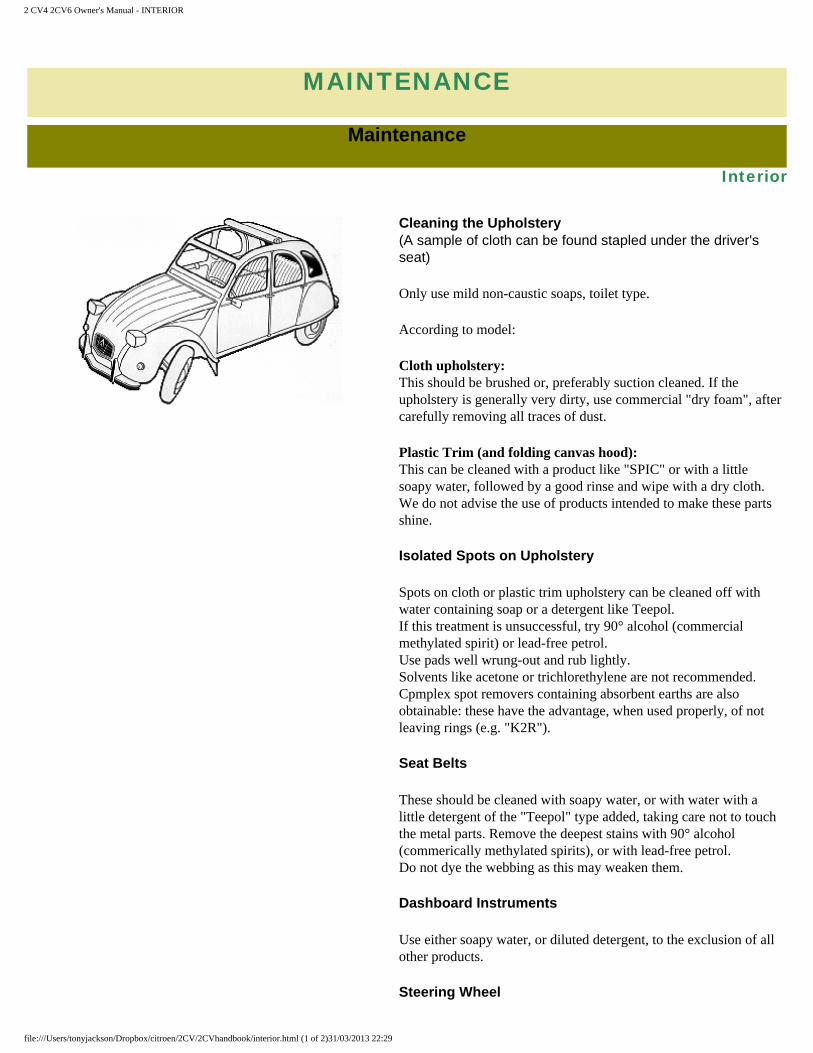
Cleaning the Upholstery (A sample of cloth can be found stapled under the driver's seat)
Only use mild non-caustic soaps, toilet type.
According to model:
Cloth upholstery: This should be brushed or, preferably suction cleaned. If the upholstery is generally very dirty, use commercial "dry foam", after carefully removing all traces of dust.
Plastic Trim (and folding canvas hood): This can be cleaned with a product like "SPIC" or with a little soapy water, followed by a good rinse and wipe with a dry cloth. We do not advise the use of products intended to make these parts shine.
Isolated Spots on Upholstery
Spots on cloth or plastic trim upholstery can be cleaned off with water containing soap or a detergent like Teepol. If this treatment is unsuccessful, try 90° alcohol (commercial methylated spirit) or lead-free petrol. Use pads well wrung-out and rub lightly. Solvents like acetone or trichlorethylene are not recommended. Cpmplex spot removers containing absorbent earths are also obtainable: these have the advantage, when used properly, of not leaving rings (e.g. "K2R").
Seat Belts
These should be cleaned with soapy water, or with water with a little detergent of the "Teepol" type added, taking care not to touch the metal parts. Remove the deepest stains with 90° alcohol (commerically methylated spirits), or with lead-free petrol. Do not dye the webbing as this may weaken them.
Dashboard Instruments
Use either soapy water, or diluted detergent, to the exclusion of all other products.
Steering Wheel
file:///Users/tonyjackson/Dropbox/citroen/2CV/2CVhandbook/interior.html (1 of 2)31/03/2013 22:29

2 CV4 2CV6 Owner's Manual - INTERIOR
Use soapy water or water with a detergent of the "Teepol" type added. In no circumstances, use solvents such as alcohol, lead-free petrol, or trichlorethylene.
[Contents] [Notices] [Important Points] [Driving] [Maintenance] [Minor Repairs] [Miscellaneous Information]
file:///Users/tonyjackson/Dropbox/citroen/2CV/2CVhandbook/interior.html (2 of 2)31/03/2013 22:29
2 CV4 2CV6 Owner's Manual - REPLACING A WHEEL
MINOR REPAIRS
Replacing a Wheel
TOOL KIT
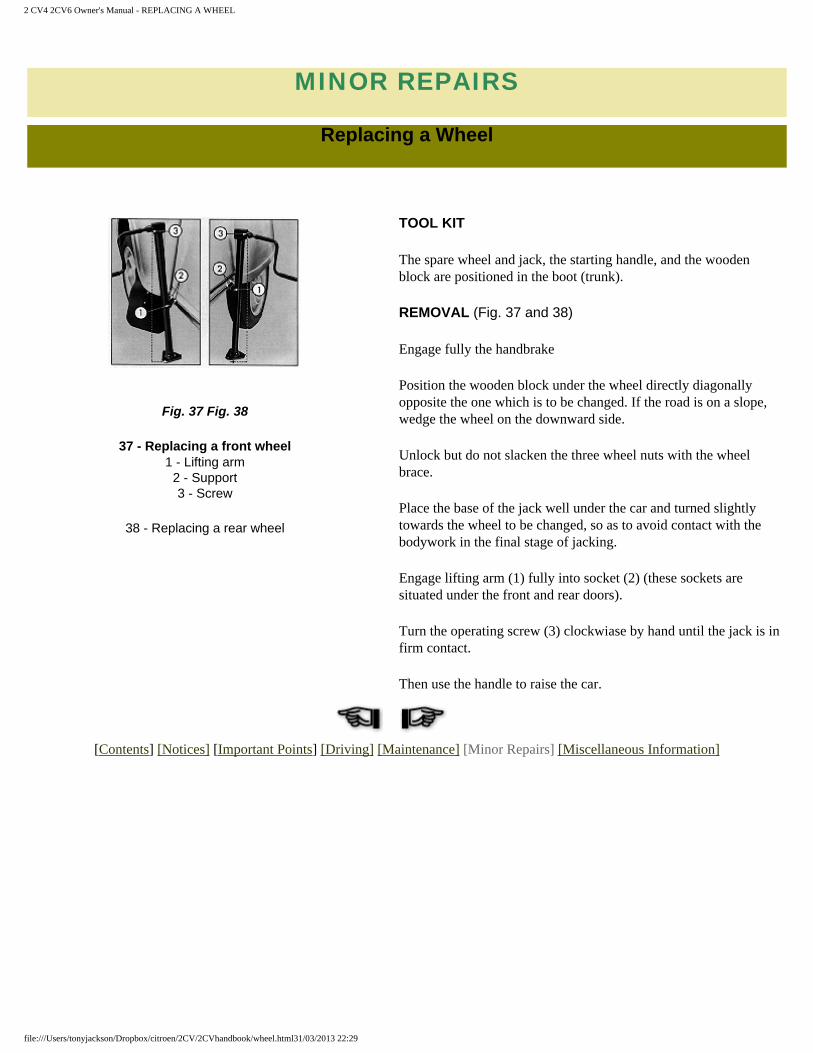
The spare wheel and jack, the starting handle, and the wooden block are positioned in the boot (trunk).
REMOVAL (Fig. 37 and 38)
Engage fully the handbrake
Position the wooden block under the wheel directly diagonally opposite the one which is to be changed. If the road is on a slope, wedge the wheel on the downward side.
Unlock but do not slacken the three wheel nuts with the wheel brace.
Place the base of the jack well under the car and turned slightly towards the wheel to be changed, so as to avoid contact with the bodywork in the final stage of jacking.
Engage lifting arm (1) fully into socket (2) (these sockets are situated under the front and rear doors).
Turn the operating screw (3) clockwiase by hand until the jack is in firm contact.
Then use the handle to raise the car.
Fig. 37 Fig. 38
37 - Replacing a front wheel 1 - Lifting arm
2 - Support 3 - Screw
38 - Replacing a rear wheel
[Contents] [Notices] [Important Points] [Driving] [Maintenance] [Minor Repairs] [Miscellaneous Information]
file:///Users/tonyjackson/Dropbox/citroen/2CV/2CVhandbook/wheel.html31/03/2013 22:29
2 CV4 2CV6 Owner's Manual - HEADLAMP ADJUSTMENT
MINOR REPAIRS
Headlamp Adjustment
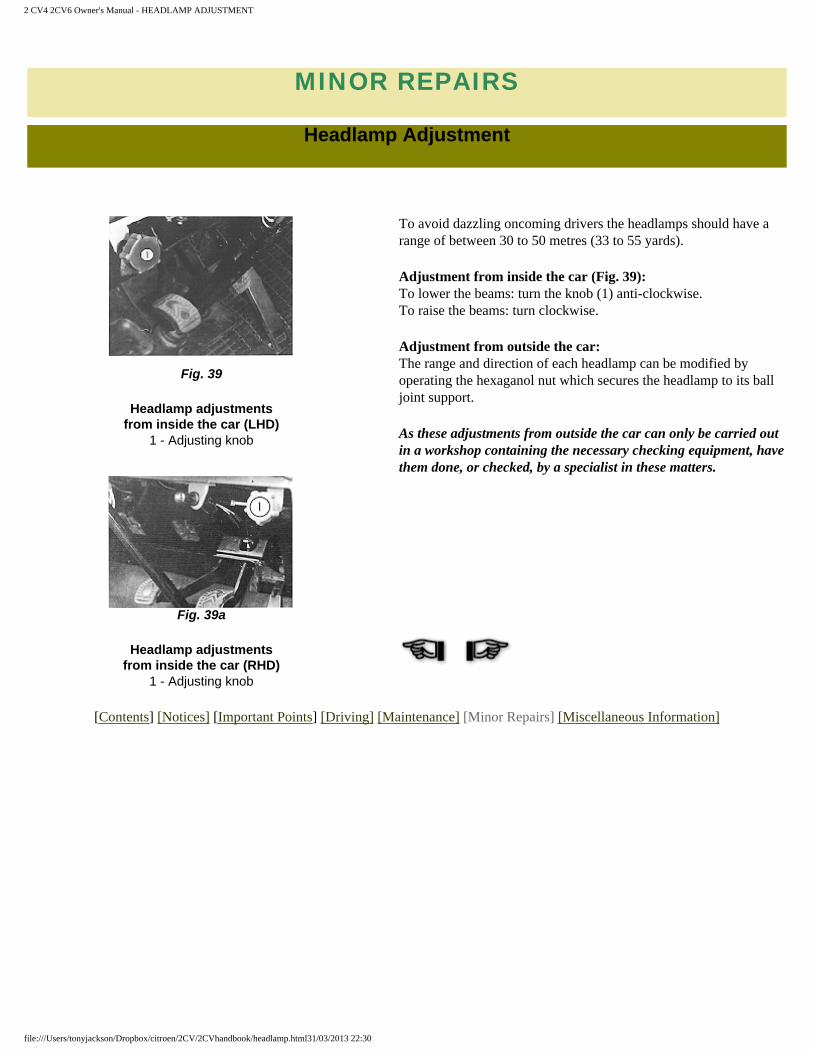
To avoid dazzling oncoming drivers the headlamps should have a range of between 30 to 50 metres (33 to 55 yards).
Adjustment from inside the car (Fig. 39): To lower the beams: turn the knob (1) anti-clockwise. To raise the beams: turn clockwise.
Adjustment from outside the car: The range and direction of each headlamp can be modified by operating the hexaganol nut which secures the headlamp to its ball joint support.
As these adjustments from outside the car can only be carried out in a workshop containing the necessary checking equipment, have them done, or checked, by a specialist in these matters.
Fig. 39
Headlamp adjustments from inside the car (LHD)
1 - Adjusting knob
Fig. 39a
Headlamp adjustments from inside the car (RHD)
1 - Adjusting knob
[Contents] [Notices] [Important Points] [Driving] [Maintenance] [Minor Repairs] [Miscellaneous Information]
file:///Users/tonyjackson/Dropbox/citroen/2CV/2CVhandbook/headlamp.html31/03/2013 22:30
2 CV4 2CV6 Owner's Manual - REPLACING A BULB
MINOR REPAIRS
Replacing a Bulb
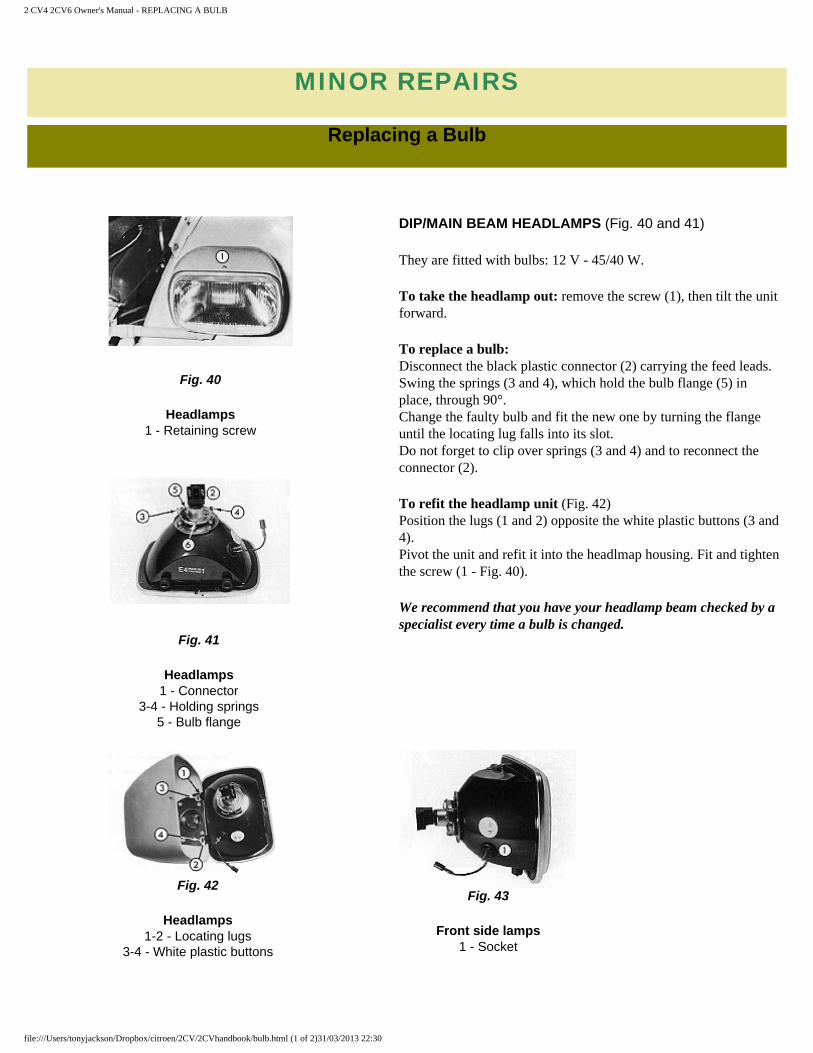
DIP/MAIN BEAM HEADLAMPS (Fig. 40 and 41)
They are fitted with bulbs: 12 V - 45/40 W.
To take the headlamp out: remove the screw (1), then tilt the unit forward.
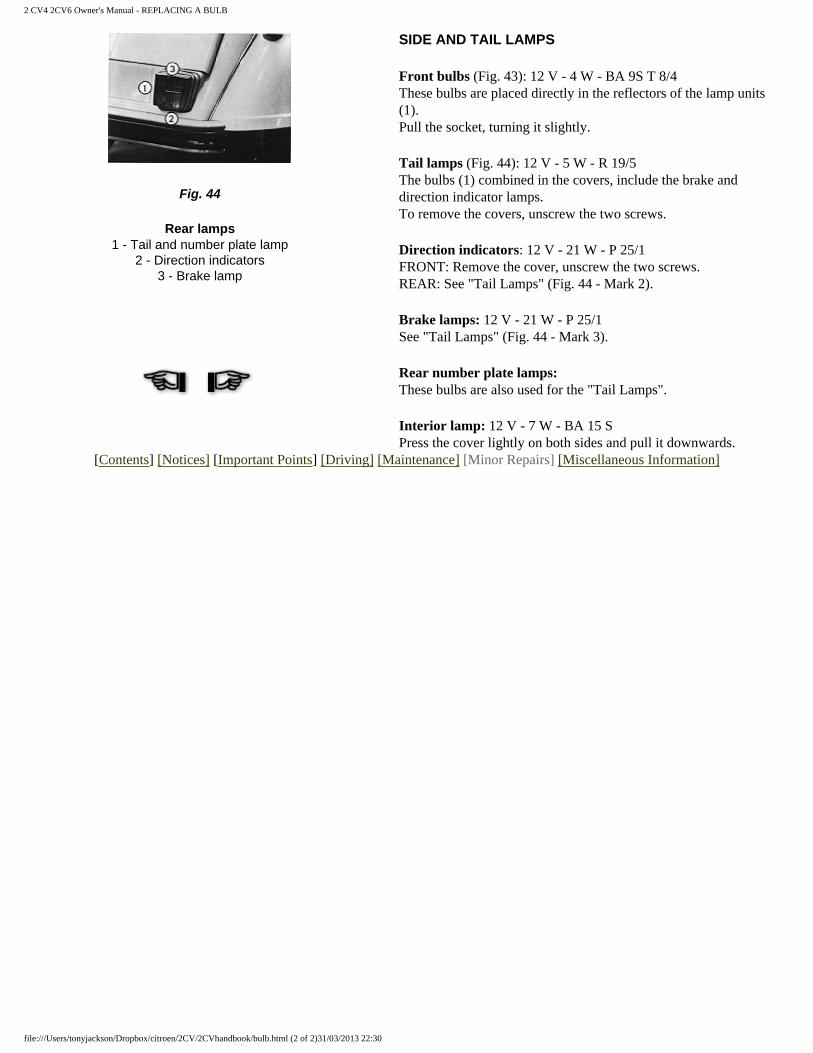
To replace a bulb: Disconnect the black plastic connector (2) carrying the feed leads. Swing the springs (3 and 4), which hold the bulb flange (5) in place, through 90°. Change the faulty bulb and fit the new one by turning the flange until the locating lug falls into its slot. Do not forget to clip over springs (3 and 4) and to reconnect the connector (2).
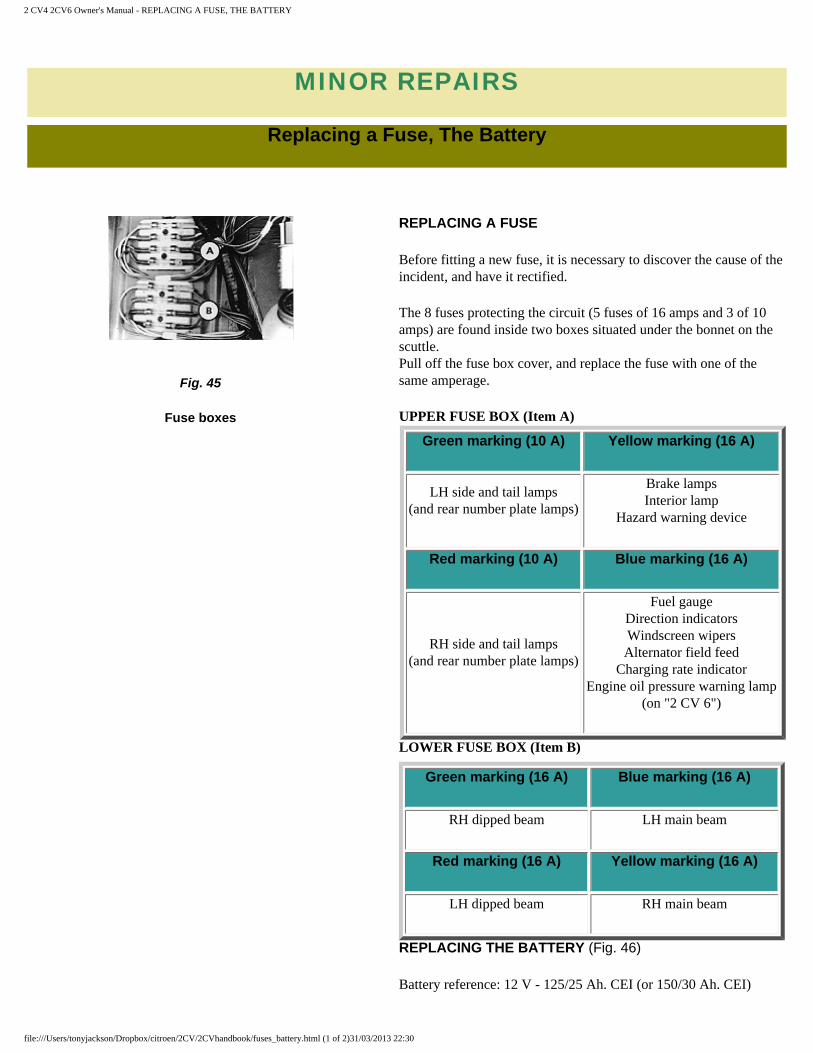
To refit the headlamp unit (Fig. 42) Position the lugs (1 and 2) opposite the white plastic buttons (3 and 4). Pivot the unit and refit it into the headlmap housing. Fit and tighten the screw (1 - Fig. 40).
We recommend that you have your headlamp beam checked by a specialist every time a bulb is changed.
Fig. 40
Headlamps 1 - Retaining screw
Fig. 41
Headlamps 1 - Connector
3-4 - Holding springs 5 - Bulb flange
Fig. 42
Headlamps 1-2 - Locating lugs
3-4 - White plastic buttons
Fig. 43
Front side lamps 1 - Socket
file:///Users/tonyjackson/Dropbox/citroen/2CV/2CVhandbook/bulb.html (1 of 2)31/03/2013 22:30
2 CV4 2CV6 Owner's Manual - REPLACING A BULB
SIDE AND TAIL LAMPS
Front bulbs (Fig. 43): 12 V - 4 W - BA 9S T 8/4 These bulbs are placed directly in the reflectors of the lamp units (1). Pull the socket, turning it slightly.
Tail lamps (Fig. 44): 12 V - 5 W - R 19/5 The bulbs (1) combined in the covers, include the brake and direction indicator lamps. To remove the covers, unscrew the two screws.
Direction indicators: 12 V - 21 W - P 25/1 FRONT: Remove the cover, unscrew the two screws. REAR: See "Tail Lamps" (Fig. 44 - Mark 2).
Brake lamps: 12 V - 21 W - P 25/1 See "Tail Lamps" (Fig. 44 - Mark 3).
Rear number plate lamps: These bulbs are also used for the "Tail Lamps".
Interior lamp: 12 V - 7 W - BA 15 S Press the cover lightly on both sides and pull it downwards.
Fig. 44
Rear lamps 1 - Tail and number plate lamp
2 - Direction indicators 3 - Brake lamp
[Contents] [Notices] [Important Points] [Driving] [Maintenance] [Minor Repairs] [Miscellaneous Information]
file:///Users/tonyjackson/Dropbox/citroen/2CV/2CVhandbook/bulb.html (2 of 2)31/03/2013 22:30
2 CV4 2CV6 Owner's Manual - REPLACING A FUSE, THE BATTERY
MINOR REPAIRS
Replacing a Fuse, The Battery
REPLACING A FUSE
Before fitting a new fuse, it is necessary to discover the cause of the incident, and have it rectified.
The 8 fuses protecting the circuit (5 fuses of 16 amps and 3 of 10 amps) are found inside two boxes situated under the bonnet on the scuttle. Pull off the fuse box cover, and replace the fuse with one of the same amperage.
UPPER FUSE BOX (Item A)
Fig. 45
Fuse boxes
Green marking (10 A) Yellow marking (16 A)
LH side and tail lamps (and rear number plate lamps)
Brake lamps Interior lamp
Hazard warning device
Red marking (10 A) Blue marking (16 A)
RH side and tail lamps (and rear number plate lamps)
Fuel gauge Direction indicators Windscreen wipers Alternator field feed
Charging rate indicator Engine oil pressure warning lamp
(on "2 CV 6")
LOWER FUSE BOX (Item B)
Green marking (16 A) Blue marking (16 A)
RH dipped beam LH main beam
Red marking (16 A) Yellow marking (16 A)
LH dipped beam RH main beam
REPLACING THE BATTERY (Fig. 46)
Battery reference: 12 V - 125/25 Ah. CEI (or 150/30 Ah. CEI)
file:///Users/tonyjackson/Dropbox/citroen/2CV/2CVhandbook/fuses_battery.html (1 of 2)31/03/2013 22:30

2 CV4 2CV6 Owner's Manual - REPLACING A FUSE, THE BATTERY
Disconnect the battery terminals, always beginning with the negative one. Unscrew the two tie-rods of the support frame then disengage the battery by sliding it towards the front of the vehicle. Check that the terminals are in the correct position before fitting the new battery.
Fig. 46
Battery 1 - Terminals 2 - Tie-rods
[Contents] [Notices] [Important Points] [Driving] [Maintenance] [Minor Repairs] [Miscellaneous Information]
file:///Users/tonyjackson/Dropbox/citroen/2CV/2CVhandbook/fuses_battery.html (2 of 2)31/03/2013 22:30
2 CV4 2CV6 Owner's Manual - REPLACING A SPARKING PLUG
MINOR REPAIRS
Replacing a sparking plug
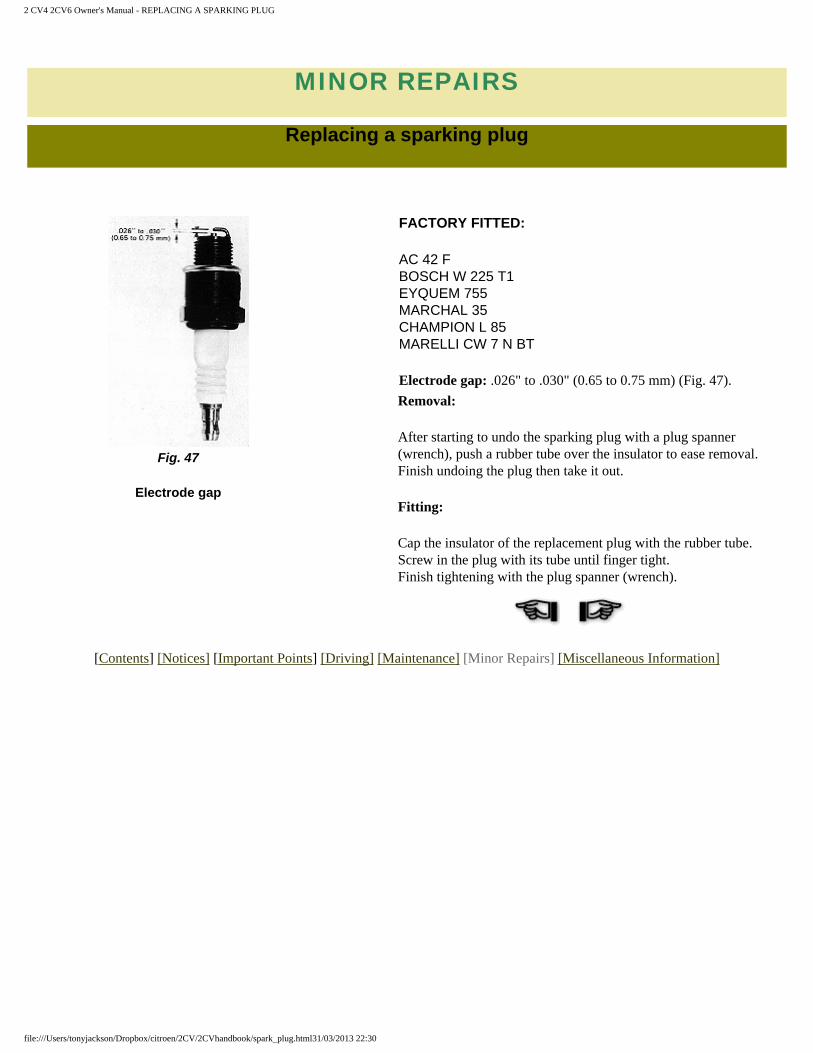
FACTORY FITTED:
AC 42 F BOSCH W 225 T1 EYQUEM 755 MARCHAL 35 CHAMPION L 85 MARELLI CW 7 N BT
Electrode gap: .026" to .030" (0.65 to 0.75 mm) (Fig. 47).
Removal:
After starting to undo the sparking plug with a plug spanner (wrench), push a rubber tube over the insulator to ease removal. Finish undoing the plug then take it out.
Fitting:
Cap the insulator of the replacement plug with the rubber tube. Screw in the plug with its tube until finger tight. Finish tightening with the plug spanner (wrench).
Fig. 47
Electrode gap
[Contents] [Notices] [Important Points] [Driving] [Maintenance] [Minor Repairs] [Miscellaneous Information]
file:///Users/tonyjackson/Dropbox/citroen/2CV/2CVhandbook/spark_plug.html31/03/2013 22:30
2 CV4 2CV6 Owner's Manual - STARTING USING THE STARTING HANDLE
MINOR REPAIRS
Starting using the starting handle
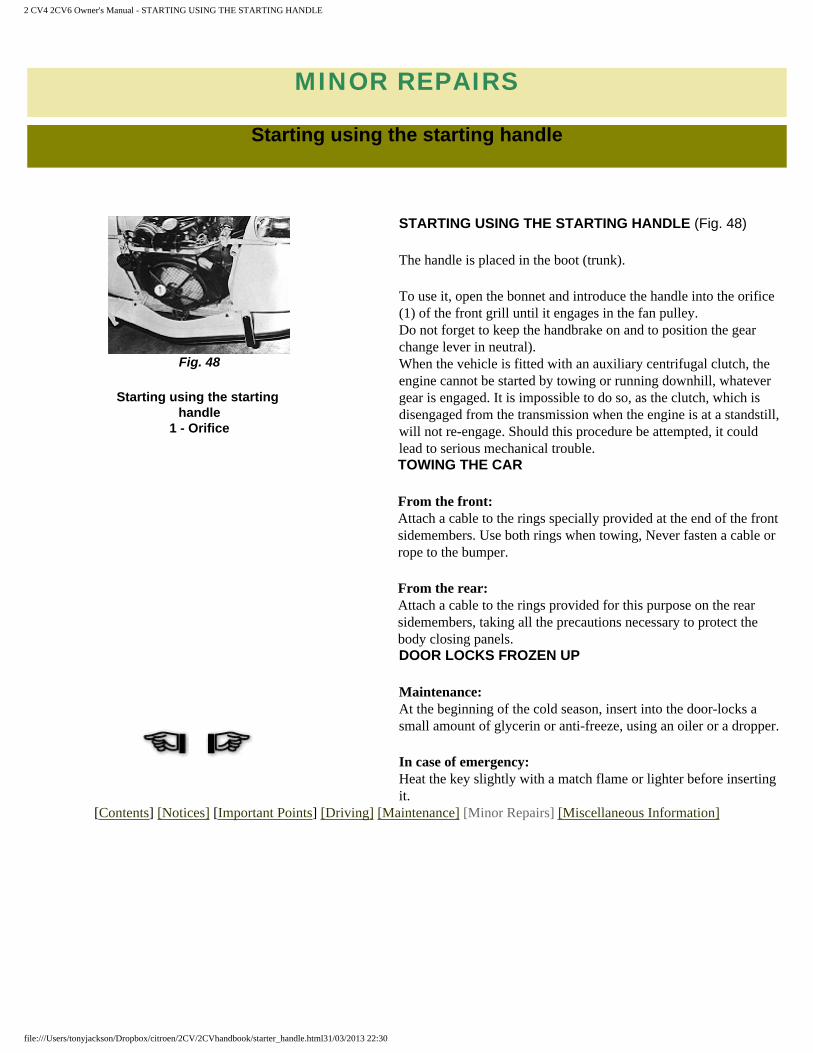
STARTING USING THE STARTING HANDLE (Fig. 48)
The handle is placed in the boot (trunk).
To use it, open the bonnet and introduce the handle into the orifice (1) of the front grill until it engages in the fan pulley. Do not forget to keep the handbrake on and to position the gear change lever in neutral). When the vehicle is fitted with an auxiliary centrifugal clutch, the engine cannot be started by towing or running downhill, whatever gear is engaged. It is impossible to do so, as the clutch, which is disengaged from the transmission when the engine is at a standstill, will not re-engage. Should this procedure be attempted, it could lead to serious mechanical trouble.
Fig. 48
Starting using the starting handle
1 - Orifice
TOWING THE CAR
From the front: Attach a cable to the rings specially provided at the end of the front sidemembers. Use both rings when towing, Never fasten a cable or rope to the bumper.
From the rear: Attach a cable to the rings provided for this purpose on the rear sidemembers, taking all the precautions necessary to protect the body closing panels.DOOR LOCKS FROZEN UP
Maintenance: At the beginning of the cold season, insert into the door-locks a small amount of glycerin or anti-freeze, using an oiler or a dropper.
In case of emergency: Heat the key slightly with a match flame or lighter before inserting it.
[Contents] [Notices] [Important Points] [Driving] [Maintenance] [Minor Repairs] [Miscellaneous Information]
file:///Users/tonyjackson/Dropbox/citroen/2CV/2CVhandbook/starter_handle.html31/03/2013 22:30
2 CV4 2CV6 Owner's Manual - RUNNING-IN, SERVICING...
MISCELLANEOUS INFORMATION
Running-in, servicing, guarantee, running costs, towing a trailer, vehicle identification, replacement parts
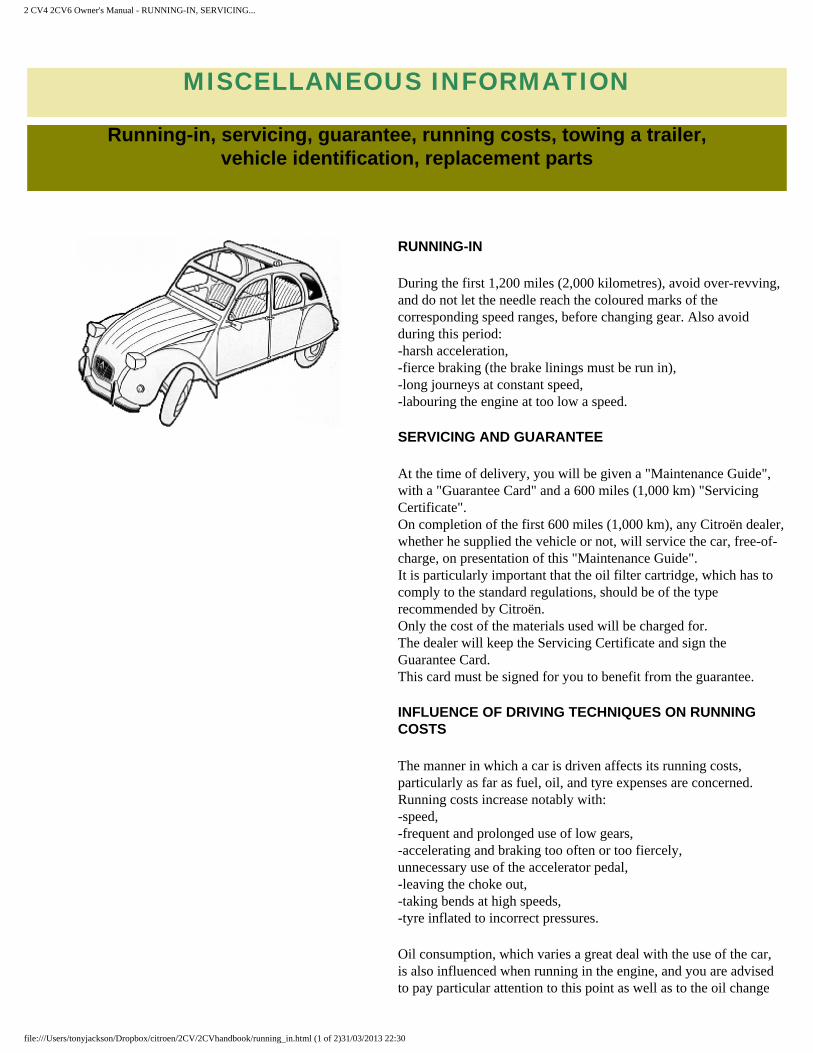
RUNNING-IN
During the first 1,200 miles (2,000 kilometres), avoid over-revving, and do not let the needle reach the coloured marks of the corresponding speed ranges, before changing gear. Also avoid during this period: -harsh acceleration, -fierce braking (the brake linings must be run in), -long journeys at constant speed, -labouring the engine at too low a speed.
SERVICING AND GUARANTEE
At the time of delivery, you will be given a "Maintenance Guide", with a "Guarantee Card" and a 600 miles (1,000 km) "Servicing Certificate". On completion of the first 600 miles (1,000 km), any Citroën dealer, whether he supplied the vehicle or not, will service the car, free-of-charge, on presentation of this "Maintenance Guide". It is particularly important that the oil filter cartridge, which has to comply to the standard regulations, should be of the type recommended by Citroën. Only the cost of the materials used will be charged for. The dealer will keep the Servicing Certificate and sign the Guarantee Card. This card must be signed for you to benefit from the guarantee.
INFLUENCE OF DRIVING TECHNIQUES ON RUNNING COSTS
The manner in which a car is driven affects its running costs, particularly as far as fuel, oil, and tyre expenses are concerned. Running costs increase notably with: -speed, -frequent and prolonged use of low gears, -accelerating and braking too often or too fiercely, unnecessary use of the accelerator pedal, -leaving the choke out, -taking bends at high speeds, -tyre inflated to incorrect pressures.
Oil consumption, which varies a great deal with the use of the car, is also influenced when running in the engine, and you are advised to pay particular attention to this point as well as to the oil change
file:///Users/tonyjackson/Dropbox/citroen/2CV/2CVhandbook/running_in.html (1 of 2)31/03/2013 22:30
2 CV4 2CV6 Owner's Manual - RUNNING-IN, SERVICING...
section in the Maintenance Guide.
TOWING A TRAILER
If you intend to tow a caravan or trailer, consult your Citroën dealer first, who will give you all the necessary advice, especially in so far as the legal requirements are concerned. The maximum towing weights are, in France: - Trailer without brake: 270 kg (595 lbs) - Trailer with overrun brake: 400 kg (881 lbs)
IDENTIFICATION
Positions
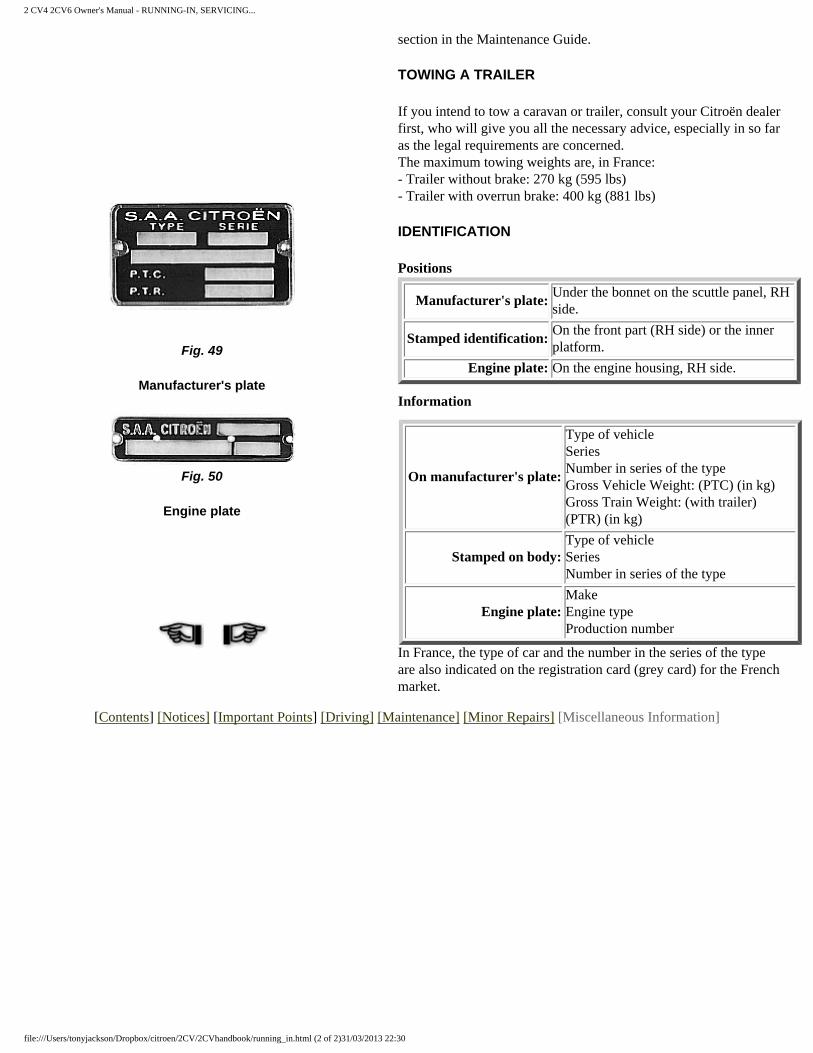
Manufacturer's plate:Under the bonnet on the scuttle panel, RH side.
Stamped identification:On the front part (RH side) or the inner platform.
Engine plate: On the engine housing, RH side.Fig. 49
Manufacturer's plateInformation
On manufacturer's plate:
Type of vehicle Series Number in series of the type Gross Vehicle Weight: (PTC) (in kg) Gross Train Weight: (with trailer) (PTR) (in kg)
Stamped on body:Type of vehicle Series Number in series of the type
Engine plate:Make Engine type Production number
Fig. 50
Engine plate
In France, the type of car and the number in the series of the type are also indicated on the registration card (grey card) for the French market.
[Contents] [Notices] [Important Points] [Driving] [Maintenance] [Minor Repairs] [Miscellaneous Information]
file:///Users/tonyjackson/Dropbox/citroen/2CV/2CVhandbook/running_in.html (2 of 2)31/03/2013 22:30
2 CV4 2CV6 Owner's Manual - TRAVELLING ABROAD
TRAVELLING ABROAD
For English, click HERE
MERKBLATT FUR PFLEGE - UND WARTUNGS-DIENST MÉMENTO POUR LA STATION-SERVICE
Reifen:MICHELIN 125-15 X Druck = 1,4 vorn, 1,8 hinten, 2 Ersatzrad
Kraftstoff:Super Fassungsvermögen = 20 L
Motoröl:
ÖI TOTAL Altigrade GT 20 W 40 oder GTS 20 W 50 In sehr kalten Ländern: ÖI TOTAL Altigrade GT oder GTS 10 W 30 Fassungsvermögen des Motors: "2 CV 4" = 2,2 L. "2 CV 6" = 2,3 L
Bremsflüssigkeit:"TOTAL 70 R 3" Fassungsvermögen: 0,5 L
Scheibenwascher:
Wasser, dem man: - zu jeder Jahreszeit ein Produkt wie z.B. "Stop-Clair" -im Winter ein Produkt wie z.B. "Stop-Gel" zusetzen kann
Batterie:12 V 125/25 Ah. Destilliertes Wasser (keine Saüre) zufüllen
Zünkerzen:
AC 42 F - Bosch W 255 T1 - Champion L 85 - Eyquem 755 - Marchal 35 - Marelli CW 7 N BT Elektrodenabstand = 0,65-0,75 mm
Glühbirnen: Siehe Tabelle.
Pneumatiques:
MICHELIN 125-15 X Pression = 1,4 bar à l'avant, 1,8 bar à l'arrière 2 bars à la roue de secours Autre montes: voir ici.
Carburant:Capacité du réservoir = 20 litres (Super)
Huile moteur:
Huile TOTAL GT 20 W 40 ou GTS 20 W 50 Dans pays très froids: TOTAL GT 10 W 30 ou GTS 10 W 30 Capacité carter moteur: Sur "2 CV 4" = 2,2 litres Sur "2 CV 6" = 2,3 litres (après échange cartouche filtre à huile: 2,4 litres)
Huile hoite de vitesses:Huile TOTAL Extrême pression SAE 80 Capacité: 0,9 litre
Graissage général: TOTAL Multis
Freinage hydraulique:"TOTAL 70 R 3" Capacité: 0,5 litres
Lave-glace:
Eau à laquelle il peut être ajouté: -en toute saison: un produit genre "Stop-Clair" -en hiver: un produit genre "Stop-Gel"
Batterie12 V 125/25 Ah. Eau distillée (ne pas ajouter d'acide)
Bougies:
AC 42 F - Bosch W 255 T1 - Champion L 85 - Eyquem 755 - Marchal 35 - Marelli CW 7 N BT Écartement des électrodes: = 0,65 à 0,75 mm
Lampes: Voir tableau.
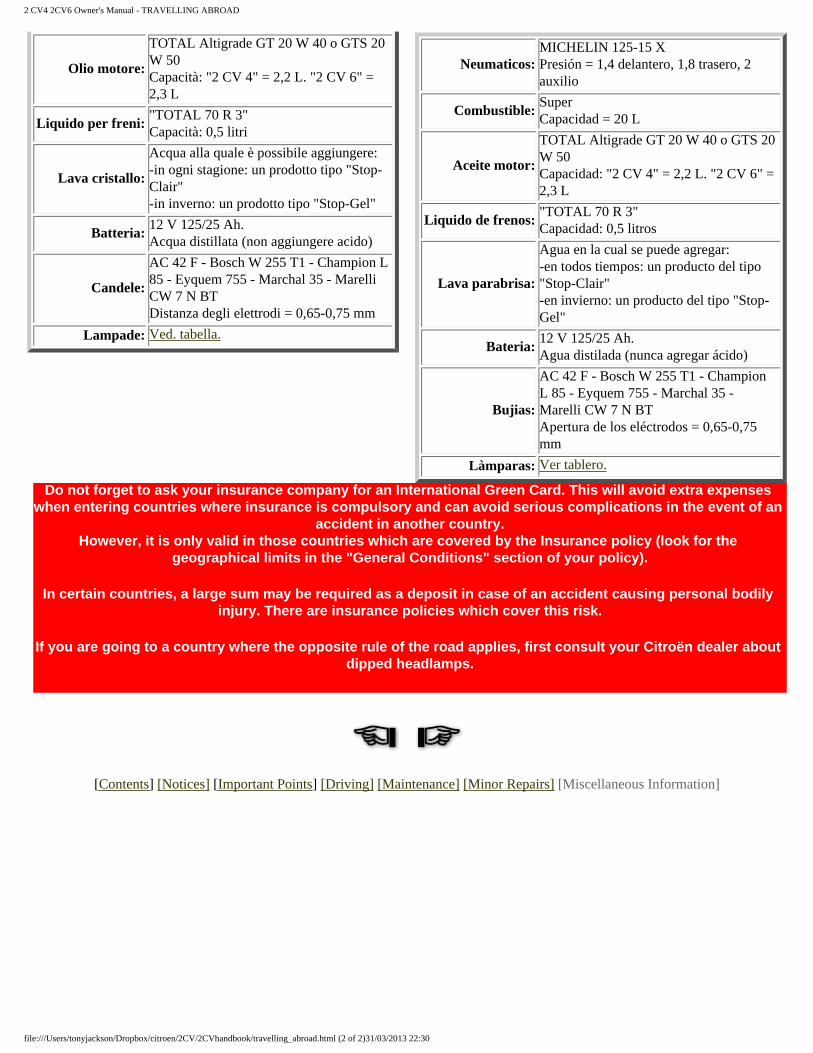
PROMEMORIA PER LA STAZIONE DI SERVIZIO MEMENTO PARA LA ESTACION SERVICIO
Pneumatici:MICHELIN 125-15 X Pressioni = 1,4 anteriori, 1,8 posteriori, 2 scorta
Carburante:Super Capacità = 20 L
file:///Users/tonyjackson/Dropbox/citroen/2CV/2CVhandbook/travelling_abroad.html (1 of 2)31/03/2013 22:30
2 CV4 2CV6 Owner's Manual - TRAVELLING ABROAD
Olio motore:
TOTAL Altigrade GT 20 W 40 o GTS 20 W 50 Capacità: "2 CV 4" = 2,2 L. "2 CV 6" = 2,3 L
Liquido per freni:"TOTAL 70 R 3" Capacità: 0,5 litri
Lava cristallo:
Acqua alla quale è possibile aggiungere: -in ogni stagione: un prodotto tipo "Stop-Clair" -in inverno: un prodotto tipo "Stop-Gel"
Batteria:12 V 125/25 Ah. Acqua distillata (non aggiungere acido)
Candele:
AC 42 F - Bosch W 255 T1 - Champion L 85 - Eyquem 755 - Marchal 35 - Marelli CW 7 N BT Distanza degli elettrodi = 0,65-0,75 mm
Lampade: Ved. tabella.
Neumaticos:MICHELIN 125-15 X Presión = 1,4 delantero, 1,8 trasero, 2 auxilio
Combustible:Super Capacidad = 20 L
Aceite motor:
TOTAL Altigrade GT 20 W 40 o GTS 20 W 50 Capacidad: "2 CV 4" = 2,2 L. "2 CV 6" = 2,3 L
Liquido de frenos:"TOTAL 70 R 3" Capacidad: 0,5 litros
Lava parabrisa:
Agua en la cual se puede agregar: -en todos tiempos: un producto del tipo "Stop-Clair" -en invierno: un producto del tipo "Stop-Gel"
Bateria:12 V 125/25 Ah. Agua distilada (nunca agregar ácido)
Bujias:
AC 42 F - Bosch W 255 T1 - Champion L 85 - Eyquem 755 - Marchal 35 - Marelli CW 7 N BT Apertura de los eléctrodos = 0,65-0,75 mm
Làmparas: Ver tablero.
Do not forget to ask your insurance company for an International Green Card. This will avoid extra expenses when entering countries where insurance is compulsory and can avoid serious complications in the event of an
accident in another country. However, it is only valid in those countries which are covered by the Insurance policy (look for the
geographical limits in the "General Conditions" section of your policy).
In certain countries, a large sum may be required as a deposit in case of an accident causing personal bodily injury. There are insurance policies which cover this risk.
If you are going to a country where the opposite rule of the road applies, first consult your Citroën dealer about dipped headlamps.
[Contents] [Notices] [Important Points] [Driving] [Maintenance] [Minor Repairs] [Miscellaneous Information]
file:///Users/tonyjackson/Dropbox/citroen/2CV/2CVhandbook/travelling_abroad.html (2 of 2)31/03/2013 22:30
2 CV4 2CV6 Owner's Manual - TECHNICAL SPECIFICATIONS
TECHNICAL SPECIFICATIONS
General
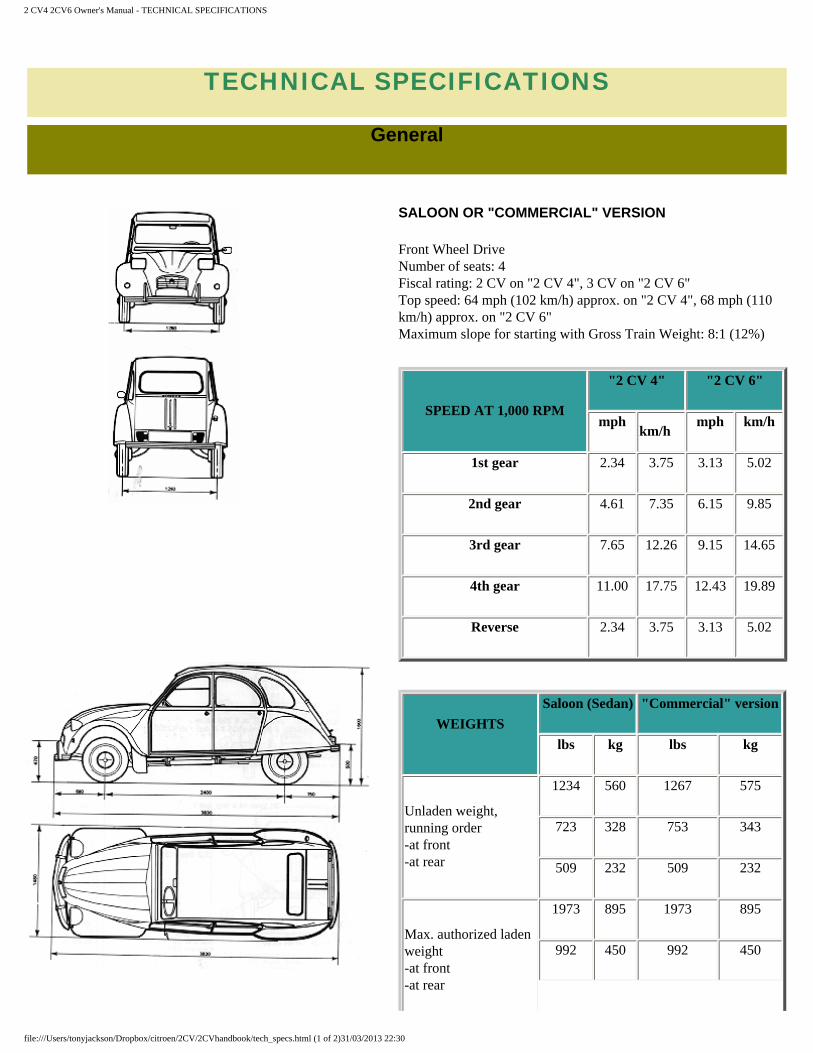
SALOON OR "COMMERCIAL" VERSION
Front Wheel Drive Number of seats: 4 Fiscal rating: 2 CV on "2 CV 4", 3 CV on "2 CV 6" Top speed: 64 mph (102 km/h) approx. on "2 CV 4", 68 mph (110 km/h) approx. on "2 CV 6" Maximum slope for starting with Gross Train Weight: 8:1 (12%)
SPEED AT 1,000 RPM
"2 CV 4" "2 CV 6"
mphkm/h
mph km/h
1st gear 2.34 3.75 3.13 5.02
2nd gear 4.61 7.35 6.15 9.85
3rd gear 7.65 12.26 9.15 14.65
4th gear 11.00 17.75 12.43 19.89
Reverse 2.34 3.75 3.13 5.02
WEIGHTS
Saloon (Sedan) "Commercial" version
lbs kg lbs kg
Unladen weight, running order -at front -at rear
1234 560 1267 575
723 328 753 343
509 232 509 232
Max. authorized laden weight -at front -at rear
1973 895 1973 895
992 450 992 450
file:///Users/tonyjackson/Dropbox/citroen/2CV/2CVhandbook/tech_specs.html (1 of 2)31/03/2013 22:30
2 CV4 2CV6 Owner's Manual - TECHNICAL SPECIFICATIONS
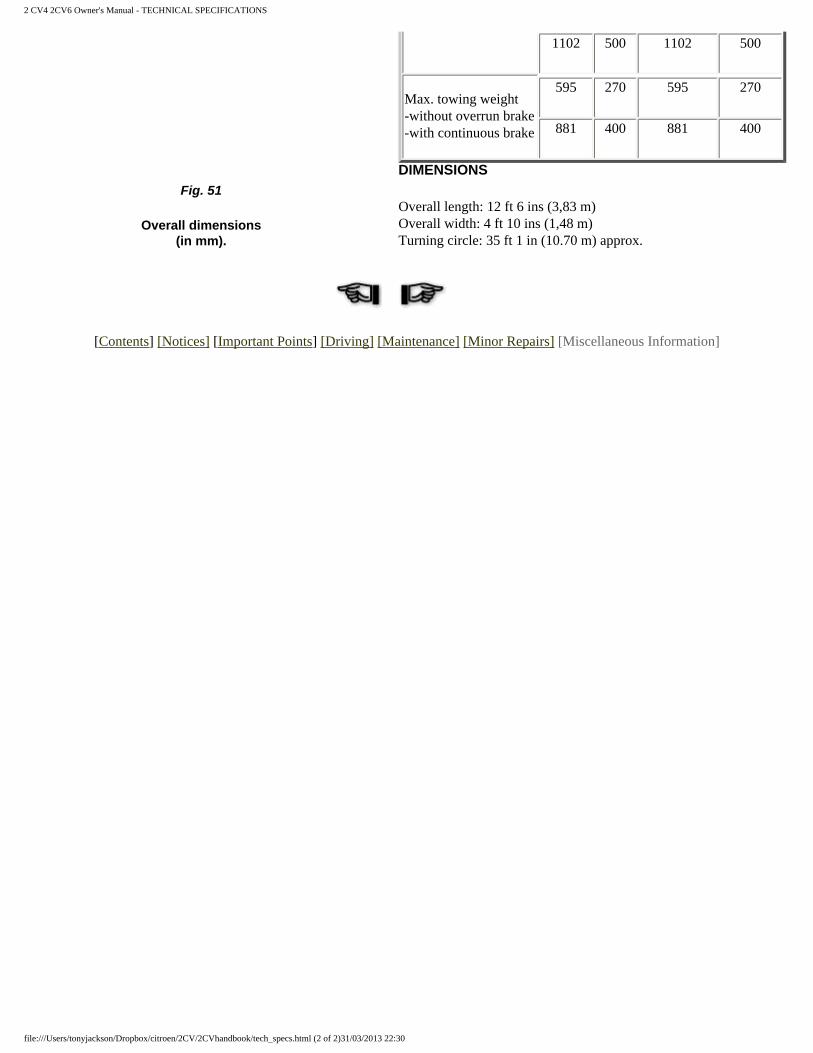
1102 500 1102 500
Max. towing weight -without overrun brake -with continuous brake
595 270 595 270
881 400 881 400
DIMENSIONS
Overall length: 12 ft 6 ins (3,83 m) Overall width: 4 ft 10 ins (1,48 m) Turning circle: 35 ft 1 in (10.70 m) approx.
Fig. 51
Overall dimensions (in mm).
[Contents] [Notices] [Important Points] [Driving] [Maintenance] [Minor Repairs] [Miscellaneous Information]
file:///Users/tonyjackson/Dropbox/citroen/2CV/2CVhandbook/tech_specs.html (2 of 2)31/03/2013 22:30
2 CV4 2CV6 Owner's Manual - ENGINE SPECIFICATIONS
TECHNICAL SPECIFICATIONS
Engine Specifications
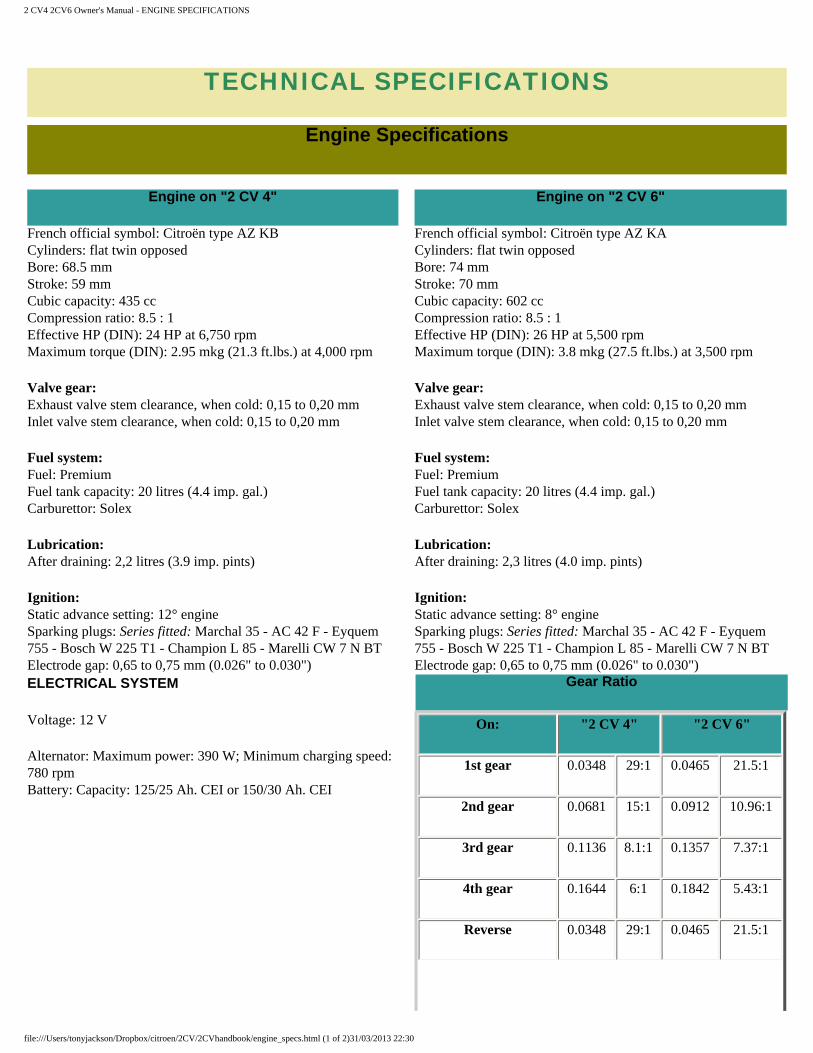
Engine on "2 CV 4" Engine on "2 CV 6"
French official symbol: Citroën type AZ KB Cylinders: flat twin opposed Bore: 68.5 mm Stroke: 59 mm Cubic capacity: 435 cc Compression ratio: 8.5 : 1 Effective HP (DIN): 24 HP at 6,750 rpm Maximum torque (DIN): 2.95 mkg (21.3 ft.lbs.) at 4,000 rpm
Valve gear: Exhaust valve stem clearance, when cold: 0,15 to 0,20 mm Inlet valve stem clearance, when cold: 0,15 to 0,20 mm
Fuel system: Fuel: Premium Fuel tank capacity: 20 litres (4.4 imp. gal.) Carburettor: Solex
Lubrication: After draining: 2,2 litres (3.9 imp. pints)
Ignition: Static advance setting: 12° engine Sparking plugs: Series fitted: Marchal 35 - AC 42 F - Eyquem 755 - Bosch W 225 T1 - Champion L 85 - Marelli CW 7 N BT Electrode gap: 0,65 to 0,75 mm (0.026" to 0.030")
French official symbol: Citroën type AZ KA Cylinders: flat twin opposed Bore: 74 mm Stroke: 70 mm Cubic capacity: 602 cc Compression ratio: 8.5 : 1 Effective HP (DIN): 26 HP at 5,500 rpm Maximum torque (DIN): 3.8 mkg (27.5 ft.lbs.) at 3,500 rpm
Valve gear: Exhaust valve stem clearance, when cold: 0,15 to 0,20 mm Inlet valve stem clearance, when cold: 0,15 to 0,20 mm
Fuel system: Fuel: Premium Fuel tank capacity: 20 litres (4.4 imp. gal.) Carburettor: Solex
Lubrication: After draining: 2,3 litres (4.0 imp. pints)
Ignition: Static advance setting: 8° engine Sparking plugs: Series fitted: Marchal 35 - AC 42 F - Eyquem 755 - Bosch W 225 T1 - Champion L 85 - Marelli CW 7 N BT Electrode gap: 0,65 to 0,75 mm (0.026" to 0.030")
Gear RatioELECTRICAL SYSTEM
Voltage: 12 V
Alternator: Maximum power: 390 W; Minimum charging speed: 780 rpm Battery: Capacity: 125/25 Ah. CEI or 150/30 Ah. CEI
On: "2 CV 4" "2 CV 6"
1st gear 0.0348 29:1 0.0465 21.5:1
2nd gear 0.0681 15:1 0.0912 10.96:1
3rd gear 0.1136 8.1:1 0.1357 7.37:1
4th gear 0.1644 6:1 0.1842 5.43:1
Reverse 0.0348 29:1 0.0465 21.5:1
file:///Users/tonyjackson/Dropbox/citroen/2CV/2CVhandbook/engine_specs.html (1 of 2)31/03/2013 22:30
2 CV4 2CV6 Owner's Manual - ENGINE SPECIFICATIONS
Crownwheel and pinion
8/33 8/33
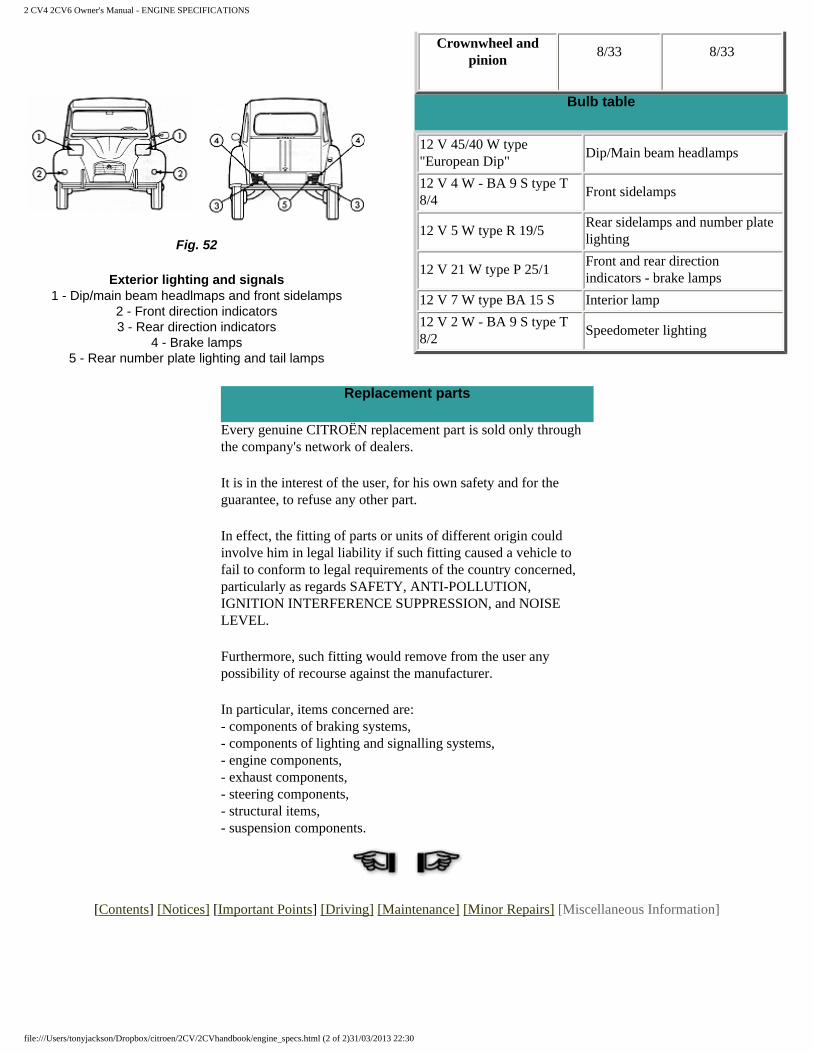
Bulb table
12 V 45/40 W type "European Dip"
Dip/Main beam headlamps
12 V 4 W - BA 9 S type T 8/4
Front sidelamps
12 V 5 W type R 19/5Rear sidelamps and number plate lighting
12 V 21 W type P 25/1Front and rear direction indicators - brake lamps
12 V 7 W type BA 15 S Interior lamp
12 V 2 W - BA 9 S type T 8/2
Speedometer lighting
Fig. 52
Exterior lighting and signals 1 - Dip/main beam headlmaps and front sidelamps
2 - Front direction indicators 3 - Rear direction indicators
4 - Brake lamps 5 - Rear number plate lighting and tail lamps
Replacement parts
Every genuine CITROËN replacement part is sold only through the company's network of dealers.
It is in the interest of the user, for his own safety and for the guarantee, to refuse any other part.
In effect, the fitting of parts or units of different origin could involve him in legal liability if such fitting caused a vehicle to fail to conform to legal requirements of the country concerned, particularly as regards SAFETY, ANTI-POLLUTION, IGNITION INTERFERENCE SUPPRESSION, and NOISE LEVEL.
Furthermore, such fitting would remove from the user any possibility of recourse against the manufacturer.
In particular, items concerned are: - components of braking systems, - components of lighting and signalling systems, - engine components, - exhaust components, - steering components, - structural items, - suspension components.
[Contents] [Notices] [Important Points] [Driving] [Maintenance] [Minor Repairs] [Miscellaneous Information]
file:///Users/tonyjackson/Dropbox/citroen/2CV/2CVhandbook/engine_specs.html (2 of 2)31/03/2013 22:30
2 CV4 2CV6 Owner's Manual - REMINDER FOR SERVICE-STATION - ENGLISH
REMINDER FOR SERVICE-STATION
For German, French, Italian, or Spanish, click HERE.
REMINDER FOR SERVICE-STATION
Tyres:
MICHELIN 125-15 X Pressure = 1.4 bar (20 psi) at the front 1.8 bar (26 psi) at the rear 2 bars (29 psi) on spare wheel Other fittings: See HERE.
Fuel:Super (Premium 4-stars, 97-99 octane) Capacity: 20 litres (4.5 imp. pints)
Engine oil:
TOTAL "GT 20 W 40" or "GTS 20 W 50" oil In very cold countries: TOTAL "GT 10 W 30" or "GTS 10 W 30" oil
Sump capacity:
On "2 CV 4" = 2.2 Litres (3.9 imp. pints) On "2 CV 6" = 2.3 Litres (4 imp. pints)
Gearbox oil:TOTAL extreme pressure "SAE 80" oil (capacity 0.9 litre (1 1/2 Imp. pints)
General lubricant: "TOTAL Multis"
Hydraulic brake system:
TOTAL FLUID "70 R3" - If this product is not available, use NFR12640 "S" or "V" or SAE J 1703a (capacity 0.5 Litres - 7/8 imp. pint)
Windscreen washer:
Water, to which may be added: - in any season: a product like "Stop-Clair", "Clearalex", "Screen-Clear". etc. -in Winter: a product like "Stop-Gel"
Battery:12 V - 125/25 Ah. CEI (or 150/30 Ah. CEI) Distilled water (do not add acid)
Sparking Plugs:
AC 42 F - Bosch W 255 T1 - Champion L 85 - Eyquem 755 - Marchal 35 - Marelli CW 7 N BT Electrode gap = 0.65-0.75 mm
Bulbs: See table.
file:///Users/tonyjackson/Dropbox/citroen/2CV/2CVhandbook/reminderUK.html (1 of 2)31/03/2013 22:30

2 CV4 2CV6 Owner's Manual - REMINDER FOR SERVICE-STATION - ENGLISH
PRE-START CHECKLIST
Levels Petrol
Engine oil Brake fluid
Battery Windscreen washer
Operation Engine Oil warning Lamp (2 CV 6)
Horn Exterior lighting
Direction indicators Brake lamps
Diverse Correct setting of rear-view mirrors
Tyre pressure Front grill muff
Seat belts Adjustment of seats
[Contents] [Notices] [Important Points] [Driving] [Maintenance] [Minor Repairs] [Miscellaneous Information]
file:///Users/tonyjackson/Dropbox/citroen/2CV/2CVhandbook/reminderUK.html (2 of 2)31/03/2013 22:30


![Manual Citroen 2cv6 y 2cv6CT].pdf](https://img.pdfslide.us/doc/110x75/577cc4671a28aba711993054/manual-citroen-2cv6-y-2cv6ctpdf.jpg)