Embed Size (px)
Citation preview

1D-Star Basics

How D-Star is differentD-Star radios convert your voice to digital before transmission.Additional information is included in the “digital stream” that
is transmitted (and displayed on the receiving radio):Your call sign (“MyCall”) is included – you never have to verbally
“identify” again!Other call signs are included when using the D-Star network.You can set a short (4 character) “call sign tag”, & a short (20
character) “identification string” that is included.(Advanced) You can also include low-speed digital data or GPS
positioning information.
2D-Star Basics

D-Star call sign terminologyThe terminology is from the viewpoint of the
communication link!“MyCall” is really YOUR call sign; that is, you, the guy or gal
holding the radio or microphone.“YourCall” (also called “UrCall”) is really the call sign of the
OTHER person, that is, the person you want to talk to (you only set this when you use the D-Star gateway system).
“Rpt1Call” and “Rpt2Call” (also called “R1Call” & “R2Call”) are also used, and will be discussed shortly.
3D-Star Basics

D-Star radio setup
D-Star radios have two transmitting modes:Analog (FM –Frequency Modulation)
You just set the frequency and talk.Digital (DV – Digital Voice)
You also set the frequency.You must also (one time) enter your call sign.Your call sign goes into the “MyCall” field.
4D-Star Basics

Using the local analog repeater
Some analog repeaters look for a special tone or code, in order to know that you want to use that repeater, rather than another on the same frequency.This tone is sometimes called “PL” or “CTCSS”.You must find out what the tone or code is, to use that
repeater.
5D-Star Basics

Using the local D-Star repeaterOn D-Star repeaters, it’s a bit easier; the “code” is just
the repeater’s callsign, and …The repeater module (“A”, “B”, or “C”).Most D-Star repeater installations have more than one
repeater. Each repeater is on a different amateur radio band. By convention:The “C” module is on the “2m” band (144-148 MHz).The “B” module is on the “70cm” band (440-450 MHz).The “A” module is on the “23cm” band (1.2 GHz).
6D-Star Basics

Local D-Star repeater setupTo set up your radio:
You must set (one time) your call sign into the “MyCall” field.
You should set the “YourCall” field to “CQCQCQ” or “/” (these are specially recognized values).
You must set the repeater call sign & module into the “Rpt1Call” field. The module (“A”, “B”, or “C”) must be set in the 8th character position of the “Rpt1Call” field.
You can leave the “Rpt2Call” field blank for local usage.
7D-Star Basics
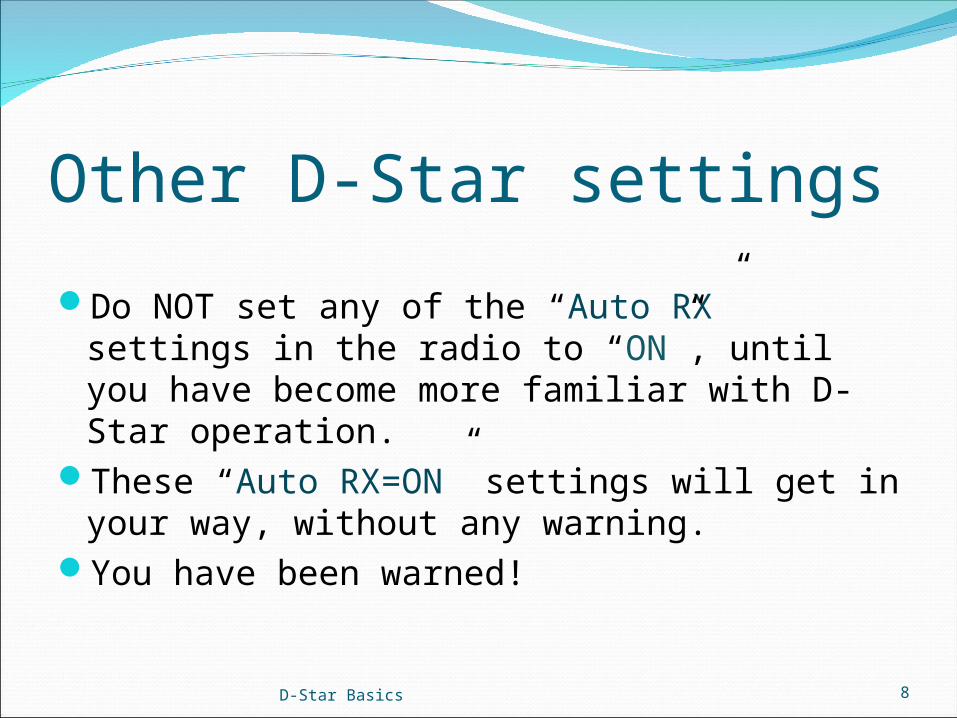
Other D-Star settings
Do NOT set any of the “Auto RX” settings in the radio to “ON”, until you have become more familiar with D-Star operation.
These “Auto RX=ON” settings will get in your way, without any warning.
You have been warned!
8D-Star Basics

Talking around the world (FM)With some analog repeaters, there are systems (eg,
“EchoLink” & “IRLP” that allow you to use the Internet to connect two or more repeaters together:A local computer connected to the repeater digitizes the
voice and sends it to a remote computer, which converts the audio back to analog and sends it to the remote repeater for transmission over the air.
9D-Star Basics
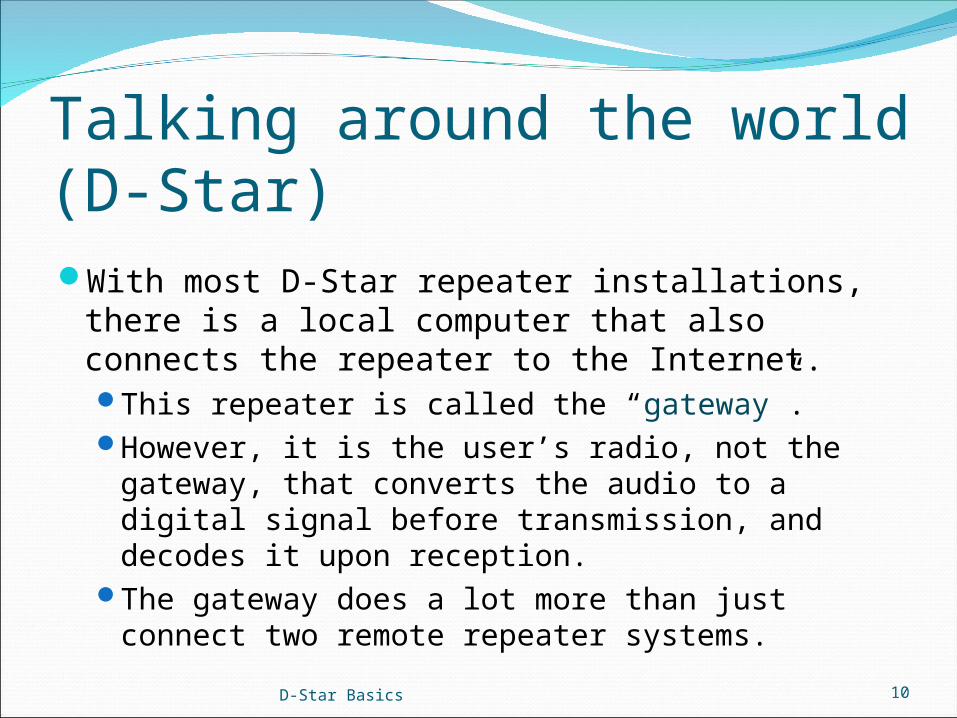
Talking around the world (D-Star)With most D-Star repeater installations, there is a local
computer that also connects the repeater to the Internet.This repeater is called the “gateway”.However, it is the user’s radio, not the gateway, that
converts the audio to a digital signal before transmission, and decodes it upon reception.
The gateway does a lot more than just connect two remote repeater systems.
10D-Star Basics

The D-Star networkThere are four ways to communicate with other users on
other D-Star repeaters, using the D-Star network:1. “Repeater routing” – this is part of the original D-Star design.2. “Call sign routing” – this is part of the original D-Star design.3. Using “repeater linking” – this capability was added by “D-
Plus”, a gateway software add-on.4. Using “reflector linking” – this capability was added by “D-
Plus”, a gateway software add-on.#s 1 & 2 are slightly complex, and if both you & the other user
don’t “get it right”, you will not be able to talk.#s 3 & 4 are much simpler to setup & use, and often the
repeater is already set in that mode.
11D-Star Basics

D-Star network basic setup (1)
To use any of these D-Star network modes, you must specify the “Rpt2Call” field:The “Rpt2Call” field designates the gateway computer,
which is considered the “G” D-Star module.In the USA, the “Rpt2Call” field also contains the local
repeater call sign (never the remote repeater or gateway).You must set the gateway call sign & module into the
“Rpt2Call” field. The module (“G”) must be set in the 8th character position of the “Rpt2Call” field.
12D-Star Basics

D-Star network basic setup (2)“MyCall” is set to your call sign.“YourCall” is initially set to “CQCQCQ” or “/” (the latter is
recommended on newer Icom D-Star radios).“Rpt1Call” is set to the local repeater call sign, with the
module (“A”, “B”, or “C”) in the 8th character position of the “Rpt1Call” field.
Even for local repeater calls, it is best to always set “Rpt2Call” to the local gateway call sign, with the module (“G”) in the 8th character position of the “Rpt2Call” field.
13D-Star Basics

D-Star “network routing” overviewAdvantages of call sign routing:
1. You can call another user without knowing which repeater that user is currently on.
Limitations of repeater or call sign routing :1. You can’t hear what is happening on the remote repeater.2. You usually need to initially announce that you are remote, so
that the remote user(s) know to set up their radios for repeater or call sign routing.
3. If the remote user doesn’t setup his/her radio correctly, you will be unable to have a successful two-way conversation.
14D-Star Basics
D-Star “network linking” overviewAdvantages of repeater or reflector linking:
1. You can hear what is happening on the remote repeater(s).
2. The remote user does not need to configure his/her radio in order to respond.
3. A repeater can be left in this configuration for new users.Limitations of repeater or reflector linking :
1. You can’t call another user without knowing which repeater that user is currently on.
15D-Star Basics

D-Star networking details
The details of repeater & call sign routing, and repeater & reflector linking, are not covered in this presentation.
16D-Star Basics

D-Star network commands (1)These commands only work if:
1. You have set the “Rpt2Call” field to specify your local gateway (otherwise the gateway will never see them).
2. Your local gateway must be running: “D-Plus”, the gateway software add-on (written by Robin
Cutshaw / AA4RC) to Icom’s gateway software; or “D-Extra” software on systems running non-Icom gateway
software.These commands are set into the “YourCall” field of the
radio. You key your radio to send the command to the gateway.
17D-Star Basics

“Can you hear me now?”(with apologies to Verizon’s advertizing slogan).Ever want a truly objective signal report? Use the
“echo” command:Program a “YourCall” value of seven (7) spaces, followed by
an “E” in the 8th (module) position.Key your radio & speak a short test message of your choice
(I recommend using the words “echo test” in it).When you unkey your radio, the gateway will play back
(“echo”) your transmission.Remember to change your “YourCall” value back!
18D-Star Basics

D-Star network commands (2)
Other D-Star network commands are available, but not described in detail here:Report the current repeater state (eg, linked).Link to another repeater or reflector.Unlink from any other repeater or reflector.
19D-Star Basics

D-Star radio tips & tricksGet computer software to program your radio’s
memories & save your radio’s settings.Learn how to at least save a new repeater or user call
sign manually into the radio until you get home …Use the “Func-F1” & “Func-F2” microphone button
combinations to save two alternate radio configurations.Become familiar with the new “DR” mode on D-Star
radios that have it (currently the Icom IC-80AD, ID-800H, ID-31A, & ID-51A).
20D-Star Basics

D-Star tip: Func-F1 & Func-F2Pressing & holding just “F1” or “F2” stores just the
current transmitter & receiver frequencies, and D-Star “YourCall” & “Rpt1Call”/“Rpt2Call” values, for recall.
Pressing “Func”, & then pressing and holding “F1” or “F2” stores almost the entire radio configuration (including screen color) for recall.
Tip: Use two different screen colors to differentiate the two configurations.
Tip: Use “F1” & “F2” as scratch-pads when switching configurations.
21D-Star Basics

D-Star tip: The new “DR” modeIcom’s new “D-Star Repeater” mode (in the IC-80AD, ID-880H,
ID-31A, & ID-51A) separates the “YourCall” memories from the “Rpt1Call”/Rpt2Call” memories.
In “DR” mode, you can select the “YourCall” value, and then scroll through the “Rpt1Call”/Rpt2Call” memories without changing the “YourCall” value.
Tip: Enter the “DR” mode first, before selecting a “YourCall” value.
Tip: Save & use “/” as a “YourCall” value in place of “CQCQCQ”. When “YourCall” contains “CQCQCQ”, the “DR” mode will blank out the “Rpt2Call” field, and your transmissions will not be routed to the gateway (or a linked repeater or reflector).
22D-Star Basics

D-Star network information
This could be a whole session, so I will just list a few:www.DstarDB.com (my site: tracks D-Star usage)www.dstarinfo.com (D-Star programming calculator)www.dstarusers.org (D-Star repeater list)www.jfindu.net (and other APRS stuff)www.aprs-is.net/DPRSCalc.aspx (D-PRS calculator)
23D-Star Basics