Embed Size (px)
Citation preview

1992 NEW WORLD COMPUTING, INC. SECOND EDITIONWritings and Maps found in this book are copyrighted. All rights are reserved. Thisbook may not be copied, photographed, reproduced, translated or reduced to anyelectrical medium or machine-readable form, in whole or in part, without priorwritten consent from New World Computing, Inc. New World Computing, Inc.Further reserves the right to make improvements on the product described In thisAdventurer’s Guide at anytime without notice.
CREDITSMight and Magic IDesigned and Created by: Jan Van CaneghemProgramming: Jon Van CaneghemMacintosh Version: Binary One, Inc.Computer Graphics: Joe Ferreira (Pendragon Studios), Vincent DeQuattro, Jr.,Jon Van CaneghemGraphic Art Designed and Produced by: Focus On DesignBook Illustrations: Vincent DeQuattro, Jr.Map Illustration: Jim Krogel (West End Studios)Technical Writing: Marie Butler-Knight and Jon Van CaneghemMight and Magic IIDesigned and Created by: Jan Van CaneghemProgramming: Jon Van Caneghem, Stephen L. Cox, Mark CaldwellMacintosh Version: Douglas GroundsComputer Graphics: Avril Harisson and Jeff GriffeathManual Illustrations: Ken MayfieldMap Illustration: Jim KrogelArt Coordinator: Vincent DeQuattro, Jr.Manual: Mark Caldwell, Jon Van Caneghem
Adventurer’s Guide Written by:Eileen A. Cronyn, Cronyn Publications, Inc.Corak’s Travelogue Written by:Nicholas BeliaeffValuable Travel Hints, Insights and Mapping provided by:Jan Van Caneghem, Mark Caldwell, and Benjamin BentCover Illustration:Jim Krogel and Richard EspyLayout and Interior Graphics:Kenneth Mayfield, Richard Espy, Mark Caldwell
New World Computing. Inc., P.O. Box 4302, Hollywood, CA 90078
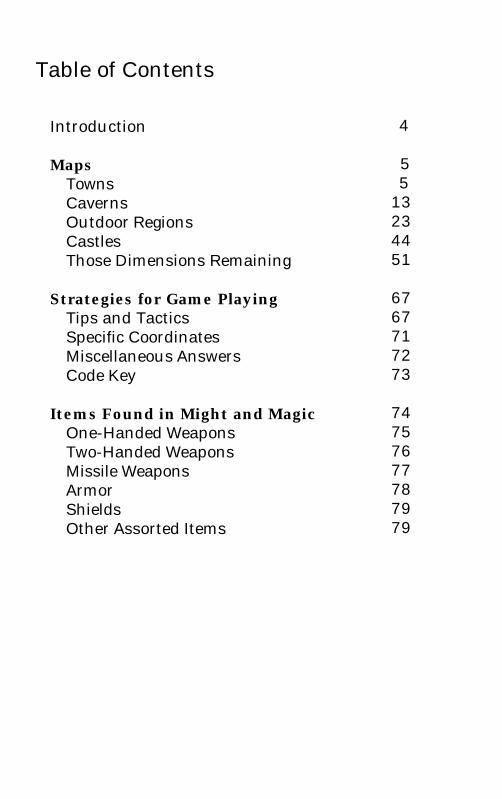
Table of Contents
Introduction
MapsTownsCavernsOutdoor RegionsCastlesThose Dimensions Remaining
Strategies for Game PlayingTips and TacticsSpecific CoordinatesMiscellaneous AnswersCode Key
Items Found in Might and MagicOne-Handed Weapons Two-Handed WeaponsMissile Weapons ArmorShieldsOther Assorted Items
4
55
13234451
6767717273
74757677787979
Welcome fellow travelers!The object of Might and Magic is but a simple one... to discover the Secret ofthe Inner Sanctum. The road ahead is a long one, and most definitely anadventurous one.
Many travelers have set out before you. They’ve encountered demons,creatures and the like. Not all have known fruitful times. Sandstorms, tidalwaves, and avalanches are but a few disasters that greeted them. Battles werewon, but many were lost. They choose to ignore clues and left treasuresunopened.
There remain plenty who have tasted the sweetness of success. It is they who,wishing only the same for your party, willingly share their findings and variedaccounts. The writings herein include a variety of hints. All shall tempt yourparty with its aroma. Savor these pages, as they enhance the flavor of yourtravel.
There are a total of 55 surfaces you may journey. Each of these surfaces maybe defined as 16 by 16 square grids; ranging from Towns, Natural Caverns,Outdoor Regions, Castles and Those Dimensions Remaining. While Mightand Magic does acquaint you with mapping skills, you may opt to utilizethose furnished in the first section of these writings. Supplied below each mapfind its legend, followed by said accounts from past travelers. These writingsfurther introduce basic strategies and suggestions. Specific coordinatesproving rich to your adventures are found. Certain riddles, quests and magicitems are difficult to locate or understand. Find here their meaning. Thoseknowing success share their mystery herein.
From the start of your journey, begin to recognize the taste of success. Itsflavor you’1l find not only satisfying, but all consuming as it heightens yourtravels.
MapsPart of the mystique enjoyed while adventuring Might and Magic is theplayer’s need to map 55 distinct 16 by 16 square grids. Those traveled beforeyou, after long hours, have successfully mapped each grid. This led them totheir Secret.
Some adventurers are anxious to begin their journey. In their eagerness theyperhaps view mapping and its skill as time consuming. The following pagesprovide all maps needed to venture the Land of Varn. While all maps areprovided, special events and encounters are left for your search. May yourjourneys flourish with great rewards!
TownsOnce was a time that children frolicked through the Land of Varn. Happinesswas known and felt by all. Though happiness still abounds, change has come.This change has driven the towns underground. Thus explaining the cavernousopenings found on your map.As you embark on your journey, take note to act wisely. When traveling thefive towns, they become both familiar and unique. Once your party registersin the Inn, you’re free to meet the townspeople and explore its sites. Charitypays on judgment day. Be sure to call on Blacksmiths, as they have supplies toaid in your journey. Since the journey promises to be a long one, shop formany culinary delights. Simple tipping gestures bestowed on bartenders proveworthwhile. Listen for rumors. Temples are to be visited to gain neededclerical guidance. Being that skill and experience are of great importance,perhaps your interest lies in training exercises. These are the familiar.The closer to town you travel, the safer your journey. One of the towns iswithout natural caverns, while another gives you change in its pool. Eachtown need be shopped wisely. Purchases made vary in worth, cost, and ofcourse in magic! Read on for the unique...

Town of Sorpigal
Your adventure begins in the quaint Town of Sorpigal. It is written that here inSorpigal you find seven of the eight statues*. Search these statues, as theypossess valuable insight on quests toward the Secret of the Inner Sanctum. Thewise avoid jailings. Sorpigal, though a lovely town, is just the beginning. Youwill go beyond. If your party yearns for the outdoors, seek its passage. If youyearn to travel to another town, look for the Irish one. A mere gem makes hima fine travel agent.*Further writings on the whereabouts of the eighth statue remain lost.
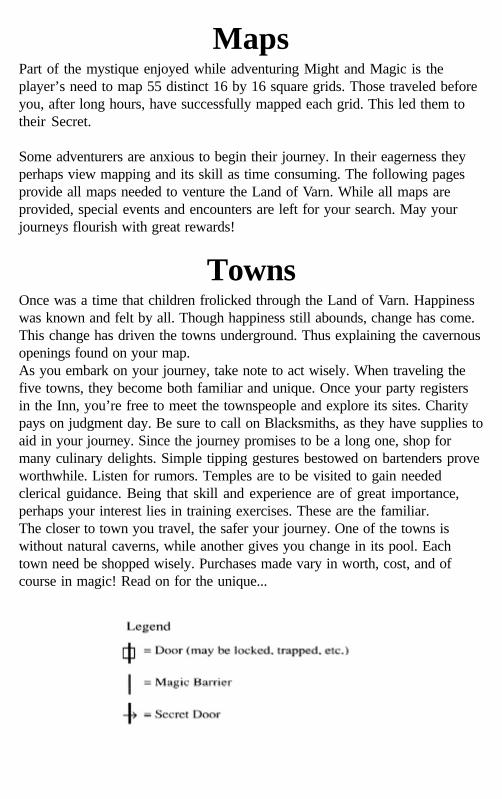
Town of Portsmith
The Succubus Queen clearly holds reign in the Town of Portsmith, althoughher reign isn’t conforming. Some yearn underneath for the contrary, as theyfind her exhausting. One waits for you here by secret passage. Once found,you’ll not only unearth the understanding of Portsmith, but enhance yourquest. Of demons and devils, a lesson is to be learned, perhaps evenencountered.
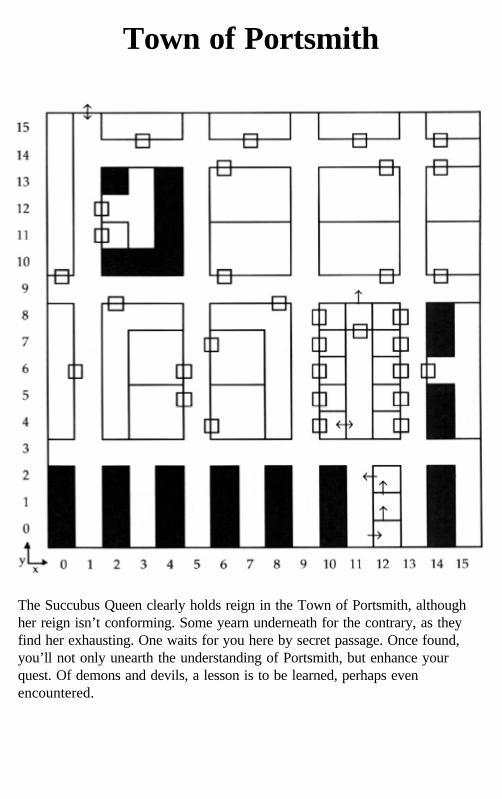
Town of Algary
One waits for you in the Town of Algary, proving that clues do add up.Resembling a tailor, the Mystic takes your measure. If it’s treasures you seek,you’ll find plenty, And plenty of encounters too! This town is mid-range inworth. Its flooring has found anchor in the Marsh. Travel from here is mostunusual.
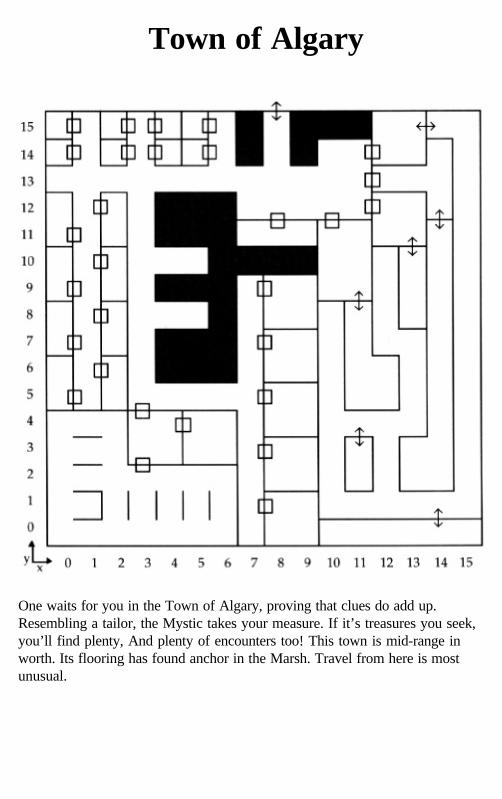
Town of Dusk
The Town of Dusk appears to be a confusing network, but that’s just the halfof it. While appearing so life-like, it’s surely a different world than you’veknown. Don’t let this illusion alarm you. One will accept your delivery andfurther share secrets. Plenty of, shall we say, chance meetings await you?
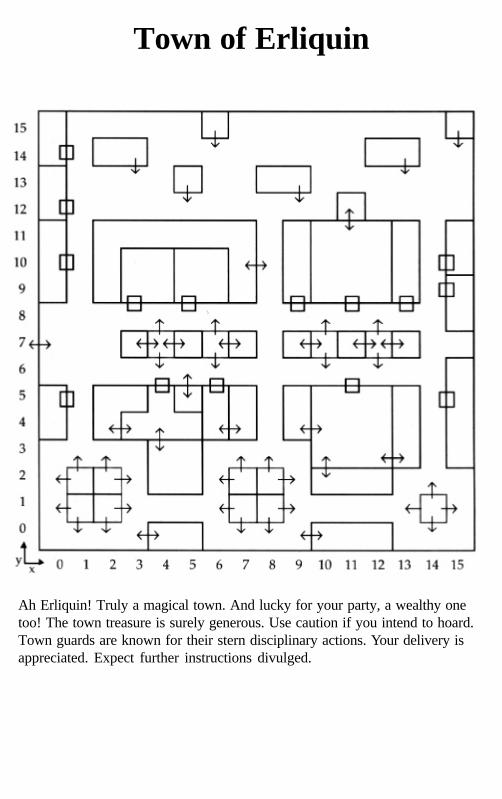
Town of Erliquin
Ah Erliquin! Truly a magical town. And lucky for your party, a wealthy onetoo! The town treasure is surely generous. Use caution if you intend to hoard.Town guards are known for their stern disciplinary actions. Your delivery isappreciated. Expect further instructions divulged.
Natural CavernsNine natural caverns await you. Caverns, as the name suggests, areunderground chambers. They are ideal for adventure and gatheringinformation. Though a bit more dangerous than towns, they are viewed fairlysafe on the whole. Travel from cavern-to-cavern may be done via theshimmering blue and white portals. Thus eliminating the need to traveloutdoors. Journeying the caverns reveals that which appears usual, and ofcourse, the unusual. Levitation skills save you from much peril. Statistics arerelative. Your party will long for more challenging caverns as you gain inexperience. Discover easy the usual. Hunt aggressively for the unusual.
Legend
= Door (may be locked, trapped, etc.)
= Magic Barrier
= Secret Door
= Grate (may be locked, trapped, etc.)
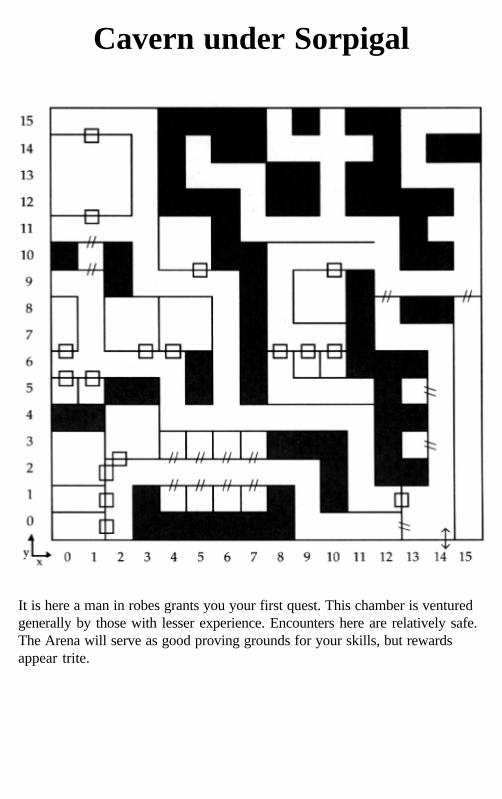
Cavern under Sorpigal
It is here a man in robes grants you your first quest. This chamber is venturedgenerally by those with lesser experience. Encounters here are relatively safe.The Arena will serve as good proving grounds for your skills, but rewardsappear trite.

Cavern in the Northern Barrier
Learn the value of your jump spell. Search the button that turns the slide off,as continual acid pool bathing seems unwise. While in this chamber, battle thethirteen specific encounters to their entirety and you’ll obtain the bronze key.Take heed of the Banner’s warning.

Cavern under Portsmith
This is a popular place for here lies the Pool of Reversal. Beware, for there areother pools here as well. This chamber is full of demons, orcs, goblins andsuch. Disturbing them may bring your death. With the appropriate key, you’llopen the door.
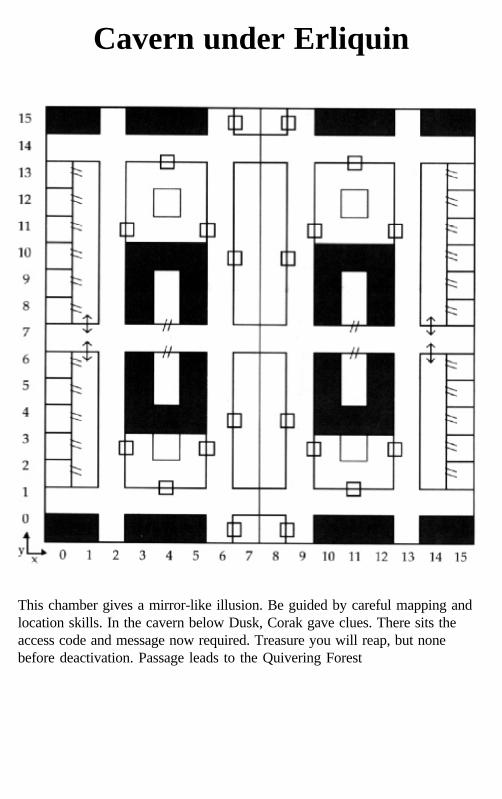
Cavern under Erliquin
This chamber gives a mirror-like illusion. Be guided by careful mapping andlocation skills. In the cavern below Dusk, Corak gave clues. There sits theaccess code and message now required. Treasure you will reap, but nonebefore deactivation. Passage leads to the Quivering Forest
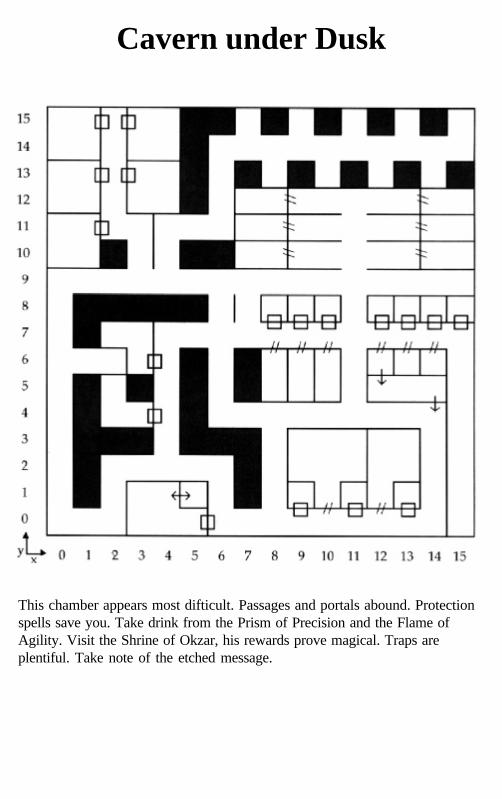
Cavern under Dusk
This chamber appears most difticult. Passages and portals abound. Protectionspells save you. Take drink from the Prism of Precision and the Flame ofAgility. Visit the Shrine of Okzar, his rewards prove magical. Traps areplentiful. Take note of the etched message.

Cavern in the Korin Bluffs
Wizard Ranalou describes your quest. Portal transport remains simple andbountiful. Levitation and jump skills save you. Don’t hesitate to jump morethan once. The presence of creatures and aliens are felt, yet not often seen.Power you seek? Find the wondrous Thundranium.
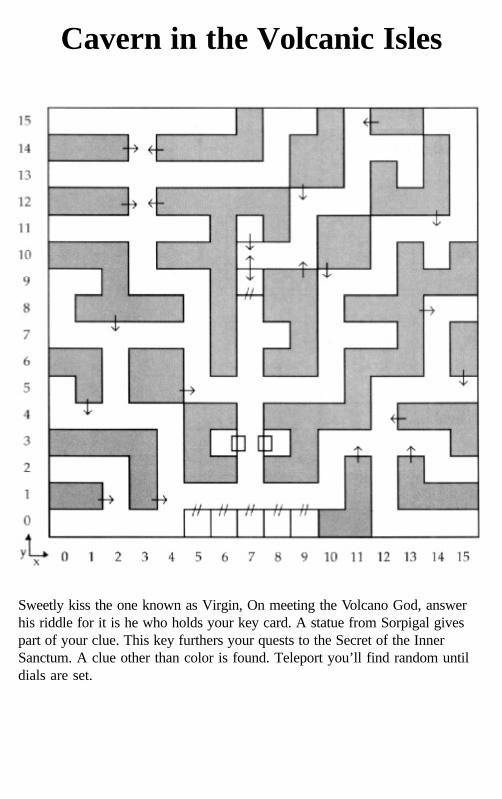
Cavern in the Volcanic Isles
Sweetly kiss the one known as Virgin, On meeting the Volcano God, answerhis riddle for it is he who holds your key card. A statue from Sorpigal givespart of your clue. This key furthers your quests to the Secret of the InnerSanctum. A clue other than color is found. Teleport you’ll find random untildials are set.
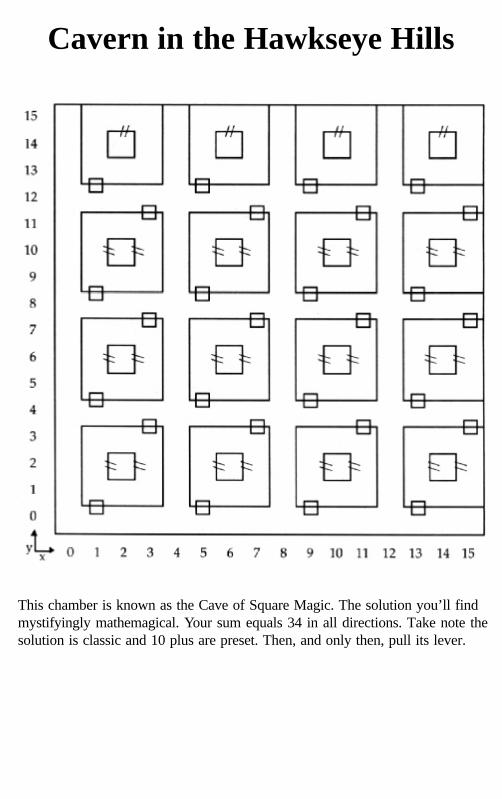
Cavern in the Hawkseye Hills
This chamber is known as the Cave of Square Magic. The solution you’ll findmystifyingly mathemagical. Your sum equals 34 in all directions. Take note thesolution is classic and 10 plus are preset. Then, and only then, pull its lever.

Cavern North of White Wolf
Save for Dusk, this will be near toughest. Dungeon walls invade this chamber.You’ll see dragon types and poison spikes. Note the message you find. Theunfortunate adventurers before you still remain. Though now you’ll see themstatue-like and shattered. Find the head of your search, as this encounter turnsthem to stone.
Outdoor Regions
While on your journey you’re free to travel all 20 geographic regions. Fromthe onset these regions appear near identical. It is later you observe thedistinct differences. The farther you travel from the center of the Land ofYarn, the more dangerous your journey becomes. Thus the four corners clearlybecome most treacherous. The same holds true for inner depths. When movingfrom place-to-place fly spells prove more advantageous than merely strollingabout. Look for secret passage, as it aids in safe travel. Read all signs. Studyyour spells, many now work. Climates are indigenous. Perhaps it best to keepthe Map of the Land of Varn close at hand. The desert is hot, draining and fullof whirlwinds. Travel here is impossible without the exiled Lord’s map andplenty of culinary goods. Keep measure of statistics. The sea is wild andwoolly with tidal waves. It too is full of wet and wicked creatures unknown toyou. Forest regions are dense and filled with encounters. Watch for crumblingmountains and avalanches. It’s suspected that many a party has made each andevery one of these regions their final resting place.

Region A-1
This is the first of four corners. Consider yourself warned! You’ll find why theForest is called Dark. The One by Land, known as Dark Rider, roams theunderbrush. Quench your thirst in the pool of health. Though difficult travelon foot unravels the concealed.
KEY: Dense Trees Glacier Mountains

KEY: Dense Trees Mountains Water
Region A-2
The Valley of Fire appears steamy, while the Lava Beasts hunger. Fire Spellssave you. The waters are rich. Look for the Druid, her treasures are regal. Abattle with the Red Dragons appears tooth and nail.

Region A-3
Find here the One by Water. His roam roughens and rocks the sea. A pastconquest with one of the four proves you have skill. Here at Luck Island thatsoon becomes your reward.
KEY: Mountains Dense Trees Water
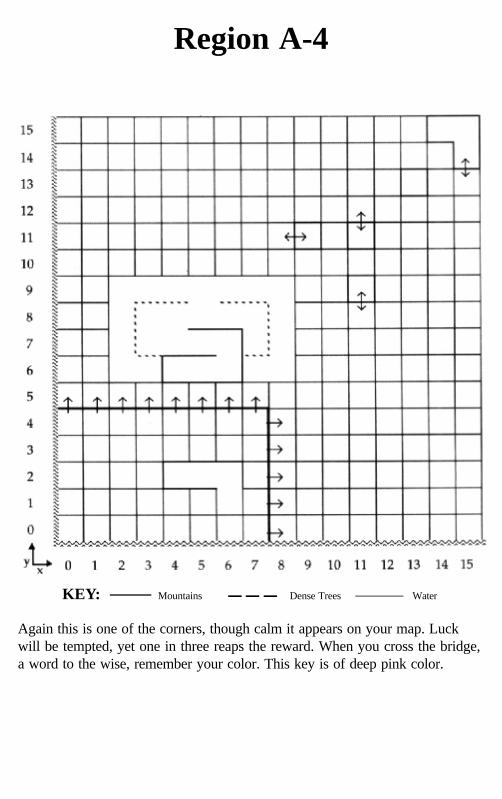
Region A-4
Again this is one of the corners, though calm it appears on your map. Luckwill be tempted, yet one in three reaps the reward. When you cross the bridge,a word to the wise, remember your color. This key is of deep pink color.
KEY: Mountains Dense Trees Water
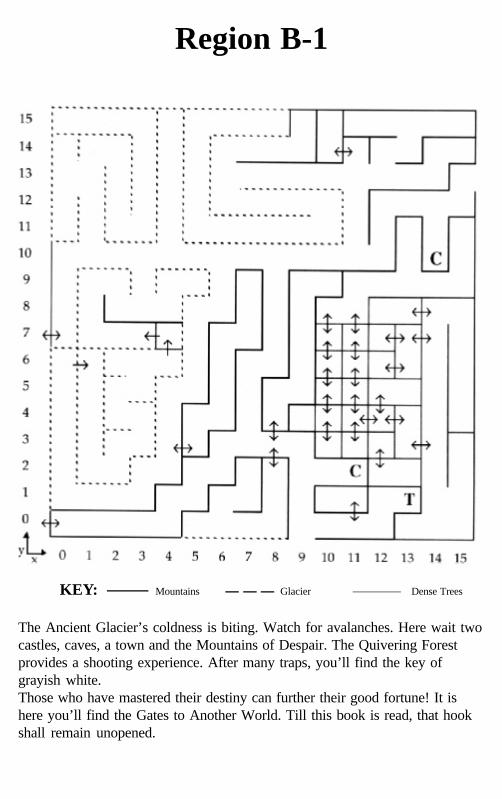
Region B-1
The Ancient Glacier’s coldness is biting. Watch for avalanches. Here wait twocastles, caves, a town and the Mountains of Despair. The Quivering Forestprovides a shooting experience. After many traps, you’ll find the key ofgrayish white.Those who have mastered their destiny can further their good fortune! It ishere you’ll find the Gates to Another World. Till this book is read, that hookshall remain unopened.
KEY: Mountains Glacier Dense Trees

Region B-2
Find secret passage through New Glacier. The one who calls herself Ice holdsyour keys. First diamond, and the second brings bronze. She’s cold to thetouch, but warm with emotion. What’s a few battles, when the treasure’sabundant? There’s a dungeon and cave. The cave has been known to havepowers of stone.
KEY: Glacier Dense Trees Mountain

Region B-3
You’ll find safety in Portsmith knowing the contrary. Signs lead to BlithesPeak, while waters fill with demons. The Wizard Ranalou waits for you in itscavern. When it comes to the dungeon, a successful courier need blow thewhistle.
KEY: Mountains Water Dense Trees
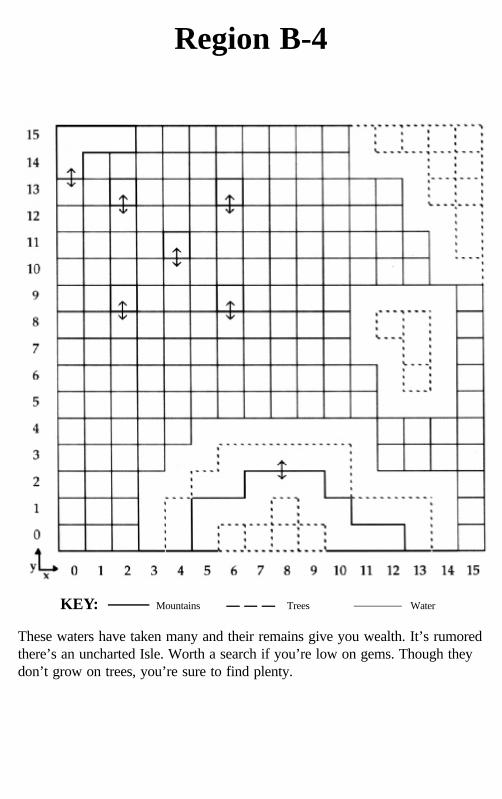
Region B-4
These waters have taken many and their remains give you wealth. It’s rumoredthere’s an uncharted Isle. Worth a search if you’re low on gems. Though theydon’t grow on trees, you’re sure to find plenty.
KEY: Mountains Trees Water

Region C-1
Roads and posting lead you to the Ancient Way. Most find drink from thefountain refreshing. If you seek to enter castles, stumble on the abandonedmerchant wagons. You’ll find your pass. The treasure chest holds anenchanting whistle.
KEY: Mountains Trees Dense Trees
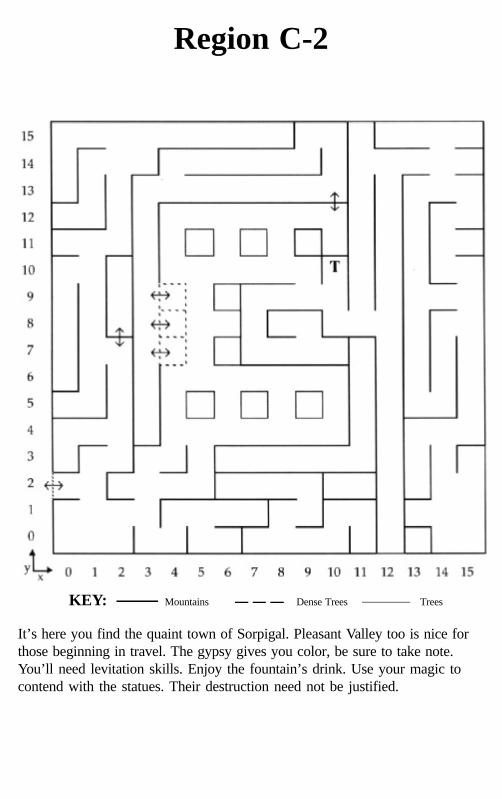
Region C-2
It’s here you find the quaint town of Sorpigal. Pleasant Valley too is nice forthose beginning in travel. The gypsy gives you color, be sure to take note.You’ll need levitation skills. Enjoy the fountain’s drink. Use your magic tocontend with the statues. Their destruction need not be justified.
KEY: Mountains Dense Trees Trees
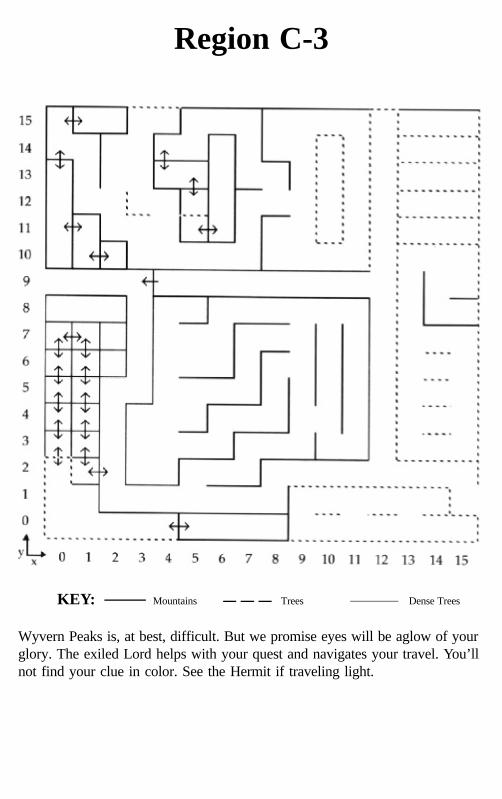
Region C-3
Wyvern Peaks is, at best, difficult. But we promise eyes will be aglow of yourglory. The exiled Lord helps with your quest and navigates your travel. You’llnot find your clue in color. See the Hermit if traveling light.
KEY: Mountains Trees Dense Trees
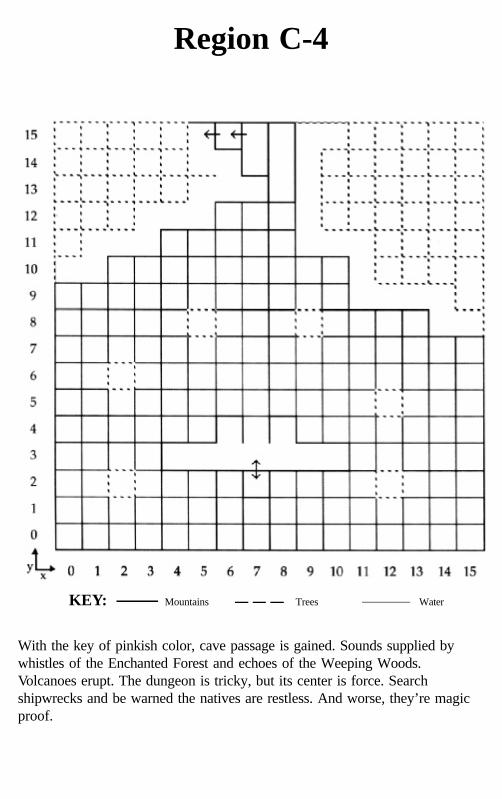
Region C-4
With the key of pinkish color, cave passage is gained. Sounds supplied bywhistles of the Enchanted Forest and echoes of the Weeping Woods.Volcanoes erupt. The dungeon is tricky, but its center is force. Searchshipwrecks and be warned the natives are restless. And worse, they’re magicproof.
KEY: Mountains Trees Water
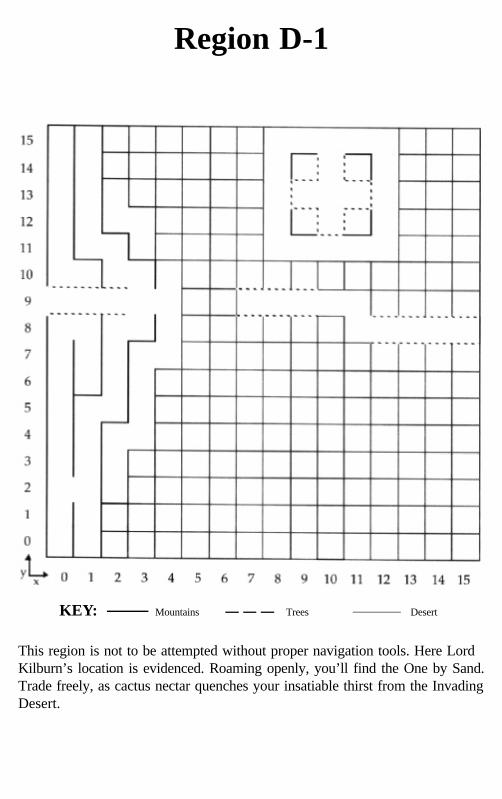
Region D-1
This region is not to be attempted without proper navigation tools. Here LordKilburn’s location is evidenced. Roaming openly, you’ll find the One by Sand.Trade freely, as cactus nectar quenches your insatiable thirst from the InvadingDesert.
KEY: Mountains Trees Desert
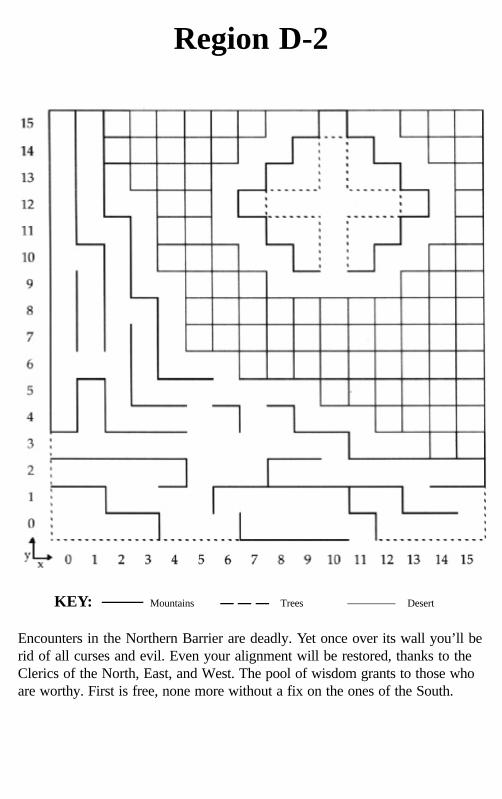
Region D-2
Encounters in the Northern Barrier are deadly. Yet once over its wall you’ll berid of all curses and evil. Even your alignment will be restored, thanks to theClerics of the North, East, and West. The pool of wisdom grants to those whoare worthy. First is free, none more without a fix on the ones of the South.
KEY: Mountains Trees Desert
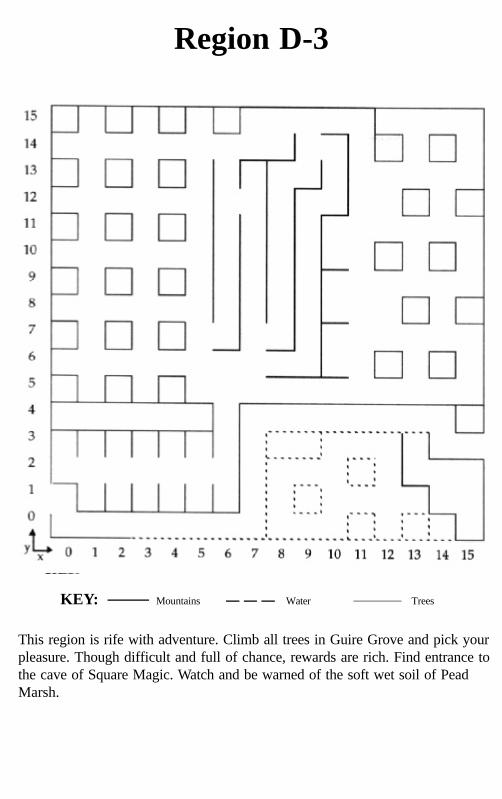
Region D-3
This region is rife with adventure. Climb all trees in Guire Grove and pick yourpleasure. Though difficult and full of chance, rewards are rich. Find entrance tothe cave of Square Magic. Watch and be warned of the soft wet soil of PeadMarsh.
KEY: Mountains Water Trees

Region D-4
Here roams the One by Air. The Marshes are full of “undead”. You’ll findpassage through the Swamp of the Dead exhilarating, yet non-negotiable aswell. Here too Algary sits. Your colorless clues add up in the Isle of Og. It ishere, through doom you learn more of the great truths of the Secret of theInner Sanctum.
KEY: Swamp Water Trees
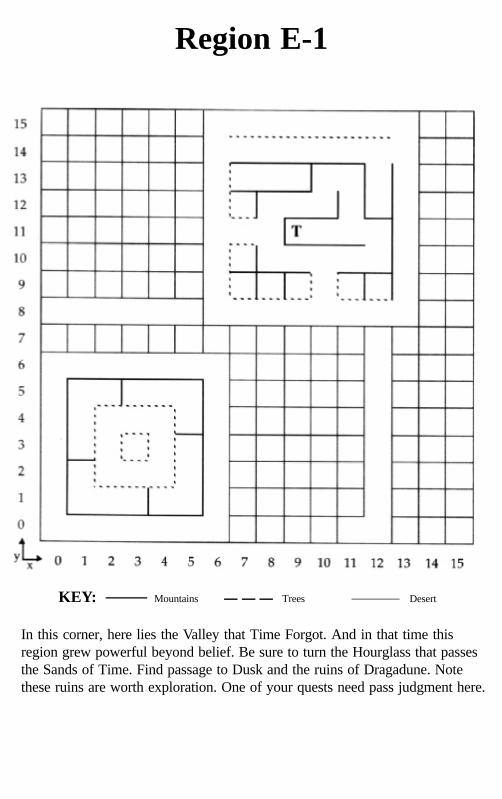
Region E-1
In this corner, here lies the Valley that Time Forgot. And in that time thisregion grew powerful beyond belief. Be sure to turn the Hourglass that passesthe Sands of Time. Find passage to Dusk and the ruins of Dragadune. Notethese ruins are worth exploration. One of your quests need pass judgment here.
KEY: Mountains Trees Desert
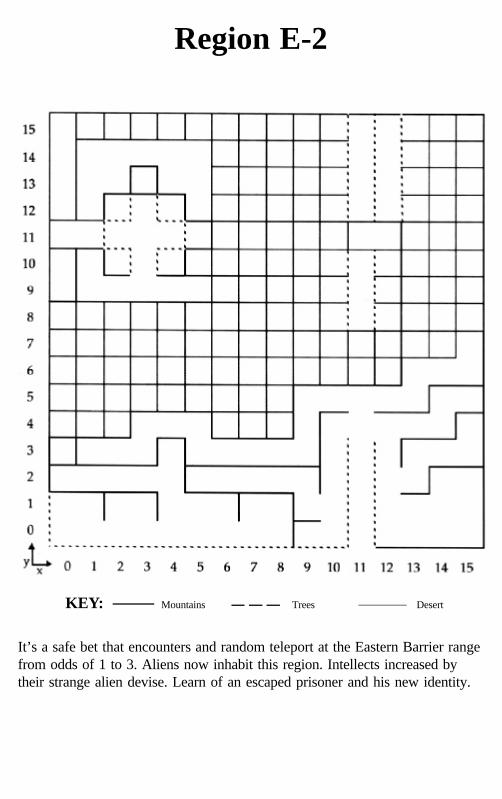
Region E-2
It’s a safe bet that encounters and random teleport at the Eastern Barrier rangefrom odds of 1 to 3. Aliens now inhabit this region. Intellects increased bytheir strange alien devise. Learn of an escaped prisoner and his new identity.
KEY: Mountains Trees Desert
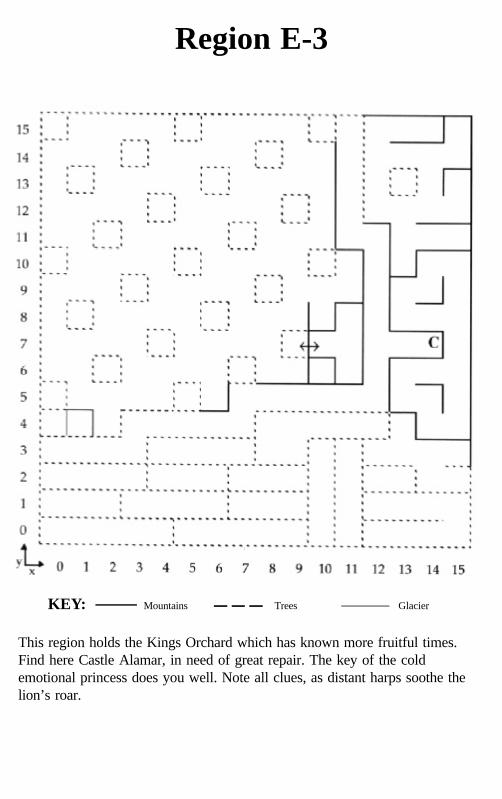
Region E-3
This region holds the Kings Orchard which has known more fruitful times.Find here Castle Alamar, in need of great repair. The key of the coldemotional princess does you well. Note all clues, as distant harps soothe thelion’s roar.
KEY: Mountains Trees Glacier

Region E-4
This final corner is the unresting place for those lost souls stuck in the Swampof the Dead. Encounters are cryptic and unnatural. Travel the Perilous Peaksif you so dare! Here you’ll discover the fabled Building of Gold and itsdungeon. Also sits and stirs evil beyond evil. The few who have returned referto this area as Dragon City. Beware!
KEY: Mountains Trees Glacier
CastlesTraveling the castles of the Land of Varn brings you closer to the Secret ofthe Inner Sanctum. Though only five appear on your map, it is suspected,even believed, you will learn of another. Assuming there is this sixth castle,it need be ventured only by those possessing great skill and experience. Forthey alone will truly reap its rewards. When frequenting castles, be sure tohave your merchants pass in hand that which you acquired from The AncientWay. Castles appear similar and not. Having prisoners, kings and messagesmake them same. Many a quests are to be granted. Take note of messages,especially in silver. One of the castles holds that interleave and the one forgold as well. All is not as it seems. Make your clues work together. Besharp, as you’ll be deceived often. Think straight, for you’ll easily beconfused. This is the similar, now find what’s not.

Castle White Wolf
Appearing calm and sedate, this castle grants you plenty of adventure. Alltold, the quests tally seven. Lord Ironfist rules with power. Yet behind histhrone you can remove his force. This brings you great treasure. The guardsare cruel to those without pass.
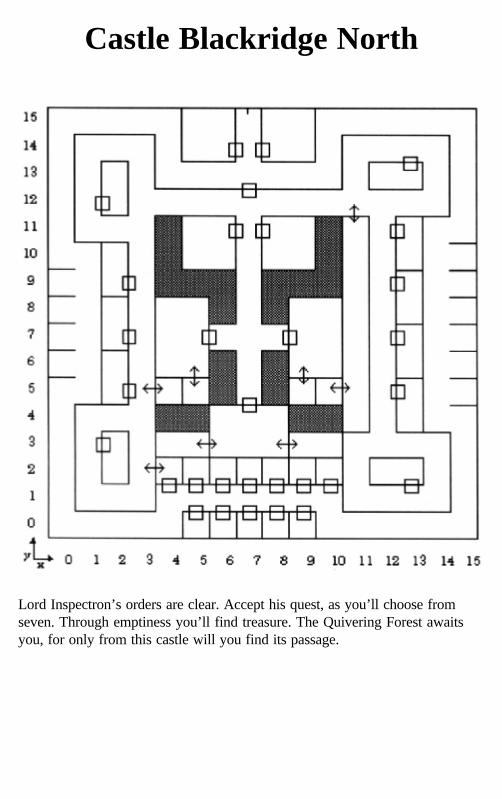
Castle Blackridge North
Lord Inspectron’s orders are clear. Accept his quest, as you’ll choose fromseven. Through emptiness you’ll find treasure. The Quivering Forest awaitsyou, for only from this castle will you find its passage.

Castle Blackridge South
Lord Hacker is in need of your party. Seven quests he is fulfilling. A brew heis bubbling. Bring his ingredients before its boil. When finished with hisquests, see him only if traveling light. At seven, ask for no more.
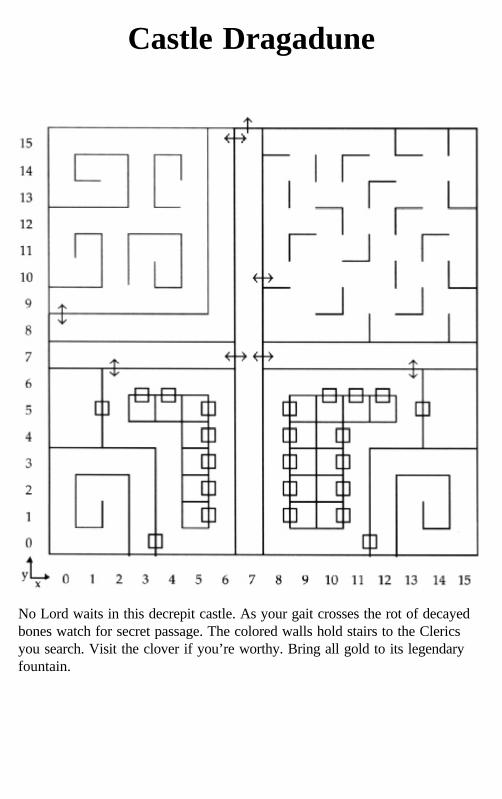
Castle Dragadune
No Lord waits in this decrepit castle. As your gait crosses the rot of decayedbones watch for secret passage. The colored walls hold stairs to the Clericsyou search. Visit the clover if you’re worthy. Bring all gold to its legendaryfountain.
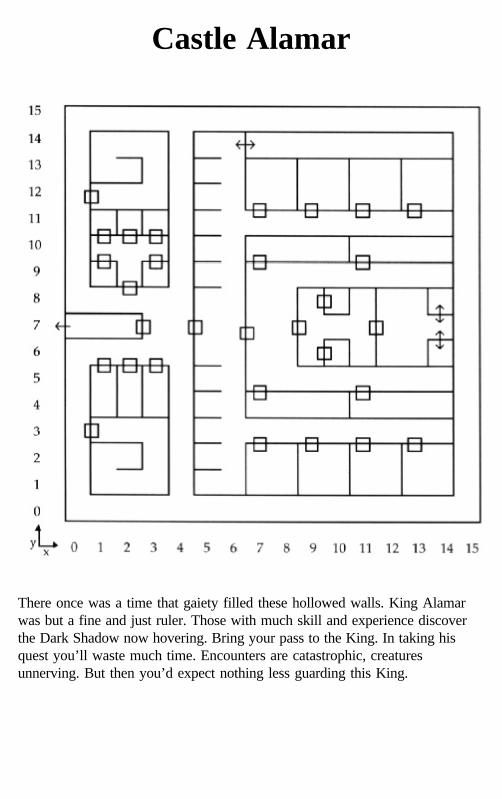
Castle Alamar
There once was a time that gaiety filled these hollowed walls. King Alamarwas but a fine and just ruler. Those with much skill and experience discoverthe Dark Shadow now hovering. Bring your pass to the King. In taking hisquest you’ll waste much time. Encounters are catastrophic, creaturesunnerving. But then you’d expect nothing less guarding this King.

Legendary Castle Doom
As stated, this Castle is suspected, and even believed to be in actual existence. Ourobjective is not to argue its existence, merely recount the reports of those who believe.
Mapping and location skills prove helpful, as travel has been described circular.Demons, devils and other monstrous beings seem to clone here. A generator need bedefused. Odd clues are uncovered. Order and sanity is queried. A clue mimics acalculator, as things begin to add up. Statistics as well! A visit to the dog gave you yourkey; use it now. Jump skills are tried. Travel on foot has worked best. These findingsremain undocumented. It is neither proven nor refuted a search will uncover likesituations.
Those Dimensions RemainingThe balance of your travel in the Land of Varn totals, shall we say, 15dimensions? These dimensions are best described as dungeons andstrongholds. You’ll even suffer a maze and a plane. Most dangerous, as theystray you far from the safety you once found traveling the towns. Some sendyou wandering far below the surface. As you journey indoors, many spells nowtest worthless. If you’re unable to gain entry, chances are you do not possessthe appropriate skill, experience, or perhaps item. If entry is gained, proceedwith caution. Three strongholds are ruled by ones possessing the utmost inpower. One dimension is regulated by the Clerics of the South, while anotherappears to be governed by Dragons of all things! Heed all signs and banners.Note all clues. Mind names and colors. Travel upstairs and downstairs. Searchall levels. Encounters occur in closed areas. Expect the impact moreadvanced, as those you battle prove more strategic than you’ve witnessed.Search all Black and White painted rooms. If not successful at first, searchagain. These are the common. Now search their difference...

Dungeon Ruins underDragadune First Level
Find passage to the cavern under Dusk. Be confronted by a cult of new order.Clerics attack most reverently, even religiously. Encounters resemble groupsof tactical combat, worsening most progressively. Mind all messages. Corakhelps in your search for the South.
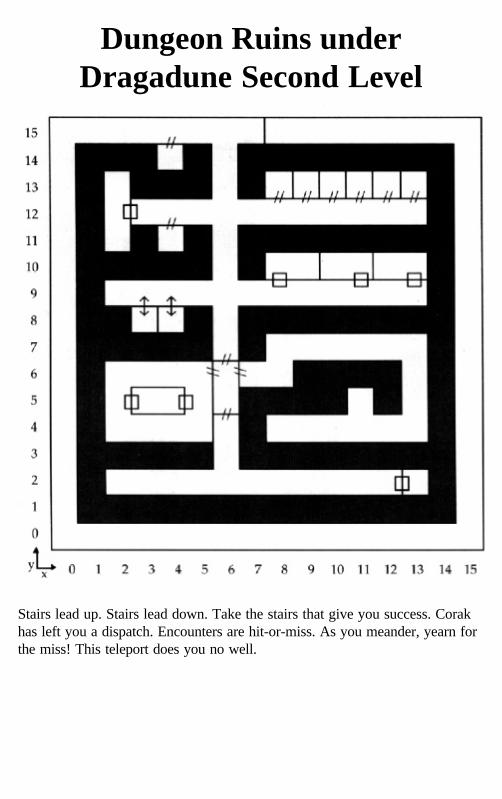
Dungeon Ruins underDragadune Second Level
Stairs lead up. Stairs lead down. Take the stairs that give you success. Corakhas left you a dispatch. Encounters are hit-or-miss. As you meander, yearn forthe miss! This teleport does you no well.

Dungeon Ruins underDragadune Third Level
Three levels down encourage doubting your safety. Discover three doors, acurtain and a box. The door is your key. A gold message adds to yourcollection. Find those that find you worthy. Here listening becomes a skill.Once deemed worthy, again take drink from fountains and pools to increasestatus.
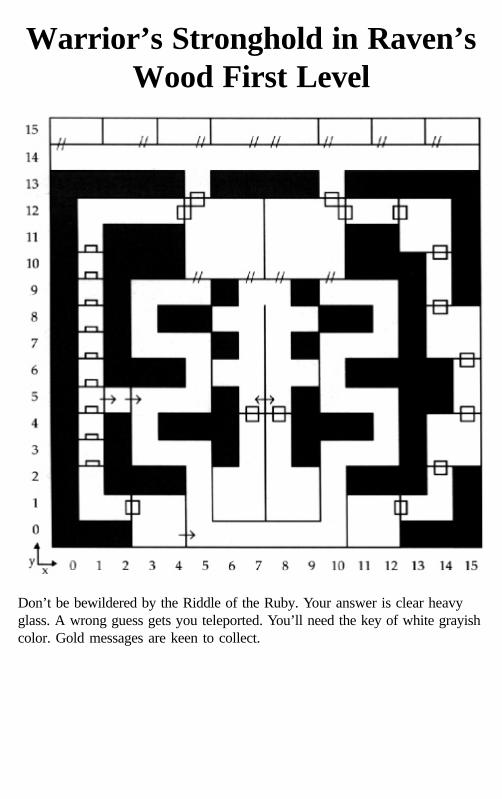
Warrior’s Stronghold in Raven’sWood First Level
Don’t be bewildered by the Riddle of the Ruby. Your answer is clear heavyglass. A wrong guess gets you teleported. You’ll need the key of white grayishcolor. Gold messages are keen to collect.

Warrior’s Stronghold in Raven’sWood Second Level
Through a secret passage you’ll locate hidden encounters. No stoning here,rather bouldering instead! Though you’ll not find the fifth test, knowing itswhereabouts, plus a jump, is the turn off. Once off, expect the Raven Archer.Text reads that meeting him serves as defeating him. The poor find him rich.

Deserted Wizard’s Lair in theQuivering Forest First Level
This remains the Stronghold of the Wizard Okrim. Confusing to map, as youneed to go down to go across. Expect battle, but you decide your death.Treasure awaits your defeat. The gold message is worth noting.
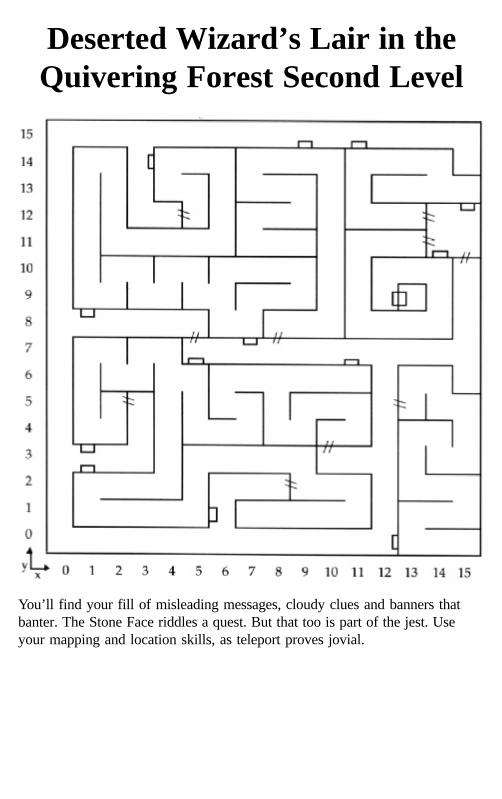
Deserted Wizard’s Lair in theQuivering Forest Second Level
You’ll find your fill of misleading messages, cloudy clues and banners thatbanter. The Stone Face riddles a quest. But that too is part of the jest. Useyour mapping and location skills, as teleport proves jovial.
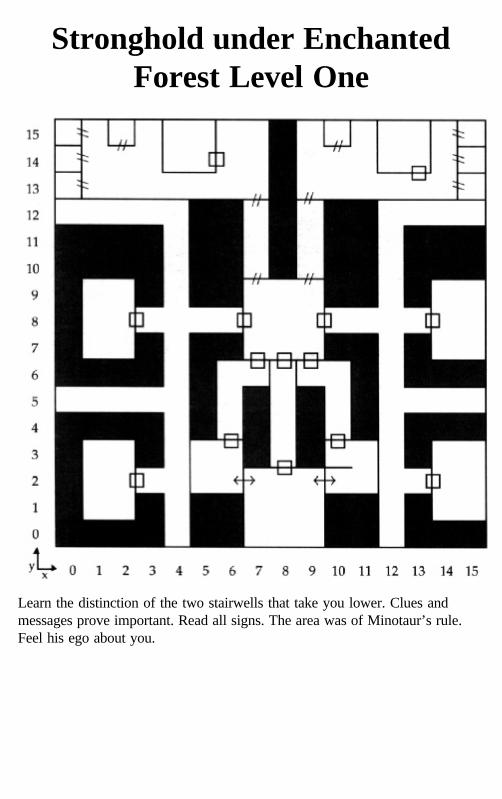
Stronghold under EnchantedForest Level One
Learn the distinction of the two stairwells that take you lower. Clues andmessages prove important. Read all signs. The area was of Minotaur’s rule.Feel his ego about you.
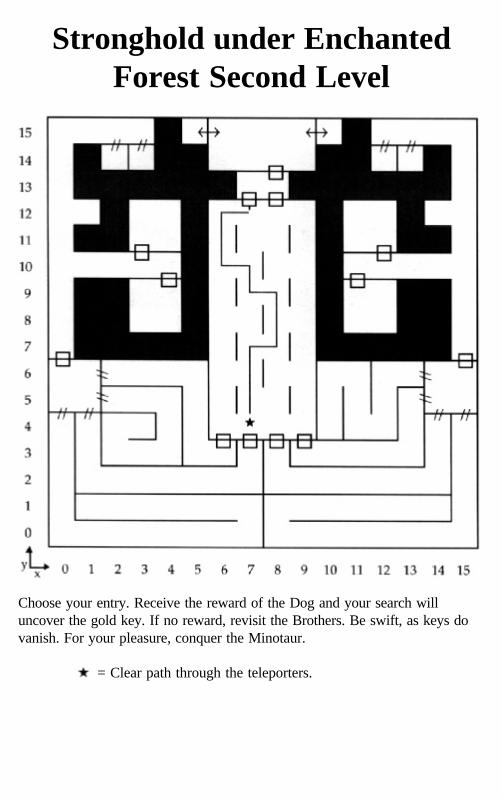
Stronghold under EnchantedForest Second Level
Choose your entry. Receive the reward of the Dog and your search willuncover the gold key. If no reward, revisit the Brothers. Be swift, as keys dovanish. For your pleasure, conquer the Minotaur.
= Clear path through the teleporters.
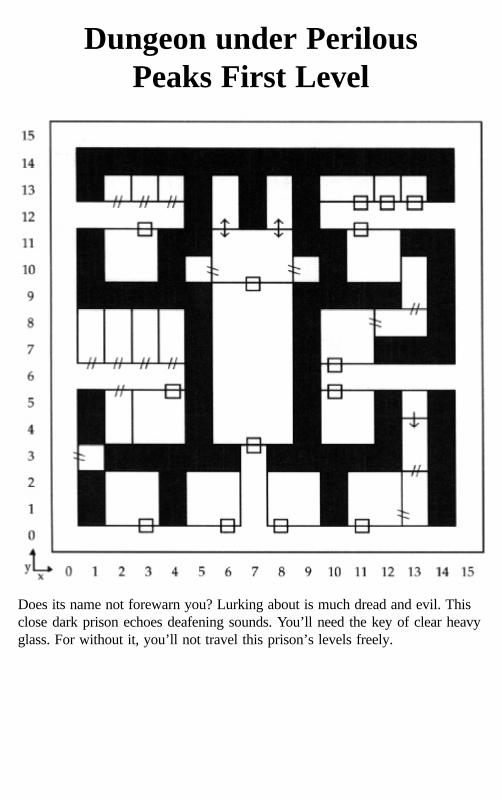
Dungeon under PerilousPeaks First Level
Does its name not forewarn you? Lurking about is much dread and evil. Thisclose dark prison echoes deafening sounds. You’ll need the key of clear heavyglass. For without it, you’ll not travel this prison’s levels freely.

Dungeon under PerilousPeaks Second Level
Your travels forced you to hoard much. Here you require the wondrous ofwonders, known as Thundranium. Travel is random without it. Encountersswoop swiftly. Assemble with near every demon, creature and monster knownand unknown to the Land of Varn.

Dungeon under PerilousPeaks Third Level
A division by five is its best depiction. Be assured you’re fully supplied byteleport, yet it need be correct. Encounters put you in jeopardy. But you’vegained entry due to experience and skill. Use them now for your profit.
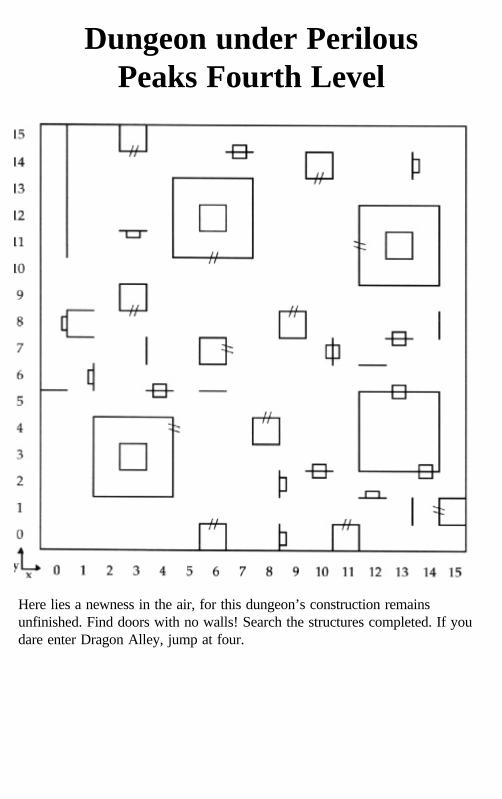
Dungeon under PerilousPeaks Fourth Level
Here lies a newness in the air, for this dungeon’s construction remainsunfinished. Find doors with no walls! Search the structures completed. If youdare enter Dragon Alley, jump at four.
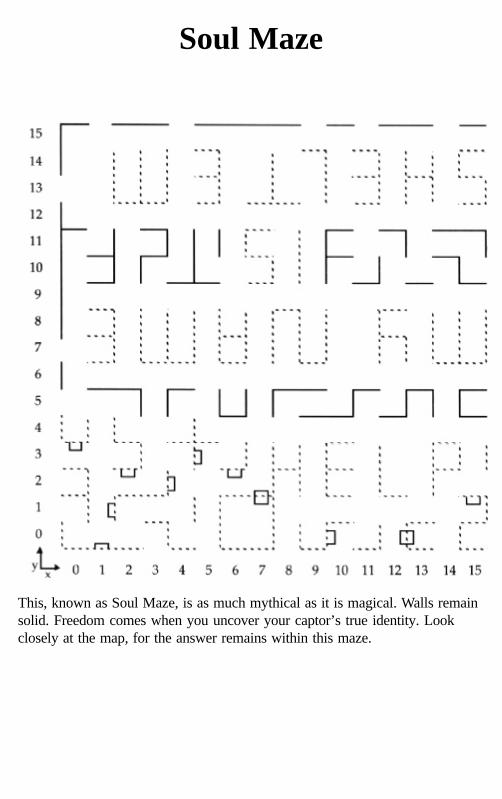
Soul Maze
This, known as Soul Maze, is as much mythical as it is magical. Walls remainsolid. Freedom comes when you uncover your captor’s true identity. Lookclosely at the map, for the answer remains within this maze.

Astral Plane
Greetings and salutations are in order! Bring your key card. Enter all fiveastral projectors to feel much glory. If you have completed your mission, youwill know all Jubilation. For it is now this book has been read. Here youuncover the Secret of the Inner Sanctum. Sorpigal awaits your return. TheGates to Another World soon pass your entry.
Strategies for Game PlayingThose in adventure need develop strategies to discover the true Secret of theInner Sanctum. The following pages list random guidelines fellow travelersfound of great worth. Those listed have been divided into three sectionsincluding tips and tactics, coordinates and answers. Don’t let the code bewitchyou. The key you will find at the end of the section.Use these hints wisely, as they stop unnecessary straying. Don’t be confused,for these remain but a few of the clues you seek. Perhaps it best to developpersonalized strategies for your party.
Tips and TacticsWhen creating members of your party, take note that a high speed Sorcererinitiates battle. Prime statistics are best at 15+. It has been stronglyrecommended that a member from each class be represented. However, thosefamiliar with the Land of Varn agree that experimentation proves mostinteresting.
Visit the Town Inns to save your game. This need be done often. In theunfortunate event your party meets its demise all not saved will be lost. Restafter encounters and before opening those items with traps.
Stock up on food with culinary delights. Use your backpack efficiently, savingroom for any items found while adventuring. Beware of the Hermit that trades.He’s greedy. Those at the trading post rummage through your backpack aswell.
Take note as clues, rumors and such messages are uncovered. Later relevanceis discovered. Rumors in Taverns appear rare. Each visit, and all revisits toTaverns warrant further listening. Tipping reveals much. Don’t hesitate to tipmore than once.
All encounters, save for set ones, are based on your party’s current experiencelevel, thus assuring constant challenge. Perhaps it best to first test an area. Ifproving too difficult, return once you have gained in experience. Each Town,Natural Cavern, Outdoor Region, Castle and Those Dimensions Remaininghave their own special events and set of governing statistics.

Monsters, orcs, goblins, demons and creatures total over 200 species. Eachspecies has its own level of friendliness.
Getting over traps and pits may require use of Rope and Hooks or LevitationSpells. If faced with corridors seeming endless, try a Jump Spell. Fly spellsappear to be the safest means of travel, save for Doom, where walking reapshighest rewards. If traveling by foot, keep to the main roads.
During combat party members should combine their attacks on the mostpowerful monster for best results. Allow the Archer to shoot wheneverpossible. Casting Sleep and Bless Spells improve your chances of survival.
Understand the three types of light. Light known as free shines in Towns.Natural Caverns are generally dark. Here casting a Light Spell allows one dayof light. In darkness cast the Spell of Lasting Light. Each square is equal toone light factor.
Wizard Ranalou holds access to all castles. He too believes of six.
Study your map of the Land of Varn. Four monstrous creatures have surfaced.Reap reward on Luck island after defeating one or more.
At least two quests are thought to be false. Some requests of Lords may befound in Towns.
Treasures are abundant! In the Land of Varn, you do judge a treasure by itscover. The richer the container, the more precious the treasure. And of course,the more fierce the traps that guard it! Black boxes contain the most powerfulof items. Though rare, they are found only after defeating forceful monsters.
Etherealize and Teleport are possible means of barrier penetration. Some areasshow resistance to magic, rest, surface spells, time distortion and dispellmagic. Resistance may also appear in combinations.
Visit the Mystic in Algary to find your resistances.
Find protection for the day from Temples, but only if your party proves giving.
Experience and skill may be raised in a variety of ways. Try a visit to theSwaze Pit hidden in the Inn of Algary. The Arena proves you well.

Gather your party’s gold, then visit the Fountain in Dragadune.
Sands of Time restores youth. Etherealize gets you there. Once there, bewareof Dinosaurs!
When visiting the Ice Princess, visit but a second time for a double pleasure.
If your leader’s alignment is correct, visit the Shrine of Okzar. Keep it correctto be judged favorably. Stay neutral around aliens.
Put your clues in interleave order, both of silver and gold, then read top tobottom.
These are but a sampling of tips and tactics those before you practiced. Whileon your journeys, learn to incorporate these findings with those of your own.
Specific CoordinatesNo matter how astute your party, certain items and quests remain difficult touncover or solve. Much appreciation is due those traveled before you. For theyfreely share exact coordinates and specific locations of such items you seek.Listed randomly find their understanding of your journeys.
Gain entry to Lords Castles via a Merchants Pass.Outdoor Region C1 at 34 41 47 35 43
Lord Killburn’s map navigates Desert Travel.Outdoor Region C3 at 34 42 47 35 37 40
If you venture the Desert without said map, search the portal back toSorpigal.In the Cavern below Dusk at 34 37 41 47 35 46
Find the Medusa in the cavern.Outdoor Region B2 at 34 44 47 35 40
A defeat gains the head of your search.In the Cavern at 34 37 41 47 35 40
Enter King Alamar’s Castle after Heratio Harper gives the password forthe day.Outdoor Region E3 at 34 45 47 35 38
This password does you well at Lion’s pass.Outdoor Region E3 at 34 37 38 47 35 42 10 25 28 10 34 37 38 47 35 44
Audience King Alamar with the King’s Pass.Outdoor Region A2 at 34 46 47 35 37 41
Desert Traders hold your Cactus Nectar.Outdoor Region D1 at 34 37 46 47 35 37 39
Og sends you away first without the Queen Idols.Dungeon in the Perilous Peaks Level 4 at 34 46 47 35 37 41Deserted Wizard’s Lair in the Quivering Forest Level 1 at 34 46 47 35 37 41
Success improves with drink from these pools and no rest. Areas appearingtoo difficult may be encountered after visiting these pools.Outdoor Region C1 at 34 45 47 35 37 40Outdoor Region C2 at 34 40 47 35 45 10 25 28 l0 34 40 47 35 43Drink here is good. Feel free to have your fill!
Face west for the Guire. He adds much to tree climbing!Outdoor Region D3 at 34 46 47 35 38
Silver Messages total six and wait in Castles.Castle Blackridge North at 34 45 47 35 41Castle White Wolf at 34 46 47 35 37Castle Blackridge South at 34 37 41 47 35 44Castle Alamar at 34 43 47 35 37 39Castle Dragadune at 34 37 46 47 35 39Legendary Castle at 34 37 47 35 37
Gold Messages total nine and wait in Those Dimensions Remaining.Deserted Wizard’s Lair in the Quivering Forest Level 1 at 34 39 47 35 37 40Warrior’s Stronghold in Raven’s Wood Level 2 at 34 37 41 47 35 42Stronghold in the Enchanted Forest Level l at 34 37 46 47 35 37 41Deserted Wizard’s Lair in the Quivering Forest Level 2 at 34 37 38 47 35 3739Dungeon Ruins under Dragadune Level 3 at 34 37 40 47 35 37 37Warrior’s Stronghold in Raven’s Wood Level 1 at 34 40 47 35 46Dungeon in the Perilous Peaks Level 1 at 34 44 47 35 37 39Dungeon Ruins under Dragadune Level l at 34 37 39 47 35 37 38Stronghold in the Enchanted Forest Level 2 at 34 37 46 47 35 40
The Interleave for both gold and silver are thought to be housed in theLegendary Castle.Silver at 34 37 41 47 35 46Gold at 34 37 41 47 35 37 41The Gypsy Seer assigns your color.Outdoor Region C2 at 34 45 47 35 37 37
Keys open many doors. Doors you find easily, whereas keys take work.Bronze Key:After defeating the 13 in the cave in Outdoor Region C2 at 34 37 41 47 35 3737Or after receiving the Diamond Key. Outdoor Region B2 at 34 40 47 35 40

Silver Key:Outdoor Region Bl at 34 40 47 35 43Crystal Key:Warrior’s Stronghold in Raven’s Wood Level l at 34 42 47 35 37 37Coral Key:Outdoor Region A4 at 34 40 47 35 42Gold Key:Stronghold in the Enchanted Forest Level 2 at 34 39 47 35 40Diamond Key:Outdoor Region B2 at 34 40 47 35 40
Combine the clues from Brothers Zam and Zom for the ruby whistle.Zam waits in Portsmith at 34 37 38 47 35 38Zom waits in Algary at 34 37 47 35 37
Thundranium gives great strength. Find it in set places, or at times bymere search.Find it in the Cavern in Outdoor Region B3 at 34 46 47 35 43Inside the Cavern at 34 37 47 35 3734 46 47 35 3934 37 47 35 4l
These coordinates suit your travels well. These are but a few of the riches andmysteries you seek. Rest assured much waits for you to discover.
Miscellaneous AnswersThose before you searched for answers, while at times grew baffled by clues.Find there the answers that served them well.
Dials in the Volcanic Isle need be set to l2 20 This allows teleport to theVolcano God.
You’ll need your Key Card to penetrate the Inner Sanctum. The VolcanoGod’s answer is 17 11 22 11
Og masters many a game. Chess is perhaps his forte. Win by27 31 15 15 24 10 30 25 10 21 19 24 17 29 10 22 15 32 15 22 10 37The Ice Princess knows and wants only 22 25 32 15
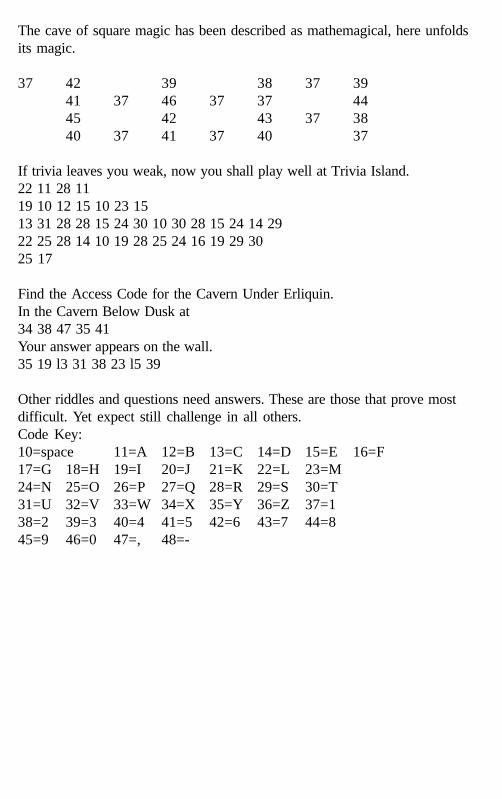
The cave of square magic has been described as mathemagical, here unfoldsits magic.
37 42 39 38 37 3941 37 46 37 37 4445 42 43 37 3840 37 41 37 40 37
If trivia leaves you weak, now you shall play well at Trivia Island.22 11 28 1119 10 12 15 10 23 1513 31 28 28 15 24 30 10 30 28 15 24 14 2922 25 28 14 10 19 28 25 24 16 19 29 3025 17
Find the Access Code for the Cavern Under Erliquin.In the Cavern Below Dusk at34 38 47 35 41Your answer appears on the wall.35 19 l3 31 38 23 l5 39
Other riddles and questions need answers. These are those that prove mostdifficult. Yet expect still challenge in all others.Code Key:10=space 11=A 12=B 13=C 14=D 15=E 16=F17=G 18=H 19=I 20=J 21=K 22=L 23=M24=N 25=O 26=P 27=Q 28=R 29=S 30=T31=U 32=V 33=W 34=X 35=Y 36=Z 37=138=2 39=3 40=4 41=5 42=6 43=7 44=845=9 46=0 47=, 48=-
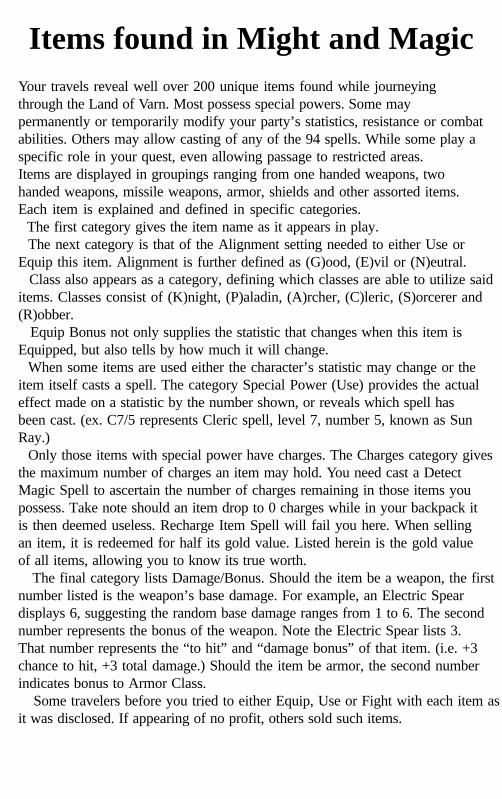
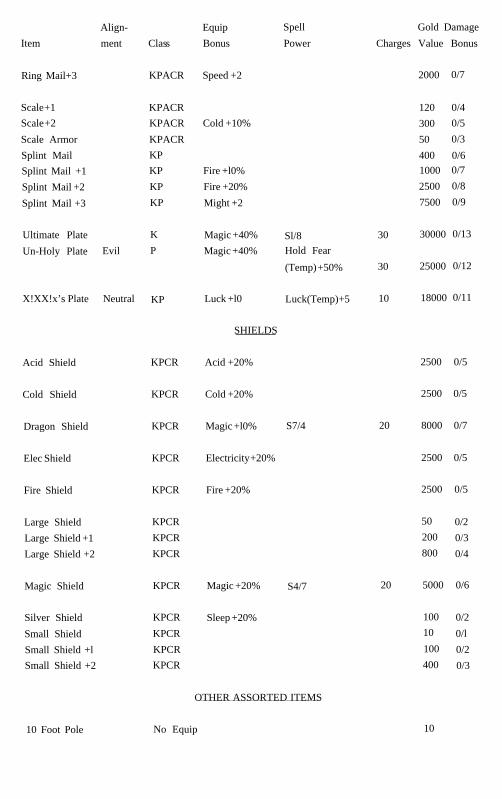
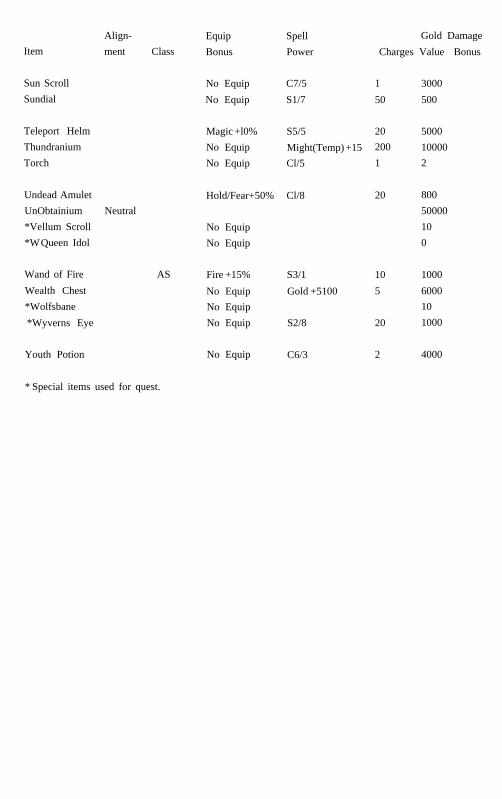
Items found in Might and MagicYour travels reveal well over 200 unique items found while journeyingthrough the Land of Varn. Most possess special powers. Some maypermanently or temporarily modify your party’s statistics, resistance or combatabilities. Others may allow casting of any of the 94 spells. While some play aspecific role in your quest, even allowing passage to restricted areas.Items are displayed in groupings ranging from one handed weapons, twohanded weapons, missile weapons, armor, shields and other assorted items.Each item is explained and defined in specific categories.
The first category gives the item name as it appears in play.The next category is that of the Alignment setting needed to either Use or
Equip this item. Alignment is further defined as (G)ood, (E)vil or (N)eutral.Class also appears as a category, defining which classes are able to utilize said
items. Classes consist of (K)night, (P)aladin, (A)rcher, (C)leric, (S)orcerer and(R)obber.
Equip Bonus not only supplies the statistic that changes when this item isEquipped, but also tells by how much it will change.
When some items are used either the character’s statistic may change or theitem itself casts a spell. The category Special Power (Use) provides the actualeffect made on a statistic by the number shown, or reveals which spell hasbeen cast. (ex. C7/5 represents Cleric spell, level 7, number 5, known as SunRay.)
Only those items with special power have charges. The Charges category givesthe maximum number of charges an item may hold. You need cast a DetectMagic Spell to ascertain the number of charges remaining in those items youpossess. Take note should an item drop to 0 charges while in your backpack itis then deemed useless. Recharge Item Spell will fail you here. When sellingan item, it is redeemed for half its gold value. Listed herein is the gold valueof all items, allowing you to know its true worth.
The final category lists Damage/Bonus. Should the item be a weapon, the firstnumber listed is the weapon’s base damage. For example, an Electric Speardisplays 6, suggesting the random base damage ranges from 1 to 6. The secondnumber represents the bonus of the weapon. Note the Electric Spear lists 3.That number represents the “to hit” and “damage bonus” of that item. (i.e. +3chance to hit, +3 total damage.) Should the item be armor, the second numberindicates bonus to Armor Class.
Some travelers before you tried to either Equip, Use or Fight with each item asit was disclosed. If appearing of no profit, others sold such items.
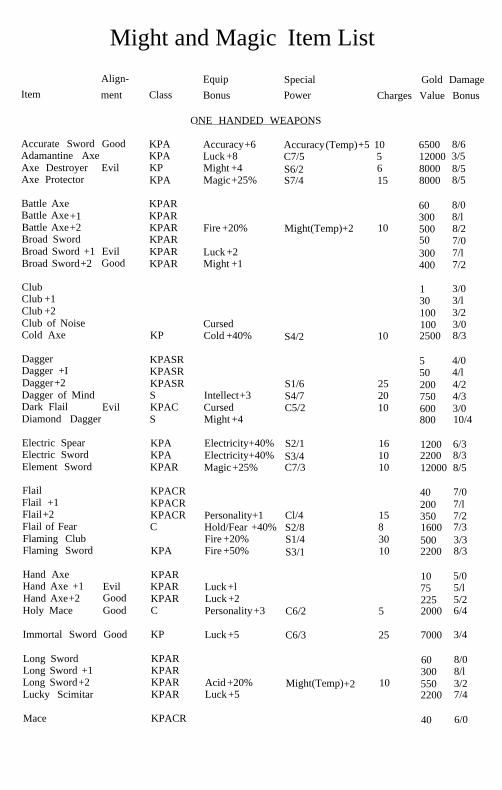
Might and Magic Item List
Align-
Item ment Class
Equip Special Gold Damage
Bonus Power Charges Value Bonus
ONE HANDED WEAPONS
Accurate Sword GoodAdamantine AxeAxe Destroyer EvilAxe Protector
KPA Accuracy +6 Accuracy (Temp) +5 10KPA Luck +8 C7/5 5KP Might +4 S6/2 6KPA Magic +25% S7/4 15
6500 8/612000 3/58000 8/58000 8/5
Battle AxeBattle Axe +1Battle Axe +2Broad SwordBroad Sword +1 EvilBroad Sword +2 Good
ClubClub +1Club +2Club of NoiseCold Axe
KPARKPARKPARKPARKPARKPAR
Fire +20%
Luck +2Might +1
Might(Temp) +2 10
60 8/0300 8/l500 8/250 7/0300 7/l400 7/2
KPCursedCold +40% S4/2 10
1 3/030 3/l100 3/2100 3/02500 8/3
Dagger KPASRDagger +I KPASRDagger +2 KPASRDagger of Mind SDark Flail Evil KPACDiamond Dagger S
Intellect +3S1/6S4/7
CursedMight +4
C5/2
252010
Electric Spear KPA Electricity +40% S2/1 16Electric Sword KPA Electricity +40% S3/4 10Element Sword KPAR Magic +25% C7/3 10
5 4/050 4/l200 4/2750 4/3600 3/0800 10/4
1200 6/32200 8/312000 8/5
FlailFlail +1Flail +2Flail of FearFlaming ClubFlaming Sword
KPACRKPACRKPACRC
KPA
Personality+1 Cl/4 15Hold/Fear +40% S2/8 8Fire +20% S1/4 30Fire +50% S3/1 10
Hand AxeHand Axe +1 EvilHand Axe +2 GoodHoly Mace Good
Immortal Sword Good
KPARKPARKPARC
Luck +lLuck +2Personality +3
KP Luck +5
C6/2 5
C6/3 25
Long SwordLong Sword +1Long Sword +2Lucky Scimitar
Mace
KPARKPARKPARKPAR
Acid +20%Luck +5
Might(Temp) +2 10
KPACR
40 7/0200 7/l350 7/21600 7/3500 3/32200 8/3
10 5/075 5/l225 5/22000 6/4
7000 3/4
60 8/0300 8/l550 3/22200 7/4
40 6/0

Align-ment
EquipBonus
SpecialPower
Gold DamageValue BonusClass Charges
Mace +1Mace +2Mace of Undead
KPACRK P A C R Personality +1 Cl/5KPAC Cursed Age +l0
125 6/l325 6/2500 6/0
2500 4/0
40 7/0250 7/l400 7/26500 10/420 6/0100 6/l300 6/215 6/0100 6/l250 6/210000 8/58000 8/57000 8/515000 20/62000 6/46000
80 10/0350 10/l900 10/2
2500 10/32500 8/310000 10/510000 10/5
20000 20/6
250 14/0600 14/l2000 14/2
5000 14/3
80 10/0
350 10/l
900 10/2
150 12/0
500 12/l
1200 12/2
3500 12/3
150 12/0
550 12/l
1200 12/2
105
5
15
15302020510
20124040
15
10
10
10
10
20
Good
Royal Dagger Neutral KPASR
ScimitarScimitar +lScimitar +2Sharp SwordShort SwordShort Sword +lShort Sword +2SpearSpear +lSpear +2Sword of MagicSword of MightSword of SpeedUltimate SwordUn-Holy MaceX!XX!X’s Sword
KPARKPARKPARKPKPARKPARKPARKPAKPAKPAKPARKKPAKPARCKPAR
GoodEvilEvil
Luck +2Might +lMagic +20% S5/3
S1/2
GoodEvil
Luck +lLuck +2Magic +30%Might +6Speed +6Might +l0Personality +3Luck +15
S6/4Might(Temp) +5Speed (Temp) +5Speed(Temp)+5C6/1Luck(Temp) +5
EvilNeutral
TWO HANDED WEAPONS
BardicheBardiche +lBardiche +2
GoodGood
KPAKPA speed +lKPA speed +2
Cold Glave Evil KPACuring Staff Good CSDemons Glaive Neutral KADevil’s Glaive Neutral KA
Cold +40%Poison +30%Acid +50%Cold +50%
C3/6Cl/6S4/1S4/3
C7/5
Might(Temp) +2
Speed(Temp) +3
Evil Flamberge Evil P Magic +50%
Flamberge KPAFlamberge +l KPAFIamberge +2 KPAFlamberge +3 KPA
Might +2Might +4
Glaive
Glaive +1 Evil
Glaive +2 Evil
Great Axe
Great Axe +l
Great Axe +2 KPA
Great Axe +3 KPA
Great Hammer KPAC
Great Hammer +l KPAC
Great Hammer +2 KPAC
KPA
KPA Speed +1
KPA Speed +2
KPA
KPA
Might +2 Might (Temp) +2
Might +4 Speed(Temp) +3
Personality +l
Personality +2 Cl/2
Item
Item ment
Halberd KPA
Halberd +l KPA
Halberd +2 KPA
Holy FIamberge Good P
Minotaur’s Axe KPA Cursed
Sorcerer Staff S
Staff KPACS
Staff +l KPACS
Staff +2 KPACS
Staff of Light KPACS
Staff of Magic KPACS
The Flamberge KPA Might +10
Thunder Hammer C Electricity +40%
Archer’s Bow A Accuracy +5 S6/2 10
Bow of Power Evil KPA Hold/Fear +40% ExpLevel(Temp)+4 15
Crossbow KPAR
Crossbow +1 KPAR
Crossbow +2 AR
Crossbow Luck AR
Crossbow Speed KPAR
Flaming Bow
Giants Bow
Great Bow
Evil
Great Bow + 1 KPA
Great Bow +2 KPA
Lightning Bow KPA
Long Bow KPA
Long Bow +l KPA
Long Bow +2 Good KPA
Magic Sling KPAR Magic +l0% Magic(Temp) +20% 10
Class
KPA
KPA
KPA
Equip Spell Gold Damage
Bonus Power Charges Value Bonus
Speed +3
Magic +50%
C1/4 20
C7/2 15
100 12/0
500 12/l
1200 12/2
20000 20/6
2000 3/0
Intellect +4
Intellect +l
Luck +2
Sleep +40%
Magic +25%
S7/3 10
S1/8 10
C3/4 20
S6/4 10
S4/3 10
C4/6 15
8000 8/5
30 8/0
200 8/l
600 8/2
1500 8/3
5000 8/4
15000 30/6
3500 12/4
MISSILE WEAPONS
Accuracy +2
Luck +3
Speed +4
Fire +20%
Cl/2 20
Cl/3 10
S3/4 10
Hold/Fear +30%
Electricity +20% S3/1 10
Sleep +l0%
12000 20/5
6000 10/4
50 6/0
250 6/l
l000 6/2
2000 6/3
2000 6/3
3000 10/3
20/3
250 12/0
1250 12/l
2000 12/2
3000 10/3
100 10/0
500 10/l
1200 10/2
800 4/3
Good
2000
Align

Item
Align-
ment Class
Equip Spell Gold Damage
Bonus Power Charges Value Bonus
Obsidian Bow cursed S5/2
Robber’s X-Bow
Short Bow
Short Bow +1
Short Bow +2
Sling
Sling +l
Evil
R speed +4 S2/7
K P A
K P A
K P A Sleep +1O%
K P A R
K P A R
The Magic Bow K P A Magic +20% S5/5
2000 3/0
8O00 10/5
75 8/0
375 8/l
1000 8/2
10 4/0
50 4/l
6000 10/4
ARMOR
Blue Ring Mail K P A C R Electricity+60% S3/4
Bracers AC 4 ASR
Bracers AC 6 ASR Hold/Fear +20% S4/7
Bracers AC 8 ASR Hold/Fear +60% S4/7
10000 0/9
1000 0/4
2500 0/6
7500 0/8
Chain Mail K P A C
Chain Mail +1 KPAC
Chain Mail +2 KPAC
Chain Mail +3 KPAC
Fire +5%
Fire +15%
Luck +4
200 0/5
500 0/6
1500 0/7
4500 0/8
Holy Plate Good P Magic+40% Hold/Fear
(Temp) +50%
3
10
5
30
20
40
30 25000 0/12
Leather +1 K P A C R 60 0/3
Leather +2 K PA C R Electricity +10% 150 0/4
Leather Armor K P A C R 20 0/2
Padded +l
Padded Armor
Plate Mail
Plate Mail +1
Plate Mail +2
Plate Mail +3
KP
KP
KP
KP
Fire +10%
Fire +20%
Fire +50%
25 0/2
10 0/l
1000 0/7
2500 0/8
7500 0/9
15000 0/10
Red Chain Mail K P A C Fire +60%
Ring Mail K P A C R
Ring Mail +11 K P A C R Fire +5%
Ring Mail +2 K P A C R Fire +15%
S3/1 30 15000 0/10
100 0/4
250 0/5
750 0/6
Align-
ment ClassItem
Equip
Bonus
Ring Mail +3 KPACR Speed +2
Spell
Power
Sl/8
Hold Fear
(Temp) +50%
Luck(Temp) +5
Gold Damage
Charges Value Bonus
2000 0/7
120 0/4
300 0/5
50 0/3
400 0/6
1000 0/7
2500 0/8
7500 0/9
30 30000 0/13
30 25000 0/12
10 18000 0/11
Scale +1
Scale +2
Scale Armor
Splint Mail
Splint Mail +1
Splint Mail +2
Splint Mail +3
Ultimate Plate
Un-Holy Plate
X!XX!x’s Plate
KPACR
KPACR
KPACR
KP
KP
KP
KP
K
Evil P
Cold +10%
Fire +l0%
Fire +20%
Might +2
Magic +40%
Magic +40%
Neutral KP Luck +l0
SHIELDS
Acid +20%
Cold +20%
Magic +l0% S7/4
Electricity +20%
Fire +20%
KPCRAcid Shield 2500 0/5
Cold Shield KPCR 2500 0/5
Dragon Shield KPCR 20 8000 0/7
Elec Shield KPCR 2500 0/5
Fire Shield KPCR 2500 0/5
Large Shield
Large Shield +1
Large Shield +2
KPCR
KPCR
KPCR
50 0/2
200 0/3
800 0/4
Magic Shield KPCR Magic +20% S4/7
Sleep +20%
20 5000 0/6
Silver Shield
Small Shield
Small Shield +l
Small Shield +2
KPCR
KPCR
KPCR
KPCR
100 0/2
10 0/l
100 0/2
400 0/3
OTHER ASSORTED ITEMS
10 Foot Pole No Equip 10
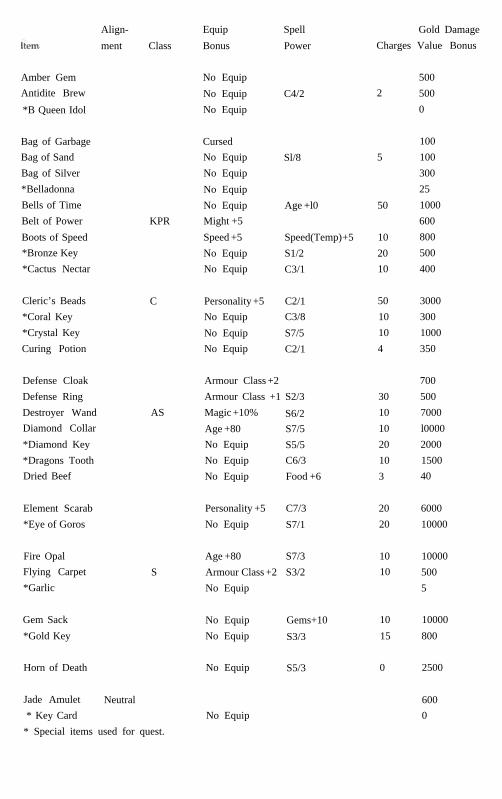
Amber Gem
Antidite Brew
*B Queen Idol
Bag of Garbage
Bag of Sand
Bag of Silver
*Belladonna
Bells of Time
Belt of Power
Boots of Speed
*Bronze Key
*Cactus Nectar
Cleric’s Beads
*Coral Key
*Crystal Key
Curing Potion
Defense Cloak
Defense Ring
Destroyer Wand
Diamond Collar
*Diamond Key
*Dragons Tooth
Dried Beef
Element Scarab
*Eye of Goros
Fire Opal
Flying Carpet
*Garlic
Gem Sack
*Gold Key
Horn of Death
Jade Amulet
* Key Card
Align-
ment Class
KPR
C
AS
S
Neutral
Equip
Bonus
No Equip
No Equip
No Equip
Spell
Power
C4/2
Cursed
No Equip Sl/8
No Equip
No Equip
No Equip Age +l0
Might +5
Speed +5 Speed(Temp) +5
No Equip S1/2
No Equip C3/1
Personality +5 C2/1
No Equip C3/8
No Equip S7/5
No Equip C2/1
Armour Class +2
Armour Class +1 S2/3
Magic +10% S6/2
Age +80 S7/5
No Equip S5/5
No Equip C6/3
No Equip Food +6
Personality +5 C7/3
No Equip S7/1
Age +80 S7/3
Armour Class +2 S3/2
No Equip
No Equip Gems+10
No Equip S3/3
No Equip S5/3
No Equip
Gold Damage
Charges Value Bonus
2
5
50
10
20
10
50
10
10
4
30
10
10
20
10
3
20
20
10
10
10
15
0
500
500
0
100
100
300
25
1000
600
800
500
400
3000
300
1000
350
700
500
7000
l0000
2000
1500
40
6000
10000
10000
500
5
10000
800
2500
600
0
* Special items used for quest.

Item
Align-
ment Class
*Kings Pass
Knowledge Book PACS
No Equip
Intellect +2
Lantern
Laser Blaster
Lightning Wand
Lucky Charm
ACR
No Equip
Accuracy +5
Electricity +20%
Luck +5
Magic Herbs No Equip
Magic Oil No Equip
Magic Potion No Equip
Magic Vest
* Map of Desert
*Medusa Head
*Merchants Pass
Might Potion
Model Boat
*Pirates Map A
*Pirates Map B
Magic +20%
No Equip
Cursed
No Equip
No Equip
No Equip
No Equip
No Equip
Potion of Life
Power Gauntlets
Precision Ring
No Equip
KPACR
Accuracy +5
Return Scroll
*Ring of Okrim
Robber’s Tools
Rope & Hooks
Ruby Idol
*Ruby Whistle
R
No Equip
Luck +10
Thief Abil’s +20%
No Equip
No Equip
Luck +2
Scroll of Fire
Shinny Pendant
Silent Chime
*Silver Key
Skill Potion
Smelling Salt
Sorcerer Robe
Speed Potion
Star Ruby
Star Sapphire
*Special items used for quest.
S
No Equip S3/ 1
Sleep +30% S2/2
No Equip C2/7
No Equip S1/5
No Equip Level (Temp) +5
No Equip Cl/l
Intellect +5 S3/3
No equip Speed (Temp) +5
Luck +l0 S1/3
Magic +30% S6/4
Equip Spell Gold Damage
Bonus Power Charges Value /Bonus
Spell Level (Temp) + 14
0
1000
Cl/5
S6/2
S3/4
Luck(Temp1 )+l0
Cl/4
S6/5
Spell Points
(Current) +l0
S4/8
S1/7
10
10
10
20
3
3
2
10
20
3
15
2
1
20
30
200
1
10
20
30
5
3
20
3
30
10
20
2000
1500
800
50
3000
Might (Temp) +5
C3/8
500
6000
400
0
0
200
400
1000
2000
C6/2 1500
3000
3000
C6/5
S4/8
S2/4
Cl/l
2000
3000
150
10
3000
500
300
2000
400
600
600
50
2500
200
6000
6000
Might+5
Item
Sun Scroll No Equip C7/5 1 3000
Sundial No Equip S1/7 50 500
Teleport Helm Magic +l0% S5/5 20 5000
Thundranium No Equip Might(Temp) +15 200 10000
Torch No Equip Cl/5 1 2
Align-
ment Class
Equip Spell Gold Damage
Bonus Power Charges Value Bonus
Undead Amulet
UnObtainium Neutral
*Vellum Scroll
*W Queen Idol
Wand of Fire
Wealth Chest
*Wolfsbane
*Wyverns Eye
Youth Potion No Equip C6/3 2
AS
Hold/Fear+50% Cl/8 20
No Equip
No Equip
Fire +15%
No Equip
No Equip
No Equip
S3/1 10
Gold +5100 5
S2/8 20
800
50000
10
0
1000
6000
10
1000
4000
* Special items used for quest.


![Special Issue on ICIT 2009 Conference - Bioinfomatics and Image - Ubiquitous Computing and Communication Journal [ISSN 1992-8424]](https://img.pdfslide.us/doc/110x75/577d39bf1a28ab3a6b9a73f2/special-issue-on-icit-2009-conference-bioinfomatics-and-image-ubiquitous.jpg)