Embed Size (px)
Citation preview
1990 DS Gasoline Golf Car
Owner's Manual
Manual Number 1015439
Effective August 1, 1989 0889A00000
This instruction manual should be read completely and carefuHy before attempting to drive or service this car. Failure to follow the instructions in this manual could result in severe personal injury or death.
NOTE: If this vehicle is equipped as a Fairway Villager four-passenger vehicle, supplements to this manual are required. If this information does not accompany this manual, contact CLUB CAR, INC., Customer Service and request the Fairway Villager supplement.
Safety Details: It is important to note that some statements throughout this manual are preceded by the words DANGER, WARNING, CAUTION or NOTE. We recommend that you take special notice of these safety procedures for your protection. Safety procedures are essential and must be followed.
A danger indicates an immediate hazard which wil l result in severe personal injury or death.
A warning indicates an immediate hazard which could result in severe personal injury br death.
A caution indicates hazards or unsafe practices which could result in minor personal injury or product or property damage.
NOTE: A note provides key information to make procedures easier or clearer.
The safety procedures listed below must be followed whenever the car is being repaired or serviced. Other specific warnings appear throughout this manual.
Only trained people should repair or service this car. Everyone doing even simple repairs or service should follow the correct procedures and obey the warningslisted in this manual as well as the maintenance and service manual.
Always wear safety glasses or eye protection when servicing the car.
Always use insulated tools when working around batteries or electrical connections.
Improper use of this vehicle or the failure to maintain it could result in decreased vehicle performance or severe personal injury.
Any modification or change t o the vehicle which affects the stability or increases the speed beyond the factory specifications could result in severe personal injury or death.
Gasoline/Battery Vapors - Flammable - Explosive - Do not smoke. Keep sparks and flames away from the area of the car. Only service in well-ventilated area.
Engines produce carbon monoxide which is an odorless, deadly poison. D O NOT OPERATE IN AN ENCLOSED AREA WITHOUT PROPER VENTILATION.
If any of the warning labels become damaged, have been removed or cannot be easily read, they should be replaced immediately. Contact your CLUB CAR Distributor/Dealer.
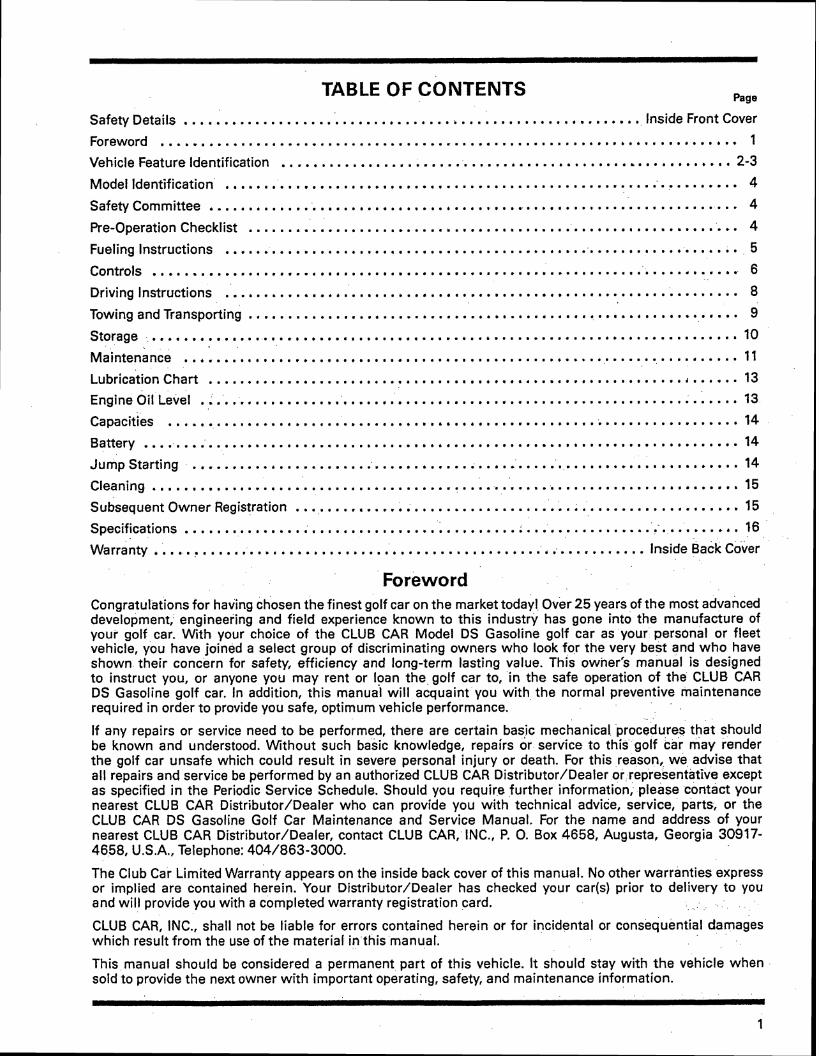
TABLE OF CONTENTS Page
.......................................................... Safety Details Inside Front Cover
Foreword ......................................................................... 1
...................................... Vehicle Feature Identification .. . . 2-3
Modelldentification ................................................................. 4
SafetyCommittee ................................................................... 4
.............................................................. Pre-Operation Checklist 4
Fuelinglnstructions ................................................................. 5
Controls .......................................................................... 6 ................................................................. Driving Instructions 8
TowingandTransporting .............................................................. 9
Storage .......................................................................... 10
Maintenance ................................................................... 1 1 Lubricationchart ................................................................... 13
EngineOilLevel .................................................................... 13
Capacities ........................................................................ 14
Battery ........................................................................ 14
Jumpstart ing ..................................................................... 14
Cleaning .......................................................................... 15
........................................................ Subsequent Owner Registration 15
Specifications .................................................................... 16 Warranty, ............................................................. InsideBackCover
Foreword Congratulations for having chosen the finest golf car on the market today1 Over 25 years of the most advanced development, engineering and field experience known to this industry has gone into the manufacture of your golf car. With your choice of the CLUB CAR Model DS Gasoline golf car as your personal or fleet vehicle, you have joined a select group of discriminating owners who look for the very best and who have shown their concern for safety, efficiency and long-term lasting value. This owner's manual is designed to instruct you, or anyone you may rent or loan the golf car to, i n the safe operation of the CLUB CAR DS Gasoline golf car. In addition, this manual wil l acquaint you with the normal preventive maintenance required in order to provide you safe, optimum vehicle performance.
If any repairs or service need to be performed, there are certain basic mechanical procedures that should be known and understood. Without such basic knowledge, repairs or service to this golf car may render the golf car unsafe which could result i n severe personal injury or death. For this reason, we advise that all repairs and service be performed by an authorized CLUB CAR Distributor/Dealer or representative except as specified in the Periodic Service Schedule. Should you require further information, please contact your nearest CLUB CAR Distributor/Dealer who can provide you with technical advice, service, parts, or the CLUB CAR DS Gasoline Golf Car Maintenance and Service Manual. For the name and address of your nearest CLUB CAR Distributor/Dealer, contact CLUB CAR, INC., P. 0. Box 4658, Augusta, Georgia 30917- 4658, U.S.A., Telephone: 404/863-3000.
The Club Car Limited Warranty appears on the inside back cover of this manual. No other warranties express or implied are contained herein. Your Distributor/Dealer has checked your car(s) prior to delivery to you and will provide you with a completed warranty registration card.
CLUB CAR, INC., shall not be tiable for errors contained herein or for incidental or consequential damages which result from the use of the material in this manual.
This manual should be considered a permanent part of this vehicle. It should stay with the vehicle when sold to provide the next owner wi th important operating, safety, and maintenance information.
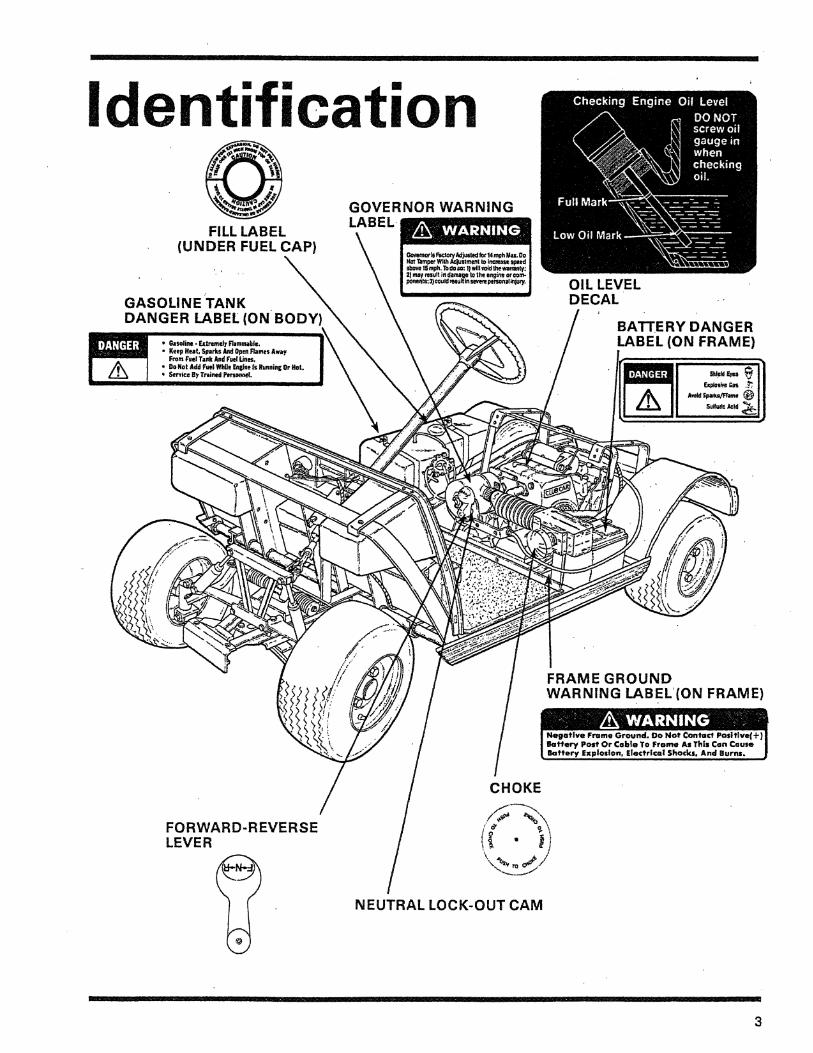
Vehicle Feature Y R K BRAKE PEDAL
OPERATING INSTRUCTIONS LABEL \ BRAKE PEDAL
I
b f OPERATING INSTRUCTIONS
Study hod Und*nland Controls. Be Sun Evevone Is Saaled. Before Ddrlng Cw. Read Safe$ Wamfngs b c r l c d AboroPcdals. Mare Sure Whe*lc Are h m e d In Dedrr6 DlrecUon.
.Be Sua Nolhlng lr InYour PaL. lam Key To ON Pollllon. Se l r e tD inc l l onB~P lac l n~ Shift Lavat b Dadred Poclthn;
F. fonard H. Neutral R. Revetce slowly Push Accnleralor Pedal To Increase Speed. Park Orah*
wi l l R.I~~O When Accelerator Pedalis Pushed. . l o Slop C r . UaIeale Ac~e lan l o r Pedal and Push Brahe Pedal.
e A111, stopping Ear, FIrmlrPurh Park Bnha UnUl I1 Locks. a Remora Hey And Place Shlf l Lever In The Straight Up Neutral
Posltlon When Car Is Not In U u . w rot Further oelallr. Read Ownafl Manual.
OIL WARNING 1 I L I G H T '
ACCESS DOOR MOVING PARTS I
SAFETY WARNING LABEL
, .
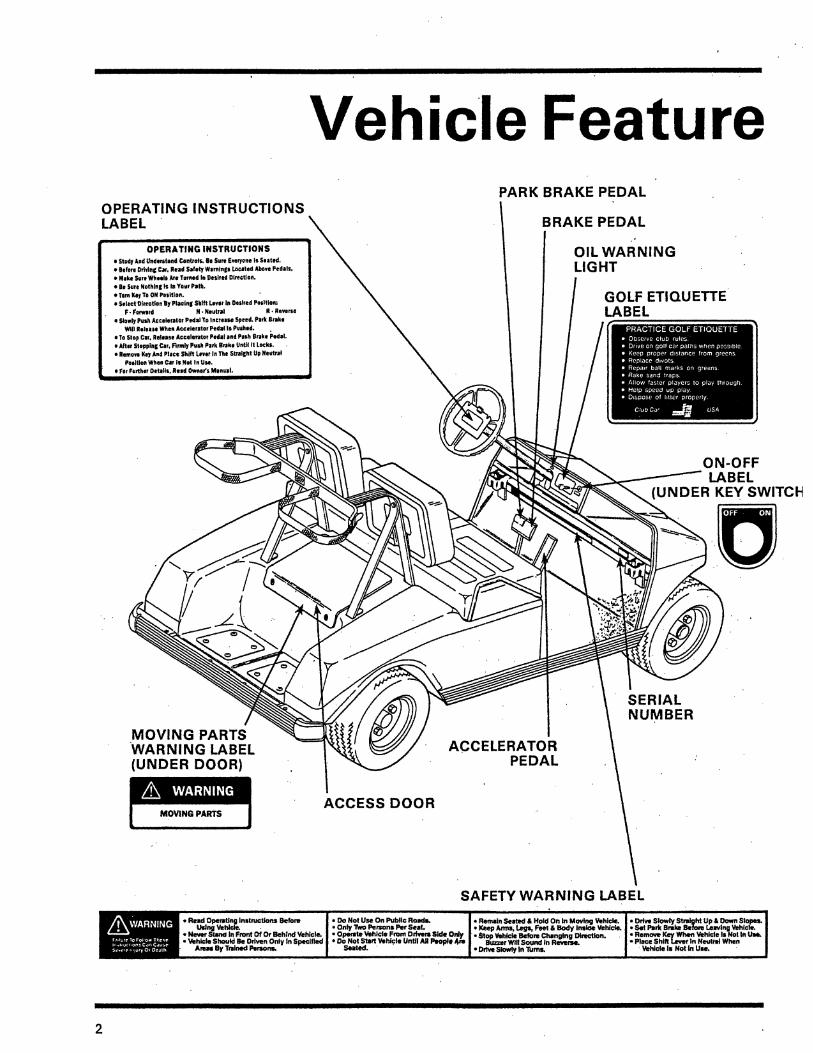
GASOLINE TANK DANGER LABEL (ON BODY ERY DANGER
/ / CHOKE / ./ ./---+,,\ *r"d
FORWARD-REVERSE /: +
LEVER & \ :P, * P j
i i NEUTRAL LOCK-OUT CAM
Model Identification: The serial number of your CLUB CAR is stamped on a data plate mounted on the frame directly under the right dash (Example: AG9005-123456).
NOTE: Always mention this number-when ordering parts or making inquiries (See Figure 1 ).
Safety Committee: If the golf car is going to be rented or is part of a fleet, we strongly recommend , , , that a safety committee be appointed. One of the main concerns of this committee should be the safe operation of the golf cars. This includes such things as where the golf cars should be driven, who should and who should not drive the golf cars, instructing all first time drivers in the controls and operation of the golf car, seeing that the golf cars are well maintained in safe driving condition and how the various rules are to be enforced. The safety committee should include all these items at a minimum and such -,
others as the committee feels necessary or appropriate. Figure 1
Pre-Operation Checklist: Your CLUB CAR has been thoroughly inspected and adjusted by the factory and by your CLUB CAR Distributor/ Dealer. However, when receiving your new CLUB CAR(s) you should become familiar with its controis and operation and carefully inspect each car to be satisfied wi th its condition before accepting delivery.
Only trained people should repair or service this car. Everyone doing even simple repairs or service should follow the correct procedures and obey the warnings listed in this manual as well as the maintenance and service manual.
Always wear safety glasses or eye protection when servicing the car.
Use this checklist as a guide to i'nspect your car. Any problems must be corrected only by your CLUB CAR Distributor/Dealer or a trained mechanic.
Visual inspection - Look for the following on your vehicle:
General: All the parts should be in place and properly installed. Be sure that all nuts, bolts and screws are tight. All hose clamps should be tight. Check the starter belt for tightness.
Warning Labels: Check that all warning and operation labels are in place (See Pages 2 & 3).
Tires: Check tire pressure. It should be 12-14 psi.
Engine: Check for proper engine oil level (See Page 12). Be sure spark plug wire is in clamp on top of engine.
Fuel: Check fuel level (See Fueling instructions - Page 5).
Be sure the plastic has been removed from the bot tom of the seat before operating vehicle. Failure t o do so may result in a fire or property damage.
Performance inspection - After you have familiarized yourself with the car's controls (See Page 5) and have read and understood the driving instructions (See Page 7), take the car for a short test drive. Check the following:
Brakes: Be sure that the brakes work properly. Both rear wheels should brake properly and the pedal should not go more than halfway to the floor. if it does, have brakes adjusted.
Park Brake: The park brake should lock the wheels when latched and should release when the accelerator or brake pedal is pushed.
Steering: The car should be easy to steer and should not have free play in the steering wheel.
Accelerator Pedal: As the accelerator pedal is pushed, the engine should start and the car should come smoothly up to full speed. When the pedal is released it should return to the original position and the engine should stop gradually.
Governor: Check the speed of the car. It should run 12-14 MPH on a level surface.
General: Listen for any unusual noises such as squeaks or rattles. Check the car's ride and performance. Have a trained mechanic investigate anything unusual.
Any modification or change t o the vehicle which affects the stability or increases the speed beyond the factory specifications could result in severe personal injury or death.
Fueling Instructions:
GASOLINE - FLAMMABLE - EXPLOSIVE - NO SMOKING
Keepb sparks and flames f r om the area of the car. Only service or repair in well-ventilated area. Never pour gasoline into tank while engine is hot or running.
To avoid electric arc caused b y static electricity, the fuel storage/pumping device must be grounded. If pump is not grounded, the vehicle must be grounded t o the pump before and during the fueling operation.
1. Lift and remove seat bottom.
2. Fuel tank is located on passenger side of car. Remove fuef cap and fill the fuel, tank with regular or unleaded gasoline. Do not use gasohol or gasolines with methyl alcohol blends.
To al low for expansion, do no t f i l l higher than one (1 ) inch f rom top o f tank.
Be sure t o clean up any spilled gas before operating vehicle.
3. Replace fuel cap on tank, being sure cap is tightly sealed to tank.
4. Replace seat bottom
Controls:
If renting or loaning this car, make sure that the driver is familiar with all controls and operating instructions before allowing the car to be driven.
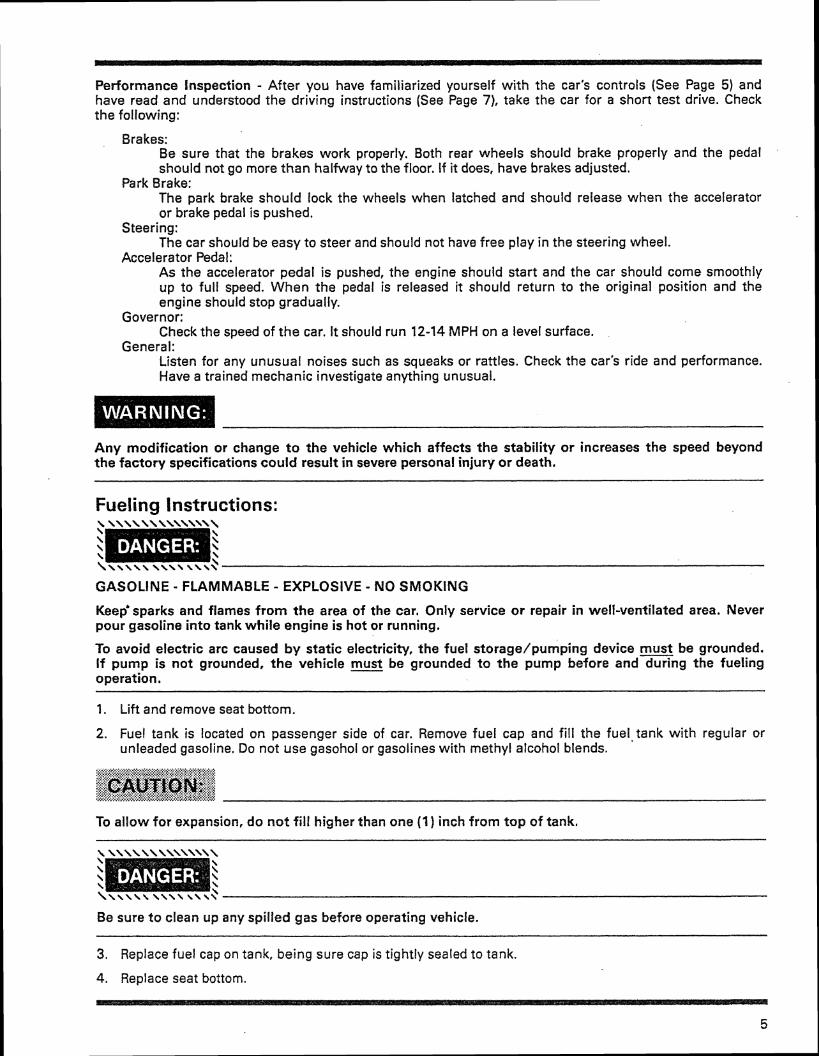
Key Switch - The key switch is mounted on the dash to the right of the steering column (See Figure 2). It has two (2) positions, "on" and "off" which are clearly labeled. Remove key in the "o f " position only.
Turn key switch to "off" and remove key when car is not in use t o avoid unintentional starting of the car.
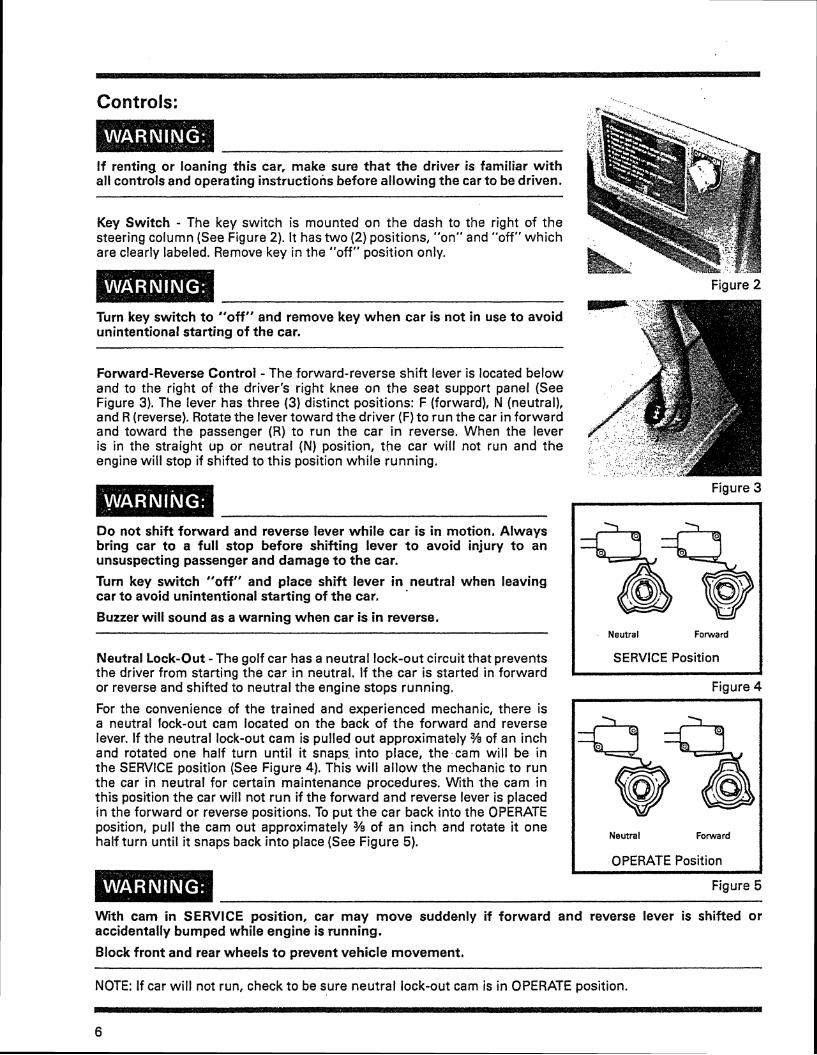
Forward-Reverse Control - The forward-reverse shift lever is located below and to the right of the driver's right knee on the seat support panel (See Figure 3). The lever has three (3) distinct positions: F (forward), N (neutral), and R (reverse). Rotate the lever toward the driver (F) to run the car in forward and toward the passenger (R) to run the car in reverse. When the lever is in the straight up or neutral (N) position, the car will not run and the engine wiil stop if shifted to this position while running.
D o not shift forward and reverse lever while car is in motion. Always bring car to a ful l stop before shifting lever t o avoid injury t o an unsuspecting passenger and damage t o the car.
Turn key switch "off" and place shift lever in neutral when leaving car to avoid unintentional starting of the car,
Buzzer wi l l sound as a warning when car is in reverse.
Neutral Lock-Out -The golf car has a neutral lock-out circuit that prevents the driver from starting the car in neutral. If the car is started in forward or reverse and shifted to neutral the engine stops running.
For the convenience of the trained and experienced mechanic, there is a neutral lock-out cam located on the back of the forward and reverse lever. If the neutral lock-out cam is pulled out approximately ?4 of an inch and rotated one half turn until it snaps. into place, the cam will be in the SERVICE position (See Figure 4). This wi l l allow the mechanic to run the car in neutral for certain maintenance procedures. With the cam in this position the car will not run if the forward and reverse lever is placed in the forward or reverse positions. To put the car back into the OPERATE position, pull the cam out approximately % of an inch and rotate it one half turn until it snaps back into place (See Figure 5).
Figure 2
Figure 3
Neutral Forward
SERVICE Position
Figure 4
Neutral Forward
OPERATE Position s
Figure 5
With cam. in SERVICE position, car may move suddenly i f forward and reverse lever is shifted or accidentally bumped while engine is running.
Block front and rear wheels t o prevent vehicle movement,
NOTE: If car wil l not run, check to be sure neutral lock-out cam is in OPERATE position.
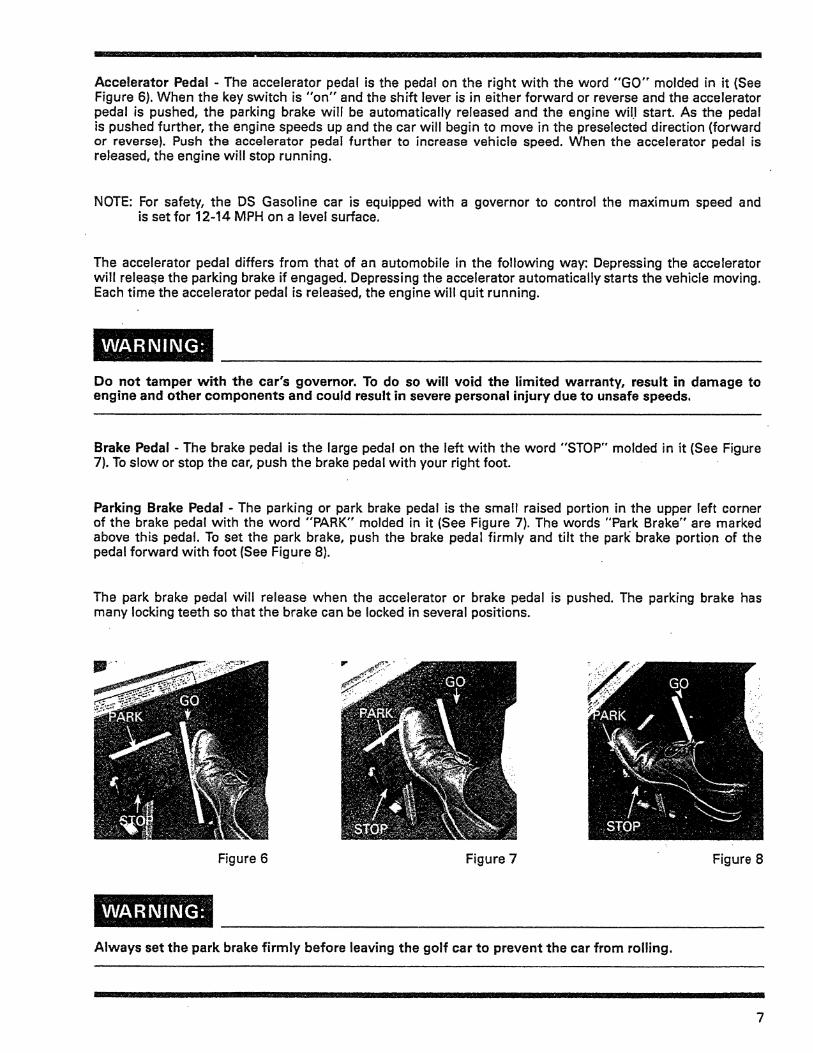
Accelerator Pedal - The accelerator pedal is the pedal on the right with the word "GO" molded in it (See Figure 6). When the key switch is "on" and the shift lever is in either forward or reverse and the accelerator pedal is pushed, the parking brake wil l be automatically released and the engine wiu start. As the pedal is pushed further, the engine speeds up and the car will begin to move in the preselected direction (forward or reverse). Push the accelerator pedal further to increase vehicle speed. When the accelerator pedal is released, the engine will stop running.
NOTE: For safety, the DS Gasoline car is equipped with a governor to control the maximum speed and is set for 12-14 MPH on a level surface.
The accelerator pedal differs from that of an automobile in the following way: Depressing the accelerator will release the parking brake if engaged. Depressing the accelerator automatically starts the vehicle moving. Each time the accelerator pedal is released, the engine will quit running.
D o no t tamper with the car's governor. To do so wit[ void the limited warranty, result in damage to engine and other components and couid result in severe personal injury due to unsafe speeds.
Brake Pedal - The brake pedal is the large pedal on the le-ft with the word "STOP" molded in it (See Figure 7). To slow or stop the car, push the brake pedal with your right foot.
Parking Brake Pedal - The parking or park brake pedal is the small raised portion in the upper left corner of the brake pedal with the word "PARK" molded in it (See Figure 7). The words "Park Brake" are marked above this pedal. To set the park brake, push the brake pedal firmly and tilt the park brake portion of the pedal forward with foot (See Figure 8).
The park brake pedal will release when the accelerator or brake pedal is pushed. The parking brake has many locking teeth so that the brake can be locked in several positions.
Figure 6 Figure 7 Figure 8
Always set the park brake f i rmly before leaving the golf car t o prevent the car frorn rolling.
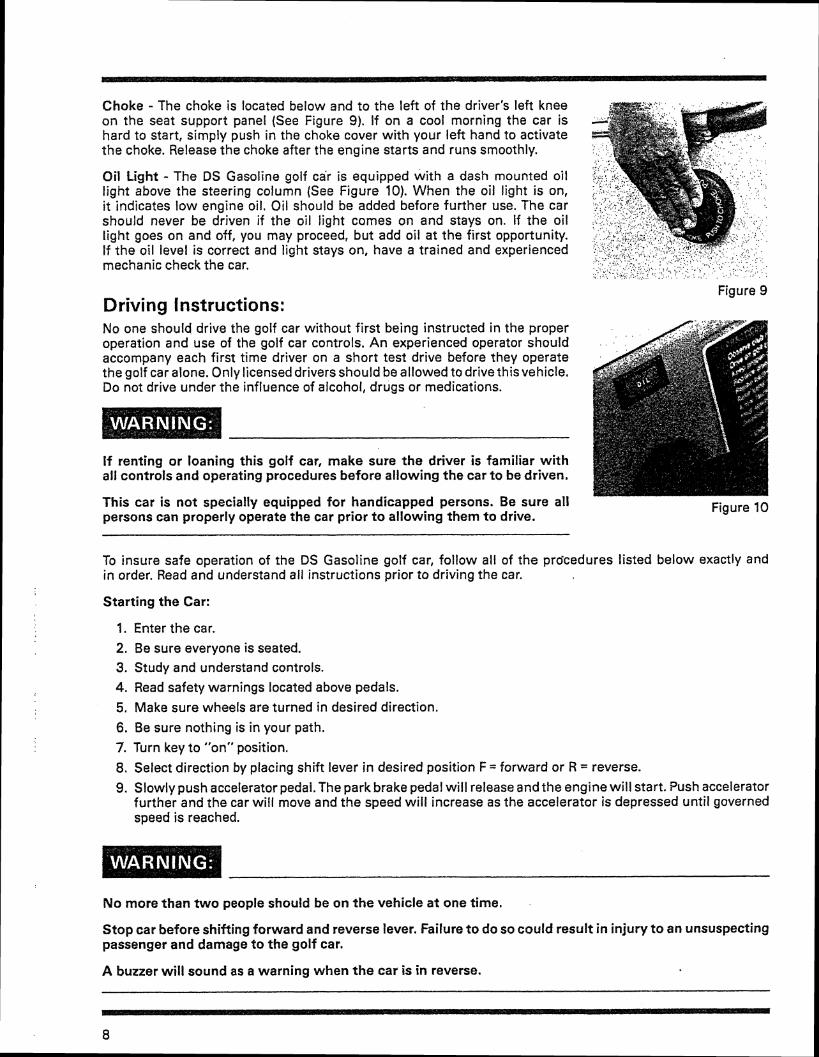
Choke - The choke is located below and to the left of the driver's left knee on the seat support panel (See Figure 9). If on a cool morning the car is hard to start, simply push in the choke cover with your left hand to activate the choke. Release the choke after the engine starts and runs smoothly.
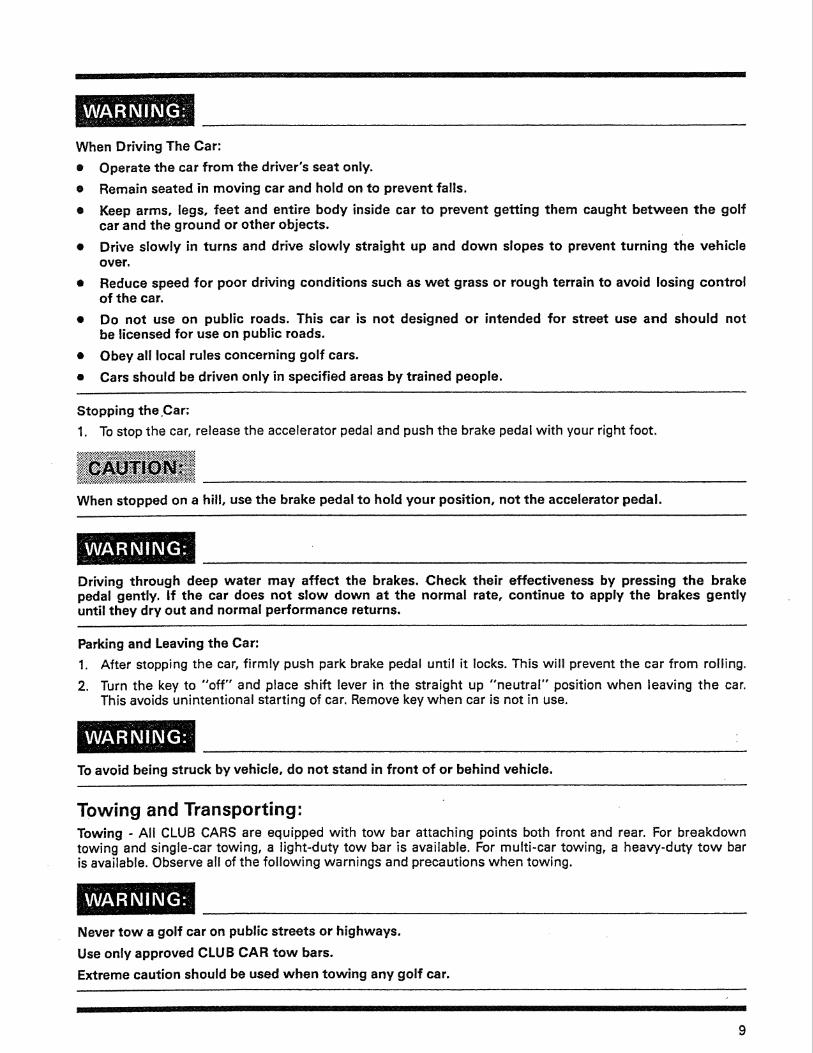
Oil tight - The DS Gasoline golf car is equipped with a dash mounted oil light above the steering column {See Figure 10). When the oil light is on, it indicates low engine oil. Oil should be added before further use. The car should never be driven if the oil light comes on and stays on. If the oil light goes on and off, you may proceed, but add oil at the first opportunity. If the oil level is correct and light stays on, have a trained and experienced mechanic check the car.
Figure 9 Driving Instructions: No one should drive the golf car without first being instructed in the proper operation and use of the golf car controls. An experienced operator should accompany each first time driver on a short test drive before they operate the golf car alone. Only licensed drivers should be allowed to drive this vehicle. Do not drive under the influence of alcohol, drugs or medications.
If renting or loaning this golf car, make sure the driver is familiar with ail controls and operating procedures before allowing the car to be driven.
This car is not specially equipped for handicapped persons. Be sure all Figure 10 persons can properly operate the car prior to allowing them to drive.
To insure safe operation of the DS Gasoline golf car, follow all of the pro'cedures listed below exactly and in order. Read and understand all instructions prior to driving the car.
Starting the Car:
1. Enter the car.
2. Be sure everyone is seated. 3. Study and understand controls.
4. Read safety warnings located above pedals.
5. Make sure wheels are turned in desired direction.
6. Be sure nothing is in your path.
7. Turn key to "on" position.
8. Select direction by placing shift lever in desired position F = forward or R = reverse.
9. Slowly push accelerator pedai. The park brake pedal will release and the engine will start. Push accelerator further and the car will move and the speed will increase as the accelerator is depressed until governed speed is reached.
No more than two people should be on the vehicle at one time.
Stop car before shifting forward and reverse lever. Failure t o do so could result in injury to an unsuspecting passenger and damage to the golf car.
A buzzer will sound as a warning when the car is in reverse.
When Driving The Car: e Operate the car from the driver's seat only.
@ Remain seated in moving car and hold on to prevent falis.
@ Keep arms, legs, feet and entire body inside car t o prevent getting them caught between the golf car and the ground or other objects.
e Drive slowly in turns and drive slowly straight up and down slopes to prevent turning the vehicle over.
a Reduce speed for poor driving conditions such as wet grass or rough terrain to avoid losing control of the car.
e Do not use on public roads. This car is not designed or intended for street use and should not be licensed for use on public roads.
e Obey all local rules concerning golf cars.
0 Cars should be driven only in specified areas by trained people.
Stopping the,Car:
1. To stop the car, release the accelerator pedal and push the brake pedal with your right foot.
When stopped on a hiil, use the brake pedal to hold your position, not the accelerator pedal.
Driving through deep water may affect the brakes. Check their effectiveness by pressing the brake pedal gently. If the car does not slow down at the normal rate, continue t o apply the brakes gently until they dry out and normal performance returns.
Parking and Leaving the Car:
1. After stopping the car, firmly push park brake pedal until it locks. This will prevent the car from roiling.
2. Turn the key to "off" and place shift lever in the straight up "neutral" position when leaving the car. This avoids unintentional starting of car. Remove key when car is not in use.
To avoid being struck by vehicle, do not stand in front of or behind vehicle.
Towing and Transporting: Towing - All CLUB CARS are equipped with tow bar attaching points both front and rear. For breakdown towing and single-car towing, a light-duty tow bar is available. For multi-car towing, a heavy-duty tow bar is available. Observe a l l of the following warnings and precautions when towing.
Never tow a golf car on public streets or highways.
Use only approved CLUB CAR tow bars.
Extreme caution should be used when towing any golf car.
D o not exceed five (5) miles per hour towing speed.
Do not t ow more than one ( 4 ) car with another CLUB CAR.
If more than one car must be towed, a properly fitted vehicle with tow hitch height of 11 inches should be used. Only heavy-duty t o w bars should be used for multi-car towing. Never tow more than five (5) cars at one time.
D o not allow people in cars being towed.
Avoid sudden starts, stops and tight turns,
Turn key switch "off" and place shift lever in neutral when car is in tow.
Transporting On A Trailer - If your golf car must be transported over long distances or on public highways, it should be done on an approved trailer observing all the following warnings and precautions.
For use on public roads the trailer must meet all federal, state and local requirements such as taillights, brake tights, etc.
Always use an approved trailer that has a load rating of 1200 Ibs, per golf car. (Example: A 2-car traiier should be rated at 2 x 1200 = 2400 lbs.).
The golf car should be securely tied down to the trailer. The golf car's key switch should be "off", the shift lever in "neutra1"and the park brake firmly applied and locked.
When towing a trailer, normal speeds should be reduced and care should be used when turning a corner due to the added length of the trailer.
Never tow a golf car behind a passenger vehicte or truck unless it is on an approved trailer.
Remove the windshield before transporting a golf car on a trailer.
Storage: To prepare your golf car for extended off season storage:
Turn key switch "off", remove key and place forward and reverse lever in neutral position to avoid unintentional starting of the vehicle.
1. Store in a cool place. This wi l l prevent self discharge of the battery. If the battery appears to be weak, have it charged by a trained mechanic.
Batteries in low state of charge will freeze at low temperatures.
Do not attempt to charge a battery if it is frozen or the case is bulged. Discard battery. Frozen batteries can explode.
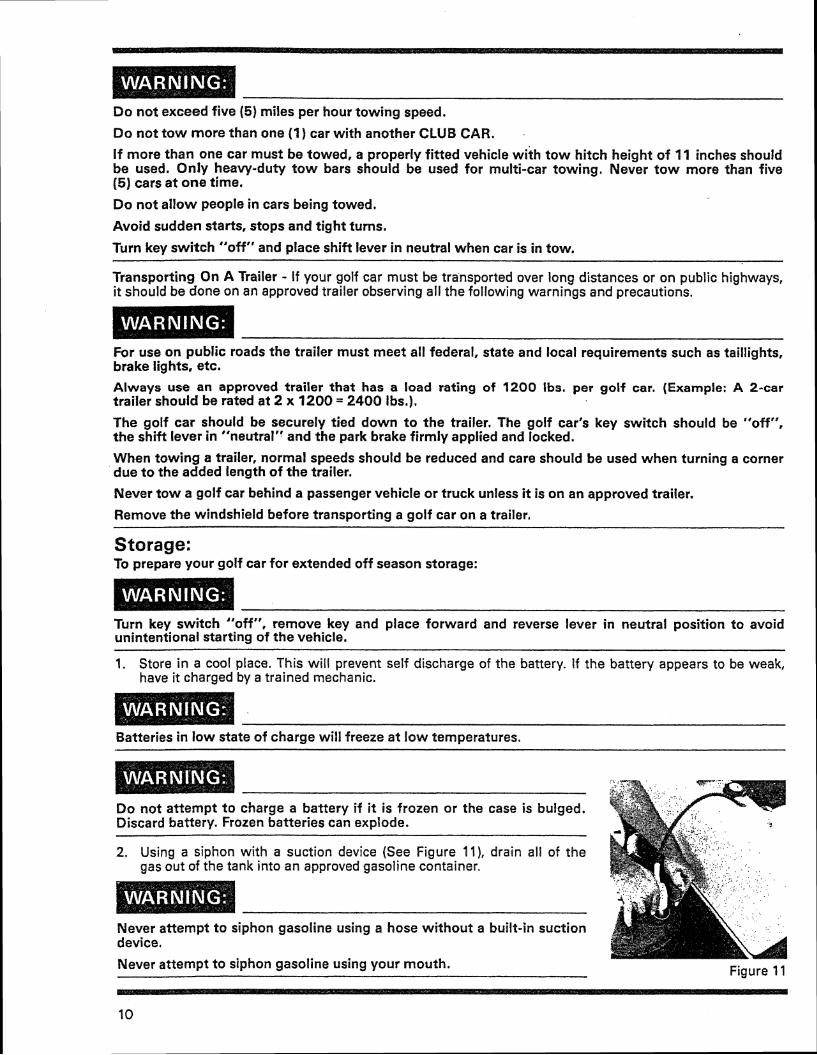
2. Using a siphon with a suction device (See Figure 1 I), drain all of the gas out of the tank into an approved gasoline container,
Never attempt to siphon gasoline using a hose without a built-in suction device.
Never attempt to siphon gasoline using your mouth. Figure 11
Gasoline - Flammable - Explosive - Do Not Smoke. Keep sparks and flames away f rom area of cars.
D o not anempt t o drain gasoline while engine is running or hot.
Store gasoline only in an approved gasoline container in a weli-ventilated area. Keep ou t of reach of children. Keep sparks, fire and flames away f rom area of gasoline.
Engines produce carbon monoxide which is an odorless, deadly poison. DO NOT OPERATE IN AN ENCLOSED AREA WITHOUT PROPER VENTILATION.
3. Be sure the tank has been drained and the stored gasoline has been removed from the area. Place the forward and reverse lever in "neutral". Place neutral lock-out cam in the SERVICE position. Turn key on. Run the engine until all of the gasoline has been drawn out of the fuel lines and carburetor and engine stalls. Return neutral lock-out cam to the OPERATE position. Turn the key switch to the "off" position and remove key.
4. To protect the engine, remove the spark plug and pour '/2 ounce of SAE 10 weight oil into the engine through the spark plug hole. Rotate the engine several times and then reinstall the spark plug. NOTE: When restarting engine, it may smoke excessively due to the oil added in step 4.
5. Increase the tire pressure to 20 psi. 6. Grease front suspension and do all quarterly periodic lubrication shown in lubrication chart (See Page 12). 7. Thoroughly clean body, seats and underside of car.
8. Do not latch the park brake. Block the wheels to prevent the car from roliing.
To Return Stored Cars To Service: 1. Fill the gas tank with regular or unleaded gasoline (See Fueling Instructions - Page 5).
Gasoline - Flammable - Explosive - No Smoking. Keep sparks and flames from the area of the car. Only service or repair in well-ventilated area. Never pour gasoline into tank while engine is ho t or running, Do not overfill. Be sure t o clean up any spilled gas before operating vehicle. - --
2. Readjust tire pressure to 12-14 psi. 3. Perform the pre-operation checks (See Page 4) before returning the car to service.
Maintenance: General information - To be, sure you have a trouble-free car, it is very important to follow an established preventive maintenance program. This is the least expensive maintenance requirement. Preventive mainte- nance means regularly scheduled services which include certain maintenance procedures that are performed on the cars even though the cars are functional. A good preventive maintenance program can prevent more expensive repairs from being required. Any car that is not functioning correctly should be removed from use until it is properly repaired.
Conta~t your local CLUB CAR Distributor/Dealer to perform all repairs and the semi-annual and annual periodic service.
Only trained people should repair or service this car. Everyone doing even simple repairs or service should follow the correct procedures and obey the warnings listed in this manual as well as the maintenance and service manual.
Turn key switch "off", remove key, and place forward and reverse lever in neutral position prior to servicing.
Always wear safety glasses or eye protection when servicing this car.

Moving parts - Do not attempt to service the car with engine running.
Ho t - D o n o t attempt t o service hot engine or exhaust system. Can cause extreme burns.
Remove spark plug wire to avoid unintentional starting of engine when servicing car.
Do not wear loose clothing and remove jewelry, such as rings, watches, chains, etc,, before servicing vehicle.
AIways use insulated tools when working around batteries or electrical connections.
Periodic Service Schedule: Regular Interval Service
Daily Service by Owner Check steering and linkages Check brake operation Check to be sure all warning labels are in place (see Pages 2 and 3) Check tires for wear and damage Check engine for proper operation Check accelerator/governor linkage for free movement and return Check reverse warning buzzer for proper operation Check engine air intake screen to be sure it is not clogged Check to be sure park brake latches and releases properly
Weekly Service by Owner Check speed of vehicle Clean battery terminals and wash dirt off battery case Wash engine and underside of car Check all electrical wires and grounds for tightness or damage Inspect car for loose hardware and tighten as required Check all daily items listed above
-
Monthly Service by Owner Check exhaust system for leaks Check brake pedal play Check tire pressure and adjust to 12-14 psi Check air intake expansion chamber for leaks Check engine oil level Check fuel tank, lines, cap, pump and carburetor for fuel leakage Check all daily and weekly items listed above
Quarterly Service by Owner Do quarterly lubrication as shown in iubrication chart on Page 12 or Trained Personnel Check a l l daily, weekly and monthly items listed above
Semi-Annual Service by Check, clean and adjust brakes Trained Personnel Only Check front wheel alignment (Every 100 Rounds or Check air filter every 50 hours of Check spark plug wire and boot for damage and proper routing operation) Check head gasket and exhaust header/pipe flange connection gasket
Check starter/generator belt tension Check condition of muffler lnspect drive belt Do semi-annual lubrication as shown in lubrication chart on Page 12 Check ail daily, weekly, monthly and quarterly items listed above
Annual Service by Trained Replace fuel filters Personnel Only Inspect starter/generator brush length (Every 200 Rounds or Inspect, clean and regap spark plug every 100 hours of Do annual lubrication as shown in lubrication chart on page 12 operation) Check all items listed above
If your periodic service inspection reveals any problems, do not operate unti l repairs are made. Failure to make necessary repairs could result i n fire, severe personal injury or death.
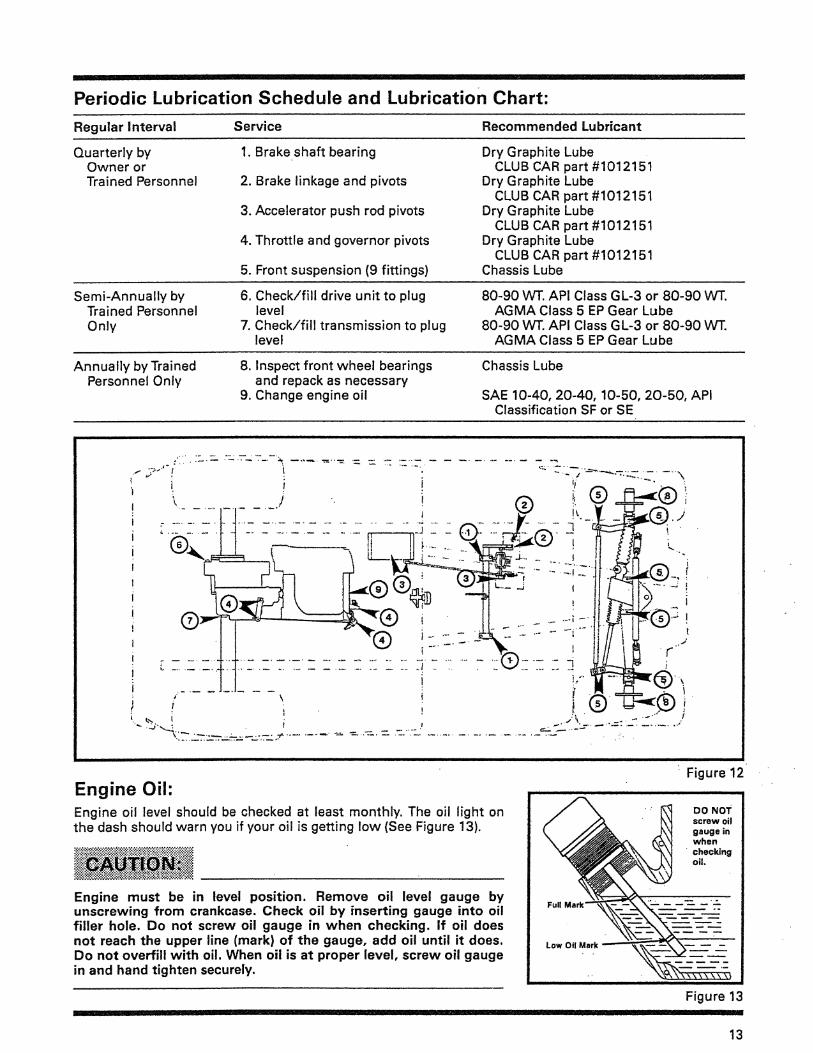
Periodic Lubrication Schedule and Lubrication Chart: Regular interval Service Recommended Lubricant
Quarterly by 1. Brake shaft bearing Dry Graphite Lube Owner or CLUB CAR part kt1012151 Trained Personnel 2. Brake linkage and pivots Dry Graphite Lube
CLUB CAR part #1012151 3. Accelerator push rod pivots Dry Graphite Lube
CLUB CAR part #1012151 4. Throttle and governor pivots Dry Graphite Lube
CLUB CAR part #I012151 5. Front suspension (9 fittings) Chassis Lube
Semi-Annually by 6 . Check/fill drive unit to plug Trained Personnel level Only 7. Check/fiil transmission to plug
level
Annually by Trained 8. Inspect front wheel bearings Personnel Only and repack as necessary
9. Change engine oil
80-90 VVT. API Class GL-3 or 80-90 VVT. AGMA Class 5 EP Gear Lube
80-90 VVT. API Class GL-3 or 80-90 WT. AGMA Class 5 EP Gear Lube
Chassis Lube
SAE 10-40, 20-45, 10-55, 20-50, API Classification SF or SE
Engine Oil: Engine oil level should be checked at least monthly. The oil light on the dash should warn you if your oil is getting low (See Figure 33).
Engine must be in level position. Remove oil level gauge by unscrewing from crankcase. Check oil by inserting gauge in to oil filler hole. Do not screw oil gauge in when checking. If oil does not reach the upper line (mark) of the gauge, add oil until it does. D o not overfill w i th oil. When oi l is at proper level, screw oil gauge in and hand tighten securely.
Figure 12
Figure 13
Capacities: Engine Crankcase 40 oz. Transmission 20 oz. Drive Unit 22 oz. Gasoline Tank 7.4 U.S. Gal. Tire Pressure 12-14 psi
Battery:
Always wear safety glasses or eye protection when servicing the car.
Always use insulated tools when working around batteries or electrical connections.
Battery - Explosive Gases. Keep sparks, flames, cigarettes away. Ventilate when charging in an enclosed space.
Poison - Contains acid - Causes severe burns - Avoid contact w i th skin, eyes or clothing.
Antidotes:
External - Flush w i t h water. Call physician immediately.
internal - Drink large quantities o f milk or water, fol low w i t h milk of magnesia or vegetable oil. Call physician immediately.
Eyes - Flush w i t h water for 15 minutes. Call physician immediately.
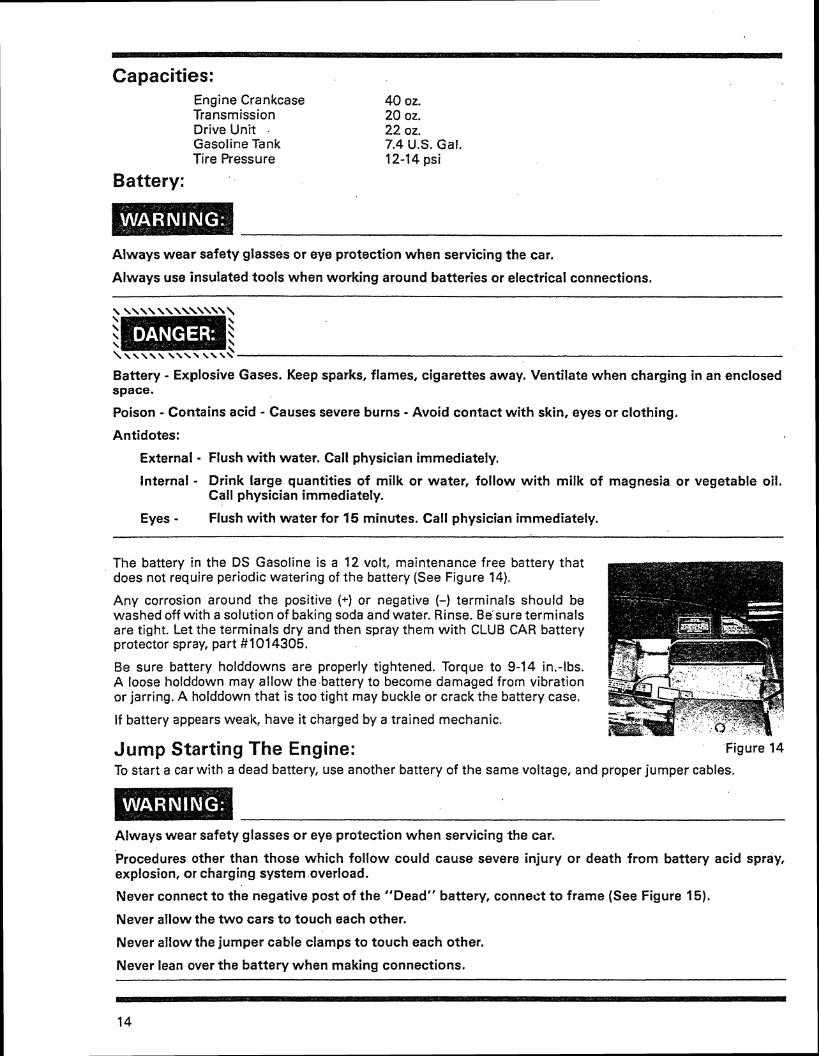
The battery in the DS Gasoline is a 12 volt, maintenance free battery that does not require periodic watering of the battery (See Figure 14).
Any corrosion around the positive (+) or negative (-) terrninais should be washed off with a solution of baking soda and water. Rinse. Be sure terminals are tight. Let the terminals dry and then spray them with CLUB CAR battery protector spray, part #1014305.
Be sure battery holddowns are properly tightened. Torque to 9-14 in.-lbs. A loose holddown may allow the battery to become damaged from vibration or jarring. A holddown that is too tight may buckle or crack the battery case.
If battery appears weak, have it charged by a trained mechanic.
Jump Starting The Engine: Figure 14
To start a car with a dead battery, use another battery of the same voltage, and proper jumper cables.
Always wear safety glasses or eye protection when servicing the car.
Procedures other than those which fol low could cause severe injury or death f rom battery acid spray, explosion, or charging system overload.
Never connect to the negative post o f the "Dead" battery, connect t o frame (See Figure 15).
Never allow the t w o cars t o touch each other.
Never allow the jumper cable clamps to touch each other.
Never lean over the battery when making connections.
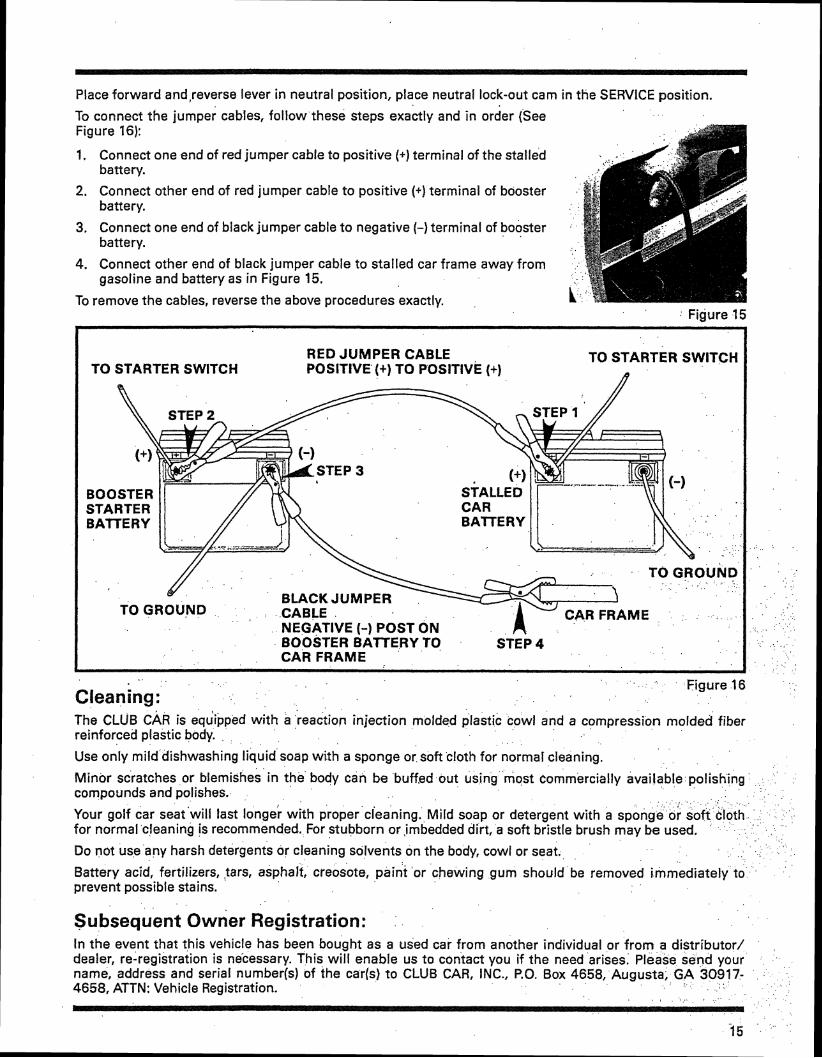
Place forward and,reverse lever in neutral position, place neutral lock-out cam in the SERVICE position.
To connect the i u m ~ e r cables, follow these s tem exactlv and in order (See * .
Figure 16):
1, Connect one end of red jumper cable to positive (+)terminal of the stalled battery.
2. Connect other end of red jumper cable to positive (+)terminal of booster battery.
3, Connect one end of black jumper cable to negative (-)terminal of . booster . battery.
4. Connect other end of black jumper cabie to stalled car frame away from gasoline and battery as in Figure 15.
To remove the cables, reverse the above procedures exactly. Figure 15
RED JUMPER CABLE POSITIVE (+J TO POSITIVE (+)
TO GROUND
BLACK JUMPER TO GROUND
NEGATIVE (-) POST ON BOOSTER BATTERY TO
Figure 16
The CLUB CAR is eq&ipped with a reaction injection molded plastic cowl and a compression molded fiber reinforced piastic body.
I Use only mild dishwashing liquid soap with a sponge or soft cloth for normal cleaning.
Minor scratches or blemishes in the body can be buffed out using most commercially available polishing com~ounds and ~olishes.
Your golf car seat'will last longer with proper cleaning. Mild soap or detergent with a sponge or soft cloth for normal cleaning is recommended. For stubborn or imbedded dirt, a soft bristle brush may be used,
I Do not use any harsh detergents or cleaning solvents on the body, cowl or seat.
Battery acid, fertilizers, tars, asphalt, creosote, paint or chewing gum should be removed immediately to prevent possible stains.
Subsequent owner Registration: In the event that this vehicle has been bought as a used car from another individual or from a distributor/ dealer, re-registration is necessary. This wi l l enable us to contact you if the need arises. Please send your name, address and serial number(s) of the car(s) to CLUB CAR, INC., P.O. Box 4658, Augusta, GA 30917- 4658, ATTN: Vehicle Registration.

DS Gaso ine Specifications Overall Length ............... .91.25" Overall Width ............... .47.25"
............... Overall Weight .46" Wheelbase ................. .65.5'" Ground Clearance ............ .4.5" Front Wheel Tread ............ .34.5"
............ Rear Wheel Tread .38.5" Weight .................... .622 ibs., dry Speed ........... , ......... .12-14 MPH, governed
.... Curb to Curb Clearance Circle .17'6" Braking Distance ............. .14' at 12 MPH Engine ..................... .4-cycle, 341 cc, 8.5 hp single cylinder, air cooled Carburetor .................. .Float bowl with fixed jets and impulse fuel pump Governor .................... Internally geared in transmission Ignition ..................... CDI electronic ignition Drive Unit .................. .Double reduction helical gear with 12.64 to 1 final ratio Transmission ..........,...... Forward, reverse, and neutral, fully synchronized Steering .................... Self-adjusting rack and pinion Suspension .................. Front and rear tapered mono-leaf springs with dual hydraulic shock
absorbers Torque Converter ............. .Automatic, variable speed, dry type Frame-Chassis .............. .Twin I-Beam welded aluminum Rear Body .................. .Fiber reinforced plastic (compression molded) Front Body ................... Reaction injection molded plastic Paint ...................... .Two part epoxy synthetic enamel Seating Capacity ..,.......... .2 persons Electrical System ............. .12 volt, 325 cold cranking amp battery and 35 amp charging capacity
starter/generator Brakes ..................... .Mechanical brake cable system to individual drum brakes on each rear
wheel. Park brake is automatically released. Tires ...................... ,18.00 x 8.50-8.00 tubeless, 4-ply rated Fuel Tank ................... .7.4 gal. U.S., regular or unleaded Standard Equipment .......... .Rack and Pinion Steering, Ball Hotder, Beverage I-folders, Dual Dash
Compartments, Scorecard and Pencil Holder, Reverse Warning Buzzer, Wear Resistant Floormats and Pedals, Front and Rear Bumpers, Side Rubber Rails, Two-Way Ignition Key, Automatic Release Park Brake, Quick Release Bag Strap Buckles, CDI Electronic Ignition System, Synchromesh Transmission with Forward, Reverse and Neutral; 12 volt 325 Cold Cranking Amp Battery, Neutral Lock-Out, Low Oil Level Warning Light, Fresh Air Intake System.
Optional Equipment . . . . . . . . . . . .Canopy Top, Snap-On Tinted Windshield, Weatherproof Enclosure, Extra Two-Bag Attachment, Sweater Basket, Rake Holder and Rake, Bagwell Protector, Adjustable Seat Back, Wheei Covers, Power Rib Tires, Extra Traction Tires, White Wall Tires, Club Insignia, I.D. Numbers, Accent Stripe, Custom Colors, Stereo Radio, Ashtray, Lighting Package (High/ Low Headlights, Taillights, Brakelights and Horn), Lighting Package with Turn Signals, Fuei Gauge, Hour Meter, Sand Bottle Kit, Woodgrain Trim, Ice Cooler, Info Holder, Tee Holder, Extra Beverage Holders (2 or 4), Trailer Hitch, Rear View Mirror, Permanent Tow Bar for 'multiple car towing (factory installation), Temporary Tow Bar for single car towing.
CLUB CAR, INC., reserves the right to change specifications and designs at any time without notice and without incurring any obligation or liability whatsoever. 1

- -
CLUB CAR LlMlTED TWO (2) YEAR WARRANTY
CLUB CAR, INC, "Manufacturer," warrants to the orrginal retail purchaser that its new DS Golf Car purchased from Manufacturer or an authorized distrrbutor or dealer IS free from defects in materials and workmanship for a perlod of two (2) years from the date of purchase, subject to the terms and provisions contained herein
This limrted warranty covers materials and workmanshlp for a period of two (2) years from the date of purchase and repair labor costs for a period of one (1) year from the date of purchase Such labor shall be performed only by Manufacturer, its authorized distr~butors or dealers, or a service agency approved by Manufacturer IF THE WARRANTY REGISTRATION FORM IS NOT COMPLETED AND RETURNED TO CLUB CAR AT THE TIME OF THE ORIGINAL RETAIL SALE, PROOF OF DATE OF PURCHASE MUST BE PROVIDED WITH ANY WARRANTY CLAIM For further rnformatron or to present a warranty claim, contact Warranty Administrator, CLUB CAR, INC , P 0 Box 4658, Augusta, Georgia 30917-4658 U S A , (404) 863-3000 ANY IMPLIED WARRANTY OF MERCHANTABILITY OR FITNESS FOR A PARTICULAR PURPOSE SHALLBEVOID AND EXCLUDED SUBSEQUENTTO TWO (2) YEARS FROM THE DATE OF PURCHASE THE REPLACEMENT OR REPAIR OF THE GOLF CAR OR DEFECTIVE COMPONENT THEREOF IS THE EXCLUSIVE REMEDY UNDER THIS WRITTEN WARRANTY OR ANY IMPLIED WARRANTY MANUFACTURER MAKES NO OTHER REPRESENTATION OR WARRANTY OF ANY KIND, AND NO REPRESENTATIVE, EMPLOYEE, DISTRIBUTOR OR DEALER OF MANUFACTURER HAS THE AUTHORITY TO MAKE OR IMPLY ANY REPRESENTATION, PROMISE OR AGREEMENT WHICH IN ANY WAY VARIES THE TERMS OF THlS LlMlTED WARRANTY.
LlMlTED WARRANTY EXCLUSIONS
Without limiting the generality of the foregoing in any way, and as part of its limited warranty exclus~ons, Manufacturer does not warrant that its golf car is suitable for use on any particular golf course or terrain As in the operation of any vehicle, a prudent driver wil l read and study the Owner's Manual, learn the proper operation of the controls, and exercise care and safe drlving habits
THE PROVISIONS OF THlS LIMITED WARRANTY SHALL NOT APPLY TO
(a) Normal maintenance services such as brake adjustments, steering and suspensron adjustments, linkage adjustments, recommended lubrication, oil changes, and filter replacements,
(b) All accessory options, bag straps, battery wires and connectors, body panels and trim pieces, charger plugs and receptacles, decals, drive and generator belts, filters, floormats, oils and lubricants, pedal pads, seats, spark plugs, fuses, tubes and hoses, and
(c) Tires, batterres and battery chargers (Warranted solely through their respective manufacturers)
Any warranty service whlch rncludes labor must be performed by Manufacturer, its authorized distributors or dealers, or a service agency approved by manufacturer.
THIS GOLFCAR IS INTENDED TO BE USED BY PERSONS PLAYING GOLF WITHIN THE CONFINES OF A GOLF COURSE AND ANY OTHER USE RENDERS THE LlMlTED WARRANTIES EXPRESSED HEREIN AND ALL IMPLIED WARRANTiES NULL AND VOID AND SAME ARE HEREBY EXCLUDED.
ALSO EXCLUDED FROM THlS LlMlTED WARRANTY ARE ANY AND ALL INCIDENTAL OR CONSEQUENTIAL DAMAGES INCLUDING, BUT NOT LIMITED TO, LOSS OF USE, LOSS OF REVENUE, LOSS OF TIME, OR INCONVENIENCE. Some states do not allow limitations on how long an ~mplred warranty lasts or the exclusron or lrmitatron of ~ncrdental or consequential damages so the above lim~tations or exclusions may not apply to you
WARRANTY LIMITATIONS
Manufacturer's liability shall be at ~ t s sole option to either replace or repair a defectrve golf car or component thereof Replacement shall mean furnishing a new golf car or component thereof which IS identrcal or reasonably equrvalent to the warranted product at no cost to purchaser during the two (2) year lrmrted warranty period except for repair labor costs after the frrst year Repair shall mean remedyrng a defect in the golf car or component thereof at no cost to purchaser during the two (2) year Irm~ted warranty period except for repair labor costs after the first year If Manufacturer elects to repair your golf car, it may use factory reconditioned parts or components.
Damage to a vehlcle or component thereof not resulting from a defect or which occurs due to unreasonable or unintended use, overload~ng, abuse or neglect (including farlure to provide reasonable or necessary maintenance as outlrned in the Owner's Manual), accident or alteration, includrng increasing the speed beyond factory specifications or modifications wh~ch affect the stability of the vehicle or the operation thereof, IS excluded from the lrmited warranty
Thrs warranty gives you speclfic legal rights, and you may also have other rights which vary from state to state

Club Car, Inc. 1 P.O. Box 4658
Augusta, Georgia 3091 7-4658 U.S.A. 1706-863-3000
O CLUB CAR, INC., 1989