Embed Size (px)
Citation preview
184
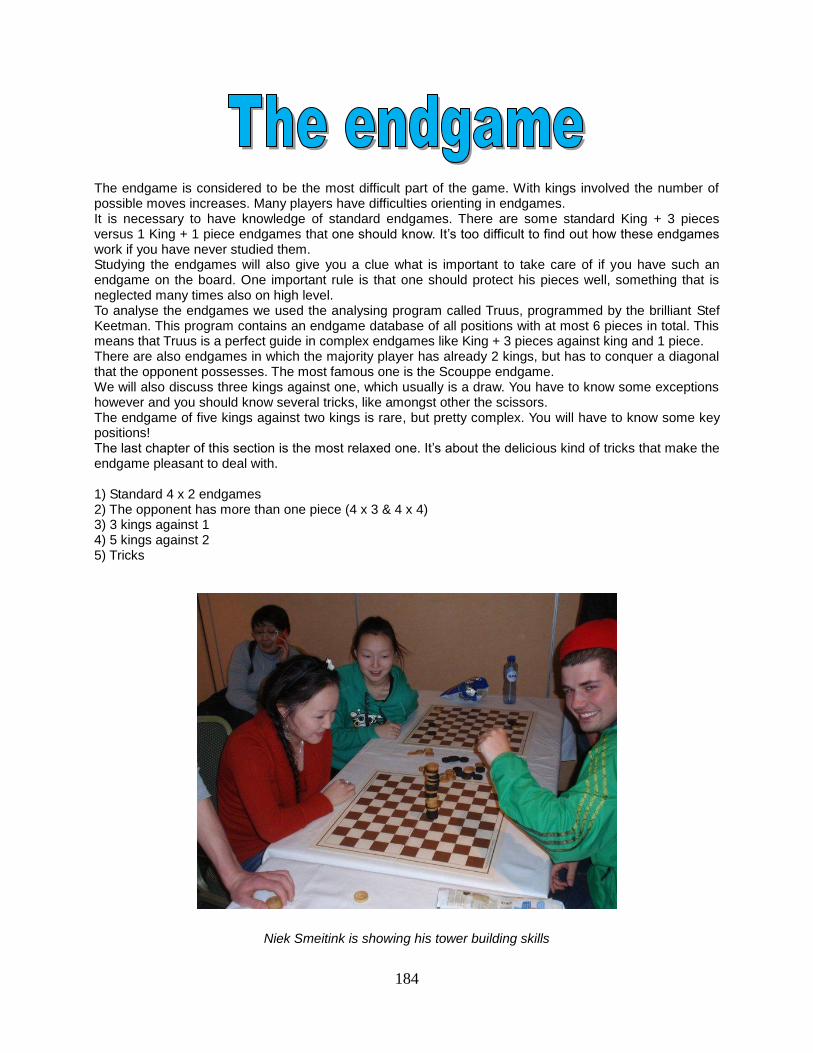
The endgame is considered to be the most difficult part of the game. With kings involved the number of possible moves increases. Many players have difficulties orienting in endgames. It is necessary to have knowledge of standard endgames. There are some standard King + 3 pieces versus 1 King + 1 piece endgames that one should know. It’s too difficult to find out how these endgames work if you have never studied them. Studying the endgames will also give you a clue what is important to take care of if you have such an endgame on the board. One important rule is that one should protect his pieces well, something that is neglected many times also on high level. To analyse the endgames we used the analysing program called Truus, programmed by the brilliant Stef Keetman. This program contains an endgame database of all positions with at most 6 pieces in total. This means that Truus is a perfect guide in complex endgames like King + 3 pieces against king and 1 piece. There are also endgames in which the majority player has already 2 kings, but has to conquer a diagonal that the opponent possesses. The most famous one is the Scouppe endgame. We will also discuss three kings against one, which usually is a draw. You have to know some exceptions however and you should know several tricks, like amongst other the scissors. The endgame of five kings against two kings is rare, but pretty complex. You will have to know some key positions! The last chapter of this section is the most relaxed one. It’s about the delicious kind of tricks that make the endgame pleasant to deal with. 1) Standard 4 x 2 endgames 2) The opponent has more than one piece (4 x 3 & 4 x 4) 3) 3 kings against 1 4) 5 kings against 2 5) Tricks
Niek Smeitink is showing his tower building skills
182
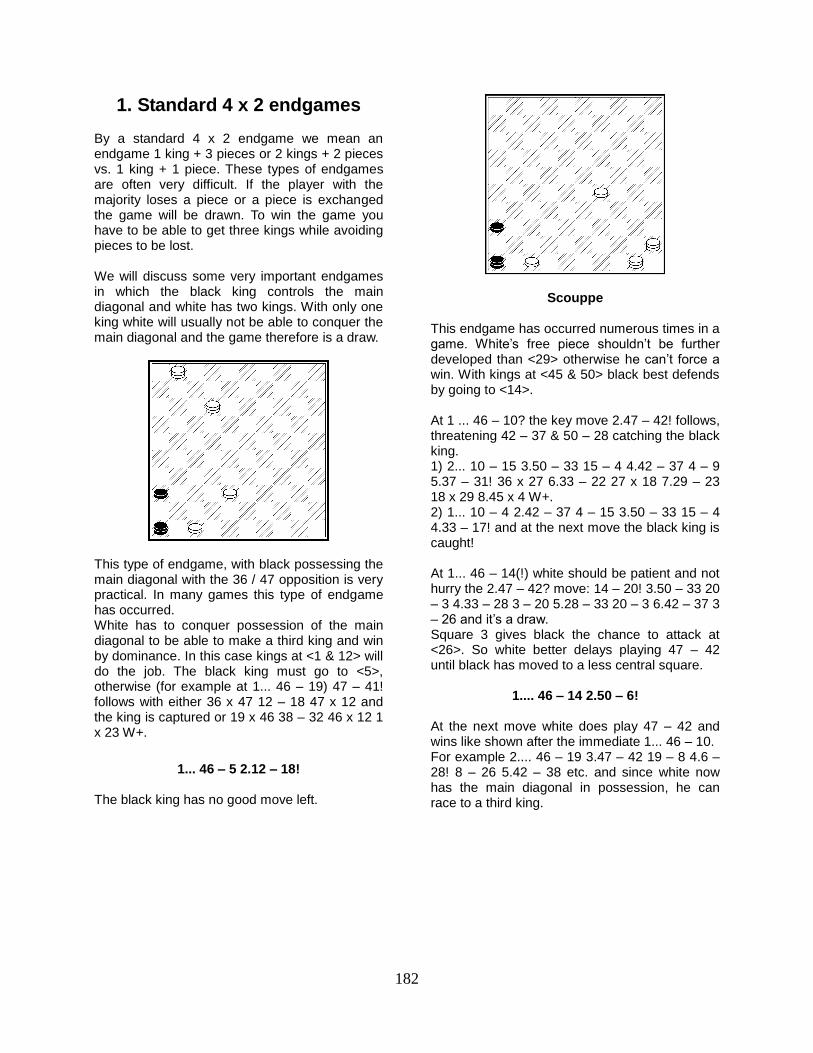
1. Standard 4 x 2 endgames By a standard 4 x 2 endgame we mean an endgame 1 king + 3 pieces or 2 kings + 2 pieces vs. 1 king + 1 piece. These types of endgames are often very difficult. If the player with the majority loses a piece or a piece is exchanged the game will be drawn. To win the game you have to be able to get three kings while avoiding pieces to be lost. We will discuss some very important endgames in which the black king controls the main diagonal and white has two kings. With only one king white will usually not be able to conquer the main diagonal and the game therefore is a draw.
This type of endgame, with black possessing the main diagonal with the 36 / 47 opposition is very practical. In many games this type of endgame has occurred. White has to conquer possession of the main diagonal to be able to make a third king and win by dominance. In this case kings at <1 & 12> will do the job. The black king must go to <5>, otherwise (for example at 1... 46 – 19) 47 – 41! follows with either 36 x 47 12 – 18 47 x 12 and the king is captured or 19 x 46 38 – 32 46 x 12 1 x 23 W+.
1... 46 – 5 2.12 – 18!
The black king has no good move left.
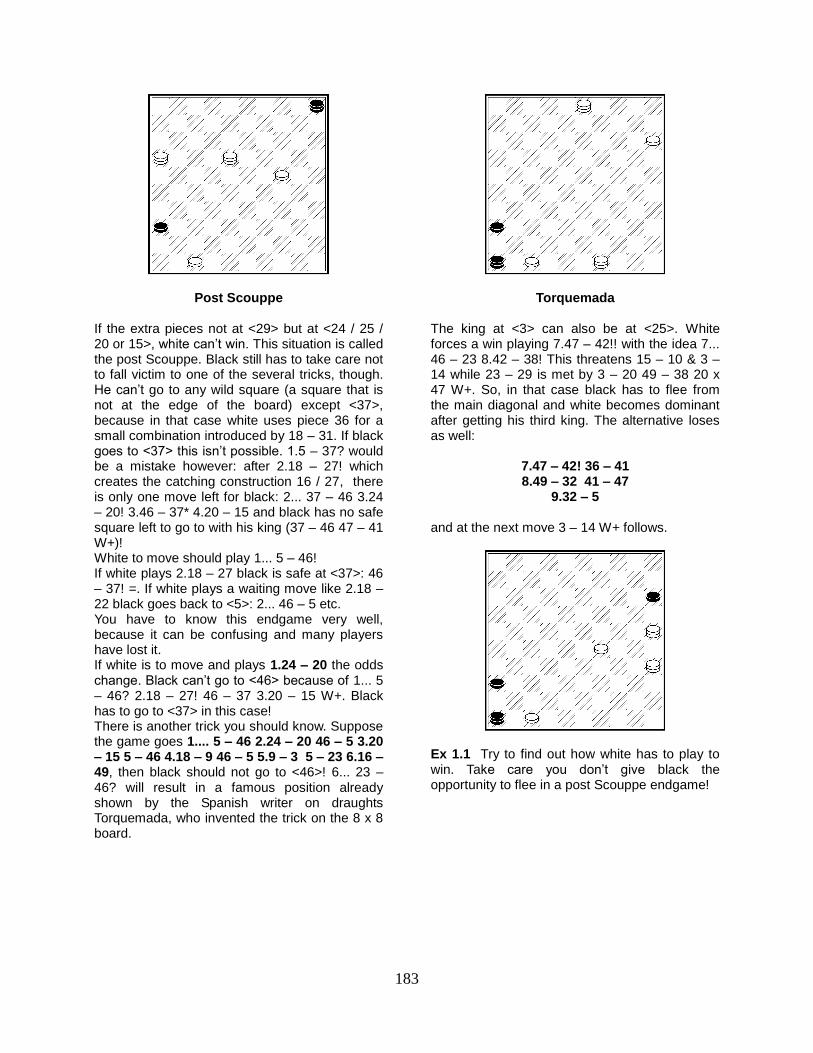
Scouppe
This endgame has occurred numerous times in a game. White’s free piece shouldn’t be further developed than <29> otherwise he can’t force a win. With kings at <45 & 50> black best defends by going to <14>. At 1 ... 46 – 10? the key move 2.47 – 42! follows, threatening 42 – 37 & 50 – 28 catching the black king. 1) 2... 10 – 15 3.50 – 33 15 – 4 4.42 – 37 4 – 9 5.37 – 31! 36 x 27 6.33 – 22 27 x 18 7.29 – 23 18 x 29 8.45 x 4 W+. 2) 1... 10 – 4 2.42 – 37 4 – 15 3.50 – 33 15 – 4 4.33 – 17! and at the next move the black king is caught! At 1... 46 – 14(!) white should be patient and not hurry the 2.47 – 42? move: 14 – 20! 3.50 – 33 20 – 3 4.33 – 28 3 – 20 5.28 – 33 20 – 3 6.42 – 37 3 – 26 and it’s a draw. Square 3 gives black the chance to attack at <26>. So white better delays playing 47 – 42 until black has moved to a less central square.
1.... 46 – 14 2.50 – 6! At the next move white does play 47 – 42 and wins like shown after the immediate 1... 46 – 10. For example 2.... 46 – 19 3.47 – 42 19 – 8 4.6 – 28! 8 – 26 5.42 – 38 etc. and since white now has the main diagonal in possession, he can race to a third king.
183
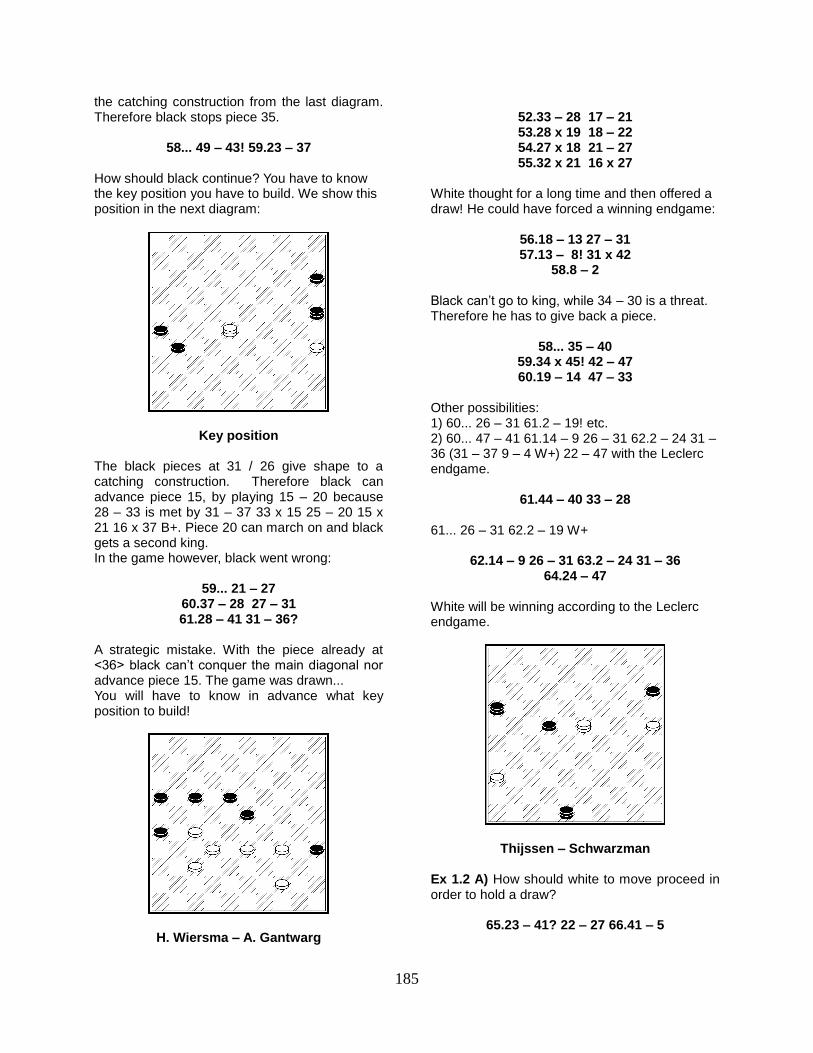
Post Scouppe
If the extra pieces not at <29> but at <24 / 25 / 20 or 15>, white can’t win. This situation is called the post Scouppe. Black still has to take care not to fall victim to one of the several tricks, though. He can’t go to any wild square (a square that is not at the edge of the board) except <37>, because in that case white uses piece 36 for a small combination introduced by 18 – 31. If black goes to <37> this isn’t possible. 1.5 – 37? would be a mistake however: after 2.18 – 27! which creates the catching construction 16 / 27, there is only one move left for black: 2... 37 – 46 3.24 – 20! 3.46 – 37* 4.20 – 15 and black has no safe square left to go to with his king (37 – 46 47 – 41 W+)! White to move should play 1... 5 – 46! If white plays 2.18 – 27 black is safe at <37>: 46 – 37! =. If white plays a waiting move like 2.18 – 22 black goes back to <5>: 2... 46 – 5 etc. You have to know this endgame very well, because it can be confusing and many players have lost it. If white is to move and plays 1.24 – 20 the odds change. Black can’t go to <46> because of 1... 5 – 46? 2.18 – 27! 46 – 37 3.20 – 15 W+. Black has to go to <37> in this case! There is another trick you should know. Suppose the game goes 1.... 5 – 46 2.24 – 20 46 – 5 3.20 – 15 5 – 46 4.18 – 9 46 – 5 5.9 – 3 5 – 23 6.16 – 49, then black should not go to <46>! 6... 23 – 46? will result in a famous position already shown by the Spanish writer on draughts Torquemada, who invented the trick on the 8 x 8 board.
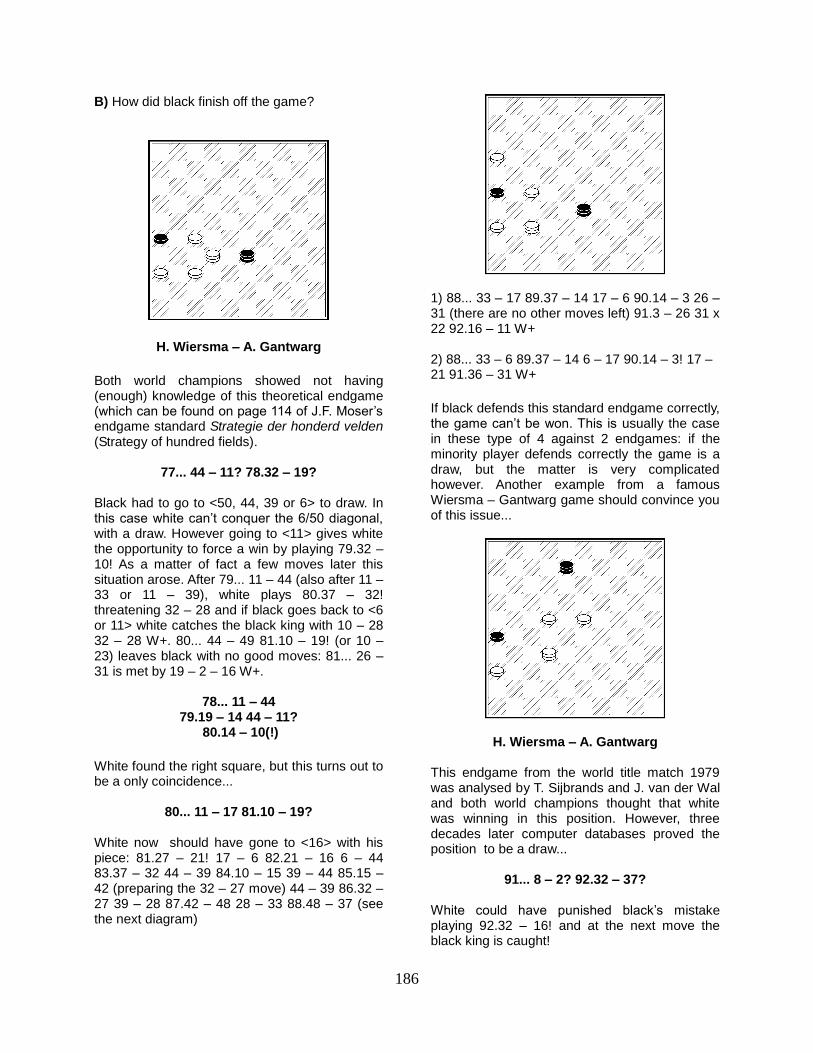
Torquemada The king at <3> can also be at <25>. White forces a win playing 7.47 – 42!! with the idea 7... 46 – 23 8.42 – 38! This threatens 15 – 10 & 3 – 14 while 23 – 29 is met by 3 – 20 49 – 38 20 x 47 W+. So, in that case black has to flee from the main diagonal and white becomes dominant after getting his third king. The alternative loses as well:
7.47 – 42! 36 – 41 8.49 – 32 41 – 47
9.32 – 5 and at the next move 3 – 14 W+ follows.
Ex 1.1 Try to find out how white has to play to win. Take care you don’t give black the opportunity to flee in a post Scouppe endgame!

184
J. van den Akker – A. Baliakin
Baliakin once wrote about these type of endgames (post-Scouppe): “People have always made mistakes in this endgame, they still make mistakes and they will be making mistakes forever.” A funny and wise observation.
84.46 – 5(?)
The white king can move almost anywhere, except to this square... But the king at <49> should actually be at the 48 / 26 diagonal to really win...
84... 4 – 9 (!) 85.15 – 10??
Macadou N’Diaye did save the draw against Kees Thijssen in this situation (Brunssum 1996), by playing 5 – 28! 9 – 13 28 – 22! and catching the king doesn’t win the game for black... Shwarzman had to escape in the same way against Getmanski (Wch 2003)...
85... 2 – 19! 86.10 – 4 19 – 46 and white resigned.
Leclerc
In this case there is no piece, but a king at <47>. This is the position you have to build. Piece 24 is covered by the king at <49>. White can chase away the black king from the main diagonal. He plays 1.47 – 38! threatening 15 – 10 & 24 – 19 W+. If black leaves the main diagonal, for example with 23 – 12, white simply plays 38 – 32 taking the main diagonal, while piece <24> is protected against an attack by king 49. If piece 24 is already at <20> white can’t win, because in this case the piece can be attacked by 12 – 3 =.
If the black king controls the main diagonal with the opposition 26 / 36 against two white kings, the white piece can’t be developed further than <33>. If the piece is at <29> or further, it isn’t possible to chase the black king from the main diagonal. In this position white threatens to catch the black king: 1.48 – 31! 26 x 37 2.33 – 28 19 x 32 3.16 x 38 W+. With black to move, after 1... 19 – 46 white plays a waiting move: 2.48 – 42 and the black king is caught at the next move.
H. Jansen – T. Kooistra
White has just conquered the main diagonal. If piece 35 gets at <25> black isn’t able to chase white from the main diagonal and it is a draw. Piece 21 is developed too far to be able to use
185
the catching construction from the last diagram. Therefore black stops piece 35.
58... 49 – 43! 59.23 – 37 How should black continue? You have to know the key position you have to build. We show this position in the next diagram:
Key position
The black pieces at 31 / 26 give shape to a catching construction. Therefore black can advance piece 15, by playing 15 – 20 because 28 – 33 is met by 31 – 37 33 x 15 25 – 20 15 x 21 16 x 37 B+. Piece 20 can march on and black gets a second king. In the game however, black went wrong:
59... 21 – 27 60.37 – 28 27 – 31 61.28 – 41 31 – 36?
A strategic mistake. With the piece already at <36> black can’t conquer the main diagonal nor advance piece 15. The game was drawn... You will have to know in advance what key position to build!
H. Wiersma – A. Gantwarg
52.33 – 28 17 – 21 53.28 x 19 18 – 22 54.27 x 18 21 – 27 55.32 x 21 16 x 27
White thought for a long time and then offered a draw! He could have forced a winning endgame:
56.18 – 13 27 – 31 57.13 – 8! 31 x 42
58.8 – 2 Black can’t go to king, while 34 – 30 is a threat. Therefore he has to give back a piece.
58... 35 – 40 59.34 x 45! 42 – 47 60.19 – 14 47 – 33
Other possibilities: 1) 60... 26 – 31 61.2 – 19! etc. 2) 60... 47 – 41 61.14 – 9 26 – 31 62.2 – 24 31 – 36 (31 – 37 9 – 4 W+) 22 – 47 with the Leclerc endgame.
61.44 – 40 33 – 28 61... 26 – 31 62.2 – 19 W+
62.14 – 9 26 – 31 63.2 – 24 31 – 36 64.24 – 47
White will be winning according to the Leclerc endgame.
Thijssen – Schwarzman
Ex 1.2 A) How should white to move proceed in order to hold a draw?
65.23 – 41? 22 – 27 66.41 – 5
186
B) How did black finish off the game?
H. Wiersma – A. Gantwarg
Both world champions showed not having (enough) knowledge of this theoretical endgame (which can be found on page 114 of J.F. Moser’s endgame standard Strategie der honderd velden (Strategy of hundred fields).
77... 44 – 11? 78.32 – 19? Black had to go to <50, 44, 39 or 6> to draw. In this case white can’t conquer the 6/50 diagonal, with a draw. However going to <11> gives white the opportunity to force a win by playing 79.32 – 10! As a matter of fact a few moves later this situation arose. After 79... 11 – 44 (also after 11 – 33 or 11 – 39), white plays 80.37 – 32! threatening 32 – 28 and if black goes back to <6 or 11> white catches the black king with 10 – 28 32 – 28 W+. 80... 44 – 49 81.10 – 19! (or 10 – 23) leaves black with no good moves: 81... 26 – 31 is met by 19 – 2 – 16 W+.
78... 11 – 44 79.19 – 14 44 – 11?
80.14 – 10(!)
White found the right square, but this turns out to be a only coincidence...
80... 11 – 17 81.10 – 19?
White now should have gone to <16> with his piece: 81.27 – 21! 17 – 6 82.21 – 16 6 – 44 83.37 – 32 44 – 39 84.10 – 15 39 – 44 85.15 – 42 (preparing the 32 – 27 move) 44 – 39 86.32 – 27 39 – 28 87.42 – 48 28 – 33 88.48 – 37 (see the next diagram)
1) 88... 33 – 17 89.37 – 14 17 – 6 90.14 – 3 26 – 31 (there are no other moves left) 91.3 – 26 31 x 22 92.16 – 11 W+ 2) 88... 33 – 6 89.37 – 14 6 – 17 90.14 – 3! 17 – 21 91.36 – 31 W+
If black defends this standard endgame correctly, the game can’t be won. This is usually the case in these type of 4 against 2 endgames: if the minority player defends correctly the game is a draw, but the matter is very complicated however. Another example from a famous Wiersma – Gantwarg game should convince you of this issue...
H. Wiersma – A. Gantwarg
This endgame from the world title match 1979 was analysed by T. Sijbrands and J. van der Wal and both world champions thought that white was winning in this position. However, three decades later computer databases proved the position to be a draw...
91... 8 – 2? 92.32 – 37? White could have punished black’s mistake playing 92.32 – 16! and at the next move the black king is caught!

187
Black could have held a draw playing either 92... 8 – 30 or 92... 8 – 24. We show the most important possibilities after 92... 8 – 30! 1) 93.22 – 18 30 – 35 94.32 – 49 (threatening 23 – 19 W+) 35 – 2 (35 – 8 is a draw too) 1.1) 95.18 – 12 26 – 31! (the only move that draws) 96.36 x 27 2 – 13 97.27 – 21 13 – 18 = 1.2) 95.49 – 16 2 – 8! 96.16 – 32 8 – 2 because white can’t control <16> he doesn’t make progress and the game is a draw, for example 97.49 – 32 2 – 16! 98.32 – 37 16 – 27 99.18 – 12 27 – 18 = 2) 93.32 – 37 30 – 13! 94.22 – 17 13 – 4! The 4 – 10 threat draws the game: 95.17 – 11 4 – 10 96.37 – 28 10 – 4! (threatening 26 – 31 =) 97.28 – 37 4 – 10 and the moves are repeated with a draw. Exercise 1.3 How does black force a draw after 93.22 – 17 ?
White needs subtle manoeuvring play to be able to get a second king. Playing 1.23 – 45 17 – 50 will not yield a positive result, for 2.25 – 20 will be a draw after 50 – 17! (20 – 14 17 – 28) =. White has to use piece 4 as a combinational object to be able to advance piece 25. White has to manoeuvre at the 36 / 4 diagonal.
1.23 – 18 17 – 33
Black takes care piece 25 can’t advance. 25 – 20 is met by 4 – 10 15 x 4 33 x 15 = now.
2.18 – 27! White wants black to go to <17>. From there he can move on to the crucial square 13, as we’ll see.
2.... 33 – 39
After 2... 33 – 28 3.25 – 20 white reaches the key position immediately. Now white can’t play 3.25 – 20 because of 39 – 25 =.
3.27 – 36! 39 – 17 Black can’t stop piece 25 in another way. After 3... 39 – 33 white does play 4.25 – 20 for 4 – 10 5.15 x 4 33 x 15 is met by 6.36 – 47! W+.
4.36 – 13!
Black can’t go to <33 or 39> anymore, stopping piece 25: 1) 4... 17 – 33 5.13 – 24 W+ 2) 4.... 17 – 39 5.15 – 10 4 x 15 6.25 – 20 15 x 24 7.13 x 48 W+
4.... 17 – 50 5.25 – 20 50 – 28 6.13 – 27
Threatening 20 – 14! 28 x 10 (28 x 5 15 – 10 W+) 27 – 9 W+. Black thus has to leave the main diagonal and piece 20 marches on to king. In a Clerc – Wesselink game white had forgotten how to build the key position and played many senseless moves. At a certain moment the same position was on the board for the third time. But Wesselink didn’t claim the draw at the right moment. You should remember that you always have to claim the draw in your own time! So, if after your move the same position with your opponent to move will emerge, you shouldn’t make the move and press the clock! Instead you should claim the draw without playing the move at all. You should call the referee and tell that after the move you plan the position with your opponent to move will emerge for the third time. The referee should check this claim using the notation. If your claim is right, the game is drawn. This is a logical rule: If the claim isn’t correct it should cost the one who made the incorrect claim time.
188
Ex 1.4 Try to find the key position white has to build to chase black away from the main diagonal.
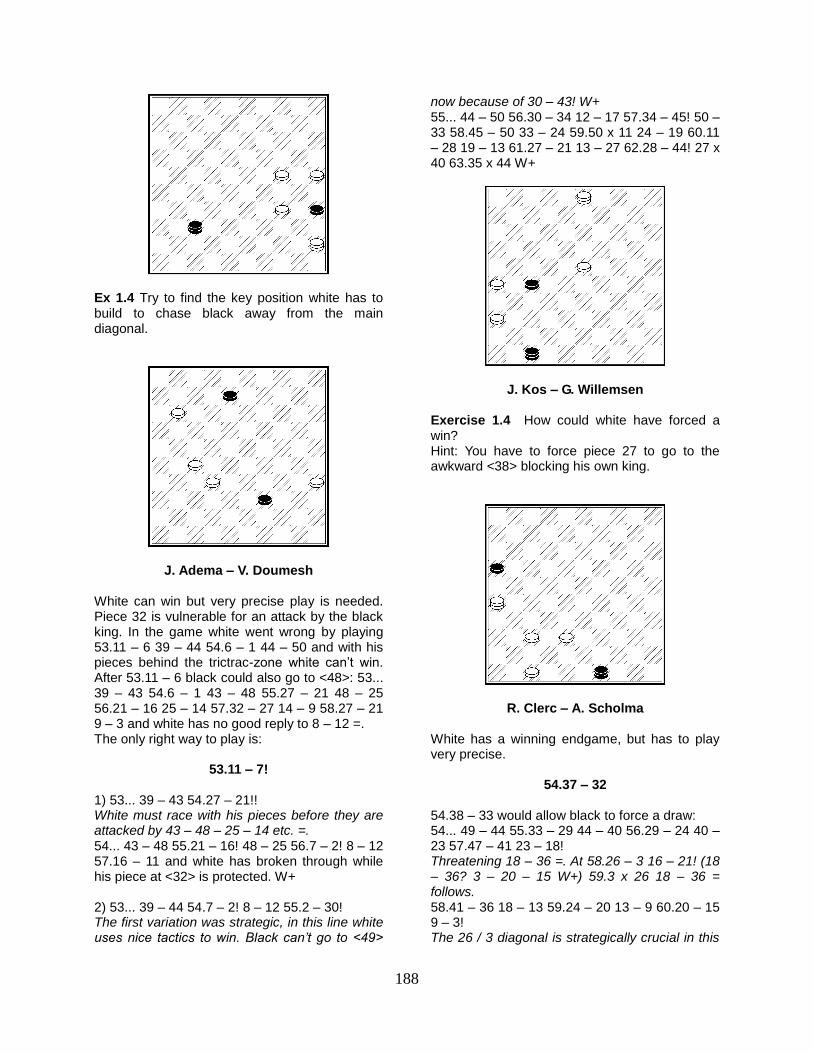
J. Adema – V. Doumesh
White can win but very precise play is needed. Piece 32 is vulnerable for an attack by the black king. In the game white went wrong by playing 53.11 – 6 39 – 44 54.6 – 1 44 – 50 and with his pieces behind the trictrac-zone white can’t win. After 53.11 – 6 black could also go to <48>: 53... 39 – 43 54.6 – 1 43 – 48 55.27 – 21 48 – 25 56.21 – 16 25 – 14 57.32 – 27 14 – 9 58.27 – 21 9 – 3 and white has no good reply to 8 – 12 =. The only right way to play is:
53.11 – 7! 1) 53... 39 – 43 54.27 – 21!! White must race with his pieces before they are attacked by 43 – 48 – 25 – 14 etc. =. 54... 43 – 48 55.21 – 16! 48 – 25 56.7 – 2! 8 – 12 57.16 – 11 and white has broken through while his piece at <32> is protected. W+ 2) 53... 39 – 44 54.7 – 2! 8 – 12 55.2 – 30! The first variation was strategic, in this line white uses nice tactics to win. Black can’t go to <49>
now because of 30 – 43! W+ 55... 44 – 50 56.30 – 34 12 – 17 57.34 – 45! 50 – 33 58.45 – 50 33 – 24 59.50 x 11 24 – 19 60.11 – 28 19 – 13 61.27 – 21 13 – 27 62.28 – 44! 27 x 40 63.35 x 44 W+
J. Kos – G. Willemsen Exercise 1.4 How could white have forced a win? Hint: You have to force piece 27 to go to the awkward <38> blocking his own king.
R. Clerc – A. Scholma
White has a winning endgame, but has to play very precise.
54.37 – 32 54.38 – 33 would allow black to force a draw: 54... 49 – 44 55.33 – 29 44 – 40 56.29 – 24 40 – 23 57.47 – 41 23 – 18! Threatening 18 – 36 =. At 58.26 – 3 16 – 21! (18 – 36? 3 – 20 – 15 W+) 59.3 x 26 18 – 36 = follows. 58.41 – 36 18 – 13 59.24 – 20 13 – 9 60.20 – 15 9 – 3! The 26 / 3 diagonal is strategically crucial in this
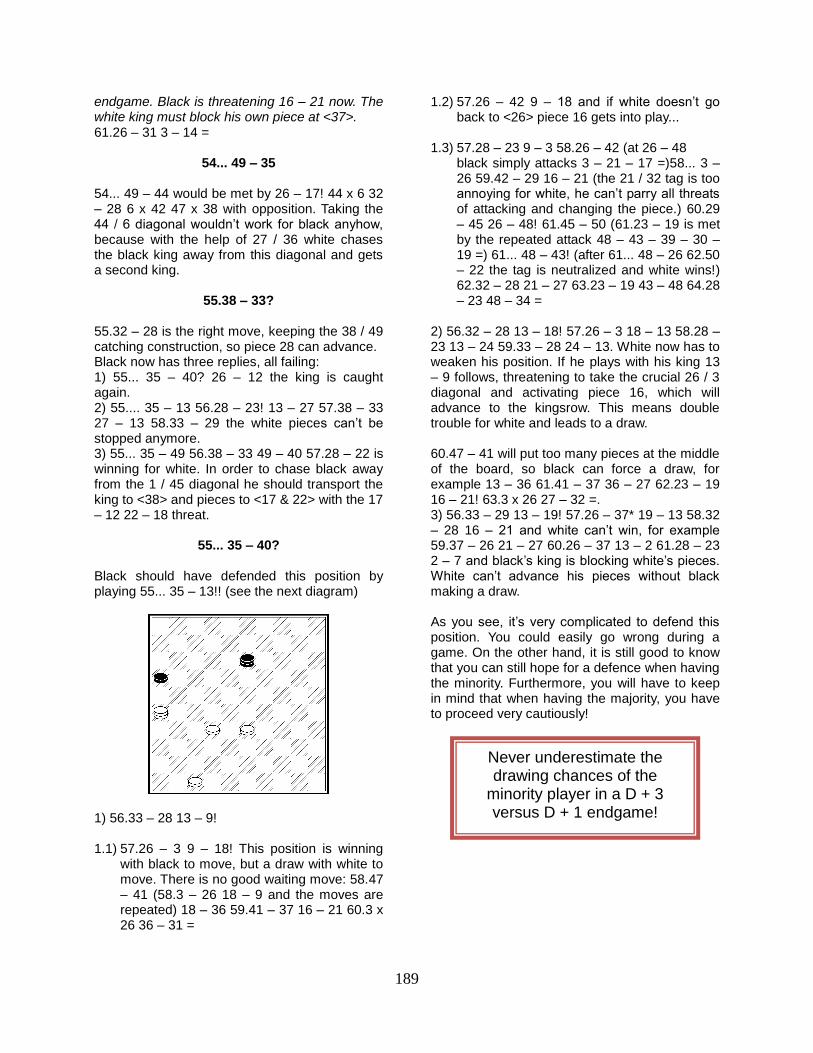
189
endgame. Black is threatening 16 – 21 now. The white king must block his own piece at <37>. 61.26 – 31 3 – 14 =
54... 49 – 35 54... 49 – 44 would be met by 26 – 17! 44 x 6 32 – 28 6 x 42 47 x 38 with opposition. Taking the 44 / 6 diagonal wouldn’t work for black anyhow, because with the help of 27 / 36 white chases the black king away from this diagonal and gets a second king.
55.38 – 33? 55.32 – 28 is the right move, keeping the 38 / 49 catching construction, so piece 28 can advance. Black now has three replies, all failing: 1) 55... 35 – 40? 26 – 12 the king is caught again. 2) 55.... 35 – 13 56.28 – 23! 13 – 27 57.38 – 33 27 – 13 58.33 – 29 the white pieces can’t be stopped anymore. 3) 55... 35 – 49 56.38 – 33 49 – 40 57.28 – 22 is winning for white. In order to chase black away from the 1 / 45 diagonal he should transport the king to <38> and pieces to <17 & 22> with the 17 – 12 22 – 18 threat.
55... 35 – 40? Black should have defended this position by playing 55... 35 – 13!! (see the next diagram)
1) 56.33 – 28 13 – 9! 1.1) 57.26 – 3 9 – 18! This position is winning
with black to move, but a draw with white to move. There is no good waiting move: 58.47 – 41 (58.3 – 26 18 – 9 and the moves are repeated) 18 – 36 59.41 – 37 16 – 21 60.3 x 26 36 – 31 =
1.2) 57.26 – 42 9 – 18 and if white doesn’t go back to <26> piece 16 gets into play...
1.3) 57.28 – 23 9 – 3 58.26 – 42 (at 26 – 48
black simply attacks 3 – 21 – 17 =)58... 3 – 26 59.42 – 29 16 – 21 (the 21 / 32 tag is too annoying for white, he can’t parry all threats of attacking and changing the piece.) 60.29 – 45 26 – 48! 61.45 – 50 (61.23 – 19 is met by the repeated attack 48 – 43 – 39 – 30 – 19 =) 61... 48 – 43! (after 61... 48 – 26 62.50 – 22 the tag is neutralized and white wins!) 62.32 – 28 21 – 27 63.23 – 19 43 – 48 64.28 – 23 48 – 34 =
2) 56.32 – 28 13 – 18! 57.26 – 3 18 – 13 58.28 – 23 13 – 24 59.33 – 28 24 – 13. White now has to weaken his position. If he plays with his king 13 – 9 follows, threatening to take the crucial 26 / 3 diagonal and activating piece 16, which will advance to the kingsrow. This means double trouble for white and leads to a draw. 60.47 – 41 will put too many pieces at the middle of the board, so black can force a draw, for example 13 – 36 61.41 – 37 36 – 27 62.23 – 19 16 – 21! 63.3 x 26 27 – 32 =. 3) 56.33 – 29 13 – 19! 57.26 – 37* 19 – 13 58.32 – 28 16 – 21 and white can’t win, for example 59.37 – 26 21 – 27 60.26 – 37 13 – 2 61.28 – 23 2 – 7 and black’s king is blocking white’s pieces. White can’t advance his pieces without black making a draw. As you see, it’s very complicated to defend this position. You could easily go wrong during a game. On the other hand, it is still good to know that you can still hope for a defence when having the minority. Furthermore, you will have to keep in mind that when having the majority, you have to proceed very cautiously!
Never underestimate the drawing chances of the
minority player in a D + 3 versus D + 1 endgame!
190
J. Bastiaannet – J. Van der Wal Because white can’t go to king immediately, he has to sacrifice a piece first. The endgame can still be defended by white because black’s pieces are all in the middle of the board.
53.36 – 31 26 x 37 54.9 – 4?
J. Bastiaannet & J. van der Wal after Jannes had
won the world title in 1983. 54.9 – 3! 8 – 13 55.3 – 20! is the right defence.
White threatens to attack piece 13. 55... 49 – 16 56.20 – 33 22 – 27 57.35 – 30 16 – 2 58.33 – 15! The only move that doesn’t lose, threatening 15 – 4 =. 58... 2 – 11 59.30 – 24 13 – 18 60.24 – 19 etc. =
54... 22 – 28?
54... 49 – 27! 55.4 – 15 22 – 28! protecting piece 22, is winning.
55.4 – 10 49 – 32 56.10 – 19?
Black could still have claimed the draw: 56.10 – 14! 28 – 33 57.14 – 3 8 – 13 58.3 – 26 37 – 41 59.26 – 42! 59.26 – 31? 41 – 47 60.31 x 4 32 – 10 B+ 59... 33 – 39 59... 32 – 38 60.42 – 31 13 – 19 61.31 – 22 = 60.42 – 31 13 – 19 61.31 – 37 32 – 23 62.32 x 46 39 – 44 63.35 – 30 =
56... 8 – 12 57.19 – 30 28 – 33 Now white is definitely lost. The game went 58.30 – 25 37 – 42 59.25 – 3 12 – 18 60.3 – 9 18 – 23 61.35 – 30 42 – 47 62.30 – 24 47 – 36 63.9 – 3 23 – 28 64.24 – 19 32 – 41 65.19 – 14 36 – 4 66.3 – 26 33 – 38 and after two more useless moves white surrendered.
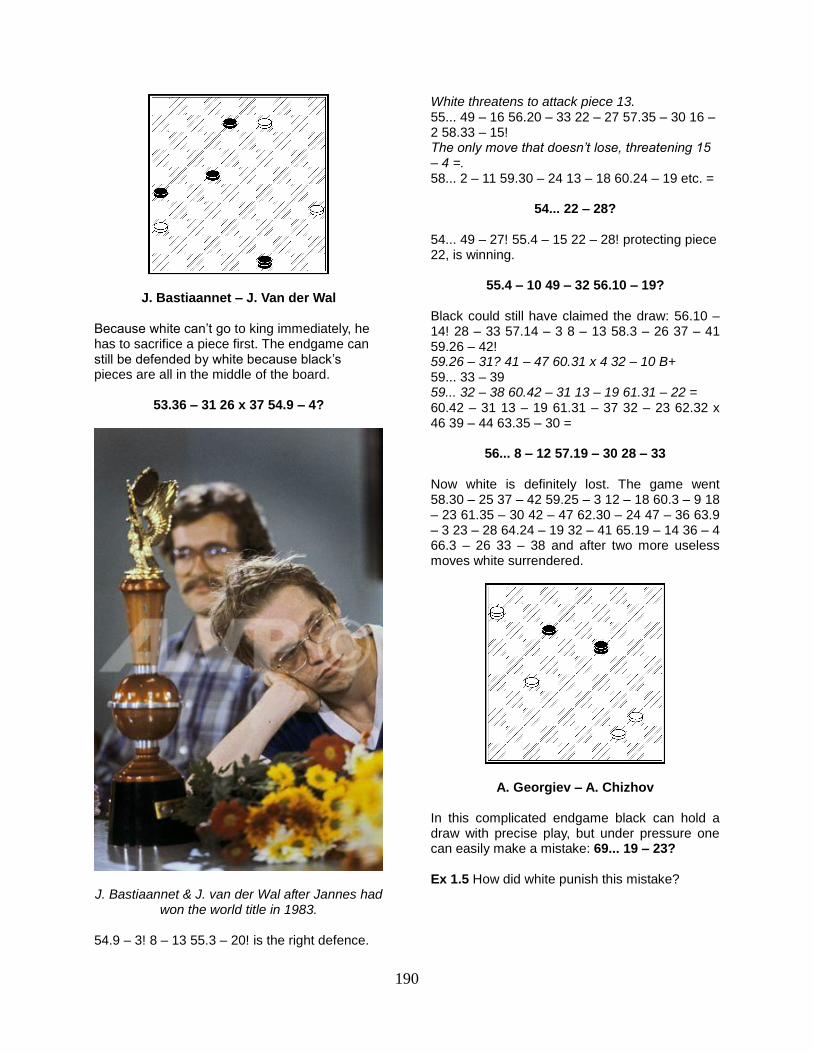
A. Georgiev – A. Chizhov
In this complicated endgame black can hold a draw with precise play, but under pressure one can easily make a mistake: 69... 19 – 23? Ex 1.5 How did white punish this mistake?
191
E. Brunsman – A. Schotanus
White has only one piece that is a bit vulnerable, piece 34. White should protect this piece first. In the game he went wrong: 1.29 – 1? 49 – 27 and now 2.34 – 29 is met by 2... 25 – 30 3.29 – 23 30 – 34 4.1 – 6 34 – 40 (or 27 – 13) 5.23 – 19 40 – 45 6.6 – 50 27 – 9 and with his king bound to piece 45 white can’t advance safely to second king: 7.48 – 42 9 – 20 8.42 – 37 20 – 3! 9.19 – 13 (9.37 – 31 is met by 3 – 26 – 37 – 31 =) 3 – 26 1) 10.37 – 32 26 – 21 11.32 – 28 21 – 17 12.28 – 23 17 – 12 13.23 – 19 12 – 3 14.36 – 31 3 – 26 15.31 – 27 26 – 37 =. 2) 10.36 – 31 26 – 3 (or 26 – 12)
2.1) 11.31 – 26 3 – 14 12.37 – 31 14 – 10! and 10 – 4 at the next move draws the game. 2.2) 12.37 – 32 3 – 26 13.31 – 27 26 – 3 14.32 – 28 3 – 14 15.28 – 22 14 – 3 16.22 – 18 If white begins with 12.31 – 27 black can force the same position. White is close to a second king but just in time the black king can rob a piece attacking from behind! 16... 3 – 25 (or 3 – 20) 17.13 – 8 25 – 43 18.27 – 22 43 – 34 19.18 – 13 34 – 18 =
In the game white played the slow 2.1 – 12 and couldn’t win either. Ex 1.6 How should white have played (from the diagram) to protect piece 34 in order to advance to a second king safely?
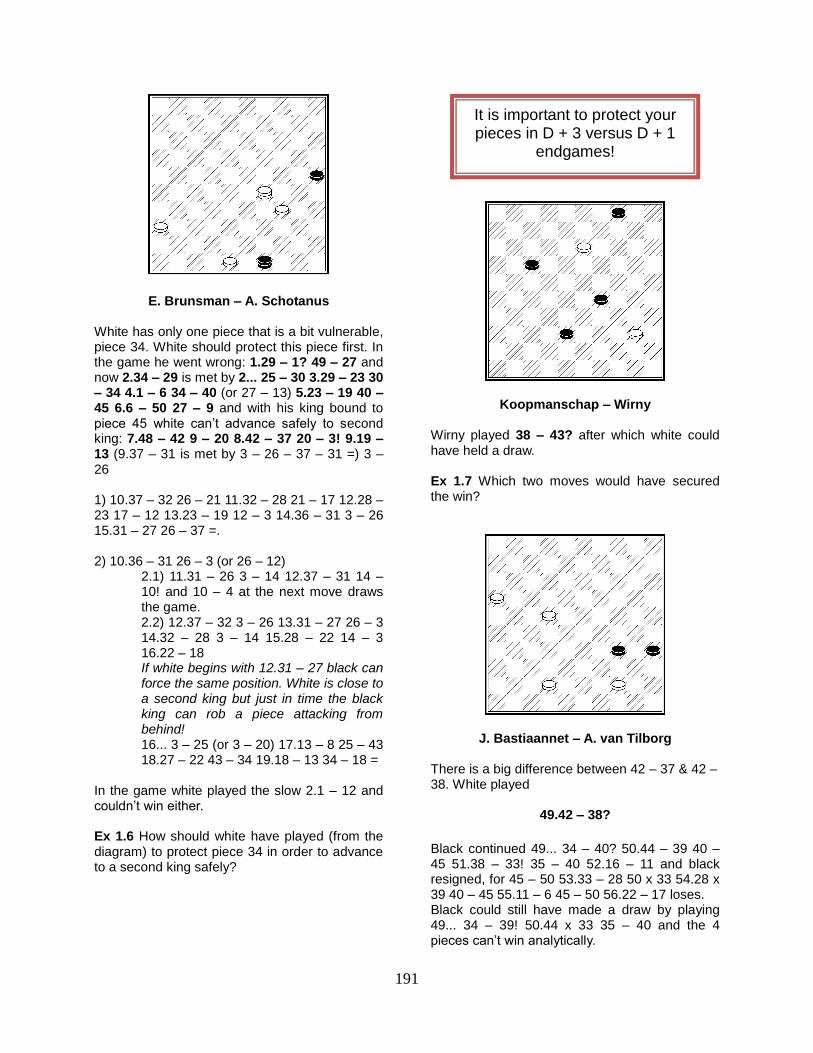
Koopmanschap – Wirny
Wirny played 38 – 43? after which white could have held a draw. Ex 1.7 Which two moves would have secured the win?
J. Bastiaannet – A. van Tilborg
There is a big difference between 42 – 37 & 42 – 38. White played
49.42 – 38?
Black continued 49... 34 – 40? 50.44 – 39 40 – 45 51.38 – 33! 35 – 40 52.16 – 11 and black resigned, for 45 – 50 53.33 – 28 50 x 33 54.28 x 39 40 – 45 55.11 – 6 45 – 50 56.22 – 17 loses. Black could still have made a draw by playing 49... 34 – 39! 50.44 x 33 35 – 40 and the 4 pieces can’t win analytically.
It is important to protect your pieces in D + 3 versus D + 1
endgames!
192
White can’t go to king: 51.16 – 11 40 – 44 (threatening 44 – 49) 52.38 – 32 44 – 49 53.32 – 28 49 – 16 54.11 – 6 16 – 2 White’s pieces in the centre are too vulnerable. White has to protect piece 33. 1) 55.6 – 1 2 – 24 56.1 – 29 24 – 19 57.29 – 23 19 – 24 repeating the moves = 2) 55.28 – 23 2 – 24 56.33 – 28 24 – 13 57.22 – 17 13 – 8 58.17 – 11 8 – 2 = From all attempts for white to win we discuss one more: 51.33 – 28 40 – 44 52.38 – 32 44 – 50 53.16 – 11 50 – 45 54.27 – 21 Otherwise 45 – 7 – 16 follows.
54... 45 – 34 Threatening 34 – 43 =. 55.27 – 21 34 – 25 56.28 – 23 25 – 43 57.21 – 16 43 – 39 58.22 – 17 39 – 34 59.23 – 19 34 – 30 60.19 – 14 30 – 8 = White could have prevented all these problems by playing 49.42 – 37!! Now 49... 34 – 40 loses the same way as in the game, while after 49... 34 – 39 50.44 x 33 35 – 40 piece 37 is at a much better position on the board than at <38>! Now white can race to king 51.16 – 11 40 – 44 52.11 – 6 44 – 49 53.6 – 1 and all white’s pieces are protected.
White can hold a draw in this famous position from 1881.
1.23 – 32 1) 1... 35 – 40 2.32 – 43 30 – 35 3.43 – 25! 3.43 – 30? would lose to 15 – 20 – 24 B+
Black can’t stop the 25 – 20 – 25 threat, for 24 – 29 is met by 25 – 34 =. 2) 1... 30 – 34 2.32 – 43 24 – 30 3.43 – 38 34 – 39 4.38 – 27 15 – 20 (39 – 44 27 – 43 is a draw, as well as 30 – 34 22 – 18 35 – 40 18 – 22 39 – 43 22 – 39 =) 5.27 – 38 20 – 25 6.38 – 29 and black can’t chase the black king away from the 1 / 45 diagonal.
3) 1... 24 – 29 2.32 – 43 29 – 34 3.43 – 38 etc. (See second variation) = As a matter of fact white can also start playing 1.23 – 14 24 – 29 2.14 – 32! etc. =
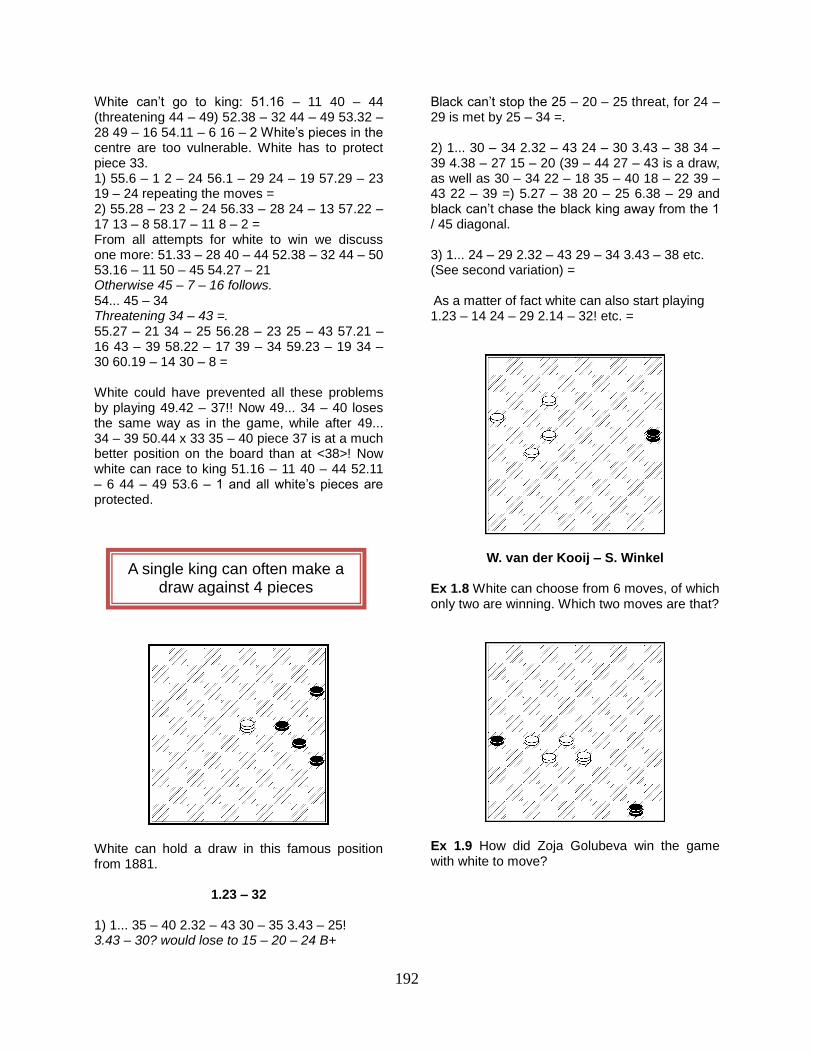
W. van der Kooij – S. Winkel
Ex 1.8 White can choose from 6 moves, of which only two are winning. Which two moves are that?
Ex 1.9 How did Zoja Golubeva win the game with white to move?
A single king can often make a draw against 4 pieces
193
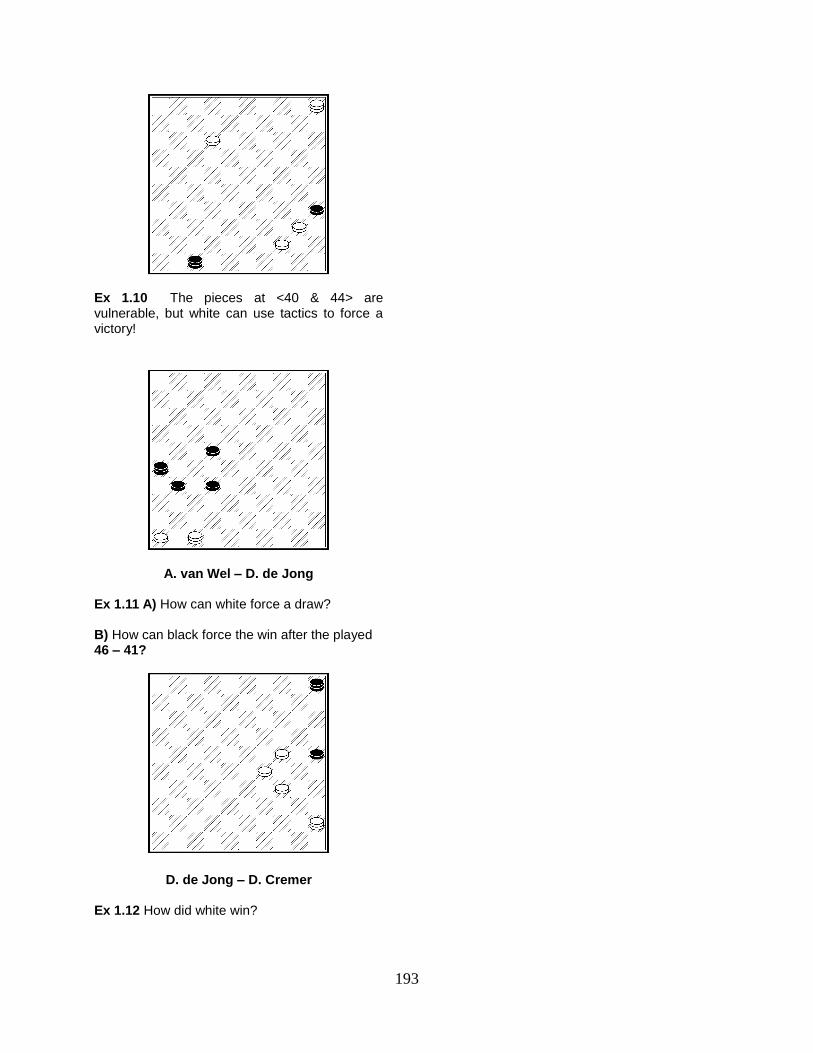
Ex 1.10 The pieces at <40 & 44> are vulnerable, but white can use tactics to force a victory!
A. van Wel – D. de Jong
Ex 1.11 A) How can white force a draw? B) How can black force the win after the played 46 – 41?
D. de Jong – D. Cremer
Ex 1.12 How did white win?
194
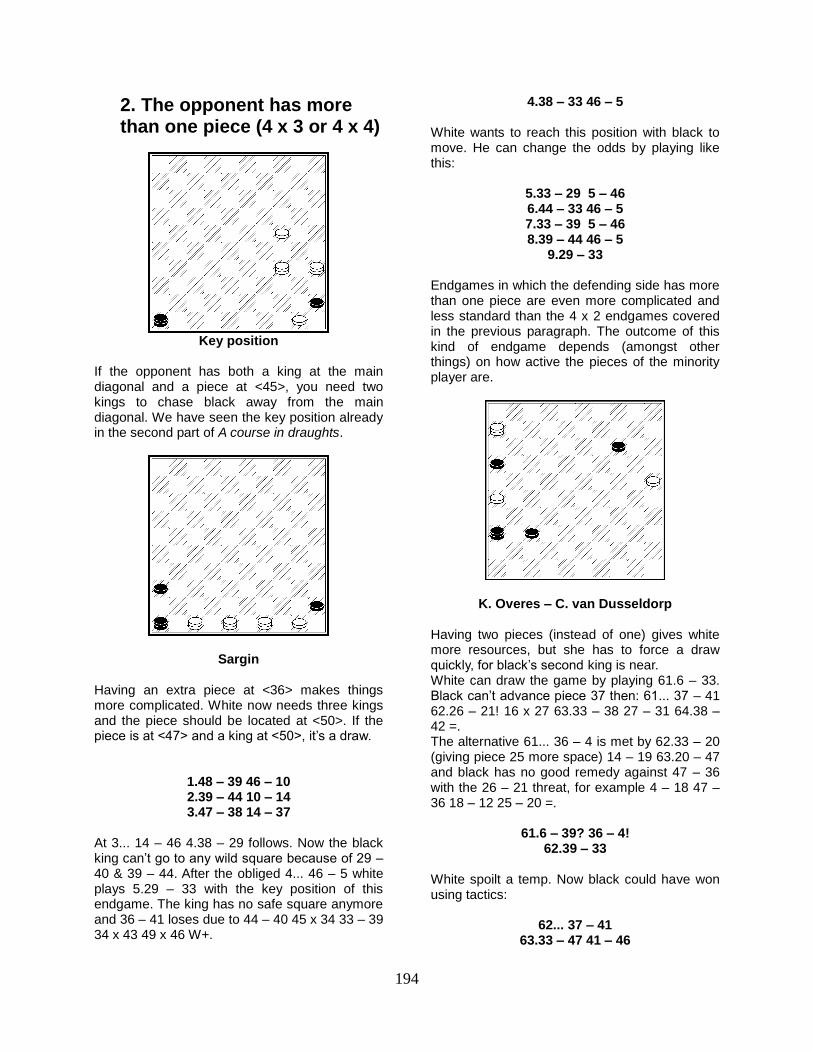
2. The opponent has more than one piece (4 x 3 or 4 x 4)
Key position
If the opponent has both a king at the main diagonal and a piece at <45>, you need two kings to chase black away from the main diagonal. We have seen the key position already in the second part of A course in draughts.
Sargin
Having an extra piece at <36> makes things more complicated. White now needs three kings and the piece should be located at <50>. If the piece is at <47> and a king at <50>, it’s a draw.
1.48 – 39 46 – 10 2.39 – 44 10 – 14 3.47 – 38 14 – 37
At 3... 14 – 46 4.38 – 29 follows. Now the black king can’t go to any wild square because of 29 – 40 & 39 – 44. After the obliged 4... 46 – 5 white plays 5.29 – 33 with the key position of this endgame. The king has no safe square anymore and 36 – 41 loses due to 44 – 40 45 x 34 33 – 39 34 x 43 49 x 46 W+.
4.38 – 33 46 – 5
White wants to reach this position with black to move. He can change the odds by playing like this:
5.33 – 29 5 – 46 6.44 – 33 46 – 5 7.33 – 39 5 – 46 8.39 – 44 46 – 5
9.29 – 33 Endgames in which the defending side has more than one piece are even more complicated and less standard than the 4 x 2 endgames covered in the previous paragraph. The outcome of this kind of endgame depends (amongst other things) on how active the pieces of the minority player are.
K. Overes – C. van Dusseldorp
Having two pieces (instead of one) gives white more resources, but she has to force a draw quickly, for black’s second king is near. White can draw the game by playing 61.6 – 33. Black can’t advance piece 37 then: 61... 37 – 41 62.26 – 21! 16 x 27 63.33 – 38 27 – 31 64.38 – 42 =. The alternative 61... 36 – 4 is met by 62.33 – 20 (giving piece 25 more space) 14 – 19 63.20 – 47 and black has no good remedy against 47 – 36 with the 26 – 21 threat, for example 4 – 18 47 – 36 18 – 12 25 – 20 =.
61.6 – 39? 36 – 4! 62.39 – 33
White spoilt a temp. Now black could have won using tactics:
62... 37 – 41 63.33 – 47 41 – 46
195
64.47 – 36 46 – 37!! 65.26 – 21 16 x 27 66.36 x 20 4 – 15
catching the king at the next move.
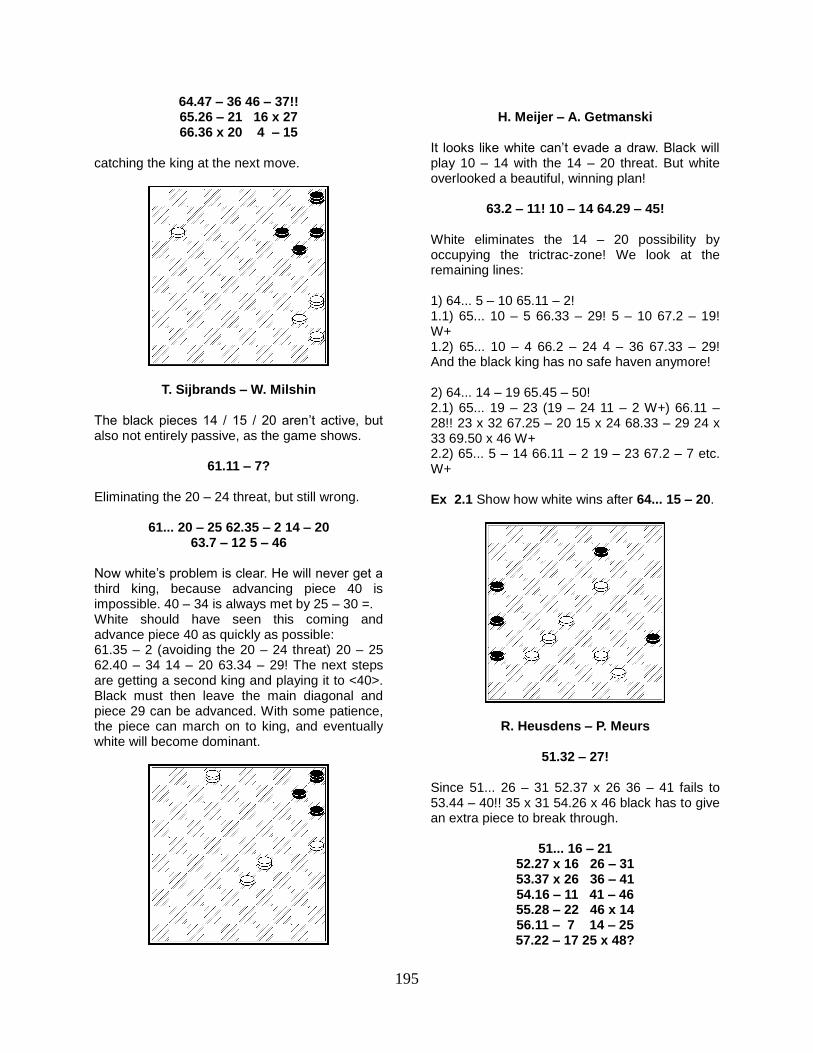
T. Sijbrands – W. Milshin The black pieces 14 / 15 / 20 aren’t active, but also not entirely passive, as the game shows.
61.11 – 7?
Eliminating the 20 – 24 threat, but still wrong.
61... 20 – 25 62.35 – 2 14 – 20 63.7 – 12 5 – 46
Now white’s problem is clear. He will never get a third king, because advancing piece 40 is impossible. 40 – 34 is always met by 25 – 30 =. White should have seen this coming and advance piece 40 as quickly as possible: 61.35 – 2 (avoiding the 20 – 24 threat) 20 – 25 62.40 – 34 14 – 20 63.34 – 29! The next steps are getting a second king and playing it to <40>. Black must then leave the main diagonal and piece 29 can be advanced. With some patience, the piece can march on to king, and eventually white will become dominant.
H. Meijer – A. Getmanski
It looks like white can’t evade a draw. Black will play 10 – 14 with the 14 – 20 threat. But white overlooked a beautiful, winning plan!
63.2 – 11! 10 – 14 64.29 – 45!
White eliminates the 14 – 20 possibility by occupying the trictrac-zone! We look at the remaining lines: 1) 64... 5 – 10 65.11 – 2! 1.1) 65... 10 – 5 66.33 – 29! 5 – 10 67.2 – 19! W+ 1.2) 65... 10 – 4 66.2 – 24 4 – 36 67.33 – 29! And the black king has no safe haven anymore! 2) 64... 14 – 19 65.45 – 50! 2.1) 65... 19 – 23 (19 – 24 11 – 2 W+) 66.11 – 28!! 23 x 32 67.25 – 20 15 x 24 68.33 – 29 24 x 33 69.50 x 46 W+ 2.2) 65... 5 – 14 66.11 – 2 19 – 23 67.2 – 7 etc. W+ Ex 2.1 Show how white wins after 64... 15 – 20.
R. Heusdens – P. Meurs
51.32 – 27!
Since 51... 26 – 31 52.37 x 26 36 – 41 fails to 53.44 – 40!! 35 x 31 54.26 x 46 black has to give an extra piece to break through.
51... 16 – 21 52.27 x 16 26 – 31 53.37 x 26 36 – 41 54.16 – 11 41 – 46 55.28 – 22 46 x 14 56.11 – 7 14 – 25 57.22 – 17 25 x 48?

196
Black could have held a draw by playing 57... 25 x 43 58.7 – 1 (see the next analysis diagram).
58... 43 – 32! White can’t get a second king. 17 – 11 is stopped by 32 – 28 =. 59.1 – 45 32 – 5! Black can also play 59... 32 – 46. The point is white still can’t advance piece 17 because of the sacrifice 60.17 – 11 35 – 40! 61.45 x 4 5 – 28 =. 60.45 – 50 5 – 23 61.17 – 11 9 – 13 62.11 – 6 23 – 1 63.26 – 21 13 – 19 and white’s problem is clear, he can’t use his king anymore. After 64.21 – 17 19 – 24 65.17 – 11 24 – 30 he has run out of moves to go on.
58.7 – 1 48 – 37 59.26 – 21 37 – 26
White can break the blocking of pieces 21 / 17.
60.1 – 45 9 – 14 61.45 – 50
Because of the 17 – 11 44 – 39 threat the black king has to leave <26>.
61... 26 – 48 62.17 – 11 48 – 43
63.21 – 17! 63... 21 – 16? 43 – 34 64.50 – 45 34 – 1 doesn’t win, as 65.44 – 39 is met by 35 – 40 66.45 x 5 1 – 6 =.
63... 43 – 34 64.50 – 45! Well played by white, for 34 – 1 can be met by 44 – 39! now.
64... 34 – 43 65.11 – 7
Black resigned.
A. Gantwarg – T. Sijbrands
White resigned in this position, but he could have held a draw! After 56.26 – 21! Black can’t get a second king safely.
56.26 – 21! 34 – 40 57.27 – 31!
At 57.27 – 36 7 – 12 wins for black, but now 57... 7 – 12 is met by 58.31 – 26! 12 – 18* 59.26 – 31 with a repeated attack on the loose piece, for example: 18 – 23 31 – 37 23 – 29 37 – 42 6 – 33 42 – 47 =. Ex 2.2 A) How does white force a draw after 56.26 – 21 6 – 50 ? B) How can white force a draw after 56.26 – 21 6 – 39 ?
A. Cordier – A. Baliakin
Black has three pieces more than white, Baliakin still couldn’t find the right strategy to win! In this position he was close to victory however... Ex 2.3 Can you find the way to victory for black to move?

197
H. Meijer – K. Thijssen
57.7 – 1 27 – 32 58.8 – 3?
Too greedy! White should have first taken care that the pieces 6 & 16 are bound to their spots: 58.1 – 12! 32 x 46 59.8 – 3 which would have won the piece anyway. 59... 46 – 37 60.3 x 25 37 – 26 61.12 – 23 is no problem: white gets the main diagonal and races to a third king. If black stays at the main diagonal it can go like this: 59... 46 – 37 60.3 x 25 37 – 28 61.24 – 20 28 – 37 62.12 – 26 37 – 19 63.36 – 31 19 – 23 (19 – 13 20 – 14 13 x 36 26 – 31 W+) 64.31 – 27 threatening 20 – 14 & 25 – 14) 23 – 7 20 – 14 etc. W+.
Kees Thijssen during the Dutch championship 1994
H. Jansen – W. Chogoliev Ex 2.4 Black to move won quickly, How?
Watjeislav Chogoliev
198
3 Kings against 1
The endgame of three kings against one king seems an easy draw. One must never forget however two important things: Three kings have a tremendous power. Experience shows that people rarely have any problem to make mistakes! Therefore it is worthwhile trying to win the game. One rule in this type of endgame is important:
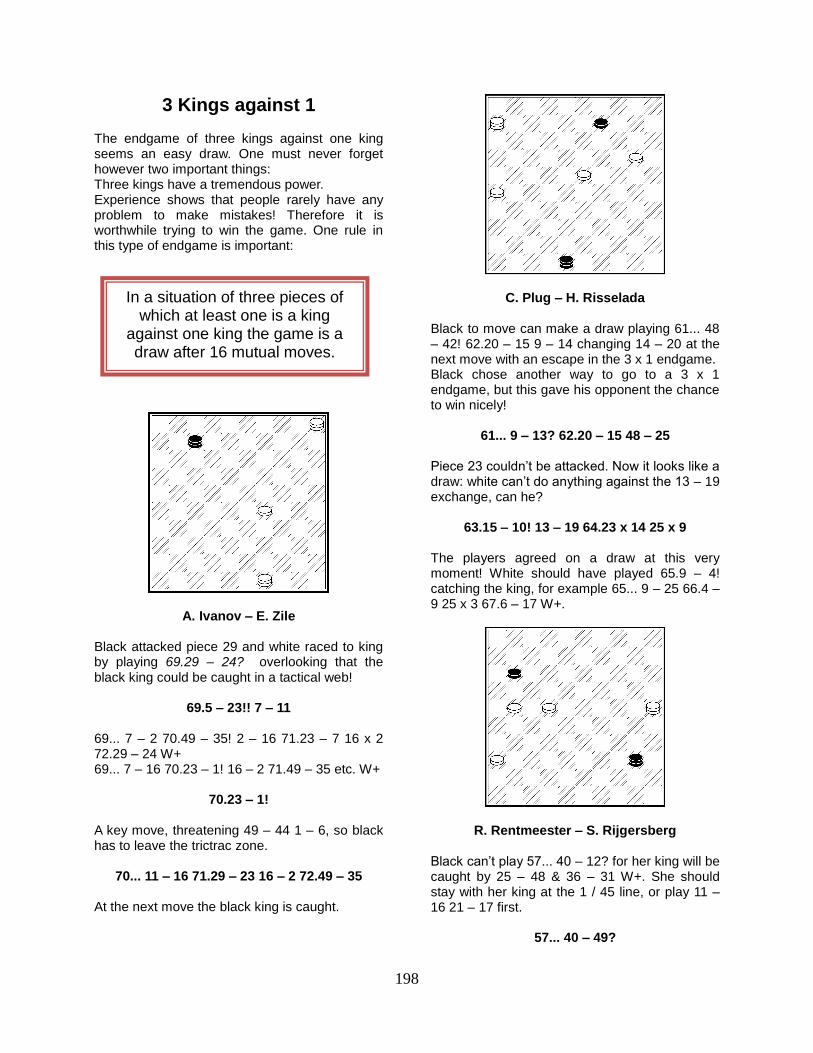
A. Ivanov – E. Zile
Black attacked piece 29 and white raced to king by playing 69.29 – 24? overlooking that the black king could be caught in a tactical web!
69.5 – 23!! 7 – 11 69... 7 – 2 70.49 – 35! 2 – 16 71.23 – 7 16 x 2 72.29 – 24 W+ 69... 7 – 16 70.23 – 1! 16 – 2 71.49 – 35 etc. W+
70.23 – 1! A key move, threatening 49 – 44 1 – 6, so black has to leave the trictrac zone.
70... 11 – 16 71.29 – 23 16 – 2 72.49 – 35
At the next move the black king is caught.
C. Plug – H. Risselada
Black to move can make a draw playing 61... 48 – 42! 62.20 – 15 9 – 14 changing 14 – 20 at the next move with an escape in the 3 x 1 endgame. Black chose another way to go to a 3 x 1 endgame, but this gave his opponent the chance to win nicely!
61... 9 – 13? 62.20 – 15 48 – 25 Piece 23 couldn’t be attacked. Now it looks like a draw: white can’t do anything against the 13 – 19 exchange, can he?
63.15 – 10! 13 – 19 64.23 x 14 25 x 9 The players agreed on a draw at this very moment! White should have played 65.9 – 4! catching the king, for example 65... 9 – 25 66.4 – 9 25 x 3 67.6 – 17 W+.
R. Rentmeester – S. Rijgersberg
Black can’t play 57... 40 – 12? for her king will be caught by 25 – 48 & 36 – 31 W+. She should stay with her king at the 1 / 45 line, or play 11 – 16 21 – 17 first.
57... 40 – 49?
In a situation of three pieces of which at least one is a king
against one king the game is a draw after 16 mutual moves.
199
White could have won by playing 58.21 – 17! and the 3 x 1 black reaches after 58... 49 – 44 59.17 x 6 44 x 17 turns out to be lost: 60.25 – 3! 17 – 26 61.6 – 1! 26 – 48 62.36 – 31 48 x 26 63.1 – 12 W+.
G. Schoenmakers – M. van Gortel
Ex 3.1 How can black force the win?
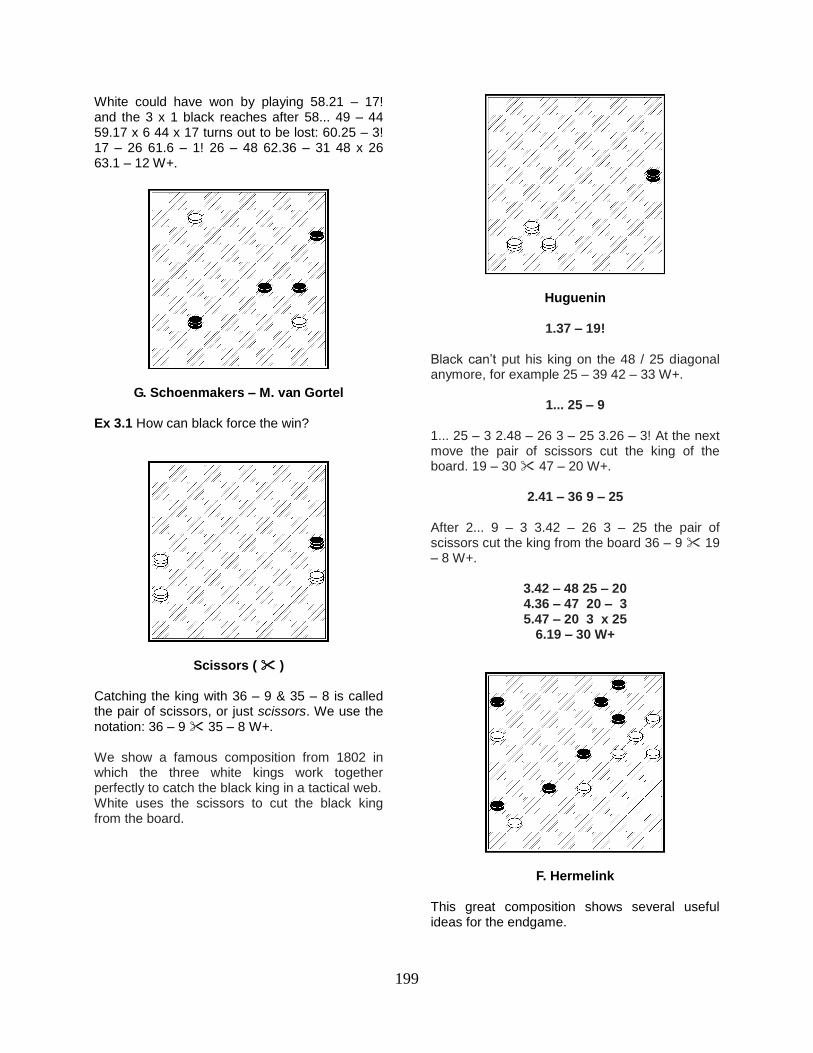
Scissors ( )
Catching the king with 36 – 9 & 35 – 8 is called the pair of scissors, or just scissors. We use the notation: 36 – 9 35 – 8 W+.
We show a famous composition from 1802 in which the three white kings work together perfectly to catch the black king in a tactical web. White uses the scissors to cut the black king from the board.
Huguenin
1.37 – 19! Black can’t put his king on the 48 / 25 diagonal anymore, for example 25 – 39 42 – 33 W+.
1... 25 – 9
1... 25 – 3 2.48 – 26 3 – 25 3.26 – 3! At the next move the pair of scissors cut the king of the board. 19 – 30 47 – 20 W+.
2.41 – 36 9 – 25
After 2... 9 – 3 3.42 – 26 3 – 25 the pair of scissors cut the king from the board 36 – 9 19 – 8 W+.
3.42 – 48 25 – 20 4.36 – 47 20 – 3 5.47 – 20 3 x 25
6.19 – 30 W+
F. Hermelink
This great composition shows several useful ideas for the endgame.
200
1.15 – 10!! 4 x 15 1... 14 x 5 2.20 – 15 36 x 47 3.16 – 11 47 x 20 4.25 x 3 6 x 17 5.3 x 38 with a beautiful ending: 23 – 28 6.38 – 20 28 – 32 6... 5 – 10 is met by 7.20 – 9! 4 x 13 8.15 x 4 13 – 19 9.4 – 15 etc. W+ 7.20 – 42 4 – 9 7... 5 – 10 8.42 – 20! (threatening 20 – 9!) 10 – 14 9.20 x 9! 4 x 13 10.15 – 10 13 – 18 11.10 – 4 18 – 23 12.4 – 15 W+ 8.42 – 26! Threatening 26 – 3 & 15 – 10
8... 9 – 13 9.26 – 48!! 32 – 38 10.48 – 25 13 – 19* 11.25 – 3! 5 – 10* 12.15 x 4 38 – 43 12... 38 – 42 13.3 – 14 W+ 13.4 – 13 19 x 8 14.3 x 49 W+ Wow!
2.33 – 28 36 x 47 3.28 x 10 15 x 4 4.20 – 15 47 x 20 5.25 x 3
Because of the 16 – 11 threat black has to sacrifice piece 6.
5... 6 – 11 6.16 x 7 32 – 38 6... 32 – 37 7.7 – 2 4 – 10* 8.15 x 4 37 – 41 9.3 – 14! 41 – 47 10.14 – 41 11.2 – 13 W+
7.7 – 2 4 – 10* 8.15 x 4
Because of the 3 – 9 threat black had to give up his last piece. The apotheosis is near...
Black can go to <47, 48 or 49> but in all cases his king is cut from the board by a pair of scissors... 1) 8... 38 – 42 9.4 – 15! 42 – 48 10.2 – 30 11.15 – 20 W+ 2) 8.38 – 43 9.2 – 16 43 – 48 10.4 – 31 11.16 – 21 W+
A brilliant composition by Hermelink!
F. van Sterkenburg
1.38 – 32 29 – 38
White has to lose a piece, but catches the black king in a tactical web.
2.43 – 49 38 x 16 3.50 – 45
3.6 – 1 is also good: 35 – 40 4.1 x 45! 16 – 2 5.49 – 35 2 – 16 6.45 – 34 16 – 2 7.34 – 39 2 – 7 8.50 – 45 7 – 2 9.35 – 49 2 – 16 10.45 – 40 16 – 7 11.39 – 34 7 – 11 12.34 – 1 11 – 2 13.40 – 34 2 – 16 14.34 – 29 16 – 2 15.49 – 35 2 – 16 16.1 – 7 16 x 2 17.29 – 24 W+
3... 16 – 7 3... 16 – 2 4.6 – 1 35 – 40 5.45 x 34! (threatening 34 – 30 1 – 40) 2 – 16 (2 – 11 49 – 44 & 1 – 6 W+) 6.34 – 29 16 – 2 7.49 – 35 and 2 – 7 29 – 24 at the next move W+
4.6 – 1 7 – 2 5.1 – 6
Black’s space to play is severely reduced. He can’t play at <8, 13, 19, 24, 30> because of 45 – 40 W+. 2 – 16 is met by 49 – 43 6 – 44 W+. 5... 35 – 40 6.45 x 34 leads to the same system as in the main line.
5... 2 – 7 6.6 – 39!
After 6... 7 – 2 7.39 – 50 black has to sacrifice his piece with the same win as in the main line.
6... 35 – 40 7.49 x 35 7 – 2
7... 7 – 16 8.35 – 49 16 – 2 9.39 – 30 2 x 35

201
10.45 – 40 W+.
8.35 – 49 Threatening 39 – 30 & 45 – 40.
8...2 – 16 9.45 – 40 16 – 7 10.39 – 34 7 – 11
11.34 – 1! A crucial move for taking control over the trictrac-zone, threatening 49 – 44 1 – 6 W+
11... 11 – 2 12.40 – 34 2 – 16 13.34 – 29 16 – 2 14.49 – 35 2 – 16 15.1 – 7 16 x 2 16.29 – 24 W+
The endgame of three kings against a king and a piece can be very complicated. The extra piece often doesn’t help the single king at all, so he should get rid of it to simplify things. We show some rare examples of a king and a piece not being able to escape from three kings.
T. Goedemoed – M. Gresiak
1.5 – 32 33 – 39 2.16 – 11
White can’t stop black from getting a king, but the king will have little space to play. White advances piece 16 in order to prevent black from going to <50>, while at the same time getting a second king himself.
2... 39 – 44 3.11 – 6 44 – 49 4.32 – 16 20 – 24 5.6 – 1 24 – 30 6.1 – 6 15 – 20
7.22 – 18 20 – 25
The only chance for black is to reduce white’s number of men (kings and pieces) to 3. It looks like he is escaping with a draw. But the black king can’t escape the tactical web after the sacrifice...
8.18 – 12 35 – 40 9.45 x 34 30 x 39
10.6 x 50
The black king can’t escape the 2 / 35 / 49 / 16 quadrant, and black’s piece also can’t move on to the kingsrow: 10... 25 – 30 11.12 – 7 30 – 34 12.50 – 33! 34 – 39 (49 – 40 33 – 39 W+; 49 – 35 33 – 24 W+; 34 – 40 33 – 38 W+) 13.33 x 50 49 – 35 14.7 – 2 35 – 40 15.50 – 44 40 x 49 16.2 – 35 W+.
10... 49 – 35 11.50 – 45
Threatening 12 – 8 45 – 7 W+. 11... 25 – 30 is met by 12.12 – 7 30 – 34 13.45 x 12! (threatening 12 – 8) 35 – 44 14.12 – 45! (threatening 16 – 11 & 45 – 50) 44 – 35 15.7 – 2 35 – 44 16.45 – 40 44 x 35 17.16 – 49 and black is locked up in the quadrant again.
11... 35 – 44 12.12 – 7
Threatening 16 – 11 & 45 – 50 +.
12... 25 – 30 13.7 – 1
Reactivating the 16 – 11 45 – 50 threat. So there’s only one move left for black.
13... 44 – 49
14.45 – 40! 49 x 35 15.16 – 49
A nice ending!
202
Ex 3.2 White must lose a piece but can catch the black king in the 2 / 35 / 49 / 16 quadrant. Try to find out how!
W. IJzerman – A. de Graaf Although white can’t prevent black from changing 24 – 30 reducing the number of black pieces to 3, white can force a tactical web, helped by the extra black piece.
1.1 – 6! 24 – 30 2.25 x 24 8 x 35
2... 8 x 30 3.7 – 2 30 – 34 (30 – 48 2 – 30 25 x 34 16 – 43 W+) 4.6 – 1 34 – 45 5.2 – 7 45 – 50 6.1 – 6 25 – 30 7 – 12 W+
3.7 – 2
White even can use another system to win: 3.6 – 17 (threatening 17 – 8) 35 – 49 4.16 – 11 (threatening 17 – 21 & 7 – 2; 49 – 35 is met by 17 – 8 & 11 – 16) 49 – 40 17 – 50 (the fastest way to win) 40 x 1 50 – 45 W+
3... 35 – 40
After 3... 25 – 30 white has plenty winning moves, for example 2 – 13 30 – 34 16 – 2 W+. 3... 40 – 49 26 – 21 & 6 – 11 W+
4.2 – 30 25 x 34 5.6 – 39 34 x 43
6.16 x 35
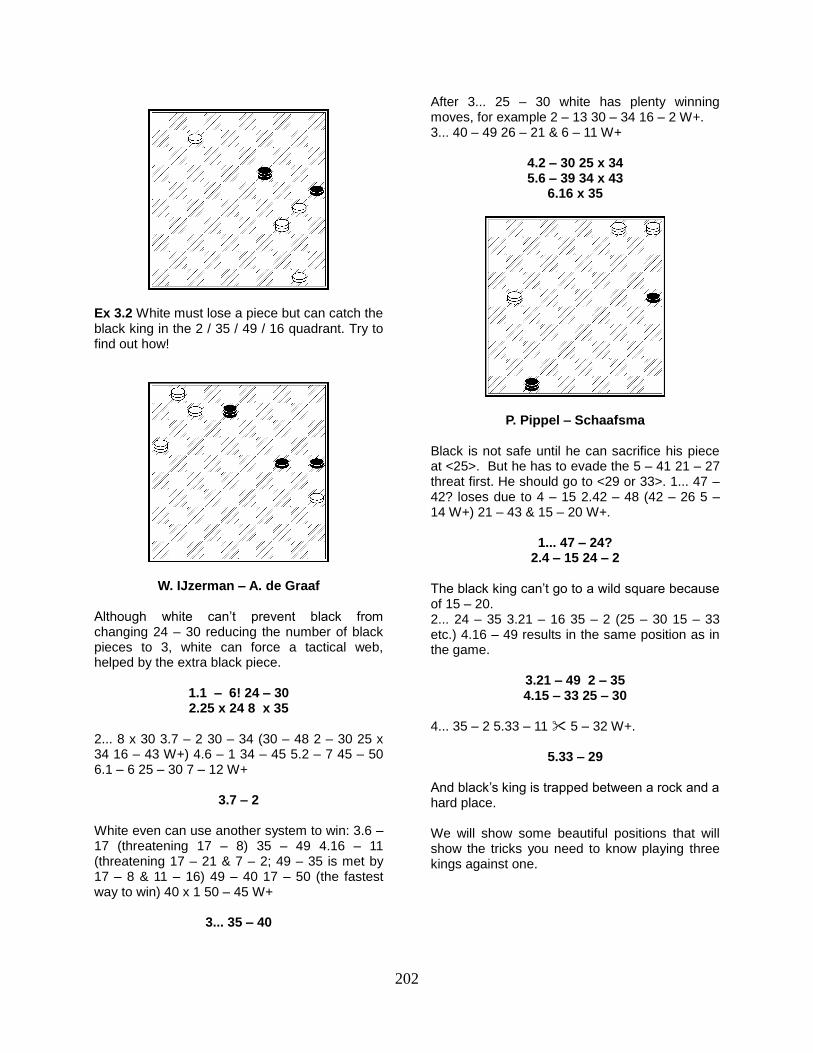
P. Pippel – Schaafsma
Black is not safe until he can sacrifice his piece at <25>. But he has to evade the 5 – 41 21 – 27 threat first. He should go to <29 or 33>. 1... 47 – 42? loses due to 4 – 15 2.42 – 48 (42 – 26 5 – 14 W+) 21 – 43 & 15 – 20 W+.
1... 47 – 24? 2.4 – 15 24 – 2
The black king can’t go to a wild square because of 15 – 20. 2... 24 – 35 3.21 – 16 35 – 2 (25 – 30 15 – 33 etc.) 4.16 – 49 results in the same position as in the game.
3.21 – 49 2 – 35 4.15 – 33 25 – 30
4... 35 – 2 5.33 – 11 5 – 32 W+.
5.33 – 29
And black’s king is trapped between a rock and a hard place.
We will show some beautiful positions that will show the tricks you need to know playing three kings against one.
203
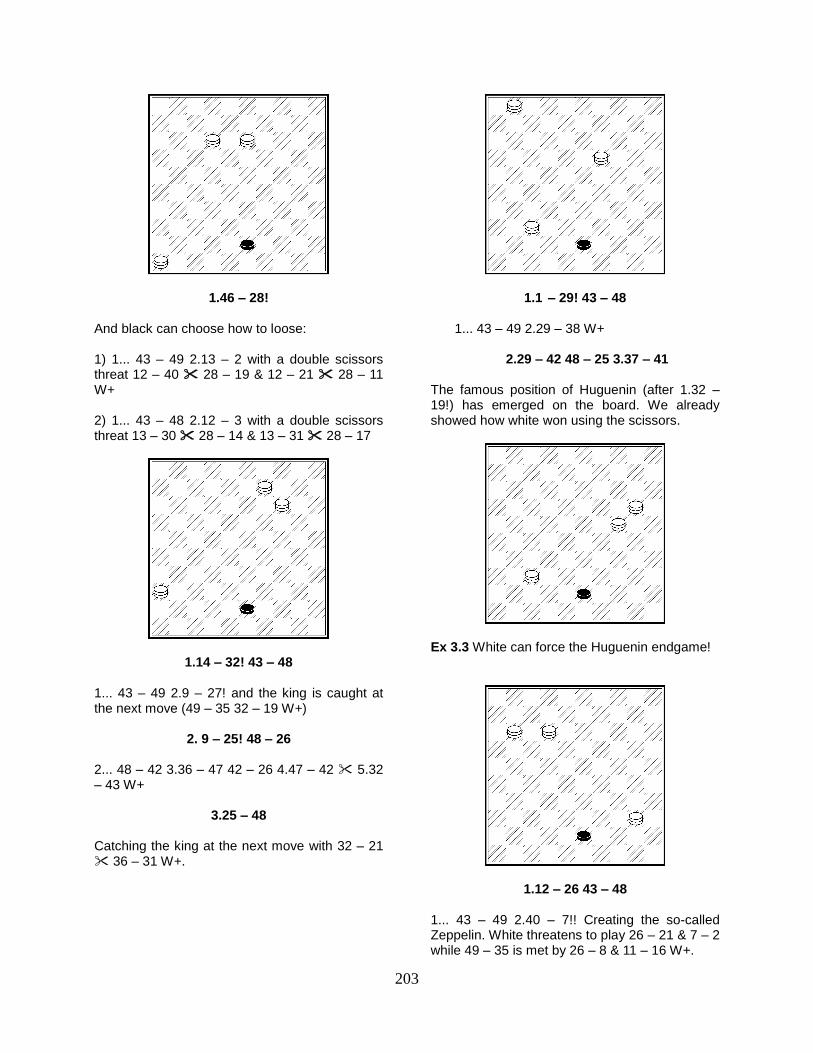
1.46 – 28!
And black can choose how to loose: 1) 1... 43 – 49 2.13 – 2 with a double scissors threat 12 – 40 28 – 19 & 12 – 21 28 – 11 W+ 2) 1... 43 – 48 2.12 – 3 with a double scissors threat 13 – 30 28 – 14 & 13 – 31 28 – 17
1.14 – 32! 43 – 48
1... 43 – 49 2.9 – 27! and the king is caught at the next move (49 – 35 32 – 19 W+)
2. 9 – 25! 48 – 26
2... 48 – 42 3.36 – 47 42 – 26 4.47 – 42 5.32 – 43 W+
3.25 – 48
Catching the king at the next move with 32 – 21 36 – 31 W+.
1.1 – 29! 43 – 48 1... 43 – 49 2.29 – 38 W+
2.29 – 42 48 – 25 3.37 – 41
The famous position of Huguenin (after 1.32 – 19!) has emerged on the board. We already showed how white won using the scissors.
Ex 3.3 White can force the Huguenin endgame!
1.12 – 26 43 – 48
1... 43 – 49 2.40 – 7!! Creating the so-called Zeppelin. White threatens to play 26 – 21 & 7 – 2 while 49 – 35 is met by 26 – 8 & 11 – 16 W+.
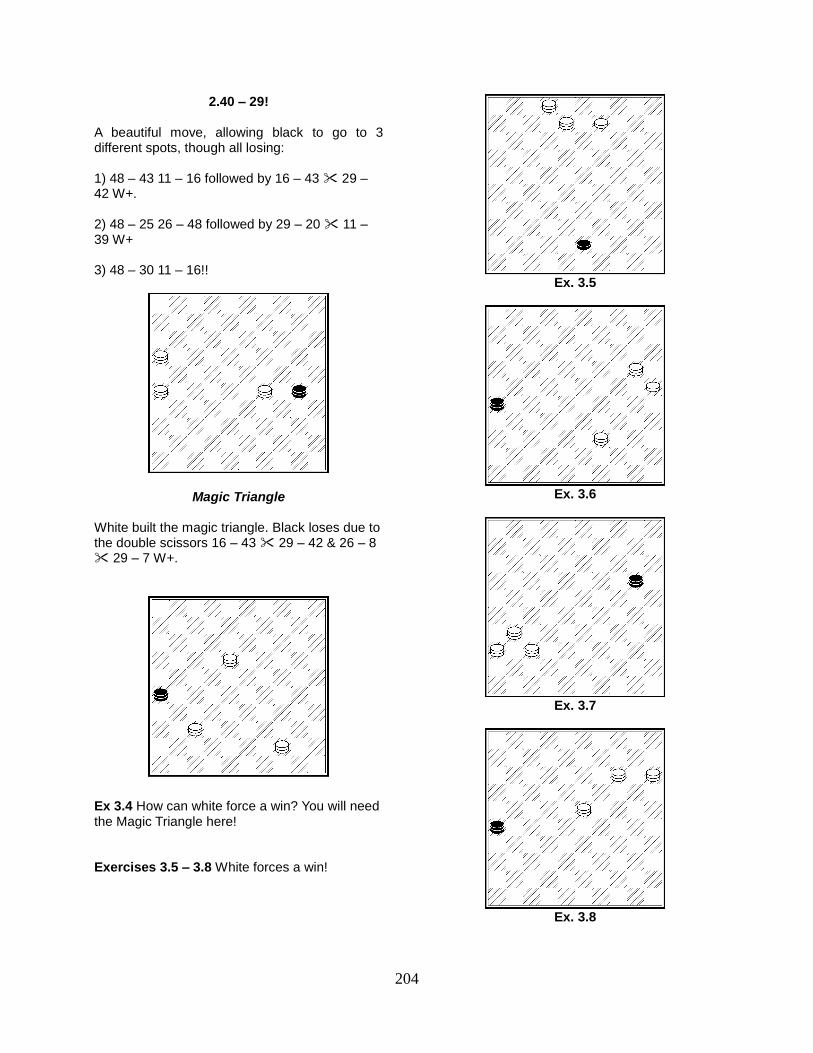
204
2.40 – 29! A beautiful move, allowing black to go to 3 different spots, though all losing: 1) 48 – 43 11 – 16 followed by 16 – 43 29 – 42 W+. 2) 48 – 25 26 – 48 followed by 29 – 20 11 – 39 W+ 3) 48 – 30 11 – 16!!
Magic Triangle
White built the magic triangle. Black loses due to the double scissors 16 – 43 29 – 42 & 26 – 8 29 – 7 W+.
Ex 3.4 How can white force a win? You will need the Magic Triangle here!
Exercises 3.5 – 3.8 White forces a win!
Ex. 3.5
Ex. 3.6
Ex. 3.7
Ex. 3.8
205
4. 5 Kings against 2 kings The endgame of five kings against two kings is very complicated. You have to know at least two key positions. If the opponent has two kings at the trictrac-lines, white should build this construction:
White to move can just wait for black to move, playing 1.46 – 5. Black then can’t have go to a wild square, and his other options are also parried: 1... 50 – 6 is met by 2.5 – 28 6 x 42 3.47 x 29 45 x 31 4.36 x 27 W+, while 1.... 45 – 1 is met by 2.5 – 23 1 x 42 3.47 x 33 W+. If black has two kings at the main diagonal the key position is like this:
Black to move has no safe squares for his kings. 1... 46 – 14 is met by 2.47 – 20 14 x 25 3.4 – 10 5 x 17 4.6 x 39 25 x 43 5.48 x 39 W+. If black has one king at the main diagonal and one elsewhere, you can also win with five kings: often the key is then to catch one of the kings while simultaneously trapping the other in a .
White waits a move until 48 – 25 is played:
1.16 – 49 48 – 25 1... 46 – 5 is met by 2.4 – 10 5 x 17 3.6 x 33 and the black king is cut from the board by 49 – 43 33 – 42 at the next move.
2.26 – 48 25 – 3 3. 4 – 9 3 x 25 4.49 – 32 46 x 17 5.6 x 39 25 x 43
6.48 x 39
The endgame of four kings and a piece at <15> against two kings is also winning, but too complicated to address here. If you think you should know this, this endgame (attributed to Van Kesteren) is treated in the book 5 tegen 2, eindspelen van vijf stukken tegen twee dammen (5 against 2, endgames of 5 men against 2 kings) by G. L. de Bruijn.
L. Ferrazzino – I. Gedance
Ex 4.1 How did black catch both kings?
206
M. Faal – W. Chogoliev Ex 4.2 Black to play won in a tricky way!
A. van Tilborg – H. Macaux
Ex 4.3 A) How did white win after 4 – 9? B) How would white have won after 4 – 36 ?
B. Bies – A. Scholma
If you have to defend this type of endgames, usually it is not a good idea to go to a wild square with one of your two kings.
Ex 4.4 How did black win after 107.50 – 11?
G. Jansen – H. Meijer
Black to move had to sacrifice his extra piece at <36> leaving a theoretical win for white. Ex 4.5 How does white win after 6 – 50 ?
Gérard Jansen
207
5. Tricks
All kind of tricks play an important role in the endgame. In part I we saw a trick called the ambush.
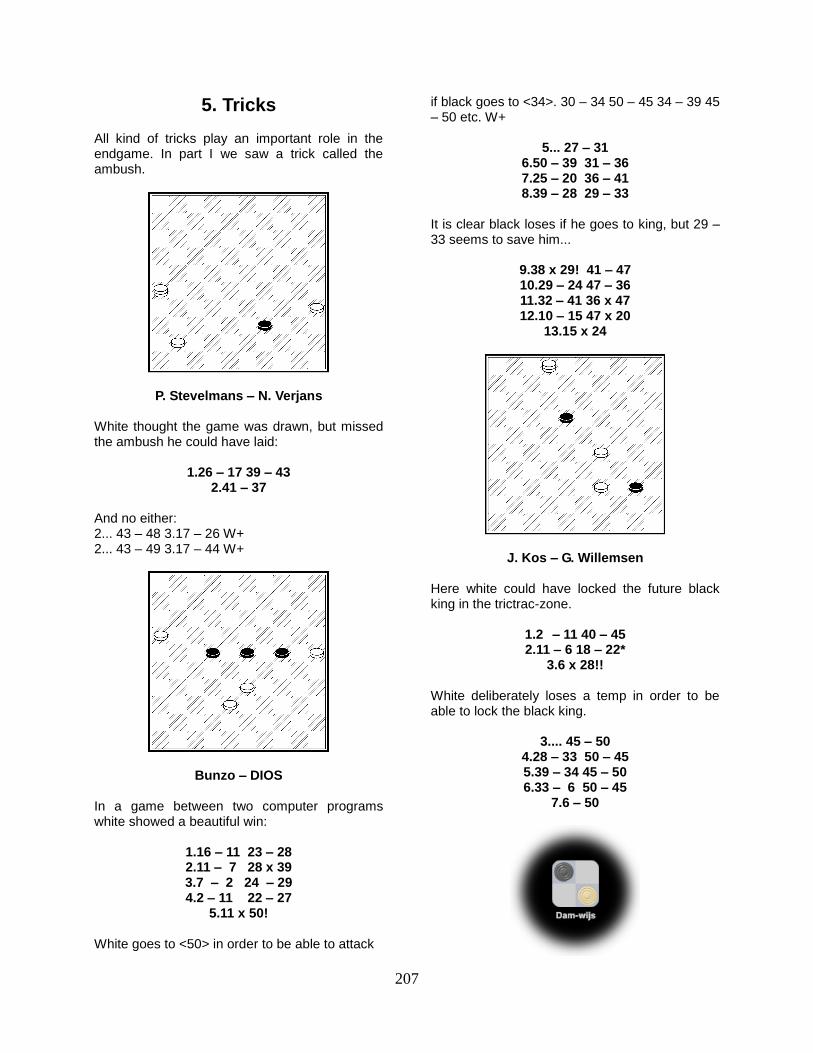
P. Stevelmans – N. Verjans White thought the game was drawn, but missed the ambush he could have laid:
1.26 – 17 39 – 43 2.41 – 37
And no either: 2... 43 – 48 3.17 – 26 W+ 2... 43 – 49 3.17 – 44 W+
Bunzo – DIOS
In a game between two computer programs white showed a beautiful win:
1.16 – 11 23 – 28 2.11 – 7 28 x 39 3.7 – 2 24 – 29 4.2 – 11 22 – 27
5.11 x 50!
White goes to <50> in order to be able to attack
if black goes to <34>. 30 – 34 50 – 45 34 – 39 45 – 50 etc. W+
5... 27 – 31
6.50 – 39 31 – 36 7.25 – 20 36 – 41 8.39 – 28 29 – 33
It is clear black loses if he goes to king, but 29 – 33 seems to save him...
9.38 x 29! 41 – 47 10.29 – 24 47 – 36 11.32 – 41 36 x 47 12.10 – 15 47 x 20
13.15 x 24
J. Kos – G. Willemsen Here white could have locked the future black king in the trictrac-zone.
1.2 – 11 40 – 45 2.11 – 6 18 – 22*
3.6 x 28!!
White deliberately loses a temp in order to be able to lock the black king.
3.... 45 – 50 4.28 – 33 50 – 45 5.39 – 34 45 – 50 6.33 – 6 50 – 45
7.6 – 50
208
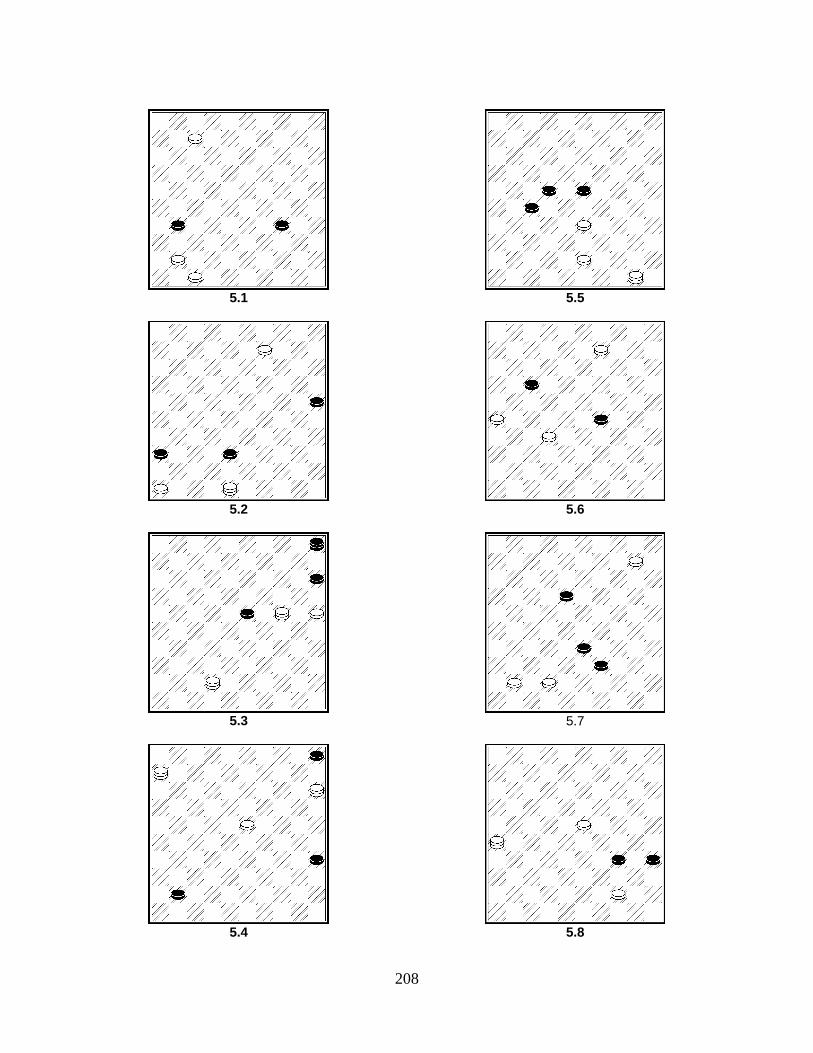
5.1
5.2
5.3
5.4
5.5
5.6
5.7
5.8
209
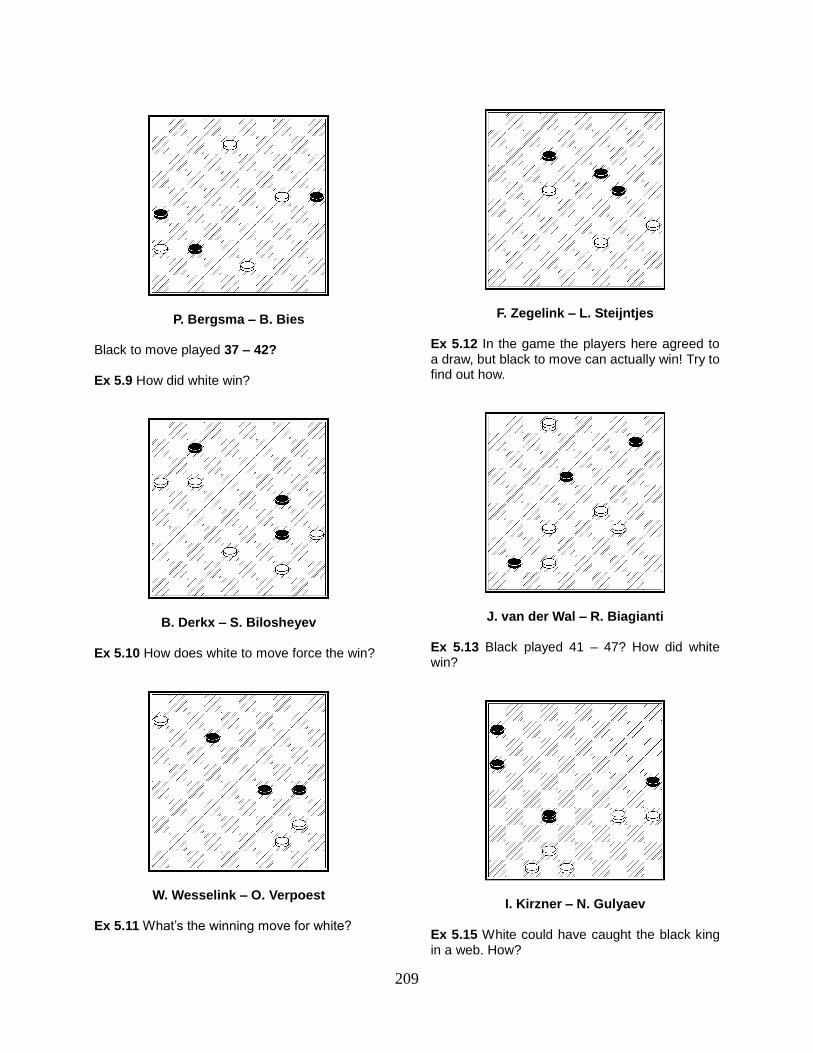
P. Bergsma – B. Bies
Black to move played 37 – 42?
Ex 5.9 How did white win?
B. Derkx – S. Bilosheyev
Ex 5.10 How does white to move force the win?
W. Wesselink – O. Verpoest Ex 5.11 What’s the winning move for white?
F. Zegelink – L. Steijntjes Ex 5.12 In the game the players here agreed to a draw, but black to move can actually win! Try to find out how.
J. van der Wal – R. Biagianti Ex 5.13 Black played 41 – 47? How did white win?
I. Kirzner – N. Gulyaev
Ex 5.15 White could have caught the black king in a web. How?
210
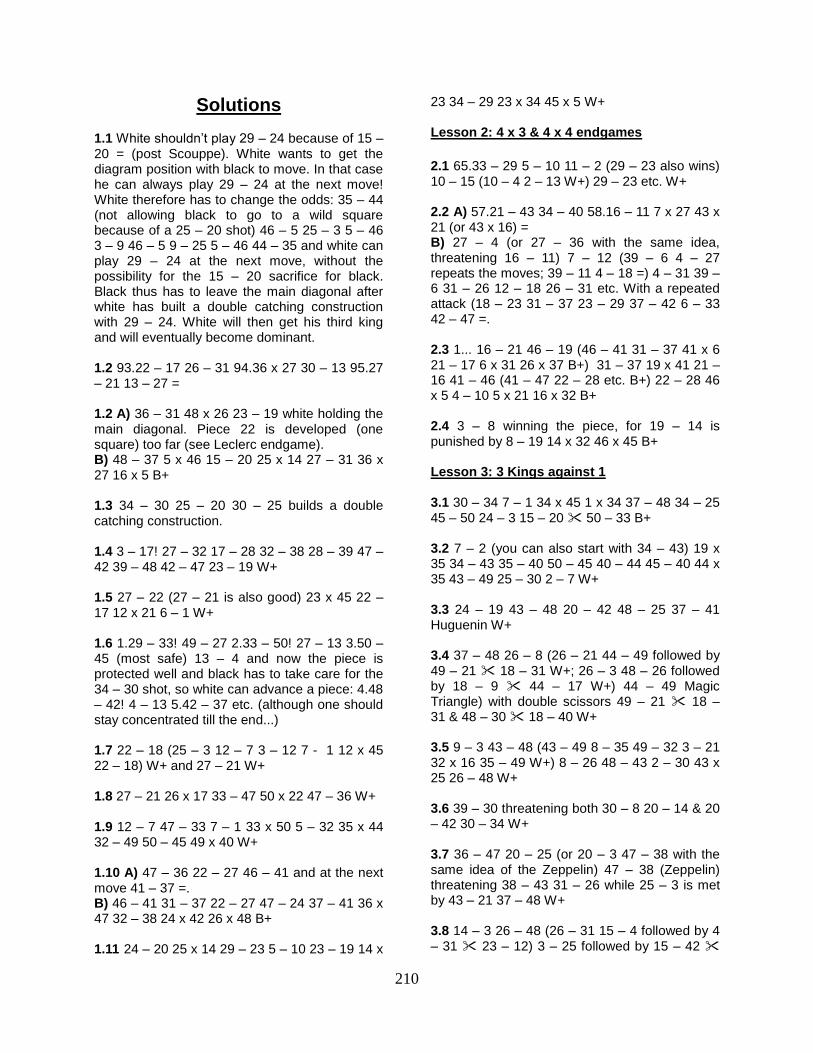
Solutions
1.1 White shouldn’t play 29 – 24 because of 15 – 20 = (post Scouppe). White wants to get the diagram position with black to move. In that case he can always play 29 – 24 at the next move! White therefore has to change the odds: 35 – 44 (not allowing black to go to a wild square because of a 25 – 20 shot) 46 – 5 25 – 3 5 – 46 3 – 9 46 – 5 9 – 25 5 – 46 44 – 35 and white can play 29 – 24 at the next move, without the possibility for the 15 – 20 sacrifice for black. Black thus has to leave the main diagonal after white has built a double catching construction with 29 – 24. White will then get his third king and will eventually become dominant. 1.2 93.22 – 17 26 – 31 94.36 x 27 30 – 13 95.27 – 21 13 – 27 = 1.2 A) 36 – 31 48 x 26 23 – 19 white holding the main diagonal. Piece 22 is developed (one square) too far (see Leclerc endgame). B) 48 – 37 5 x 46 15 – 20 25 x 14 27 – 31 36 x 27 16 x 5 B+ 1.3 34 – 30 25 – 20 30 – 25 builds a double catching construction. 1.4 3 – 17! 27 – 32 17 – 28 32 – 38 28 – 39 47 – 42 39 – 48 42 – 47 23 – 19 W+ 1.5 27 – 22 (27 – 21 is also good) 23 x 45 22 – 17 12 x 21 6 – 1 W+ 1.6 1.29 – 33! 49 – 27 2.33 – 50! 27 – 13 3.50 – 45 (most safe) 13 – 4 and now the piece is protected well and black has to take care for the 34 – 30 shot, so white can advance a piece: 4.48 – 42! 4 – 13 5.42 – 37 etc. (although one should stay concentrated till the end...) 1.7 22 – 18 (25 – 3 12 – 7 3 – 12 7 - 1 12 x 45 22 – 18) W+ and 27 – 21 W+ 1.8 27 – 21 26 x 17 33 – 47 50 x 22 47 – 36 W+ 1.9 12 – 7 47 – 33 7 – 1 33 x 50 5 – 32 35 x 44 32 – 49 50 – 45 49 x 40 W+ 1.10 A) 47 – 36 22 – 27 46 – 41 and at the next move 41 – 37 =. B) 46 – 41 31 – 37 22 – 27 47 – 24 37 – 41 36 x 47 32 – 38 24 x 42 26 x 48 B+ 1.11 24 – 20 25 x 14 29 – 23 5 – 10 23 – 19 14 x
23 34 – 29 23 x 34 45 x 5 W+ Lesson 2: 4 x 3 & 4 x 4 endgames
2.1 65.33 – 29 5 – 10 11 – 2 (29 – 23 also wins) 10 – 15 (10 – 4 2 – 13 W+) 29 – 23 etc. W+ 2.2 A) 57.21 – 43 34 – 40 58.16 – 11 7 x 27 43 x 21 (or 43 x 16) = B) 27 – 4 (or 27 – 36 with the same idea, threatening 16 – 11) 7 – 12 (39 – 6 4 – 27 repeats the moves; 39 – 11 4 – 18 =) 4 – 31 39 – 6 31 – 26 12 – 18 26 – 31 etc. With a repeated attack (18 – 23 31 – 37 23 – 29 37 – 42 6 – 33 42 – 47 =. 2.3 1... 16 – 21 46 – 19 (46 – 41 31 – 37 41 x 6 21 – 17 6 x 31 26 x 37 B+) 31 – 37 19 x 41 21 – 16 41 – 46 (41 – 47 22 – 28 etc. B+) 22 – 28 46 x 5 4 – 10 5 x 21 16 x 32 B+ 2.4 3 – 8 winning the piece, for 19 – 14 is punished by 8 – 19 14 x 32 46 x 45 B+ Lesson 3: 3 Kings against 1 3.1 30 – 34 7 – 1 34 x 45 1 x 34 37 – 48 34 – 25 45 – 50 24 – 3 15 – 20 50 – 33 B+ 3.2 7 – 2 (you can also start with 34 – 43) 19 x 35 34 – 43 35 – 40 50 – 45 40 – 44 45 – 40 44 x 35 43 – 49 25 – 30 2 – 7 W+ 3.3 24 – 19 43 – 48 20 – 42 48 – 25 37 – 41 Huguenin W+ 3.4 37 – 48 26 – 8 (26 – 21 44 – 49 followed by 49 – 21 18 – 31 W+; 26 – 3 48 – 26 followed by 18 – 9 44 – 17 W+) 44 – 49 Magic Triangle) with double scissors 49 – 21 18 – 31 & 48 – 30 18 – 40 W+ 3.5 9 – 3 43 – 48 (43 – 49 8 – 35 49 – 32 3 – 21 32 x 16 35 – 49 W+) 8 – 26 48 – 43 2 – 30 43 x 25 26 – 48 W+ 3.6 39 – 30 threatening both 30 – 8 20 – 14 & 20 – 42 30 – 34 W+ 3.7 36 – 47 20 – 25 (or 20 – 3 47 – 38 with the same idea of the Zeppelin) 47 – 38 (Zeppelin) threatening 38 – 43 31 – 26 while 25 – 3 is met by 43 – 21 37 – 48 W+ 3.8 14 – 3 26 – 48 (26 – 31 15 – 4 followed by 4 – 31 23 – 12) 3 – 25 followed by 15 – 42

211
23 – 34 W+ Lesson 4: 5 Kings against 2 kings 4.1 36 – 41 46 x 32 4 – 10 28 x 5 25 – 14 5 x 40 45 x 46 B+ 4.2 25 – 20 47 x 15 36 – 47 46 – 5 (if the king goes to a wild square 47 – 20 follows) 4 – 10 5 x 11 6 x 33 B+ 4.3 A) 29 – 23 19 x 46 12 – 23 46 x 30 35 x 4 W+ B) 29 – 18 36 x 30 35 x 19 W+ 4.4 45 – 34 48 x 25 29 – 20 25 x 37 46 x 6 B+ 4.5 5 – 23 1 x 42 47 x 33 50 x 31 26 x 37 W+ Lesson 5: Tricks 5.1 7 – 2 (7 – 1? 31 – 37 =) 31 – 37 (34 – 39 2 – 30 39 – 44 30 – 39 44 x 33 41 – 37 W+) 41 x 32 34 – 39 2 – 30 39 – 44 30 – 39 44 x 33 32 – 28 33 x 22 47 – 42 W+ 5.2 9 – 4 25 – 30 48 x 25 38 – 42 46 – 41 36 x 47 25 – 48 47 – 36 48 x 31 W+ 5.3 24 – 35 23 – 29 42 x 24 5 – 46* 25 – 20 W+ 5.4 15 – 47 41 – 46 6 – 28 35 – 40 28 – 39 & 39 – 34 W+ 5.5 50 – 45 23 – 28 43 – 38 28 x 39 45 – 50 39 – 43 50 x 11 43 x 32 11 – 16
5.6 26 – 21 17 x 26 9 – 3 26 – 31 (29 – 34 3 – 25 34 – 40 25 – 39 40 – 45 39 – 6 26 – 31 32 – 27 31 x 22 6 x 50 W+) 32 – 27 31 x 22 3 – 9 22 – 28 9 – 14 28 – 33 14 – 20 etc.. W+ 5.7 20 – 4 18 – 23 (18 – 22 4 x 36 etc.) 4 – 36 39 – 43 42 – 38 W+ 5.8 26 – 17 34 – 40 44 – 39 40 – 45 39 – 34 45 – 50 17 – 6 W+ 5.9 43 – 38 42 x 33 24 – 20 25 x 14 9 – 3 14 – 19 3 – 8 19 – 23 8 – 12 23 – 28 12 – 17 28 – 32 17 x 39 32 – 37 39 – 28 37 – 42 28 – 37 42 x 31 36 x 27 W+ 5.10 35 – 30 24 x 35 17 – 11 34 – 40 (7 – 12 11 – 6 34 – 40 38 – 32 40 x 49 6 – 1 W+) 11 x 2 40 x 49 16 – 11 W+
5.11 44 – 39 12 – 17 6 – 1 30 – 35 1 x 34 35 x 33 34 – 43 17 – 22 32 – 16 W+ 5.12 24 – 29 35 – 30 29 – 34 30 – 25 34 x 43 22 – 18 12 x 23 25 – 20 43 – 49 (or 43 – 48 – 31 – 4) 20 – 15 49 – 27 15 – 10 27 – 4 10 – 5 4 – 10 B+ 5.13 41 – 47 2 – 16 47 x 24 34 – 29 24 x 27 16 x 5 W+ 5.14 35 – 30 (7 – 1 27 – 32 =) 34 x 25 7 – 1 18 – 22 1 – 6 etc. W+ Sources: Strategie der honderd velden – J.F. Moser Turbo Dambase – K. Bor Truus for Windows – S, Keetman 5 tegen 2 – G.L. de Bruijn