Embed Size (px)
Citation preview

MODEL #870015
FOR CUSTOMER SERVICEPARA EL SERVICIO
PARA EL CONSUMIDOR
1-888-278-8092Printed in Taiwan
SNAP-ON® IS A TRADEMARK LICENSED BY SNAP-ON® CORP.,U.S.A., WHICH DOES NOT MANUFACTURE OR DISTRIBUTE THIS PRODUCT. CONSUMER INQUIRES SHOULD BEDIRECTED TO:©COPYRIGHT 2007 ALLTRADE TOOLS, LLC.1431 VIA PLATALONG BEACH, CA 90810-1462 USA870015 – 18 Gauge 2" Brad Nailer _Rev 9/6/07
18 GAUGE 2" BRAD NAILERINSTRUCTION MANUAL
THIS MANUAL CONTAINS IMPORTANT INFORMATION REGARDING SAFETY, OPERATION,MAINTENANCE AND STORAGE OF THIS PRODUCT. BEFORE USE, READ CAREFULLY AND UNDERSTAND ALL CAUTIONS, WARNINGS, INSTRUCTIONS AND PRODUCT LABELS. FAILURE TO DO SOCOULD RESULT IN SERIOUS PERSONAL INJURY AND/OR PROPERTY DAMAGE.
IF YOU SHOULD HAVE ANY QUESTIONS OR EXPERIENCE A PROBLEM WITH YOUR SNAP-ON PRODUCT, DONOT RETURN THIS PRODUCT TO THE STORE. PLEASE CALL OUR CUSTOMER SERVICE DEPARTMENT AT1-888-278-8092. BEFORE YOU CALL, HAVE THE FOLLOWING INFORMATION AVAILABLE: MODEL No.,DATE PURCHASED AND STORE LOCATION.
CONGRATULATIONS!
Thanks for choosing this product. Our aim is to provide you with the highest quality prod-ucts, and we want you to be totally satisfied with your product and our Customer Service.If any help or advice is needed, please contact us at 1-888-278-8092. When properlycared for, this product will give you many years of satisfaction.
GENERAL SAFETY RULES
RREEAADD AANNDD FFOOLLLLOOWW AALLLL IINNSSTTRRUUCCTTIIOONNSS.. Failure to fol-low all instructions in this manual may result in severe personal injury or death.Keep this manual and refer to it for Safety Instructions, Operating Procedures,and Warranty.
SSAAVVEE TTHHEESSEE IINNSSTTRRUUCCTTIIOONNSS FFOORR FFUUTTUURREE RREEFFEERREENNCCEE..
RECOGNIZE SAFETY SYMBOLS, WORDS AND LABELS
The safety instructions provided in this manual are not intended to cover all possibleconditions and practices that may occur when operating, maintaining and cleaningpower tools.
Always use common sense and pay particular attention to all the DDAANNGGEERR, WWAARRNNIINNGG, CCAAUUTTIIOONN and NNOOTTEE statements of this manual.
This is the safety alert symbol. It is used to alertyou to potential personal injury hazards. Obey allsafety messages that follow this symbol to avoidpossible injury or death.
DDAANNGGEERR indicates an imminently hazardous situation which, if not avoided, will result in deathor serious injury.
WWAARRNNIINNGG indicates a potentially hazardous situation which, if not avoided, could result indeath or serious injury.
CCAAUUTTIIOONN indicates a potentially hazardous situation which, if not avoided, may result inminor or moderate injury.
TABLE OF CONTENTS
CCOONNGGRRAATTUULLAATTIIOONNSS!! . . . . . . . . . . . . . . . . . . . . . . . . . . . . . . . . . . . . . . . . . 2GENERAL SAFETY RULES . . . . . . . . . . . . . . . . . . . . . . . . . . . . . . . . . . 2
RECOGNIZE SAFETY SYMBOLS, WORDS AND LABELS . . . . . . . . 2-3IMPORTANT INFORMATION ABOUT THIS MANUAL . . . . . . . . . . . 4SAFETY WARNINGS AND PRECAUTIONS . . . . . . . . . . . . . . . . . . . 4-7
FUNCTIONAL DESCRIPTION . . . . . . . . . . . . . . . . . . . . . . . . . . . . . . . . . 7COMPONENT INSTALLATION . . . . . . . . . . . . . . . . . . . . . . . . . . . . . 8-9
OPERATING THE BRAD NAILER . . . . . . . . . . . . . . . . . . . . . . . . . . . . . . 9-13SELECT TRIGGER ACTUATION MODE . . . . . . . . . . . . . . . . . . . . . . 9-11ADJUSTING DEPTH OF NAILING . . . . . . . . . . . . . . . . . . . . . . . . . . 11-12USING THE HOOK . . . . . . . . . . . . . . . . . . . . . . . . . . . . . . . . . . . . . 12LOADING NAILS INTO THE AIR NAILER . . . . . . . . . . . . . . . . . . . . 12USING THE NO-MAR NOSEPIECE . . . . . . . . . . . . . . . . . . . . . . . . . 12-13
REQUIRED DAILY PREPARATION . . . . . . . . . . . . . . . . . . . . . . . . . . . . . 13-14USING THE AIR NAILER . . . . . . . . . . . . . . . . . . . . . . . . . . . . . . . . . . . . 14-15
CHANGING DIRECTION OF EXHAUST AIR . . . . . . . . . . . . . . . . . . . 15CLEARING JAMS . . . . . . . . . . . . . . . . . . . . . . . . . . . . . . . . . . . . . . 15
MAINTENANCE . . . . . . . . . . . . . . . . . . . . . . . . . . . . . . . . . . . . . . . . . . . 15-16MANDATORY MAINTENANCE . . . . . . . . . . . . . . . . . . . . . . . . . . . . . . . 17TROUBLESHOOTING . . . . . . . . . . . . . . . . . . . . . . . . . . . . . . . . . . . . . . . 17-18PARTS DIAGRAM . . . . . . . . . . . . . . . . . . . . . . . . . . . . . . . . . . . . . . . . . 19PARTS LIST . . . . . . . . . . . . . . . . . . . . . . . . . . . . . . . . . . . . . . . . . . . . . 20-23SPECIFICATIONS . . . . . . . . . . . . . . . . . . . . . . . . . . . . . . . . . . . . . . . . . . 231 YEAR LIMITED WARRANTY . . . . . . . . . . . . . . . . . . . . . . . . . . . . . . . . 23-26
1 2

IMPORTANT INFORMATION ABOUT THIS MANUAL
Improper maintenance and operation are responsible for the majority of accidentsinvolving brad nailers. The largest portion of these could be prevented by recogniz-ing the basic safety rules and precautions. Most accidents can be avoided if theoperator recognizes a potentially hazardous situation before it happens and byobserving appropriate safety rules and procedures as outlined in this manual.
Basic safety precautions are outlined in the SSAAFFEETTYY portion of this manual andthroughout text in this manual where a potential hazard might occur.
Hazards that MMUUSSTT be avoided to prevent serious injury follow headers markedDDAANNGGEERR oorr WWAARRNNIINNGG. These same precautions are placed as labels on the toolitself.
NNEEVVEERR use this nailer for applications that are NNOOTT specified in this manual.
SAFETY WARNINGS AND PRECAUTIONS
DDoo nnoott ooppeerraattee bbrraadd nnaaiilleerr aannyywwhheerree ffaasstteenneerr mmaayy ccoonnttaacctt hhiiddddeenn eelleeccttrriiccaallwwiirriinngg.. Contact with a “live” wire will make all metal parts of the brad nailer“live.” This can result in severe electrical shock, severe burns or death to theoperator. Contact a qualified electrical contractor to ensure a safe working envi-ronment exists.
BBee aawwaarree ooff ccoonndduuiittss oorr ggaass ppiippeess.. Striking a gas pipe could result in an explo-sion causing serious injuries or even death to the operator or bystanders.
BBee aawwaarree ooff wwhhaatt iiss bbeehhiinndd tthhee wwoorrkk ppiieeccee.. A fastener could travel through thework piece and out the other side, striking a bystander resulting in seriousinjury or even death.
DDoo nnoott ooppeerraattee tthhee bbrraadd nnaaiilleerr iinn tthhee pprreesseennccee ooff ffllaammmmaabbllee lliiqquuiiddss,, ssuucchh aassggaassoolliinnee,, tthhiinnnneerr,, ppaaiinntt,, oorr aaddhheessiivveess,, ggaasseess oorr dduusstt.. Sparks created by the toolcan cause flammable materials to ignite or explode. Failure to comply with this warn-ing could result in serious injury or even death to the operator.
KKeeeepp bbyyssttaannddeerrss,, cchhiillddrreenn aanndd vviissiittoorrss aawwaayy ffrroomm aarreeaa wwhheerree bbrraadd nnaaiilleerr iissbbeeiinngg uusseedd.. Distractions can result in severe injury or even death to anyonewho inadvertently gets in the way of nailing operations.
DDoo nnoott uussee ooxxyyggeenn,, ccoommbbuussttiibbllee oorr bboottttlleedd ggaasseess ((ssuucchh aass ccaarrbboonnddiiooxxiiddee oorr nniittrrooggeenn)) aass aa ppoowweerr ssoouurrccee ffoorr tthhee bbrraadd nnaaiilleerr.. Useonly compressed air from a source as outlined in this manual. The
tool will explode resulting in severe injury or even death to the operator andbystanders.
3
CCAAUUTTIIOONN used without the safety alert symbolindicates a potentially hazardous situation which,if not avoided, may result in property damage.
NNOOTTEE provides additional information that is usefulfor proper use and maintenance of this tool. If aNOTE is indicated make sure it is fully understood.
In addition to SSAAFFEETTYY AALLEERRTTSS listed above, there could also be numerous symbolsalerting the operator that specific safety equipment is required to safely operate thistool. Learn these SSAAFFEETTYY SSYYMMBBOOLLSS as well as the SSAAFFEETTYY AALLEERRTTSS to preventinjury to the operator and to bystanders.
RREEAADD OOPPEERRAATTIINNGG IINNSSTTRRUUCCTTIIOONNSS:: Read and understand tool labels,safety warnings and precautions in this manual before operating the tool.Failure to follow WARNINGS could result in serious injury or even deathto the operator or bystanders.
WWEEAARR AAPPPPRROOVVEEDD EEYYEE PPRROOTTEECCTTIIOONN:: Safety glasses must conform tothe requirements of American National Standards Institute (ANSI) Z87.1and provide protection against flying particles from both front and side.
WWEEAARR HHEEAARRIINNGG PPRROOTTEECCTTOORRSS:: Hearing protectors should be worn toprotect the ears from loud exhaust noise produced by the air tools.
UUSSEE OONNLLYY CCLLEEAANN,, DDRRYY CCOOMMPPRREESSSSEEDD AAIIRR:: Never use oxygen, com-bustible gases and any other bottled gas to operate air tools. Using theseother sources can cause the air tool to explode.
NNEEVVEERR PPOOIINNTT TTHHEE BBRRAADD NNAAIILLEERR AATT YYOOUURRSSEELLFF OORR OOTTHHEERRSS:: Fastenersare under extreme pressure and can cause severe injury or even death ifmisused.
DDOO NNOOTT EEXXCCEEEEDD 112200 ppssii ((88..4433 kkgg//ccmm22GG)).. Using excessive pressurefrom the power source can cause the brad nailer to explode resulting insevere injury or even death to the operator or bystanders.

AAllwwaayyss uussee hheeaarriinngg pprrootteeccttiioonn ttoo pprrootteecctt yyoouurr eeaarrss aaggaaiinnsstthheeaarriinngg lloossss dduuee ttoo eexxhhaauusstt nnooiissee.. AAllwwaayyss wweeaarr pprrooppeerr ssaaffee--ttyy ggllaasssseess ttoo pprreevveenntt iinnjjuurriieess ttoo tthhee eeyyeess ffrroomm ffrraaggmmeennttss ooff
tthhee wwoorrkk ppiieeccee,, ddeeffeeccttiivvee nnaaiillss oorr ootthheerr ddeebbrriiss ccaauusseedd bbyy uussiinngg tthhee bbrraadd nnaaiill--eerr.. All safety glasses must have side shields and should conform to the require-ments of the American National Standards Institute (ANSI) z87.1. Failure tocomply with this warning could lead to serious or permanent damage to theears as well as serious damage or permanent blindness in the eyes.
NNeevveerr ccaarrrryy tthhee bbrraadd nnaaiilleerr bbyy tthhee aaiirr hhoossee.. A sudden disconnection of the airhose could cause the brad nailer to remain charged and an accidental firingcould occur. Failure to comply with this warning could lead to serious injury tothe operator or bystanders.
AAllwwaayyss ddiissccoonnnneecctt tthhee ppoowweerr ssoouurrccee aanndd eennssuurree tthhee ttooooll iiss nnoott cchhaarrggeeddbbeeffoorree llooaaddiinngg ffaasstteenneerrss.. Failure to comply with this warning could causesevere injury or death to the operator, bystanders and severe damage to thebrad nailer.
NNeevveerr uussee aa nnoonn--rreelliieevviinngg aaiirr ccoouupplleerr wwiitthh tthhee bbrraadd nnaaiilleerr.. Always use cou-plers that release any built-up charge in the brad nailer’s firing mechanism. Anon-relieving air coupler can allow the brad nailer to discharge a fastener whilethe tool is disconnected from the power source. Failure to comply with thiswarning can result in serious or permanent injury or even death to the operatoror to bystanders.
DDoo nnoott ddrriivvee nnaaiillss oonn ttoopp ooff ootthheerr nnaaiillss.. Do not operate the brad nailer at toosteep of an angle. Nails can ricochet. Failure to comply with this warning canresult in serious injury or even death to the operator or bystanders.
DDoo nnoott mmooddiiffyy tthhee bbrraadd nnaaiilleerr iinn aannyy wwaayy.. Unauthorized alterations can jeop-ardize safety in the tool’s operation. Failure to follow this precaution can resultin serious injury or even death to the operator or bystanders.
OOnn rrooooffttooppss aanndd ootthheerr hhiigghh llooccaattiioonnss,, aallwwaayyss mmoovvee ffoorrwwaarrdd aass yyoouu uussee tthheebbrraadd nnaaiilleerr.. You can easily loose your footing if moving backwards. When nail-ing against a perpendicular surface, nail from the top down. This causes lessfatigue and reduces the chances of accidents.
EEnnssuurree tthhee wwoorrkk aarreeaa iiss ssuuffffiicciieennttllyy iilllluummiinnaatteedd ttoo ooppeerraattee ppoowweerr ttoooollss.. Thework area should be clear and free of litter.
DDoo nnoott ccoonnnneecctt bbrraadd nnaaiilleerr ttoo aann aaiirr ssoouurrccee ccaappaabbllee ooff ggeenneerraattiinnggmmoorree tthhaann 220000 ppssii ((1144..0066 kkgg//ccmm22GG)).. Over-pressurizing the bradnailer will result in bursting, abnormal operation or breakage of thetool. Use only clean, dry, regulated compressed air at levels speci-
fied on the tool. Failure to comply can cause severe injury or death to the oper-ator or bystanders.
DDoo nnoott aatttteemmpptt ttoo ffaasstteenn tthhee ttrriiggggeerr iinn tthhee ““OONN”” ppoossiittiioonn.. This could lead toan accidental discharge of the brad nailer. Do not operate the brad nailer if anyportion of the tool’s operating controls are inoperable, disconnected, altered inany way or not in proper working order. Failure to comply with this warningcould result in serious injury or even death to the operator or other bystanders.
AAllll aaiirr ccoommpprreessssoorrss mmuusstt ccoommppllyy wwiitthh tthhee rreeqquuiirreemmeennttss ooff AANNSSIIbb1199..33.. Pressure regulators must be used to limit air pressure whereair supply pressure exceeds the tool’s rated operating pressure.
DDoo nnoott ccaarrrryy tthhee bbrraadd nnaaiilleerr wwiitthh aa ffiinnggeerr oonn tthhee ttrriiggggeerr.. This could lead to anaccidental discharge of the brad nailer. Do not press the trigger of the brad nail-er unless it is pressed firmly against the work piece. Do not point the brad nail-er at yourself or in the direction of another person. Failure to comply with thiswarning could result in serious injury or even death to the operator or otherbystanders.
DDoo nnoott ttaammppeerr wwiitthh tthhee wwoorrkk ppiieeccee ccoonnttaacctt.. The work piece contact preventsaccidental discharge of the brad nailer and should never be removed or com-promised in any way. Failure to comply with this warning could result in seri-ous injury or even death to the operator or other bystanders.
AAllwwaayyss ddiissccoonnnneecctt aaiirr hhoossee aanndd rreemmoovvee aannyy rreemmaaiinniinngg nnaaiillss::
1. When brad nailer is left unattended.
2. Before performing any maintenance or repair on the brad nailer.
3. Before attempting to clear a jam in the brad nailer.
4. Before moving the brad nailer to a new location.
AAllwwaayyss cchheecckk tthhee oovveerraallll ccoonnddiittiioonn ooff tthhee bbrraadd nnaaiilleerr bbeeffoorree uussiinngg.. CChheecckk ffoorraanndd ttiigghhtteenn aannyy lloooossee ssccrreewwss.. Ensure all safety systems are in working condi-tion before using the brad nailer. The brad nailer must not operate if only thetrigger is pulled or if only the work piece contact is pressed against the workpiece. The brad nailer must only be used if both the trigger and work piece con-tact work at the same time.
65

COMPONENT INSTALLATION
NNeevveerr uussee aa nnoonn--rreelliieevviinngg aaiirr ccoouupplleerr wwiitthh tthhee bbrraadd nnaaiill--eerr.. Always use couplers that release any built-up charge in the brad nailer’s fir-ing mechanism. A non-relieving air coupler can allow the brad nailer to dis-charge a fastener while the tool is disconnected from the power source. Failureto comply with this warning can result in serious or permanent injury or evendeath to the operator or to bystanders.
When selecting an air compressor, it must comply with the requirements of theAmerican National Safety Institute - ANSI B19.3.
Choose an air compressor that can supply more than the required air pressure toensure optimum efficiency. Always use clean, dry compressed air with a maximumpressure of 200 psi. Use a pressure regulator and set the pressure between 70 –120 psi. (5.0 – 8.5 kg/cm2G). Before each use, check the pressure regulator toensure it is functioning within the proper pressure range.
UUssiinngg aann aaiirr pprreessssuurree ooff mmoorree tthhaann 112200 ppssii ccaannccaauussee tthhee bbrraadd nnaaiilleerr ttoo mmaallffuunnccttiioonn oorr ppoossssiibbllyy eexxppllooddee ccaauussiinnggsseevveerree iinnjjuurryy oorr pprrooppeerrttyy ddaammaaggee..
SSEELLEECCTTIINNGG AA PPRROOPPEERR AAIIRR HHOOSSEEUse an air hose with the largest diameter and shortest length possible to ensurecontinuous, efficient nailing operations. Using an air pressure of 70 psi (5.0kg/cm2G), an air hose with an inside diameter of 1/4" (6.5 mm) or greater and a hoselength of less than 6.6 ft (20 m), it is recommended that a 0.5 second interval beallowed between each nailing. Air supply hoses shall have a minimum working pres-sure of 150 psi (10.7 kg/cm2G) or 150% of the maximum pressure produced by thecompressor or whichever is higher.
LLooww aaiirr oouuttppuutt bbyy tthhee ccoommpprreessssoorr oorr aa lloonnggeerr hhoossee wwiitthhaa ssmmaalllleerr iinnssiiddee ddiiaammeetteerr iinn rreellaattiioonn ttoo tthhee nnaaiilliinngg ffrreeqquueennccyy mmaayy ddeeccrreeaasseetthhee ddrriivviinngg ccaappaabbiilliittyy ooff tthhee aaiirr nnaaiilleerr..
SSEELLEECCTTIINNGG AA QQUUIICCKK DDIISSCCOONNNNEECCTT1. Remove the plastic protective plug
from the tool’s air inlet.
2. Insert a 1/4" NPT male quick disconnect into the air inlet. Installthe female portion to the air hose.
TThhoorroouugghhllyy cclleeaann aanndd mmaaiinnttaaiinn tthhee bbrraadd nnaaiilleerr aafftteerr eevveerryy uussee.. Lubricatemoving parts to prevent rust and minimize friction-related wear. Wipe down theentire tool and remove all dust from the moving parts. Properly store the bradnailer in a suitable case to keep it ready for the next job.
AAllll mmaaiinntteennaannccee aanndd rreeppaaiirrss sshhoouulldd bbee ppeerrffoorrmmeedd bbyy aann aauutthhoorriizzeedd rreeppaaiirrffaacciilliittyy.. Call 1-888-278-8092 to obtain a list of repair facilities in your area orto make arrangements to return the tool for service.
FUNCTIONAL DESCRIPTION
CCOONNTTRROOLLSS AANNDD CCOOMMPPOONNEENNTTSS::1. Exhaust Cover2. Trigger3. Jam Clearing Door4. No-mar Nosepiece5. Empty Magazine Indicator6. Nail Depth Adjuster7. Hanging Hook8. Air Inlet9. Nail Magazine Lever
10. Nail Magazine Cover
11. Work Piece Contact 12. Trigger Actuation Mode Selector
AACCCCEESSSSOORRIIEESS::13. Lubricant 14. Safety Glasses15. Hex Wrenches (2) 16. F32 - Brad Strips
7 8

OOPPEERRAATTIIOONN IINN SSIINNGGLLEE SSEEQQUUEENNTTIIAALL AACCTTUUAATTIIOONN MMOODDEETo select the Single Sequential Actuation Mode (seeFigure 1):
1. Press and hold the red Actuation Selector embeddedin the trigger.
2. Rotate Actuation Selector down to the SingleSequential Actuation (T).
3. Release Actuation Selector, ensuring locking tab isfully seated in the slot.
EEnnssuurree sseelleeccttoorr hhaass lloocckkeedd iinnttoo ppoossiittiioonn.. EEnnssuurree aaccttuuaattiioonn pprroocceessss iiss ffuullllyy uunnddeerrssttoooodd bbeeffoorree aatttteemmppttiinngg ttoo uussee bbrraadd nnaaiilleerr..
TTOO UUSSEE TTHHEE BBRRAADD NNAAIILLEERR IINN SSIINNGGLLEE SSEEQQUUEENNTTIIAALL AACCTTUUAATTIIOONN MMOODDEE::1. Firmly grip brad nailer handle.
2. Position brad nailer work piece con-tact on work piece surface.
3. Push brad nailer against work piececompressing work piece contact.
4. Pull trigger on brad nailer to drivenail. The brad nailer will recoil awayfrom the work piece as nail is driven.
5. Remove finger from trigger and liftbrad nailer away from surface of workpiece.
OOPPEERRAATTIIOONN IINN CCOONNTTAACCTT AACCTTUUAATTIIOONN MMOODDEE
WWhheenn uussiinngg ccoonnttaacctt aaccttuuaattiioonn mmooddee,, bbee ccaarreeffuull ooff uunniinn--tteennttiioonnaall ddoouubbllee ffiirreess rreessuullttiinngg ffrroomm ttooooll rreeccooiill.. UUnnwwaanntteedd ffaasstteenneerrss mmaayy bbeeddrriivveenn iiff tthhee wwoorrkk ppiieeccee ccoonnttaacctt iiss aalllloowweedd ttoo aacccciiddeennttaallllyy rree--ccoonnttaacctt tthhee wwoorrkkppiieeccee..
9 10
To improve the connection between the quick disconnect and air nailer, and to helpprevent oxidation, apply PTFE tape or joint compound to the connector threadsbefore insertion.
3. Snap the air hose onto the quick disconnect on the air nailer. Check for airleaks.
LLUUBBRRIICCAATTIIOONNTo ensure maximum performance, it is recommended to install an air set (oiler, reg-ulator, and air filter) as close as possible to the air nailer. Adjust the oiler so thatapproximately one drop of oil will be released for every 50 nails.
If an air set is not used or is unavailable, oil the tool using pneumatic tool oil by plac-ing 2 or 3 drops into the air inlet. This should be done before and after use. Forproper lubrication, the tool must be fired several times after the oil is introduced tothe filter.
OPERATING THE BRAD NAILER
AAllwwaayyss uussee hheeaarriinngg pprrootteeccttiioonn ttoo pprrootteecctt yyoouurr eeaarrss aaggaaiinnsstthheeaarriinngg lloossss dduuee ttoo eexxhhaauusstt nnooiissee.. AAllwwaayyss wweeaarr pprrooppeerr ssaaffee--ttyy ggllaasssseess ttoo pprreevveenntt iinnjjuurriieess ttoo tthhee eeyyeess ffrroomm ffrraaggmmeennttss ooff
tthhee wwoorrkk ppiieeccee,, ddeeffeeccttiivvee nnaaiillss oorr ootthheerr ddeebbrriiss ccaauusseedd bbyy uussiinngg tthhee bbrraadd nnaaiill--eerr.. All safety glasses must have side shields and should conform to the require-ments of the American National Standards Institute (ANSI) z87.1. Failure tocomply with this warning could lead to serious or permanent damage to theears as well as serious damage or permanent blindness in the eyes.
AAllwwaayyss ddiissccoonnnneecctt tthhee aaiirr hhoossee bbeeffoorree mmaakkiinngg aaddjjuussttmmeennttss oorr cchheecckkiinngg tthheeffuunnccttiioonnaalliittyy ooff tthhee aaiirr nnaaiilleerr..
SELECT TRIGGER ACTUATION MODE
The brad nailer is equipped with a selectable trigger. This allows the selection ofSSiinnggllee SSeeqquueennttiiaall AAccttuuaattiioonn MMooddee or CCoonnttaacctt AAccttuuaattiioonn MMooddee.
Figure 1

To select Contact Sequential Actuation Mode (see Figure 2):
1. Press and hold Actuation Selector embedded in thetrigger.
2. Rotate Actuation Selector up to the ContactSequential Actuation (TTT).
3. Release Actuation Selector, ensuring locking tab isfully seated in the slot.
EEnnssuurree sseelleeccttoorr hhaass lloocckkeedd iinnttoo ppoossiittiioonn.. EEnnssuurree aaccttuuaattiioonn pprroocceessss iiss ffuullllyy uunnddeerrssttoooodd bbeeffoorree aatttteemmppttiinngg ttoo uussee bbrraadd nnaaiilleerr..
TTOO UUSSEE TTHHEE BBRRAADD NNAAIILLEERR IINN CCOONNTTAACCTT AACCTTUUAATTIIOONN MMOODDEE::1. Firmly grip brad nailer handle.
2. Pull and hold the brad nailer trigger.
3. Push brad nailer against work piece compressing work piece contact.
4. The brad nailer will drive nail upon contact. The brad nailer will recoil awayfrom the work piece as nail is driven.
ADJUSTING DEPTH OF NAILING
BBee aawwaarree ooff mmaatteerriiaall tthhiicckknneessss wwhheenn uussiinngg nnaaiilleerr.. AA pprroo--ttrruuddiinngg nnaaiill mmaayy ccaauussee iinnjjuurryy..
Adjust the depth of nailing by turning the adjustment knob (Figure 3, Item 1) to the left(A) for the deepest setting and to the right (B)for the shallowest setting. To increase the depthof the nails, when the adjustment knob isalready set to its highest setting, increase the airpressure. To decrease the depth of nails whenthe adjustment knob is already set to its lowestsetting, decrease the air pressure. Should nailsbe driven too deep even when the adjustmentknob is set at its lowest setting, decrease the airpressure. In general, the brad nailer will have alonger service life when the adjustment knob isset at a lower setting causing less wear and tearon the driving mechanism.
AAllwwaayyss ddiissccoonnnneecctt tthhee bbrraadd nnaaiilleerr bbeeffoorree mmaakkiinngg aannyyaaddjjuussttmmeennttss ttoo tthhee nnaaiill ddeepptthh kknnoobb..
USING THE HOOK
AAllwwaayyss ddiissccoonnnneecctt tthhee aaiirr hhoossee bbeeffoorree hhaannggiinngg tthhee bbrraadd nnaaiilleerr wwiitthh tthhee hhooookk..
NNEEVVEERR hhooookk tthhee bbrraadd nnaaiilleerr iinn aa hhiigghh llooccaattiioonn oorr oonn aann uunnssttaabbllee ppllaattffoorrmm..
LOADING NAILS INTO THE AIR NAILER
AAllwwaayyss ddiissccoonnnneecctt tthhee aaiirr hhoossee ffrroomm tthhee nnaaiilleerr bbeeffoorree aaddddiinngg oorr rreemmoovviinnggnnaaiillss ttoo tthhee bbrraadd nnaaiilleerr..
NNEEVVEERR uussee ddeeffoorrmmeedd nnaaiillss oorr nnaaiill ssttrriipp.. FFaaiilluurree ttoo oobbsseerrvvee tthhiiss pprreeccaauuttiioonnccaann rreessuulltt iinn ppoooorr nnaaiill ffeeeeddiinngg aanndd//oorr jjaammss iinn tthhee ffeeeeddiinngg mmeecchhaanniissmm..
To load nails in brad nailer, depress magazine lever and pull magazine cover to backof magazine. (Figure 4). Insert nails and slide magazine cover over nails until it locksinto place.
USING THE NO-MAR NOSEPIECE
AAllwwaayyss ddiissccoonnnneecctt tthhee aaiirr hhoossee bbeeffoorree aattttaacchhiinngg tthhee nnoo--mmaarr nnoosseeppiieeccee..
11
Figure 3
Figure 2
Figure 4
12
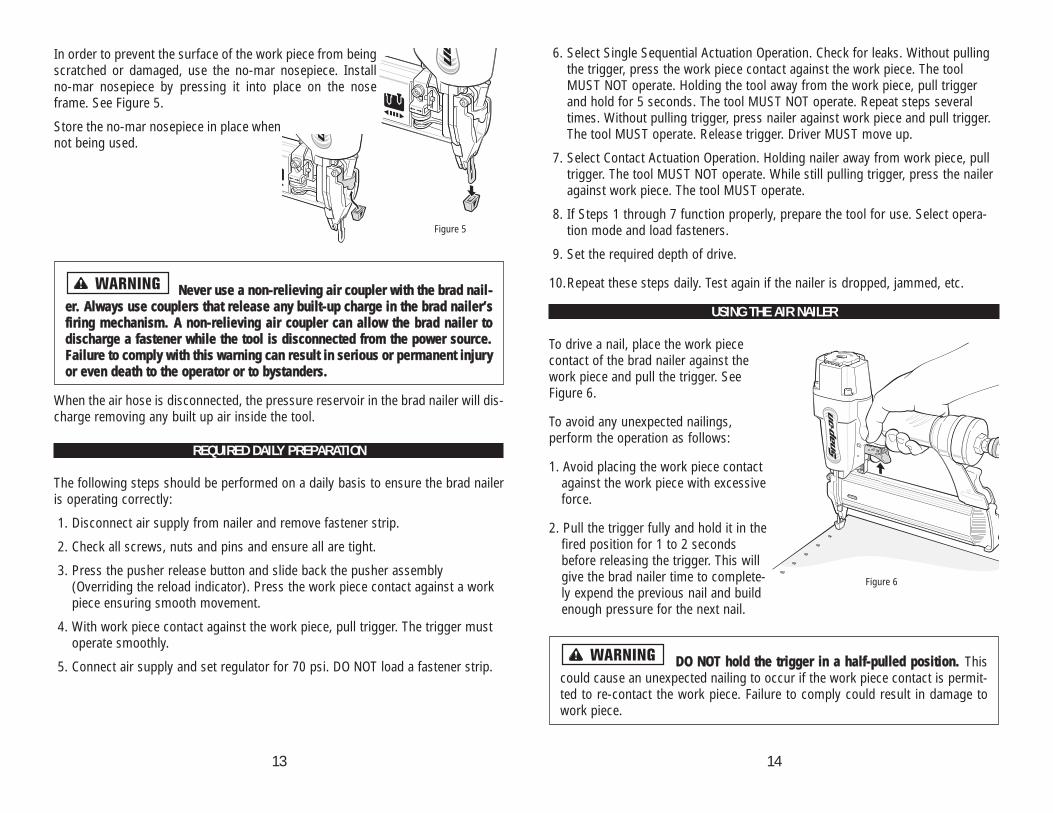
6. Select Single Sequential Actuation Operation. Check for leaks. Without pullingthe trigger, press the work piece contact against the work piece. The toolMUST NOT operate. Holding the tool away from the work piece, pull triggerand hold for 5 seconds. The tool MUST NOT operate. Repeat steps severaltimes. Without pulling trigger, press nailer against work piece and pull trigger.The tool MUST operate. Release trigger. Driver MUST move up.
7. Select Contact Actuation Operation. Holding nailer away from work piece, pulltrigger. The tool MUST NOT operate. While still pulling trigger, press the naileragainst work piece. The tool MUST operate.
8. If Steps 1 through 7 function properly, prepare the tool for use. Select opera-tion mode and load fasteners.
9. Set the required depth of drive.
10.Repeat these steps daily. Test again if the nailer is dropped, jammed, etc.
USING THE AIR NAILER
To drive a nail, place the work piececontact of the brad nailer against thework piece and pull the trigger. SeeFigure 6.
To avoid any unexpected nailings, perform the operation as follows:
1. Avoid placing the work piece contactagainst the work piece with excessiveforce.
2. Pull the trigger fully and hold it in thefired position for 1 to 2 secondsbefore releasing the trigger. This willgive the brad nailer time to complete-ly expend the previous nail and buildenough pressure for the next nail.
DDOO NNOOTT hhoolldd tthhee ttrriiggggeerr iinn aa hhaallff--ppuulllleedd ppoossiittiioonn.. Thiscould cause an unexpected nailing to occur if the work piece contact is permit-ted to re-contact the work piece. Failure to comply could result in damage towork piece.
14
In order to prevent the surface of the work piece from beingscratched or damaged, use the no-mar nosepiece. Installno-mar nosepiece by pressing it into place on the noseframe. See Figure 5.
Store the no-mar nosepiece in place whennot being used.
NNeevveerr uussee aa nnoonn--rreelliieevviinngg aaiirr ccoouupplleerr wwiitthh tthhee bbrraadd nnaaiill--eerr.. AAllwwaayyss uussee ccoouupplleerrss tthhaatt rreelleeaassee aannyy bbuuiilltt--uupp cchhaarrggee iinn tthhee bbrraadd nnaaiilleerr’’ssffiirriinngg mmeecchhaanniissmm.. AA nnoonn--rreelliieevviinngg aaiirr ccoouupplleerr ccaann aallllooww tthhee bbrraadd nnaaiilleerr ttooddiisscchhaarrggee aa ffaasstteenneerr wwhhiillee tthhee ttooooll iiss ddiissccoonnnneecctteedd ffrroomm tthhee ppoowweerr ssoouurrccee..FFaaiilluurree ttoo ccoommppllyy wwiitthh tthhiiss wwaarrnniinngg ccaann rreessuulltt iinn sseerriioouuss oorr ppeerrmmaanneenntt iinnjjuurryyoorr eevveenn ddeeaatthh ttoo tthhee ooppeerraattoorr oorr ttoo bbyyssttaannddeerrss..
When the air hose is disconnected, the pressure reservoir in the brad nailer will dis-charge removing any built up air inside the tool.
REQUIRED DAILY PREPARATION
The following steps should be performed on a daily basis to ensure the brad naileris operating correctly:
1. Disconnect air supply from nailer and remove fastener strip.
2. Check all screws, nuts and pins and ensure all are tight.
3. Press the pusher release button and slide back the pusher assembly(Overriding the reload indicator). Press the work piece contact against a workpiece ensuring smooth movement.
4. With work piece contact against the work piece, pull trigger. The trigger mustoperate smoothly.
5. Connect air supply and set regulator for 70 psi. DO NOT load a fastener strip.
13
Figure 6
Figure 5

OOVVEERRAALLLL MMAAIINNTTEENNAANNCCEE OOFF AAIIRR NNAAIILLEERR
AAllwwaayyss ddiissccoonnnneecctt tthhee aaiirr hhoossee ffrroomm aaiirr nnaaiilleerr bbeeffoorreeaatttteemmppttiinngg aannyy ttyyppee ooff mmaaiinntteennaannccee oorr vviissuuaall iinnssppeeccttiioonn ooff ttooooll..
Always visually inspect air nailer before every use. Check on the overall conditionand for any loose screws. Tighten any screws that have come loose. See Figure 9.
Visually inspect the work piece contactand trigger to ensure there is freemovement. See Figure 10.
When the tool is not going to be usedfor an extended period, wipe off all dustand debris that have collected on it.Tighten all loose screws. Lubricate thefiring mechanism with pneumatic tooloil. See page 9 for Lubrication.
Store the brad nailer in a safe location or insuitable carrying case. It is recommendedthat the brad nailer be secured in a lockedlocation to prevent unauthorized usage.
Avoid exposure to direct sunlight and/orlocations with high humidity and heat.
RReemmoovvee tthhee bbrraadd nnaaiilleerr ffrroomm uussee aanndd sscchheedduullee ttoo hhaavveeiitt rreeppaaiirreedd aatt aann aauutthhoorriizzeedd rreeppaaiirr ffaacciilliittyy iiff tthhee wwoorrkk ppiieeccee ccoonnttaacctt iiss bbiinndd--iinngg oorr nnoott mmoovviinngg ffrreeeellyy.. DDoo nnoott aatttteemmpptt ttoo rreeppaaiirr tthhee bbrraadd nnaaiilleerr.. FFaaiilluurree ttooccoommppllyy ccaann rreessuulltt iinn mmaallffuunnccttiioonn ooff tthhee ttooooll aanndd sseevveerree iinnjjuurryy ttoo tthhee ooppeerraa--ttoorr oorr aannyy bbyyssttaannddeerrss..
CHANGING DIRECTION OF EXHAUST AIR
The direction of exhaust air on the air nailer can bedirected 360˚ degrees by placing hand on exhaustcover and turning. See Figure 7.
CLEARING JAMS
Typically, jams are caused when a fastener or a fastener fragment becomes wedgedbetween the driver blade and nail guide. Using the wrong fastener can also cause jams.
TTOO CCLLEEAARR AA JJAAMM::1. Disconnect the air supply and remove the fas-
tener strip. Leave the pusher assembly open.2. Pull out the latch tab and open the jam-clear-
ing door.3. Remove all debris that has built up during
operation.4. Remove jammed fastener. If fastener is diffi-
cult to grasp, use needle nose pliers instead offingers.
5. If necessary, insert a flat-blade screwdriver sothat it touches the tip of the driver blade. SeeFigure 8. Tap the screwdriver with a hammer.The screwdriver will push the driver bladeback, freeing the jam.
6. Close the jam-clearing door securely.
MAINTENANCE
SSTTOORRAAGGEE OOFF NNAAIILLSSAlways handle nail strips and their box very carefully. If the nail strips have beenmishandled, they may be out of shape or have breaks in the connecting strips. Thiswill cause the nails to feed poorly and possibly result in misfiring or jams in the airnailer.
Avoid storing nails in a very humid or hot environment or place in direct sunlight.
15 16
Figure 8
Figure 9
Figure 10
Figure 7
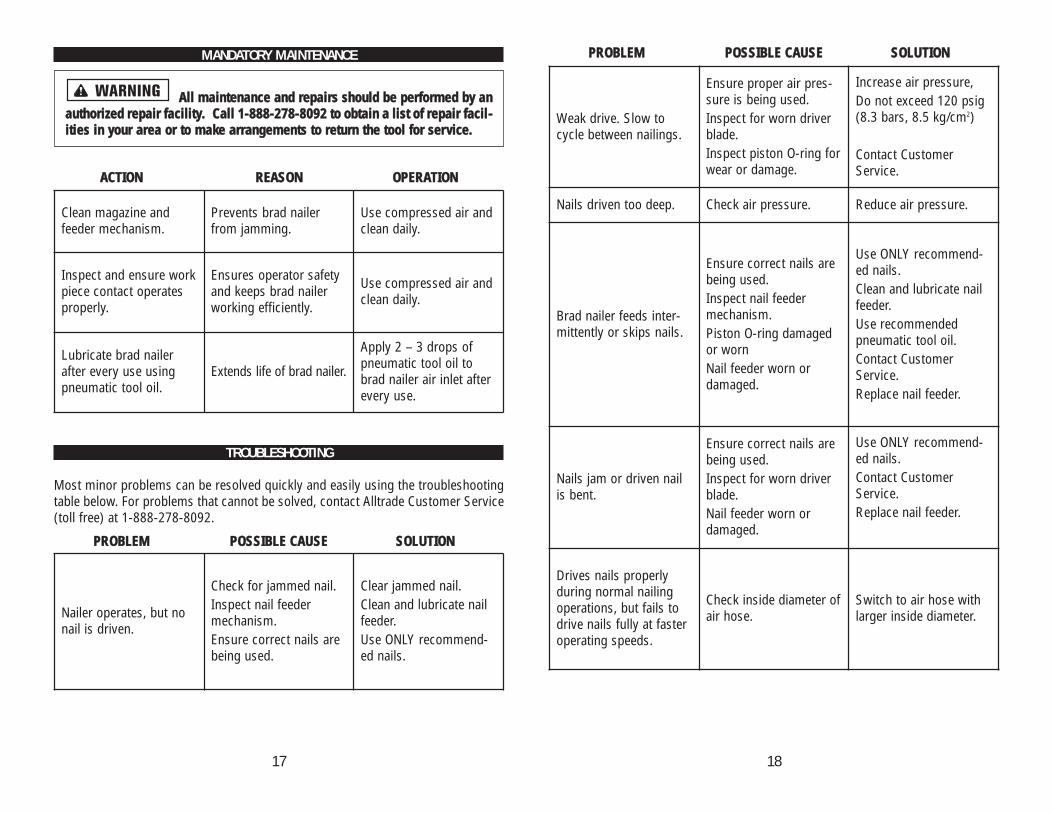
PPRROOBBLLEEMM PPOOSSSSIIBBLLEE CCAAUUSSEE SSOOLLUUTTIIOONNMANDATORY MAINTENANCE
AAllll mmaaiinntteennaannccee aanndd rreeppaaiirrss sshhoouulldd bbee ppeerrffoorrmmeedd bbyy aannaauutthhoorriizzeedd rreeppaaiirr ffaacciilliittyy.. CCaallll 11--888888--227788--88009922 ttoo oobbttaaiinn aa lliisstt ooff rreeppaaiirr ffaacciill--iittiieess iinn yyoouurr aarreeaa oorr ttoo mmaakkee aarrrraannggeemmeennttss ttoo rreettuurrnn tthhee ttooooll ffoorr sseerrvviiccee..
AACCTTIIOONN RREEAASSOONN OOPPEERRAATTIIOONN
TROUBLESHOOTING
Most minor problems can be resolved quickly and easily using the troubleshootingtable below. For problems that cannot be solved, contact Alltrade Customer Service(toll free) at 1-888-278-8092.
PPRROOBBLLEEMM PPOOSSSSIIBBLLEE CCAAUUSSEE SSOOLLUUTTIIOONN
Clean magazine andfeeder mechanism.
Prevents brad nailerfrom jamming.
Use compressed air andclean daily.
Inspect and ensure workpiece contact operatesproperly.
Ensures operator safetyand keeps brad nailerworking efficiently.
Use compressed air andclean daily.
Lubricate brad nailerafter every use usingpneumatic tool oil.
Extends life of brad nailer.
Apply 2 – 3 drops ofpneumatic tool oil tobrad nailer air inlet afterevery use.
Weak drive. Slow tocycle between nailings.
Ensure proper air pres-sure is being used.Inspect for worn driverblade.Inspect piston O-ring forwear or damage.
Increase air pressure, Do not exceed 120 psig(8.3 bars, 8.5 kg/cm2)
Contact CustomerService.
Nails driven too deep. Check air pressure. Reduce air pressure.
Brad nailer feeds inter-mittently or skips nails.
Ensure correct nails arebeing used.Inspect nail feedermechanism.Piston O-ring damagedor wornNail feeder worn ordamaged.
Use ONLY recommend-ed nails.Clean and lubricate nailfeeder.Use recommendedpneumatic tool oil.Contact CustomerService.Replace nail feeder.
Nails jam or driven nailis bent.
Ensure correct nails arebeing used.Inspect for worn driverblade.Nail feeder worn ordamaged.
Use ONLY recommend-ed nails.Contact CustomerService.Replace nail feeder.
Drives nails properlyduring normal nailingoperations, but fails todrive nails fully at fasteroperating speeds.
Check inside diameter ofair hose.
Switch to air hose withlarger inside diameter.Nailer operates, but no
nail is driven.
Check for jammed nail.Inspect nail feedermechanism.Ensure correct nails arebeing used.
Clear jammed nail.Clean and lubricate nailfeeder.Use ONLY recommend-ed nails.
17 18

PARTS LIST
IITTEEMM NNOO.. PPAARRTT NNOO.. DDEESSCCRRIIPPTTIIOONN
PARTS DIAGRAM
19 20
1 A0000-1211 Nylon Screw M4*8
2 A0005-0691 Washer 12*1
3 A0304-0651 Exhaust Cover
4 A0200-1471 O-Ring 7.59*2.62
5 B0000-0051 Screw Set M5*20
6 A0000-0091 Screw M5*20
7 A0005-0031 Washer #5*1.21
8 A0301-1551 Cap, Top
9 A0311-0451 Seal, Air
10 A0200-0221 O-Ring 15*2.5
11 A0205-0651 Gasket
12 A0100-0631 Spring
13 K0300-2221 Firing Valve Piston Set
14 A0200-0711 O-Ring 33.5*2.5
15 A0308-0341 Firing Valve Piston
16 A0200-0601 O-Ring 26.59*2.95
17 A0313-0041 Piston Stopper
18 K0600-4291 Piston Unit
19 A0200-1281 O-Ring 22.4*3.3
20 B0600-4271 Piston Set
21 A0305-0081 Sleeve Retainer
22 A0200-0271 O-Ring 44.8*2.6
23 A0800-0391 Spacer
24 A0200-0071 O-Ring 31*2.5

IITTEEMM NNOO.. PPAARRTT NNOO.. DDEESSCCRRIIPPTTIIOONN
22
IITTEEMM NNOO.. PPAARRTT NNOO.. DDEESSCCRRIIPPTTIIOONN
21
25 A0303-0941 Sleeve, Cylinder
26 A0309-0741 Bumper
27 K0400-0601 Body and Handle Grip
28 A0204-1661 Grip
29 A0401-1951 Body
30 A0310-0751 Nozzle
31 A0006-0821 Trigger Pin
32 A0005-0311 Pin Retainer 5.5*2
33 A0011-0161 Spring Pin 3*24
34 A0313-0631 Main Body Bumper L(Snap-on)
35 A0313-0641 Main Body Bumper R(Snap-on)
36 A0006-0411 Pin
37 A0005-0291 Pin Retainer 6*2.9
38 A0316-0331 Belt Hook
39 A0200-2851 O-Ring 38*3.5W
40 A0203-0191 Filter
41 A0306-1181 Tail Cover
42 A0101-0191 Spring
43 A0709-0301 Click Lever
44 A0712-0341 Safety Guide Plate
45 A0100-0811 Spring
46 A0200-1091 O-Ring 11*1.05
47 K0500-1381 Trigger Valve Set
48 K0500-1491 Trigger Set
49 K0800-0111 Driver Guide Cover Set
50 K0700-2531 Release Catch Assembly
51 A0005-0041 E-Ring2.5
52 A0711-0841 Release Catch (C)
53 A0011-0181 Spring Pin 3*8
54 A0200-4301 O-Ring 4.4*1.8
55 A0004-0181 Safety Adjustment Wheel
56 A0711-0831 Release Catch (B)
57 A0006-0491 Step Pin
58 A0000-0071 Screw M5*16
59 A0800-0211 Spacer
60 A0011-0011 Spring Pin 2*10
61 A0001-0001 Screw M4*18
62 A0801-0771 Driver Guide
63 A0000-0851 Screw M4*10
64 A0710-0272 Spacer
65 A0701-2561 Lower Magazine
66 A0708-0321 Steel Bar
67 A0706-0561 Support
68 A0715-0161 Magazine Stop
69 A0000-0241 Screw M5*14
70 A0000-0521 Nylon Screw M4*12
71 A0707-1391 Pusher
72 A0700-1781 Upper Magazine
73 A0011-0131 Spring Pin 3*10
74 A0718-0141 Tail Cover

WWAARRRRAANNTTYY PPEERRFFOORRMMAANNCCEEBy purchasing this product, purchaser expressly acknowledges and agrees thattheir sole and exclusive remedy under this warranty shall be strictly limited to therepair or replacement of any covered nonconforming items or parts thereof provid-ed that any such nonconforming item and/or part is promptly returned to an author-ized Service Center within the applicable warranty period, with a written request bypurchaser that Alltrade repair and/or replace the nonconforming item and/or part.We recommend that you keep the original product packaging in the event you needto ship the unit. We suggest the package be insured against loss or in transit dam-age. When sending your product, include your name, address, phone number, e-mail address, dated proof of purchase (or copy) and a statement about the natureof the problem. Warranty coverage is conditioned upon purchaser furnishingAlltrade with adequate written proof that they are the original purchaser and of theoriginal purchase date. Parts returned, freight prepaid and insured, will be inspect-ed and, at Alltrade's option, repaired and/or replaced free of charge if it is found tobe defective and subject to warranty. Alltrade retains the sole discretion to deter-mine whether any item or part is nonconforming and, if so, whether the item and/orpart will be repaired and/or replaced. If the unit is repaired, new or reconditionedreplacement parts may be used. If Alltrade chooses to replace the product, it mayreplace it with a new or reconditioned of the same or comparable design. Therepaired or replaced unit will be warranted under the terms of the remainder of theone year warranty period; covered defective parts not subject to normal wear andtear or other exclusions will be repaired or replaced, at Alltrade's option. During thewarranty period, Alltrade will be responsible for the return shipping charges.Alltrade's repair and/or replacement of any nonconforming item and/or part thereofshall constitute fulfillment of all obligations to the purchaser. Alltrade shall not beresponsible or liable for any expense, including freight charges, or repairs madeoutside Alltrade's facility or an Alltrade designated service, unless expressly agreedto by Alltrade in writing. Under no circumstances shall Alltrade bear any responsi-bility for loss of the unit, loss of time or rental, inconvenience, commercial loss, orconsequential damages.
For the location of an Authorized Service Center nearest you, please call customerservice at 1-888-278-8092.
EEXXCCLLUUSSIIOONNSSAir nailers and staplers need periodic maintenance to remain in proper operatingcondition. Normal wear parts (o-rings and driver blades) shall be warranted to theoriginal purchaser to be free from defects in materials and workmanship for a peri-od of 90 days from the original date of purchase.
This warranty does not cover parts damaged due to normal wear, abnormal condi-tions, misapplication, misuse, abuse, accidents, operation, improper storage, orfreight damage. Parts damaged or worn by operation in dusty environments are notwarranted. Failure to follow recommended operating and maintenance procedures
24
IITTEEMM NNOO.. PPAARRTT NNOO.. DDEESSCCRRIIPPTTIIOONN
SPECIFICATIONS
1 YEAR LIMITED WARRANTY
EExxpprreessss aanndd EExxcclluussiivvee LLiimmiitteedd WWaarrrraannttyy ttoo OOrriiggiinnaall RReettaaiill BBuuyyeerrAlltrade Tools LLC (hereinafter "Alltrade") expressly warrants to the original retailpurchaser of the accompanying SNAP-ON™ portable air tool and no one else allparts of the product (except those parts referred to below which are specificallyexcluded from such warranty (see Exclusions) to be free from defects in materialsand workmanship for a period of one year from the original date of purchase.
The date of purchase shall be the date of shipment to the original purchaser, or thedate the original purchaser took possession, custody, or control of the product,whichever occurred first. This warranty shall be null and void if the product or anycomponent thereof is modified or altered. This warranty does not apply to any otherproduct and/or component thereof manufactured or distributed by Alltrade, anddoes not apply to products and/or components thereof designed, manufacturedand/or assembled by others, for which Alltrade makes no warranties whatsoever.TTHHEERREE AARREE NNOO WWAARRRRAANNTTIIEESS,, WWHHIICCHH EEXXTTEENNDD BBEEYYOONNDD TTHHEE DDEESSCCRRIIPPTTIIOONN OONNTTHHEE FFAACCEE HHEERREEOOFF..
23
MODEL NUMBER 870015
AIR PRESSURE 70-120 PSIG (5.0- 8.5 kg/cm2G)
NAIL LENGTH 5/8" (15 mm) - 2" (50.8 mm)
NAIL CAPACITY 110 NAILS
MINIMUM HOSEDIAMETER 1/4" (6.5 mm)
NAIL DIAMETER 18 GAUGE
NET WEIGHT 2.6 LBS. (1.17KG)
75 A0706-1741 Spring Holder
76 A0200-0291 O-Ring 4*1.25 (red)
77 A0101-0351 Spring
78 A00204-1571 No-Mar Pad

PURCHASER'S SOLE AND EXCLUSIVE REMEDY IS AS STATED ON PRECEDINGPAGES.
LLIIMMIITTAATTIIOONNSS OOFF LLIIAABBIILLIITTYYIN NO EVENT SHALL ALLTRADE AND/OR ITS REPRESENTATIVE(S) BE LIABLE FORINDIRECT, INCIDENTAL, SPECIAL AND/OR CONSEQUENTIAL DAMAGES OF ANYKIND ARISING OUT OF OR RELATED TO, DIRECTLY OR INDIRECTLY, ANY BREACHOR PROVISION OF ANY AGREEMENT BETWEEN ALLTRADE AND/OR ITS REPRE-SENTATIVE(S) AND PURCHASER, AND WARRANTY HEREUNDER, AND/OR THEEXISTENCE, DESIGN, MANUFACTURE, PURCHASE, USE AND/OR OPERATION OFANY ITEM(S) SOLD HEREUNDER EVEN IF ALLTRADE AND/OR ITS REPRESENTA-TIVE(S) HAS BEEN ADVISED OF THE POSSIBILITY OF ANY SUCH DAMAGES. IN NOEVENT, WHETHER BECAUSE OF A BREACH OF CONTRACT, WARRANTY, TORT(INCLUDING NEGLIGENCE) OR OTHERWISE, SHALL ALLTRADE'S AND/OR ITSREPRESENTATIVE (S) LIABILITY EXCEED THE PRICE OF THE PRODUCT. All LIA-BILITY CONNECTED WITH THE USE OF THIS PRODUCT SHALL TERMINATE UPONTHE EXPIRATION OF THE WARRANTY PERIODS SPECIFIED ABOVE.
LLIIMMIITTAATTIIOONNSS OONN WWAARRRRAANNTTYY DDIISSCCLLAAIIMMEERRSSSome states do not allow limitations on how long an implied warranty lasts andsome states do not allow the exclusion or limitation of the incidental or consequen-tial damages, so part or all of the above limitations or exclusions may not apply toyou. This warranty gives you specific legal rights, and you may also have otherrights, which vary from state to state.
If your product is not covered by this warranty, please call our Customer ServiceDepartment at 1-888-278-8092 for general repair information, and charges and thelocation of your nearest authorized service facility.
26
also voids warranty.
DAMAGE TO THE PRODUCT RESULTING FROM TAMPERING, ACCIDENT, ABUSE,NEGLIGENCE, FAILURE TO FOLLOW INSTRUCTIONS, UNAUTHORIZED REPAIRSOR ALTERATIONS, DAMAGE WHILE IN TRANSIT TO OUR SERVICE FACILITY, USEOF UNAPPROVED OR IMPROPER ATTACHMENTS OR ACCESSORIES, OR OTHERCAUSES UNRELATED TO PROBLEMS WITH MATERIAL OR WORKMANSHIP ARENOT COVERED BY THIS WARRANTY.
Alltrade will not be liable for the following: labor charges, loss or damage resultingfrom improper operation, maintenance or repairs made by other persons; pre-deliv-ery services such as assembly, oil and lubricants, and adjustment; maintenanceservices that are normally required to maintain the product.
The use of other than genuine Snap-On™ Repair Parts will VOID the warranty.
WWAARRRRAANNTTYY DDIISSCCLLAAIIMMEERRSSEXCLUSION AND DISCLAIMER OF ALL OTHER EXPRESS WARRANTIES, GUAR-ANTIES AND/OR REPRESENTATIONS, EXCEPT FOR THE LIMITED WARRANTYPROVIDED HEREIN, ALL OTHER EXPRESS WARRANTIES, GUARANTIES, AND/ORREPRESENTATIONS BY ALLTRADE AND OR ITS REPRESENTATIVE(S) REGARDINGTHE DESIGN, MANUFACTURE, PURCHASE, USE AND/OR OPERATION OF THEPRODUCT OR ANY COMPONENT THEREOF SOLD HEREUNDER, REGARDLESS OFWHETHER ANY SUCH WARRANTY, GUARANTY AND/OR REPRESENTATION,WRITTEN OR ORAL, ARISES BY OPERATION OF LAW AND/OR EQUITY AND/OR BYANY ACT OR OMISSION OF ALLTRADE AND/OR ITS REPRESENTATIVE(S), OR THEBUYER, ARE HEREBY EXPRESSLY EXCLUDED AND DISCLAIMED BY ALLTRADEAND/OR ITS REPRESENTATIVES. PURCHASER KNOWINGLY AND WILLINGLYWAIVES ANY AND ALL SUCH WARRANTIES AND RIGHTS, CLAIMS AND/ORCAUSE OF ACTION ARISING THEREFROM OR BASED THEREON. PURCHASER'SSOLE AND EXCLUSIVE REMEDY IS AS STATED ABOVE.
EXCLUSION AND DISCLAIMER OF ALL IMPLIED WARRANTIES, INCLUDING THEIMPLIED WARRANTIES OF MERCHANTABILITY AND FITNESS FOR A PARTICULARPURPOSE. NO WARRANTY, ORAL OR WRITTEN, OTHER THAN THE WARRANTYLISTED HEREIN IS MADE WITH REGARD TO THIS PRODUCT. ALL WARRANTIESAND/OR IMPLIED WARRANTIES, GUARANTIES AND/OR REPRESENTATIONS BYALLTRADE AND/OR ITS REPRESENTATIVE(S) REGARDING THE DESIGN, MANU-FACTURE, PURCHASE, USE AND/OR OPERATION OF THE PRODUCT OR ANY COM-PONENT THEREOF SOLD HEREUNDER, REGARDLESS OF WHETHER ANY SUCHWARRANTY, GUARANTY AND/OR REPRESENTATION, WRITTEN OR ORAL, ARISESBY OPERATION OF LAW AND/OR EQUITY AND/OR BY ANY ACT OR OMISSION OFALLTRADE AND/OR ITS REPRESENTATIVES. PURCHASER KNOWINGLY ANDWILLINGLY WAIVES ANY AND ALL SUCH WARRANTIES AND RIGHTS, CLAIMSAND/OR CAUSES OF ACTION ARISING THEREFROM OR BASED THEREON.
25