Embed Size (px)
DESCRIPTION
Replace 9120 BSC with 9130 BSC Evolution
Citation preview

Alcatel-Lucent GSM
Replace 9120 BSC with 9130
BSC Evolution
BSS Document
Reconfiguration Method
Release B10
3BK 17430 1152 RJZZA Ed.11

Status RELEASED
Short title MPI115 / MDR2
All rights reserved. Passing on and copying of this document, useand communication of its contents not permitted without writtenauthorization from Alcatel-Lucent.
BLANK PAGE BREAK
2 / 47 3BK 17430 1152 RJZZA Ed.11

Contents
Contents
Preface . . . . . . . . . . . . . . . . . . . . . . . . . . . . . . . . . . . . . . . . . . . . . . . . . . . . . . . . . . . . . . . . . . . . . . . . . . . . . . . . . . . . . . . . 5
1 Overview . . . . . . . . . . . . . . . . . . . . . . . . . . . . . . . . . . . . . . . . . . . . . . . . . . . . . . . . . . . . . . . . . . . . . . . . . . . . . . . . . . 71.1 Presentation . . . . . . . . . . . . . . . . . . . . . . . . . . . . . . . . . . . . . . . . . . . . . . . . . . . . . . . . . . . . . . . . . . . . . . 8
1.1.1 Cases . . . . . . . . . . . . . . . . . . . . . . . . . . . . . . . . . . . . . . . . . . . . . . . . . . . . . . . . . . . . . . . . . 81.1.2 Options . . . . . . . . . . . . . . . . . . . . . . . . . . . . . . . . . . . . . . . . . . . . . . . . . . . . . . . . . . . . . . . . 81.1.3 Restrictions . . . . . . . . . . . . . . . . . . . . . . . . . . . . . . . . . . . . . . . . . . . . . . . . . . . . . . . . . . . . 81.1.4 Grouped Task Sequence . . . . . . . . . . . . . . . . . . . . . . . . . . . . . . . . . . . . . . . . . . . . . . . . 9
1.2 Preparation . . . . . . . . . . . . . . . . . . . . . . . . . . . . . . . . . . . . . . . . . . . . . . . . . . . . . . . . . . . . . . . . . . . . . . . 101.2.1 Prerequisites . . . . . . . . . . . . . . . . . . . . . . . . . . . . . . . . . . . . . . . . . . . . . . . . . . . . . . . . . . . 101.2.2 Site Specific Information . . . . . . . . . . . . . . . . . . . . . . . . . . . . . . . . . . . . . . . . . . . . . . . . 111.2.3 External Tasks . . . . . . . . . . . . . . . . . . . . . . . . . . . . . . . . . . . . . . . . . . . . . . . . . . . . . . . . . 11
1.3 Scheduling . . . . . . . . . . . . . . . . . . . . . . . . . . . . . . . . . . . . . . . . . . . . . . . . . . . . . . . . . . . . . . . . . . . . . . . . 121.4 Telecom / Supervision Outage and Operating Impact . . . . . . . . . . . . . . . . . . . . . . . . . . . . . . . . . . 131.5 Resources . . . . . . . . . . . . . . . . . . . . . . . . . . . . . . . . . . . . . . . . . . . . . . . . . . . . . . . . . . . . . . . . . . . . . . . . 14
1.5.1 Tools . . . . . . . . . . . . . . . . . . . . . . . . . . . . . . . . . . . . . . . . . . . . . . . . . . . . . . . . . . . . . . . . . . 141.5.2 Supplies . . . . . . . . . . . . . . . . . . . . . . . . . . . . . . . . . . . . . . . . . . . . . . . . . . . . . . . . . . . . . . . 141.5.3 Applicable Documents . . . . . . . . . . . . . . . . . . . . . . . . . . . . . . . . . . . . . . . . . . . . . . . . . . 14
2 Scenario . . . . . . . . . . . . . . . . . . . . . . . . . . . . . . . . . . . . . . . . . . . . . . . . . . . . . . . . . . . . . . . . . . . . . . . . . . . . . . . . . . 15
2.1 Before Going Onsite . . . . . . . . . . . . . . . . . . . . . . . . . . . . . . . . . . . . . . . . . . . . . . . . . . . . . . . . . . . . . . . 162.2 Before You Start . . . . . . . . . . . . . . . . . . . . . . . . . . . . . . . . . . . . . . . . . . . . . . . . . . . . . . . . . . . . . . . . . . . 16
2.2.1 Checks . . . . . . . . . . . . . . . . . . . . . . . . . . . . . . . . . . . . . . . . . . . . . . . . . . . . . . . . . . . . . . . . 162.2.2 Required Knowledge . . . . . . . . . . . . . . . . . . . . . . . . . . . . . . . . . . . . . . . . . . . . . . . . . . . 16
2.3 Scenario Description . . . . . . . . . . . . . . . . . . . . . . . . . . . . . . . . . . . . . . . . . . . . . . . . . . . . . . . . . . . . . . . 172.3.1 Initial Checks . . . . . . . . . . . . . . . . . . . . . . . . . . . . . . . . . . . . . . . . . . . . . . . . . . . . . . . . . . 172.3.2 Backup Software Package on 9120 BSC . . . . . . . . . . . . . . . . . . . . . . . . . . . . . . . . . . 222.3.3 New BSS Package Production . . . . . . . . . . . . . . . . . . . . . . . . . . . . . . . . . . . . . . . . . . . 252.3.4 Test 9130 BSC Evolution Functionality . . . . . . . . . . . . . . . . . . . . . . . . . . . . . . . . . . . 302.3.5 Remove 9120 BSC . . . . . . . . . . . . . . . . . . . . . . . . . . . . . . . . . . . . . . . . . . . . . . . . . . . . . 302.3.6 Upgrade OMC-R Configuration . . . . . . . . . . . . . . . . . . . . . . . . . . . . . . . . . . . . . . . . . . 352.3.7 Test Call and GPRS Services . . . . . . . . . . . . . . . . . . . . . . . . . . . . . . . . . . . . . . . . . . . . 382.3.8 Enable SNMP Collector (O1) . . . . . . . . . . . . . . . . . . . . . . . . . . . . . . . . . . . . . . . . . . . . 402.3.9 Final Checks . . . . . . . . . . . . . . . . . . . . . . . . . . . . . . . . . . . . . . . . . . . . . . . . . . . . . . . . . . . 41
2.4 Reverse Procedure . . . . . . . . . . . . . . . . . . . . . . . . . . . . . . . . . . . . . . . . . . . . . . . . . . . . . . . . . . . . . . . . 432.4.1 Recreate Old Configuration . . . . . . . . . . . . . . . . . . . . . . . . . . . . . . . . . . . . . . . . . . . . . . 432.4.2 Test Call and GPRS Services . . . . . . . . . . . . . . . . . . . . . . . . . . . . . . . . . . . . . . . . . . . . 452.4.3 Final Operations . . . . . . . . . . . . . . . . . . . . . . . . . . . . . . . . . . . . . . . . . . . . . . . . . . . . . . . . 46
3BK 17430 1152 RJZZA Ed.11 3 / 47

Contents
4 / 47 3BK 17430 1152 RJZZA Ed.11

Preface
Preface
Purpose This scenario defines how to replace an 9120 BSC with an 9130 BSC Evolution.
The scenario is applicable for 9120 BSC at technical release B10.
What’s New In Edition 11Improvements done in sections:
Upgrade OMC-R Configuration (Section 2.3.6)
Recreate Old Configuration (Section 2.4.1)Updates were made in the following sections:
Software Tools (Section 1.5.1.2)
Check the Presence of Data Model Files on Solaris Station (Section 2.3.1.4)
New BSS Package Production (Section 2.3.3)
In Edition 10Improvements were made in section Upgrade OMC-R Configuration (Section2.3.6).
Update with the new equipment naming.
In Edition 09Overall document quality was improved following a quality review.
In Edition 083BKA20FBR212905 Restriction removed from Upgrade OMC-R Configuration(Section 2.3.6)
In Edition 07Improvements were made inthe following sections:
Check the Presence of Data Model Files on Solaris Station (Section 2.3.1.4)
New BSS Package Production (Section 2.3.3)
Logical Preparation (Section 2.3.5.1)
3BK 17430 1152 RJZZA Ed.11 5 / 47

Preface
Enable SNMP Collector (O1) (Section 2.3.8)
In Edition 06Delivered in release.
In Edition 05Section New BSS Package Production (Section 2.3.3) was updated followingsystem evolution changes.
In Edition 04Improvements were made in the following sections as a result of systemevolution changes:
Upgrade OMC-R Configuration (Section 2.3.6)
Recreate Old Configuration (Section 2.4.1)
Options (Section 1.1.2)
Logical Preparation (Section 2.3.5.1)
In Edition 03Improvements were made due to system evolution changes.
In Edition 023BKA20FBR212905 Restriction added in Upgrade OMC-R Configuration(Section 2.3.6)
In Edition 01First official release of the document for B10.
Audience This document is intended for:
Field service technicians
Specialists
Project managers
Foremen.
Assumed Knowledge You must have a basic understanding of the following:
Planning:
Network architecture and reshuffling principles
Scheduling.
Implementation:
Alcatel-Lucent operations and maintenance concepts for the BSS
GPRS concepts
9153 OMC-R operation
Basic UNIX knowledge.
6 / 47 3BK 17430 1152 RJZZA Ed.11

1 Overview
1 Overview
This Overview gives information needed by project managers and foremen, forpresentation to the customer and for site planning.
3BK 17430 1152 RJZZA Ed.11 7 / 47

1 Overview
1.1 PresentationThe object of this operation is to install, cable and commission the new 9130BSC Evolution without disturbing the 9120 BSC. Once the 9130 BSC Evolutionis ready, the 9120 BSC is stopped and all Abis and Ater links are switchedfrom the 9120 BSC to the 9130 BSC Evolution.
The same procedure can be applied for rack shared configurations (two 9130BSC Evolution in the same rack or one 9130 BSC Evolution and one 9130MFS Evolution in the same rack).
In case of XLarge configuration, all scripts must be launched from the MasterOMC-R. All the other operations must be launched from Agents or HMIs .
1.1.1 Cases
None.
1.1.2 Options
The following option applies:
O1: Enable SNMP Collector.
O2: External Alarm Box for 9130 BSC Evolution.
1.1.3 Restrictions
The only current restriction is the change of X.25/IP extraction mode.
8 / 47 3BK 17430 1152 RJZZA Ed.11

1 Overview
1.1.4 Grouped Task Sequence
The following figure shows the grouped task sequence for this scenario.
OMC−R
Initial Checks
Backup Software Package on 9120 BSC
New BSS Package Production
Final Checks
Test 9130 BSC EvolutionFunctionality
Cabling the New 9130 BSC Evolution
OMC−R Configuration Upgrade
Test Call and GPRS Services
9120BSC9130 BSCSolaris Station withG2MxUT
Logical Preparation
Remove 9120 BSC
Figure 1: Grouped Task Sequence
3BK 17430 1152 RJZZA Ed.11 9 / 47
1 Overview
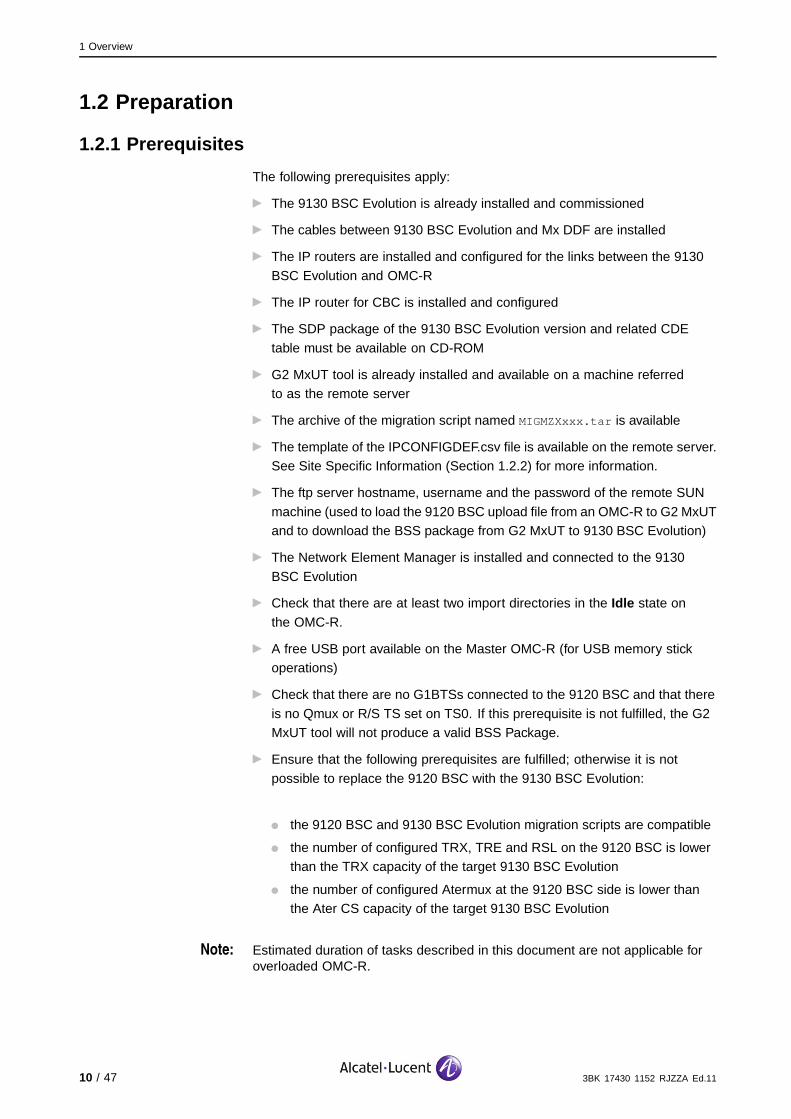
1.2 Preparation
1.2.1 Prerequisites
The following prerequisites apply:
The 9130 BSC Evolution is already installed and commissioned
The cables between 9130 BSC Evolution and Mx DDF are installed
The IP routers are installed and configured for the links between the 9130
BSC Evolution and OMC-R
The IP router for CBC is installed and configured
The SDP package of the 9130 BSC Evolution version and related CDE
table must be available on CD-ROM
G2 MxUT tool is already installed and available on a machine referredto as the remote server
The archive of the migration script named MIGMZXxxx.tar is available
The template of the IPCONFIGDEF.csv file is available on the remote server.See Site Specific Information (Section 1.2.2) for more information.
The ftp server hostname, username and the password of the remote SUN
machine (used to load the 9120 BSC upload file from an OMC-R to G2 MxUTand to download the BSS package from G2 MxUT to 9130 BSC Evolution)
The Network Element Manager is installed and connected to the 9130
BSC Evolution
Check that there are at least two import directories in the Idle state on
the OMC-R.
A free USB port available on the Master OMC-R (for USB memory stickoperations)
Check that there are no G1BTSs connected to the 9120 BSC and that there
is no Qmux or R/S TS set on TS0. If this prerequisite is not fulfilled, the G2MxUT tool will not produce a valid BSS Package.
Ensure that the following prerequisites are fulfilled; otherwise it is not
possible to replace the 9120 BSC with the 9130 BSC Evolution:
the 9120 BSC and 9130 BSC Evolution migration scripts are compatible
the number of configured TRX, TRE and RSL on the 9120 BSC is lowerthan the TRX capacity of the target 9130 BSC Evolution
the number of configured Atermux at the 9120 BSC side is lower thanthe Ater CS capacity of the target 9130 BSC Evolution
Note: Estimated duration of tasks described in this document are not applicable foroverloaded OMC-R.
10 / 47 3BK 17430 1152 RJZZA Ed.11

1 Overview
1.2.2 Site Specific Information
You must have the following information to complete the scenario:
The IP address parameters for the 9130 BSC Evolution listed in the
IPCONFIGDEF.csv configuration file.The template of this file can be found on the Solaris stationwhere the G2MXUT tool is installed. The location of thefile is <path_to_installation_directory>/res , where<path_to_installation_directory> is the path where the G2 MxUTwas installed.The IP address parameters are listed in the first line of theIPCONFIGDEF.csv template file. The values corresponding to theseparameters must be written on the second line of this file, in the exact sameorder, also separated by a semicolon.Note : The values for BSC_IP_LOCAL_SUBNETB_MASK andBSC_IP_LOCAL_SUBNETC_MASK must be 255.255.255.248, otherwisethe operation fails.
OMC-R axadmin user login and password
Available ftp transfer rate
The Data Model of the 9120 BSC and of the 9130 BSC Evolution.
1.2.3 External Tasks
None.
3BK 17430 1152 RJZZA Ed.11 11 / 47
1 Overview
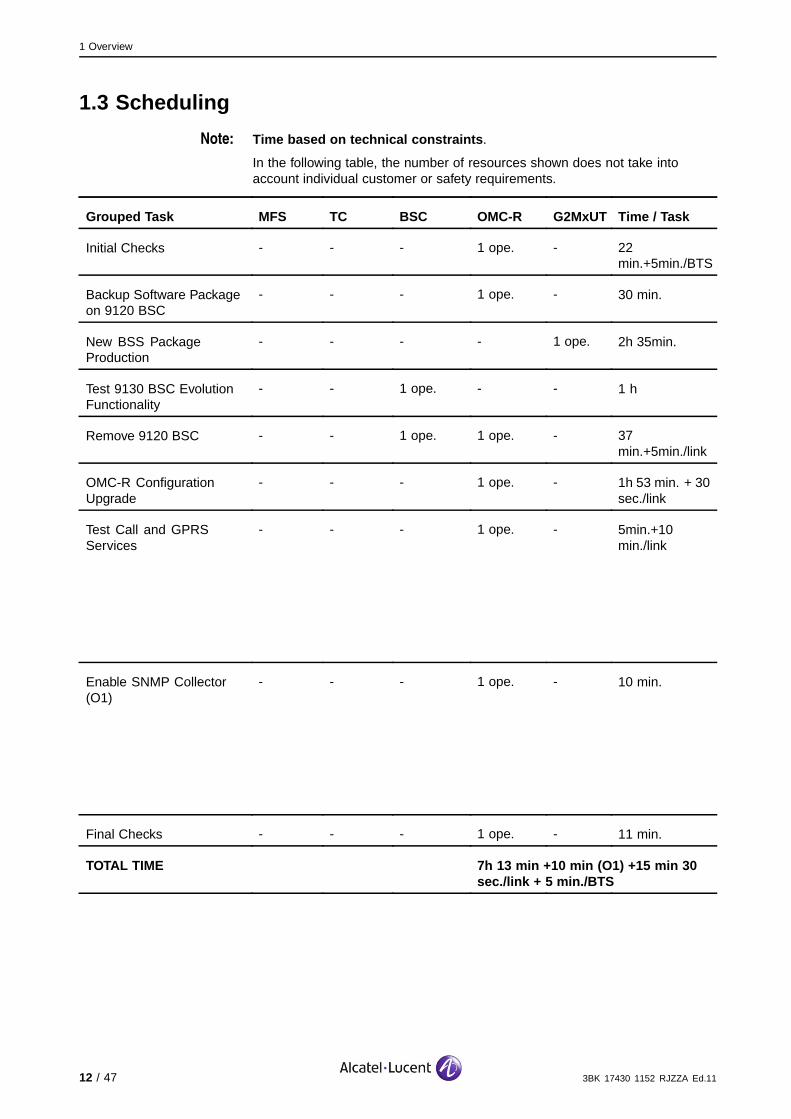
1.3 Scheduling
Note: Time based on technical constraints .
In the following table, the number of resources shown does not take intoaccount individual customer or safety requirements.
Grouped Task MFS TC BSC OMC-R G2MxUT Time / Task
Initial Checks - - - 1 ope. - 22min.+5min./BTS
Backup Software Packageon 9120 BSC
- - - 1 ope. - 30 min.
New BSS PackageProduction
- - - - 1 ope. 2h 35min.
Test 9130 BSC EvolutionFunctionality
- - 1 ope. - - 1 h
Remove 9120 BSC - - 1 ope. 1 ope. - 37min.+5min./link
OMC-R ConfigurationUpgrade
- - - 1 ope. - 1h 53 min. + 30sec./link
Test Call and GPRSServices
- - - 1 ope. - 5min.+10min./link
Enable SNMP Collector(O1)
- - - 1 ope. - 10 min.
Final Checks - - - 1 ope. - 11 min.
TOTAL TIME 7h 13 min +10 min (O1) +15 min 30sec./link + 5 min./BTS
12 / 47 3BK 17430 1152 RJZZA Ed.11

1 Overview
1.4 Telecom / Supervision Outage and Operating ImpactThe following table describes the traffic outage and loss of supervision causedby each grouped task.
Out.Ref. Grouped Task Tel. Out
Tel.Red Sup. Out
Oper.Impact
Impacts...
- Initial Checks. - - - - None.
- Backup Software Packageon 9120 BSC
- - - - None.
- New BSS PackageProduction
- - - - None.
- Test 9130 BSC EvolutionFunctionality
- - - - None.
- Remove 9120 BSC 5min+5min./link - 15min.+5min./link
-
- OMC-R ConfigurationUpgrade
- - 1h30min. -
- Test Call and GPRSServices
- - - - None.
- Enable SNMP Collector(O1)
- - - - None.
- Final Checks - - - - None.
- Total 5min+5min./link
- 1h 45min +5min./ link
-
3BK 17430 1152 RJZZA Ed.11 13 / 47

1 Overview
1.5 Resources
1.5.1 Tools
The following tables describe the necessary hardware tools, software tools,and forms.
1.5.1.1 Hardware ToolsNone.
1.5.1.2 Software Tools
Item Use at ...
G2MxUT -
1.5.1.3 FormsNone.
1.5.2 Supplies
Item Contents Use at...
A USB memory stick for the complete BSS backup package (gzipfiles)
OMC-R, BSC
1.5.3 Applicable Documents
You must have the following documents or have electronic access to thefollowing documents:
B10 BSS Methods Handbook
BSS Configuration Handbook
BSS Surveillance Handbook
Network Reconfiguration Recommendations
Network Element Manager User Guide
9130 BSC Evolution Software Replacement
9130 BSC Evolution Commissioning
14 / 47 3BK 17430 1152 RJZZA Ed.11

2 Scenario
2 Scenario
This Scenario presents all checks needed before beginning the scenario, andall detailed tasks to be performed on each site.
3BK 17430 1152 RJZZA Ed.11 15 / 47

2 Scenario
2.1 Before Going OnsiteBefore going onsite, you must check that the following information and suppliesare available:
All Prerequisites (Section 1.2.1) are met
The customer has been informed of the:
Date and time
Site name and address
Purpose of operation.
Personnel are available (refer to Scheduling (Section 1.3))
Site Specific Information (Section 1.2.2) is available
Tools (Section 1.5.1) are available and ready for operation
Supplies (Section 1.5.2) are available and ready for operation
Applicable Documents (Section 1.5.3) are available.
Ensure that the technical release level of the delivered board is in accordancewith the BSS hardware technical release document.
Ensure that the method used at the BSS site is at the same level as at theOMC-R.
2.2 Before You Start
2.2.1 Checks
Perform the following operations:
Check that all Prerequisites (Section 1.2.1) are met
Check the availability of all necessary Tools (Section 1.5.1) and Supplies
(Section 1.5.2)
Inform the operator.
2.2.2 Required Knowledge
You must be familiar with the following:
Safety Rules and Precautions
Telecom / Supervision Outage and Operating Impact (Section 1.4)
Reverse Procedure
Grouped Task Sequence (Section 1.1.4)
Operating Hints
How to document Faults and Anomalies.
16 / 47 3BK 17430 1152 RJZZA Ed.11

2 Scenario
2.3 Scenario DescriptionThis section lists the tasks required to replace an 9120 BSC with an 9130BSC Evolution.
2.3.1 Initial Checks
2.3.1.1 Global Checks on 9120 BSCThis task performs a simultaneous audit on the BSS and the basic alerters.
Note Task Description Site To Do Outage
- Perform an Audit Alarm State on impacted BSS OMC-R 10 min. None.
Perform a simultaneous audit on the BSS and the basic alerters:
1. In the BSSUSM: Main View, select the required BSS in the HW EquipmentView.
2. Select Audit -> Alarm/State Audit.
The audit starts and a message appears in the Follow-up window.
Note Task Description Site To Do Outage
OMC-R 8 min.+ 5min/BTS
None.- View Status of Managed Objects and Alarms (BSC andBTS) and print them.
Verify the status of the BSS,BSC, N7 and of all BTSs on theimpacted BSS
For the BSS View and print the status of managed objects and alarms:
1. In the HW Equipment View panel, select the BSS.
2. Right click, and select Expand All from the popup menu.
3. Re-select the BSS, right click, and select Report from the popup menu.
The HW Equipment View window opens, showing a report listing the statusof the BSC, TC and BTS boards.
4. Close the HW Equipment View - Web Browser window.
5. In the HW Equipment View panel, select the BSS.
6. Right click and select Show Alarms from the popup menu.
The AS Current USM: Counter Summary and the AS Current USM:AlarmSublist windows open, showing reports on the counters and alarms.
3BK 17430 1152 RJZZA Ed.11 17 / 47

2 Scenario
For N7 View and print the status of managed objects and alarms:
1. In the GSM Functional View panel, expand the N7 Synthesis tree.
2. Select the required N7.
3. Right click, and select Show Alarms from the popup menu.
The AS Current USM: Counter Summary and the AS Current USM:AlarmSublist windows open. You see reports on the counters and alarms.
For the BSC View and print the status of managed objects and alarms:
1. In the HW Equipment View panel, select the required BSC.
2. In the GSM Functional View panel, double click on the BSC name.
A tree appears, showing the status for X.25, DISC, TR_O&M and additionalfunctions.
3. Right click, and select Report from the popup menu.
The GSM Functional View window opens, showing a report on the status ofX25, DISC, TR_O&M and additional functions.
4. Check that X.25 links and the status of the DISK are Enabled before startingthe software migration.
5. Close GSM Functional View - Web Browser window.
For the BTS View and print the status of managed objects and alarms:
1. In the HW Equipment View panel, expand the BTS synthesis tree andselect the required BTS.
2. In the GSM Functional View, right click on the BTS name and selectExpand All.
A tree appears, showing the status of all managed objects of the BTS (OML,RSL, RA, FU, CU, CLLK, TRE).
3. Right click on the BTS name, and select Report from the popup menu.
4. Check if the status for OML is Enabled before starting the software change.
5. Close the GSM Functional View - Web Browser window.
2.3.1.2 Check Directories in Export Operation Window
Note Task Description Site To do Outage
- Check the status of the directories in the ExportOperation window.
OMC-R 2 min. None.
Check the status of the directories in the Export Operation window:
1. In RNUSM window, select Configuration -> Export.
2. In the Export Operation window, check that at least one directory status isIdle before starting the operation.
3. Click on [ Close ] to close the Export Operation window.
18 / 47 3BK 17430 1152 RJZZA Ed.11

2 Scenario
2.3.1.3 Check Status of Software Replacement for 9120 BSC
Note Task Description Site To do Outage
- Check the status of the softwarereplacement.
OMC-R 2 min. None.
Check the status of the software replacement:
1. In the BSSUSM: Main View, select Configuration -> SoftwareManagement.The Software Management window appears.
2. Check that the ’Status’ field is Idle.
3. Check that the following information appears in the ’Software Information’field:
The Running Software is in the Running directory
The Backup directory = the Running directory
The New directory is Empty.
3BK 17430 1152 RJZZA Ed.11 19 / 47

2 Scenario
2.3.1.4 Check the Presence of Data Model Files on Solaris Station
Note: This step has to be performed for both 9120 BSC and 9130 BSC Evolution toensure that all the necessary Data Model files are present. Also it is necessaryto ensure that the format of the files is correct: prefix are uppercase letters andsuffix are lower case letters.
Note Task Description Site To do Outage
- Check the existence of the FDWN files onthe Solaris station with G2 Mx UT Tool
G2 MX UT /OMC-R
15 min. None.
1. On the Solaris station with G2 MxUT check the presence of the FDWNAX<xx>
files (for 9120 BSC) and FDWNZX<xx>files (for 9130 BSC Evolution), where<xx> is the Data Model of the 9120 BSC/9130 BSC Evolution.
These files must be present in<path_to_installation_directory>/DLSContext ,where <path_to_installation_directory> is the path where G2MxUT has been installed.
If the files already exist, skip the next steps and go to the next section.
2. Go to the FDWN files location on the OMC-R:cd /alcatel/var/share/oef/SDPpackage/<SDP_version>
where <SDP_version> stands for the SDP version of the BSS.
3. Connect to the Solaris station with G2 MxUT:ftp <Solaris Machine IP Address>
Enter the username and the password for the ftp transfer when you areasked.
cd <path_to_installation_directory>/DLSContext
where <path_to_installation_directory> is the path where G2 MxUTwas installed.
4. If the files don’t exist, run the following commands:prombinput FDWNAX<xx>.DSP FDWNAX<xx>.dspput FDWNAX<xx>.DOM FDWNAX<xx>.domput FDWNAX<xx>.REL FDWNAX<xx>.relput FDWNAX<xx>.TAB FDWNAX<xx>.tablesput FDWNAX<xx>.FLD FDWNAX<xx>.fldput FDWNAX<xx>.PD2 FDWNAX<xx>.pd2put FDWNAX<xx>.RNG FDWNAX<xx>.rng
Note: These files should be readable and writable. Use chmod 666 DLSContext/* tochange the access right of these files.
5. Exit the FTP session:
20 / 47 3BK 17430 1152 RJZZA Ed.11

2 Scenario
by
Note: To copy the files using a USB memory stick, perform the following:
Copy all FDWNAXxxfiles to the USB memory stick.
Copy the content of the USB memory stick to<path_to_installation_directory>/DLSContext of the
remote server, where <path_to_installation_directory> is the path
where G2MxUT was installed.
3BK 17430 1152 RJZZA Ed.11 21 / 47
2 Scenario
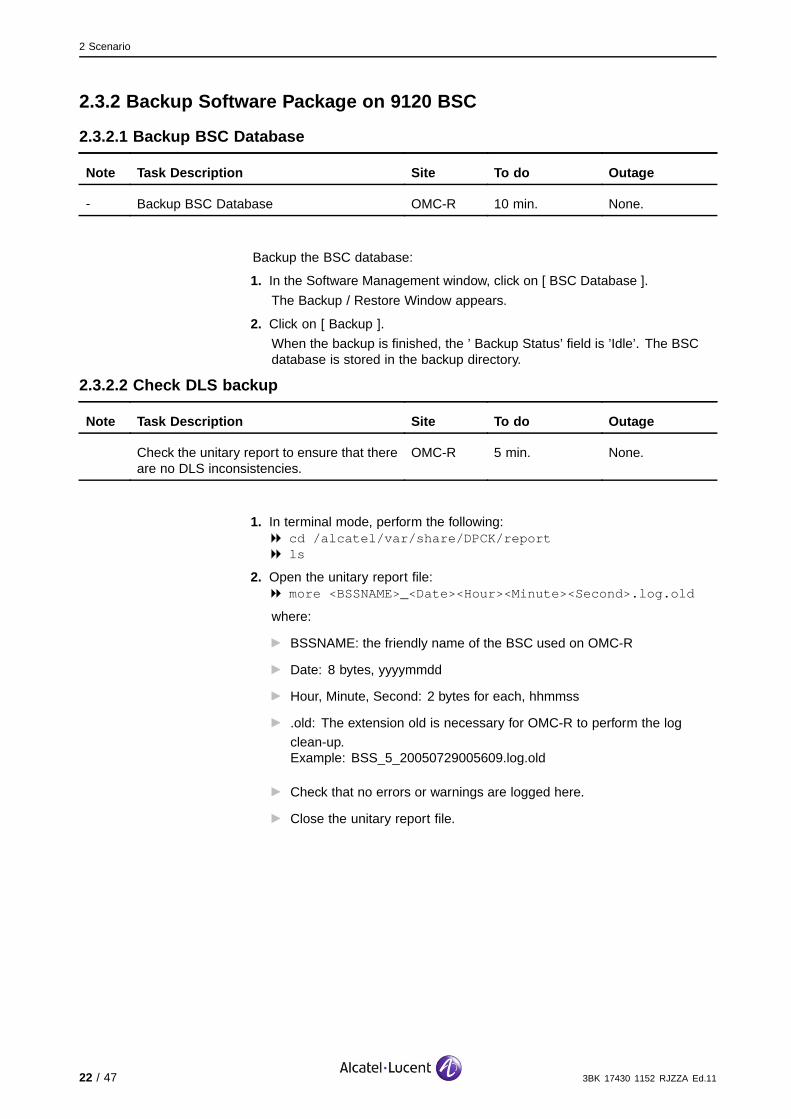
2.3.2 Backup Software Package on 9120 BSC
2.3.2.1 Backup BSC Database
Note Task Description Site To do Outage
- Backup BSC Database OMC-R 10 min. None.
Backup the BSC database:
1. In the Software Management window, click on [ BSC Database ].
The Backup / Restore Window appears.
2. Click on [ Backup ].
When the backup is finished, the ’ Backup Status’ field is ’Idle’. The BSCdatabase is stored in the backup directory.
2.3.2.2 Check DLS backup
Note Task Description Site To do Outage
Check the unitary report to ensure that thereare no DLS inconsistencies.
OMC-R 5 min. None.
1. In terminal mode, perform the following:cd /alcatel/var/share/DPCK/reportls
2. Open the unitary report file:more <BSSNAME>_<Date><Hour><Minute><Second>.log.old
where:
BSSNAME: the friendly name of the BSC used on OMC-R
Date: 8 bytes, yyyymmdd
Hour, Minute, Second: 2 bytes for each, hhmmss
.old: The extension old is necessary for OMC-R to perform the log
clean-up.Example: BSS_5_20050729005609.log.old
Check that no errors or warnings are logged here.
Close the unitary report file.
22 / 47 3BK 17430 1152 RJZZA Ed.11

2 Scenario
2.3.2.3 Generate Complete BSS Software Package
Note Task Description Site To do Outage
- Generate Complete BSS Software Package. OMC-R 20 min. None.
Generate a complete BSS software package:
1. Select the BSC database (current version).
2. Click on [ Generate Complete BSS Software Package ].
3. Select the SDP Package (the current version).
4. Select [ Zip Production ] in order to use the tarfile directory.
5. Click on [ Apply ].The system generates several files in/alcatel/var/share/oef/outputdir/<BSCName>/tarfile/
<cipher>SBP<Diskette> , where:
<BSCName>is the BSC name
<cipher> is a variable that depends on the BSC name and identifier
<Diskette> identifies the type and number of the diskette.
The system also generates the non-compressed files in/alcatel/var/share/oef/outputdir/<BSCName> .
6. Close the BSSUSM backup / restore window.
7. Save the files.
Transfer or transport these files to the Solaris station with G2 Mx UT, usingany available media.
To transfer the compressed files:
via a USB memory stick, use Copy package to USB memory stick
(Section 2.3.2.4)
via ftp, use the cpBssSw script as described in Copy Package Using Ftp(Section 2.3.2.5)
3BK 17430 1152 RJZZA Ed.11 23 / 47

2 Scenario
2.3.2.4 Copy package to USB memory stick
Note: In case of XLarge configuration, perform this operation connected as axadminto the master OMC-R. If the operation is performed from the HMI, connect viaSSH to the master OMC-R.
1. Remove the Read-Only protection of the USB memory stick, then plug thememory stick in a free USB socket of the Master OMC-R machine. Thedevice is automatically mounted in a few seconds.
On OMC-R, from a terminal window, run the command:mount | grep rmdisk | tail -1 | awk ’{print $1}’
The device directory with complete path is displayed in the following form:
/rmdisk/<device_directory_name>(as an example: /rmdisk/unnamed_rmdisk#1).
2. To copy the backup package, launch:cd /alcatel/var/share/oef/outputdircp -r <BSCName> /rmdisk/<device_directory_name>
where <BSCName> is the name of the BSC.
Check the presence of the backup directory on the memory stick:ls -lR /rmdisk/<device_directory_name>/<BSCName>/
The contents of the backup package from the memory stick is listedon the screen.
3. To extract the memory stick, launch:cd /eject <device_directory_name>
Unplug the memory stick from the USB connector.
2.3.2.5 Copy Package Using Ftp
Note: In case of XLarge configuration, perform this operation connected as axadminto the master OMC-R. If the operation is performed from the HMI, connect viaSSH to the master OMC-R.
To copy the complete package to a remote ftp server:
1. In terminal mode, type:/install/script/cpBssSw -b <BSCName> -f <user@host>-p <password> -l <remotepath>
where:
<BSCName> is the name of the BSC
<user@host> is the ftp server user and host
<password> is the password of the ftp remote server
<remote path> is the path to the package destination.
2. After the END OF SCRIPT EXECUTIONmessage appears, close the terminal.
24 / 47 3BK 17430 1152 RJZZA Ed.11

2 Scenario
2.3.3 New BSS Package Production
Note Task Description Site To Do Outage
- If the 9130 BSC Evolution SDP Package is locatedon the OMC-R, copy the SDP Package to a locationaccesible via ftp from the Solaris Station.
OMC-R 3 min None
To copy the SDP Package from the OMC-R to a location accesible via ftp fromthe Solaris station, perform the following:
1. In /alcatel/var/share/AFTR/MISC create a new directory named <SDP>
mkdir /alcatel/var/share/AFTR/MISC/<SDP>
2. Copy the SDP Package into <SDP>directory:cd /alcatel/var/share/oef/SDPpackagecp -rf <SDP_directory>/alcatel/var/share/AFTR/MISC/<SDP>
where the <SDP_directory> is the directory where the 9130 BSC EvolutionSDP Package can be found on the OMC-R.
Note Task Description Site To Do Outage
- On a Solaris station with G2 MxUT, prepare the inputsfor the migration (9120 BSC upload package, 9130BSC Evolution SDP package and the 9130 BSCEvolution IP configuration file)
G2 MxUT 15 min None
To prepare the inputs for the migration:
1. Create the following directory structures:
Create a new directory called <general_directory> , used for the migrationfrom the 9120 BSC to the 9130 BSC Evolution.In this directory, create thefollowing sub-directories:
<download_directory> for the results of G2–Mx migration provided by
the G2MXUT tool
<UPL> for the 9120 BSC upload package
<SDP> for the 9130 BSC Evolution SDP package.The name of the <SDP>sub-directory must be the same as the nameof the SDP.
2. If ftp is used to copy the content of all archives belonging to a complete BSSpackage in one directory, enter the following commands:
cd <remotepath>
cp */* <general_directory>/<UPL>
If a USB memory stick is used to copy the content of all archives belongingto a complete BSS package in one directory, there are several possiblitiesto perform the mount operation. Therefore the following operations are tobe considered as an example only.
3BK 17430 1152 RJZZA Ed.11 25 / 47
2 Scenario
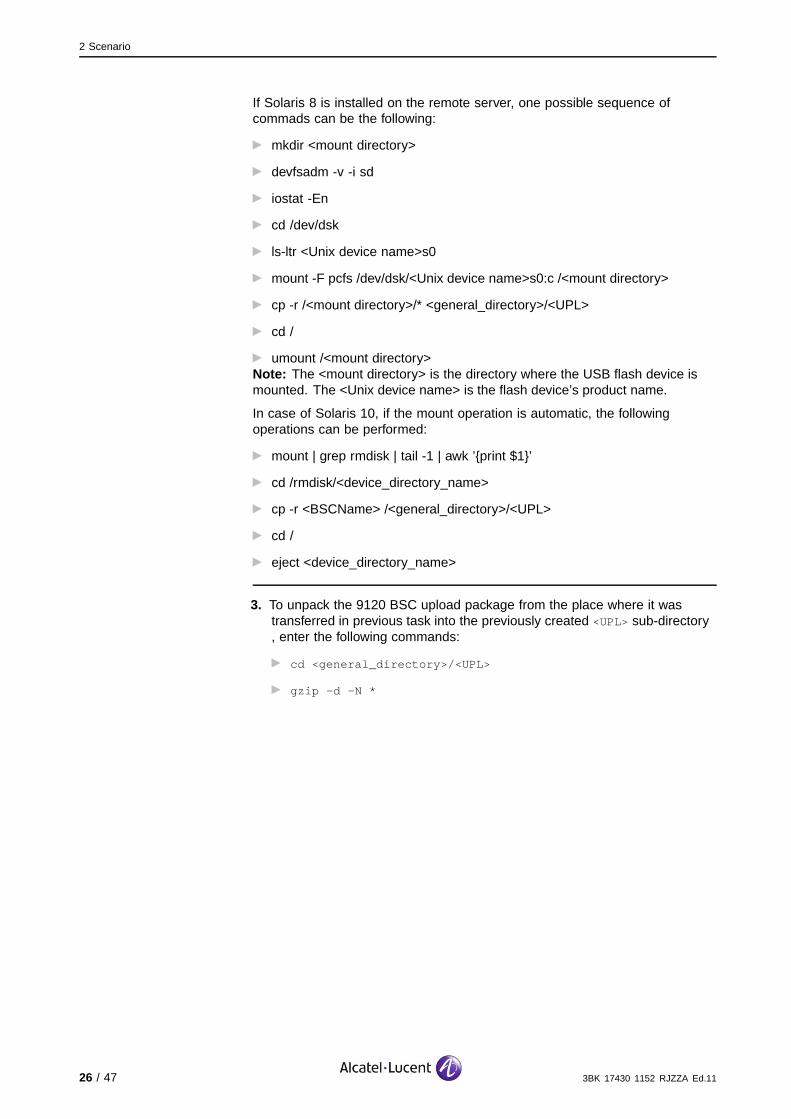
If Solaris 8 is installed on the remote server, one possible sequence ofcommads can be the following:
mkdir <mount directory>
devfsadm -v -i sd
iostat -En
cd /dev/dsk
ls-ltr <Unix device name>s0
mount -F pcfs /dev/dsk/<Unix device name>s0:c /<mount directory>
cp -r /<mount directory>/* <general_directory>/<UPL>
cd /
umount /<mount directory>Note: The <mount directory> is the directory where the USB flash device ismounted. The <Unix device name> is the flash device’s product name.
In case of Solaris 10, if the mount operation is automatic, the followingoperations can be performed:
mount | grep rmdisk | tail -1 | awk ’{print $1}’
cd /rmdisk/<device_directory_name>
cp -r <BSCName> /<general_directory>/<UPL>
cd /
eject <device_directory_name>
3. To unpack the 9120 BSC upload package from the place where it wastransferred in previous task into the previously created <UPL> sub-directory, enter the following commands:
cd <general_directory>/<UPL>
gzip -d -N *
26 / 47 3BK 17430 1152 RJZZA Ed.11

2 Scenario
4. To copy the 9130 BSC Evolution SDP package and CDE table into thepreviously created <SDP>sub-directory, there are two ways:
1. Copy the SDP from the CD-ROM.
2. Copy the SDP from the remote server using ftp.
1. To copy the SDP from the CD-ROM enter the commands:
cd /cdrom/cdrom0
cd SDPTXXxx.yyc
cp -r * <general_directory>/<SDP>
cd ..
cp *.CDE <general_directory>/<SDP>
2. To copy the SDP from the remote server, enter the following:
cd <general_directory>/<SDP>
mkdir MXPF
ftp <IP_Remote_server>
If the remote server is the OMCR, enter the username (omc3ftp) and the
password (omc3ftp) for the ftp transfer when requested.
Note: After the ftp connection is established the default working directory is/alcatel/var/share/AFTR .
cd <source_dir> where <source_dir> is the directory where the SDPcan be found on the remote server.
Note: If the remote server is the OMC-R, copy the SDP Package fromthe/alcatel/var/share/AFTR/MISC/<SDP>
prompt
ha
bin
mget *
by
5. Copy the 9130 BSC Evolution IP configuration file (IPCONFIGDEF.csv)into the previously created <SDP> sub-directory, using the cp
<IP_file_path>/IPCONFIGDEF.csv <SDP> command, where<IP_file_path> is the path for the 9130 BSC Evolution IP configuration file.
3BK 17430 1152 RJZZA Ed.11 27 / 47
2 Scenario
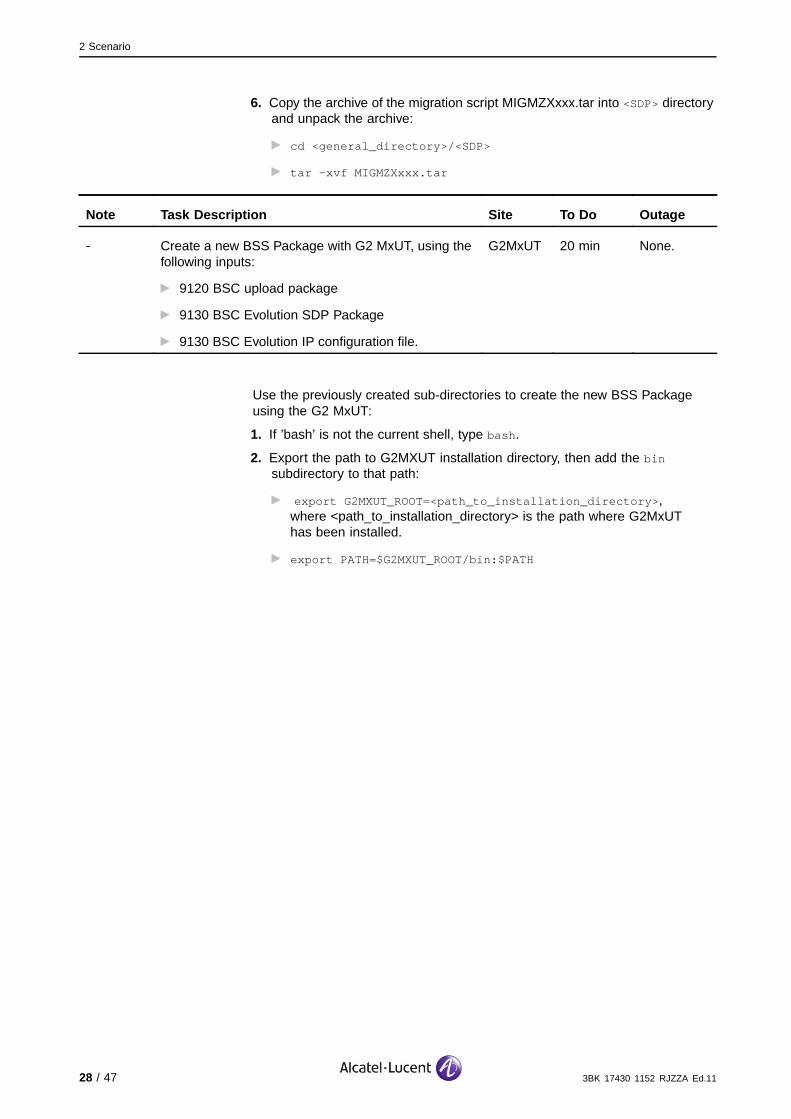
6. Copy the archive of the migration script MIGMZXxxx.tar into <SDP>directoryand unpack the archive:
cd <general_directory>/<SDP>
tar -xvf MIGMZXxxx.tar
Note Task Description Site To Do Outage
- Create a new BSS Package with G2 MxUT, using thefollowing inputs:
9120 BSC upload package
9130 BSC Evolution SDP Package
9130 BSC Evolution IP configuration file.
G2MxUT 20 min None.
Use the previously created sub-directories to create the new BSS Packageusing the G2 MxUT:
1. If ’bash’ is not the current shell, type bash .
2. Export the path to G2MXUT installation directory, then add the bin
subdirectory to that path:
export G2MXUT_ROOT=<path_to_installation_directory> ,where <path_to_installation_directory> is the path where G2MxUThas been installed.
export PATH=$G2MXUT_ROOT/bin:$PATH
28 / 47 3BK 17430 1152 RJZZA Ed.11

2 Scenario
3. Type the following commands:
cd $G2MXUT_ROOT/bin
g2mxut -u <UPL> -o <download_directory> -p <SDP> -d
<cde_new> -m <BSS_MF>
where:
<UPL> is the absolute path to the upload directory previously defined(for the 9120 BSC upload package)
<download_directory> is the absolute path to the directory where
the G2MxUT provides the result of G2–Mx migrationA log file used to report the result messages is also stored herewhen the migration is finished.
<SDP> is the absolute path to the SDP directory previously defined
(for the 9130 BSC Evolution SDP)
<cde_new> is a variable indicating if a new CDE table must be
applied or notThe <cde_new> variable can have the following values:
yes a new CDE table is used. The CDE ASCII table must be
located in the same directory as the SDP (the <SDP>directorypreviously defined). The consequence of using a new CDE table
is that G2MxUT has to perform a complete DLS migration.
no: the same CDE table is used.
Select yes since the 9130 BSC Evolution CDE is not the samewith the 9120 BSC CDE.
<BSS_MF>is the name of the BSS master file of the 9120 BSC
upload package.
4. Check if the execution was successful:
Check if the new BSS package is created in the <download_directory>
in the subdirectories SBPA, SBPB and SBPC .
Check the content of the g2xlog.txt log file in the
<download_directory>\SBPC .If everything is OK, the following message is displayed in the g2xlog.txt file:Please wait patient, the RPM trace file RPM.out will be
in output Dir .
Also check the RPM.out file to verify that no error occurred.
5. If step 1 was performed, type exit to leave the ’bash’ shell.
Note Task Description Site To Do Outage
- Load the BSS Package on 9130 BSC Evolution. NEM 2h None
1. Copy to a CD the BSS Package produced by the G2 Mx UT Tool. Ensurethat the files from MXPF have execution rights.
3BK 17430 1152 RJZZA Ed.11 29 / 47

2 Scenario
2. Load the BSS package to the 9130 BSC Evolution using NEM. Refer to thedocument 9130 BSC Evolution Software Installation.
Note 1: In order to load the BSS Package on NEM, all files generated inthe subdirectories SBPA, SBPB, SBPC should be copied inside the samedirectory on the NEM PC.
Note 2: The BSS master file produced by the G2 Mx UT Tool may bedifferent than the one described in the 9130 BSC Evolution SoftwareInstallation document.
To find the name of the master file, use the following command instead ofthe one described in the referred document:
ls | grep ’^...M.X......’
The command returns two files:
the BSC master file – its name starts with BSXMAX...
the BSS master file.
2.3.4 Test 9130 BSC Evolution Functionality
Note Task Description Site To do Outage
- Run a reduced set of commissioning tests in orderto test the functionality of the equipment with therunning software (refer to the 9130 BSC EvolutionCommissioning manual).
9130 BSCEvolution
1h None.
2.3.5 Remove 9120 BSC
2.3.5.1 Logical Preparation
Note Task Description Site To do Outage
- Create PRC. OMC-R 5 min None
Create the PRC:
1. In the RNUSM main window, select Configuration -> Create PRC.
The Create PRC window opens.
2. Type the name (for example, backup) of the PRC to be created.
3. Click on [ OK ] to create the PRC. A window asking you to wait appears andthen the PRC automatically opens.
Note Task Description Site To do Outage
- Copy OMC Cells to PRC (all cells fromimpacted BSC and all its external cells).
OMC-R 5 min None
30 / 47 3BK 17430 1152 RJZZA Ed.11

2 Scenario
In the RNUSM main window, in the opened PRC window:
1. Select Population -> Copy from Configuration from the menu.
The Copy From window is displayed.
2. Select Supervised Configuration to work with equipment from the runningconfiguration.
Click on [ Copy ].
The Copy From Supervised Configuration window is displayed.
3. Click on the OMC cells tab.
The Copy From OMC Cells View is displayed.
4. Select ’With cell filter’ then click on [ Edit Filter ].
The Cell Filter View is displayed.
5. Check the box ’Bsc Name’ and type the BSC name in the corresponding field.
6. Click on [ Apply ] then on [ Close ] to exit the Cell Filter View.
7. Click on [ Select All ] then on [ OK ] to copy the cells.
8. Click on the External 2G Cells tab.
The Copy From OMC Cells View is displayed.
9. Click on [ Select All ] then on [ OK ] to copy the cells.
Note Task Description Site To do Outage
OMC-R 5 min None- Copy BSC to PRC.
The hardware of the following is copied:
BSC
BTSs that have no cells and that are associatedwith the BSC.
Copy all BTSs with no cells from impacted BSS:
1. In the Copy From Supervised Configuration window, click on the [ OMCBTSs ] tab.
The Copy From OMC BTSs View window opens.
2. Select the BTSs connected to the 9120 BSC you want to replace andthen click on [ OK ].
The selected BTS(s) appear(s) in the PRC window.
3. Click on [ Close ] to close the window.
Note Task Description Site To do Outage
- Check PRC. OMC-R 5 min None
3BK 17430 1152 RJZZA Ed.11 31 / 47

2 Scenario
Check the PRC:
1. In the RNUSM main window, from the open PRC, select Activation ->Check All.Leave the [ With Forcing Administrative State ] button unselected.
Wait until the checking is performed. If the checks produce error messages,correct the PRC configuration as required and re-attempt the check.Continue corrections and checks until no errors occur.
2. When no more errors are detected, a message appears. Click on [ OK ]to confirm the message.
Note Task Description Site To do Outage
- Export Radio Configuration. OMC-R 2 min None
Export the radio configuration:
1. In the RNUSM main window, from the open PRC, select Configuration ->Export.
The RNUSM: Export Operation window opens.
2. Select a directory X in the Idle state. Note the X directory.
3. Set [ CGI mode used for Cell Identification ] to ’Yes’.
4. Click on [ Export ].
The Follow-up window displays the export progress.
5. When the directory becomes Ready, click on [ Close ].
6. Close the BSSUSM window. If the BSSUSM window is not closed, afterperforming the next task and until the 9130 BSC Evolution is declared to theOMC-R, polling failure messages will appear.
Note Task Description Site To do Outage
- Remove the 9120 BSC from the OMC-R. OMC-R 10 min Start 1(supervisionoutage)
To remove the 9120 BSC from the OMC-R, connect as axadmin to the masterOMC-R in terminal mode and type:
1. cd /alcatel/omc3/migration/script/
2. Type ./removeBSCforSwap.pl <bssId> <ExportDirectory> where:
bssID is the ID of the 9120 BSC
ExportDirectory is the X directory previously selected where the
configuration of the 9120 BSC was exported in the previous task.
Note: If the MFSUSM window is open, you must close it on each workstation.Otherwise MFSUSM will enter Limited Mode.
Do not close the terminal window because it is used in some of the followingtasks.
32 / 47 3BK 17430 1152 RJZZA Ed.11

2 Scenario
2.3.5.2 Cable New 9130 BSC Evolution
Note Task Description Site To do Outage
9120 BSC 5 min Outage1+Start 2- Stop traffic on the 9120 BSC.
Begin CS and PS traffic outage.
To stop traffic on the 9120 BSC, from the 9120 BSC terminal:
1. Connect to the 9120 BSC terminal via X.25.
2. Select Commands -> Equipment Handling -> SBL Disable.
3. Select or type the following parameters:
SBL in the ’OBJ Class’ field
BSC in the ’Unit Type’ field
BSS_TEL in the ’SBL Type’ field
1 in the ’Nbr’ field
1 in the ’UnitNumber’ field
255 in the ’SubNbr’ field
4 in the ’WTC’ field (minutes).
4. Click on [ OK ] to stop the traffic.
Note Task Description Site To do Outage
9120 BSC /9130 BSCEvolution
5 min/link Outage1+Outage2
End2
- Disconnect Abis and Ater links from the9120 BSC and connect them to the 9130BSC Evolution.
BTS audits are automatically triggered assoon as Abis are connected. Audits aredone in parallel for a maximum of 16 BTSs.
Note 1: To minimize the outage, it is advised tomove Ater and Abis in parallel.
Note 2: The duration depends on the 9120 BSCconfiguration.
Example: for an 9120 BSC conf 6, the maximumduration is 8h30min. The traffic outage is 10 minfor the first cell and 8h 30 min for the last cell.
BTS Audits are automatically triggered (the corresponding messages aredisplayed at the 9130 BSC Evolution terminal).
3BK 17430 1152 RJZZA Ed.11 33 / 47

2 Scenario
Note Task Description Site To do Outage
- In case the 9130 BSC Evolution usesMLPPP, Lock and then Unlock theSM_ADAPT.
9130 BSCEvolution
5 min/board Outage1+Start 3
End 3
For each SM_ADAPT , perform the following steps:
1. From the BSC Terminal menu bar, follow the menu path Commands ->Equipment Handling -> SBL Disable
2. In the ’Object Class’ field, select SBL .
3. In the ’Unit Type’ field, select TC .
4. In the ’SBL Type’ field, select SM_ADAPT.
5. In the ’Unit Number’ field, type 1.
6. In the ’Nbr’ field, type the number corresponding to the appropriateSM_ADAPT.
7. In the ’SubNbr’ field, type 255.
8. In the ’Wait Traffic Clear’ field, type 0.
9. Click on [ OK ] to disable the SM_ADAPT.
10. To initialize the SM_ADAPT that has just been disabled, follow the menu pathCommands -> Equipment Handling -> SBL Initialize
11. In the ’Object Class’ field, select SBL .
12. In the ’Unit Type’ field, select TC .
13. In the ’SBL Type’ field, select SM_ADAPT.
14. In the ’Unit Number’ field, type 1.
15. In the ’Nbr’ field, type the number corresponding to the appropriateSM_ADAPT.
16. In the ’SubNbr’ field, type 255.
17. Click on [ OK ] to initialize the SM_ADAPT.
34 / 47 3BK 17430 1152 RJZZA Ed.11

2 Scenario
2.3.6 Upgrade OMC-R Configuration
Note Task Description Site To do Outage
- Check the physical links between the 9130BSC Evolution and the OMC-R.
OMC-R 5 min. Outage1
Check the physical links between the 9130 BSC Evolution and the OMC-R:
1. On the OMC-R, open a new terminal window.
2. Type the following command to check the connection between the OMC-Rand the 9130 BSC Evolution:
ssh <BSC_IP_Address>
where <BSC_IP_Address> is the IP address of the 9130 BSC Evolution.
If the connection between the OMC-R and the 9130 BSC Evolution is OK,you are asked to type your password.
3. Type [ Ctrl + C ] to close the connection and then close this terminal window.
Note: Do not close the other terminal window because it is used in some of thefollowing tasks.
4. On the 9130 BSC Evolution terminal, open a terminal window.
5. Type the following command to check the connectionbetween the 9130 BSC Evolution and the OMC-R:ssh <OMC_IP_Address>
where <OMC_IP_Address> is the IP address of the OMC-R.
If the connection between the OMC-R and the 9130 BSC Evolution is OK,you are asked to type your password.
6. Close this terminal window.
Note Task Description Site To do Outage
- Declare the 9130 BSC Evolution. OMC-R 1h25 min End1
To declare the 9130 BSC Evolution to the OMC-R, in the already openedterminal window (connected as axadmin to the master OMC-R), type:./declareBSCforSwap.pl <bssId> <9130_BSC_IP_Address> where:
bssID is the ID of the 9130 BSC Evolution, which is the same as the one
of the 9120 BSC
9130_BSC_IP_Address is the IP address of the 9130 BSC Evolution .
The 9130 BSC Evolution discover is automatically triggered. To follow thediscover progress open manually the BSSUSM main window.
Note: Do not close the terminal window because it is used in some of the followingtasks.
3BK 17430 1152 RJZZA Ed.11 35 / 47

2 Scenario
Note Task Description Site To do Outage
O2 Declare External Alarm Box for the 9130BSC Evolution.
OMC-R 2 min None
To declare an External Alarm Box for the 9130 BSC Evolution:
1. Open the Unique Function Management (UFM) window of the OMC-R.
2. Select the [ Supervised Units Management ] button on left menu.
3. Click on [ Declare ].
The Declare Supervision Unit window opens.
4. Fill in or select the fields:
For the ’Friendly Name’ field, enter the EAB name (the one used at the
9120 BSC)
’IP Address’
For ’Device Type’, select the type from the popup
For ’Protocol’, enter WAGO
For ’Associated NE’, select the 9130 BSC Evolution.
5. Click on [ OK ].
The Supervision Unit successfully declared message appears.
Note Task Description Site To do Outage
- If GPRS is activated on the BSS, whenthe discover is finished, retrieve the GPRSparameters from the 9120 BSC.
OMC-R 15 min None
To retrieve the GPRS parameters from the 9120 BSC, in the already openedterminal window (connected as axadmin to the master OMC-R), type:./dataRetrievalForBSC.pl <ExportDirectory> <ImportDirectory>
<bssId>
where:
ExportDirectory is the X directory where the 9120 BSC configurationhas been exported
ImportDirectory is a free import directory
bssId is the ID of the 9120 BSC, which is the same as the one of the9130 BSC Evolution.
If the MFSUSM window is opened, to exit the current limited mode, selectViews –> Refresh.
Note: Do not close the terminal window because it is used in some of the followingtasks.
36 / 47 3BK 17430 1152 RJZZA Ed.11

2 Scenario
Note Task Description Site To do Outage
- Align Links for One BSC OMC-R 30 sec. /link None
To align BSC-MFS and MFS-TC links for one BSC:
1. In the MFSUSM main window, select Configure -> Links And Connections.
The Links configuration window opens.
If the window is opened empty without any TP:
Select Select -> BSC
Select the required BSC in "Links configuration/BSC Selection" windowand click on [ Select ]The BSS panel displays the available TPs of the selected BSC.
2. Select Links -> Align Links.
Note: In case of multi-GPU, the appropriate GPU has to be selected from theAlign Links - Links configuration/GPU Selection window.
Note Task Description Site Time/Task Outage
- Align Globally MFS Cabling to BSCs. OMC-R 1 min. -
To align all MFS Aters to all BSCs:
In the MFSUSM main window, select Align -> Global Align.
Note Task Description Site Time/Task Outage
- Unlock GSL for all GSL defined on sourceMFS.
OMC-R 1 min
To unlock a GSL:
1. In the MFSUSM main window, click on the Ater supervision tab.
2. Select the required TP.
3. Right click and select Unlock GSL as required.
3BK 17430 1152 RJZZA Ed.11 37 / 47

2 Scenario
2.3.7 Test Call and GPRS Services
If tests are unsuccessful, apply the Reverse Procedure (Section 2.4).
Note Task Description SiteTime /Task Outage
BTS/ OMC-R 10min./link
NoneCHECK Display USD Detailed DTC Information tocheck in the DTC-report if CS and GPRScalls are made on each link of the 9130 BSCEvolution and print the report. Note 1: Several packets must be transferred.
Resource allocation is not performed at mobileconnection but at data transfer.
Note 2: You can perform the Reverse Procedure(Section 2.4) from this point onwards.
To open the DTC Report window and display detailed DTC information:
1. In the BSSUSM: Main View window, select USD -> USD A Interface.
The USD A Interface window opens.
2. Select the required DTCs from the DTC Information panel, and clickon [ DTC Report ].
3. To close the window, click on [ Close ].
If the internal processing of the BSC is overloaded, the values of the DTCare set to 0!
38 / 47 3BK 17430 1152 RJZZA Ed.11

2 Scenario
Note Task Description SiteTime /Task Outage
- If all calls are good, remove all the 9120 BSCinformation from the OMC-R.
OMC-R 5 min None
To remove all the 9120 BSC information from the OMC-R,in the terminal window opened in a previous task, type./cleanUpBSCforSwap.pl <bssId>
where: bssID is the ID of the 9130 BSC Evolution, whichis the same as the one of the 9120 BSC.
Note: After this operation, close the terminal window.
Note Task Description Site Time/Task Outage
- If you want, change the name or the Node IDof the BSS.
OMC-R 5 min None
To modify a BSS name:
1. In the DCN: Management main window, click on the BSS tab.
The DCN BSS view opens.
2. Select the required BSS.
3. Right-click, and select Modify from the pop-up menu.
The Modify a BSS window opens.
4. Enter the new name in the ’User Label’ field.
You can use any of the following characters in the ’User Label’ field: A-Z,a-z, 0 - 9, -, _ (hyphen, underscore). Blank characters are NOT allowed inthe ’User Label’ field. Use the rules fromO&M Parameters Dictionary, seechapter (User label) - (BSS - Name).
5. Click on [ OK ].
To modify a node identifier:
1. In the DCN: Management main window, click on the BSS tab.
The DCN BSS view opens.
2. Select the required BSS.
3. Right-click, and select Modify from the pop-up menu.
The Modify a BSS window opens.
4. Modify the node identifier.
5. Click on [ OK ].
3BK 17430 1152 RJZZA Ed.11 39 / 47

2 Scenario
2.3.8 Enable SNMP Collector (O1)
Note Task Description Site To do Outage
O1 Enable Collector OMC-R 10 min. None.
This task is applicable for :
9135 MFS
9130 MFS Evolution
9130 BSC Evolution
To enable or disable collector for MRTG perform the following:
1. In the DCN Management window, click on the BSS or MFS tab and selectFunction->Enable Collector or Function->Disable Collector as required.
2. In case a message appears, acknowledge it.
If the two Community Strings differ, perform the following:
1. In the DCN Management main window, click on the BSS or MFS tab.
2. Select the required BSC or MFS.
3. Right-click, and select Modify from the pop-up menu.
The Modify BSC/MFS window opens.
4. Select Enable collection and type the same Community String as theone defined at BSC/ MFS side.
5. Click on [ OK ].
40 / 47 3BK 17430 1152 RJZZA Ed.11
2 Scenario
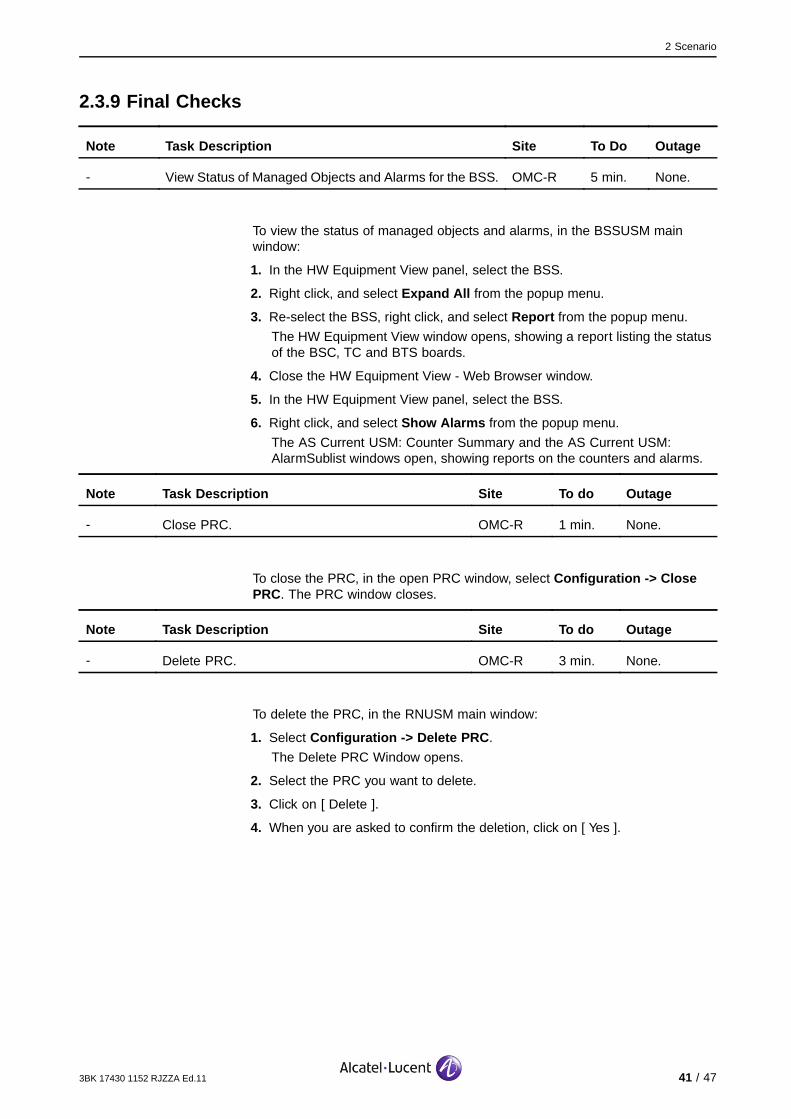
2.3.9 Final Checks
Note Task Description Site To Do Outage
- View Status of Managed Objects and Alarms for the BSS. OMC-R 5 min. None.
To view the status of managed objects and alarms, in the BSSUSM mainwindow:
1. In the HW Equipment View panel, select the BSS.
2. Right click, and select Expand All from the popup menu.
3. Re-select the BSS, right click, and select Report from the popup menu.
The HW Equipment View window opens, showing a report listing the statusof the BSC, TC and BTS boards.
4. Close the HW Equipment View - Web Browser window.
5. In the HW Equipment View panel, select the BSS.
6. Right click, and select Show Alarms from the popup menu.
The AS Current USM: Counter Summary and the AS Current USM:AlarmSublist windows open, showing reports on the counters and alarms.
Note Task Description Site To do Outage
- Close PRC. OMC-R 1 min. None.
To close the PRC, in the open PRC window, select Configuration -> ClosePRC. The PRC window closes.
Note Task Description Site To do Outage
- Delete PRC. OMC-R 3 min. None.
To delete the PRC, in the RNUSM main window:
1. Select Configuration -> Delete PRC.
The Delete PRC Window opens.
2. Select the PRC you want to delete.
3. Click on [ Delete ].
4. When you are asked to confirm the deletion, click on [ Yes ].
3BK 17430 1152 RJZZA Ed.11 41 / 47

2 Scenario
Note Task Description Site To do Outage
- Free the directory X to which the configuration of the9120 BSC was exported.
OMC-R 2 min None.
To free the used directory, in the RNUSM main window:
1. Select Configuration -> Export.The Export Operation window opens.
2. Select the X directory used for the export of the 9120 BSC configuration.
3. Click on [ Free ].
4. When a confirmation window appears, click on [ OK ].
5. Click on [ Close ] to close the Export Operation window.
42 / 47 3BK 17430 1152 RJZZA Ed.11

2 Scenario
2.4 Reverse ProcedureFollow the procedures in this section if the scenario was not successful.
2.4.1 Recreate Old Configuration
Note Task Description Site To Do Outage
9120BSC/9130BSCEvolution
5 min/link -- Disconnect Abis and Ater links from the 9130 BSCEvolution and connect them to the 9120 BSC.
BTS audits are automatically triggered as soon asAbis are connected. Audits are done in parallel fora maximum of 16 BTSs. Note 1: It is advised to move Ater and
Abis links in parallel.
Note Task Description Site To do Outage
- Delete the 9130 BSC Evolution anddeclare the 9120 BSC.
OMC-R 5 min. -
To declare the 9120 BSC Evolution to the OMC-R,in the already openedterminal window (connected as axadmin to the master OMC-R ), type:./declareBSCforSwap.pl -r <bssId>
where bssID is the ID of the 9120 BSC, which is the sameas the one of the 9130 BSC Evolution.
The 9120 BSC discover is automatically triggered.
Note: Do not close the terminal window because it is used in some of the followingtasks.
Note Task Description Site To do Outage
- If GPRS is activated on the BSS, whenthe discover is finished retrieve the GPRSparameters from the 9120 BSC.
OMC-R 15 min -
To retrieve the GPRS parameters from the 9120 BSC, in the already openedterminal window (connected as axadmin to the master OMC-R ), type:./dataRetrievalForBSC.pl <ExportDirectory> <ImportDirectory>
<bssId>
where:
ExportDirectory is the X directory where the 9120 BSC configuration
has been exported.
ImportDirectory is a free import directory.
3BK 17430 1152 RJZZA Ed.11 43 / 47

2 Scenario
bssId is the ID of the 9120 BSC, which is the same as the one of the9130 BSC Evolution.
Note: Do not close the terminal window because it is used in some of the followingtasks.
Note Task Description Site To do Outage
- Align Links for One BSC OMC-R 30 sec. /link None
To align BSC-MFS and MFS-TC links for one BSC:
1. In the MFSUSM main window, select Configure -> Links And Connections.
The Links configuration window opens.
If the window is opened empty without any TP:
Select Select -> BSC
Select the required BSC in "Links configuration/BSC Selection" windowand click on [ Select ]The BSS panel displays the available TPs of the selected BSC.
2. Select Links -> Align Links.
Note: In case of multi-GPU, the appropriate GPU has to be selected from theAlign Links - Links configuration/GPU Selection window.
Note Task Description Site Time/Task Outage
- Align Globally MFS Cabling to BSCs. OMC-R 1 min. -
To align all MFS Aters to all BSCs:
In the MFSUSM main window, select Align -> Global Align.
Note Task Description Site Time/Task Outage
- Unlock BSS Function. OMC-R 1 min -
To start traffic on the BSS:
1. In the RNUSM: SC main window, select the required BSS.
2. Right-click, and select Unlock BSS Function from the pop-up menu andacknowledge the confirmation message.
Note Task Description Site Time/Task Outage
- Unlock GSL for all GSL defined on sourceMFS.
OMC-R 1 min -
44 / 47 3BK 17430 1152 RJZZA Ed.11

2 Scenario
To unlock a GSL:
1. In the MFSUSM main window, click on the Ater supervision tab.
2. Select the required TP.
3. Right click and select Unlock GSL as required.
2.4.2 Test Call and GPRS Services
Note Task Description SiteTime /Task Outage
BTS/ OMC-R 10min./link
-CHECK Display USD Detailed DTC Information tocheck in the DTC-report if CS and GPRS callsare made on each link of the 9120 BSC andprint the report. Note:: Several packets must be transferred.
Resource allocation is not performed at mobileconnection but at data transfer.
To open the DTC Report window and display detailed DTC information:
1. In the BSSUSM: Main View window, select USD -> USD A Interface.
The USD A Interface window opens.
2. Select the required DTCs from the DTC Information panel, and clickon [ DTC Report ].
3. To close the window, click on [ Close ].
If the internal processing of the BSC is overloaded, the values of the DTCare set to 0!
Note Task Description SiteTime /Task Outage
- If all calls are good, remove all the 9130 BSCEvolution information from the OMC-R.
OMC-R 5 min -
To remove all the 9130 BSC Evolution information from the OMC-R, in the terminal window opened in a previous task, type./cleanUpBSCforSwap.pl <bssId>
where: bssID is the ID of the 9130 BSC Evolution, whichis the same as the one of the 9120 BSC.
Note: After this operation, close the terminal window.
3BK 17430 1152 RJZZA Ed.11 45 / 47

2 Scenario
2.4.3 Final Operations
Note Task Description Site To Do Outage
- View Status of Managed Objects and Alarms for the BSS. OMC-R 5 min. -
To view the status of managed objects and alarms, in BSSUSM main window:
1. In the HW Equipment View panel, select the BSS.
2. Right click, and select Expand All from the popup menu.
3. Re-select the BSS, right click, and select Report from the popup menu.
The HW Equipment View window opens, showing a report listing the statusof the BSC, TC and BTS boards.
4. Close the HW Equipment View - Web Browser window.
5. In the HW Equipment View panel, select the BSS.
6. Right click, and select Show Alarms from the popup menu.
The AS Current USM: Counter Summary and the AS Current USM:AlarmSublist windows open, showing reports on the counters and alarms.
Note Task Description Site To do Outage
- Close PRC. OMC-R 1 min. -
In order to close the PRC, in the open PRC window, select Configuration ->Close PRC. The PRC window closes.
Note Task Description Site To do Outage
- Delete PRC. OMC-R 3 min. -
To delete the PRC, in the RNUSM main window:
1. Select Configuration -> Delete PRC.
The Delete PRC Window opens.
2. Select the PRC you want to delete.
3. Click on [ Delete ].
4. When you are asked to confirm the deletion, click on [ Yes ].
46 / 47 3BK 17430 1152 RJZZA Ed.11

2 Scenario
Note Task Description Site To do Outage
- Free the directory X to which the configuration of the9120 BSC was exported.
OMC-R 2 min -
To free the used directory, in the RNUSM main window:
1. Select Configuration -> Export.The Export Operation window opens.
2. Select the X directory used for the export of the 9120 BSC configuration.
3. Click on [ Free ].
4. When a confirmation window appears, click on [ OK ].
5. Click on [ Close ] to close the Export Operation window.
3BK 17430 1152 RJZZA Ed.11 47 / 47

2 Scenario
48 / 47 3BK 17430 1152 RJZZA Ed.11