Embed Size (px)
Citation preview
Repair of an Canon EFs 17-85 IS lens (Januari 2009) back to projects
This canon lens of type EF 17-85 IS gave the 'err99' warning on my eos 350 dslr camera. Closer inverstigation made clear that the diaphragm did not return to its position well. Strangely this was only when used in the wide angle range. All in all the problem must be very probably in the mechanical area or possibly mechanically-electrically, such as a broken wire. This lens costs nowadays around 350 euro or so, and a repair would cost about 200 euros. Still quite expensive compared
to the price of a new lens, so I decided to give it a try. Below are my photos of the lens which I took for my own documentation, but they might also be helpful to other people when they decide to repair or take a look inside this lens. I have found a link of some guy who took the same type of lens apart (which had obviously the same problem as this one), and he has taken a very nice photo of all the elements together, see http://www.fredmiranda.com/forum/topic/694090 . He did not reassemble the lens though, but made a nice penholder out of it :).
Before doing this you will need the right equipment, that is mostly a good screwdriver: once you mess up screws while
wrecking them with a bad screwdriver you are even further away from your goal. You will need a small and strong phillips screwdriver primarely. Secondly, it is very important to keep all lens elements clean, I have found it quite a tedious task to clean a dirty element perfectly and it is not a very nice task. So wash your hands well with soap or use gloves. Keep some lenspaper to clean the elements if necessary.
To start: there are no photos of this, but you will have to remove the metal lens mount by removing four screws. remove the two small screws in the side of the metal which hold the electrical connector. carefully lift the piece and you can remove the black plastic part holding the connector in place. From there you can follow the photos.
A happy visitor sent me a link to a webpage where the sell the broken item
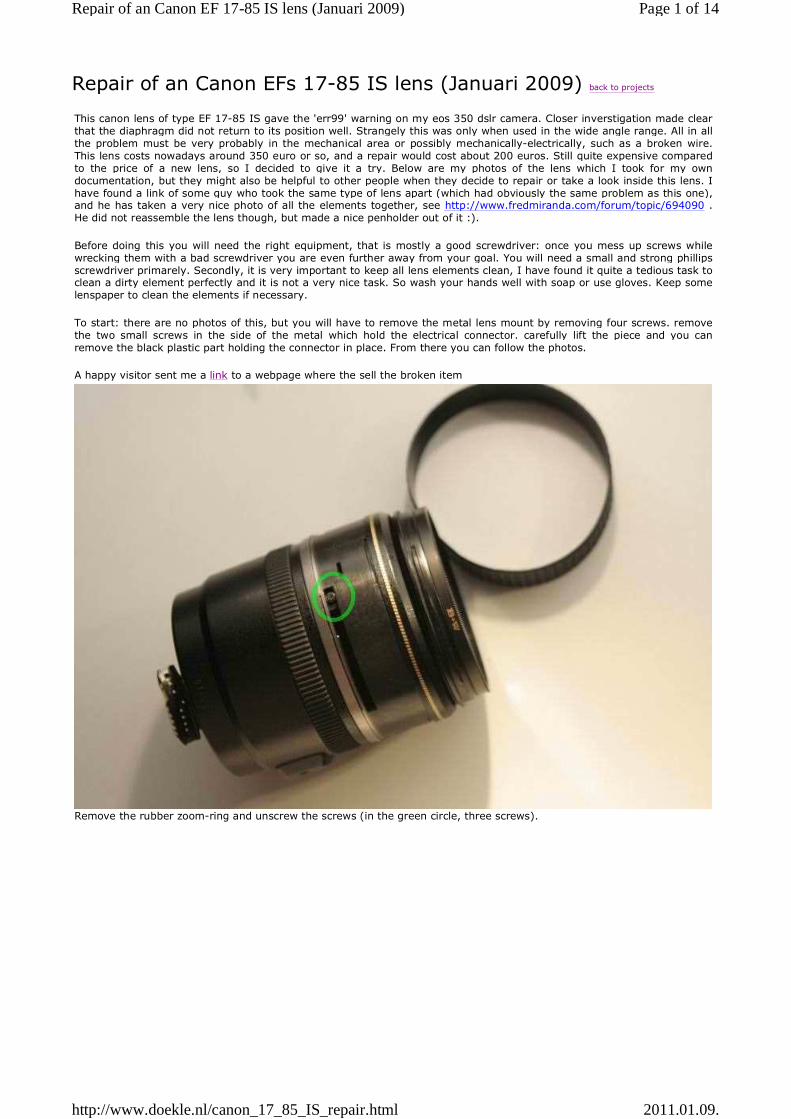
Remove the rubber zoom-ring and unscrew the screws (in the green circle, three screws).
Page 1 of 14Repair of an Canon EF 17-85 IS lens (Januari 2009)
2011.01.09.http://www.doekle.nl/canon_17_85_IS_repair.html
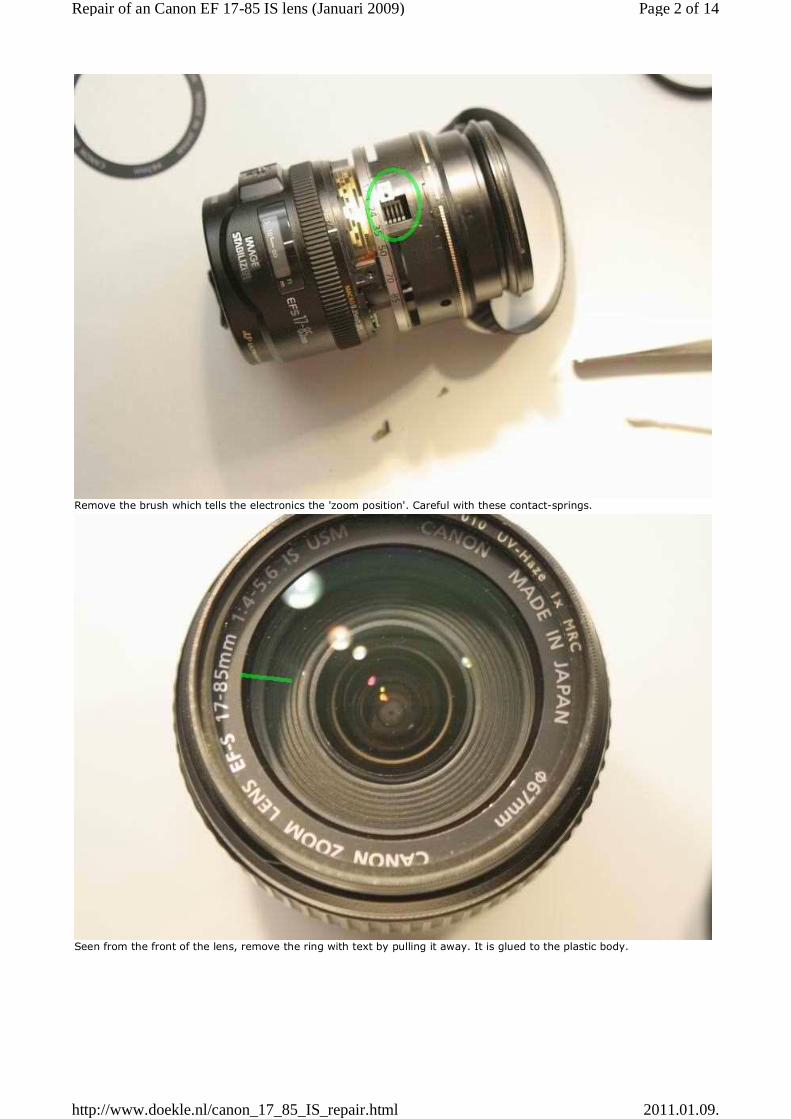
Remove the brush which tells the electronics the 'zoom position'. Careful with these contact-springs.
Seen from the front of the lens, remove the ring with text by pulling it away. It is glued to the plastic body.
Page 2 of 14Repair of an Canon EF 17-85 IS lens (Januari 2009)
2011.01.09.http://www.doekle.nl/canon_17_85_IS_repair.html
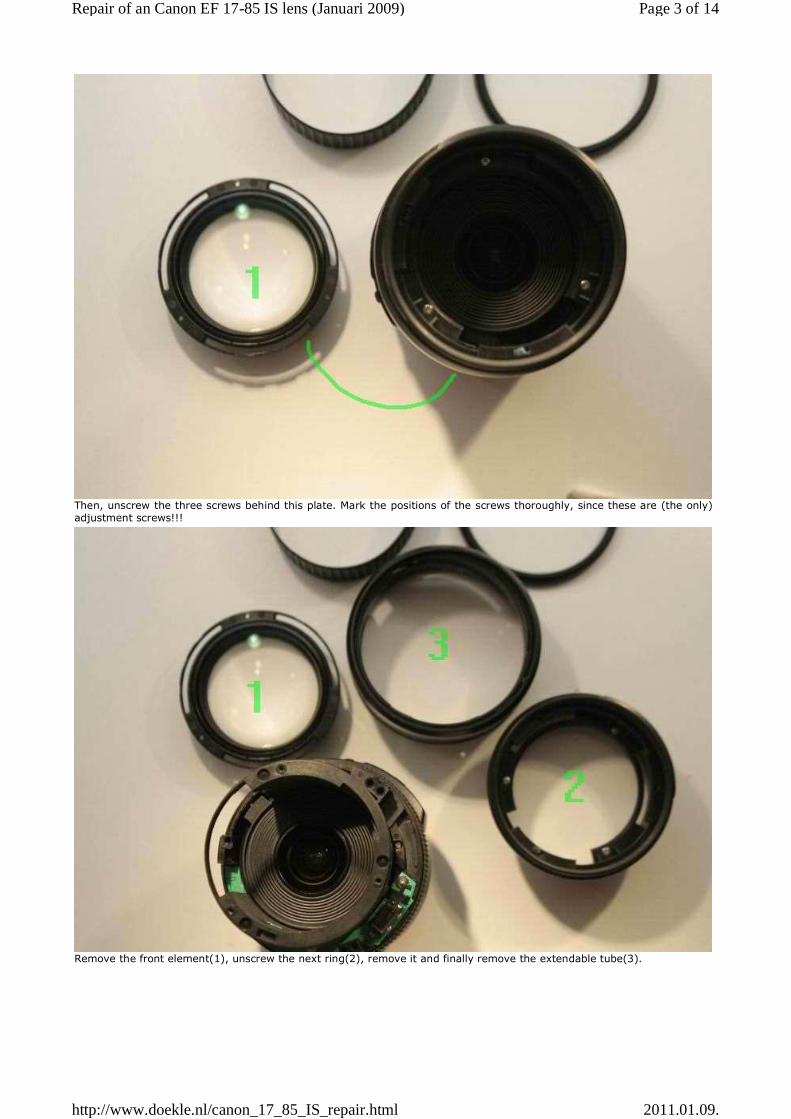
Then, unscrew the three screws behind this plate. Mark the positions of the screws thoroughly, since these are (the only)
adjustment screws!!!
Remove the front element(1), unscrew the next ring(2), remove it and finally remove the extendable tube(3).
Page 3 of 14Repair of an Canon EF 17-85 IS lens (Januari 2009)
2011.01.09.http://www.doekle.nl/canon_17_85_IS_repair.html
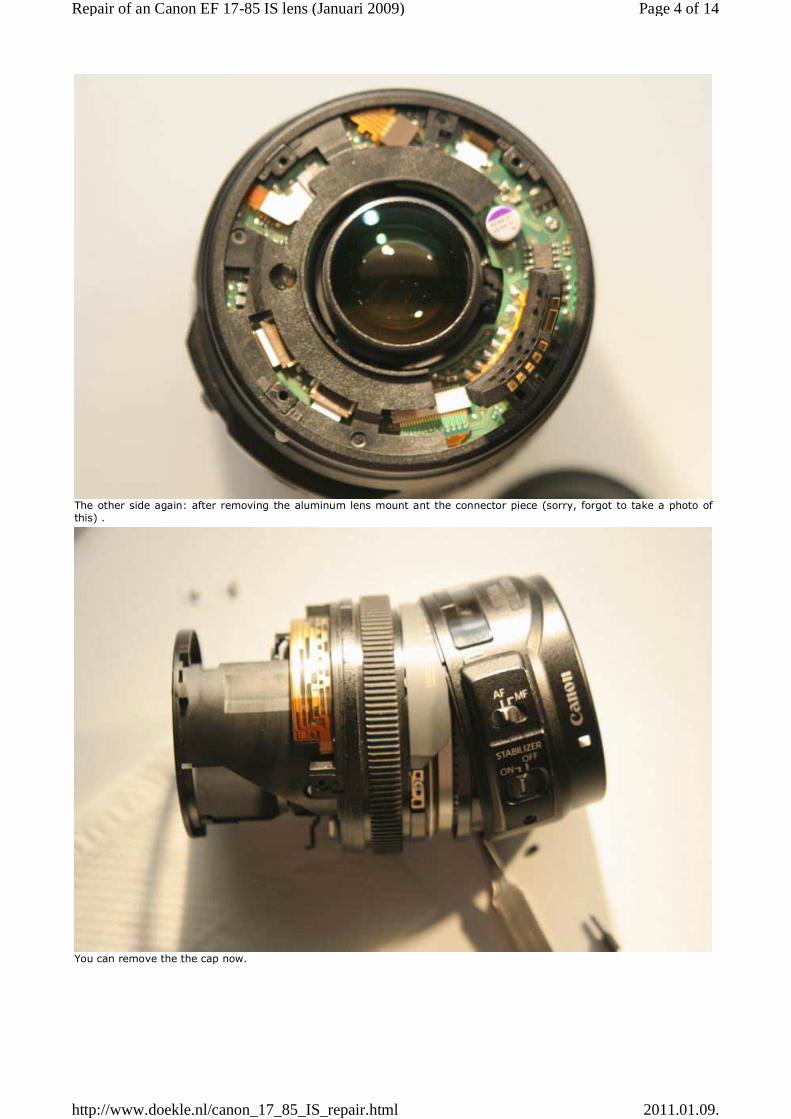
The other side again: after removing the aluminum lens mount ant the connector piece (sorry, forgot to take a photo of
this) .
You can remove the the cap now.
Page 4 of 14Repair of an Canon EF 17-85 IS lens (Januari 2009)
2011.01.09.http://www.doekle.nl/canon_17_85_IS_repair.html
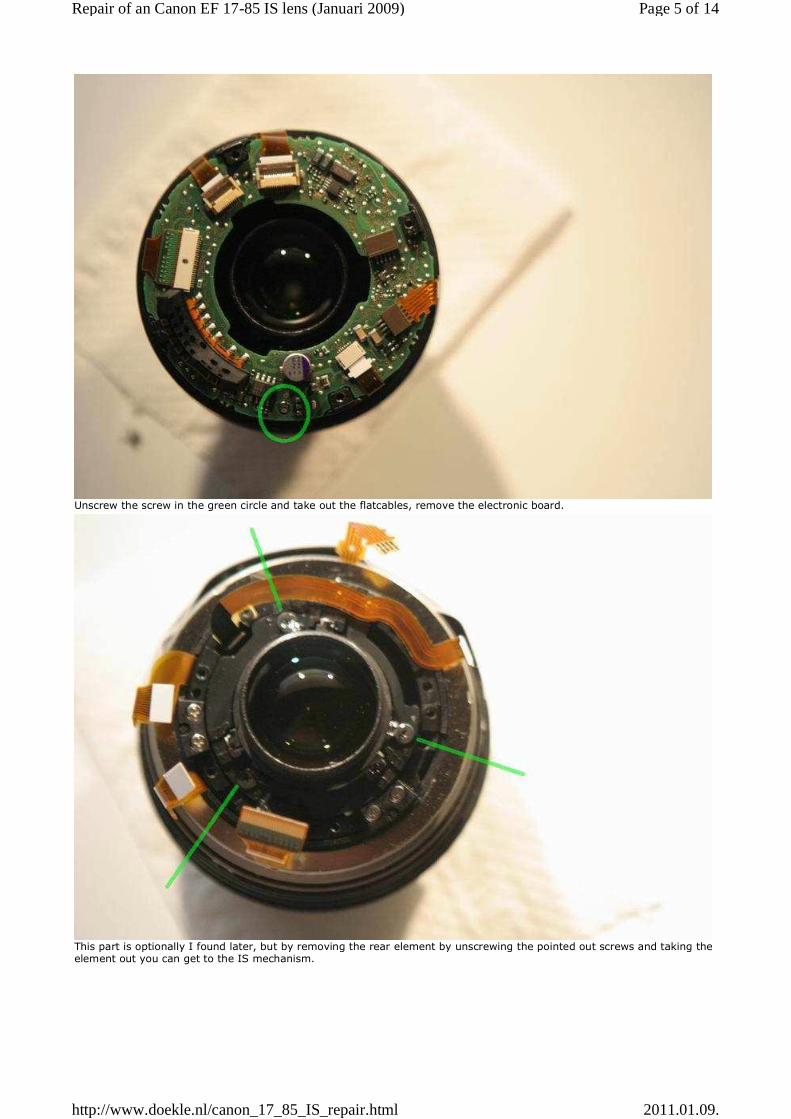
Unscrew the screw in the green circle and take out the flatcables, remove the electronic board.
This part is optionally I found later, but by removing the rear element by unscrewing the pointed out screws and taking the element out you can get to the IS mechanism.
Page 5 of 14Repair of an Canon EF 17-85 IS lens (Januari 2009)
2011.01.09.http://www.doekle.nl/canon_17_85_IS_repair.html
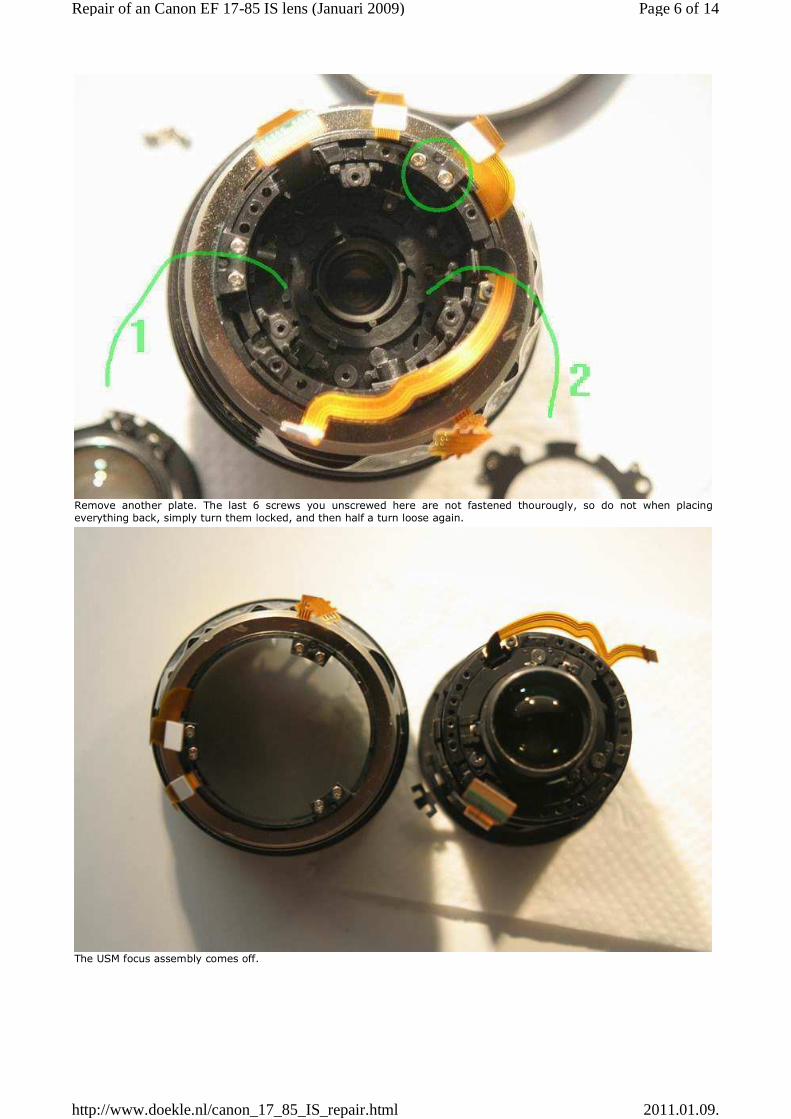
Remove another plate. The last 6 screws you unscrewed here are not fastened thourougly, so do not when placing
everything back, simply turn them locked, and then half a turn loose again.
The USM focus assembly comes off.
Page 6 of 14Repair of an Canon EF 17-85 IS lens (Januari 2009)
2011.01.09.http://www.doekle.nl/canon_17_85_IS_repair.html
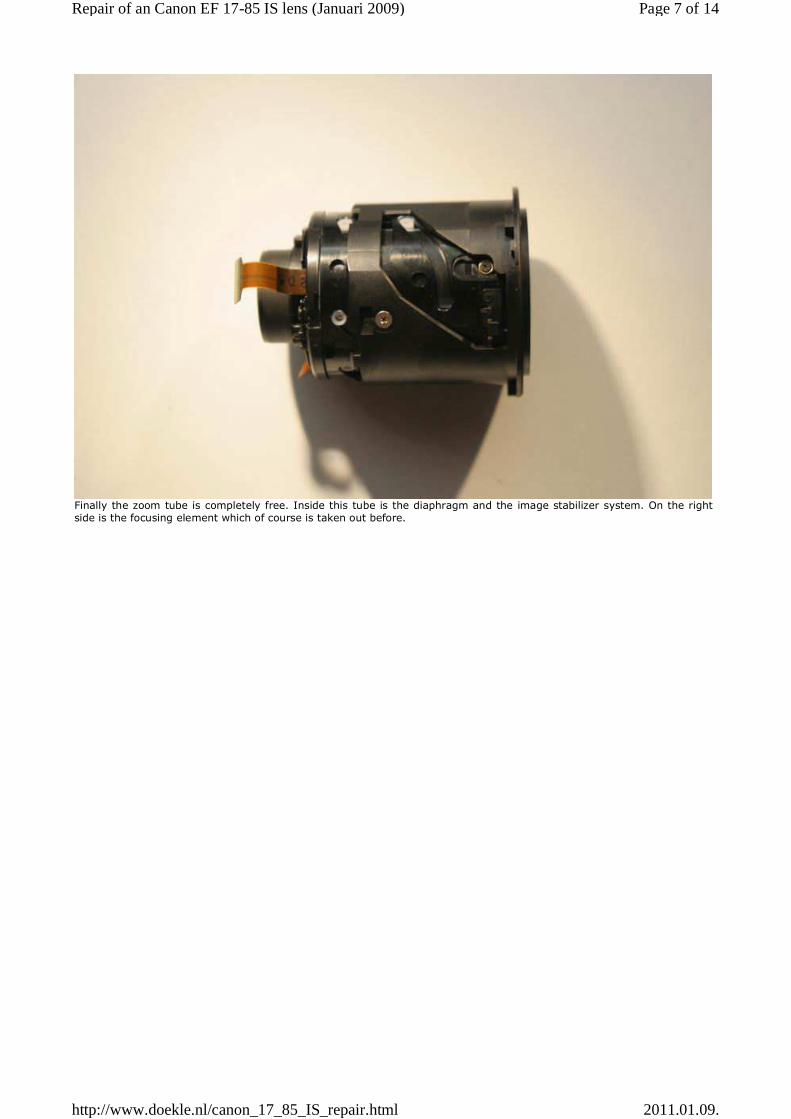
Finally the zoom tube is completely free. Inside this tube is the diaphragm and the image stabilizer system. On the right
side is the focusing element which of course is taken out before.
Page 7 of 14Repair of an Canon EF 17-85 IS lens (Januari 2009)
2011.01.09.http://www.doekle.nl/canon_17_85_IS_repair.html

The front focusing element taken out, the diaphragm unit is visible now.
Page 8 of 14Repair of an Canon EF 17-85 IS lens (Januari 2009)
2011.01.09.http://www.doekle.nl/canon_17_85_IS_repair.html
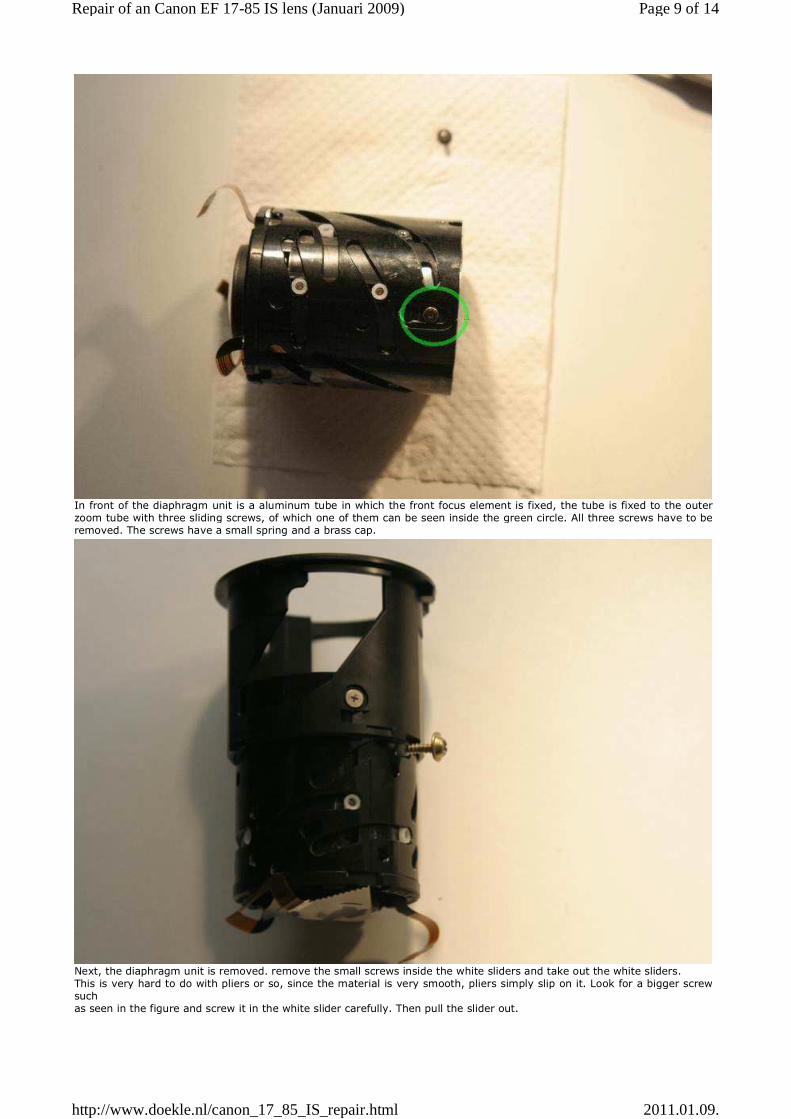
In front of the diaphragm unit is a aluminum tube in which the front focus element is fixed, the tube is fixed to the outer
zoom tube with three sliding screws, of which one of them can be seen inside the green circle. All three screws have to be removed. The screws have a small spring and a brass cap.
Next, the diaphragm unit is removed. remove the small screws inside the white sliders and take out the white sliders. This is very hard to do with pliers or so, since the material is very smooth, pliers simply slip on it. Look for a bigger screw
such as seen in the figure and screw it in the white slider carefully. Then pull the slider out.
Page 9 of 14Repair of an Canon EF 17-85 IS lens (Januari 2009)
2011.01.09.http://www.doekle.nl/canon_17_85_IS_repair.html
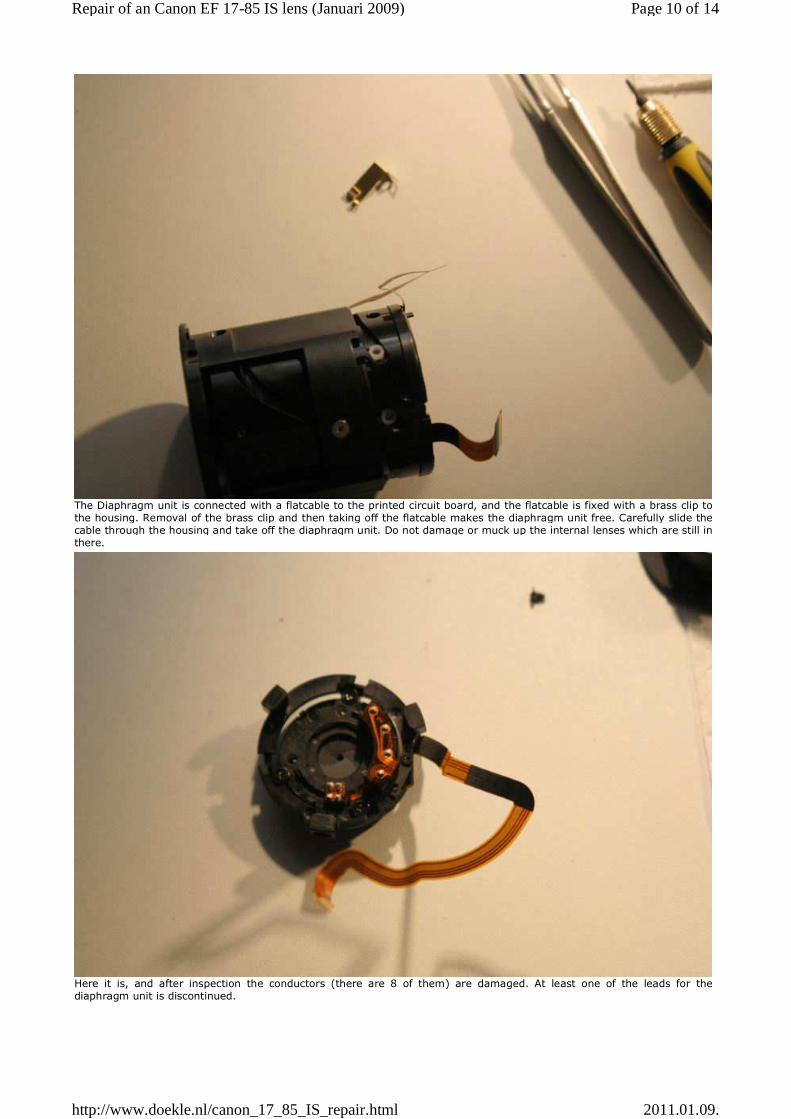
The Diaphragm unit is connected with a flatcable to the printed circuit board, and the flatcable is fixed with a brass clip to
the housing. Removal of the brass clip and then taking off the flatcable makes the diaphragm unit free. Carefully slide the cable through the housing and take off the diaphragm unit. Do not damage or muck up the internal lenses which are still in there.
Here it is, and after inspection the conductors (there are 8 of them) are damaged. At least one of the leads for the
diaphragm unit is discontinued.
Page 10 of 14Repair of an Canon EF 17-85 IS lens (Januari 2009)
2011.01.09.http://www.doekle.nl/canon_17_85_IS_repair.html
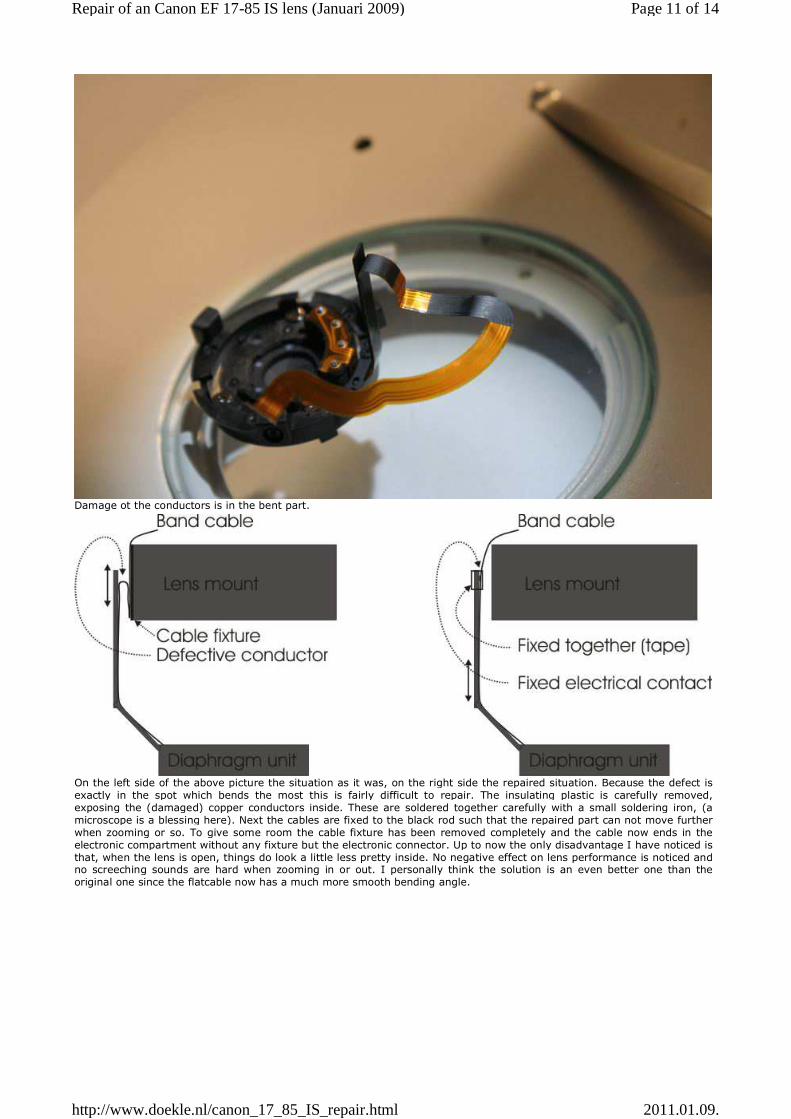
Damage ot the conductors is in the bent part.
On the left side of the above picture the situation as it was, on the right side the repaired situation. Because the defect is exactly in the spot which bends the most this is fairly difficult to repair. The insulating plastic is carefully removed, exposing the (damaged) copper conductors inside. These are soldered together carefully with a small soldering iron, (a
microscope is a blessing here). Next the cables are fixed to the black rod such that the repaired part can not move further when zooming or so. To give some room the cable fixture has been removed completely and the cable now ends in the electronic compartment without any fixture but the electronic connector. Up to now the only disadvantage I have noticed is that, when the lens is open, things do look a little less pretty inside. No negative effect on lens performance is noticed and no screeching sounds are hard when zooming in or out. I personally think the solution is an even better one than the
original one since the flatcable now has a much more smooth bending angle.
Page 11 of 14Repair of an Canon EF 17-85 IS lens (Januari 2009)
2011.01.09.http://www.doekle.nl/canon_17_85_IS_repair.html
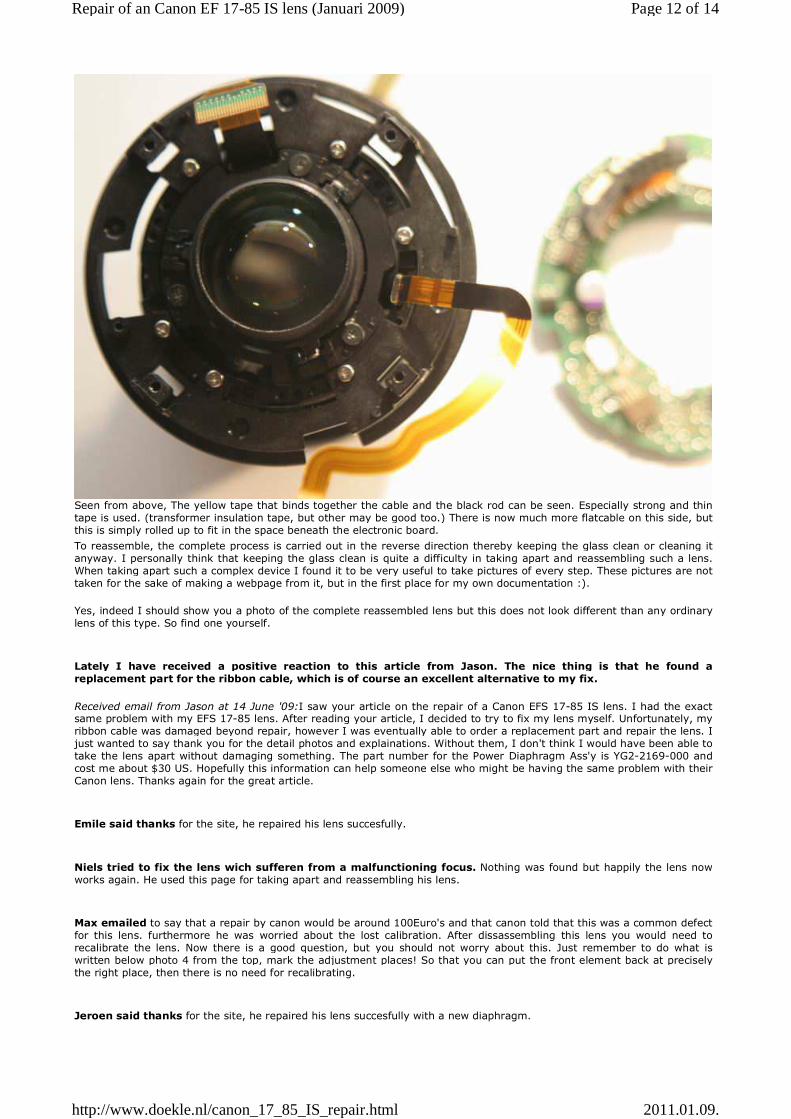
Seen from above, The yellow tape that binds together the cable and the black rod can be seen. Especially strong and thin
tape is used. (transformer insulation tape, but other may be good too.) There is now much more flatcable on this side, but this is simply rolled up to fit in the space beneath the electronic board.
To reassemble, the complete process is carried out in the reverse direction thereby keeping the glass clean or cleaning it anyway. I personally think that keeping the glass clean is quite a difficulty in taking apart and reassembling such a lens.
When taking apart such a complex device I found it to be very useful to take pictures of every step. These pictures are not taken for the sake of making a webpage from it, but in the first place for my own documentation :).
Yes, indeed I should show you a photo of the complete reassembled lens but this does not look different than any ordinary lens of this type. So find one yourself.
Lately I have received a positive reaction to this article from Jason. The nice thing is that he found a
replacement part for the ribbon cable, which is of course an excellent alternative to my fix.
Received email from Jason at 14 June '09:I saw your article on the repair of a Canon EFS 17-85 IS lens. I had the exact same problem with my EFS 17-85 lens. After reading your article, I decided to try to fix my lens myself. Unfortunately, my ribbon cable was damaged beyond repair, however I was eventually able to order a replacement part and repair the lens. I
just wanted to say thank you for the detail photos and explainations. Without them, I don't think I would have been able to take the lens apart without damaging something. The part number for the Power Diaphragm Ass'y is YG2-2169-000 and
cost me about $30 US. Hopefully this information can help someone else who might be having the same problem with their Canon lens. Thanks again for the great article.
Emile said thanks for the site, he repaired his lens succesfully.
Niels tried to fix the lens wich sufferen from a malfunctioning focus. Nothing was found but happily the lens now works again. He used this page for taking apart and reassembling his lens.
Max emailed to say that a repair by canon would be around 100Euro's and that canon told that this was a common defect for this lens. furthermore he was worried about the lost calibration. After dissassembling this lens you would need to recalibrate the lens. Now there is a good question, but you should not worry about this. Just remember to do what is written below photo 4 from the top, mark the adjustment places! So that you can put the front element back at precisely the right place, then there is no need for recalibrating.
Jeroen said thanks for the site, he repaired his lens succesfully with a new diaphragm.
Page 12 of 14Repair of an Canon EF 17-85 IS lens (Januari 2009)
2011.01.09.http://www.doekle.nl/canon_17_85_IS_repair.html
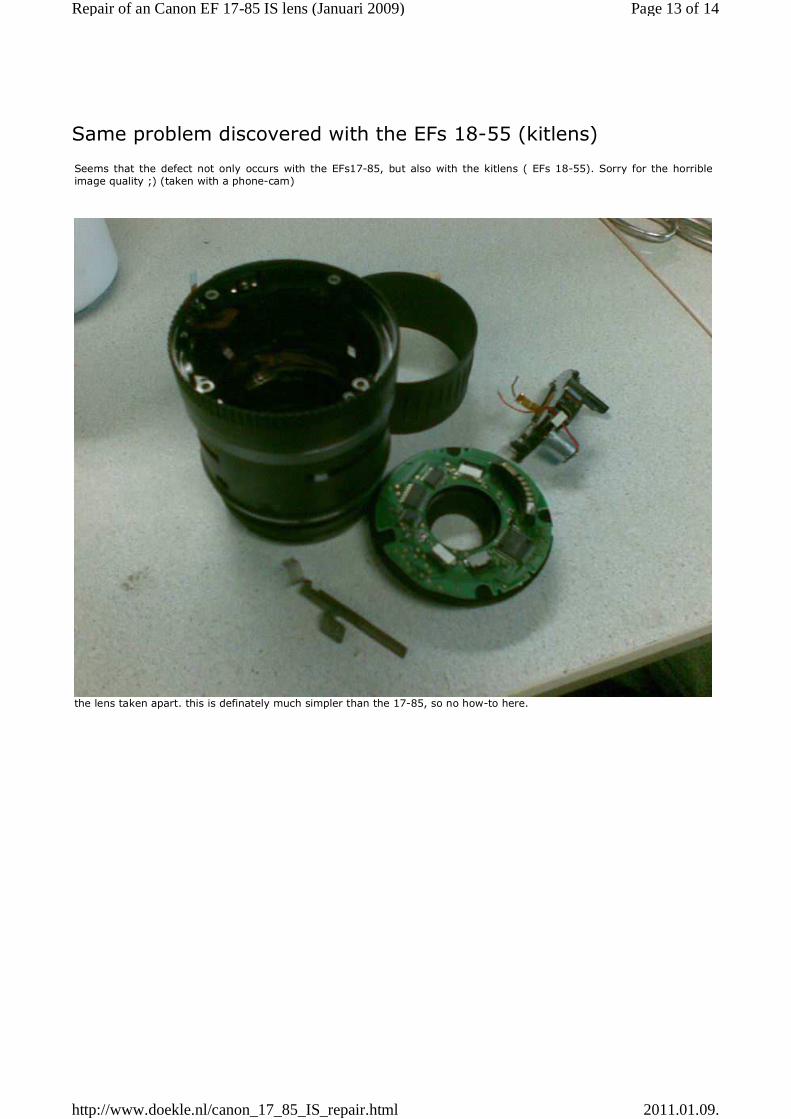
Same problem discovered with the EFs 18-55 (kitlens)
Seems that the defect not only occurs with the EFs17-85, but also with the kitlens ( EFs 18-55). Sorry for the horrible image quality ;) (taken with a phone-cam)
the lens taken apart. this is definately much simpler than the 17-85, so no how-to here.
Page 13 of 14Repair of an Canon EF 17-85 IS lens (Januari 2009)
2011.01.09.http://www.doekle.nl/canon_17_85_IS_repair.html
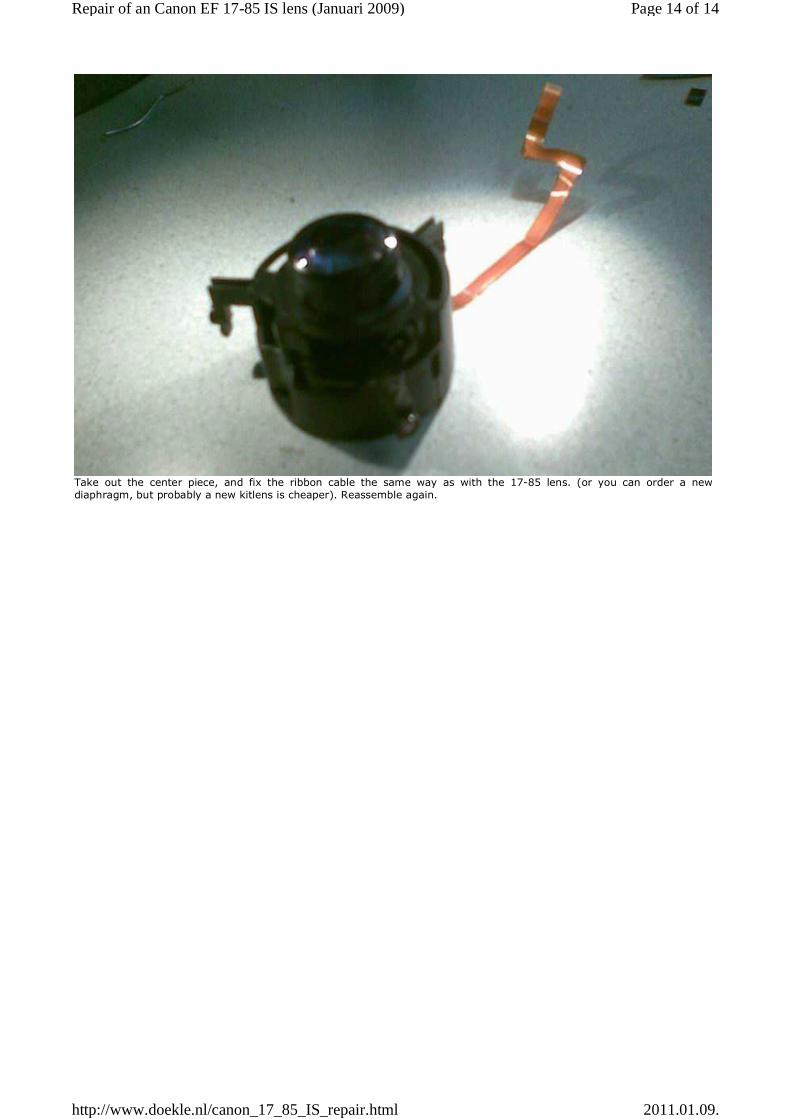
Take out the center piece, and fix the ribbon cable the same way as with the 17-85 lens. (or you can order a new diaphragm, but probably a new kitlens is cheaper). Reassemble again.
Page 14 of 14Repair of an Canon EF 17-85 IS lens (Januari 2009)
2011.01.09.http://www.doekle.nl/canon_17_85_IS_repair.html