Embed Size (px)
Citation preview
Script for
Basic Course Community RadioLive Radio
1 INTRODUCTION
2 TALKING ON THE RADIO
3 PRESENTATION
4 JOURNALISTIC REPRESENTATION FORMS OR BROADCASTING FORMATS WITH LIVE CHARACTER 4.1 Checklist for Live Discussion Rounds 4.2 Checklist for Live Broadcasts in General
5 BASICS OF RADIO TECHNOLOGY 5.1 Mixing Desk Studio 1 5.2 Phone Patch Studio 1
6 BROADCAST SCHEDULES 6.1 YARM screen 6.2 Example of Broadcast Schedule 6.3 Broadcast Schedule Scheme for Live Programmes 6.4 Broadcasting Clock
7 CREATING PROGRAMMES AT ORANGE 94.0
APPENDIX: GUIDELINE PROGRAMME CONCEPT


4
1 IntRoduCtIon
There are different options of making your voice heard on community radio. Going live on air, addressing the audience directly together with in-studio guests is one of them.
Live means talking now and being heard immediately, and thus excluding the possibility of correcting and revising or repeating presentation phrases and comments. It is the most direct form of doing radio, and sometimes causes stage fright or nervousness. At the same time, it releases energy and provides both in-studio guests and broadcasters with the unique feeling of being on the radio. Live radio is where it becomes most evident that, on the one hand, skill comes with practice, and, on the other hand, routine still cannot guarantee absolute security – because no live broadcast is like a previous one.
Live radio is a challenge for everyone at the beginning, and remains one even after years of practice. However, in order to make things easier and avoid some common pitfalls, on the following pages you will find some basic knowledge and useful tips and tricks for doing live radio at ORANGE 94.0.

5
1 IntRoduCtIon
Don’t be afraid of talking!Many people are too scared to talk on the radio. When people have an accent, speak in a dialect, do not have a trained “radio voice” or a standard pronuncia-tion, they might think they are unable to speak “well” enough. But on community radio there is no “right” or “wrong” way of talking – language tends to be very individual; and everyone can keep her or his personal style of speech, refusing to subject herself or himself to a standard norm. However, bearing in mind some basic rules can be useful in order to express oneself understandably for the audience.
Radio language is spoken languageAt best, people feel directly addressed when listening to the radio. Speaking everyday language on the radio facilitates this even more. This sounds easier than it is, since there is a difference between written language and spoken lan-guage; the latter being suitable for the radio. That, however, does not mean that a text cannot be prepared respectively written down beforehand. Even though radio talk often sounds “spontaneous,” this impression is deceptive: radio texts are well prepared and often completely written down before. Because unlike everyday language, statements made on the radio have to reach the listeners in a clear and direct way, without unnecessary filler words. Messages are worked out precisely, choosing fitting linguistic images, examples, and comparisons. And yet, these well-prepared texts sound as if they were spoken freely. In order to achieve this, consider the following:
Radio texts are linearA radio text has to be structured logically through linguistic elements and rely on a simple sentence structure, allowing the listeners to follow. Hence, only give one piece of information per phrase. Organize and sequence the most important thoughts and phrase them in successive sentences. Try to avoid nested sen-tence structures and dependent clauses.
Choose and reduceA clear and simple text structure is achieved by concentrating on the most essential basics. When writing a radio text, you have to reduce and narrow down the material at your disposal. You might find the so-called WH-questions helpful:
Who talks/acts? What happens? Where? Why? When was that? How many?
Structure of a radio textA radio text relies on a clear and simple structure. Also, its structure should be conveyed verbally in order to facilitate the comprehensibility. The introduc-tion has the function of a heading and communicates the content. The trains of thought should follow each other logically and be linked with each other throughout the text.
2 taLkIng on the RadIo

6
Repetitions on the radio are helpful and permittedThe repetition of central thoughts helps listeners to follow the programme. Short summaries of what has been said until now make the comprehension of a text easier, especially when coming back after a song, or before new aspects are discussed. Also repeat central information, basic assumptions and lines of thought, as well as addresses, phone numbers, websites, etc.
Radio language is concrete and pictorialIn order to give listeners the chance to develop images of what has been said, it is necessary to use a concrete language that offers exact descriptions and pro-vokes associations, understanding, as well as mental images. However, avoid falling back to stereotypes and clichés by creating familiar pictures. Attentive observation and perception during the research are the basis for clear linguistic description. Only what has been understood can be expressed precisely.
Abstract language “typical spring flora” Concrete language “snowdrops, crocuses and daffodils”
Verbs can moveVerbs (which indicate activity) are mainly responsible for provoking an impres-sion of liveliness and dynamic, as they are able to express actions in a very nuanced way.
To move on two feet can mean to go, walk, run, hop, saunter, stroll, rush, trot, …
Be careful with adjectivesThere are descriptive adjectives (such as red, soft, clear, etc.) that support and concretise the listener’s image. However, lining up too many adjectives while using too few verbs makes a text sound stiff. And there is also another problem with adjectives: a description often contains a judgment. Radio listeners, how-ever, prefer to make up their own minds regarding a topic. Valuing adjectives therefore appear to be slightly patronizing.
Active instead of passive voiceSentences in active voice address the listeners more directly and tend to be much more lively. The use of active voice also has the advantage of naming the actor.
Passive voice “The music was composed at 100-metre height.” Aktive voice “Marta Farrenc composed this music at 100-metre height.”

7
Avoid filler words, empty phrases, loan words, and technical language!
Be careful with numbers! It is very hard to understand figures on the radio. Therefore avoid or simplify them.
Tell a story in situationsDescribing a particular situation helps focussing on a specific content – in terms of space, time, or a person. When describing a situation, try to appeal to all senses of the audience – you can also explain how it smells, feels, etc.
Speech rhythm A text in which all sentences are constructed according to the same prin-ciple tends to look dull. The construction of phrases very much depends on the dynamics and rhythm of a text. For instance, sometimes the verb can be omitted and the situation be entered directly. You can use spoken language as a reference point.
Make sure the text is well legibleUse a large font size (min. 12 - 14 pt.) and a big line distance (1.5 lines) in order to facilitate reading the radio text. After writing down the text, read it out loud, in order to make sure that it is possible to speak the text and that you would have expressed the content that way in spoken lan-guage. Write down corrections in a clear way, and, at best, print out the text on slightly thicker paper or thin cardboard that does not “rustle” when holding it or putting it down in the studio; you can also use a clipboard for holding the paper without causing noise.
Addressing the audienceWhether a text or the presentation generally appeals to the listeners, de-cisively depends on whether the presenter really addresses an audience or rather holds a monologue. The difficulty consists in the fact that you are sometimes sitting all alone in the studio. The audience is not visible – and yet, it has to be addressed. Simply imagining the listeners being present in the studio can change this! This automatically increases the expression and tone of a voice.
Speech, thoughts, and feelings form a unityOnly if you are concentrated and understand what you are actually say-ing, only if you see in front of your mind what you are telling, being pres-ent with your thoughts and feelings, you can convey a text vocally. Only what is in your head/belly will find its expression in your voice.
8
3 PResentatIon
Presenters guide through a programme and have central tasks that contribute substantially to the success of a broadcasting. They provide the structure and shape the atmosphere of a programme.
Duration of the presentation textWhen preparing a presentation, determine its duration and test it by speaking the text out loud. According to a rule of thumb, 15 lines with 60 characters each (a total of approx. 900 characters) correspond to about one broad-casting minute.
Presentation technique: Key word cardsEven more than with other radio texts, presentations should sound freely spoken and not “read off.” However, this impression is often deceptive: good presentations are spontaneously improvised only in the minority of cases. On the contrary: Presentations ought to be well prepared, so that they have the aimed effects, avoiding superfluous filler words and empty phrases. It is possible to write down the whole text beforehand and un-derline the most important words with a text marker. The best results are achieved, however, by working with well legible key words on presenta-tion cards.
Tasks of the presentation in detail
– It gives an overview of what a particular programme is about and what will happen in it (e.g., introducing the subject(s) of a broadcasting at the beginning).
– It piques the listener’s curiosity for the content of the prepared reports.
– It “guides” and accompanies the audience through the programme, providing a “golden thread.” This includes designing the transitions from one programme point to another.
– With her/his personality, the presenter substantially contributes to the style and the atmosphere of a broadcasting.

9
3 PResentatIon
There are plenty of possible broadcasting formats, which in the context of community radio, however, shall only provide a source of orientation, leaving space for experimentation. The following forms are the most current live broadcasting formats.
4 JouRnaLIstIC RePResentatIon FoRms oR BRoadCastIng FoRmats wIth LIve ChaRaCteR
Live interviewThe journalist asks one or more in-stu-dio guests questions on a subject, her or his opinion or person. The interviewer does not reveal personal opinions, but only formulates questions and presents, without giving personal input.
Studio conversationTwo or more people talk about differ-ent subjects. Often a host introduces the guests at the beginning, and then asks questions every now and then. In contrast to the interview, in a discussion listeners do learn something about the host.
Call-InListeners have the opportunity of calling in during a live programme in order to:
– make music requests and/or greet people,– ask questions (to a studio guest or to the presenter),– or to express their opinion on a certain subject.
Live transmission An event (sport, concert, parliamentary speech, panel discussion, art action, talk...) is broadcasted live on the radio.
Live reportageA journalist reports live about a topical event or subject from the place of incident. The presentation in the studio often gives complementary information.
These formats can partially be combined with each other and be expanded by different forms of multilingualism.
10
Preparing the conversation situation
Create a positive atmosphere! Place chairs/stools in a position that allows everyone to hold eye contact with each other.
Preliminary talk Ask the guests to come to the studio a little earlier in order to avoid delays and offer them the possibility to prepare and familiarise themselves with the spatial and technical circumstances. It is important that everyone agrees on the same form of addressing each other during the conversation. How- ever, avoid discussing the subject already in the preliminary talk, since this might prevent your guests from speaking in detail about it later on the microphone. Besides, too much preparation is tiring; hence, schedule the preliminary talk with a maximum of 30 minutes; 15 minutes are better.
4.1 Check List for Live Discussion Rounds
Preparing the content
Make up your mind about the subject, the guests, as well as their positions, and prepare your questions accordingly.
Divide the topic into meaningful blocks according to the duration of the whole conversation and decide whom you want to ask which questions. Include in the schedule musical “breathers” for guests and listeners.
Prepare additional back-up questions for every subject area.
Keep ready back-up musical pieces (if possible, on an audio-CD) to be able to react to possible breaks.

11
Things to avoid
Dominance of the presentation The presenter should always confine herself/himself to what is absolutely necessary.
Role change NEVER give up your own role as a presenter; neither become too biased nor reveal too much of your personal opinion on the subject. Do not allow the participants to “take over” the presentation or let things take their course.
Question chains Too many questions at the same time not only have an overwhelming effect, but also offer the opportunity to chose the easiest and most pleasant question. Hence: One question after the other.
Points to consider during the discussion
Attentiveness Follow the content carefully and keep track of the whole course. For studio discussions it is advisable to ask somebody to take care of the technical part to be able to pay full attention to the conversation.
Distribution of conversation time Every participant should be given the same and equally important conversation time. Also try to integrate more introverted people into the discussion by asking questions.
After music breaks Briefly introduce the audience once more into the subject: present the programme name, the current subject, and the guest’s names. If convenient, give a short overview of the aspects already discussed.

12
4.2 4.2 Check List for Live Broadcasts in General
Before the broadcasting
Preparation is important! A prepared presentation, music, and a schedule make it easier to orient yourself during a programme and focus on the technical part.
Punctuality Your own emotional constitution ought to be positive, therefore it is important to come to the studio on time and not be exhausted. This gives you time to take a deep breath and build up positive energy.
Technical check Make sure everything works in the studio, all controllers are in the starting position, the required devices/ channels/mics are operational and switched on at the mixing desk.
Prepare music Prepare a playlist on the computer, insert audio CDs, and select the right tracks.
Place the broadcast schedule and presentation text where they are well visible.
Avoid noise sources (close the windows, switch off the mobile phone).
Introduce your in-studio guests conduct a preliminary talk, agree on signs, demonstrate the distance to the mic, go through the subject, etc…
Prepare your vocal chords for talking! (through humming)
Control posture (legs on the ground, upright position), adjust the seat position, which should neither be too high nor too low (also with guests – children!).
Shortly before the broadcasting take a d e e e e e p breath, concentrate, enjoy!

13
After the broadcasting
Mixing desk restore default settings.
Do not forget to remove audio-CDs, USB-drives from the devices.
Tidiness leave the studio as you wish to find it yourself.
On air
Constantly check the master level and put on headphones to hear any noise or background music that is too loud or too quiet, and to send a steady signal on air.
If a mistake happens Stay calm! One musical piece later, no one will remember it.... except if you remind the listeners three times!
Always think one step ahead! If possible, keep ready the next song and contribution to be played. This avoids unnecessary breaks.
Watch the clock How much broadcasting time remains?
Towards the end of the broadcasting
Have a look at the YARM (cf. 6.1) in order to see what comes next in the studio - another live broadcast or a pre-programmed contribution? Depending on this, schedule enough time for handing over the studio, e.g., make the closing announcement on time and play one or two songs at the end. This way, the studio can be “vacated” for the following broadcasters.

14
5 BasICs oF RadIo teChnoLogy
Mixing desk, mics, source and recording devices facilitate the production of a good programme that makes your voice heard on the radio. The broadcast’s quality lies in your own hands. You do not need to hold an audio engineering degree in order to be able to produce a good broadcast. However, newcomers should make themselves familiar with some technical basics.
How does the signal get from the studio into the radio set?The mixing desk collects the electronic audio signals from the mics and various source devices and mixes them into one stereo signal. From the mixing desk, the signal goes into a processor where it is transformed into a signal that can be broadcasted. During this process, among others levels that are too strong or weak are reduced or amplified respectively. However, this does not substitute for a permanent control of the output level on the mixing desk: a signal which is too strong or too weak does not produce an optimum broadcasting quality.
In a next step the signal is split into three signals:
Mixing deskThe mixing desk is the heart of a radio studio. It unites and controls all the components necessary for the production of radio programmes: microphones and source devices, such as studio PC, CD player, mini disc player, record player, studio telephone, external input (laptop with a playlist, recording device, etc.), are connected to the mixing desk and can be controlled through labelled “channels” on the mixing desk.
One goes to the legally prescribed logging (record-ing for archiving purposes). At ORANGE 94.0 these automatic recordings can be downloaded in an hour-ly rhythm on the computers in studio 1, studio 2, and the kitchen, e.g. for post-processing and archiving of one’s own live broadcast.
One signal is sent to the internet stream and …
the third signal is sent into a codec which trans-forms the analogue audio signal into a digital one. Through a telephone line or a radio connection, this digital signal is sent to the transmitter (at the Donauturm). An HF modulator transforms the signal into a high frequency signal (HF) with e.g. 105 megahertz (MHz). With about 250 watts the signal reaches the transmitting aerial. The radio re-ceiver transforms the HF signal again in an analogue one and sends it through an audio amplifier to the loudspeaker.

15
5 BasICs oF RadIo teChnoLogy
Sending a channel on air through the mixing desk Consider the following at the mixing desk: A fader (volume control) that has been pushed up will be heard on the radio. However, make sure first that the respective channel’s ON button (labelled with a green sticker at the mixing desk) is switched on. Only then the signal’s volume can be regulated or levelled, e.g. to 0 dB (display of the light-emitting diode from green to red). Depend-ing on the volume of one’s voice, the distance to the microphone, or the music intensity (drum’n’bass is produced differently than e.g. classical music) the dBs have to be reduced or raised in order to send a steady signal to the audience. Presentation, music, pre-produced reports, and in-studio guests should not vary considerably in their volume, because this would have to be compensated by the listeners themselves with the volume control of their radio receiver. It should be clarified in advance who will be responsible for this during the whole programme.
Being in charge and keeping trackThe master level regulates how loud or well balanced a radio programme will be transmitted. The master level is a display located at the head of the mixing desk (in the ORANGE 94.0 studio it is located above the mixing desk in front of the studio’s window) and indicates the strength of the signal (presentation, music, etc.) going on air. The master level should not exceed the red area for a longer period of time, since otherwise a continuous overdrive is caused. A signal which is too quiet (only a few green lights lighting up) is not ideal either. The best strategy is to level everything in the orange range, with occasional exceptions into the green or red range, according to mood. (For example, a short laughter can cause a slight tolerable overdrive. A short reflection pause, or pensive, calm talking can also be transmitted quieter.) However, these diver-gences should only be short exceptions in order to avoid negative effects on the listening quality.
By putting on the headphones (which have to be properly adjusted) you can monitor how the broadcast will sound on the radio. First and foremost, the head-phones allow you to control whether another sound signal (music) is maybe erroneously being played back, because the fader has not been pushed down completely, or if e.g. the volume of the presentation or the background music is unbalanced. Even if hearing one’s own voice feels unfamiliar at first, always use the headphones – adjusted at a comfortable volume – during broadcasting. It helps you getting used to your own voice, keeping track of the programme, and controlling its volume level. The in-studio guests behind the studio’s win-dowpane need the headphones to be able to listen to the programme at all. It is important to check the headphones’ volume together with them in advance and agree upon hand signals (e.g. thumbs up or down) in case the volume needs to be readjusted during the programme.

16
5.1 Sketch Mixing Desk Studio 1 and Auxiliary Equipment
Most of the functions of the mixing desk are preconfigured, so you don’t have to make your own adjustments. The basic configuration of the mixing desk, the one with which you are going live on air, is indicated by coloured stick-ers. A red or green sticker (marked with X in the picture below) indicates that the respective lamp should light up. If it isn’t, just push the small button next to it.
Headphones The two rotary volume control buttons are located in the middle area of the mixer: KOPFHÖRER HIER (“headphones here”) regulates the volume of the headphones in the control room, KOFPHÖRER DRÜBEN (“headphones there”) regulates the volume of the headphones behind the window.
Talkback Press the button labelled RÜBER-SPRECHEN (“talk to the other side”) and talk into the cracks on the mixer surface. If CUE/SELECT is pressed for the respective mic, it is possible to answer from the guest area.
1 m
ini j
ack
cabl
e fo
r con
nect
ing
MP
3-pl
ayer
s, la
ptop
s, e
tc.,
1 ta
pe d
eck
and
inte
rnet
con
nect
ion
via
DH
CP.
Microphones 3 mics (no. 1-3) for your guests behind the window. In the control room 2 mics for guests (no. 4-5) and the mic of the moderator (no. 6). Mics 4-6 (labelled “hier” [“here”]) are switching off the speakers in the control room (put on the headphones!) and are also switching on the “mic on air”-lamp in front of the studio door.
1 2 3 4 5 6 MP3 TAPE________ MICROPHONES ________________
< DRÜBEN
< HIER
ON
CUE

17
Mixing Desk Channel To some channels, two sources are assigned, such that it is necessary to select the desired function/source by pressing a button. The record players share a channel with “CD3” – if using the record players, press the LINE B button in the upper area of the PHONO /LINE B channel. Please restore the default setting after your studio session (see sticker)!
ON
CUE
PC CD 3 CD 2 CD 1 MD 1 MD 2 Telephone +PHONO
3 CD players (CD3 can play back MP3-CDs), 2 MiniDisc players, 1 telephone, 2 record players (through DJ desk) and computer (labelled “MP3”) for programme via FTP-Server/“Radio”-folder from the preproduction, USB-drive. Attention: DVDs cannot be played!
Please leave the button labelled AIR in the CRM (Control Room) section of the mixing desk switched on (green lamp)!
Previewing Before the signal from one of the channels of the mixer is go-ing on air, you can preview the signal by pushing the CUE/SELECT but-ton (red lamp) and sliding the fader up. If you want to go on air with the channel, press the ON button (green lamp). CUE/SELECT is automatically deactivated. If the rotary control button CUE/PFL AIR in the middle area of the mixer is turend all the way left, you are hearing only the preview signal through the loudspeakers/control room head-phones. Your guests are always hearing the on air programme through their headphones.

18
5.2 Telephone, Recording, and Further Hints
Monitoring The programme from the playout server and the frame programme can only be monitored through the control room headphones.
Recording A recording of your programme can be found on MD (on the left side of the sending room, automatic level control) or on tape deck. Additionally, your programmes are being archieved by ORANGE 94.0 and can be accessed and copied as MP3 logs for example at the kitchen terminal.
For Experts
A headset-input can be assigned to channel 7 (labeled “ext. Miniklinke”) by pushing the MIC button.
Through two additional multipoint connectors underneath the tape deck, external devices can be included.
3 additional headphones, 8 additional line-inputs (cinch oder jack, symmetric oder asymmetric) for up to 4 additional stereo signals – for this purpose, mics 2-5 are switched to Line A by deactivating the MIC button (green lamp goes out).
2 x Aux-Out-Stereo: here, trough XLR connectors, symmetric or asymmetric, e.g. effect devices can be connected. Their output must be reconnected to a Line-In jack of the mixing desk. For each channel the level can be adjusted seperately through the Stereo-Aux control button. The master Aux-Send level is regulated via ST AUX in the upper middle area of the mixer.
2 x Sub-Out-Stereo: for each channel where the SUB button (above the PRG button) is pushed, the respective signal is also sent to “Sub-Out,” from where it can be accessed via XLR connection. For this purpose, the “sub”-master volume needs to be regulated with the SUB rotary control button in the upper middle area of the mixer. This function is handy for audio recordings or cameras. Just switch the camera to Line In (don’t forget to activate the camera’s phantom power if necessary!) and push the SUB buttons of all channels.

19
Telephone (extension 33)
The callers’ volume can be regulated with the volume fader (and the Gain rotary control button); the upper TELKO SEND rotary control regulates how loud the caller is hearing you.
With the ON button, you accept the call and also end it later. If you pick up the receiver additionally, you can continue talking with the caller and put her/him back on air after a musical intermission, even if you have deac-tived ON beforehands. In this case, don’t forget to pull down the faders of all the speech microphones.The phone connection is only ended when the receiver is put down.

20
6 BRoadCast sCheduLes
YARM-Radio Manager in the Radio Studio
The YARM (Yet Another Radio Manager) regulates the sequence of the whole programme during the day in the radio studio. On the screen you can see which programme is currently running, when it will finish and the frame programme will be switched on, and which programme follows. The YARM also tells you if the programme is live or pre-produced. Pre-produced programmes run under PLAYLIST, no matter if it is the frame programme, a radio programme or a music mix. The studio is switched off when pre-produced programmes are running and this cannot be changed. The studio and the mixing desk are opera-tional only during the broadcasting slots that have been programmed as LIVE in the YARM.
YARM is a helpful tool for the programme sequence and should be watched during a live programme (especially towards the end). Because the frame programme excludes the possibility of overrunning airtime and is automatically switched on three minutes before every full hour. Hence, make sure to start on time saying goodbye to the audience and playing the jingle.
PLAYLIST: pre-produced programme LIVE: Live broadcasting (studio is in use)
next program
next but one program

21
6 BRoadCast sCheduLes
radio broadcasting station on which the programme is running (YARM was developed by the Free Media Community in Austria and is used by different community radios in Austria.)
connected to the server current time
shows the next programme’s character; schedule time for handover if a LIVE broadcasting follows
displays the title of the current programme or music piece
displays the remaining time of the current programme until the next programme or the frame programme will start

22
6.2 Example of Broadcast Schedule
Medium/audio source What? Who? Time in minutes Total time (approx.) in minutes
studio-PC jingle / signation technical support 0.30 00.00 – 00.30
mic 1 opening presentation: introduction, naming of guests, topic, programme overview
presenter ~ 1.30 00.30 – 02.00
CD 1 / track 2 music: Natascha Atlas – I put a spell on you technical support 3.20 02.00 – 05.20
mic 1 first question to guest 1 on subject 1 presenter ~ 0.20 05.20 – 05.40
mic 2 response to question 1 guest 1 ~ 2.00 05.40 – 07.40
mic 1+2+3 conversation between presenter and guest 1, guest 2 presenter, guest 1, guest 2 ~ 4.00 07.40 – 11.40
CD 2 / track 1 music … technical support ~ 4.10 (ausfaden) 11.40 – 14.00
mic 1 return, short summary, question on next subject are… presenter 0.30 14.00 – 14.30
mic 2+3 response to question guest 1, guest 2 … …
…
studio-PC signature tunes – jingle technical support 0.30 ~ half of broadcasting time
mic 1 return, short summary, question on next subject are… presenter … …
.
.
.
mic 1 goodbye to guests and audience at home presenter … towards end of broadcasting time
studio-PC music – if convenient for handing over studio to next group technical support … …
studio-PC signature tunes – closing jingle technical support 0.30 programme end

23
Medium/audio source What? Who? Time in minutes Total time (approx.) in minutes
studio-PC jingle / signation technical support 0.30 00.00 – 00.30
mic 1 opening presentation: introduction, naming of guests, topic, programme overview
presenter ~ 1.30 00.30 – 02.00
CD 1 / track 2 music: Natascha Atlas – I put a spell on you technical support 3.20 02.00 – 05.20
mic 1 first question to guest 1 on subject 1 presenter ~ 0.20 05.20 – 05.40
mic 2 response to question 1 guest 1 ~ 2.00 05.40 – 07.40
mic 1+2+3 conversation between presenter and guest 1, guest 2 presenter, guest 1, guest 2 ~ 4.00 07.40 – 11.40
CD 2 / track 1 music … technical support ~ 4.10 (ausfaden) 11.40 – 14.00
mic 1 return, short summary, question on next subject are… presenter 0.30 14.00 – 14.30
mic 2+3 response to question guest 1, guest 2 … …
…
studio-PC signature tunes – jingle technical support 0.30 ~ half of broadcasting time
mic 1 return, short summary, question on next subject are… presenter … …
.
.
.
mic 1 goodbye to guests and audience at home presenter … towards end of broadcasting time
studio-PC music – if convenient for handing over studio to next group technical support … …
studio-PC signature tunes – closing jingle technical support 0.30 programme end

24
The following is only a proposal – the pattern can vary according to a group’s needs. It is advisable to copy the schedule for the presenter and the person responsible for the technical support (but not for in-studio guests, as they are irritated by it) and/or hang up a big version in the studio (mind the angle of vi-sion!). Cross out what has already been broadcasted, so that everyone is able to keep track and knows what comes next. Musical pieces can be used as time buffers, because they can be faded out earlier or later as required, if they are long enough. If the opening jingle/signature tune is very short, it might be recommended to play some music until everyone is really ready to start the pro-gramme. On the other hand, playing “only” music too long before starting with the introduction or an audio quote can also be problematic. At the beginning you want to arouse the audience’s curiosity about what will follow, and extended “waiting” can lead to frustration and loss of interest.
6.3 Broadcast Schedule Scheme for Live Programmes
Medium/audio source What? Who? Time in minutes Total time (approx.) in minutes

25
Medium/audio source What? Who? Time in minutes Total time (approx.) in minutes

26
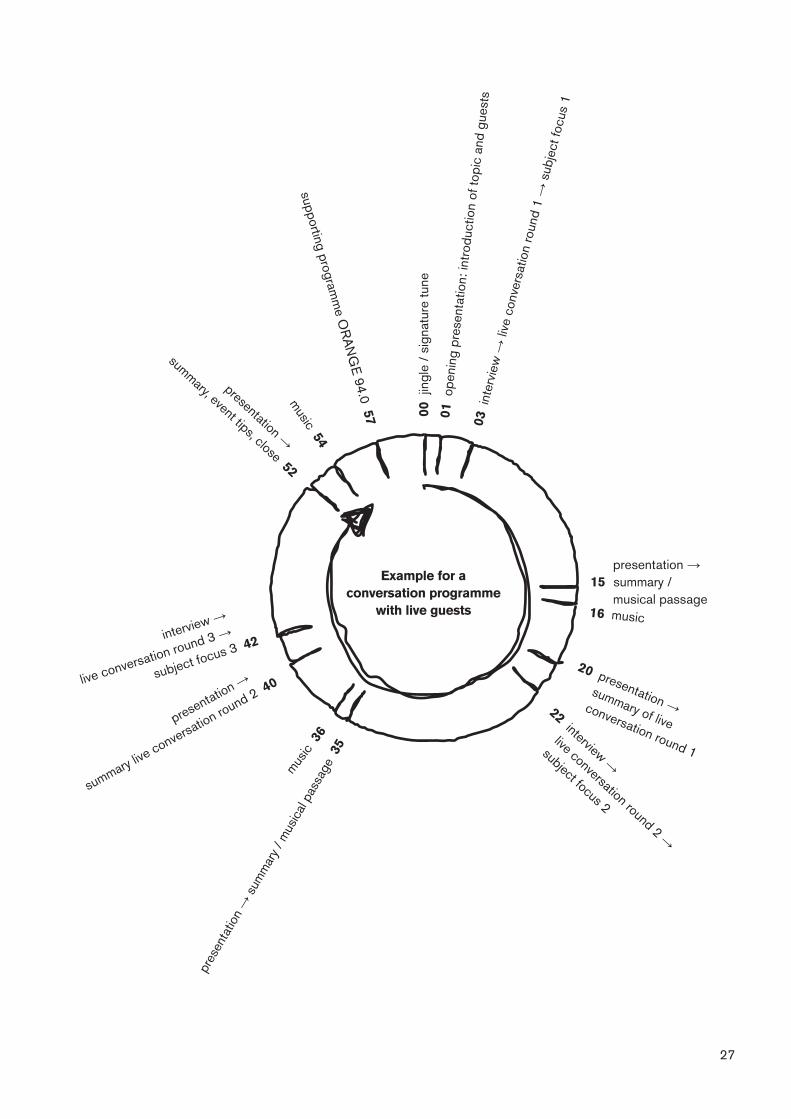
Another opportunity to schedule your programme is the so-called broadcasting clock. The circle shows one hour (60 minutes). By dividing the circle into units of minutes, you can define the planned content and gain a graphical overview of the planned broadcast. It is recommended to create a clock as a basic structure for a broadcasting series and adapt the single elements to the current programme.
Example for a magazine programme including different pre-produced
contributions and interviews
00 j
ingl
e /
sign
atur
e tu
ne01
ope
ning
pre
sent
atio
n, o
verv
iew
02 m
usic
06 p
rese
ntin
g in
terv
iew
07 c
urre
nt in
tervi
ew
12 close of report
13 music
19 presenting report20 current report → song of the week
25 close of report
26 music
even
t tip
s 3
0
mus
ic →
mat
chin
g th
e ev
ent
33
pres
entin
g int
ervie
w 37
interv
iew 3
8
close 44
presentation 49
current report 50
closing presentation, preview of next broadcast, sign off 53
music 55
supporting programm
e OR
AN
GE 94.0 57
music 45presentation →
summary live conversation round 2 40
interview →
live conversation round 3 →
subject focus 3 42
presentation →
summary, event tips, close 52
6.4 Broadcasting Clock
27
Example for a conversation programme
with live guests
00 j
ingl
e /
sign
atur
e tu
ne
01 o
peni
ng p
rese
ntat
ion:
intr
oduc
tion
of to
pic
and
gues
ts03
int
ervi
ew →
live
con
vers
atio
n ro
und
1 →
sub
ject
focu
s 1
presentation → 15 summary /
musical passage16 music
20 presentation → summary of live
conversation round 1
22 interview →
live conversation round 2 →
subject focus 2
pres
enta
tion →
sum
mar
y / m
usic
al p
assa
ge 3
5
music 54
mus
ic 3
6
presentation →
summary live conversation round 2 40
interview →
live conversation round 3 →
subject focus 3 42
presentation →
summary, event tips, close 52supporting program
me O
RA
NG
E 94.0 57

28
7 CReatIng PRogRammes at oRange 94.0
Community Radio in Vienna
ORANGE 94.0 is Vienna’s only community radio. 450 voluntary broadcasters create the programme independently, making it Vienna’s radio with the most journalists, opinions, and languages, and with the most music played around the clock. ORANGE 94.0 is non-commercial and independent from party politics.
ORANGE 94.0 is a free community radio: open access to the radio is one of its basic principles. In particular, want to promote groups and topics that have been underrepresented in mainstream-media or have not been represented at all so far, such as ethnic, social and language minorities, children, adolescents, women, and their concerns.
Sexist, racist, fascist, anti-Semitic, homophobic, transphobic, and every other content that offends against human dignity, as well as groups that represent such contents programmatically are excluded decidedly.
Every programme production is done on a voluntary basis, hence unpaid. ORANGE 94.0 is non-commercial and independent from party politics. Financial support by broadcasters and listeners is also important. You have the opportunity to contribute with the community radio donation (Freier Radio Beitrag).
Steps to your own radio programme
1Info eveningAt our info evenings you are informed about the principles of community radio. We show you opportunities of taking part and answer your questions.
2ConditionsCompleting the basic course “community radio,” including a training in media law and copyright, is a necessary condition for receiv-ing one’s own broadcasting place. The basic course consists of four modules and provides basics of radio journalism and technics that facilitate the first steps in doing radio.

29
7 CReatIng PRogRammes at oRange 94.0
5Apply for a programmeIf you have drafted your programme concept and recorded the pilot show, bring it to us in person or send it by e-mail to: [email protected] or by mail to: ORANGE 94.0, Programmkoordination, Klosterneuburger Strasse 1, 1200 Wien.
3Programme conceptPrepare a written draft of a programme con-cept. Preferably you describe your ideas such that we can imagine how your future radio programme will sound. You find a template for a broadcasting concept in this script or on our homepage: http://www.o94.at/.
4Pilot programmeBased on your concept, you produce a so-called “pilot programme,” a test broadcast in a digital file (mp3 format). It does not have to be technically perfect, but should be audible. For recording the pilot number, you can use the ORANGE 94.0 studio, which you can book with us.

30
guIdeLIne PRogRamme ConCePt FoR PeRIodICaL PRogRammes
Name of the programme
Content, subject of the programme
Desired broadcasting dates (frequency, duration, etc.)
Self-presentation of involved broadcasters (name, age, short bio)
Have you completed the “Basic Course Community Radio” □ yes □ no
Personal relation to the contents / subject of the programme
Motivation for making this programme
Aim of the programme
Target audience

31
guIdeLIne PRogRamme ConCePt FoR PeRIodICaL PRogRammes
To what extent does the programme grant voice or publicity to people,
groups, opinions, artistic currents, or contents that have been underrepresented
or not represented at all in other media?
What distinguishes this programme from other shows in other media
and from other broadcasts on ORANGE 94.0?
Which elements does the broadcast contain?
(music, reportages, features, reports, news, interviews, studio talks,
call-ins, discussion groups, fi ctional elements, parodies, etc.)
Will the programme be produced live, pre-produced, or both?
Example of broadcast schedule:
subject, structure of one edition of the programme /
sub topics of further programmes

32

33

34

Sources
Antje Schwarzmeier & Ulrike Werner: Inter-audio – Materialien für die interkulturelle Radioausbildung. www.interaudio.org
Commit – Community/Medien/Institut (ed.): Das Freie Radio 1x1 – Basiswissen für RadiomacherInnen im Nichtkommerziellen Rundfunk. (2014)

Publishing Information
Compiled by Margit Wolfsberger Edited by Maiada G. Hadaia Mischa G. Hendel Margit WolfsbergerEditor Verein Freies Radio WienTranslation Katharina MalyLayout David Palme
Creative CommonsCC BY-NC-ND 4.0 This dokument may be shared
under the following terms: attribution, no derivates, for noncommercial purposes. Vienna January 2015