Embed Size (px)
Citation preview

DaVinci ShakeTM
INSTALLATION GUIDEDaVinci Shake is a synthetic shake carefully engineered to provide the authenticlook of natural shake with dramatically increased durability and resistanceto fire and impact. Special care has been taken to make the product easyto install. By following these instructions, and using good installationpractices, you will be assured of a quality installation.
NOTE TO INSTALLER
DaVinci Shake offers a 5/8” thick profile, yet remains lightweight, because the shakes have an engineered rib structure on the back. When cutting shakes for valleys or at overhangs such as eaves and gable ends, the core-out and ribbed support structure on the underside of the shake needs to be hidden by standard metal flashings.
Pay special attention to recommendations for accessories and installation at eaves (page 2), gable ends (page 4) and valleys (page 7).
JOB SITE READY!
DaVinci Shakes are delivered to the construction site in bundles pre-collated with all five shingle widths and color variations in the ordered blend. This pre-planned distribution produces the right aesthetic effect every time. Collated bundles also simplify installation and save time by eliminating hand sorting on the job site.
This information is provided for the use of professional roofing contractors. This Installation Guide does not supersede local building codes which should always be followed. DaVinci Roofscapes® does not warranty or have any responsibility for installation of its products.
The DaVinci Roofscapes Limited Fifty Year Warranty outlines its warranty responsibilities for the roofing materials it manufactures.
For questions about DaVinci Shake or its application, contact DaVinci Roofscapes®, LLC
IG-SH-4/09
Pg. 1 of 10
Distributed by: BEST MATERIALS LLC, Phoenix AZPh: 800-474-7570, 602-272-8128 Fx: 602-272-8014 www.BestMaterials.com Email: [email protected]

INSTALLATIONDECKING
DaVinci Shake must be installed on a smooth flat surface; minimum 15/32” APA approved plywood or 7/16” APA OSB. It is also necessary that all previous roofing materials be torn off prior to installation of DaVinci Shake. Imperfection in the decking may transmit through to finished roof.
DRIP-EDGE
Metal flashing is required on gable ends and eaves. An overhanging drip edge such as a Style “D” or Style “F” is recommended on gable ends to help mask the rib- structure on the underside. An overhanging drip edge may also be used on eaves although Style “A” or Style “B” drip edge are acceptable options.
ICE AND WATER ShIELD (Severe Climate Underlayment in accordance with Chapter 15 of the UBC)
In areas where the average daily temperature in January is 25° F or lower or where ice buildup is possible, DaVinci requires ice and water shield be installed: from the bottom edge to two feet above the exterior wall line on all eaves, in all valleys, on all gable ends, and around all roof projections. In all cases ice and water shield is required in all valleys, regardless of average daily temperatures or the possibility of ice buildup.
UNDERLAYmENT AND INTERLAYmENT
method 1 : Class A installation — Two layers of MB technologies TU-35 must be installed over the entire roof deck including areas with ice and water shield. No interlayment is required. method 2 : Class A Installation — Two layers of Fontana Vucaseal G4 must be installed over the entire roof deck including areas with ice and water shield. No interlayment is required.method 3 : Class A installation — In areas where ice and water shield is not installed the roof deck must be covered with 30 lb non-perforated asphalt saturated felt meeting requirements of ASTM D 226. Once the underlayment has been installed the roof must be covered with GAF Elk Versashield interlay. The Versashield should be cut into minimum 18” rolls and installed at the same exposure as the shakes. The felt should be applied over the top portion of the shakes and extend on to the plywood sheathing so that the bottom edge of the felt is positioned at a distance above the butt equal to twice the weather exposure. So, for an exposure of 9”, start the next layer of felt 18” above the butt-line of the course below. (20” above the butt-line for a 10” exposure).method 4 : Class C Installation — Areas of the roof deck not covered by ice and watershield must be covered with 30 lb non-perforated asphalt saturated felt meeting requirements of ASTM D 226. In addition to the underlayment, roofs with slopes less than 6:12 must be covered with 18” 30 lb felt interlay. The felt should be applied over the top portion of the shakes and extend on to the plywood sheathing so that the bottom edge of the felt is positioned at a distance above the butt equal to twice the weather exposure. So, for an exposure of 9”, start the next layer of felt 18” above the butt-line of the course below. (20” above the butt-line for a 10” exposure).
Distance from butt-line to felt isequal to twice the shingle exposure
Felt Interlay Decking
Shingle exposure
Style D orStyle F Drip Edgecan be used
Ice & Water Shield
Starter Strip
IG-SH-4/09Pg. 2 of 10
STARTER COURSE
Each starter tile should be installed extending past the drip edge by approximately 1”. However, if using Style D or Style F drip edge, the starter shingle can be allowed to overhang less if it is appropriate for the gutter system. The starter tiles should be installed with the DaVinci logo on top. The starter tiles should be spaced 3/8” apart as tiles will expand when warm. Each starter tile should be nailed with two nails on a line approximately 6” from the butt and ¾” from outside edge.

INSTALLATION
STRAIGhT COURSING
Install the shakes one at a time starting in the lower left hand corner if right handed and lower right hand corner if left handed. The first course of shakes should be laid directly on the starter tiles with the butt of the shake flush with the butt of the starter tile. The shakes should be installed individually with two nails near the defined areas.
The shakes should be laid individually with a rack type system, also known as rack-style, stair-stepping, or pyramiding; to prevent same size shake directly on top of another. The shakes should be laid with a 3/8” gap between each shake. The gaps between shakes on adjacent courses should offset by a minimum 1½”. The use of the alignment lines on the shakes may be used to facilitate installation but chalk lines should be used frequently to assure horizontal alignment.
Chalk lines should be snapped on underlayment with the tips of the shakes following the lines. Do not snap lines on DaVinci Shake or use red chalk as the chalk may permanently discolor the shake.
STAGG ERED COURSING
Staggering the courses is accomplished by laying the shakesin 9” courses with every other shingle lowered 1”.
An example of how to accomplish this is as follows:Step 1: Lay the first course of shakes flush on top of the starter. Then snap a horizontal line 9” above the tips of the shakes you just installed or 31” from the eave line (butt of the shake you just laid).Step 2: The first shake on second course should be installed putting the tip of the shake on the chalk line. The next or adjacent shake should be 1” below theline. The third shake should be on the line; the fourthshake should be below the line. This continues in the same pattern all the way across the roof one shingle tip on the line and the next 1” below the line.
IG-SH-4/09Pg. 3 of 10
Straight Coursing on DaVinci Shake at a 10” Exposure
Nailholes
3/8” Gapbetween each
shingle
42”
32”
22”
}
Staggered Coursing on DaVinci Shake at a 9” Exposure
Nailholes
40”
31”
22”
3/8” Gapbetween each
shingle
}
GETTING STARTED
Use two corrosion-resistant nails in each shake near nailing location shown on the shakes. (See page 10). This includes theroofer’s choice of: copper, stainless steel or hot-dipped galvanized nails. Once the starter is in place, begin installing shakes in the lower left corner (or lower right corner for a left-handed roofer).The shakes should be flush with the starter tiles on the outer (rakes) and lower (eaves) edges. DaVinci recommends3/8” gap between shakes.Two methods of installation are available: Straight or staggered (see details below). Use the alignment indicator at the top of each shake to help manage the exposure. An exposure of between 9” or 10” is acceptable for straight courses and 9” for staggered courses. As you progress up the roof, be careful not to damage shakes already in place. Put something, perhaps a cut shake, under toe irons (scaffolding brackets) to avoid scratching or marring the finish of the shake already installed below.
9”
9”
IG-SH-4/09
INSTALLATION
GABLE ENDS / RAKES
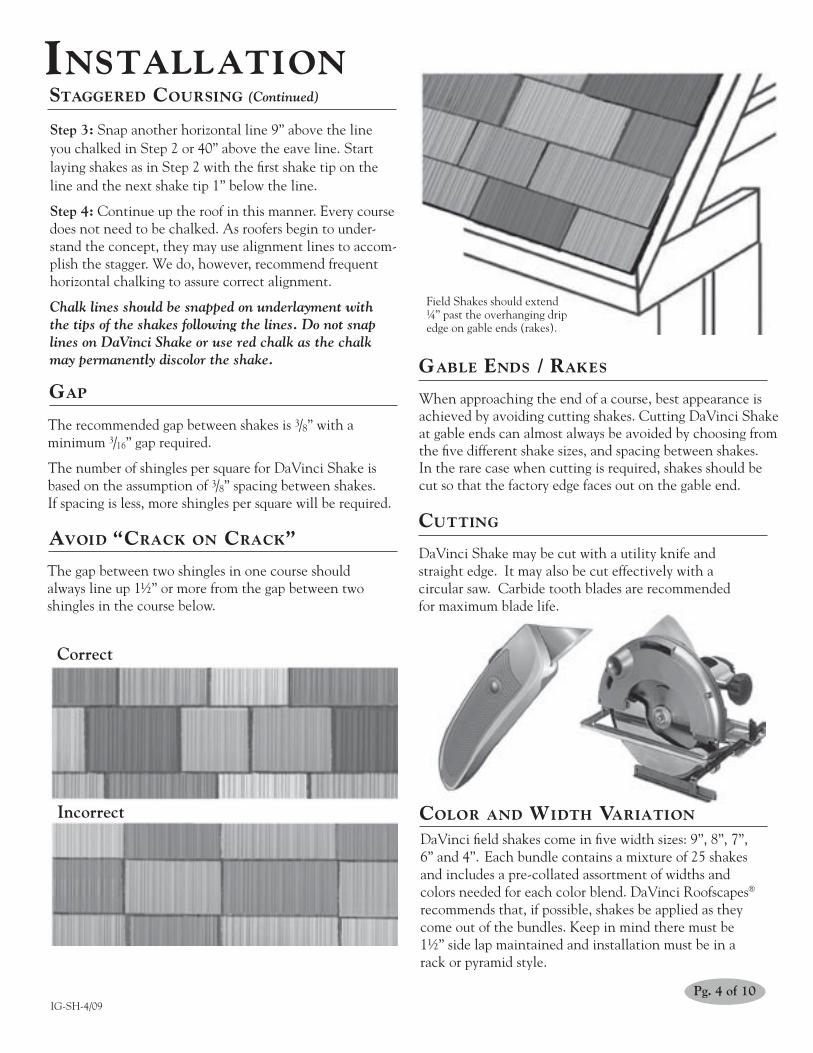
When approaching the end of a course, best appearance is achieved by avoiding cutting shakes. Cutting DaVinci Shake at gable ends can almost always be avoided by choosing from the five different shake sizes, and spacing between shakes. In the rare case when cutting is required, shakes should becut so that the factory edge faces out on the gable end.
CUTTING
DaVinci Shake may be cut with a utility knife andstraight edge. It may also be cut effectively with acircular saw. Carbide tooth blades are recommendedfor maximum blade life.
GAP
The recommended gap between shakes is 3/8” with a minimum 3/16” gap required.
The number of shingles per square for DaVinci Shake isbased on the assumption of 3/8” spacing between shakes.If spacing is less, more shingles per square will be required.
AVOID “CRACK ON CRACK”
The gap between two shingles in one course shouldalways line up 1½” or more from the gap between twoshingles in the course below.
COLOR AND WIDTh VARIATION
DaVinci field shakes come in five width sizes: 9”, 8”, 7”, 6” and 4”. Each bundle contains a mixture of 25 shakes and includes a pre-collated assortment of widths and colors needed for each color blend. DaVinci Roofscapes® recommends that, if possible, shakes be applied as they come out of the bundles. Keep in mind there must be 1½” side lap maintained and installation must be in a rack or pyramid style.
Field Shakes should extend¼” past the overhanging dripedge on gable ends (rakes).
Correct
Incorrect
Pg. 4 of 10
STAGGERED COURSING (Continued)
Step 3: Snap another horizontal line 9” above the lineyou chalked in Step 2 or 40” above the eave line. Start laying shakes as in Step 2 with the first shake tip on the line and the next shake tip 1” below the line.
Step 4: Continue up the roof in this manner. Every course does not need to be chalked. As roofers begin to under-stand the concept, they may use alignment lines to accom-plish the stagger. We do, however, recommend frequenthorizontal chalking to assure correct alignment.
Chalk lines should be snapped on underlayment with the tips of the shakes following the lines. Do not snap lines on DaVinci Shake or use red chalk as the chalk may permanently discolor the shake.

IG-SH-4/09
INSTALLATIONhIP AND RIDGE PREPARATION
ONE-PIECE hIP AND RIDGE APPLICATION:
DaVinci one-piece hip and ridge shakes have an optimum appearance when used on pitches of 12:12 or less. Steeper pitches may cause outside edge to lift and it is recommended the conventional two-piece hip and ridge method be used for pitches greater than 12:12.
After installing field shakes, hips and ridges should be prepared by installing a minimum 6” wide piece of 30 lb felt over the areas where the hip and ridge shakes will be installed. This 30 lb felt should extend at least three inches from the center point on each side of the hip or ridge.
RIDGE VENT APPLICATIONS
If using a continuous ridge vent we recommend a rigid shingle roll-over type. Once the continuous vent is installed, prepackaged 12” DaVinci One-Piece Hip and Ridge shingles should be installed in accordance with the standard hip and ridge installation instructions below. Special caution should be used when cutting the decking on the ridge to assure adequate nailing for the ridge pieces.
DAVINCI ONE-PIECE hIP AND RIDGE ShINGLE INSTALLATION
• DaVinci Shake One-Piece Hip and Ridge should be installed at a 10” exposure with two roofing nails in each piece. • Nails should be long enough to penetrate the roof deck by ¾”. • Two pieces of hip and ridge should be used at the bottom of a hip or the start of a gable. The bottom piece of hip
and ridge should be cut so the tip does not extend past the butt of the second course. If preferred, on the bottom, of a hip two 6” DaVinci Shake placed upside down can be used as an under course. This will prevent the rib structure from being seen on the underside.
• When installing the hip and ridge attempt to nail in areas where the underneath shakes offer support. It is not necessary to nail precisely in the nailing circles.
30 lb felt
10” exposure12” DaVinci Shake One-PieceHip and Ridge Pg. 5 of 10

IG-SH-4/09
INSTALLATION
hIP AND RIDGE PREPARATION
After installing field shakes, hips and ridges should be prepared by installing a minimum 6” wide piece of non-corrosivemetal or UV stable EPDM or equivalent over the hips and ridges. This metal or rubber should extend at least threeinches from the center point on each side of the hip or ridge.
RIDGE VENT APPLICATION
If using a continuous ridge vent we recommend a rigid shingle roll-over type. When installing continuous ridge vent,care should be taken to insure joints in ridge vent are water tight. Once the continuous vent is installed, prepackaged6” DaVinci hip and ridge shakes should be installed in accordance with the standard hip and ridge installationinstructions below. Special caution should be used when cutting the decking on the ridge to assure adequate nailingfor the ridge pieces.
TWO-PIECE hIP AND RIDGE ShINGLE APPLICATION
The bottom piece of hip and ridge should be cut so the tip does not extend past the butt of the second course. If preferred, on the bottom, of a hip two 6” DaVinci Shake placed upside down can be used as an under course. This will prevent the rib structure from being seen on the underside. These shakes that make up a hip and ridge unit should be installed with a ten-inch exposure. Using a chalk line to assure straightness, the prepackaged 6” hip and ridge should be installed one piece at a time so that the butts of two shingles are adjacent and the inside edges touch.
Non-corrosive metal
10” exposure6” DaVinci Shakes
Pg. 6 of 10
TWO-PIECE hIP AND RIDGE APPLICATION:
IG-SH-4/09
INSTALLATION
Pg. 7 of 10
VALL EYS
Because DaVinci Shake has a rib-structure on the underside, special consideration must be used when installing DaVinci Shake in valleys. Open or closed valley systems may be used with variants of each system. Whether installing an open or a closed valley system, valley metal should be made from 24” stock of copper, aluminum, or a minimum 28-gauge clad steel. We require ice and water shield be used in all valleys.
OPEN VALLEYS
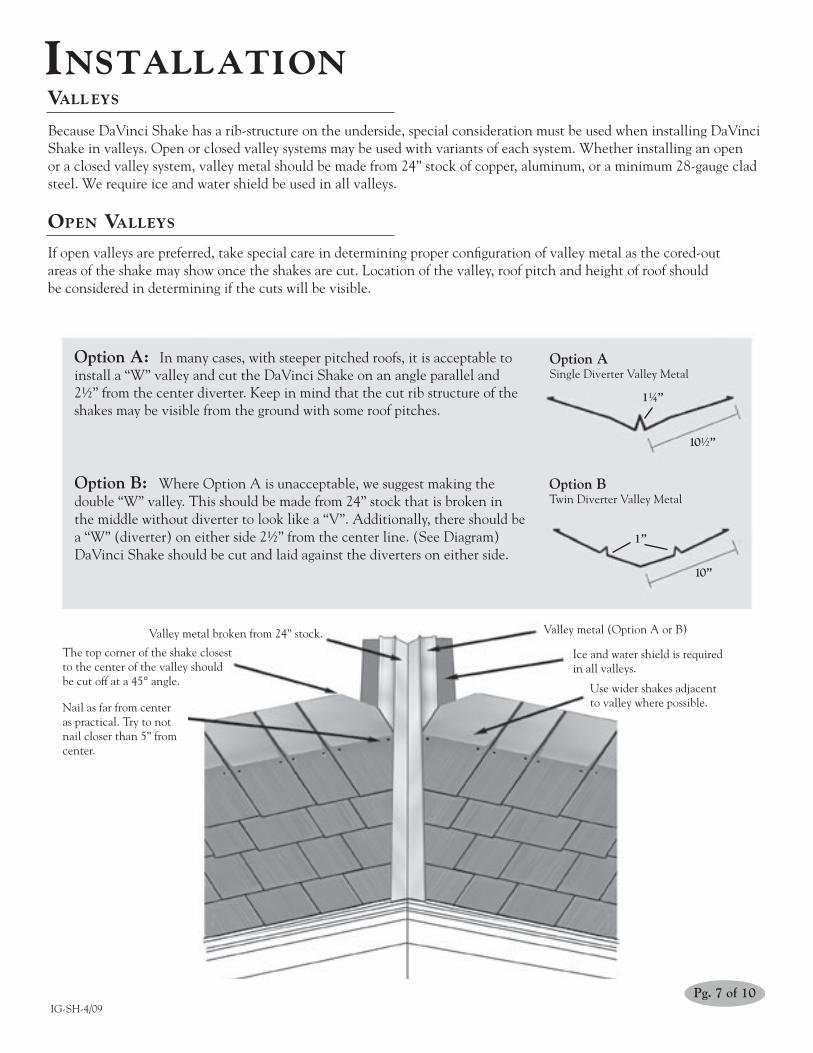
If open valleys are preferred, take special care in determining proper configuration of valley metal as the cored-outareas of the shake may show once the shakes are cut. Location of the valley, roof pitch and height of roof should be considered in determining if the cuts will be visible.
Option A: In many cases, with steeper pitched roofs, it is acceptable toinstall a “W” valley and cut the DaVinci Shake on an angle parallel and2½” from the center diverter. Keep in mind that the cut rib structure of theshakes may be visible from the ground with some roof pitches.
Option B: Where Option A is unacceptable, we suggest making thedouble “W” valley. This should be made from 24” stock that is broken inthe middle without diverter to look like a “V”. Additionally, there should bea “W” (diverter) on either side 2½” from the center line. (See Diagram)DaVinci Shake should be cut and laid against the diverters on either side.
Option ASingle Diverter Valley Metal
1¼”
10½”
Option BTwin Diverter Valley Metal
1”
10”
Valley metal broken from 24” stock.
Ice and water shield is requiredin all valleys.
Use wider shakes adjacentto valley where possible.
Valley metal (Option A or B)
The top corner of the shake closestto the center of the valley shouldbe cut off at a 45° angle.
Nail as far from center as practical. Try to not nail closer than 5” from center.

IG-SH-4/09
INSTALLATION
Pg. 8 of 10
CLOSED VALLE YS
A closed valley can be achieved by using Valley metal option (A, B, or C). In our preferred method, option A, valley metal with a single, narrow-based diverter in the middle is used and the DaVinci Shakes are cut and butted to the diverter. An alternate is to use standard “W” valley with the shakes butted against the diverter. Lastly valley metal broken in the middle with no diverter can be used. In this option shakes should be cut to fit flush with matching course on the opposite side. Wider shakes should be used as valley cuts in order to ensure that nailing be kept at least 5” from center or as far from center as possible.
Option B: It is acceptable to install a “W” valley and place analready-cut DaVinci Shake against center diverter. Metal should bebroken with a diverter at least 1” tall.
Valley metal (Option A, B or C)
Option C: Classic closed valley with no diverter in the middleof the valley.
Option CClassic Closed Valley (no diverter)
11”
Valley metal broken from 24” stock.
Ice and water shield isrequired in all valleys.
Use wider shakes adjacentto valley where possible.
The top corner of the shake closestto the center of the valley should becut off at a 45° angle.
Nail as far from center as practical. Try to not nail closer than 5” from center.
Option A: Install valley with a standing seam in the middle andplace already-cut DaVinci Shake against center standing seam.
1¼”
Option AStanding Seam Valley Metal
10½ -11”
Option BSingle Diverter Valley Metal
1¼”
10½”

IG-SH-4/09
Pg. 9 of 10
SPECIAL ISSUES
FLAShING
Flashing should be used in all areas in which the roof abuts a vertical wall, dormer, chimney, skylight or other structural protrusions. Use the step flashing method, with copper, a minimum of 28-gauge clad steel, or aluminum. The flashing should extend 4” up vertical walls.
Fold down counter flashing over step flashing.
VENTILATION
In some climatic regions of the country, proper ventilation is crucial to the perfor-mance of a roofing system. Proper ventila-tion is especially important in cold climates where modern houses are well insulated and weather-tight. We suggest you follow standard building practices in your area and meet all national and local building codes. A continuous ridge vent is an especially effective ventilation system that we highly recommend.
SNOW GUARDS
Snow guards should be used in all geographic areas where moderate to heavy snow fall is possible. Most kinds of brass or copper snow guard systems work well with DaVinci. Details regarding installation remain the responsibility of the installer and the customer. For additional information please contact DaVinci at any of the numbers listed on the first page of this guide.
A good source for information is Alpine SnowGuards (802-888-8573 or 888-766-4273).
Fasten flashing to roof.
Succeeding flashing pieces 11” long with 4” overlap.
First piece of flashing is 11”
Minimum Lengths
11”
4”
4”
CounterFlashing
ApronFlashing
Soffit Vents
Continuous Vent

IG-SH-4/09
Pg. 10 of 10
PRODUCT FEATURESEXPOSURE
All calculations are based on using the recommended 3/8” gap between shingles.Felt interlay is suggested on any pitch and required on pitches less than 6” in 12”.*If two layer of MB Tech use interlay not required.
ROOF PITCH COURSING INTERLAY MAX. EXPOSURE
less than 6:12 Staggered Required* 9”
less than 6:12 Straight Required* 10”
6:12 or greater Staggered Recommended 9”
6:12 or greater Straight Recommended 10”
NAILING
Each shake should be applied with two copper, non-corrosive stainless steel or hot-dipped galvanized, 3/8” head x 1¾” length nails. Shakes can be nailed by hand or with a pneumatic nail gun. Don’t overdrive nails or nail at an angle. Keep the nail head flush with the surface of the shingle to avoid creating “craters” which can collect moisture and can also prevent the exposed end of the shingles from laying flat.
Use these alignment guides with the top edge of the previous row of shakes to control the exposure.
CUTTING
DaVinci Shake can be cut with a utility knife and straight edge. Electrical circular saws (carbide blade, two teeth per inch) or cordless circular saws (a minimum of 18 volts is recommended) may also be used.
NATU RAL APPEARANCE
To produce the most natural and realistic appearance, DaVinci Shake is modeled directly from real hand-split cedar shake. Scientifically engineered, reinforcing ribs on the back of the shingle add stability and strength.
Please note: DaVinci Shake is made flat, should be stored flat, and must not be installed unless it is flat and in its original form. If shakes are not stored flat and become twisted or curled, lay them flat in a warm place and they will return to their original flatness. Damaged shake should never be installed.
QUICK REFERE NCE
ISSUEDAVINCI
RECOMMENDSACCEPTABLE
ALTERNATIVES
Valley Copper 28-gauge clad metal
Flashing Copper 28-gauge clad metal
Eaves Flashing Copper 28-gauge clad metal
Nails Hot-Dipped Galvanized
Non-corrosive stainless steel
For questions about DaVinci Shake or its application, contact DaVinci Roofscapes®, LLC
ExposureAlignment
Guides
Nail Holes
Natural Appearance
Distributed by: BEST MATERIALS LLC, Phoenix AZPh: 800-474-7570, 602-272-8128 Fx: 602-272-8014 www.BestMaterials.com Email: [email protected]