Embed Size (px)
Citation preview

NCB File Converter User Manual V1.3
9 2 0 0 0 1 0 0 0www.alahli.com@
alah
lincb
/ala
hlin
cb

The National Commercial Bank
Copyright ©2013 The National Commercial Bank
Page 2 of 44
NCB File Converter User Manual V 1.3
File Converter User Manual

Table of Contents
1. Overview 52. Installing The Converter 6 System Requirements 6 Installation Steps 7 Uninstalling The Converter 123. Getting Started 144. Change Language To Arabic 155. Login 156. The main window 177. Adding Company Details 188. Changing Company Details 209. Delete Company 2110. Convert File 22 Duplicate File Warning 25 Duplicate Records Warning 2511. View Report 2612. Reset File Counter 2713. Change Username and Password 2914. Bank Code List 30 Add New Bank Codes 3015. Exit Application 3216. Preparing Input Files 33CSV Format 33 Creating CSV file using Notepad (or any text editor) 33 Creating Files CSV Files using Microsoft Excel 34 Converting Excel File to CSV Format 36 Change the separator in all .csv text files 36Entering Arabic Text In CSV File 37Input File Templates 40 CSV format for DCI (IBAN), DCR ( BBAN) and DDI (Direct Debit) file formats: 40 WPS Template 42
Page 3 of 44
NCB File Converter User Manual V 1.3

Page 4 of 44
NCB File Converter User Manual V 1.3

1. Overview
The National Commercial Bank provides a sophisticated File Converter solution to streamline the conversion process of the client’s files from CSV format to the accepted format by NCB. Using NCB Converter Tool will minimize the time and errors experienced with traditional payroll converters. File converter supports NCB file formats including Payroll, WPS, Bulk Payments and Direct Debit.
Page 5 of 44
NCB File Converter User Manual V 1.3

2. Installing The Converter This section describes system requirements and installation procedure for the Converter.
System Requirements❖ Supported operating system ✱ Windows XP Service Pack 3 (Professional/Home Edition) ✱ Windows Vista ✱ Windows 7❖ Minimum hardware requirements� ✱ Processor GHz� ✱ RAM 512MB� ✱ Disk space 25 MB
• The converter needs Microsoft dot net framework 4 (Client Profile) installed on your computer. If the dot net framework is not already installed on your computer minimum 1 GB in 32 bit operating system and 2 GB in 64 bit operating systems is required to install the dot net framework.
❖ Additional softwares required to install the converter Below is the list of additional softwares needed to install the Converter. The Converter setup will check for these softwares before starting the installation . If these softwares are not installed on your computer then the setup will down load them automatically from Microsoft® Website and install it on your computer.
� ✱ Internet Explorer 6.0 or later� ✱ Windows Installer 3.1 or later� ✱ Dot Net Framework 4 (Client Profile)
❖ Internet connection is required to download the additional softwares listed above, if they are not installed on your computer.❖ User Access Rights� ✱ The user should have sufficient privileges to install software (Administrator Privilege is recommended)
Page 6 of 44
NCB File Converter User Manual V 1.3

Installation StepsPlease follow below steps to install the Converter.
Step 1. Open the deployment package and run the “setup.exe” (refer Figure 1)
Figure 1: Deployment Package
Page 7 of 44
NCB File Converter User Manual V 1.3
Note
Before installing, any previous installation of the Converter should be removed. Please refer “Uninstalling The Converter” section below to remove the Converter completely from your computer.
If you are installing the converter for the first time and your computer does not have dot net framework 4 (Client Profile) installed on it, then “Microsoft .NET Frame-work 4 Client Profile (x86 and x64)” setup dialog box appears (refer Figure 2)
✱

Figure 2: Microsoft.NET Framework 4 Client Profile (x86 and x64) Installation
Figure 3 : Downloading Required Files
Page 8 of 44
NCB File Converter User Manual V 1.3
Click “Accept”Setup will start download required files (refer Figure 3)
✱
✱

Step 2. A welcome screen appears, Click “Next >” (refer Figure 5)
Figure 5: Welcome Screen
Figure 4: Installing Dot Net Framework Client Profile
Page 9 of 44
NCB File Converter User Manual V 1.3
Setup will install Dot Net Framework Client Profile✱
Step 3. Select the path where you wish to install the application. It is NOT recommended to change the default location. Click “Next >” (refer Figure 6)

Page 10 of 44
NCB File Converter User Manual V 1.3
Step 4. Click “Next>” to confirm the installation (refer Figure 7)
Figure 6: Select Installation Folder
Step 5. Please wait until the installer completes the setup (refer Figure 8)
Figure 7: Confirm Installation

Page 11 of 44
NCB File Converter User Manual V 1.3
Step 6. Click “Close” to exit the application (refer Figure 9).
Figure 8: Installig The Converter
Congratulations, you have now successfully installed the NCB File Converter
Figure 9: Installation Complete

Page 12 of 44
NCB File Converter User Manual V 1.3
3. Wait until the process complete
Figure : Unistall or Change Program
Figure 10 : Removing the Converter
Uninstalling The ConverterIn case you want to remove the Converter completely from your computer, please follow below steps.
In Windows7 and Vista 1. Open Programs and Features by clicking the Start button , clicking Control Panel, clicking Programs, and then clicking Programs and Features. 2. Select “NCB File Converter” from the list of programs (refer Figure ), and click “Uninstall”. If you're prompted for an administrator password or confirmation, type the password or provide confirmation.
In Windows XP 1. Click Start, click Control Panel, and then double-click Add or Remove Programs. 2. In the Currently installed programs box, click “NCB Converter” then click “Remove” (refer Figure 11)

Figure 11 : Add or Remove Programs (Windows XP)
Page 13 of 44
NCB File Converter User Manual V 1.3
3. Provide confirmation and wait until the process complete

Page 14 of 44
NCB File Converter User Manual V 1.3
✱ Double click the desktop shortcut “NCB Converter” (Refer Figure 13)
Figure 12 : Opening The Converter From Start Menu
Figure 13 : Desktop Icon of the Converter
3. Getting Started To open the File Converter
❖ Do one of the following� ✱ Click Start >> All Programs >> NCB Converter >> NCB Converter (Refer Figure 12)

Page 15 of 44
NCB File Converter User Manual V 1.3
Figure 14 : Change Language
Figure 15: Login Form
4. Change Language To ArabicYou can change the interface language to Arabic by clicking the link
5. LoginOnce you open the application a login page as shown below will be displayed
✱ � Login to the Converter using the default password and username provided • The default username is Admin and password is Admin@123 • The password is case sensitive • You can change this default username and password after login.

Figure 16: Invalid User or Password
Page 16 of 44
NCB File Converter User Manual V 1.3
If the username and password is correct then the Converter will navigate you to the main window otherwise a message box will be displayed as shown below.
✱

Page 17 of 44
NCB File Converter User Manual V 1.3
Figure 17 : Main Navigation Window
6. The main window When you open the converter, the main window provides access to all menus, options, Help, and Support.

Page 18 of 44
NCB File Converter User Manual V 1.3
Figure 18: Add Company
7. Adding Company Details To start converting files, you have to enter your company details like Company Name, File Identification Code, MoL Establishment ID and debit account number.
To add company details click “Add Company”✱
Company entry form will be displayed as shown below✱
Enter the following details:
1. Company Name: Name of your company, this field should not be more than 14 characters.2. File Identification Code : Four character company identification code (institution code) provided by NCB.3. Corporate Commercial Reg. No. (CR): This is the commercial registration number of the company.4. MoL Establishment ID: The MoL assigned id of the corporation. The corporate can get this number from MoL.

Page 19 of 44
NCB File Converter User Manual V 1.3
5. Payment Chanel: Here you can select one of two payment options • Alahli eCorp - The output file from the Converter would not be encrypted, you can upload the files to Alahli eCorp portal. • Manual CD - The output from the Converter would be encrypted and need to send manually to NCB.
6. Account Number: Here you can enter the list of 14 digit account numbers of your company, from which the amount would be deducted.
Figure 19: Confirm Save
1-211-211-12341-123412-123456789012345
The format of MOL Establishment is: One or two digits then hyphen then minimum 1 and maximum 15 digits. A sample of such code could be:
Note
You can enter multiple companies to the Converter and multiple debit account numbers for each company.
✱ � After entering all details click on “Save” to save your company details. ✱ A confirmation message box will be displayed as shown below.

Page 20 of 44
NCB File Converter User Manual V 1.3
Figure 20 : Edit Company
8. Changing Company Details You can change any of your company details, from the menu “Edit Company”.
❖ To change company details� ✱ Open the Converter ✱ Click on “Edit Company”
• If you have entered multiple companies, select the company name from the list
� ✱ �Change the details you want and save it.
� ✱ Press the delete key on your keyboard
❖ To delete any account number� ✱ Select the account number by clicking the row heading as shown in below figure
Figure 21: Select Account Number To Delete

Page 21 of 44
NCB File Converter User Manual V 1.3
9. Delete Company
❖ To delete a company� ✱ Select the company as same way, described in “Changing Company Details” section ✱ Click on “Delete” button. ✱ A confirmation box appears, click “Yes” to confirm.

Page 22 of 44
NCB File Converter User Manual V 1.3
Figure 22: File Conversion
10. Convert File
❖ To convert file� ✱ Open the Converter and click “File Conversion” menu ✱ File Conversion form will be displayed as shown below
❖ To convert file1. Select company name2. Account numbers for the selected company will be listed in the Account Number drop down, select the account from which you want to deduct the amount.3. Select payment type4. Select file type5. Select date format, Gregorian or Hijri6. Select value date, this is the date on which you want the payment has to be credited to the beneficiaries account.7. Enter the input file path, you can click on browse button or directly enter the file path. a. To view sample input file click the “Download Sample File” button. b. Refer “Preparing Input File” Page 40 for more details on CSV file formats.8. Select payment channel.9. Click on “Convert” button10. Now, your input file will be validated by the Converter for any data entry errors, and a dialog will be displayed if any error is there, as shown below.

Page 23 of 44
NCB File Converter User Manual V 1.3
Figure 23: Validation Errors
• This form has two grids, 1. Records in the input file: which contains all records in the input file 2. Records having errors: which contains row number and description of errors. You can click on any row in this grid to view its original input record.
• You can export this to a CSV file by clicking Export to CSV button.11. You have to fix all this errors in your input file and upload again, to continue.12. If there are no errors, a folder browser will be displayed, as shown below

Figure 24: Browse output folder
Page 24 of 44
NCB File Converter User Manual V 1.3
13. You have to fix all this errors in your input file and upload again, to continue.14. If there are no errors, a folder browser will be displayed, as shown below
Figure 25: Conversion Completed

Page 25 of 44
NCB File Converter User Manual V 1.3
Figure 26: Duplicate File Warning Dialog
Duplicate File Warning
If any file with same debit account number, month and year , total number of records and amount has already been processed then a dialog will be displayed as shown below
You can check the details of previous files shown in the grid and decide to proceed or not.
Duplicate Records Warning
If Same account number and Same beneficiary name and Same Beneficiary ID number and Same Amount and Same Bank Code been duplicated in the file, then a dialog box will be displayed highlighting the duplicate records, you have to remove the duplicate rows form the input file in order to continue.

Page 26 of 44
NCB File Converter User Manual V 1.3
Figure 27: Duplicate Record Highlighting
You can check the details of previous files shown in the grid and decide to proceed or not.
11. View Report
You can view the details of processed files from the menu “View Reports”
❖ To load the records,� ✱ enter the search conditions and click “Search” Button

Page 27 of 44
NCB File Converter User Manual V 1.3
Figure 28: Payment Report

Page 28 of 44
NCB File Converter User Manual V 1.3
Figure 29 : Reset File Counter
12. Reset File Counter
The output files generated by the Converter contains a sequence number, which is unique for the month. You can reset this number from the menu “Reset File Counter” .
You should not reset this number unless and until you want to regenerate an output file with the same filename.
❖ To reset the counter • Select the file identification code • Current counter will be displayed in the “Counter” textbox. Delete this number and enter the number you want to set. • � Click “Save” to save • �A confirmation box will be displayed, click “Yes” to confirm.

Page 29 of 44
NCB File Converter User Manual V 1.3
Figure 30: File Counter Reset Confirmation Dialog

Page 30 of 44
NCB File Converter User Manual V 1.3
Figure 31: Change Username And Password
13. Change Username and Password
❖ To Change the username and or password • Open the Converter • Click on “Change Password”, change password form will be opened as shown below
• Current username will be displayed in the “New User Name” textbox, change it to the new username if you want to change username • Enter your new password in the “New Password” and “Retype Password” textboxes • �Click ”Save”.

Page 31 of 44
NCB File Converter User Manual V 1.3
Figure 32: Bank Code List
14. Bank Code List The Converter is loaded with a set of predefined SARIE bank codes, you can add bank codes if needed from the menu “Bank Code List”.
❖ To add or edit bank code� ✱ Open the Converter ✱ Click “Bank Code List” , bank code list form will be opened as shown below
Add New Bank Codes❖ To add new bank code� ✱ Scroll down the grid and add the bank code and bank name in the last row •In the same way you can add more bank codes. ✱ Click “Save” button to save your changes.
Edit Bank Codes❖ To edit a bank code � ✱ �Select the bank code you want to change ✱ �Edit it by typing the new bank code in the same cell. ✱ �� Click “Save” to save your changes

Page 32 of 44
NCB File Converter User Manual V 1.3
Delete Bank Codes❖ To delete a bank code, � ✱ �Select the row you want to delete by clicking the row heading. ✱ �Delete the row using your keyboard Delete button.
Note
You cannot edit or delete the predefined bank codes which are shown in
pin color.

Page 33 of 44
NCB File Converter User Manual V 1.3
15. Exit Application❖ To exit application� ✱ �Click “Close Application”

Page 34 of 44
NCB File Converter User Manual V 1.3
16. Preparing Input Files
CSV Format the row you want to delete by clicking the row heading.the row using your keyboard Delete button.
To convert a file you need to have Input file in CSV format, A CSV (Comma Separated Values) file is any file containing text that is separated with a comma, but can also be a file separated with any other character.
To create a CSV is as simple as creating any text file and can be created in any text editor, however, is often created in a spreadsheet program such as Microsoft Excel or Open Office Calc. Below are the steps on how to create a CSV file using a text editor such as Notepad and Microsoft Excel.
Creating CSV file using Notepad (or any text editor)❖ To create a CSV file in a text editor� ✱ Open a new text editor program, such as Notepad. Once open write the text data you wish the file to contain and separate each field or column of data with a comma and each row with a new line (refer Figure 33).
Figure 33: Create CSV file in Notepad
✱ From the menu click “Save” The Save dialog box appears. ✱ In the save dialog box browse the location where you want to save the file and select the file type “All Files”

Page 35 of 44
NCB File Converter User Manual V 1.3
✱ Enter the file name with extension “.csv” (refer Figure 34) ✱ Click “Save”
Creating Files CSV Files using Microsoft Excel❖ To create a CSV file using Microsoft Excel � ✱ Open Excel ✱ Type the data you want the file to contain. ✱ Click the Microsoft Office Button, and then click Save. The Save dialog box appears. ✱ In the Save as type box, choose the CSV (Comma delimited) file format for the worksheet. ✱ Browse to the location where you want to save the new CSV file, and then click “Save”
Figure 34: Save file in CSV Format (Notepad)
Note
The Converter uses the “List separator” character as CSV column separator (delimiter) which is defined in the Regional and Language settings of your com-puter. So you have to use the same character as column sepertor while creating the CSV file in text editors such as Notepad.
To view the current "List Separator" follow step 1 to 3 of "Change the separator in all .csv text files" section

Page 36 of 44
NCB File Converter User Manual V 1.3
✱ �A dialog box appears; reminding you that only the current worksheet will be saved to the new file, click “OK”. If you have multiple worksheets in the same excel file, you can save other worksheets as separate text files by repeating this procedure for each worksheet. ✱ A second dialog box appears, reminding you that your worksheet may contain features that are not supported by text file formats. Click “Yes”.

Page 37 of 44
NCB File Converter User Manual V 1.3
16. Converting Excel File to CSV Format
You can convert an Excel worksheet to a text file by using the Save As command.
❖ Converting Excel File to CSV Format� ✱ Open the file you want to convert. ✱ Click the Microsoft Office Button , and then click Save As. The save dialog box appears ✱ In the Save as type box, choose the or CSV (Comma delimited) file format for the worksheet. ✱ Browse to the location where you want to save the new CSV file, and then click Save. ✱ A dialog box appears, reminding you that only the current worksheet will be saved to the new file. If you are certain that the current worksheet is the one that you want to save as a CSV file, click OK. You can save other worksheets as separate text files by repeating this procedure for each worksheet. ✱ A second dialog box appears, reminding you that your worksheet may contain features that are not supported by CSV file formats. If you are interested only in saving the worksheet data into the new CSV file, click Yes. If you are unsure and would like to know more about which Excel features are not supported by text file formats, click Help for more information.
Change the separator in all .csv text files
❖ Converting Excel File to CSV Format� ✱ In Microsoft Windows, click the Start button, and then click Control Panel. ✱ Open the Regional and Language Options dialog box. ✱ Do one of the following: • In Windows Vista, click the Formats tab, and then click Customize this format. • In Windows XP, click the Regional Options tab, and then click Customize. • In Windows 7, click the Formats tab, and then click Additional Settings ✱ Type a new separator in the List separator box. ✱ Click OK twice.
Note
After you change the list separator character for your computer, all programs use the new character as a list separator. You can change the character back to the default character by following the same procedure.

Page 38 of 44
NCB File Converter User Manual V 1.3
Entering Arabic Text In CSV File
To prepare a CSV file in Arabic, Arabic language must be installed on your computer and the system locale must be set to Arabic. Otherwise Arabic texts will not display properly in the CSV files.
❖ To change system locale to Arabic
In Windows XP� ✱ Click “Start” and click “Control Panel”, click “Regional And Language Options” ✱ Select “Advanced” tab ✱ In “Language for non-Unicode programs”, select “Arabic (Saudi Arabia)” (refer Figure 35) ✱ Click “OK”, the system will ask you to restart your computer, click “Restart now”.
Warning !
Changing system locale will affect other non-unicode programs installed on your computer.
You need to restart your computer after changing system locale.
The system locale determines the default character set (letters, symbols, and numbers) and font that you use to enter information and that are used to display information in programs that do not use Unicode. This allows non-Unicode programs to run on your computer using the specified language. You might need to change the default system locale when you install additional display languages on your computer. Selecting a different language for the system locale does not affect the language in menus and dialog boxes for Windows or other programs that do use Unicode.

Page 39 of 44
NCB File Converter User Manual V 1.3
In Windows Vista and Windows 7� ✱ Open Regional and Language Options by clicking the “Start” button , clicking “Control Panel”, clicking “Clock, Language, and Region”, and then clicking “Regional and Language Options” (refer Figure 36) ✱ Click the “Administrative” tab, and then, under “Language for non-Unicode programs (System Locale)”, click “Change system locale”. If you are prompted for an administrator password or confirmation, type the password or provide confirmation. ✱ Select the language “Arabic (Saudi Arabia)”, and then click “OK” (refer Figure 37). � • To restart your computer, click “Restart now”.
Figure 35 : Change System Locale (XP)

Page 40 of 44
NCB File Converter User Manual V 1.3
Figure 36: Regional And Language(Windows 7)
Figure 37: Change System Locale
Page 41 of 44
NCB File Converter User Manual V 1.3
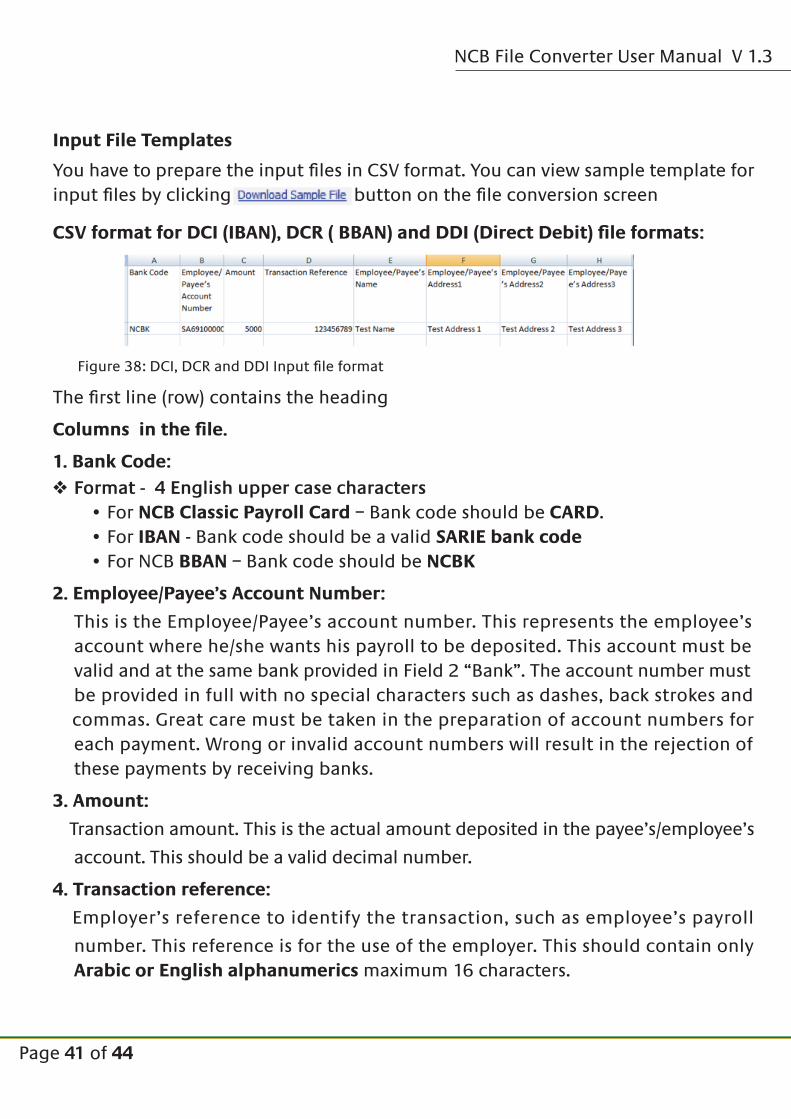
Figure 38: DCI, DCR and DDI Input file format
Input File Templates
You have to prepare the input files in CSV format. You can view sample template for input files by clicking button on the file conversion screen
CSV format for DCI (IBAN), DCR ( BBAN) and DDI (Direct Debit) file formats:
The first line (row) contains the heading
Columns in the file.
1. Bank Code: ❖ Format - 4 English upper case characters� • For NCB Classic Payroll Card – Bank code should be CARD. • For IBAN - Bank code should be a valid SARIE bank code • For NCB BBAN – Bank code should be NCBK
2. Employee/Payee’s Account Number:
This is the Employee/Payee’s account number. This represents the employee’s account where he/she wants his payroll to be deposited. This account must be valid and at the same bank provided in Field 2 “Bank”. The account number must be provided in full with no special characters such as dashes, back strokes and commas. Great care must be taken in the preparation of account numbers for each payment. Wrong or invalid account numbers will result in the rejection of these payments by receiving banks.
3. Amount:
Transaction amount. This is the actual amount deposited in the payee’s/employee’s
account. This should be a valid decimal number.
4. Transaction reference:
Employer’s reference to identify the transaction, such as employee’s payroll
number. This reference is for the use of the employer. This should contain only Arabic or English alphanumerics maximum 16 characters.

Page 42 of 44
NCB File Converter User Manual V 1.3
5. Employee/Payee’s Name:
Employee’s name. This is the name of the Employee which this transaction
(payroll) belongs. This should contain only English or Arabic Alphabets maximum 35 characters
6. Employee/Payee’s Address 1 :
The Employee address can be entered here, English or Arabic Alphabets maximum
35 characters
7. Employee/Payee’s Address 2 :
The Employee address can be entered here, English or Arabic Alphabets maximum
35 characters
8. Employee/Payee’s Address 3:
The Employee address can be entered here, English or Arabic Alphabets maximum
35 characters

Page 43 of 44
NCB File Converter User Manual V 1.3
Figure 39 : WPS Input File Format
WPS Template
The first line (row) contains the heading . In addition to above described columns, WPS template contains 5 additional columns
Columns in the file.
1. Bank Code: ❖ Format - 4 English upper case characters� ✱ For NCB Classic Payroll Card – Bank code should be CARD. ✱ For IBAN - Bank code should be a valid SARIE bank code ✱ For NCB BBAN – Bank code should be NCBK
2. Employee/Payee’s Account Number:
This is the Employee/Payee’s account number. This represents the employee’s account where he/she wants his payroll to be deposited. This account must be valid and at the same bank provided in Field 2 “Bank”. The account number must be provided in full with no special characters such as dashes, back strokes and commas. Great care must be taken in the preparation of account numbers for each payment. Wrong or invalid account numbers will result in the rejection of these payments by receiving banks.
3. Amount:
Transaction amount. This is the actual amount deposited in the payee’s/employee’s
account. This should be a valid decimal number.
4. Transaction reference:
Employer’s reference to identify the transaction, such as employee’s payroll
number. This reference is for the use of the employer. This should contain only Arabic or English alphanumerics maximum 16 characters.
5. Employee/Payee’s Name:
Employee’s name. This is the name of the Employee which this transaction
(payroll) belongs. This should contain only English or Arabic Alphabets maximum 35 characters

Page 44 of 44
NCB File Converter User Manual V 1.3
6. Employee/Payee’s Address 1: The Employee address can be entered here, English or Arabic Alphabets maximum 35 characters
7. Employee/Payee’s Address 2: The Employee address can be entered here, English or Arabic Alphabets maximum 35 characters
8. Employee/Payee’s Address 3: The Employee address can be entered here, English or Arabic Alphabets maximum 35 characters
9. Beneficiary ID (National/Iqama ID): This field should contain the national ID or Iqama ID of the beneficiary.
10. Basic Salary: Employee Basic Salary, enter 0 if not applicable
11. Housing Allowance: Employee Housing Allowance, enter 0 if not applicable
12. Other Earnings: Employee Other Earnings, enter 0 if not applicable
13. Deductions: Employee Salary Deductions, enter 0 if not applicable, negative values not
acceptable.
Note
The above salary details (Basic salary, Housing allowance, Earning and deduction) are for reporting only. NCB will credit beneficiary account with the amount men-tioned in column Amount.