Embed Size (px)
Citation preview
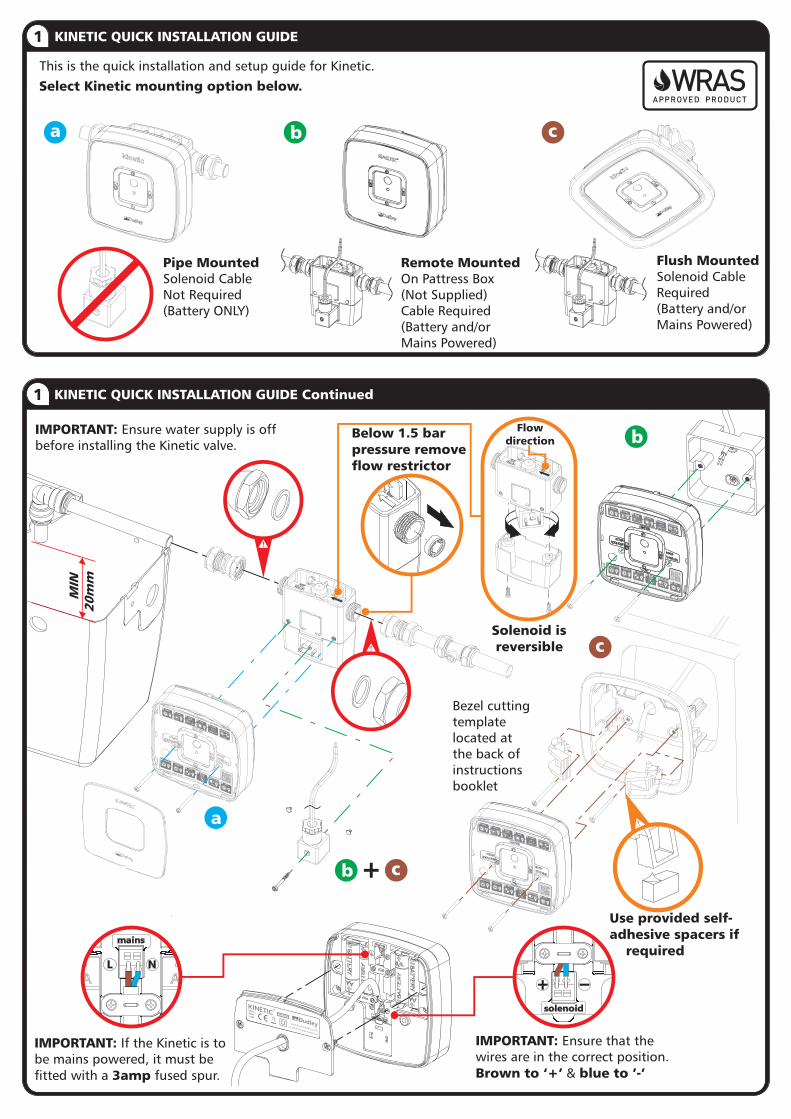
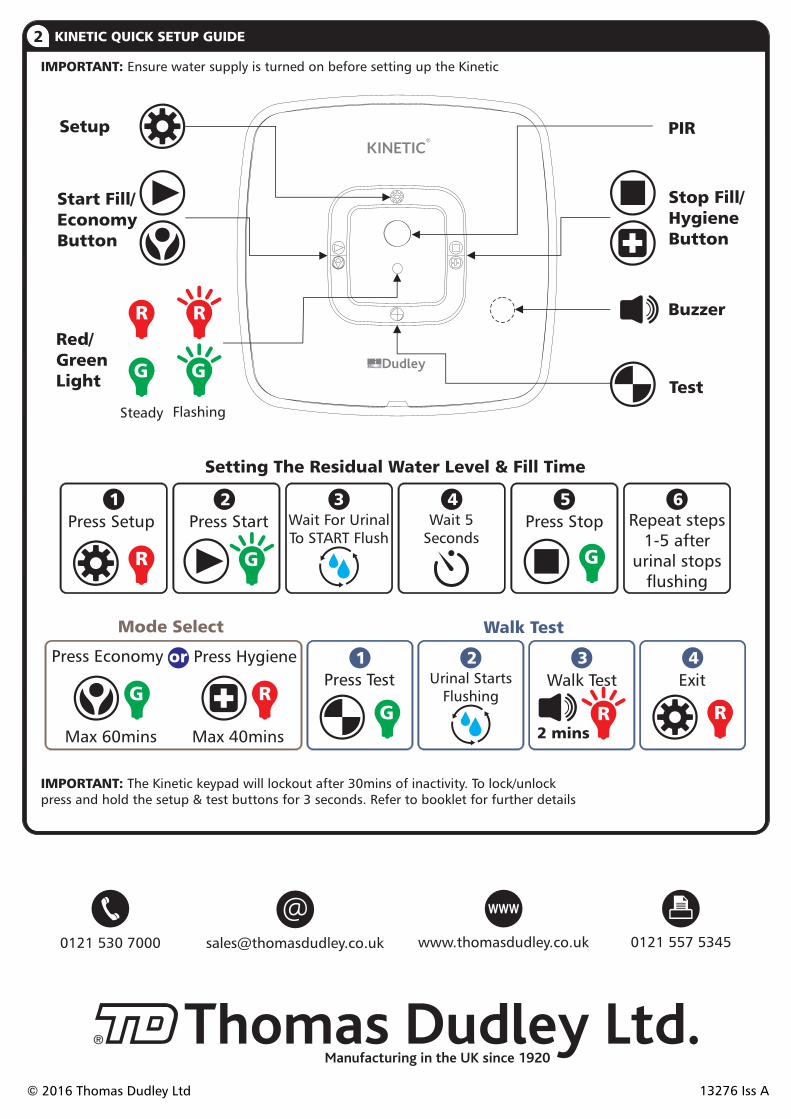
1 KINETIC QUICK INSTALLATION GUIDE
This is the quick installation and setup guide for Kinetic.
Select Kinetic mounting option below.
a b c
Pipe MountedSolenoid CableNot Required(Battery ONLY)
Remote MountedOn Pattress Box (Not Supplied)Cable Required(Battery and/orMains Powered)
Flush MountedSolenoid CableRequired(Battery and/orMains Powered)
1 KINETIC QUICK INSTALLATION GUIDE Continued
IMPORTANT: Ensure water supply is offbefore installing the Kinetic valve.
IMPORTANT: If the Kinetic is tobe mains powered, it must betted with a 3amp fused spur.
MIN
20m
m
b c
Solenoid is reversible
Flowdirection
Below 1.5 bar pressure removeow restrictor
Bezel cuttingtemplatelocated atthe back of instructionsbooklet
Use provided self- adhesive spacers if required
c
a
b
S/N: XXXX
230v~50Hz1.5W
®
www.thomasdudley.co.uk
© 2016 Thomas Dudley Ltd
IMPORTANT: Ensure that thewires are in the correct position.Brown to ‘+’ & blue to ’-’
®
Buzzer
Test
Stop Fill/HygieneButton
PIR
IMPORTANT: Ensure water supply is turned on before setting up the Kinetic
IMPORTANT: The Kinetic keypad will lockout after 30mins of inactivity. To lock/unlockpress and hold the setup & test buttons for 3 seconds. Refer to booklet for further details
Steady Flashing
Setting The Residual Water Level & Fill Time
Repeat steps1-5 after
urinal stopsushing
6
Press Stop
5Wait 5
Seconds
4
Press Setup
1Wait For UrinalTo START Flush
3
Press Start
2
2 KINETIC QUICK SETUP GUIDE
Walk Test
Walk Test
3
Exit
4Urinal Starts
Flushing
2Press Economy
Max 60mins Max 40mins
Press Hygiene
Press Test
1
Mode Select
Red/GreenLight
Setup
Start Fill/EconomyButton
13276 Iss A© 2016 Thomas Dudley Ltd
0121 557 53450121 530 7000 [email protected] www.thomasdudley.co.uk
www

![Quick Installation Guide – PS107 - SEH Technology · @ support@seh.de Print Server PS107 Quick Installation Guide Overview [en] This Quick Installation Guide provides a description](https://img.pdfslide.us/doc/110x75/60636d0038f9905e874fdfb6/quick-installation-guide-a-ps107-seh-technology-supportsehde-print-server.jpg)