Embed Size (px)
Citation preview
10.Retouching Photos | Photoshop Elements 2 H•O•T
| 222 |
In the last chapter, you learned how to correct a photo that has bad value or color. In this
chapter, it’s all about the details. You willlearn how to easily remove the annoying
“red eye” (that makes your kind uncleBob look like a homicidal maniac), howto subtly remove wrinkles from a face(better than botox injections—andless painful, too!), how to removedust, scratches, and imperfectionsfrom a photo, how to sharpen/blurareas selectively, and how to col-orize a black-and-white photo. So,as you can see, there are lots ofnew and really fun things to cover
in this chapter. Read on, good friend,read on.
10.Retouching Photos
| Removing “Red Eye” | Removing Wrinkles |
| Removing Dust, Scratches, and Imperfections |
| Sharpening a Photo | Blurring a Photo |
| Colorizing a Black-and-White Photo |
chap_10
Photoshop Elements 2H•O•T CD-ROM
Photoshop Elements 2 H•O•T | 10.Retouching Photos
| 223 |
Removing Red Eye
In this exercise, you will learn how to easily remove red eye from a photograph. The dreaded red eye iscaused when light—from the flash on your camera, for instance—is reflected off of the back of someone’seye(s). Although many digital cameras do a good job at filtering out red eye, some photos with red eyewill invariably slip through, especially if you take pictures with a standard film-based camera.
1.
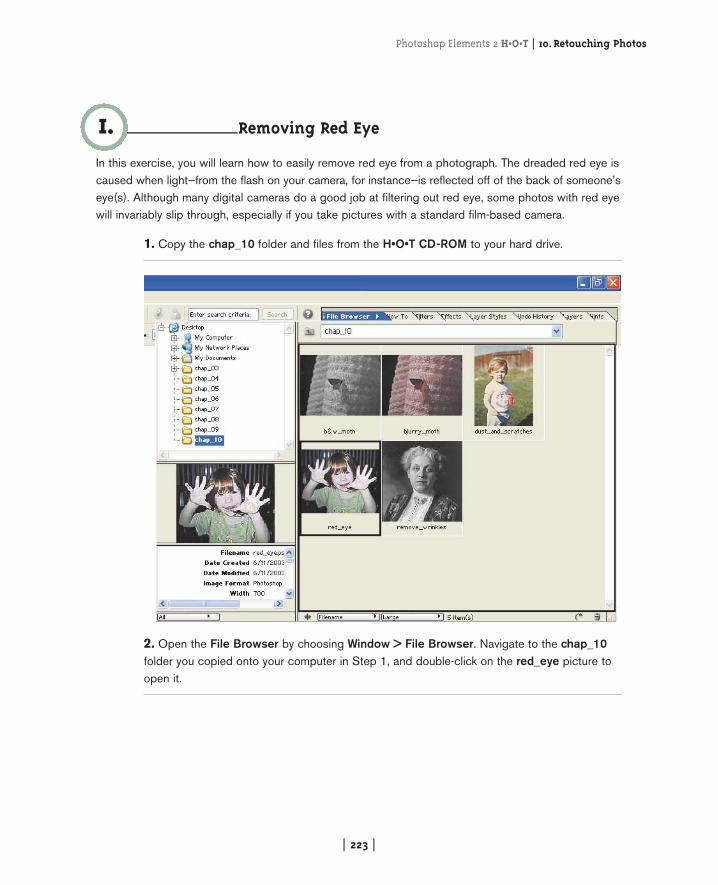
1. Copy the chap_10 folder and files from the H•O•T CD-ROM to your hard drive.
2. Open the File Browser by choosing Window > File Browser. Navigate to the chap_10folder you copied onto your computer in Step 1, and double-click on the red_eye picture toopen it.

10.Retouching Photos | Photoshop Elements 2 H•O•T
| 224 |
As you can see in the photograph, not only are her hands filthy, but she’s got a bad case of the redeye. Luckily, it’s easily corrected in Elements using the Red Eye Brush tool. The Red Eye Brush toolis essentially the Eyedropper tool and the Clone stamp tool, which you’ll learn later in this chapter,mixed together into one tool…but in a very smart way. The Red Eye Brush tool allows you to quicklysample a color you want to replace in an image (the red pupils in the sample image) and replace itwith a color of your choosing (in this case, you’ll replace the red with black). Not only that, but the RedEye Brush tool leaves the texture in the image intact while changing only the color. Pretty spiffy, eh?
3. Single-click on the Red Eye Brush tool in the Toolbox.
Photoshop Elements 2 H•O•T | 10.Retouching Photos
| 225 |
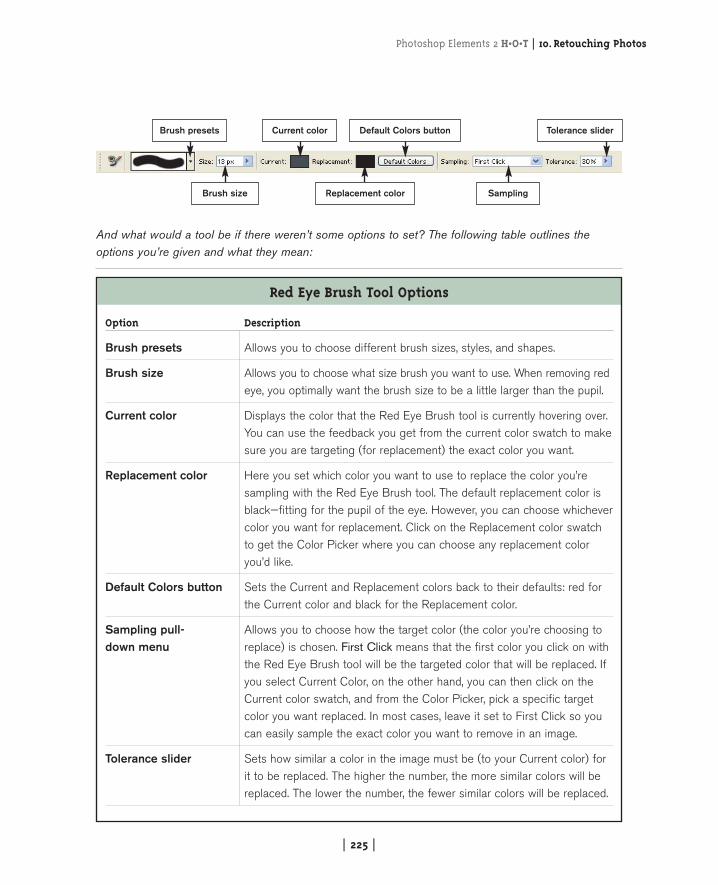
And what would a tool be if there weren’t some options to set? The following table outlines theoptions you’re given and what they mean:
Red Eye Brush Tool Options
Option Description
Brush presets Allows you to choose different brush sizes, styles, and shapes.
Brush size Allows you to choose what size brush you want to use. When removing redeye, you optimally want the brush size to be a little larger than the pupil.
Current color Displays the color that the Red Eye Brush tool is currently hovering over.You can use the feedback you get from the current color swatch to makesure you are targeting (for replacement) the exact color you want.
Replacement color Here you set which color you want to use to replace the color you’resampling with the Red Eye Brush tool. The default replacement color isblack—fitting for the pupil of the eye. However, you can choose whichevercolor you want for replacement. Click on the Replacement color swatchto get the Color Picker where you can choose any replacement coloryou’d like.
Default Colors button Sets the Current and Replacement colors back to their defaults: red forthe Current color and black for the Replacement color.
Sampling pull- Allows you to choose how the target color (the color you’re choosing to down menu replace) is chosen. First Click means that the first color you click on with
the Red Eye Brush tool will be the targeted color that will be replaced. Ifyou select Current Color, on the other hand, you can then click on theCurrent color swatch, and from the Color Picker, pick a specific targetcolor you want replaced. In most cases, leave it set to First Click so youcan easily sample the exact color you want to remove in an image.
Tolerance slider Sets how similar a color in the image must be (to your Current color) forit to be replaced. The higher the number, the more similar colors will bereplaced. The lower the number, the fewer similar colors will be replaced.
Brush presets
Brush size
Current color Default Colors button Tolerance slider
Replacement color Sampling
10.Retouching Photos | Photoshop Elements 2 H•O•T
| 226 |
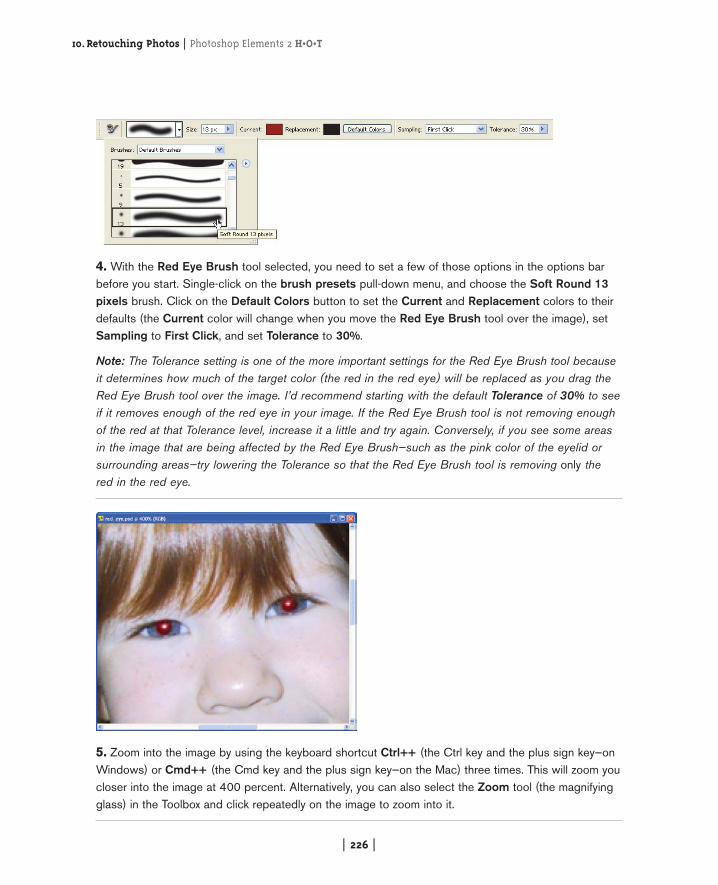
4. With the Red Eye Brush tool selected, you need to set a few of those options in the options barbefore you start. Single-click on the brush presets pull-down menu, and choose the Soft Round 13pixels brush. Click on the Default Colors button to set the Current and Replacement colors to theirdefaults (the Current color will change when you move the Red Eye Brush tool over the image), setSampling to First Click, and set Tolerance to 30%.
Note: The Tolerance setting is one of the more important settings for the Red Eye Brush tool becauseit determines how much of the target color (the red in the red eye) will be replaced as you drag theRed Eye Brush tool over the image. I’d recommend starting with the default Tolerance of 30% to seeif it removes enough of the red eye in your image. If the Red Eye Brush tool is not removing enoughof the red at that Tolerance level, increase it a little and try again. Conversely, if you see some areasin the image that are being affected by the Red Eye Brush—such as the pink color of the eyelid orsurrounding areas—try lowering the Tolerance so that the Red Eye Brush tool is removing only thered in the red eye.
5. Zoom into the image by using the keyboard shortcut Ctrl++ (the Ctrl key and the plus sign key—onWindows) or Cmd++ (the Cmd key and the plus sign key—on the Mac) three times. This will zoom youcloser into the image at 400 percent. Alternatively, you can also select the Zoom tool (the magnifyingglass) in the Toolbox and click repeatedly on the image to zoom into it.
Photoshop Elements 2 H•O•T | 10.Retouching Photos
| 227 |
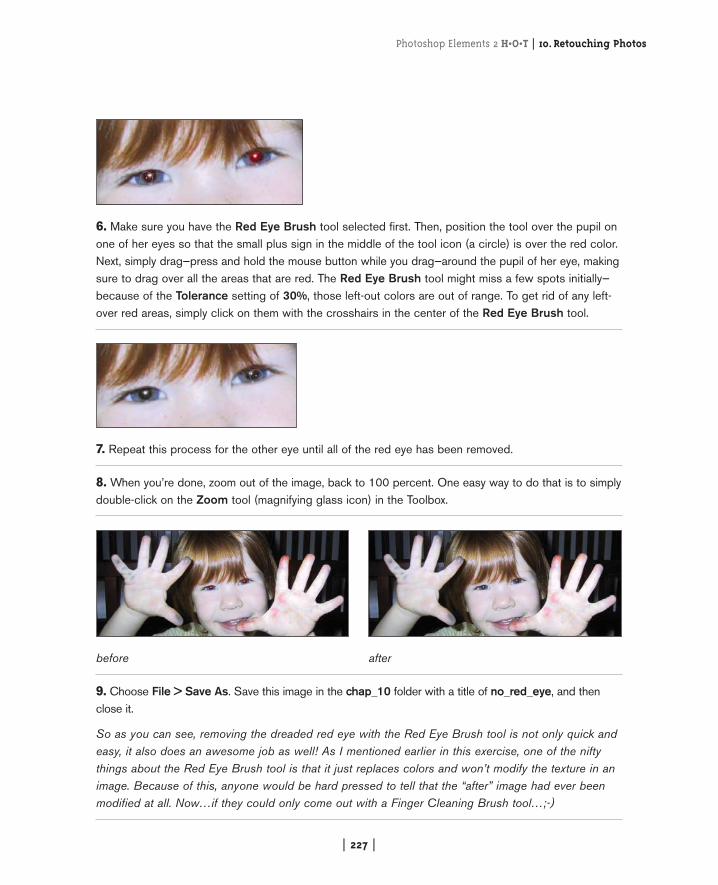
6. Make sure you have the Red Eye Brush tool selected first. Then, position the tool over the pupil onone of her eyes so that the small plus sign in the middle of the tool icon (a circle) is over the red color.Next, simply drag—press and hold the mouse button while you drag—around the pupil of her eye, makingsure to drag over all the areas that are red. The Red Eye Brush tool might miss a few spots initially—because of the Tolerance setting of 30%, those left-out colors are out of range. To get rid of any left-over red areas, simply click on them with the crosshairs in the center of the Red Eye Brush tool.
7. Repeat this process for the other eye until all of the red eye has been removed.
8. When you’re done, zoom out of the image, back to 100 percent. One easy way to do that is to simplydouble-click on the Zoom tool (magnifying glass icon) in the Toolbox.
before after
9. Choose File > Save As. Save this image in the chap_10 folder with a title of no_red_eye, and thenclose it.
So as you can see, removing the dreaded red eye with the Red Eye Brush tool is not only quick andeasy, it also does an awesome job as well! As I mentioned earlier in this exercise, one of the niftythings about the Red Eye Brush tool is that it just replaces colors and won’t modify the texture in animage. Because of this, anyone would be hard pressed to tell that the “after” image had ever beenmodified at all. Now…if they could only come out with a Finger Cleaning Brush tool…;-)
10.Retouching Photos | Photoshop Elements 2 H•O•T
| 228 |
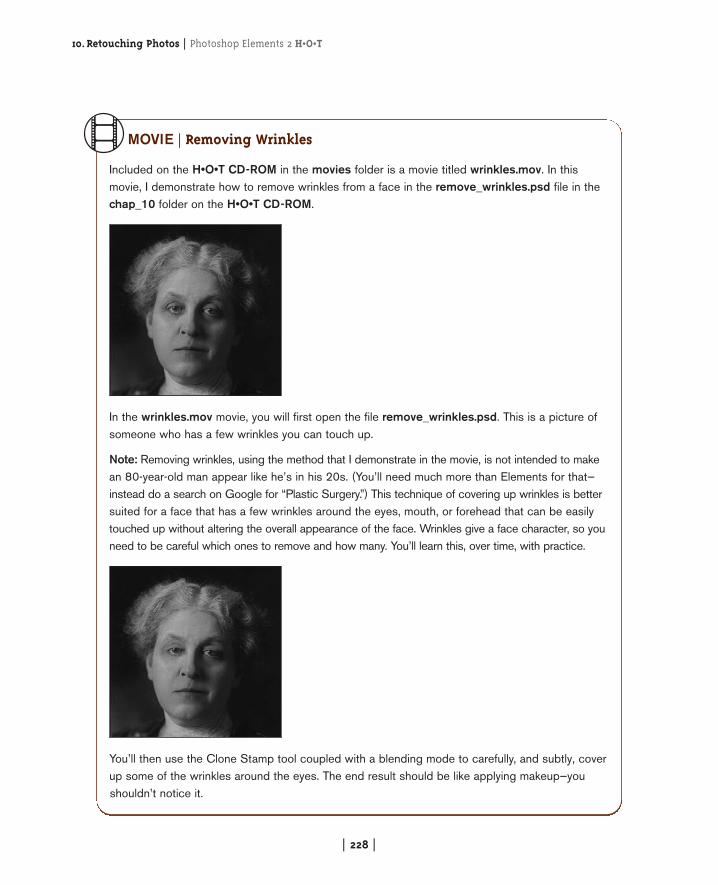
MOVIE | Removing Wrinkles
Included on the H•O•T CD-ROM in the movies folder is a movie titled wrinkles.mov. In thismovie, I demonstrate how to remove wrinkles from a face in the remove_wrinkles.psd file in thechap_10 folder on the H•O•T CD-ROM.
In the wrinkles.mov movie, you will first open the file remove_wrinkles.psd. This is a picture ofsomeone who has a few wrinkles you can touch up.
Note: Removing wrinkles, using the method that I demonstrate in the movie, is not intended to makean 80-year-old man appear like he’s in his 20s. (You’ll need much more than Elements for that—instead do a search on Google for “Plastic Surgery.”) This technique of covering up wrinkles is bettersuited for a face that has a few wrinkles around the eyes, mouth, or forehead that can be easilytouched up without altering the overall appearance of the face. Wrinkles give a face character, so youneed to be careful which ones to remove and how many. You’ll learn this, over time, with practice.
You’ll then use the Clone Stamp tool coupled with a blending mode to carefully, and subtly, coverup some of the wrinkles around the eyes. The end result should be like applying makeup—youshouldn’t notice it.
Photoshop Elements 2 H•O•T | 10.Retouching Photos
| 229 |
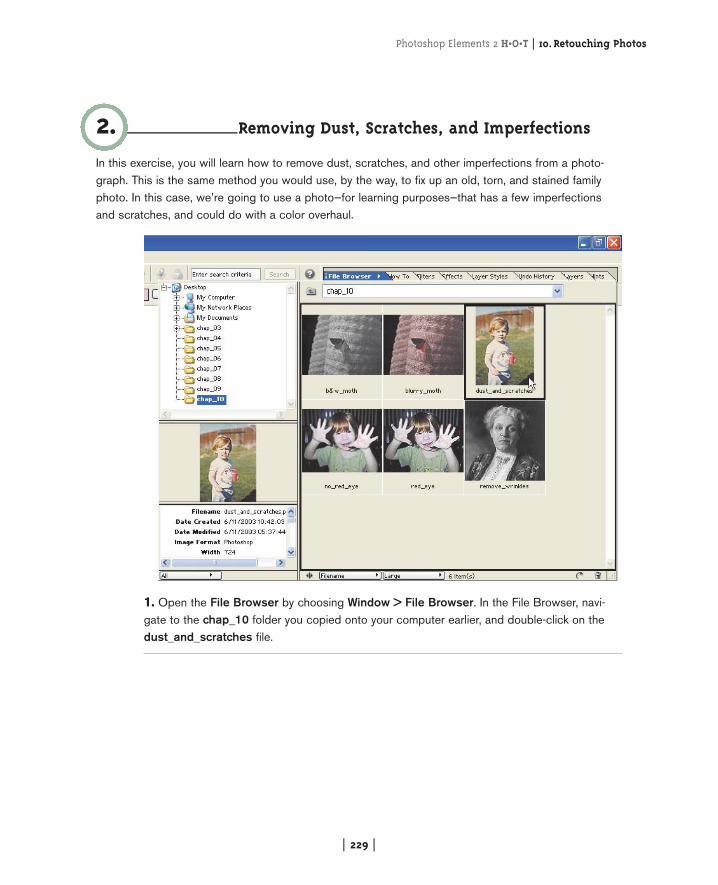
Removing Dust, Scratches, and Imperfections
In this exercise, you will learn how to remove dust, scratches, and other imperfections from a photo-graph. This is the same method you would use, by the way, to fix up an old, torn, and stained familyphoto. In this case, we’re going to use a photo—for learning purposes—that has a few imperfectionsand scratches, and could do with a color overhaul.
2.
1. Open the File Browser by choosing Window > File Browser. In the File Browser, navi-gate to the chap_10 folder you copied onto your computer earlier, and double-click on thedust_and_scratches file.
10.Retouching Photos | Photoshop Elements 2 H•O•T
| 230 |
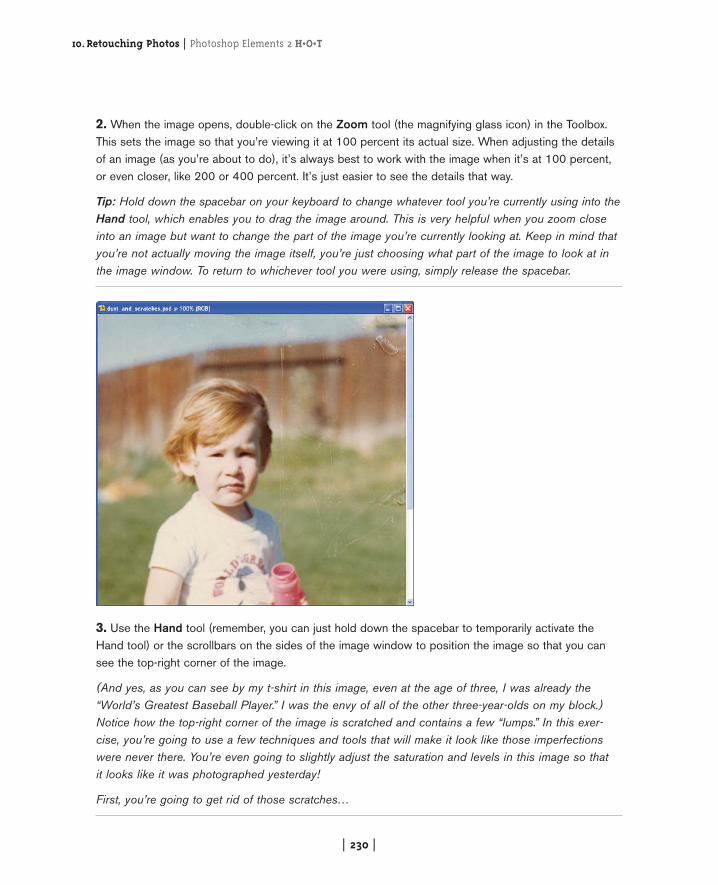
2. When the image opens, double-click on the Zoom tool (the magnifying glass icon) in the Toolbox.This sets the image so that you’re viewing it at 100 percent its actual size. When adjusting the detailsof an image (as you’re about to do), it’s always best to work with the image when it’s at 100 percent,or even closer, like 200 or 400 percent. It’s just easier to see the details that way.
Tip: Hold down the spacebar on your keyboard to change whatever tool you’re currently using into theHand tool, which enables you to drag the image around. This is very helpful when you zoom closeinto an image but want to change the part of the image you’re currently looking at. Keep in mind thatyou’re not actually moving the image itself, you’re just choosing what part of the image to look at inthe image window. To return to whichever tool you were using, simply release the spacebar.
3. Use the Hand tool (remember, you can just hold down the spacebar to temporarily activate theHand tool) or the scrollbars on the sides of the image window to position the image so that you cansee the top-right corner of the image.
(And yes, as you can see by my t-shirt in this image, even at the age of three, I was already the“World’s Greatest Baseball Player.” I was the envy of all of the other three-year-olds on my block.)Notice how the top-right corner of the image is scratched and contains a few “lumps.” In this exer-cise, you’re going to use a few techniques and tools that will make it look like those imperfectionswere never there. You’re even going to slightly adjust the saturation and levels in this image so that it looks like it was photographed yesterday!
First, you’re going to get rid of those scratches…
Photoshop Elements 2 H•O•T | 10.Retouching Photos
| 231 |
4. Zoom out one tick by pressing Ctrl+– (Ctrl key and the minus [or hyphen] key on Windows) or theCmd+– (Cmd key and the minus [or hyphen] key on the Mac) once. This will zoom the image out to66.67 percent.
I know, I know, I just told you that it’s best to edit images at 100 percent or greater. So why are youzooming out then? Because first you need to select the area that has the scratches on it. Thesescratches cover such a large part of the image that it’s best to zoom out a little so you can see thewhole area without having to scroll around. If you’re one of those people who is blessed with a largemonitor, you probably won’t need to zoom out because you’ll have plenty of monitor space (oftencalled “screen real estate”) to see the whole image, even while viewing it at 100 percent. For the rest of you, though, you’ll need to zoom out once to see all of the area you want to select.
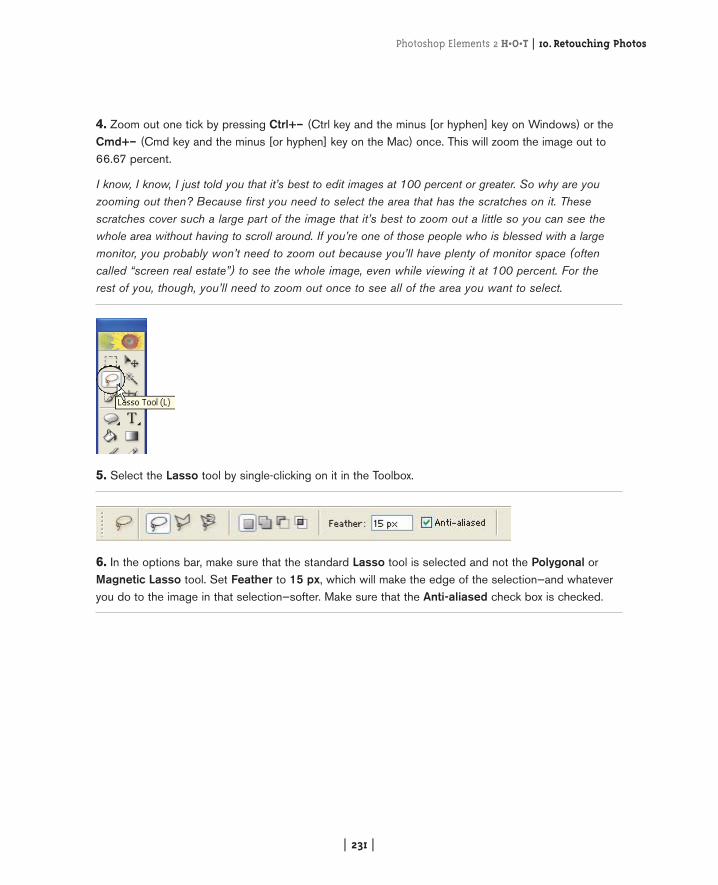
5. Select the Lasso tool by single-clicking on it in the Toolbox.
6. In the options bar, make sure that the standard Lasso tool is selected and not the Polygonal orMagnetic Lasso tool. Set Feather to 15 px, which will make the edge of the selection—and whateveryou do to the image in that selection—softer. Make sure that the Anti-aliased check box is checked.
10.Retouching Photos | Photoshop Elements 2 H•O•T
| 232 |
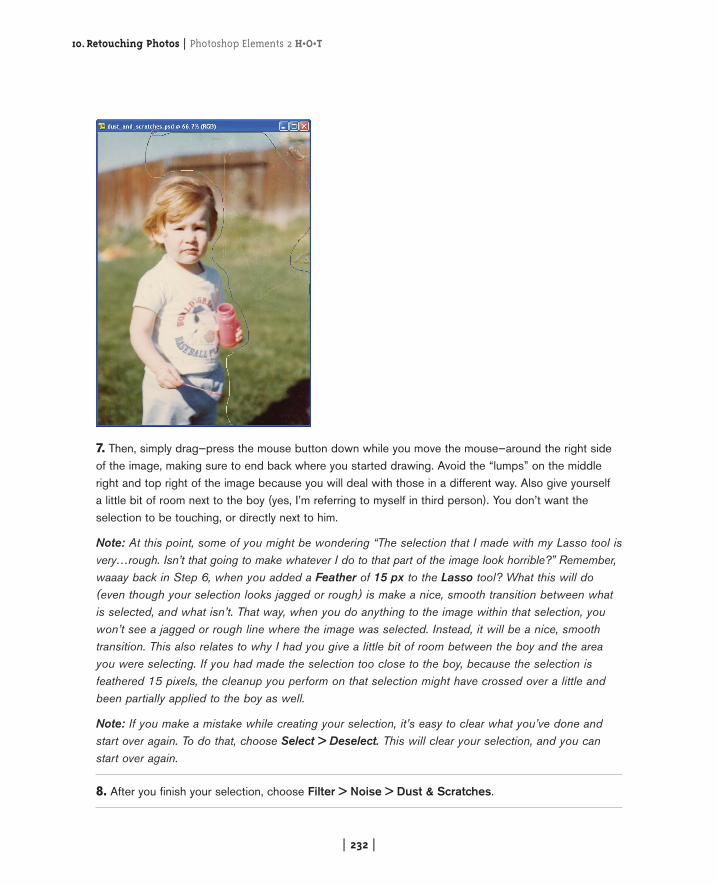
7. Then, simply drag—press the mouse button down while you move the mouse—around the right sideof the image, making sure to end back where you started drawing. Avoid the “lumps” on the middleright and top right of the image because you will deal with those in a different way. Also give yourself a little bit of room next to the boy (yes, I’m referring to myself in third person). You don’t want theselection to be touching, or directly next to him.
Note: At this point, some of you might be wondering “The selection that I made with my Lasso tool isvery…rough. Isn’t that going to make whatever I do to that part of the image look horrible?” Remember,waaay back in Step 6, when you added a Feather of 15 px to the Lasso tool? What this will do(even though your selection looks jagged or rough) is make a nice, smooth transition between whatis selected, and what isn’t. That way, when you do anything to the image within that selection, youwon’t see a jagged or rough line where the image was selected. Instead, it will be a nice, smoothtransition. This also relates to why I had you give a little bit of room between the boy and the areayou were selecting. If you had made the selection too close to the boy, because the selection isfeathered 15 pixels, the cleanup you perform on that selection might have crossed over a little andbeen partially applied to the boy as well.
Note: If you make a mistake while creating your selection, it’s easy to clear what you’ve done andstart over again. To do that, choose Select > Deselect. This will clear your selection, and you canstart over again.
8. After you finish your selection, choose Filter > Noise > Dust & Scratches.
Photoshop Elements 2 H•O•T | 10.Retouching Photos
| 233 |
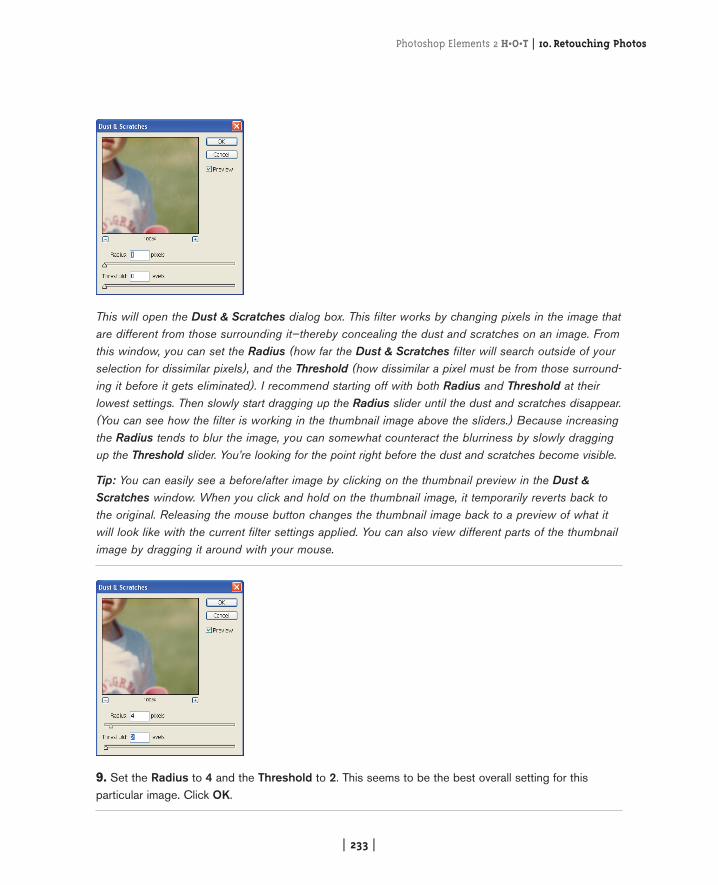
This will open the Dust & Scratches dialog box. This filter works by changing pixels in the image thatare different from those surrounding it—thereby concealing the dust and scratches on an image. Fromthis window, you can set the Radius (how far the Dust & Scratches filter will search outside of yourselection for dissimilar pixels), and the Threshold (how dissimilar a pixel must be from those surround-ing it before it gets eliminated). I recommend starting off with both Radius and Threshold at theirlowest settings. Then slowly start dragging up the Radius slider until the dust and scratches disappear.(You can see how the filter is working in the thumbnail image above the sliders.) Because increasingthe Radius tends to blur the image, you can somewhat counteract the blurriness by slowly draggingup the Threshold slider. You’re looking for the point right before the dust and scratches become visible.
Tip: You can easily see a before/after image by clicking on the thumbnail preview in the Dust &Scratches window. When you click and hold on the thumbnail image, it temporarily reverts back tothe original. Releasing the mouse button changes the thumbnail image back to a preview of what itwill look like with the current filter settings applied. You can also view different parts of the thumbnailimage by dragging it around with your mouse.
9. Set the Radius to 4 and the Threshold to 2. This seems to be the best overall setting for thisparticular image. Click OK.
10.Retouching Photos | Photoshop Elements 2 H•O•T
| 234 |
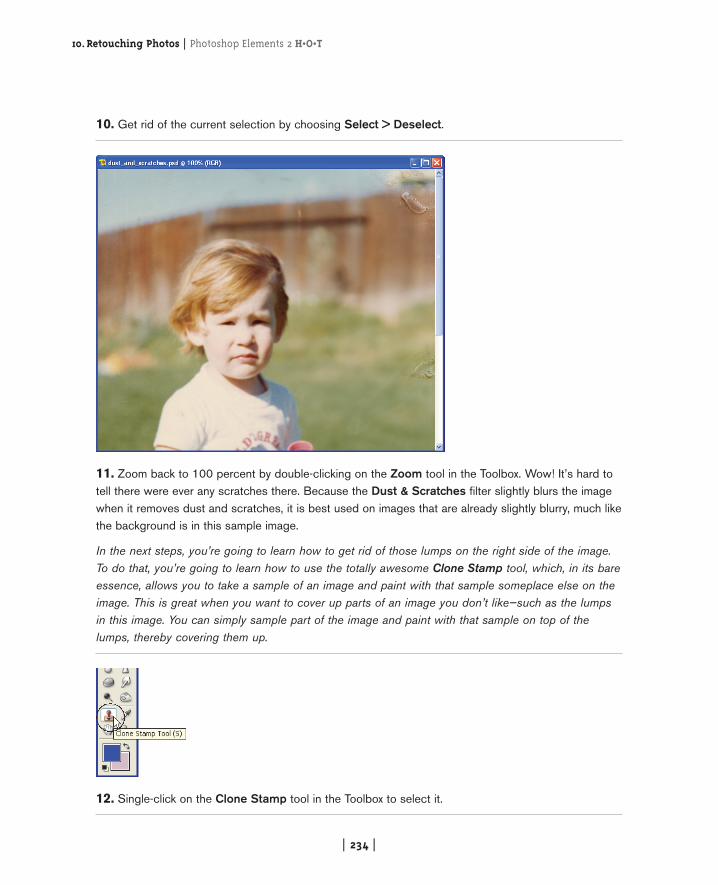
10. Get rid of the current selection by choosing Select > Deselect.
11. Zoom back to 100 percent by double-clicking on the Zoom tool in the Toolbox. Wow! It’s hard totell there were ever any scratches there. Because the Dust & Scratches filter slightly blurs the imagewhen it removes dust and scratches, it is best used on images that are already slightly blurry, much likethe background is in this sample image.
In the next steps, you’re going to learn how to get rid of those lumps on the right side of the image.To do that, you’re going to learn how to use the totally awesome Clone Stamp tool, which, in its bareessence, allows you to take a sample of an image and paint with that sample someplace else on theimage. This is great when you want to cover up parts of an image you don’t like—such as the lumpsin this image. You can simply sample part of the image and paint with that sample on top of thelumps, thereby covering them up.
12. Single-click on the Clone Stamp tool in the Toolbox to select it.
Photoshop Elements 2 H•O•T | 10.Retouching Photos
| 235 |
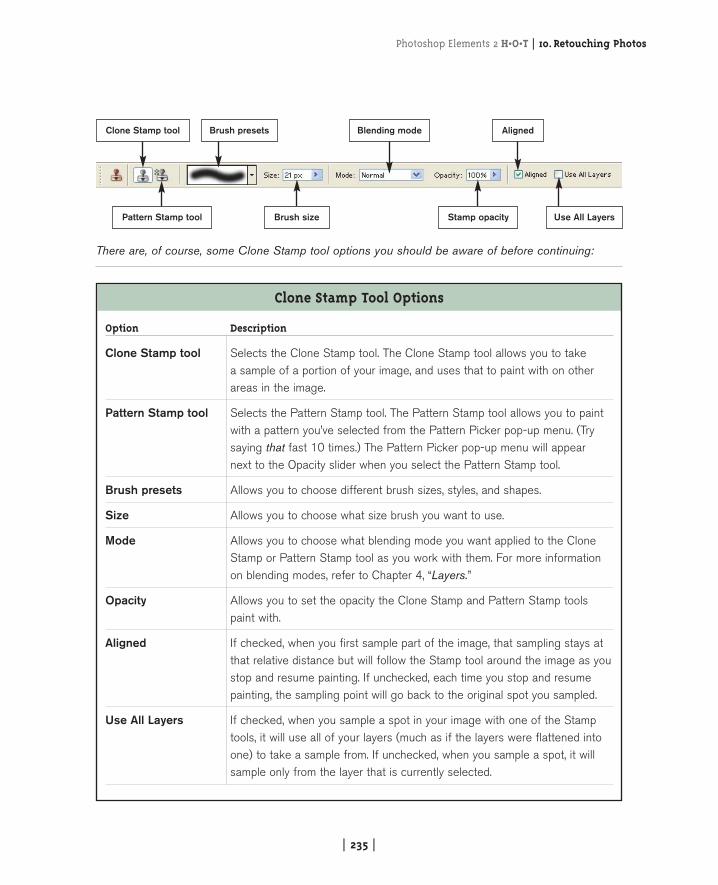
There are, of course, some Clone Stamp tool options you should be aware of before continuing:
Clone Stamp Tool Options
Option Description
Clone Stamp tool Selects the Clone Stamp tool. The Clone Stamp tool allows you to take a sample of a portion of your image, and uses that to paint with on otherareas in the image.
Pattern Stamp tool Selects the Pattern Stamp tool. The Pattern Stamp tool allows you to paintwith a pattern you’ve selected from the Pattern Picker pop-up menu. (Trysaying that fast 10 times.) The Pattern Picker pop-up menu will appear next to the Opacity slider when you select the Pattern Stamp tool.
Brush presets Allows you to choose different brush sizes, styles, and shapes.
Size Allows you to choose what size brush you want to use.
Mode Allows you to choose what blending mode you want applied to the CloneStamp or Pattern Stamp tool as you work with them. For more informationon blending modes, refer to Chapter 4, “Layers.”
Opacity Allows you to set the opacity the Clone Stamp and Pattern Stamp toolspaint with.
Aligned If checked, when you first sample part of the image, that sampling stays atthat relative distance but will follow the Stamp tool around the image as youstop and resume painting. If unchecked, each time you stop and resumepainting, the sampling point will go back to the original spot you sampled.
Use All Layers If checked, when you sample a spot in your image with one of the Stamptools, it will use all of your layers (much as if the layers were flattened intoone) to take a sample from. If unchecked, when you sample a spot, it willsample only from the layer that is currently selected.
Clone Stamp tool
Pattern Stamp tool
Brush presets Blending mode Aligned
Brush size Stamp opacity Use All Layers
10.Retouching Photos | Photoshop Elements 2 H•O•T
| 236 |
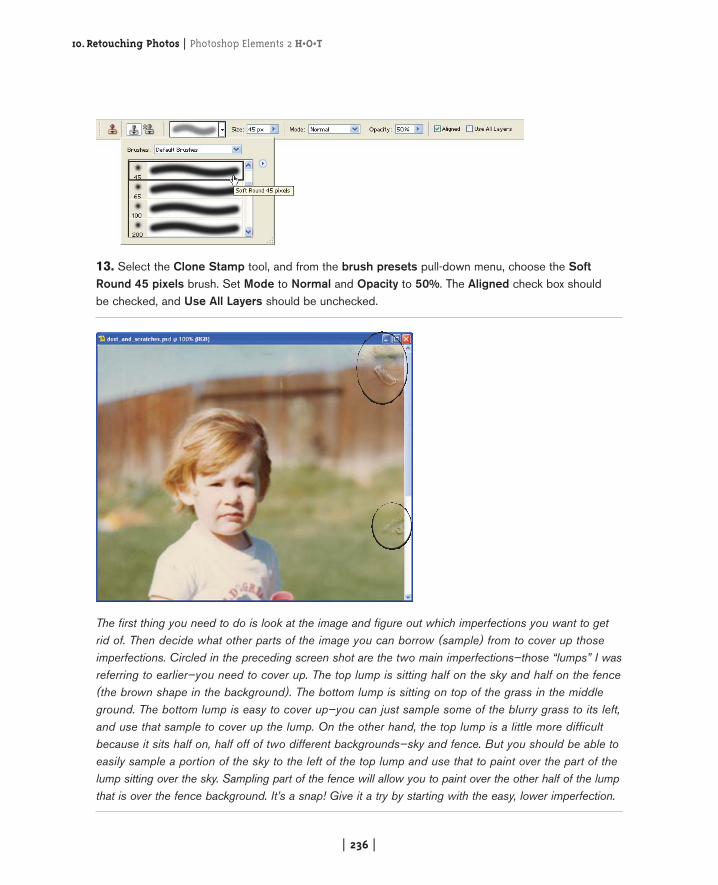
13. Select the Clone Stamp tool, and from the brush presets pull-down menu, choose the SoftRound 45 pixels brush. Set Mode to Normal and Opacity to 50%. The Aligned check box should be checked, and Use All Layers should be unchecked.
The first thing you need to do is look at the image and figure out which imperfections you want to getrid of. Then decide what other parts of the image you can borrow (sample) from to cover up thoseimperfections. Circled in the preceding screen shot are the two main imperfections—those “lumps” I wasreferring to earlier—you need to cover up. The top lump is sitting half on the sky and half on the fence(the brown shape in the background). The bottom lump is sitting on top of the grass in the middleground. The bottom lump is easy to cover up—you can just sample some of the blurry grass to its left,and use that sample to cover up the lump. On the other hand, the top lump is a little more difficultbecause it sits half on, half off of two different backgrounds—sky and fence. But you should be able toeasily sample a portion of the sky to the left of the top lump and use that to paint over the part of thelump sitting over the sky. Sampling part of the fence will allow you to paint over the other half of the lumpthat is over the fence background. It’s a snap! Give it a try by starting with the easy, lower imperfection.
Photoshop Elements 2 H•O•T | 10.Retouching Photos
| 237 |
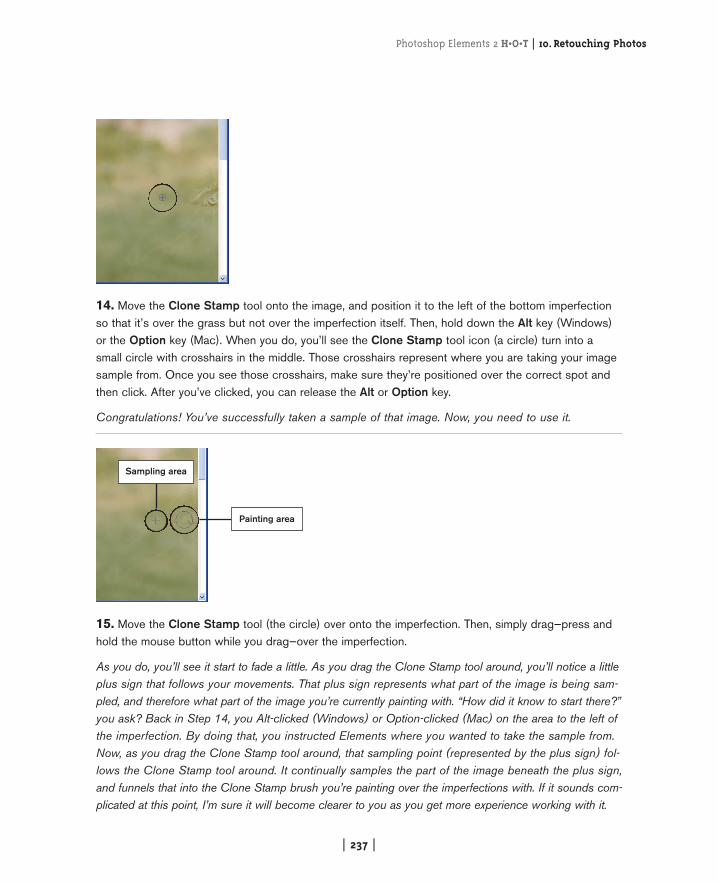
14. Move the Clone Stamp tool onto the image, and position it to the left of the bottom imperfectionso that it’s over the grass but not over the imperfection itself. Then, hold down the Alt key (Windows)or the Option key (Mac). When you do, you’ll see the Clone Stamp tool icon (a circle) turn into asmall circle with crosshairs in the middle. Those crosshairs represent where you are taking your imagesample from. Once you see those crosshairs, make sure they’re positioned over the correct spot andthen click. After you’ve clicked, you can release the Alt or Option key.
Congratulations! You’ve successfully taken a sample of that image. Now, you need to use it.
15. Move the Clone Stamp tool (the circle) over onto the imperfection. Then, simply drag—press andhold the mouse button while you drag—over the imperfection.
As you do, you’ll see it start to fade a little. As you drag the Clone Stamp tool around, you’ll notice a littleplus sign that follows your movements. That plus sign represents what part of the image is being sam-pled, and therefore what part of the image you’re currently painting with. “How did it know to start there?”you ask? Back in Step 14, you Alt-clicked (Windows) or Option-clicked (Mac) on the area to the left ofthe imperfection. By doing that, you instructed Elements where you wanted to take the sample from.Now, as you drag the Clone Stamp tool around, that sampling point (represented by the plus sign) fol-lows the Clone Stamp tool around. It continually samples the part of the image beneath the plus sign,and funnels that into the Clone Stamp brush you’re painting over the imperfections with. If it sounds com-plicated at this point, I’m sure it will become clearer to you as you get more experience working with it.
Sampling area
Painting area
10.Retouching Photos | Photoshop Elements 2 H•O•T
| 238 |
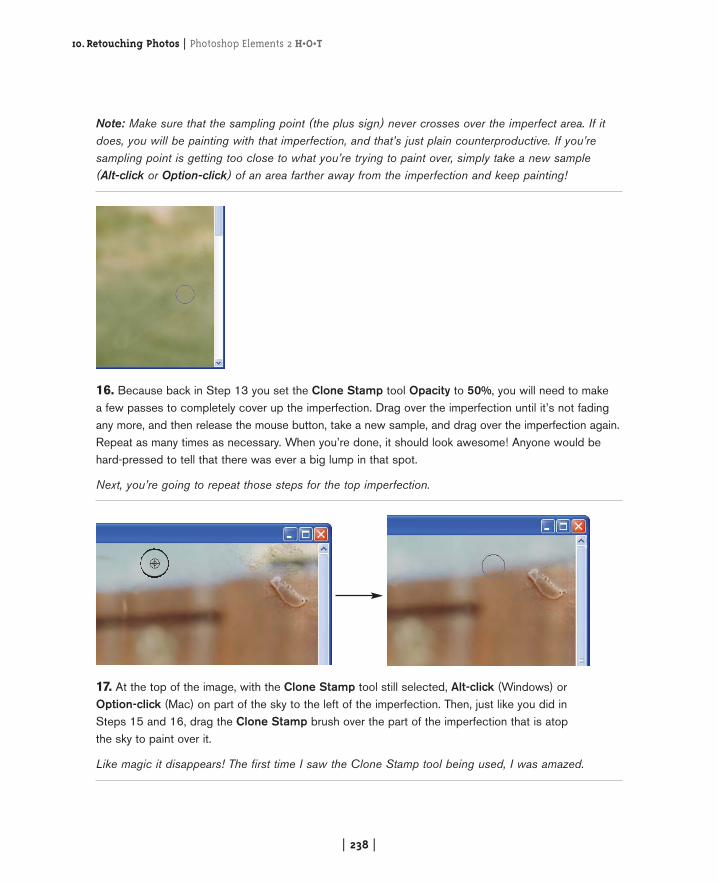
Note: Make sure that the sampling point (the plus sign) never crosses over the imperfect area. If itdoes, you will be painting with that imperfection, and that’s just plain counterproductive. If you’resampling point is getting too close to what you’re trying to paint over, simply take a new sample(Alt-click or Option-click) of an area farther away from the imperfection and keep painting!
16. Because back in Step 13 you set the Clone Stamp tool Opacity to 50%, you will need to make a few passes to completely cover up the imperfection. Drag over the imperfection until it’s not fadingany more, and then release the mouse button, take a new sample, and drag over the imperfection again.Repeat as many times as necessary. When you’re done, it should look awesome! Anyone would behard-pressed to tell that there was ever a big lump in that spot.
Next, you’re going to repeat those steps for the top imperfection.
17. At the top of the image, with the Clone Stamp tool still selected, Alt-click (Windows) orOption-click (Mac) on part of the sky to the left of the imperfection. Then, just like you did in Steps 15 and 16, drag the Clone Stamp brush over the part of the imperfection that is atop the sky to paint over it.
Like magic it disappears! The first time I saw the Clone Stamp tool being used, I was amazed.
Photoshop Elements 2 H•O•T | 10.Retouching Photos
| 239 |
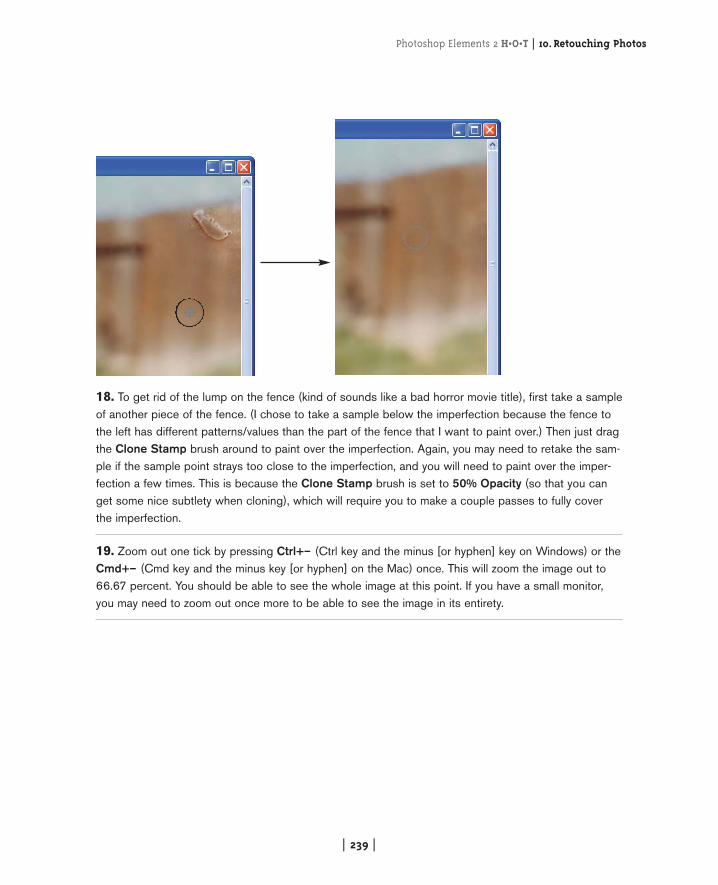
18. To get rid of the lump on the fence (kind of sounds like a bad horror movie title), first take a sampleof another piece of the fence. (I chose to take a sample below the imperfection because the fence tothe left has different patterns/values than the part of the fence that I want to paint over.) Then just dragthe Clone Stamp brush around to paint over the imperfection. Again, you may need to retake the sam-ple if the sample point strays too close to the imperfection, and you will need to paint over the imper-fection a few times. This is because the Clone Stamp brush is set to 50% Opacity (so that you canget some nice subtlety when cloning), which will require you to make a couple passes to fully cover the imperfection.
19. Zoom out one tick by pressing Ctrl+– (Ctrl key and the minus [or hyphen] key on Windows) or theCmd+– (Cmd key and the minus key [or hyphen] on the Mac) once. This will zoom the image out to66.67 percent. You should be able to see the whole image at this point. If you have a small monitor,you may need to zoom out once more to be able to see the image in its entirety.
10.Retouching Photos | Photoshop Elements 2 H•O•T
| 240 |
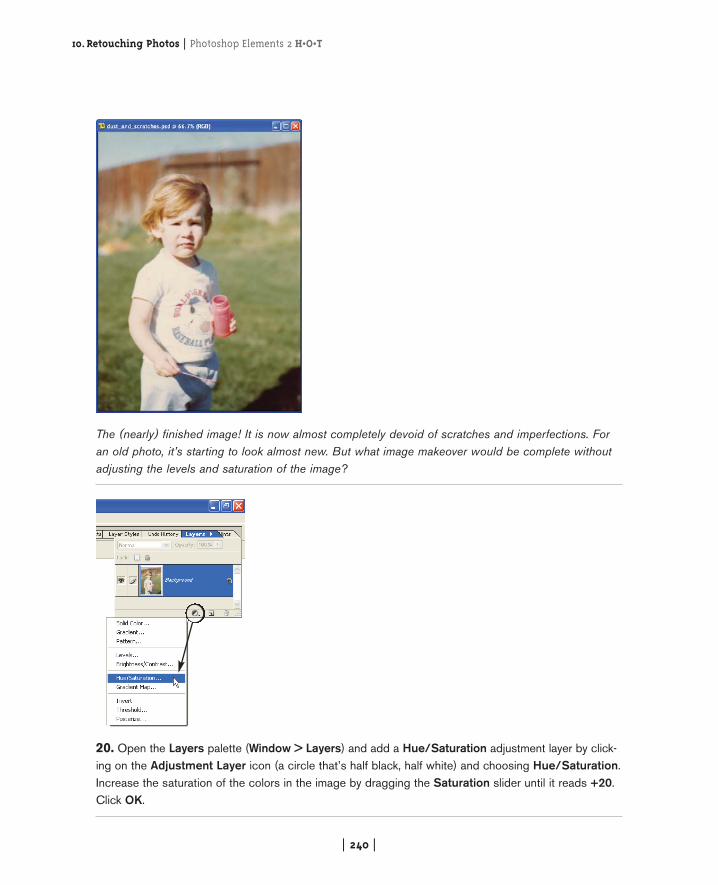
The (nearly) finished image! It is now almost completely devoid of scratches and imperfections. Foran old photo, it’s starting to look almost new. But what image makeover would be complete withoutadjusting the levels and saturation of the image?
20. Open the Layers palette (Window > Layers) and add a Hue/Saturation adjustment layer by click-ing on the Adjustment Layer icon (a circle that’s half black, half white) and choosing Hue/Saturation.Increase the saturation of the colors in the image by dragging the Saturation slider until it reads +20.Click OK.
Photoshop Elements 2 H•O•T | 10.Retouching Photos
| 241 |
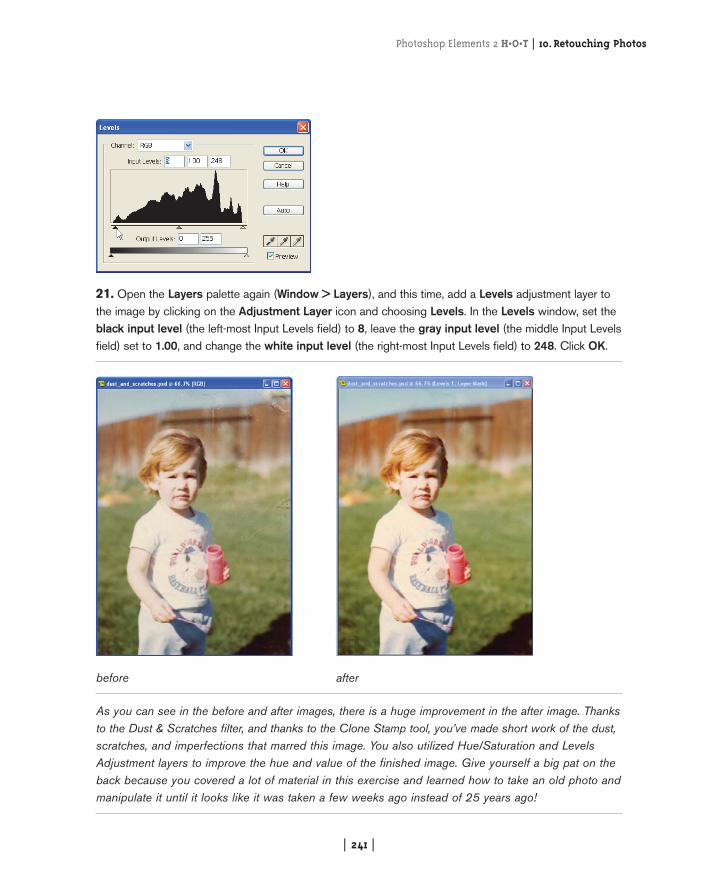
21. Open the Layers palette again (Window > Layers), and this time, add a Levels adjustment layer tothe image by clicking on the Adjustment Layer icon and choosing Levels. In the Levels window, set theblack input level (the left-most Input Levels field) to 8, leave the gray input level (the middle Input Levelsfield) set to 1.00, and change the white input level (the right-most Input Levels field) to 248. Click OK.
before after
As you can see in the before and after images, there is a huge improvement in the after image. Thanksto the Dust & Scratches filter, and thanks to the Clone Stamp tool, you’ve made short work of the dust,scratches, and imperfections that marred this image. You also utilized Hue/Saturation and LevelsAdjustment layers to improve the hue and value of the finished image. Give yourself a big pat on theback because you covered a lot of material in this exercise and learned how to take an old photo andmanipulate it until it looks like it was taken a few weeks ago instead of 25 years ago!
10.Retouching Photos | Photoshop Elements 2 H•O•T
| 242 |
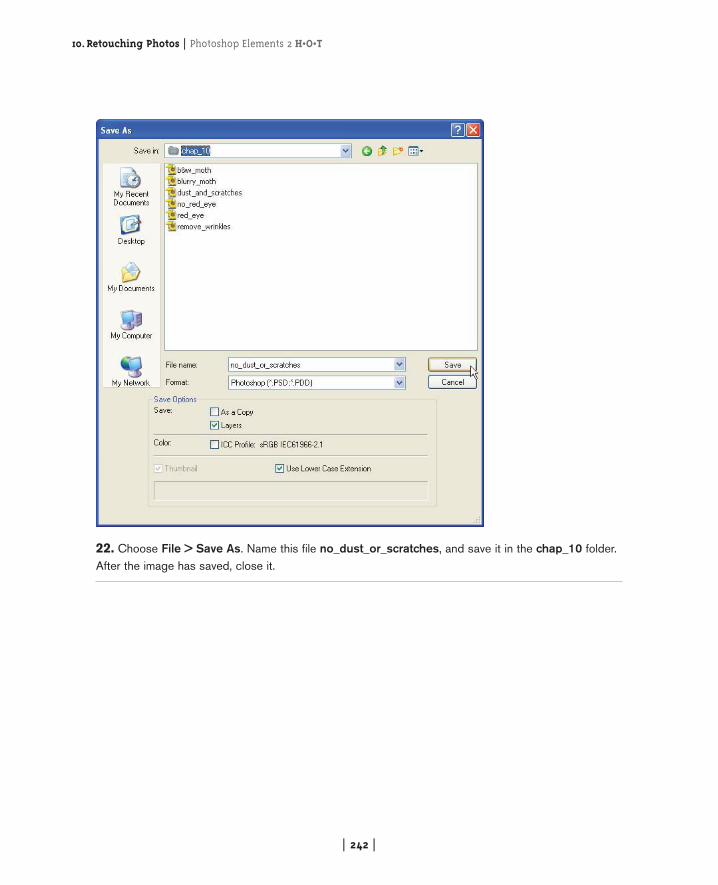
22. Choose File > Save As. Name this file no_dust_or_scratches, and save it in the chap_10 folder.After the image has saved, close it.
Photoshop Elements 2 H•O•T | 10.Retouching Photos
| 243 |
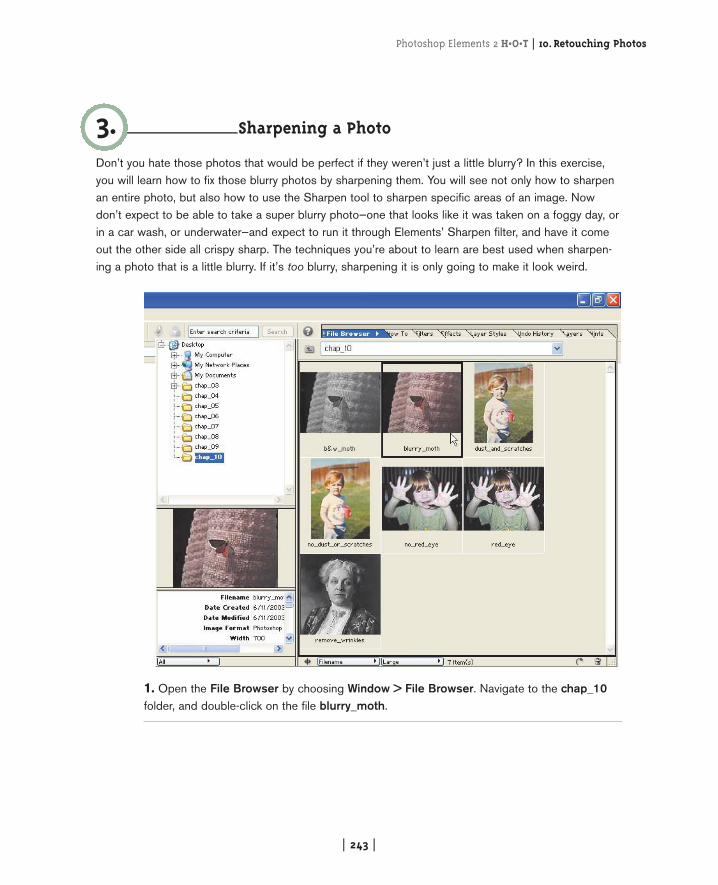
Sharpening a Photo
Don’t you hate those photos that would be perfect if they weren’t just a little blurry? In this exercise,you will learn how to fix those blurry photos by sharpening them. You will see not only how to sharpenan entire photo, but also how to use the Sharpen tool to sharpen specific areas of an image. Nowdon’t expect to be able to take a super blurry photo—one that looks like it was taken on a foggy day, orin a car wash, or underwater—and expect to run it through Elements’ Sharpen filter, and have it comeout the other side all crispy sharp. The techniques you’re about to learn are best used when sharpen-ing a photo that is a little blurry. If it’s too blurry, sharpening it is only going to make it look weird.
3.
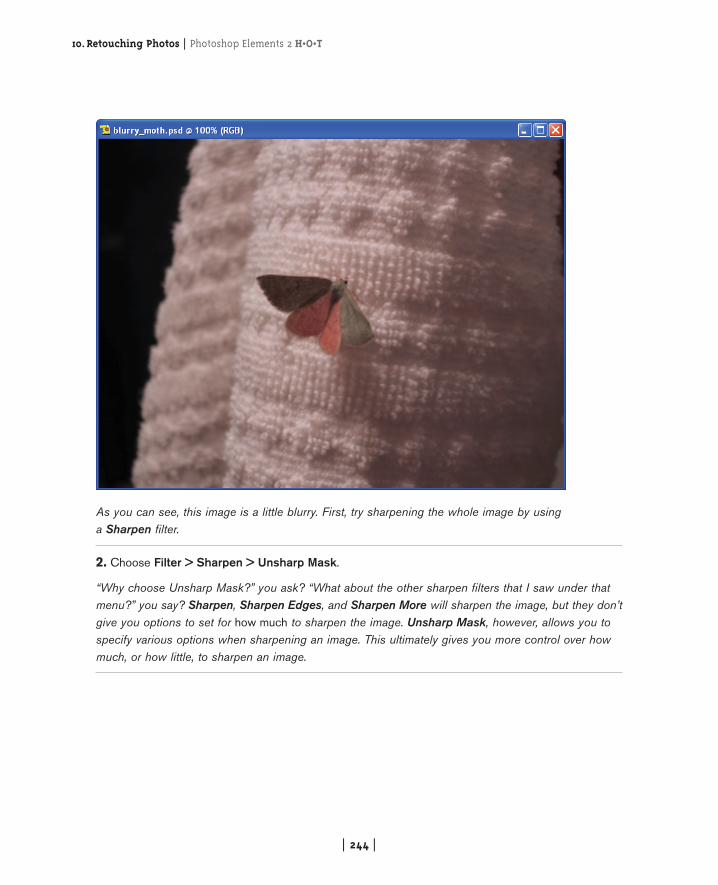
1. Open the File Browser by choosing Window > File Browser. Navigate to the chap_10folder, and double-click on the file blurry_moth.
10.Retouching Photos | Photoshop Elements 2 H•O•T
| 244 |
As you can see, this image is a little blurry. First, try sharpening the whole image by using a Sharpen filter.
2. Choose Filter > Sharpen > Unsharp Mask.
“Why choose Unsharp Mask?” you ask? “What about the other sharpen filters that I saw under thatmenu?” you say? Sharpen, Sharpen Edges, and Sharpen More will sharpen the image, but they don’tgive you options to set for how much to sharpen the image. Unsharp Mask, however, allows you tospecify various options when sharpening an image. This ultimately gives you more control over howmuch, or how little, to sharpen an image.

Photoshop Elements 2 H•O•T | 10.Retouching Photos
| 245 |
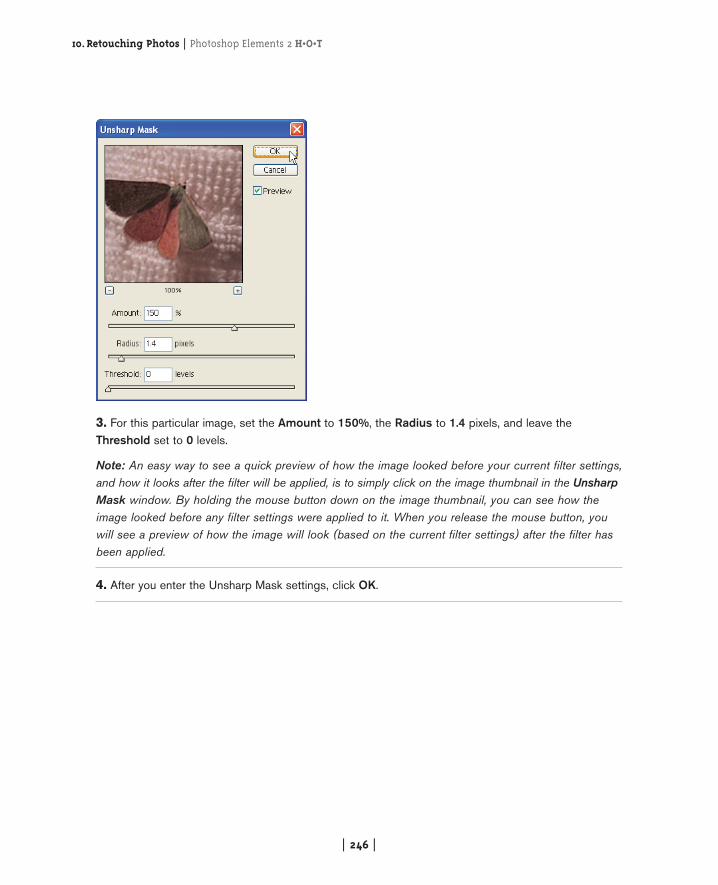
The Unsharp Mask filter window has three fields/sliders:
• Amount: A percentage of how much you want to increase the contrast of the pixels in the image.Adobe recommends setting the Amount slider to 150% to 200% for high-resolution (200ppi orhigher) images you are going to print.
• Radius: The number of pixels to sharpen around edges. A low Radius sharpens only the pixelsright near edges, whereas a high Radius sharpens a wider area around edges. Adobe recom-mends a Radius between 1 and 2 for high-resolution images you are going to print.
• Threshold: Sets how different a pixel must be from the other pixels surrounding it before it isconsidered an “edge pixel” and sharpened. A Threshold of 0, the default, sharpens all the pixelsin the image. Essentially, the lower the threshold, the more pixels will be sharpened; the higherthe threshold, the fewer pixels will be sharpened. To avoid reducing visual “noise” in the image,Adobe recommends setting the Threshold somewhere between 2 and 20.
When I sharpen images, I usually start by setting the Amount to 100% (it’s a good starting spot),and then slowly increase the Radius amount until the image has the sharpness I want. If there’s too much of an “edge” around shapes, I can fine-tune it with the Threshold slider.
10.Retouching Photos | Photoshop Elements 2 H•O•T
| 246 |
3. For this particular image, set the Amount to 150%, the Radius to 1.4 pixels, and leave theThreshold set to 0 levels.
Note: An easy way to see a quick preview of how the image looked before your current filter settings,and how it looks after the filter will be applied, is to simply click on the image thumbnail in the UnsharpMask window. By holding the mouse button down on the image thumbnail, you can see how theimage looked before any filter settings were applied to it. When you release the mouse button, youwill see a preview of how the image will look (based on the current filter settings) after the filter hasbeen applied.
4. After you enter the Unsharp Mask settings, click OK.
Photoshop Elements 2 H•O•T | 10.Retouching Photos
| 247 |
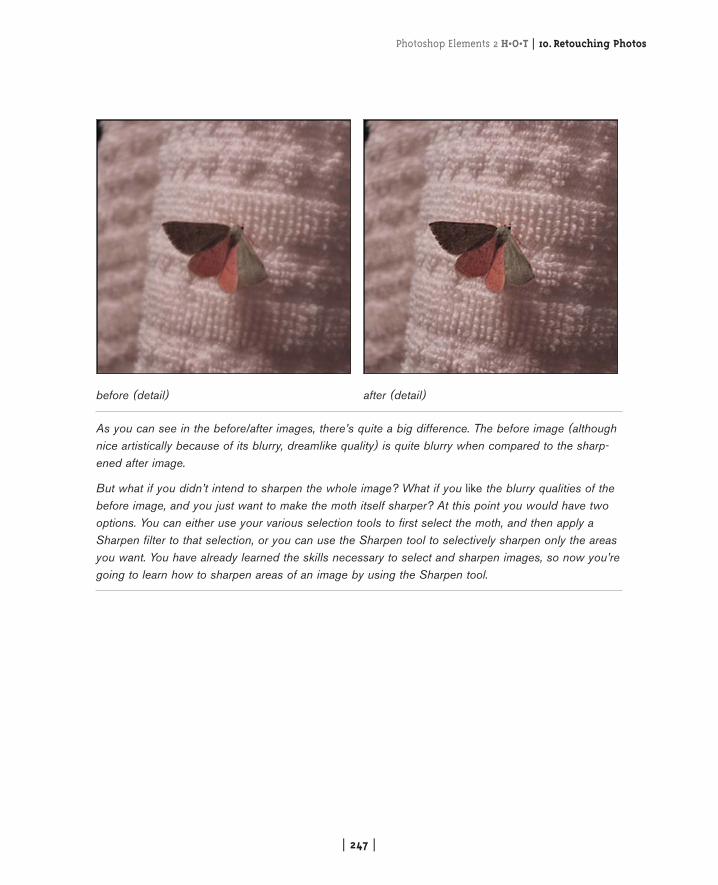
before (detail) after (detail)
As you can see in the before/after images, there’s quite a big difference. The before image (althoughnice artistically because of its blurry, dreamlike quality) is quite blurry when compared to the sharp-ened after image.
But what if you didn’t intend to sharpen the whole image? What if you like the blurry qualities of thebefore image, and you just want to make the moth itself sharper? At this point you would have twooptions. You can either use your various selection tools to first select the moth, and then apply aSharpen filter to that selection, or you can use the Sharpen tool to selectively sharpen only the areasyou want. You have already learned the skills necessary to select and sharpen images, so now you’regoing to learn how to sharpen areas of an image by using the Sharpen tool.
10.Retouching Photos | Photoshop Elements 2 H•O•T
| 248 |
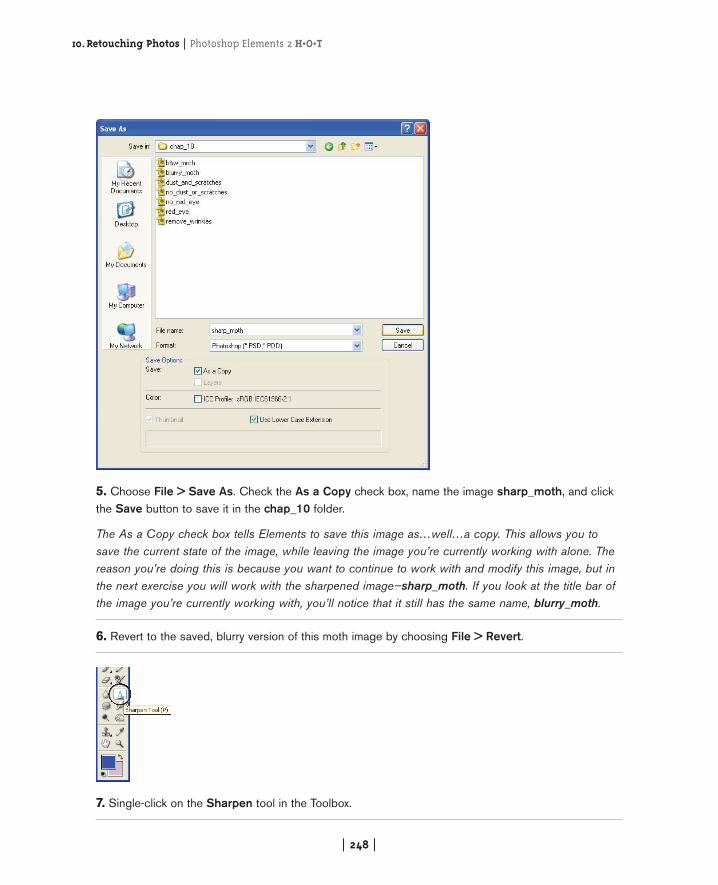
5. Choose File > Save As. Check the As a Copy check box, name the image sharp_moth, and clickthe Save button to save it in the chap_10 folder.
The As a Copy check box tells Elements to save this image as…well…a copy. This allows you tosave the current state of the image, while leaving the image you’re currently working with alone. Thereason you’re doing this is because you want to continue to work with and modify this image, but inthe next exercise you will work with the sharpened image—sharp_moth. If you look at the title bar ofthe image you’re currently working with, you’ll notice that it still has the same name, blurry_moth.
6. Revert to the saved, blurry version of this moth image by choosing File > Revert.
7. Single-click on the Sharpen tool in the Toolbox.
Photoshop Elements 2 H•O•T | 10.Retouching Photos
| 249 |
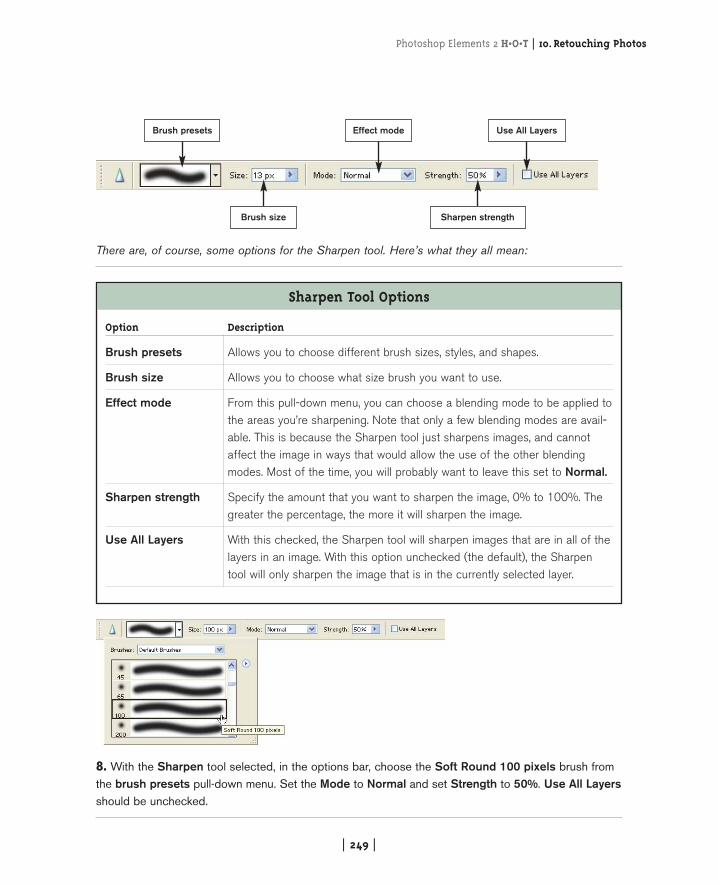
There are, of course, some options for the Sharpen tool. Here’s what they all mean:
Brush presets Effect mode Use All Layers
Brush size Sharpen strength
Sharpen Tool Options
Option Description
Brush presets Allows you to choose different brush sizes, styles, and shapes.
Brush size Allows you to choose what size brush you want to use.
Effect mode From this pull-down menu, you can choose a blending mode to be applied tothe areas you’re sharpening. Note that only a few blending modes are avail-able. This is because the Sharpen tool just sharpens images, and cannotaffect the image in ways that would allow the use of the other blendingmodes. Most of the time, you will probably want to leave this set to Normal.
Sharpen strength Specify the amount that you want to sharpen the image, 0% to 100%. Thegreater the percentage, the more it will sharpen the image.
Use All Layers With this checked, the Sharpen tool will sharpen images that are in all of thelayers in an image. With this option unchecked (the default), the Sharpentool will only sharpen the image that is in the currently selected layer.
8. With the Sharpen tool selected, in the options bar, choose the Soft Round 100 pixels brush fromthe brush presets pull-down menu. Set the Mode to Normal and set Strength to 50%. Use All Layersshould be unchecked.
10.Retouching Photos | Photoshop Elements 2 H•O•T
| 250 |
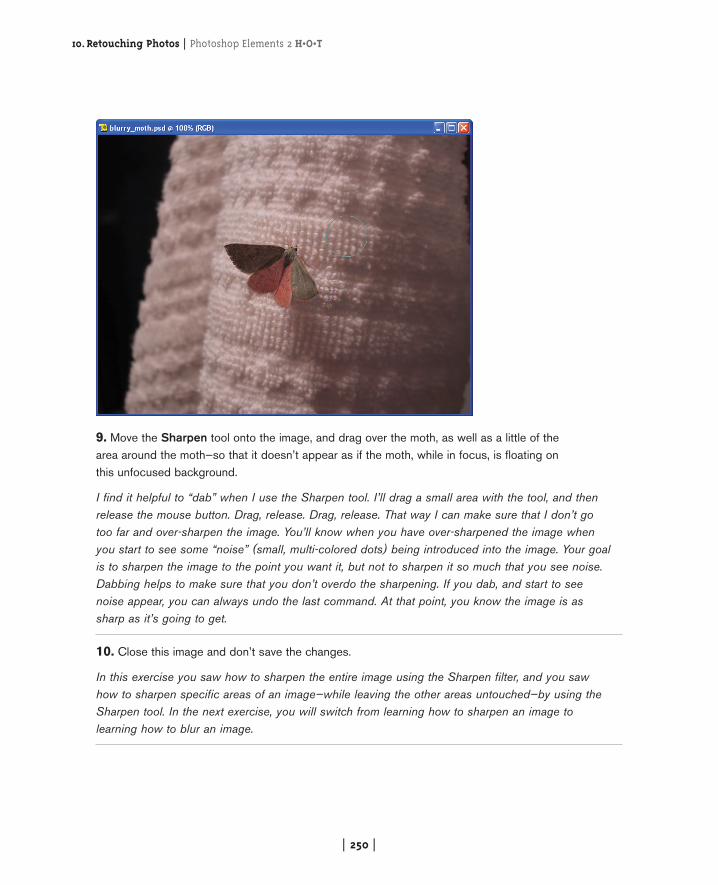
9. Move the Sharpen tool onto the image, and drag over the moth, as well as a little of the area around the moth—so that it doesn’t appear as if the moth, while in focus, is floating on this unfocused background.
I find it helpful to “dab” when I use the Sharpen tool. I’ll drag a small area with the tool, and then release the mouse button. Drag, release. Drag, release. That way I can make sure that I don’t go too far and over-sharpen the image. You’ll know when you have over-sharpened the image when you start to see some “noise” (small, multi-colored dots) being introduced into the image. Your goal is to sharpen the image to the point you want it, but not to sharpen it so much that you see noise.Dabbing helps to make sure that you don’t overdo the sharpening. If you dab, and start to see noise appear, you can always undo the last command. At that point, you know the image is as sharp as it’s going to get.
10. Close this image and don’t save the changes.
In this exercise you saw how to sharpen the entire image using the Sharpen filter, and you saw how to sharpen specific areas of an image—while leaving the other areas untouched—by using theSharpen tool. In the next exercise, you will switch from learning how to sharpen an image to learning how to blur an image.
Photoshop Elements 2 H•O•T | 10.Retouching Photos
| 251 |
Blurring a Photo
You’ve seen it in magazine pictures, and you’ve seen it in your own pictures (but probably due to anaccident). Now it’s time to learn how to blur your photos! *Cue echo machine* At this point, you’reprobably wondering why you are going to learn how to blur photos. “Sharpening a photo I can under-stand, but making a photo blurry?” you say. “Are you nuts?” Yes I am. But that doesn’t have anything to do with blurring images! Blurring photographs can be used for a variety of purposes. The mostcommon is to draw the viewer’s eyes toward specific areas of the image by blurring areas that youwant to draw their attention away from. The viewers eyes will inherently stray away from blurry areasand will be drawn towards areas of contrast and areas that are in focus.
4.
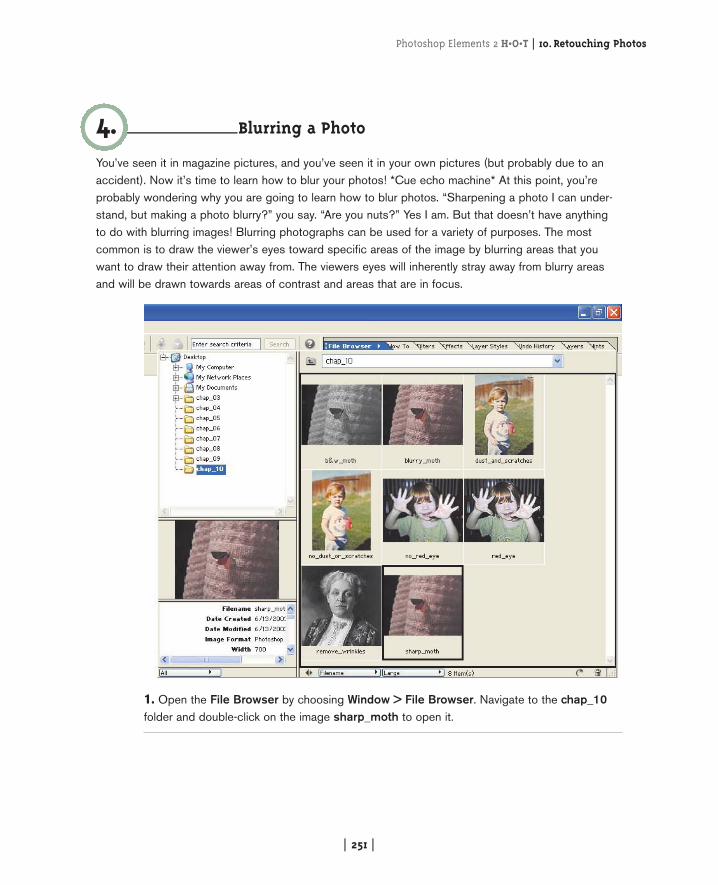
1. Open the File Browser by choosing Window > File Browser. Navigate to the chap_10folder and double-click on the image sharp_moth to open it.
10.Retouching Photos | Photoshop Elements 2 H•O•T
| 252 |
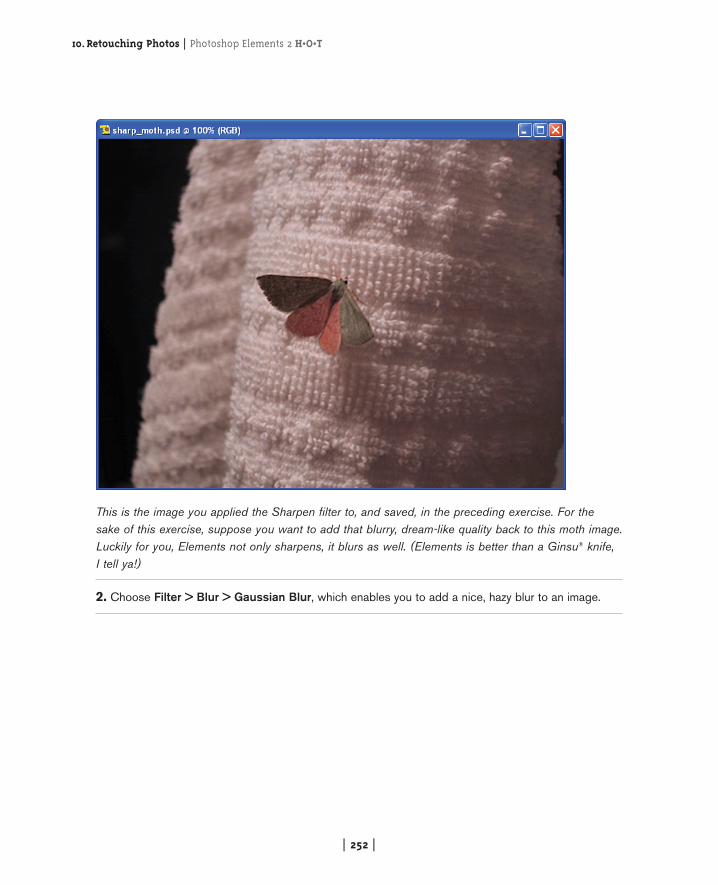
This is the image you applied the Sharpen filter to, and saved, in the preceding exercise. For the sake of this exercise, suppose you want to add that blurry, dream-like quality back to this moth image.Luckily for you, Elements not only sharpens, it blurs as well. (Elements is better than a Ginsu® knife,I tell ya!)
2. Choose Filter > Blur > Gaussian Blur, which enables you to add a nice, hazy blur to an image.
Photoshop Elements 2 H•O•T | 10.Retouching Photos
| 253 |
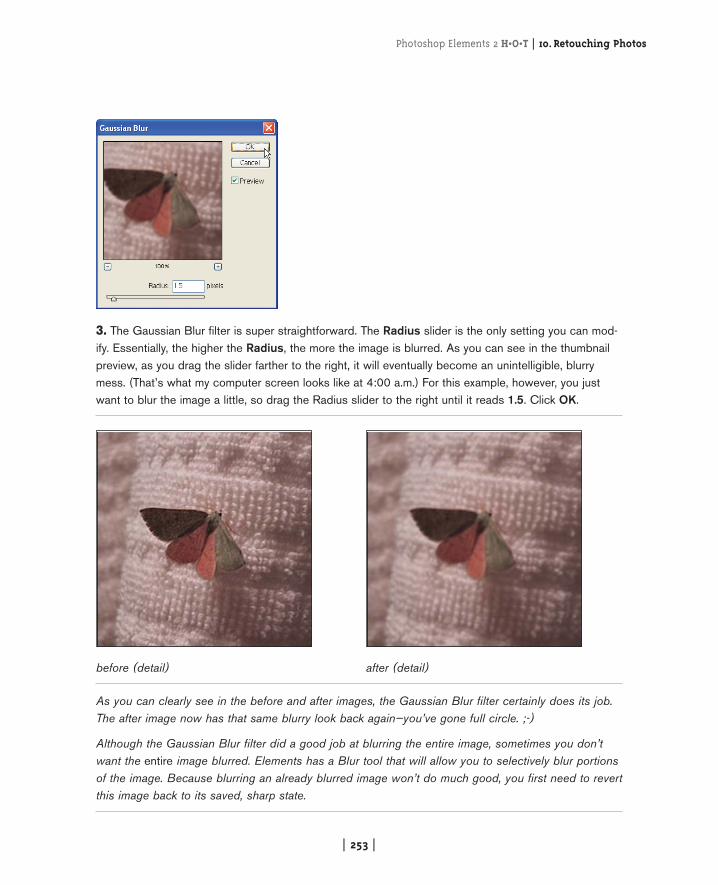
3. The Gaussian Blur filter is super straightforward. The Radius slider is the only setting you can mod-ify. Essentially, the higher the Radius, the more the image is blurred. As you can see in the thumbnailpreview, as you drag the slider farther to the right, it will eventually become an unintelligible, blurrymess. (That’s what my computer screen looks like at 4:00 a.m.) For this example, however, you justwant to blur the image a little, so drag the Radius slider to the right until it reads 1.5. Click OK.
before (detail) after (detail)
As you can clearly see in the before and after images, the Gaussian Blur filter certainly does its job.The after image now has that same blurry look back again—you’ve gone full circle. ;-)
Although the Gaussian Blur filter did a good job at blurring the entire image, sometimes you don’twant the entire image blurred. Elements has a Blur tool that will allow you to selectively blur portionsof the image. Because blurring an already blurred image won’t do much good, you first need to revertthis image back to its saved, sharp state.
10.Retouching Photos | Photoshop Elements 2 H•O•T
| 254 |
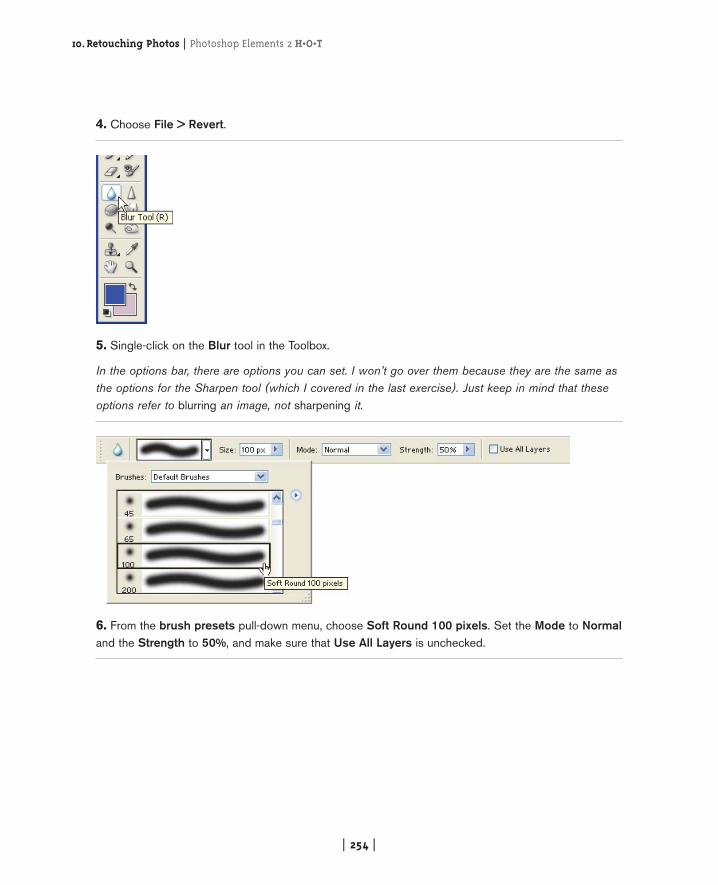
4. Choose File > Revert.
5. Single-click on the Blur tool in the Toolbox.
In the options bar, there are options you can set. I won’t go over them because they are the same asthe options for the Sharpen tool (which I covered in the last exercise). Just keep in mind that theseoptions refer to blurring an image, not sharpening it.
6. From the brush presets pull-down menu, choose Soft Round 100 pixels. Set the Mode to Normaland the Strength to 50%, and make sure that Use All Layers is unchecked.
Photoshop Elements 2 H•O•T | 10.Retouching Photos
| 255 |
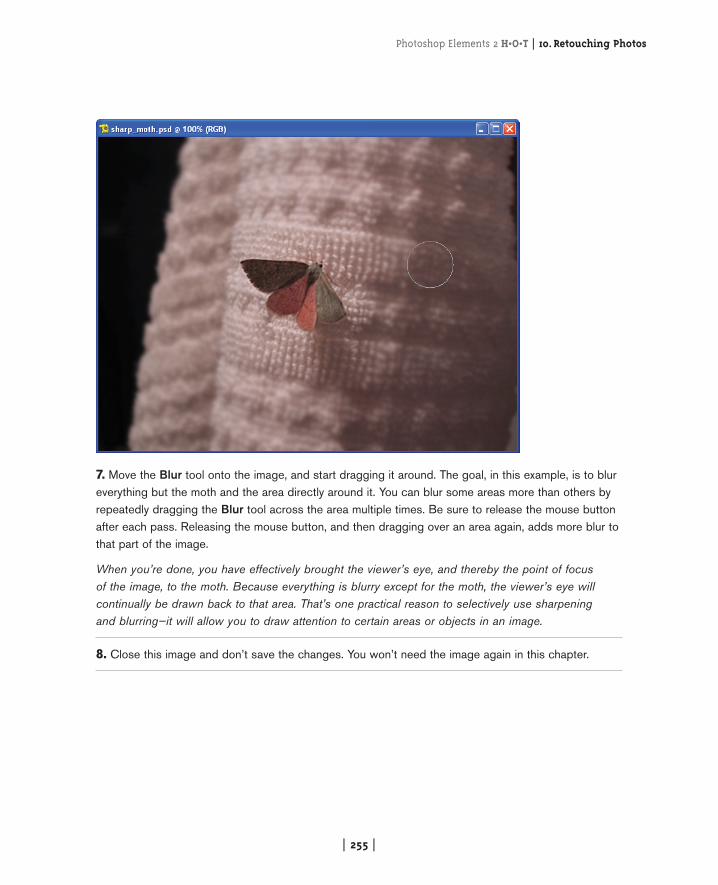
7. Move the Blur tool onto the image, and start dragging it around. The goal, in this example, is to blureverything but the moth and the area directly around it. You can blur some areas more than others byrepeatedly dragging the Blur tool across the area multiple times. Be sure to release the mouse buttonafter each pass. Releasing the mouse button, and then dragging over an area again, adds more blur tothat part of the image.
When you’re done, you have effectively brought the viewer’s eye, and thereby the point of focus of the image, to the moth. Because everything is blurry except for the moth, the viewer’s eye willcontinually be drawn back to that area. That’s one practical reason to selectively use sharpening and blurring—it will allow you to draw attention to certain areas or objects in an image.
8. Close this image and don’t save the changes. You won’t need the image again in this chapter.
10.Retouching Photos | Photoshop Elements 2 H•O•T
| 256 |
MOVIE | Colorizing a Black-and-White Photo
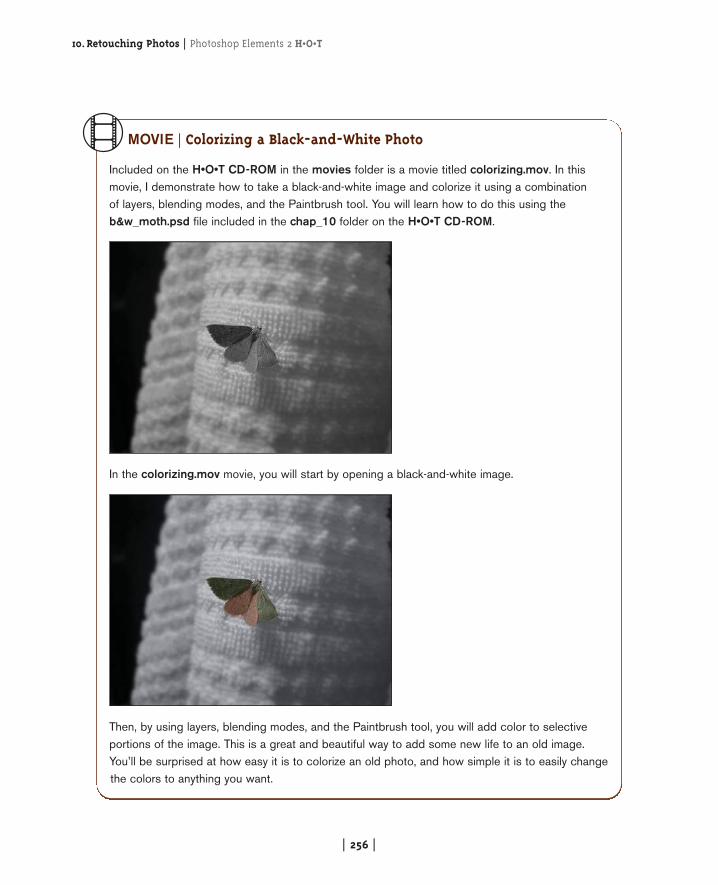
Included on the H•O•T CD-ROM in the movies folder is a movie titled colorizing.mov. In thismovie, I demonstrate how to take a black-and-white image and colorize it using a combination of layers, blending modes, and the Paintbrush tool. You will learn how to do this using theb&w_moth.psd file included in the chap_10 folder on the H•O•T CD-ROM.
In the colorizing.mov movie, you will start by opening a black-and-white image.
Then, by using layers, blending modes, and the Paintbrush tool, you will add color to selectiveportions of the image. This is a great and beautiful way to add some new life to an old image.You’ll be surprised at how easy it is to colorize an old photo, and how simple it is to easily changethe colors to anything you want.
Photoshop Elements 2 H•O•T | 10.Retouching Photos
| 257 |
In this chapter, you learned some very powerful and very important image-editing techniques. Youlearned how to remove the dreaded red eye, how to subtly remove wrinkles from a face, how toremove dust, scratches, and imperfections from an old(ish) picture, how to selectively sharpen andblur a photograph, and how to colorize a black-and-white image. You’re on your way to creating yourown “image restoration” business with just the techniques you learned in this chapter!
In the next chapter, you will learn the intricate ins and outs of photo manipulation. Everything fromcreating a panoramic photo using a series of stitched-together photographs, to photo compositing(creating one photo “composition” using a series of separate photos), to some fun and useful experi-mentation with the Smudge tool and Liquify filter. Turn the page…you can do it! :-)


![WELCOME []Adobe Photoshop I am an expert in using Adobe Photoshop specialized in photo editing, photo enhancement, photo retouching, photo manipulation, image resizing, removing background,](https://img.pdfslide.us/doc/110x75/602cb77d7113b8630d645efd/welcome-adobe-photoshop-i-am-an-expert-in-using-adobe-photoshop-specialized.jpg)