Embed Size (px)
Citation preview
Oracle 10gR2 RAC Installation in RedHat 5 Linux Using VMware.
Important points to install 10gR2 oracle RAC in linux5.1.LINUX 5(Redhat 5) doesn't have /etc/sysconfig/rawdevices file. so we have to configure it.2. Edit the /etc/redhat-release version to redhat-4 and and to invoke the runInstaller use the command$runInstaller -ignoreSysPrereqs. //this will bypass the os check //3. Next during clusterware installation at the end of root.sh in node 2 end with error message.So we have adjust the parameters in vipca and srvctl files.4. vipca will fail to run. so we have to adjust some parameters and configure it manually.
rest of things are similar like RAC 11gR1 installation in linux5 using VMware.please refer the documentation installing oracle 11gR1 RAC in LINUX5 using vmware. if you have any doubts in my installation steps. 11gR1RACInstallationOnOEL5UsingVMwareServer2 10gR2 RAC Installation in RHEL4 using VMware
step 1: vmware installationstep 2: guest 0S (LINUX 5) INSTALLATION.step 3: pre installation steps for installing clusterware.step 4: Install Vmware tools step 5: creating shared storage.step 6: clone virtual machine. step 7: Installing clusterware.step 8: Installing oracle software.
Step 1.for vmware installation refer below link to install.
vmware_server_installation
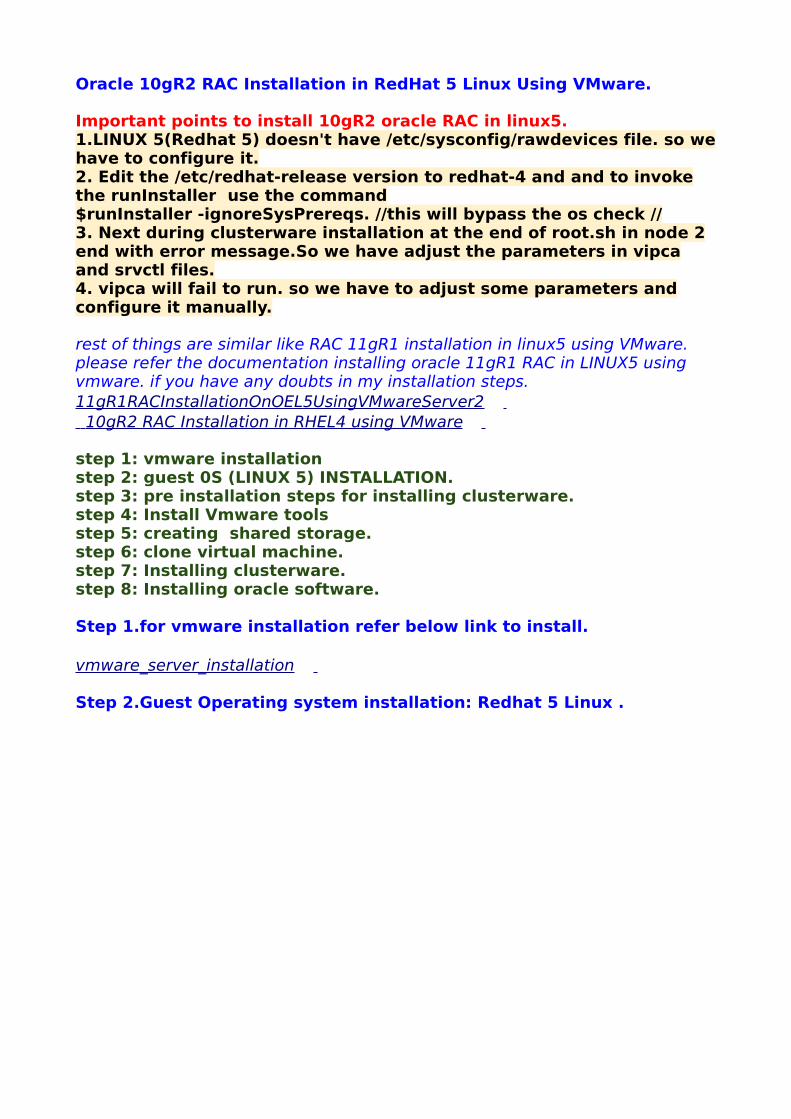
Step 2.Guest Operating system installation: Redhat 5 Linux .

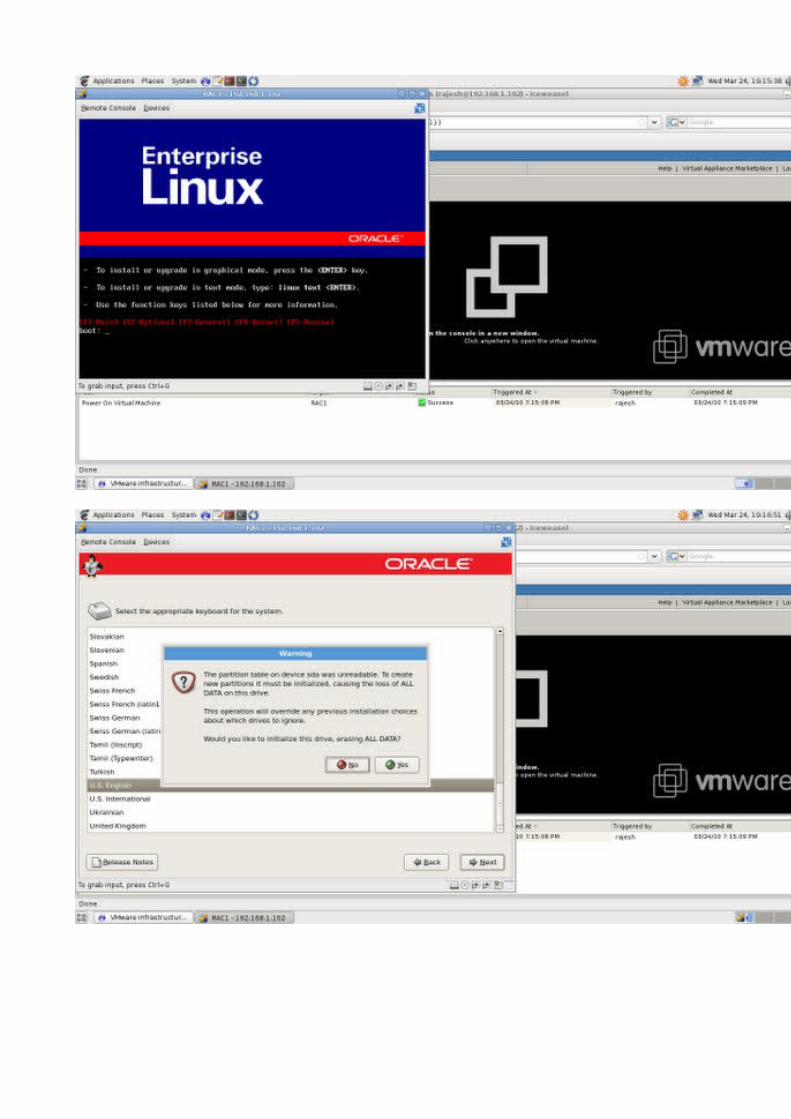
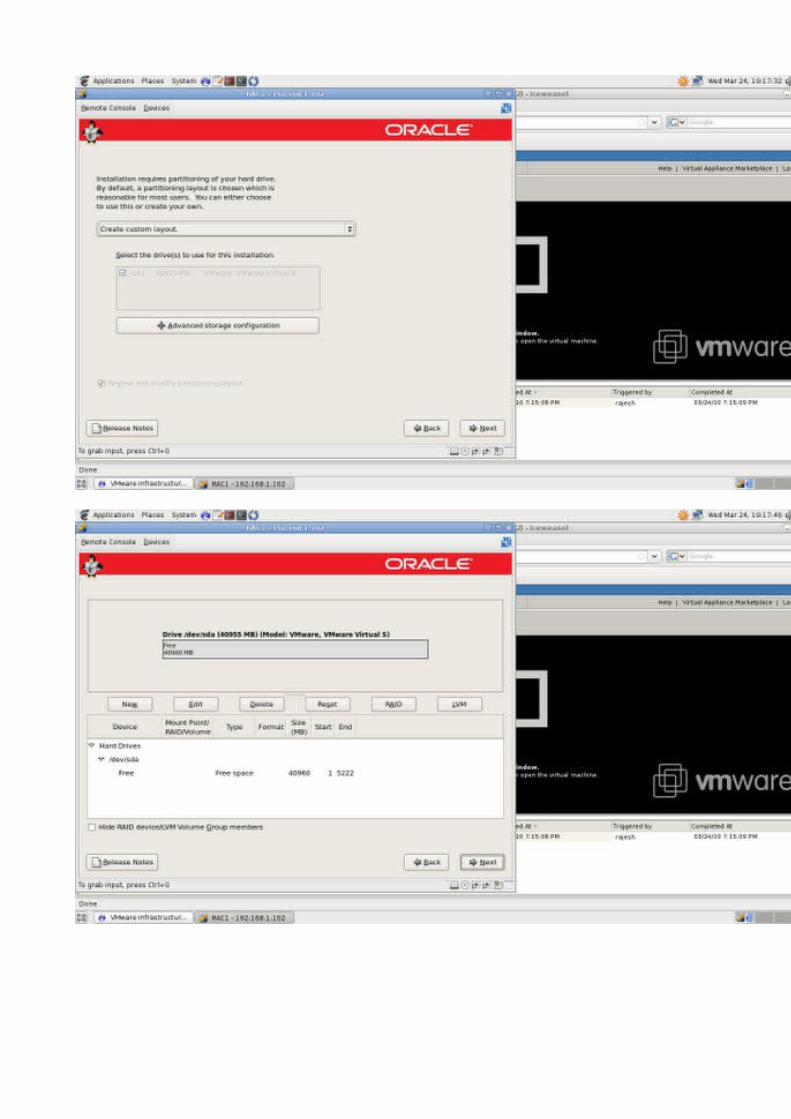
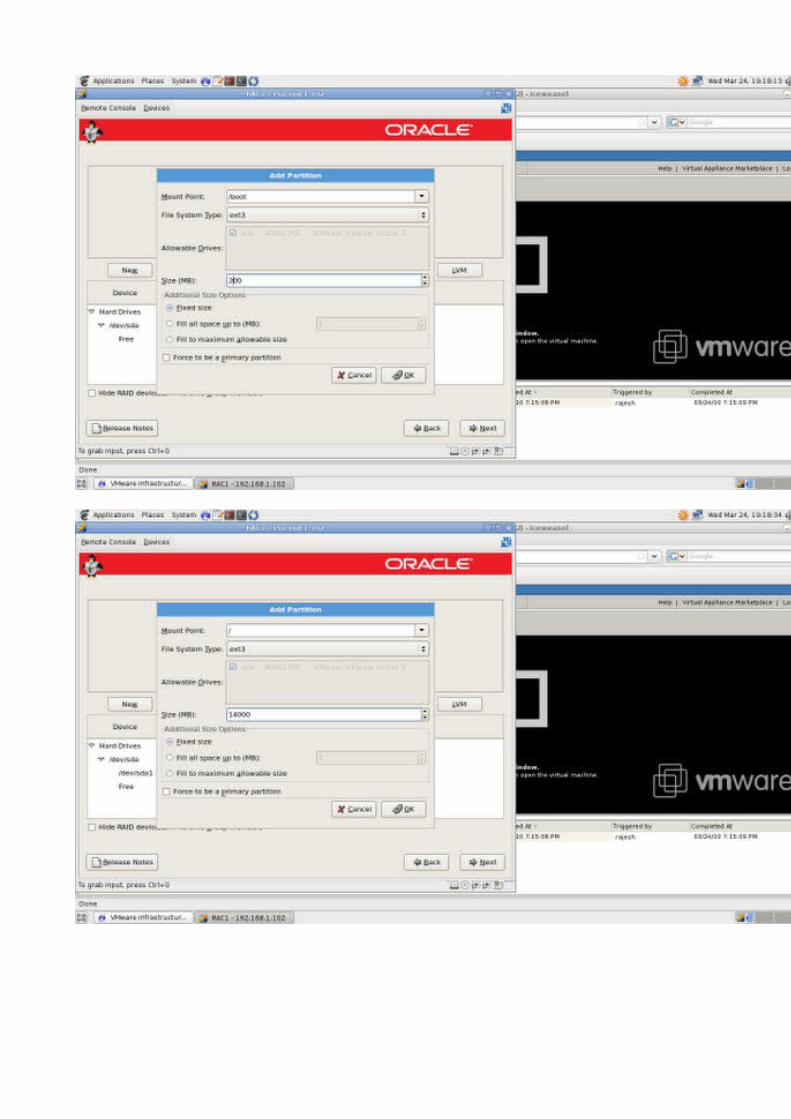
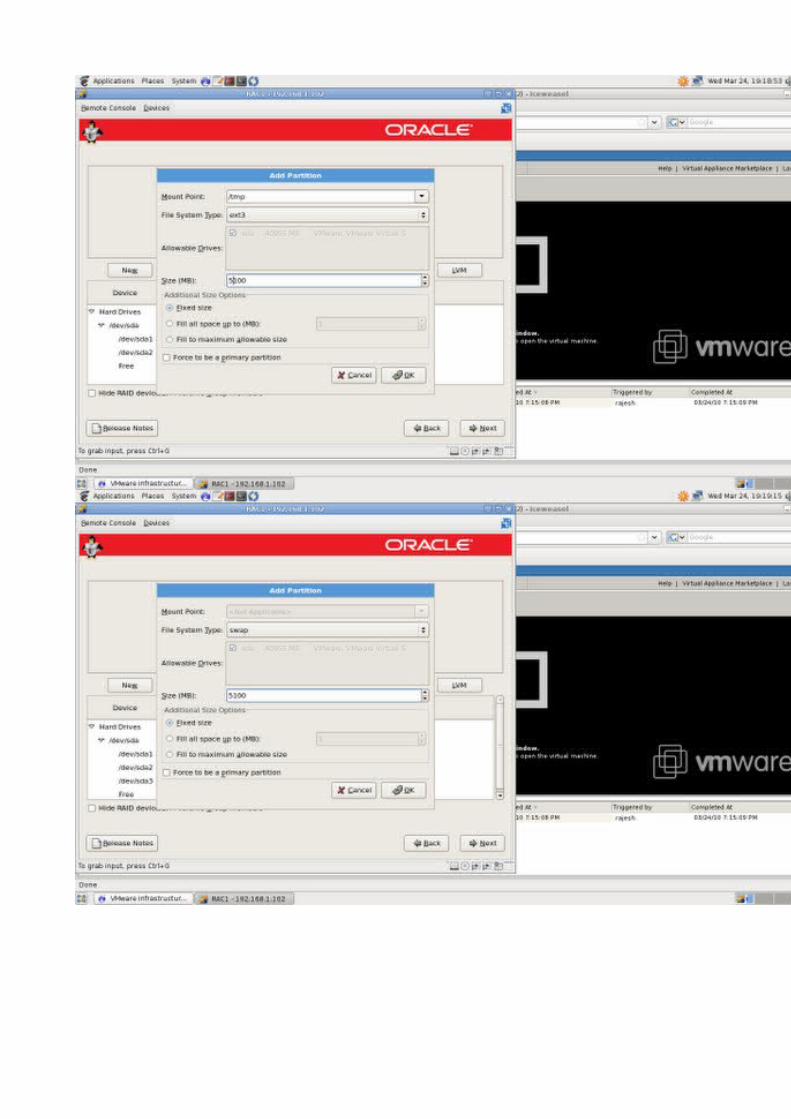
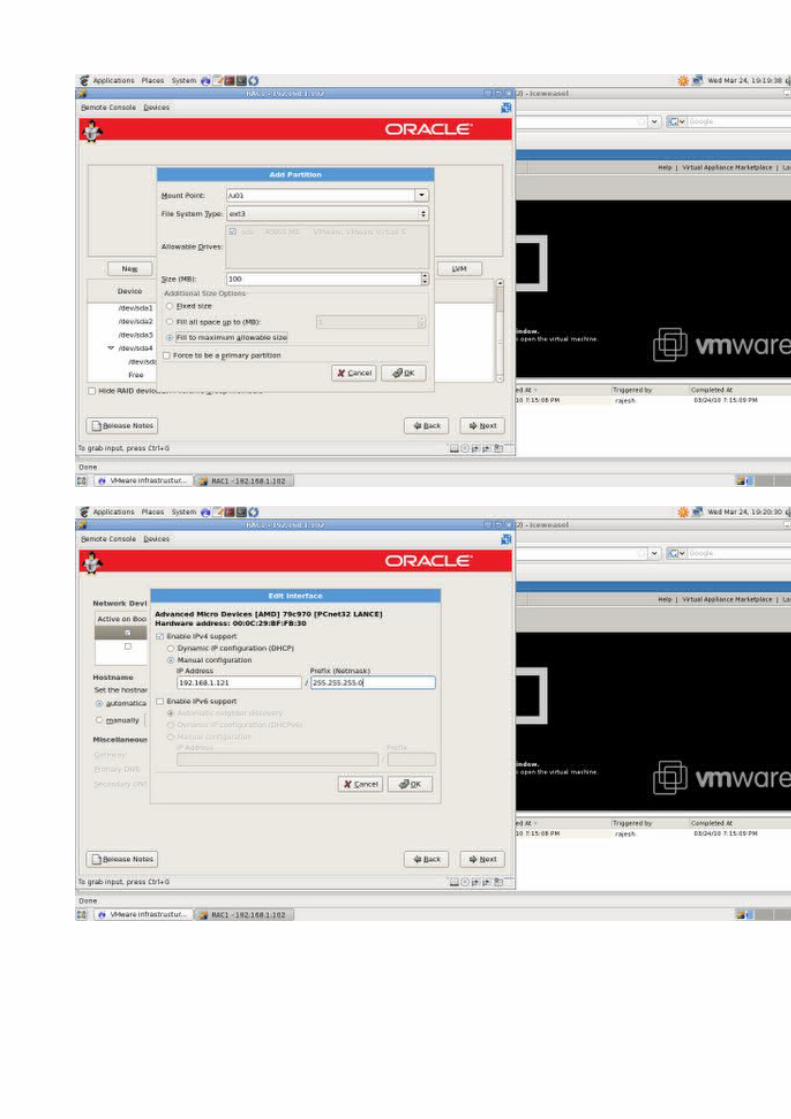
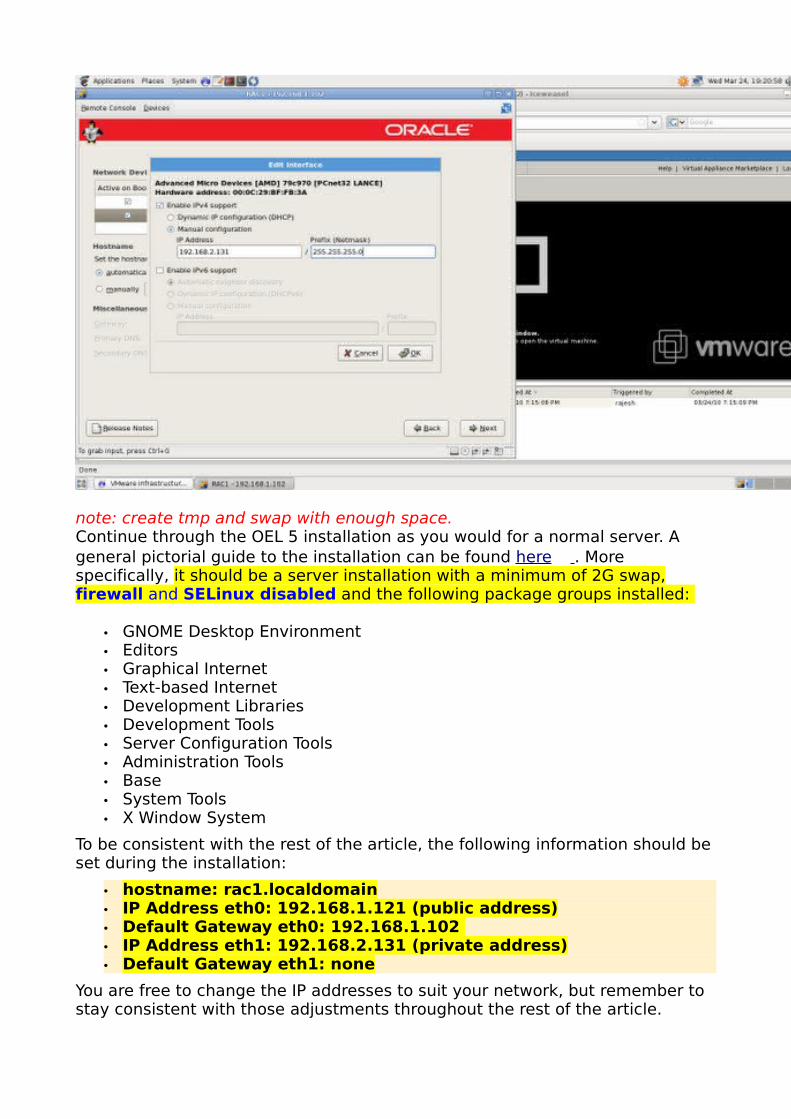
note: create tmp and swap with enough space. Continue through the OEL 5 installation as you would for a normal server. A general pictorial guide to the installation can be found here . More specifically, it should be a server installation with a minimum of 2G swap, firewall and SELinux disabled and the following package groups installed:
• GNOME Desktop Environment • Editors • Graphical Internet • Text-based Internet • Development Libraries • Development Tools • Server Configuration Tools • Administration Tools • Base • System Tools • X Window System
To be consistent with the rest of the article, the following information should be set during the installation:
• hostname: rac1.localdomain • IP Address eth0: 192.168.1.121 (public address) • Default Gateway eth0: 192.168.1.102 • IP Address eth1: 192.168.2.131 (private address) • Default Gateway eth1: none
You are free to change the IP addresses to suit your network, but remember to stay consistent with those adjustments throughout the rest of the article.
Once the basic installation is complete, install the following packages whilst logged in as the root user.
# From Enterprise Linux 5 Disk 1cd /media/cdrom/Serverrpm -Uvh binutils-2.*rpm -Uvh elfutils-libelf-0.*rpm -Uvh glibc-2.*rpm -Uvh glibc-common-2.*rpm -Uvh libaio-0.*rpm -Uvh libgcc-4.*rpm -Uvh libstdc++-4.*rpm -Uvh make-3.*cd /eject
# From Enterprise Linux 5 Disk 2cd /media/cdrom/Serverrpm -Uvh compat-libstdc++-33*rpm -Uvh elfutils-libelf-devel-*rpm -Uvh glibc-headers*rpm -Uvh glibc-devel-2.*rpm -Uvh libgomp*rpm -Uvh gcc-4.*rpm -Uvh gcc-c++-4.*rpm -Uvh libaio-devel-0.*rpm -Uvh libstdc++-devel-4.*rpm -Uvh unixODBC-2.*rpm -Uvh unixODBC-devel-2.*cd /eject
# From Enterprise Linux 5 Disk 3cd /media/cdrom/Serverrpm -Uvh sysstat-7.*cd /eject
if you have any doubts in installing 10g in linux please refer below link: 10g installation in linux5
3. Pre Installation steps for installing clusterware and oracle software.Oracle Installation PrerequisitesPerform the following steps whilst logged into the RAC1 virtual machine as the root user.
The /etc/hosts file must contain the following information.
127.0.0.1 localhost.localdomain localhost # Public 192.168.1.121 rac1.localdomain rac1 192.168.1.122 rac2.localdomain rac2 #Private 192.168.2.131 rac1-priv.localdomain rac1-priv 192.168.2.132 rac2-priv.localdomain rac2-priv #Virtual 192.168.1.111 rac1-vip.localdomain rac1-vip 192.168.1.112 rac2-vip.localdomain rac2-vip
Add the following lines to the /etc/sysctl.conf file.
kernel.shmmni = 4096 # semaphores: semmsl, semmns, semopm, semmni kernel.sem = 250 32000 100 128 net.ipv4.ip_local_port_range = 1024 65000 net.core.rmem_default=4194304 net.core.rmem_max=4194304 net.core.wmem_default=262144 net.core.wmem_max=262144
Run the following command to change the current kernel parameters.
/sbin/sysctl -p
Add the following lines to the /etc/security/limits.conf file.
oracle soft nproc 2047 oracle hard nproc 16384 oracle soft nofile 1024 oracle hard nofile 65536
Add the following lines to the /etc/pam.d/login file, if it does not already exist.
session required pam_limits.so
Disable secure linux by editing the /etc/selinux/config file, making sure the SELINUX flag is set as follows.
SELINUX=disabled
Create the new groups and users.
groupadd oinstall groupadd dba groupadd oper groupadd asmadmin
useradd -u 500 -g oinstall -G dba,oper,asmadmin oracle passwd oracle
Create the directories in which the Oracle software will be installed.
mkdir -p /u01/crs/oracle/product/10.2..0/crs mkdir -p /u01/app/oracle/product/10.2.0/db_1 chown -R oracle:oinstall /u01
Edit the /etc/redhat-release file replacing the current release information (Red Hat Enterprise Linux Server release 5) with the
following:
redhat-4
eg:[root@rac1 ~]# vi /etc/redhat-release redhat-4Login as the oracle user and add the following lines at the end of the .bash_profile file.
# Oracle Settings TMP=/tmp; export TMP TMPDIR=$TMP; export TMPDIR
ORACLE_HOSTNAME=rac1.localdomain; export ORACLE_HOSTNAME ORACLE_BASE=/u01/app/oracle; export ORACLE_BASE ORACLE_HOME=$ORACLE_BASE/product/10.2.0/db_1; export ORACLE_HOME ORACLE_TERM=xterm; export ORACLE_TERM PATH=/usr/sbin:$PATH; export PATH PATH=$ORACLE_HOME/bin:$PATH; export PATH
LD_LIBRARY_PATH=$ORACLE_HOME/lib:/lib:/usr/lib; export LD_LIBRARY_PATH CLASSPATH=$ORACLE_HOME/JRE:$ORACLE_HOME/jlib:$ORACLE_HOME/rdbms/jlib; export CLASSPATH
if [ $USER = "oracle" ]; then if [ $SHELL = "/bin/ksh" ]; then ulimit -p 16384 ulimit -n 65536 else ulimit -u 16384 -n 65536 fi fi
The packages listed in this section (or later versions) are required for Oracle Clusterware 10g Release 2 and Oracle RAC 10g Release 2 running on the Oracle Enterprise Linux 5 platform.
32-bit (x86) Installations
* binutils-2.17.50.0.6-2.el5 * compat-libstdc++-296-2.96-138 * compat-libstdc++-33-3.2.3-61 * elfutils-libelf-0.125-3.el5 * elfutils-libelf-devel-0.125 * gcc-4.1.1-52 * gcc-c++-4.1.1-52 * glibc-2.5-12 * glibc-common-2.5-12 * glibc-devel-2.5-12 * glibc-headers-2.5-12
* libaio-0.3.106 * libaio-devel-0.3.106 * libgcc-4.1.1-52 * libstdc++-4.1.1 * libstdc++-devel-4.1.1-52.e15 * libXp-1.0.0-8 * make-3.81-1.1 * openmotif-2.2.3 * sysstat-7.0.0 * unixODBC-2.2.11 * unixODBC-devel-2.2.11
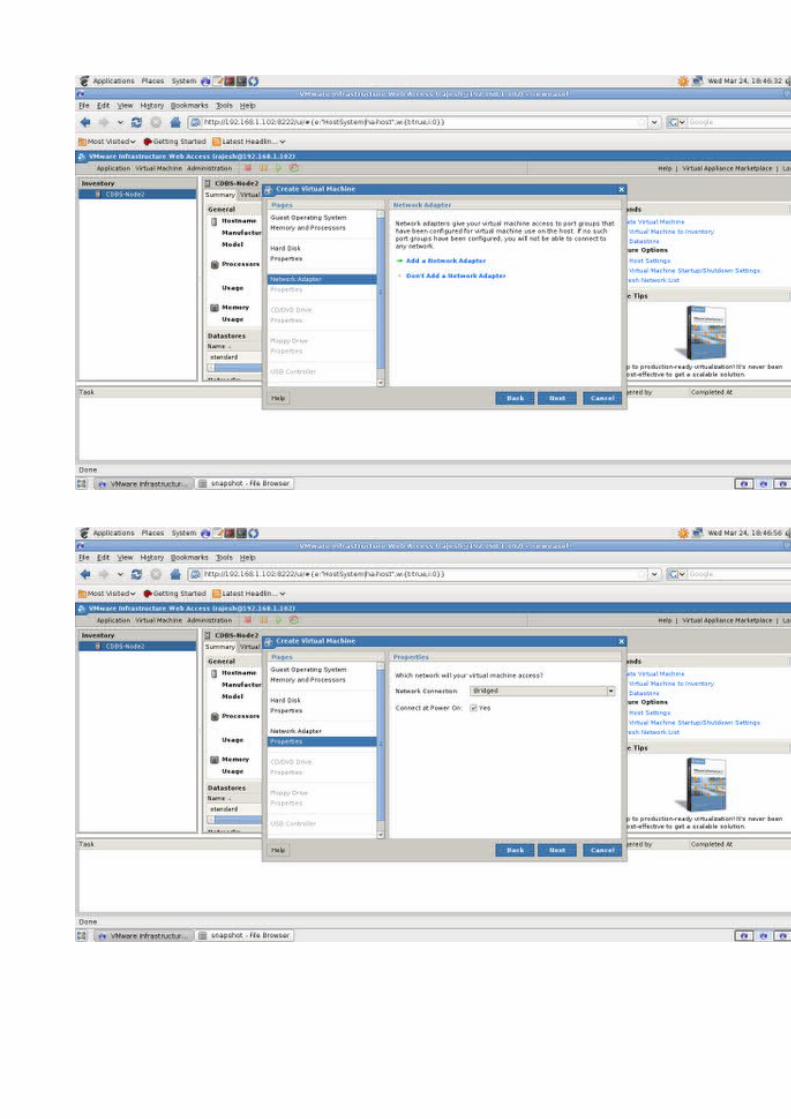
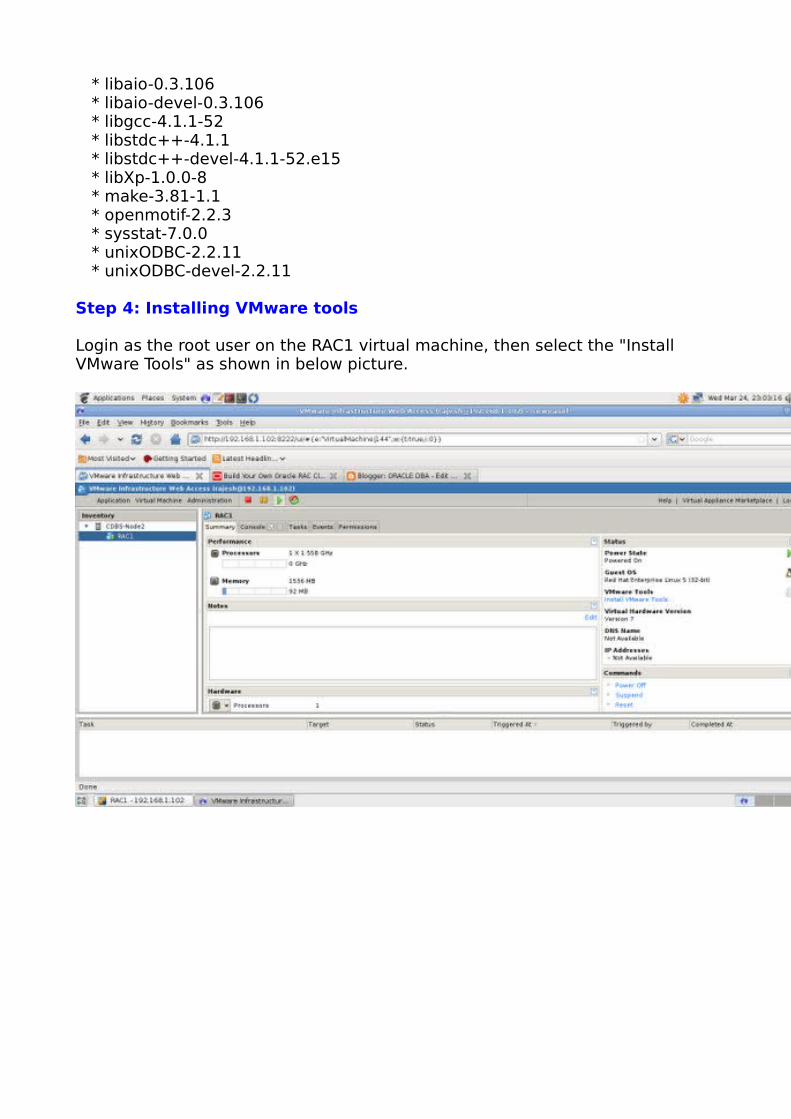
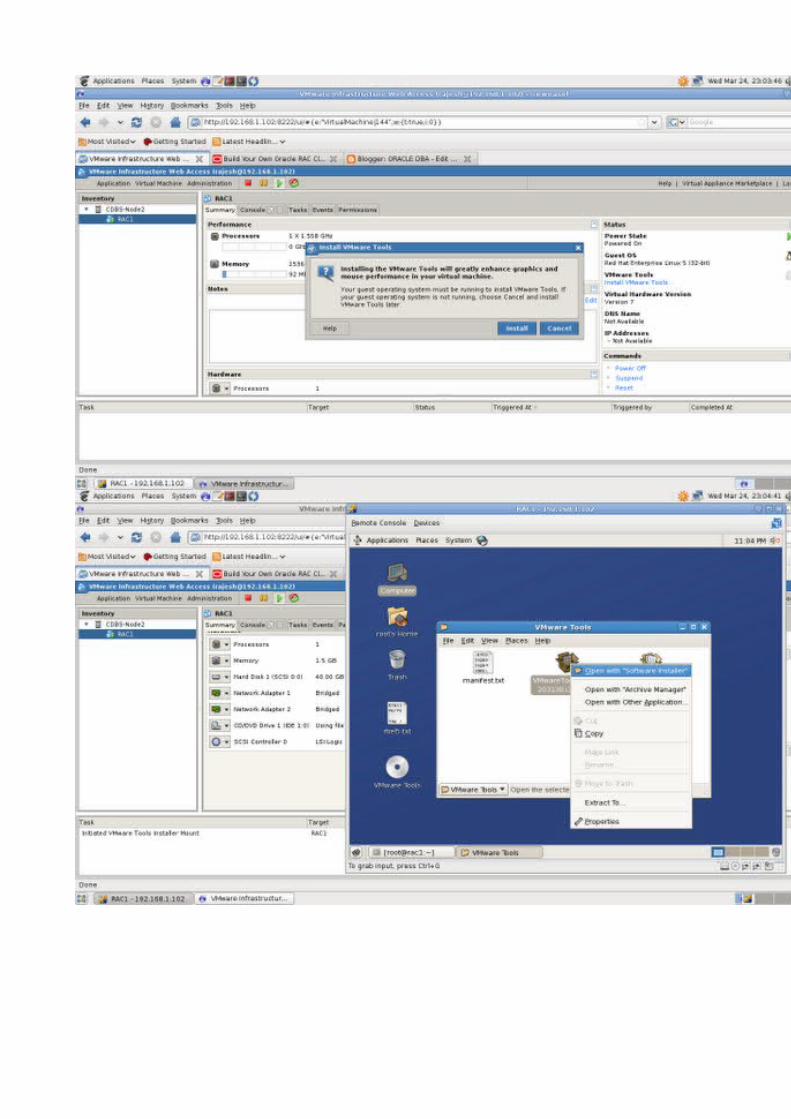
Step 4: Installing VMware tools
Login as the root user on the RAC1 virtual machine, then select the "Install VMware Tools" as shown in below picture.
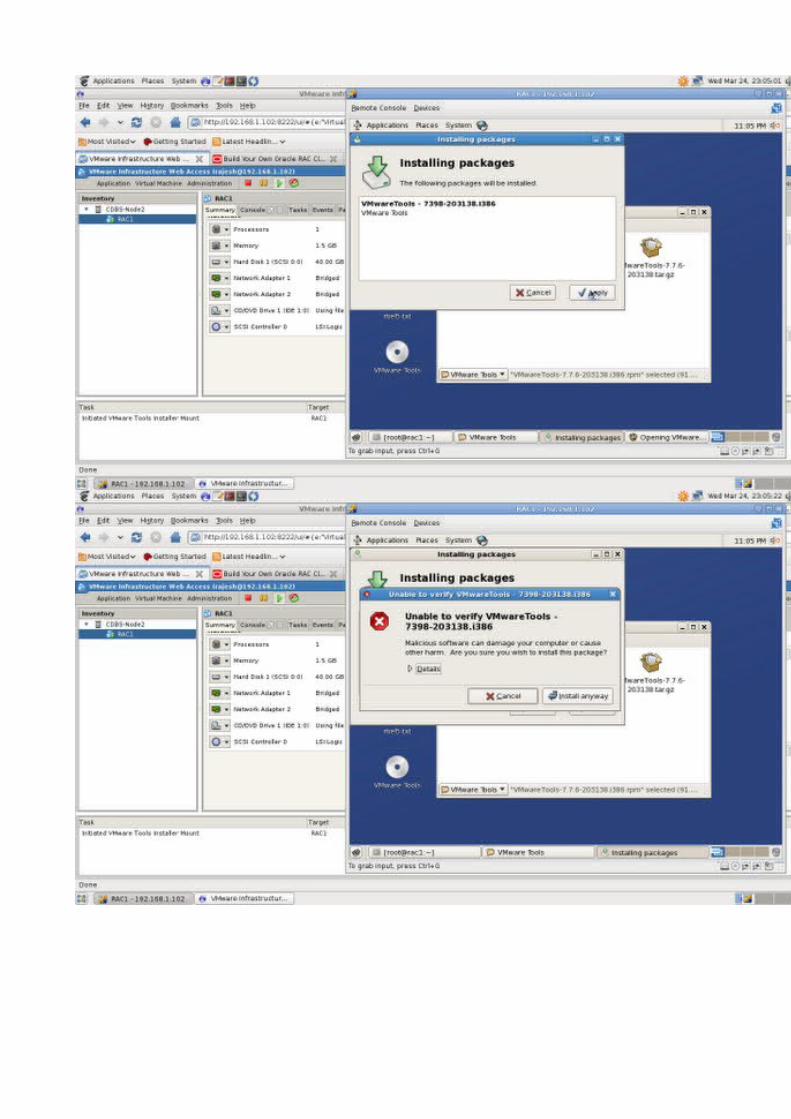
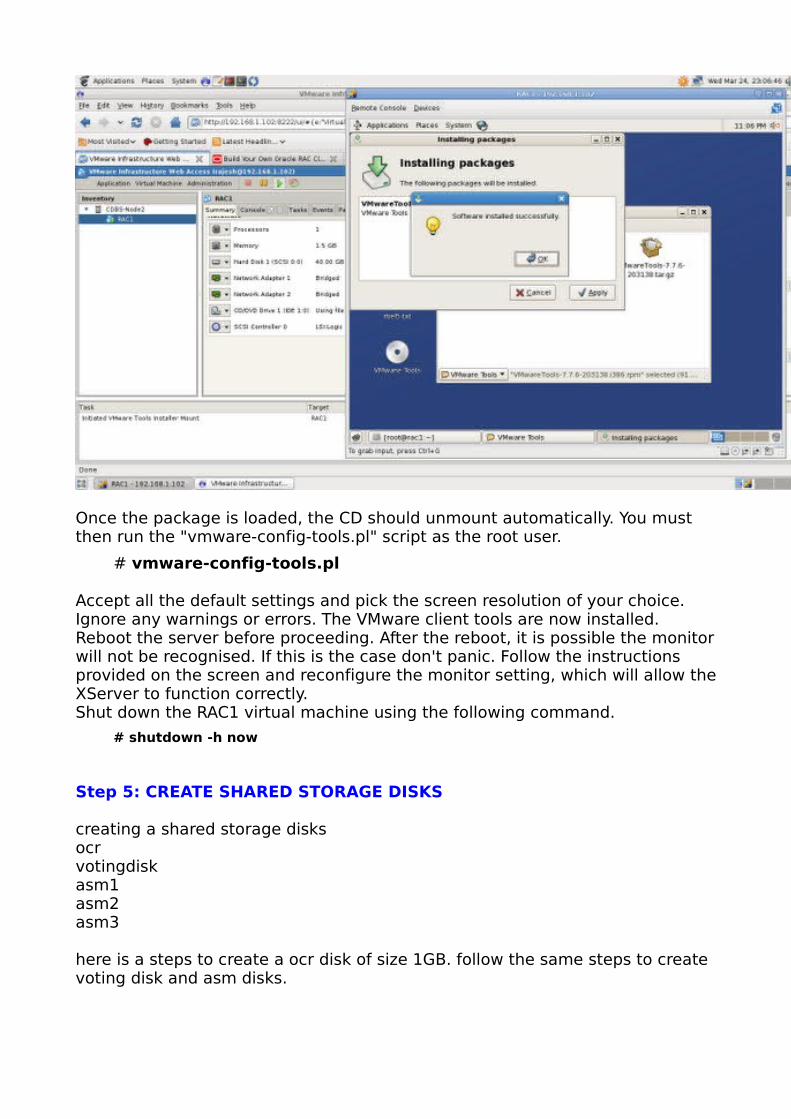
Once the package is loaded, the CD should unmount automatically. You must then run the "vmware-config-tools.pl" script as the root user.
# vmware-config-tools.pl
Accept all the default settings and pick the screen resolution of your choice. Ignore any warnings or errors. The VMware client tools are now installed. Reboot the server before proceeding. After the reboot, it is possible the monitor will not be recognised. If this is the case don't panic. Follow the instructions provided on the screen and reconfigure the monitor setting, which will allow the XServer to function correctly.Shut down the RAC1 virtual machine using the following command.
# shutdown -h now
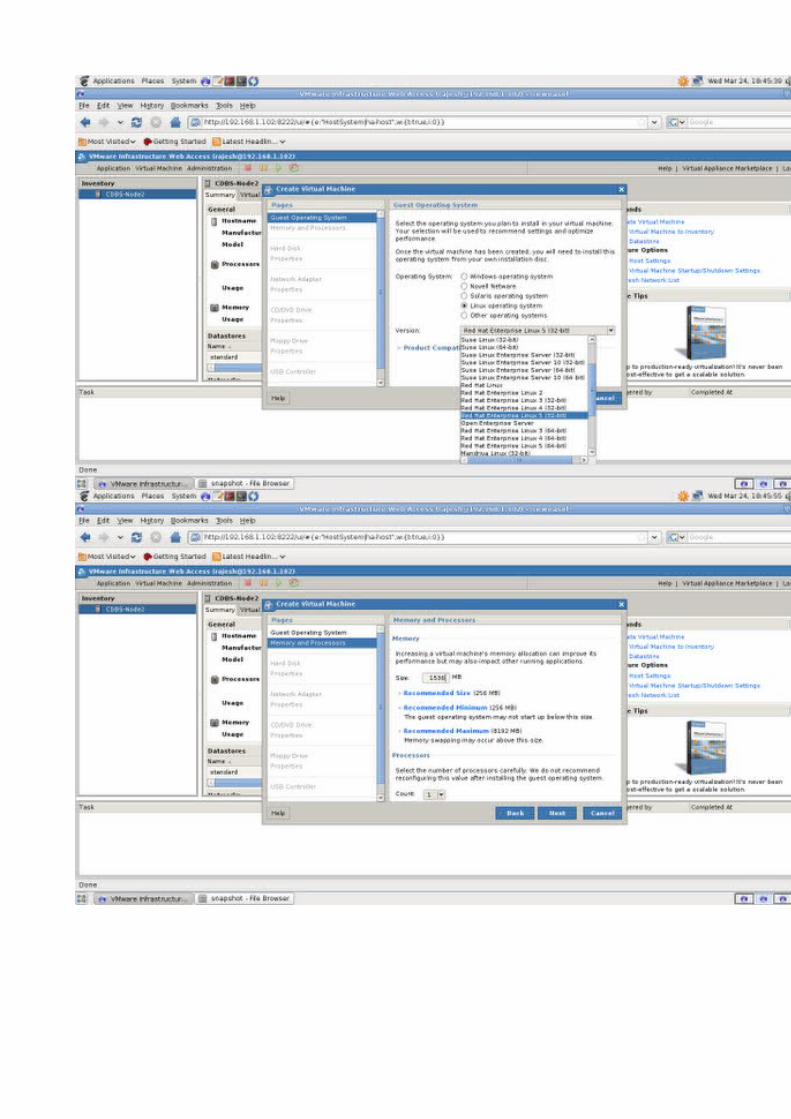
Step 5: CREATE SHARED STORAGE DISKS
creating a shared storage disksocr votingdiskasm1asm2asm3
here is a steps to create a ocr disk of size 1GB. follow the same steps to create voting disk and asm disks.
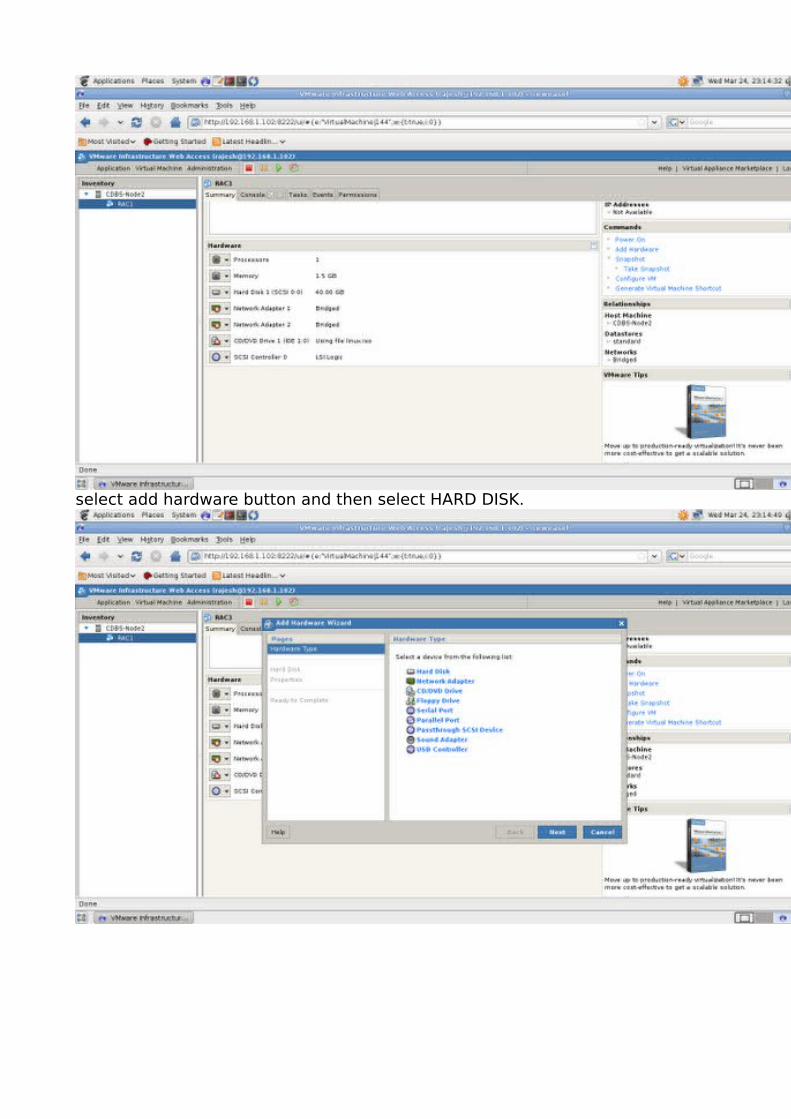
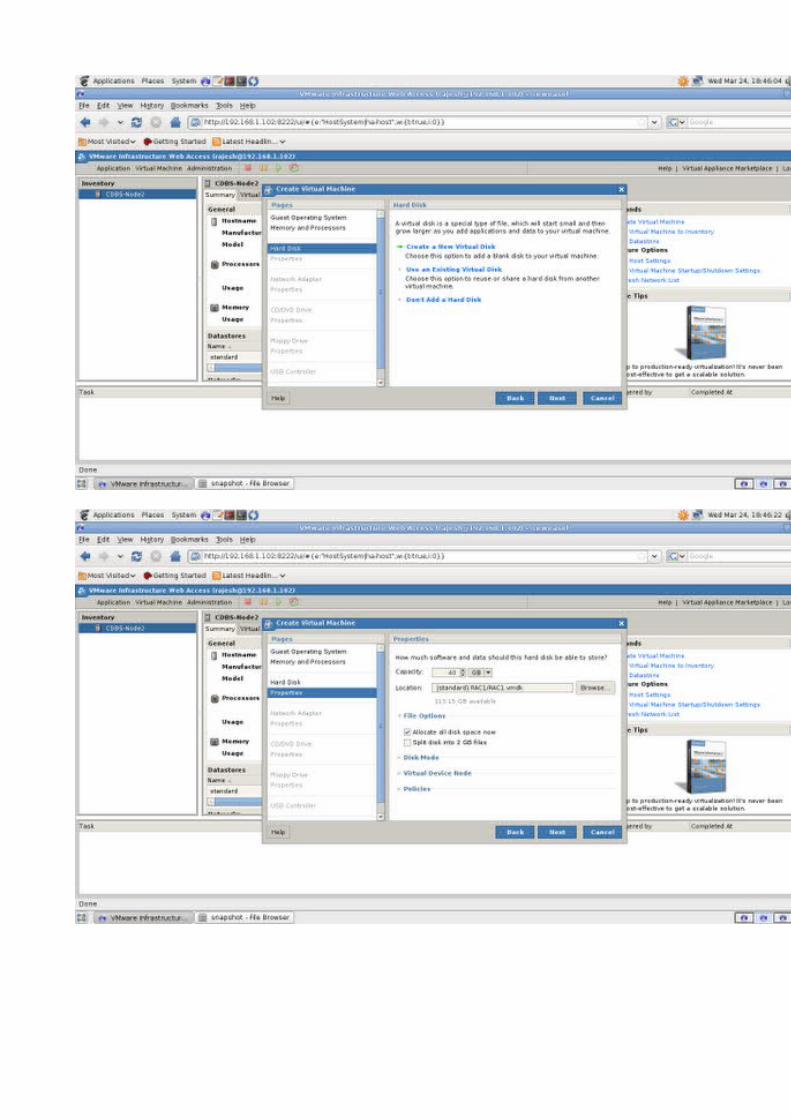
select add hardware button and then select HARD DISK.

Click browse button to select the shared storage disk.
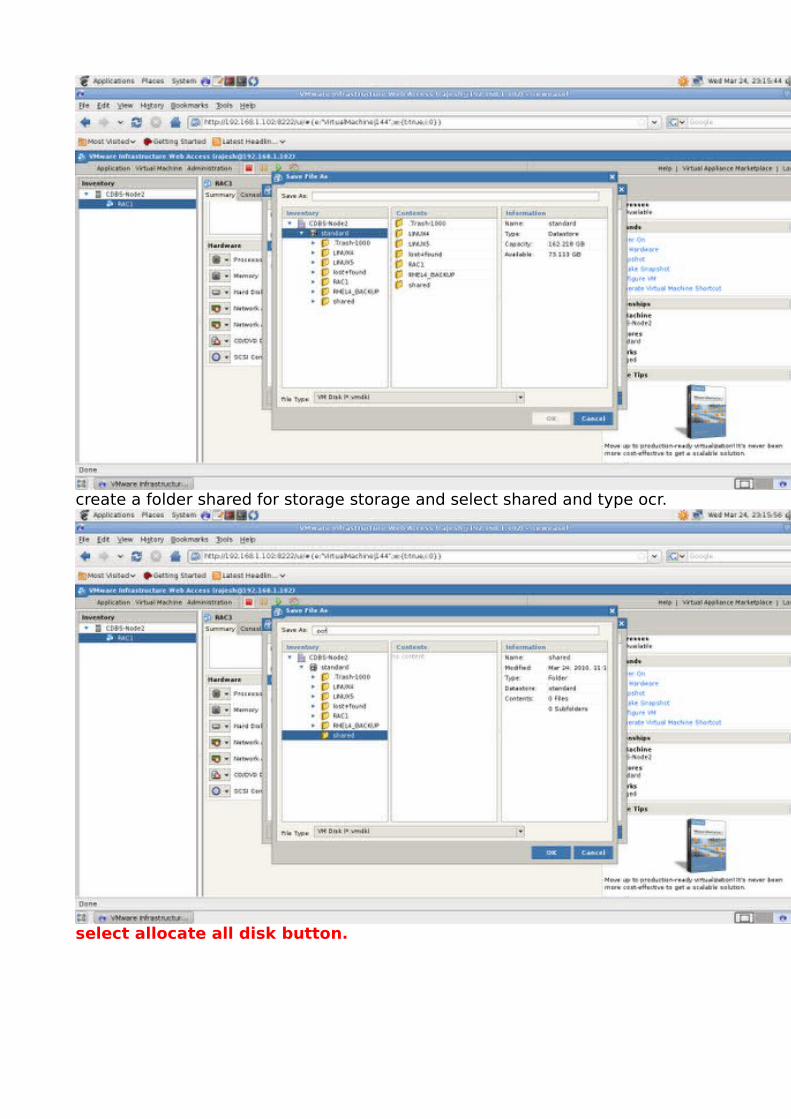
create a folder shared for storage storage and select shared and type ocr.
select allocate all disk button.
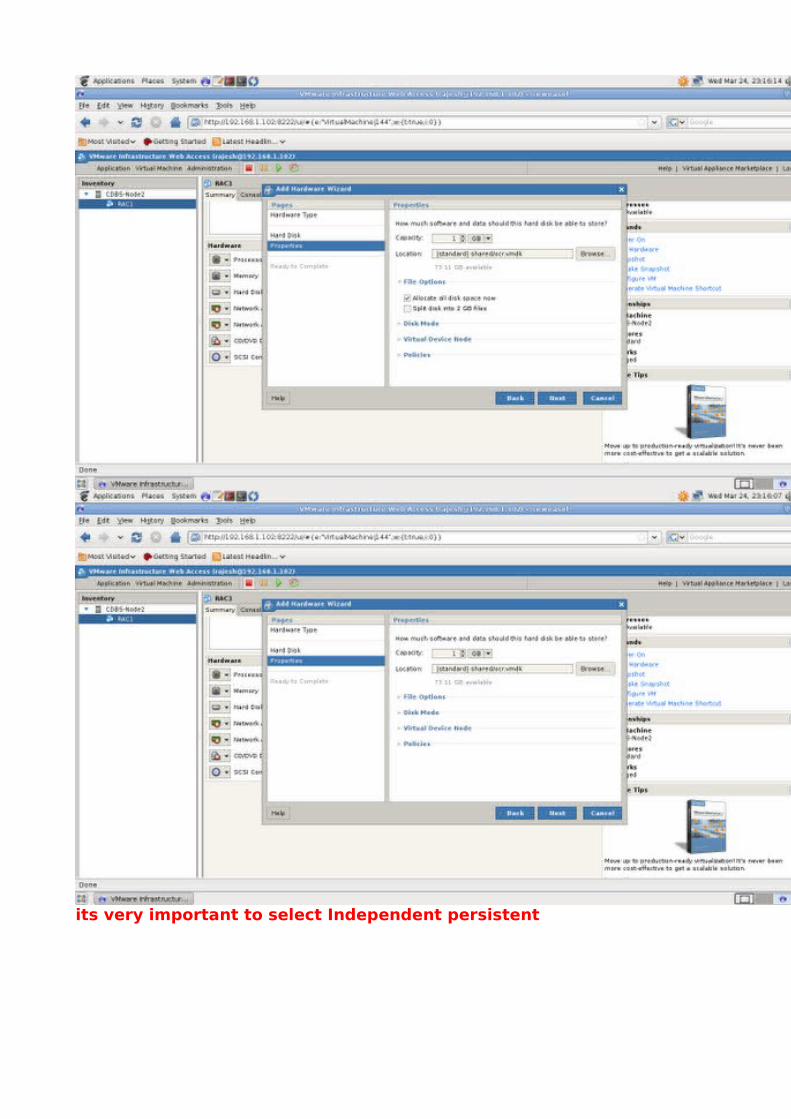
its very important to select Independent persistent

select virtual device mode scsi1

select optimize for performance
and then click finish after than you can see the new added hard disk with size 1 gb and its properties.
Repeat the previous hard disk creation steps 4 more times, using the following values:
• File Name: votingdiskVirtual Device Node: SCSI 1:1Mode: Independent and Persistent
• File Name: asm1Virtual Device Node: SCSI 1:2Mode: Independent and Persistent
• File Name: asm2Virtual Device Node: SCSI 1:3Mode: Independent and Persistent
• File Name: asm3Virtual Device Node: SCSI 1:4Mode: Independent and Persistent
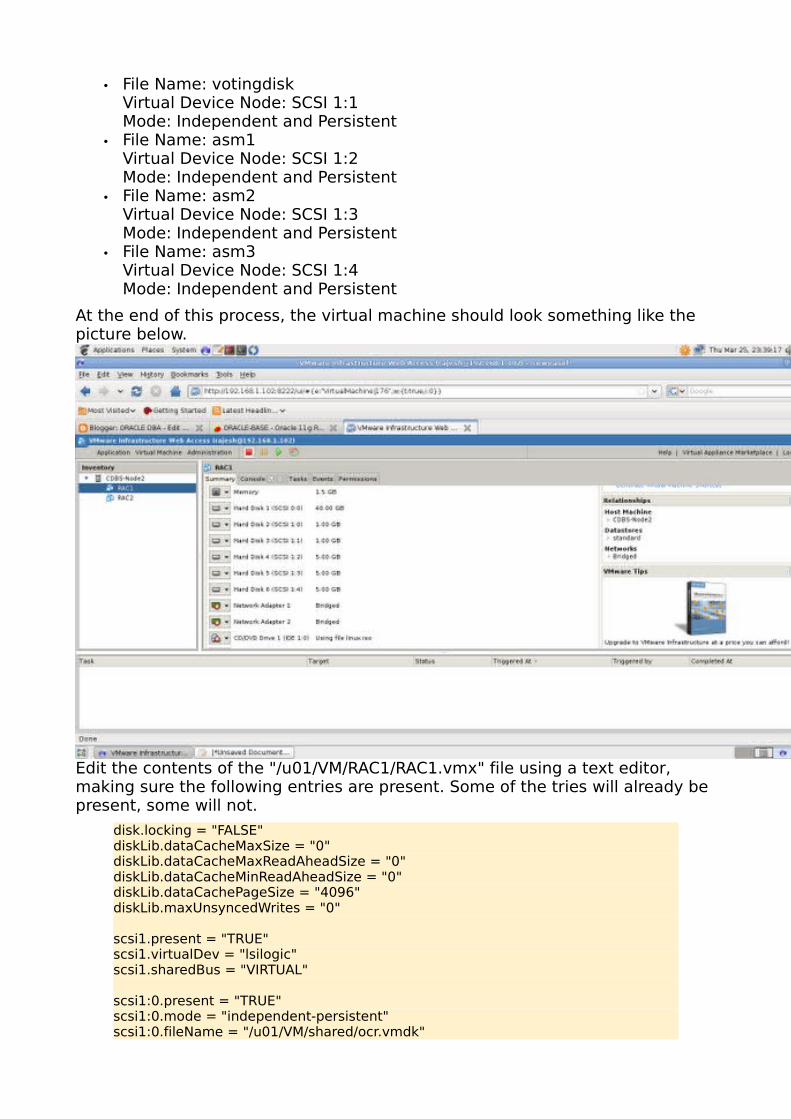
At the end of this process, the virtual machine should look something like the picture below.
Edit the contents of the "/u01/VM/RAC1/RAC1.vmx" file using a text editor, making sure the following entries are present. Some of the tries will already be present, some will not.
disk.locking = "FALSE"diskLib.dataCacheMaxSize = "0"diskLib.dataCacheMaxReadAheadSize = "0"diskLib.dataCacheMinReadAheadSize = "0"diskLib.dataCachePageSize = "4096"diskLib.maxUnsyncedWrites = "0"
scsi1.present = "TRUE"scsi1.virtualDev = "lsilogic"scsi1.sharedBus = "VIRTUAL"
scsi1:0.present = "TRUE"scsi1:0.mode = "independent-persistent"scsi1:0.fileName = "/u01/VM/shared/ocr.vmdk"
scsi1:0.deviceType = "plainDisk"scsi1:0.redo = ""
scsi1:1.present = "TRUE"scsi1:1.mode = "independent-persistent"scsi1:1.fileName = "/u01/VM/shared/votingdisk.vmdk"scsi1:1.deviceType = "plainDisk"scsi1:1.redo = ""
scsi1:2.present = "TRUE"scsi1:2.mode = "independent-persistent"scsi1:2.fileName = "/u01/VM/shared/asm1.vmdk"scsi1:2.deviceType = "plainDisk"scsi1:2.redo = ""
scsi1:3.present = "TRUE"scsi1:3.mode = "independent-persistent"scsi1:3.fileName = "/u01/VM/shared/asm2.vmdk"scsi1:3.deviceType = "plainDisk"scsi1:3.redo = ""
scsi1:4.present = "TRUE"scsi1:4.mode = "independent-persistent"scsi1:4.fileName = "/u01/VM/shared/asm3.vmdk"scsi1:4.deviceType = "plainDisk"scsi1:4.redo = ""
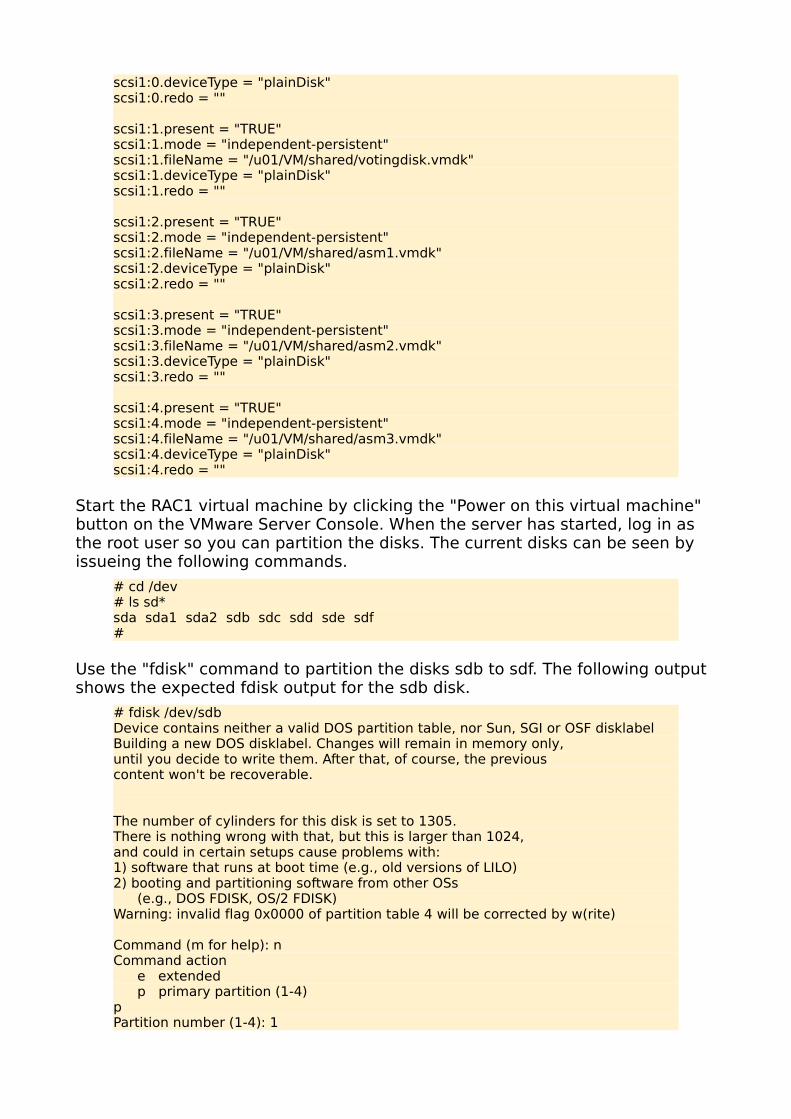
Start the RAC1 virtual machine by clicking the "Power on this virtual machine" button on the VMware Server Console. When the server has started, log in as the root user so you can partition the disks. The current disks can be seen by issueing the following commands.
# cd /dev# ls sd*sda sda1 sda2 sdb sdc sdd sde sdf#
Use the "fdisk" command to partition the disks sdb to sdf. The following output shows the expected fdisk output for the sdb disk.
# fdisk /dev/sdbDevice contains neither a valid DOS partition table, nor Sun, SGI or OSF disklabelBuilding a new DOS disklabel. Changes will remain in memory only,until you decide to write them. After that, of course, the previouscontent won't be recoverable.
The number of cylinders for this disk is set to 1305.There is nothing wrong with that, but this is larger than 1024,and could in certain setups cause problems with:1) software that runs at boot time (e.g., old versions of LILO)2) booting and partitioning software from other OSs (e.g., DOS FDISK, OS/2 FDISK)Warning: invalid flag 0x0000 of partition table 4 will be corrected by w(rite)
Command (m for help): nCommand action e extended p primary partition (1-4)pPartition number (1-4): 1
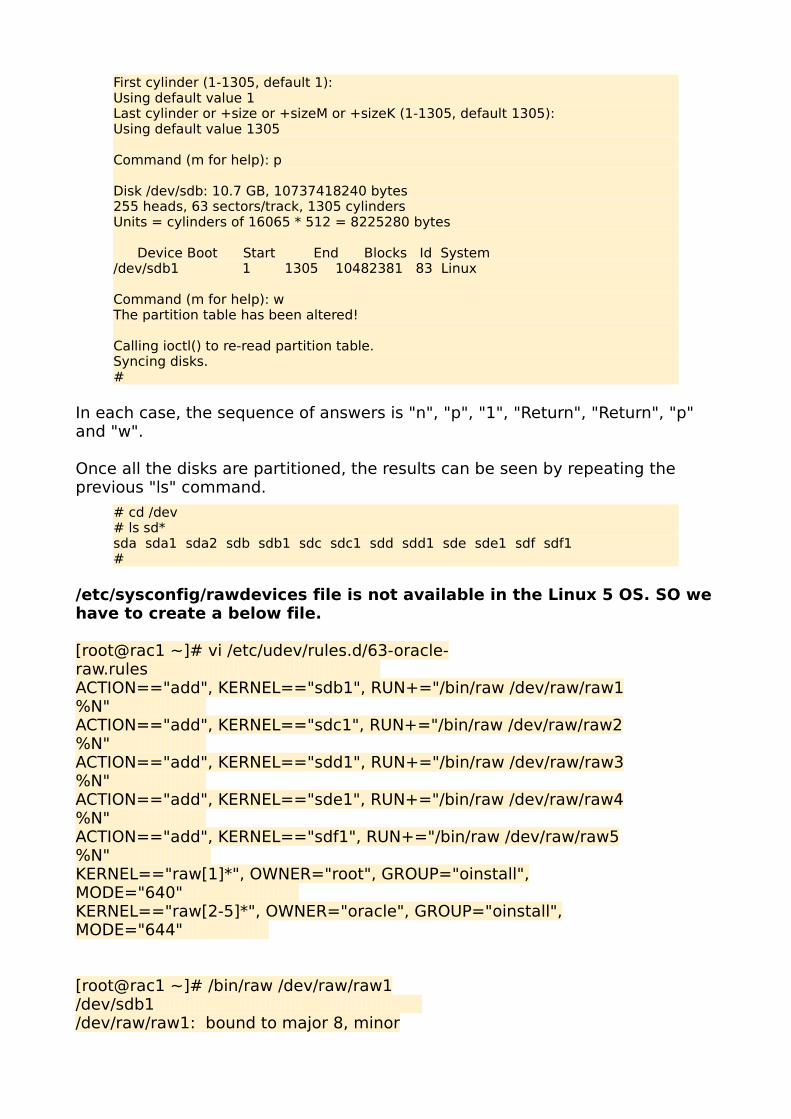
First cylinder (1-1305, default 1):Using default value 1Last cylinder or +size or +sizeM or +sizeK (1-1305, default 1305):Using default value 1305
Command (m for help): p
Disk /dev/sdb: 10.7 GB, 10737418240 bytes255 heads, 63 sectors/track, 1305 cylindersUnits = cylinders of 16065 * 512 = 8225280 bytes
Device Boot Start End Blocks Id System/dev/sdb1 1 1305 10482381 83 Linux
Command (m for help): wThe partition table has been altered!
Calling ioctl() to re-read partition table.Syncing disks.#
In each case, the sequence of answers is "n", "p", "1", "Return", "Return", "p" and "w".
Once all the disks are partitioned, the results can be seen by repeating the previous "ls" command.
# cd /dev# ls sd*sda sda1 sda2 sdb sdb1 sdc sdc1 sdd sdd1 sde sde1 sdf sdf1#
/etc/sysconfig/rawdevices file is not available in the Linux 5 OS. SO we have to create a below file.
[root@rac1 ~]# vi /etc/udev/rules.d/63-oracle-raw.rules ACTION=="add", KERNEL=="sdb1", RUN+="/bin/raw /dev/raw/raw1 %N" ACTION=="add", KERNEL=="sdc1", RUN+="/bin/raw /dev/raw/raw2 %N" ACTION=="add", KERNEL=="sdd1", RUN+="/bin/raw /dev/raw/raw3 %N" ACTION=="add", KERNEL=="sde1", RUN+="/bin/raw /dev/raw/raw4 %N" ACTION=="add", KERNEL=="sdf1", RUN+="/bin/raw /dev/raw/raw5 %N" KERNEL=="raw[1]*", OWNER="root", GROUP="oinstall", MODE="640" KERNEL=="raw[2-5]*", OWNER="oracle", GROUP="oinstall", MODE="644"
[root@rac1 ~]# /bin/raw /dev/raw/raw1 /dev/sdb1 /dev/raw/raw1: bound to major 8, minor
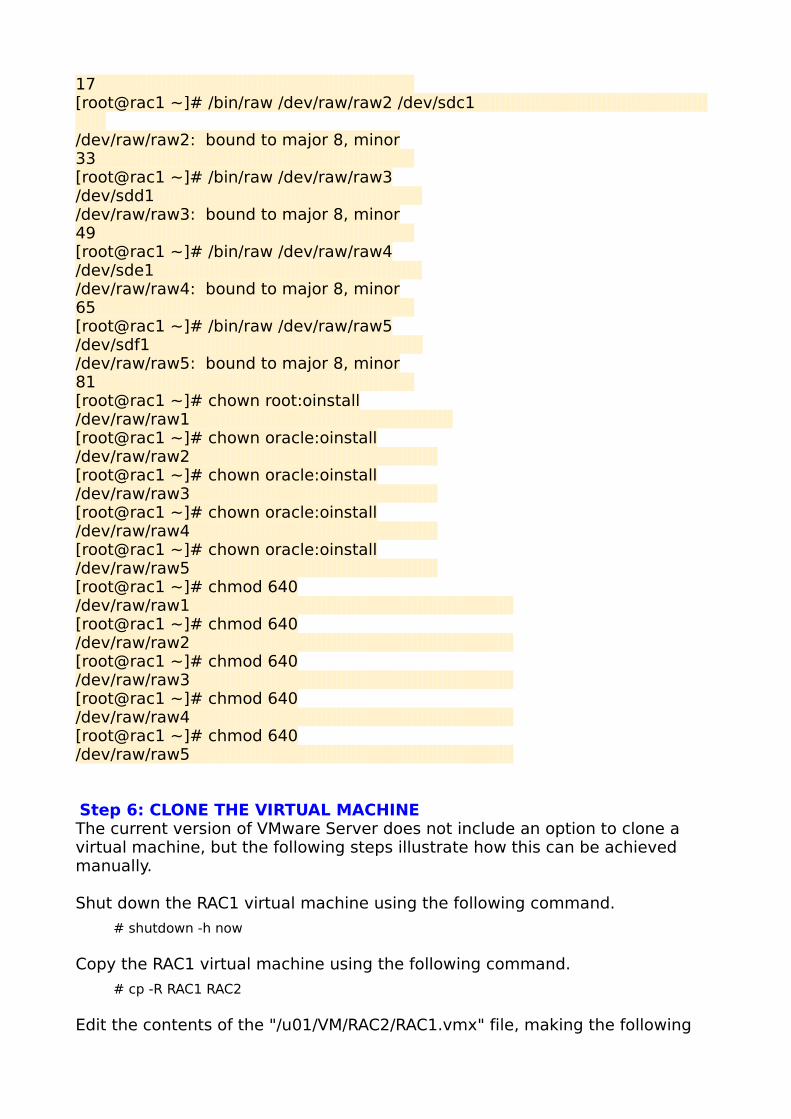
17 [root@rac1 ~]# /bin/raw /dev/raw/raw2 /dev/sdc1 /dev/raw/raw2: bound to major 8, minor 33 [root@rac1 ~]# /bin/raw /dev/raw/raw3 /dev/sdd1 /dev/raw/raw3: bound to major 8, minor 49 [root@rac1 ~]# /bin/raw /dev/raw/raw4 /dev/sde1 /dev/raw/raw4: bound to major 8, minor 65 [root@rac1 ~]# /bin/raw /dev/raw/raw5 /dev/sdf1 /dev/raw/raw5: bound to major 8, minor 81 [root@rac1 ~]# chown root:oinstall /dev/raw/raw1 [root@rac1 ~]# chown oracle:oinstall /dev/raw/raw2 [root@rac1 ~]# chown oracle:oinstall /dev/raw/raw3 [root@rac1 ~]# chown oracle:oinstall /dev/raw/raw4 [root@rac1 ~]# chown oracle:oinstall /dev/raw/raw5 [root@rac1 ~]# chmod 640 /dev/raw/raw1 [root@rac1 ~]# chmod 640 /dev/raw/raw2 [root@rac1 ~]# chmod 640 /dev/raw/raw3 [root@rac1 ~]# chmod 640 /dev/raw/raw4 [root@rac1 ~]# chmod 640 /dev/raw/raw5
Step 6: CLONE THE VIRTUAL MACHINEThe current version of VMware Server does not include an option to clone a virtual machine, but the following steps illustrate how this can be achieved manually.
Shut down the RAC1 virtual machine using the following command.
# shutdown -h now
Copy the RAC1 virtual machine using the following command.
# cp -R RAC1 RAC2
Edit the contents of the "/u01/VM/RAC2/RAC1.vmx" file, making the following

change.
displayName = "RAC2"
And then follow the steps as below:
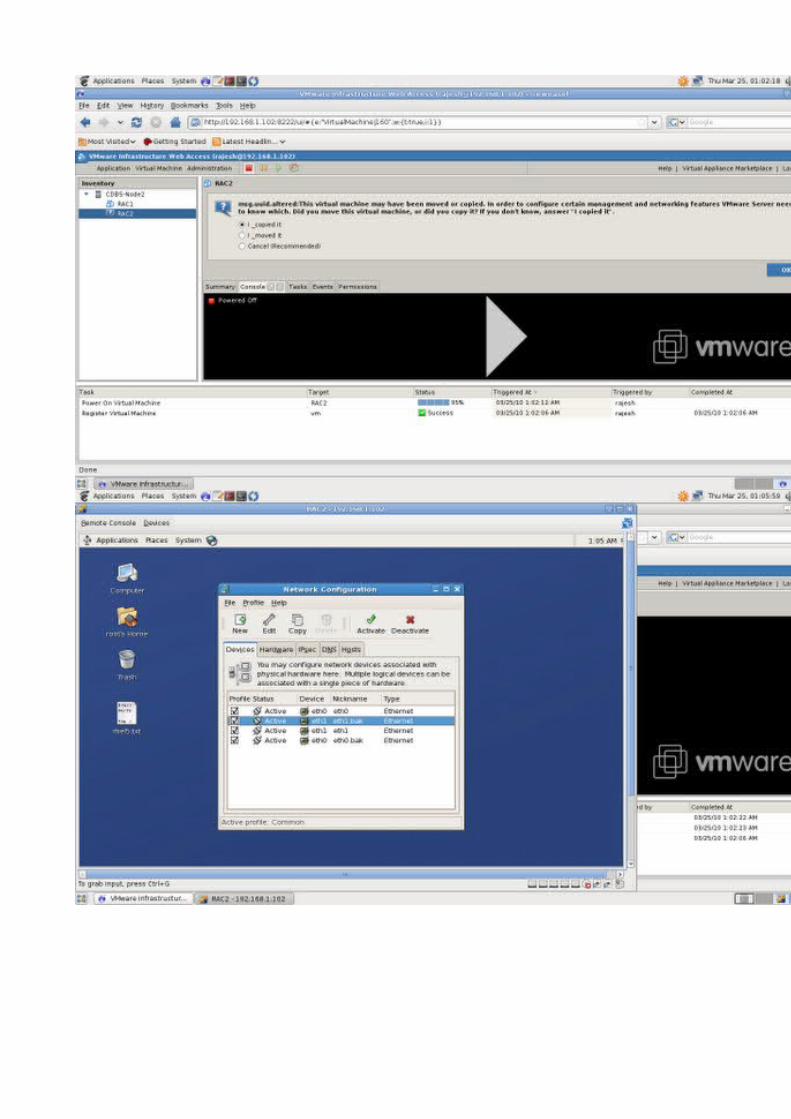


Edit the hostname to rac2.localdomain#vi /etc/sysconfig/networkand #hostname rac2.localdomain #vi /etc/hosts check the public,private and virtuals ips are correctly configured.
Start the RAC1 virtual machine and restart the RAC2 virtual machine. When both nodes have started, check they can both ping all the public and private IP addresses using the following commands. login as oracle user
ping -c 3 rac1ping -c 3 rac1-privping -c 3 rac2ping -c 3 rac2-priv
Configure SSH on each node in the cluster. Log in as the "oracle" user and perform the following tasks on each node.
su - oraclemkdir ~/.sshchmod 700 ~/.ssh/usr/bin/ssh-keygen -t rsa # Accept the default settings.
The RSA public key is written to the ~/.ssh/id_rsa.pub file and the private key to the ~/.ssh/id_rsa file.
Log in as the "oracle" user on RAC1, generate an "authorized_keys" file on RAC1 and copy it to RAC2 using the following commands.
su - oraclecd ~/.ssh

cat id_rsa.pub >> authorized_keysscp authorized_keys rac2:/home/oracle/.ssh/
Next, log in as the "oracle" user on RAC2 and perform the following commands.
su - oraclecd ~/.sshcat id_rsa.pub >> authorized_keysscp authorized_keys rac1:/home/oracle/.ssh/
The "authorized_keys" file on both servers now contains the public keys generated on all RAC nodes.
To enable SSH user equivalency on the cluster member nodes issue the following commands on each node.
ssh rac1 datessh rac2 datessh rac1.localdomain datessh rac2.localdomain dateexec /usr/bin/ssh-agent $SHELL/usr/bin/ssh-add
You should now be able to SSH and SCP between servers without entering passwords.
Before installing the clusterware, check the prerequisites have been met using the "runcluvfy.sh" utility in the clusterware root directory.while running this you will get unsuccessful message no need to worry about this. ignore this only for vmware setup testing and education purpose, testing time no need to worry.
/home/oracle/clusterware/cluvfy/runcluvfy.sh stage -pre crsinst -n rac1,rac2 -verbose
Step 7: Installing Clusterware Software
Install the Clusterware SoftwareStart the RAC1 and RAC2 virtual machines, login to RAC1 as the oracle user and start the Oracle installer.$cd clusterware
To install 10gR2, you must first install the base release, which is 10.2.0.1. As these version of OS are newer, you should use the following command to invoke the installer:$ runInstaller -ignoreSysPrereqs // This will bypass the OS check //note: Edit the /etc/redhat-release file replacing the current release information (Red Hat Enterprise Linux Server release 5 ) with the following:
redhat-4
./runInstaller -ignoreSysPrereqs
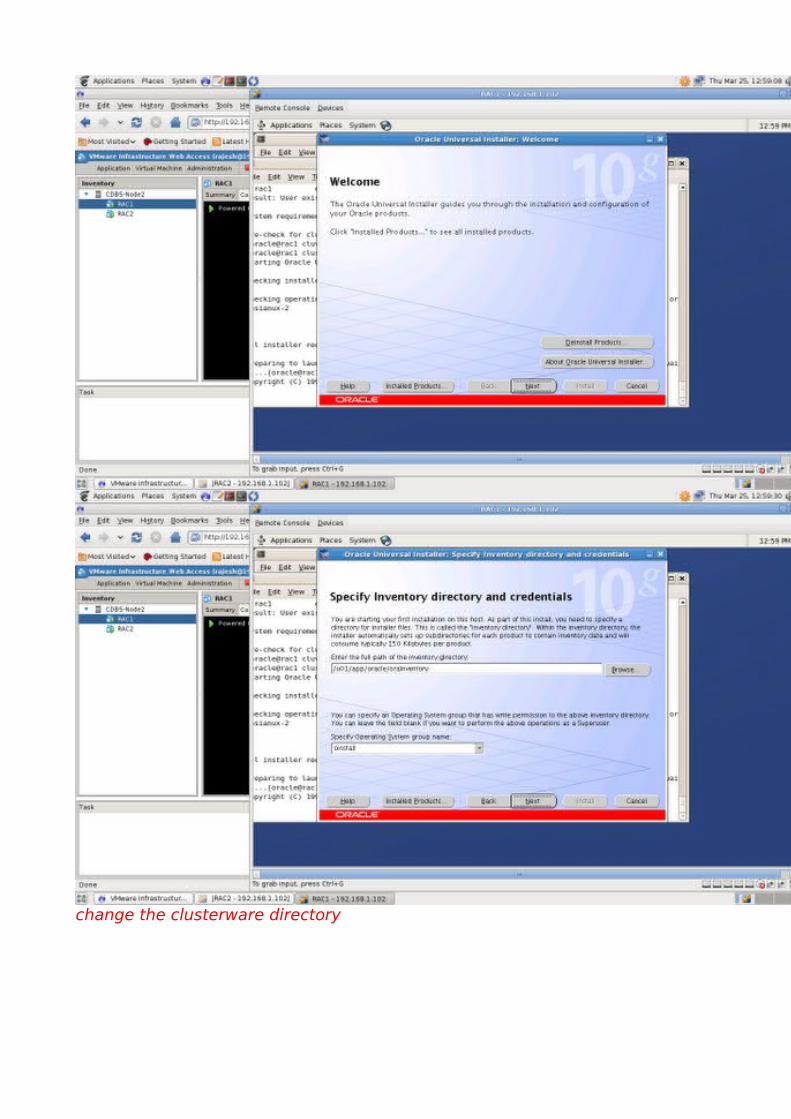
change the clusterware directory
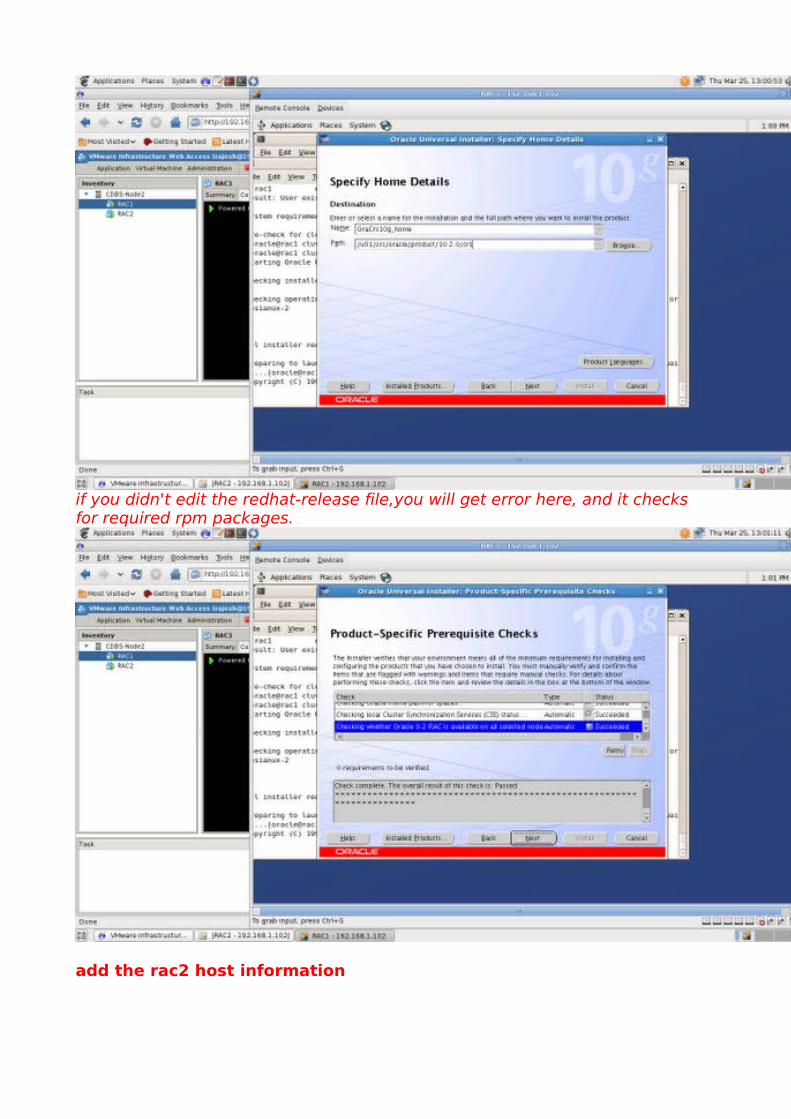
if you didn't edit the redhat-release file,you will get error here, and it checks for required rpm packages.
add the rac2 host information
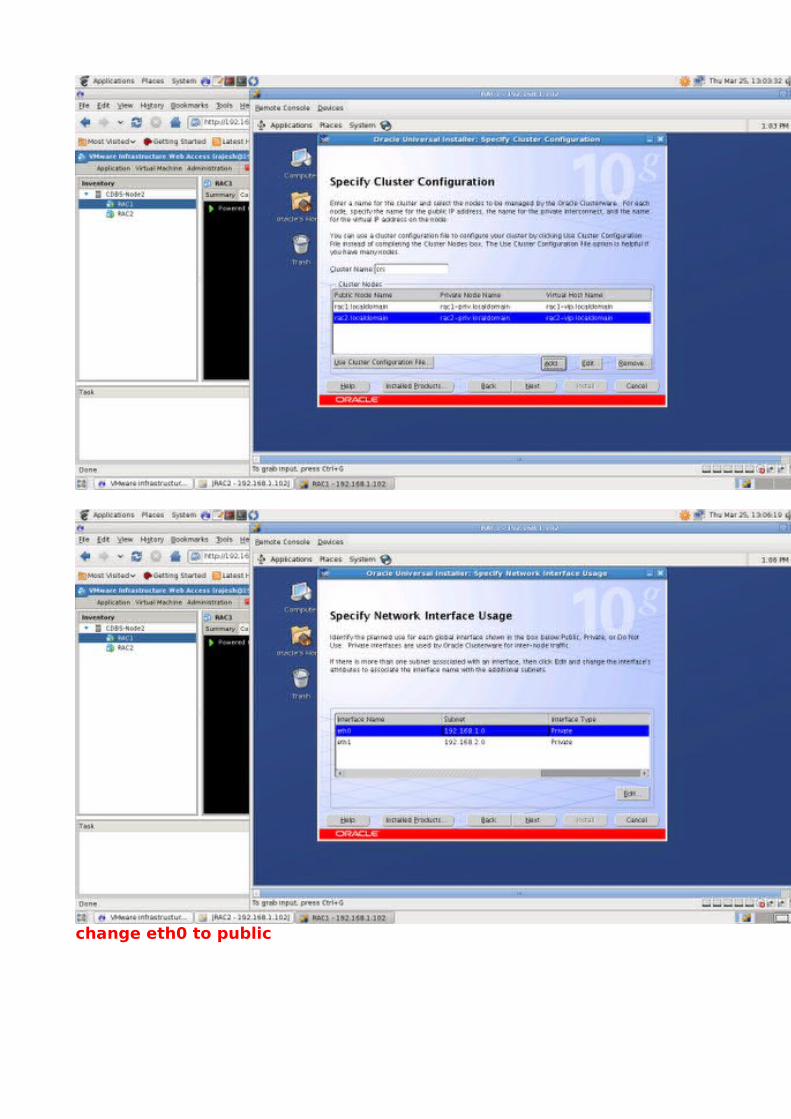
change eth0 to public
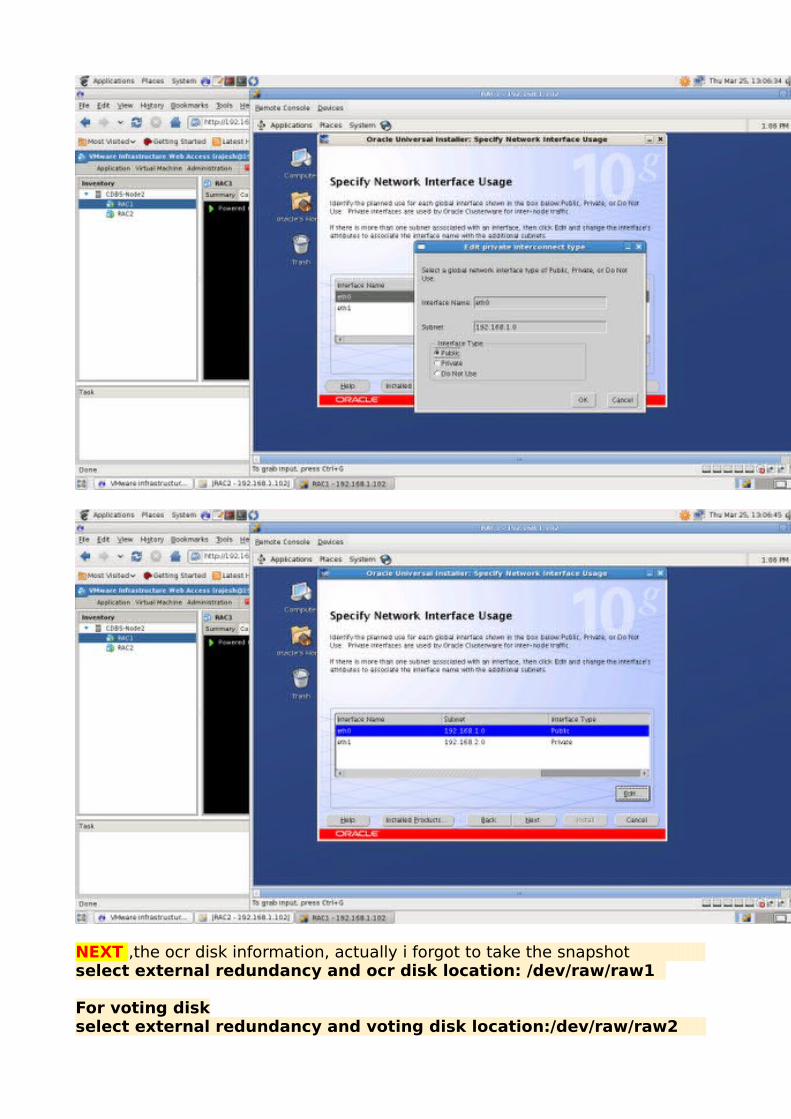
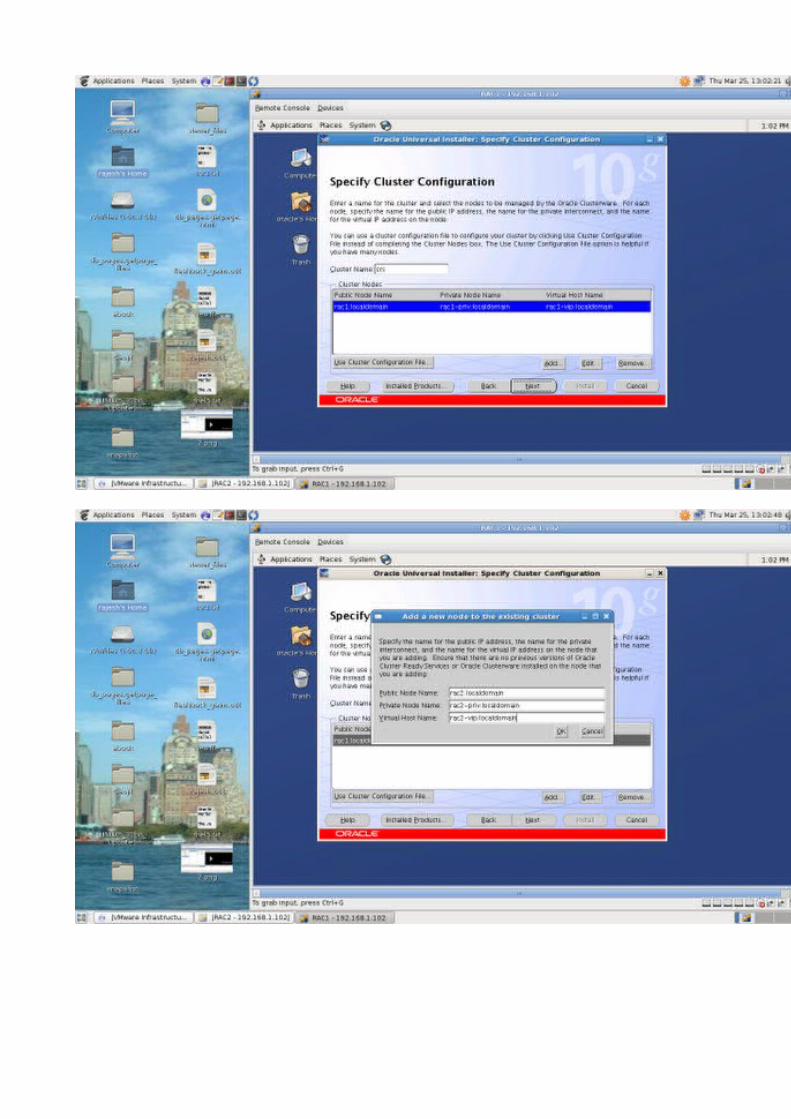
NEXT ,the ocr disk information, actually i forgot to take the snapshot select external redundancy and ocr disk location: /dev/raw/raw1
For voting diskselect external redundancy and voting disk location:/dev/raw/raw2
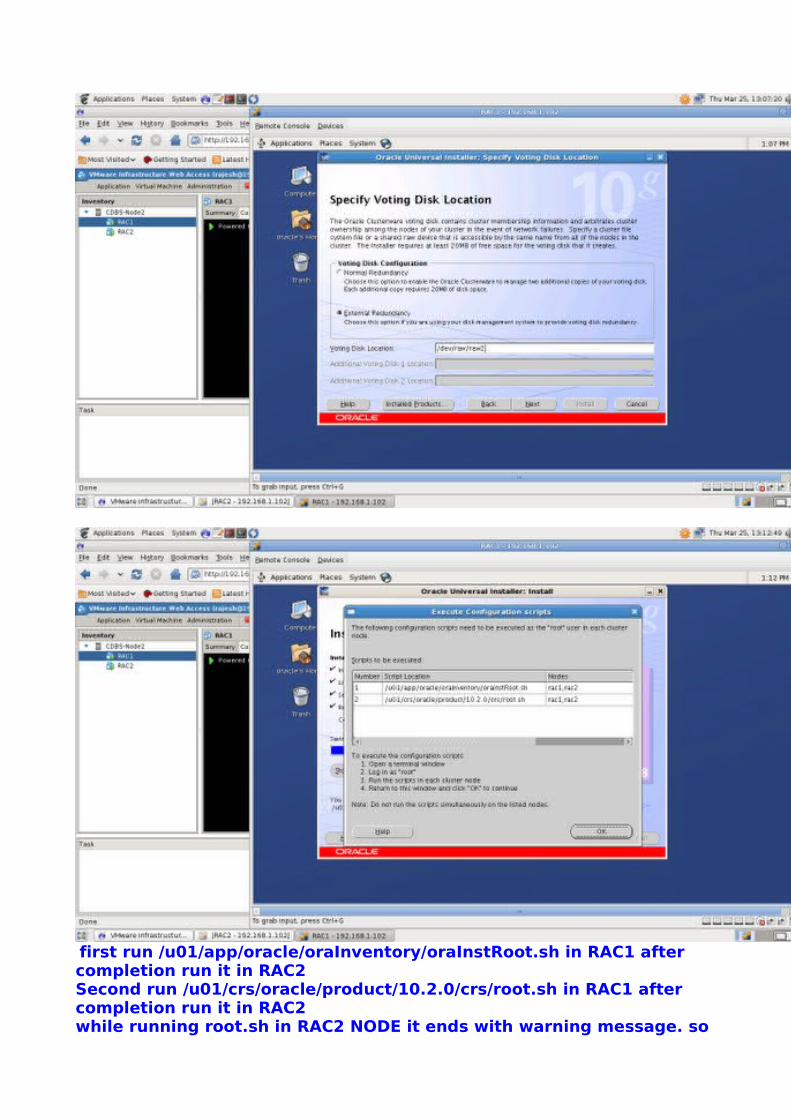
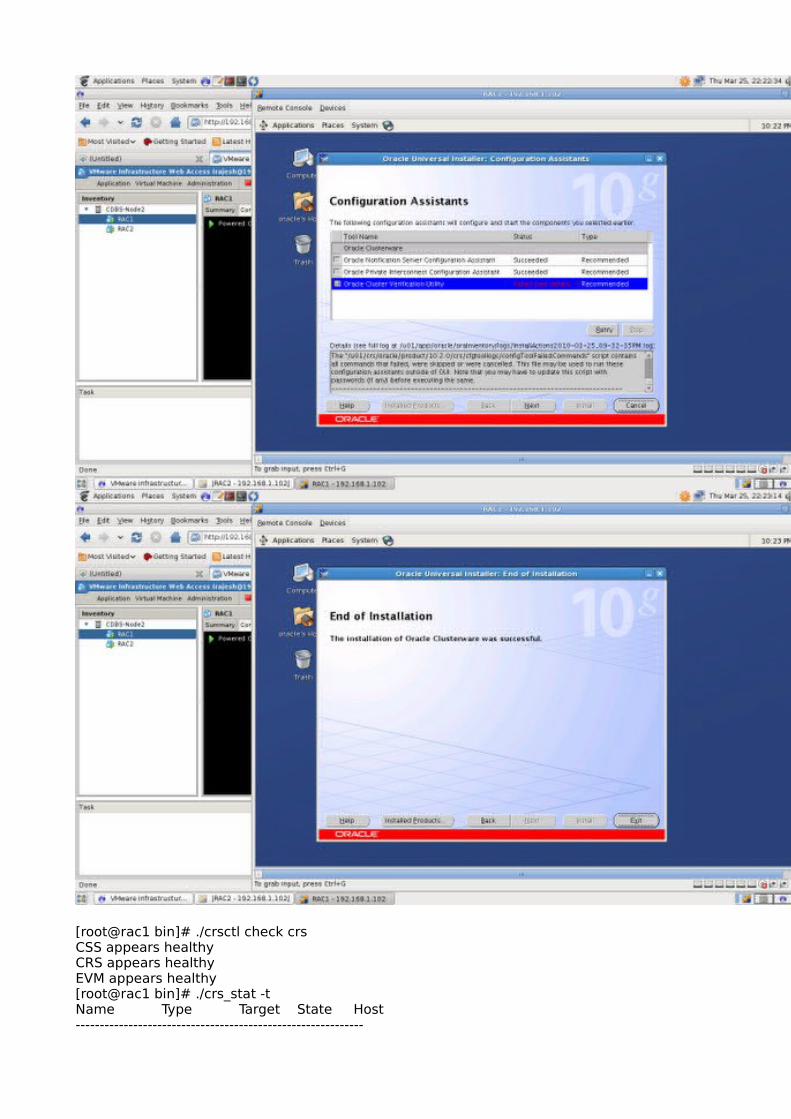
first run /u01/app/oracle/oraInventory/oraInstRoot.sh in RAC1 after completion run it in RAC2Second run /u01/crs/oracle/product/10.2.0/crs/root.sh in RAC1 after completion run it in RAC2while running root.sh in RAC2 NODE it ends with warning message. so

follow the below steps[root@rac1 ~]# /u01/app/oracle/oraInventory/orainstRoot.sh Changing permissions of /u01/app/oracle/oraInventory to 770.Changing groupname of /u01/app/oracle/oraInventory to oinstall.The execution of the script is complete
[root@rac2 ~]# /u01/app/oracle/oraInventory/orainstRoot.sh Changing permissions of /u01/app/oracle/oraInventory to 770.Changing groupname of /u01/app/oracle/oraInventory to oinstall.The execution of the script is complete
[root@rac1 ~]# /u01/crs/oracle/product/10.2.0/crs/root.sh WARNING: directory '/u01/crs/oracle/product/10.2.0' is not owned by rootWARNING: directory '/u01/crs/oracle/product' is not owned by rootWARNING: directory '/u01/crs/oracle' is not owned by rootWARNING: directory '/u01/crs' is not owned by rootWARNING: directory '/u01' is not owned by rootChecking to see if Oracle CRS stack is already configured/etc/oracle does not exist. Creating it now.
Setting the permissions on OCR backup directorySetting up NS directoriesOracle Cluster Registry configuration upgraded successfullyWARNING: directory '/u01/crs/oracle/product/10.2.0' is not owned by rootWARNING: directory '/u01/crs/oracle/product' is not owned by rootWARNING: directory '/u01/crs/oracle' is not owned by rootWARNING: directory '/u01/crs' is not owned by rootWARNING: directory '/u01' is not owned by rootassigning default hostname rac1 for node 1.assigning default hostname rac2 for node 2.Successfully accumulated necessary OCR keys.Using ports: CSS=49895 CRS=49896 EVMC=49898 and EVMR=49897.node : node 1: rac1 rac1-priv rac1node 2: rac2 rac2-priv rac2Creating OCR keys for user 'root', privgrp 'root'..Operation successful.Now formatting voting device: /dev/raw/raw2Format of 1 voting devices complete.Startup will be queued to init within 90 seconds.Adding daemons to inittabExpecting the CRS daemons to be up within 600 seconds.CSS is active on these nodes. rac1CSS is inactive on these nodes. rac2Local node checking complete.Run root.sh on remaining nodes to start CRS daemons.
[root@rac2 ~]# /u01/crs/oracle/product/10.2.0/crs/root.sh WARNING: directory '/u01/crs/oracle/product/10.2.0' is not owned by rootWARNING: directory '/u01/crs/oracle/product' is not owned by rootWARNING: directory '/u01/crs/oracle' is not owned by rootWARNING: directory '/u01/crs' is not owned by rootWARNING: directory '/u01' is not owned by rootChecking to see if Oracle CRS stack is already configured/etc/oracle does not exist. Creating it now.
Setting the permissions on OCR backup directorySetting up NS directoriesOracle Cluster Registry configuration upgraded successfullyWARNING: directory '/u01/crs/oracle/product/10.2.0' is not owned by rootWARNING: directory '/u01/crs/oracle/product' is not owned by rootWARNING: directory '/u01/crs/oracle' is not owned by rootWARNING: directory '/u01/crs' is not owned by rootWARNING: directory '/u01' is not owned by rootclscfg: EXISTING configuration version 3 detected.clscfg: version 3 is 10G Release 2.assigning default hostname rac1 for node 1.assigning default hostname rac2 for node 2.Successfully accumulated necessary OCR keys.Using ports: CSS=49895 CRS=49896 EVMC=49898 and EVMR=49897.node : node 1: rac1 rac1-priv rac1node 2: rac2 rac2-priv rac2clscfg: Arguments check out successfully.
NO KEYS WERE WRITTEN. Supply -force parameter to override.-force is destructive and will destroy any previous clusterconfiguration.Oracle Cluster Registry for cluster has already been initializedStartup will be queued to init within 90 seconds.Adding daemons to inittabExpecting the CRS daemons to be up within 600 seconds.
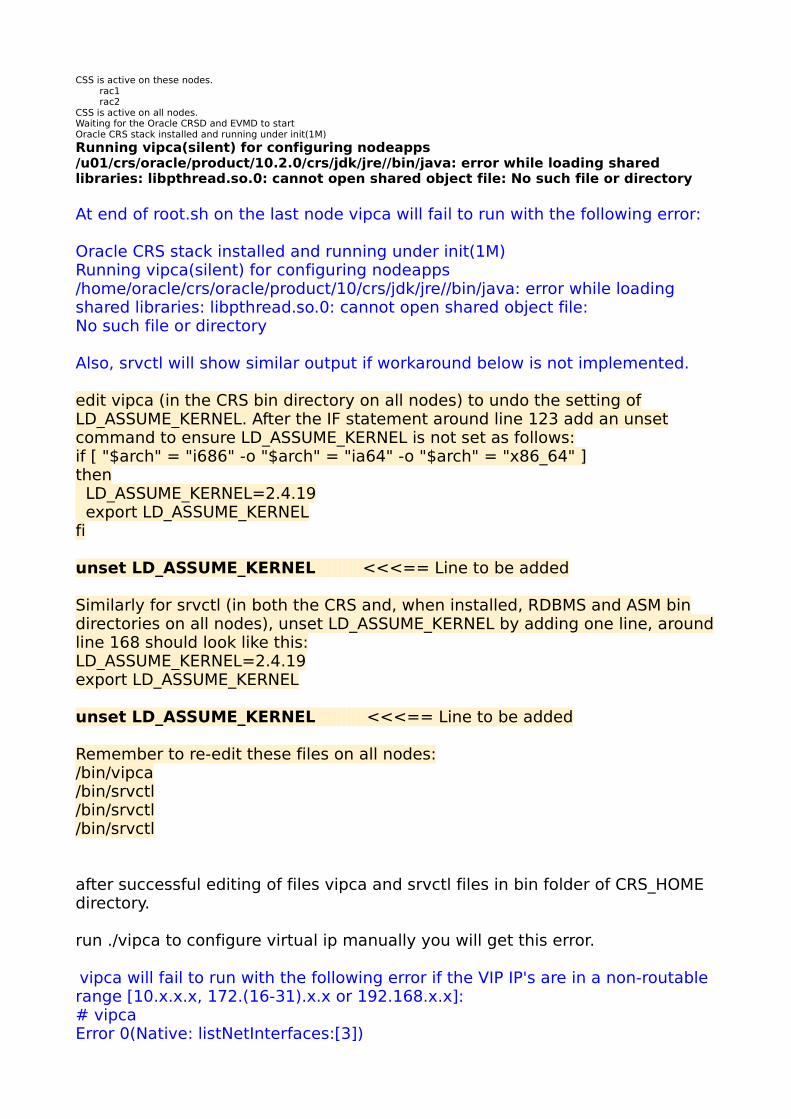
CSS is active on these nodes. rac1 rac2CSS is active on all nodes.Waiting for the Oracle CRSD and EVMD to startOracle CRS stack installed and running under init(1M)
Running vipca(silent) for configuring nodeapps/u01/crs/oracle/product/10.2.0/crs/jdk/jre//bin/java: error while loading shared libraries: libpthread.so.0: cannot open shared object file: No such file or directory
At end of root.sh on the last node vipca will fail to run with the following error:
Oracle CRS stack installed and running under init(1M)Running vipca(silent) for configuring nodeapps/home/oracle/crs/oracle/product/10/crs/jdk/jre//bin/java: error while loadingshared libraries: libpthread.so.0: cannot open shared object file:No such file or directory
Also, srvctl will show similar output if workaround below is not implemented.
edit vipca (in the CRS bin directory on all nodes) to undo the setting of LD_ASSUME_KERNEL. After the IF statement around line 123 add an unset command to ensure LD_ASSUME_KERNEL is not set as follows:if [ "$arch" = "i686" -o "$arch" = "ia64" -o "$arch" = "x86_64" ]then LD_ASSUME_KERNEL=2.4.19 export LD_ASSUME_KERNELfi
unset LD_ASSUME_KERNEL <<<== Line to be added
Similarly for srvctl (in both the CRS and, when installed, RDBMS and ASM bin directories on all nodes), unset LD_ASSUME_KERNEL by adding one line, around line 168 should look like this:LD_ASSUME_KERNEL=2.4.19export LD_ASSUME_KERNEL
unset LD_ASSUME_KERNEL <<<== Line to be added
Remember to re-edit these files on all nodes:/bin/vipca/bin/srvctl/bin/srvctl/bin/srvctl
after successful editing of files vipca and srvctl files in bin folder of CRS_HOME directory.
run ./vipca to configure virtual ip manually you will get this error.
vipca will fail to run with the following error if the VIP IP's are in a non-routable range [10.x.x.x, 172.(16-31).x.x or 192.168.x.x]:# vipcaError 0(Native: listNetInterfaces:[3])
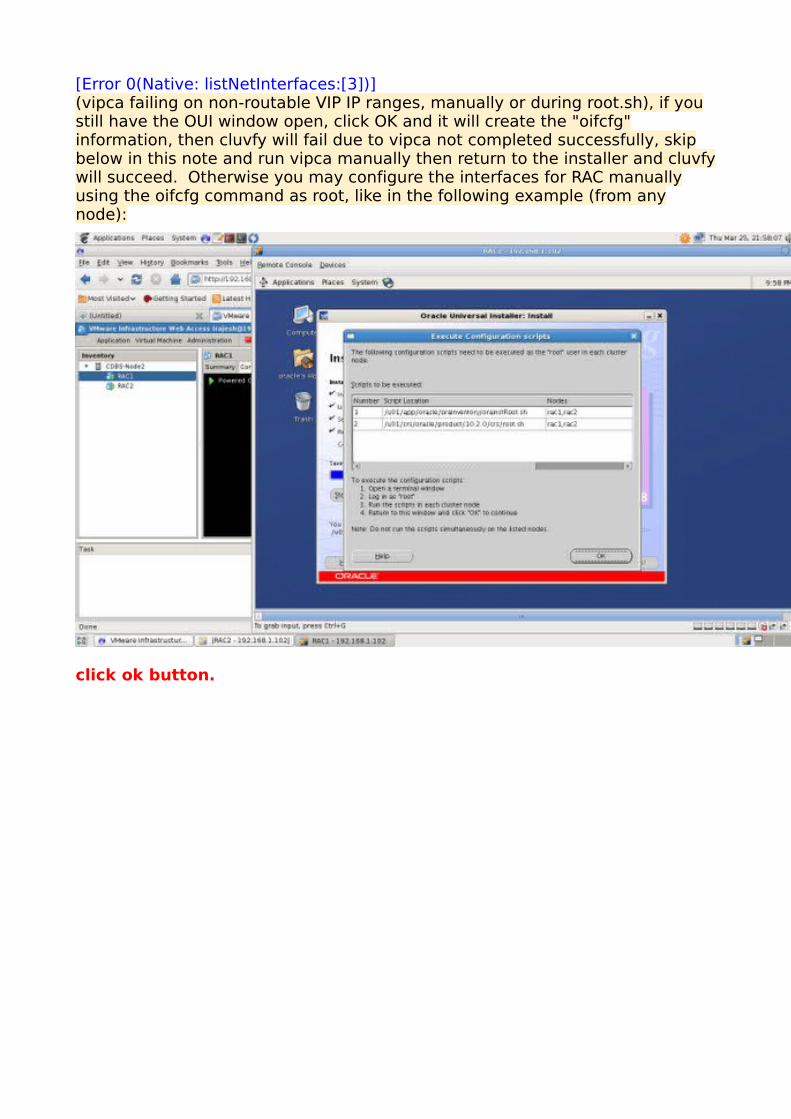
[Error 0(Native: listNetInterfaces:[3])](vipca failing on non-routable VIP IP ranges, manually or during root.sh), if you still have the OUI window open, click OK and it will create the "oifcfg" information, then cluvfy will fail due to vipca not completed successfully, skip below in this note and run vipca manually then return to the installer and cluvfy will succeed. Otherwise you may configure the interfaces for RAC manually using the oifcfg command as root, like in the following example (from any node):
click ok button.
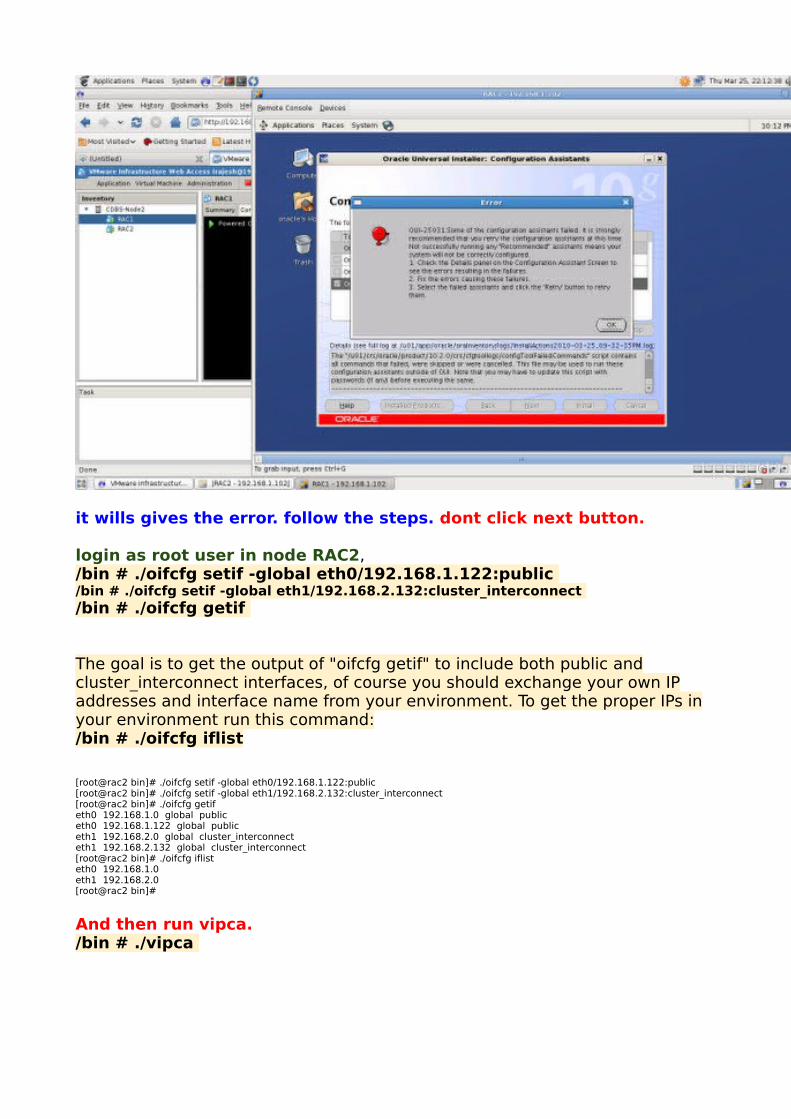
it wills gives the error. follow the steps. dont click next button.
login as root user in node RAC2, /bin # ./oifcfg setif -global eth0/192.168.1.122:public /bin # ./oifcfg setif -global eth1/192.168.2.132:cluster_interconnect /bin # ./oifcfg getif
The goal is to get the output of "oifcfg getif" to include both public and cluster_interconnect interfaces, of course you should exchange your own IP addresses and interface name from your environment. To get the proper IPs in your environment run this command:/bin # ./oifcfg iflist
[root@rac2 bin]# ./oifcfg setif -global eth0/192.168.1.122:public[root@rac2 bin]# ./oifcfg setif -global eth1/192.168.2.132:cluster_interconnect[root@rac2 bin]# ./oifcfg getifeth0 192.168.1.0 global publiceth0 192.168.1.122 global publiceth1 192.168.2.0 global cluster_interconnecteth1 192.168.2.132 global cluster_interconnect[root@rac2 bin]# ./oifcfg iflisteth0 192.168.1.0eth1 192.168.2.0[root@rac2 bin]#
And then run vipca./bin # ./vipca
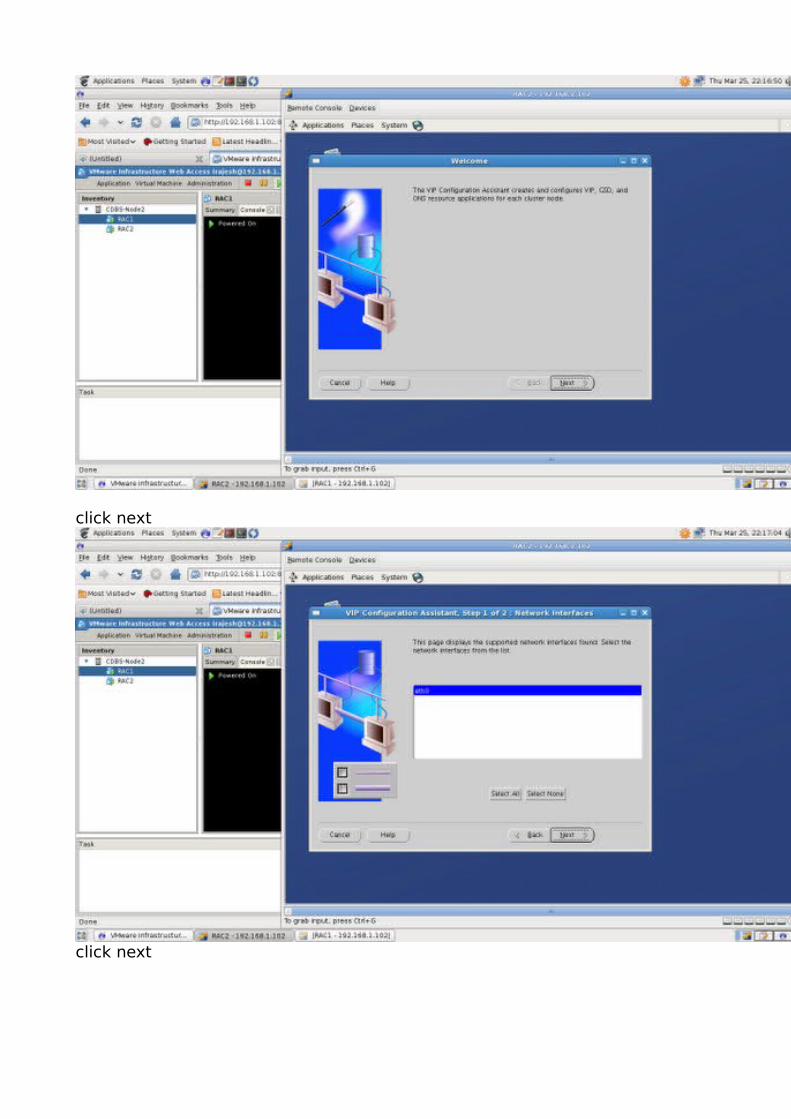
click next
click next

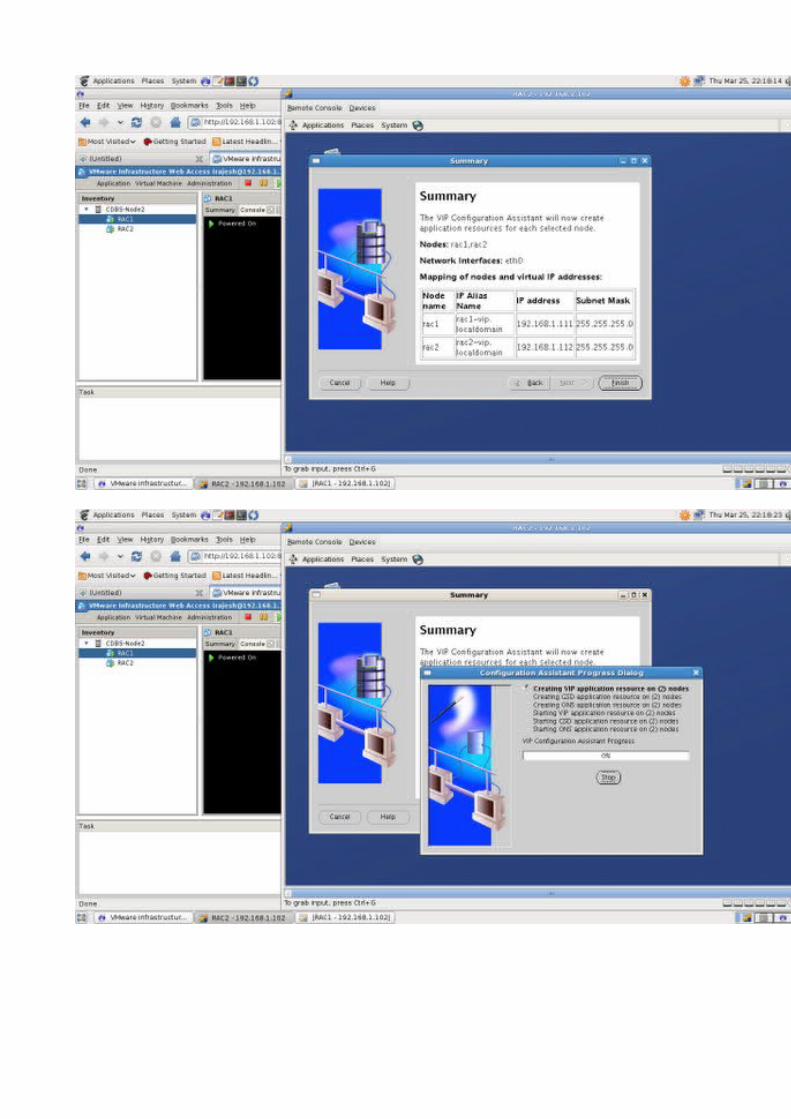
enter rac1-vip.localdomain
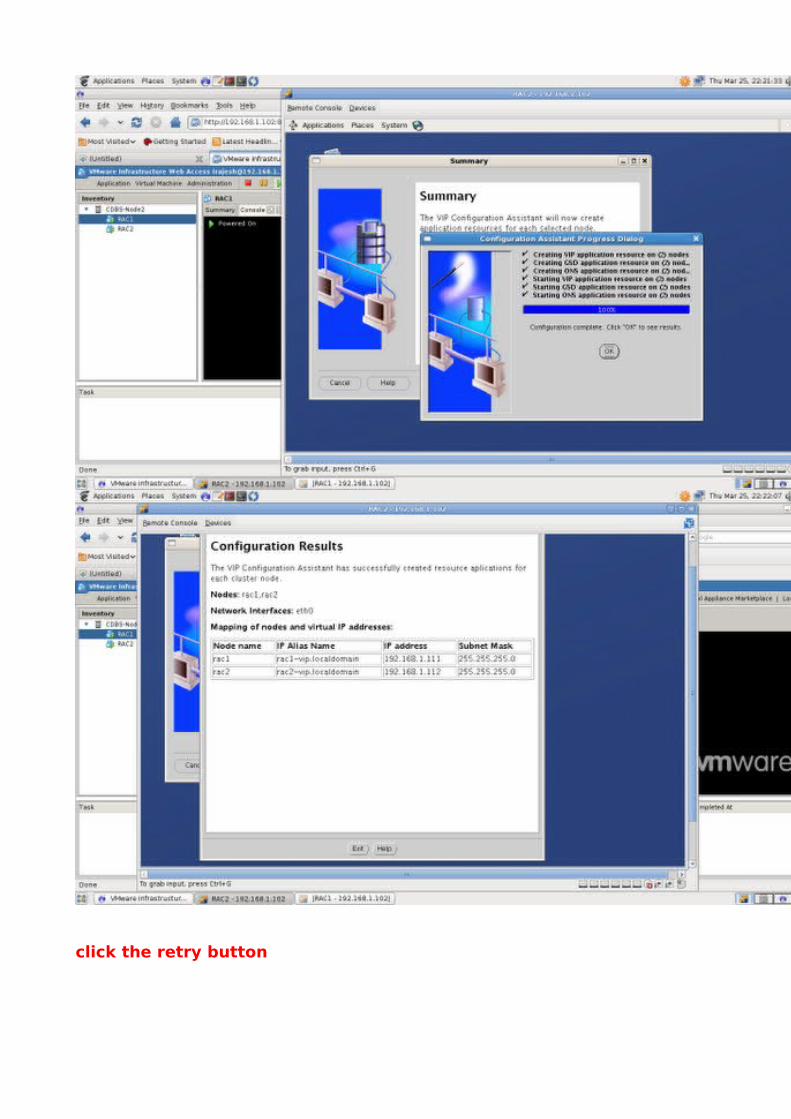
click the retry button
[root@rac1 bin]# ./crsctl check crsCSS appears healthyCRS appears healthyEVM appears healthy[root@rac1 bin]# ./crs_stat -tName Type Target State Host ------------------------------------------------------------
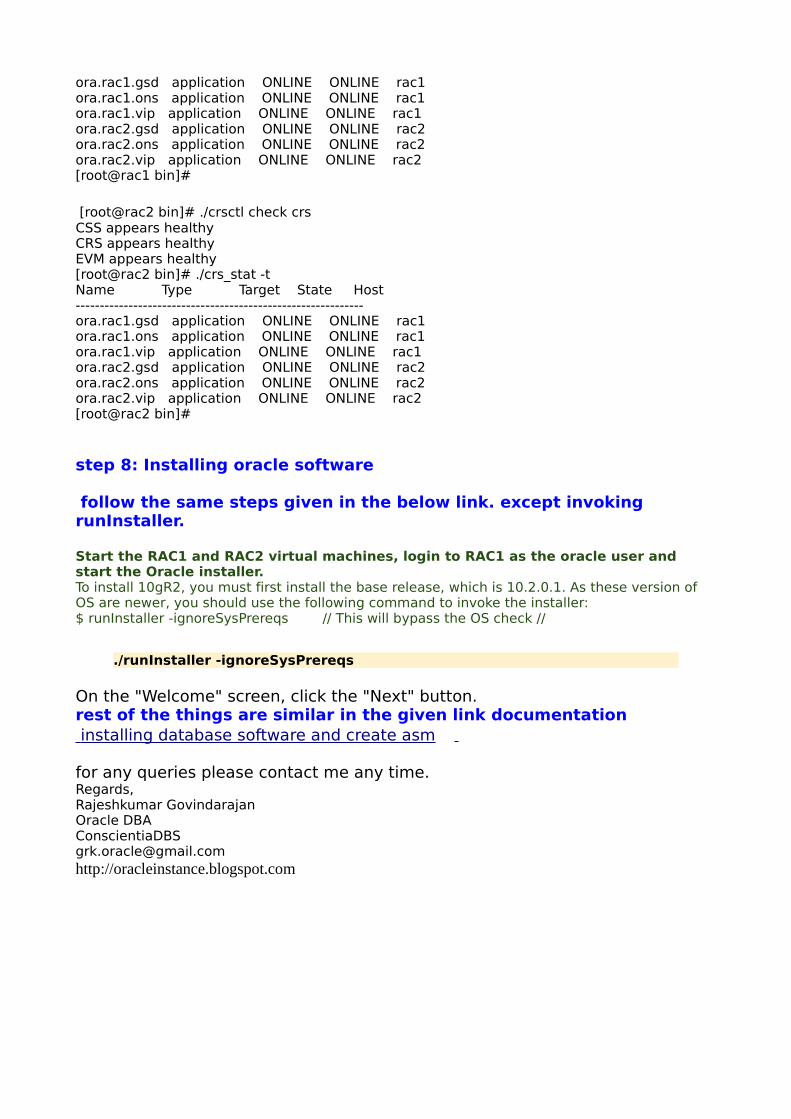
ora.rac1.gsd application ONLINE ONLINE rac1 ora.rac1.ons application ONLINE ONLINE rac1 ora.rac1.vip application ONLINE ONLINE rac1 ora.rac2.gsd application ONLINE ONLINE rac2 ora.rac2.ons application ONLINE ONLINE rac2 ora.rac2.vip application ONLINE ONLINE rac2 [root@rac1 bin]#
[root@rac2 bin]# ./crsctl check crsCSS appears healthyCRS appears healthyEVM appears healthy[root@rac2 bin]# ./crs_stat -tName Type Target State Host ------------------------------------------------------------ora.rac1.gsd application ONLINE ONLINE rac1 ora.rac1.ons application ONLINE ONLINE rac1 ora.rac1.vip application ONLINE ONLINE rac1 ora.rac2.gsd application ONLINE ONLINE rac2 ora.rac2.ons application ONLINE ONLINE rac2 ora.rac2.vip application ONLINE ONLINE rac2 [root@rac2 bin]#
step 8: Installing oracle software
follow the same steps given in the below link. except invoking runInstaller.
Start the RAC1 and RAC2 virtual machines, login to RAC1 as the oracle user and start the Oracle installer.To install 10gR2, you must first install the base release, which is 10.2.0.1. As these version of OS are newer, you should use the following command to invoke the installer:$ runInstaller -ignoreSysPrereqs // This will bypass the OS check //
./runInstaller -ignoreSysPrereqs
On the "Welcome" screen, click the "Next" button.rest of the things are similar in the given link documentation installing database software and create asm
for any queries please contact me any time.Regards,Rajeshkumar GovindarajanOracle DBA [email protected]://oracleinstance.blogspot.com