Embed Size (px)
Citation preview

8/8/2019 10. Publisher Graphics Merged
http://slidepdf.com/reader/full/10-publisher-graphics-merged 1/41
Microsoft Publisher 2003Working With GraphicsOTS PUBLICATION : PB4 • REVISED 07-01-2006 • [email protected] • OFFICE OF TECHNOLOGY SERVICES
=Shortcut =Advice =Caution
© 2005 Towson University -This work is licensed under the Creative Commons Attribution-NonCommercial-NoDerivs License.Details available at http://www.towson.edu/OTStraining. 410-704-4070.
Adding GraphicsThere are two ways to add a new picture to a publication:
1. Replace a placeholder picture by right-clicking it, and then
clicking Change P icture. If you don't see Change Picture on
the shortcut menu, the picture is part of a group (like the one
above). Click the picture a second time until you see gray circles
around it, then try right-clicking again.
2. Create a new frame with the Picture Frame tool, and put a picture
in it (Figure 1, 1).
Pictu re Source
When you add a graphic the first task will be to choose the source of the new picture. There are four
source choices from the Insert > Picture Menu:
1. If you choose Clip Art: The Clip Art task pane opens, where you can search for the clip art,
photograph, movie, or sound you want.
2. If you choose From File: The Insert Picture dialog box opens, where you can locate the
graphic file you want to add.
3. If you choose From Scanner or Camera: If a TWAIN or WIA-compatible scanner or digital
camera is connected to your computer, you can add an image directly from the device into your
publication.
4. If you don't know yet exactly which picture you want to use, you can add a picture placeholder to
a publication by choosing Empty Picture Frame.
Move, Resize or Crop a Pictu re
Once a picture is in a frame you can move, resize and crop it:
• To Move a picture, simply click on it and drag it to a new location (Figure 2).
Graphics
1. Adding Graphics
2. Picture Source
3. Move, Resize, Crop
Picture Toolbar
1. Contrast and Brightness
2. Format Picture
• Border
• Background
• Recolor
3. Text Wrapping
Summary
1
Figur e 1
Figur e 2
2

8/8/2019 10. Publisher Graphics Merged
http://slidepdf.com/reader/full/10-publisher-graphics-merged 2/41
2
PUBLISHER 2003: WORKING WITH GRAPHICS
• To Resize a picture, (make it larger or smaller), and keep the original proportions, press the
Shift key on the keyboard and then drag a corner handle (Figure 3).
• To Crop a picture, (trim parts of a picture away), click the Crop tool on the Picture toolbar
(Figure 1, 2). Position the tool over a black cropping handle, and then drag (Figure 4).
The P ictu re Too lbar
Once a picture is in a frame you can change it’s appearance in many different ways:
1. Adjust contrast and brightness by using the contrast icons (Figure 5, 1), or the brightness icons
(Figure 5, 2).
2. The Format Picture tool (Figure 5, 3), gives you many options:
• Add a border by using the Line choices under the Color and Lines Tab.
• Add a colored background by using the Fill choices under the Color and Lines Tab.
• Recolor the picture by using the Picture Tab.
Figur e 3
Figur e 4
F igur e 5
1012 32
4

8/8/2019 10. Publisher Graphics Merged
http://slidepdf.com/reader/full/10-publisher-graphics-merged 3/41
3
PUBLISHER 2003: WORKING WITH GRAPHICS
3. The Text Wrapping tool (Figure 5, 4) , allows you to set up different relationships between
pictures and text by controlling how the text wraps around a picture.
The following examples illustrate common text
wrapping choices:
Top and Bottom:Text stops at the top of
the picture's frame and continues after
the bottom of the frame.
Tight:Text wraps around the outline of
the picture itself rather than around
the frame.
Square:Text wraps around the frame
rather than around the picture itself.
None: Text acts as if the picture isn't
there.

8/8/2019 10. Publisher Graphics Merged
http://slidepdf.com/reader/full/10-publisher-graphics-merged 4/41
Microsoft Publisher 2003Publication DesignOTS PUBLICATION : PB1 • REVISED 07-01-2006 • [email protected] • OFFICE OF TECHNOLOGY SERVICES
=Shortcut =Advice =Caution
© 2005 Towson University -This work is licensed under the Creative Commons Attribution-NonCommercial-NoDerivs License.Details available at http://www.towson.edu/OTStraining. 410-704-4070.
Design StepsWhen you create a publication, it is crucial to first identify important
issues involved. Changes in publication design can affect the cost and
time involved in accomplishing your goal.
1. Plan the publication.
2. Decide on the printing device and paper size.
3. Determine the orientation and layout.
4. Develop a grid to work with.
5. Select a color scheme.
6. Establish text styles.
7. Position consistent portions of the publication in the background.8. Place text and graphics. Plann ing
In the first phase of the design process you need to iron out the
basics. Consider the following questions: • What is the purpose or goal of the publication?
• What text and graphics do you want to include (just a rough idea is necessary)?
• How much money and time do you have to complete it?
Pr in t ing Dec is ions
In the second step of the design process, you must determine options for the publication imposed by
printer, cost, and quality involved. Consider the following questions:
• Does the printer require a printed original, or will they accept a copy of the publication on
disk? Or will they need both?
• If you are providing a disk, what fonts do they have?
• What size paper is best for the publication?
• Will there be additional trimming costs or paper waste?
• If the publication will be mailed:
•What type of labels do you need to provide based on machine limitations
and time constraints? (Some labels may need to be applied manually,
increasing the overall cost.)
•Is the publication being sent off-campus or on-campus? How much
postage is required?
•What paper color is appropriate? Try to choose a color that will
be easy to coordinate with Publisher color schemes.
The Design Process
1. Design Steps
2. Using a Wizard
3. Customizing
Getting Started
1. From Scratch
2. Publisher Screen
3. Page Setup
4. Layout Guides5. Frames
6. Spell Check
7. Views
Graphics
1. Resizing
Summary
8/8/2019 10. Publisher Graphics Merged
http://slidepdf.com/reader/full/10-publisher-graphics-merged 5/41
2
PUBLISHER 2003: PUBLICATION DESIGN
Or ien ta t i on and Page Layou t
These decisions will determine the number of pages required to print the publication. Using a
booklet layout you may add blank pages at the end of the publication, and small sizes may require
trimming or special paper.
Deve lop Gr id Structure is very important. Graphic designers often use a grid to aid in aligning objects such as
pictures and text, on the page. Typically, a grid is based on the smallest common denominator of
the objects involved. For example, if you are going to include pictures that are either 1 /4 of the
page or 1 /8 of the page in size, dividing the page with 8 grid lines will help you line up and resize
all of the pictures.
Colo r Schem es The color variations that you include in the publication help attract attention and keep it
interesting. Consider the following questions:
• Are the colors selected pleasing to the eye?
• Do they present too much contrast? Some contrast is good, but there is such a thing as too
much contrast as well.
• Does the text stand out against the background? Avoid using just dark shades or just light
shades for both the background and the text, since the text will then be difficult to read.
• Will you use the color scheme as a tool for consistency of headings or section breaks?
• Is the color displayed in Publisher close enough to the color when printed? Some colors
appear fantastic on the screen, but when the printing device tries to replicate the color, it
fails miserably.
• Who is the audience ⎯ a print or Web audience, or both? If you are going to distribute the
publication electronically, the resolution at which it is viewed can have a significant impact
on how the colors appear.
• Will there be photographs in the publication, and if so, will they be grayscale or color?
• If you are sending your publication to a professional printer: Will there be more than four
colors in the publication? The four-color printing process, necessary for photographs and
some other illustration types, is more expensive than “spot color,” a single color applied to
certain spots in the publication.
There is a tradeoff between color and design. Simple designs can tolerate stronger color choices,
whereas busy design schemes benefit from simple, familiar colors, and color combinations.
Font Sty les Since the appearance of the text has a significant effect on how easy it is to read a publication and
how long the publication is, understanding typeface styles and evaluating them are essential.
Consider the following:
• TrueType fonts can usually be printed regardless of the printer you use. If you use a font
specific to your current printer then you reduce printing flexibility.
• Which fonts are you going to use? There are three main categories of fonts to consider
when making this decision.

8/8/2019 10. Publisher Graphics Merged
http://slidepdf.com/reader/full/10-publisher-graphics-merged 6/41
3
PUBLISHER 2003: PUBLICATION DESIGN
• Does the font contain lowercase characters that extend above or below the main body?
Font structure also has an impact on legibility. Fonts whose lowercase and uppercase letters are
almost the same height tend to be legible at small point sizes, while fonts with a large difference can
be employed if you need to decrease the amount of space text takes up. Compare the fonts used onthe same phrase, at the same point size, in the following example:
• What weight and width should you use?
Some fonts come with a variety of options. Weight refers to the thickness of the lines used to
construct the letter. Various weights you may see within a single typeface include light, demi, heavy,
and bold. Condensed fonts will take up less room on the line, while expanded may be easier to read.
Consider the following examples:
Type/
Example
Description
Serif Fonts
Garamond
Curves and small lines used at the ends of
each stroke. This is commonly used for thebody text of a publication. Research hasshown that serifs make reading easier.
Sans Serif
Fonts
Arial
Straighter lines used. No curvesor small lines at the ends of eachstroke. Used primarily for head-ings and titles.
Ornamental Fonts French Script
More decorative, artistic letter shapes. Can be used for titles or headings for more informal publications. SHOULDBE AVOIDED IN LARGE BLOCKS OF TEXT, PARTICULARLY WHEN USINGALL CAPS OR SMALL CAPS.
Font Name x-height Example
Goudy Old Style Xx big dog
Times New Roman Xx big dog
Broadway Xx big dog

8/8/2019 10. Publisher Graphics Merged
http://slidepdf.com/reader/full/10-publisher-graphics-merged 7/41
4
PUBLISHER 2003: PUBLICATION DESIGN
Font Name Example
Gill Sans MT big dog
Gill Sans MT Condensed big dog
Gill Sans MT Extra Condensed big dog
Font Name Example
Eras Light ITC big dog
Eras Demi ITC big dog
Eras Bold ITC big dog
• What font combinations are you going to use?
Try to use only 2 different font families. Research shows readers tend to lose interest and
comprehension when there are more than 3 different fonts. Arial, Arial Bold, and Arial
Italic are all in the same family.
Apply attributes such as bold and italic within a font family for emphasis and variety.
Vary weights and widths to energize a publication.
Try not to use two fonts from the same category, like Arial and Franklin Gothic Book, which are
both Sans Serif fonts.
Backg r ound Com ponen t s
For consistency it is helpful to place common features in the background of a publication. We
discuss the background in greater detail on a later page. Information you might include:
• Headers:
Logos, Graphics, Titles
• Rules/Lines:
Borders for uniform formatting or to help separate sections of the page.
• Page Margins:
Unvarying placement of text frames to structure the page.
• Footers:
Page numbers, date, version, lesson or chapter number
Use generic shapes when determining placement of information. This way you
have a better idea of the space available for each section.
Fin ish ing Touches Once the majority of the publication is completed, you can add finishing touches by fixing problems
that were not anticipated, adding additional formats, or modifying the graphics.

8/8/2019 10. Publisher Graphics Merged
http://slidepdf.com/reader/full/10-publisher-graphics-merged 8/41
5
PUBLISHER 2003: PUBLICATION DESIGN
Get t i n g S ta r ted Using a W izard
Publisher has a tremendous selection of wizards for you to work with. Wizards walk you through the
steps of designing a publication. By choosing a publication, you determine the paper size, layout, as
well as text and graphic placement. The wizard then helps you include specific information and
choose a color scheme for consistency. Alternatively, you may choose a design scheme and select
the type of layout. There are over 1,000 different items to choose from!
Once the wizard is started you will be directed to make choices about the publication. In the
following steps you will see the questions presented when a newsletter publication is selected.
1. From the New Publication drop down arrow, choose Publications for Print.
2. Choose your publication type, template design, and actual template. Choose a Newsletters
template.
3. Click on Page Content located in the task pane on the left and choose the number of columns.
4. By choosing Publication Designs, a new template can be used.
5. Click on Color Scheme and select one. Do the same for Font Scheme.
The wizard will apply the first color as the main color and the remaining colors as accents.
You are now ready to add your text and customize the publication.
Cus tomiz i ng
After you use the wizard to get started, it is time to add your own text and customize objects that
the wizard included.

8/8/2019 10. Publisher Graphics Merged
http://slidepdf.com/reader/full/10-publisher-graphics-merged 9/41
6
PUBLISHER 2003: PUBLICATION DESIGN
• Click in an area that has a text placeholder. If the text is selected, whatever you type will
replace the information already there. If not, click once on the text or click and drag to
select it.
• Click on an object you would like to modify. If you see the wizard button, you can click on it
and Publisher will provide you with additional choices for customization.
Select what you need from the wizard and close the window.
• Check File, Page Setup to determine what the wizard selected for Layout, Paper Size, and
Orientation.
• Create guides to enable quick alignment.
Starting from ScratchOnce you have an understanding of how your publication should appear, you may want to start from
a blank page and customize it to meet your specific needs.
1. From the File menu choose New .
2. Click on Blank Publications under the New from a design category on the left task pane
(Figure 1, 1).
3. Select the type of publication, (Full Page for this exercise), and double-click it to open
(Figure 1, 2).
4. From the task pane on the left, select Publication Design. Then click on a specific design to
see the effect.
5. Choose Color Scheme from the list and then select the scheme that will work best.
6. Choose a Font Scheme according to the style you had in mind.
7. If you are going to include personal information about the organization, go to Edit > Personal
Information. This provides a quick way to include preset addresses, etc.
8. Click on the X to close the task pane to provide more room on the screen (Figure 1, 3) .
Publisher can only have one file open at a time. If you have another file open, you will be prompted
to save changes to the previous document before closing it.
The Publ isher Screen Figure 1
1
23

8/8/2019 10. Publisher Graphics Merged
http://slidepdf.com/reader/full/10-publisher-graphics-merged 10/41
7
PUBLISHER 2003: PUBLICATION DESIGN
Page Setu p
If you need to specify a special page size, go to File > Page Setup. Publisher considers each file a
publication. A publication is composed of pages. The size of a page depends on the settings in Page
Setup. For many publications, the paper size is the same as a page in Publisher; however, if you are
creating a special publication like a booklet or banner, one page of the publication can be a small
portion of a piece of paper or several sheets.
Layou t Gu ides 1. Go to the Arrange menu and select Layout Guides.
2. Determine the Margin Guides which will be indicated by the blue lines. Determine how many
columns and rows you need to divide the page into under the Grid Guides tab and type in the
corresponding values.
3. Click OK.

8/8/2019 10. Publisher Graphics Merged
http://slidepdf.com/reader/full/10-publisher-graphics-merged 11/41
8
PUBLISHER 2003: PUBLICATION DESIGN
Add i t iona l Gu ides You can also place guides anywhere on the page. These guides help you align other objects.
1. Move your mouse over the horizontal or
vertical ruler.
2.Click and drag toward the center of the
page. The guide appears as a green line.
Move Guides Click and drag the green guide and move it to
the desired location.
Delete Guides Drag the line off the publication.
Frames Objects in a publication are often in a frame.
This makes positioning items on a page much
more flexible.
Text Frames Add text to your publication using text box
frames. Publisher refers to a contiguous
section of text as a story. A story can be
contained in a single text frame or a series of
connected frames.
1. From the Insert menu, choose Text Box.
2. Move the cursor into the page.
3. Click and drag to create a text frame the size you want.
4. Type in your text.
The overflow symbol indicates a text frame is too small to display all of the text it contains.
Resiz ing Text F ram es When you create a text frame, you may not know what size will work best. You can change the size
at any time.
1. Click on the text frame.
2. Move the cursor over one of the resize handles.
3. Click and drag with the Resize cursor (Figure 2, 1).
Figure 2
1
2

8/8/2019 10. Publisher Graphics Merged
http://slidepdf.com/reader/full/10-publisher-graphics-merged 12/41
9
PUBLISHER 2003: PUBLICATION DESIGN
Mov ing T ex t Fram es As you place graphics and other text on a page, you may need to adjust the placement of existing
text frames.
1. Click on the text frame.
2. Move the cursor over the edge of the frame. (Make sure the cursor is not on a resize handle).
3. Click and drag with the Moving cursor (Figure 2, 1).
Hyphena t i on By default, Publisher automatically hyphenates text. As you resize text boxes, this feature will
hyphenate words to fill the text box frame as evenly as possible. This can lead to “ladders”. If you
would like to turn this feature off, go to the Tools menu and select Language, Hyphenation. When
the hyphenation dialog box appears, remove the checkmark next to Automatically Hyphenate
This Story.
De let i ng Tex t Fram es Removing text frames is not as simple as just pressing the Delete key on the keyboard. You must
right-click inside of the text frame and select Delete Object.
Crea t i ng T ex t Box L i nks If you need to arrange text so that it is in columns or continues on another page, you can designate
text flow. You don’t need to type small portions of text in each box because text in a story can flow
to any other text frame in the publication.
1. Make sure that you have at least two text frames in the publication, one of which is empty. Click
in the frame containing the overflow text.
2. Click on the Create Text Box link icon on the toolbar.
If you don’t see the Create Text Box Link button, you can select Connect Text Boxes from the
View >Toolbars menu and the button should be available.
3. The cursor should change to look like a pitcher. Move the cursor to the frame that should
contain the overflow of text and click when the pitcher cursor looks like it is being poured.
Sw i tch i ng Be tw een Connec ted Fram es
While editing the text of a publication you may need to switch quickly between connected frames to
view and edit text.
1. Click in one of the text frames.
2. Click on the PREVIOUS or NEXT FRAME icons on the Connect Text Boxes toolbar (Figure 3, 1) .
3. To Delete a Link between text boxes use the Break Link icon
(Figure 3, 2).
Spell Check
Checking for typos and misspelled words is extremely important. Grammatical and spelling errors
seriously detract from the content and credibility of a publication. There are two main methods you
can employ:
• Check an entire story and the entire publication. From the Tools Menu, select Spelling,
Check Spelling
12Figure 3
8/8/2019 10. Publisher Graphics Merged
http://slidepdf.com/reader/full/10-publisher-graphics-merged 13/41
10
PUBLISHER 2003: PUBLICATION DESIGN
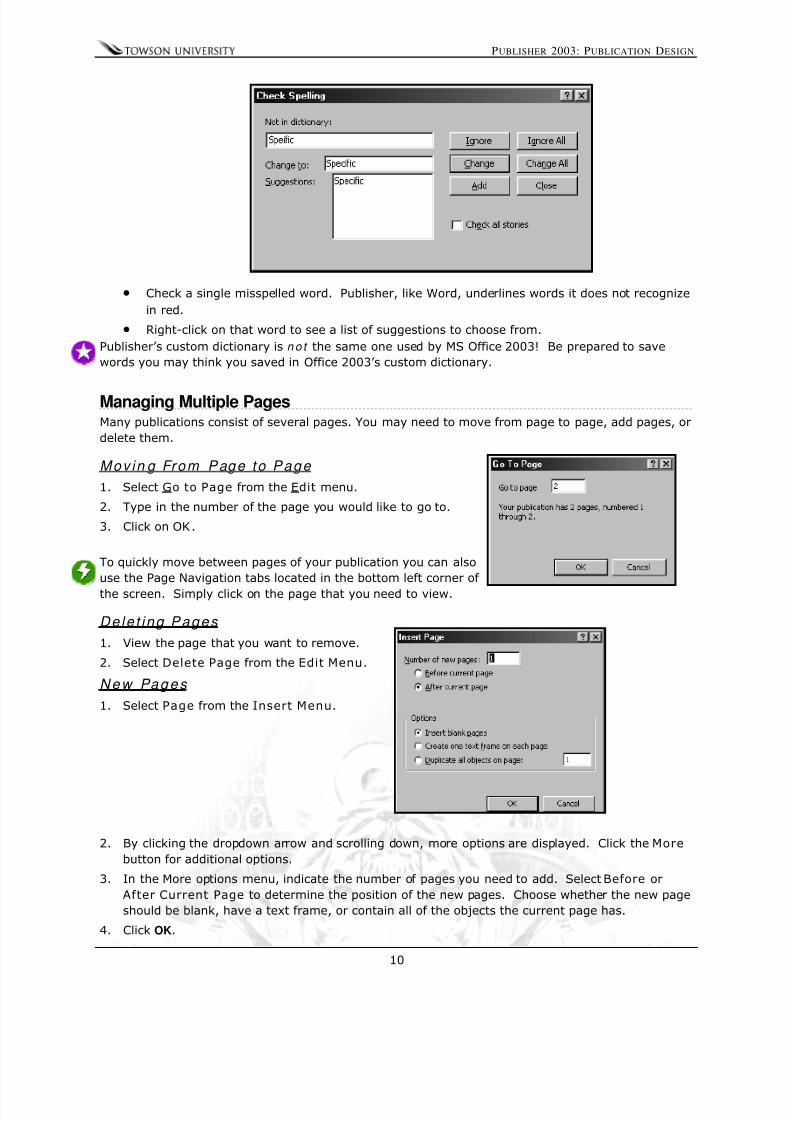
• Check a single misspelled word. Publisher, like Word, underlines words it does not recognize
in red.
• Right-click on that word to see a list of suggestions to choose from.
Publisher’s custom dictionary is n o t the same one used by MS Office 2003! Be prepared to save
words you may think you saved in Office 2003’s custom dictionary.
Managing Multiple Pages
Many publications consist of several pages. You may need to move from page to page, add pages, or
delete them.
Movin g From Page to Page 1. Select Go to Page from the Edit menu.
2. Type in the number of the page you would like to go to.
3. Click on OK .
To quickly move between pages of your publication you can also
use the Page Navigation tabs located in the bottom left corner of
the screen. Simply click on the page that you need to view.
Dele t ing Pages
1. View the page that you want to remove.
2. Select Delete Page from the Edit Menu.
New Pages
1. Select Page from the Insert Menu.
2. By clicking the dropdown arrow and scrolling down, more options are displayed. Click the More
button for additional options.
3. In the More options menu, indicate the number of pages you need to add. Select Before or
After Current Page to determine the position of the new pages. Choose whether the new page
should be blank, have a text frame, or contain all of the objects the current page has.
4. Click OK.

8/8/2019 10. Publisher Graphics Merged
http://slidepdf.com/reader/full/10-publisher-graphics-merged 14/41
11
PUBLISHER 2003: PUBLICATION DESIGN
Chang ing t he V iew You can change the view of your publication to see more than one page at a time
or to zoom in closely on a specific page.
Tw o Page V iew Once the publication contains three or more pages, you can change the view to
display two pages at the same time. Go to the View Menu and select Two Page
Spread. You can turn this off by selecting it again.
Background Objects you wish to appear on every page, such as automatic page numbers, headers or footers,
logos, or watermarks, should be placed on the background of the publication.
1. Click on View , Master Page on the menu bar (Control+m).
2. Place the desired frames in the appropriate locations on the background.
3. When finished, click Ignore Master page.
GraphicsPictures truly enhance the appearance of publications by supplementing the text. You can use
graphics to demonstrate a key point, or simply to add visual interest to the layout by breaking up
sections of the design.
The Cl ip Ar t Screen
From the Insert Menu, select Picture, Clip Art. The following dialog box will appear:

8/8/2019 10. Publisher Graphics Merged
http://slidepdf.com/reader/full/10-publisher-graphics-merged 15/41
12
PUBLISHER 2003: PUBLICATION DESIGN
I nse r t i ng Graph i cs
1. From the Insert menu select Picture, From File.
2. Navigate to the location where the picture is stored and select it.
Click on INSERT or press Enter on the
keyboard.
Format Extension
Windows Bitmap * .bmp
CorelDRAW! .cdr
CGM graphics .cgm
Windows Enhanced Metafile .emf
Encapsulated PostScript .eps
Graphics Interchange Format (CompuServeformat) *
.gif
Joint Photographics Expert Group * .jpeg or .jpg
Kodak Photo CD and Pro Photo CD
*.pcd
PC Paintbrush * .pcx
Macintosh Picture .pict or .pct
Portable Network Graphics * .png
TIFF, Tagged Image File Format * .tif
Windows Metafile .wmf
WordPerfect Graphics .wpg

8/8/2019 10. Publisher Graphics Merged
http://slidepdf.com/reader/full/10-publisher-graphics-merged 16/41
13
PUBLISHER 2003: PUBLICATION DESIGN
Inserting Graphic Frames Frames provide flexibility and control when inserting graphics. Often, you will need to place the
graphic in a space that is larger or smaller than the original picture size. You can draw a frame of
any size with the appropriate tool and then place the picture in it. If the graphic doesn’t fit in the
frame automatically, Publisher will adjust it for the “Best Fit” without distorting it.
1. Click on the PICTURE FRAME TOOL found on the Objects toolbar.
2. Move the cursor into the page and click and drag to create the correct size frame.
If the frame is created for ClipArt, the Clip Gallery will appear automatically. If the frame is created
for a special graphic, then double-click to activate the Insert Picture From File options.
Resiz ing
You can resize graphics using the mouse, just like text frames. If you use one of the corner resize
handles, the picture will stay proportional. There are two additional methods that you can use to
resize a frame:
• If you want to enter the exact size in inches, you can select the image and then go to the
Format Menu and choose Pictu re, Select tab size.• You can also modify the size by changing the percentage. Select the image then click on
Format, Picture, and Select tab size.

8/8/2019 10. Publisher Graphics Merged
http://slidepdf.com/reader/full/10-publisher-graphics-merged 17/41
14
PUBLISHER 2003: PUBLICATION DESIGN
Border Art For eye-catching publications, you can add fancy borders to any frame or the entire page!
1. Click on a graphic and be sure it is highlighted.
2. Click the Line/Border button and select More Lines.
3. Click on the BorderArt button.
4. Select the border you need and click OK.

8/8/2019 10. Publisher Graphics Merged
http://slidepdf.com/reader/full/10-publisher-graphics-merged 18/41
Microsoft Publisher 2003BookletsOTS PUBLICATION : PB7 • REVISED 08-01-2006 • [email protected] • OFFICE OF TECHNOLOGY SERVICES
=Shortcut =Advice =Caution
© 2006 Towson University -This work is licensed under the Creative Commons Attribution-NonCommercial-NoDerivs License.Details available at http://www.towson.edu/OTStraining. 410-704-4070.
Creating a booklet for a play or musical event? Have a lot of
information to share? Publisher 2003 gives it’s users options to create astylish booklet that can be used for a variety of purposes. Although
Publisher 2003 does not have a wizard that guides through the process
like it does for making newsletters or brochures, with a little
background information and instruction, making booklets can be easy.
Two Options for Making BookletsBooklets can be created using Publisher 2003 or Microsoft Word. Both have similar steps and
page set-up but one may fit better with your project over the other. If you are creating a simple four
page booklet, perhaps for a musical program or event, Microsoft Word provides attractive
templates that are simple to download, customize and print. Use Publisher 2003 if you are
creating multi-page booklets with a lot of complex information.
Getting StartedThe best way to start is by using
Page Setup to let Publisher know
it’s making a booklet. To do this:
1. Open Publisher 2003 and
under New Publication, select
Blank Print Publication on
the menu.
2. Go to File > Page Setup.
3. Under Publication Type, se-
lect Booklet (Figure 1, 1).
Make sure the Landscape op-
tion is selected and click OK .
(Figure 1, 2)
By default, the width and height measurements are set for a 4 page folder booklet with
letter-sized paper, the most common type of booklet created. The preview shows what the
booklet will look like (Figure 1, 3) .
Also, if the paper size needs to be changed, click the Printer and Paper tab in the
Page Setup window and change the option under Paper > Size to desired style.
The default size is based on the standard letter size..
4. When prompted to automatically insert pages, click Yes .
Four pages should be in your document now.
Changing MarginsWith a new booklet, the margins set to the default 1 inch wide style.
To change margins:
1. Go to Arrange > Layout Guides.
1. Change Page Setup2. Create Cover Page
3. Insert Objects
• Text Box
• Graphics
• Calendar
Process Summary
3
Figure 1
13
2
1

8/8/2019 10. Publisher Graphics Merged
http://slidepdf.com/reader/full/10-publisher-graphics-merged 19/41
2
PUBLISHER 2003: BOOKLETS
11
2. Under the Margin Guides tab, change all margins to desired level. Changing the margins to .5
adds more room to a booklet while maintaining readability. (Figure 2).
The Cover PageAlthough Publisher 2003 does not offer a wizard to help create the look
and feel of your booklet, there are design options that offer templates for
your cover page using the Quick Publication Options and Publication
Designs window.
If there is no Publication Design window (Figure 3), go to View >
Toolbars > Task Pane.
1. Select any of the templates by clicking their icon.
2. The template will show on your cover page. Change the images in the
templates to personalize you’re booklet. Keep the theme and audi-
ence of the booklet in mind.
3. To change the colors of your template, go to Color Schemes on the
Publication Designs window and choose a scheme. Keep in mind
your booklets purpose and the audience that it is geared toward
when designing.
These templates only affect the cover page and can not be used on the
inside or back pages of your booklet. Selecting any other of the template
options will only change the cover page.
Inserting ObjectsTo make your booklet as dynamic as possible, you can insert graphics,
text-boxes and even calendars to create the ideal effect and a unique look.
Tex t Box es
Text boxes are areas for text to be written. They enable the author to add any personalized text intothe booklet to customize it. Text boxes can be overlapped and placed anywhere on the booklet butbe careful to make sure the booklet is readable and will make sense to your audience before gettingtoo creative with their positions.
1. Go to Insert > Text Box
2. Click and drag your cursor to create a text box to the size that you want.
Figure 2
Figure 3

8/8/2019 10. Publisher Graphics Merged
http://slidepdf.com/reader/full/10-publisher-graphics-merged 20/41
3
PUBLISHER 2003: BOOKLETS
3. Format your text and arrange on the page to create the desired affect.
Graphics
Graphics and images add a visually appealing look to booklets and should be used according to the
booklets purpose. If the event is more of an artistic, creative event like a play or poetry reading,
graphics can help peak interest in a potential audience.
To add graphics:
1. Go to Insert > Picture.
2. Choose to add either clip-art from the clip-art gallery or your own file by choosing From File.
3. After finding the picture you wish to insert, arrange it on your page.
W o r d A r t
WordArt can be used in booklets for displaying
the event or booklet title in an eye-catching
way.
To use word art:
1. Go to Insert > Picture > WordArt.
2. Choose the design style that best fits with
your booklet and click OK .
3. Type your text into the dialog box,
replacing the words “Your Text Here”.
Change the look of your text by using the
Fonts, Size and formatting options at the top of the window (Figure 3).
WordArt is useful on the cover page, acting as the attention getter. Placing WordArt on the inside
of booklets may be useful in your publication, but this tool is mainly for titles and cover pages.
Calendars
In a booklet, it may be convenient to add a calendar to show events or upcoming shows, for in-
stance.
To add a calendar:
1. Go to Insert > Design Gallery Object.
2. In the Categories menu, select Calendars.
3. Choose the style of calendar that you want and select Insert Object.
4. Your calendar will be added to your booklet. Change size and style of the calendar to best fit your
booklet. You may need to change the size of the font to enable writing more information within
the daily boxes.
More than 4 Pages?When you create a new booklet, Publisher gives the booklet 4 pages automatically. If you want more
pages than 4, you can insert new pages by going to Insert > Page. However, Publisher 2003 in-
serts pages into booklets in increments of 4 so inserting “one” new page will insert four.
Figure 3

8/8/2019 10. Publisher Graphics Merged
http://slidepdf.com/reader/full/10-publisher-graphics-merged 21/41
4
PUBLISHER 2003: BOOKLETS
Printing the BookletTo print a booklet in Publisher 2003,
setting have to be changed slightly.
1. Go to File > Print.
Do NOT hit the Print icon. You need
to change print settings and the iconwill not prompt you to change them
2. If your printer can not print on both
sides click OK . The booklet will
Print your pages separately and
bind them in whatever matter you
wish.
3. If your printer is capable of printing
on both sides of the paper, click
Properties in the Print window.
Change the option under Print on
Both Sides to reflect your booklet(Figure 4, 1). Flip on Short Edge
makes the traditional booklet.
4. Click OK .
Publisher 2003 will automatically order your pages in printing to make your booklet flow. Be sure to
follow the page order when adding and taking content out.
Check your print preview and test your documents before the final print.
Figure 4
1

8/8/2019 10. Publisher Graphics Merged
http://slidepdf.com/reader/full/10-publisher-graphics-merged 22/41
Microsoft Publisher 2003NewslettersOTS PUBLICATION : PB3 • REVISED 07-01-2006 • [email protected] • OFFICE OF TECHNOLOGY SERVICES
=Shortcut =Advice =Caution
© 2005 Towson University -This work is licensed under the Creative Commons Attribution-NonCommercial-NoDerivs License.Details available at http://www.towson.edu/OTStraining. 410-704-4070.
DefinitionA newsletter is a small publication containing news of interest exclu-sively to a special group. Companies send them tocustomers to inform them of upcoming events. Newsletters should besent frequently and be concise, containing just enough information toget the customers attention to find out more.
Creating a NewsletterTo create a newsletter using Publisher 2003:
1. Open Microsoft Publisher 2003.
2. Click on Publications for Print.
3. Scroll down (Figure 1, 1) and click Newsletters (Figure 1, 2).
4. Double-click a design template (Figure 1, 3).
Editing a Newsletter1. Before editing the page for content, edit the Newsletter options on the
left side of the screen. Click Newsletter Options (Figure 2, 1).
2. Decide whether to create a newsletter with one or two-sided
printing and click the appropriate option (Figure 2, 2) .
3. Decide whether to include customers addresses and click the
corresponding button (Figure 2, 3) .
4. Click Page Content and click on the number of columns you want to
include.5. If you wish to change the template you picked in step 4 above, click
Publication Designs and click on the new layout you want to use.
6. Click Color Schemes and double click on the colors you plan to use.
Click the Custom color scheme button under the list of colors to create
your own.
7. Click Font Schemes and double click on a font scheme to apply.
1. Definition
2. Creating a Newsletter
3. Editing a Newsletter
Summary
32
1
Figure 1
Figure 21
2
1

8/8/2019 10. Publisher Graphics Merged
http://slidepdf.com/reader/full/10-publisher-graphics-merged 23/41
2
PUBLISHER 2003: NEWSLETTERS
A newsletter should now be displayed on your
screen. It should look similar to Figure 3.
To edit the newsletter, simply left click on an object
(text box, heading, or caption) to highlight it and
write over it. Pictures can be deleted and moved.
The newsletter can be edited around your prefer-
ences, the template is a merely a guide.
Please refer to the Publisher 2003: Publication Basics document for information on how to edit
Published documents.
Figure 3
Figure 4
1
2

8/8/2019 10. Publisher Graphics Merged
http://slidepdf.com/reader/full/10-publisher-graphics-merged 24/41
Microsoft Publisher 2003Using Blank PublicationsOTS PUBLICATION: PB6 • REVISED 07-01-2006 • [email protected] • OFFICE OF TECHNOLOGY SERVICES
=Shortcut =Advice =Caution
© 2005 Towson University -This work is licensed under the Creative Commons Attribution-NonCommercial-NoDerivs License.Details available at http://www.towson.edu/OTStraining. 410-704-4070.
Generally, when people use Microsoft Publisher, they use the templates to create publications.
Although, this is a fine way of creating documents, some people require a greater level of creativity.For those people, Microsoft included the ability to create publications
from blank pages in Microsoft Publisher 2003.
Choosing a Form1. Open Microsoft Publisher 2003.
2. Click on Blank Publications (Figure1, 1)
3. Choose a layout (Figure 1, 2) .
Design Gallery Objects1. Click on the Design Gallery Object button on the left side toolbar.
2. If not already selected, click on the
Objects by Category tab and click on
Mastheads and choose one to your liking
(Figure 2, 1). Double-click on the one toinsert the object (Figure 2, 2).
A masthead is a graphic and text box,
reserving room for a title.
3. After selecting a masthead, you may want to
add a sidebar or table of contents. A Table of
Contents will describe what is included in the
publication with a corresponding page
number. Sidebars will fill room on the side of
the publication and often include some special
points of interest.
4. Borders can also be added under the Objects by Category tab. Borders aredesigns which run around the edge of the paper, adding more color and
creativity.
5. Many other options exist under the Objects by Design tab, these designs
are worth taking the time to look through.
1. Choosing a Form
2. Design Gallery Objects
3. Editing Options
4. Color and Font Schemes
5. Ungrouping
6. Changing Pictures
7. Adding Text Boxes
8. Adding Pages
Summary
1
2
Figure 1
Figure 2
1
2

8/8/2019 10. Publisher Graphics Merged
http://slidepdf.com/reader/full/10-publisher-graphics-merged 25/41
2
MICROSOFT PUBLISHER 2003: USING BLANK PUBLICATIONS
Editing OptionsAfter inserting a Design Gallery Object, a magic wand icon
appears underneath the object while highlighted (Figure 3, 1) .
This wand gives users the option to change the object. To
change the masthead to a different choice:
1. Click the magic wand icon.
2. Choose and click on a new object in the task bar on the left.Your new ob jec t w i l l be t ak i ng t he p l ac e o f t he o l d one .
SchemesJust like in the design process using the wizard, color and font schemes can
be applied to publications created from blank documents. To add a color and
font scheme:
1. If the task pane is not currently open, go to the View > Task Pane. You
can also hit Ctrl + F1 on the keyboard as a shortcut.
2. Click Color Schemes located in the task pane on the left (Figure 4, 1) .
3. Choose a color scheme by left clicking on the appropriate one.
4. Click Font Scheme to add the same font style throughout the
publication.
UngroupingEven more creativity can be added by right clicking on Design Gallery Objects and selecting
Ungroup (Figure 5, 1) . Answer Yes to the prompt and the Design Gallery Objects will split up. You
can select a single object and delete it if you wish. When finished, select the whole object by clicking
and dragging. Left click the button with two squares on it.
A quicker way to select more than one object is
holding down Ctrl on your keyboard and clicking the
objects.
Changing PicturesOne design gallery object is called Picture Captions, located in the Objects by Category toolbar. The
pictures in samples can be changed. To add a picture caption with a new picture:
1. Click the Design Gallery Object button.
2. Click Picture Captions.3. Double click one of the choices.
4. Right-click on the picture (Figure 6, 1).
5. Choose Change Picture (F igure 6, 2).
6. Decide where the new picture will be coming from. The border and text box will remain intact,
but the picture will change into the new one selected by the user.
1
Figure 3
1
Figure 4
Figure 5
1

8/8/2019 10. Publisher Graphics Merged
http://slidepdf.com/reader/full/10-publisher-graphics-merged 26/41
3
MICROSOFT PUBLISHER 2003: USING BLANK PUBLICATIONS
Adding Text BoxesText boxes are frames added to a document in order to type words into Microsoft Publisher.
To add a text box
1. Click the Text Box button on the tool bar on the left (Figure 7)
2. Your cursor will turn into crosshairs. Click and drag the crosshairs to the
appropriate length.
3. Place your cursor in the text box and begin typing.
Adding PagesYou may need to add pages as you create your document.
1. Click Insert in the menu bar at the top.
2. Select Page.
3. Choose how many pages to add (Figure 8, 1).
4. Decide where to place the page (Figure 8, 2) .
5. Add any options if needed (Figure 8, 3).
6. Click OK .
1
2
Figure 6
Figure 8 1
23
4
Figure 7

8/8/2019 10. Publisher Graphics Merged
http://slidepdf.com/reader/full/10-publisher-graphics-merged 27/41
© 2005 Towson University -This work is licensed under the Creative Commons Attribution-NonCommercial-NoDerivs License.
Details available at http://www.towson.edu/OTStraining. 410-704-4070.
Microsoft Publisher 2003Connect Text BoxesOTS PUBLICATION: PB08 • REVISED 11/16/2006 • [email protected] • OFFICE OF TECHNOLOGY SERVICES
=Shortcut =Advice =Caution
Text Flow OverviewIn professional publications such as newspaper and newsletters, it is
not uncommon to see a story begin on page 1 and continue on a
different page. You too can control the way the text of your stories
flow in your publications by connecting text boxes using the Create
Text Box Link icon on the Connect Text Boxes toolbar.
You can connect text boxes that are adjacent to each other, on the
same page or on different pages. When you connect text boxes, each
text box is independent of the other. Connected text boxes share only
a string of text. If you delete one text box, the text reverts back to the
other connected text box, or if the text box is too small to fit the text it will appear as “text in
overflow”. “Text in overflow” is text that does not fit within a text box and is hidden until it can be
flowed into a new text box, or until the text box is resized to include the text. Special text box iconsappear when there is text in overflow, or when two or more text boxes are linked together. There
are also icons you can use to jump from one connected text box to the next.
Add a New PageYou may need to add a new page before you add a text box to which to connect. Adding a new page
to your publication is a breeze.
1. Select the page that come before the new page you wish to add.
2. Select Insert > Page from the menu bar.
3. In the Insert Page dialog box, select the options you want (Figure 1, 1), and then click OK
(Figure 1, 2).
Note: For publications, such as newsletters using the two-page spread view, it is recommended to
add pages in multiples of four.
1. Text Flow Overview
2. Add a New Page
3. Connect Text Between Text
Boxes
4. Jump Between Text Boxes
5. Add a Continued Notice
Summary
Figure 1
2
1

8/8/2019 10. Publisher Graphics Merged
http://slidepdf.com/reader/full/10-publisher-graphics-merged 28/41
2
MICROSOFT PUBLISHER 2003: CONNECT TEXT BOXES
Connect Text Between Text BoxesThe following demonstrates how to connect an existing (source) text box to a new (target) text box.
The “source” text box is the original text box that has text in overflow and the “target” text box is
the text box that will receive the extra text.
1. First, create a new (target) text box using the Text Box icon on the Objects toolbar
(Figure 2, 1).
2. Next, go back and select the (source) text box with text in overflow.
3. Click the Create Text Box Link icon on the Connect Text Boxes toolbar (figure 2, 2).
4. Your mouse pointer turns into a “pitcher” .
5. Point to the (target) text box created in step 1. Your mouse turns into a “pouring pitcher”
when over the (target) text box.
6. Click inside the (target) text box.
7. The text boxes are now connected and text in overflow will appear in the next box.
If needed, you can connect a chain of text boxes across multiple pages.
Figure 2
5 3
4
1
2

8/8/2019 10. Publisher Graphics Merged
http://slidepdf.com/reader/full/10-publisher-graphics-merged 29/41
3
MICROSOFT PUBLISHER 2003: CONNECT TEXT BOXES
Jump Between Text BoxesYou can easily move from one connected text box to another by clicking the “Go to Next Text Box” or
“Go to Previous Text Box” icons. These special icons appear at the top or bottom of the connected
text boxes. To move to the next connected text box, click Next Text Box icon at the top
of the connected text box (Figure 2, 3). To move to the previous connected text box, click the
Previous Text Box icon at the bottom of the connected text box (Figure 2, 4).
Add a Continued NoticeIn order to guide your reader through a story that spans across two or more connected text boxes,
you can add a Continued Notice. A Continued Notice is a small note that appears at the beginning
or end of a text box (Figure 2, 5) indicating that the text is continued from or continues on a
different page. Text must be present in each linked text box for the Continued Notice to appear.
1. Select the desired text box and the click Format > Text Box from the menu bar.
2. In the Format Text Box dialog box, select the Text Box tab (Figure 3, 1).
3. Under the Text autofitting heading, select the check box for the type of Continued notice
you wish to add (Figure 3, 2).
4. Click OK (Figure 3, 3).
Repeat the steps above for each connected box in the chain applying the proper Continued Notice for
each text box.
Figure 3
3
1
2

8/8/2019 10. Publisher Graphics Merged
http://slidepdf.com/reader/full/10-publisher-graphics-merged 30/41
© 2005 Towson University -This work is licensed under the Creative Commons Attribution-NonCommercial-NoDerivs License.
Details available at http://www.towson.edu/OTStraining. 410-704-4070.
Microsoft Publisher 2003Printing a Newsletter onto 11x17OTS PUBLICATION: PB10 • REVISED 12/6/2006 • [email protected] • OFFICE OF TECHNOLOGY SERVICES
=Shortcut =Advice =Caution
Newsletter Page Setup OptionsA Newsletter is a regularly distributed publication generally about one
main topic. It typically uses a 8 ½ x 11 page layout and the pages are
added in multiples of four. This document describes how to setup your
newsletter to print booklet style onto a single 11x17 sheet of paper.
This document assumes that your printer can print to an 11x17 sheet of
paper.
You have two options for printing a 4-page newsletter publication. The first option is to print the
newsletter onto separate 8x11 sheets of paper (Figure 1). This option is your default page setup
setting. The second option is to print the newsletter “booklet style”, or onto a single 11x17 sheet of
paper (Figure 2). This option requires you to change options in Page Setup within the publication
1. Newsletter Page Setup
Options
2. Change Page Setup
3. Change Print Option
Summary
Figure 1
Figure 2

8/8/2019 10. Publisher Graphics Merged
http://slidepdf.com/reader/full/10-publisher-graphics-merged 31/41
2
APP NAME AND CLASS NAME
Set Page Setup
The procedure below describes how to change options in Page Setup within the publication.
1. Create a 4-page publication either starting from scratch or through the use of an existing
Design Template.
For information on how to create a publication, please refer to Publisher 2003: Blank Document,
Publisher 2003: Publication Basics, or Publisher 2003: Newsletter Self-Help Training Documents.
2. Select File > Page Setup from the menu bar. The Page Setup dialog box displays.
3. On the Layout tab, under Publication type, select Booklet (Figure 3, 1) and under
Orientation, select Landscape (Figure 3, 2).
4. On the Printer and Paper tab, under Paper, select 11x17 (Figure 4, 1).
5. When ready, click OK (Figure 4, 2) to close the Page Setup dialog box.
Figure 4
1
2
Figure 3
1
2

8/8/2019 10. Publisher Graphics Merged
http://slidepdf.com/reader/full/10-publisher-graphics-merged 32/41
3
APP NAME AND CLASS NAME
Set Print Option
Typically when you print documents, you print to your default printer and this printer will select the
proper paper size using the automatic feed option. This means that when you print a regular 4-page
document, each page will print as a single page. To print your newsletter on an 11x17 sheet of
paper, you need to set the Print Option to manual feed.
The below procedure assumes that your printer can print the 11x17 paper size. Before completing
this process, place a single sheet of 11x17 paper in the printer’s manual feed tray. Once the sheet isfed through the printer, you will need to insert the sheet again in order to print double-sided. Note:
some printers already have this setting in Print Options.
1. Select File > Print... from the menu bar. The Print dialog box displays.
2. Click Properties (Figure 5, 1). The “Printer” Document Properties dialog box displays.
4. On the Paper/Quality tab under Paper Source, select Manual Feed (Figure 6, 1).
5. When ready, click OK to close the “Printer” Document Properties dialog box.
6. Click OK to close the Print dialog box (Note: the publication will be sent to the Printer).
Figure 5
1
Figure 6
1

8/8/2019 10. Publisher Graphics Merged
http://slidepdf.com/reader/full/10-publisher-graphics-merged 33/41
© 2005 Towson University -This work is licensed under the Creative Commons Attribution-NonCommercial-NoDerivs License.
Details available at http://www.towson.edu/OTStraining. 410-704-4070.
Microsoft Publisher 2003Working With PagesOTS PUBLICATION: PB09 • REVISED 11/17/2006 • [email protected] • OFFICE OF TECHNOLOGY SERVICES
=Shortcut =Advice =Caution
Arranging PagesAs your publication evolves, you may need to adjust the pages within it; you
may need to insert additional pages, move or removing existing pages. This
document will walk you through how to work with pages in Microsoft Publisher,
as well as help you understand the use of the Two-Page Spread View.
Using the Two-Page Spread ViewA two-page spread is a convention used in certain types of folded or bound
publications, such as greeting cards, books, or newsletters, where two pages
are meant to be viewed at the same time. In the example of a newsletter,
page 2 and 3 would make up a two-page spread. The two-page spread enables you to see two
facing, or “mirrored”, pages in the work area. The left page is always an even-numbered page, and
the right page is always and odd-numbered page. If you compare the locations of the page num-
bers, you can see that page 3 is a mirror image of page 2.
Use the two-page spread view if you plan to have graphics, tables, or other elements print across
facing pages. A publication must have at least three pages in order for you to see the results of
selecting Two-Page Spread. You can't view two-page spreads in Web publications.
Turn on/off Two-Page spread
1. Select View > Two-Page Spread from the menu bar.
Inserting New Pages
Inserting a new page is a common task. You can add one page or multiple pages to your publicationat any time during the design process. However, you can only delete one page or 2-page spread at
a time.
1. Place your insertion point on the page before or after where the additional page is to be
inserted.
2. Select Insert > Page... from the menu bar.
3. In the Insert Page dialog box, select either Before current page or After current page
to insert the new page before or after the current page.
4. Click OK. Publisher inserts a new page (or 2 new pages if using the Two-Page Spread View).
Note: you can also right-click the desired page number on the page sorter at the bottom of thePublisher window and select Insert Page… from the shortcut menu.
1. Arranging Pages
2. Using the Two-Page
Spread View
3. Inserting New Pages
4. Moving a Page
5. Deleting a Page
6. Duplicating a Page
Summary

8/8/2019 10. Publisher Graphics Merged
http://slidepdf.com/reader/full/10-publisher-graphics-merged 34/41
2
MICROSOFT PUBLISHER 2003: WORKING WITH PAGES
Moving a PageRelocating pages within a publication is a snap using drag and drop.
1. On the Page Sorter (Figure 1), click the page that you want to move.
2. Press and hold the left mouse button.
3. Drag the page to the desired new location.
4. When ready, release the mouse button
You can also move a page by clicking the page on the page sorter and dragging it to a new location
on the page sorter. If you are in two-page spread view, you should move both pages of a two-page
spread at the same time in order to avoid splitting up any two-page spreads.
Deleting a PageYou can only delete one page or 2-page spread at a time. Your page removal options also depend on
whether you are viewing individual pages or the Two-Page Spread view.
Delete an Individual Page
1. On the Page Sorter, click the desired page to be removed.
2. Select Edit > Delete Page… from the menu bar. The page is deleted.
Note: you can also right-click the desired page number on the page sorter at the bottom of the
Publisher window and select Delete Page… from the shortcut menu.
Delete a Two-Page Spread
1. On the Page Sorter, click the desired page to be removed.
2. Select Edit > Delete Page… from the menu bar. The Delete Page dialog box appears.
3. In the Delete Page dialog box, select Both pages to delete the displayed two-page spread,
or select Left page only or Right page only to delete only one of the displayed pages in
the two-page spread.
4. Click OK. The page(s) are removed.
Note: To delete the contents of a page without deleting the page itself, select each object, such as
graphics, text boxes and more, and press Delete on the keyboard.
Duplicating a PageMicrosoft Publisher makes is it easy for you to copy an existing page with all its objects if you need a
similar looking new page in your publication. When you duplicate an existing page, all graphics and
text boxes are copied, but not the text.
1. On the Page Sorter, click the desired page to be duplicated.
2. Select Edit > Duplicate Page… from the menu bar. The page is duplicated.
3. Note: If you are in two-page spread view, this will insert a new two-page spread immediately
after the selected two-page spread.
You can also right-click the desired page number on the page sorter at the bottom of the Publisher
window and select Duplicate Page… from the shortcut menu.
Figure 1

8/8/2019 10. Publisher Graphics Merged
http://slidepdf.com/reader/full/10-publisher-graphics-merged 35/41
Microsoft Publisher 2003BrochuresOTS PUBLICATION : PB2• REVISED 07-01-2006 • [email protected] • OFFICE OF TECHNOLOGY SERVICES
=Shortcut =Advice =Caution
© 2005 Towson University -This work is licensed under the Creative Commons Attribution-NonCommercial-NoDerivs License. Details available at http://www.towson.edu/OTStraining.410-704-4070.
What is a Brochure?A brochure is a publication used to convince readers you have
something they need. The readers have to see right away what they
will get from reading the brochure, as well as what it will cost them.
This can be a real challenge because when people look at a brochure
cover they don’t read it, they glance at it. So it has to catch their
attention, first of all, and then motivate them to pick it up.
Creating a Brochure Using A Wizard1. Open Publisher 2003.
2. In the New Publication task pane on the left,
under New from a design, click the arrow next
to Publications for Print and choose
Brochures (Figure 1, 1).
3. Look through the templates by choosing each of
the options under Brochures (Figure 1, 2).
4. When you make your selection, an information
screen may pop up. You can either enter
information here or click Cancel and enter it in
yourself on the brochure.
EditingThe Template is strictly an example. In most cases,
many graphics and text boxes will have to be added,
deleted, or moved.
To move an object:
1. Place your cursor on the dotted line encasing the
objects and click once to highlight the area.
2. With the cursor looking like this , click the
dotted line holding down the left mouse button.
3. Drag the object to the preferred place by moving the mouse to that area.
To delete an object:
1. Left-click one time to select the object and press Delete on keyboard
OR
2. Right-click object and select Delete from drop down menu.
1. Creating a Brochure
2. Editing Objects
-Moving
-Resizing
-Deleting
3. Adding New Objects
4. Rearranging Panels
Summary
1
2
Figure 1

8/8/2019 10. Publisher Graphics Merged
http://slidepdf.com/reader/full/10-publisher-graphics-merged 36/41
2
BROCHURES WITH PUBLISHER 2003
Resizing an object:
1. Select the object you wish to resize.
2. Place your cursor on one of the white dots located on the dotted lines. Drag your cursor to re-
size.
Do not click the green dot to resize. The green dots tilt the object on an angle.
Adding Objects
Pic tu res
1. Go to Insert > Picture.
2. Choose from the menu what kind of picture you would like to add.
3. For clipart, you can search for specific pictures by typing a keyword in the Search Field and
clicking Go.
4. For files, choose from file and browse for the image.
5. When you choose a picture, double-click to add to your publication.
Tex t Box es
1. Go to Insert > Text Box
2. The cursor will turn into a cross. Place your cursor where the text box is to be inserted, hold
down the left mouse button, and drag the box to the desired size.
Drop Caps
A drop cap, is a large letter at the start of a paragraph. A successful publication should use just one
drop-cap at the beginning of a story or section.
1. Click in the paragraph where you want to add the drop cap and go to Format > Drop Cap.
If your text box contains more than one paragraph, be sure to only highlight the first paragraph
or the drop cap will be added to all paragraphs in the text box.
2. Choose the style that you would like from the menu. You can click on the Custom Drop Cap tab
at the top of the window to further customize.
3. If you want to remove the drop cap, go to Format > Drop Cap and click Remove.
4. Click OK to return to your document.
Tilt
Resize

8/8/2019 10. Publisher Graphics Merged
http://slidepdf.com/reader/full/10-publisher-graphics-merged 37/41
3
BROCHURES WITH PUBLISHER 2003
Design Ga l le ry Ob jec t
Publisher has mini-Wizards used to create design objects within a publication.
1. Go to Insert > Design Gallery Object
2. From here you can choose to look at Objects by Category, by Design or that you created
yourself.
3. After you choose the object, click Insert Object.
4. Along with the object is a mini-wizard that you can click by selecting the object and clicking the
wizard icon. This allows you to re-open the customization of the object.
Rearranging PanelsBefore re-arranging your brochure panels, adjust magnification so that you can see your whole
brochure.
1. Open the publication you need to edit.
2. Go to View > Zoom > 33% .
3. Select all of the objects on your page by going to Edit > Select All or creating a box around
them by clicking and dragging.
4. Click the Group button and move the grouped objects out to the right of the document
page onto the Scratch Area (The scratch area is the grey area surrounding your publication).
5. If you have a multi-paged document, go to page 2 and repeat steps 3 and 4.
6. In order to re-arrange things, you can ungroup and regroup objects by clicking the Group button
and place them in the new order on your brochure pages.

8/8/2019 10. Publisher Graphics Merged
http://slidepdf.com/reader/full/10-publisher-graphics-merged 38/41
Publisher 2003E-Mail Newsletters and Other E-Mail TemplatesOTS PUBLICATION: PB5 • REVISED 07-21-2005 • ©2005 TOWSON UNIVERSITY • OFFICE OF TECHNOLOGY SERVICES
=Shortcut =Advice =Caution
Office of Technology Services • http:/ /www.towson.edu/OTStraining • 410-704-4070 • [email protected]
E-Mail TemplatesHave you ever wondered how people send out those professional
E-Mail newsletters? Publisher 2003 has some great built in design
templates that are simple to use and help you look like the
professional that you are.
New Pub l i ca t i on
Under the New Publication task pane there are six E-Mail design
templates to choose from. These templates are built to look perfect
as an E-Mail message and can be sent directly from the Publisher
software screen. The six templates all have the same procedure, this
document will take you step-by-step through the newsletter
template. The templates are: Newsletter, Letter, Event/Speaker,Event/Activity, Product List and Featured Product.
Se lec t i ng the E-Ma i l New s let t e r s
1. Open Publisher 2003
2. From the New Publication task pane under the New from a design section, click on the blue
arrow in front of Web Sites and E-Mail.
3. Click on the arrow in front of E-Mail and select Newsletter.
4. Select one of the Newsletter templates (Figure 1).
E-Mail Templates
1. New Publication
2. E-Mail Newsletter
3. Editing Text
4. Changing Graphics
5. Hyperlinks
6. Delete and Undo
7. Save
Send E-Mail Temp late1. Sending
2. Receiving
Summary
F igur e 1

8/8/2019 10. Publisher Graphics Merged
http://slidepdf.com/reader/full/10-publisher-graphics-merged 39/41
2
PUBLISHER 2003: E-MAIL NEWSLETTERS
Pub l i ca t ion Des ign Cho ices
Once you select your newsletter template your newsletter will appear in the scratch area of your
window and the task pane will have three choices to further customize your newsletter (Figure 2).
1. Publication Design: Choose different publication design templates if you want to change your
first choice.
2. Color Schemes: Choose different color schemes to apply to the newsletter template.
3. Font Schemes: Choose different font schemes to apply to your template.
Ed i t i ng t he T em p la te
Editing the newsletter is a simple process when using the pre-made newsletter template.
Zooming
The first trick to learn when you begin editing your template is to use the F9 key on your keyboard
to toggle between zooming your view in and out. You can also use the Zoom toolbar icon (Figure 3).
Figur e 2
Figur e 3

8/8/2019 10. Publisher Graphics Merged
http://slidepdf.com/reader/full/10-publisher-graphics-merged 40/41
3
PUBLISHER 2003: E-MAIL NEWSLETTERS
Edi t ing Text
Editing text using the template is easy to do:
1. Select the text in one of the text boxes and delete it (Figure 4, 1).
It is useful to read the test first because it gives suggestions of what to include in the newsletter.
2. Type in the new text .
3. If you prefer a different format for the text use the Format menu (Figure 4, 2) and choose Font.
Chang ing P ic tu r es and Graph ics
The template will have a picture or graphic that you will probably want to change.
1. Right-click on the graphic and choose Change Picture (Figure 4, 3).
2. Choose a new picture or graphic by selecting Clip Art, From File or From Scanner or Camera.
Hype r l i nks
To change or make a hyperlink:
1. Highlight the text you want to link.
2. Select the Create Hyperlink icon from the toolbar (Figure 4, 4) and choose the hyperlinkoptions that you desire.
De lete and Undo
• To delete any part of the newsletter template you don’t want, right click on it and choose
Delete Object.
• To undo any action that you have done, select the Undo icon from the toolbar (Figure 4, 5).
Save
1. Go to the File menu and choose Save or Save As.
2. Browse to the area where you would like to save your newsletter, name it and choose Save.
Figur e 4
4
5
3
2
1

8/8/2019 10. Publisher Graphics Merged
http://slidepdf.com/reader/full/10-publisher-graphics-merged 41/41
PUBLISHER 2003: E-MAIL NEWSLETTERS
Sending the E-Mail Newsletter
Send ing
After you have made all of your changes and have saved your newsletter you are ready to send it.
1. Go to the File menu and choose Send E-Mail > Send This Page as Message.
2. Your E-Mail editor software will open up on the top section of your Publisher screen (Figure 5, 1).
3. Click on the To button (Figure 5, 2) and bring in the recipients that you want for this E-Mail.4. Fill in the Subject field (Figure 5, 3) .
5. Click Send (Figure 5, 4).
Rece iv ing
The recipients who receive your newsletter will see its contents it in the message area of the letter
(Figure 6).
Figur e 5
4
3
2
1
Figur e 6