Embed Size (px)
Citation preview
1
Team 8: RC Car Drone
Brandon Briegel
Matt Henry
Jerrod Kempf
Arber Nicaj
Michael Price
Facilitator: Ramakrishna Mukkamala
Sponsor: Texas Instruments
Advisors: Tim Adcock & Zachary Buckley
Executive Summary The goal of the RC car drone project is to develop and create an RC drone that can be controlled
over the internet via a website and locally using a Bluetooth interface. The purpose of the project is to
create a user-friendly application of Texas Instruments’ DRV8301 microcontroller kit in order to
demonstrate the control algorithms and implement them into a flying drone in future development.
The core component to making this project a success is the ability to send commands from the website
to the onboard Android phone in order to control the RC drone. The final design will allow the drone to
be controlled by a user from a website while receiving the drone’s GPS coordinates as well as visual
feedback through the phone’s camera.
2
Table of Contents
Executive Summary
Table of Contents
Introduction
Background
Design Specifications
FAST Diagram
Conceptual Design Descriptions
Design Solution
DRV8301-HC-C2-KIT
Power HD Metal Gear Servo
C2000 Piccolo F28035 MCU controlCARD
Bluetooth Module
SWorkz S350 BX1e 1/8 Sport ARTR Buggy Roller
Turnigy TrackStar 1/8th Sensored Brushless Motor
Figure 2: Motor Selection - Turnigy TrackStar 1/8th Sensored Brushless Motor
Turnigy 5000mAh 2S 20C Lipo Pack
Risk Analysis
Component Damage/Management
Scheduling and Time Allocation
Communication Delay
Project Management Plan
Budget
References
3
Introduction Texas Instruments is a renowned company, specializing in semiconductors and consumer
electronics, that has created a project for the team involving the designing, prototyping and testing of
an RC car drone. The final project will perform on design day, December 6th, with the goal of fulfilling the
objectives and creating a functional drone that can be utilized by the Texas Instruments’ motor lab
located in Dallas, Texas.
The RC car drone offered in this proposal is a design with the purpose to create a demo that
shows the functionality of the DRV8301 and the control algorithms that will be supplied by Texas
Instruments. The sponsor has also specified that the RC car should exhibit certain functional and
performance characteristics, which are expected to be met by design day.
In order to implement the functions, the team will have to integrate the DRV8301 control board,
implement code from the Piccolo microcontroller to the motor for commands and incorporate the
motor to rotate the wheels of the platform. For wireless communication, an android phone needs to
send wireless commands to the platform to effectively act as a remote control. In order to create a
drone aspect for the RC car, the user will be able to send commands via a web page that will be set up
by the team. The phone will then utilize its various sensors and camera to relay information on its
location.
The performance of the vehicle will be based on whether these functions are properly
implemented as well as whether or not the vehicle can move efficiently through various terrains. In
order to meet the needs required, a budget of $500 has been allocated to the team.
Background Timothy Adcock is the sponsor of the project with support from Zachary Buckley and the Texas
Instruments’ Kilby Motor Lab. The Kilby Lab is dedicated to making the drive and control of electric
motors smarter and more efficient. The lab attempts to create various control algorithms that will be
tested by the team for this project.
Various radio-controlled vehicles exist and there are many different aspects that compose the
completed vehicle. The largest component is the platform and it is classified based on its scale and each
platform will include various components such as wheels and suspension. A platform is ideally sturdy
and able to withstand various terrains. The DRV8301 is a gate driver IC for three phase motor drive
applications[1]. The versatility of the board allows for easy integration with various brushless DC motors
as well as interfacing with microcontrollers, other logic devices, sensors, etc.
The RC car drone has to relay information back to the user and the primary data needed would
often be location. A readily available device with various sensors and graphical interfaces is a phone and
that is the simplest way to reach the design specifications that will be discussed.
4
As with all RC cars, motors are needed to drive the vehicle and spin the wheels an appropriate
amount. Much like platforms, motors for RC cars are classified into various groups and factors such as
cost, power and full system integration that need to be addressed.
In order to send commands over a wi-fi connection, the phone must be connected to a server
that is shared to a website or other phone. Optimal connectivity is needed to ensure an acceptable
latency, or time delay, in the system.
Design Specifications Our final design must be able to use a combination of control algorithms to create an adaptive
control vehicle. The vehicle should be controlled over the internet and allow remote control via wi-fi or
bluetooth cellular communication. We will need to select an RC car platform that will house all of the
hardware components. This car platform should house the DRV8301 kit, motor, batteries, servos, cell
phone and any other components that may need to be added. A servo must be implemented to control
the turning of the vehicle. We will also need to procure a permanent magnet BLDC motor that fits the
sponsors specifications. The motor will drive the back 2 wheels controlling the speed and direction of
the platform. We will be supplied with a DRV8301 hardware platform that includes a Bluetooth
interface. The DRV8301 shall implement motor control through a control card. We will be provided with
motor control algorithms in the form of callable libraries.
An android phone will be used to send signal data from a webpage to the on board
microcontroller. As stated, this can be done through bluetooth communication or wi-fi. The phone
should interface with the RC platform to receive signals wirelessly and send data to the car. It will also
obtain sensor data via an accelerometer, GPS or camera functionality to send back to the webpage it’s
speed, location and pictures. We will develop the software to control the drive train from inputs from
the phone via the webpage. The webpage will have the ability to communicate with the phone. We
will create user-friendly control applications on the webpage that can start, stop, turn, switch between
control algorithms, move at different speeds and receive data. We will finally integrate the entire
system together to be a single working platform. The next step is to test the platform on various terrain
and compare its operation over the different environments. We will do this by observing the data sent
from the phone to the webpage and the physical effects.

5
FAST Diagram
Conceptual Design Descriptions
Platform
The first design choice for this project is which platform to use. There are several options to
choose from, but there are three basic types. The first option was to build a platform from the ground
up. As the complexities of the requirements for the drone increased, it became less feasible to design
our own platform. The main problem would be implementing a steering system. The drone is supposed
to have Anderson, or servo, steering to meet the design requirements. Designing the front end of the
drone is outside of the scope of this project and the cost benefit does not outweigh this fault.
The second design choice would be to purchase a development kit that would include the
chassis and the wheels. One of these platform kits is the Arduino Mobile Platform. This platform is large
enough to fit the control board and is very robust. This design is typically used in robotics applications,
so it uses tank steering. Tank steering relies on differential wheel speeds to cause the vehicle to pivot.
Since one of the design specifications is servo steering, an alternative design is necessary.
The final platform type is an actual RC car. The reason this is not the obvious choice is due to the
cost of a large, high-quality car. One of these ready to drive platforms is the Traxxas E-Max. The E-Max is
a large platform with excellent performance; it has dual-servo steering and dual-motor drive. It also has
a great suspension system that can handle heavy impacts. The suspension is important to protect the
components mounted on the platform from physical shock damage. The drawback of this platform is
that its purchase would drain the majority of our budget and limit our design choices. The platform
comes with two brushless motors and two servo motors. It also comes with the motor controller and
6
the radio controller for the car. These two components add cost to the platform without benefiting the
project. Our drone will operate from the DRV8301 motor pre-driver and the Android phone wireless
controller, so the extra components included with a full RC platform will not be used. Another design
solution is a combination of the second and third options. This option combines the cost savings of a
development kit with the features of a full RC platform. The Sworks S350 platform is a rolling chassis
that fits the size and durability requirements for the project. This specific platform sells as a full RC car
for around the same price as the E-Max, or as a kit for $200 cheaper. If this design is used, we will be
able to choose our own brushless motor as well as the servo motor. Since this platform is also built as a
full RC car, there are slots for batteries and a designated spot for the drive and servo motors.
Application Programming
The Android programming can be done in any language, but there are only a few practical
choices. The feasible choices for our design project are Basic and Java. We have more experience as a
group with Basic than we do with Java, so it will be easier to begin development with this language. In
order to run the Basic scripts, however, the phone needs an additional application installed on it in order
to interpret the code. Several interpreter applications exist and many of them are free. The choice for
the interpreter application is mainly affected by features of the phone that it can access. An interpreter
called RFO! Basic facilitates access to all of the Android sensors necessary for the drone. The drawback
in using Basic is the slower performance of the implemented code.
The alternative to Basic is Java which is typically used for Android application development. Due
to its popularity, there are many resources to consult for sample code. Despite this advantage,
development in Java will require much more time since we are unfamiliar with the language. A finished
Java application, however, will run much faster since it does not have to go through an interpreter
application beforehand. Also, the application would be more flexible for different Android devices.
Design Solution
DRV8301-HC-C2-KIT
The DRV8301 kit is the core of our RC drone project. The kit is provided power from our
batteries described below to supply the board with 14.8 Volts. The DRV8301 motor pre-driver chip
communicates back and forth between the motor and the Piccolo microcontroller described below. The
microcontroller will send setup information to the motor as well as pulse width modulation signals. In
return, the DRV8301 is able to communicate back any faults that are occurring as well as status
information such as current consumption. The DRV8301 is required here because it can source up to 1.7
Amps and sink up to 2.3 Amps when outputting pulses to supply the gate and source of the onboard
power MOSFETs. A typical microcontroller can not handle currents of this magnitude. The DRV8301 also
provides a buck converter which will allow us to be able to power our servo which requires a lower
voltage of 4.8 Volts.
7
Power HD Metal Gear Servo
The ability for the drone to steer and maneuver is critically important to its overall function. To
supply this ability a servo will be implemented. The chosen servo is powered through a 4.8 Volt supply
which will be supplied from the DRV8301 buck converter which is able to supply up to 1.5 Amps. The
servo will be supplied with a pulse of 50 Hz from the Piccolo microcontroller. The position of the metal
gear is determined by the duty cycle of the signal and can vary from approximately 1 ms to 2 ms. This
covers a 180 degree rotation of the servo gear. This rotatable gear provides the torque to turn the
steering rod of the drone and turn the car. Because there is a continuous range of gear positions,
steering can be implemented in a smooth manner.
C2000 Piccolo F28035 MCU controlCARD
The Piccolo controlCARD is provided with the DRV8301 Kit and contains the microcontroller
which will communicate with the motor pre-driver and servo. The controlCard contains a USB port
which can be used to flash code on to the microcontroller with Code Composer Studio as well as
communicate information supplied by the motor to an interface on a computer. The card has also been
modified with a Bluetooth module to receive ASCII commands sent from a mobile phone. C Code will be
implemented to determine how the microcontroller should respond when provided with a command,
whether it be to supply a signal or command to the motor pre-driver or to change the pulse width
modulation for the servo.
Bluetooth Module
The Bluetooth module used for the drone is a BR-LE4.0-S2 made by Blue Radios. The Bluetooth
chip is mounted on an antenna and this combination boasts a range of 500 ft with a line of sight
connection. The actual range is not important since the phone will be eventually mounted onto the
drone, but a moderate range will be beneficial in the initial stages of testing especially when we are
testing for maximum speed. The Bluetooth module is wired directly into the microcontroller via UART
pins and powered from the 3.3V on the DRV8301. The module includes libraries to pair with an android
phone to establish the connection between the remote and the controller.
The power draw by the Bluetooth module will be inconsequential compared to the current draw
from the motor. The strongest transmission signals draws 31.6mA for long range applications. There is
an adjustable transmission power setting so that we can decrease the current draw by about 30% when
the phone is mounted onto the vehicle. The receiver current draw is around 20mA.
SWorkz S350 BX1e 1/8 Sport ARTR Buggy Roller
Choosing a platform was a very important part of our project. The platform is the body of our
design. It will house all of the other hardware components . Our sponsor, Texas Instruments, did not
provide any specifications in choosing our RC car. Therefore we had to do research on various platforms
to make an informed decision on what would be the best solution. The first factor we looked at in
making this decision was the size of the platform. We knew that we would need something big enough
8
to hold all other physical components such as the DRV8301 kit, the motor, the batteries, etc... We also
wanted to make sure that we did not select a platform that was so large that it would require a large
amount of power to accelerate. As a group we determined that a ⅛ scale car would be the ideal size. We
then looked for a vehicle that had good suspension and weight distribution. This is important for
balancing all hardware components and ensuring stable steering. Another major factor we looked at
was tires. Upon completion of the project, TI asked us to test the device on various terrain such as dirt,
sand, grass and concrete. Therefore we needed sturdy tires capable of performing effectively in all these
environments. Factoring all these variables we then considered cost. We knew that the platform was
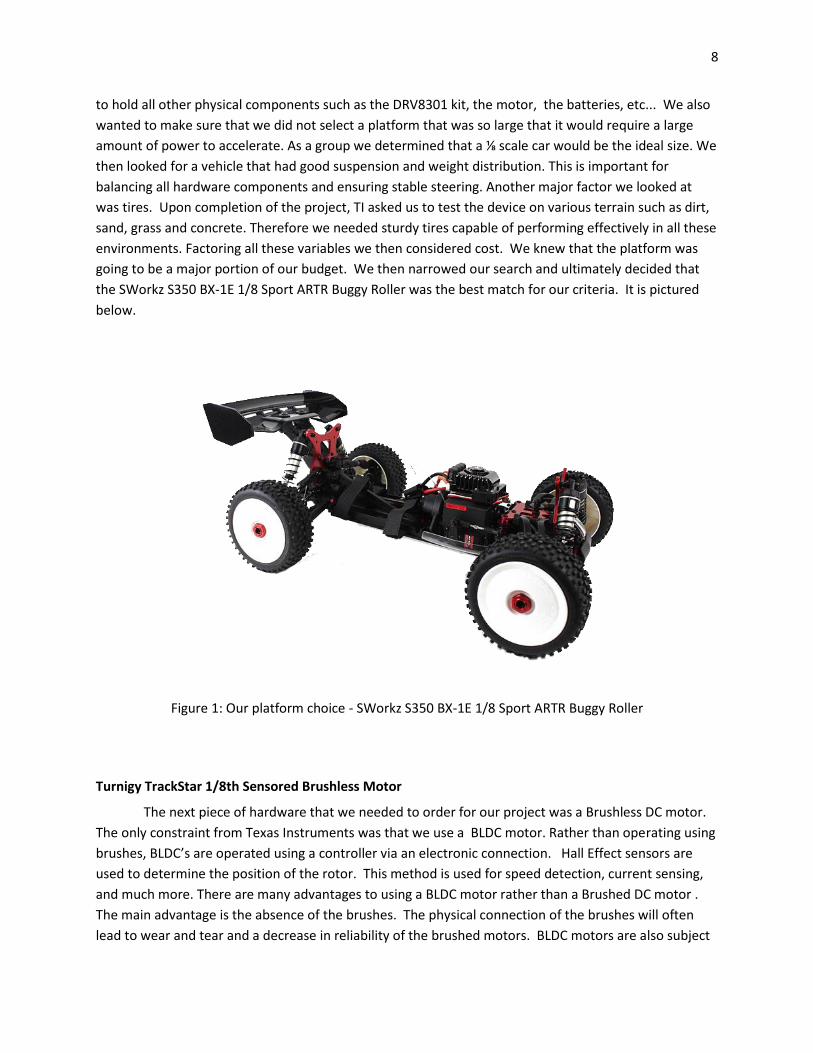
going to be a major portion of our budget. We then narrowed our search and ultimately decided that
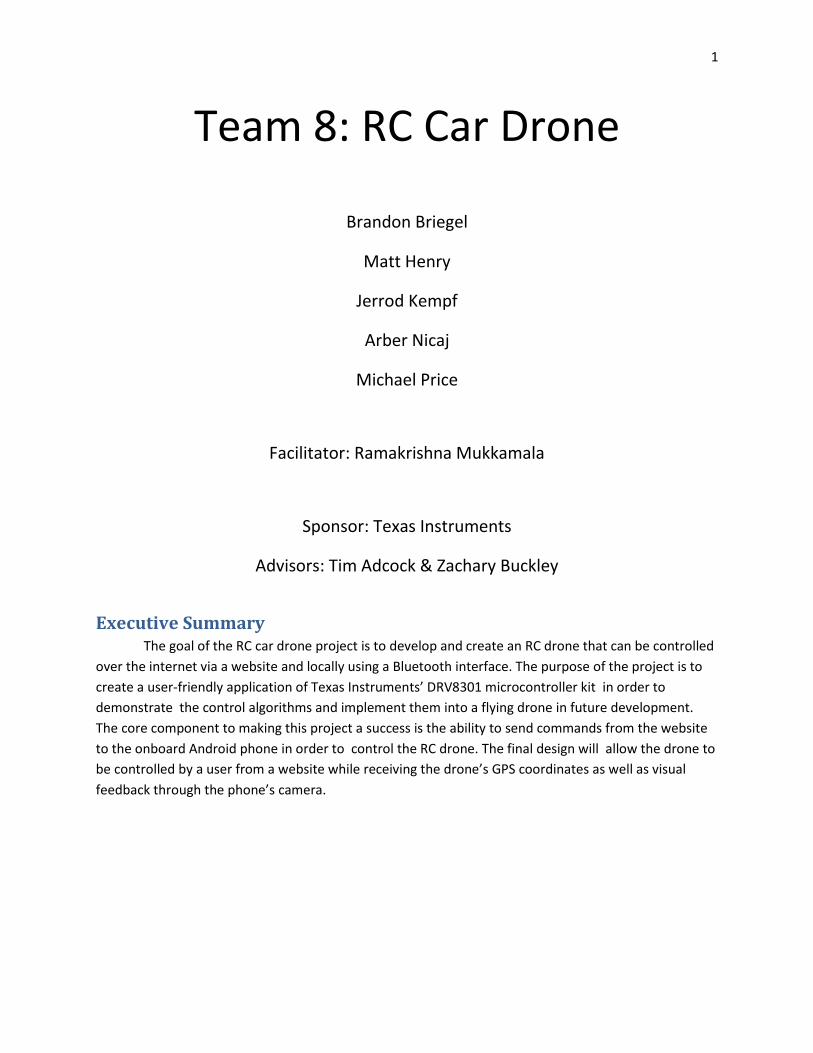
the SWorkz S350 BX-1E 1/8 Sport ARTR Buggy Roller was the best match for our criteria. It is pictured
below.
Figure 1: Our platform choice - SWorkz S350 BX-1E 1/8 Sport ARTR Buggy Roller
Turnigy TrackStar 1/8th Sensored Brushless Motor
The next piece of hardware that we needed to order for our project was a Brushless DC motor.
The only constraint from Texas Instruments was that we use a BLDC motor. Rather than operating using
brushes, BLDC’s are operated using a controller via an electronic connection. Hall Effect sensors are
used to determine the position of the rotor. This method is used for speed detection, current sensing,
and much more. There are many advantages to using a BLDC motor rather than a Brushed DC motor .
The main advantage is the absence of the brushes. The physical connection of the brushes will often
lead to wear and tear and a decrease in reliability of the brushed motors. BLDC motors are also subject
9
to less noise and electromagnetic interference (EMI). In addition they are cleaner and more powerful
than brushed motors. The only disadvantage of using a BLDC motor for our purpose is that they cost
slightly more to purchase than it’s counterpart.
The motor is what will physically drive our RC car. The motor receives commands from the
controller which will drive its rotor causing it to spin. This force will drive the back 2 wheels of our
platform, either forward or backward, causing it to move. Our motor will be controlled by the DRV8301
kit as described above. The DRV8301 kit can handle anywhere from 6 - 60V. Therefore in choosing a
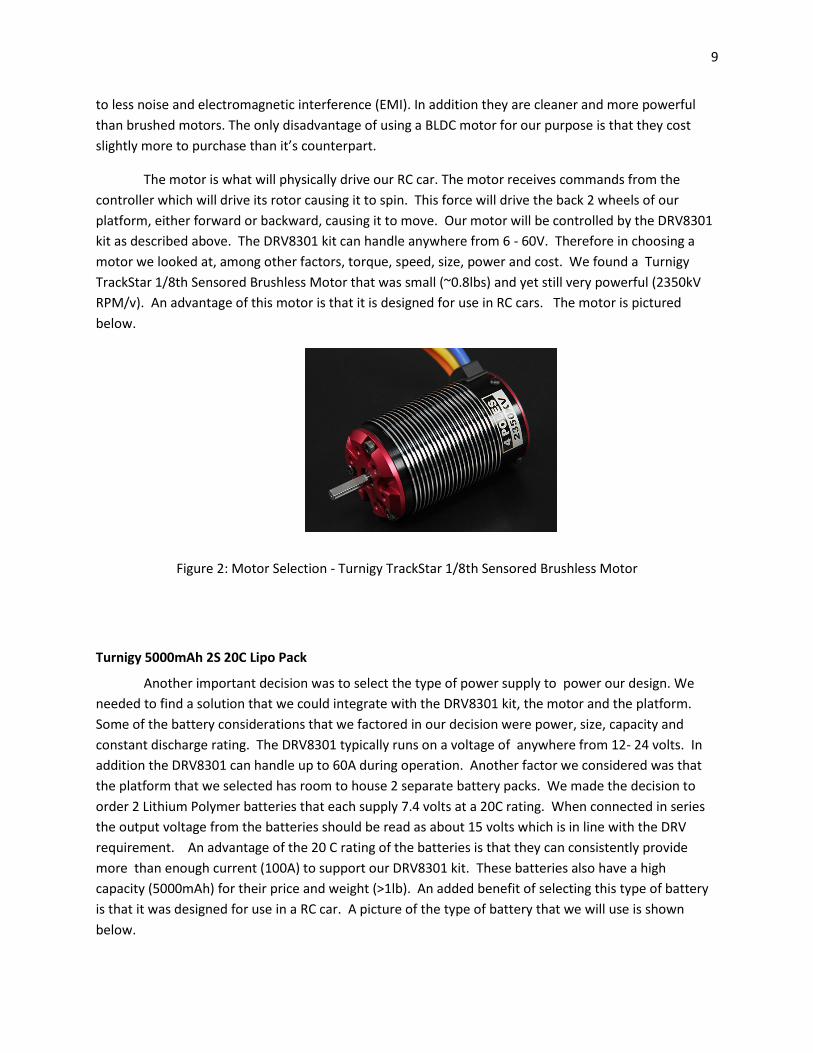
motor we looked at, among other factors, torque, speed, size, power and cost. We found a Turnigy
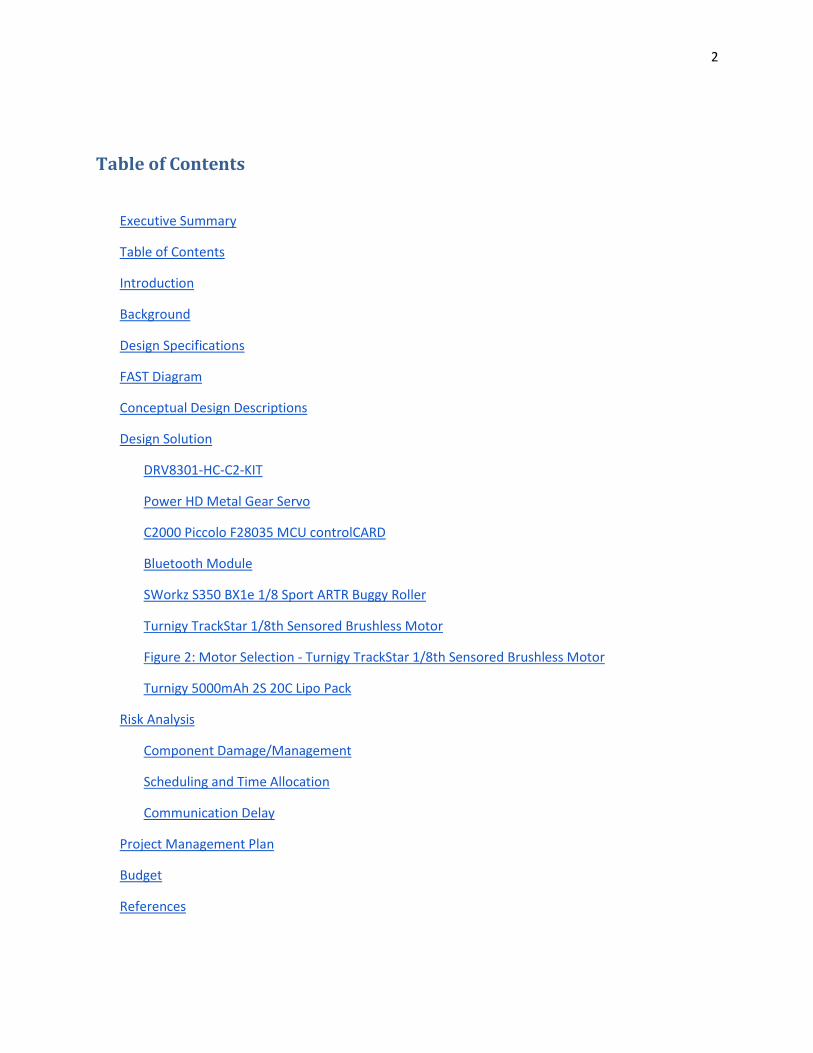
TrackStar 1/8th Sensored Brushless Motor that was small (~0.8lbs) and yet still very powerful (2350kV
RPM/v). An advantage of this motor is that it is designed for use in RC cars. The motor is pictured
below.
Figure 2: Motor Selection - Turnigy TrackStar 1/8th Sensored Brushless Motor
Turnigy 5000mAh 2S 20C Lipo Pack
Another important decision was to select the type of power supply to power our design. We
needed to find a solution that we could integrate with the DRV8301 kit, the motor and the platform.
Some of the battery considerations that we factored in our decision were power, size, capacity and
constant discharge rating. The DRV8301 typically runs on a voltage of anywhere from 12- 24 volts. In
addition the DRV8301 can handle up to 60A during operation. Another factor we considered was that
the platform that we selected has room to house 2 separate battery packs. We made the decision to
order 2 Lithium Polymer batteries that each supply 7.4 volts at a 20C rating. When connected in series
the output voltage from the batteries should be read as about 15 volts which is in line with the DRV
requirement. An advantage of the 20 C rating of the batteries is that they can consistently provide
more than enough current (100A) to support our DRV8301 kit. These batteries also have a high
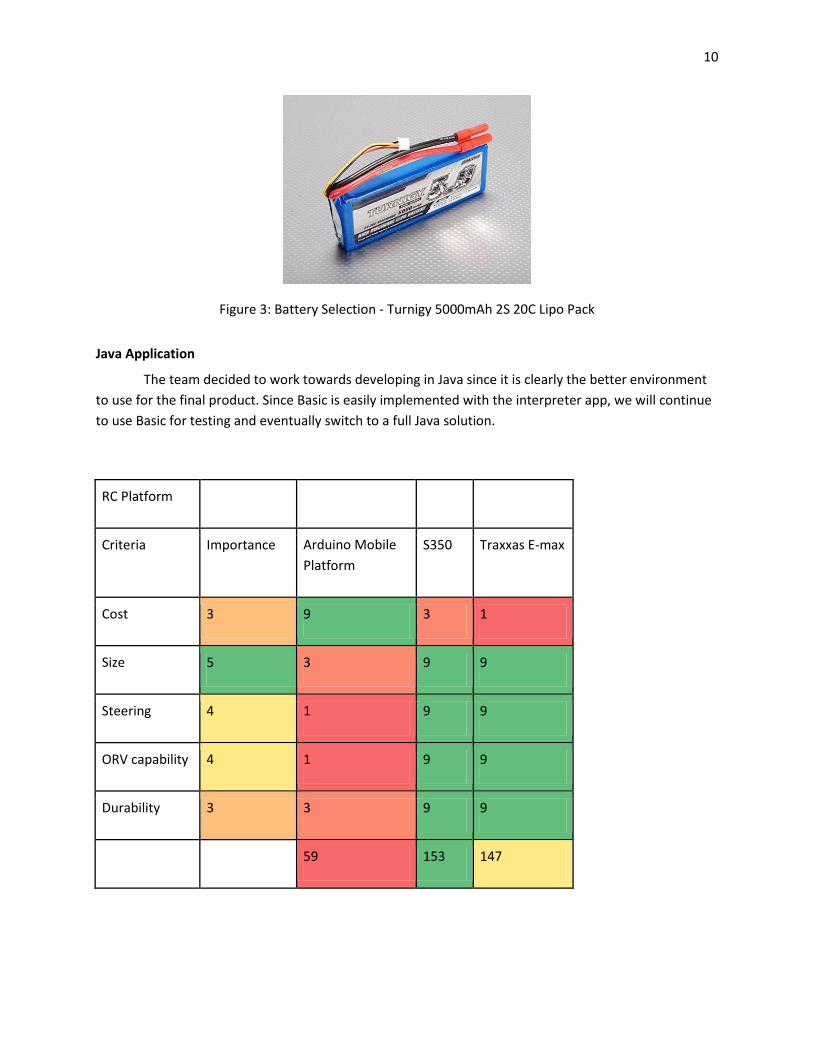
capacity (5000mAh) for their price and weight (>1lb). An added benefit of selecting this type of battery
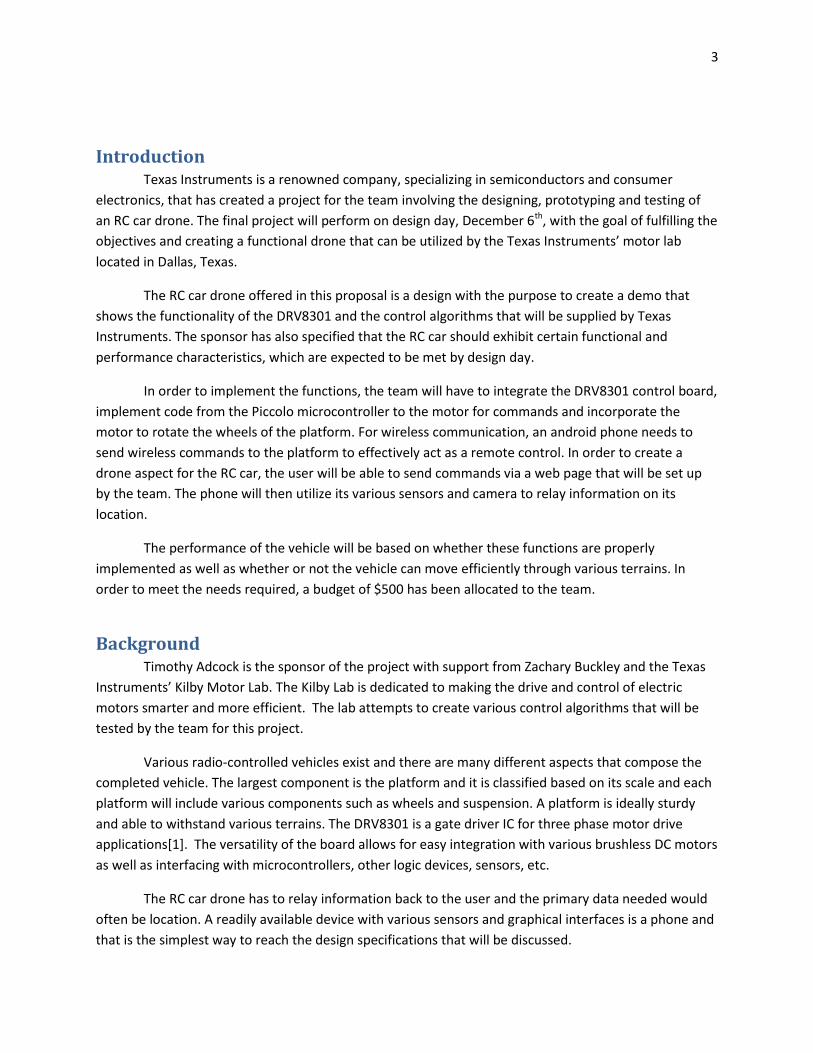
is that it was designed for use in a RC car. A picture of the type of battery that we will use is shown
below.
10
Figure 3: Battery Selection - Turnigy 5000mAh 2S 20C Lipo Pack
Java Application
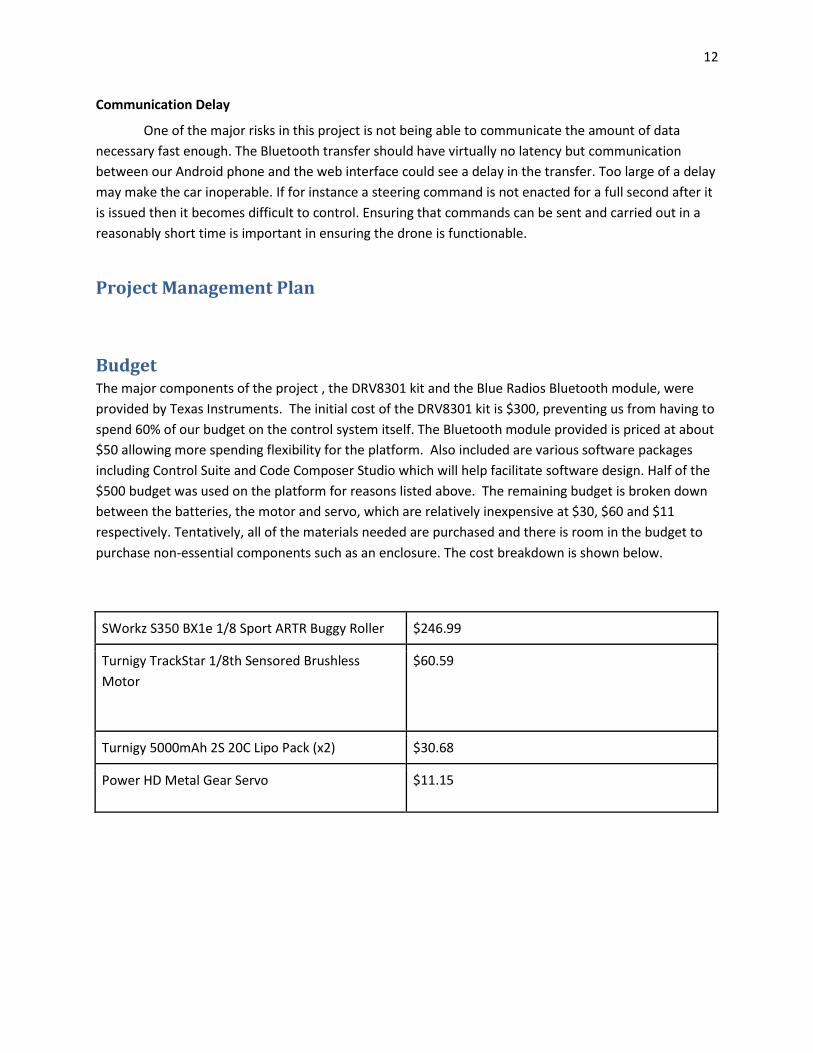
The team decided to work towards developing in Java since it is clearly the better environment
to use for the final product. Since Basic is easily implemented with the interpreter app, we will continue
to use Basic for testing and eventually switch to a full Java solution.
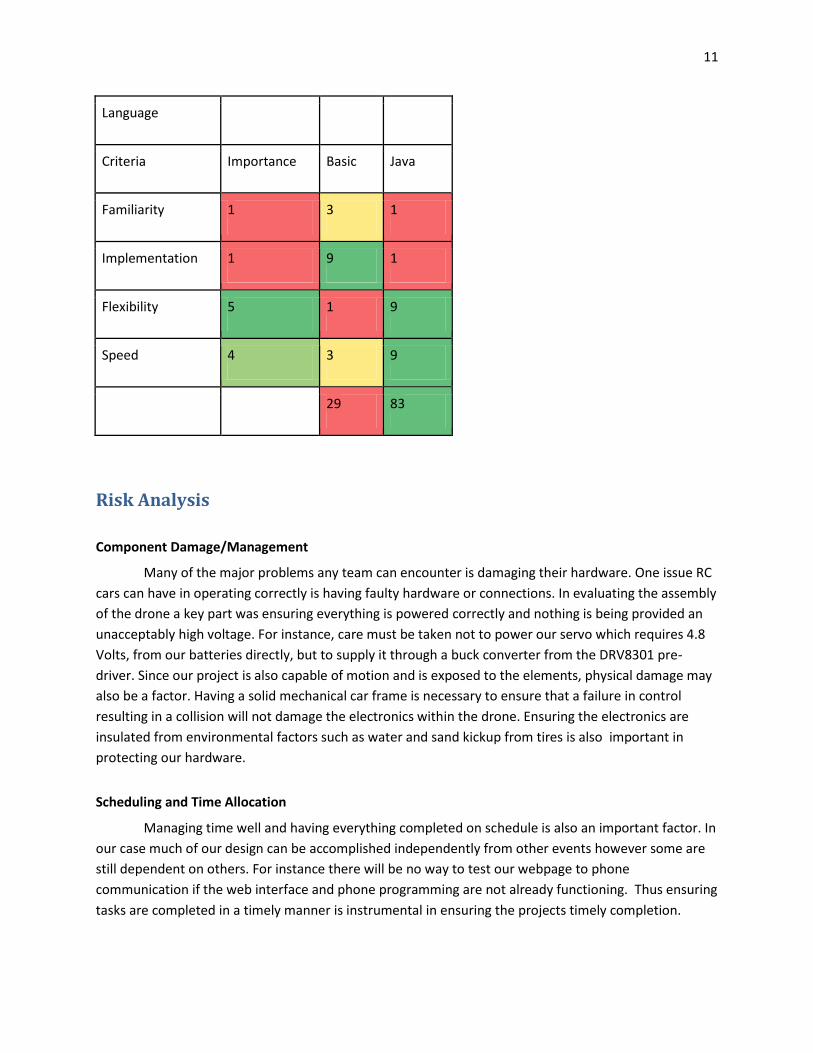
RC Platform
Criteria Importance Arduino Mobile
Platform
S350 Traxxas E-max
Cost 3 9 3 1
Size 5 3 9 9
Steering 4 1 9 9
ORV capability 4 1 9 9
Durability 3 3 9 9
59 153 147
11
Language
Criteria Importance Basic Java
Familiarity 1 3 1
Implementation 1 9 1
Flexibility 5 1 9
Speed 4 3 9
29 83
Risk Analysis
Component Damage/Management
Many of the major problems any team can encounter is damaging their hardware. One issue RC
cars can have in operating correctly is having faulty hardware or connections. In evaluating the assembly
of the drone a key part was ensuring everything is powered correctly and nothing is being provided an
unacceptably high voltage. For instance, care must be taken not to power our servo which requires 4.8
Volts, from our batteries directly, but to supply it through a buck converter from the DRV8301 pre-
driver. Since our project is also capable of motion and is exposed to the elements, physical damage may
also be a factor. Having a solid mechanical car frame is necessary to ensure that a failure in control
resulting in a collision will not damage the electronics within the drone. Ensuring the electronics are
insulated from environmental factors such as water and sand kickup from tires is also important in
protecting our hardware.
Scheduling and Time Allocation
Managing time well and having everything completed on schedule is also an important factor. In
our case much of our design can be accomplished independently from other events however some are
still dependent on others. For instance there will be no way to test our webpage to phone
communication if the web interface and phone programming are not already functioning. Thus ensuring
tasks are completed in a timely manner is instrumental in ensuring the projects timely completion.
12
Communication Delay
One of the major risks in this project is not being able to communicate the amount of data
necessary fast enough. The Bluetooth transfer should have virtually no latency but communication
between our Android phone and the web interface could see a delay in the transfer. Too large of a delay
may make the car inoperable. If for instance a steering command is not enacted for a full second after it
is issued then it becomes difficult to control. Ensuring that commands can be sent and carried out in a
reasonably short time is important in ensuring the drone is functionable.
Project Management Plan
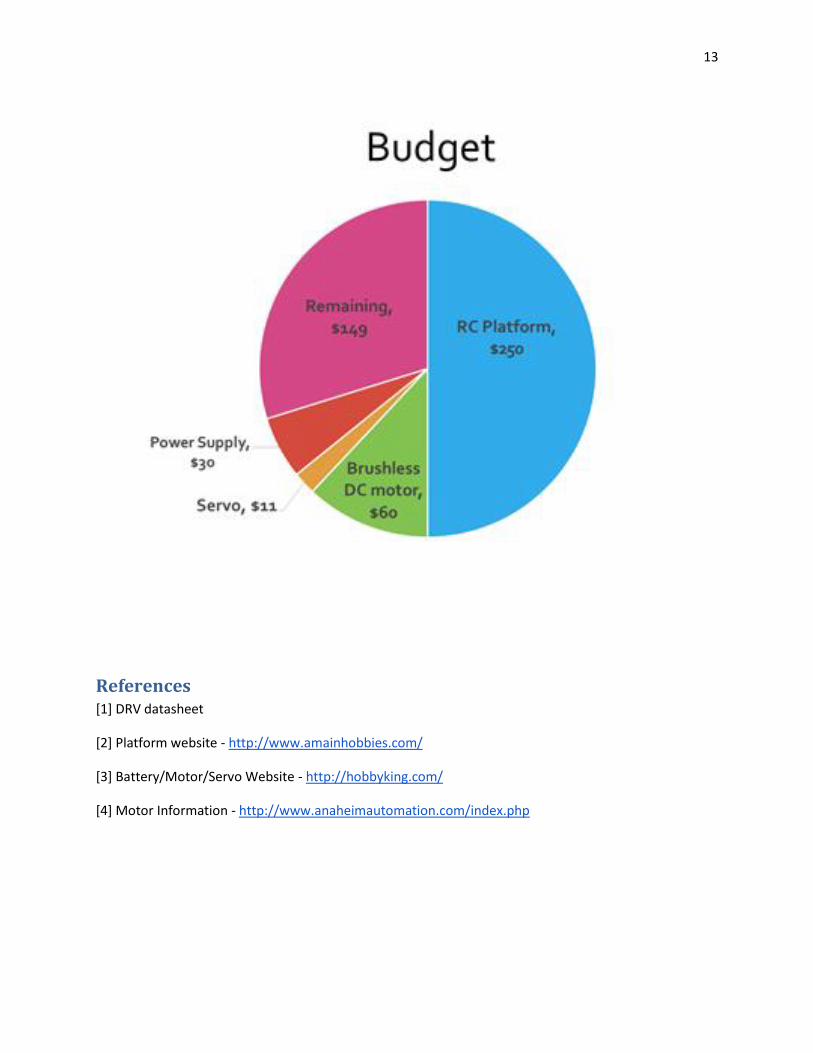
Budget The major components of the project , the DRV8301 kit and the Blue Radios Bluetooth module, were
provided by Texas Instruments. The initial cost of the DRV8301 kit is $300, preventing us from having to
spend 60% of our budget on the control system itself. The Bluetooth module provided is priced at about
$50 allowing more spending flexibility for the platform. Also included are various software packages
including Control Suite and Code Composer Studio which will help facilitate software design. Half of the
$500 budget was used on the platform for reasons listed above. The remaining budget is broken down
between the batteries, the motor and servo, which are relatively inexpensive at $30, $60 and $11
respectively. Tentatively, all of the materials needed are purchased and there is room in the budget to
purchase non-essential components such as an enclosure. The cost breakdown is shown below.
SWorkz S350 BX1e 1/8 Sport ARTR Buggy Roller $246.99
Turnigy TrackStar 1/8th Sensored Brushless
Motor
$60.59
Turnigy 5000mAh 2S 20C Lipo Pack (x2) $30.68
Power HD Metal Gear Servo $11.15
13
References [1] DRV datasheet
[2] Platform website - http://www.amainhobbies.com/
[3] Battery/Motor/Servo Website - http://hobbyking.com/
[4] Motor Information - http://www.anaheimautomation.com/index.php