Embed Size (px)
Citation preview
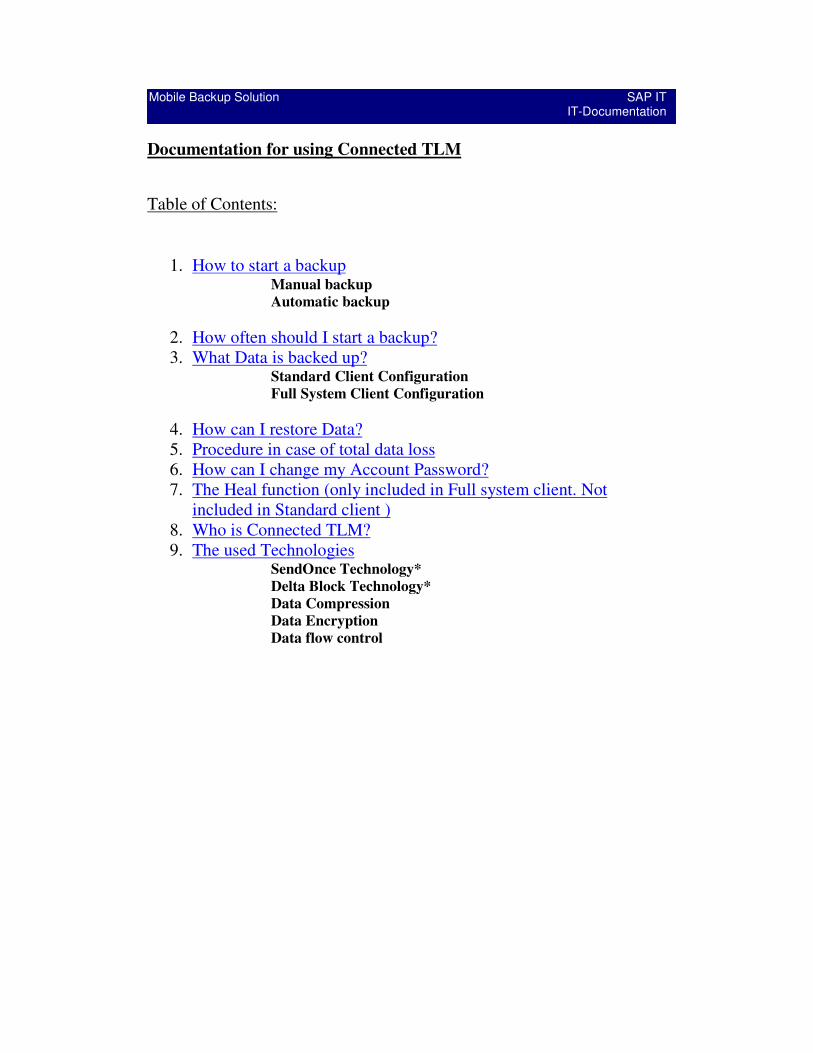
Mobile Backup Solution SAP IT IT-Documentation
Documentation for using Connected TLM
Table of Contents:
1. How to start a backup Manual backup Automatic backup
2. How often should I start a backup? 3. What Data is backed up?
Standard Client Configuration Full System Client Configuration
4. How can I restore Data? 5. Procedure in case of total data loss 6. How can I change my Account Password? 7. The Heal function (only included in Full system client. Not
included in Standard client ) 8. Who is Connected TLM? 9. The used Technologies
SendOnce Technology* Delta Block Technology* Data Compression Data Encryption Data flow control
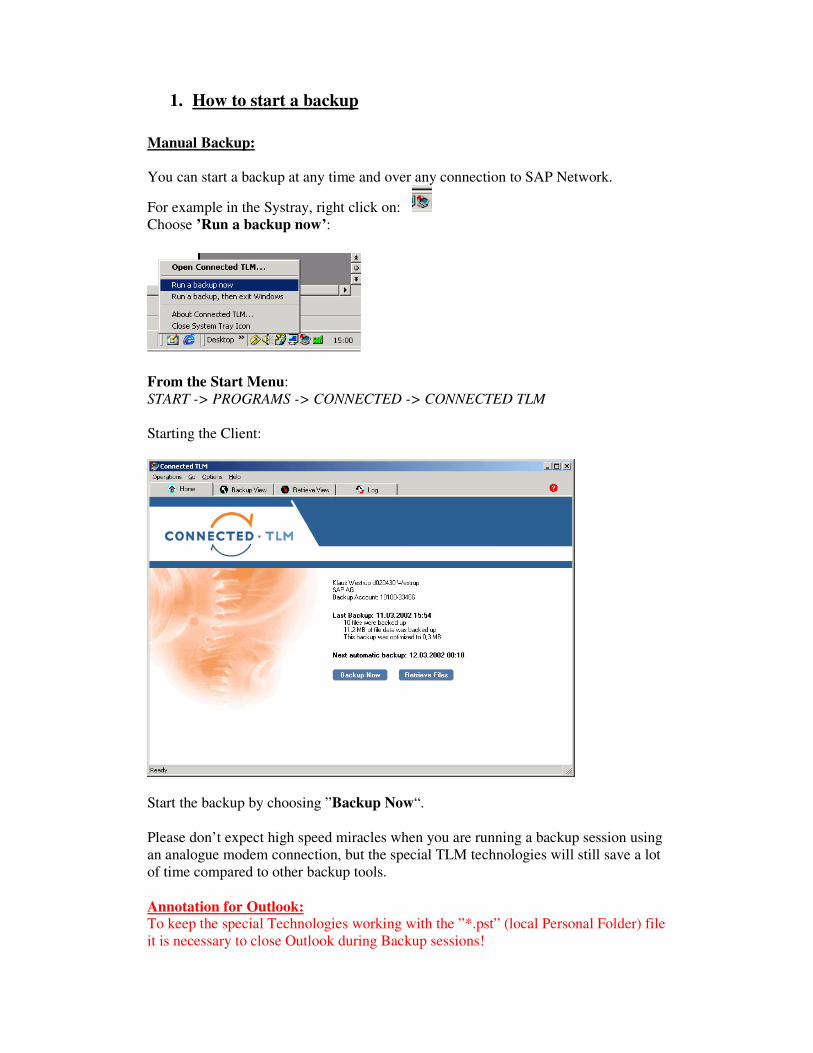
1. How to start a backup Manual Backup: You can start a backup at any time and over any connection to SAP Network.
For example in the Systray, right click on: Choose ’Run a backup now’:
From the Start Menu: START -> PROGRAMS -> CONNECTED -> CONNECTED TLM Starting the Client:
Start the backup by choosing ”Backup Now“. Please don’t expect high speed miracles when you are running a backup session using an analogue modem connection, but the special TLM technologies will still save a lot of time compared to other backup tools. Annotation for Outlook: To keep the special Technologies working with the ”*.pst” (local Personal Folder) file it is necessary to close Outlook during Backup sessions!
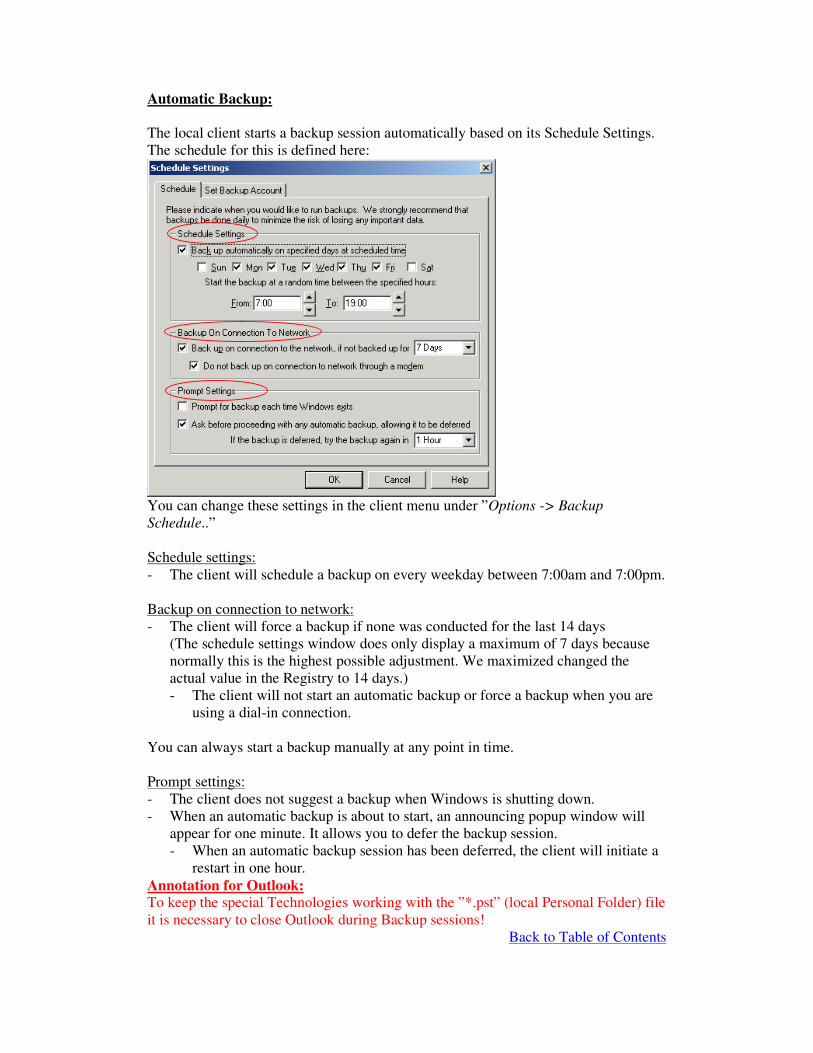
Automatic Backup: The local client starts a backup session automatically based on its Schedule Settings. The schedule for this is defined here:
You can change these settings in the client menu under ” Options -> Backup Schedule..” Schedule settings: - The client will schedule a backup on every weekday between 7:00am and 7:00pm. Backup on connection to network: - The client will force a backup if none was conducted for the last 14 days
(The schedule settings window does only display a maximum of 7 days because normally this is the highest possible adjustment. We maximized changed the actual value in the Registry to 14 days.) - The client will not start an automatic backup or force a backup when you are
using a dial-in connection. You can always start a backup manually at any point in time. Prompt settings: - The client does not suggest a backup when Windows is shutting down. - When an automatic backup is about to start, an announcing popup window will
appear for one minute. It allows you to defer the backup session. - When an automatic backup session has been deferred, the client will initiate a
restart in one hour. Annotation for Outlook: To keep the special Technologies working with the ” *.pst” (local Personal Folder) file it is necessary to close Outlook during Backup sessions!
Back to Table of Contents
2. How often should I start a backup? Almost ~26% of all laptop hard disks become damaged in the first two years of their usage. Therefore we recommend a daily backup. It is the only way to prevent severe data loss in case of hardware failure or theft.
Back to Table of Contents
3. What Data is Backed Up? Standard client configuration The configuration in detail
• What Data is backed up • Excluded Folders • SAP specific in- and exclusions • Excluded applications
What Data is Backed up We strongly recommend placing all user data in one of these folders. c:\Documents and Settings or c:\Users All data except *.mp3’s within these folders will be backed up! Excluded folders
• C:\nobackup No Files will be backed up in this Folder! All other Folders including their Subfolders will not be backed up except of User Data with the following Extensions: *.doc=word documents *.dot=word templates *.xls=excel documents *.xlt=excel templates *.xla=excel documents *.xlb=excel documents *.pst=exchange Personal Folder Files *.pot=power point templates *.ppt=power point documents *.mdb=data base *.mda=access template *.mdf=access *.kep=sap specific *.zip=zip files *.html=html
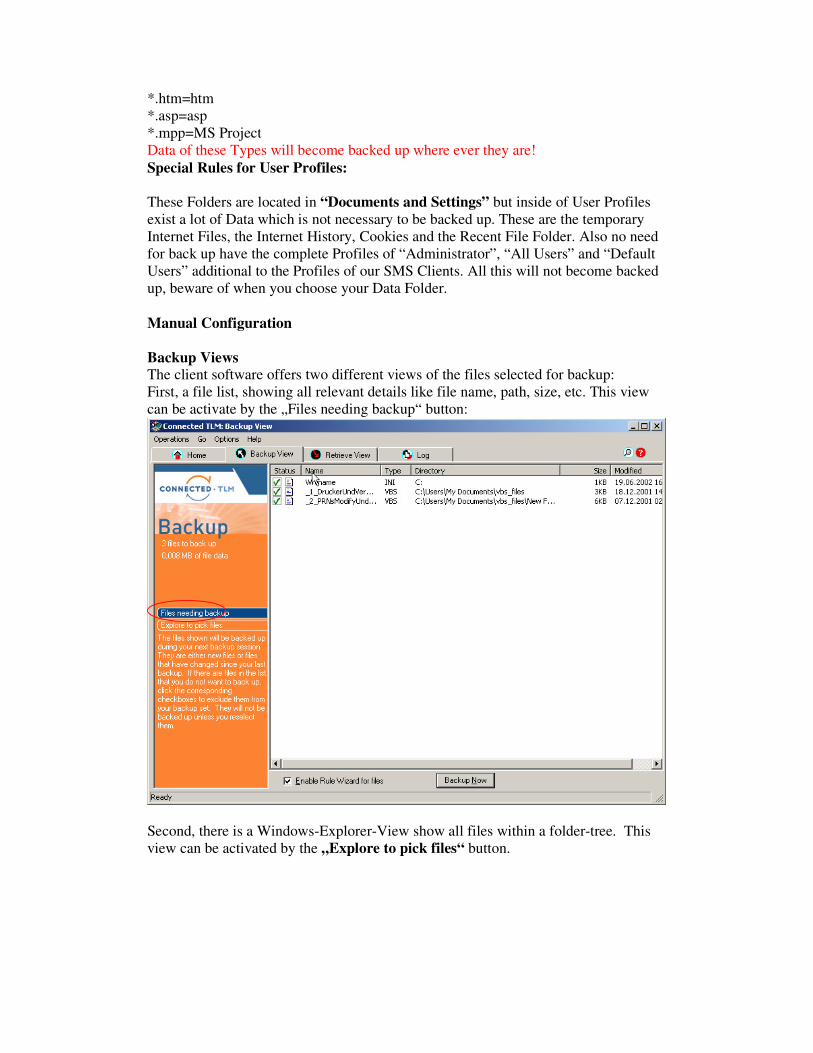
*.htm=htm *.asp=asp *.mpp=MS Project Data of these Types will become backed up where ever they are! Special Rules for User Profiles: These Folders are located in “Documents and Settings” but inside of User Profiles exist a lot of Data which is not necessary to be backed up. These are the temporary Internet Files, the Internet History, Cookies and the Recent File Folder. Also no need for back up have the complete Profiles of “Administrator” , “All Users” and “Default Users” additional to the Profiles of our SMS Clients. All this will not become backed up, beware of when you choose your Data Folder. Manual Configuration Backup Views The client software offers two different views of the files selected for backup: First, a file list, showing all relevant details like file name, path, size, etc. This view can be activate by the „Files needing backup“ button:
Second, there is a Windows-Explorer-View show all files within a folder-tree. This view can be activated by the „Explore to pick files“ button.
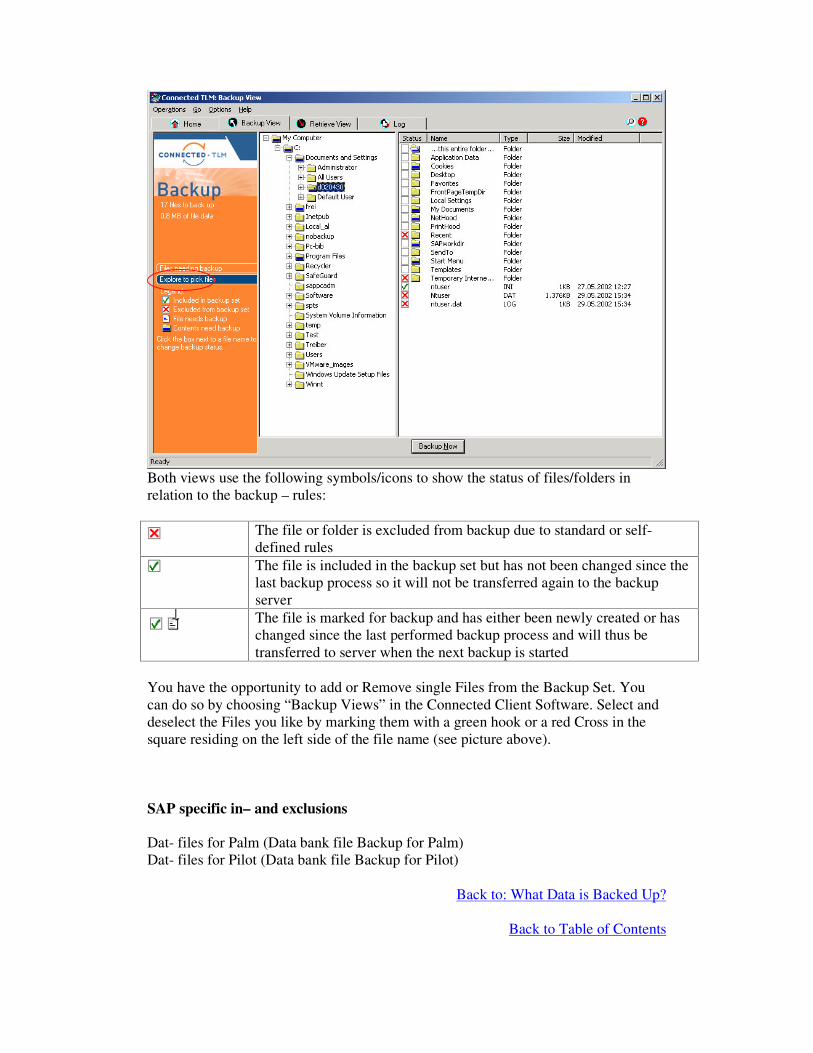
Both views use the following symbols/icons to show the status of files/folders in relation to the backup – rules:
The file or folder is excluded from backup due to standard or self-defined rules
The file is included in the backup set but has not been changed since the last backup process so it will not be transferred again to the backup server
The file is marked for backup and has either been newly created or has changed since the last performed backup process and will thus be transferred to server when the next backup is started
You have the opportunity to add or Remove single Files from the Backup Set. You can do so by choosing “ Backup Views” in the Connected Client Software. Select and deselect the Files you like by marking them with a green hook or a red Cross in the square residing on the left side of the file name (see picture above). SAP specific in– and exclusions Dat- files for Palm (Data bank file Backup for Palm) Dat- files for Pilot (Data bank file Backup for Pilot)
Back to: What Data is Backed Up?
Back to Table of Contents
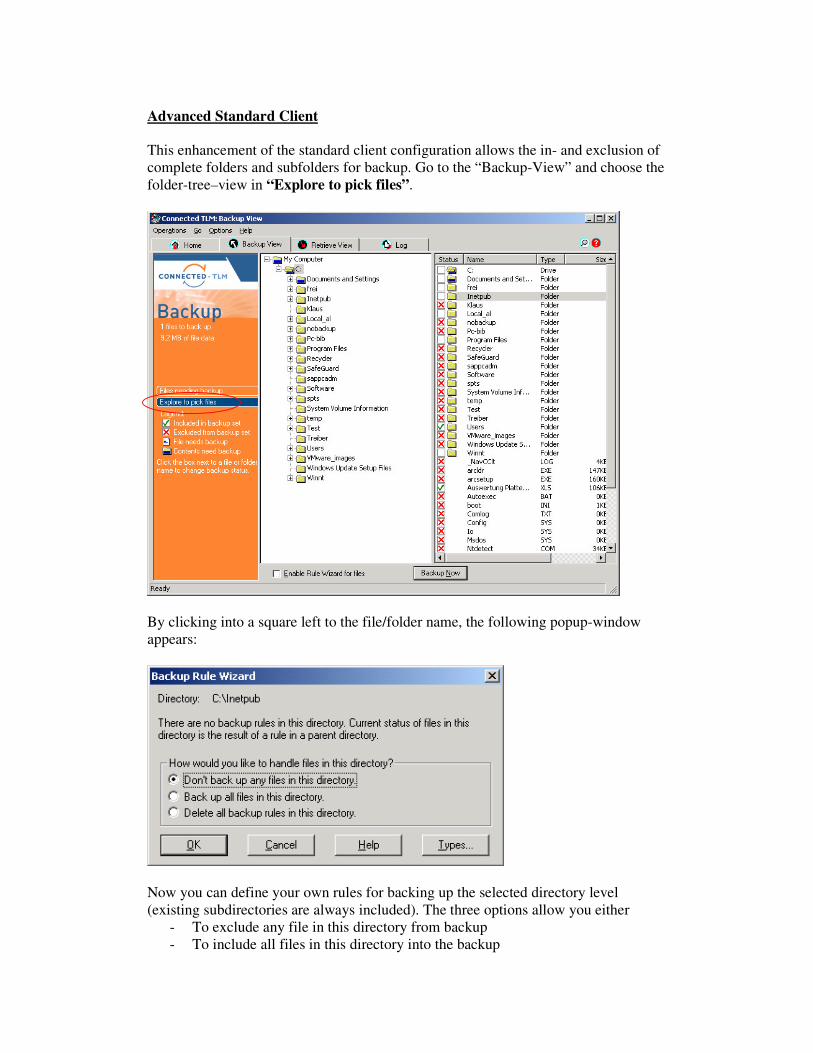
Advanced Standard Client This enhancement of the standard client configuration allows the in- and exclusion of complete folders and subfolders for backup. Go to the “ Backup-View” and choose the folder-tree–view in “Explore to pick files”.
By clicking into a square left to the file/folder name, the following popup-window appears:
Now you can define your own rules for backing up the selected directory level (existing subdirectories are always included). The three options allow you either
- To exclude any file in this directory from backup - To include all files in this directory into the backup
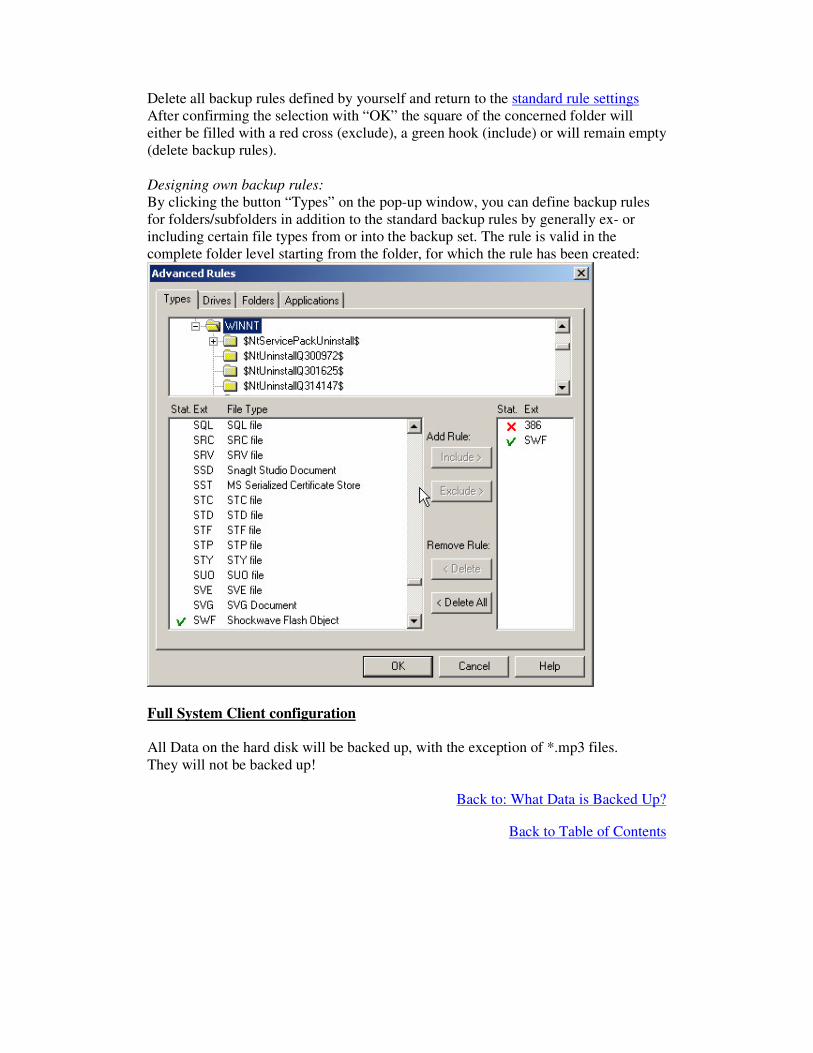
Delete all backup rules defined by yourself and return to the standard rule settings After confirming the selection with “ OK” the square of the concerned folder will either be filled with a red cross (exclude), a green hook (include) or will remain empty (delete backup rules). Designing own backup rules: By clicking the button “ Types” on the pop-up window, you can define backup rules for folders/subfolders in addition to the standard backup rules by generally ex- or including certain file types from or into the backup set. The rule is valid in the complete folder level starting from the folder, for which the rule has been created:
Full System Client configuration All Data on the hard disk will be backed up, with the exception of *.mp3 files. They will not be backed up!
Back to: What Data is Backed Up?
Back to Table of Contents
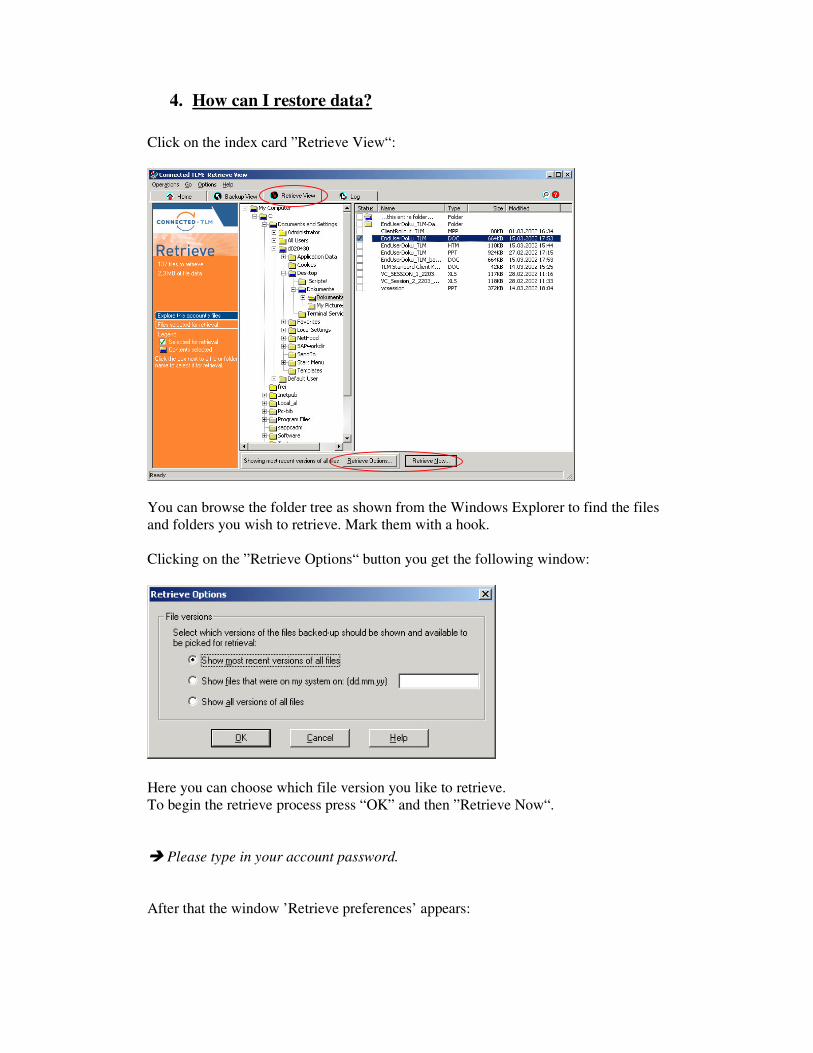
4. How can I restore data? Click on the index card ” Retrieve View“ :
You can browse the folder tree as shown from the Windows Explorer to find the files and folders you wish to retrieve. Mark them with a hook. Clicking on the ” Retrieve Options“ button you get the following window:
Here you can choose which file version you like to retrieve. To begin the retrieve process press “ OK” and then ” Retrieve Now“ . Î Please type in your account password. After that the window ’Retrieve preferences’ appears:

Now you have to choose how duplicate files are treated. Duplicate file names are supplied with ongoing number suffixes.
Back to Table of Contents
5. Procedure in case of total data loss In case of total loss of Data (caused by hardware failure or theft) please contact your local IT Support. IT Support has to reinstall your Backup client to enable you to restore your User Data. (Your account password and the encryption key are required. The encryption key can be read out by End User Services). The data restore is carried out like described in topic 4 “ How can I restore data.”
Back to Table of Contents
6. How can I change my account password? To change your account password you have to click in the client menu on “ Options” and “ Security” . Then press the button “ Change Account Password” . The end user service will also be able to reset your password. In the same window you can view your encryption key. You need it when you want to reinstall an existing client on a different laptop. The encryption key can also be viewed by the end user service.
Back to Table of Contents
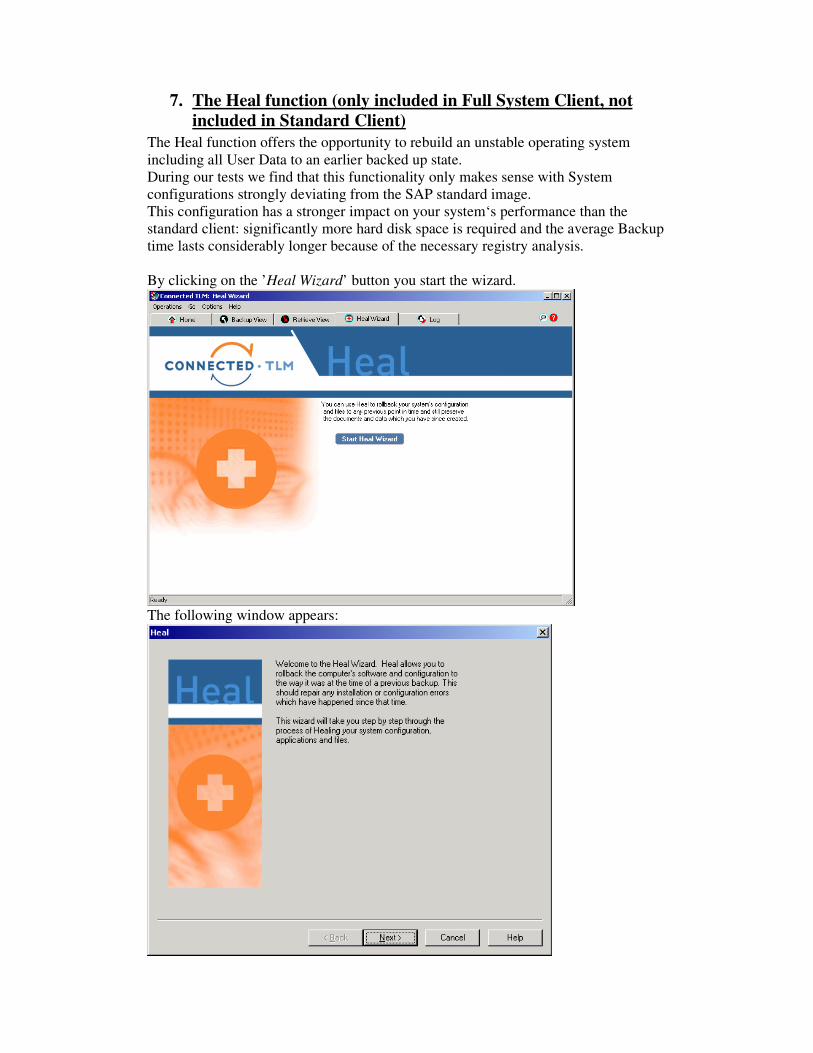
7. The Heal function (only included in Full System Client, not included in Standard Client)
The Heal function offers the opportunity to rebuild an unstable operating system including all User Data to an earlier backed up state. During our tests we find that this functionality only makes sense with System configurations strongly deviating from the SAP standard image. This configuration has a stronger impact on your system‘s performance than the standard client: significantly more hard disk space is required and the average Backup time lasts considerably longer because of the necessary registry analysis. By clicking on the ’ Heal Wizard’ button you start the wizard.
The following window appears:
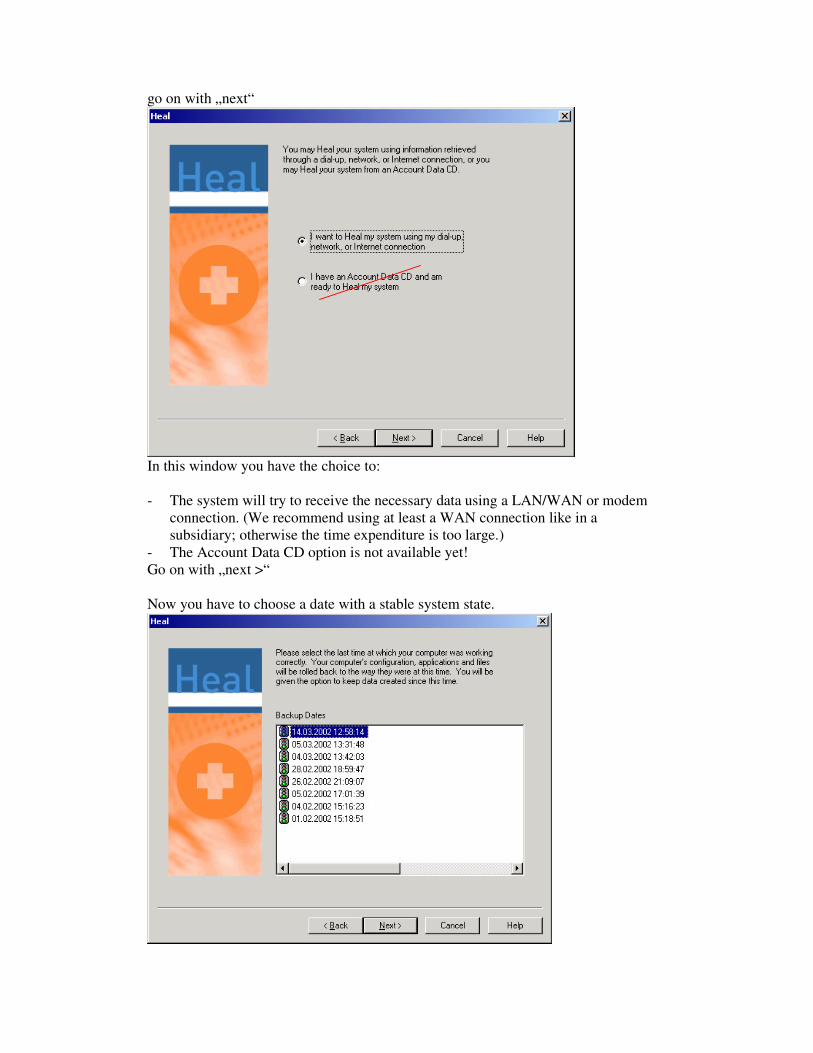
go on with „next“
In this window you have the choice to: - The system will try to receive the necessary data using a LAN/WAN or modem
connection. (We recommend using at least a WAN connection like in a subsidiary; otherwise the time expenditure is too large.)
- The Account Data CD option is not available yet! Go on with „next >“ Now you have to choose a date with a stable system state.
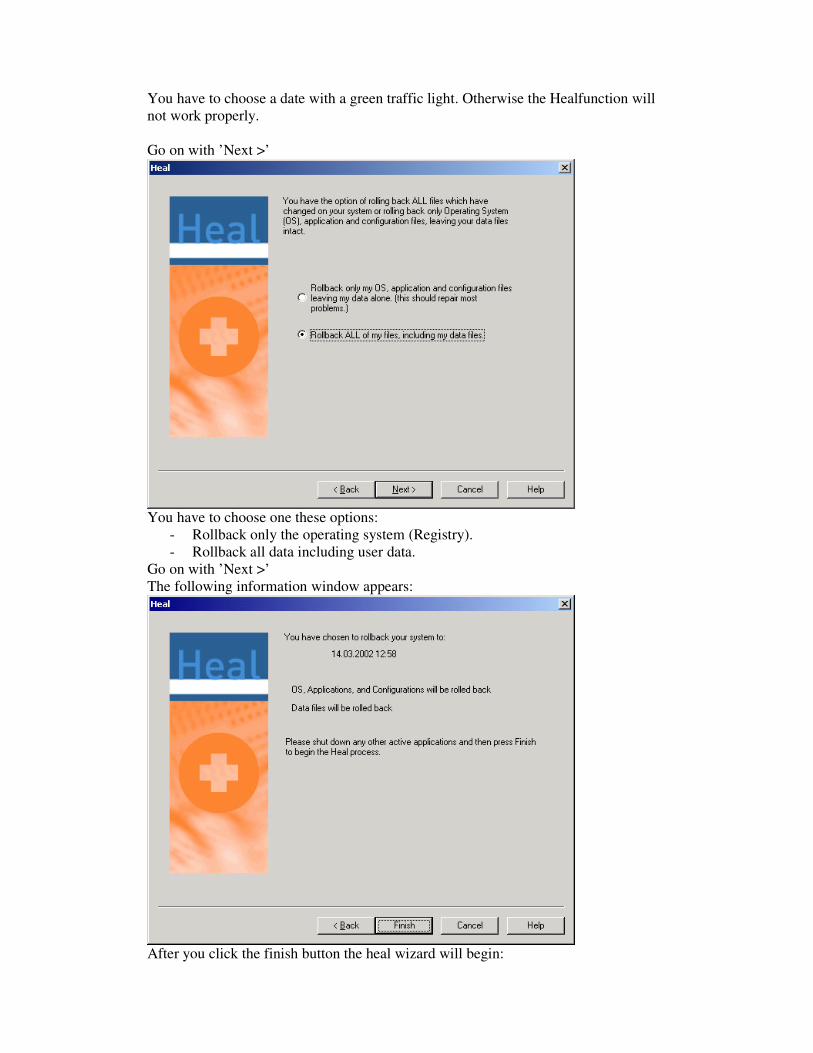
You have to choose a date with a green traffic light. Otherwise the Healfunction will not work properly. Go on with ’ Next >’
You have to choose one these options:
- Rollback only the operating system (Registry). - Rollback all data including user data.
Go on with ’ Next >’ The following information window appears:
After you click the finish button the heal wizard will begin:
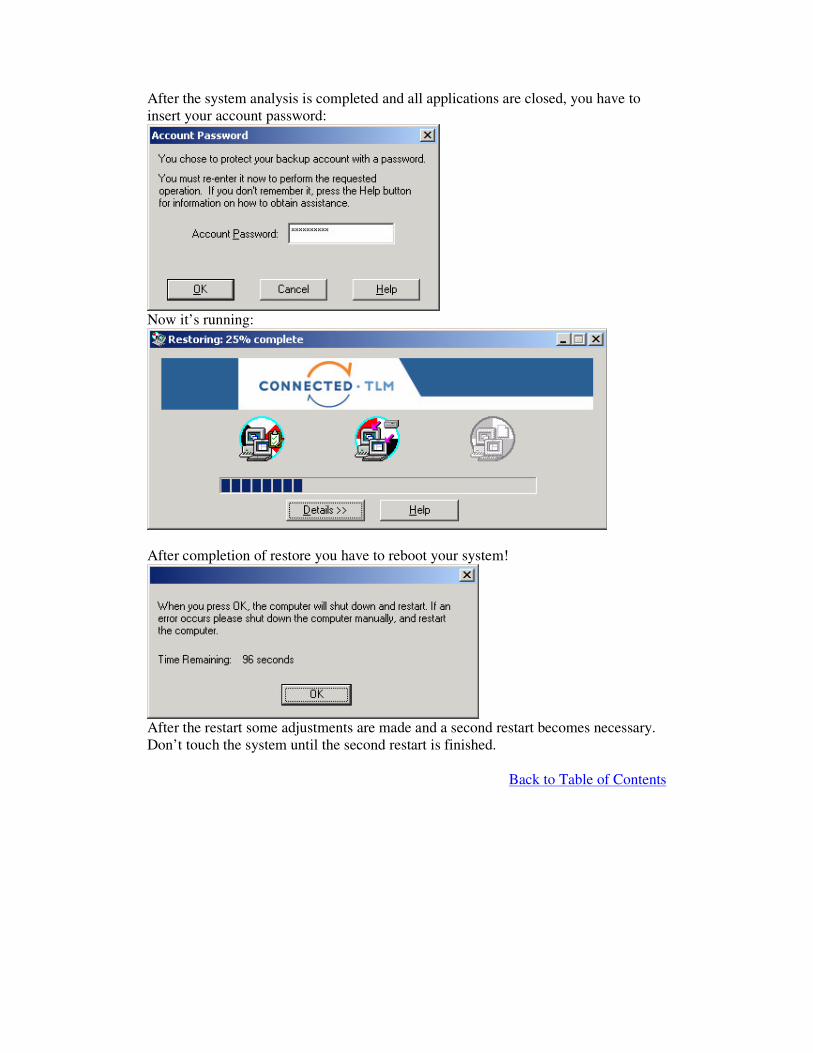
After the system analysis is completed and all applications are closed, you have to insert your account password:
Now it’ s running:
After completion of restore you have to reboot your system!
After the restart some adjustments are made and a second restart becomes necessary. Don’ t touch the system until the second restart is finished.
Back to Table of Contents
8. Who is Connected TLM? Connected is an American company specialized in the backup topic. TLM (Total Lifecycle Management) is the name of the product we use here.
Zur deutschsprachigen Homepage von Connected The English Homepage of Connected
Back to Table of Contents
9. Used technologies TLM uses different technologies for minimizing the amount of data that have to be transferred. A short description: SendOnce technology*: This technique avoids transferring files that are already stored on the server (even in different backup sets). Instead of transferring the whole file only a short cut will be set. For the file identity a checksum on the file is made. Delta Block technology*: This technique takes effect especially on large files like Personal Folder files from Outlook. The file will be split in 512 Byte blocks and only the changed blocks will be transferred. Unfortunately this will work only with unused files. With Personal Folder files it is required to keep Outlook closed during backup session. Otherwise the client is forced to make a snapshot of the File and transfer it completely in the next backup session. *SendOnce & Delta Block are registered trademarks of Connected Data compression: All data will be compressed before transfer to keep the amount of data small. Data encryption: The data is encrypted (112-bit Triple.DES) before it gets saved on the backup server. Data flow control: When a backup or restore process has been interrupted it will restart next time from point of interruption
Back to Table of Contents
Author: Klaus Westrup, SAP Global IT EMEA Date: 17.07.2002 Documentation valid for TLM Client Version 6.2