Embed Size (px)
Citation preview

NPS Museum Handbook, Part I (2000) 10:33
1. How do I determine which
emergencies to assess?
Read the park administrative history and talk to park staff who have been in the park the longest. Ask them if the park has ever had a problem with each type of emergency. Call your park EOP coordinator to try to discover the frequency of this type of emergency in your site’s area. Talk to your local public library reference librarian for help. Use the Websites listed in the bibliography—some of which provide specific risk information on certain types of disasters, such as:
• Floodcast Website at <http://www.earthsat.com/flood/floodcast.html>
• U.S. Fire Administration Website at <http://www.usfa.fema.gov/>
• Volcano World, the active volcano site, at <http://www.volcano.und. nodak.edu/wvdocs/current_volcs/current.html/>
• National Oceanic and Atmospheric Administration’s flood and storm watch and warning page at <http://iwin.nws.noaa.gov/iwin/ nationalwarnings.html>
• Earth Watch site at <http://www.earthwatch.com/STORMWATCH/ stormwatch.html>
• Federal Emergency Management Agency (FEMA) Website at <http://www.fema.gov>
2. How do I complete the Risk
Assessment Worksheets?
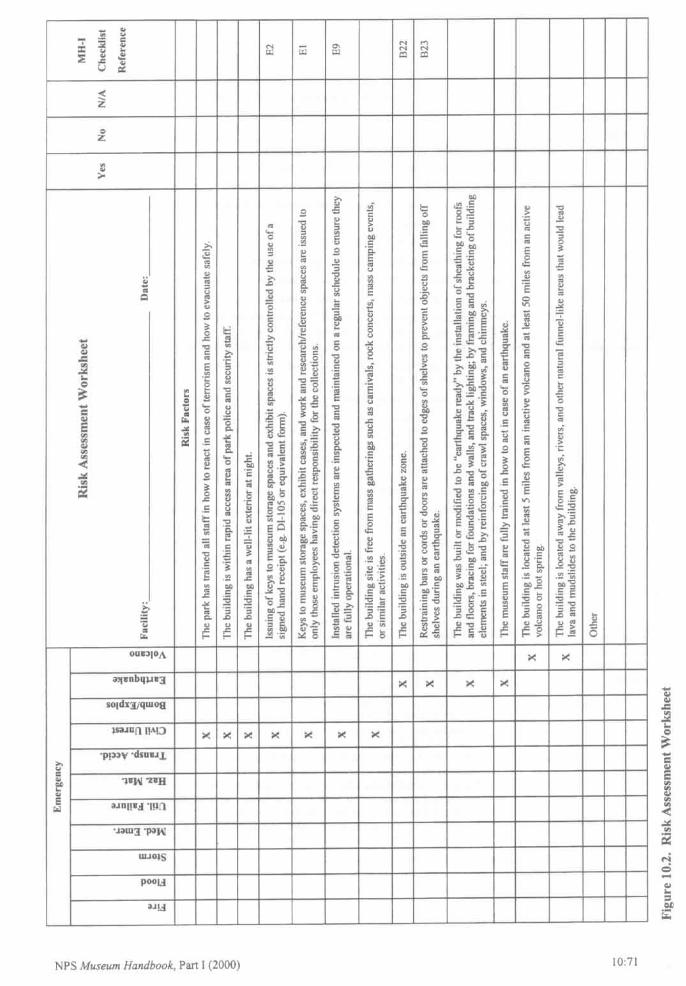
Look at Figure 10.2. The worksheet is a list of risk factors (for example, having the museum storage structure on a flood plain) that relate to the 11 key types of emergencies described in this chapter. Read the list, to remind yourself of the various risks and hazards that your park faces for each type of emergency. If you wish to fully assess each facility in your park for risks and hazards, as you read the worksheet determine if each point applies to the particular facility you are assessing, then answer each question “yes” or “no.” If you answer “no,” this factor is a risk for the listed emergencies. Only use the NA or “not applicable” category if the risk factor has no relevance to your facility. Repeat the task until you have completed the form for each facility that houses museum collections. References to the Checklist for Preservation and Protection of Museum Collections in Appendix F within a question indicate when answers may be found in the Checklist. When checklist requirements match Risk Assessment risk factors, the Checklist section letter and question number is noted in the final column. When you have completed the Risk Assessment Worksheet, add up the number of “no” responses that apply to each emergency type (fire, flood, etc). The more “no” responses, the greater your risk for this type of emergency.
3. How do I determine the likelihood of a particular type of emergency?
Use the Emergency Master Planning Worksheet (Figure 10.1a). Once the Risk Assessment Worksheet (Figure 10.2) is completed for all types of emergencies, you should have a sound grasp of what remains to be done. You can now identify the greatest risks and hazards for your collections by prioritizing your risks on the Emergency Planning Master Worksheet. You can focus the largest part of your planning energies on the likeliest forms of emergencies, buying the necessary supplies and training staff most thoroughly in activities for those types of emergencies.

10:34 NPS Museum Handbook, Part I (2000)
Use the Emergency Planning Master Worksheet to identify the sort of mitigation you should consider undertaking for each facility. Note on the Emergency Planning Master Worksheet which facilities and what types of emergencies were assessed. Make note of mitigation actions needed. While the Emergency Planning Master Worksheet contains spaces for tracking all conceivable types of emergencies from fires and floods to volcanoes, you may already know that your park has little or no risk from certain types of emergencies. When a particular type of emergency is very unlikely, such as a volcano in Iowa, you will be able to focus on more likely types of emergencies. As you complete the worksheet, do the steps listed in C.2 (interviewing staff). Also consider the number of “no” responses when you prioritize your risks.
4. Once I have completed the Emergency Planning Master Worksheet, what new information do I have?
Following this exercise, you should know:
• which emergencies are most likely for your park and which are your greatest risks as noted here (your emergency priorities)
• specific situations in your park that place museum collections at risk for each type of emergency
• some basic steps for preventing these emergencies (also see Sections B.2-13)
Your MCEOP should address your emergencies in priority order as established by this risk assessment procedure. The greatest amount of attention on how to plan for, mitigate, survive, and recover from an emergency should be focused on the emergencies you are most likely to face. Secondary types of emergencies, such as volcanoes in New England or tornadoes in California, may be dealt with more generically as part of a general category of similar disasters, such as “earthquakes and volcanoes” or “storms.” Focus your planning, training, supply, and other resources on the high priority emergencies that you are likely to face.
5. How do I limit risks to my museum collections and staff?
After you have determined your most likely emergencies, you should begin to limit risks. There are a number of tools you can use to identify specific risk factors to mitigate. First mitigate the conditions listed on the Risk Assessment Worksheets (the “no” responses), particularly those that are on the Checklist in MH-I, Appendix F. Second, mitigate risks under the header “Prevention” in Sections B.2-13. Taking the steps recommended in these sections should greatly reduce the possibility of an emergency becoming a disaster.

NPS Museum Handbook, Part I (2000) 10:35
D. Prioritization of Museum Collections for Salvage
When an emergency threatens, you may be required to: • move materials fast:
− to an off-site building
− to a different building within the park
− to a different floor of the same building
− to the tops of existing shelving and furniture
− to an interior area out of the path of the emergency
• salvage materials from fire, kinetic, smoke, storm, volcanic, or water damage
• send collections to cold storage, a safe workspace, or to a conservation laboratory
Prioritize park collections for recovery so you will not have to make vital relocation, salvage, or treatment decisions when you are under stress, without full information, or operating without power, lights, or automated systems.
1. What preliminary work should I do?
Before you begin prioritizing your collections for salvage:
• Evaluate your structures containing museum collection storage, work, exhibit, and research spaces as described in Section C.1. If you have multiple structures, determine if some of these structures face greater hazards than others. For example, is one structure in a flood plain, near a tidal river, or situated near a major highway?
If so, you may need to prioritize your various structures by the types of disaster they may experience. Review the Risk Assessment Worksheet (Figure 10.2).
• Review your risk assessment exercises. See Section C.1 and Figures 10.1, Emergency Planning Master Worksheet, and 10.2, the Risk Assessment Worksheet.
• Review your types of collection materials by walking through your collection storage, work, exhibit, and research spaces and looking at your Scope of Collection Statement, Collections Management Report (CMR) and your Collection Management Plan (CMP)
• Determine your criteria to be used in setting your MCEOP salvage and treatment priorities

10:36 NPS Museum Handbook, Part I (2000)
• Talk to your staff, cooperators, contractors, and collaborators about salvage and treatment priorities
2. What criteria might I use to
set priorities?
Many factors may be important in salvage recovery. Always the single most important criterion is prevention of loss of life. The health and safety of staff, visitors, and others comes above all collections concerns. After health and safety issues, preservation of the most valuable portions of the museum collections is essential.
Salvage priorities are almost impossible to establish during salvage. Your MCEOP should include salvage priorities. The basic rule for setting priorities is to salvage materials in affected or damaged spaces first. Within the affected spaces, follow the established salvage priorities as expressed in written labels or color codes. For example, you may wish to keep the system simple setting only three priority levels:
• High priority materials receive a green indicator label or the code HP.
• Moderate priority materials receive a blue indicator label or the code MP.
• Low priority materials receive a red indicator label or the code LP. The most commonly used evaluation criteria for identifying these most valuable museum collection components are:
• Value/Significance, which includes factors such as:
− artifactual value (intrinsic value as material culture)
− associational value (direct link to eminent individuals or groups, famous events, projects, or activities)
− informational value (as the material records important data on the topics, activities, individuals, groups, and places that form part of the park’s Scope of Collection Statement)
− evidential value (as historical or legal proof, such as land records or vital records)
− administrative value (as active records used by the park for essential resource management activities)
− monetary value (as determined by the marketplace)
Most museum collections have some artifactual value; some however, also have important associations to major figures and events, major value as information (such as type specimens), or evidential value for legal cases or as historical proof of a contested point. See Conserve O Gram (COG) 19/10, Reformatting for Preservation and Access: Prioritizing Materials for Duplication, for a fuller discussion of these types of value and how to use them for prioritization of museum collections.

NPS Museum Handbook, Part I (2000) 10:37
• Risk, which includes hazard likelihood plus vulnerability due to the media, process, format, and material, and local housing and storage concerns. Again see COG 19/10 (listed above).
• Usage, which includes the frequency of usage by scholarly researchers, students, and associated communities. Note: Usage can affect value and significance—for example an upcoming anniversary or planned exhibit may give a collection or item added temporary significance; or risk can be affected by usage—for example a traveling exhibit may provide significant additional risk. Placing an image of a valuable collection item on the Web if you lack good security can also pose a risk as you are increasing the number of people aware of its existence, a certain percentage of whom may be less than honest. Instructions on how to judge these usage levels is included in COG 19/10.
In determining salvage priorities for specific types of emergencies, set up a numeric chart like that in COG 19/10. This is a simple scale that judges each group of items being assessed as high, medium, or low for value, use, and risk. For your salvage plan when filling in the numeric chart, consider weighting your criteria giving triple weight to risk factors, so that high risk items are 9 points, medium risk items are 6 points, and low risk items are 3 points. You may score all three criteria the same (high=3 points, medium=2 points, and low=1 point) or differently as shown in the example below.
Example: If the affected items include:
• Item 1: a group of tanned Buffalo hides collected in 1950 for use in interpretive programs
• Item 2: a set of undecorated fruit gathering baskets made by a 12 year old Colonial girl in 1769
• Item 3: several veneered musical instruments including a violin once owned by John Quincy Adams
• Item 4: paleontological specimens in shale collected by the first park geologist
• Item 5: ledger books documenting the botanical collecting activities of the first park botanist
• Item 6: typewritten correspondence between the park founder and various historical figures
• Item 7: rare mineral specimens collected by John Muir
• Item 8: portrait miniatures of unidentified subjects on wood

10:38 NPS Museum Handbook, Part I (2000)
• Item 9: metal architectural fragments (lead gutters predominantly) from the first park visitor center
• Item 10: models of lead cannons acquired from a collector
You will fill out a form like the example below, which assigns high, medium, or low numerical values for each of the categories. Note: Since this exercise is for emergency salvage and planning purposes, this example uses a weighted scale that places highest emphasis on risk, then value, then usage. The numerical values are as follows: For Risk: High=9; Medium=6; and Low=3 For Value: High=6; Medium=4; and Low=2 For Use: High=3; Medium=2; and Low=1 For Total: High=13+; Medium=7-12; Low=1-6
Item Number and Descriptor
Risk Score
Value Score
Use Score
Point Total
High, Medium or Low?
1-Buffalo Hides
3 2 1 6 Low
2-Colonial Baskets
6 6 1 13 High
3-Musical Instruments
9 6 2 17 High
4-Paleontological Specimens in Shale
9 2 1 12 Medium
5-Botanist’s Ledger Books
6 6 3 15 High
6-Correspondence
6 6 2 14 High
7-Mineral Specimens
3 6 1 10 Medium
8-Portrait Miniatures
6 2 3 11 Medium
9-Architectural Fragments
3 2 1 6 Low
10-Cannon Models
3 2 1 6 Low

NPS Museum Handbook, Part I (2000) 10:39
After scoring each group of items on value, use, and risk, add the total number of points and prioritize the various groups of items by their numerical scores. The higher the score you assign, the higher the material’s salvage priority. In the above example, you would remove the musical instruments (particularly the Adams violin) first, followed by botanist’s ledger books, the correspondence, and the Colonial baskets.
When assigning numbers, focus on groups of materials rather than individual items. For example, assess your basket collections, your botanical specimens, your metal sculptures, against your archival materials. This procedure will be far too labor intensive to do at an item level. Review the vulnerabilities and classic damage information in Sections B.2-13 for help in judging risks. Use your researcher registration forms and logbook to judge usage. Use your curatorial judgment and the guidance above to judge value.
3. How do I ensure my priorities are followed?
To make it easy to follow your priorities, use color coding as described in Section B.2. When an area or space is in an emergency situation, remove or salvage items in order by priority as expressed by the color or coded labels. If you color code, choose a logical sequence of colors.
4. How should my plan indicate my priorities?
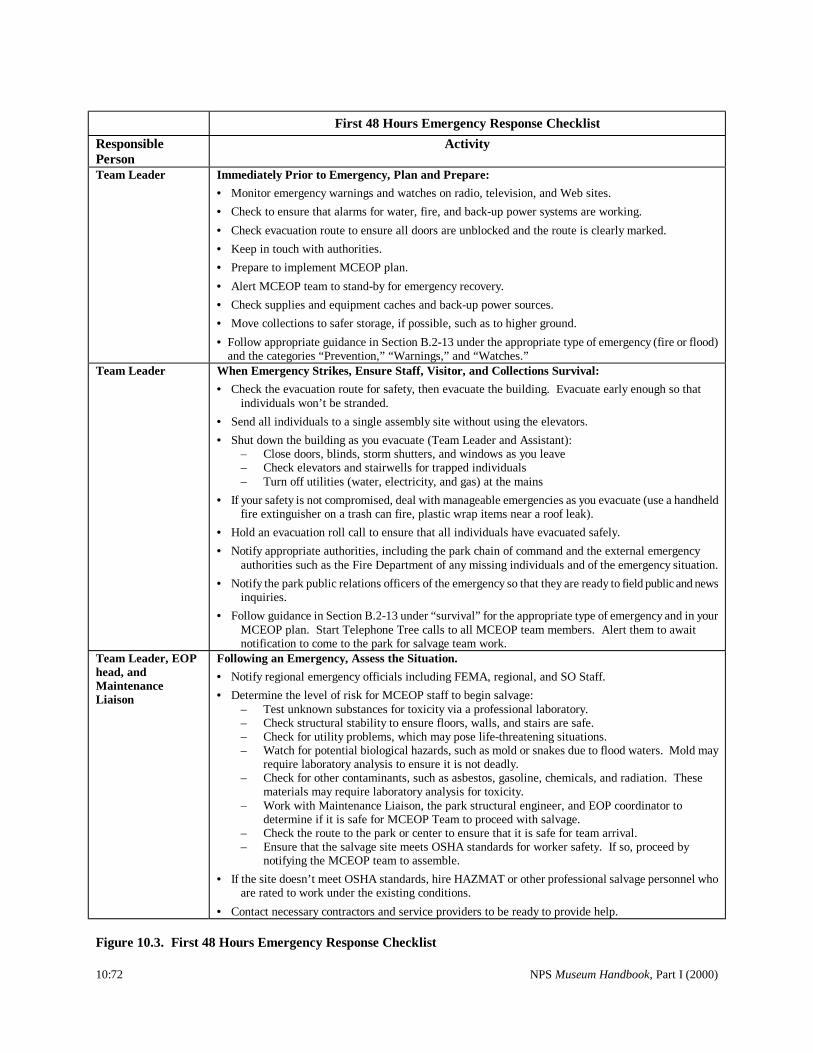
Regardless of how you choose to indicate priorities, ensure that samples of your marking system are included in your emergency operations plan so that it is very clear which materials are to be removed first. See the First 48 Hours Emergency Response Checklist (Figure 10.3).
5. How do I salvage my collection?
OSHA requires that all work sites, including emergency salvage sites, have certain features and meet certain requirements, including:
• bathroom facilities
• washing facilities with a clean water supply
• a sound structure with no sagging floors or walls
• no uncovered gaps or holes in the floor (Gaps larger than 4 feet require a guard, railings, or covers.)
• ground fault circuit interrupters on all outlets used for power tools and tools within 10 feet of water
• a handrail along each side of stairways with more than 4 steps and a rise greater than a 30 inches
• no unidentified substances contaminating the space
• no garbage and toxic chemicals, including:
− animal and human waste, including bodies, excrement, and other biological waste, including bird and vermin nests, used condoms, and needles

10:40 NPS Museum Handbook, Part I (2000)
− asbestos waste from insulation; ceiling, floor, wallboard and acoustic board, and tile; some geological specimens, such as talc; historic papier mache and plaster materials, including stage backdrops; roofing materials; spackle, and wiring coatings and insulation
− lead paint waste
− moldy and mildewed items
− pesticides and chemicals, including spilled chemicals, old containers, and contaminated objects such as taxidermy specimens and pesticide-treated wood waste
If these conditions can’t be met, only MCEOP staff who have had HAZMAT
training, as required by OSHA, can undertake disaster recovery in the space. All staff working anywhere near any of these hazards must be verbally warned of them. Once judged structurally safe, the composition of any residue (soot or flood mud) should be identified. Look for mold growth, chemical and biological residue, carcinogens, and toxic substances. Problematic materials include:
• hazardous residues, such as:
− arsenic residue from old taxidermy specimens
− asbestos particles (from insulation, ceiling and floor tiles, wallboard, plaster, spackle; and other building materials and some taxidermy specimens that can cause lung ailments)
− cadmium
− dioxin
− blood (rickettsia, spirochetes, and viruses)
− fire extinguishers containing carbon tetrachloride
− gasoline
− gun powder
− lead powder residue (from lead shot, paint, tiles, and toys), which if it becomes dust, can cause many medical problems, including blood and brain problems
− mercury gauges and daguerreotype equipment
− old medicines
− old pesticide residues on farm machinery
NPS Museum Handbook, Part I (2000) 10:41
− polychlorinated biphenyls (PCBs) in soot
− radioactive source materials, including radium dials on old instruments
• dead animals, excrement, and nests, which can cause:
− cholera
− dysentery
− hantavirus (from rodent waste)
− hepatitis
− histoplasmosis (from bird waste)
− salmonella enteritis
− shigella
− tetanus
− toxoplasmosis
• microorganisms, such as:
− bacteria (Anthrax, Brucellosis, Campylobacteriosis, Colibacillosis, Hepatitis, Legionellosis [Legionnaire’s disease], Leptospirosis, Melioidosis, Nocardiosis, Plague, Psittacosis, Salmonella Enteritidis, Shigella, Tetanus, and Tularemia)
− fungi and yeasts (particularly deadly Aspergillum, Blastomycosis, Candidiasis, Chromomycosis, Coccidioidomycosis, Cryptococcosis, Histoplasmosis, Ringworm, and Stachybotrys atra)
− insects (ticks, fleas, lice, mosquitoes, sandflies, and ticks, particularly in high stagnant water situations leading to many diseases including Babesiosis [ticks], Leishmaniasis [sandflies], Lyme disease [ticks], Relapsing fever [ticks], Rocky mountain spotted fever [ticks], Tularemia [ticks], Typhus [lice])
− parasites (Acariasis, Babesiasis, Cryptosporidium parvum, Clospora, Hymenolepiasis, Leishmaniasis, Strongyloidiasis, Toxoplasmosis)
− viruses (Hantavirus [vermin waste], Hepatitis [skin contact with infected body fluids, needles, or substances], Herpes B [handling primate bodies], Lassa fever [rodents], Lymphocytic choriomeningitis [rodents], and Rabies [contact with infected animals or their bodies])

10:42 NPS Museum Handbook, Part I (2000)
Museum staff may be expected to take samples of substances with cotton swabs, scotch tape, or agar slides for immediate delivery to the MCEOP-designated testing laboratory for toxicity tests. If requested to take samples of mold or hazardous substances, work with the park’s hazardous materials coordinator. Wear protective clothing (nitrile gloves, goggles, and a long washable smock or Tyvek jumpsuit) and an appropriately rated breathing apparatus that has been fitted to you. The MCEOP should indicate the location of testing laboratories that can identify whether the materials encountered are potentially toxic. If high quantities of toxic substances are found in the residue (such as soot or flood mud), a professional abatement team may be required before any other work can be done. If the laboratory reports that dangerous soot, molds, or bacteria are found in excessive amounts, don’t attempt to do the work with park staff. Be particularly careful when cleaning up the dried and powdered residue of floods, as this may contain asbestos particles, chemicals, molds, bacteria, excrement, and hundreds of microorganisms.
If possible, determine the source of any water or other wet contaminant
(waste water from plumbing, flood waters, or rainwater), the length of exposure, the speed and type of drying, and other materials that contributed to the flood residue, such as dead animals or asbestos tiles. Your MCEOP team should include at least one team member who can interpret the laboratory report, preferably a conservator. Follow the guidance in the:
• Emergency Planning Master Worksheet (Figure 10.1)
• Risk Assessment Worksheet (Figure 10.2)
• First 48 Hours Emergency Response Checklist (Figure 10.3) These documents are used in judging the amount of emphasis to be given to each potential type of emergency. The original information is captured on the Risk Assessment Worksheet, which includes significant planning and prevention information. The summary of this information is transferred to the Emergency Planning Master Worksheet to determine disaster priorities. The Emergency Planning Master Worksheet tells you where to place your time and money for best effect. Once priorities have been established, use the First 48 Hours Emergency Response Checklist to determine how to proceed on a step-by-step basis. Also see the readings provided in the bibliography, particularly:
• Southeastern Registrars Association’s Steal This Handbook! A Template for Creating a Museum’s Emergency Preparedness Plan
• National Task Force on Emergency Response. Safeguarding Our Cultural Heritage: Emergency Response and Salvage Wheel (mailed to all parks in 1997)

NPS Museum Handbook, Part I (2000) 10:43
E. Preparation of a Museum Component to an Emergency Operations Plan
1. What is an MCEOP?
Each NPS park has an Emergency Operation Plan or EOP, which indicates how emergencies will be handled to prevent them from becoming disasters. The Museum Collection Emergency Operation Plan (MCEOP) is a museum component of the EOP. This MCEOP should be simple, flexible, and current, focusing on the key actions, resources, and organizations/individuals to be involved. The MCEOP includes:
• job descriptions and reporting structure for each emergency team member (See Section E.3.)
• telephone tree or calling list of response team members and alternates (See Section E. 4.)
• building floor plans for all structures containing museum storage, work, exhibit, and research spaces (See Section E.5.)
• key emergency response information, including:
− evacuation plan
− quick reference checklists on prevention and preparation for emergencies, including:
emergency security procedures emergency utility shut-off procedures emergency mechanical work, such as air intake valve closures (See Section E.6.)
• salvage procedures
− Emergency Planning Master Worksheet (Figure 10.1)
− Risk Assessment Worksheet (see Figure 10.2)
− First 48 Hours Emergency Response Checklist (Figure 10.3)
• list of equipment services and supplies (See Section E.8.)
• prioritized list of collections in paper (not electronic) format that focuses on types of materials. For example,
Water disaster:
High priorities: photographs, leather, paper, friable media, and watercolors
Moderate priorities: herbaria, textiles, iron, brass, copper

10:44 NPS Museum Handbook, Part I (2000)
Low priorities: stone, paleontological specimens, most metals other than iron, brass, and copper
See Section D.2.
• bibliographies for further information (See the Bibliography.)
2. How do I prepare the MCEOP?
The MCEOP can be completed as a set of lists to be contained in a master set of MCEOP loose-leaf notebooks for distribution to all MCEOP team members. Some of these MCEOP notebooks should be kept at team members’ homes as well as offices to ensure ready access at all times.
Keep your plan clear, simple, and flexible.
The simplest plans are the most easily executed. Complexity can delay action and discourage flexibility. Use the plan and the planning process to communicate with all the individuals you will need to have involved in the emergency recovery process. For a sample MCEOP see the Northeast Museum Services Center Emergency Planning and Response for Museum Collections, 2nd edition. Boston, Mass.: Northeast Museum Services Center, 1998. Make certain the plan identifies resources and potential sources of assistance, including park, regional, and SO staff; cooperators such as regional conservation laboratories, local universities, and selected contractors; and federal, state, and county emergency support staff. Set up collaborative or contractual relationships with local universities, state and local archives, libraries, museums, and others to respond in case of emergencies. Identify the materials to be salvaged, their location, and their salvage order. Explain how to salvage them. Indicate within the MCEOP where all the supplies and equipment necessary to salvage are located.
3. How do I determine who should be involved?
Keep team leadership at the park level, preferably with the museum staff. Call on park staff. To determine how many people should be involved, look at the collections size, range of types and formats, vulnerabilities, salvage priorities, distribution within various structures, exhibit space, workspaces, and research spaces, as well as off-site storage. How long would it take you to evacuate the collection in case of an emergency (earthquake, fire, flood, storm, or volcano)? Are you likely to have to move the collection to another structure or locale? This is most likely if you are in a flood plain, near a volcano, or in a similarly hazardous area. What are the environmental and security conditions of this alternate space? Where is it? How will you wrap, document, and transport collections? Your relocation need will depend upon where and how your collection is housed and the sort of collection you have. You may wish to set up a two-tier team with a core MCEOP crew and a larger disaster response support group that includes already trained volunteers and cooperators. The core park staff MCEOP team members plan for, mitigate, supervise, and manage the emergency. The larger group provides additional hands.

NPS Museum Handbook, Part I (2000) 10:45
You are more likely to succeed at relocating herbaria that are in a volcano’s path than in moving a row of cannons or large outdoor sculptures in response to a tornado alert. Exercise judgment, knowing that all collections movement is also potentially hazardous. Collections in boxes and on shelves are easier to evacuate than those in file cabinets or exhibit cases. Boxed collections on mobile bun rack shelving can simply be rolled onto trucks, shelving unit-by-shelving unit and transported out of harms way. How many people would you need to manage the types of emergencies you are apt to experience? How fast could the work be done? Once you establish this, you can investigate the local and regional resources at your disposal for managing emergencies. Once you determine how many people are needed, review available park staff, particularly museum staff, records managers, librarians, historians, and similar individuals who have some expertise in working with material culture. If you do not have enough park staff for an emergency response effort, ask SO and regional staff to serve. If the staffing level is still inadequate, ask cooperators for assistance, particularly nearby university personnel, state library or archives staff, and regional conservation labs. Don’t forget that you will be able to call upon some selected contractors and federal, state, and county emergency support staff in your region. Meet with these individuals now, before you need them. As you identify MCEOP team members, remember to write descriptions for each job including:
• MCEOP coordinator, who supervises emergency planning, response, and mitigation and salvage measures and coordinates with all EOP personnel
• emergency registrar, who manages documentation, labeling, and treatment, and orders and manages supplies/equipment availability
• salvage coordinator, who manages priority identification and object salvage, packing and relocation
• security coordinator, who identifies and helps manage health, safety, and collection risks, ensures security, and cooperates with park EOP coordinator on basic utility and service recovery
• MCEOP team members, who undertake the basic salvage and recovery work
Lines of authority, work assignments, and actual responsibilities should be clear for all positions. Alternates should be assigned and trained for each position.
Consider setting up cooperative agreements for mutual emergency support and recovery activities. Talk to your regional curator and SO staffs about existing mutual support activities they have already established. Work with your local or regional conservation laboratory as well as state and local archives, libraries, and museums. Ensure that the names, addresses, phone and fax numbers, and e-mail addresses of all individuals involved are incorporated into your plan.

10:46 NPS Museum Handbook, Part I (2000)
4. What is a telephone tree?
Your telephone tree may be one of the most important documents you create. In this section of the MCEOP you will list the fire department, hospital, police department, MCEOP team members and their alternates, giving the following:
• names
• telephone numbers
• beeper numbers
• fax numbers
• e-mail address
• address
• anticipated response time
• special skills, such as photographic documentation, heavy equipment operator, paper preservation
• assigned job title for emergencies (such as salvage registrar or photographic collections salvage team leader)
The telephone tree should be set up so that each staff member is responsible for calling several others at the time of the emergency so as to free up the team leader for emergency response actions.
5. How do I incorporate floor plans into my MCEOP?
Your MCEOP should include a full set of floor plans for all structures that house museum storage, work, exhibit, and research spaces. All floors of all structures involved, including attics and basements, should be included. The floor plans should be appropriately annotated to indicate locations of:
• collections, with salvage priorities marked
• park records, particularly museum documentation
• electricity shut-off valves and breaker boxes
• emergency response equipment and supply caches
• evacuation routes
• fire detectors, extinguishers, and suppression equipment
• utility (gas, water, power) shut-off valves
• HVAC equipment

NPS Museum Handbook, Part I (2000) 10:47
• alternate power source shut-off valve
• security systems
• sprinkler system shut-off valves
• water detectors/alarms
• appliances with separate shut-off valves (water heaters, stoves, etc) Due to the complexity of this information, you may need to use a number of different plans with grouped information. For example, keep the evacuation route on one plan, the shut-off valves on another set, and the collections information on yet another.
6. What other museum collections emergency response planning information should I include in the MCEOP?
There are several other basic types of emergency response information you should include in the MCEOP. Include guidance on how to:
• standardize safety activities for staff and visitors during an emergency, including such steps as:
− setting up an evacuation system and clearly marked route
− setting up an emergency evacuation assemblage area
− checking the evacuation route and the emergency assemblage area for potential hazards prior to evacuation
− avoiding elevators and windows
− holding an evacuation roll call
− practicing fire drills and other evacuations
− training staff how to use equipment, wear protective clothing, and undertake salvage
− training staff how to report and handle medical emergencies
− testing staff to ensure comprehension of all training as per OSHA requirements
− keeping staff tetanus shots current
• manage emergency shut-down and lock up procedures, such as:
− securing doors and key control to the extent possible
− training staff to shut-off water, electricity, and gas
− training staff how to close doors, windows, and blinds

10:48 NPS Museum Handbook, Part I (2000)
− training staff how to shut down all air intake and air handling system
• assess the damage, including:
− making a list of all affected spaces
− looking for evidence of mold and insect or pest infestations
− checking for evidence of theft
− checking for destruction of portions of the collection
− watching for hazardous contaminants or conditions See Section B, Section E.7, the First 48 Hours Emergency Response Checklist (Figure 10.3), and the National Task Force on Safeguarding Our Cultural Heritage’s Emergency Response and Salvage Wheel for detailed descriptions of how to act, particularly during the vital first 48 hours after an emergency. Other resources in the bibliography provide specific guidance for each type of emergency.
7. What salvage guidance should my MCEOP include?
Your plan indicates your salvage priorities, the location of your highest priority collections, and procedures to be taken for disaster prevention, survival, mitigation, and recovery. See Sections B.2-B.13 and Figure 10.3 and the sources in the bibliography. Some specific guidance on how to handle, pack, and freeze particular types of materials may also be useful, although most of this knowledge must be gained through disaster recovery exercises rather than through readings.
When disaster strikes, recovery operations should be second nature to staff. To be comfortable, non-threatening, and routine, build your disaster recovery procedures upon routine museum activities. Train staff through hands-on activities.
8. What information on
equipment, services, and suppliers should my MCEOP include?
List the following equipment, services, and supplies information:
• collections salvage supplies, such as acetone, ammonia, bleaches, blotting paper, brooms, buckets, disinfectants, clean garbage cans, dumpsters, clothes pins, garbage bags, dust pans, ethanol, fungicides, masking tape, mops, mylar, Japanese tissue paper, paper towels, plastic sheeting, polyethylene bags, plastic milk crates or records cartons, rags, rope and twine, scoops, scouring powder, scrub brushes, shovels, sponges, towels, and wax paper
• construction materials, such as glue, lumber, nails, paint, plywood, screws, twine, and wire
• documentation supplies, such as cameras, film, paper, pencils, tripods, videotape camera and videotapes, a portable computer printer, and portable computers with ANCS+

NPS Museum Handbook, Part I (2000) 10:49
• emergency equipment, such as air compressors, many batteries, battery-powered weather band radios, blotters, cellular phone, clothes pins, extension cords, flashlights, hoses, knives, ladders, portable lights, portable tables, polyurethane ice chests, rope, sand bags, pumps, scissors, shovels, squeegees, tools, tarps, tents, weights, such as glass bricks, and wet/dry vacuum cleaners. Note: Store copies of appropriate equipment manuals with the equipment.
• emergency work areas and safe storage areas, including their location, amount and type of space, security measures, and local contact person’s name and number
• environmental equipment, such as dataloggers, dehumidifiers, fans, hygrometers, and space heaters
• first aid equipment, such as blankets, burn packs, first aid kits, resuscitator, stretcher, and 3-4 days of clean water. Note: You don’t need to stockpile perishable supplies. Instead, identify commercial suppliers and make arrangements for rapid delivery of items during an emergency.
• hand tools, such as axes, block and tackle, bolt cutters, chain saws, crowbars, hammers, pliers, ropes, saws, screwdrivers, sledge hammers, staple guns, staples, tape measurers, tin snips, utility knives, wire cutters, wood saws, and wrenches
• off-site salvage equipment and supplier list, including the supplier location, telephone number, contract or cooperative agreement number or purchasing arrangements, and the contact person’s name and telephone numbers for:
− architects − building contractors − carpenters − chemical testing laboratories − cleaning services − commercial cold storage vaults − computer data recovery services − conservation treatment services − dehumidification services − electricians − environmental control services − fumigation services − glaziers − HVAC services − mycologists − photographic salvage and/or reprocessing services − plumbers − portable equipment suppliers − scientific monitoring equipment suppliers − security services − transportation rental (including freezer trucks)
10:50 NPS Museum Handbook, Part I (2000)
• planning tools, such as battery-operated portable computers and calculators
• protective clothing, such as dust masks, fitted breathing apparatuses with cartridges for mold, goggles, life vests, nitrile gloves, old wool sweaters, rubber aprons and boots, safety goggles. Note: Some of this equipment must be specially fitted to the individual team member and requires training to use properly.
9. What kinds of references
should I include in the bibliography?
Include key references from the bibliography at the end of this chapter. In particular, include:
• Southeastern Registrars Association’s Steal This Handbook! A Template for Creating a Museum’s Emergency Preparedness Plan
• National Task Force on Emergency Response. Safeguarding Our Cultural Heritage: Emergency Response and Salvage Wheel. (mailed to all parks in 1997)
F. Staff Training and Plan Evaluation and Revision
Train your entire emergency operations team, not just the park staff, to manage the various types of emergencies. The entire team must know each other, be capable of working together efficiently, and be aware of the authority lines within the team. Roles, responsibilities, and reporting structure must be absolutely clear. It is essential that work not be slowed because of operational disagreements or need for contracts or approval for activities. What will be done, how it will be done, and when it will be done must be agreed upon before you begin emergency preparations or salvage.
1. How do I guarantee my team’s efficiency and confidence?
Don’t wait until a disaster happens to begin training exercises. Train, train, and train again! Give the entire team some hands-on training together before you experience problems. Stage simulated disasters in cooperation with other local agencies. Many professional organizations train staff in disaster recovery through use of actual disposable materials. These simulated disasters are the ideal training ground. While your MCEOP will be helpful, it will not teach your team how to handle wet textiles, charred documents, or metals affected by volcanic ash. Your team’s efficiency will only be as good as that of the team’s weakest member. Whenever a team member leaves or is replaced, train the entire team again. The team must know exactly what to do without having to think about it. Speed is essential, as is actual hands-on expertise.
2. How do I prevent panic and ensure the health and safety of staff?
Write your MCEOP now. Begin training your emergency team today. Don’t wait! When training staff, make certain that they know that their health and safety are the most important measures of the success of the emergency plan.
Personal safety comes first, collections safety second.

NPS Museum Handbook, Part I (2000) 10:51
To achieve staff safety, emergency team members must remain calm and alert, aware of potential dangers such as gas, electrical utility lines, loose asbestos, disease risks, contaminated water, mold, and so forth. A panicked team is useless.
3. What role does the team leader play?
The team leader’s leadership qualities are a crucial factor in team capabilities and efficiency. An uncertain or squeamish emergency team leader can be disastrous. The first 48 hours of response time are crucial for determining what is salvaged. If major mistakes are made during the first 48 hours, many of them will be irreversible. The team leader is ultimately responsible for:
• team composition––who serves, who remains on the team, and who doesn’t
• job assignments and reporting structure on the team
• frequency of team meetings
• team performance
• team expenses
• museum component of the EOP—development, review, and updating
• training and testing team members, including drills, simulations and tests for safety in all types of emergencies
• critiquing and offering feedback on training exercises
• setting up all outside contacts, such as with the local fire and police departments and the Red Cross
• convincing park staff of the importance of the effort
• ensuring team safety, including identifying structural stability, electrical system damage, leaking gas, raw sewage leaks, mold problems, disease risks, and similar problems that must be solved before work can proceed on site
• determining when salvage must stop due to safety concerns or materials to be salvaged must be removed by HAZMAT specialists to a safe workspace
• pulling together all the necessary supplies, services, contractors, equipment, and participants
• determining salvage priorities without seeking further authorizations, if they are not readily obtainable

10:52 NPS Museum Handbook, Part I (2000)
• ensuring that the team has all the information and training necessary to make the right decisions
• keeping the plan up to date and distributing updated copies as changes are made
• maintaining a list of plan holders
4. Who should evaluate the emergency operations plan?
Everyone, particularly all emergency operation team members, should evaluate the plan.
5. How do I keep the plan current?
As you train staff you will find errors or changes you wish to make to the plan. Comments should be provided to the team leader. The team leader should establish a regular review period, preferably about every six months, but at least annually, for updating and revising the plan. Specific events may lead to a need to reissue the plan, such as changes in staff or telephone numbers, development of new park hazards and vulnerabilities, major new equipment, new cooperative relationships, and new park capabilities. Once evaluated and revised, the new plan must be sent out to all emergency team members, preferably in duplicate so that they have copies for both office and home. The revised plan should be accompanied by a “Record of Amendments and Changes” sheet to alert staff to changed text. Old pages should be replaced with new ones when team members receive the revised pages.
6. Summary Personal and team safety is the top priority of all salvage efforts. Once safety is ensured through proper training, the second priority is disaster prevention through risk assessment and mitigation activities. Preservation and disaster prevention always trump disaster recovery. Finally, disaster recovery is a team effort that builds on careful planning, prioritization, team-building, and hands-on experience, as well as on the ability to rapidly and calmly respond in the face of emergencies.
G. Bibliography General: Allyn, Lord, Carolyn Reno, and Marie Demeroukas. Steal This Handbook! A Template for Creating a Museum’s
Emergency Preparedness Plan. Columbia, S.C.: Southeastern Registrars Association, 1994. Barton, John P., and Johanna G. Wellheiser, eds. An Ounce of Prevention: A Handbook on Disaster Contingency
Planning for Archives, Libraries, and Record Centers. Toronto: Toronto Area Archivists Group Education Foundation, 1985.
Buchanan, Sally. “Disaster Prevention, Preparedness, and Action.” Library Trends 30 (2, 1981): 241-53. Coleman, Christopher. “Practical Large-Scale Disaster Planning.” Westwords 2 (May 1992): 1-20. Fortson, Judith. Disaster Planning and Recovery: A How-To-Do-It Manual for Librarians and Archivists. New
York: Neal Schuman Publishers, 1992.

NPS Museum Handbook, Part I (2000) 10:53
Fox, Lisa L. “Management Strategies for Disaster Preparedness.” ALA Yearbook of Library and Information
Services 14 (1989): 1-6. Gennelly, Lawrence. J. Museum, Archives, and Library Security. Stoneham, Mass.: Butterworth Publisher, 1983. Gallery Association of New York State. Insurance and Risk Management for Museums and Historic Societies.
Hamilton, N.H.: Gallery Association of New York State, 1985. Grant, Joan, Barbara Jones, Nancy Kranish, and Janice Maiman, eds. Disaster Plan Workbook. New York: New
York University, Elmer Holmes Bobst Library, 1984. Hendriks, Klaus B., and Brian Lesser. “Disaster Preparedness and Recovery: Photographic Materials.” The
American Archivist 46, no. 1 (Winter 1983): pp 52-68. Jones, Barclay G., ed. Protecting Historic Architecture and Museum Collections from Natural Disasters.
Stoneham, Mass.: Butterworth Publishers, 1986. Meister, Pamela, ed. Southeastern Museums Conference 1991 Disaster Preparedness Seminar Proceedings. No
location given. 1991. Murray, Toby. “Disaster Preparedness: A Checklist.” Technical Bulletin 2. Oklahoma Field Advisory Service:
(October 1989) Myers, James N., and Denise D. Bedford, eds. Disasters: Prevention and Coping. Proceedings of the Conference,
21-22 May 1980. Stanford, Calif.: Stanford Universities Libraries, 1981. National Task Force on Emergency Response. Safeguarding Our Cultural Heritage: Emergency Response and
Salvage Wheel. Washington, D.C.: National Institute for the Conservation of Cultural Property, Inc., 1997. Norris, Debra Hess. Disaster Recovery: Salvaging Photograph Collections. Philadelphia: Conservation Center for
Art and Historic Artifacts, 1998. O’Connell, Mildred. “Disaster Planning: Writing and Implementing Plans for Collections-Holding Institutions.”
Technology & Conservation (Summer 1983): 18-26. Ogden, Sherelyn. Preservation of Library & Archival Materials: A Manual. Andover, Mass: Northeast Document
Conservation Center, 1994. Rhodes, Barbara J. Hell and Highwater: A Disaster Information Sourcebook. New York: METRO Misc. Pub. 35:
New York Metropolitan Reference and Research Libraries (METRO), 1988, 58 pp. Sable, Martin H. The Protection of the Library and Archive: An International Bibliography. New York: Haworth
Press, 1983. Reprinted from Library & Archival Security 5 (Summer/Fall 1983) Special Libraries Association. Disaster Planning and Recovery: An SLA Information Kit. Washington D.C.: SLA,
1989. United States Department of the Interior: Bureau of Land Management. “Disaster Recovery Plan for Paper and
Film Records.” BLM Manual Handbook 1273-1. Washington, D.C.: Bureau of Land Management, 1988.

10:54 NPS Museum Handbook, Part I (2000)
Earthquakes: Agbabian, M.F. Masri, and R.L. Nigbor. “Evaluation of Seismic Migration Measures for Art Objects.” Getty
Conservation Institute Scientific Program Report (January 1990). Algermissen, S.T. An Introduction to the Seismicity of the United States. Buffalo, N.Y.: State University of New
York, 1983. Bosai, Elmer E., Alfred Goldberg, John L. Fisher, Henry J. Lagorio, and Thomas D. Wosser. Architects and
Earthquakes. Washington, D.C.: American Institute of Architects, 1987. Federal Emergency Management Agency. Earthquake Preparedness and Public Information Materials: An
Annotated Bibliography. Earthquake Reduction Series. Washington, D.C.: FEMA. Jacob, Klaus H., and Carl Turkstra, eds. “Earthquake Hazards and the Design of Constructed Facilities in the
Eastern United States.” Annals of the New York Academy of Sciences. New York: New York Academy of Sciences, 1989.
Stover, Carl W., and Jerry L. Coffman. Seismicity of the United States, 1568-1989. (rev.) Washington, D.C.:
USGS, Professional Paper 1527. Note: Also call the USGS Earth Science Information Center at 415-329-4390. Explosions: Federal Bureau of Alcohol, Tobacco, and Firearms. Federal Firearms Regulations Reference Guide. ATF P5300.4;
Washington, D.C.: Federal Bureau of Alcohol, Tobacco, and Firearms, n.d.. ______. ATF Explosives Laws and Regulations. ATF P5400.7; Washington, D.C.: Federal Bureau of Alcohol,
Tobacco, and Firearms, n.d. Fire: Advisory Council on Historic Preservation. Fire Safety Retrofitting in Historic Buildings. Washington, D.C.:
Advisory Council on Historic Preservation and General Services Administration. 1989. Artim, Nicholas. “Cultural Heritage Fire Suppression Systems: Alternatives to Halon 1301.” WAAC Newsletter
15/2 (May 1993): 34-36. McKinnon, Gordon P. Fire Protection Handbook. Boston: National Fire Protection Association, 1976. Morris, John. The Library Disaster Preparedness Handbook. Chicago and London: American Library Association,
1986. Morris, John. Managing the Library Fire Risk. 2nd ed. Berkeley, Calif.: University of California, 1979. National Fire Protection Association. NFPA 909: Standard for the Protection of Cultural Resources including
Museums, Libraries, Places of Worship, and Historic Properties. Quincy, Mass.: National Fire Protection Association, 1997.
National Fire Protection Association. NFPA 232A: Guide for Fire Protection of Archives and Records Center.
Quincy, Mass.: National Fire Protection Association, 1995.
NPS Museum Handbook, Part I (2000) 10:55
Trinkley, Michael. “Can You Stand the Heat? A Fire Safety Primer for Libraries, Archives and Museums.” Atlanta: SOLINET, 1991/1992.
Wilson, J. Andrew. “Fire Fighters.” Museum News (November/December 1989): 68-72. Flood: Eulenberg, Julia Niebuhr. Handbook for the Recovery of Water Damaged Business Records. Prairie Village, Kans.:
Association of Records Managers and Administrators, 1986. Martin, John H., ed. The Corning Flood: Museum Underwater. Corning, N.Y.: The Corning Museum of Glass,
1977. Nyberg, Sandra. “The Invasion of the Giant Spore.” SOLINET Preservation Program Leaflet, no. 5. Atlanta:
Southeastern Library Network, 1987. Walsh, Betty. “Salvage Operations for Water-Damaged Collections.” Western Association for Art Conservation
Newsletter 10, no. 2 (May 1988). Waters, Peter. Procedures for Salvage of Water-Damaged Library Materials. 2nd ed. Washington, D.C.: Library of
Congress, 1979. Storms: Bomar, George. Texas Weather. Austin, Tex.: University of Texas Press, 1983. Mathieson, David F. “Hurricane Preparedness: Establish Workable Policies for Dealing with Storm Threats.”
Technology and Conservation (Summer 1983): 28-29. Trinkley, Michael. Hurricane!Surviving the Big One: A Primer for Libraries, Museums, and Archives. Atlanta:
Southeastern Library Network, Inc. (SOLINET), 1993. Structural Collapse: Frens, Dale H. “Temporary Protection: Specifying Temporary Protection of Historic Interiors During Construction
and Repair.” Preservation Tech Notes, no. 2. Washington D.C.: National Park Service, 1993. Volcanoes: Simkin, Tom, and Lee Siebert. Volcanoes of the World. Tucson, Ariz.: GeoScience Press, 1994. McClelland, L., T. Simkin, M. Summers, E. Nielsen, and T. Stein. Global Volcanism, 1975-1985. Washington,
D.C.: Smithsonian Institution, 1993. Web Resources: Disaster Recovery Journal: <http://www.drj.com> via e-mail at [email protected] article and chat forum user name: drj;
password: world; questions to [email protected]. Disaster Resource Guide: <http://www.disaster-resource.com/>. Disaster Recovery for Records Managers: <http://www.system.missouri.edu/records/disaster.html>. Earthwatch Storm Watch: <http://www.earthwatch.com/STORMWATCH/stormwatch.html>.

10:56 NPS Museum Handbook, Part I (2000)
FEMA: <http://www.fema.gov>. Floodcast: <http://www.earthsat.com/flood/floodcast.html>. National Earthquake Information Center: <http://wwwneic.cr.usgs.gov/eqlists/eqstats.html>. National Fire Protection Association: <http://www.nfpa.org> or call 1-800-344-3555. NIOSH: <http://www.cdc.gov/niosh/flood.html>. NOAA Storm and Flood Warnings: <http://iwin.nws.noaa.gov/iwin/nationalwarnings.html>. Volcano World Volcano Index: <http://volcano.und.nodak.edyu/vwdocs/volc_images/sorted_by_country.html>. Worldwide Connection for Audit, Security, Control, and Y2K Conversion Professionals:
<http://www.auditserve.com/>.

NPS Museum Handbook, Part I (2000) 10:57
H. List of Figures
Figure 10.1a. Emergency Planning Master Worksheet ........................................................................................ 10:58 Figure 10.1b. Sample Completed Emergency Planning Master Worksheet ........................................................ 10:59 Figure 10.2. Risk Assessment Worksheet (Click here for Fillable Risk Assessment Worksheet) ..................... 10:61 Figure 10.3. First 48 Hours Emergency Response Checklist ............................................................................ 10:72

10:58 NPS Museum Handbook, Part I (2000)
Facility Name: Emergency Prioritize
Emergencies* Reminder of Key Mitigation
Actions Necessary Reminder of Key Mitigation
Actions Already Taken
Fire
Flood and Water Damage
Storms
Medical Emergency
Utility Failure
Accident
(Hazardous Material)
Accident (Transportation)
Civil Unrest and Terrorism
Explosions and Bombs
Earthquakes and Structural Collapse
Volcanoes
(includes Mudslides)
Other (please specify)
Other (Please specify)
Other (Please specify)
Other (Please specify)
*Use numbers from 1 (most likely) to 12 (least likely) based upon conversations with long-term staff and upon research. Also consider the “no” responses on the Risk Assessment Worksheet (Figure 10.2). A large number of “no” responses for a particular emergency (e.g., fire) can mean a higher risk for an emergency to become a disaster. Figure 10.1a. Emergency Planning Master Worksheet

NPS Museum Handbook, Part I (2000) 10:59
Facility Name: Stayer Bldg, YAPI Emergency Prioritize
Emergencies* Reminder of Key Mitigation
Actions Necessary Reminder of Key Mitigation
Actions Already Taken
Fire
1 1. Remove nitrate negatives from museum storage, copy, and place in off-site storage
2. Remove stove from curatorial work space.
3. Have shrubs removed from front of building.
4. Obtain back-up power source for fire alarms, detectors, and suppression system.
1. Done on 5/9/99. 2. To be done on 11/15/99 3. Done on 9/9/99. 4. To be done on 11/23/99
Flood and Water Damage
2 1. Relocate collections from basement to 2nd floor.
2. Fix drainage near footings.
3. Replace roof.
4. Install water detectors.
5. Clear gutters and downspouts every 4 months.
6. When selecting new furniture, select metal.
7. When refinishing space, choose tile and paint.
1. Done on 10/18/99 2. Begun on 10/30/99; due to be done
on 12/15/99 3. Due to be done in Spring 2000 4. Done on 6/8/99 5. On maintenance schedule; being
done regularly. 6. Due to be done in Fall 2000. 7. Due to be done in Spring 2001.
Storms
5 1. Repair building structural seals around windows, doors, etc.
2. Purchase weather band radios. 3. Teach staff how to secure and shut
down the building. 4. Bolt furniture to walls. 5. Check to see if near-by utility line
can be moved.
1. On maintenance schedule for Fall 1999.
2. Done 5/10/99. 3. Done 4/30/99. 4. Scheduled for Fall 1999. 5. Proposed to Maintenance on
6/30/99; awaiting a decision.
Medical Emergency
6 1. Train museum staff in identification of health and safety hazards.
2. Train one staff member in hazardous waste management and basic CPR.
3. Purchase first aid kits.
1. To be done on 9/5/99 at the Curatorial Retreat
2. To be done at specialized workshops in May and June of 1999.
3. Done on 2/1/99.
Utility Failure
4 1. Arrange for back-up power source for security, emergency lighting, and HVAC.
2. Move boxes away from back door to free up the emergency exit.
3. Teach staff how to shut down and evacuate the building.
1. On RMP projects list as of 8/15/99. 2. Scheduled to be done by
maintenance on 7/30/99. 3. Scheduled for regional collections
management retreat on 4/15/99. *Use numbers from 1 (most likely) to 12 (least likely) based upon conversations with long-term staff and upon research. Also consider the “no” responses on the Risk Assessment Worksheet (Figure 10.2). A large number of “no” responses for a particular emergency (e.g., fire) can mean a higher risk for an emergency to become a disaster. Figure 10.1b. Sample Completed Emergency Planning Master Worksheet
10:60 NPS Museum Handbook, Part I (2000)
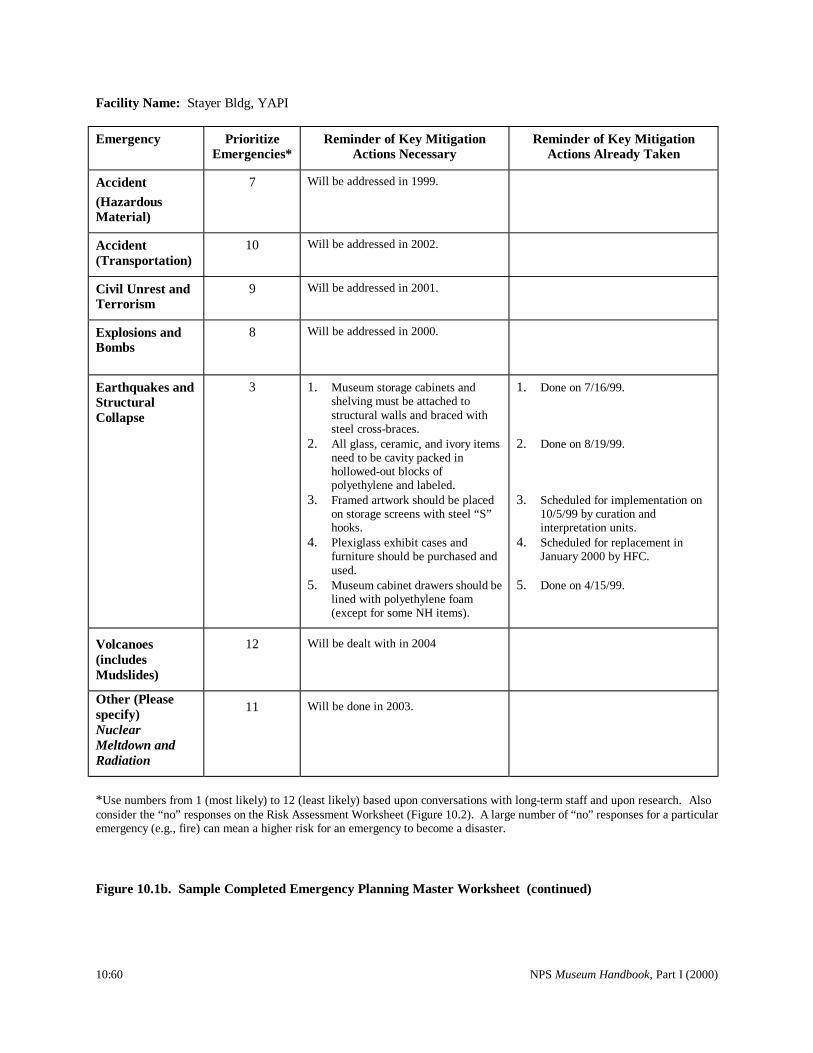
Facility Name: Stayer Bldg, YAPI Emergency Prioritize
Emergencies* Reminder of Key Mitigation
Actions Necessary Reminder of Key Mitigation
Actions Already Taken
Accident (Hazardous Material)
7 Will be addressed in 1999.
Accident (Transportation)
10 Will be addressed in 2002.
Civil Unrest and Terrorism
9 Will be addressed in 2001.
Explosions and Bombs
8 Will be addressed in 2000.
Earthquakes and Structural Collapse
3 1. Museum storage cabinets and shelving must be attached to structural walls and braced with steel cross-braces.
2. All glass, ceramic, and ivory items need to be cavity packed in hollowed-out blocks of polyethylene and labeled.
3. Framed artwork should be placed on storage screens with steel “S” hooks.
4. Plexiglass exhibit cases and furniture should be purchased and used.
5. Museum cabinet drawers should be lined with polyethylene foam (except for some NH items).
1. Done on 7/16/99. 2. Done on 8/19/99. 3. Scheduled for implementation on
10/5/99 by curation and interpretation units.
4. Scheduled for replacement in January 2000 by HFC.
5. Done on 4/15/99.
Volcanoes (includes Mudslides)
12 Will be dealt with in 2004
Other (Please specify) Nuclear Meltdown and Radiation
11 Will be done in 2003.
*Use numbers from 1 (most likely) to 12 (least likely) based upon conversations with long-term staff and upon research. Also consider the “no” responses on the Risk Assessment Worksheet (Figure 10.2). A large number of “no” responses for a particular emergency (e.g., fire) can mean a higher risk for an emergency to become a disaster. Figure 10.1b. Sample Completed Emergency Planning Master Worksheet (continued)


10:72 NPS Museum Handbook, Part I (2000)
First 48 Hours Emergency Response Checklist Responsible Person
Activity
Team Leader Immediately Prior to Emergency, Plan and Prepare: • Monitor emergency warnings and watches on radio, television, and Web sites. • Check to ensure that alarms for water, fire, and back-up power systems are working. • Check evacuation route to ensure all doors are unblocked and the route is clearly marked. • Keep in touch with authorities. • Prepare to implement MCEOP plan. • Alert MCEOP team to stand-by for emergency recovery. • Check supplies and equipment caches and back-up power sources. • Move collections to safer storage, if possible, such as to higher ground. • Follow appropriate guidance in Section B.2-13 under the appropriate type of emergency (fire or flood)
and the categories “Prevention,” “Warnings,” and “Watches.” Team Leader When Emergency Strikes, Ensure Staff, Visitor, and Collections Survival:
• Check the evacuation route for safety, then evacuate the building. Evacuate early enough so that individuals won’t be stranded.
• Send all individuals to a single assembly site without using the elevators. • Shut down the building as you evacuate (Team Leader and Assistant):
– Close doors, blinds, storm shutters, and windows as you leave – Check elevators and stairwells for trapped individuals – Turn off utilities (water, electricity, and gas) at the mains
• If your safety is not compromised, deal with manageable emergencies as you evacuate (use a handheld fire extinguisher on a trash can fire, plastic wrap items near a roof leak).
• Hold an evacuation roll call to ensure that all individuals have evacuated safely. • Notify appropriate authorities, including the park chain of command and the external emergency
authorities such as the Fire Department of any missing individuals and of the emergency situation. • Notify the park public relations officers of the emergency so that they are ready to field public and news
inquiries. • Follow guidance in Section B.2-13 under “survival” for the appropriate type of emergency and in your
MCEOP plan. Start Telephone Tree calls to all MCEOP team members. Alert them to await notification to come to the park for salvage team work.
Team Leader, EOP head, and Maintenance Liaison
Following an Emergency, Assess the Situation. • Notify regional emergency officials including FEMA, regional, and SO Staff. • Determine the level of risk for MCEOP staff to begin salvage:
– Test unknown substances for toxicity via a professional laboratory. – Check structural stability to ensure floors, walls, and stairs are safe. – Check for utility problems, which may pose life-threatening situations. – Watch for potential biological hazards, such as mold or snakes due to flood waters. Mold may
require laboratory analysis to ensure it is not deadly. – Check for other contaminants, such as asbestos, gasoline, chemicals, and radiation. These
materials may require laboratory analysis for toxicity. – Work with Maintenance Liaison, the park structural engineer, and EOP coordinator to
determine if it is safe for MCEOP Team to proceed with salvage. – Check the route to the park or center to ensure that it is safe for team arrival. – Ensure that the salvage site meets OSHA standards for worker safety. If so, proceed by
notifying the MCEOP team to assemble. • If the site doesn’t meet OSHA standards, hire HAZMAT or other professional salvage personnel who
are rated to work under the existing conditions. • Contact necessary contractors and service providers to be ready to provide help.
Figure 10.3. First 48 Hours Emergency Response Checklist
NPS Museum Handbook, Part I (2000) 10:73
First 48 Hours Emergency Response Checklist Responsible Person
Activity
MCEOP Team and Team Leader
Get Coordinated: • Set up emergency escape routes (two escape routes are necessary per area according to OSHA), rest
rooms (including washing facilities), water sources, staff clean-up areas, rest spaces, and eating spaces.
• Ensure that medical equipment and expertise is available nearby. • Make a list of all affected spaces and identify type and level of damage. • Assemble the MCEOP team. Individuals should wear appropriate clothing, and shoes, and bring fresh
water, food, and any other necessary supplies. • Assemble necessary tools and supplies. • Ensure that each staff member has all necessary protective equipment and a current copy of the
MCEOP. Remind staff of health and safety concerns. • Obtain priorities for salvage among the buildings, floors, spaces, types of collections, and groups of
items affected based upon the priorities listed in the MCEOP from the team leader. The team leader uses the salvage priorities coding during decision-making.
• Review the lines of command during the salvage operation. • Review the handling instructions, such as:
– assemble pieces of broken objects – handle weak or damaged objects using supports – keep handling to a minimum – be careful not to transfer contaminants to your face and hair by touching
• Obtain assignments from team leader. • Schedule work breaks and identify when to go for meals and down-time. • Identify work teams and remind team members of priorities for salvage and crucial issues during
handling and preparation. • Prepare work stations for the various types of activities necessary for salvage, such as:
– rinsing stations with clean running water and sponges – air-drying stations using clothes lines and plastic or rust-proof bakers racks – interleaving stations with portable metal work tables wrapped in paper – wrapping stations where materials can be boxed for transportation to cold storage – vacuum freeze-drying, or vacuum drying stations off-site – cover all work surfaces with polyethylene
• Provide on-site dehumidification for pumping very dry air into the building to dry paper, books, and carpeting, wallboard, and furnishings. Note: Don’t use this for historic structures or general museum collections.
• Document the level of damage found photographically or using a video camera. • Set up a mobile communications system including walkie-talkies and/or cellular phones. • Allocate equipment and supplies.
MCEOP team and cooperators who are fully trained.
Stabilize the Structural Environment: • Remove standing water and contaminants to the extent possible as speedily as possible. • Set-up environmental controls as soon as the Maintenance Liaison judges that the electricity can be
turned on again and the controls may be used safely. • Follow the Secretary of the Interior’s Standards for Treatment of Historic Properties during work,
although it may be necessary to remove carpeting, wallpaper, and wood furniture if they are holding water, hazardous chemicals, or biological contaminants, or are moldy. Ask for assistance from the park’s cultural resource manager if you are uncertain how to proceed.
• Set up good security including locking doors and key control to the extent possible. • Set up good air circulation and ventilation in all spaces where you will work.
Figure 10.3. First 48 Hours Emergency Response Checklist (continued)

10:74 NPS Museum Handbook, Part I (2000)
First 48 Hours Emergency Response Checklist Responsible Person
Activity
MCEOP team Begin Salvage: • Have a conservator on hand to answer questions. • Have a toxic waste disposal contractor available to remove old chemicals, unidentified or unlabeled
substances, asbestos, lead paint waste, and similar items. • Have a professional waste handler on hand to remove animal and human waste, mold, dead animals,
and medical waste. • Work on high priority collections first, based upon your coded tags. • If an item can’t be dried in 48 hours, freeze it unless it is glass, metal, furniture, or photographic.
Consult conservators and your MCEOP about what may and may not be frozen. • Do the minimum of work possible per item. Save as much as possible. • Don’t attempt complex cleaning or treatment procedures during salvage. Instead transfer the materials
to a conservator or stabilize items by drying them and removing them from immediate danger. • Document all work done via a disaster registration process, so that appropriate records of transfers to
cold storage, conservation, and so forth can go into the museum records. • Handle objects carefully. • Where possible, work in teams. • Use the gentlest action possible, for example use an air bulb over canned air for cleaning fragile
surfaces. Work from the center towards the edges. MCEOP team Fire Damage:
• Avoid moving sooty, smoky, or fire-damaged objects without nitrile gloves and a rated breathing apparatus that has been fitted to the user for smoke and soot. Soot is carcinogenic, so be very, very cautious.
• If the fire involved burning pesticide treated wood (often green in color) the soot will be highly hazardous. Use rated breathing apparatus and gloves when working nearby.
• Don’t touch metallic, gilded, stone or other heat absorptive items soon after a fire. They may still be hot.
• Don’t try to clean sooty, smoky, or fire damaged objects. Simply remove them to a conservator’s care. MCEOP team Flood Damage:
• Lower the humidity by: – Pumping out the water – Using dehumidifiers and room desiccants
• Lower the temperature as low as the workers can handle • Improve the air circulation by opening windows and using fans. • Keep the lights on to discourage mold growth. • Remove the wettest high priority objects first to bring the humidity down. • Use a moisture meter or visual testing to determine if items are wet or damp in order to determine how
best to stabilize the items. • Move wet objects in safe and sturdy containers such as polyethylene boxes with air holes poked in the
bottom to encourage drainage. • Be extremely cautious in the presence of mold:
– separate moldy objects from others and move them into cold storage until they can be treated. – avoid blotting moldy objects as you may drive the mold spores deeper or spread them. – always wear nitrile gloves and a rated breathing apparatus when working with mold
Figure 10.3. First 48 Hours Emergency Response Checklist (continued)

NPS Museum Handbook, Part I (2000) 10:75
First 48 Hours Emergency Response Checklist Responsible Person
Activity
MCEOP team Flood Damage (continued): • Air dry animal skins, baskets, bone, books, botanical specimens, ceramics, film, framed art work,
furniture, geological specimens, glass plates, ivory, leather, magnetic media, metal, photographs, paper, stone, textiles, wooden objects, and so forth at <70°F and < 50% R.H. For detailed instructions see the National Task Force on Emergency Response Emergency Response and Salvage Wheel.
• Use fans and room desiccants such as Damp Rid to keep the humidity down when you are air drying items, but don’t use heat sources such as portable heaters, to hasten the drying. Don’t allow breezes to blow directly on objects.
• Use wax paper, freezer paper, aluminum foil, silicone paper, or polyethylene sheets to keep objects from sticking to each other.
• Use unprinted blotting paper, lint-free towels, or unprinted newsprint to interleave/blot items. Don't reuse dirty blotting materials except for the towels that must be washed in a fungicidal detergent and thoroughly dried before reuse.
• If you can’t air dry an item within 48 hours; place it in cold storage. Blast freezing at -20°F or less will cause the least damage to objects.
• Don’t blast freeze or place in a freezer magnetic media, glass plates, glass, historic wooden furniture, ceramics, stone, paintings, geological specimens, bone, shell, ivory, paleontological specimens, or metal. Air-dry these items.
• Wrap and pack items for cold storage. Label every box. Keep wet materials separate from damp materials, but do not destroy the original order and provenance to do so.
• If you have a lot of flood-damaged items, hire a freezer truck to transport them. Otherwise temporarily use a home freezer, or dry ice (should not touch the materials).
• If a single dead mouse or bird or their nest or waste is discovered, only trained staff should deal with the materials wearing nitrile gloves, splash goggles, and a rated breathing apparatus to avoid contracting disease.
• For detailed instructions on cleaning, packing, and drying, see the sources in the bibliography.
Figure 10.3. First 48 Hours Emergency Response Checklist (continued)