Embed Size (px)
Citation preview
storageoptions.com/support 1

HomeGuard IP Camera Instruction Manual
2
CAUTION
RISK OF ELECTRIC SHOCK DO NOT OPEN
TO REDUCE THE RISK OF ELECTRIC SHOCK, DO NOT REMOVE THE COVER.
NO USER SERVICABLE PARTS INSIDE.
REFER SERVICING TO QUALIFIED PERSONNEL.
The lightning flash with arrowhead symbol, within an equilateral triangle, is intended to alert the user to the presence of non-insulated “dangerous voltage” within the product’s enclosure that may be of sufficient magnitude to constitute a risk of electric shock.
The exclamation point within an equilateral triangle is intended to alert the user to the presence of important operating and maintenance (servicing) instructions in the literature accompanying the appliance.
WARNING: TO PREVENT FIRE OR SHOCK HAZARD, DO NOT
EXPOSE THIS UNIT TO RAIN OR MOISTURE
CAUTION: TO PREVENT ELECTRIC SHOCK, ENSURE THE PLUG
IS FULLY INSERTED INTO A MAINS SOCKET
storageoptions.com/support 3
IMPORTANT SAFEGUARD
All lead-free products offered by the company comply with the requirements of the European law of the Restriction of Hazardous Substances (RoHS) directive, which means our manufacturing processes and products are strictly “lead-free” and without the hazardous substances cited in the directive.
The crossed-out wheeled bin mark symbolizes that within the European Union the product must be collected separately at the product’s end-of-life. This applies to your product and any peripherals marked with this symbol. Do not dispose of these products as unsorted municipal waste. Contact your local dealer for procedures for recycling this equipment.
DISCLAIMER We reserve the right to revise or remove any content in this manual at any time. We do not warrant or assume any legal liability or responsibility for the accuracy, completeness, or usefulness of this manual. The content of this manual is subject to change without notice.
RECOMMENDATIONS
AVOID DUSTY LOCATIONS:
INSTALL IN VENTILATED SPACE:
DO NOT EXPOSE TO MOISTURE:
DO NOT DROP:
DO NOT OPEN CHASSIS:
Excessive build-up of dust may cause the unit to fail. Ensure adequate airflow around the camera to prevent overheating. Exposing the unit to water poses high risk of electric shock. Doing so could damage internal components. No user-serviceable parts inside.
NOTE
DEFAULT PASS CODE INFORMATION:
Username: admin Password: 123456
WARRANTY AND TECHNICAL SUPPORT
To help you make the most of this product you’ll find a host of information including full product manuals, FAQ, troubleshooting guides and a support service if you have specific questions, available at our support website: storageoptions.com/support. This product is also backed by a 12 month supplier warranty in the unlikely event of something going wrong. More information and warranty registration is available at storageoptions.com/warranty.
Support: storageoptions.com/support/
HomeGuard IP Camera Instruction Manual
4
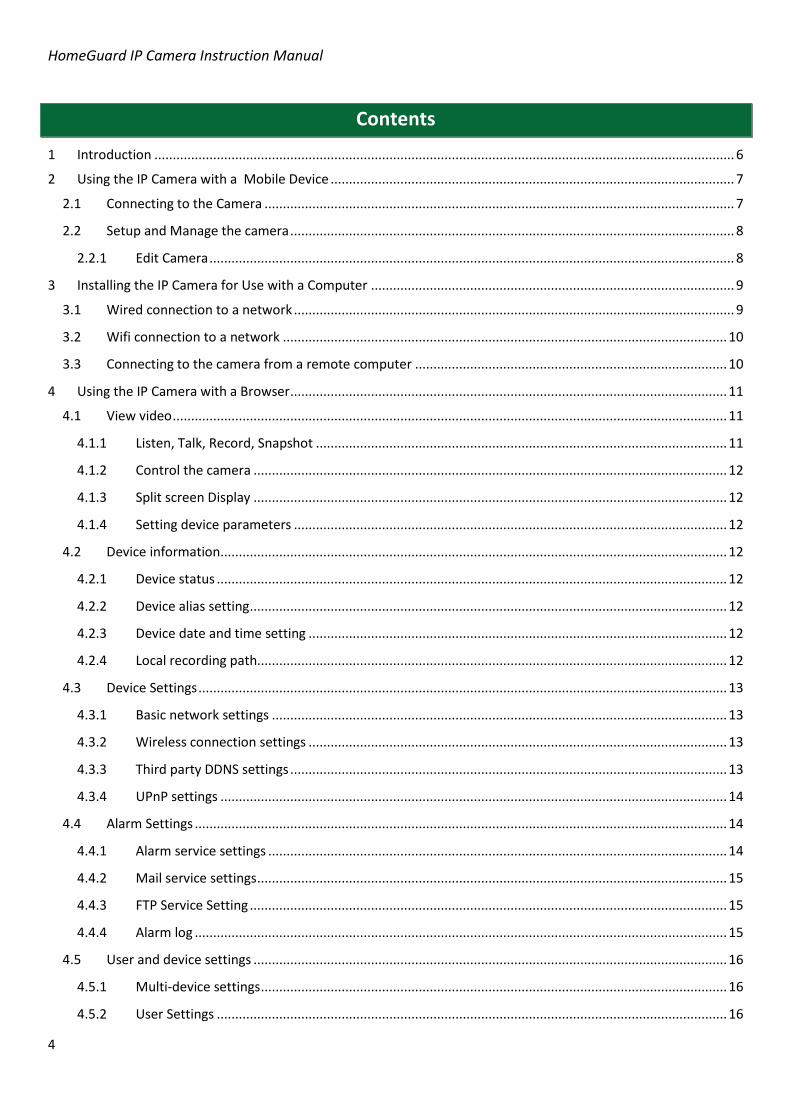
Contents
1 Introduction .............................................................................................................................................................. 6
2 Using the IP Camera with a Mobile Device .............................................................................................................. 7
2.1 Connecting to the Camera ................................................................................................................................ 7
2.2 Setup and Manage the camera ......................................................................................................................... 8
2.2.1 Edit Camera ............................................................................................................................................... 8
3 Installing the IP Camera for Use with a Computer ................................................................................................... 9
3.1 Wired connection to a network ........................................................................................................................ 9
3.2 Wifi connection to a network ......................................................................................................................... 10
3.3 Connecting to the camera from a remote computer ..................................................................................... 10
4 Using the IP Camera with a Browser ....................................................................................................................... 11
4.1 View video ....................................................................................................................................................... 11
4.1.1 Listen, Talk, Record, Snapshot ................................................................................................................ 11
4.1.2 Control the camera ................................................................................................................................. 12
4.1.3 Split screen Display ................................................................................................................................. 12
4.1.4 Setting device parameters ...................................................................................................................... 12
4.2 Device information .......................................................................................................................................... 12
4.2.1 Device status ........................................................................................................................................... 12
4.2.2 Device alias setting .................................................................................................................................. 12
4.2.3 Device date and time setting .................................................................................................................. 12
4.2.4 Local recording path................................................................................................................................ 12
4.3 Device Settings ................................................................................................................................................ 13
4.3.1 Basic network settings ............................................................................................................................ 13
4.3.2 Wireless connection settings .................................................................................................................. 13
4.3.3 Third party DDNS settings ....................................................................................................................... 13
4.3.4 UPnP settings .......................................................................................................................................... 14
4.4 Alarm Settings ................................................................................................................................................. 14
4.4.1 Alarm service settings ............................................................................................................................. 14
4.4.2 Mail service settings ................................................................................................................................ 15
4.4.3 FTP Service Setting .................................................................................................................................. 15
4.4.4 Alarm log ................................................................................................................................................. 15
4.5 User and device settings ................................................................................................................................. 16
4.5.1 Multi-device settings ............................................................................................................................... 16
4.5.2 User Settings ........................................................................................................................................... 16

storageoptions.com/support 5
4.5.3 PTZ settings ............................................................................................................................................. 16
4.5.4 Maintain .................................................................................................................................................. 16
5 Appendix ................................................................................................................................................................. 17
5.1 Technical specifications .................................................................................................................................. 17
5.2 Warranty and Technical support .................................................................................................................... 18
HomeGuard IP Camera Instruction Manual
6
1 Introduction
Congratulations on your purchase of this HomeGuard IP Camera. With this device, you can easily keep an eye on your property and record any event as required. The IP camera features:
MJPEG video compression, so the videos are easy to replay
Pan and Tilt, to help you cover a wide area with one camera
Live viewing from anywhere with a PC or smartphone. Throughout this manual, you will see highlighted text:
NOTE Important notes are highlighted in blue.
TIP Tips on best practice are highlighted in green.
CAUTION Important cautions are highlighted in red.
Package Contents Check the contents of your IP Camera package against this checklist. If anything is missing or damaged, please do not use the system, and inform your supplier as soon as possible.
Camera Software CD
Power adaptor Bracket
Network Cable
storageoptions.com/support 7
2 Using the IP Camera with a Mobile Device
You can easily access your IP camera from a mobile device, via the P2P service, as long as the camera is connected to a router and the Internet.
2.1 Connecting to the Camera
On your mobile device, please download and Install the IPCloud app, which you can find on the App Store or Play Market (iOS5 or above, Android 2.2 or above required).
Connect mobile phone to internet by WIFI, 3G or 4G
Ensure the camera is connected to your router with a network cable.
Launch the IPCloud app
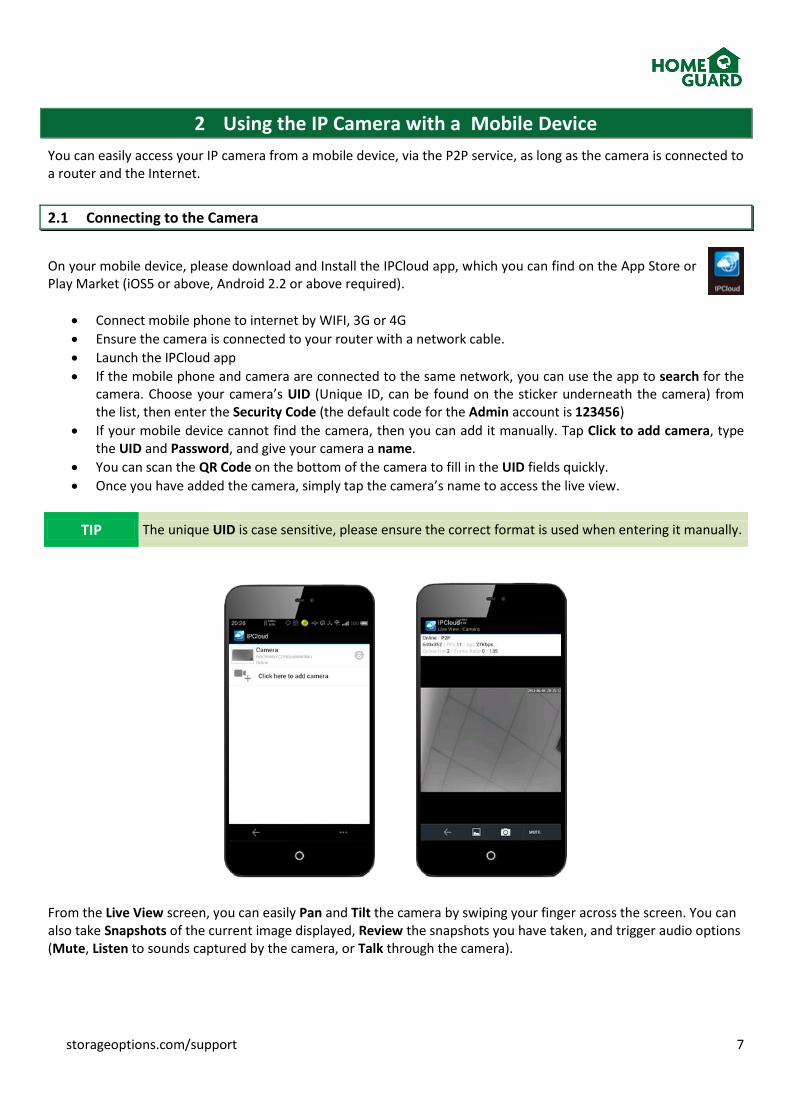
If the mobile phone and camera are connected to the same network, you can use the app to search for the camera. Choose your camera’s UID (Unique ID, can be found on the sticker underneath the camera) from the list, then enter the Security Code (the default code for the Admin account is 123456)
If your mobile device cannot find the camera, then you can add it manually. Tap Click to add camera, type the UID and Password, and give your camera a name.
You can scan the QR Code on the bottom of the camera to fill in the UID fields quickly.
Once you have added the camera, simply tap the camera’s name to access the live view.
TIP The unique UID is case sensitive, please ensure the correct format is used when entering it manually.
From the Live View screen, you can easily Pan and Tilt the camera by swiping your finger across the screen. You can also take Snapshots of the current image displayed, Review the snapshots you have taken, and trigger audio options (Mute, Listen to sounds captured by the camera, or Talk through the camera).
HomeGuard IP Camera Instruction Manual
8
2.2 Setup and Manage the camera
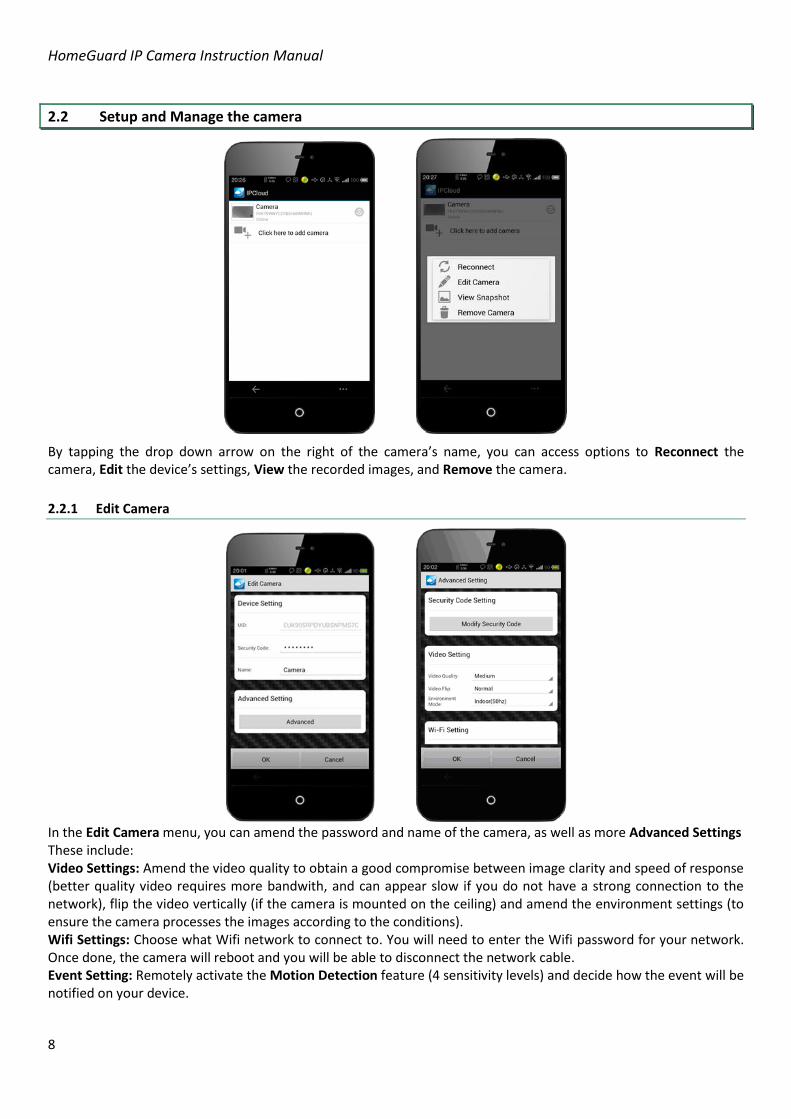
By tapping the drop down arrow on the right of the camera’s name, you can access options to Reconnect the camera, Edit the device’s settings, View the recorded images, and Remove the camera.
2.2.1 Edit Camera
In the Edit Camera menu, you can amend the password and name of the camera, as well as more Advanced Settings These include: Video Settings: Amend the video quality to obtain a good compromise between image clarity and speed of response (better quality video requires more bandwith, and can appear slow if you do not have a strong connection to the network), flip the video vertically (if the camera is mounted on the ceiling) and amend the environment settings (to ensure the camera processes the images according to the conditions). Wifi Settings: Choose what Wifi network to connect to. You will need to enter the Wifi password for your network. Once done, the camera will reboot and you will be able to disconnect the network cable. Event Setting: Remotely activate the Motion Detection feature (4 sensitivity levels) and decide how the event will be notified on your device.
storageoptions.com/support 9
3 Installing the IP Camera for Use with a Computer
The Homeguard IP camera is designed to be connected to a network, either wired or wireless. It can then be accessed from anywhere using either a smartphone or a computer connected to the internet.
3.1 Wired connection to a network
To setup the IP camera, please follow these steps:
Connect the IP camera to your router with a network cable, install the removable wireless antenna, then power on the IP camera using the supplied 5V adapter.
The lens will move up and down and side to side while the camera performs its starting test.
Insert the supplied CD into your computer’s CD drive, then run “LSearch_en.exe”. Click “Search”, this will display all connected HomeGuard IP cameras.
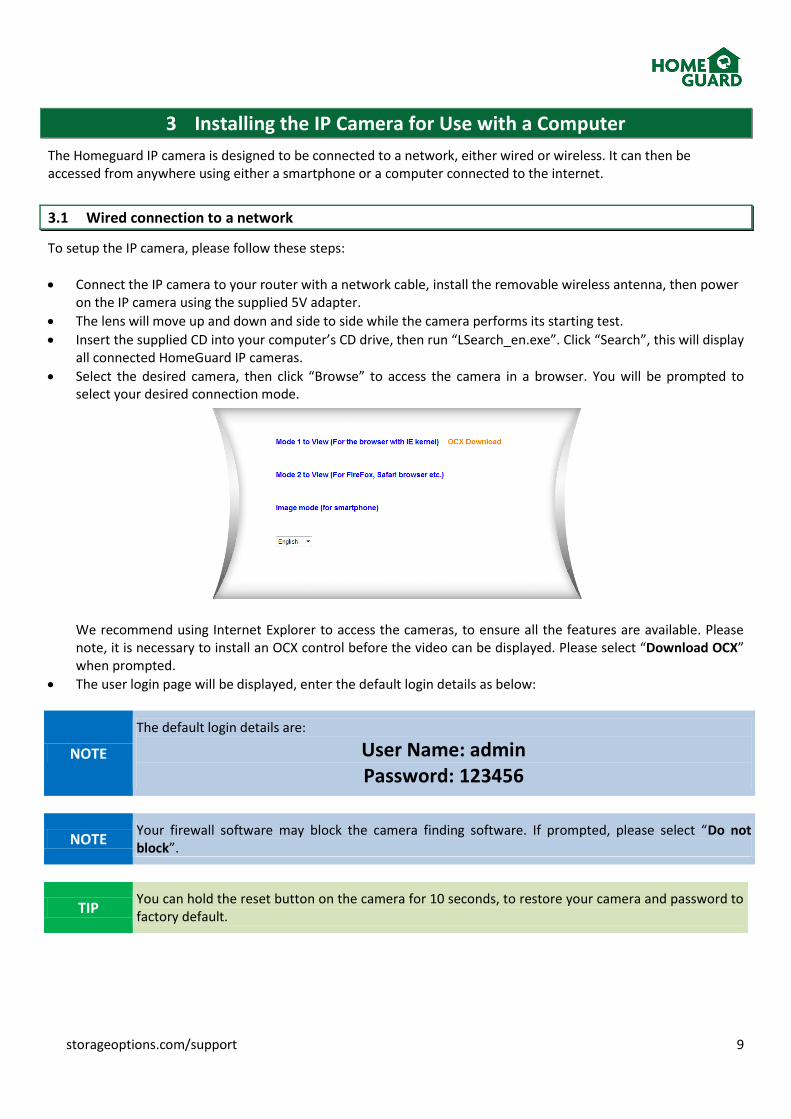
Select the desired camera, then click “Browse” to access the camera in a browser. You will be prompted to select your desired connection mode.
We recommend using Internet Explorer to access the cameras, to ensure all the features are available. Please note, it is necessary to install an OCX control before the video can be displayed. Please select “Download OCX” when prompted.
The user login page will be displayed, enter the default login details as below:
NOTE
The default login details are:
User Name: admin Password: 123456
NOTE Your firewall software may block the camera finding software. If prompted, please select “Do not block”.
TIP You can hold the reset button on the camera for 10 seconds, to restore your camera and password to factory default.
HomeGuard IP Camera Instruction Manual
10
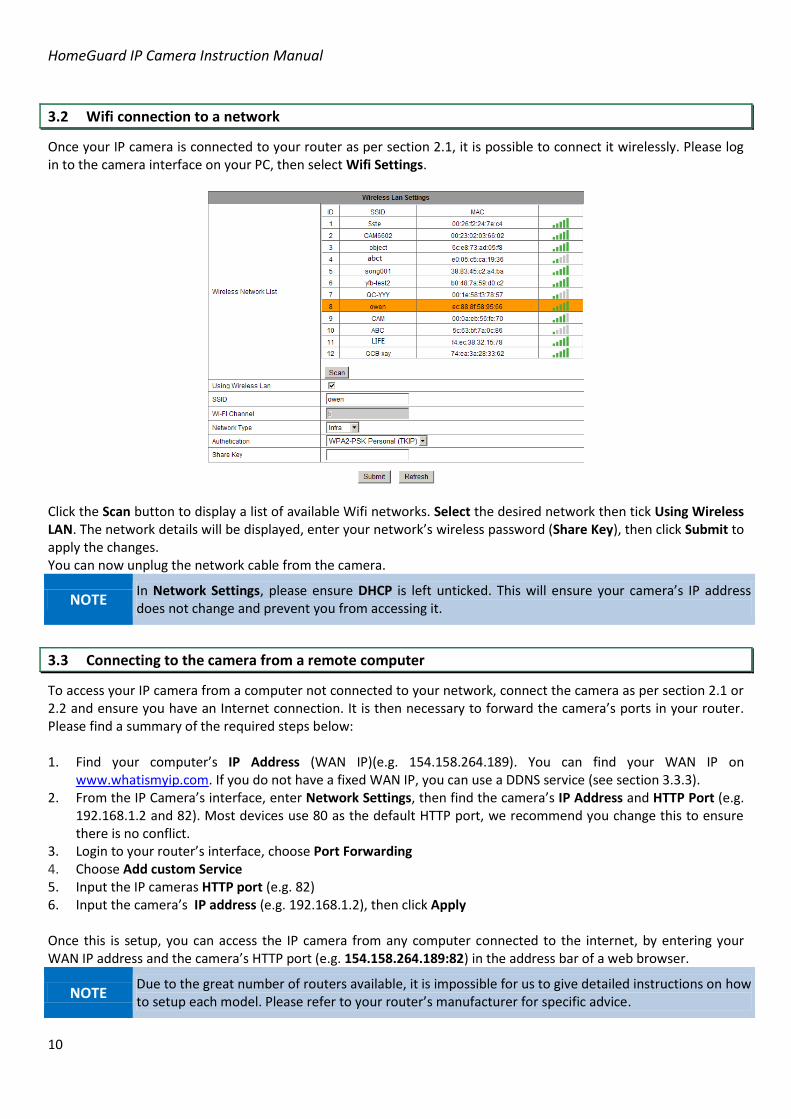
3.2 Wifi connection to a network
Once your IP camera is connected to your router as per section 2.1, it is possible to connect it wirelessly. Please log in to the camera interface on your PC, then select Wifi Settings.
Click the Scan button to display a list of available Wifi networks. Select the desired network then tick Using Wireless LAN. The network details will be displayed, enter your network’s wireless password (Share Key), then click Submit to apply the changes. You can now unplug the network cable from the camera.
NOTE In Network Settings, please ensure DHCP is left unticked. This will ensure your camera’s IP address does not change and prevent you from accessing it.
3.3 Connecting to the camera from a remote computer
To access your IP camera from a computer not connected to your network, connect the camera as per section 2.1 or 2.2 and ensure you have an Internet connection. It is then necessary to forward the camera’s ports in your router. Please find a summary of the required steps below: 1. Find your computer’s IP Address (WAN IP)(e.g. 154.158.264.189). You can find your WAN IP on
www.whatismyip.com. If you do not have a fixed WAN IP, you can use a DDNS service (see section 3.3.3). 2. From the IP Camera’s interface, enter Network Settings, then find the camera’s IP Address and HTTP Port (e.g.
192.168.1.2 and 82). Most devices use 80 as the default HTTP port, we recommend you change this to ensure there is no conflict.
3. Login to your router’s interface, choose Port Forwarding 4. Choose Add custom Service
5. Input the IP cameras HTTP port (e.g. 82) 6. Input the camera’s IP address (e.g. 192.168.1.2), then click Apply Once this is setup, you can access the IP camera from any computer connected to the internet, by entering your WAN IP address and the camera’s HTTP port (e.g. 154.158.264.189:82) in the address bar of a web browser.
NOTE Due to the great number of routers available, it is impossible for us to give detailed instructions on how to setup each model. Please refer to your router’s manufacturer for specific advice.

storageoptions.com/support 11
4 Using the IP Camera with a Browser
4.1 View video
Once you have logged in to the camera interface, you can view the live video feed on the screen as per the screenshot below:
From this screen, you can Listen to the feed from the camera, Talk through the camera, Record videos and Snapshots to your computer. You can also Control the camera’s movements, Display several cameras at once and set the camera’s Parameters. These options are detailed below.
4.1.1 Listen, Talk, Record, Snapshot
Click to listen to the sound recorded by the camera. This will be played through your computer’s speakers.
Click to speak through the camera (microphone required). Please note there may be a slight delay between the picture and the sound.
Click to start recording the video feed to the computer.
Click to take a snapshot of the image displayed. To define where the videos and snapshots are saved on your computer, please select the Local Recording Path in the
system settings. Click to access these.
HomeGuard IP Camera Instruction Manual
12
4.1.2 Control the camera
The icons on the left hand side of the screen allow you to control the camera’s movements, reverse or mirror the image (e.g. if the camera is mounted on the ceiling), and adjust video parameters, such as resolution, brightness, etc. The camera supports 16 preset points. When the camera is in a position you often check (e.g. pointing at a doorway), you can Set this as a preset point. When the camera is pointing to a different place, you can then Call this preset for the camera to point in the desired direction automatically.
Click to control the IR LEDs mode. In Auto mode, the will turn on automatically when the ambient light is low. In some instances, this can lead to a poor picture as the ambient light is not low enough for the camera’s night vision to be fully effective. If this is the case, you can switch the LEDs to Forced Closed mode.
4.1.3 Split screen Display
You can add several cameras to your system, as per section 3.5.1. Using the icons on the right hand side of the screen, you can choose to display 1, 4 or 9 cameras at once. By selecting the desired area, you can then apply all the controls to that camera.
4.1.4 Setting device parameters
Click to enter the camera’s settings. You can adjust all the settings described in the following sections. Only the administrator can login to set these parameters.
4.2 Device information
4.2.1 Device status
Displays the camera’s Firmware version, Web UI Version, Alias, AP MAC, etc
4.2.2 Device alias setting
Use this to give your IP camera a recognisable name (e.g. Office, Kitchen, etc). This will be displayed when accessing the camera from a browser.
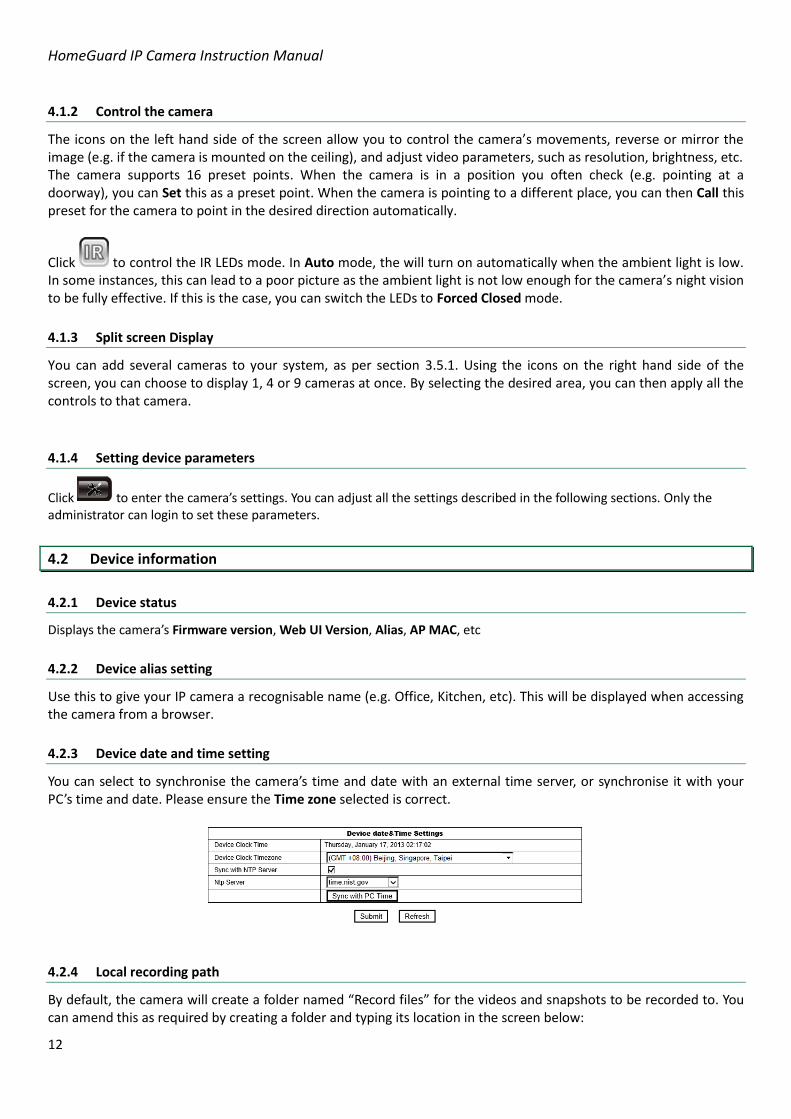
4.2.3 Device date and time setting
You can select to synchronise the camera’s time and date with an external time server, or synchronise it with your PC’s time and date. Please ensure the Time zone selected is correct.
4.2.4 Local recording path
By default, the camera will create a folder named “Record files” for the videos and snapshots to be recorded to. You can amend this as required by creating a folder and typing its location in the screen below:
storageoptions.com/support 13
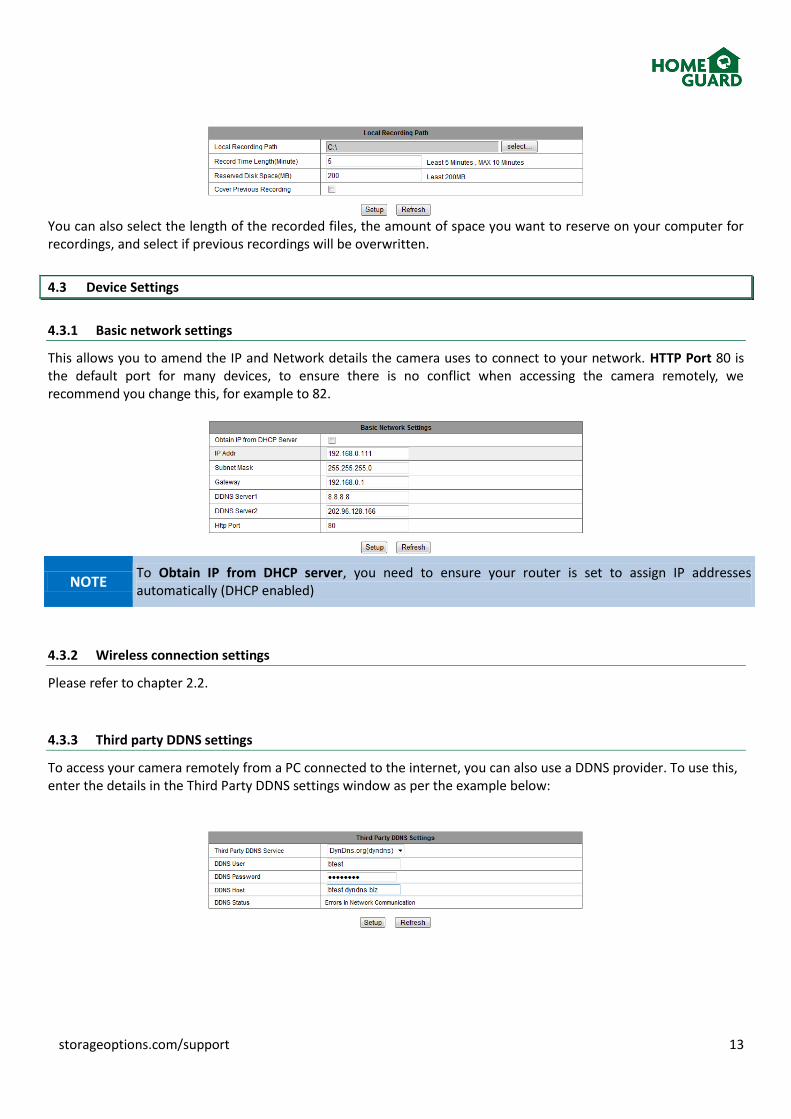
You can also select the length of the recorded files, the amount of space you want to reserve on your computer for recordings, and select if previous recordings will be overwritten.
4.3 Device Settings
4.3.1 Basic network settings
This allows you to amend the IP and Network details the camera uses to connect to your network. HTTP Port 80 is the default port for many devices, to ensure there is no conflict when accessing the camera remotely, we recommend you change this, for example to 82.
NOTE To Obtain IP from DHCP server, you need to ensure your router is set to assign IP addresses automatically (DHCP enabled)
4.3.2 Wireless connection settings
Please refer to chapter 2.2.
4.3.3 Third party DDNS settings
To access your camera remotely from a PC connected to the internet, you can also use a DDNS provider. To use this, enter the details in the Third Party DDNS settings window as per the example below:
HomeGuard IP Camera Instruction Manual
14
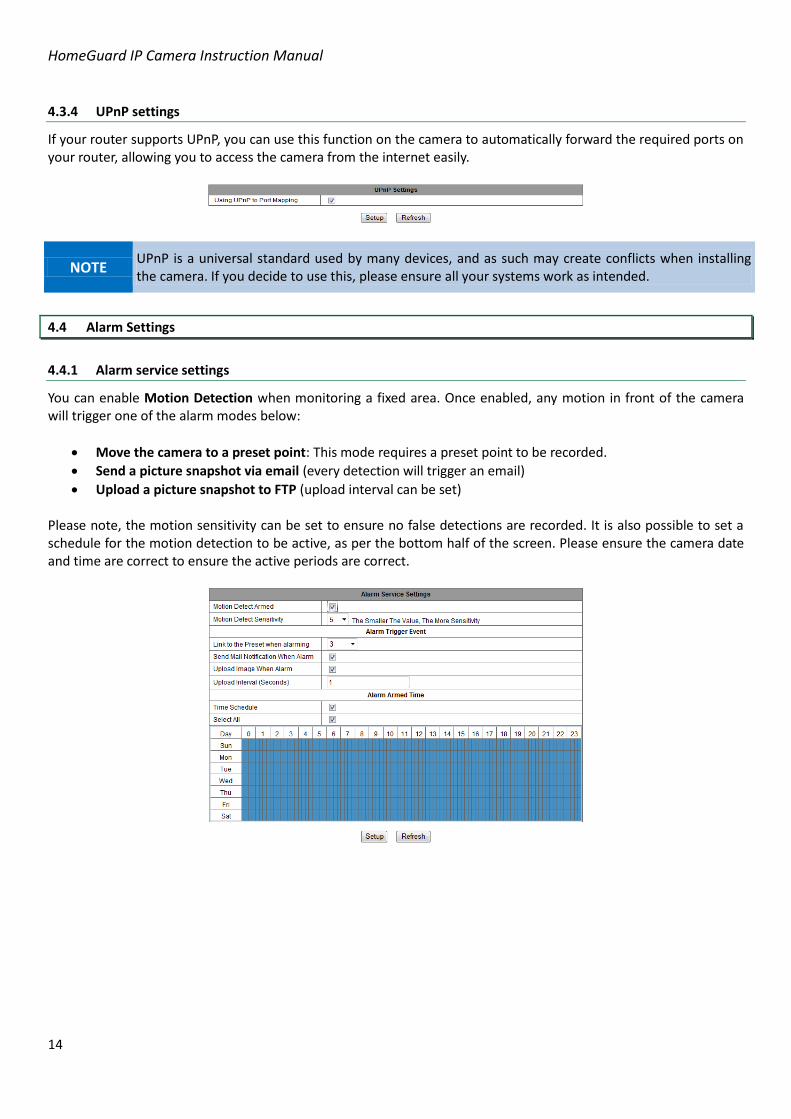
4.3.4 UPnP settings
If your router supports UPnP, you can use this function on the camera to automatically forward the required ports on your router, allowing you to access the camera from the internet easily.
NOTE UPnP is a universal standard used by many devices, and as such may create conflicts when installing the camera. If you decide to use this, please ensure all your systems work as intended.
4.4 Alarm Settings
4.4.1 Alarm service settings
You can enable Motion Detection when monitoring a fixed area. Once enabled, any motion in front of the camera will trigger one of the alarm modes below:
Move the camera to a preset point: This mode requires a preset point to be recorded.
Send a picture snapshot via email (every detection will trigger an email)
Upload a picture snapshot to FTP (upload interval can be set) Please note, the motion sensitivity can be set to ensure no false detections are recorded. It is also possible to set a schedule for the motion detection to be active, as per the bottom half of the screen. Please ensure the camera date and time are correct to ensure the active periods are correct.
storageoptions.com/support 15
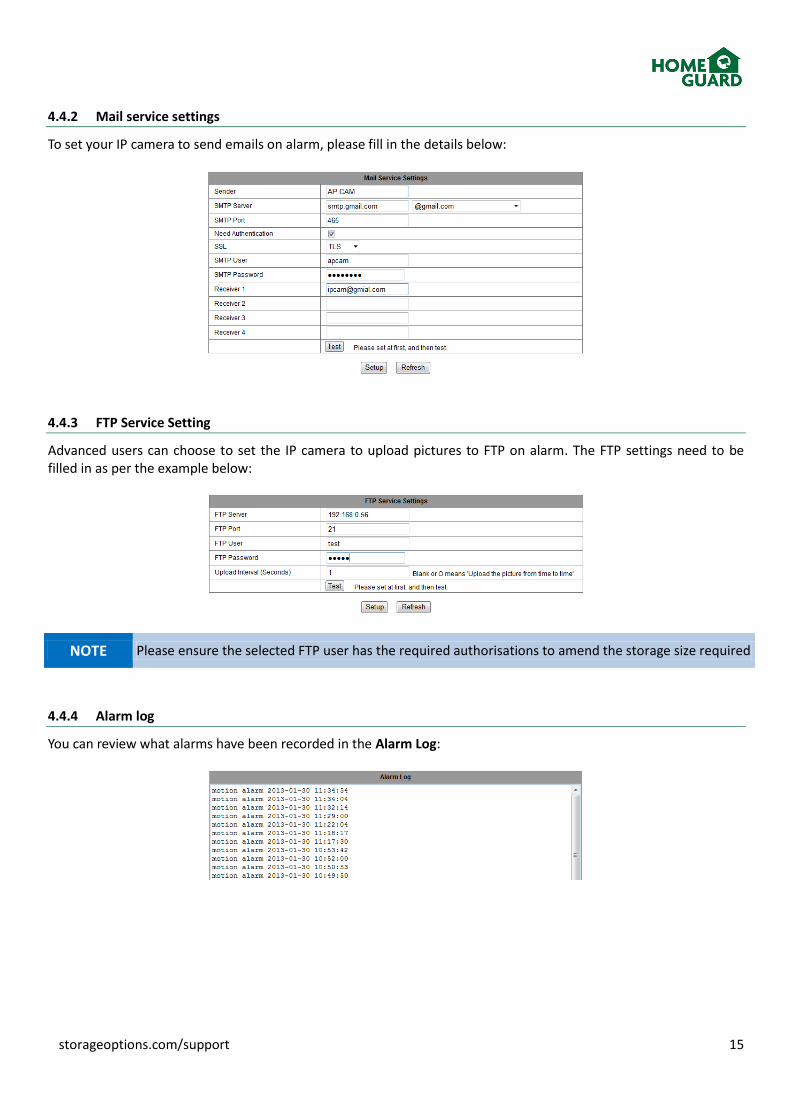
4.4.2 Mail service settings
To set your IP camera to send emails on alarm, please fill in the details below:
4.4.3 FTP Service Setting
Advanced users can choose to set the IP camera to upload pictures to FTP on alarm. The FTP settings need to be filled in as per the example below:
NOTE Please ensure the selected FTP user has the required authorisations to amend the storage size required
4.4.4 Alarm log
You can review what alarms have been recorded in the Alarm Log:
HomeGuard IP Camera Instruction Manual
16
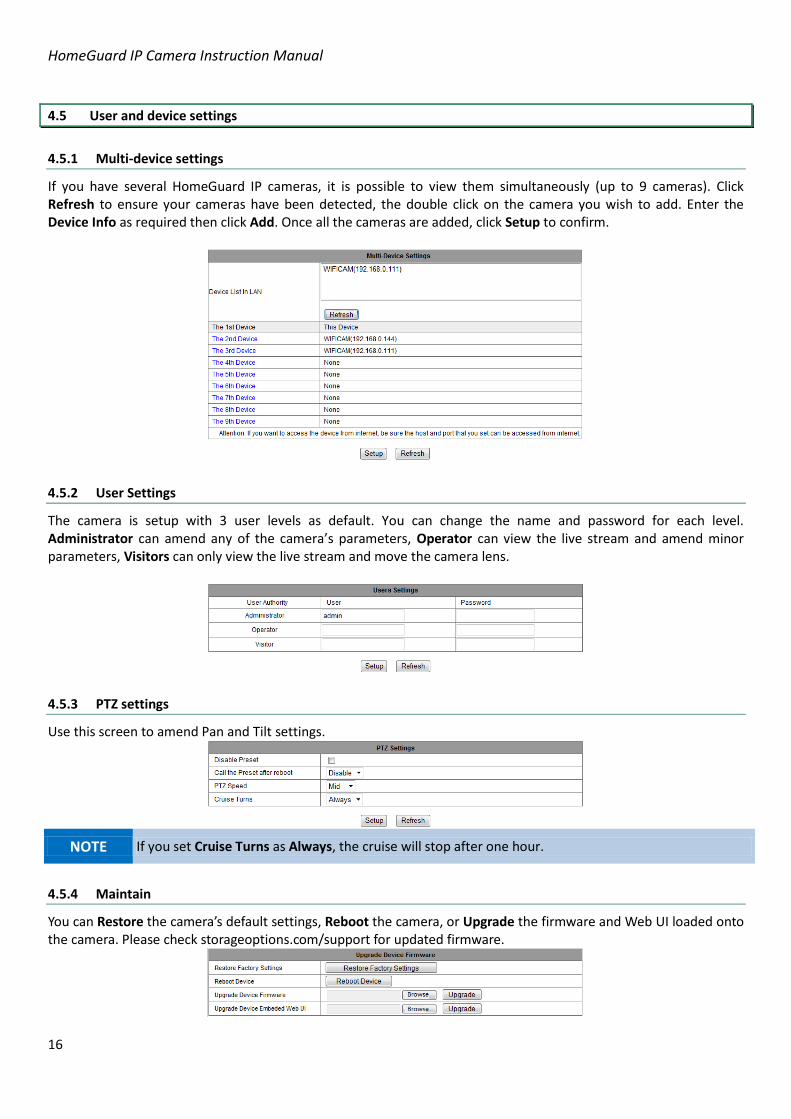
4.5 User and device settings
4.5.1 Multi-device settings
If you have several HomeGuard IP cameras, it is possible to view them simultaneously (up to 9 cameras). Click Refresh to ensure your cameras have been detected, the double click on the camera you wish to add. Enter the Device Info as required then click Add. Once all the cameras are added, click Setup to confirm.
4.5.2 User Settings
The camera is setup with 3 user levels as default. You can change the name and password for each level. Administrator can amend any of the camera’s parameters, Operator can view the live stream and amend minor parameters, Visitors can only view the live stream and move the camera lens.
4.5.3 PTZ settings
Use this screen to amend Pan and Tilt settings.
NOTE If you set Cruise Turns as Always, the cruise will stop after one hour.
4.5.4 Maintain
You can Restore the camera’s default settings, Reboot the camera, or Upgrade the firmware and Web UI loaded onto the camera. Please check storageoptions.com/support for updated firmware.
storageoptions.com/support 17
5 Appendix
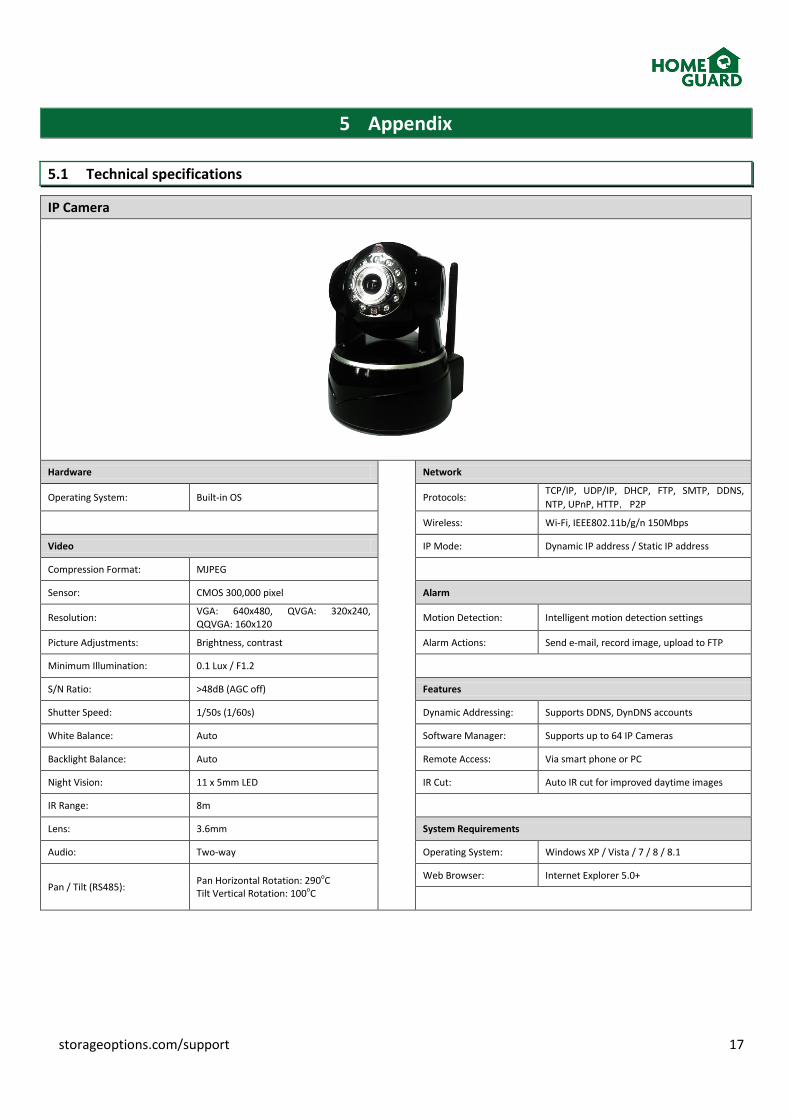
5.1 Technical specifications
IP Camera
Hardware
Network
Operating System: Built-in OS Protocols: TCP/IP, UDP/IP, DHCP, FTP, SMTP, DDNS,
NTP, UPnP, HTTP,P2P
Wireless: Wi-Fi, IEEE802.11b/g/n 150Mbps
Video IP Mode: Dynamic IP address / Static IP address
Compression Format: MJPEG
Sensor: CMOS 300,000 pixel Alarm
Resolution: VGA: 640x480, QVGA: 320x240, QQVGA: 160x120
Motion Detection: Intelligent motion detection settings
Picture Adjustments: Brightness, contrast Alarm Actions: Send e-mail, record image, upload to FTP
Minimum Illumination: 0.1 Lux / F1.2
S/N Ratio: >48dB (AGC off) Features
Shutter Speed: 1/50s (1/60s) Dynamic Addressing: Supports DDNS, DynDNS accounts
White Balance: Auto Software Manager: Supports up to 64 IP Cameras
Backlight Balance: Auto Remote Access: Via smart phone or PC
Night Vision: 11 x 5mm LED IR Cut: Auto IR cut for improved daytime images
IR Range: 8m
Lens: 3.6mm System Requirements
Audio: Two-way Operating System: Windows XP / Vista / 7 / 8 / 8.1
Pan / Tilt (RS485): Pan Horizontal Rotation: 290oC Tilt Vertical Rotation: 100oC
Web Browser: Internet Explorer 5.0+
HomeGuard IP Camera Instruction Manual
18
5.2 Warranty and Technical support
If you are experiencing difficulties with your product, or have questions which are not answered in this instruction manual, our dedicated support site offers a wide range of clearly written FAQs, manuals and user guides which are designed to help you get the most from your purchase.
Visit our dedicated support site at storageoptions.com/support for FAQs, manuals and user guides
If you are unable to find an answer online, still experiencing issues or suspect your product to be faulty, our UK based customer service team is available to offer full support, and can be contacted via the support pages of our website.
Submit a service request online if you cannot find an answer to your problem
A member of our UK based support team will review your case and offer the highest level of advice and support
Please contact us directly through our support site if you have any queries or concerns.

storageoptions.com/support 19