Embed Size (px)
Citation preview

VideoPad Video Editor Contents Add Videos .................................................................................................................................................... 2
Trim a Video .................................................................................................................................................. 5
Split a Video (or Remove Segments from the Middle of a Clip) ................................................................... 6
Change the Speed of the Video .................................................................................................................... 7
Add Caption .................................................................................................................................................. 8
Saving & Exporting Your Video ................................................................................................................... 12
Make sure you download the FREE VIDEO EDITOR VERSION FOR NON-COMMERCIAL USE at http://www.nchsoftware.com/videopad/index.html.
You can find video tutorials at http://www.nchsoftware.com/videopad/tutorial.html.
For more assistance, visit the VideoPad Video Editor Help Site at http://help.nchsoftware.com/help/en/videopad/win/index.html.

Add Videos
1. Open VideoPad Video Editor, and start a New Project. 2. Click Add File from the Home tab. Locate your file, and click Open.
a. You can also drag the file from your desktop into the media bin (the area that says Drag and Drop Files here).

3. Click and drag the file from the media bin to Video Track 1 in the Timeline panel at the bottom of the window.

4. You can change the order of the clips by clicking and dragging them around on the Timeline.
5. Select a clip by clicking on it. It will open up in the Clip Preview pane so you can view it.

Trim a Video 1. Click on the clip you want to trim from the Timeline, and it will appear in the Clip Preview pane.
a. Double-check that you are on Clip Preview, not Sequence Preview.
2. Play the video to where you want the clip to begin, or drag the red cursor to the point. 3. Press Start to set the beginning point. Repeat the process
4. Repeat the process for where you want the clip to end, using the End button.

Split a Video (or Remove Segments from the Middle of a Clip) 1. Click the clip in the Timeline panel to open the video up in Clip Preview. 2. Play the video or drag the red cursor to the point in the clip you want to split the video (or
remove). 3. Click Split under the Clip Preview window. The clip is now split into two segments in the
Timeline.
4. Click the second segment from the Timeline, and play it in Clip Preview until you reach the end of the segment you want to remove.
5. Click Split again, and you should have 3 segments in the Timeline now. 6. Click the second segment (the part you want to remove), and press the Delete key.

Change the Speed of the Video 1. Right-click the clip that you want to change the speed from the Timeline. 2. Choose Change Clip Speed from the menu.
3. Choose your desired speed (based on %), and click Set. a. Below 100 = slower. Above 100 = faster. You may have to play around to achieve the
desired effect.

Add Caption 1. Make sure none of your video files are selected by clicking in the white space in the Media Bin. 2. Click Add Text from the top toolbar. A Text Clip will open in the Clip Preview window.
3. Type your caption in the box that appears, and select your formatting.
4. Click off the textbox to close it. Your caption will be added as a file to the Images tab in the Media Bin.
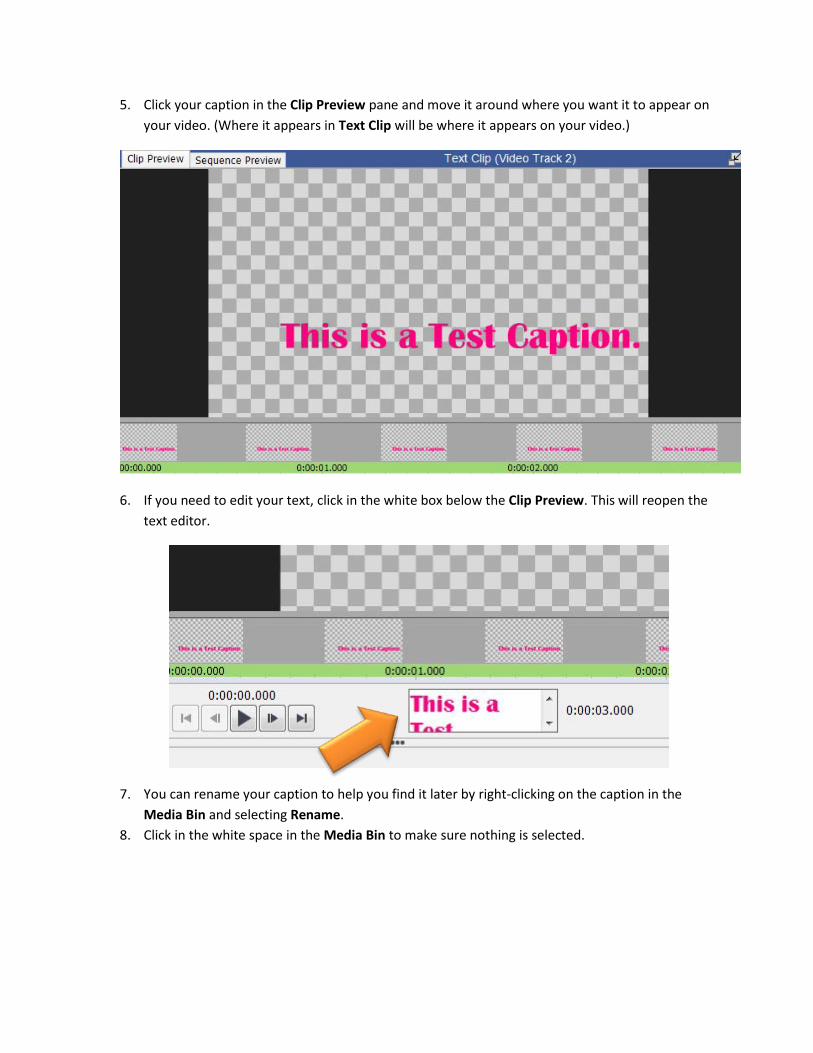
5. Click your caption in the Clip Preview pane and move it around where you want it to appear on your video. (Where it appears in Text Clip will be where it appears on your video.)
6. If you need to edit your text, click in the white box below the Clip Preview. This will reopen the text editor.
7. You can rename your caption to help you find it later by right-clicking on the caption in the Media Bin and selecting Rename.
8. Click in the white space in the Media Bin to make sure nothing is selected.

9. Click the video clip you want to add the caption to from the Timeline panel. 10. Play the video or move the red cursor to point you want the text to appear.
11. Click your caption from the Media Bin. It will open in the Clip Preview pane. 12. Click the down arrow next to Place and choose Overlay on Sequence at Cursor.
13. This will add the caption to video clip in the Timeline. It will be added wherever the red cursor is located as a separate video track.

14. To make your caption appear for a longer or shorter duration, click and drag the bracket icon ] on Video Track 2 in the Timeline.
15. If you’re having difficulty grabbing the bracket, try to zoom in on the Timeline using the magnifying glass icons in the bottom right of the screen.
16. You can click and drag the caption around on Video Track 2 if you need to adjust where it appears.
17. You can create additional captions the same way, adding them to Video Track 2.

Saving & Exporting Your Video 1. When you are ready to save, click Save Project on top toolbar.
2. Choose your project name and a location to save it. We recommend saving it to Drive, your network drive, or an external device.
THIS WILL ONLY SAVE YOUR WORKING FILE. YOU MUST FOLLOW THE STEPS BELOW TO SAVE THE PROJECT AS A MOVIE FILE WHICH CAN BE VIEWED BY OTHER PEOPLE ON OTHER COMPUTERS.
3. Click Export Video from the top toolbar.

4. For Export Type, choose File and then Video File.
5. If your file is large, change the Resolution to 320 x 240 – Low Resolution. If your file is small, you can leave it at the default. (If you aren’t sure, use the Low Resolution option!)
6. Make sure that the File Format is set to .wmv or .avi; other formats won’t be available once your demo version expires.
7. Click Browse to choose where you want to save your video & name it.
8. Click Create to save your video. The Export Queue window will say Complete when it is finished saving.