Embed Size (px)
Citation preview
1 2
4
5
3
6 7
A. Be sure the vehicle is outside and the antenna has a clear view of the sky.
B. Verify that you are receiving the Sirius signal. The Stratus 7 Radio should be tuned to Sirius channel 184, the Preview channel. There should at least be two bars in the upper right corner of the screen that denotes antenna signal strength. If not, be sure that you have mounted the antenna on the outside of the vehicle, as shown in step 2, and that the vehicle is parked outdoors with a clear view of the sky. Move the vehicle away from any obstructed area, for example, if you are parked in a garage, or parked near a large structure.
C. You can also press and hold menu, and press to scroll to and highlight Signal. Press the Select button to display the Signal screen. The Satellite and Terrestrial bars show the strength of the signal being received. If the signal reception is good, press and hold menu to return to Sirius channel 184, the Preview channel.
Verify Signal Reception
SignalSAT - +TER - +
To Activate Call1-866-635-2349
184 Preview
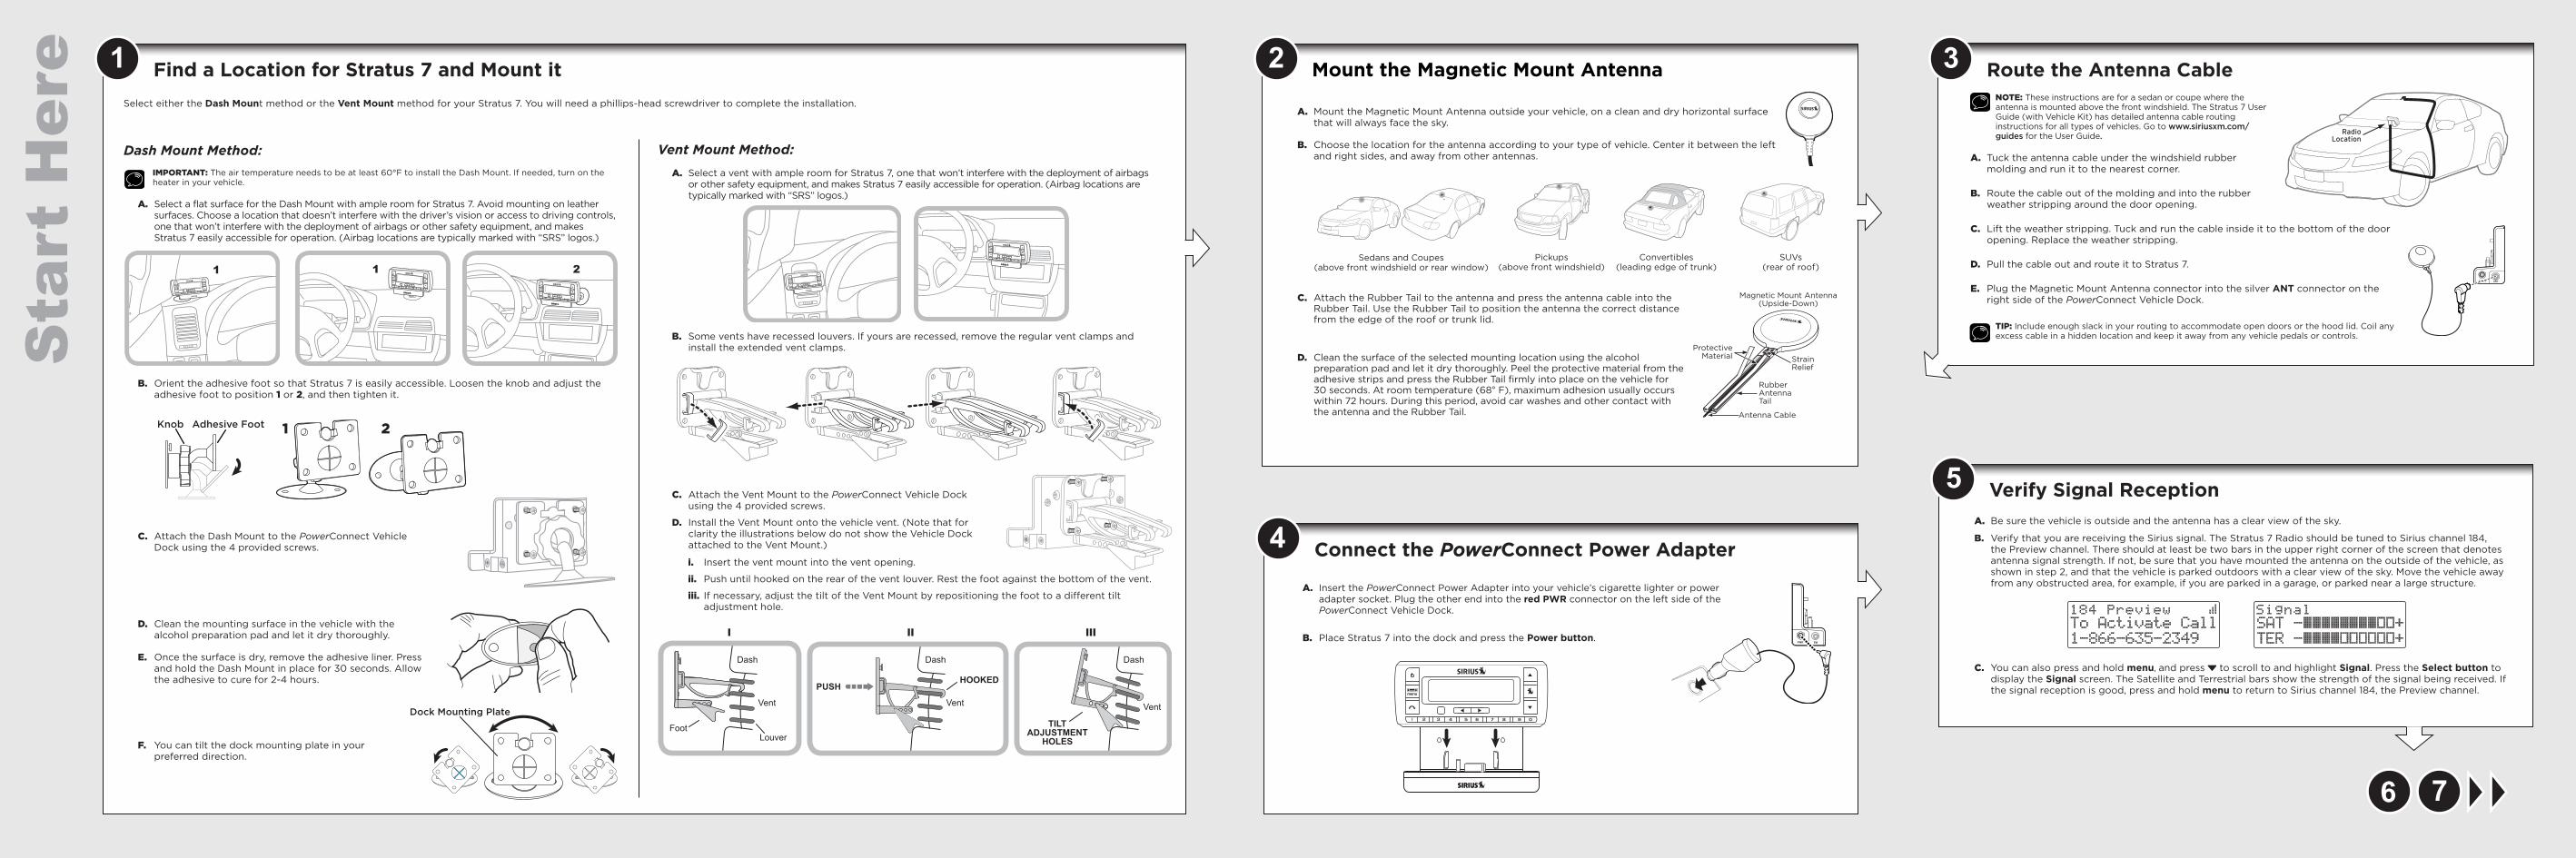
Find a Location for Stratus 7 and Mount it
Dash Mount Method:
IMPORTANT: The air temperature needs to be at least 60°F to install the Dash Mount. If needed, turn on the heater in your vehicle.
A. Select a flat surface for the Dash Mount with ample room for Stratus 7. Avoid mounting on leather surfaces. Choose a location that doesn’t interfere with the driver’s vision or access to driving controls, one that won’t interfere with the deployment of airbags or other safety equipment, and makes Stratus 7 easily accessible for operation. (Airbag locations are typically marked with “SRS” logos.)
B. Orient the adhesive foot so that Stratus 7 is easily accessible. Loosen the knob and adjust the adhesive foot to position 1 or 2, and then tighten it.
C. Attach the Dash Mount to the PowerConnect Vehicle Dock using the 4 provided screws.
D. Clean the mounting surface in the vehicle with the alcohol preparation pad and let it dry thoroughly.
E. Once the surface is dry, remove the adhesive liner. Press and hold the Dash Mount in place for 30 seconds. Allow the adhesive to cure for 2-4 hours.
F. You can tilt the dock mounting plate in your preferred direction.
Vent Mount Method:
A. Select a vent with ample room for Stratus 7, one that won’t interfere with the deployment of airbags or other safety equipment, and makes Stratus 7 easily accessible for operation. (Airbag locations are typically marked with “SRS” logos.)
B. Some vents have recessed louvers. If yours are recessed, remove the regular vent clamps and install the extended vent clamps.
C. Attach the Vent Mount to the PowerConnect Vehicle Dock using the 4 provided screws.
D. Install the Vent Mount onto the vehicle vent. (Note that for clarity the illustrations below do not show the Vehicle Dock attached to the Vent Mount.)
i. Insert the vent mount into the vent opening.
ii. Push until hooked on the rear of the vent louver. Rest the foot against the bottom of the vent.
iii. If necessary, adjust the tilt of the Vent Mount by repositioning the foot to a different tilt adjustment hole.
Select either the Dash Mount method or the Vent Mount method for your Stratus 7. You will need a phillips-head screwdriver to complete the installation.A. Mount the Magnetic Mount Antenna outside your vehicle, on a clean and dry horizontal surface
that will always face the sky.
B. Choose the location for the antenna according to your type of vehicle. Center it between the left and right sides, and away from other antennas.
C. Attach the Rubber Tail to the antenna and press the antenna cable into the Rubber Tail. Use the Rubber Tail to position the antenna the correct distance from the edge of the roof or trunk lid.
D. Clean the surface of the selected mounting location using the alcohol preparation pad and let it dry thoroughly. Peel the protective material from the adhesive strips and press the Rubber Tail firmly into place on the vehicle for 30 seconds. At room temperature (68° F), maximum adhesion usually occurs within 72 hours. During this period, avoid car washes and other contact with the antenna and the Rubber Tail.
Sedans and Coupes (above front windshield or rear window)
Pickups (above front windshield)
SUVs (rear of roof)
Convertibles (leading edge of trunk)
Route the Antenna Cable NOTE: These instructions are for a sedan or coupe where the antenna is mounted above the front windshield. The Stratus 7 User Guide (with Vehicle Kit) has detailed antenna cable routing instructions for all types of vehicles. Go to www.siriusxm.com/guides for the User Guide.
A. Tuck the antenna cable under the windshield rubber molding and run it to the nearest corner.
B. Route the cable out of the molding and into the rubber weather stripping around the door opening.
C. Lift the weather stripping. Tuck and run the cable inside it to the bottom of the door opening. Replace the weather stripping.
D. Pull the cable out and route it to Stratus 7.
E. Plug the Magnetic Mount Antenna connector into the silver ANT connector on the right side of the PowerConnect Vehicle Dock.
TIP: Include enough slack in your routing to accommodate open doors or the hood lid. Coil any excess cable in a hidden location and keep it away from any vehicle pedals or controls.
RadioLocation
A. Insert the PowerConnect Power Adapter into your vehicle’s cigarette lighter or power adapter socket. Plug the other end into the red PWR connector on the left side of the PowerConnect Vehicle Dock.
B. Place Stratus 7 into the dock and press the Power button.
Mount the Magnetic Mount Antenna
Connect the PowerConnect Power Adapter
Sta
rt H
ere
1 2Knob Adhesive Foot
Dock Mounting Plate
Dash
Vent
LouverFoot
PUSH
Vent
Dash
HOOKED
Vent
Dash
TILTADJUSTMENT
HOLES
I II III
21sel
1
RubberAntennaTail
ProtectiveMaterial Strain
Relief
Antenna Cable
Magnetic Mount Antenna(Upside-Down)
PWR FM
menu
AUDIO ANT

6 ? What’s in the Box? 7
Specifications
Important Legal Information
System Power Requirements: 9-16 V DC, 500 mA (max) Operating Temperature: -4°F to +140°F (-20°C to +60°C) Audio Output: 1.0 Vrms (max)
Stratus 7 Radio Dimensions: 4.5 in (W) x 1.9 in (H) x 0.7 in (D) 115 mm (W) x 48 mm (H) x 17 mm (D) Weight: 2.3 oz (66 g)
PowerConnect Vehicle Dock Dimensions: 4.0 in (W) x 2.6 in (H) x 1.2 in (D) 102 mm (W) x 65 mm (H) x 31 mm (D) Weight: 1.6 oz (46 g) Audio Connector: 1/8 in (3.5 mm) female Antenna Connector: SMB male
PowerConnect Power Adapter Dimensions: 3.7 in (W) x 1.7 in (H) x 1.3 in (D) 94 mm (W) x 43 mm (H) x 34 mm (D) Weight: 2.4 oz (69 g) Input / Output: 9-16 V DC / 5 V DC, 1.5 A Cable Length: 4 ft 7 in (1.4 m)
Vehicle Antenna Type: Sirius Magnetic Mount Connector: SMB female, right angle Cable Length: 21 ft (6.4 m)
Aux In Cable Connectors: 1/8 in (3.5 mm) stereo male to 1/8 in (3.5 mm) stereo male Cable Length: 4 ft (1.2 m)
© 2013 Sirius XM Radio Inc. “Sirius”, “XM” and all related marks and logos are trademarks of Sirius XM Radio Inc. and its subsidiaries. “BBC” and “Radio One” are trademarks of the British Broadcasting Corporation and are used under license. BBC logo © BBC 1996. Radio 1 logo © BBC 2001. Cosmopolitan® is a registered trademark of Hearst Communications, Inc. Elvis Radio logo © EPE Reg. U.S. Pat & TM off. IndyCar (and Design) are registered trademarks of Brickyard Trademarks, Inc., used with permission. Major League Baseball trademarks and copyrights are used with permission of Major League Baseball Properties, Inc. Visit the official website at MLB.com. Games subject to availability and change and may not include all spring training games. All rights reserved. NASCAR® is a registered trademark of the National Association for Stock Car Auto Racing, Inc. The NBA identifications are the intellectual property of NBA Properties, Inc. and the respective NBA member teams. © 2011 NBA Properties, Inc. © 2011 NFL Properties LLC. All NFL-related trademarks are trademarks of the National Football League. NHL and the NHL Shield are registered trademarks of the National Hockey League. © NHL 2011. All NHL logos and marks and NHL team logos and marks depicted herein are the property of the NHL and the respective teams and may not be reproduced without the prior written consent of NHL Enterprises, L.P. The Home Ice© channel is a registered trademark of XM Satellite Radio Inc. The Swinger Golfer logo is a registered trademark of PGA TOUR, Inc. Visit www.siriusxm.com/channellineup for updates. All programming/channel lineup/XM service subject to change or preemption. All other marks and logos are the property of their respective owners. All rights reserved.
IMPORTANT NOTICE: REQUIRED SUBSCRIPTIONHardware and subscription sold separately, and activation fee required. Other fees and taxes may apply. Subscriptions governed by SiriusXM Customer Agreement; see www.siriusxm.com. Prices and programming are subject to change. Service automatically renews into the subscription Package you choose (which may differ from the Package which arrived with the Radio), for additional periods of the same length, and automatically bills at the then current rates, after any complimentary trial or promotional period ends, until you call us at 1-866-635-2349 to cancel. XM U.S. Satellite service available only to those at least 18 years of age in the 48 contiguous USA and DC, while SiriusXM Internet Radio is available throughout our satellite area and also AK, HI and PR.
!
FCC Statement: The user is cautioned that changes or modifications not expressly approved by Sirius XM Radio Inc. can void the user’s authority to operate this device. This device complies with Part 15 of the FCC Rules. Operation is subject to the following two conditions: 1. This device may not cause harmful interference. 2. This device must accept any interference received, including interference that may cause undesired operation. This equipment has been tested and found to comply with the limits for a Class B digital device, pursuant to Part 15 of the FCC Rules. These limits are designed to provide reasonable protection against harmful interference in a residential installation. This equipment generates, uses, and can radiate radio frequency energy and, if not installed and used in accordance with the installation instructions, may cause harmful interference to radio communications. However, there is no guarantee that interference will not occur in a particular installation. If this equipment does cause harmful interference to radio or television reception, which can be determined by turning the equipment off and on, the user is encouraged to try to correct the interference by one or more of the following measures: •Reorient or relocate the receiving antenna of the affected receiver. •Increase the separation between the SiriusXM equipment and the affected receiver. •Connect the SiriusXM equipment into an outlet on a circuit different from that to which the affected receiver is connected. •Consult the dealer or an experienced radio/TV technician for help.WARNING! The FCC and FAA have not certified this Satellite Radio Receiver for use in any aircraft (neither portable nor permanent installation). Therefore, Sirius XM Radio Inc. cannot support this type of application or installation.
To Activate Call1-866-635-2349
184 Preview
Signal Strength
Channel Nameor Category Name
Black Eyed PeasRock That Body
051 BPM
Song Title
Artist Name
Channel Number
Decide on one of the following in-box audio connection options. You can also refer to “Step 6: Connect the Audio” in the Stratus 7 User Guide (with Vehicle Kit) for additional audio connection options, such as a cassette adapter or the FM Direct Adapter (FMDA) (both sold separately). Go to www.siriusxm.com/guides for the User Guide.
Option 1: Best: Use the provided Aux In Cable, if your vehicle’s stereo system has an auxiliary input jack.
A. Plug one end of the cable into the green AUDIO connector on the right side of the PowerConnect Vehicle Dock and the other end into the auxiliary input jack on the vehicle’s stereo system.
B. Turn on your vehicle’s stereo system and set it to play from the auxiliary input source.
C. You should hear Sirius channel 184 through your vehicle’s stereo system. The installation is complete.
TIP! Refer to your vehicle’s owner’s manual to find the location of the auxiliary input jack, or consult the vehicle dealer.
Option 2: Good: Use the PowerConnect feature of Stratus 7. PowerConnect plays the Sirius audio through your vehicle’s FM radio.
A. Find and make a list of all available FM channels in your area that are not being used by an FM radio station.
B. Pick the first FM channel on your list. Tune your vehicle’s FM radio to this FM channel.
C. Set your Stratus 7 to transmit on the same FM channel:
i. Press and hold menu until the menu options are displayed.
ii. Press to scroll to and highlight FM Settings and press the Select button.
iii. If FM Channels is not highlighted, press to highlight FM Channels. Press the Select button.
iv. Press to scroll to and highlight the storage location FM2. Press the Select button.
v. Tune to the FM channel you found in step 1. Press and to tune in steps of .2, i.e., 99.3 to 99.5. Press and to tune in steps of 1, i.e., 99.3 to 100.3. Press the Select button to select the FM channel.
vi. The FM channel you selected will be confirmed on the display screen and Stratus 7 will tune to the FM channel.
D. You should hear Sirius channel 184 through your vehicle’s FM radio. If you are satisfied with the sound quality the installation is complete.
E. If you are not satisfied, move to the next FM channel on your list and repeat the process. Continue until you have found an FM channel with which you are satisfied.
Connect the Audio CAUTION: Do not attempt to install, activate, or adjust any of the setting options described in this Quick Start Guide unless your vehicle is parked in a safe location.
Stratus 7 Radio
PowerConnect™ Vehicle Dock
Magnetic Mount Antenna & Rubber Tail
Antenna & Dash Mount Alcohol Preparation Pads
PowerConnect Power Adapter
Aux In Cable
When listening to a channel, information about the channel and what is currently playing is displayed.
The Stratus 7 User Guide is available at www.siriusxm.com/guides.
Stratus 7 Main DisplaySubscribeSubscribe your Stratus 7 to the Sirius service:
A. Make sure your Stratus 7 is turned on, receiving the Sirius signal, and tuned to Sirius channel 184, the Preview channel, so that you can hear the Sirius audio.
B. Make a note of your Sirius Radio ID. You can find it by selecting Radio ID in menu items, by tuning to channel 0, on a label on the bottom of the gift box, and on the label on the back of your Stratus 7.
C. To subscribe: •Online: Go to www.siriusxm.com/activatenow to access or set up an online
account, subscribe to the service, and activate your Radio. OR
•By phone: Call 1-866-635-2349.
Activation usually takes less than 5 minutes, but sometimes may take longer. We recommend that your radio remain on until activated. When your service is activated, your Stratus 7 will display an alert message. To continue, press any button.
Press or to tune to other channels, and or to browse the different categories of channels. Learn what all the buttons do in the panel below.
Dash Mount
Screws (4)
Vent Mount and Extended Vent Clamps
Self installation instructions and tips are provided for your convenience. It is your responsibility to determine if you have the knowledge, skills and physical ability required to properly perform an installation. SiriusXM shall have no liability for damage or injury resulting from the installation or use of any SiriusXM or third party products. It is your responsibility to ensure that all products are installed in adherence with local laws and regulations and in such a manner as to allow a vehicle to be operated safely and without distraction. SiriusXM product warranties do not cover the installation, removal or reinstallation of any product.
Sirius XM Radio Inc.1221 Avenue of the AmericasNew York, NY 10020
1.866.635.2349
siriusxm.com
© 2013 Sirius XM Radio Inc.
SSV7VKQSG 130312a
Stratus 7 Button Functions
AUDIO ANT
96.3
MATCH FM CHANNELS
menusel
96.3 FMFM Channels
Sirius ID>FM Settings
Menu Options
>FM2 96.3 FM3 Empty
FM Channels
>FM Channels FM Transmitter
FM Settings
FM1 88.1>FM2 Empty
FM Channels
menu
Power Button Press to turn Stratus 7 on and off.
Left and Right Arrows Press to search for channels by category.
Up and Down Buttons Press to preview and tune channels through the channel lineup; also press to scroll through lists and highlight menu items.
FM / Menu Button FM: Press to access and cycle through FM presets.Menu: Press and hold to access advanced features and configuration options; in configuration options, press and hold to return to main display screen.
Select Button Press to confirm selection of highlighted items in a menu or list; when not in a menu or list, press first before entering the channel number, to directly tune to a channel. Press and hold to go back to the previous channel.
Jump Button Press to directly access traffic and weather for the city of your choice; or press it to go back to the previous channel to which you were listening.
Number Buttons Press to tune to a stored favorite channel, press and hold to store a favorite channel; also enter a channel number.
menu*The phone number shown above may differ from the one shown on your Stratus 7. All numbers are valid.
QUICK START GUIDE
Dock & Play Radio
VEHICLE KIT INCLUDED


![[Data Visualization] NBA Players Hometown and NBA Championships](https://img.pdfslide.us/doc/110x75/546d89a0af7959e2148b4c73/data-visualization-nba-players-hometown-and-nba-championships.jpg)